Instapak Quick Application Guide Brochure · sealed air shall in no event be liable for general,...
38
Instapak Quick ® Foam Packaging Applications Guide Foam Packaging Applications Guide Rev. D, Draft 8, 01-27-06
-
Upload
trinhkhanh -
Category
Documents
-
view
221 -
download
0
Transcript of Instapak Quick Application Guide Brochure · sealed air shall in no event be liable for general,...
Instapak Quickreg Foam Packaging Applications Guide
1 copy Sealed Air Corporation (US) 2006Rev 0506
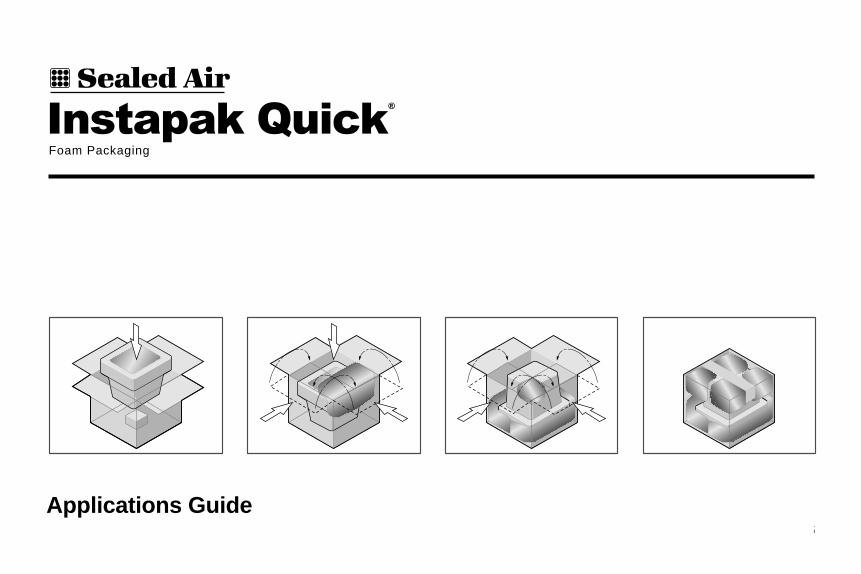
Foam Packaging
Applications Guide Rev D Draft 8 01-27-06
copy Sealed Air Corporation (US) 2006 Rev 0506 2
x
x
x
Instapak Quickreg Foam Packaging Applications Guide
Table of Contents
About This Guide 4
Introduction 5
How To Determine When To Use Instapak Quickreg Foam Packaging 6
Example 1 - Packaging a Video Cassette Recorder with Instapak Quickreg 8
Example 2 - Packaging a Heavy Product with Instapakreg Quick Tufftrade 10
Instapak Quickreg Packaging Parameters 12
Information on Corrugated Shipping Boxes 14
Bag Volumetric Table 15
Packaging Examples Using Instapak Quickreg Foam Packaging 21
Glass Framed Print 22
Framed Artwork (Painting) on Canvas 24
Clock 26
Porcelain Vase 28
Crystal Pitcher 30
Computer Monitor 32
Notes 36
Rev 0506 copy Sealed Air Corporation (US) 20063
About This Guide
The Instapak Quickreg Foam Packaging Applications Guide is designed with illustrations and step-by-step packaging guidelines to assist the operator with the use of this product
Information symbols used throughout this guide
This GOGGLES symbol calls attention to the need to wear protective eye glasses with side shields while performing operating procedures
This EXCLAMATION POINT symbol calls attention to features for which you should read the enclosed literature closely to prevent operating problems
This TRIANGLE symbol calls attention to special notes that will enhance operating procedures
WARRANTY POLICY
Sealed Air warrants that for a period of six (6) months from shipment Instapak Quickreg foam packaging bags when used in accordance with our instructions will make polyurethane foam meeting our foam specifications In addition Sealed Air warrants that the Instapak Quickreg bags will be free from material defects in manufacture for a period of six (6) months from the date of shipment Sealed Airrsquos liability under these warranties shall be limited at our option (a) to repayment or if not paid to credit of the purchase price (b) to replacement or (c) to repair THE USER SHOULD TEST THE APPLICATION TO DETERMINE THE SUITABILITY OF INSTAPAK QUICKreg FOAM PACKAGING FOR THE INTENDED USE SEALED AIR SHALL IN NO EVENT BE LIABLE FOR GENERAL SPECIAL INCIDENTAL INDIRECT CONSEQUENTIAL PUNITIVE OR PENAL DAMAGES SEALED AIR MAKES NO OTHER WARRANTIES EXPRESSED OR IMPLIED AS TO INSTAPAK QUICKreg FOAM PACKAGING INCLUDING WITHOUT LIMITATION THE IMPLIED WARRANTY OF MERCHANTABILITY OR OF FITNESS FOR A PARTICULAR PURPOSE
NOTICE
copy Copyright 2006 by Sealed Air Corporation (US) All rights reserved
This document is copyrighted The material contained herein is protected under the US Copyright Act of 1976 This document in whole or in part may not be copied photocopied reproduced translated or reduced to any electronic or machine-readable form without the prior written permission of Sealed Air Corporation (US)
copy Sealed Air Corporation (US) 2006 Rev 0506 4
Instapak Quickreg Foam Packaging Applications Guide
Introduction
Welcome to the Instapak Quickreg Foam Packaging Applications Guide This guide offers generic packaging examples that serve as general guidelines for using this product and does not attempt to cover every Instapak Quickreg packaging application A simple method to help determine the appropriate Instapak Quickreg product for your application is also provided
This guide covers Instapak Quickreg Instapakreg Quick Tufftrade and Instapak Quickreg RT foam packaging products
Note All safety and application information in this guide pertains to Instapak Quickreg Instapakreg Quick Tufftrade and Instapak Quickreg RT foam packaging products
Instapak Quickreg is a fast and easy to use packaging material that provides superior protection for your products It is ideal for cushioning blocking and bracing and for producing small molded cushions Each Instapak Quickreg bag contains two separate liquids that when mixed together will react and expand to form polyurethane foam packaging
If you have any questions about this product please call your authorized Sealed Air Instapak Quickreg distributor
WARNING Before using this product read and familiarize yourself with important safety and instructional information that is found in the following material bull Material Safety Data Sheets bull Applications Guide (this guide) bull Bag Label bull Instructional CD (included with the purchase of a Quicktrade Warmer and bull Users Guide not included with Instapak Quickreg RT products)
Who to Call bull For Chemical Emergency bull Instapak Quickreg Reorder Information
Spill Leak Fire Exposure or Call your authorized Sealed Air Accident call CHEMTREC at Instapak Quickreg distributor 1-800-424-9300 24 Hours
Rev 0506 copy Sealed Air Corporation (US) 20065
How To Determine When To Use Instapak Quickreg Foam Packaging
Now you need to determine if Instapak Quickreg foam will support the weight of your product
Each Instapak Quickreg packaging foam has been designed to support a specific pounds per square inch (psi) static load In other words the foam can be used to package an item of any weight as long as there is adequate surface area on each side of the product to spread out the load The heavier the item the more surface area you will need to cover with Quicktrade foam in order to protect the product properly
The maximum psi loading for a product can be determined by dividing the weight of the product by the surface area of the smallest side of the product (length x width) The following equation illustrates this concept
Total weight of the product (lbs) = Static Loading (psi)
Area in inches of the smallest side of the product (L x W)
A range of 1 - 35 lbs per square inch (psi) load is optimum when using at least 2 of Instapak Quickreg or Instapak Quickreg RT
A range of 35 - 80 lbs per square inch (psi) load is optimum when using at least 2 of Instapakreg Quick Tufftrade
This means that if your product has a static loading within the optimal range per square inch (psi) and you completely surround the product with at least 2 of Instapak Quickreg foam your product should be sufficiently protected through a typical shipping cycle
When a product properly packaged in Quicktrade is dropped the cushions will deflect (compress) between 125 - 15 at the time of impact This is based on a typical drop height determined by the productrsquos weight For example the lighter the product the higher the drop height and the heavier the product the lower the drop height That is why a minimum of 2 of Quicktrade protection is required When this deflection occurs foam begins to do its job by absorbing the shock within the 2 cushion as opposed to the product absorbing that shock If the cushion did not deflect (because it was too rigid eg wood) or it deflected a full 2 (bottomed out) the shock would be transmitted right through the product resulting in possible damage to the product
copy Sealed Air Corporation (US) 2006 Rev 0506 6
Instapak Quickreg Foam Packaging Applications Guide
How To Determine When To Use Instapak Quickreg Foam Packaging (cont)
This psi loading should be determined for the smallest side of the product being shipped If it is within the optimal range the remaining sides will also be within the performance capabilities of Quicktrade packaging Although the weight for an item is conshystant the surface area may vary from side to side and have an impact on the performance of the cushioning material That is why we focus on the smallest side which presents the highest loading
Please refer to the Instapak Quickreg Packaging Parameters on pages 12-13 of this guide to determine which Instapak Quickreg foam packaging product is best suited for your application
Rev 0506 copy Sealed Air Corporation (US) 20067
How To Determine When To Use Instapak Quickreg Foam Packaging (cont)
Example 1 - Packaging a Video Cassette Recorder
This video cassette recorder measures 20 x 11 x 45 and weighs 13 lbs
Perform the following calculation to determine the psi (lbs per square inch) loading for the smallest side (only one calculation is necessary)
bull Weight divide the area (L x W) of the smallest side = loading (psi)
bull 13 lbs divide (45 x 11) = 26 psi
bull 13 lbs divide 495 in sq = 26 psi
bull 26 psi is within the optimal range of 10 - 35 psi for Instapak Quickreg or Instapak Quickreg RT (refer to pages 12-13)
Completely surrounding the video cassette recorder with 2 of Quicktrade foam should protect this product
copy Sealed Air Corporation (US) 2006 Rev 0506 8
Instapak Quickreg Foam Packaging Applications Guide
How To Determine When To Use Instapak Quickreg Foam Packaging (cont)
Video Cassette Recorder (13 lbs)
20Length 11Width
45Height
Smallest Side (45 x 110 = 495 in sq)
Weight divide the area (L x W) of the smallest side = loading
13 lbs divide (45 x 11) = 26 psi
13 lbs divide 495 in sq = 26 psi
Figure 1 Packaging a Video Cassette Recorder
Rev 0506 copy Sealed Air Corporation (US) 20069
How To Determine When To Use Instapak Quickreg Packaging Foam (cont)
Example 2 - Packaging a Heavy Product with Instapakreg Quick Tufftrade
The heavy product measures 24 x 5 x 10 and weighs 30 lbs
Perform the following calculation to determine the psi (lbs per square inch) loading for the smallest side (only one calculation is necessary)
bull Weight divide the area (L x W) of the smallest side = loading (psi)
bull 30 lbs divide (5 x 10) = 6 psi
bull 30 lbs divide 50 in sq = 6 psi
bull 6 psi is within the optimal range of 35 - 80 psi for Instapakreg Quick Tufftrade (refer to pages 12-13)
Note If your product does not fall within Quicktrade packaging specifications contact our on-line packaging expert at 1-800-568-6636 or e-mail - packagingexpertsealedaircom
copy Sealed Air Corporation (US) 2006 Rev 0506 10
Instapak Quickreg Foam Packaging Applications Guide
How To Determine When To Use Instapak Quickreg Packaging Foam (cont)
Heavy Product (30 lbs)
24Length
5Width
10Height
Smallest Side (50 x 100 = 50 in sq)
Weight divide the area (L x W) of the smallest side = loading
30 lbs divide (5 x 10) = 6 psi
30 lbs divide 50 in sq = 6 psi
Figure 2 Packaging a Heavy Product
Rev 0506 copy Sealed Air Corporation (US) 200611
Instapak Quickreg Packaging Parameters
Instapak Quickreg foam packaging is used to protect products of various size shape and weight To determine which Instapak Quickreg product is best suited for your product refer to the Instapak Quickreg Packaging Performance Chart on the following page
You will need to know two attributes of your product bull Product weight bull Area of the smallest side of the product in inches (LxW)
The smallest side of the product represents the highest loading (psi) When static loading of the smallest side falls within the optimal range the remaining sides will also be within Quickrsquostrade packaging performance capabilities
Contact our Packaging Expert to discuss correspond or to arrange a visit by one of our many packaging specialists bull 1-800-568-6636 (830 - 500 ET US and Canada only) bull e-mail - packagingexpertsealedaircom
Rugged Products bull If your product falls within the ldquoRugged Productsrdquo parameter and is classified ldquoNot Fragilerdquo then Instapak Quick reg or
Instapak Quickreg RT should provide adequate protection
Note The shipping and transportation environment is a very unpredictable chain of events Packaging is not an exact science thus we caution that the Instapak Quickreg Packaging Performance Chart be used as a guide and not a final stamp of approval or guarantee that Instapak Quickreg will or will not be successful in protecting the product to be packaged
copy Sealed Air Corporation (US) 2006 Rev 0506 12
Instapak Quickreg Foam Packaging Applications Guide
0
Lbs
of P
rodu
ct
10
20
30
40
50
Void Fill or Blocking and Bracing (Rugged Products)
Contact your Sealed Airreg
Packaging Expert for an Engineered
Solution
Instapak Quickreg
or Instapak Quickreg RT
Instapakreg Quick Tufftrade
Cushioning (Fragile Products)
Instapak Quickreg Packaging Parameters (cont)
0 20 40 60 80 100 120 140 160 180 200 Square Inches of the Smallest Side of Product
Figure 3 Instapak Quickreg Packaging Performance Chart
Rev 0506 copy Sealed Air Corporation (US) 200613
Information on Corrugated Shipping Boxes
A major component of any successful protective package is the shipping box Today most shipping boxes are made of corrushygated fiberboard In order to increase the likelihood that any package will protect its contents through shipping and handling it is necessary that you use a shipping box that will maintain the integrity and performance of the interior packaging from the point of shipment to the ultimate delivery
Corrugated fiberboard is primarily classified on the basis of two laboratory test procedures bull Burst Test bull Edge Crush Test (ECT)
Each of these laboratory tests evaluates a different property of the corrugated structure Burst measures how the board resists bursting pressures applied by an instrument in the lab The level of burst force in this equipment is expressed in pounds So common corrugated fiberboard constructions are rated at 175 200 250 pounds for example At best this number is an indirect indication of how much weight a box made from any specific grade will support or contain
The other value Edge Crush measures the ability of the corrugated structure to support a load applied parallel to the fluted direction Typical values for common corrugated grades are 28 pounds 32 pounds or some other value Unlike burst these values do relate to stacking strength of the boxes made from these materials
When selecting a box for a protective package one must consider the burst or edge crush values for the corrugated fiberboard the style of box to be used and the type of closure for the box By referring to the Box Makers certificate on the bottom of the box you can see what the burst or ECT is for that material Most boxes for products up to 60 or 70 pounds will be of 200 pound test or 32 ECT board
If a product to be packaged weighs more than 60 pounds or so then the designer might want to consider a higher grade of corrugated andor going to a double wall corrugated structure (two sets of flutes in the same fiberboard structure)
In any case a well made and properly designed shipping box closed with strong tape (or some other adequate closure method) is an important criteria in a package that will protect its contents throughout shipping and handling
Further information can be obtained from the Fiber Box Association
copy Sealed Air Corporation (US) 2006 Rev 0506 14
Instapak Quickreg Foam Packaging Applications Guide
Bag Volumetric Table
The following line drawings (pages 15-18) are intended to illustrate the approximate size of the cushion when Quicktrade bags are expanded Cushion sizes may vary depending on product size environshymental conditions and packaging technique
The left portion of the table shows the dimensions of a bag when it is expanded to form a 2 high flat cushion The right portion of the table shows the effect of placing a typical product (represented as a gray box) in the rising foam within a corrugated box This drawing shows how the dimensions are affected by the placement of a product and will help select the correct size corrugated box when using top and bottom cushions
Note Expanded cushion dimensions are smaller than the unexpanded bag dimensions
Note Due to their shape and size some products may require more than two Instapak Quickreg foam bags for adequate protection This is a common occurrence when using the foam-in-bag packaging process - see Packaging Examples pages 22-27 and 32-35
Quicktrade Bag Typical ProductSize
Dimensions
Shipping Box
12 12
4 16 16
2
8
6
840 Bag
(18 x 24)
40 Bag as a Shaped Cushion
40 Bag as a Flat Pad
Product
Shipping Box
Quicktrade Bagas a Flat Size 40
Dimensions of Quicktrade Bag
Dimensions of Expanded
Product Placed in ItExpanded Cushion
Quicktrade Cushion in Shipping Box with
Figure 4 Understanding the Bag Volumetric Table
Rev 0506 copy Sealed Air Corporation (US) 200615
Bag Volumetric Table - Instapak Quickreg and Instapak Quickreg RT
20 Bag as a Product Shaped Cushion
20 Bag (18 x 18)
Shipping Box
20 Bag as a Flat Pad 20 Bag as a
Shaped Cushion
6
10 10
4
6
6
8 8
4
44
6
Product10 Bag (15 x 18)
Shipping Box
10 Bag as a Flat Pad
10 9 2
14 14
2
Figure 5 Instapak Quickreg and Instapak Quickreg RT Bag Volumetric Table - Part 1
copy Sealed Air Corporation (US) 2006 Rev 0506 16
Instapak Quickreg Foam Packaging Applications Guide
Bag Volumetric Table - Instapak Quickreg and Instapak Quickreg RT (cont)
40 Bag (18 x 24)
40 Bag as a Flat Pad
Product
Shipping Box
40 Bag as a Shaped Cushion
12 12
4
8
6
8
17 11
421 15
2
13
4
7
60 Bag as a Flat Pad
60 Bag (18 x 24)
60 Bag as a Shaped Cushion
Product
Shipping Box
16 16
2
25 more foam than 40 bag)
Figure 6 Instapak Quickreg and Instapak Quickreg RT Bag Volumetric Table - Part 2
Rev 0506 copy Sealed Air Corporation (US) 200617
Bag Volumetric Table - Instapak Quickreg and Instapak Quickreg RT (cont)
17 14
4 21 18
2
5
1310
80 Bag as a Flat Pad
80 Bag as a Shaped Cushion
Shipping Box
80 Bag (22 x 27) Product
Figure 7 Instapak Quickreg and Instapak Quickreg RT Bag Volumetric Table - Part 3
copy Sealed Air Corporation (US) 2006 Rev 0506 18
Instapak Quickreg Foam Packaging Applications Guide
Bag Volumetric Table - Instapakreg Quick Tufftrade
25 Bag (18 x 18)
25 Bag as a Flat Pad
6
10 10
4
6
6
14 14
2
Product
Shipping Box
25 Bag as a Shaped Cushion
12 12
4 16 16
2
8
6
845 Bag
(18 x 24)
45 Bag as a Shaped Cushion
45 Bag as a Flat Pad
Product
Shipping Box
Figure 8 Instapakreg Quick Tufftrade Bag Volumetric Table
Rev 0506 copy Sealed Air Corporation (US) 200619
(intentionally blank)
copy Sealed Air Corporation (US) 2006 Rev 0506 20
Instapak Quickreg Foam Packaging Applications Guide
Packaging Examples Using Instapak Quickreg Foam Packaging
The PSI loading for the following applications were calculated using the smallest side of each product These calculations detershymined that Instapak Quickreg was an appropriate packaging material for these products
The products in this section were also subjected to the International Safe Transit Association (ISTA) Procedure 1A Test for Shock and Vibration Testing These products all passed this industry standard test
Note The packaging examples on pages 22-25 could both be packaged in either the full overlap end loading or regular slotted box styles depicted
Note In the following examples product positioners may be used to aid the packaging process A product positioner may be a piece of wood polystyrene polyethylene polyurethane or other suitable material Product positioners are not supplied with this product A positioner is used to lift center position or hold your product so that at least 2 of space for cushioning material around your product Certain applications may require larger product positioners
CAUTION Safety glasses with side shields should be worn while using Instapak Quickreg foam packaging
Rev 0506 copy Sealed Air Corporation (US) 200621
Packaging Examples Using Instapak Quickreg Foam Packaging Glass Framed Print
1 Determine the overall dimensions of your print (L x W x H) Choose a shipping box that is at least 4 larger in each dimension (L x W x H)
2 Erect the box and do not tape the flaps
3 Place the centering product positioner (polyethylene foam block or wood) in the middle of the bottom of the box
4 Lower your artwork into the box and place it into the product positioner
5 Place another product positioner on top of the artwork at the open end of the box
6 Start a 20 bag and place the expanding bag around one of the top corners of the artwork Close and hold the flaps to form the corner cushion
7 Start another 20 bag and place the bag around the other corner of the artwork Close and hold the flaps to form the second corner cushion
8 Remove the centering product positioner and tape these flaps closed
9 Rotate the box and open the flaps
Note Be careful when rotating the box that the artwork does not slip out of the untaped end of the box
10 Repeat steps 6 and 7
11 Remove the centering product positioner Start another 20 bag and place it down between the corrugated box and the front (glass) side of the artwork
12 Verify that the print is locked in place Close and seal the box
copy Sealed Air Corporation (US) 2006 Rev 0506 22
Instapak Quickreg Foam Packaging Applications Guide
Packaging Examples Using Instapak Quickreg Foam Packaging Glass Framed Print (cont)
62
2
STEP 12
STEP 4 STEP 5 STEP 6
STEP 8 STEP 11
Figure 9 Packaging a Glass Framed Print
Rev 0506 copy Sealed Air Corporation (US) 200623
Packaging Examples Using Instapak Quickreg Foam Packaging Framed Artwork (Painting) on Canvas
1 Wrap the painting in a large piece of corrugated and secure it around the frame
Note This is necessary so the cushions do not touch the canvas and cause the canvas to stretch
2 Determine the overall dimensions of your painting (L x W x H) Choose a shipping box that is at least 4 larger in each dimension (L x W x H)
3 Locate or make two 2 (or larger if required) blocks to be used as product positioners Then place them in one corner farthest from you
4 Start a 20 bag
5 Place the bag in the center of the bottom of the box
6 Place the painting into the center of the box on top of the rising bag of foam (be sure that the back of the painting is placed against the foam cushion Continue to hold the painting so that the bag rises to meet the frame and forms a 2 high cushion Hold the painting until the bag supports the frame This takes about 8 seconds
7 Be sure the painting is centered in the box
8 Activate a 20 bag and place it in the corner closest to you and opposite the two 2 foam blocks
9 Close and hold the two flaps closest to you over the expanding bag This will help the cushion form around the corner of the painting
10 After the bag stops expanding open the flaps and rotate the box so the two foam blocks are in front of you
11 Pull the blocks out and activate a 20 bag and place it in this corner Close and hold the two flaps over the expanding bag
12 Activate a 20 bag and place it in the next corner Close and hold the two flaps over the expanding bag
13 Activate a 20 bag and place it in the final corner Close and hold the two flaps over the expanding bag
14 Verify that the painting is locked in place Close and seal the box
copy Sealed Air Corporation (US) 2006 Rev 0506 24
Instapak Quickreg Foam Packaging Applications Guide
Packaging Examples Using Instapak Quickreg Foam Packaging Framed Artwork (Painting) on Canvas (cont)
Foam Blocks
STEP 14
STEP 3 STEP 5 STEP 6
STEP 8 STEP 9
Figure 10 Packaging Framed Artwork (Painting) on Canvas
Rev 0506 copy Sealed Air Corporation (US) 200625
Packaging Examples Using Instapak Quickreg Foam Packaging Clock
Note If you gently shake the clock and hear a rattling noise an additional step will need to be taken to ensure moving parts are secured before shipping
1 Place a piece of flexible foam between the chimes and hammers before packaging the clock This will stop any internal movement and will protect them from shock and vibration during shipping
2 If the clock has a front door andor a back panel place an elastic band around the clock to keep the doors and panels closed
3 Determine the overall dimensions of your clock (L x W x H) Choose a shipping box that is at least 4 larger in each dimension (L x W x H)
4 Activate a 60 bag
5 Place the bag in the center of the bottom of the box
6 Place the clock in the center of the box on top of the rising bag of foam Continue to hold the clock so that the bag rises to meet the clock and forms a 2 high cushion Hold the product until the bag supports the clock This takes about 8 seconds
7 Be sure the clock is centered in the box
8 Activate a 60 bag and place it over the bottom half of the clock Close and hold the flap at this end of the box as the foam rises This will help the cushion form around the clock Hold the other end of the clock at the same time to make sure the rising foam does not push the clock out of the center of the box
9 Activate another 60 bag and place it over the opposite half of the clock Close and hold the two major flaps as the foam rises This will help the cushion form around the clock
10 Verify that the clock is locked in place Close and seal the box
copy Sealed Air Corporation (US) 2006 Rev 0506 26
Instapak Quickreg Foam Packaging Applications Guide
Packaging Examples Using Instapak Quickreg Foam Packaging Clock (cont)
STEP 5 STEP 6 STEP 8
STEP 9 STEP 10
Figure 11 Packaging a Clock
CROSS SECTION
Lower CushionCarton
Upper Cushions
Clock
Rev 0506 copy Sealed Air Corporation (US) 200627
Packaging Examples Using Instapak Quickreg Foam Packaging Porcelain Vase
1 Determine the overall dimensions of your vase (L x W x H) Choose a shipping box that is at least 4 larger in each dimension (L x W x H)
2 Activate a 40 bag
3 Place the bag in the center of the bottom of the box
4 Place the vase in the center of the box on top of the rising bag of foam Continue to hold the vase so that the bag rises up to form a 2 high protective cushion Hold the product until the bag supports the vase This takes about 8 seconds
5 Be sure the vase is centered in the box
6 Activate a 40 bag and place it on top of the vase
7 Close and hold the two major flaps as the foam rises This will help the cushion form around the vase
8 Verify that the vase is locked in place Close and seal the box
copy Sealed Air Corporation (US) 2006 Rev 0506 28
Instapak Quickreg Foam Packaging Applications Guide
Packaging Examples Using Instapak Quickreg Foam Packaging Porcelain Vase (cont)
STEP 3 STEP 4 STEP 6
STEP 7 STEP 8
Figure 12 Packaging a Vase
CROSS SECTION
Lower CushionCarton
Upper Cushion
Vase
Rev 0506 copy Sealed Air Corporation (US) 200629
Packaging Examples Using Instapak Quickreg Foam Packaging Crystal Pitcher
1 Determine the overall dimensions of your pitcher (L x W x H) Choose a shipping box that is at least 4 larger in each dimension (L x W x H)
2 Activate a 40 bag
3 Place the bag in the center of the bottom of the box
4 Place the pitcher in the center of the box on top of the rising bag of foam Continue to hold the pitcher so that the bag rises up to form a 2 high protective cushion Hold the product until the bag supports the pitcher This takes about 8 seconds
5 Be sure the pitcher is centered in the box
6 Activate a 40 bag and place it on top of the pitcher
7 Close and hold the two major flaps as the foam rises This will help the cushion form around the pitcher
8 Verify that the pitcher is locked in place Close and seal the box
copy Sealed Air Corporation (US) 2006 Rev 0506 30
Instapak Quickreg Foam Packaging Applications Guide
Packaging Examples Using Instapak Quickreg Foam Packaging Crystal Pitcher (cont)
STEP 3 STEP 4 STEP 6
STEP 7 STEP 8
Figure 13 Packaging a Crystal Pitcher
CROSS SECTION
Lower CushionCarton
Upper Cushion
Pitcher
Rev 0506 copy Sealed Air Corporation (US) 200631
Packaging Examples Using Instapak Quickreg Foam Packaging Computer Monitor
1 Determine the overall dimensions of your monitor (L x W x H) Choose a shipping box that is at least 4 larger in each dimension (L x W x H)
2 Erect the box upside down so the bottom of the box is facing up Do not tape the flaps
3 Place a 2 product positioner in the center of the bottom of the box
4 By using the bag volumetric table (pages 15-17) it is determined that it will take more than two (2) cushions to package the monitor
5 This product will take two (2) 80 bags on the bottom and four (4) 60 bags on top as corner cushions
6 Place the monitor on the product positioner with the screen side facing up
7 Activate a 80 bag
8 Hold the bag in the box so half the bag goes down the side of the monitor and half the bag covers the top side of the monitor facing you
9 Once the cushion can support itself close and hold the flaps on this side of the box to help it form around the monitor Hold the other end of the monitor at the same time to make sure the rising foam does not push the monitor out of the center of the box
10 Activate another 80 bag and place it in the box on the opposite side of the first bag Once the cushion can support itself close and hold the flaps on this side of the box This will help the cushion form around the monitor
11 Close and tape the four (4) flaps on this side of the box
(Continued on page 34)
copy Sealed Air Corporation (US) 2006 Rev 0506 32
Instapak Quickreg Foam Packaging Applications Guide
Packaging Examples Using Instapak Quickreg Foam Packaging Computer Monitor (cont)
STEP 6STEP 3 STEP 8
STEP 9 STEP 10 STEP 11
Product Positioner
Figure 14 Packaging a Computer Monitor - 1
Rev 0506 copy Sealed Air Corporation (US) 200633
Packaging Examples Using Instapak Quickreg Foam Packaging Computer Monitor (cont)
12 Carefully roll the box over so the other side of the box can be opened
Note The flaps on this side are not taped closed so be careful the monitor does not fall out while doing this
13 Open the flaps on this side and remove the product positioner
14 Activate a 60 bag and place it about half way down in one of the corners
15 Once the cushion can support itself close and hold the flaps on this side of the box to help it form around the monitor Hold the opposing corner of the monitor at the same time to make sure the rising foam does not push the monitor out of the center of the box
16 Activate another 60 bag and place it in the opposite corner of the first bag Close and hold the flaps on this side of the box to help it form around the monitor
17 Activate another 60 bag and place it in the third corner so the bag can form Again hold the monitor so it wonrsquot shift
18 Repeat step 17 for the fourth corner
19 Tape the flaps closed on this side and the box is ready to ship
copy Sealed Air Corporation (US) 2006 Rev 0506 34
Instapak Quickreg Foam Packaging Applications Guide
Packaging Examples Using Instapak Quickreg Foam Packaging Computer Monitor (cont)
STEP 15
STEP 14STEP 13
STEP 19
Figure 15 Packaging a Computer Monitor - 2
Rev 0506 copy Sealed Air Corporation (US) 200635
Notes
copy Sealed Air Corporation (US) 2006 Rev 0506 36
Instapak Quickreg Foam Packaging Applications Guide
Rev 0506 copy Sealed Air Corporation (US) 200637
38copy Sealed Air Corporation (US) 2006 Rev 0506
Protective Packaging 10 Old Sherman Turnpike Danbury CT 06810 203-791-3500 Fax 203-791-3618 wwwinstapakquickcom
Our Products Protect Your Productsreg
Corporate Office Sealed Air Corporation (US) Park 80 East Saddle Brook NJ 07663-5291 wwwsealedaircom reg Reg US Pat amp TM Off copy Sealed Air Corporation (US) 2006 All rights reserved Printed in the USA The 9 Dot Logo and Sealed Air are registered trademarks of Sealed Air Corporation (US)
Instapak Quickreg Applications Guide T-124 0506

x
x
x
Instapak Quickreg Foam Packaging Applications Guide
Table of Contents
About This Guide 4
Introduction 5
How To Determine When To Use Instapak Quickreg Foam Packaging 6
Example 1 - Packaging a Video Cassette Recorder with Instapak Quickreg 8
Example 2 - Packaging a Heavy Product with Instapakreg Quick Tufftrade 10
Instapak Quickreg Packaging Parameters 12
Information on Corrugated Shipping Boxes 14
Bag Volumetric Table 15
Packaging Examples Using Instapak Quickreg Foam Packaging 21
Glass Framed Print 22
Framed Artwork (Painting) on Canvas 24
Clock 26
Porcelain Vase 28
Crystal Pitcher 30
Computer Monitor 32
Notes 36
Rev 0506 copy Sealed Air Corporation (US) 20063
About This Guide
The Instapak Quickreg Foam Packaging Applications Guide is designed with illustrations and step-by-step packaging guidelines to assist the operator with the use of this product
Information symbols used throughout this guide
This GOGGLES symbol calls attention to the need to wear protective eye glasses with side shields while performing operating procedures
This EXCLAMATION POINT symbol calls attention to features for which you should read the enclosed literature closely to prevent operating problems
This TRIANGLE symbol calls attention to special notes that will enhance operating procedures
WARRANTY POLICY
Sealed Air warrants that for a period of six (6) months from shipment Instapak Quickreg foam packaging bags when used in accordance with our instructions will make polyurethane foam meeting our foam specifications In addition Sealed Air warrants that the Instapak Quickreg bags will be free from material defects in manufacture for a period of six (6) months from the date of shipment Sealed Airrsquos liability under these warranties shall be limited at our option (a) to repayment or if not paid to credit of the purchase price (b) to replacement or (c) to repair THE USER SHOULD TEST THE APPLICATION TO DETERMINE THE SUITABILITY OF INSTAPAK QUICKreg FOAM PACKAGING FOR THE INTENDED USE SEALED AIR SHALL IN NO EVENT BE LIABLE FOR GENERAL SPECIAL INCIDENTAL INDIRECT CONSEQUENTIAL PUNITIVE OR PENAL DAMAGES SEALED AIR MAKES NO OTHER WARRANTIES EXPRESSED OR IMPLIED AS TO INSTAPAK QUICKreg FOAM PACKAGING INCLUDING WITHOUT LIMITATION THE IMPLIED WARRANTY OF MERCHANTABILITY OR OF FITNESS FOR A PARTICULAR PURPOSE
NOTICE
copy Copyright 2006 by Sealed Air Corporation (US) All rights reserved
This document is copyrighted The material contained herein is protected under the US Copyright Act of 1976 This document in whole or in part may not be copied photocopied reproduced translated or reduced to any electronic or machine-readable form without the prior written permission of Sealed Air Corporation (US)
copy Sealed Air Corporation (US) 2006 Rev 0506 4
Instapak Quickreg Foam Packaging Applications Guide
Introduction
Welcome to the Instapak Quickreg Foam Packaging Applications Guide This guide offers generic packaging examples that serve as general guidelines for using this product and does not attempt to cover every Instapak Quickreg packaging application A simple method to help determine the appropriate Instapak Quickreg product for your application is also provided
This guide covers Instapak Quickreg Instapakreg Quick Tufftrade and Instapak Quickreg RT foam packaging products
Note All safety and application information in this guide pertains to Instapak Quickreg Instapakreg Quick Tufftrade and Instapak Quickreg RT foam packaging products
Instapak Quickreg is a fast and easy to use packaging material that provides superior protection for your products It is ideal for cushioning blocking and bracing and for producing small molded cushions Each Instapak Quickreg bag contains two separate liquids that when mixed together will react and expand to form polyurethane foam packaging
If you have any questions about this product please call your authorized Sealed Air Instapak Quickreg distributor
WARNING Before using this product read and familiarize yourself with important safety and instructional information that is found in the following material bull Material Safety Data Sheets bull Applications Guide (this guide) bull Bag Label bull Instructional CD (included with the purchase of a Quicktrade Warmer and bull Users Guide not included with Instapak Quickreg RT products)
Who to Call bull For Chemical Emergency bull Instapak Quickreg Reorder Information
Spill Leak Fire Exposure or Call your authorized Sealed Air Accident call CHEMTREC at Instapak Quickreg distributor 1-800-424-9300 24 Hours
Rev 0506 copy Sealed Air Corporation (US) 20065
How To Determine When To Use Instapak Quickreg Foam Packaging
Now you need to determine if Instapak Quickreg foam will support the weight of your product
Each Instapak Quickreg packaging foam has been designed to support a specific pounds per square inch (psi) static load In other words the foam can be used to package an item of any weight as long as there is adequate surface area on each side of the product to spread out the load The heavier the item the more surface area you will need to cover with Quicktrade foam in order to protect the product properly
The maximum psi loading for a product can be determined by dividing the weight of the product by the surface area of the smallest side of the product (length x width) The following equation illustrates this concept
Total weight of the product (lbs) = Static Loading (psi)
Area in inches of the smallest side of the product (L x W)
A range of 1 - 35 lbs per square inch (psi) load is optimum when using at least 2 of Instapak Quickreg or Instapak Quickreg RT
A range of 35 - 80 lbs per square inch (psi) load is optimum when using at least 2 of Instapakreg Quick Tufftrade
This means that if your product has a static loading within the optimal range per square inch (psi) and you completely surround the product with at least 2 of Instapak Quickreg foam your product should be sufficiently protected through a typical shipping cycle
When a product properly packaged in Quicktrade is dropped the cushions will deflect (compress) between 125 - 15 at the time of impact This is based on a typical drop height determined by the productrsquos weight For example the lighter the product the higher the drop height and the heavier the product the lower the drop height That is why a minimum of 2 of Quicktrade protection is required When this deflection occurs foam begins to do its job by absorbing the shock within the 2 cushion as opposed to the product absorbing that shock If the cushion did not deflect (because it was too rigid eg wood) or it deflected a full 2 (bottomed out) the shock would be transmitted right through the product resulting in possible damage to the product
copy Sealed Air Corporation (US) 2006 Rev 0506 6
Instapak Quickreg Foam Packaging Applications Guide
How To Determine When To Use Instapak Quickreg Foam Packaging (cont)
This psi loading should be determined for the smallest side of the product being shipped If it is within the optimal range the remaining sides will also be within the performance capabilities of Quicktrade packaging Although the weight for an item is conshystant the surface area may vary from side to side and have an impact on the performance of the cushioning material That is why we focus on the smallest side which presents the highest loading
Please refer to the Instapak Quickreg Packaging Parameters on pages 12-13 of this guide to determine which Instapak Quickreg foam packaging product is best suited for your application
Rev 0506 copy Sealed Air Corporation (US) 20067
How To Determine When To Use Instapak Quickreg Foam Packaging (cont)
Example 1 - Packaging a Video Cassette Recorder
This video cassette recorder measures 20 x 11 x 45 and weighs 13 lbs
Perform the following calculation to determine the psi (lbs per square inch) loading for the smallest side (only one calculation is necessary)
bull Weight divide the area (L x W) of the smallest side = loading (psi)
bull 13 lbs divide (45 x 11) = 26 psi
bull 13 lbs divide 495 in sq = 26 psi
bull 26 psi is within the optimal range of 10 - 35 psi for Instapak Quickreg or Instapak Quickreg RT (refer to pages 12-13)
Completely surrounding the video cassette recorder with 2 of Quicktrade foam should protect this product
copy Sealed Air Corporation (US) 2006 Rev 0506 8
Instapak Quickreg Foam Packaging Applications Guide
How To Determine When To Use Instapak Quickreg Foam Packaging (cont)
Video Cassette Recorder (13 lbs)
20Length 11Width
45Height
Smallest Side (45 x 110 = 495 in sq)
Weight divide the area (L x W) of the smallest side = loading
13 lbs divide (45 x 11) = 26 psi
13 lbs divide 495 in sq = 26 psi
Figure 1 Packaging a Video Cassette Recorder
Rev 0506 copy Sealed Air Corporation (US) 20069
How To Determine When To Use Instapak Quickreg Packaging Foam (cont)
Example 2 - Packaging a Heavy Product with Instapakreg Quick Tufftrade
The heavy product measures 24 x 5 x 10 and weighs 30 lbs
Perform the following calculation to determine the psi (lbs per square inch) loading for the smallest side (only one calculation is necessary)
bull Weight divide the area (L x W) of the smallest side = loading (psi)
bull 30 lbs divide (5 x 10) = 6 psi
bull 30 lbs divide 50 in sq = 6 psi
bull 6 psi is within the optimal range of 35 - 80 psi for Instapakreg Quick Tufftrade (refer to pages 12-13)
Note If your product does not fall within Quicktrade packaging specifications contact our on-line packaging expert at 1-800-568-6636 or e-mail - packagingexpertsealedaircom
copy Sealed Air Corporation (US) 2006 Rev 0506 10
Instapak Quickreg Foam Packaging Applications Guide
How To Determine When To Use Instapak Quickreg Packaging Foam (cont)
Heavy Product (30 lbs)
24Length
5Width
10Height
Smallest Side (50 x 100 = 50 in sq)
Weight divide the area (L x W) of the smallest side = loading
30 lbs divide (5 x 10) = 6 psi
30 lbs divide 50 in sq = 6 psi
Figure 2 Packaging a Heavy Product
Rev 0506 copy Sealed Air Corporation (US) 200611
Instapak Quickreg Packaging Parameters
Instapak Quickreg foam packaging is used to protect products of various size shape and weight To determine which Instapak Quickreg product is best suited for your product refer to the Instapak Quickreg Packaging Performance Chart on the following page
You will need to know two attributes of your product bull Product weight bull Area of the smallest side of the product in inches (LxW)
The smallest side of the product represents the highest loading (psi) When static loading of the smallest side falls within the optimal range the remaining sides will also be within Quickrsquostrade packaging performance capabilities
Contact our Packaging Expert to discuss correspond or to arrange a visit by one of our many packaging specialists bull 1-800-568-6636 (830 - 500 ET US and Canada only) bull e-mail - packagingexpertsealedaircom
Rugged Products bull If your product falls within the ldquoRugged Productsrdquo parameter and is classified ldquoNot Fragilerdquo then Instapak Quick reg or
Instapak Quickreg RT should provide adequate protection
Note The shipping and transportation environment is a very unpredictable chain of events Packaging is not an exact science thus we caution that the Instapak Quickreg Packaging Performance Chart be used as a guide and not a final stamp of approval or guarantee that Instapak Quickreg will or will not be successful in protecting the product to be packaged
copy Sealed Air Corporation (US) 2006 Rev 0506 12
Instapak Quickreg Foam Packaging Applications Guide
0
Lbs
of P
rodu
ct
10
20
30
40
50
Void Fill or Blocking and Bracing (Rugged Products)
Contact your Sealed Airreg
Packaging Expert for an Engineered
Solution
Instapak Quickreg
or Instapak Quickreg RT
Instapakreg Quick Tufftrade
Cushioning (Fragile Products)
Instapak Quickreg Packaging Parameters (cont)
0 20 40 60 80 100 120 140 160 180 200 Square Inches of the Smallest Side of Product
Figure 3 Instapak Quickreg Packaging Performance Chart
Rev 0506 copy Sealed Air Corporation (US) 200613
Information on Corrugated Shipping Boxes
A major component of any successful protective package is the shipping box Today most shipping boxes are made of corrushygated fiberboard In order to increase the likelihood that any package will protect its contents through shipping and handling it is necessary that you use a shipping box that will maintain the integrity and performance of the interior packaging from the point of shipment to the ultimate delivery
Corrugated fiberboard is primarily classified on the basis of two laboratory test procedures bull Burst Test bull Edge Crush Test (ECT)
Each of these laboratory tests evaluates a different property of the corrugated structure Burst measures how the board resists bursting pressures applied by an instrument in the lab The level of burst force in this equipment is expressed in pounds So common corrugated fiberboard constructions are rated at 175 200 250 pounds for example At best this number is an indirect indication of how much weight a box made from any specific grade will support or contain
The other value Edge Crush measures the ability of the corrugated structure to support a load applied parallel to the fluted direction Typical values for common corrugated grades are 28 pounds 32 pounds or some other value Unlike burst these values do relate to stacking strength of the boxes made from these materials
When selecting a box for a protective package one must consider the burst or edge crush values for the corrugated fiberboard the style of box to be used and the type of closure for the box By referring to the Box Makers certificate on the bottom of the box you can see what the burst or ECT is for that material Most boxes for products up to 60 or 70 pounds will be of 200 pound test or 32 ECT board
If a product to be packaged weighs more than 60 pounds or so then the designer might want to consider a higher grade of corrugated andor going to a double wall corrugated structure (two sets of flutes in the same fiberboard structure)
In any case a well made and properly designed shipping box closed with strong tape (or some other adequate closure method) is an important criteria in a package that will protect its contents throughout shipping and handling
Further information can be obtained from the Fiber Box Association
copy Sealed Air Corporation (US) 2006 Rev 0506 14
Instapak Quickreg Foam Packaging Applications Guide
Bag Volumetric Table
The following line drawings (pages 15-18) are intended to illustrate the approximate size of the cushion when Quicktrade bags are expanded Cushion sizes may vary depending on product size environshymental conditions and packaging technique
The left portion of the table shows the dimensions of a bag when it is expanded to form a 2 high flat cushion The right portion of the table shows the effect of placing a typical product (represented as a gray box) in the rising foam within a corrugated box This drawing shows how the dimensions are affected by the placement of a product and will help select the correct size corrugated box when using top and bottom cushions
Note Expanded cushion dimensions are smaller than the unexpanded bag dimensions
Note Due to their shape and size some products may require more than two Instapak Quickreg foam bags for adequate protection This is a common occurrence when using the foam-in-bag packaging process - see Packaging Examples pages 22-27 and 32-35
Quicktrade Bag Typical ProductSize
Dimensions
Shipping Box
12 12
4 16 16
2
8
6
840 Bag
(18 x 24)
40 Bag as a Shaped Cushion
40 Bag as a Flat Pad
Product
Shipping Box
Quicktrade Bagas a Flat Size 40
Dimensions of Quicktrade Bag
Dimensions of Expanded
Product Placed in ItExpanded Cushion
Quicktrade Cushion in Shipping Box with
Figure 4 Understanding the Bag Volumetric Table
Rev 0506 copy Sealed Air Corporation (US) 200615
Bag Volumetric Table - Instapak Quickreg and Instapak Quickreg RT
20 Bag as a Product Shaped Cushion
20 Bag (18 x 18)
Shipping Box
20 Bag as a Flat Pad 20 Bag as a
Shaped Cushion
6
10 10
4
6
6
8 8
4
44
6
Product10 Bag (15 x 18)
Shipping Box
10 Bag as a Flat Pad
10 9 2
14 14
2
Figure 5 Instapak Quickreg and Instapak Quickreg RT Bag Volumetric Table - Part 1
copy Sealed Air Corporation (US) 2006 Rev 0506 16
Instapak Quickreg Foam Packaging Applications Guide
Bag Volumetric Table - Instapak Quickreg and Instapak Quickreg RT (cont)
40 Bag (18 x 24)
40 Bag as a Flat Pad
Product
Shipping Box
40 Bag as a Shaped Cushion
12 12
4
8
6
8
17 11
421 15
2
13
4
7
60 Bag as a Flat Pad
60 Bag (18 x 24)
60 Bag as a Shaped Cushion
Product
Shipping Box
16 16
2
25 more foam than 40 bag)
Figure 6 Instapak Quickreg and Instapak Quickreg RT Bag Volumetric Table - Part 2
Rev 0506 copy Sealed Air Corporation (US) 200617
Bag Volumetric Table - Instapak Quickreg and Instapak Quickreg RT (cont)
17 14
4 21 18
2
5
1310
80 Bag as a Flat Pad
80 Bag as a Shaped Cushion
Shipping Box
80 Bag (22 x 27) Product
Figure 7 Instapak Quickreg and Instapak Quickreg RT Bag Volumetric Table - Part 3
copy Sealed Air Corporation (US) 2006 Rev 0506 18
Instapak Quickreg Foam Packaging Applications Guide
Bag Volumetric Table - Instapakreg Quick Tufftrade
25 Bag (18 x 18)
25 Bag as a Flat Pad
6
10 10
4
6
6
14 14
2
Product
Shipping Box
25 Bag as a Shaped Cushion
12 12
4 16 16
2
8
6
845 Bag
(18 x 24)
45 Bag as a Shaped Cushion
45 Bag as a Flat Pad
Product
Shipping Box
Figure 8 Instapakreg Quick Tufftrade Bag Volumetric Table
Rev 0506 copy Sealed Air Corporation (US) 200619
(intentionally blank)
copy Sealed Air Corporation (US) 2006 Rev 0506 20
Instapak Quickreg Foam Packaging Applications Guide
Packaging Examples Using Instapak Quickreg Foam Packaging
The PSI loading for the following applications were calculated using the smallest side of each product These calculations detershymined that Instapak Quickreg was an appropriate packaging material for these products
The products in this section were also subjected to the International Safe Transit Association (ISTA) Procedure 1A Test for Shock and Vibration Testing These products all passed this industry standard test
Note The packaging examples on pages 22-25 could both be packaged in either the full overlap end loading or regular slotted box styles depicted
Note In the following examples product positioners may be used to aid the packaging process A product positioner may be a piece of wood polystyrene polyethylene polyurethane or other suitable material Product positioners are not supplied with this product A positioner is used to lift center position or hold your product so that at least 2 of space for cushioning material around your product Certain applications may require larger product positioners
CAUTION Safety glasses with side shields should be worn while using Instapak Quickreg foam packaging
Rev 0506 copy Sealed Air Corporation (US) 200621
Packaging Examples Using Instapak Quickreg Foam Packaging Glass Framed Print
1 Determine the overall dimensions of your print (L x W x H) Choose a shipping box that is at least 4 larger in each dimension (L x W x H)
2 Erect the box and do not tape the flaps
3 Place the centering product positioner (polyethylene foam block or wood) in the middle of the bottom of the box
4 Lower your artwork into the box and place it into the product positioner
5 Place another product positioner on top of the artwork at the open end of the box
6 Start a 20 bag and place the expanding bag around one of the top corners of the artwork Close and hold the flaps to form the corner cushion
7 Start another 20 bag and place the bag around the other corner of the artwork Close and hold the flaps to form the second corner cushion
8 Remove the centering product positioner and tape these flaps closed
9 Rotate the box and open the flaps
Note Be careful when rotating the box that the artwork does not slip out of the untaped end of the box
10 Repeat steps 6 and 7
11 Remove the centering product positioner Start another 20 bag and place it down between the corrugated box and the front (glass) side of the artwork
12 Verify that the print is locked in place Close and seal the box
copy Sealed Air Corporation (US) 2006 Rev 0506 22
Instapak Quickreg Foam Packaging Applications Guide
Packaging Examples Using Instapak Quickreg Foam Packaging Glass Framed Print (cont)
62
2
STEP 12
STEP 4 STEP 5 STEP 6
STEP 8 STEP 11
Figure 9 Packaging a Glass Framed Print
Rev 0506 copy Sealed Air Corporation (US) 200623
Packaging Examples Using Instapak Quickreg Foam Packaging Framed Artwork (Painting) on Canvas
1 Wrap the painting in a large piece of corrugated and secure it around the frame
Note This is necessary so the cushions do not touch the canvas and cause the canvas to stretch
2 Determine the overall dimensions of your painting (L x W x H) Choose a shipping box that is at least 4 larger in each dimension (L x W x H)
3 Locate or make two 2 (or larger if required) blocks to be used as product positioners Then place them in one corner farthest from you
4 Start a 20 bag
5 Place the bag in the center of the bottom of the box
6 Place the painting into the center of the box on top of the rising bag of foam (be sure that the back of the painting is placed against the foam cushion Continue to hold the painting so that the bag rises to meet the frame and forms a 2 high cushion Hold the painting until the bag supports the frame This takes about 8 seconds
7 Be sure the painting is centered in the box
8 Activate a 20 bag and place it in the corner closest to you and opposite the two 2 foam blocks
9 Close and hold the two flaps closest to you over the expanding bag This will help the cushion form around the corner of the painting
10 After the bag stops expanding open the flaps and rotate the box so the two foam blocks are in front of you
11 Pull the blocks out and activate a 20 bag and place it in this corner Close and hold the two flaps over the expanding bag
12 Activate a 20 bag and place it in the next corner Close and hold the two flaps over the expanding bag
13 Activate a 20 bag and place it in the final corner Close and hold the two flaps over the expanding bag
14 Verify that the painting is locked in place Close and seal the box
copy Sealed Air Corporation (US) 2006 Rev 0506 24
Instapak Quickreg Foam Packaging Applications Guide
Packaging Examples Using Instapak Quickreg Foam Packaging Framed Artwork (Painting) on Canvas (cont)
Foam Blocks
STEP 14
STEP 3 STEP 5 STEP 6
STEP 8 STEP 9
Figure 10 Packaging Framed Artwork (Painting) on Canvas
Rev 0506 copy Sealed Air Corporation (US) 200625
Packaging Examples Using Instapak Quickreg Foam Packaging Clock
Note If you gently shake the clock and hear a rattling noise an additional step will need to be taken to ensure moving parts are secured before shipping
1 Place a piece of flexible foam between the chimes and hammers before packaging the clock This will stop any internal movement and will protect them from shock and vibration during shipping
2 If the clock has a front door andor a back panel place an elastic band around the clock to keep the doors and panels closed
3 Determine the overall dimensions of your clock (L x W x H) Choose a shipping box that is at least 4 larger in each dimension (L x W x H)
4 Activate a 60 bag
5 Place the bag in the center of the bottom of the box
6 Place the clock in the center of the box on top of the rising bag of foam Continue to hold the clock so that the bag rises to meet the clock and forms a 2 high cushion Hold the product until the bag supports the clock This takes about 8 seconds
7 Be sure the clock is centered in the box
8 Activate a 60 bag and place it over the bottom half of the clock Close and hold the flap at this end of the box as the foam rises This will help the cushion form around the clock Hold the other end of the clock at the same time to make sure the rising foam does not push the clock out of the center of the box
9 Activate another 60 bag and place it over the opposite half of the clock Close and hold the two major flaps as the foam rises This will help the cushion form around the clock
10 Verify that the clock is locked in place Close and seal the box
copy Sealed Air Corporation (US) 2006 Rev 0506 26
Instapak Quickreg Foam Packaging Applications Guide
Packaging Examples Using Instapak Quickreg Foam Packaging Clock (cont)
STEP 5 STEP 6 STEP 8
STEP 9 STEP 10
Figure 11 Packaging a Clock
CROSS SECTION
Lower CushionCarton
Upper Cushions
Clock
Rev 0506 copy Sealed Air Corporation (US) 200627
Packaging Examples Using Instapak Quickreg Foam Packaging Porcelain Vase
1 Determine the overall dimensions of your vase (L x W x H) Choose a shipping box that is at least 4 larger in each dimension (L x W x H)
2 Activate a 40 bag
3 Place the bag in the center of the bottom of the box
4 Place the vase in the center of the box on top of the rising bag of foam Continue to hold the vase so that the bag rises up to form a 2 high protective cushion Hold the product until the bag supports the vase This takes about 8 seconds
5 Be sure the vase is centered in the box
6 Activate a 40 bag and place it on top of the vase
7 Close and hold the two major flaps as the foam rises This will help the cushion form around the vase
8 Verify that the vase is locked in place Close and seal the box
copy Sealed Air Corporation (US) 2006 Rev 0506 28
Instapak Quickreg Foam Packaging Applications Guide
Packaging Examples Using Instapak Quickreg Foam Packaging Porcelain Vase (cont)
STEP 3 STEP 4 STEP 6
STEP 7 STEP 8
Figure 12 Packaging a Vase
CROSS SECTION
Lower CushionCarton
Upper Cushion
Vase
Rev 0506 copy Sealed Air Corporation (US) 200629
Packaging Examples Using Instapak Quickreg Foam Packaging Crystal Pitcher
1 Determine the overall dimensions of your pitcher (L x W x H) Choose a shipping box that is at least 4 larger in each dimension (L x W x H)
2 Activate a 40 bag
3 Place the bag in the center of the bottom of the box
4 Place the pitcher in the center of the box on top of the rising bag of foam Continue to hold the pitcher so that the bag rises up to form a 2 high protective cushion Hold the product until the bag supports the pitcher This takes about 8 seconds
5 Be sure the pitcher is centered in the box
6 Activate a 40 bag and place it on top of the pitcher
7 Close and hold the two major flaps as the foam rises This will help the cushion form around the pitcher
8 Verify that the pitcher is locked in place Close and seal the box
copy Sealed Air Corporation (US) 2006 Rev 0506 30
Instapak Quickreg Foam Packaging Applications Guide
Packaging Examples Using Instapak Quickreg Foam Packaging Crystal Pitcher (cont)
STEP 3 STEP 4 STEP 6
STEP 7 STEP 8
Figure 13 Packaging a Crystal Pitcher
CROSS SECTION
Lower CushionCarton
Upper Cushion
Pitcher
Rev 0506 copy Sealed Air Corporation (US) 200631
Packaging Examples Using Instapak Quickreg Foam Packaging Computer Monitor
1 Determine the overall dimensions of your monitor (L x W x H) Choose a shipping box that is at least 4 larger in each dimension (L x W x H)
2 Erect the box upside down so the bottom of the box is facing up Do not tape the flaps
3 Place a 2 product positioner in the center of the bottom of the box
4 By using the bag volumetric table (pages 15-17) it is determined that it will take more than two (2) cushions to package the monitor
5 This product will take two (2) 80 bags on the bottom and four (4) 60 bags on top as corner cushions
6 Place the monitor on the product positioner with the screen side facing up
7 Activate a 80 bag
8 Hold the bag in the box so half the bag goes down the side of the monitor and half the bag covers the top side of the monitor facing you
9 Once the cushion can support itself close and hold the flaps on this side of the box to help it form around the monitor Hold the other end of the monitor at the same time to make sure the rising foam does not push the monitor out of the center of the box
10 Activate another 80 bag and place it in the box on the opposite side of the first bag Once the cushion can support itself close and hold the flaps on this side of the box This will help the cushion form around the monitor
11 Close and tape the four (4) flaps on this side of the box
(Continued on page 34)
copy Sealed Air Corporation (US) 2006 Rev 0506 32
Instapak Quickreg Foam Packaging Applications Guide
Packaging Examples Using Instapak Quickreg Foam Packaging Computer Monitor (cont)
STEP 6STEP 3 STEP 8
STEP 9 STEP 10 STEP 11
Product Positioner
Figure 14 Packaging a Computer Monitor - 1
Rev 0506 copy Sealed Air Corporation (US) 200633
Packaging Examples Using Instapak Quickreg Foam Packaging Computer Monitor (cont)
12 Carefully roll the box over so the other side of the box can be opened
Note The flaps on this side are not taped closed so be careful the monitor does not fall out while doing this
13 Open the flaps on this side and remove the product positioner
14 Activate a 60 bag and place it about half way down in one of the corners
15 Once the cushion can support itself close and hold the flaps on this side of the box to help it form around the monitor Hold the opposing corner of the monitor at the same time to make sure the rising foam does not push the monitor out of the center of the box
16 Activate another 60 bag and place it in the opposite corner of the first bag Close and hold the flaps on this side of the box to help it form around the monitor
17 Activate another 60 bag and place it in the third corner so the bag can form Again hold the monitor so it wonrsquot shift
18 Repeat step 17 for the fourth corner
19 Tape the flaps closed on this side and the box is ready to ship
copy Sealed Air Corporation (US) 2006 Rev 0506 34
Instapak Quickreg Foam Packaging Applications Guide
Packaging Examples Using Instapak Quickreg Foam Packaging Computer Monitor (cont)
STEP 15
STEP 14STEP 13
STEP 19
Figure 15 Packaging a Computer Monitor - 2
Rev 0506 copy Sealed Air Corporation (US) 200635
Notes
copy Sealed Air Corporation (US) 2006 Rev 0506 36
Instapak Quickreg Foam Packaging Applications Guide
Rev 0506 copy Sealed Air Corporation (US) 200637
38copy Sealed Air Corporation (US) 2006 Rev 0506
Protective Packaging 10 Old Sherman Turnpike Danbury CT 06810 203-791-3500 Fax 203-791-3618 wwwinstapakquickcom
Our Products Protect Your Productsreg
Corporate Office Sealed Air Corporation (US) Park 80 East Saddle Brook NJ 07663-5291 wwwsealedaircom reg Reg US Pat amp TM Off copy Sealed Air Corporation (US) 2006 All rights reserved Printed in the USA The 9 Dot Logo and Sealed Air are registered trademarks of Sealed Air Corporation (US)
Instapak Quickreg Applications Guide T-124 0506

Instapak Quickreg Foam Packaging Applications Guide
Introduction
Welcome to the Instapak Quickreg Foam Packaging Applications Guide This guide offers generic packaging examples that serve as general guidelines for using this product and does not attempt to cover every Instapak Quickreg packaging application A simple method to help determine the appropriate Instapak Quickreg product for your application is also provided
This guide covers Instapak Quickreg Instapakreg Quick Tufftrade and Instapak Quickreg RT foam packaging products
Note All safety and application information in this guide pertains to Instapak Quickreg Instapakreg Quick Tufftrade and Instapak Quickreg RT foam packaging products
Instapak Quickreg is a fast and easy to use packaging material that provides superior protection for your products It is ideal for cushioning blocking and bracing and for producing small molded cushions Each Instapak Quickreg bag contains two separate liquids that when mixed together will react and expand to form polyurethane foam packaging
If you have any questions about this product please call your authorized Sealed Air Instapak Quickreg distributor
WARNING Before using this product read and familiarize yourself with important safety and instructional information that is found in the following material bull Material Safety Data Sheets bull Applications Guide (this guide) bull Bag Label bull Instructional CD (included with the purchase of a Quicktrade Warmer and bull Users Guide not included with Instapak Quickreg RT products)
Who to Call bull For Chemical Emergency bull Instapak Quickreg Reorder Information
Spill Leak Fire Exposure or Call your authorized Sealed Air Accident call CHEMTREC at Instapak Quickreg distributor 1-800-424-9300 24 Hours
Rev 0506 copy Sealed Air Corporation (US) 20065
How To Determine When To Use Instapak Quickreg Foam Packaging
Now you need to determine if Instapak Quickreg foam will support the weight of your product
Each Instapak Quickreg packaging foam has been designed to support a specific pounds per square inch (psi) static load In other words the foam can be used to package an item of any weight as long as there is adequate surface area on each side of the product to spread out the load The heavier the item the more surface area you will need to cover with Quicktrade foam in order to protect the product properly
The maximum psi loading for a product can be determined by dividing the weight of the product by the surface area of the smallest side of the product (length x width) The following equation illustrates this concept
Total weight of the product (lbs) = Static Loading (psi)
Area in inches of the smallest side of the product (L x W)
A range of 1 - 35 lbs per square inch (psi) load is optimum when using at least 2 of Instapak Quickreg or Instapak Quickreg RT
A range of 35 - 80 lbs per square inch (psi) load is optimum when using at least 2 of Instapakreg Quick Tufftrade
This means that if your product has a static loading within the optimal range per square inch (psi) and you completely surround the product with at least 2 of Instapak Quickreg foam your product should be sufficiently protected through a typical shipping cycle
When a product properly packaged in Quicktrade is dropped the cushions will deflect (compress) between 125 - 15 at the time of impact This is based on a typical drop height determined by the productrsquos weight For example the lighter the product the higher the drop height and the heavier the product the lower the drop height That is why a minimum of 2 of Quicktrade protection is required When this deflection occurs foam begins to do its job by absorbing the shock within the 2 cushion as opposed to the product absorbing that shock If the cushion did not deflect (because it was too rigid eg wood) or it deflected a full 2 (bottomed out) the shock would be transmitted right through the product resulting in possible damage to the product
copy Sealed Air Corporation (US) 2006 Rev 0506 6
Instapak Quickreg Foam Packaging Applications Guide
How To Determine When To Use Instapak Quickreg Foam Packaging (cont)
This psi loading should be determined for the smallest side of the product being shipped If it is within the optimal range the remaining sides will also be within the performance capabilities of Quicktrade packaging Although the weight for an item is conshystant the surface area may vary from side to side and have an impact on the performance of the cushioning material That is why we focus on the smallest side which presents the highest loading
Please refer to the Instapak Quickreg Packaging Parameters on pages 12-13 of this guide to determine which Instapak Quickreg foam packaging product is best suited for your application
Rev 0506 copy Sealed Air Corporation (US) 20067
How To Determine When To Use Instapak Quickreg Foam Packaging (cont)
Example 1 - Packaging a Video Cassette Recorder
This video cassette recorder measures 20 x 11 x 45 and weighs 13 lbs
Perform the following calculation to determine the psi (lbs per square inch) loading for the smallest side (only one calculation is necessary)
bull Weight divide the area (L x W) of the smallest side = loading (psi)
bull 13 lbs divide (45 x 11) = 26 psi
bull 13 lbs divide 495 in sq = 26 psi
bull 26 psi is within the optimal range of 10 - 35 psi for Instapak Quickreg or Instapak Quickreg RT (refer to pages 12-13)
Completely surrounding the video cassette recorder with 2 of Quicktrade foam should protect this product
copy Sealed Air Corporation (US) 2006 Rev 0506 8
Instapak Quickreg Foam Packaging Applications Guide
How To Determine When To Use Instapak Quickreg Foam Packaging (cont)
Video Cassette Recorder (13 lbs)
20Length 11Width
45Height
Smallest Side (45 x 110 = 495 in sq)
Weight divide the area (L x W) of the smallest side = loading
13 lbs divide (45 x 11) = 26 psi
13 lbs divide 495 in sq = 26 psi
Figure 1 Packaging a Video Cassette Recorder
Rev 0506 copy Sealed Air Corporation (US) 20069
How To Determine When To Use Instapak Quickreg Packaging Foam (cont)
Example 2 - Packaging a Heavy Product with Instapakreg Quick Tufftrade
The heavy product measures 24 x 5 x 10 and weighs 30 lbs
Perform the following calculation to determine the psi (lbs per square inch) loading for the smallest side (only one calculation is necessary)
bull Weight divide the area (L x W) of the smallest side = loading (psi)
bull 30 lbs divide (5 x 10) = 6 psi
bull 30 lbs divide 50 in sq = 6 psi
bull 6 psi is within the optimal range of 35 - 80 psi for Instapakreg Quick Tufftrade (refer to pages 12-13)
Note If your product does not fall within Quicktrade packaging specifications contact our on-line packaging expert at 1-800-568-6636 or e-mail - packagingexpertsealedaircom
copy Sealed Air Corporation (US) 2006 Rev 0506 10
Instapak Quickreg Foam Packaging Applications Guide
How To Determine When To Use Instapak Quickreg Packaging Foam (cont)
Heavy Product (30 lbs)
24Length
5Width
10Height
Smallest Side (50 x 100 = 50 in sq)
Weight divide the area (L x W) of the smallest side = loading
30 lbs divide (5 x 10) = 6 psi
30 lbs divide 50 in sq = 6 psi
Figure 2 Packaging a Heavy Product
Rev 0506 copy Sealed Air Corporation (US) 200611
Instapak Quickreg Packaging Parameters
Instapak Quickreg foam packaging is used to protect products of various size shape and weight To determine which Instapak Quickreg product is best suited for your product refer to the Instapak Quickreg Packaging Performance Chart on the following page
You will need to know two attributes of your product bull Product weight bull Area of the smallest side of the product in inches (LxW)
The smallest side of the product represents the highest loading (psi) When static loading of the smallest side falls within the optimal range the remaining sides will also be within Quickrsquostrade packaging performance capabilities
Contact our Packaging Expert to discuss correspond or to arrange a visit by one of our many packaging specialists bull 1-800-568-6636 (830 - 500 ET US and Canada only) bull e-mail - packagingexpertsealedaircom
Rugged Products bull If your product falls within the ldquoRugged Productsrdquo parameter and is classified ldquoNot Fragilerdquo then Instapak Quick reg or
Instapak Quickreg RT should provide adequate protection
Note The shipping and transportation environment is a very unpredictable chain of events Packaging is not an exact science thus we caution that the Instapak Quickreg Packaging Performance Chart be used as a guide and not a final stamp of approval or guarantee that Instapak Quickreg will or will not be successful in protecting the product to be packaged
copy Sealed Air Corporation (US) 2006 Rev 0506 12
Instapak Quickreg Foam Packaging Applications Guide
0
Lbs
of P
rodu
ct
10
20
30
40
50
Void Fill or Blocking and Bracing (Rugged Products)
Contact your Sealed Airreg
Packaging Expert for an Engineered
Solution
Instapak Quickreg
or Instapak Quickreg RT
Instapakreg Quick Tufftrade
Cushioning (Fragile Products)
Instapak Quickreg Packaging Parameters (cont)
0 20 40 60 80 100 120 140 160 180 200 Square Inches of the Smallest Side of Product
Figure 3 Instapak Quickreg Packaging Performance Chart
Rev 0506 copy Sealed Air Corporation (US) 200613
Information on Corrugated Shipping Boxes
A major component of any successful protective package is the shipping box Today most shipping boxes are made of corrushygated fiberboard In order to increase the likelihood that any package will protect its contents through shipping and handling it is necessary that you use a shipping box that will maintain the integrity and performance of the interior packaging from the point of shipment to the ultimate delivery
Corrugated fiberboard is primarily classified on the basis of two laboratory test procedures bull Burst Test bull Edge Crush Test (ECT)
Each of these laboratory tests evaluates a different property of the corrugated structure Burst measures how the board resists bursting pressures applied by an instrument in the lab The level of burst force in this equipment is expressed in pounds So common corrugated fiberboard constructions are rated at 175 200 250 pounds for example At best this number is an indirect indication of how much weight a box made from any specific grade will support or contain
The other value Edge Crush measures the ability of the corrugated structure to support a load applied parallel to the fluted direction Typical values for common corrugated grades are 28 pounds 32 pounds or some other value Unlike burst these values do relate to stacking strength of the boxes made from these materials
When selecting a box for a protective package one must consider the burst or edge crush values for the corrugated fiberboard the style of box to be used and the type of closure for the box By referring to the Box Makers certificate on the bottom of the box you can see what the burst or ECT is for that material Most boxes for products up to 60 or 70 pounds will be of 200 pound test or 32 ECT board
If a product to be packaged weighs more than 60 pounds or so then the designer might want to consider a higher grade of corrugated andor going to a double wall corrugated structure (two sets of flutes in the same fiberboard structure)
In any case a well made and properly designed shipping box closed with strong tape (or some other adequate closure method) is an important criteria in a package that will protect its contents throughout shipping and handling
Further information can be obtained from the Fiber Box Association
copy Sealed Air Corporation (US) 2006 Rev 0506 14
Instapak Quickreg Foam Packaging Applications Guide
Bag Volumetric Table
The following line drawings (pages 15-18) are intended to illustrate the approximate size of the cushion when Quicktrade bags are expanded Cushion sizes may vary depending on product size environshymental conditions and packaging technique
The left portion of the table shows the dimensions of a bag when it is expanded to form a 2 high flat cushion The right portion of the table shows the effect of placing a typical product (represented as a gray box) in the rising foam within a corrugated box This drawing shows how the dimensions are affected by the placement of a product and will help select the correct size corrugated box when using top and bottom cushions
Note Expanded cushion dimensions are smaller than the unexpanded bag dimensions
Note Due to their shape and size some products may require more than two Instapak Quickreg foam bags for adequate protection This is a common occurrence when using the foam-in-bag packaging process - see Packaging Examples pages 22-27 and 32-35
Quicktrade Bag Typical ProductSize
Dimensions
Shipping Box
12 12
4 16 16
2
8
6
840 Bag
(18 x 24)
40 Bag as a Shaped Cushion
40 Bag as a Flat Pad
Product
Shipping Box
Quicktrade Bagas a Flat Size 40
Dimensions of Quicktrade Bag
Dimensions of Expanded
Product Placed in ItExpanded Cushion
Quicktrade Cushion in Shipping Box with
Figure 4 Understanding the Bag Volumetric Table
Rev 0506 copy Sealed Air Corporation (US) 200615
Bag Volumetric Table - Instapak Quickreg and Instapak Quickreg RT
20 Bag as a Product Shaped Cushion
20 Bag (18 x 18)
Shipping Box
20 Bag as a Flat Pad 20 Bag as a
Shaped Cushion
6
10 10
4
6
6
8 8
4
44
6
Product10 Bag (15 x 18)
Shipping Box
10 Bag as a Flat Pad
10 9 2
14 14
2
Figure 5 Instapak Quickreg and Instapak Quickreg RT Bag Volumetric Table - Part 1
copy Sealed Air Corporation (US) 2006 Rev 0506 16
Instapak Quickreg Foam Packaging Applications Guide
Bag Volumetric Table - Instapak Quickreg and Instapak Quickreg RT (cont)
40 Bag (18 x 24)
40 Bag as a Flat Pad
Product
Shipping Box
40 Bag as a Shaped Cushion
12 12
4
8
6
8
17 11
421 15
2
13
4
7
60 Bag as a Flat Pad
60 Bag (18 x 24)
60 Bag as a Shaped Cushion
Product
Shipping Box
16 16
2
25 more foam than 40 bag)
Figure 6 Instapak Quickreg and Instapak Quickreg RT Bag Volumetric Table - Part 2
Rev 0506 copy Sealed Air Corporation (US) 200617
Bag Volumetric Table - Instapak Quickreg and Instapak Quickreg RT (cont)
17 14
4 21 18
2
5
1310
80 Bag as a Flat Pad
80 Bag as a Shaped Cushion
Shipping Box
80 Bag (22 x 27) Product
Figure 7 Instapak Quickreg and Instapak Quickreg RT Bag Volumetric Table - Part 3
copy Sealed Air Corporation (US) 2006 Rev 0506 18
Instapak Quickreg Foam Packaging Applications Guide
Bag Volumetric Table - Instapakreg Quick Tufftrade
25 Bag (18 x 18)
25 Bag as a Flat Pad
6
10 10
4
6
6
14 14
2
Product
Shipping Box
25 Bag as a Shaped Cushion
12 12
4 16 16
2
8
6
845 Bag
(18 x 24)
45 Bag as a Shaped Cushion
45 Bag as a Flat Pad
Product
Shipping Box
Figure 8 Instapakreg Quick Tufftrade Bag Volumetric Table
Rev 0506 copy Sealed Air Corporation (US) 200619
(intentionally blank)
copy Sealed Air Corporation (US) 2006 Rev 0506 20
Instapak Quickreg Foam Packaging Applications Guide
Packaging Examples Using Instapak Quickreg Foam Packaging
The PSI loading for the following applications were calculated using the smallest side of each product These calculations detershymined that Instapak Quickreg was an appropriate packaging material for these products
The products in this section were also subjected to the International Safe Transit Association (ISTA) Procedure 1A Test for Shock and Vibration Testing These products all passed this industry standard test
Note The packaging examples on pages 22-25 could both be packaged in either the full overlap end loading or regular slotted box styles depicted
Note In the following examples product positioners may be used to aid the packaging process A product positioner may be a piece of wood polystyrene polyethylene polyurethane or other suitable material Product positioners are not supplied with this product A positioner is used to lift center position or hold your product so that at least 2 of space for cushioning material around your product Certain applications may require larger product positioners
CAUTION Safety glasses with side shields should be worn while using Instapak Quickreg foam packaging
Rev 0506 copy Sealed Air Corporation (US) 200621
Packaging Examples Using Instapak Quickreg Foam Packaging Glass Framed Print
1 Determine the overall dimensions of your print (L x W x H) Choose a shipping box that is at least 4 larger in each dimension (L x W x H)
2 Erect the box and do not tape the flaps
3 Place the centering product positioner (polyethylene foam block or wood) in the middle of the bottom of the box
4 Lower your artwork into the box and place it into the product positioner
5 Place another product positioner on top of the artwork at the open end of the box
6 Start a 20 bag and place the expanding bag around one of the top corners of the artwork Close and hold the flaps to form the corner cushion
7 Start another 20 bag and place the bag around the other corner of the artwork Close and hold the flaps to form the second corner cushion
8 Remove the centering product positioner and tape these flaps closed
9 Rotate the box and open the flaps
Note Be careful when rotating the box that the artwork does not slip out of the untaped end of the box
10 Repeat steps 6 and 7
11 Remove the centering product positioner Start another 20 bag and place it down between the corrugated box and the front (glass) side of the artwork
12 Verify that the print is locked in place Close and seal the box
copy Sealed Air Corporation (US) 2006 Rev 0506 22
Instapak Quickreg Foam Packaging Applications Guide
Packaging Examples Using Instapak Quickreg Foam Packaging Glass Framed Print (cont)
62
2
STEP 12
STEP 4 STEP 5 STEP 6
STEP 8 STEP 11
Figure 9 Packaging a Glass Framed Print
Rev 0506 copy Sealed Air Corporation (US) 200623
Packaging Examples Using Instapak Quickreg Foam Packaging Framed Artwork (Painting) on Canvas
1 Wrap the painting in a large piece of corrugated and secure it around the frame
Note This is necessary so the cushions do not touch the canvas and cause the canvas to stretch
2 Determine the overall dimensions of your painting (L x W x H) Choose a shipping box that is at least 4 larger in each dimension (L x W x H)
3 Locate or make two 2 (or larger if required) blocks to be used as product positioners Then place them in one corner farthest from you
4 Start a 20 bag
5 Place the bag in the center of the bottom of the box
6 Place the painting into the center of the box on top of the rising bag of foam (be sure that the back of the painting is placed against the foam cushion Continue to hold the painting so that the bag rises to meet the frame and forms a 2 high cushion Hold the painting until the bag supports the frame This takes about 8 seconds
7 Be sure the painting is centered in the box
8 Activate a 20 bag and place it in the corner closest to you and opposite the two 2 foam blocks
9 Close and hold the two flaps closest to you over the expanding bag This will help the cushion form around the corner of the painting
10 After the bag stops expanding open the flaps and rotate the box so the two foam blocks are in front of you
11 Pull the blocks out and activate a 20 bag and place it in this corner Close and hold the two flaps over the expanding bag
12 Activate a 20 bag and place it in the next corner Close and hold the two flaps over the expanding bag
13 Activate a 20 bag and place it in the final corner Close and hold the two flaps over the expanding bag
14 Verify that the painting is locked in place Close and seal the box
copy Sealed Air Corporation (US) 2006 Rev 0506 24
Instapak Quickreg Foam Packaging Applications Guide
Packaging Examples Using Instapak Quickreg Foam Packaging Framed Artwork (Painting) on Canvas (cont)
Foam Blocks
STEP 14
STEP 3 STEP 5 STEP 6
STEP 8 STEP 9
Figure 10 Packaging Framed Artwork (Painting) on Canvas
Rev 0506 copy Sealed Air Corporation (US) 200625
Packaging Examples Using Instapak Quickreg Foam Packaging Clock
Note If you gently shake the clock and hear a rattling noise an additional step will need to be taken to ensure moving parts are secured before shipping
1 Place a piece of flexible foam between the chimes and hammers before packaging the clock This will stop any internal movement and will protect them from shock and vibration during shipping
2 If the clock has a front door andor a back panel place an elastic band around the clock to keep the doors and panels closed
3 Determine the overall dimensions of your clock (L x W x H) Choose a shipping box that is at least 4 larger in each dimension (L x W x H)
4 Activate a 60 bag
5 Place the bag in the center of the bottom of the box
6 Place the clock in the center of the box on top of the rising bag of foam Continue to hold the clock so that the bag rises to meet the clock and forms a 2 high cushion Hold the product until the bag supports the clock This takes about 8 seconds
7 Be sure the clock is centered in the box
8 Activate a 60 bag and place it over the bottom half of the clock Close and hold the flap at this end of the box as the foam rises This will help the cushion form around the clock Hold the other end of the clock at the same time to make sure the rising foam does not push the clock out of the center of the box
9 Activate another 60 bag and place it over the opposite half of the clock Close and hold the two major flaps as the foam rises This will help the cushion form around the clock
10 Verify that the clock is locked in place Close and seal the box
copy Sealed Air Corporation (US) 2006 Rev 0506 26
Instapak Quickreg Foam Packaging Applications Guide
Packaging Examples Using Instapak Quickreg Foam Packaging Clock (cont)
STEP 5 STEP 6 STEP 8
STEP 9 STEP 10
Figure 11 Packaging a Clock
CROSS SECTION
Lower CushionCarton
Upper Cushions
Clock
Rev 0506 copy Sealed Air Corporation (US) 200627
Packaging Examples Using Instapak Quickreg Foam Packaging Porcelain Vase
1 Determine the overall dimensions of your vase (L x W x H) Choose a shipping box that is at least 4 larger in each dimension (L x W x H)
2 Activate a 40 bag
3 Place the bag in the center of the bottom of the box
4 Place the vase in the center of the box on top of the rising bag of foam Continue to hold the vase so that the bag rises up to form a 2 high protective cushion Hold the product until the bag supports the vase This takes about 8 seconds
5 Be sure the vase is centered in the box
6 Activate a 40 bag and place it on top of the vase
7 Close and hold the two major flaps as the foam rises This will help the cushion form around the vase
8 Verify that the vase is locked in place Close and seal the box
copy Sealed Air Corporation (US) 2006 Rev 0506 28
Instapak Quickreg Foam Packaging Applications Guide
Packaging Examples Using Instapak Quickreg Foam Packaging Porcelain Vase (cont)
STEP 3 STEP 4 STEP 6
STEP 7 STEP 8
Figure 12 Packaging a Vase
CROSS SECTION
Lower CushionCarton
Upper Cushion
Vase
Rev 0506 copy Sealed Air Corporation (US) 200629
Packaging Examples Using Instapak Quickreg Foam Packaging Crystal Pitcher
1 Determine the overall dimensions of your pitcher (L x W x H) Choose a shipping box that is at least 4 larger in each dimension (L x W x H)
2 Activate a 40 bag
3 Place the bag in the center of the bottom of the box
4 Place the pitcher in the center of the box on top of the rising bag of foam Continue to hold the pitcher so that the bag rises up to form a 2 high protective cushion Hold the product until the bag supports the pitcher This takes about 8 seconds
5 Be sure the pitcher is centered in the box
6 Activate a 40 bag and place it on top of the pitcher
7 Close and hold the two major flaps as the foam rises This will help the cushion form around the pitcher
8 Verify that the pitcher is locked in place Close and seal the box
copy Sealed Air Corporation (US) 2006 Rev 0506 30
Instapak Quickreg Foam Packaging Applications Guide
Packaging Examples Using Instapak Quickreg Foam Packaging Crystal Pitcher (cont)
STEP 3 STEP 4 STEP 6
STEP 7 STEP 8
Figure 13 Packaging a Crystal Pitcher
CROSS SECTION
Lower CushionCarton
Upper Cushion
Pitcher
Rev 0506 copy Sealed Air Corporation (US) 200631
Packaging Examples Using Instapak Quickreg Foam Packaging Computer Monitor
1 Determine the overall dimensions of your monitor (L x W x H) Choose a shipping box that is at least 4 larger in each dimension (L x W x H)
2 Erect the box upside down so the bottom of the box is facing up Do not tape the flaps
3 Place a 2 product positioner in the center of the bottom of the box
4 By using the bag volumetric table (pages 15-17) it is determined that it will take more than two (2) cushions to package the monitor
5 This product will take two (2) 80 bags on the bottom and four (4) 60 bags on top as corner cushions
6 Place the monitor on the product positioner with the screen side facing up
7 Activate a 80 bag
8 Hold the bag in the box so half the bag goes down the side of the monitor and half the bag covers the top side of the monitor facing you
9 Once the cushion can support itself close and hold the flaps on this side of the box to help it form around the monitor Hold the other end of the monitor at the same time to make sure the rising foam does not push the monitor out of the center of the box
10 Activate another 80 bag and place it in the box on the opposite side of the first bag Once the cushion can support itself close and hold the flaps on this side of the box This will help the cushion form around the monitor
11 Close and tape the four (4) flaps on this side of the box
(Continued on page 34)
copy Sealed Air Corporation (US) 2006 Rev 0506 32
Instapak Quickreg Foam Packaging Applications Guide
Packaging Examples Using Instapak Quickreg Foam Packaging Computer Monitor (cont)
STEP 6STEP 3 STEP 8
STEP 9 STEP 10 STEP 11
Product Positioner
Figure 14 Packaging a Computer Monitor - 1
Rev 0506 copy Sealed Air Corporation (US) 200633
Packaging Examples Using Instapak Quickreg Foam Packaging Computer Monitor (cont)
12 Carefully roll the box over so the other side of the box can be opened
Note The flaps on this side are not taped closed so be careful the monitor does not fall out while doing this
13 Open the flaps on this side and remove the product positioner
14 Activate a 60 bag and place it about half way down in one of the corners
15 Once the cushion can support itself close and hold the flaps on this side of the box to help it form around the monitor Hold the opposing corner of the monitor at the same time to make sure the rising foam does not push the monitor out of the center of the box
16 Activate another 60 bag and place it in the opposite corner of the first bag Close and hold the flaps on this side of the box to help it form around the monitor
17 Activate another 60 bag and place it in the third corner so the bag can form Again hold the monitor so it wonrsquot shift
18 Repeat step 17 for the fourth corner
19 Tape the flaps closed on this side and the box is ready to ship
copy Sealed Air Corporation (US) 2006 Rev 0506 34
Instapak Quickreg Foam Packaging Applications Guide
Packaging Examples Using Instapak Quickreg Foam Packaging Computer Monitor (cont)
STEP 15
STEP 14STEP 13
STEP 19
Figure 15 Packaging a Computer Monitor - 2
Rev 0506 copy Sealed Air Corporation (US) 200635
Notes
copy Sealed Air Corporation (US) 2006 Rev 0506 36
Instapak Quickreg Foam Packaging Applications Guide
Rev 0506 copy Sealed Air Corporation (US) 200637
38copy Sealed Air Corporation (US) 2006 Rev 0506
Protective Packaging 10 Old Sherman Turnpike Danbury CT 06810 203-791-3500 Fax 203-791-3618 wwwinstapakquickcom
Our Products Protect Your Productsreg
Corporate Office Sealed Air Corporation (US) Park 80 East Saddle Brook NJ 07663-5291 wwwsealedaircom reg Reg US Pat amp TM Off copy Sealed Air Corporation (US) 2006 All rights reserved Printed in the USA The 9 Dot Logo and Sealed Air are registered trademarks of Sealed Air Corporation (US)
Instapak Quickreg Applications Guide T-124 0506

Instapak Quickreg Foam Packaging Applications Guide
How To Determine When To Use Instapak Quickreg Foam Packaging (cont)
This psi loading should be determined for the smallest side of the product being shipped If it is within the optimal range the remaining sides will also be within the performance capabilities of Quicktrade packaging Although the weight for an item is conshystant the surface area may vary from side to side and have an impact on the performance of the cushioning material That is why we focus on the smallest side which presents the highest loading
Please refer to the Instapak Quickreg Packaging Parameters on pages 12-13 of this guide to determine which Instapak Quickreg foam packaging product is best suited for your application
Rev 0506 copy Sealed Air Corporation (US) 20067
How To Determine When To Use Instapak Quickreg Foam Packaging (cont)
Example 1 - Packaging a Video Cassette Recorder
This video cassette recorder measures 20 x 11 x 45 and weighs 13 lbs
Perform the following calculation to determine the psi (lbs per square inch) loading for the smallest side (only one calculation is necessary)
bull Weight divide the area (L x W) of the smallest side = loading (psi)
bull 13 lbs divide (45 x 11) = 26 psi
bull 13 lbs divide 495 in sq = 26 psi
bull 26 psi is within the optimal range of 10 - 35 psi for Instapak Quickreg or Instapak Quickreg RT (refer to pages 12-13)
Completely surrounding the video cassette recorder with 2 of Quicktrade foam should protect this product
copy Sealed Air Corporation (US) 2006 Rev 0506 8
Instapak Quickreg Foam Packaging Applications Guide
How To Determine When To Use Instapak Quickreg Foam Packaging (cont)
Video Cassette Recorder (13 lbs)
20Length 11Width
45Height
Smallest Side (45 x 110 = 495 in sq)
Weight divide the area (L x W) of the smallest side = loading
13 lbs divide (45 x 11) = 26 psi
13 lbs divide 495 in sq = 26 psi
Figure 1 Packaging a Video Cassette Recorder
Rev 0506 copy Sealed Air Corporation (US) 20069
How To Determine When To Use Instapak Quickreg Packaging Foam (cont)
Example 2 - Packaging a Heavy Product with Instapakreg Quick Tufftrade
The heavy product measures 24 x 5 x 10 and weighs 30 lbs
Perform the following calculation to determine the psi (lbs per square inch) loading for the smallest side (only one calculation is necessary)
bull Weight divide the area (L x W) of the smallest side = loading (psi)
bull 30 lbs divide (5 x 10) = 6 psi
bull 30 lbs divide 50 in sq = 6 psi
bull 6 psi is within the optimal range of 35 - 80 psi for Instapakreg Quick Tufftrade (refer to pages 12-13)
Note If your product does not fall within Quicktrade packaging specifications contact our on-line packaging expert at 1-800-568-6636 or e-mail - packagingexpertsealedaircom
copy Sealed Air Corporation (US) 2006 Rev 0506 10
Instapak Quickreg Foam Packaging Applications Guide
How To Determine When To Use Instapak Quickreg Packaging Foam (cont)
Heavy Product (30 lbs)
24Length
5Width
10Height
Smallest Side (50 x 100 = 50 in sq)
Weight divide the area (L x W) of the smallest side = loading
30 lbs divide (5 x 10) = 6 psi
30 lbs divide 50 in sq = 6 psi
Figure 2 Packaging a Heavy Product
Rev 0506 copy Sealed Air Corporation (US) 200611
Instapak Quickreg Packaging Parameters
Instapak Quickreg foam packaging is used to protect products of various size shape and weight To determine which Instapak Quickreg product is best suited for your product refer to the Instapak Quickreg Packaging Performance Chart on the following page
You will need to know two attributes of your product bull Product weight bull Area of the smallest side of the product in inches (LxW)
The smallest side of the product represents the highest loading (psi) When static loading of the smallest side falls within the optimal range the remaining sides will also be within Quickrsquostrade packaging performance capabilities
Contact our Packaging Expert to discuss correspond or to arrange a visit by one of our many packaging specialists bull 1-800-568-6636 (830 - 500 ET US and Canada only) bull e-mail - packagingexpertsealedaircom
Rugged Products bull If your product falls within the ldquoRugged Productsrdquo parameter and is classified ldquoNot Fragilerdquo then Instapak Quick reg or
Instapak Quickreg RT should provide adequate protection
Note The shipping and transportation environment is a very unpredictable chain of events Packaging is not an exact science thus we caution that the Instapak Quickreg Packaging Performance Chart be used as a guide and not a final stamp of approval or guarantee that Instapak Quickreg will or will not be successful in protecting the product to be packaged
copy Sealed Air Corporation (US) 2006 Rev 0506 12
Instapak Quickreg Foam Packaging Applications Guide
0
Lbs
of P
rodu
ct
10
20
30
40
50
Void Fill or Blocking and Bracing (Rugged Products)
Contact your Sealed Airreg
Packaging Expert for an Engineered
Solution
Instapak Quickreg
or Instapak Quickreg RT
Instapakreg Quick Tufftrade
Cushioning (Fragile Products)
Instapak Quickreg Packaging Parameters (cont)
0 20 40 60 80 100 120 140 160 180 200 Square Inches of the Smallest Side of Product
Figure 3 Instapak Quickreg Packaging Performance Chart
Rev 0506 copy Sealed Air Corporation (US) 200613
Information on Corrugated Shipping Boxes
A major component of any successful protective package is the shipping box Today most shipping boxes are made of corrushygated fiberboard In order to increase the likelihood that any package will protect its contents through shipping and handling it is necessary that you use a shipping box that will maintain the integrity and performance of the interior packaging from the point of shipment to the ultimate delivery
Corrugated fiberboard is primarily classified on the basis of two laboratory test procedures bull Burst Test bull Edge Crush Test (ECT)
Each of these laboratory tests evaluates a different property of the corrugated structure Burst measures how the board resists bursting pressures applied by an instrument in the lab The level of burst force in this equipment is expressed in pounds So common corrugated fiberboard constructions are rated at 175 200 250 pounds for example At best this number is an indirect indication of how much weight a box made from any specific grade will support or contain
The other value Edge Crush measures the ability of the corrugated structure to support a load applied parallel to the fluted direction Typical values for common corrugated grades are 28 pounds 32 pounds or some other value Unlike burst these values do relate to stacking strength of the boxes made from these materials
When selecting a box for a protective package one must consider the burst or edge crush values for the corrugated fiberboard the style of box to be used and the type of closure for the box By referring to the Box Makers certificate on the bottom of the box you can see what the burst or ECT is for that material Most boxes for products up to 60 or 70 pounds will be of 200 pound test or 32 ECT board
If a product to be packaged weighs more than 60 pounds or so then the designer might want to consider a higher grade of corrugated andor going to a double wall corrugated structure (two sets of flutes in the same fiberboard structure)
In any case a well made and properly designed shipping box closed with strong tape (or some other adequate closure method) is an important criteria in a package that will protect its contents throughout shipping and handling
Further information can be obtained from the Fiber Box Association
copy Sealed Air Corporation (US) 2006 Rev 0506 14
Instapak Quickreg Foam Packaging Applications Guide
Bag Volumetric Table
The following line drawings (pages 15-18) are intended to illustrate the approximate size of the cushion when Quicktrade bags are expanded Cushion sizes may vary depending on product size environshymental conditions and packaging technique
The left portion of the table shows the dimensions of a bag when it is expanded to form a 2 high flat cushion The right portion of the table shows the effect of placing a typical product (represented as a gray box) in the rising foam within a corrugated box This drawing shows how the dimensions are affected by the placement of a product and will help select the correct size corrugated box when using top and bottom cushions
Note Expanded cushion dimensions are smaller than the unexpanded bag dimensions
Note Due to their shape and size some products may require more than two Instapak Quickreg foam bags for adequate protection This is a common occurrence when using the foam-in-bag packaging process - see Packaging Examples pages 22-27 and 32-35
Quicktrade Bag Typical ProductSize
Dimensions
Shipping Box
12 12
4 16 16
2
8
6
840 Bag
(18 x 24)
40 Bag as a Shaped Cushion
40 Bag as a Flat Pad
Product
Shipping Box
Quicktrade Bagas a Flat Size 40
Dimensions of Quicktrade Bag
Dimensions of Expanded
Product Placed in ItExpanded Cushion
Quicktrade Cushion in Shipping Box with
Figure 4 Understanding the Bag Volumetric Table
Rev 0506 copy Sealed Air Corporation (US) 200615
Bag Volumetric Table - Instapak Quickreg and Instapak Quickreg RT
20 Bag as a Product Shaped Cushion
20 Bag (18 x 18)
Shipping Box
20 Bag as a Flat Pad 20 Bag as a
Shaped Cushion
6
10 10
4
6
6
8 8
4
44
6
Product10 Bag (15 x 18)
Shipping Box
10 Bag as a Flat Pad
10 9 2
14 14
2
Figure 5 Instapak Quickreg and Instapak Quickreg RT Bag Volumetric Table - Part 1
copy Sealed Air Corporation (US) 2006 Rev 0506 16
Instapak Quickreg Foam Packaging Applications Guide
Bag Volumetric Table - Instapak Quickreg and Instapak Quickreg RT (cont)
40 Bag (18 x 24)
40 Bag as a Flat Pad
Product
Shipping Box
40 Bag as a Shaped Cushion
12 12
4
8
6
8
17 11
421 15
2
13
4
7
60 Bag as a Flat Pad
60 Bag (18 x 24)
60 Bag as a Shaped Cushion
Product
Shipping Box
16 16
2
25 more foam than 40 bag)
Figure 6 Instapak Quickreg and Instapak Quickreg RT Bag Volumetric Table - Part 2
Rev 0506 copy Sealed Air Corporation (US) 200617
Bag Volumetric Table - Instapak Quickreg and Instapak Quickreg RT (cont)
17 14
4 21 18
2
5
1310
80 Bag as a Flat Pad
80 Bag as a Shaped Cushion
Shipping Box
80 Bag (22 x 27) Product
Figure 7 Instapak Quickreg and Instapak Quickreg RT Bag Volumetric Table - Part 3
copy Sealed Air Corporation (US) 2006 Rev 0506 18
Instapak Quickreg Foam Packaging Applications Guide
Bag Volumetric Table - Instapakreg Quick Tufftrade
25 Bag (18 x 18)
25 Bag as a Flat Pad
6
10 10
4
6
6
14 14
2
Product
Shipping Box
25 Bag as a Shaped Cushion
12 12
4 16 16
2
8
6
845 Bag
(18 x 24)
45 Bag as a Shaped Cushion
45 Bag as a Flat Pad
Product
Shipping Box
Figure 8 Instapakreg Quick Tufftrade Bag Volumetric Table
Rev 0506 copy Sealed Air Corporation (US) 200619
(intentionally blank)
copy Sealed Air Corporation (US) 2006 Rev 0506 20
Instapak Quickreg Foam Packaging Applications Guide
Packaging Examples Using Instapak Quickreg Foam Packaging
The PSI loading for the following applications were calculated using the smallest side of each product These calculations detershymined that Instapak Quickreg was an appropriate packaging material for these products
The products in this section were also subjected to the International Safe Transit Association (ISTA) Procedure 1A Test for Shock and Vibration Testing These products all passed this industry standard test
Note The packaging examples on pages 22-25 could both be packaged in either the full overlap end loading or regular slotted box styles depicted
Note In the following examples product positioners may be used to aid the packaging process A product positioner may be a piece of wood polystyrene polyethylene polyurethane or other suitable material Product positioners are not supplied with this product A positioner is used to lift center position or hold your product so that at least 2 of space for cushioning material around your product Certain applications may require larger product positioners
CAUTION Safety glasses with side shields should be worn while using Instapak Quickreg foam packaging
Rev 0506 copy Sealed Air Corporation (US) 200621
Packaging Examples Using Instapak Quickreg Foam Packaging Glass Framed Print
1 Determine the overall dimensions of your print (L x W x H) Choose a shipping box that is at least 4 larger in each dimension (L x W x H)
2 Erect the box and do not tape the flaps
3 Place the centering product positioner (polyethylene foam block or wood) in the middle of the bottom of the box
4 Lower your artwork into the box and place it into the product positioner
5 Place another product positioner on top of the artwork at the open end of the box
6 Start a 20 bag and place the expanding bag around one of the top corners of the artwork Close and hold the flaps to form the corner cushion
7 Start another 20 bag and place the bag around the other corner of the artwork Close and hold the flaps to form the second corner cushion
8 Remove the centering product positioner and tape these flaps closed
9 Rotate the box and open the flaps
Note Be careful when rotating the box that the artwork does not slip out of the untaped end of the box
10 Repeat steps 6 and 7
11 Remove the centering product positioner Start another 20 bag and place it down between the corrugated box and the front (glass) side of the artwork
12 Verify that the print is locked in place Close and seal the box
copy Sealed Air Corporation (US) 2006 Rev 0506 22
Instapak Quickreg Foam Packaging Applications Guide
Packaging Examples Using Instapak Quickreg Foam Packaging Glass Framed Print (cont)
62
2
STEP 12
STEP 4 STEP 5 STEP 6
STEP 8 STEP 11
Figure 9 Packaging a Glass Framed Print
Rev 0506 copy Sealed Air Corporation (US) 200623
Packaging Examples Using Instapak Quickreg Foam Packaging Framed Artwork (Painting) on Canvas
1 Wrap the painting in a large piece of corrugated and secure it around the frame
Note This is necessary so the cushions do not touch the canvas and cause the canvas to stretch
2 Determine the overall dimensions of your painting (L x W x H) Choose a shipping box that is at least 4 larger in each dimension (L x W x H)
3 Locate or make two 2 (or larger if required) blocks to be used as product positioners Then place them in one corner farthest from you
4 Start a 20 bag
5 Place the bag in the center of the bottom of the box
6 Place the painting into the center of the box on top of the rising bag of foam (be sure that the back of the painting is placed against the foam cushion Continue to hold the painting so that the bag rises to meet the frame and forms a 2 high cushion Hold the painting until the bag supports the frame This takes about 8 seconds
7 Be sure the painting is centered in the box
8 Activate a 20 bag and place it in the corner closest to you and opposite the two 2 foam blocks
9 Close and hold the two flaps closest to you over the expanding bag This will help the cushion form around the corner of the painting
10 After the bag stops expanding open the flaps and rotate the box so the two foam blocks are in front of you
11 Pull the blocks out and activate a 20 bag and place it in this corner Close and hold the two flaps over the expanding bag
12 Activate a 20 bag and place it in the next corner Close and hold the two flaps over the expanding bag
13 Activate a 20 bag and place it in the final corner Close and hold the two flaps over the expanding bag
14 Verify that the painting is locked in place Close and seal the box
copy Sealed Air Corporation (US) 2006 Rev 0506 24
Instapak Quickreg Foam Packaging Applications Guide
Packaging Examples Using Instapak Quickreg Foam Packaging Framed Artwork (Painting) on Canvas (cont)
Foam Blocks
STEP 14
STEP 3 STEP 5 STEP 6
STEP 8 STEP 9
Figure 10 Packaging Framed Artwork (Painting) on Canvas
Rev 0506 copy Sealed Air Corporation (US) 200625
Packaging Examples Using Instapak Quickreg Foam Packaging Clock
Note If you gently shake the clock and hear a rattling noise an additional step will need to be taken to ensure moving parts are secured before shipping
1 Place a piece of flexible foam between the chimes and hammers before packaging the clock This will stop any internal movement and will protect them from shock and vibration during shipping
2 If the clock has a front door andor a back panel place an elastic band around the clock to keep the doors and panels closed
3 Determine the overall dimensions of your clock (L x W x H) Choose a shipping box that is at least 4 larger in each dimension (L x W x H)
4 Activate a 60 bag
5 Place the bag in the center of the bottom of the box
6 Place the clock in the center of the box on top of the rising bag of foam Continue to hold the clock so that the bag rises to meet the clock and forms a 2 high cushion Hold the product until the bag supports the clock This takes about 8 seconds
7 Be sure the clock is centered in the box
8 Activate a 60 bag and place it over the bottom half of the clock Close and hold the flap at this end of the box as the foam rises This will help the cushion form around the clock Hold the other end of the clock at the same time to make sure the rising foam does not push the clock out of the center of the box
9 Activate another 60 bag and place it over the opposite half of the clock Close and hold the two major flaps as the foam rises This will help the cushion form around the clock
10 Verify that the clock is locked in place Close and seal the box
copy Sealed Air Corporation (US) 2006 Rev 0506 26
Instapak Quickreg Foam Packaging Applications Guide
Packaging Examples Using Instapak Quickreg Foam Packaging Clock (cont)
STEP 5 STEP 6 STEP 8
STEP 9 STEP 10
Figure 11 Packaging a Clock
CROSS SECTION
Lower CushionCarton
Upper Cushions
Clock
Rev 0506 copy Sealed Air Corporation (US) 200627
Packaging Examples Using Instapak Quickreg Foam Packaging Porcelain Vase
1 Determine the overall dimensions of your vase (L x W x H) Choose a shipping box that is at least 4 larger in each dimension (L x W x H)
2 Activate a 40 bag
3 Place the bag in the center of the bottom of the box
4 Place the vase in the center of the box on top of the rising bag of foam Continue to hold the vase so that the bag rises up to form a 2 high protective cushion Hold the product until the bag supports the vase This takes about 8 seconds
5 Be sure the vase is centered in the box
6 Activate a 40 bag and place it on top of the vase
7 Close and hold the two major flaps as the foam rises This will help the cushion form around the vase
8 Verify that the vase is locked in place Close and seal the box
copy Sealed Air Corporation (US) 2006 Rev 0506 28
Instapak Quickreg Foam Packaging Applications Guide
Packaging Examples Using Instapak Quickreg Foam Packaging Porcelain Vase (cont)
STEP 3 STEP 4 STEP 6
STEP 7 STEP 8
Figure 12 Packaging a Vase
CROSS SECTION
Lower CushionCarton
Upper Cushion
Vase
Rev 0506 copy Sealed Air Corporation (US) 200629
Packaging Examples Using Instapak Quickreg Foam Packaging Crystal Pitcher
1 Determine the overall dimensions of your pitcher (L x W x H) Choose a shipping box that is at least 4 larger in each dimension (L x W x H)
2 Activate a 40 bag
3 Place the bag in the center of the bottom of the box
4 Place the pitcher in the center of the box on top of the rising bag of foam Continue to hold the pitcher so that the bag rises up to form a 2 high protective cushion Hold the product until the bag supports the pitcher This takes about 8 seconds
5 Be sure the pitcher is centered in the box
6 Activate a 40 bag and place it on top of the pitcher
7 Close and hold the two major flaps as the foam rises This will help the cushion form around the pitcher
8 Verify that the pitcher is locked in place Close and seal the box
copy Sealed Air Corporation (US) 2006 Rev 0506 30
Instapak Quickreg Foam Packaging Applications Guide
Packaging Examples Using Instapak Quickreg Foam Packaging Crystal Pitcher (cont)
STEP 3 STEP 4 STEP 6
STEP 7 STEP 8
Figure 13 Packaging a Crystal Pitcher
CROSS SECTION
Lower CushionCarton
Upper Cushion
Pitcher
Rev 0506 copy Sealed Air Corporation (US) 200631
Packaging Examples Using Instapak Quickreg Foam Packaging Computer Monitor
1 Determine the overall dimensions of your monitor (L x W x H) Choose a shipping box that is at least 4 larger in each dimension (L x W x H)
2 Erect the box upside down so the bottom of the box is facing up Do not tape the flaps
3 Place a 2 product positioner in the center of the bottom of the box
4 By using the bag volumetric table (pages 15-17) it is determined that it will take more than two (2) cushions to package the monitor
5 This product will take two (2) 80 bags on the bottom and four (4) 60 bags on top as corner cushions
6 Place the monitor on the product positioner with the screen side facing up
7 Activate a 80 bag
8 Hold the bag in the box so half the bag goes down the side of the monitor and half the bag covers the top side of the monitor facing you
9 Once the cushion can support itself close and hold the flaps on this side of the box to help it form around the monitor Hold the other end of the monitor at the same time to make sure the rising foam does not push the monitor out of the center of the box
10 Activate another 80 bag and place it in the box on the opposite side of the first bag Once the cushion can support itself close and hold the flaps on this side of the box This will help the cushion form around the monitor
11 Close and tape the four (4) flaps on this side of the box
(Continued on page 34)
copy Sealed Air Corporation (US) 2006 Rev 0506 32
Instapak Quickreg Foam Packaging Applications Guide
Packaging Examples Using Instapak Quickreg Foam Packaging Computer Monitor (cont)
STEP 6STEP 3 STEP 8
STEP 9 STEP 10 STEP 11
Product Positioner
Figure 14 Packaging a Computer Monitor - 1
Rev 0506 copy Sealed Air Corporation (US) 200633
Packaging Examples Using Instapak Quickreg Foam Packaging Computer Monitor (cont)
12 Carefully roll the box over so the other side of the box can be opened
Note The flaps on this side are not taped closed so be careful the monitor does not fall out while doing this
13 Open the flaps on this side and remove the product positioner
14 Activate a 60 bag and place it about half way down in one of the corners
15 Once the cushion can support itself close and hold the flaps on this side of the box to help it form around the monitor Hold the opposing corner of the monitor at the same time to make sure the rising foam does not push the monitor out of the center of the box
16 Activate another 60 bag and place it in the opposite corner of the first bag Close and hold the flaps on this side of the box to help it form around the monitor
17 Activate another 60 bag and place it in the third corner so the bag can form Again hold the monitor so it wonrsquot shift
18 Repeat step 17 for the fourth corner
19 Tape the flaps closed on this side and the box is ready to ship
copy Sealed Air Corporation (US) 2006 Rev 0506 34
Instapak Quickreg Foam Packaging Applications Guide
Packaging Examples Using Instapak Quickreg Foam Packaging Computer Monitor (cont)
STEP 15
STEP 14STEP 13
STEP 19
Figure 15 Packaging a Computer Monitor - 2
Rev 0506 copy Sealed Air Corporation (US) 200635
Notes
copy Sealed Air Corporation (US) 2006 Rev 0506 36
Instapak Quickreg Foam Packaging Applications Guide
Rev 0506 copy Sealed Air Corporation (US) 200637
38copy Sealed Air Corporation (US) 2006 Rev 0506
Protective Packaging 10 Old Sherman Turnpike Danbury CT 06810 203-791-3500 Fax 203-791-3618 wwwinstapakquickcom
Our Products Protect Your Productsreg
Corporate Office Sealed Air Corporation (US) Park 80 East Saddle Brook NJ 07663-5291 wwwsealedaircom reg Reg US Pat amp TM Off copy Sealed Air Corporation (US) 2006 All rights reserved Printed in the USA The 9 Dot Logo and Sealed Air are registered trademarks of Sealed Air Corporation (US)
Instapak Quickreg Applications Guide T-124 0506
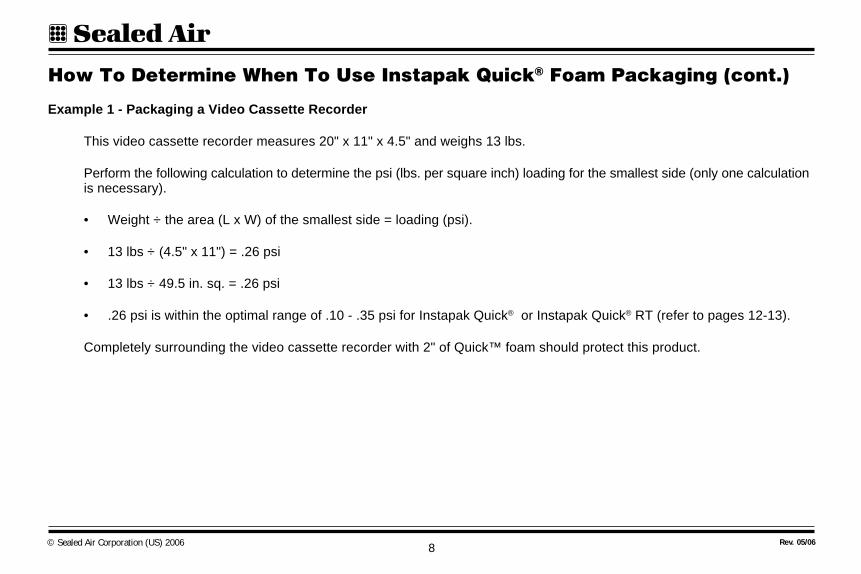
How To Determine When To Use Instapak Quickreg Foam Packaging (cont)
Example 1 - Packaging a Video Cassette Recorder
This video cassette recorder measures 20 x 11 x 45 and weighs 13 lbs
Perform the following calculation to determine the psi (lbs per square inch) loading for the smallest side (only one calculation is necessary)
bull Weight divide the area (L x W) of the smallest side = loading (psi)
bull 13 lbs divide (45 x 11) = 26 psi
bull 13 lbs divide 495 in sq = 26 psi
bull 26 psi is within the optimal range of 10 - 35 psi for Instapak Quickreg or Instapak Quickreg RT (refer to pages 12-13)
Completely surrounding the video cassette recorder with 2 of Quicktrade foam should protect this product
copy Sealed Air Corporation (US) 2006 Rev 0506 8
Instapak Quickreg Foam Packaging Applications Guide
How To Determine When To Use Instapak Quickreg Foam Packaging (cont)
Video Cassette Recorder (13 lbs)
20Length 11Width
45Height
Smallest Side (45 x 110 = 495 in sq)
Weight divide the area (L x W) of the smallest side = loading
13 lbs divide (45 x 11) = 26 psi
13 lbs divide 495 in sq = 26 psi
Figure 1 Packaging a Video Cassette Recorder
Rev 0506 copy Sealed Air Corporation (US) 20069
How To Determine When To Use Instapak Quickreg Packaging Foam (cont)
Example 2 - Packaging a Heavy Product with Instapakreg Quick Tufftrade
The heavy product measures 24 x 5 x 10 and weighs 30 lbs
Perform the following calculation to determine the psi (lbs per square inch) loading for the smallest side (only one calculation is necessary)
bull Weight divide the area (L x W) of the smallest side = loading (psi)
bull 30 lbs divide (5 x 10) = 6 psi
bull 30 lbs divide 50 in sq = 6 psi
bull 6 psi is within the optimal range of 35 - 80 psi for Instapakreg Quick Tufftrade (refer to pages 12-13)
Note If your product does not fall within Quicktrade packaging specifications contact our on-line packaging expert at 1-800-568-6636 or e-mail - packagingexpertsealedaircom
copy Sealed Air Corporation (US) 2006 Rev 0506 10
Instapak Quickreg Foam Packaging Applications Guide
How To Determine When To Use Instapak Quickreg Packaging Foam (cont)
Heavy Product (30 lbs)
24Length
5Width
10Height
Smallest Side (50 x 100 = 50 in sq)
Weight divide the area (L x W) of the smallest side = loading
30 lbs divide (5 x 10) = 6 psi
30 lbs divide 50 in sq = 6 psi
Figure 2 Packaging a Heavy Product
Rev 0506 copy Sealed Air Corporation (US) 200611
Instapak Quickreg Packaging Parameters
Instapak Quickreg foam packaging is used to protect products of various size shape and weight To determine which Instapak Quickreg product is best suited for your product refer to the Instapak Quickreg Packaging Performance Chart on the following page
You will need to know two attributes of your product bull Product weight bull Area of the smallest side of the product in inches (LxW)
The smallest side of the product represents the highest loading (psi) When static loading of the smallest side falls within the optimal range the remaining sides will also be within Quickrsquostrade packaging performance capabilities
Contact our Packaging Expert to discuss correspond or to arrange a visit by one of our many packaging specialists bull 1-800-568-6636 (830 - 500 ET US and Canada only) bull e-mail - packagingexpertsealedaircom
Rugged Products bull If your product falls within the ldquoRugged Productsrdquo parameter and is classified ldquoNot Fragilerdquo then Instapak Quick reg or
Instapak Quickreg RT should provide adequate protection
Note The shipping and transportation environment is a very unpredictable chain of events Packaging is not an exact science thus we caution that the Instapak Quickreg Packaging Performance Chart be used as a guide and not a final stamp of approval or guarantee that Instapak Quickreg will or will not be successful in protecting the product to be packaged
copy Sealed Air Corporation (US) 2006 Rev 0506 12
Instapak Quickreg Foam Packaging Applications Guide
0
Lbs
of P
rodu
ct
10
20
30
40
50
Void Fill or Blocking and Bracing (Rugged Products)
Contact your Sealed Airreg
Packaging Expert for an Engineered
Solution
Instapak Quickreg
or Instapak Quickreg RT
Instapakreg Quick Tufftrade
Cushioning (Fragile Products)
Instapak Quickreg Packaging Parameters (cont)
0 20 40 60 80 100 120 140 160 180 200 Square Inches of the Smallest Side of Product
Figure 3 Instapak Quickreg Packaging Performance Chart
Rev 0506 copy Sealed Air Corporation (US) 200613
Information on Corrugated Shipping Boxes
A major component of any successful protective package is the shipping box Today most shipping boxes are made of corrushygated fiberboard In order to increase the likelihood that any package will protect its contents through shipping and handling it is necessary that you use a shipping box that will maintain the integrity and performance of the interior packaging from the point of shipment to the ultimate delivery
Corrugated fiberboard is primarily classified on the basis of two laboratory test procedures bull Burst Test bull Edge Crush Test (ECT)
Each of these laboratory tests evaluates a different property of the corrugated structure Burst measures how the board resists bursting pressures applied by an instrument in the lab The level of burst force in this equipment is expressed in pounds So common corrugated fiberboard constructions are rated at 175 200 250 pounds for example At best this number is an indirect indication of how much weight a box made from any specific grade will support or contain
The other value Edge Crush measures the ability of the corrugated structure to support a load applied parallel to the fluted direction Typical values for common corrugated grades are 28 pounds 32 pounds or some other value Unlike burst these values do relate to stacking strength of the boxes made from these materials
When selecting a box for a protective package one must consider the burst or edge crush values for the corrugated fiberboard the style of box to be used and the type of closure for the box By referring to the Box Makers certificate on the bottom of the box you can see what the burst or ECT is for that material Most boxes for products up to 60 or 70 pounds will be of 200 pound test or 32 ECT board
If a product to be packaged weighs more than 60 pounds or so then the designer might want to consider a higher grade of corrugated andor going to a double wall corrugated structure (two sets of flutes in the same fiberboard structure)
In any case a well made and properly designed shipping box closed with strong tape (or some other adequate closure method) is an important criteria in a package that will protect its contents throughout shipping and handling
Further information can be obtained from the Fiber Box Association
copy Sealed Air Corporation (US) 2006 Rev 0506 14
Instapak Quickreg Foam Packaging Applications Guide
Bag Volumetric Table
The following line drawings (pages 15-18) are intended to illustrate the approximate size of the cushion when Quicktrade bags are expanded Cushion sizes may vary depending on product size environshymental conditions and packaging technique
The left portion of the table shows the dimensions of a bag when it is expanded to form a 2 high flat cushion The right portion of the table shows the effect of placing a typical product (represented as a gray box) in the rising foam within a corrugated box This drawing shows how the dimensions are affected by the placement of a product and will help select the correct size corrugated box when using top and bottom cushions
Note Expanded cushion dimensions are smaller than the unexpanded bag dimensions
Note Due to their shape and size some products may require more than two Instapak Quickreg foam bags for adequate protection This is a common occurrence when using the foam-in-bag packaging process - see Packaging Examples pages 22-27 and 32-35
Quicktrade Bag Typical ProductSize
Dimensions
Shipping Box
12 12
4 16 16
2
8
6
840 Bag
(18 x 24)
40 Bag as a Shaped Cushion
40 Bag as a Flat Pad
Product
Shipping Box
Quicktrade Bagas a Flat Size 40
Dimensions of Quicktrade Bag
Dimensions of Expanded
Product Placed in ItExpanded Cushion
Quicktrade Cushion in Shipping Box with
Figure 4 Understanding the Bag Volumetric Table
Rev 0506 copy Sealed Air Corporation (US) 200615
Bag Volumetric Table - Instapak Quickreg and Instapak Quickreg RT
20 Bag as a Product Shaped Cushion
20 Bag (18 x 18)
Shipping Box
20 Bag as a Flat Pad 20 Bag as a
Shaped Cushion
6
10 10
4
6
6
8 8
4
44
6
Product10 Bag (15 x 18)
Shipping Box
10 Bag as a Flat Pad
10 9 2
14 14
2
Figure 5 Instapak Quickreg and Instapak Quickreg RT Bag Volumetric Table - Part 1
copy Sealed Air Corporation (US) 2006 Rev 0506 16
Instapak Quickreg Foam Packaging Applications Guide
Bag Volumetric Table - Instapak Quickreg and Instapak Quickreg RT (cont)
40 Bag (18 x 24)
40 Bag as a Flat Pad
Product
Shipping Box
40 Bag as a Shaped Cushion
12 12
4
8
6
8
17 11
421 15
2
13
4
7
60 Bag as a Flat Pad
60 Bag (18 x 24)
60 Bag as a Shaped Cushion
Product
Shipping Box
16 16
2
25 more foam than 40 bag)
Figure 6 Instapak Quickreg and Instapak Quickreg RT Bag Volumetric Table - Part 2
Rev 0506 copy Sealed Air Corporation (US) 200617
Bag Volumetric Table - Instapak Quickreg and Instapak Quickreg RT (cont)
17 14
4 21 18
2
5
1310
80 Bag as a Flat Pad
80 Bag as a Shaped Cushion
Shipping Box
80 Bag (22 x 27) Product
Figure 7 Instapak Quickreg and Instapak Quickreg RT Bag Volumetric Table - Part 3
copy Sealed Air Corporation (US) 2006 Rev 0506 18
Instapak Quickreg Foam Packaging Applications Guide
Bag Volumetric Table - Instapakreg Quick Tufftrade
25 Bag (18 x 18)
25 Bag as a Flat Pad
6
10 10
4
6
6
14 14
2
Product
Shipping Box
25 Bag as a Shaped Cushion
12 12
4 16 16
2
8
6
845 Bag
(18 x 24)
45 Bag as a Shaped Cushion
45 Bag as a Flat Pad
Product
Shipping Box
Figure 8 Instapakreg Quick Tufftrade Bag Volumetric Table
Rev 0506 copy Sealed Air Corporation (US) 200619
(intentionally blank)
copy Sealed Air Corporation (US) 2006 Rev 0506 20
Instapak Quickreg Foam Packaging Applications Guide
Packaging Examples Using Instapak Quickreg Foam Packaging
The PSI loading for the following applications were calculated using the smallest side of each product These calculations detershymined that Instapak Quickreg was an appropriate packaging material for these products
The products in this section were also subjected to the International Safe Transit Association (ISTA) Procedure 1A Test for Shock and Vibration Testing These products all passed this industry standard test
Note The packaging examples on pages 22-25 could both be packaged in either the full overlap end loading or regular slotted box styles depicted
Note In the following examples product positioners may be used to aid the packaging process A product positioner may be a piece of wood polystyrene polyethylene polyurethane or other suitable material Product positioners are not supplied with this product A positioner is used to lift center position or hold your product so that at least 2 of space for cushioning material around your product Certain applications may require larger product positioners
CAUTION Safety glasses with side shields should be worn while using Instapak Quickreg foam packaging
Rev 0506 copy Sealed Air Corporation (US) 200621
Packaging Examples Using Instapak Quickreg Foam Packaging Glass Framed Print
1 Determine the overall dimensions of your print (L x W x H) Choose a shipping box that is at least 4 larger in each dimension (L x W x H)
2 Erect the box and do not tape the flaps
3 Place the centering product positioner (polyethylene foam block or wood) in the middle of the bottom of the box
4 Lower your artwork into the box and place it into the product positioner
5 Place another product positioner on top of the artwork at the open end of the box
6 Start a 20 bag and place the expanding bag around one of the top corners of the artwork Close and hold the flaps to form the corner cushion
7 Start another 20 bag and place the bag around the other corner of the artwork Close and hold the flaps to form the second corner cushion
8 Remove the centering product positioner and tape these flaps closed
9 Rotate the box and open the flaps
Note Be careful when rotating the box that the artwork does not slip out of the untaped end of the box
10 Repeat steps 6 and 7
11 Remove the centering product positioner Start another 20 bag and place it down between the corrugated box and the front (glass) side of the artwork
12 Verify that the print is locked in place Close and seal the box
copy Sealed Air Corporation (US) 2006 Rev 0506 22
Instapak Quickreg Foam Packaging Applications Guide
Packaging Examples Using Instapak Quickreg Foam Packaging Glass Framed Print (cont)
62
2
STEP 12
STEP 4 STEP 5 STEP 6
STEP 8 STEP 11
Figure 9 Packaging a Glass Framed Print
Rev 0506 copy Sealed Air Corporation (US) 200623
Packaging Examples Using Instapak Quickreg Foam Packaging Framed Artwork (Painting) on Canvas
1 Wrap the painting in a large piece of corrugated and secure it around the frame
Note This is necessary so the cushions do not touch the canvas and cause the canvas to stretch
2 Determine the overall dimensions of your painting (L x W x H) Choose a shipping box that is at least 4 larger in each dimension (L x W x H)
3 Locate or make two 2 (or larger if required) blocks to be used as product positioners Then place them in one corner farthest from you
4 Start a 20 bag
5 Place the bag in the center of the bottom of the box
6 Place the painting into the center of the box on top of the rising bag of foam (be sure that the back of the painting is placed against the foam cushion Continue to hold the painting so that the bag rises to meet the frame and forms a 2 high cushion Hold the painting until the bag supports the frame This takes about 8 seconds
7 Be sure the painting is centered in the box
8 Activate a 20 bag and place it in the corner closest to you and opposite the two 2 foam blocks
9 Close and hold the two flaps closest to you over the expanding bag This will help the cushion form around the corner of the painting
10 After the bag stops expanding open the flaps and rotate the box so the two foam blocks are in front of you
11 Pull the blocks out and activate a 20 bag and place it in this corner Close and hold the two flaps over the expanding bag
12 Activate a 20 bag and place it in the next corner Close and hold the two flaps over the expanding bag
13 Activate a 20 bag and place it in the final corner Close and hold the two flaps over the expanding bag
14 Verify that the painting is locked in place Close and seal the box
copy Sealed Air Corporation (US) 2006 Rev 0506 24
Instapak Quickreg Foam Packaging Applications Guide
Packaging Examples Using Instapak Quickreg Foam Packaging Framed Artwork (Painting) on Canvas (cont)
Foam Blocks
STEP 14
STEP 3 STEP 5 STEP 6
STEP 8 STEP 9
Figure 10 Packaging Framed Artwork (Painting) on Canvas
Rev 0506 copy Sealed Air Corporation (US) 200625
Packaging Examples Using Instapak Quickreg Foam Packaging Clock
Note If you gently shake the clock and hear a rattling noise an additional step will need to be taken to ensure moving parts are secured before shipping
1 Place a piece of flexible foam between the chimes and hammers before packaging the clock This will stop any internal movement and will protect them from shock and vibration during shipping
2 If the clock has a front door andor a back panel place an elastic band around the clock to keep the doors and panels closed
3 Determine the overall dimensions of your clock (L x W x H) Choose a shipping box that is at least 4 larger in each dimension (L x W x H)
4 Activate a 60 bag
5 Place the bag in the center of the bottom of the box
6 Place the clock in the center of the box on top of the rising bag of foam Continue to hold the clock so that the bag rises to meet the clock and forms a 2 high cushion Hold the product until the bag supports the clock This takes about 8 seconds
7 Be sure the clock is centered in the box
8 Activate a 60 bag and place it over the bottom half of the clock Close and hold the flap at this end of the box as the foam rises This will help the cushion form around the clock Hold the other end of the clock at the same time to make sure the rising foam does not push the clock out of the center of the box
9 Activate another 60 bag and place it over the opposite half of the clock Close and hold the two major flaps as the foam rises This will help the cushion form around the clock
10 Verify that the clock is locked in place Close and seal the box
copy Sealed Air Corporation (US) 2006 Rev 0506 26
Instapak Quickreg Foam Packaging Applications Guide
Packaging Examples Using Instapak Quickreg Foam Packaging Clock (cont)
STEP 5 STEP 6 STEP 8
STEP 9 STEP 10
Figure 11 Packaging a Clock
CROSS SECTION
Lower CushionCarton
Upper Cushions
Clock
Rev 0506 copy Sealed Air Corporation (US) 200627
Packaging Examples Using Instapak Quickreg Foam Packaging Porcelain Vase
1 Determine the overall dimensions of your vase (L x W x H) Choose a shipping box that is at least 4 larger in each dimension (L x W x H)
2 Activate a 40 bag
3 Place the bag in the center of the bottom of the box
4 Place the vase in the center of the box on top of the rising bag of foam Continue to hold the vase so that the bag rises up to form a 2 high protective cushion Hold the product until the bag supports the vase This takes about 8 seconds
5 Be sure the vase is centered in the box
6 Activate a 40 bag and place it on top of the vase
7 Close and hold the two major flaps as the foam rises This will help the cushion form around the vase
8 Verify that the vase is locked in place Close and seal the box
copy Sealed Air Corporation (US) 2006 Rev 0506 28
Instapak Quickreg Foam Packaging Applications Guide
Packaging Examples Using Instapak Quickreg Foam Packaging Porcelain Vase (cont)
STEP 3 STEP 4 STEP 6
STEP 7 STEP 8
Figure 12 Packaging a Vase
CROSS SECTION
Lower CushionCarton
Upper Cushion
Vase
Rev 0506 copy Sealed Air Corporation (US) 200629
Packaging Examples Using Instapak Quickreg Foam Packaging Crystal Pitcher
1 Determine the overall dimensions of your pitcher (L x W x H) Choose a shipping box that is at least 4 larger in each dimension (L x W x H)
2 Activate a 40 bag
3 Place the bag in the center of the bottom of the box
4 Place the pitcher in the center of the box on top of the rising bag of foam Continue to hold the pitcher so that the bag rises up to form a 2 high protective cushion Hold the product until the bag supports the pitcher This takes about 8 seconds
5 Be sure the pitcher is centered in the box
6 Activate a 40 bag and place it on top of the pitcher
7 Close and hold the two major flaps as the foam rises This will help the cushion form around the pitcher
8 Verify that the pitcher is locked in place Close and seal the box
copy Sealed Air Corporation (US) 2006 Rev 0506 30
Instapak Quickreg Foam Packaging Applications Guide
Packaging Examples Using Instapak Quickreg Foam Packaging Crystal Pitcher (cont)
STEP 3 STEP 4 STEP 6
STEP 7 STEP 8
Figure 13 Packaging a Crystal Pitcher
CROSS SECTION
Lower CushionCarton
Upper Cushion
Pitcher
Rev 0506 copy Sealed Air Corporation (US) 200631
Packaging Examples Using Instapak Quickreg Foam Packaging Computer Monitor
1 Determine the overall dimensions of your monitor (L x W x H) Choose a shipping box that is at least 4 larger in each dimension (L x W x H)
2 Erect the box upside down so the bottom of the box is facing up Do not tape the flaps
3 Place a 2 product positioner in the center of the bottom of the box
4 By using the bag volumetric table (pages 15-17) it is determined that it will take more than two (2) cushions to package the monitor
5 This product will take two (2) 80 bags on the bottom and four (4) 60 bags on top as corner cushions
6 Place the monitor on the product positioner with the screen side facing up
7 Activate a 80 bag
8 Hold the bag in the box so half the bag goes down the side of the monitor and half the bag covers the top side of the monitor facing you
9 Once the cushion can support itself close and hold the flaps on this side of the box to help it form around the monitor Hold the other end of the monitor at the same time to make sure the rising foam does not push the monitor out of the center of the box
10 Activate another 80 bag and place it in the box on the opposite side of the first bag Once the cushion can support itself close and hold the flaps on this side of the box This will help the cushion form around the monitor
11 Close and tape the four (4) flaps on this side of the box
(Continued on page 34)
copy Sealed Air Corporation (US) 2006 Rev 0506 32
Instapak Quickreg Foam Packaging Applications Guide
Packaging Examples Using Instapak Quickreg Foam Packaging Computer Monitor (cont)
STEP 6STEP 3 STEP 8
STEP 9 STEP 10 STEP 11
Product Positioner
Figure 14 Packaging a Computer Monitor - 1
Rev 0506 copy Sealed Air Corporation (US) 200633
Packaging Examples Using Instapak Quickreg Foam Packaging Computer Monitor (cont)
12 Carefully roll the box over so the other side of the box can be opened
Note The flaps on this side are not taped closed so be careful the monitor does not fall out while doing this
13 Open the flaps on this side and remove the product positioner
14 Activate a 60 bag and place it about half way down in one of the corners
15 Once the cushion can support itself close and hold the flaps on this side of the box to help it form around the monitor Hold the opposing corner of the monitor at the same time to make sure the rising foam does not push the monitor out of the center of the box
16 Activate another 60 bag and place it in the opposite corner of the first bag Close and hold the flaps on this side of the box to help it form around the monitor
17 Activate another 60 bag and place it in the third corner so the bag can form Again hold the monitor so it wonrsquot shift
18 Repeat step 17 for the fourth corner
19 Tape the flaps closed on this side and the box is ready to ship
copy Sealed Air Corporation (US) 2006 Rev 0506 34
Instapak Quickreg Foam Packaging Applications Guide
Packaging Examples Using Instapak Quickreg Foam Packaging Computer Monitor (cont)
STEP 15
STEP 14STEP 13
STEP 19
Figure 15 Packaging a Computer Monitor - 2
Rev 0506 copy Sealed Air Corporation (US) 200635
Notes
copy Sealed Air Corporation (US) 2006 Rev 0506 36
Instapak Quickreg Foam Packaging Applications Guide
Rev 0506 copy Sealed Air Corporation (US) 200637
38copy Sealed Air Corporation (US) 2006 Rev 0506
Protective Packaging 10 Old Sherman Turnpike Danbury CT 06810 203-791-3500 Fax 203-791-3618 wwwinstapakquickcom
Our Products Protect Your Productsreg
Corporate Office Sealed Air Corporation (US) Park 80 East Saddle Brook NJ 07663-5291 wwwsealedaircom reg Reg US Pat amp TM Off copy Sealed Air Corporation (US) 2006 All rights reserved Printed in the USA The 9 Dot Logo and Sealed Air are registered trademarks of Sealed Air Corporation (US)
Instapak Quickreg Applications Guide T-124 0506

Instapak Quickreg Foam Packaging Applications Guide
How To Determine When To Use Instapak Quickreg Foam Packaging (cont)
Video Cassette Recorder (13 lbs)
20Length 11Width
45Height
Smallest Side (45 x 110 = 495 in sq)
Weight divide the area (L x W) of the smallest side = loading
13 lbs divide (45 x 11) = 26 psi
13 lbs divide 495 in sq = 26 psi
Figure 1 Packaging a Video Cassette Recorder
Rev 0506 copy Sealed Air Corporation (US) 20069
How To Determine When To Use Instapak Quickreg Packaging Foam (cont)
Example 2 - Packaging a Heavy Product with Instapakreg Quick Tufftrade
The heavy product measures 24 x 5 x 10 and weighs 30 lbs
Perform the following calculation to determine the psi (lbs per square inch) loading for the smallest side (only one calculation is necessary)
bull Weight divide the area (L x W) of the smallest side = loading (psi)
bull 30 lbs divide (5 x 10) = 6 psi
bull 30 lbs divide 50 in sq = 6 psi
bull 6 psi is within the optimal range of 35 - 80 psi for Instapakreg Quick Tufftrade (refer to pages 12-13)
Note If your product does not fall within Quicktrade packaging specifications contact our on-line packaging expert at 1-800-568-6636 or e-mail - packagingexpertsealedaircom
copy Sealed Air Corporation (US) 2006 Rev 0506 10
Instapak Quickreg Foam Packaging Applications Guide
How To Determine When To Use Instapak Quickreg Packaging Foam (cont)
Heavy Product (30 lbs)
24Length
5Width
10Height
Smallest Side (50 x 100 = 50 in sq)
Weight divide the area (L x W) of the smallest side = loading
30 lbs divide (5 x 10) = 6 psi
30 lbs divide 50 in sq = 6 psi
Figure 2 Packaging a Heavy Product
Rev 0506 copy Sealed Air Corporation (US) 200611
Instapak Quickreg Packaging Parameters
Instapak Quickreg foam packaging is used to protect products of various size shape and weight To determine which Instapak Quickreg product is best suited for your product refer to the Instapak Quickreg Packaging Performance Chart on the following page
You will need to know two attributes of your product bull Product weight bull Area of the smallest side of the product in inches (LxW)
The smallest side of the product represents the highest loading (psi) When static loading of the smallest side falls within the optimal range the remaining sides will also be within Quickrsquostrade packaging performance capabilities
Contact our Packaging Expert to discuss correspond or to arrange a visit by one of our many packaging specialists bull 1-800-568-6636 (830 - 500 ET US and Canada only) bull e-mail - packagingexpertsealedaircom
Rugged Products bull If your product falls within the ldquoRugged Productsrdquo parameter and is classified ldquoNot Fragilerdquo then Instapak Quick reg or
Instapak Quickreg RT should provide adequate protection
Note The shipping and transportation environment is a very unpredictable chain of events Packaging is not an exact science thus we caution that the Instapak Quickreg Packaging Performance Chart be used as a guide and not a final stamp of approval or guarantee that Instapak Quickreg will or will not be successful in protecting the product to be packaged
copy Sealed Air Corporation (US) 2006 Rev 0506 12
Instapak Quickreg Foam Packaging Applications Guide
0
Lbs
of P
rodu
ct
10
20
30
40
50
Void Fill or Blocking and Bracing (Rugged Products)
Contact your Sealed Airreg
Packaging Expert for an Engineered
Solution
Instapak Quickreg
or Instapak Quickreg RT
Instapakreg Quick Tufftrade
Cushioning (Fragile Products)
Instapak Quickreg Packaging Parameters (cont)
0 20 40 60 80 100 120 140 160 180 200 Square Inches of the Smallest Side of Product
Figure 3 Instapak Quickreg Packaging Performance Chart
Rev 0506 copy Sealed Air Corporation (US) 200613
Information on Corrugated Shipping Boxes
A major component of any successful protective package is the shipping box Today most shipping boxes are made of corrushygated fiberboard In order to increase the likelihood that any package will protect its contents through shipping and handling it is necessary that you use a shipping box that will maintain the integrity and performance of the interior packaging from the point of shipment to the ultimate delivery
Corrugated fiberboard is primarily classified on the basis of two laboratory test procedures bull Burst Test bull Edge Crush Test (ECT)
Each of these laboratory tests evaluates a different property of the corrugated structure Burst measures how the board resists bursting pressures applied by an instrument in the lab The level of burst force in this equipment is expressed in pounds So common corrugated fiberboard constructions are rated at 175 200 250 pounds for example At best this number is an indirect indication of how much weight a box made from any specific grade will support or contain
The other value Edge Crush measures the ability of the corrugated structure to support a load applied parallel to the fluted direction Typical values for common corrugated grades are 28 pounds 32 pounds or some other value Unlike burst these values do relate to stacking strength of the boxes made from these materials
When selecting a box for a protective package one must consider the burst or edge crush values for the corrugated fiberboard the style of box to be used and the type of closure for the box By referring to the Box Makers certificate on the bottom of the box you can see what the burst or ECT is for that material Most boxes for products up to 60 or 70 pounds will be of 200 pound test or 32 ECT board
If a product to be packaged weighs more than 60 pounds or so then the designer might want to consider a higher grade of corrugated andor going to a double wall corrugated structure (two sets of flutes in the same fiberboard structure)
In any case a well made and properly designed shipping box closed with strong tape (or some other adequate closure method) is an important criteria in a package that will protect its contents throughout shipping and handling
Further information can be obtained from the Fiber Box Association
copy Sealed Air Corporation (US) 2006 Rev 0506 14
Instapak Quickreg Foam Packaging Applications Guide
Bag Volumetric Table
The following line drawings (pages 15-18) are intended to illustrate the approximate size of the cushion when Quicktrade bags are expanded Cushion sizes may vary depending on product size environshymental conditions and packaging technique
The left portion of the table shows the dimensions of a bag when it is expanded to form a 2 high flat cushion The right portion of the table shows the effect of placing a typical product (represented as a gray box) in the rising foam within a corrugated box This drawing shows how the dimensions are affected by the placement of a product and will help select the correct size corrugated box when using top and bottom cushions
Note Expanded cushion dimensions are smaller than the unexpanded bag dimensions
Note Due to their shape and size some products may require more than two Instapak Quickreg foam bags for adequate protection This is a common occurrence when using the foam-in-bag packaging process - see Packaging Examples pages 22-27 and 32-35
Quicktrade Bag Typical ProductSize
Dimensions
Shipping Box
12 12
4 16 16
2
8
6
840 Bag
(18 x 24)
40 Bag as a Shaped Cushion
40 Bag as a Flat Pad
Product
Shipping Box
Quicktrade Bagas a Flat Size 40
Dimensions of Quicktrade Bag
Dimensions of Expanded
Product Placed in ItExpanded Cushion
Quicktrade Cushion in Shipping Box with
Figure 4 Understanding the Bag Volumetric Table
Rev 0506 copy Sealed Air Corporation (US) 200615
Bag Volumetric Table - Instapak Quickreg and Instapak Quickreg RT
20 Bag as a Product Shaped Cushion
20 Bag (18 x 18)
Shipping Box
20 Bag as a Flat Pad 20 Bag as a
Shaped Cushion
6
10 10
4
6
6
8 8
4
44
6
Product10 Bag (15 x 18)
Shipping Box
10 Bag as a Flat Pad
10 9 2
14 14
2
Figure 5 Instapak Quickreg and Instapak Quickreg RT Bag Volumetric Table - Part 1
copy Sealed Air Corporation (US) 2006 Rev 0506 16
Instapak Quickreg Foam Packaging Applications Guide
Bag Volumetric Table - Instapak Quickreg and Instapak Quickreg RT (cont)
40 Bag (18 x 24)
40 Bag as a Flat Pad
Product
Shipping Box
40 Bag as a Shaped Cushion
12 12
4
8
6
8
17 11
421 15
2
13
4
7
60 Bag as a Flat Pad
60 Bag (18 x 24)
60 Bag as a Shaped Cushion
Product
Shipping Box
16 16
2
25 more foam than 40 bag)
Figure 6 Instapak Quickreg and Instapak Quickreg RT Bag Volumetric Table - Part 2
Rev 0506 copy Sealed Air Corporation (US) 200617
Bag Volumetric Table - Instapak Quickreg and Instapak Quickreg RT (cont)
17 14
4 21 18
2
5
1310
80 Bag as a Flat Pad
80 Bag as a Shaped Cushion
Shipping Box
80 Bag (22 x 27) Product
Figure 7 Instapak Quickreg and Instapak Quickreg RT Bag Volumetric Table - Part 3
copy Sealed Air Corporation (US) 2006 Rev 0506 18
Instapak Quickreg Foam Packaging Applications Guide
Bag Volumetric Table - Instapakreg Quick Tufftrade
25 Bag (18 x 18)
25 Bag as a Flat Pad
6
10 10
4
6
6
14 14
2
Product
Shipping Box
25 Bag as a Shaped Cushion
12 12
4 16 16
2
8
6
845 Bag
(18 x 24)
45 Bag as a Shaped Cushion
45 Bag as a Flat Pad
Product
Shipping Box
Figure 8 Instapakreg Quick Tufftrade Bag Volumetric Table
Rev 0506 copy Sealed Air Corporation (US) 200619
(intentionally blank)
copy Sealed Air Corporation (US) 2006 Rev 0506 20
Instapak Quickreg Foam Packaging Applications Guide
Packaging Examples Using Instapak Quickreg Foam Packaging
The PSI loading for the following applications were calculated using the smallest side of each product These calculations detershymined that Instapak Quickreg was an appropriate packaging material for these products
The products in this section were also subjected to the International Safe Transit Association (ISTA) Procedure 1A Test for Shock and Vibration Testing These products all passed this industry standard test
Note The packaging examples on pages 22-25 could both be packaged in either the full overlap end loading or regular slotted box styles depicted
Note In the following examples product positioners may be used to aid the packaging process A product positioner may be a piece of wood polystyrene polyethylene polyurethane or other suitable material Product positioners are not supplied with this product A positioner is used to lift center position or hold your product so that at least 2 of space for cushioning material around your product Certain applications may require larger product positioners
CAUTION Safety glasses with side shields should be worn while using Instapak Quickreg foam packaging
Rev 0506 copy Sealed Air Corporation (US) 200621
Packaging Examples Using Instapak Quickreg Foam Packaging Glass Framed Print
1 Determine the overall dimensions of your print (L x W x H) Choose a shipping box that is at least 4 larger in each dimension (L x W x H)
2 Erect the box and do not tape the flaps
3 Place the centering product positioner (polyethylene foam block or wood) in the middle of the bottom of the box
4 Lower your artwork into the box and place it into the product positioner
5 Place another product positioner on top of the artwork at the open end of the box
6 Start a 20 bag and place the expanding bag around one of the top corners of the artwork Close and hold the flaps to form the corner cushion
7 Start another 20 bag and place the bag around the other corner of the artwork Close and hold the flaps to form the second corner cushion
8 Remove the centering product positioner and tape these flaps closed
9 Rotate the box and open the flaps
Note Be careful when rotating the box that the artwork does not slip out of the untaped end of the box
10 Repeat steps 6 and 7
11 Remove the centering product positioner Start another 20 bag and place it down between the corrugated box and the front (glass) side of the artwork
12 Verify that the print is locked in place Close and seal the box
copy Sealed Air Corporation (US) 2006 Rev 0506 22
Instapak Quickreg Foam Packaging Applications Guide
Packaging Examples Using Instapak Quickreg Foam Packaging Glass Framed Print (cont)
62
2
STEP 12
STEP 4 STEP 5 STEP 6
STEP 8 STEP 11
Figure 9 Packaging a Glass Framed Print
Rev 0506 copy Sealed Air Corporation (US) 200623
Packaging Examples Using Instapak Quickreg Foam Packaging Framed Artwork (Painting) on Canvas
1 Wrap the painting in a large piece of corrugated and secure it around the frame
Note This is necessary so the cushions do not touch the canvas and cause the canvas to stretch
2 Determine the overall dimensions of your painting (L x W x H) Choose a shipping box that is at least 4 larger in each dimension (L x W x H)
3 Locate or make two 2 (or larger if required) blocks to be used as product positioners Then place them in one corner farthest from you
4 Start a 20 bag
5 Place the bag in the center of the bottom of the box
6 Place the painting into the center of the box on top of the rising bag of foam (be sure that the back of the painting is placed against the foam cushion Continue to hold the painting so that the bag rises to meet the frame and forms a 2 high cushion Hold the painting until the bag supports the frame This takes about 8 seconds
7 Be sure the painting is centered in the box
8 Activate a 20 bag and place it in the corner closest to you and opposite the two 2 foam blocks
9 Close and hold the two flaps closest to you over the expanding bag This will help the cushion form around the corner of the painting
10 After the bag stops expanding open the flaps and rotate the box so the two foam blocks are in front of you
11 Pull the blocks out and activate a 20 bag and place it in this corner Close and hold the two flaps over the expanding bag
12 Activate a 20 bag and place it in the next corner Close and hold the two flaps over the expanding bag
13 Activate a 20 bag and place it in the final corner Close and hold the two flaps over the expanding bag
14 Verify that the painting is locked in place Close and seal the box
copy Sealed Air Corporation (US) 2006 Rev 0506 24
Instapak Quickreg Foam Packaging Applications Guide
Packaging Examples Using Instapak Quickreg Foam Packaging Framed Artwork (Painting) on Canvas (cont)
Foam Blocks
STEP 14
STEP 3 STEP 5 STEP 6
STEP 8 STEP 9
Figure 10 Packaging Framed Artwork (Painting) on Canvas
Rev 0506 copy Sealed Air Corporation (US) 200625
Packaging Examples Using Instapak Quickreg Foam Packaging Clock
Note If you gently shake the clock and hear a rattling noise an additional step will need to be taken to ensure moving parts are secured before shipping
1 Place a piece of flexible foam between the chimes and hammers before packaging the clock This will stop any internal movement and will protect them from shock and vibration during shipping
2 If the clock has a front door andor a back panel place an elastic band around the clock to keep the doors and panels closed
3 Determine the overall dimensions of your clock (L x W x H) Choose a shipping box that is at least 4 larger in each dimension (L x W x H)
4 Activate a 60 bag
5 Place the bag in the center of the bottom of the box
6 Place the clock in the center of the box on top of the rising bag of foam Continue to hold the clock so that the bag rises to meet the clock and forms a 2 high cushion Hold the product until the bag supports the clock This takes about 8 seconds
7 Be sure the clock is centered in the box
8 Activate a 60 bag and place it over the bottom half of the clock Close and hold the flap at this end of the box as the foam rises This will help the cushion form around the clock Hold the other end of the clock at the same time to make sure the rising foam does not push the clock out of the center of the box
9 Activate another 60 bag and place it over the opposite half of the clock Close and hold the two major flaps as the foam rises This will help the cushion form around the clock
10 Verify that the clock is locked in place Close and seal the box
copy Sealed Air Corporation (US) 2006 Rev 0506 26
Instapak Quickreg Foam Packaging Applications Guide
Packaging Examples Using Instapak Quickreg Foam Packaging Clock (cont)
STEP 5 STEP 6 STEP 8
STEP 9 STEP 10
Figure 11 Packaging a Clock
CROSS SECTION
Lower CushionCarton
Upper Cushions
Clock
Rev 0506 copy Sealed Air Corporation (US) 200627
Packaging Examples Using Instapak Quickreg Foam Packaging Porcelain Vase
1 Determine the overall dimensions of your vase (L x W x H) Choose a shipping box that is at least 4 larger in each dimension (L x W x H)
2 Activate a 40 bag
3 Place the bag in the center of the bottom of the box
4 Place the vase in the center of the box on top of the rising bag of foam Continue to hold the vase so that the bag rises up to form a 2 high protective cushion Hold the product until the bag supports the vase This takes about 8 seconds
5 Be sure the vase is centered in the box
6 Activate a 40 bag and place it on top of the vase
7 Close and hold the two major flaps as the foam rises This will help the cushion form around the vase
8 Verify that the vase is locked in place Close and seal the box
copy Sealed Air Corporation (US) 2006 Rev 0506 28
Instapak Quickreg Foam Packaging Applications Guide
Packaging Examples Using Instapak Quickreg Foam Packaging Porcelain Vase (cont)
STEP 3 STEP 4 STEP 6
STEP 7 STEP 8
Figure 12 Packaging a Vase
CROSS SECTION
Lower CushionCarton
Upper Cushion
Vase
Rev 0506 copy Sealed Air Corporation (US) 200629
Packaging Examples Using Instapak Quickreg Foam Packaging Crystal Pitcher
1 Determine the overall dimensions of your pitcher (L x W x H) Choose a shipping box that is at least 4 larger in each dimension (L x W x H)
2 Activate a 40 bag
3 Place the bag in the center of the bottom of the box
4 Place the pitcher in the center of the box on top of the rising bag of foam Continue to hold the pitcher so that the bag rises up to form a 2 high protective cushion Hold the product until the bag supports the pitcher This takes about 8 seconds
5 Be sure the pitcher is centered in the box
6 Activate a 40 bag and place it on top of the pitcher
7 Close and hold the two major flaps as the foam rises This will help the cushion form around the pitcher
8 Verify that the pitcher is locked in place Close and seal the box
copy Sealed Air Corporation (US) 2006 Rev 0506 30
Instapak Quickreg Foam Packaging Applications Guide
Packaging Examples Using Instapak Quickreg Foam Packaging Crystal Pitcher (cont)
STEP 3 STEP 4 STEP 6
STEP 7 STEP 8
Figure 13 Packaging a Crystal Pitcher
CROSS SECTION
Lower CushionCarton
Upper Cushion
Pitcher
Rev 0506 copy Sealed Air Corporation (US) 200631
Packaging Examples Using Instapak Quickreg Foam Packaging Computer Monitor
1 Determine the overall dimensions of your monitor (L x W x H) Choose a shipping box that is at least 4 larger in each dimension (L x W x H)
2 Erect the box upside down so the bottom of the box is facing up Do not tape the flaps
3 Place a 2 product positioner in the center of the bottom of the box
4 By using the bag volumetric table (pages 15-17) it is determined that it will take more than two (2) cushions to package the monitor
5 This product will take two (2) 80 bags on the bottom and four (4) 60 bags on top as corner cushions
6 Place the monitor on the product positioner with the screen side facing up
7 Activate a 80 bag
8 Hold the bag in the box so half the bag goes down the side of the monitor and half the bag covers the top side of the monitor facing you
9 Once the cushion can support itself close and hold the flaps on this side of the box to help it form around the monitor Hold the other end of the monitor at the same time to make sure the rising foam does not push the monitor out of the center of the box
10 Activate another 80 bag and place it in the box on the opposite side of the first bag Once the cushion can support itself close and hold the flaps on this side of the box This will help the cushion form around the monitor
11 Close and tape the four (4) flaps on this side of the box
(Continued on page 34)
copy Sealed Air Corporation (US) 2006 Rev 0506 32
Instapak Quickreg Foam Packaging Applications Guide
Packaging Examples Using Instapak Quickreg Foam Packaging Computer Monitor (cont)
STEP 6STEP 3 STEP 8
STEP 9 STEP 10 STEP 11
Product Positioner
Figure 14 Packaging a Computer Monitor - 1
Rev 0506 copy Sealed Air Corporation (US) 200633
Packaging Examples Using Instapak Quickreg Foam Packaging Computer Monitor (cont)
12 Carefully roll the box over so the other side of the box can be opened
Note The flaps on this side are not taped closed so be careful the monitor does not fall out while doing this
13 Open the flaps on this side and remove the product positioner
14 Activate a 60 bag and place it about half way down in one of the corners
15 Once the cushion can support itself close and hold the flaps on this side of the box to help it form around the monitor Hold the opposing corner of the monitor at the same time to make sure the rising foam does not push the monitor out of the center of the box
16 Activate another 60 bag and place it in the opposite corner of the first bag Close and hold the flaps on this side of the box to help it form around the monitor
17 Activate another 60 bag and place it in the third corner so the bag can form Again hold the monitor so it wonrsquot shift
18 Repeat step 17 for the fourth corner
19 Tape the flaps closed on this side and the box is ready to ship
copy Sealed Air Corporation (US) 2006 Rev 0506 34
Instapak Quickreg Foam Packaging Applications Guide
Packaging Examples Using Instapak Quickreg Foam Packaging Computer Monitor (cont)
STEP 15
STEP 14STEP 13
STEP 19
Figure 15 Packaging a Computer Monitor - 2
Rev 0506 copy Sealed Air Corporation (US) 200635
Notes
copy Sealed Air Corporation (US) 2006 Rev 0506 36
Instapak Quickreg Foam Packaging Applications Guide
Rev 0506 copy Sealed Air Corporation (US) 200637
38copy Sealed Air Corporation (US) 2006 Rev 0506
Protective Packaging 10 Old Sherman Turnpike Danbury CT 06810 203-791-3500 Fax 203-791-3618 wwwinstapakquickcom
Our Products Protect Your Productsreg
Corporate Office Sealed Air Corporation (US) Park 80 East Saddle Brook NJ 07663-5291 wwwsealedaircom reg Reg US Pat amp TM Off copy Sealed Air Corporation (US) 2006 All rights reserved Printed in the USA The 9 Dot Logo and Sealed Air are registered trademarks of Sealed Air Corporation (US)
Instapak Quickreg Applications Guide T-124 0506

How To Determine When To Use Instapak Quickreg Packaging Foam (cont)
Example 2 - Packaging a Heavy Product with Instapakreg Quick Tufftrade
The heavy product measures 24 x 5 x 10 and weighs 30 lbs
Perform the following calculation to determine the psi (lbs per square inch) loading for the smallest side (only one calculation is necessary)
bull Weight divide the area (L x W) of the smallest side = loading (psi)
bull 30 lbs divide (5 x 10) = 6 psi
bull 30 lbs divide 50 in sq = 6 psi
bull 6 psi is within the optimal range of 35 - 80 psi for Instapakreg Quick Tufftrade (refer to pages 12-13)
Note If your product does not fall within Quicktrade packaging specifications contact our on-line packaging expert at 1-800-568-6636 or e-mail - packagingexpertsealedaircom
copy Sealed Air Corporation (US) 2006 Rev 0506 10
Instapak Quickreg Foam Packaging Applications Guide
How To Determine When To Use Instapak Quickreg Packaging Foam (cont)
Heavy Product (30 lbs)
24Length
5Width
10Height
Smallest Side (50 x 100 = 50 in sq)
Weight divide the area (L x W) of the smallest side = loading
30 lbs divide (5 x 10) = 6 psi
30 lbs divide 50 in sq = 6 psi
Figure 2 Packaging a Heavy Product
Rev 0506 copy Sealed Air Corporation (US) 200611
Instapak Quickreg Packaging Parameters
Instapak Quickreg foam packaging is used to protect products of various size shape and weight To determine which Instapak Quickreg product is best suited for your product refer to the Instapak Quickreg Packaging Performance Chart on the following page
You will need to know two attributes of your product bull Product weight bull Area of the smallest side of the product in inches (LxW)
The smallest side of the product represents the highest loading (psi) When static loading of the smallest side falls within the optimal range the remaining sides will also be within Quickrsquostrade packaging performance capabilities
Contact our Packaging Expert to discuss correspond or to arrange a visit by one of our many packaging specialists bull 1-800-568-6636 (830 - 500 ET US and Canada only) bull e-mail - packagingexpertsealedaircom
Rugged Products bull If your product falls within the ldquoRugged Productsrdquo parameter and is classified ldquoNot Fragilerdquo then Instapak Quick reg or
Instapak Quickreg RT should provide adequate protection
Note The shipping and transportation environment is a very unpredictable chain of events Packaging is not an exact science thus we caution that the Instapak Quickreg Packaging Performance Chart be used as a guide and not a final stamp of approval or guarantee that Instapak Quickreg will or will not be successful in protecting the product to be packaged
copy Sealed Air Corporation (US) 2006 Rev 0506 12
Instapak Quickreg Foam Packaging Applications Guide
0
Lbs
of P
rodu
ct
10
20
30
40
50
Void Fill or Blocking and Bracing (Rugged Products)
Contact your Sealed Airreg
Packaging Expert for an Engineered
Solution
Instapak Quickreg
or Instapak Quickreg RT
Instapakreg Quick Tufftrade
Cushioning (Fragile Products)
Instapak Quickreg Packaging Parameters (cont)
0 20 40 60 80 100 120 140 160 180 200 Square Inches of the Smallest Side of Product
Figure 3 Instapak Quickreg Packaging Performance Chart
Rev 0506 copy Sealed Air Corporation (US) 200613
Information on Corrugated Shipping Boxes
A major component of any successful protective package is the shipping box Today most shipping boxes are made of corrushygated fiberboard In order to increase the likelihood that any package will protect its contents through shipping and handling it is necessary that you use a shipping box that will maintain the integrity and performance of the interior packaging from the point of shipment to the ultimate delivery
Corrugated fiberboard is primarily classified on the basis of two laboratory test procedures bull Burst Test bull Edge Crush Test (ECT)
Each of these laboratory tests evaluates a different property of the corrugated structure Burst measures how the board resists bursting pressures applied by an instrument in the lab The level of burst force in this equipment is expressed in pounds So common corrugated fiberboard constructions are rated at 175 200 250 pounds for example At best this number is an indirect indication of how much weight a box made from any specific grade will support or contain
The other value Edge Crush measures the ability of the corrugated structure to support a load applied parallel to the fluted direction Typical values for common corrugated grades are 28 pounds 32 pounds or some other value Unlike burst these values do relate to stacking strength of the boxes made from these materials
When selecting a box for a protective package one must consider the burst or edge crush values for the corrugated fiberboard the style of box to be used and the type of closure for the box By referring to the Box Makers certificate on the bottom of the box you can see what the burst or ECT is for that material Most boxes for products up to 60 or 70 pounds will be of 200 pound test or 32 ECT board
If a product to be packaged weighs more than 60 pounds or so then the designer might want to consider a higher grade of corrugated andor going to a double wall corrugated structure (two sets of flutes in the same fiberboard structure)
In any case a well made and properly designed shipping box closed with strong tape (or some other adequate closure method) is an important criteria in a package that will protect its contents throughout shipping and handling
Further information can be obtained from the Fiber Box Association
copy Sealed Air Corporation (US) 2006 Rev 0506 14
Instapak Quickreg Foam Packaging Applications Guide
Bag Volumetric Table
The following line drawings (pages 15-18) are intended to illustrate the approximate size of the cushion when Quicktrade bags are expanded Cushion sizes may vary depending on product size environshymental conditions and packaging technique
The left portion of the table shows the dimensions of a bag when it is expanded to form a 2 high flat cushion The right portion of the table shows the effect of placing a typical product (represented as a gray box) in the rising foam within a corrugated box This drawing shows how the dimensions are affected by the placement of a product and will help select the correct size corrugated box when using top and bottom cushions
Note Expanded cushion dimensions are smaller than the unexpanded bag dimensions
Note Due to their shape and size some products may require more than two Instapak Quickreg foam bags for adequate protection This is a common occurrence when using the foam-in-bag packaging process - see Packaging Examples pages 22-27 and 32-35
Quicktrade Bag Typical ProductSize
Dimensions
Shipping Box
12 12
4 16 16
2
8
6
840 Bag
(18 x 24)
40 Bag as a Shaped Cushion
40 Bag as a Flat Pad
Product
Shipping Box
Quicktrade Bagas a Flat Size 40
Dimensions of Quicktrade Bag
Dimensions of Expanded
Product Placed in ItExpanded Cushion
Quicktrade Cushion in Shipping Box with
Figure 4 Understanding the Bag Volumetric Table
Rev 0506 copy Sealed Air Corporation (US) 200615
Bag Volumetric Table - Instapak Quickreg and Instapak Quickreg RT
20 Bag as a Product Shaped Cushion
20 Bag (18 x 18)
Shipping Box
20 Bag as a Flat Pad 20 Bag as a
Shaped Cushion
6
10 10
4
6
6
8 8
4
44
6
Product10 Bag (15 x 18)
Shipping Box
10 Bag as a Flat Pad
10 9 2
14 14
2
Figure 5 Instapak Quickreg and Instapak Quickreg RT Bag Volumetric Table - Part 1
copy Sealed Air Corporation (US) 2006 Rev 0506 16
Instapak Quickreg Foam Packaging Applications Guide
Bag Volumetric Table - Instapak Quickreg and Instapak Quickreg RT (cont)
40 Bag (18 x 24)
40 Bag as a Flat Pad
Product
Shipping Box
40 Bag as a Shaped Cushion
12 12
4
8
6
8
17 11
421 15
2
13
4
7
60 Bag as a Flat Pad
60 Bag (18 x 24)
60 Bag as a Shaped Cushion
Product
Shipping Box
16 16
2
25 more foam than 40 bag)
Figure 6 Instapak Quickreg and Instapak Quickreg RT Bag Volumetric Table - Part 2
Rev 0506 copy Sealed Air Corporation (US) 200617
Bag Volumetric Table - Instapak Quickreg and Instapak Quickreg RT (cont)
17 14
4 21 18
2
5
1310
80 Bag as a Flat Pad
80 Bag as a Shaped Cushion
Shipping Box
80 Bag (22 x 27) Product
Figure 7 Instapak Quickreg and Instapak Quickreg RT Bag Volumetric Table - Part 3
copy Sealed Air Corporation (US) 2006 Rev 0506 18
Instapak Quickreg Foam Packaging Applications Guide
Bag Volumetric Table - Instapakreg Quick Tufftrade
25 Bag (18 x 18)
25 Bag as a Flat Pad
6
10 10
4
6
6
14 14
2
Product
Shipping Box
25 Bag as a Shaped Cushion
12 12
4 16 16
2
8
6
845 Bag
(18 x 24)
45 Bag as a Shaped Cushion
45 Bag as a Flat Pad
Product
Shipping Box
Figure 8 Instapakreg Quick Tufftrade Bag Volumetric Table
Rev 0506 copy Sealed Air Corporation (US) 200619
(intentionally blank)
copy Sealed Air Corporation (US) 2006 Rev 0506 20
Instapak Quickreg Foam Packaging Applications Guide
Packaging Examples Using Instapak Quickreg Foam Packaging
The PSI loading for the following applications were calculated using the smallest side of each product These calculations detershymined that Instapak Quickreg was an appropriate packaging material for these products
The products in this section were also subjected to the International Safe Transit Association (ISTA) Procedure 1A Test for Shock and Vibration Testing These products all passed this industry standard test
Note The packaging examples on pages 22-25 could both be packaged in either the full overlap end loading or regular slotted box styles depicted
Note In the following examples product positioners may be used to aid the packaging process A product positioner may be a piece of wood polystyrene polyethylene polyurethane or other suitable material Product positioners are not supplied with this product A positioner is used to lift center position or hold your product so that at least 2 of space for cushioning material around your product Certain applications may require larger product positioners
CAUTION Safety glasses with side shields should be worn while using Instapak Quickreg foam packaging
Rev 0506 copy Sealed Air Corporation (US) 200621
Packaging Examples Using Instapak Quickreg Foam Packaging Glass Framed Print
1 Determine the overall dimensions of your print (L x W x H) Choose a shipping box that is at least 4 larger in each dimension (L x W x H)
2 Erect the box and do not tape the flaps
3 Place the centering product positioner (polyethylene foam block or wood) in the middle of the bottom of the box
4 Lower your artwork into the box and place it into the product positioner
5 Place another product positioner on top of the artwork at the open end of the box
6 Start a 20 bag and place the expanding bag around one of the top corners of the artwork Close and hold the flaps to form the corner cushion
7 Start another 20 bag and place the bag around the other corner of the artwork Close and hold the flaps to form the second corner cushion
8 Remove the centering product positioner and tape these flaps closed
9 Rotate the box and open the flaps
Note Be careful when rotating the box that the artwork does not slip out of the untaped end of the box
10 Repeat steps 6 and 7
11 Remove the centering product positioner Start another 20 bag and place it down between the corrugated box and the front (glass) side of the artwork
12 Verify that the print is locked in place Close and seal the box
copy Sealed Air Corporation (US) 2006 Rev 0506 22
Instapak Quickreg Foam Packaging Applications Guide
Packaging Examples Using Instapak Quickreg Foam Packaging Glass Framed Print (cont)
62
2
STEP 12
STEP 4 STEP 5 STEP 6
STEP 8 STEP 11
Figure 9 Packaging a Glass Framed Print
Rev 0506 copy Sealed Air Corporation (US) 200623
Packaging Examples Using Instapak Quickreg Foam Packaging Framed Artwork (Painting) on Canvas
1 Wrap the painting in a large piece of corrugated and secure it around the frame
Note This is necessary so the cushions do not touch the canvas and cause the canvas to stretch
2 Determine the overall dimensions of your painting (L x W x H) Choose a shipping box that is at least 4 larger in each dimension (L x W x H)
3 Locate or make two 2 (or larger if required) blocks to be used as product positioners Then place them in one corner farthest from you
4 Start a 20 bag
5 Place the bag in the center of the bottom of the box
6 Place the painting into the center of the box on top of the rising bag of foam (be sure that the back of the painting is placed against the foam cushion Continue to hold the painting so that the bag rises to meet the frame and forms a 2 high cushion Hold the painting until the bag supports the frame This takes about 8 seconds
7 Be sure the painting is centered in the box
8 Activate a 20 bag and place it in the corner closest to you and opposite the two 2 foam blocks
9 Close and hold the two flaps closest to you over the expanding bag This will help the cushion form around the corner of the painting
10 After the bag stops expanding open the flaps and rotate the box so the two foam blocks are in front of you
11 Pull the blocks out and activate a 20 bag and place it in this corner Close and hold the two flaps over the expanding bag
12 Activate a 20 bag and place it in the next corner Close and hold the two flaps over the expanding bag
13 Activate a 20 bag and place it in the final corner Close and hold the two flaps over the expanding bag
14 Verify that the painting is locked in place Close and seal the box
copy Sealed Air Corporation (US) 2006 Rev 0506 24
Instapak Quickreg Foam Packaging Applications Guide
Packaging Examples Using Instapak Quickreg Foam Packaging Framed Artwork (Painting) on Canvas (cont)
Foam Blocks
STEP 14
STEP 3 STEP 5 STEP 6
STEP 8 STEP 9
Figure 10 Packaging Framed Artwork (Painting) on Canvas
Rev 0506 copy Sealed Air Corporation (US) 200625
Packaging Examples Using Instapak Quickreg Foam Packaging Clock
Note If you gently shake the clock and hear a rattling noise an additional step will need to be taken to ensure moving parts are secured before shipping
1 Place a piece of flexible foam between the chimes and hammers before packaging the clock This will stop any internal movement and will protect them from shock and vibration during shipping
2 If the clock has a front door andor a back panel place an elastic band around the clock to keep the doors and panels closed
3 Determine the overall dimensions of your clock (L x W x H) Choose a shipping box that is at least 4 larger in each dimension (L x W x H)
4 Activate a 60 bag
5 Place the bag in the center of the bottom of the box
6 Place the clock in the center of the box on top of the rising bag of foam Continue to hold the clock so that the bag rises to meet the clock and forms a 2 high cushion Hold the product until the bag supports the clock This takes about 8 seconds
7 Be sure the clock is centered in the box
8 Activate a 60 bag and place it over the bottom half of the clock Close and hold the flap at this end of the box as the foam rises This will help the cushion form around the clock Hold the other end of the clock at the same time to make sure the rising foam does not push the clock out of the center of the box
9 Activate another 60 bag and place it over the opposite half of the clock Close and hold the two major flaps as the foam rises This will help the cushion form around the clock
10 Verify that the clock is locked in place Close and seal the box
copy Sealed Air Corporation (US) 2006 Rev 0506 26
Instapak Quickreg Foam Packaging Applications Guide
Packaging Examples Using Instapak Quickreg Foam Packaging Clock (cont)
STEP 5 STEP 6 STEP 8
STEP 9 STEP 10
Figure 11 Packaging a Clock
CROSS SECTION
Lower CushionCarton
Upper Cushions
Clock
Rev 0506 copy Sealed Air Corporation (US) 200627
Packaging Examples Using Instapak Quickreg Foam Packaging Porcelain Vase
1 Determine the overall dimensions of your vase (L x W x H) Choose a shipping box that is at least 4 larger in each dimension (L x W x H)
2 Activate a 40 bag
3 Place the bag in the center of the bottom of the box
4 Place the vase in the center of the box on top of the rising bag of foam Continue to hold the vase so that the bag rises up to form a 2 high protective cushion Hold the product until the bag supports the vase This takes about 8 seconds
5 Be sure the vase is centered in the box
6 Activate a 40 bag and place it on top of the vase
7 Close and hold the two major flaps as the foam rises This will help the cushion form around the vase
8 Verify that the vase is locked in place Close and seal the box
copy Sealed Air Corporation (US) 2006 Rev 0506 28
Instapak Quickreg Foam Packaging Applications Guide
Packaging Examples Using Instapak Quickreg Foam Packaging Porcelain Vase (cont)
STEP 3 STEP 4 STEP 6
STEP 7 STEP 8
Figure 12 Packaging a Vase
CROSS SECTION
Lower CushionCarton
Upper Cushion
Vase
Rev 0506 copy Sealed Air Corporation (US) 200629
Packaging Examples Using Instapak Quickreg Foam Packaging Crystal Pitcher
1 Determine the overall dimensions of your pitcher (L x W x H) Choose a shipping box that is at least 4 larger in each dimension (L x W x H)
2 Activate a 40 bag
3 Place the bag in the center of the bottom of the box
4 Place the pitcher in the center of the box on top of the rising bag of foam Continue to hold the pitcher so that the bag rises up to form a 2 high protective cushion Hold the product until the bag supports the pitcher This takes about 8 seconds
5 Be sure the pitcher is centered in the box
6 Activate a 40 bag and place it on top of the pitcher
7 Close and hold the two major flaps as the foam rises This will help the cushion form around the pitcher
8 Verify that the pitcher is locked in place Close and seal the box
copy Sealed Air Corporation (US) 2006 Rev 0506 30
Instapak Quickreg Foam Packaging Applications Guide
Packaging Examples Using Instapak Quickreg Foam Packaging Crystal Pitcher (cont)
STEP 3 STEP 4 STEP 6
STEP 7 STEP 8
Figure 13 Packaging a Crystal Pitcher
CROSS SECTION
Lower CushionCarton
Upper Cushion
Pitcher
Rev 0506 copy Sealed Air Corporation (US) 200631
Packaging Examples Using Instapak Quickreg Foam Packaging Computer Monitor
1 Determine the overall dimensions of your monitor (L x W x H) Choose a shipping box that is at least 4 larger in each dimension (L x W x H)
2 Erect the box upside down so the bottom of the box is facing up Do not tape the flaps
3 Place a 2 product positioner in the center of the bottom of the box
4 By using the bag volumetric table (pages 15-17) it is determined that it will take more than two (2) cushions to package the monitor
5 This product will take two (2) 80 bags on the bottom and four (4) 60 bags on top as corner cushions
6 Place the monitor on the product positioner with the screen side facing up
7 Activate a 80 bag
8 Hold the bag in the box so half the bag goes down the side of the monitor and half the bag covers the top side of the monitor facing you
9 Once the cushion can support itself close and hold the flaps on this side of the box to help it form around the monitor Hold the other end of the monitor at the same time to make sure the rising foam does not push the monitor out of the center of the box
10 Activate another 80 bag and place it in the box on the opposite side of the first bag Once the cushion can support itself close and hold the flaps on this side of the box This will help the cushion form around the monitor
11 Close and tape the four (4) flaps on this side of the box
(Continued on page 34)
copy Sealed Air Corporation (US) 2006 Rev 0506 32
Instapak Quickreg Foam Packaging Applications Guide
Packaging Examples Using Instapak Quickreg Foam Packaging Computer Monitor (cont)
STEP 6STEP 3 STEP 8
STEP 9 STEP 10 STEP 11
Product Positioner
Figure 14 Packaging a Computer Monitor - 1
Rev 0506 copy Sealed Air Corporation (US) 200633
Packaging Examples Using Instapak Quickreg Foam Packaging Computer Monitor (cont)
12 Carefully roll the box over so the other side of the box can be opened
Note The flaps on this side are not taped closed so be careful the monitor does not fall out while doing this
13 Open the flaps on this side and remove the product positioner
14 Activate a 60 bag and place it about half way down in one of the corners
15 Once the cushion can support itself close and hold the flaps on this side of the box to help it form around the monitor Hold the opposing corner of the monitor at the same time to make sure the rising foam does not push the monitor out of the center of the box
16 Activate another 60 bag and place it in the opposite corner of the first bag Close and hold the flaps on this side of the box to help it form around the monitor
17 Activate another 60 bag and place it in the third corner so the bag can form Again hold the monitor so it wonrsquot shift
18 Repeat step 17 for the fourth corner
19 Tape the flaps closed on this side and the box is ready to ship
copy Sealed Air Corporation (US) 2006 Rev 0506 34
Instapak Quickreg Foam Packaging Applications Guide
Packaging Examples Using Instapak Quickreg Foam Packaging Computer Monitor (cont)
STEP 15
STEP 14STEP 13
STEP 19
Figure 15 Packaging a Computer Monitor - 2
Rev 0506 copy Sealed Air Corporation (US) 200635
Notes
copy Sealed Air Corporation (US) 2006 Rev 0506 36
Instapak Quickreg Foam Packaging Applications Guide
Rev 0506 copy Sealed Air Corporation (US) 200637
38copy Sealed Air Corporation (US) 2006 Rev 0506
Protective Packaging 10 Old Sherman Turnpike Danbury CT 06810 203-791-3500 Fax 203-791-3618 wwwinstapakquickcom
Our Products Protect Your Productsreg
Corporate Office Sealed Air Corporation (US) Park 80 East Saddle Brook NJ 07663-5291 wwwsealedaircom reg Reg US Pat amp TM Off copy Sealed Air Corporation (US) 2006 All rights reserved Printed in the USA The 9 Dot Logo and Sealed Air are registered trademarks of Sealed Air Corporation (US)
Instapak Quickreg Applications Guide T-124 0506

Instapak Quickreg Foam Packaging Applications Guide
How To Determine When To Use Instapak Quickreg Packaging Foam (cont)
Heavy Product (30 lbs)
24Length
5Width
10Height
Smallest Side (50 x 100 = 50 in sq)
Weight divide the area (L x W) of the smallest side = loading
30 lbs divide (5 x 10) = 6 psi
30 lbs divide 50 in sq = 6 psi
Figure 2 Packaging a Heavy Product
Rev 0506 copy Sealed Air Corporation (US) 200611
Instapak Quickreg Packaging Parameters
Instapak Quickreg foam packaging is used to protect products of various size shape and weight To determine which Instapak Quickreg product is best suited for your product refer to the Instapak Quickreg Packaging Performance Chart on the following page
You will need to know two attributes of your product bull Product weight bull Area of the smallest side of the product in inches (LxW)
The smallest side of the product represents the highest loading (psi) When static loading of the smallest side falls within the optimal range the remaining sides will also be within Quickrsquostrade packaging performance capabilities
Contact our Packaging Expert to discuss correspond or to arrange a visit by one of our many packaging specialists bull 1-800-568-6636 (830 - 500 ET US and Canada only) bull e-mail - packagingexpertsealedaircom
Rugged Products bull If your product falls within the ldquoRugged Productsrdquo parameter and is classified ldquoNot Fragilerdquo then Instapak Quick reg or
Instapak Quickreg RT should provide adequate protection
Note The shipping and transportation environment is a very unpredictable chain of events Packaging is not an exact science thus we caution that the Instapak Quickreg Packaging Performance Chart be used as a guide and not a final stamp of approval or guarantee that Instapak Quickreg will or will not be successful in protecting the product to be packaged
copy Sealed Air Corporation (US) 2006 Rev 0506 12
Instapak Quickreg Foam Packaging Applications Guide
0
Lbs
of P
rodu
ct
10
20
30
40
50
Void Fill or Blocking and Bracing (Rugged Products)
Contact your Sealed Airreg
Packaging Expert for an Engineered
Solution
Instapak Quickreg
or Instapak Quickreg RT
Instapakreg Quick Tufftrade
Cushioning (Fragile Products)
Instapak Quickreg Packaging Parameters (cont)
0 20 40 60 80 100 120 140 160 180 200 Square Inches of the Smallest Side of Product
Figure 3 Instapak Quickreg Packaging Performance Chart
Rev 0506 copy Sealed Air Corporation (US) 200613
Information on Corrugated Shipping Boxes
A major component of any successful protective package is the shipping box Today most shipping boxes are made of corrushygated fiberboard In order to increase the likelihood that any package will protect its contents through shipping and handling it is necessary that you use a shipping box that will maintain the integrity and performance of the interior packaging from the point of shipment to the ultimate delivery
Corrugated fiberboard is primarily classified on the basis of two laboratory test procedures bull Burst Test bull Edge Crush Test (ECT)
Each of these laboratory tests evaluates a different property of the corrugated structure Burst measures how the board resists bursting pressures applied by an instrument in the lab The level of burst force in this equipment is expressed in pounds So common corrugated fiberboard constructions are rated at 175 200 250 pounds for example At best this number is an indirect indication of how much weight a box made from any specific grade will support or contain
The other value Edge Crush measures the ability of the corrugated structure to support a load applied parallel to the fluted direction Typical values for common corrugated grades are 28 pounds 32 pounds or some other value Unlike burst these values do relate to stacking strength of the boxes made from these materials
When selecting a box for a protective package one must consider the burst or edge crush values for the corrugated fiberboard the style of box to be used and the type of closure for the box By referring to the Box Makers certificate on the bottom of the box you can see what the burst or ECT is for that material Most boxes for products up to 60 or 70 pounds will be of 200 pound test or 32 ECT board
If a product to be packaged weighs more than 60 pounds or so then the designer might want to consider a higher grade of corrugated andor going to a double wall corrugated structure (two sets of flutes in the same fiberboard structure)
In any case a well made and properly designed shipping box closed with strong tape (or some other adequate closure method) is an important criteria in a package that will protect its contents throughout shipping and handling
Further information can be obtained from the Fiber Box Association
copy Sealed Air Corporation (US) 2006 Rev 0506 14
Instapak Quickreg Foam Packaging Applications Guide
Bag Volumetric Table
The following line drawings (pages 15-18) are intended to illustrate the approximate size of the cushion when Quicktrade bags are expanded Cushion sizes may vary depending on product size environshymental conditions and packaging technique
The left portion of the table shows the dimensions of a bag when it is expanded to form a 2 high flat cushion The right portion of the table shows the effect of placing a typical product (represented as a gray box) in the rising foam within a corrugated box This drawing shows how the dimensions are affected by the placement of a product and will help select the correct size corrugated box when using top and bottom cushions
Note Expanded cushion dimensions are smaller than the unexpanded bag dimensions
Note Due to their shape and size some products may require more than two Instapak Quickreg foam bags for adequate protection This is a common occurrence when using the foam-in-bag packaging process - see Packaging Examples pages 22-27 and 32-35
Quicktrade Bag Typical ProductSize
Dimensions
Shipping Box
12 12
4 16 16
2
8
6
840 Bag
(18 x 24)
40 Bag as a Shaped Cushion
40 Bag as a Flat Pad
Product
Shipping Box
Quicktrade Bagas a Flat Size 40
Dimensions of Quicktrade Bag
Dimensions of Expanded
Product Placed in ItExpanded Cushion
Quicktrade Cushion in Shipping Box with
Figure 4 Understanding the Bag Volumetric Table
Rev 0506 copy Sealed Air Corporation (US) 200615
Bag Volumetric Table - Instapak Quickreg and Instapak Quickreg RT
20 Bag as a Product Shaped Cushion
20 Bag (18 x 18)
Shipping Box
20 Bag as a Flat Pad 20 Bag as a
Shaped Cushion
6
10 10
4
6
6
8 8
4
44
6
Product10 Bag (15 x 18)
Shipping Box
10 Bag as a Flat Pad
10 9 2
14 14
2
Figure 5 Instapak Quickreg and Instapak Quickreg RT Bag Volumetric Table - Part 1
copy Sealed Air Corporation (US) 2006 Rev 0506 16
Instapak Quickreg Foam Packaging Applications Guide
Bag Volumetric Table - Instapak Quickreg and Instapak Quickreg RT (cont)
40 Bag (18 x 24)
40 Bag as a Flat Pad
Product
Shipping Box
40 Bag as a Shaped Cushion
12 12
4
8
6
8
17 11
421 15
2
13
4
7
60 Bag as a Flat Pad
60 Bag (18 x 24)
60 Bag as a Shaped Cushion
Product
Shipping Box
16 16
2
25 more foam than 40 bag)
Figure 6 Instapak Quickreg and Instapak Quickreg RT Bag Volumetric Table - Part 2
Rev 0506 copy Sealed Air Corporation (US) 200617
Bag Volumetric Table - Instapak Quickreg and Instapak Quickreg RT (cont)
17 14
4 21 18
2
5
1310
80 Bag as a Flat Pad
80 Bag as a Shaped Cushion
Shipping Box
80 Bag (22 x 27) Product
Figure 7 Instapak Quickreg and Instapak Quickreg RT Bag Volumetric Table - Part 3
copy Sealed Air Corporation (US) 2006 Rev 0506 18
Instapak Quickreg Foam Packaging Applications Guide
Bag Volumetric Table - Instapakreg Quick Tufftrade
25 Bag (18 x 18)
25 Bag as a Flat Pad
6
10 10
4
6
6
14 14
2
Product
Shipping Box
25 Bag as a Shaped Cushion
12 12
4 16 16
2
8
6
845 Bag
(18 x 24)
45 Bag as a Shaped Cushion
45 Bag as a Flat Pad
Product
Shipping Box
Figure 8 Instapakreg Quick Tufftrade Bag Volumetric Table
Rev 0506 copy Sealed Air Corporation (US) 200619
(intentionally blank)
copy Sealed Air Corporation (US) 2006 Rev 0506 20
Instapak Quickreg Foam Packaging Applications Guide
Packaging Examples Using Instapak Quickreg Foam Packaging
The PSI loading for the following applications were calculated using the smallest side of each product These calculations detershymined that Instapak Quickreg was an appropriate packaging material for these products
The products in this section were also subjected to the International Safe Transit Association (ISTA) Procedure 1A Test for Shock and Vibration Testing These products all passed this industry standard test
Note The packaging examples on pages 22-25 could both be packaged in either the full overlap end loading or regular slotted box styles depicted
Note In the following examples product positioners may be used to aid the packaging process A product positioner may be a piece of wood polystyrene polyethylene polyurethane or other suitable material Product positioners are not supplied with this product A positioner is used to lift center position or hold your product so that at least 2 of space for cushioning material around your product Certain applications may require larger product positioners
CAUTION Safety glasses with side shields should be worn while using Instapak Quickreg foam packaging
Rev 0506 copy Sealed Air Corporation (US) 200621
Packaging Examples Using Instapak Quickreg Foam Packaging Glass Framed Print
1 Determine the overall dimensions of your print (L x W x H) Choose a shipping box that is at least 4 larger in each dimension (L x W x H)
2 Erect the box and do not tape the flaps
3 Place the centering product positioner (polyethylene foam block or wood) in the middle of the bottom of the box
4 Lower your artwork into the box and place it into the product positioner
5 Place another product positioner on top of the artwork at the open end of the box
6 Start a 20 bag and place the expanding bag around one of the top corners of the artwork Close and hold the flaps to form the corner cushion
7 Start another 20 bag and place the bag around the other corner of the artwork Close and hold the flaps to form the second corner cushion
8 Remove the centering product positioner and tape these flaps closed
9 Rotate the box and open the flaps
Note Be careful when rotating the box that the artwork does not slip out of the untaped end of the box
10 Repeat steps 6 and 7
11 Remove the centering product positioner Start another 20 bag and place it down between the corrugated box and the front (glass) side of the artwork
12 Verify that the print is locked in place Close and seal the box
copy Sealed Air Corporation (US) 2006 Rev 0506 22
Instapak Quickreg Foam Packaging Applications Guide
Packaging Examples Using Instapak Quickreg Foam Packaging Glass Framed Print (cont)
62
2
STEP 12
STEP 4 STEP 5 STEP 6
STEP 8 STEP 11
Figure 9 Packaging a Glass Framed Print
Rev 0506 copy Sealed Air Corporation (US) 200623
Packaging Examples Using Instapak Quickreg Foam Packaging Framed Artwork (Painting) on Canvas
1 Wrap the painting in a large piece of corrugated and secure it around the frame
Note This is necessary so the cushions do not touch the canvas and cause the canvas to stretch
2 Determine the overall dimensions of your painting (L x W x H) Choose a shipping box that is at least 4 larger in each dimension (L x W x H)
3 Locate or make two 2 (or larger if required) blocks to be used as product positioners Then place them in one corner farthest from you
4 Start a 20 bag
5 Place the bag in the center of the bottom of the box
6 Place the painting into the center of the box on top of the rising bag of foam (be sure that the back of the painting is placed against the foam cushion Continue to hold the painting so that the bag rises to meet the frame and forms a 2 high cushion Hold the painting until the bag supports the frame This takes about 8 seconds
7 Be sure the painting is centered in the box
8 Activate a 20 bag and place it in the corner closest to you and opposite the two 2 foam blocks
9 Close and hold the two flaps closest to you over the expanding bag This will help the cushion form around the corner of the painting
10 After the bag stops expanding open the flaps and rotate the box so the two foam blocks are in front of you
11 Pull the blocks out and activate a 20 bag and place it in this corner Close and hold the two flaps over the expanding bag
12 Activate a 20 bag and place it in the next corner Close and hold the two flaps over the expanding bag
13 Activate a 20 bag and place it in the final corner Close and hold the two flaps over the expanding bag
14 Verify that the painting is locked in place Close and seal the box
copy Sealed Air Corporation (US) 2006 Rev 0506 24
Instapak Quickreg Foam Packaging Applications Guide
Packaging Examples Using Instapak Quickreg Foam Packaging Framed Artwork (Painting) on Canvas (cont)
Foam Blocks
STEP 14
STEP 3 STEP 5 STEP 6
STEP 8 STEP 9
Figure 10 Packaging Framed Artwork (Painting) on Canvas
Rev 0506 copy Sealed Air Corporation (US) 200625
Packaging Examples Using Instapak Quickreg Foam Packaging Clock
Note If you gently shake the clock and hear a rattling noise an additional step will need to be taken to ensure moving parts are secured before shipping
1 Place a piece of flexible foam between the chimes and hammers before packaging the clock This will stop any internal movement and will protect them from shock and vibration during shipping
2 If the clock has a front door andor a back panel place an elastic band around the clock to keep the doors and panels closed
3 Determine the overall dimensions of your clock (L x W x H) Choose a shipping box that is at least 4 larger in each dimension (L x W x H)
4 Activate a 60 bag
5 Place the bag in the center of the bottom of the box
6 Place the clock in the center of the box on top of the rising bag of foam Continue to hold the clock so that the bag rises to meet the clock and forms a 2 high cushion Hold the product until the bag supports the clock This takes about 8 seconds
7 Be sure the clock is centered in the box
8 Activate a 60 bag and place it over the bottom half of the clock Close and hold the flap at this end of the box as the foam rises This will help the cushion form around the clock Hold the other end of the clock at the same time to make sure the rising foam does not push the clock out of the center of the box
9 Activate another 60 bag and place it over the opposite half of the clock Close and hold the two major flaps as the foam rises This will help the cushion form around the clock
10 Verify that the clock is locked in place Close and seal the box
copy Sealed Air Corporation (US) 2006 Rev 0506 26
Instapak Quickreg Foam Packaging Applications Guide
Packaging Examples Using Instapak Quickreg Foam Packaging Clock (cont)
STEP 5 STEP 6 STEP 8
STEP 9 STEP 10
Figure 11 Packaging a Clock
CROSS SECTION
Lower CushionCarton
Upper Cushions
Clock
Rev 0506 copy Sealed Air Corporation (US) 200627
Packaging Examples Using Instapak Quickreg Foam Packaging Porcelain Vase
1 Determine the overall dimensions of your vase (L x W x H) Choose a shipping box that is at least 4 larger in each dimension (L x W x H)
2 Activate a 40 bag
3 Place the bag in the center of the bottom of the box
4 Place the vase in the center of the box on top of the rising bag of foam Continue to hold the vase so that the bag rises up to form a 2 high protective cushion Hold the product until the bag supports the vase This takes about 8 seconds
5 Be sure the vase is centered in the box
6 Activate a 40 bag and place it on top of the vase
7 Close and hold the two major flaps as the foam rises This will help the cushion form around the vase
8 Verify that the vase is locked in place Close and seal the box
copy Sealed Air Corporation (US) 2006 Rev 0506 28
Instapak Quickreg Foam Packaging Applications Guide
Packaging Examples Using Instapak Quickreg Foam Packaging Porcelain Vase (cont)
STEP 3 STEP 4 STEP 6
STEP 7 STEP 8
Figure 12 Packaging a Vase
CROSS SECTION
Lower CushionCarton
Upper Cushion
Vase
Rev 0506 copy Sealed Air Corporation (US) 200629
Packaging Examples Using Instapak Quickreg Foam Packaging Crystal Pitcher
1 Determine the overall dimensions of your pitcher (L x W x H) Choose a shipping box that is at least 4 larger in each dimension (L x W x H)
2 Activate a 40 bag
3 Place the bag in the center of the bottom of the box
4 Place the pitcher in the center of the box on top of the rising bag of foam Continue to hold the pitcher so that the bag rises up to form a 2 high protective cushion Hold the product until the bag supports the pitcher This takes about 8 seconds
5 Be sure the pitcher is centered in the box
6 Activate a 40 bag and place it on top of the pitcher
7 Close and hold the two major flaps as the foam rises This will help the cushion form around the pitcher
8 Verify that the pitcher is locked in place Close and seal the box
copy Sealed Air Corporation (US) 2006 Rev 0506 30
Instapak Quickreg Foam Packaging Applications Guide
Packaging Examples Using Instapak Quickreg Foam Packaging Crystal Pitcher (cont)
STEP 3 STEP 4 STEP 6
STEP 7 STEP 8
Figure 13 Packaging a Crystal Pitcher
CROSS SECTION
Lower CushionCarton
Upper Cushion
Pitcher
Rev 0506 copy Sealed Air Corporation (US) 200631
Packaging Examples Using Instapak Quickreg Foam Packaging Computer Monitor
1 Determine the overall dimensions of your monitor (L x W x H) Choose a shipping box that is at least 4 larger in each dimension (L x W x H)
2 Erect the box upside down so the bottom of the box is facing up Do not tape the flaps
3 Place a 2 product positioner in the center of the bottom of the box
4 By using the bag volumetric table (pages 15-17) it is determined that it will take more than two (2) cushions to package the monitor
5 This product will take two (2) 80 bags on the bottom and four (4) 60 bags on top as corner cushions
6 Place the monitor on the product positioner with the screen side facing up
7 Activate a 80 bag
8 Hold the bag in the box so half the bag goes down the side of the monitor and half the bag covers the top side of the monitor facing you
9 Once the cushion can support itself close and hold the flaps on this side of the box to help it form around the monitor Hold the other end of the monitor at the same time to make sure the rising foam does not push the monitor out of the center of the box
10 Activate another 80 bag and place it in the box on the opposite side of the first bag Once the cushion can support itself close and hold the flaps on this side of the box This will help the cushion form around the monitor
11 Close and tape the four (4) flaps on this side of the box
(Continued on page 34)
copy Sealed Air Corporation (US) 2006 Rev 0506 32
Instapak Quickreg Foam Packaging Applications Guide
Packaging Examples Using Instapak Quickreg Foam Packaging Computer Monitor (cont)
STEP 6STEP 3 STEP 8
STEP 9 STEP 10 STEP 11
Product Positioner
Figure 14 Packaging a Computer Monitor - 1
Rev 0506 copy Sealed Air Corporation (US) 200633
Packaging Examples Using Instapak Quickreg Foam Packaging Computer Monitor (cont)
12 Carefully roll the box over so the other side of the box can be opened
Note The flaps on this side are not taped closed so be careful the monitor does not fall out while doing this
13 Open the flaps on this side and remove the product positioner
14 Activate a 60 bag and place it about half way down in one of the corners
15 Once the cushion can support itself close and hold the flaps on this side of the box to help it form around the monitor Hold the opposing corner of the monitor at the same time to make sure the rising foam does not push the monitor out of the center of the box
16 Activate another 60 bag and place it in the opposite corner of the first bag Close and hold the flaps on this side of the box to help it form around the monitor
17 Activate another 60 bag and place it in the third corner so the bag can form Again hold the monitor so it wonrsquot shift
18 Repeat step 17 for the fourth corner
19 Tape the flaps closed on this side and the box is ready to ship
copy Sealed Air Corporation (US) 2006 Rev 0506 34
Instapak Quickreg Foam Packaging Applications Guide
Packaging Examples Using Instapak Quickreg Foam Packaging Computer Monitor (cont)
STEP 15
STEP 14STEP 13
STEP 19
Figure 15 Packaging a Computer Monitor - 2
Rev 0506 copy Sealed Air Corporation (US) 200635
Notes
copy Sealed Air Corporation (US) 2006 Rev 0506 36
Instapak Quickreg Foam Packaging Applications Guide
Rev 0506 copy Sealed Air Corporation (US) 200637
38copy Sealed Air Corporation (US) 2006 Rev 0506
Protective Packaging 10 Old Sherman Turnpike Danbury CT 06810 203-791-3500 Fax 203-791-3618 wwwinstapakquickcom
Our Products Protect Your Productsreg
Corporate Office Sealed Air Corporation (US) Park 80 East Saddle Brook NJ 07663-5291 wwwsealedaircom reg Reg US Pat amp TM Off copy Sealed Air Corporation (US) 2006 All rights reserved Printed in the USA The 9 Dot Logo and Sealed Air are registered trademarks of Sealed Air Corporation (US)
Instapak Quickreg Applications Guide T-124 0506

Instapak Quickreg Foam Packaging Applications Guide
0
Lbs
of P
rodu
ct
10
20
30
40
50
Void Fill or Blocking and Bracing (Rugged Products)
Contact your Sealed Airreg
Packaging Expert for an Engineered
Solution
Instapak Quickreg
or Instapak Quickreg RT
Instapakreg Quick Tufftrade
Cushioning (Fragile Products)
Instapak Quickreg Packaging Parameters (cont)
0 20 40 60 80 100 120 140 160 180 200 Square Inches of the Smallest Side of Product
Figure 3 Instapak Quickreg Packaging Performance Chart
Rev 0506 copy Sealed Air Corporation (US) 200613
Information on Corrugated Shipping Boxes
A major component of any successful protective package is the shipping box Today most shipping boxes are made of corrushygated fiberboard In order to increase the likelihood that any package will protect its contents through shipping and handling it is necessary that you use a shipping box that will maintain the integrity and performance of the interior packaging from the point of shipment to the ultimate delivery
Corrugated fiberboard is primarily classified on the basis of two laboratory test procedures bull Burst Test bull Edge Crush Test (ECT)
Each of these laboratory tests evaluates a different property of the corrugated structure Burst measures how the board resists bursting pressures applied by an instrument in the lab The level of burst force in this equipment is expressed in pounds So common corrugated fiberboard constructions are rated at 175 200 250 pounds for example At best this number is an indirect indication of how much weight a box made from any specific grade will support or contain
The other value Edge Crush measures the ability of the corrugated structure to support a load applied parallel to the fluted direction Typical values for common corrugated grades are 28 pounds 32 pounds or some other value Unlike burst these values do relate to stacking strength of the boxes made from these materials
When selecting a box for a protective package one must consider the burst or edge crush values for the corrugated fiberboard the style of box to be used and the type of closure for the box By referring to the Box Makers certificate on the bottom of the box you can see what the burst or ECT is for that material Most boxes for products up to 60 or 70 pounds will be of 200 pound test or 32 ECT board
If a product to be packaged weighs more than 60 pounds or so then the designer might want to consider a higher grade of corrugated andor going to a double wall corrugated structure (two sets of flutes in the same fiberboard structure)
In any case a well made and properly designed shipping box closed with strong tape (or some other adequate closure method) is an important criteria in a package that will protect its contents throughout shipping and handling
Further information can be obtained from the Fiber Box Association
copy Sealed Air Corporation (US) 2006 Rev 0506 14
Instapak Quickreg Foam Packaging Applications Guide
Bag Volumetric Table
The following line drawings (pages 15-18) are intended to illustrate the approximate size of the cushion when Quicktrade bags are expanded Cushion sizes may vary depending on product size environshymental conditions and packaging technique
The left portion of the table shows the dimensions of a bag when it is expanded to form a 2 high flat cushion The right portion of the table shows the effect of placing a typical product (represented as a gray box) in the rising foam within a corrugated box This drawing shows how the dimensions are affected by the placement of a product and will help select the correct size corrugated box when using top and bottom cushions
Note Expanded cushion dimensions are smaller than the unexpanded bag dimensions
Note Due to their shape and size some products may require more than two Instapak Quickreg foam bags for adequate protection This is a common occurrence when using the foam-in-bag packaging process - see Packaging Examples pages 22-27 and 32-35
Quicktrade Bag Typical ProductSize
Dimensions
Shipping Box
12 12
4 16 16
2
8
6
840 Bag
(18 x 24)
40 Bag as a Shaped Cushion
40 Bag as a Flat Pad
Product
Shipping Box
Quicktrade Bagas a Flat Size 40
Dimensions of Quicktrade Bag
Dimensions of Expanded
Product Placed in ItExpanded Cushion
Quicktrade Cushion in Shipping Box with
Figure 4 Understanding the Bag Volumetric Table
Rev 0506 copy Sealed Air Corporation (US) 200615
Bag Volumetric Table - Instapak Quickreg and Instapak Quickreg RT
20 Bag as a Product Shaped Cushion
20 Bag (18 x 18)
Shipping Box
20 Bag as a Flat Pad 20 Bag as a
Shaped Cushion
6
10 10
4
6
6
8 8
4
44
6
Product10 Bag (15 x 18)
Shipping Box
10 Bag as a Flat Pad
10 9 2
14 14
2
Figure 5 Instapak Quickreg and Instapak Quickreg RT Bag Volumetric Table - Part 1
copy Sealed Air Corporation (US) 2006 Rev 0506 16
Instapak Quickreg Foam Packaging Applications Guide
Bag Volumetric Table - Instapak Quickreg and Instapak Quickreg RT (cont)
40 Bag (18 x 24)
40 Bag as a Flat Pad
Product
Shipping Box
40 Bag as a Shaped Cushion
12 12
4
8
6
8
17 11
421 15
2
13
4
7
60 Bag as a Flat Pad
60 Bag (18 x 24)
60 Bag as a Shaped Cushion
Product
Shipping Box
16 16
2
25 more foam than 40 bag)
Figure 6 Instapak Quickreg and Instapak Quickreg RT Bag Volumetric Table - Part 2
Rev 0506 copy Sealed Air Corporation (US) 200617
Bag Volumetric Table - Instapak Quickreg and Instapak Quickreg RT (cont)
17 14
4 21 18
2
5
1310
80 Bag as a Flat Pad
80 Bag as a Shaped Cushion
Shipping Box
80 Bag (22 x 27) Product
Figure 7 Instapak Quickreg and Instapak Quickreg RT Bag Volumetric Table - Part 3
copy Sealed Air Corporation (US) 2006 Rev 0506 18
Instapak Quickreg Foam Packaging Applications Guide
Bag Volumetric Table - Instapakreg Quick Tufftrade
25 Bag (18 x 18)
25 Bag as a Flat Pad
6
10 10
4
6
6
14 14
2
Product
Shipping Box
25 Bag as a Shaped Cushion
12 12
4 16 16
2
8
6
845 Bag
(18 x 24)
45 Bag as a Shaped Cushion
45 Bag as a Flat Pad
Product
Shipping Box
Figure 8 Instapakreg Quick Tufftrade Bag Volumetric Table
Rev 0506 copy Sealed Air Corporation (US) 200619
(intentionally blank)
copy Sealed Air Corporation (US) 2006 Rev 0506 20
Instapak Quickreg Foam Packaging Applications Guide
Packaging Examples Using Instapak Quickreg Foam Packaging
The PSI loading for the following applications were calculated using the smallest side of each product These calculations detershymined that Instapak Quickreg was an appropriate packaging material for these products
The products in this section were also subjected to the International Safe Transit Association (ISTA) Procedure 1A Test for Shock and Vibration Testing These products all passed this industry standard test
Note The packaging examples on pages 22-25 could both be packaged in either the full overlap end loading or regular slotted box styles depicted
Note In the following examples product positioners may be used to aid the packaging process A product positioner may be a piece of wood polystyrene polyethylene polyurethane or other suitable material Product positioners are not supplied with this product A positioner is used to lift center position or hold your product so that at least 2 of space for cushioning material around your product Certain applications may require larger product positioners
CAUTION Safety glasses with side shields should be worn while using Instapak Quickreg foam packaging
Rev 0506 copy Sealed Air Corporation (US) 200621
Packaging Examples Using Instapak Quickreg Foam Packaging Glass Framed Print
1 Determine the overall dimensions of your print (L x W x H) Choose a shipping box that is at least 4 larger in each dimension (L x W x H)
2 Erect the box and do not tape the flaps
3 Place the centering product positioner (polyethylene foam block or wood) in the middle of the bottom of the box
4 Lower your artwork into the box and place it into the product positioner
5 Place another product positioner on top of the artwork at the open end of the box
6 Start a 20 bag and place the expanding bag around one of the top corners of the artwork Close and hold the flaps to form the corner cushion
7 Start another 20 bag and place the bag around the other corner of the artwork Close and hold the flaps to form the second corner cushion
8 Remove the centering product positioner and tape these flaps closed
9 Rotate the box and open the flaps
Note Be careful when rotating the box that the artwork does not slip out of the untaped end of the box
10 Repeat steps 6 and 7
11 Remove the centering product positioner Start another 20 bag and place it down between the corrugated box and the front (glass) side of the artwork
12 Verify that the print is locked in place Close and seal the box
copy Sealed Air Corporation (US) 2006 Rev 0506 22
Instapak Quickreg Foam Packaging Applications Guide
Packaging Examples Using Instapak Quickreg Foam Packaging Glass Framed Print (cont)
62
2
STEP 12
STEP 4 STEP 5 STEP 6
STEP 8 STEP 11
Figure 9 Packaging a Glass Framed Print
Rev 0506 copy Sealed Air Corporation (US) 200623
Packaging Examples Using Instapak Quickreg Foam Packaging Framed Artwork (Painting) on Canvas
1 Wrap the painting in a large piece of corrugated and secure it around the frame
Note This is necessary so the cushions do not touch the canvas and cause the canvas to stretch
2 Determine the overall dimensions of your painting (L x W x H) Choose a shipping box that is at least 4 larger in each dimension (L x W x H)
3 Locate or make two 2 (or larger if required) blocks to be used as product positioners Then place them in one corner farthest from you
4 Start a 20 bag
5 Place the bag in the center of the bottom of the box
6 Place the painting into the center of the box on top of the rising bag of foam (be sure that the back of the painting is placed against the foam cushion Continue to hold the painting so that the bag rises to meet the frame and forms a 2 high cushion Hold the painting until the bag supports the frame This takes about 8 seconds
7 Be sure the painting is centered in the box
8 Activate a 20 bag and place it in the corner closest to you and opposite the two 2 foam blocks
9 Close and hold the two flaps closest to you over the expanding bag This will help the cushion form around the corner of the painting
10 After the bag stops expanding open the flaps and rotate the box so the two foam blocks are in front of you
11 Pull the blocks out and activate a 20 bag and place it in this corner Close and hold the two flaps over the expanding bag
12 Activate a 20 bag and place it in the next corner Close and hold the two flaps over the expanding bag
13 Activate a 20 bag and place it in the final corner Close and hold the two flaps over the expanding bag
14 Verify that the painting is locked in place Close and seal the box
copy Sealed Air Corporation (US) 2006 Rev 0506 24
Instapak Quickreg Foam Packaging Applications Guide
Packaging Examples Using Instapak Quickreg Foam Packaging Framed Artwork (Painting) on Canvas (cont)
Foam Blocks
STEP 14
STEP 3 STEP 5 STEP 6
STEP 8 STEP 9
Figure 10 Packaging Framed Artwork (Painting) on Canvas
Rev 0506 copy Sealed Air Corporation (US) 200625
Packaging Examples Using Instapak Quickreg Foam Packaging Clock
Note If you gently shake the clock and hear a rattling noise an additional step will need to be taken to ensure moving parts are secured before shipping
1 Place a piece of flexible foam between the chimes and hammers before packaging the clock This will stop any internal movement and will protect them from shock and vibration during shipping
2 If the clock has a front door andor a back panel place an elastic band around the clock to keep the doors and panels closed
3 Determine the overall dimensions of your clock (L x W x H) Choose a shipping box that is at least 4 larger in each dimension (L x W x H)
4 Activate a 60 bag
5 Place the bag in the center of the bottom of the box
6 Place the clock in the center of the box on top of the rising bag of foam Continue to hold the clock so that the bag rises to meet the clock and forms a 2 high cushion Hold the product until the bag supports the clock This takes about 8 seconds
7 Be sure the clock is centered in the box
8 Activate a 60 bag and place it over the bottom half of the clock Close and hold the flap at this end of the box as the foam rises This will help the cushion form around the clock Hold the other end of the clock at the same time to make sure the rising foam does not push the clock out of the center of the box
9 Activate another 60 bag and place it over the opposite half of the clock Close and hold the two major flaps as the foam rises This will help the cushion form around the clock
10 Verify that the clock is locked in place Close and seal the box
copy Sealed Air Corporation (US) 2006 Rev 0506 26
Instapak Quickreg Foam Packaging Applications Guide
Packaging Examples Using Instapak Quickreg Foam Packaging Clock (cont)
STEP 5 STEP 6 STEP 8
STEP 9 STEP 10
Figure 11 Packaging a Clock
CROSS SECTION
Lower CushionCarton
Upper Cushions
Clock
Rev 0506 copy Sealed Air Corporation (US) 200627
Packaging Examples Using Instapak Quickreg Foam Packaging Porcelain Vase
1 Determine the overall dimensions of your vase (L x W x H) Choose a shipping box that is at least 4 larger in each dimension (L x W x H)
2 Activate a 40 bag
3 Place the bag in the center of the bottom of the box
4 Place the vase in the center of the box on top of the rising bag of foam Continue to hold the vase so that the bag rises up to form a 2 high protective cushion Hold the product until the bag supports the vase This takes about 8 seconds
5 Be sure the vase is centered in the box
6 Activate a 40 bag and place it on top of the vase
7 Close and hold the two major flaps as the foam rises This will help the cushion form around the vase
8 Verify that the vase is locked in place Close and seal the box
copy Sealed Air Corporation (US) 2006 Rev 0506 28
Instapak Quickreg Foam Packaging Applications Guide
Packaging Examples Using Instapak Quickreg Foam Packaging Porcelain Vase (cont)
STEP 3 STEP 4 STEP 6
STEP 7 STEP 8
Figure 12 Packaging a Vase
CROSS SECTION
Lower CushionCarton
Upper Cushion
Vase
Rev 0506 copy Sealed Air Corporation (US) 200629
Packaging Examples Using Instapak Quickreg Foam Packaging Crystal Pitcher
1 Determine the overall dimensions of your pitcher (L x W x H) Choose a shipping box that is at least 4 larger in each dimension (L x W x H)
2 Activate a 40 bag
3 Place the bag in the center of the bottom of the box
4 Place the pitcher in the center of the box on top of the rising bag of foam Continue to hold the pitcher so that the bag rises up to form a 2 high protective cushion Hold the product until the bag supports the pitcher This takes about 8 seconds
5 Be sure the pitcher is centered in the box
6 Activate a 40 bag and place it on top of the pitcher
7 Close and hold the two major flaps as the foam rises This will help the cushion form around the pitcher
8 Verify that the pitcher is locked in place Close and seal the box
copy Sealed Air Corporation (US) 2006 Rev 0506 30
Instapak Quickreg Foam Packaging Applications Guide
Packaging Examples Using Instapak Quickreg Foam Packaging Crystal Pitcher (cont)
STEP 3 STEP 4 STEP 6
STEP 7 STEP 8
Figure 13 Packaging a Crystal Pitcher
CROSS SECTION
Lower CushionCarton
Upper Cushion
Pitcher
Rev 0506 copy Sealed Air Corporation (US) 200631
Packaging Examples Using Instapak Quickreg Foam Packaging Computer Monitor
1 Determine the overall dimensions of your monitor (L x W x H) Choose a shipping box that is at least 4 larger in each dimension (L x W x H)
2 Erect the box upside down so the bottom of the box is facing up Do not tape the flaps
3 Place a 2 product positioner in the center of the bottom of the box
4 By using the bag volumetric table (pages 15-17) it is determined that it will take more than two (2) cushions to package the monitor
5 This product will take two (2) 80 bags on the bottom and four (4) 60 bags on top as corner cushions
6 Place the monitor on the product positioner with the screen side facing up
7 Activate a 80 bag
8 Hold the bag in the box so half the bag goes down the side of the monitor and half the bag covers the top side of the monitor facing you
9 Once the cushion can support itself close and hold the flaps on this side of the box to help it form around the monitor Hold the other end of the monitor at the same time to make sure the rising foam does not push the monitor out of the center of the box
10 Activate another 80 bag and place it in the box on the opposite side of the first bag Once the cushion can support itself close and hold the flaps on this side of the box This will help the cushion form around the monitor
11 Close and tape the four (4) flaps on this side of the box
(Continued on page 34)
copy Sealed Air Corporation (US) 2006 Rev 0506 32
Instapak Quickreg Foam Packaging Applications Guide
Packaging Examples Using Instapak Quickreg Foam Packaging Computer Monitor (cont)
STEP 6STEP 3 STEP 8
STEP 9 STEP 10 STEP 11
Product Positioner
Figure 14 Packaging a Computer Monitor - 1
Rev 0506 copy Sealed Air Corporation (US) 200633
Packaging Examples Using Instapak Quickreg Foam Packaging Computer Monitor (cont)
12 Carefully roll the box over so the other side of the box can be opened
Note The flaps on this side are not taped closed so be careful the monitor does not fall out while doing this
13 Open the flaps on this side and remove the product positioner
14 Activate a 60 bag and place it about half way down in one of the corners
15 Once the cushion can support itself close and hold the flaps on this side of the box to help it form around the monitor Hold the opposing corner of the monitor at the same time to make sure the rising foam does not push the monitor out of the center of the box
16 Activate another 60 bag and place it in the opposite corner of the first bag Close and hold the flaps on this side of the box to help it form around the monitor
17 Activate another 60 bag and place it in the third corner so the bag can form Again hold the monitor so it wonrsquot shift
18 Repeat step 17 for the fourth corner
19 Tape the flaps closed on this side and the box is ready to ship
copy Sealed Air Corporation (US) 2006 Rev 0506 34
Instapak Quickreg Foam Packaging Applications Guide
Packaging Examples Using Instapak Quickreg Foam Packaging Computer Monitor (cont)
STEP 15
STEP 14STEP 13
STEP 19
Figure 15 Packaging a Computer Monitor - 2
Rev 0506 copy Sealed Air Corporation (US) 200635
Notes
copy Sealed Air Corporation (US) 2006 Rev 0506 36
Instapak Quickreg Foam Packaging Applications Guide
Rev 0506 copy Sealed Air Corporation (US) 200637
38copy Sealed Air Corporation (US) 2006 Rev 0506
Protective Packaging 10 Old Sherman Turnpike Danbury CT 06810 203-791-3500 Fax 203-791-3618 wwwinstapakquickcom
Our Products Protect Your Productsreg
Corporate Office Sealed Air Corporation (US) Park 80 East Saddle Brook NJ 07663-5291 wwwsealedaircom reg Reg US Pat amp TM Off copy Sealed Air Corporation (US) 2006 All rights reserved Printed in the USA The 9 Dot Logo and Sealed Air are registered trademarks of Sealed Air Corporation (US)
Instapak Quickreg Applications Guide T-124 0506

Instapak Quickreg Foam Packaging Applications Guide
Bag Volumetric Table
The following line drawings (pages 15-18) are intended to illustrate the approximate size of the cushion when Quicktrade bags are expanded Cushion sizes may vary depending on product size environshymental conditions and packaging technique
The left portion of the table shows the dimensions of a bag when it is expanded to form a 2 high flat cushion The right portion of the table shows the effect of placing a typical product (represented as a gray box) in the rising foam within a corrugated box This drawing shows how the dimensions are affected by the placement of a product and will help select the correct size corrugated box when using top and bottom cushions
Note Expanded cushion dimensions are smaller than the unexpanded bag dimensions
Note Due to their shape and size some products may require more than two Instapak Quickreg foam bags for adequate protection This is a common occurrence when using the foam-in-bag packaging process - see Packaging Examples pages 22-27 and 32-35
Quicktrade Bag Typical ProductSize
Dimensions
Shipping Box
12 12
4 16 16
2
8
6
840 Bag
(18 x 24)
40 Bag as a Shaped Cushion
40 Bag as a Flat Pad
Product
Shipping Box
Quicktrade Bagas a Flat Size 40
Dimensions of Quicktrade Bag
Dimensions of Expanded
Product Placed in ItExpanded Cushion
Quicktrade Cushion in Shipping Box with
Figure 4 Understanding the Bag Volumetric Table
Rev 0506 copy Sealed Air Corporation (US) 200615
Bag Volumetric Table - Instapak Quickreg and Instapak Quickreg RT
20 Bag as a Product Shaped Cushion
20 Bag (18 x 18)
Shipping Box
20 Bag as a Flat Pad 20 Bag as a
Shaped Cushion
6
10 10
4
6
6
8 8
4
44
6
Product10 Bag (15 x 18)
Shipping Box
10 Bag as a Flat Pad
10 9 2
14 14
2
Figure 5 Instapak Quickreg and Instapak Quickreg RT Bag Volumetric Table - Part 1
copy Sealed Air Corporation (US) 2006 Rev 0506 16
Instapak Quickreg Foam Packaging Applications Guide
Bag Volumetric Table - Instapak Quickreg and Instapak Quickreg RT (cont)
40 Bag (18 x 24)
40 Bag as a Flat Pad
Product
Shipping Box
40 Bag as a Shaped Cushion
12 12
4
8
6
8
17 11
421 15
2
13
4
7
60 Bag as a Flat Pad
60 Bag (18 x 24)
60 Bag as a Shaped Cushion
Product
Shipping Box
16 16
2
25 more foam than 40 bag)
Figure 6 Instapak Quickreg and Instapak Quickreg RT Bag Volumetric Table - Part 2
Rev 0506 copy Sealed Air Corporation (US) 200617
Bag Volumetric Table - Instapak Quickreg and Instapak Quickreg RT (cont)
17 14
4 21 18
2
5
1310
80 Bag as a Flat Pad
80 Bag as a Shaped Cushion
Shipping Box
80 Bag (22 x 27) Product
Figure 7 Instapak Quickreg and Instapak Quickreg RT Bag Volumetric Table - Part 3
copy Sealed Air Corporation (US) 2006 Rev 0506 18
Instapak Quickreg Foam Packaging Applications Guide
Bag Volumetric Table - Instapakreg Quick Tufftrade
25 Bag (18 x 18)
25 Bag as a Flat Pad
6
10 10
4
6
6
14 14
2
Product
Shipping Box
25 Bag as a Shaped Cushion
12 12
4 16 16
2
8
6
845 Bag
(18 x 24)
45 Bag as a Shaped Cushion
45 Bag as a Flat Pad
Product
Shipping Box
Figure 8 Instapakreg Quick Tufftrade Bag Volumetric Table
Rev 0506 copy Sealed Air Corporation (US) 200619
(intentionally blank)
copy Sealed Air Corporation (US) 2006 Rev 0506 20
Instapak Quickreg Foam Packaging Applications Guide
Packaging Examples Using Instapak Quickreg Foam Packaging
The PSI loading for the following applications were calculated using the smallest side of each product These calculations detershymined that Instapak Quickreg was an appropriate packaging material for these products
The products in this section were also subjected to the International Safe Transit Association (ISTA) Procedure 1A Test for Shock and Vibration Testing These products all passed this industry standard test
Note The packaging examples on pages 22-25 could both be packaged in either the full overlap end loading or regular slotted box styles depicted
Note In the following examples product positioners may be used to aid the packaging process A product positioner may be a piece of wood polystyrene polyethylene polyurethane or other suitable material Product positioners are not supplied with this product A positioner is used to lift center position or hold your product so that at least 2 of space for cushioning material around your product Certain applications may require larger product positioners
CAUTION Safety glasses with side shields should be worn while using Instapak Quickreg foam packaging
Rev 0506 copy Sealed Air Corporation (US) 200621
Packaging Examples Using Instapak Quickreg Foam Packaging Glass Framed Print
1 Determine the overall dimensions of your print (L x W x H) Choose a shipping box that is at least 4 larger in each dimension (L x W x H)
2 Erect the box and do not tape the flaps
3 Place the centering product positioner (polyethylene foam block or wood) in the middle of the bottom of the box
4 Lower your artwork into the box and place it into the product positioner
5 Place another product positioner on top of the artwork at the open end of the box
6 Start a 20 bag and place the expanding bag around one of the top corners of the artwork Close and hold the flaps to form the corner cushion
7 Start another 20 bag and place the bag around the other corner of the artwork Close and hold the flaps to form the second corner cushion
8 Remove the centering product positioner and tape these flaps closed
9 Rotate the box and open the flaps
Note Be careful when rotating the box that the artwork does not slip out of the untaped end of the box
10 Repeat steps 6 and 7
11 Remove the centering product positioner Start another 20 bag and place it down between the corrugated box and the front (glass) side of the artwork
12 Verify that the print is locked in place Close and seal the box
copy Sealed Air Corporation (US) 2006 Rev 0506 22
Instapak Quickreg Foam Packaging Applications Guide
Packaging Examples Using Instapak Quickreg Foam Packaging Glass Framed Print (cont)
62
2
STEP 12
STEP 4 STEP 5 STEP 6
STEP 8 STEP 11
Figure 9 Packaging a Glass Framed Print
Rev 0506 copy Sealed Air Corporation (US) 200623
Packaging Examples Using Instapak Quickreg Foam Packaging Framed Artwork (Painting) on Canvas
1 Wrap the painting in a large piece of corrugated and secure it around the frame
Note This is necessary so the cushions do not touch the canvas and cause the canvas to stretch
2 Determine the overall dimensions of your painting (L x W x H) Choose a shipping box that is at least 4 larger in each dimension (L x W x H)
3 Locate or make two 2 (or larger if required) blocks to be used as product positioners Then place them in one corner farthest from you
4 Start a 20 bag
5 Place the bag in the center of the bottom of the box
6 Place the painting into the center of the box on top of the rising bag of foam (be sure that the back of the painting is placed against the foam cushion Continue to hold the painting so that the bag rises to meet the frame and forms a 2 high cushion Hold the painting until the bag supports the frame This takes about 8 seconds
7 Be sure the painting is centered in the box
8 Activate a 20 bag and place it in the corner closest to you and opposite the two 2 foam blocks
9 Close and hold the two flaps closest to you over the expanding bag This will help the cushion form around the corner of the painting
10 After the bag stops expanding open the flaps and rotate the box so the two foam blocks are in front of you
11 Pull the blocks out and activate a 20 bag and place it in this corner Close and hold the two flaps over the expanding bag
12 Activate a 20 bag and place it in the next corner Close and hold the two flaps over the expanding bag
13 Activate a 20 bag and place it in the final corner Close and hold the two flaps over the expanding bag
14 Verify that the painting is locked in place Close and seal the box
copy Sealed Air Corporation (US) 2006 Rev 0506 24
Instapak Quickreg Foam Packaging Applications Guide
Packaging Examples Using Instapak Quickreg Foam Packaging Framed Artwork (Painting) on Canvas (cont)
Foam Blocks
STEP 14
STEP 3 STEP 5 STEP 6
STEP 8 STEP 9
Figure 10 Packaging Framed Artwork (Painting) on Canvas
Rev 0506 copy Sealed Air Corporation (US) 200625
Packaging Examples Using Instapak Quickreg Foam Packaging Clock
Note If you gently shake the clock and hear a rattling noise an additional step will need to be taken to ensure moving parts are secured before shipping
1 Place a piece of flexible foam between the chimes and hammers before packaging the clock This will stop any internal movement and will protect them from shock and vibration during shipping
2 If the clock has a front door andor a back panel place an elastic band around the clock to keep the doors and panels closed
3 Determine the overall dimensions of your clock (L x W x H) Choose a shipping box that is at least 4 larger in each dimension (L x W x H)
4 Activate a 60 bag
5 Place the bag in the center of the bottom of the box
6 Place the clock in the center of the box on top of the rising bag of foam Continue to hold the clock so that the bag rises to meet the clock and forms a 2 high cushion Hold the product until the bag supports the clock This takes about 8 seconds
7 Be sure the clock is centered in the box
8 Activate a 60 bag and place it over the bottom half of the clock Close and hold the flap at this end of the box as the foam rises This will help the cushion form around the clock Hold the other end of the clock at the same time to make sure the rising foam does not push the clock out of the center of the box
9 Activate another 60 bag and place it over the opposite half of the clock Close and hold the two major flaps as the foam rises This will help the cushion form around the clock
10 Verify that the clock is locked in place Close and seal the box
copy Sealed Air Corporation (US) 2006 Rev 0506 26
Instapak Quickreg Foam Packaging Applications Guide
Packaging Examples Using Instapak Quickreg Foam Packaging Clock (cont)
STEP 5 STEP 6 STEP 8
STEP 9 STEP 10
Figure 11 Packaging a Clock
CROSS SECTION
Lower CushionCarton
Upper Cushions
Clock
Rev 0506 copy Sealed Air Corporation (US) 200627
Packaging Examples Using Instapak Quickreg Foam Packaging Porcelain Vase
1 Determine the overall dimensions of your vase (L x W x H) Choose a shipping box that is at least 4 larger in each dimension (L x W x H)
2 Activate a 40 bag
3 Place the bag in the center of the bottom of the box
4 Place the vase in the center of the box on top of the rising bag of foam Continue to hold the vase so that the bag rises up to form a 2 high protective cushion Hold the product until the bag supports the vase This takes about 8 seconds
5 Be sure the vase is centered in the box
6 Activate a 40 bag and place it on top of the vase
7 Close and hold the two major flaps as the foam rises This will help the cushion form around the vase
8 Verify that the vase is locked in place Close and seal the box
copy Sealed Air Corporation (US) 2006 Rev 0506 28
Instapak Quickreg Foam Packaging Applications Guide
Packaging Examples Using Instapak Quickreg Foam Packaging Porcelain Vase (cont)
STEP 3 STEP 4 STEP 6
STEP 7 STEP 8
Figure 12 Packaging a Vase
CROSS SECTION
Lower CushionCarton
Upper Cushion
Vase
Rev 0506 copy Sealed Air Corporation (US) 200629
Packaging Examples Using Instapak Quickreg Foam Packaging Crystal Pitcher
1 Determine the overall dimensions of your pitcher (L x W x H) Choose a shipping box that is at least 4 larger in each dimension (L x W x H)
2 Activate a 40 bag
3 Place the bag in the center of the bottom of the box
4 Place the pitcher in the center of the box on top of the rising bag of foam Continue to hold the pitcher so that the bag rises up to form a 2 high protective cushion Hold the product until the bag supports the pitcher This takes about 8 seconds
5 Be sure the pitcher is centered in the box
6 Activate a 40 bag and place it on top of the pitcher
7 Close and hold the two major flaps as the foam rises This will help the cushion form around the pitcher
8 Verify that the pitcher is locked in place Close and seal the box
copy Sealed Air Corporation (US) 2006 Rev 0506 30
Instapak Quickreg Foam Packaging Applications Guide
Packaging Examples Using Instapak Quickreg Foam Packaging Crystal Pitcher (cont)
STEP 3 STEP 4 STEP 6
STEP 7 STEP 8
Figure 13 Packaging a Crystal Pitcher
CROSS SECTION
Lower CushionCarton
Upper Cushion
Pitcher
Rev 0506 copy Sealed Air Corporation (US) 200631
Packaging Examples Using Instapak Quickreg Foam Packaging Computer Monitor
1 Determine the overall dimensions of your monitor (L x W x H) Choose a shipping box that is at least 4 larger in each dimension (L x W x H)
2 Erect the box upside down so the bottom of the box is facing up Do not tape the flaps
3 Place a 2 product positioner in the center of the bottom of the box
4 By using the bag volumetric table (pages 15-17) it is determined that it will take more than two (2) cushions to package the monitor
5 This product will take two (2) 80 bags on the bottom and four (4) 60 bags on top as corner cushions
6 Place the monitor on the product positioner with the screen side facing up
7 Activate a 80 bag
8 Hold the bag in the box so half the bag goes down the side of the monitor and half the bag covers the top side of the monitor facing you
9 Once the cushion can support itself close and hold the flaps on this side of the box to help it form around the monitor Hold the other end of the monitor at the same time to make sure the rising foam does not push the monitor out of the center of the box
10 Activate another 80 bag and place it in the box on the opposite side of the first bag Once the cushion can support itself close and hold the flaps on this side of the box This will help the cushion form around the monitor
11 Close and tape the four (4) flaps on this side of the box
(Continued on page 34)
copy Sealed Air Corporation (US) 2006 Rev 0506 32
Instapak Quickreg Foam Packaging Applications Guide
Packaging Examples Using Instapak Quickreg Foam Packaging Computer Monitor (cont)
STEP 6STEP 3 STEP 8
STEP 9 STEP 10 STEP 11
Product Positioner
Figure 14 Packaging a Computer Monitor - 1
Rev 0506 copy Sealed Air Corporation (US) 200633
Packaging Examples Using Instapak Quickreg Foam Packaging Computer Monitor (cont)
12 Carefully roll the box over so the other side of the box can be opened
Note The flaps on this side are not taped closed so be careful the monitor does not fall out while doing this
13 Open the flaps on this side and remove the product positioner
14 Activate a 60 bag and place it about half way down in one of the corners
15 Once the cushion can support itself close and hold the flaps on this side of the box to help it form around the monitor Hold the opposing corner of the monitor at the same time to make sure the rising foam does not push the monitor out of the center of the box
16 Activate another 60 bag and place it in the opposite corner of the first bag Close and hold the flaps on this side of the box to help it form around the monitor
17 Activate another 60 bag and place it in the third corner so the bag can form Again hold the monitor so it wonrsquot shift
18 Repeat step 17 for the fourth corner
19 Tape the flaps closed on this side and the box is ready to ship
copy Sealed Air Corporation (US) 2006 Rev 0506 34
Instapak Quickreg Foam Packaging Applications Guide
Packaging Examples Using Instapak Quickreg Foam Packaging Computer Monitor (cont)
STEP 15
STEP 14STEP 13
STEP 19
Figure 15 Packaging a Computer Monitor - 2
Rev 0506 copy Sealed Air Corporation (US) 200635
Notes
copy Sealed Air Corporation (US) 2006 Rev 0506 36
Instapak Quickreg Foam Packaging Applications Guide
Rev 0506 copy Sealed Air Corporation (US) 200637
38copy Sealed Air Corporation (US) 2006 Rev 0506
Protective Packaging 10 Old Sherman Turnpike Danbury CT 06810 203-791-3500 Fax 203-791-3618 wwwinstapakquickcom
Our Products Protect Your Productsreg
Corporate Office Sealed Air Corporation (US) Park 80 East Saddle Brook NJ 07663-5291 wwwsealedaircom reg Reg US Pat amp TM Off copy Sealed Air Corporation (US) 2006 All rights reserved Printed in the USA The 9 Dot Logo and Sealed Air are registered trademarks of Sealed Air Corporation (US)
Instapak Quickreg Applications Guide T-124 0506

Instapak Quickreg Foam Packaging Applications Guide
Bag Volumetric Table - Instapak Quickreg and Instapak Quickreg RT (cont)
40 Bag (18 x 24)
40 Bag as a Flat Pad
Product
Shipping Box
40 Bag as a Shaped Cushion
12 12
4
8
6
8
17 11
421 15
2
13
4
7
60 Bag as a Flat Pad
60 Bag (18 x 24)
60 Bag as a Shaped Cushion
Product
Shipping Box
16 16
2
25 more foam than 40 bag)
Figure 6 Instapak Quickreg and Instapak Quickreg RT Bag Volumetric Table - Part 2
Rev 0506 copy Sealed Air Corporation (US) 200617
Bag Volumetric Table - Instapak Quickreg and Instapak Quickreg RT (cont)
17 14
4 21 18
2
5
1310
80 Bag as a Flat Pad
80 Bag as a Shaped Cushion
Shipping Box
80 Bag (22 x 27) Product
Figure 7 Instapak Quickreg and Instapak Quickreg RT Bag Volumetric Table - Part 3
copy Sealed Air Corporation (US) 2006 Rev 0506 18
Instapak Quickreg Foam Packaging Applications Guide
Bag Volumetric Table - Instapakreg Quick Tufftrade
25 Bag (18 x 18)
25 Bag as a Flat Pad
6
10 10
4
6
6
14 14
2
Product
Shipping Box
25 Bag as a Shaped Cushion
12 12
4 16 16
2
8
6
845 Bag
(18 x 24)
45 Bag as a Shaped Cushion
45 Bag as a Flat Pad
Product
Shipping Box
Figure 8 Instapakreg Quick Tufftrade Bag Volumetric Table
Rev 0506 copy Sealed Air Corporation (US) 200619
(intentionally blank)
copy Sealed Air Corporation (US) 2006 Rev 0506 20
Instapak Quickreg Foam Packaging Applications Guide
Packaging Examples Using Instapak Quickreg Foam Packaging
The PSI loading for the following applications were calculated using the smallest side of each product These calculations detershymined that Instapak Quickreg was an appropriate packaging material for these products
The products in this section were also subjected to the International Safe Transit Association (ISTA) Procedure 1A Test for Shock and Vibration Testing These products all passed this industry standard test
Note The packaging examples on pages 22-25 could both be packaged in either the full overlap end loading or regular slotted box styles depicted
Note In the following examples product positioners may be used to aid the packaging process A product positioner may be a piece of wood polystyrene polyethylene polyurethane or other suitable material Product positioners are not supplied with this product A positioner is used to lift center position or hold your product so that at least 2 of space for cushioning material around your product Certain applications may require larger product positioners
CAUTION Safety glasses with side shields should be worn while using Instapak Quickreg foam packaging
Rev 0506 copy Sealed Air Corporation (US) 200621
Packaging Examples Using Instapak Quickreg Foam Packaging Glass Framed Print
1 Determine the overall dimensions of your print (L x W x H) Choose a shipping box that is at least 4 larger in each dimension (L x W x H)
2 Erect the box and do not tape the flaps
3 Place the centering product positioner (polyethylene foam block or wood) in the middle of the bottom of the box
4 Lower your artwork into the box and place it into the product positioner
5 Place another product positioner on top of the artwork at the open end of the box
6 Start a 20 bag and place the expanding bag around one of the top corners of the artwork Close and hold the flaps to form the corner cushion
7 Start another 20 bag and place the bag around the other corner of the artwork Close and hold the flaps to form the second corner cushion
8 Remove the centering product positioner and tape these flaps closed
9 Rotate the box and open the flaps
Note Be careful when rotating the box that the artwork does not slip out of the untaped end of the box
10 Repeat steps 6 and 7
11 Remove the centering product positioner Start another 20 bag and place it down between the corrugated box and the front (glass) side of the artwork
12 Verify that the print is locked in place Close and seal the box
copy Sealed Air Corporation (US) 2006 Rev 0506 22
Instapak Quickreg Foam Packaging Applications Guide
Packaging Examples Using Instapak Quickreg Foam Packaging Glass Framed Print (cont)
62
2
STEP 12
STEP 4 STEP 5 STEP 6
STEP 8 STEP 11
Figure 9 Packaging a Glass Framed Print
Rev 0506 copy Sealed Air Corporation (US) 200623
Packaging Examples Using Instapak Quickreg Foam Packaging Framed Artwork (Painting) on Canvas
1 Wrap the painting in a large piece of corrugated and secure it around the frame
Note This is necessary so the cushions do not touch the canvas and cause the canvas to stretch
2 Determine the overall dimensions of your painting (L x W x H) Choose a shipping box that is at least 4 larger in each dimension (L x W x H)
3 Locate or make two 2 (or larger if required) blocks to be used as product positioners Then place them in one corner farthest from you
4 Start a 20 bag
5 Place the bag in the center of the bottom of the box
6 Place the painting into the center of the box on top of the rising bag of foam (be sure that the back of the painting is placed against the foam cushion Continue to hold the painting so that the bag rises to meet the frame and forms a 2 high cushion Hold the painting until the bag supports the frame This takes about 8 seconds
7 Be sure the painting is centered in the box
8 Activate a 20 bag and place it in the corner closest to you and opposite the two 2 foam blocks
9 Close and hold the two flaps closest to you over the expanding bag This will help the cushion form around the corner of the painting
10 After the bag stops expanding open the flaps and rotate the box so the two foam blocks are in front of you
11 Pull the blocks out and activate a 20 bag and place it in this corner Close and hold the two flaps over the expanding bag
12 Activate a 20 bag and place it in the next corner Close and hold the two flaps over the expanding bag
13 Activate a 20 bag and place it in the final corner Close and hold the two flaps over the expanding bag
14 Verify that the painting is locked in place Close and seal the box
copy Sealed Air Corporation (US) 2006 Rev 0506 24
Instapak Quickreg Foam Packaging Applications Guide
Packaging Examples Using Instapak Quickreg Foam Packaging Framed Artwork (Painting) on Canvas (cont)
Foam Blocks
STEP 14
STEP 3 STEP 5 STEP 6
STEP 8 STEP 9
Figure 10 Packaging Framed Artwork (Painting) on Canvas
Rev 0506 copy Sealed Air Corporation (US) 200625
Packaging Examples Using Instapak Quickreg Foam Packaging Clock
Note If you gently shake the clock and hear a rattling noise an additional step will need to be taken to ensure moving parts are secured before shipping
1 Place a piece of flexible foam between the chimes and hammers before packaging the clock This will stop any internal movement and will protect them from shock and vibration during shipping
2 If the clock has a front door andor a back panel place an elastic band around the clock to keep the doors and panels closed
3 Determine the overall dimensions of your clock (L x W x H) Choose a shipping box that is at least 4 larger in each dimension (L x W x H)
4 Activate a 60 bag
5 Place the bag in the center of the bottom of the box
6 Place the clock in the center of the box on top of the rising bag of foam Continue to hold the clock so that the bag rises to meet the clock and forms a 2 high cushion Hold the product until the bag supports the clock This takes about 8 seconds
7 Be sure the clock is centered in the box
8 Activate a 60 bag and place it over the bottom half of the clock Close and hold the flap at this end of the box as the foam rises This will help the cushion form around the clock Hold the other end of the clock at the same time to make sure the rising foam does not push the clock out of the center of the box
9 Activate another 60 bag and place it over the opposite half of the clock Close and hold the two major flaps as the foam rises This will help the cushion form around the clock
10 Verify that the clock is locked in place Close and seal the box
copy Sealed Air Corporation (US) 2006 Rev 0506 26
Instapak Quickreg Foam Packaging Applications Guide
Packaging Examples Using Instapak Quickreg Foam Packaging Clock (cont)
STEP 5 STEP 6 STEP 8
STEP 9 STEP 10
Figure 11 Packaging a Clock
CROSS SECTION
Lower CushionCarton
Upper Cushions
Clock
Rev 0506 copy Sealed Air Corporation (US) 200627
Packaging Examples Using Instapak Quickreg Foam Packaging Porcelain Vase
1 Determine the overall dimensions of your vase (L x W x H) Choose a shipping box that is at least 4 larger in each dimension (L x W x H)
2 Activate a 40 bag
3 Place the bag in the center of the bottom of the box
4 Place the vase in the center of the box on top of the rising bag of foam Continue to hold the vase so that the bag rises up to form a 2 high protective cushion Hold the product until the bag supports the vase This takes about 8 seconds
5 Be sure the vase is centered in the box
6 Activate a 40 bag and place it on top of the vase
7 Close and hold the two major flaps as the foam rises This will help the cushion form around the vase
8 Verify that the vase is locked in place Close and seal the box
copy Sealed Air Corporation (US) 2006 Rev 0506 28
Instapak Quickreg Foam Packaging Applications Guide
Packaging Examples Using Instapak Quickreg Foam Packaging Porcelain Vase (cont)
STEP 3 STEP 4 STEP 6
STEP 7 STEP 8
Figure 12 Packaging a Vase
CROSS SECTION
Lower CushionCarton
Upper Cushion
Vase
Rev 0506 copy Sealed Air Corporation (US) 200629
Packaging Examples Using Instapak Quickreg Foam Packaging Crystal Pitcher
1 Determine the overall dimensions of your pitcher (L x W x H) Choose a shipping box that is at least 4 larger in each dimension (L x W x H)
2 Activate a 40 bag
3 Place the bag in the center of the bottom of the box
4 Place the pitcher in the center of the box on top of the rising bag of foam Continue to hold the pitcher so that the bag rises up to form a 2 high protective cushion Hold the product until the bag supports the pitcher This takes about 8 seconds
5 Be sure the pitcher is centered in the box
6 Activate a 40 bag and place it on top of the pitcher
7 Close and hold the two major flaps as the foam rises This will help the cushion form around the pitcher
8 Verify that the pitcher is locked in place Close and seal the box
copy Sealed Air Corporation (US) 2006 Rev 0506 30
Instapak Quickreg Foam Packaging Applications Guide
Packaging Examples Using Instapak Quickreg Foam Packaging Crystal Pitcher (cont)
STEP 3 STEP 4 STEP 6
STEP 7 STEP 8
Figure 13 Packaging a Crystal Pitcher
CROSS SECTION
Lower CushionCarton
Upper Cushion
Pitcher
Rev 0506 copy Sealed Air Corporation (US) 200631
Packaging Examples Using Instapak Quickreg Foam Packaging Computer Monitor
1 Determine the overall dimensions of your monitor (L x W x H) Choose a shipping box that is at least 4 larger in each dimension (L x W x H)
2 Erect the box upside down so the bottom of the box is facing up Do not tape the flaps
3 Place a 2 product positioner in the center of the bottom of the box
4 By using the bag volumetric table (pages 15-17) it is determined that it will take more than two (2) cushions to package the monitor
5 This product will take two (2) 80 bags on the bottom and four (4) 60 bags on top as corner cushions
6 Place the monitor on the product positioner with the screen side facing up
7 Activate a 80 bag
8 Hold the bag in the box so half the bag goes down the side of the monitor and half the bag covers the top side of the monitor facing you
9 Once the cushion can support itself close and hold the flaps on this side of the box to help it form around the monitor Hold the other end of the monitor at the same time to make sure the rising foam does not push the monitor out of the center of the box
10 Activate another 80 bag and place it in the box on the opposite side of the first bag Once the cushion can support itself close and hold the flaps on this side of the box This will help the cushion form around the monitor
11 Close and tape the four (4) flaps on this side of the box
(Continued on page 34)
copy Sealed Air Corporation (US) 2006 Rev 0506 32
Instapak Quickreg Foam Packaging Applications Guide
Packaging Examples Using Instapak Quickreg Foam Packaging Computer Monitor (cont)
STEP 6STEP 3 STEP 8
STEP 9 STEP 10 STEP 11
Product Positioner
Figure 14 Packaging a Computer Monitor - 1
Rev 0506 copy Sealed Air Corporation (US) 200633
Packaging Examples Using Instapak Quickreg Foam Packaging Computer Monitor (cont)
12 Carefully roll the box over so the other side of the box can be opened
Note The flaps on this side are not taped closed so be careful the monitor does not fall out while doing this
13 Open the flaps on this side and remove the product positioner
14 Activate a 60 bag and place it about half way down in one of the corners
15 Once the cushion can support itself close and hold the flaps on this side of the box to help it form around the monitor Hold the opposing corner of the monitor at the same time to make sure the rising foam does not push the monitor out of the center of the box
16 Activate another 60 bag and place it in the opposite corner of the first bag Close and hold the flaps on this side of the box to help it form around the monitor
17 Activate another 60 bag and place it in the third corner so the bag can form Again hold the monitor so it wonrsquot shift
18 Repeat step 17 for the fourth corner
19 Tape the flaps closed on this side and the box is ready to ship
copy Sealed Air Corporation (US) 2006 Rev 0506 34
Instapak Quickreg Foam Packaging Applications Guide
Packaging Examples Using Instapak Quickreg Foam Packaging Computer Monitor (cont)
STEP 15
STEP 14STEP 13
STEP 19
Figure 15 Packaging a Computer Monitor - 2
Rev 0506 copy Sealed Air Corporation (US) 200635
Notes
copy Sealed Air Corporation (US) 2006 Rev 0506 36
Instapak Quickreg Foam Packaging Applications Guide
Rev 0506 copy Sealed Air Corporation (US) 200637
38copy Sealed Air Corporation (US) 2006 Rev 0506
Protective Packaging 10 Old Sherman Turnpike Danbury CT 06810 203-791-3500 Fax 203-791-3618 wwwinstapakquickcom
Our Products Protect Your Productsreg
Corporate Office Sealed Air Corporation (US) Park 80 East Saddle Brook NJ 07663-5291 wwwsealedaircom reg Reg US Pat amp TM Off copy Sealed Air Corporation (US) 2006 All rights reserved Printed in the USA The 9 Dot Logo and Sealed Air are registered trademarks of Sealed Air Corporation (US)
Instapak Quickreg Applications Guide T-124 0506

Instapak Quickreg Foam Packaging Applications Guide
Bag Volumetric Table - Instapakreg Quick Tufftrade
25 Bag (18 x 18)
25 Bag as a Flat Pad
6
10 10
4
6
6
14 14
2
Product
Shipping Box
25 Bag as a Shaped Cushion
12 12
4 16 16
2
8
6
845 Bag
(18 x 24)
45 Bag as a Shaped Cushion
45 Bag as a Flat Pad
Product
Shipping Box
Figure 8 Instapakreg Quick Tufftrade Bag Volumetric Table
Rev 0506 copy Sealed Air Corporation (US) 200619
(intentionally blank)
copy Sealed Air Corporation (US) 2006 Rev 0506 20
Instapak Quickreg Foam Packaging Applications Guide
Packaging Examples Using Instapak Quickreg Foam Packaging
The PSI loading for the following applications were calculated using the smallest side of each product These calculations detershymined that Instapak Quickreg was an appropriate packaging material for these products
The products in this section were also subjected to the International Safe Transit Association (ISTA) Procedure 1A Test for Shock and Vibration Testing These products all passed this industry standard test
Note The packaging examples on pages 22-25 could both be packaged in either the full overlap end loading or regular slotted box styles depicted
Note In the following examples product positioners may be used to aid the packaging process A product positioner may be a piece of wood polystyrene polyethylene polyurethane or other suitable material Product positioners are not supplied with this product A positioner is used to lift center position or hold your product so that at least 2 of space for cushioning material around your product Certain applications may require larger product positioners
CAUTION Safety glasses with side shields should be worn while using Instapak Quickreg foam packaging
Rev 0506 copy Sealed Air Corporation (US) 200621
Packaging Examples Using Instapak Quickreg Foam Packaging Glass Framed Print
1 Determine the overall dimensions of your print (L x W x H) Choose a shipping box that is at least 4 larger in each dimension (L x W x H)
2 Erect the box and do not tape the flaps
3 Place the centering product positioner (polyethylene foam block or wood) in the middle of the bottom of the box
4 Lower your artwork into the box and place it into the product positioner
5 Place another product positioner on top of the artwork at the open end of the box
6 Start a 20 bag and place the expanding bag around one of the top corners of the artwork Close and hold the flaps to form the corner cushion
7 Start another 20 bag and place the bag around the other corner of the artwork Close and hold the flaps to form the second corner cushion
8 Remove the centering product positioner and tape these flaps closed
9 Rotate the box and open the flaps
Note Be careful when rotating the box that the artwork does not slip out of the untaped end of the box
10 Repeat steps 6 and 7
11 Remove the centering product positioner Start another 20 bag and place it down between the corrugated box and the front (glass) side of the artwork
12 Verify that the print is locked in place Close and seal the box
copy Sealed Air Corporation (US) 2006 Rev 0506 22
Instapak Quickreg Foam Packaging Applications Guide
Packaging Examples Using Instapak Quickreg Foam Packaging Glass Framed Print (cont)
62
2
STEP 12
STEP 4 STEP 5 STEP 6
STEP 8 STEP 11
Figure 9 Packaging a Glass Framed Print
Rev 0506 copy Sealed Air Corporation (US) 200623
Packaging Examples Using Instapak Quickreg Foam Packaging Framed Artwork (Painting) on Canvas
1 Wrap the painting in a large piece of corrugated and secure it around the frame
Note This is necessary so the cushions do not touch the canvas and cause the canvas to stretch
2 Determine the overall dimensions of your painting (L x W x H) Choose a shipping box that is at least 4 larger in each dimension (L x W x H)
3 Locate or make two 2 (or larger if required) blocks to be used as product positioners Then place them in one corner farthest from you
4 Start a 20 bag
5 Place the bag in the center of the bottom of the box
6 Place the painting into the center of the box on top of the rising bag of foam (be sure that the back of the painting is placed against the foam cushion Continue to hold the painting so that the bag rises to meet the frame and forms a 2 high cushion Hold the painting until the bag supports the frame This takes about 8 seconds
7 Be sure the painting is centered in the box
8 Activate a 20 bag and place it in the corner closest to you and opposite the two 2 foam blocks
9 Close and hold the two flaps closest to you over the expanding bag This will help the cushion form around the corner of the painting
10 After the bag stops expanding open the flaps and rotate the box so the two foam blocks are in front of you
11 Pull the blocks out and activate a 20 bag and place it in this corner Close and hold the two flaps over the expanding bag
12 Activate a 20 bag and place it in the next corner Close and hold the two flaps over the expanding bag
13 Activate a 20 bag and place it in the final corner Close and hold the two flaps over the expanding bag
14 Verify that the painting is locked in place Close and seal the box
copy Sealed Air Corporation (US) 2006 Rev 0506 24
Instapak Quickreg Foam Packaging Applications Guide
Packaging Examples Using Instapak Quickreg Foam Packaging Framed Artwork (Painting) on Canvas (cont)
Foam Blocks
STEP 14
STEP 3 STEP 5 STEP 6
STEP 8 STEP 9
Figure 10 Packaging Framed Artwork (Painting) on Canvas
Rev 0506 copy Sealed Air Corporation (US) 200625
Packaging Examples Using Instapak Quickreg Foam Packaging Clock
Note If you gently shake the clock and hear a rattling noise an additional step will need to be taken to ensure moving parts are secured before shipping
1 Place a piece of flexible foam between the chimes and hammers before packaging the clock This will stop any internal movement and will protect them from shock and vibration during shipping
2 If the clock has a front door andor a back panel place an elastic band around the clock to keep the doors and panels closed
3 Determine the overall dimensions of your clock (L x W x H) Choose a shipping box that is at least 4 larger in each dimension (L x W x H)
4 Activate a 60 bag
5 Place the bag in the center of the bottom of the box
6 Place the clock in the center of the box on top of the rising bag of foam Continue to hold the clock so that the bag rises to meet the clock and forms a 2 high cushion Hold the product until the bag supports the clock This takes about 8 seconds
7 Be sure the clock is centered in the box
8 Activate a 60 bag and place it over the bottom half of the clock Close and hold the flap at this end of the box as the foam rises This will help the cushion form around the clock Hold the other end of the clock at the same time to make sure the rising foam does not push the clock out of the center of the box
9 Activate another 60 bag and place it over the opposite half of the clock Close and hold the two major flaps as the foam rises This will help the cushion form around the clock
10 Verify that the clock is locked in place Close and seal the box
copy Sealed Air Corporation (US) 2006 Rev 0506 26
Instapak Quickreg Foam Packaging Applications Guide
Packaging Examples Using Instapak Quickreg Foam Packaging Clock (cont)
STEP 5 STEP 6 STEP 8
STEP 9 STEP 10
Figure 11 Packaging a Clock
CROSS SECTION
Lower CushionCarton
Upper Cushions
Clock
Rev 0506 copy Sealed Air Corporation (US) 200627
Packaging Examples Using Instapak Quickreg Foam Packaging Porcelain Vase
1 Determine the overall dimensions of your vase (L x W x H) Choose a shipping box that is at least 4 larger in each dimension (L x W x H)
2 Activate a 40 bag
3 Place the bag in the center of the bottom of the box
4 Place the vase in the center of the box on top of the rising bag of foam Continue to hold the vase so that the bag rises up to form a 2 high protective cushion Hold the product until the bag supports the vase This takes about 8 seconds
5 Be sure the vase is centered in the box
6 Activate a 40 bag and place it on top of the vase
7 Close and hold the two major flaps as the foam rises This will help the cushion form around the vase
8 Verify that the vase is locked in place Close and seal the box
copy Sealed Air Corporation (US) 2006 Rev 0506 28
Instapak Quickreg Foam Packaging Applications Guide
Packaging Examples Using Instapak Quickreg Foam Packaging Porcelain Vase (cont)
STEP 3 STEP 4 STEP 6
STEP 7 STEP 8
Figure 12 Packaging a Vase
CROSS SECTION
Lower CushionCarton
Upper Cushion
Vase
Rev 0506 copy Sealed Air Corporation (US) 200629
Packaging Examples Using Instapak Quickreg Foam Packaging Crystal Pitcher
1 Determine the overall dimensions of your pitcher (L x W x H) Choose a shipping box that is at least 4 larger in each dimension (L x W x H)
2 Activate a 40 bag
3 Place the bag in the center of the bottom of the box
4 Place the pitcher in the center of the box on top of the rising bag of foam Continue to hold the pitcher so that the bag rises up to form a 2 high protective cushion Hold the product until the bag supports the pitcher This takes about 8 seconds
5 Be sure the pitcher is centered in the box
6 Activate a 40 bag and place it on top of the pitcher
7 Close and hold the two major flaps as the foam rises This will help the cushion form around the pitcher
8 Verify that the pitcher is locked in place Close and seal the box
copy Sealed Air Corporation (US) 2006 Rev 0506 30
Instapak Quickreg Foam Packaging Applications Guide
Packaging Examples Using Instapak Quickreg Foam Packaging Crystal Pitcher (cont)
STEP 3 STEP 4 STEP 6
STEP 7 STEP 8
Figure 13 Packaging a Crystal Pitcher
CROSS SECTION
Lower CushionCarton
Upper Cushion
Pitcher
Rev 0506 copy Sealed Air Corporation (US) 200631
Packaging Examples Using Instapak Quickreg Foam Packaging Computer Monitor
1 Determine the overall dimensions of your monitor (L x W x H) Choose a shipping box that is at least 4 larger in each dimension (L x W x H)
2 Erect the box upside down so the bottom of the box is facing up Do not tape the flaps
3 Place a 2 product positioner in the center of the bottom of the box
4 By using the bag volumetric table (pages 15-17) it is determined that it will take more than two (2) cushions to package the monitor
5 This product will take two (2) 80 bags on the bottom and four (4) 60 bags on top as corner cushions
6 Place the monitor on the product positioner with the screen side facing up
7 Activate a 80 bag
8 Hold the bag in the box so half the bag goes down the side of the monitor and half the bag covers the top side of the monitor facing you
9 Once the cushion can support itself close and hold the flaps on this side of the box to help it form around the monitor Hold the other end of the monitor at the same time to make sure the rising foam does not push the monitor out of the center of the box
10 Activate another 80 bag and place it in the box on the opposite side of the first bag Once the cushion can support itself close and hold the flaps on this side of the box This will help the cushion form around the monitor
11 Close and tape the four (4) flaps on this side of the box
(Continued on page 34)
copy Sealed Air Corporation (US) 2006 Rev 0506 32
Instapak Quickreg Foam Packaging Applications Guide
Packaging Examples Using Instapak Quickreg Foam Packaging Computer Monitor (cont)
STEP 6STEP 3 STEP 8
STEP 9 STEP 10 STEP 11
Product Positioner
Figure 14 Packaging a Computer Monitor - 1
Rev 0506 copy Sealed Air Corporation (US) 200633
Packaging Examples Using Instapak Quickreg Foam Packaging Computer Monitor (cont)
12 Carefully roll the box over so the other side of the box can be opened
Note The flaps on this side are not taped closed so be careful the monitor does not fall out while doing this
13 Open the flaps on this side and remove the product positioner
14 Activate a 60 bag and place it about half way down in one of the corners
15 Once the cushion can support itself close and hold the flaps on this side of the box to help it form around the monitor Hold the opposing corner of the monitor at the same time to make sure the rising foam does not push the monitor out of the center of the box
16 Activate another 60 bag and place it in the opposite corner of the first bag Close and hold the flaps on this side of the box to help it form around the monitor
17 Activate another 60 bag and place it in the third corner so the bag can form Again hold the monitor so it wonrsquot shift
18 Repeat step 17 for the fourth corner
19 Tape the flaps closed on this side and the box is ready to ship
copy Sealed Air Corporation (US) 2006 Rev 0506 34
Instapak Quickreg Foam Packaging Applications Guide
Packaging Examples Using Instapak Quickreg Foam Packaging Computer Monitor (cont)
STEP 15
STEP 14STEP 13
STEP 19
Figure 15 Packaging a Computer Monitor - 2
Rev 0506 copy Sealed Air Corporation (US) 200635
Notes
copy Sealed Air Corporation (US) 2006 Rev 0506 36
Instapak Quickreg Foam Packaging Applications Guide
Rev 0506 copy Sealed Air Corporation (US) 200637
38copy Sealed Air Corporation (US) 2006 Rev 0506
Protective Packaging 10 Old Sherman Turnpike Danbury CT 06810 203-791-3500 Fax 203-791-3618 wwwinstapakquickcom
Our Products Protect Your Productsreg
Corporate Office Sealed Air Corporation (US) Park 80 East Saddle Brook NJ 07663-5291 wwwsealedaircom reg Reg US Pat amp TM Off copy Sealed Air Corporation (US) 2006 All rights reserved Printed in the USA The 9 Dot Logo and Sealed Air are registered trademarks of Sealed Air Corporation (US)
Instapak Quickreg Applications Guide T-124 0506

Instapak Quickreg Foam Packaging Applications Guide
Packaging Examples Using Instapak Quickreg Foam Packaging
The PSI loading for the following applications were calculated using the smallest side of each product These calculations detershymined that Instapak Quickreg was an appropriate packaging material for these products
The products in this section were also subjected to the International Safe Transit Association (ISTA) Procedure 1A Test for Shock and Vibration Testing These products all passed this industry standard test
Note The packaging examples on pages 22-25 could both be packaged in either the full overlap end loading or regular slotted box styles depicted
Note In the following examples product positioners may be used to aid the packaging process A product positioner may be a piece of wood polystyrene polyethylene polyurethane or other suitable material Product positioners are not supplied with this product A positioner is used to lift center position or hold your product so that at least 2 of space for cushioning material around your product Certain applications may require larger product positioners
CAUTION Safety glasses with side shields should be worn while using Instapak Quickreg foam packaging
Rev 0506 copy Sealed Air Corporation (US) 200621
Packaging Examples Using Instapak Quickreg Foam Packaging Glass Framed Print
1 Determine the overall dimensions of your print (L x W x H) Choose a shipping box that is at least 4 larger in each dimension (L x W x H)
2 Erect the box and do not tape the flaps
3 Place the centering product positioner (polyethylene foam block or wood) in the middle of the bottom of the box
4 Lower your artwork into the box and place it into the product positioner
5 Place another product positioner on top of the artwork at the open end of the box
6 Start a 20 bag and place the expanding bag around one of the top corners of the artwork Close and hold the flaps to form the corner cushion
7 Start another 20 bag and place the bag around the other corner of the artwork Close and hold the flaps to form the second corner cushion
8 Remove the centering product positioner and tape these flaps closed
9 Rotate the box and open the flaps
Note Be careful when rotating the box that the artwork does not slip out of the untaped end of the box
10 Repeat steps 6 and 7
11 Remove the centering product positioner Start another 20 bag and place it down between the corrugated box and the front (glass) side of the artwork
12 Verify that the print is locked in place Close and seal the box
copy Sealed Air Corporation (US) 2006 Rev 0506 22
Instapak Quickreg Foam Packaging Applications Guide
Packaging Examples Using Instapak Quickreg Foam Packaging Glass Framed Print (cont)
62
2
STEP 12
STEP 4 STEP 5 STEP 6
STEP 8 STEP 11
Figure 9 Packaging a Glass Framed Print
Rev 0506 copy Sealed Air Corporation (US) 200623
Packaging Examples Using Instapak Quickreg Foam Packaging Framed Artwork (Painting) on Canvas
1 Wrap the painting in a large piece of corrugated and secure it around the frame
Note This is necessary so the cushions do not touch the canvas and cause the canvas to stretch
2 Determine the overall dimensions of your painting (L x W x H) Choose a shipping box that is at least 4 larger in each dimension (L x W x H)
3 Locate or make two 2 (or larger if required) blocks to be used as product positioners Then place them in one corner farthest from you
4 Start a 20 bag
5 Place the bag in the center of the bottom of the box
6 Place the painting into the center of the box on top of the rising bag of foam (be sure that the back of the painting is placed against the foam cushion Continue to hold the painting so that the bag rises to meet the frame and forms a 2 high cushion Hold the painting until the bag supports the frame This takes about 8 seconds
7 Be sure the painting is centered in the box
8 Activate a 20 bag and place it in the corner closest to you and opposite the two 2 foam blocks
9 Close and hold the two flaps closest to you over the expanding bag This will help the cushion form around the corner of the painting
10 After the bag stops expanding open the flaps and rotate the box so the two foam blocks are in front of you
11 Pull the blocks out and activate a 20 bag and place it in this corner Close and hold the two flaps over the expanding bag
12 Activate a 20 bag and place it in the next corner Close and hold the two flaps over the expanding bag
13 Activate a 20 bag and place it in the final corner Close and hold the two flaps over the expanding bag
14 Verify that the painting is locked in place Close and seal the box
copy Sealed Air Corporation (US) 2006 Rev 0506 24
Instapak Quickreg Foam Packaging Applications Guide
Packaging Examples Using Instapak Quickreg Foam Packaging Framed Artwork (Painting) on Canvas (cont)
Foam Blocks
STEP 14
STEP 3 STEP 5 STEP 6
STEP 8 STEP 9
Figure 10 Packaging Framed Artwork (Painting) on Canvas
Rev 0506 copy Sealed Air Corporation (US) 200625
Packaging Examples Using Instapak Quickreg Foam Packaging Clock
Note If you gently shake the clock and hear a rattling noise an additional step will need to be taken to ensure moving parts are secured before shipping
1 Place a piece of flexible foam between the chimes and hammers before packaging the clock This will stop any internal movement and will protect them from shock and vibration during shipping
2 If the clock has a front door andor a back panel place an elastic band around the clock to keep the doors and panels closed
3 Determine the overall dimensions of your clock (L x W x H) Choose a shipping box that is at least 4 larger in each dimension (L x W x H)
4 Activate a 60 bag
5 Place the bag in the center of the bottom of the box
6 Place the clock in the center of the box on top of the rising bag of foam Continue to hold the clock so that the bag rises to meet the clock and forms a 2 high cushion Hold the product until the bag supports the clock This takes about 8 seconds
7 Be sure the clock is centered in the box
8 Activate a 60 bag and place it over the bottom half of the clock Close and hold the flap at this end of the box as the foam rises This will help the cushion form around the clock Hold the other end of the clock at the same time to make sure the rising foam does not push the clock out of the center of the box
9 Activate another 60 bag and place it over the opposite half of the clock Close and hold the two major flaps as the foam rises This will help the cushion form around the clock
10 Verify that the clock is locked in place Close and seal the box
copy Sealed Air Corporation (US) 2006 Rev 0506 26
Instapak Quickreg Foam Packaging Applications Guide
Packaging Examples Using Instapak Quickreg Foam Packaging Clock (cont)
STEP 5 STEP 6 STEP 8
STEP 9 STEP 10
Figure 11 Packaging a Clock
CROSS SECTION
Lower CushionCarton
Upper Cushions
Clock
Rev 0506 copy Sealed Air Corporation (US) 200627
Packaging Examples Using Instapak Quickreg Foam Packaging Porcelain Vase
1 Determine the overall dimensions of your vase (L x W x H) Choose a shipping box that is at least 4 larger in each dimension (L x W x H)
2 Activate a 40 bag
3 Place the bag in the center of the bottom of the box
4 Place the vase in the center of the box on top of the rising bag of foam Continue to hold the vase so that the bag rises up to form a 2 high protective cushion Hold the product until the bag supports the vase This takes about 8 seconds
5 Be sure the vase is centered in the box
6 Activate a 40 bag and place it on top of the vase
7 Close and hold the two major flaps as the foam rises This will help the cushion form around the vase
8 Verify that the vase is locked in place Close and seal the box
copy Sealed Air Corporation (US) 2006 Rev 0506 28
Instapak Quickreg Foam Packaging Applications Guide
Packaging Examples Using Instapak Quickreg Foam Packaging Porcelain Vase (cont)
STEP 3 STEP 4 STEP 6
STEP 7 STEP 8
Figure 12 Packaging a Vase
CROSS SECTION
Lower CushionCarton
Upper Cushion
Vase
Rev 0506 copy Sealed Air Corporation (US) 200629
Packaging Examples Using Instapak Quickreg Foam Packaging Crystal Pitcher
1 Determine the overall dimensions of your pitcher (L x W x H) Choose a shipping box that is at least 4 larger in each dimension (L x W x H)
2 Activate a 40 bag
3 Place the bag in the center of the bottom of the box
4 Place the pitcher in the center of the box on top of the rising bag of foam Continue to hold the pitcher so that the bag rises up to form a 2 high protective cushion Hold the product until the bag supports the pitcher This takes about 8 seconds
5 Be sure the pitcher is centered in the box
6 Activate a 40 bag and place it on top of the pitcher
7 Close and hold the two major flaps as the foam rises This will help the cushion form around the pitcher
8 Verify that the pitcher is locked in place Close and seal the box
copy Sealed Air Corporation (US) 2006 Rev 0506 30
Instapak Quickreg Foam Packaging Applications Guide
Packaging Examples Using Instapak Quickreg Foam Packaging Crystal Pitcher (cont)
STEP 3 STEP 4 STEP 6
STEP 7 STEP 8
Figure 13 Packaging a Crystal Pitcher
CROSS SECTION
Lower CushionCarton
Upper Cushion
Pitcher
Rev 0506 copy Sealed Air Corporation (US) 200631
Packaging Examples Using Instapak Quickreg Foam Packaging Computer Monitor
1 Determine the overall dimensions of your monitor (L x W x H) Choose a shipping box that is at least 4 larger in each dimension (L x W x H)
2 Erect the box upside down so the bottom of the box is facing up Do not tape the flaps
3 Place a 2 product positioner in the center of the bottom of the box
4 By using the bag volumetric table (pages 15-17) it is determined that it will take more than two (2) cushions to package the monitor
5 This product will take two (2) 80 bags on the bottom and four (4) 60 bags on top as corner cushions
6 Place the monitor on the product positioner with the screen side facing up
7 Activate a 80 bag
8 Hold the bag in the box so half the bag goes down the side of the monitor and half the bag covers the top side of the monitor facing you
9 Once the cushion can support itself close and hold the flaps on this side of the box to help it form around the monitor Hold the other end of the monitor at the same time to make sure the rising foam does not push the monitor out of the center of the box
10 Activate another 80 bag and place it in the box on the opposite side of the first bag Once the cushion can support itself close and hold the flaps on this side of the box This will help the cushion form around the monitor
11 Close and tape the four (4) flaps on this side of the box
(Continued on page 34)
copy Sealed Air Corporation (US) 2006 Rev 0506 32
Instapak Quickreg Foam Packaging Applications Guide
Packaging Examples Using Instapak Quickreg Foam Packaging Computer Monitor (cont)
STEP 6STEP 3 STEP 8
STEP 9 STEP 10 STEP 11
Product Positioner
Figure 14 Packaging a Computer Monitor - 1
Rev 0506 copy Sealed Air Corporation (US) 200633
Packaging Examples Using Instapak Quickreg Foam Packaging Computer Monitor (cont)
12 Carefully roll the box over so the other side of the box can be opened
Note The flaps on this side are not taped closed so be careful the monitor does not fall out while doing this
13 Open the flaps on this side and remove the product positioner
14 Activate a 60 bag and place it about half way down in one of the corners
15 Once the cushion can support itself close and hold the flaps on this side of the box to help it form around the monitor Hold the opposing corner of the monitor at the same time to make sure the rising foam does not push the monitor out of the center of the box
16 Activate another 60 bag and place it in the opposite corner of the first bag Close and hold the flaps on this side of the box to help it form around the monitor
17 Activate another 60 bag and place it in the third corner so the bag can form Again hold the monitor so it wonrsquot shift
18 Repeat step 17 for the fourth corner
19 Tape the flaps closed on this side and the box is ready to ship
copy Sealed Air Corporation (US) 2006 Rev 0506 34
Instapak Quickreg Foam Packaging Applications Guide
Packaging Examples Using Instapak Quickreg Foam Packaging Computer Monitor (cont)
STEP 15
STEP 14STEP 13
STEP 19
Figure 15 Packaging a Computer Monitor - 2
Rev 0506 copy Sealed Air Corporation (US) 200635
Notes
copy Sealed Air Corporation (US) 2006 Rev 0506 36
Instapak Quickreg Foam Packaging Applications Guide
Rev 0506 copy Sealed Air Corporation (US) 200637
38copy Sealed Air Corporation (US) 2006 Rev 0506
Protective Packaging 10 Old Sherman Turnpike Danbury CT 06810 203-791-3500 Fax 203-791-3618 wwwinstapakquickcom
Our Products Protect Your Productsreg
Corporate Office Sealed Air Corporation (US) Park 80 East Saddle Brook NJ 07663-5291 wwwsealedaircom reg Reg US Pat amp TM Off copy Sealed Air Corporation (US) 2006 All rights reserved Printed in the USA The 9 Dot Logo and Sealed Air are registered trademarks of Sealed Air Corporation (US)
Instapak Quickreg Applications Guide T-124 0506

Instapak Quickreg Foam Packaging Applications Guide
Packaging Examples Using Instapak Quickreg Foam Packaging Glass Framed Print (cont)
62
2
STEP 12
STEP 4 STEP 5 STEP 6
STEP 8 STEP 11
Figure 9 Packaging a Glass Framed Print
Rev 0506 copy Sealed Air Corporation (US) 200623
Packaging Examples Using Instapak Quickreg Foam Packaging Framed Artwork (Painting) on Canvas
1 Wrap the painting in a large piece of corrugated and secure it around the frame
Note This is necessary so the cushions do not touch the canvas and cause the canvas to stretch
2 Determine the overall dimensions of your painting (L x W x H) Choose a shipping box that is at least 4 larger in each dimension (L x W x H)
3 Locate or make two 2 (or larger if required) blocks to be used as product positioners Then place them in one corner farthest from you
4 Start a 20 bag
5 Place the bag in the center of the bottom of the box
6 Place the painting into the center of the box on top of the rising bag of foam (be sure that the back of the painting is placed against the foam cushion Continue to hold the painting so that the bag rises to meet the frame and forms a 2 high cushion Hold the painting until the bag supports the frame This takes about 8 seconds
7 Be sure the painting is centered in the box
8 Activate a 20 bag and place it in the corner closest to you and opposite the two 2 foam blocks
9 Close and hold the two flaps closest to you over the expanding bag This will help the cushion form around the corner of the painting
10 After the bag stops expanding open the flaps and rotate the box so the two foam blocks are in front of you
11 Pull the blocks out and activate a 20 bag and place it in this corner Close and hold the two flaps over the expanding bag
12 Activate a 20 bag and place it in the next corner Close and hold the two flaps over the expanding bag
13 Activate a 20 bag and place it in the final corner Close and hold the two flaps over the expanding bag
14 Verify that the painting is locked in place Close and seal the box
copy Sealed Air Corporation (US) 2006 Rev 0506 24
Instapak Quickreg Foam Packaging Applications Guide
Packaging Examples Using Instapak Quickreg Foam Packaging Framed Artwork (Painting) on Canvas (cont)
Foam Blocks
STEP 14
STEP 3 STEP 5 STEP 6
STEP 8 STEP 9
Figure 10 Packaging Framed Artwork (Painting) on Canvas
Rev 0506 copy Sealed Air Corporation (US) 200625
Packaging Examples Using Instapak Quickreg Foam Packaging Clock
Note If you gently shake the clock and hear a rattling noise an additional step will need to be taken to ensure moving parts are secured before shipping
1 Place a piece of flexible foam between the chimes and hammers before packaging the clock This will stop any internal movement and will protect them from shock and vibration during shipping
2 If the clock has a front door andor a back panel place an elastic band around the clock to keep the doors and panels closed
3 Determine the overall dimensions of your clock (L x W x H) Choose a shipping box that is at least 4 larger in each dimension (L x W x H)
4 Activate a 60 bag
5 Place the bag in the center of the bottom of the box
6 Place the clock in the center of the box on top of the rising bag of foam Continue to hold the clock so that the bag rises to meet the clock and forms a 2 high cushion Hold the product until the bag supports the clock This takes about 8 seconds
7 Be sure the clock is centered in the box
8 Activate a 60 bag and place it over the bottom half of the clock Close and hold the flap at this end of the box as the foam rises This will help the cushion form around the clock Hold the other end of the clock at the same time to make sure the rising foam does not push the clock out of the center of the box
9 Activate another 60 bag and place it over the opposite half of the clock Close and hold the two major flaps as the foam rises This will help the cushion form around the clock
10 Verify that the clock is locked in place Close and seal the box
copy Sealed Air Corporation (US) 2006 Rev 0506 26
Instapak Quickreg Foam Packaging Applications Guide
Packaging Examples Using Instapak Quickreg Foam Packaging Clock (cont)
STEP 5 STEP 6 STEP 8
STEP 9 STEP 10
Figure 11 Packaging a Clock
CROSS SECTION
Lower CushionCarton
Upper Cushions
Clock
Rev 0506 copy Sealed Air Corporation (US) 200627
Packaging Examples Using Instapak Quickreg Foam Packaging Porcelain Vase
1 Determine the overall dimensions of your vase (L x W x H) Choose a shipping box that is at least 4 larger in each dimension (L x W x H)
2 Activate a 40 bag
3 Place the bag in the center of the bottom of the box
4 Place the vase in the center of the box on top of the rising bag of foam Continue to hold the vase so that the bag rises up to form a 2 high protective cushion Hold the product until the bag supports the vase This takes about 8 seconds
5 Be sure the vase is centered in the box
6 Activate a 40 bag and place it on top of the vase
7 Close and hold the two major flaps as the foam rises This will help the cushion form around the vase
8 Verify that the vase is locked in place Close and seal the box
copy Sealed Air Corporation (US) 2006 Rev 0506 28
Instapak Quickreg Foam Packaging Applications Guide
Packaging Examples Using Instapak Quickreg Foam Packaging Porcelain Vase (cont)
STEP 3 STEP 4 STEP 6
STEP 7 STEP 8
Figure 12 Packaging a Vase
CROSS SECTION
Lower CushionCarton
Upper Cushion
Vase
Rev 0506 copy Sealed Air Corporation (US) 200629
Packaging Examples Using Instapak Quickreg Foam Packaging Crystal Pitcher
1 Determine the overall dimensions of your pitcher (L x W x H) Choose a shipping box that is at least 4 larger in each dimension (L x W x H)
2 Activate a 40 bag
3 Place the bag in the center of the bottom of the box
4 Place the pitcher in the center of the box on top of the rising bag of foam Continue to hold the pitcher so that the bag rises up to form a 2 high protective cushion Hold the product until the bag supports the pitcher This takes about 8 seconds
5 Be sure the pitcher is centered in the box
6 Activate a 40 bag and place it on top of the pitcher
7 Close and hold the two major flaps as the foam rises This will help the cushion form around the pitcher
8 Verify that the pitcher is locked in place Close and seal the box
copy Sealed Air Corporation (US) 2006 Rev 0506 30
Instapak Quickreg Foam Packaging Applications Guide
Packaging Examples Using Instapak Quickreg Foam Packaging Crystal Pitcher (cont)
STEP 3 STEP 4 STEP 6
STEP 7 STEP 8
Figure 13 Packaging a Crystal Pitcher
CROSS SECTION
Lower CushionCarton
Upper Cushion
Pitcher
Rev 0506 copy Sealed Air Corporation (US) 200631
Packaging Examples Using Instapak Quickreg Foam Packaging Computer Monitor
1 Determine the overall dimensions of your monitor (L x W x H) Choose a shipping box that is at least 4 larger in each dimension (L x W x H)
2 Erect the box upside down so the bottom of the box is facing up Do not tape the flaps
3 Place a 2 product positioner in the center of the bottom of the box
4 By using the bag volumetric table (pages 15-17) it is determined that it will take more than two (2) cushions to package the monitor
5 This product will take two (2) 80 bags on the bottom and four (4) 60 bags on top as corner cushions
6 Place the monitor on the product positioner with the screen side facing up
7 Activate a 80 bag
8 Hold the bag in the box so half the bag goes down the side of the monitor and half the bag covers the top side of the monitor facing you
9 Once the cushion can support itself close and hold the flaps on this side of the box to help it form around the monitor Hold the other end of the monitor at the same time to make sure the rising foam does not push the monitor out of the center of the box
10 Activate another 80 bag and place it in the box on the opposite side of the first bag Once the cushion can support itself close and hold the flaps on this side of the box This will help the cushion form around the monitor
11 Close and tape the four (4) flaps on this side of the box
(Continued on page 34)
copy Sealed Air Corporation (US) 2006 Rev 0506 32
Instapak Quickreg Foam Packaging Applications Guide
Packaging Examples Using Instapak Quickreg Foam Packaging Computer Monitor (cont)
STEP 6STEP 3 STEP 8
STEP 9 STEP 10 STEP 11
Product Positioner
Figure 14 Packaging a Computer Monitor - 1
Rev 0506 copy Sealed Air Corporation (US) 200633
Packaging Examples Using Instapak Quickreg Foam Packaging Computer Monitor (cont)
12 Carefully roll the box over so the other side of the box can be opened
Note The flaps on this side are not taped closed so be careful the monitor does not fall out while doing this
13 Open the flaps on this side and remove the product positioner
14 Activate a 60 bag and place it about half way down in one of the corners
15 Once the cushion can support itself close and hold the flaps on this side of the box to help it form around the monitor Hold the opposing corner of the monitor at the same time to make sure the rising foam does not push the monitor out of the center of the box
16 Activate another 60 bag and place it in the opposite corner of the first bag Close and hold the flaps on this side of the box to help it form around the monitor
17 Activate another 60 bag and place it in the third corner so the bag can form Again hold the monitor so it wonrsquot shift
18 Repeat step 17 for the fourth corner
19 Tape the flaps closed on this side and the box is ready to ship
copy Sealed Air Corporation (US) 2006 Rev 0506 34
Instapak Quickreg Foam Packaging Applications Guide
Packaging Examples Using Instapak Quickreg Foam Packaging Computer Monitor (cont)
STEP 15
STEP 14STEP 13
STEP 19
Figure 15 Packaging a Computer Monitor - 2
Rev 0506 copy Sealed Air Corporation (US) 200635
Notes
copy Sealed Air Corporation (US) 2006 Rev 0506 36
Instapak Quickreg Foam Packaging Applications Guide
Rev 0506 copy Sealed Air Corporation (US) 200637
38copy Sealed Air Corporation (US) 2006 Rev 0506
Protective Packaging 10 Old Sherman Turnpike Danbury CT 06810 203-791-3500 Fax 203-791-3618 wwwinstapakquickcom
Our Products Protect Your Productsreg
Corporate Office Sealed Air Corporation (US) Park 80 East Saddle Brook NJ 07663-5291 wwwsealedaircom reg Reg US Pat amp TM Off copy Sealed Air Corporation (US) 2006 All rights reserved Printed in the USA The 9 Dot Logo and Sealed Air are registered trademarks of Sealed Air Corporation (US)
Instapak Quickreg Applications Guide T-124 0506

Instapak Quickreg Foam Packaging Applications Guide
Packaging Examples Using Instapak Quickreg Foam Packaging Framed Artwork (Painting) on Canvas (cont)
Foam Blocks
STEP 14
STEP 3 STEP 5 STEP 6
STEP 8 STEP 9
Figure 10 Packaging Framed Artwork (Painting) on Canvas
Rev 0506 copy Sealed Air Corporation (US) 200625
Packaging Examples Using Instapak Quickreg Foam Packaging Clock
Note If you gently shake the clock and hear a rattling noise an additional step will need to be taken to ensure moving parts are secured before shipping
1 Place a piece of flexible foam between the chimes and hammers before packaging the clock This will stop any internal movement and will protect them from shock and vibration during shipping
2 If the clock has a front door andor a back panel place an elastic band around the clock to keep the doors and panels closed
3 Determine the overall dimensions of your clock (L x W x H) Choose a shipping box that is at least 4 larger in each dimension (L x W x H)
4 Activate a 60 bag
5 Place the bag in the center of the bottom of the box
6 Place the clock in the center of the box on top of the rising bag of foam Continue to hold the clock so that the bag rises to meet the clock and forms a 2 high cushion Hold the product until the bag supports the clock This takes about 8 seconds
7 Be sure the clock is centered in the box
8 Activate a 60 bag and place it over the bottom half of the clock Close and hold the flap at this end of the box as the foam rises This will help the cushion form around the clock Hold the other end of the clock at the same time to make sure the rising foam does not push the clock out of the center of the box
9 Activate another 60 bag and place it over the opposite half of the clock Close and hold the two major flaps as the foam rises This will help the cushion form around the clock
10 Verify that the clock is locked in place Close and seal the box
copy Sealed Air Corporation (US) 2006 Rev 0506 26
Instapak Quickreg Foam Packaging Applications Guide
Packaging Examples Using Instapak Quickreg Foam Packaging Clock (cont)
STEP 5 STEP 6 STEP 8
STEP 9 STEP 10
Figure 11 Packaging a Clock
CROSS SECTION
Lower CushionCarton
Upper Cushions
Clock
Rev 0506 copy Sealed Air Corporation (US) 200627
Packaging Examples Using Instapak Quickreg Foam Packaging Porcelain Vase
1 Determine the overall dimensions of your vase (L x W x H) Choose a shipping box that is at least 4 larger in each dimension (L x W x H)
2 Activate a 40 bag
3 Place the bag in the center of the bottom of the box
4 Place the vase in the center of the box on top of the rising bag of foam Continue to hold the vase so that the bag rises up to form a 2 high protective cushion Hold the product until the bag supports the vase This takes about 8 seconds
5 Be sure the vase is centered in the box
6 Activate a 40 bag and place it on top of the vase
7 Close and hold the two major flaps as the foam rises This will help the cushion form around the vase
8 Verify that the vase is locked in place Close and seal the box
copy Sealed Air Corporation (US) 2006 Rev 0506 28
Instapak Quickreg Foam Packaging Applications Guide
Packaging Examples Using Instapak Quickreg Foam Packaging Porcelain Vase (cont)
STEP 3 STEP 4 STEP 6
STEP 7 STEP 8
Figure 12 Packaging a Vase
CROSS SECTION
Lower CushionCarton
Upper Cushion
Vase
Rev 0506 copy Sealed Air Corporation (US) 200629
Packaging Examples Using Instapak Quickreg Foam Packaging Crystal Pitcher
1 Determine the overall dimensions of your pitcher (L x W x H) Choose a shipping box that is at least 4 larger in each dimension (L x W x H)
2 Activate a 40 bag
3 Place the bag in the center of the bottom of the box
4 Place the pitcher in the center of the box on top of the rising bag of foam Continue to hold the pitcher so that the bag rises up to form a 2 high protective cushion Hold the product until the bag supports the pitcher This takes about 8 seconds
5 Be sure the pitcher is centered in the box
6 Activate a 40 bag and place it on top of the pitcher
7 Close and hold the two major flaps as the foam rises This will help the cushion form around the pitcher
8 Verify that the pitcher is locked in place Close and seal the box
copy Sealed Air Corporation (US) 2006 Rev 0506 30
Instapak Quickreg Foam Packaging Applications Guide
Packaging Examples Using Instapak Quickreg Foam Packaging Crystal Pitcher (cont)
STEP 3 STEP 4 STEP 6
STEP 7 STEP 8
Figure 13 Packaging a Crystal Pitcher
CROSS SECTION
Lower CushionCarton
Upper Cushion
Pitcher
Rev 0506 copy Sealed Air Corporation (US) 200631
Packaging Examples Using Instapak Quickreg Foam Packaging Computer Monitor
1 Determine the overall dimensions of your monitor (L x W x H) Choose a shipping box that is at least 4 larger in each dimension (L x W x H)
2 Erect the box upside down so the bottom of the box is facing up Do not tape the flaps
3 Place a 2 product positioner in the center of the bottom of the box
4 By using the bag volumetric table (pages 15-17) it is determined that it will take more than two (2) cushions to package the monitor
5 This product will take two (2) 80 bags on the bottom and four (4) 60 bags on top as corner cushions
6 Place the monitor on the product positioner with the screen side facing up
7 Activate a 80 bag
8 Hold the bag in the box so half the bag goes down the side of the monitor and half the bag covers the top side of the monitor facing you
9 Once the cushion can support itself close and hold the flaps on this side of the box to help it form around the monitor Hold the other end of the monitor at the same time to make sure the rising foam does not push the monitor out of the center of the box
10 Activate another 80 bag and place it in the box on the opposite side of the first bag Once the cushion can support itself close and hold the flaps on this side of the box This will help the cushion form around the monitor
11 Close and tape the four (4) flaps on this side of the box
(Continued on page 34)
copy Sealed Air Corporation (US) 2006 Rev 0506 32
Instapak Quickreg Foam Packaging Applications Guide
Packaging Examples Using Instapak Quickreg Foam Packaging Computer Monitor (cont)
STEP 6STEP 3 STEP 8
STEP 9 STEP 10 STEP 11
Product Positioner
Figure 14 Packaging a Computer Monitor - 1
Rev 0506 copy Sealed Air Corporation (US) 200633
Packaging Examples Using Instapak Quickreg Foam Packaging Computer Monitor (cont)
12 Carefully roll the box over so the other side of the box can be opened
Note The flaps on this side are not taped closed so be careful the monitor does not fall out while doing this
13 Open the flaps on this side and remove the product positioner
14 Activate a 60 bag and place it about half way down in one of the corners
15 Once the cushion can support itself close and hold the flaps on this side of the box to help it form around the monitor Hold the opposing corner of the monitor at the same time to make sure the rising foam does not push the monitor out of the center of the box
16 Activate another 60 bag and place it in the opposite corner of the first bag Close and hold the flaps on this side of the box to help it form around the monitor
17 Activate another 60 bag and place it in the third corner so the bag can form Again hold the monitor so it wonrsquot shift
18 Repeat step 17 for the fourth corner
19 Tape the flaps closed on this side and the box is ready to ship
copy Sealed Air Corporation (US) 2006 Rev 0506 34
Instapak Quickreg Foam Packaging Applications Guide
Packaging Examples Using Instapak Quickreg Foam Packaging Computer Monitor (cont)
STEP 15
STEP 14STEP 13
STEP 19
Figure 15 Packaging a Computer Monitor - 2
Rev 0506 copy Sealed Air Corporation (US) 200635
Notes
copy Sealed Air Corporation (US) 2006 Rev 0506 36
Instapak Quickreg Foam Packaging Applications Guide
Rev 0506 copy Sealed Air Corporation (US) 200637
38copy Sealed Air Corporation (US) 2006 Rev 0506
Protective Packaging 10 Old Sherman Turnpike Danbury CT 06810 203-791-3500 Fax 203-791-3618 wwwinstapakquickcom
Our Products Protect Your Productsreg
Corporate Office Sealed Air Corporation (US) Park 80 East Saddle Brook NJ 07663-5291 wwwsealedaircom reg Reg US Pat amp TM Off copy Sealed Air Corporation (US) 2006 All rights reserved Printed in the USA The 9 Dot Logo and Sealed Air are registered trademarks of Sealed Air Corporation (US)
Instapak Quickreg Applications Guide T-124 0506

Instapak Quickreg Foam Packaging Applications Guide
Packaging Examples Using Instapak Quickreg Foam Packaging Clock (cont)
STEP 5 STEP 6 STEP 8
STEP 9 STEP 10
Figure 11 Packaging a Clock
CROSS SECTION
Lower CushionCarton
Upper Cushions
Clock
Rev 0506 copy Sealed Air Corporation (US) 200627
Packaging Examples Using Instapak Quickreg Foam Packaging Porcelain Vase
1 Determine the overall dimensions of your vase (L x W x H) Choose a shipping box that is at least 4 larger in each dimension (L x W x H)
2 Activate a 40 bag
3 Place the bag in the center of the bottom of the box
4 Place the vase in the center of the box on top of the rising bag of foam Continue to hold the vase so that the bag rises up to form a 2 high protective cushion Hold the product until the bag supports the vase This takes about 8 seconds
5 Be sure the vase is centered in the box
6 Activate a 40 bag and place it on top of the vase
7 Close and hold the two major flaps as the foam rises This will help the cushion form around the vase
8 Verify that the vase is locked in place Close and seal the box
copy Sealed Air Corporation (US) 2006 Rev 0506 28
Instapak Quickreg Foam Packaging Applications Guide
Packaging Examples Using Instapak Quickreg Foam Packaging Porcelain Vase (cont)
STEP 3 STEP 4 STEP 6
STEP 7 STEP 8
Figure 12 Packaging a Vase
CROSS SECTION
Lower CushionCarton
Upper Cushion
Vase
Rev 0506 copy Sealed Air Corporation (US) 200629
Packaging Examples Using Instapak Quickreg Foam Packaging Crystal Pitcher
1 Determine the overall dimensions of your pitcher (L x W x H) Choose a shipping box that is at least 4 larger in each dimension (L x W x H)
2 Activate a 40 bag
3 Place the bag in the center of the bottom of the box
4 Place the pitcher in the center of the box on top of the rising bag of foam Continue to hold the pitcher so that the bag rises up to form a 2 high protective cushion Hold the product until the bag supports the pitcher This takes about 8 seconds
5 Be sure the pitcher is centered in the box
6 Activate a 40 bag and place it on top of the pitcher
7 Close and hold the two major flaps as the foam rises This will help the cushion form around the pitcher
8 Verify that the pitcher is locked in place Close and seal the box
copy Sealed Air Corporation (US) 2006 Rev 0506 30
Instapak Quickreg Foam Packaging Applications Guide
Packaging Examples Using Instapak Quickreg Foam Packaging Crystal Pitcher (cont)
STEP 3 STEP 4 STEP 6
STEP 7 STEP 8
Figure 13 Packaging a Crystal Pitcher
CROSS SECTION
Lower CushionCarton
Upper Cushion
Pitcher
Rev 0506 copy Sealed Air Corporation (US) 200631
Packaging Examples Using Instapak Quickreg Foam Packaging Computer Monitor
1 Determine the overall dimensions of your monitor (L x W x H) Choose a shipping box that is at least 4 larger in each dimension (L x W x H)
2 Erect the box upside down so the bottom of the box is facing up Do not tape the flaps
3 Place a 2 product positioner in the center of the bottom of the box
4 By using the bag volumetric table (pages 15-17) it is determined that it will take more than two (2) cushions to package the monitor
5 This product will take two (2) 80 bags on the bottom and four (4) 60 bags on top as corner cushions
6 Place the monitor on the product positioner with the screen side facing up
7 Activate a 80 bag
8 Hold the bag in the box so half the bag goes down the side of the monitor and half the bag covers the top side of the monitor facing you
9 Once the cushion can support itself close and hold the flaps on this side of the box to help it form around the monitor Hold the other end of the monitor at the same time to make sure the rising foam does not push the monitor out of the center of the box
10 Activate another 80 bag and place it in the box on the opposite side of the first bag Once the cushion can support itself close and hold the flaps on this side of the box This will help the cushion form around the monitor
11 Close and tape the four (4) flaps on this side of the box
(Continued on page 34)
copy Sealed Air Corporation (US) 2006 Rev 0506 32
Instapak Quickreg Foam Packaging Applications Guide
Packaging Examples Using Instapak Quickreg Foam Packaging Computer Monitor (cont)
STEP 6STEP 3 STEP 8
STEP 9 STEP 10 STEP 11
Product Positioner
Figure 14 Packaging a Computer Monitor - 1
Rev 0506 copy Sealed Air Corporation (US) 200633
Packaging Examples Using Instapak Quickreg Foam Packaging Computer Monitor (cont)
12 Carefully roll the box over so the other side of the box can be opened
Note The flaps on this side are not taped closed so be careful the monitor does not fall out while doing this
13 Open the flaps on this side and remove the product positioner
14 Activate a 60 bag and place it about half way down in one of the corners
15 Once the cushion can support itself close and hold the flaps on this side of the box to help it form around the monitor Hold the opposing corner of the monitor at the same time to make sure the rising foam does not push the monitor out of the center of the box
16 Activate another 60 bag and place it in the opposite corner of the first bag Close and hold the flaps on this side of the box to help it form around the monitor
17 Activate another 60 bag and place it in the third corner so the bag can form Again hold the monitor so it wonrsquot shift
18 Repeat step 17 for the fourth corner
19 Tape the flaps closed on this side and the box is ready to ship
copy Sealed Air Corporation (US) 2006 Rev 0506 34
Instapak Quickreg Foam Packaging Applications Guide
Packaging Examples Using Instapak Quickreg Foam Packaging Computer Monitor (cont)
STEP 15
STEP 14STEP 13
STEP 19
Figure 15 Packaging a Computer Monitor - 2
Rev 0506 copy Sealed Air Corporation (US) 200635
Notes
copy Sealed Air Corporation (US) 2006 Rev 0506 36
Instapak Quickreg Foam Packaging Applications Guide
Rev 0506 copy Sealed Air Corporation (US) 200637
38copy Sealed Air Corporation (US) 2006 Rev 0506
Protective Packaging 10 Old Sherman Turnpike Danbury CT 06810 203-791-3500 Fax 203-791-3618 wwwinstapakquickcom
Our Products Protect Your Productsreg
Corporate Office Sealed Air Corporation (US) Park 80 East Saddle Brook NJ 07663-5291 wwwsealedaircom reg Reg US Pat amp TM Off copy Sealed Air Corporation (US) 2006 All rights reserved Printed in the USA The 9 Dot Logo and Sealed Air are registered trademarks of Sealed Air Corporation (US)
Instapak Quickreg Applications Guide T-124 0506

Instapak Quickreg Foam Packaging Applications Guide
Packaging Examples Using Instapak Quickreg Foam Packaging Porcelain Vase (cont)
STEP 3 STEP 4 STEP 6
STEP 7 STEP 8
Figure 12 Packaging a Vase
CROSS SECTION
Lower CushionCarton
Upper Cushion
Vase
Rev 0506 copy Sealed Air Corporation (US) 200629
Packaging Examples Using Instapak Quickreg Foam Packaging Crystal Pitcher
1 Determine the overall dimensions of your pitcher (L x W x H) Choose a shipping box that is at least 4 larger in each dimension (L x W x H)
2 Activate a 40 bag
3 Place the bag in the center of the bottom of the box
4 Place the pitcher in the center of the box on top of the rising bag of foam Continue to hold the pitcher so that the bag rises up to form a 2 high protective cushion Hold the product until the bag supports the pitcher This takes about 8 seconds
5 Be sure the pitcher is centered in the box
6 Activate a 40 bag and place it on top of the pitcher
7 Close and hold the two major flaps as the foam rises This will help the cushion form around the pitcher
8 Verify that the pitcher is locked in place Close and seal the box
copy Sealed Air Corporation (US) 2006 Rev 0506 30
Instapak Quickreg Foam Packaging Applications Guide
Packaging Examples Using Instapak Quickreg Foam Packaging Crystal Pitcher (cont)
STEP 3 STEP 4 STEP 6
STEP 7 STEP 8
Figure 13 Packaging a Crystal Pitcher
CROSS SECTION
Lower CushionCarton
Upper Cushion
Pitcher
Rev 0506 copy Sealed Air Corporation (US) 200631
Packaging Examples Using Instapak Quickreg Foam Packaging Computer Monitor
1 Determine the overall dimensions of your monitor (L x W x H) Choose a shipping box that is at least 4 larger in each dimension (L x W x H)
2 Erect the box upside down so the bottom of the box is facing up Do not tape the flaps
3 Place a 2 product positioner in the center of the bottom of the box
4 By using the bag volumetric table (pages 15-17) it is determined that it will take more than two (2) cushions to package the monitor
5 This product will take two (2) 80 bags on the bottom and four (4) 60 bags on top as corner cushions
6 Place the monitor on the product positioner with the screen side facing up
7 Activate a 80 bag
8 Hold the bag in the box so half the bag goes down the side of the monitor and half the bag covers the top side of the monitor facing you
9 Once the cushion can support itself close and hold the flaps on this side of the box to help it form around the monitor Hold the other end of the monitor at the same time to make sure the rising foam does not push the monitor out of the center of the box
10 Activate another 80 bag and place it in the box on the opposite side of the first bag Once the cushion can support itself close and hold the flaps on this side of the box This will help the cushion form around the monitor
11 Close and tape the four (4) flaps on this side of the box
(Continued on page 34)
copy Sealed Air Corporation (US) 2006 Rev 0506 32
Instapak Quickreg Foam Packaging Applications Guide
Packaging Examples Using Instapak Quickreg Foam Packaging Computer Monitor (cont)
STEP 6STEP 3 STEP 8
STEP 9 STEP 10 STEP 11
Product Positioner
Figure 14 Packaging a Computer Monitor - 1
Rev 0506 copy Sealed Air Corporation (US) 200633
Packaging Examples Using Instapak Quickreg Foam Packaging Computer Monitor (cont)
12 Carefully roll the box over so the other side of the box can be opened
Note The flaps on this side are not taped closed so be careful the monitor does not fall out while doing this
13 Open the flaps on this side and remove the product positioner
14 Activate a 60 bag and place it about half way down in one of the corners
15 Once the cushion can support itself close and hold the flaps on this side of the box to help it form around the monitor Hold the opposing corner of the monitor at the same time to make sure the rising foam does not push the monitor out of the center of the box
16 Activate another 60 bag and place it in the opposite corner of the first bag Close and hold the flaps on this side of the box to help it form around the monitor
17 Activate another 60 bag and place it in the third corner so the bag can form Again hold the monitor so it wonrsquot shift
18 Repeat step 17 for the fourth corner
19 Tape the flaps closed on this side and the box is ready to ship
copy Sealed Air Corporation (US) 2006 Rev 0506 34
Instapak Quickreg Foam Packaging Applications Guide
Packaging Examples Using Instapak Quickreg Foam Packaging Computer Monitor (cont)
STEP 15
STEP 14STEP 13
STEP 19
Figure 15 Packaging a Computer Monitor - 2
Rev 0506 copy Sealed Air Corporation (US) 200635
Notes
copy Sealed Air Corporation (US) 2006 Rev 0506 36
Instapak Quickreg Foam Packaging Applications Guide
Rev 0506 copy Sealed Air Corporation (US) 200637
38copy Sealed Air Corporation (US) 2006 Rev 0506
Protective Packaging 10 Old Sherman Turnpike Danbury CT 06810 203-791-3500 Fax 203-791-3618 wwwinstapakquickcom
Our Products Protect Your Productsreg
Corporate Office Sealed Air Corporation (US) Park 80 East Saddle Brook NJ 07663-5291 wwwsealedaircom reg Reg US Pat amp TM Off copy Sealed Air Corporation (US) 2006 All rights reserved Printed in the USA The 9 Dot Logo and Sealed Air are registered trademarks of Sealed Air Corporation (US)
Instapak Quickreg Applications Guide T-124 0506

Instapak Quickreg Foam Packaging Applications Guide
Packaging Examples Using Instapak Quickreg Foam Packaging Crystal Pitcher (cont)
STEP 3 STEP 4 STEP 6
STEP 7 STEP 8
Figure 13 Packaging a Crystal Pitcher
CROSS SECTION
Lower CushionCarton
Upper Cushion
Pitcher
Rev 0506 copy Sealed Air Corporation (US) 200631
Packaging Examples Using Instapak Quickreg Foam Packaging Computer Monitor
1 Determine the overall dimensions of your monitor (L x W x H) Choose a shipping box that is at least 4 larger in each dimension (L x W x H)
2 Erect the box upside down so the bottom of the box is facing up Do not tape the flaps
3 Place a 2 product positioner in the center of the bottom of the box
4 By using the bag volumetric table (pages 15-17) it is determined that it will take more than two (2) cushions to package the monitor
5 This product will take two (2) 80 bags on the bottom and four (4) 60 bags on top as corner cushions
6 Place the monitor on the product positioner with the screen side facing up
7 Activate a 80 bag
8 Hold the bag in the box so half the bag goes down the side of the monitor and half the bag covers the top side of the monitor facing you
9 Once the cushion can support itself close and hold the flaps on this side of the box to help it form around the monitor Hold the other end of the monitor at the same time to make sure the rising foam does not push the monitor out of the center of the box
10 Activate another 80 bag and place it in the box on the opposite side of the first bag Once the cushion can support itself close and hold the flaps on this side of the box This will help the cushion form around the monitor
11 Close and tape the four (4) flaps on this side of the box
(Continued on page 34)
copy Sealed Air Corporation (US) 2006 Rev 0506 32
Instapak Quickreg Foam Packaging Applications Guide
Packaging Examples Using Instapak Quickreg Foam Packaging Computer Monitor (cont)
STEP 6STEP 3 STEP 8
STEP 9 STEP 10 STEP 11
Product Positioner
Figure 14 Packaging a Computer Monitor - 1
Rev 0506 copy Sealed Air Corporation (US) 200633
Packaging Examples Using Instapak Quickreg Foam Packaging Computer Monitor (cont)
12 Carefully roll the box over so the other side of the box can be opened
Note The flaps on this side are not taped closed so be careful the monitor does not fall out while doing this
13 Open the flaps on this side and remove the product positioner
14 Activate a 60 bag and place it about half way down in one of the corners
15 Once the cushion can support itself close and hold the flaps on this side of the box to help it form around the monitor Hold the opposing corner of the monitor at the same time to make sure the rising foam does not push the monitor out of the center of the box
16 Activate another 60 bag and place it in the opposite corner of the first bag Close and hold the flaps on this side of the box to help it form around the monitor
17 Activate another 60 bag and place it in the third corner so the bag can form Again hold the monitor so it wonrsquot shift
18 Repeat step 17 for the fourth corner
19 Tape the flaps closed on this side and the box is ready to ship
copy Sealed Air Corporation (US) 2006 Rev 0506 34
Instapak Quickreg Foam Packaging Applications Guide
Packaging Examples Using Instapak Quickreg Foam Packaging Computer Monitor (cont)
STEP 15
STEP 14STEP 13
STEP 19
Figure 15 Packaging a Computer Monitor - 2
Rev 0506 copy Sealed Air Corporation (US) 200635
Notes
copy Sealed Air Corporation (US) 2006 Rev 0506 36
Instapak Quickreg Foam Packaging Applications Guide
Rev 0506 copy Sealed Air Corporation (US) 200637
38copy Sealed Air Corporation (US) 2006 Rev 0506
Protective Packaging 10 Old Sherman Turnpike Danbury CT 06810 203-791-3500 Fax 203-791-3618 wwwinstapakquickcom
Our Products Protect Your Productsreg
Corporate Office Sealed Air Corporation (US) Park 80 East Saddle Brook NJ 07663-5291 wwwsealedaircom reg Reg US Pat amp TM Off copy Sealed Air Corporation (US) 2006 All rights reserved Printed in the USA The 9 Dot Logo and Sealed Air are registered trademarks of Sealed Air Corporation (US)
Instapak Quickreg Applications Guide T-124 0506
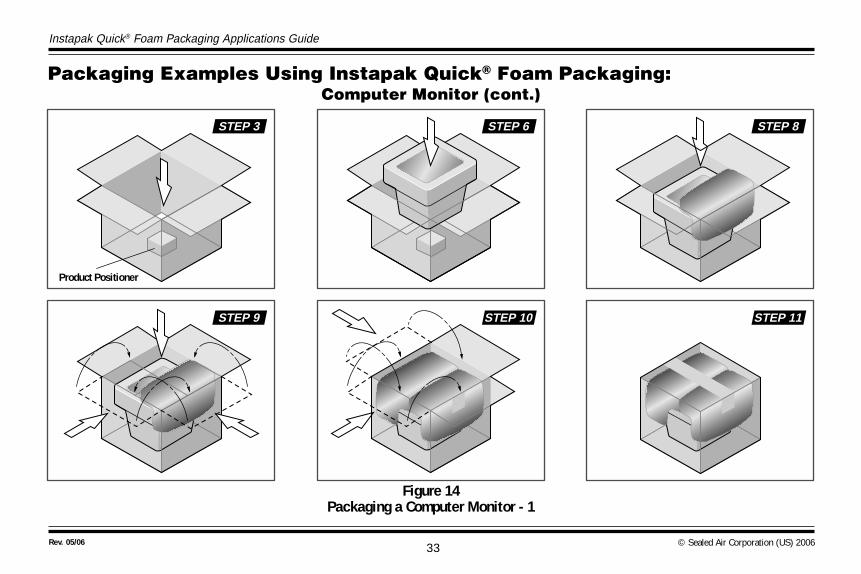
Instapak Quickreg Foam Packaging Applications Guide
Packaging Examples Using Instapak Quickreg Foam Packaging Computer Monitor (cont)
STEP 6STEP 3 STEP 8
STEP 9 STEP 10 STEP 11
Product Positioner
Figure 14 Packaging a Computer Monitor - 1
Rev 0506 copy Sealed Air Corporation (US) 200633
Packaging Examples Using Instapak Quickreg Foam Packaging Computer Monitor (cont)
12 Carefully roll the box over so the other side of the box can be opened
Note The flaps on this side are not taped closed so be careful the monitor does not fall out while doing this
13 Open the flaps on this side and remove the product positioner
14 Activate a 60 bag and place it about half way down in one of the corners
15 Once the cushion can support itself close and hold the flaps on this side of the box to help it form around the monitor Hold the opposing corner of the monitor at the same time to make sure the rising foam does not push the monitor out of the center of the box
16 Activate another 60 bag and place it in the opposite corner of the first bag Close and hold the flaps on this side of the box to help it form around the monitor
17 Activate another 60 bag and place it in the third corner so the bag can form Again hold the monitor so it wonrsquot shift
18 Repeat step 17 for the fourth corner
19 Tape the flaps closed on this side and the box is ready to ship
copy Sealed Air Corporation (US) 2006 Rev 0506 34
Instapak Quickreg Foam Packaging Applications Guide
Packaging Examples Using Instapak Quickreg Foam Packaging Computer Monitor (cont)
STEP 15
STEP 14STEP 13
STEP 19
Figure 15 Packaging a Computer Monitor - 2
Rev 0506 copy Sealed Air Corporation (US) 200635
Notes
copy Sealed Air Corporation (US) 2006 Rev 0506 36
Instapak Quickreg Foam Packaging Applications Guide
Rev 0506 copy Sealed Air Corporation (US) 200637
38copy Sealed Air Corporation (US) 2006 Rev 0506
Protective Packaging 10 Old Sherman Turnpike Danbury CT 06810 203-791-3500 Fax 203-791-3618 wwwinstapakquickcom
Our Products Protect Your Productsreg
Corporate Office Sealed Air Corporation (US) Park 80 East Saddle Brook NJ 07663-5291 wwwsealedaircom reg Reg US Pat amp TM Off copy Sealed Air Corporation (US) 2006 All rights reserved Printed in the USA The 9 Dot Logo and Sealed Air are registered trademarks of Sealed Air Corporation (US)
Instapak Quickreg Applications Guide T-124 0506

Packaging Examples Using Instapak Quickreg Foam Packaging Computer Monitor (cont)
12 Carefully roll the box over so the other side of the box can be opened
Note The flaps on this side are not taped closed so be careful the monitor does not fall out while doing this
13 Open the flaps on this side and remove the product positioner
14 Activate a 60 bag and place it about half way down in one of the corners
15 Once the cushion can support itself close and hold the flaps on this side of the box to help it form around the monitor Hold the opposing corner of the monitor at the same time to make sure the rising foam does not push the monitor out of the center of the box
16 Activate another 60 bag and place it in the opposite corner of the first bag Close and hold the flaps on this side of the box to help it form around the monitor
17 Activate another 60 bag and place it in the third corner so the bag can form Again hold the monitor so it wonrsquot shift
18 Repeat step 17 for the fourth corner
19 Tape the flaps closed on this side and the box is ready to ship
copy Sealed Air Corporation (US) 2006 Rev 0506 34
Instapak Quickreg Foam Packaging Applications Guide
Packaging Examples Using Instapak Quickreg Foam Packaging Computer Monitor (cont)
STEP 15
STEP 14STEP 13
STEP 19
Figure 15 Packaging a Computer Monitor - 2
Rev 0506 copy Sealed Air Corporation (US) 200635
Notes
copy Sealed Air Corporation (US) 2006 Rev 0506 36
Instapak Quickreg Foam Packaging Applications Guide
Rev 0506 copy Sealed Air Corporation (US) 200637
38copy Sealed Air Corporation (US) 2006 Rev 0506
Protective Packaging 10 Old Sherman Turnpike Danbury CT 06810 203-791-3500 Fax 203-791-3618 wwwinstapakquickcom
Our Products Protect Your Productsreg
Corporate Office Sealed Air Corporation (US) Park 80 East Saddle Brook NJ 07663-5291 wwwsealedaircom reg Reg US Pat amp TM Off copy Sealed Air Corporation (US) 2006 All rights reserved Printed in the USA The 9 Dot Logo and Sealed Air are registered trademarks of Sealed Air Corporation (US)
Instapak Quickreg Applications Guide T-124 0506
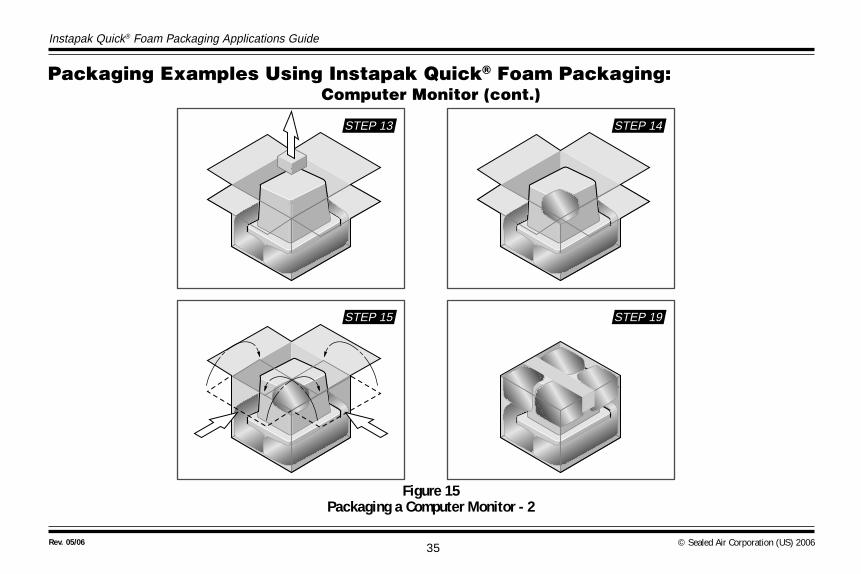
Instapak Quickreg Foam Packaging Applications Guide
Packaging Examples Using Instapak Quickreg Foam Packaging Computer Monitor (cont)
STEP 15
STEP 14STEP 13
STEP 19
Figure 15 Packaging a Computer Monitor - 2
Rev 0506 copy Sealed Air Corporation (US) 200635
Notes
copy Sealed Air Corporation (US) 2006 Rev 0506 36
Instapak Quickreg Foam Packaging Applications Guide
Rev 0506 copy Sealed Air Corporation (US) 200637
38copy Sealed Air Corporation (US) 2006 Rev 0506
Protective Packaging 10 Old Sherman Turnpike Danbury CT 06810 203-791-3500 Fax 203-791-3618 wwwinstapakquickcom
Our Products Protect Your Productsreg
Corporate Office Sealed Air Corporation (US) Park 80 East Saddle Brook NJ 07663-5291 wwwsealedaircom reg Reg US Pat amp TM Off copy Sealed Air Corporation (US) 2006 All rights reserved Printed in the USA The 9 Dot Logo and Sealed Air are registered trademarks of Sealed Air Corporation (US)
Instapak Quickreg Applications Guide T-124 0506