Installing vRealize Network Insight - VMware vRealize …. Cisco Catalyst switches 3000, 3750, 4500,...
28
Installing vRealize Network Insight VMware vRealize Network Insight 3.5
Transcript of Installing vRealize Network Insight - VMware vRealize …. Cisco Catalyst switches 3000, 3750, 4500,...
Installing vRealize Network InsightVMware vRealize Network Insight 3.5
Installing vRealize Network Insight
2 VMware, Inc.
You can find the most up-to-date technical documentation on the VMware Web site at:
https://docs.vmware.com/
The VMware Web site also provides the latest product updates.
If you have comments about this documentation, submit your feedback to:
Copyright © 2017 VMware, Inc. All rights reserved. Copyright and trademark information.
VMware, Inc.3401 Hillview Ave.Palo Alto, CA 94304www.vmware.com
Contents
About vRealize Network Insight Installation Guide 5
1 Preparing for Installation 7
System Requirements 7Supported Products and Versions 9Prerequisites 10
2 Installing vRealize Network Insight 13
Installation Workflow 13Deploying vRealize Network Insight Platform OVA 14Activating the License 16Generating Shared Secret 16Setting up vRealize Network Insight Proxy Virtual Appliance (OVA) 16Deploy Additional Proxy to an Existing Setup 18Default Login Credentials 19NSX Assessment Mode for Evaluation License 19Add vCenter Server 19Analyze Traffic Flows 20Generate a Report 20Adding Data Sources 20
3 Scaling up of a Platform or Proxy Appliance 21
4 Planning to Scale Up the Platform Cluster 23
5 Planning to Scale up the Proxy Cluster 25
Index 27
VMware, Inc. 3

Installing vRealize Network Insight
4 VMware, Inc.
About vRealize Network Insight InstallationGuide
The vRealize Network Insight Installation Guide is intended for administrators or specialists responsible forinstalling vRealize Network Insight.
Intended AudienceThis information is intended for administrators or specialists responsible for installingvRealize Network Insight. The information is written for experienced virtual machine administrators whoare familiar with enterprise management applications and datacenter operations.
VMware Technical Publications GlossaryVMware Technical Publications provides a glossary of terms that might be unfamiliar to you. For definitionsof terms as they are used in VMware technical documentation, go to http://www.vmware.com/support/pubs.
VMware, Inc. 5

Installing vRealize Network Insight
6 VMware, Inc.
Preparing for Installation 1Before you install vRealize Network Insight, prepare the deployment environment to meet the systemrequirements.
This chapter includes the following topics:
n “System Requirements,” on page 7
n “Supported Products and Versions,” on page 9
n “Prerequisites,” on page 10
System RequirementsEnsure that the system meets the minimum hardware configurations to install vRealize Network Insight.
Minimum Resource Requirementsn vRealize Network Insight Platform OVA
n 800 GB - HDD, Thin provisioned
n Medium Brick Requirement
n 8 cores - Reservation 4096 Mhz
n 32 GB RAM - Reservation - 16GB
n Large Brick Requirement
n 12 cores - Reservation 6144 Mhz
n 48 GB RAM - Reservation - 24GB
n vRealize Network Insight Proxy OVA
n 150 GB - HDD, Thin provisioned
n Medium Brick Requirement
n 4 cores - Reservation 2048 Mhz
n 10 GB RAM - Reservation - 5GB
n Large Brick Requirement
n 6 cores - Reservation 3072 Mhz
n 12 GB RAM - Reservation - 6GB
VMware, Inc. 7
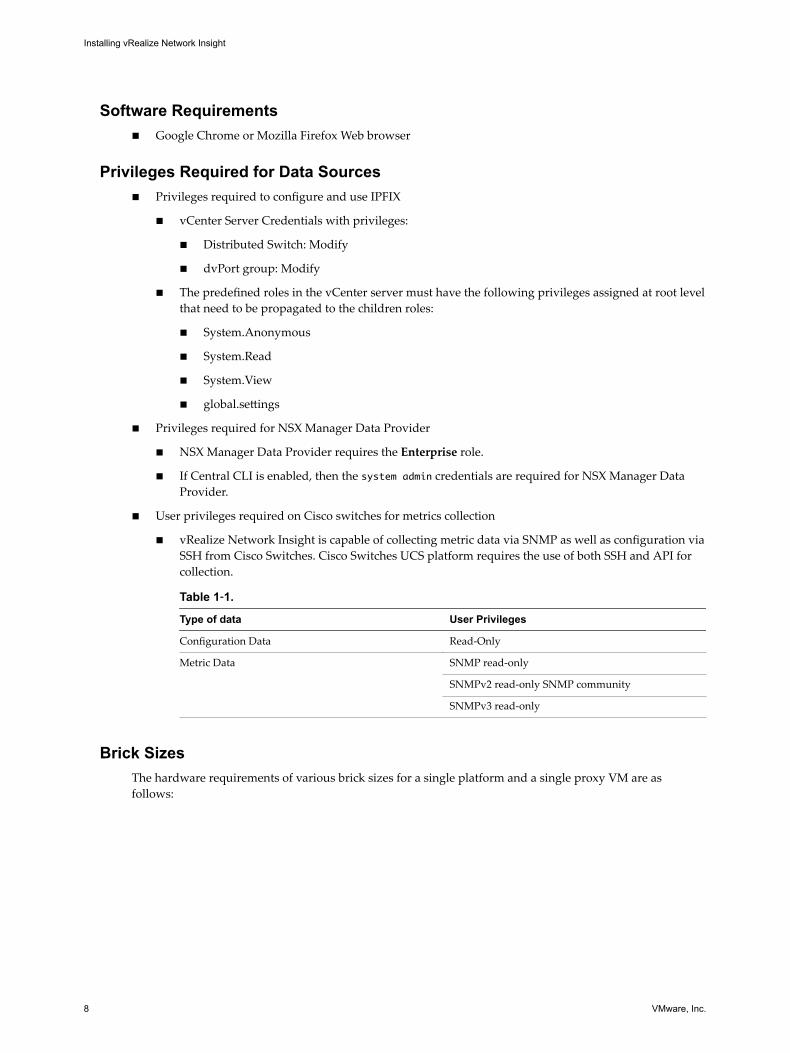
Software Requirementsn Google Chrome or Mozilla Firefox Web browser
Privileges Required for Data Sourcesn Privileges required to configure and use IPFIX
n vCenter Server Credentials with privileges:
n Distributed Switch: Modify
n dvPort group: Modify
n The predefined roles in the vCenter server must have the following privileges assigned at root levelthat need to be propagated to the children roles:
n System.Anonymous
n System.Read
n System.View
n global.settings
n Privileges required for NSX Manager Data Provider
n NSX Manager Data Provider requires the Enterprise role.
n If Central CLI is enabled, then the system admin credentials are required for NSX Manager DataProvider.
n User privileges required on Cisco switches for metrics collection
n vRealize Network Insight is capable of collecting metric data via SNMP as well as configuration viaSSH from Cisco Switches. Cisco Switches UCS platform requires the use of both SSH and API forcollection.
Table 1‑1.
Type of data User Privileges
Configuration Data Read-Only
Metric Data SNMP read-only
SNMPv2 read-only SNMP community
SNMPv3 read-only
Brick SizesThe hardware requirements of various brick sizes for a single platform and a single proxy VM are asfollows:
Installing vRealize Network Insight
8 VMware, Inc.
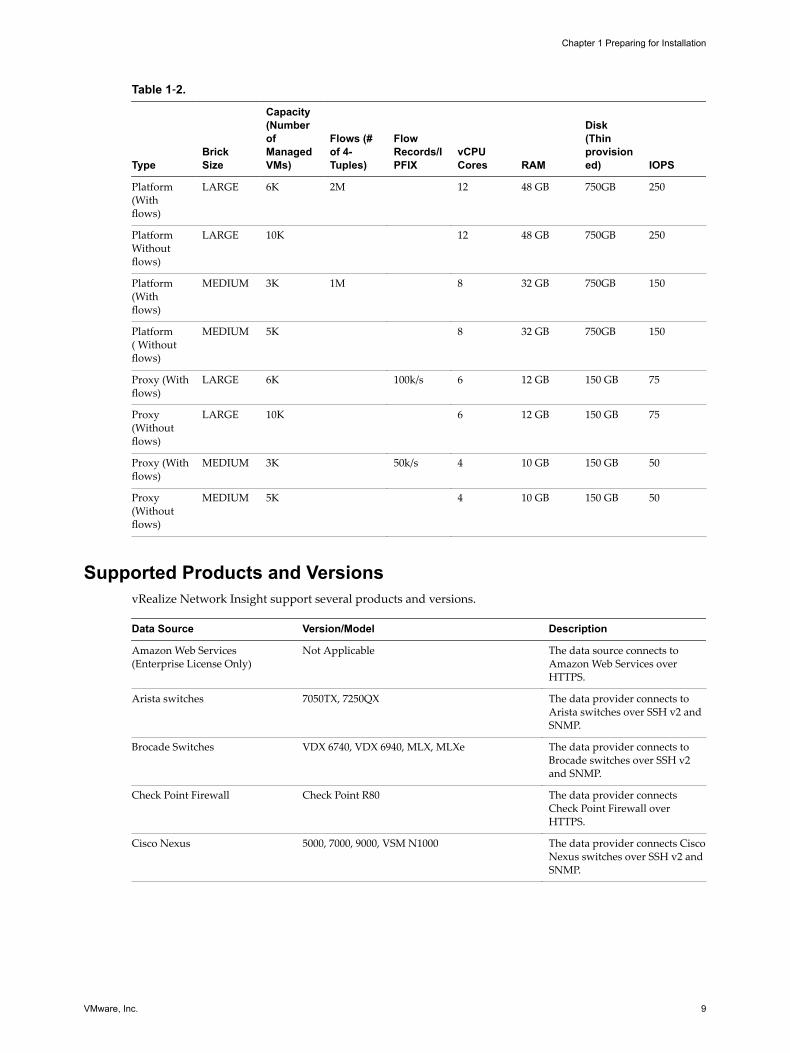
Table 1‑2.
TypeBrickSize
Capacity(NumberofManagedVMs)
Flows (#of 4-Tuples)
FlowRecords/IPFIX
vCPUCores RAM
Disk(Thinprovisioned) IOPS
Platform(Withflows)
LARGE 6K 2M 12 48 GB 750GB 250
PlatformWithoutflows)
LARGE 10K 12 48 GB 750GB 250
Platform(Withflows)
MEDIUM 3K 1M 8 32 GB 750GB 150
Platform( Withoutflows)
MEDIUM 5K 8 32 GB 750GB 150
Proxy (Withflows)
LARGE 6K 100k/s 6 12 GB 150 GB 75
Proxy(Withoutflows)
LARGE 10K 6 12 GB 150 GB 75
Proxy (Withflows)
MEDIUM 3K 50k/s 4 10 GB 150 GB 50
Proxy(Withoutflows)
MEDIUM 5K 4 10 GB 150 GB 50
Supported Products and VersionsvRealize Network Insight support several products and versions.
Data Source Version/Model Description
Amazon Web Services(Enterprise License Only)
Not Applicable The data source connects toAmazon Web Services overHTTPS.
Arista switches 7050TX, 7250QX The data provider connects toArista switches over SSH v2 andSNMP.
Brocade Switches VDX 6740, VDX 6940, MLX, MLXe The data provider connects toBrocade switches over SSH v2and SNMP.
Check Point Firewall Check Point R80 The data provider connectsCheck Point Firewall overHTTPS.
Cisco Nexus 5000, 7000, 9000, VSM N1000 The data provider connects CiscoNexus switches over SSH v2 andSNMP.
Chapter 1 Preparing for Installation
VMware, Inc. 9
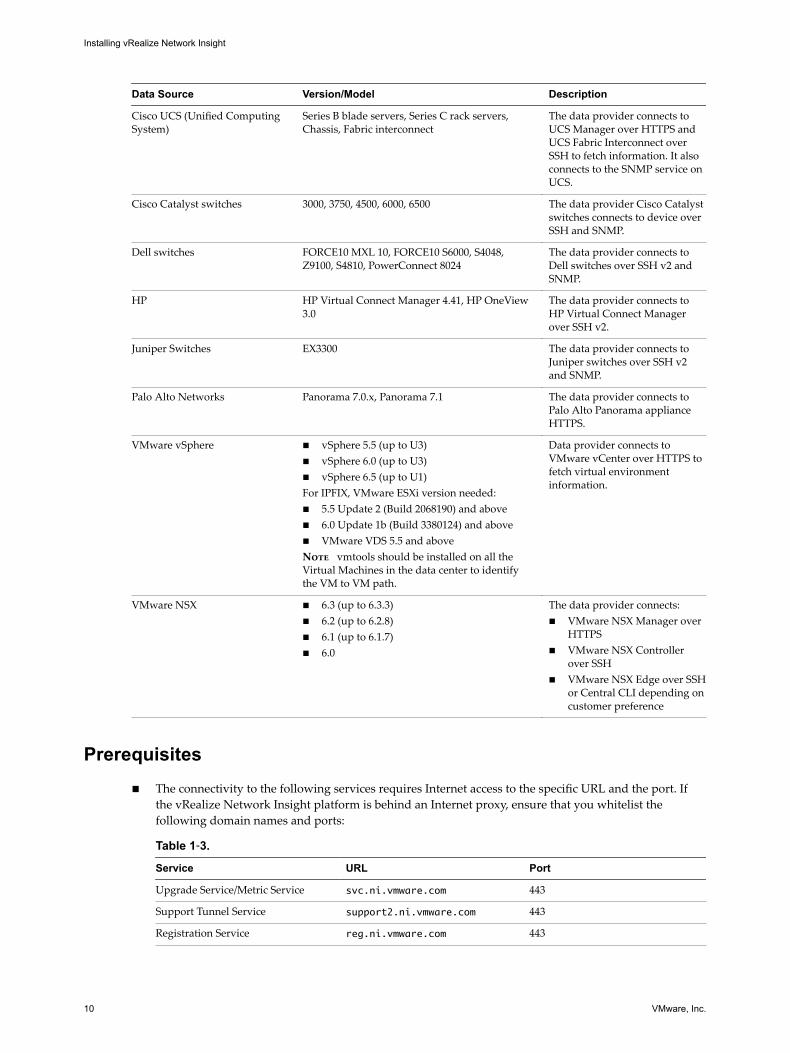
Data Source Version/Model Description
Cisco UCS (Unified ComputingSystem)
Series B blade servers, Series C rack servers,Chassis, Fabric interconnect
The data provider connects toUCS Manager over HTTPS andUCS Fabric Interconnect overSSH to fetch information. It alsoconnects to the SNMP service onUCS.
Cisco Catalyst switches 3000, 3750, 4500, 6000, 6500 The data provider Cisco Catalystswitches connects to device overSSH and SNMP.
Dell switches FORCE10 MXL 10, FORCE10 S6000, S4048,Z9100, S4810, PowerConnect 8024
The data provider connects toDell switches over SSH v2 andSNMP.
HP HP Virtual Connect Manager 4.41, HP OneView3.0
The data provider connects toHP Virtual Connect Managerover SSH v2.
Juniper Switches EX3300 The data provider connects toJuniper switches over SSH v2and SNMP.
Palo Alto Networks Panorama 7.0.x, Panorama 7.1 The data provider connects toPalo Alto Panorama applianceHTTPS.
VMware vSphere n vSphere 5.5 (up to U3)n vSphere 6.0 (up to U3)n vSphere 6.5 (up to U1)For IPFIX, VMware ESXi version needed:n 5.5 Update 2 (Build 2068190) and aboven 6.0 Update 1b (Build 3380124) and aboven VMware VDS 5.5 and aboveNote vmtools should be installed on all theVirtual Machines in the data center to identifythe VM to VM path.
Data provider connects toVMware vCenter over HTTPS tofetch virtual environmentinformation.
VMware NSX n 6.3 (up to 6.3.3)n 6.2 (up to 6.2.8)n 6.1 (up to 6.1.7)n 6.0
The data provider connects:n VMware NSX Manager over
HTTPSn VMware NSX Controller
over SSHn VMware NSX Edge over SSH
or Central CLI depending oncustomer preference
Prerequisitesn The connectivity to the following services requires Internet access to the specific URL and the port. If
the vRealize Network Insight platform is behind an Internet proxy, ensure that you whitelist thefollowing domain names and ports:
Table 1‑3.
Service URL Port
Upgrade Service/Metric Service svc.ni.vmware.com 443
Support Tunnel Service support2.ni.vmware.com 443
Registration Service reg.ni.vmware.com 443
Installing vRealize Network Insight
10 VMware, Inc.

n Ensure that you take a backup of the Platform1 node before you create clusters. Refer to VMware bestpractices to take the backup of virtual machines (like VMware VDP using VADP). Restore the Platform1node from backup if there is an unrecoverable error while creating the cluster. It is recommended thatyou use cleanly deployed platform nodes while creating clusters. Redeploy the new platform nodes (p2-pn) before restarting cluster creation process if there is an unrecoverable error.
Chapter 1 Preparing for Installation
VMware, Inc. 11

Installing vRealize Network Insight
12 VMware, Inc.
Installing vRealize Network Insight 2You can deploy vRealize Network Insight using vSphere Web client or vSphere Windows native client.
Note After you successfully deploy vRealize Network Insight Platform OVA, verify whether the givenstatic IP is set on vCenter Server.
This chapter includes the following topics:
n “Installation Workflow,” on page 13
n “Deploying vRealize Network Insight Platform OVA,” on page 14
n “Activating the License,” on page 16
n “Generating Shared Secret,” on page 16
n “Setting up vRealize Network Insight Proxy Virtual Appliance (OVA),” on page 16
n “Deploy Additional Proxy to an Existing Setup,” on page 18
n “Default Login Credentials,” on page 19
n “NSX Assessment Mode for Evaluation License,” on page 19
n “Add vCenter Server,” on page 19
n “Analyze Traffic Flows,” on page 20
n “Generate a Report,” on page 20
n “Adding Data Sources,” on page 20
Installation WorkflowTo install vRealize Network Insight, you install the platform OVA, activate the license, generate sharedsecret, and setup proxy OVA.
Note The terms Proxy and Collector are used interchangeably in the documentation.
VMware, Inc. 13
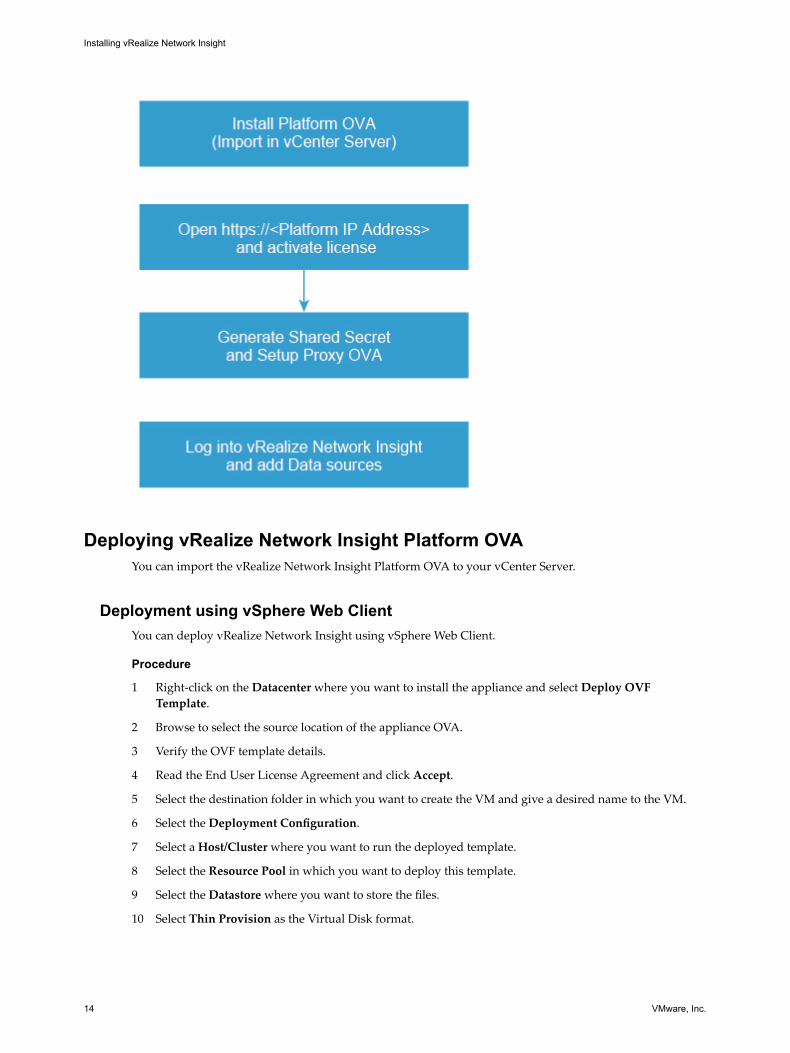
Deploying vRealize Network Insight Platform OVAYou can import the vRealize Network Insight Platform OVA to your vCenter Server.
Deployment using vSphere Web ClientYou can deploy vRealize Network Insight using vSphere Web Client.
Procedure
1 Right-click on the Datacenter where you want to install the appliance and select Deploy OVFTemplate.
2 Browse to select the source location of the appliance OVA.
3 Verify the OVF template details.
4 Read the End User License Agreement and click Accept.
5 Select the destination folder in which you want to create the VM and give a desired name to the VM.
6 Select the Deployment Configuration.
7 Select a Host/Cluster where you want to run the deployed template.
8 Select the Resource Pool in which you want to deploy this template.
9 Select the Datastore where you want to store the files.
10 Select Thin Provision as the Virtual Disk format.
Installing vRealize Network Insight
14 VMware, Inc.
11 Select the Network that the deployed VM will use.
Selected network should allow the appliance to reach out to the Internet for support and upgrade.
12 Customize the template as mentioned below:
a IPv4 Address: First reserved static IP address
b Netmask: Subnet mask for the above static IP
c Gateway: Default gateway of your network
d DNS Server List: DNS servers of your environment
e (Optional) DNS Server List: DNS servers of your environment
f Domain Search List: Determines which domain to be appended for dns lookups.
g (Optional) NTP Server List: Enter the list of NTP servers and ensure that NTP Server can bereached from the VM. The services will fail to start if NTP time is out of sync.
h (Optional) Web Proxy IP/FQDN and Web Proxy Port: For accessing the Internet using a proxy
i (Optional) Syslog server IP : Syslog server IP [Optional]: IP address of the syslog server where youwant to send the syslog messages
j Uncheck the Log Push Enable checkbox if you do not want to send diagnostic and troubleshootingdata to VMware.
13 Review the details and select the Power on after deployment checkbox, then click Finish.
Deployment using vSphere Windows Native ClientYou can deploy vRealize Network Insight using vSphere Windows native client.
Procedure
1 Click File > Deploy OVF Template.
2 Browse to select the source location of the OVA.
3 Click Next and Verify OVF template details.
4 Ensure that the desired folder is selected and give a name to the VM.
5 Select the Deployment Configuration.
6 Select a Host/Cluster where you want to run the deployed template.
7 Select the Resource Pool in which you want to deploy this template.
8 Select the Datastore where you want to store the files.
9 Select Thin Provision as the Virtual Disk format.
10 Map the Network from OVA to your inventory
11 Customize the template as mentioned below:
a IPv4 Address: First reserved static IP address
b Netmask: Subnet mask for the above static IP
c Gateway: Default gateway of your network
d DNS Server List: DNS servers of your environment
e (Optional) DNS Server List: DNS servers of your environment
f Domain Search List: Determines which domain to be appended for dns lookups.
Chapter 2 Installing vRealize Network Insight
VMware, Inc. 15
g (Optional) NTP Server List: Enter the list of NTP servers and ensure that the NTP Server can bereached from the VM. The services will fail to start if NTP time is out of sync.
h (Optional) HTTP Proxy IP/FQDN and HTTP Proxy Port: For accessing the Internet using a proxy
i (Optional) Syslog server IP : IP address of the syslog server where you want to send the syslogmessages
j Uncheck the Log Push Enable checkbox if you do not want to send diagnostic and troubleshootingdata to VMware.
k Select the Health Telemetry Enable checkbox to improve the product by sending anonymous dataabout product performance.
12 Review the details and select the Power on after deployment checkbox, then click Finish.
Generating the Support Tunnel CertificatePerform this step only if you are offline or have restricted access to Internet.
To generate the support tunnel certificate:1 Log on to the console user CLI and run the offline-registration command.
2 The CLI generates a token. After you supply this token to VMware Support, an entry is created in theregistration server and a certificate is given to you.
3 Install this certificate by using the offline-registration command.
Activating the LicenseBefore the deployment, activate and install the vRealize Network Insight virtual appliance.
After installing the vRealize Network Insight Platform OVA, open https://<vRealize Network Insight PlatformIP address> in the Chrome Web browser.
Procedure
1 Enter the license key received in the welcome email.
2 For UI admin (admin@local) user name, set the password. If you are a support user or a CLI user, refer “Default Login Credentials,” on page 19for the password.
3 Click Activate.
4 Add the vRealize Network Insight Collector after activating the license.
Generating Shared SecretYou can generate and import the vRealize Network Insight proxy virtual appliance.
Generate a shared secret and import the vRealize Network Insight proxy virtual appliance:
Procedure
1 Generate a shared secret after activating the license on the Setup Proxy Virtual Appliance page.
2 Copy the shared secret.
You will require this during the deployment of vRealize Network Insight Proxy OVA.
Setting up vRealize Network Insight Proxy Virtual Appliance (OVA)You can set up vRealize Network Insight proxy virtual appliance by importing OVA to your vCenter server.
Follow the steps below to import the vRealize Network InsightProxy OVA to your vCenter Server
Installing vRealize Network Insight
16 VMware, Inc.
Deployment using vSphere Web ClientYou can import the vRealize Network Insight Proxy OVA using vSphere Web Client.
Procedure
1 Right-click on the Datacenter where you want to install the appliance and select Deploy OVF Template.
2 Browse to select the source location of the appliance OVA.
3 Verify the OVF template details.
4 Read the End User License Agreement and click Accept.
5 Select the destination folder in which you want to create the VM and give a desired name to the VM.
6 Select the Deployment Configuration.
7 Select a Host/Cluster where you want to run the deployed template.
8 Select the Resource Pool in which you want to deploy this template.
9 Select the Datastore where you want to store the files.
10 Select Thin Provision as the Virtual Disk format.
11 Select the Network that the deployed VM will use.
12 Customize the template as mentioned below:
a Shared Secret for vRealize Network Insight Proxy: The shared secret generated on theonboarding page
b IPv4 Address: Second reserved static IP address
c Netmask: Subnet mask for the above static IP
d Gateway: Default gateway of your network
e DNS Server List: DNS servers of your environment
f (Optional) Domain Search List : Determines which domain to be appended for dns lookups
g NTP Server List: Enter the list of NTP servers and ensure that the NTP Server can be reached fromthe VM. The services will fail to start if NTP time is out of sync.
h (Optional) Web Proxy IP/FQDNand Web Proxy Port: For accessing the Internet using a proxy
i (Optional) Syslog server IP : IP address of the syslog server where you want to send the syslogmessages
j Uncheck the Log Push Enable checkbox if you do not want to send diagnostic and troubleshootingdata to VMware.
k Select the Health Telemetry Enable checkbox, to improve the product by sending anonymous dataabout product performance.
13 Review the details and select the Power on after deployment checkbox then click Finish.
Deployment using vSphere Windows Native ClientYou can import the vRealize Network Insight Proxy OVA using vSphere Windows native client.
Procedure
1 Click File > Deploy OVF Template.
2 Browse to select the source location of OVA.
Chapter 2 Installing vRealize Network Insight
VMware, Inc. 17
3 Verify the OVF template details.
4 Read the End-User License Agreement and click Accept.
5 Ensure the desired folder is selected and give a name to the VM.
6 Select the Deployment Configuration.
7 Select a Host/Cluster where you want to run the deployed template.
8 Select the Resource Pool in which you want to deploy this template.
9 Select the Datastore where you want to store the files.
10 Select Thin Provision as the Virtual Disk format.
11 Select the Network that the deployed VM will use.
12 Map the network from OVA to your inventory.
13 Customize the template as mentioned below:
a Shared Secret for vRealize Network Insight Proxy: The shared secret generated on theonboarding page
b IPv4 Address: Second reserved static IP address
c Netmask: Subnet mask for the above static IP
d Gateway: Default gateway of your network
e DNS Server List: DNS servers of your environment
f (Optional) Domain Search List : Determines which domain to be appended for dns lookups
g NTP Server List: Enter the list of NTP servers and ensure that the NTP Server can be reached fromthe VM. The services will fail to start if NTP time is out of sync.
h (Optional) HTTP Proxy IP/FQDN and HTTP Proxy Port: For accessing the Internet using a proxy
i (Optional) Syslog server IP : IP address of the syslog server where you want to send the syslogmessages
j Uncheck the Log Push Enable checkbox if you do not want to send diagnostic and troubleshootingdata to VMware.
k Select the Health Telemetry Enable checkbox, to improve the product by sending anonymous dataabout product performance.
14 Review the details and select the Power on after deployment checkbox then click Finish.
Note After the vRealize Network Insight Proxy OVA is deployed and running, you must verifywhether the given static IP is set on vCenter Server.
15 Click Finish, once Proxy Detected! message is displayed on the onboarding page. It will redirect to theLogin Page.
Deploy Additional Proxy to an Existing SetupYou can add additional vRealize Network Insight proxy to an existing setup.
Procedure
1 Log into the vRealize Network Insight UI. Navigate to Settings > Install and Support.
2 Click Add Proxy VM.
3 Copy the shared secret from the dialog that is displayed.
Installing vRealize Network Insight
18 VMware, Inc.
4 Follow the steps in section “Setting up vRealize Network Insight Proxy Virtual Appliance (OVA),” onpage 16 in step 3.
Default Login CredentialsvRealize Network Insight has three types of users. The login credentials for these users are as follows:
Note Use Google Chrome to log in to vRealize Network Insight.
Table 2‑1.
Types of Users Username Password
Admin UI admin@local Set this password in ActivateLicense screen duringinstallation
SSH User support ark1nc0113ct0r
CLI User consoleuser ark1nc0ns0l3
Procedure
1 Open https://<vRealize Network Insight Platform IP address>.
2 Log in to the product UI with the corresponding username and password.
NSX Assessment Mode for Evaluation LicensevRealize Network Insight starts in the NSX assessment mode when you use the evaluation license.
You can add a data source to vRealize Network Insight, analyze traffic flow, and generate reports.
Note To switch to the Full Product mode, click Switch to Full Product Evaluation located in the bottomright corner.
Add vCenter ServerYou can add vCenter Servers as data source to vRealize Network Insight.
Multiple vCenter Servers can be added to vRealize Network Insight to start monitoring data.
Procedure
1 Click Add vCenter.
2 Click Add new source and customize the options.
Option Action
Source Type Select the vCenter Server system from the drop-down menu.
IP Address/FQDN Enter the IP address or fully qualified domain name of the vCenter Server.
Username Enter the user name, with the following privileges:n Distributed Switch: Modifyn dvPort group: Modify
Password Enter the password for vRealize Network Insight software to access thevCenter Server system.
3 Click Validate.
4 Add advanced data collection sources to your vCenter Server system.
Chapter 2 Installing vRealize Network Insight
VMware, Inc. 19
5 (Optional) Click Submit to add the vCenter Server system. The vCenter Server systems appear on thehomepage.
Analyze Traffic FlowsYou can use vRealize Network Insight to analyze flows in your datacenter.
Prerequisites
At least two hours of data collection must occur before starting the flow analysis.
Procedure
1 Specify the scope of the analysis. For example, if you are interested in flows of all virtual machines in aCluster, select Cluster from the dropdown menu. You can alternately select all virtual machinesconnected to a VLAN or VXLAN.
2 Select the entity name for which you want to analyze the flows.
3 Select the duration and click Analyze.
Generate a ReportYou can generate a report of the flow assessment.
Prerequisites
Analyze traffic flows in the datacenter. For comprehensive reports, collect 24 hours of data before theanalysis.
Procedure
1 In the EVAL NSX Assessment Mode, click Generate Report in the Analyze Flows page.
2 In the Non EVAL Mode, on the Microsegmentation page, click Traffic Distribution > More Options >Assesment Report.
Adding Data SourcesAfter you log in, add the various data sources to vRealize Network Insight for the software to monitor yourdata center.
The product will start showing the data from your environment after two hours of data collection.
Procedure
1 Select Profile > Settings.
2 Click the Add new source button.
3 Select the Source Type.
4 Enter the required details and click Submit to add the Data source.
5 Repeat the above steps to add all the required data sources from your environment.
Installing vRealize Network Insight
20 VMware, Inc.
Scaling up of a Platform or ProxyAppliance 3
The process of scaling up of a platform or a proxy appliance implies changing its brick size from MEDIUM toLARGE.
If a platform is of LARGE brick size, then you have to scale out by adding more platform nodes such ascreating a platform cluster. After a proxy is of LARGE brick size, then you have to add more proxies.
The steps to scale up vRealize Network Insight Virtual Appliance from MEDIUM brick to LARGE brick are asfollows:1 a Log in to vCenter.
b Increase the RAM of the VM to at least match the LARGE brick size requirements.
c Increase the vCPU count of the VM to at least match the LARGE brick size requirements.
d Refer to the brick size in the “System Requirements,” on page 7 section.
e Restart the VM.
VMware, Inc. 21

Installing vRealize Network Insight
22 VMware, Inc.
Planning to Scale Up the PlatformCluster 4
3 or more LARGE platform bricks can be connected together to form a platform cluster.
To decide the required number of platform bricks:
Number of bricks needed = Round off to next Integer ((Total number of managed VMs) / (Capacity of
LARGE Platform brick in table above))
Scaling Up Scenarios for the Platform Clustern Scenario 1
a Assume that on January 1st (today), the datacenter has 2000 VM's (with flows) across manyvCenters.
b Assume that in March, the number of VMs grows to 3100.
c Assume that in June, the number of VMs grows to 6100 which could be because of the additions offew more vCenters or the expansion of the existing vCenters.
d Assume that in December, the number of VMs grows to 18100 (with flows).
The deployment model for this scenario is as follows:
a On January 1, deploy a single platform node with MEDIUM brick size.
b In March, scale up the platform node to LARGE brick size.
c In June, scale out the platform, convert to a 3-node platform cluster by adding new Platform nodesto the existing Platform.
d In December, the user needs a 4-node platform cluster. vRealize Network Insight does not supportextension of cluster.
n Scenario 2
a Assume that on January 1st (today), the datacenter has 7000 VM's (with flows) across manyvCenters.
b Assume that in June, the number of VMs grows to 15000 (with flows).
c Assume that in December, the number of VMs grows to 24000 (with flows).
The deployment model for this scenario is as follows:
a On January 1, deploy a 3-node platform cluster.
b In June or later, as the environment size gets closer to exceeding 18000, the user needs a 4-nodeplatform cluster. vRealize Network Insight does not support extension of cluster.
VMware, Inc. 23

c In December, as the environment size gets closer to exceeding 24000, the user needs a 5-nodeplatform cluster. vRealize Network Insight does not support extension of cluster..
Installing vRealize Network Insight
24 VMware, Inc.
Planning to Scale up the ProxyCluster 5
The scaling out of the proxy node is independent of the platform nodes in the cluster
Typically, users install one or more proxy VMs per site. Within a site, the number of proxy VMs needed is asimple function of total number of VMs for which it has to collect data. Refer to the capacity of proxy VMsin the brick size table in the System Requirements section. A data source (maybe a vCenter or a switch) canbe added to exactly one proxy VM.
Scaling up Scenarios for the Proxy Clustern Scenario1: 2000 VMs in one vCenter
Install one medium proxy VM. Assign this vCenter to this proxy using product UI.
n Scenario 2: 1000 VMs in vCenter1 and 2000 VMs vCenter2 (all of them are in one data center)
Install one Medium Proxy VM. Assign both vCenters to this proxy using product UI.
n Scenario 3: 1000 VMs in vCenter1 (data center1) and 2000 VMs in vCenter2 (data center2)
Install one Medium Proxy VM in each data center. Assign vCenter1 to proxy VM in same data centerusing Product UI. Assign vCenter2 to Proxy VM in its data center using Product UI.
n Scenario 4: 9,000 VMs in vCenter1 without flows (data center1)
Install one Large proxy brick. Assign this vCenter to this proxy using product UI.
n Scenario 5: 11,000 VMs in vCenter1 with flows (data center1)
This scenario is not supported. Maximum number of VMs that can be managed by one proxy VM is10,000 without flows OR 6,000 with flows. And one vCenter can be added to only one proxy at a time.
n Scenario 6: vCenter1 with 2000 VMs in January, vCenter2 with 5000 VMs in June
Install one Medium Proxy VM in January and assign vCenter1 to it. Install the second large proxy VMin June and assign vCenter2 to it.
Proxy VMs with a Platform ClusterThe number of proxy VMs does not depend on the number of VMs in a platform cluster. All proxy VMscommunicate only to the first platform VM in a platform cluster. A few example deployment models are asfollows
n Case1: One Proxy VM connecting to a platform cluster
Supported. Proxy connects to platform1.
n Case2: Many Proxy VMs connecting to a platform cluster
VMware, Inc. 25

Supported. All proxies are connected to platform1. And then platform1 VM load balances both proxyrequests and the data processing to other platform VMs in this cluster internally automatically.
n Case3: One proxy connecting to single platform node deployment
Supported.
n Case4: Many proxy VMs connecting to One platform node deployment
Supported.
:
Installing vRealize Network Insight
26 VMware, Inc.

Index
Aactivate license 16add data source 20add vCenter Server 19adding proxy 18analyze traffic 20
Ddefault login 19deployment 14, 17deployment with vSphere Windows native
client 17
Gglossary 5
Iinstall 13–15intended audience 5
Nnsx assessment mode 19
OOVA setup 16
Rreport generation 20
Ssupport tunnel certificate 16supported products 9system requirements 7
VMware, Inc. 27

Installing vRealize Network Insight
28 VMware, Inc.


![Cisco Catalyst 3850 Series Switches running IOS-XE …ST] Cisco... · Cisco Catalyst 3850 Series Switches running IOS-XE 3.6.0E and Catalyst 6500 Series Switches running IOS 15.1(2)SY3Security](https://static.fdocuments.us/doc/165x107/5af843227f8b9a8d1c914ead/cisco-catalyst-3850-series-switches-running-ios-xe-st-ciscocisco-catalyst.jpg)