
Installing Oracle Database 12c R1 on Linux 6 with · PDF filePage: 1 . Tutorial Target ....
50
Page: 1 Tutorial Target Installing Oracle Database 12c R1 on Linux 6 with ASM Version / Date 1.0 / Feb-2016 Required Software and Packages • Oracle VirtualBox software, version 5. This tutorial was implemented on VirtualBox 5.0.12 for Windows which can be downloaded from Oracle web site. I made a copy of it here. • Oracle Virtualbox VM appliance which has a fresh installation of Oracle Linux 6.7 (seed VM). o The procedure to create it from scratch is documented here, or can be watched at Youtube here. o Alternatively, you can download a pre-built one from here. • Oracle Grid Infrastructure 12c R1 installation files. This can be downloaded from Oracle site. Search for a page titled “Oracle Grid Infrastructure Downloads”. At the time of this writing, its link is here. This tutorial was implemented using Oracle Grid Infrastructure 12c Release 1 (12.1.0.2). • Oracle Database 12c R1 installation files • WinSCP utility: to copy the files to and from the Oracle VM box • Xming : to display the GUI windows in your hosting Windows PC. Just look for its download page, download it, and install it using Full Installation option. It is straight forward. • Putty : which provides a command line prompt to connect to a Linux server from Windows Required Hardware • Memory to run the VM machine: 4 GB • Expected storage space needed to hold the VM appliance: 40 GB Editor Ahmed Baraka ( www.ahmedbaraka.com ) Tutorial Target and Description This tutorial describes the hands-on practical procedure to install Oracle Database 12c R1 on a Linux server (Oracle Linux 6.7). Tutorial Procedure Plan 1. Clone the Oracle Linux pre-built VM appliance from a seed 2. Create virtual hard disks for ASM 3. Alter network configuration and hostname 4. Set up environment variables for OS accounts: grid and oracle 5. Install Oracle ASM packages 6. Create ASM disk volumes 7. Install Oracle Grid Infrastructure software 8. Create ASM disk groups 9. Install Oracle database software 10. Create an Oracle database Note: Download the required software and packages before you start implementing the tutorial.
Transcript of Installing Oracle Database 12c R1 on Linux 6 with · PDF filePage: 1 . Tutorial Target ....

Page: 1
Tutorial Target Installing Oracle Database 12c R1 on Linux 6 with ASM
Version / Date 1.0 / Feb-2016
Required Software and Packages • Oracle VirtualBox software, version 5. This tutorial was implemented on VirtualBox 5.0.12 for Windows which
can be downloaded from Oracle web site. I made a copy of it here. • Oracle Virtualbox VM appliance which has a fresh installation of Oracle Linux 6.7 (seed VM).
o The procedure to create it from scratch is documented here, or can be watched at Youtube here.
o Alternatively, you can download a pre-built one from here.
• Oracle Grid Infrastructure 12c R1 installation files. This can be downloaded from Oracle site. Search for a page titled “Oracle Grid Infrastructure Downloads”. At the time of this writing, its link is here. This tutorial was implemented using Oracle Grid Infrastructure 12c Release 1 (12.1.0.2).
• Oracle Database 12c R1 installation files
• WinSCP utility: to copy the files to and from the Oracle VM box
• Xming : to display the GUI windows in your hosting Windows PC. Just look for its download page, download it, and install it using Full Installation option. It is straight forward.
• Putty : which provides a command line prompt to connect to a Linux server from Windows
Required Hardware • Memory to run the VM machine: 4 GB
• Expected storage space needed to hold the VM appliance: 40 GB
Editor Ahmed Baraka ( www.ahmedbaraka.com )
Tutorial Target and Description This tutorial describes the hands-on practical procedure to install Oracle Database 12c R1 on a Linux server (Oracle Linux 6.7).
Tutorial Procedure Plan 1. Clone the Oracle Linux pre-built VM appliance from a seed
2. Create virtual hard disks for ASM
3. Alter network configuration and hostname
4. Set up environment variables for OS accounts: grid and oracle
5. Install Oracle ASM packages
6. Create ASM disk volumes
7. Install Oracle Grid Infrastructure software
8. Create ASM disk groups
9. Install Oracle database software
10. Create an Oracle database
Note: Download the required software and packages before you start implementing the tutorial.

Page: 2
Installation Architecture The tutorial builds a system with the following architecture diagram:

Page: 3
Tutorial Procedure 1. Clone the Oracle Linux pre-built VM appliance from a seed Make sure you have enough free disk space to clone the appliance

Page: 4

Page: 5
2. Create virtual hard disks for ASM We create 3 virtual disks CRSDISK1 (2GB), DATADISK1(50GB) & FRADISK1(50GB).

Page: 6
Repeat the procedure to create DATADISK1(50GB) & FRADISK1(50GB).

Page: 7
Optionally, edit the description of the VM appliance:
Page: 8
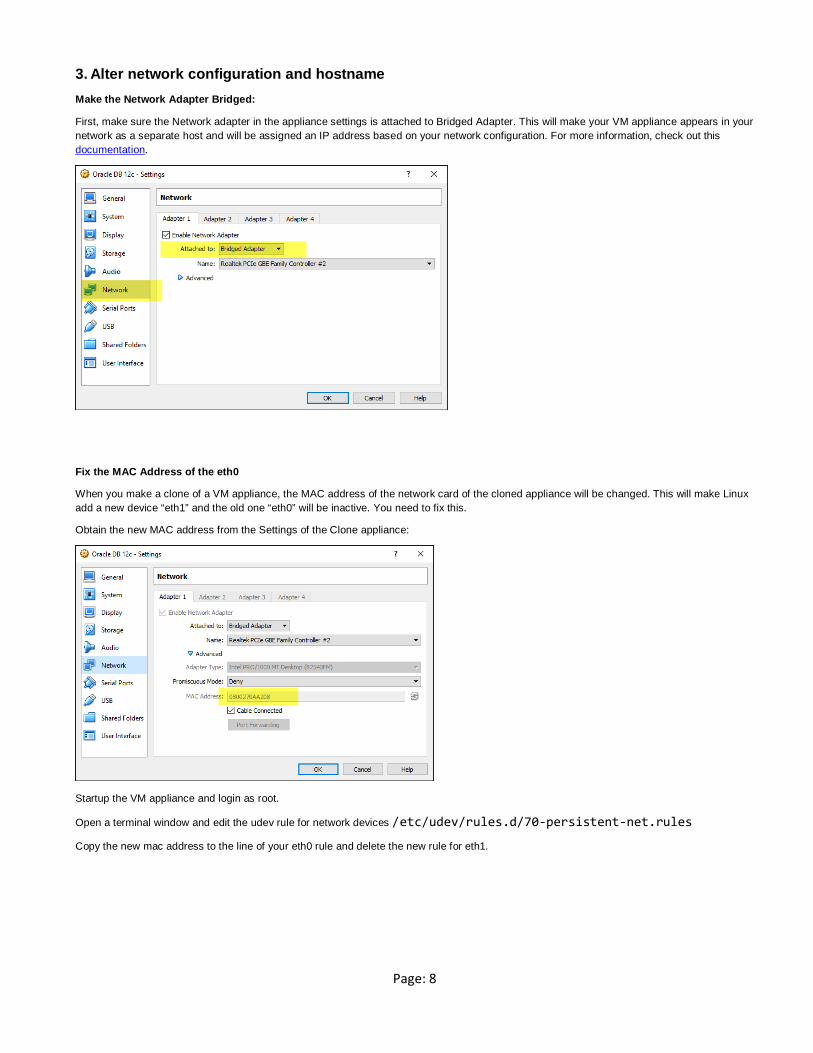
3. Alter network configuration and hostname Make the Network Adapter Bridged:
First, make sure the Network adapter in the appliance settings is attached to Bridged Adapter. This will make your VM appliance appears in your network as a separate host and will be assigned an IP address based on your network configuration. For more information, check out this documentation.
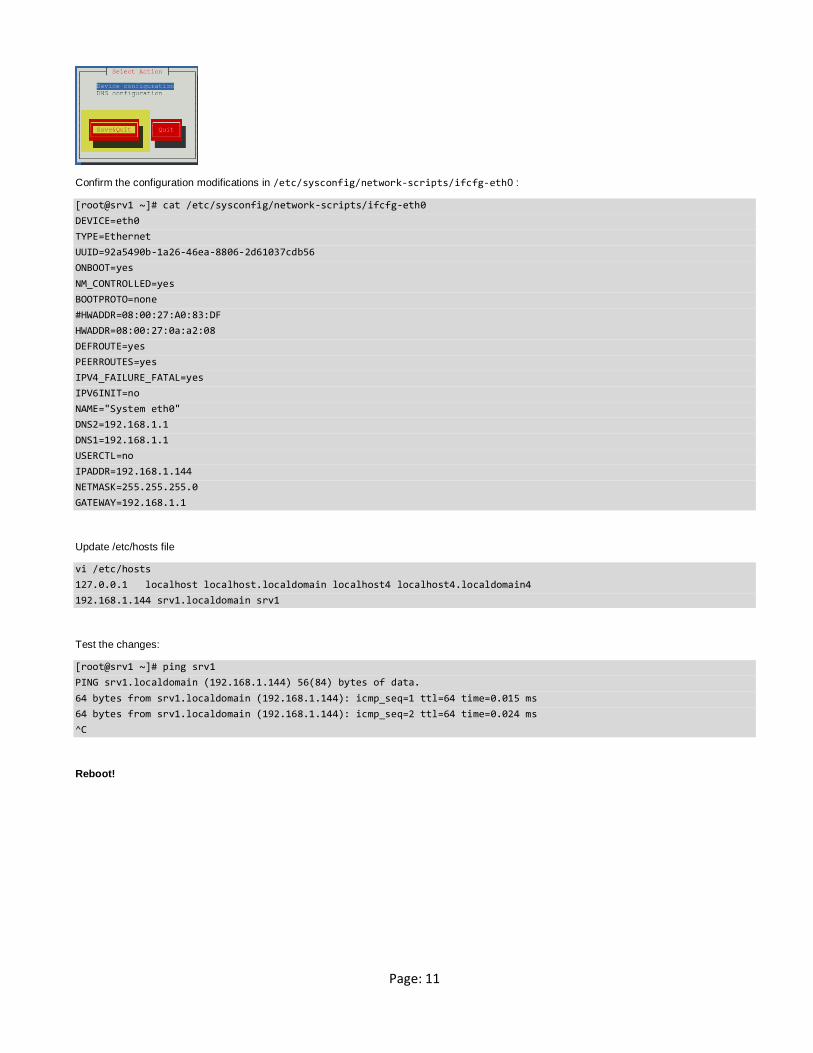
Fix the MAC Address of the eth0
When you make a clone of a VM appliance, the MAC address of the network card of the cloned appliance will be changed. This will make Linux add a new device “eth1” and the old one “eth0” will be inactive. You need to fix this.
Obtain the new MAC address from the Settings of the Clone appliance:
Startup the VM appliance and login as root.
Open a terminal window and edit the udev rule for network devices /etc/udev/rules.d/70-persistent-net.rules
Copy the new mac address to the line of your eth0 rule and delete the new rule for eth1.

Page: 9
Enter the new MAC address in the file /etc/sysconfig/network-scripts/ifcfg-eth0 as well:
Reboot
Perform the Network configuration
We need to set the DNS server in the VM appliance. Obtain the DNS sever IP address configured in your network.
Note: If you do not know the DNS IP address in your network, try the following command in the command prompt in the host machine
C:\>ipconfig /all | find "DNS" .. Connection-specific DNS Suffix . : DNS Servers . . . . . . . . . . . : 192.168.1.1 ..
Obtain the IP address assigned to the VM appliance and take a note of it.
We are going to make this IP address a static IP address for this machine.
Login as root and open a terminal window.
Run system-config-network command

Page: 10
the utility window will open. Make sure the “Device Configuration” select and press ENTER
Select eth0 and press ENTER
Enter the IP address of the machine and DNS and Gateway IP addresses taken from the previous step:
Page: 11
Confirm the configuration modifications in /etc/sysconfig/network-scripts/ifcfg-eth0 :
[root@srv1 ~]# cat /etc/sysconfig/network-scripts/ifcfg-eth0 DEVICE=eth0 TYPE=Ethernet UUID=92a5490b-1a26-46ea-8806-2d61037cdb56 ONBOOT=yes NM_CONTROLLED=yes BOOTPROTO=none #HWADDR=08:00:27:A0:83:DF HWADDR=08:00:27:0a:a2:08 DEFROUTE=yes PEERROUTES=yes IPV4_FAILURE_FATAL=yes IPV6INIT=no NAME="System eth0" DNS2=192.168.1.1 DNS1=192.168.1.1 USERCTL=no IPADDR=192.168.1.144 NETMASK=255.255.255.0 GATEWAY=192.168.1.1
Update /etc/hosts file
vi /etc/hosts 127.0.0.1 localhost localhost.localdomain localhost4 localhost4.localdomain4 192.168.1.144 srv1.localdomain srv1
Test the changes:
[root@srv1 ~]# ping srv1 PING srv1.localdomain (192.168.1.144) 56(84) bytes of data. 64 bytes from srv1.localdomain (192.168.1.144): icmp_seq=1 ttl=64 time=0.015 ms 64 bytes from srv1.localdomain (192.168.1.144): icmp_seq=2 ttl=64 time=0.024 ms ^C
Reboot!

Page: 12
Connect to the VM appliance using Putty
Putty is a nice utility which provides a command prompt from Windows client to connect to Linux server. Let’s configure it here to connect to our VM appliance.
Ping the VM IP address from your host machine to make sure it is seen. It should see it.
Start Putty and connect to the VM:

Page: 13
You can control the font in the command prompt as follow:
Save the configuration and connect:
Page: 14
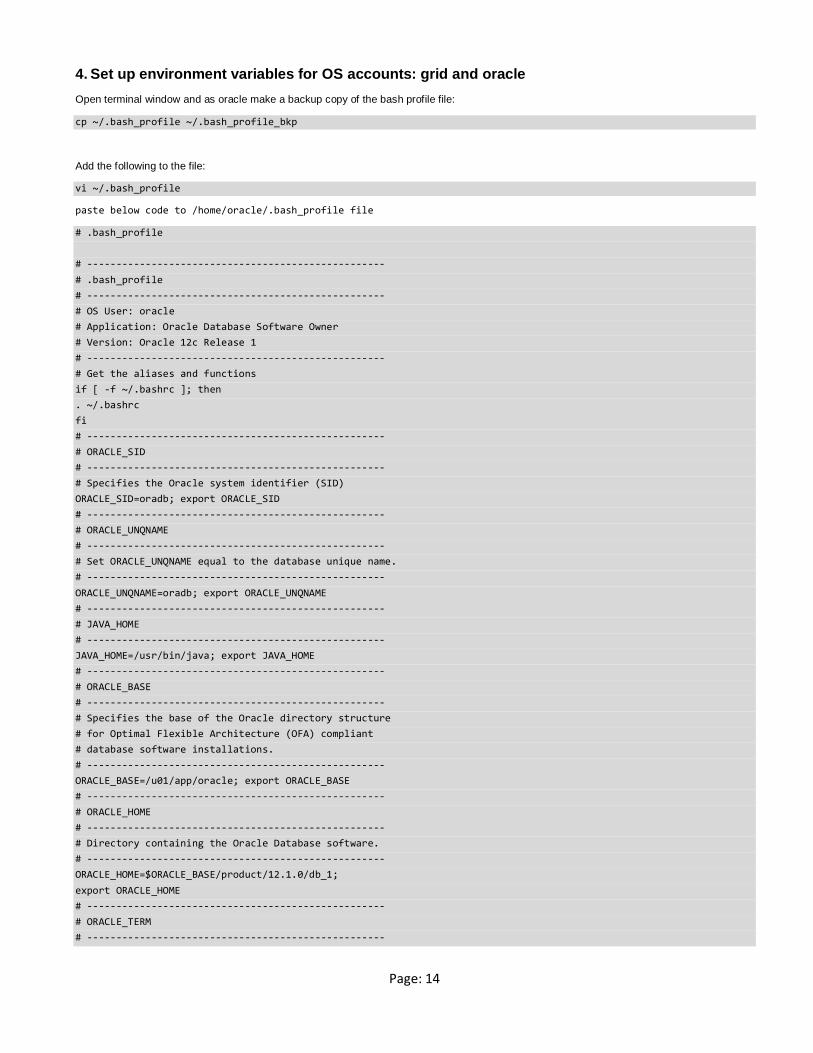
4. Set up environment variables for OS accounts: grid and oracle Open terminal window and as oracle make a backup copy of the bash profile file:
cp ~/.bash_profile ~/.bash_profile_bkp
Add the following to the file:
vi ~/.bash_profile
paste below code to /home/oracle/.bash_profile file
# .bash_profile # --------------------------------------------------- # .bash_profile # --------------------------------------------------- # OS User: oracle # Application: Oracle Database Software Owner # Version: Oracle 12c Release 1 # --------------------------------------------------- # Get the aliases and functions if [ -f ~/.bashrc ]; then . ~/.bashrc fi # --------------------------------------------------- # ORACLE_SID # --------------------------------------------------- # Specifies the Oracle system identifier (SID) ORACLE_SID=oradb; export ORACLE_SID # --------------------------------------------------- # ORACLE_UNQNAME # --------------------------------------------------- # Set ORACLE_UNQNAME equal to the database unique name. # --------------------------------------------------- ORACLE_UNQNAME=oradb; export ORACLE_UNQNAME # --------------------------------------------------- # JAVA_HOME # --------------------------------------------------- JAVA_HOME=/usr/bin/java; export JAVA_HOME # --------------------------------------------------- # ORACLE_BASE # --------------------------------------------------- # Specifies the base of the Oracle directory structure # for Optimal Flexible Architecture (OFA) compliant # database software installations. # --------------------------------------------------- ORACLE_BASE=/u01/app/oracle; export ORACLE_BASE # --------------------------------------------------- # ORACLE_HOME # --------------------------------------------------- # Directory containing the Oracle Database software. # --------------------------------------------------- ORACLE_HOME=$ORACLE_BASE/product/12.1.0/db_1; export ORACLE_HOME # --------------------------------------------------- # ORACLE_TERM # ---------------------------------------------------

Page: 15
# Defines a terminal definition. If not set, it # defaults to the value of your TERM environment # variable. Used by all character mode products. # --------------------------------------------------- ORACLE_TERM=xterm; export ORACLE_TERM # --------------------------------------------------- # NLS_DATE_FORMAT # --------------------------------------------------- NLS_DATE_FORMAT="DD-MON-YYYY HH24:MI:SS" export NLS_DATE_FORMAT # --------------------------------------------------- # TNS_ADMIN # --------------------------------------------------- # Specifies the directory containing the Oracle Net # Services configuration files like listener.ora, # tnsnames.ora, and sqlnet.ora. # --------------------------------------------------- TNS_ADMIN=$ORACLE_HOME/network/admin; export TNS_ADMIN # --------------------------------------------------- # PATH # --------------------------------------------------- # Used by the shell to locate executable programs; # must include the $ORACLE_HOME/bin directory. # --------------------------------------------------- PATH=.:${JAVA_HOME}/bin:${PATH}:$HOME/bin:$ORACLE_HOME/bin PATH=${PATH}:/usr/bin:/bin:/usr/local/bin export PATH # --------------------------------------------------- # LD_LIBRARY_PATH # --------------------------------------------------- # Specifies the list of directories that the shared # library loader searches to locate shared object # libraries at runtime. # --------------------------------------------------- LD_LIBRARY_PATH=$ORACLE_HOME/lib LD_LIBRARY_PATH=${LD_LIBRARY_PATH}:$ORACLE_HOME/oracm/lib LD_LIBRARY_PATH=${LD_LIBRARY_PATH}:/lib:/usr/lib:/usr/local/lib export LD_LIBRARY_PATH # --------------------------------------------------- # CLASSPATH # --------------------------------------------------- # Specifies the directory or list of directories that # contain compiled Java classes. # --------------------------------------------------- CLASSPATH=$ORACLE_HOME/JRE CLASSPATH=${CLASSPATH}:$ORACLE_HOME/jlib CLASSPATH=${CLASSPATH}:$ORACLE_HOME/rdbms/jlib CLASSPATH=${CLASSPATH}:$ORACLE_HOME/network/jlib export CLASSPATH # --------------------------------------------------- # THREADS_FLAG # --------------------------------------------------- # All the tools in the JDK use green threads as a # default. To specify that native threads should be # used, set the THREADS_FLAG environment variable to # "native". You can revert to the use of green # threads by setting THREADS_FLAG to the value

Page: 16
# "green". # --------------------------------------------------- THREADS_FLAG=native; export THREADS_FLAG # --------------------------------------------------- # TEMP, TMP, and TMPDIR # --------------------------------------------------- export TEMP=/tmp export TMPDIR=/tmp # --------------------------------------------------- # UMASK # --------------------------------------------------- # Set the default file mode creation mask # (umask) to 022 to ensure that the user performing # the Oracle software installation creates files # with 644 permissions. # --------------------------------------------------- umask 022
Switch to root user and create grid user and assign it to its groups:
useradd -u 54323 -g oinstall -G dba grid passwd grid
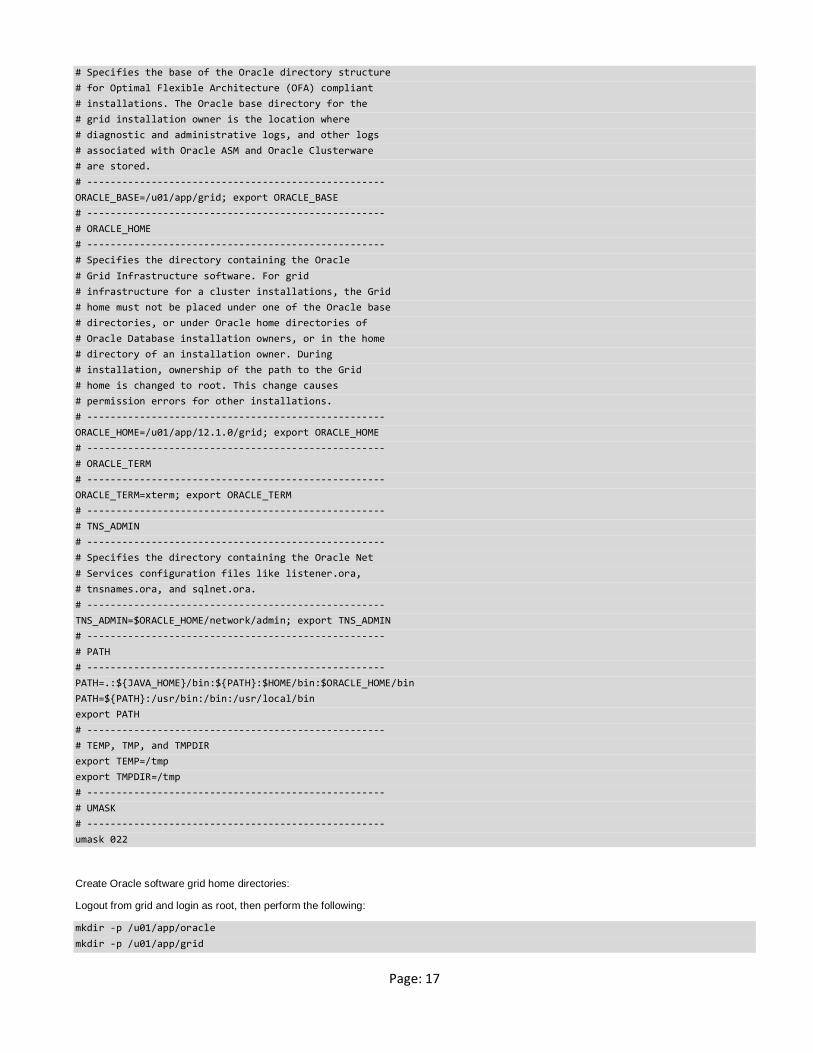
Switch to grid user and modify its bash profile as follows:
cp ~/.bash_profile ~/.bash_profile_bkp vi ~/.bash_profile # .bash_profile # OS User: grid # Application: Oracle Grid Infrastructure # Version: Oracle 12c Release 1 # --------------------------------------------------- # Get the aliases and functions if [ -f ~/.bashrc ]; then . ~/.bashrc fi # --------------------------------------------------- # ORACLE_SID # --------------------------------------------------- # Specifies the Oracle system identifier (SID) # for the Automatic Storage Management (ASM)instance # running on this node. # --------------------------------------------------- ORACLE_SID=+ASM; export ORACLE_SID # --------------------------------------------------- # JAVA_HOME # --------------------------------------------------- # Specifies the directory of the Java SDK and Runtime # Environment. # --------------------------------------------------- JAVA_HOME=/usr/bin/java; export JAVA_HOME # --------------------------------------------------- # ORACLE_BASE # ---------------------------------------------------
Page: 17
# Specifies the base of the Oracle directory structure # for Optimal Flexible Architecture (OFA) compliant # installations. The Oracle base directory for the # grid installation owner is the location where # diagnostic and administrative logs, and other logs # associated with Oracle ASM and Oracle Clusterware # are stored. # --------------------------------------------------- ORACLE_BASE=/u01/app/grid; export ORACLE_BASE # --------------------------------------------------- # ORACLE_HOME # --------------------------------------------------- # Specifies the directory containing the Oracle # Grid Infrastructure software. For grid # infrastructure for a cluster installations, the Grid # home must not be placed under one of the Oracle base # directories, or under Oracle home directories of # Oracle Database installation owners, or in the home # directory of an installation owner. During # installation, ownership of the path to the Grid # home is changed to root. This change causes # permission errors for other installations. # --------------------------------------------------- ORACLE_HOME=/u01/app/12.1.0/grid; export ORACLE_HOME # --------------------------------------------------- # ORACLE_TERM # --------------------------------------------------- ORACLE_TERM=xterm; export ORACLE_TERM # --------------------------------------------------- # TNS_ADMIN # --------------------------------------------------- # Specifies the directory containing the Oracle Net # Services configuration files like listener.ora, # tnsnames.ora, and sqlnet.ora. # --------------------------------------------------- TNS_ADMIN=$ORACLE_HOME/network/admin; export TNS_ADMIN # --------------------------------------------------- # PATH # --------------------------------------------------- PATH=.:${JAVA_HOME}/bin:${PATH}:$HOME/bin:$ORACLE_HOME/bin PATH=${PATH}:/usr/bin:/bin:/usr/local/bin export PATH # --------------------------------------------------- # TEMP, TMP, and TMPDIR export TEMP=/tmp export TMPDIR=/tmp # --------------------------------------------------- # UMASK # --------------------------------------------------- umask 022
Create Oracle software grid home directories:
Logout from grid and login as root, then perform the following:
mkdir -p /u01/app/oracle mkdir -p /u01/app/grid

Page: 18
mkdir -p /u01/app/12.1.0/grid chown -R grid:oinstall /u01 chown oracle:oinstall /u01/app/oracle chmod -R 775 /u01

Page: 19
5. Install Oracle ASM packages Verify oracleasm package is installed:
[root@srv1 ~]# rpm -qa | grep oracleasm oracleasm-support-2.1.8-1.el6.x86_64
Install Oracle ASMLib package
The oracleasm kernel driver for the 64-bit (x86_64) Red Hat Compatible Kernel for Oracle Linux 6 can be installed manually from ULN or http://public-yum.oracle.com using the yum tool:
# yum install kmod-oracleasm
Further information can be obtained from a page in Oracle site titled:"Oracle ASMLib Downloads for Oracle Linux 6"
http://www.oracle.com/technetwork/server-storage/linux/asmlib/ol6-1709075.html
[root@srv1 ~]# yum install kmod-oracleasm Loaded plugins: refresh-packagekit, security, ulninfo Setting up Install Process public_ol6_UEKR3_latest | 1.2 kB 00:00 public_ol6_latest | 1.4 kB 00:00 Resolving Dependencies --> Running transaction check ---> Package kmod-oracleasm.x86_64 0:2.0.8-6.el6_7 will be installed --> Finished Dependency Resolution Dependencies Resolved ================================================================================ Package Arch Version Repository Size ================================================================================ Installing: kmod-oracleasm x86_64 2.0.8-6.el6_7 public_ol6_latest 35 k Transaction Summary ================================================================================ Install 1 Package(s) Total download size: 35 k Installed size: 117 k Is this ok [y/N]: y Downloading Packages: kmod-oracleasm-2.0.8-6.el6_7.x86_64.rpm | 35 kB 00:00 Running rpm_check_debug Running Transaction Test Transaction Test Succeeded Running Transaction Installing : kmod-oracleasm-2.0.8-6.el6_7.x86_64 1/1 Verifying : kmod-oracleasm-2.0.8-6.el6_7.x86_64 1/1 Installed: kmod-oracleasm.x86_64 0:2.0.8-6.el6_7 Complete!
Configure and load the ASM kernel module:
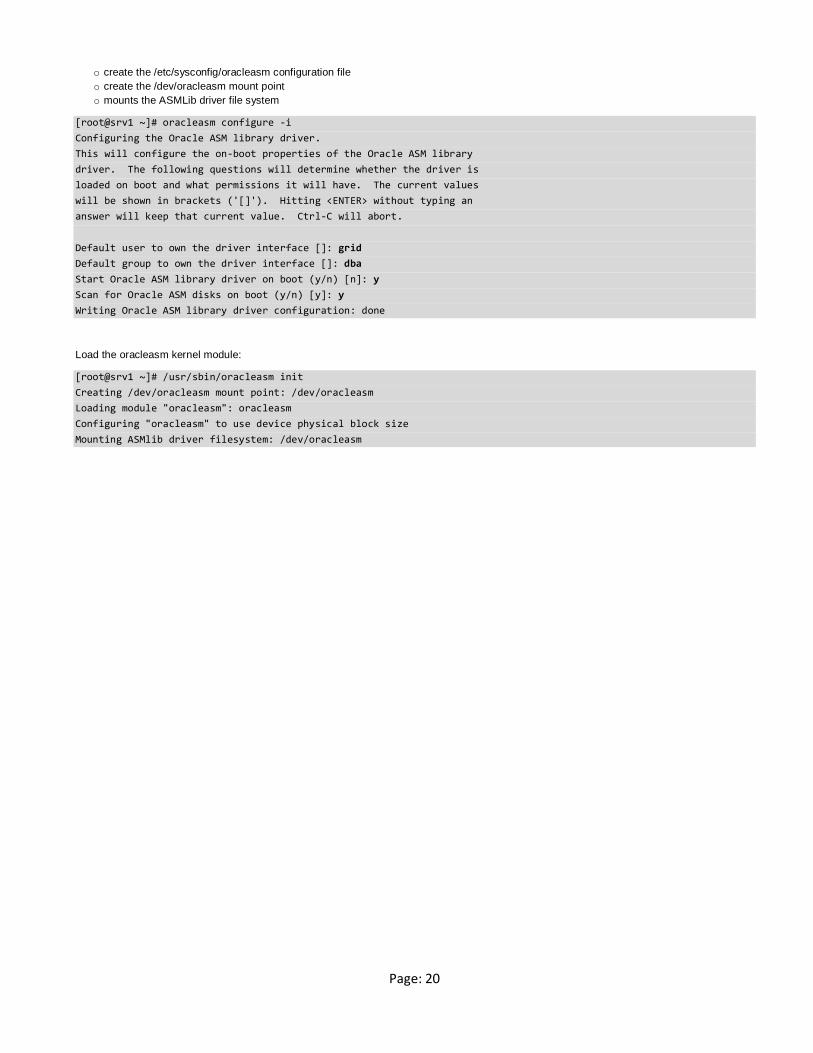
The “oracleasm configure” will do the following:
Page: 20
o create the /etc/sysconfig/oracleasm configuration file o create the /dev/oracleasm mount point o mounts the ASMLib driver file system
[root@srv1 ~]# oracleasm configure -i Configuring the Oracle ASM library driver. This will configure the on-boot properties of the Oracle ASM library driver. The following questions will determine whether the driver is loaded on boot and what permissions it will have. The current values will be shown in brackets ('[]'). Hitting <ENTER> without typing an answer will keep that current value. Ctrl-C will abort. Default user to own the driver interface []: grid Default group to own the driver interface []: dba Start Oracle ASM library driver on boot (y/n) [n]: y Scan for Oracle ASM disks on boot (y/n) [y]: y Writing Oracle ASM library driver configuration: done
Load the oracleasm kernel module:
[root@srv1 ~]# /usr/sbin/oracleasm init Creating /dev/oracleasm mount point: /dev/oracleasm Loading module "oracleasm": oracleasm Configuring "oracleasm" to use device physical block size Mounting ASMlib driver filesystem: /dev/oracleasm

Page: 21
6. Create ASM disk volumes List the disks in the OS, you should see the disks created earlier:
[root@srv1 ~]# fdisk -l | grep "Disk /dev/sd" Disk /dev/sda: 107.4 GB, 107374182400 bytes Disk /dev/sdb: 2147 MB, 2147483648 bytes Disk /dev/sdc: 53.7 GB, 53687091200 bytes Disk /dev/sdd: 53.7 GB, 53687091200 bytes
In order to use those disks with ASM, partitions should be created in them.
use fdisk <device file>
then press: n, p, 1, ENTER, ENTER, w – to apply changes
Do this for all the disks sdb,sdc,sdd
Following is the output done on sdb:
[root@srv1 ~]# fdisk /dev/sdb Device contains neither a valid DOS partition table, nor Sun, SGI or OSF disklabel Building a new DOS disklabel with disk identifier 0xd2973f79. Changes will remain in memory only, until you decide to write them. After that, of course, the previous content won't be recoverable. Warning: invalid flag 0x0000 of partition table 4 will be corrected by w(rite) WARNING: DOS-compatible mode is deprecated. It's strongly recommended to switch off the mode (command 'c') and change display units to sectors (command 'u'). Command (m for help): n Command action e extended p primary partition (1-4) p Partition number (1-4): 1 First cylinder (1-261, default 1): Using default value 1 Last cylinder, +cylinders or +size{K,M,G} (1-261, default 261): Using default value 261 Command (m for help): w The partition table has been altered! Calling ioctl() to re-read partition table. Syncing disks.
Verify:
[root@srv1 ~]# fdisk -l | grep "/dev/s" Disk /dev/sda: 107.4 GB, 107374182400 bytes /dev/sda1 * 1 64 512000 83 Linux /dev/sda2 64 13055 104344576 8e Linux LVM Disk /dev/sdb: 2147 MB, 2147483648 bytes /dev/sdb1 1 261 2096451 83 Linux Disk /dev/sdc: 53.7 GB, 53687091200 bytes

Page: 22
/dev/sdc1 1 6527 52428096 83 Linux Disk /dev/sdd: 53.7 GB, 53687091200 bytes /dev/sdd1 1 6527 52428096 83 Linux
Create ASM disks:
oracleasm createdisk CRSDISK1 /dev/sdb1
oracleasm createdisk DATADISK1 /dev/sdc1
oracleasm createdisk FRADISK1 /dev/sdd1
[root@srv1 ~]# oracleasm createdisk CRSDISK1 /dev/sdb1 Writing disk header: done Instantiating disk: done [root@srv1 ~]# oracleasm createdisk DATADISK1 /dev/sdc1 Writing disk header: done Instantiating disk: done [root@srv1 ~]# oracleasm createdisk FRADISK1 /dev/sdd1 Writing disk header: done Instantiating disk: done [root@srv1 ~]# oracleasm listdisks CRSDISK1 DATADISK1 FRADISK1
Reboot!

Page: 23
7. Install Oracle Grid Infrastructure software Copy the installation files to the VM appliance:
Use WinSCP to copy Oracle Grid Infrastructure installation files to the VM appliance. As grid user, I created the directory /home/grid/source to copy the installation files to it
[root@srv1 ~]# su - grid [grid@srv1 ~]$ pwd /home/grid [grid@srv1 ~]$ mkdir source

Page: 24
After the files were copied, as root, make grid user and oinstall group the owner of the installation files:
[root@srv1 ~]# chown grid:oinstall /home/grid/source/linuxamd64_12102_grid_*
Run Xming and configure Putty for it
Run Xming to view Oracle GUI Installer windows in your host Windows client machine. You should see its icon in the task bar mini icons.
Then, you need to configure PyTTY session with port forwarding enabled to be able to display GUI windows via Xming server and test it with xclock command.
Xclock is not installed in our appliance. To install it, simply run the following command:
yum install xclock
Page: 25
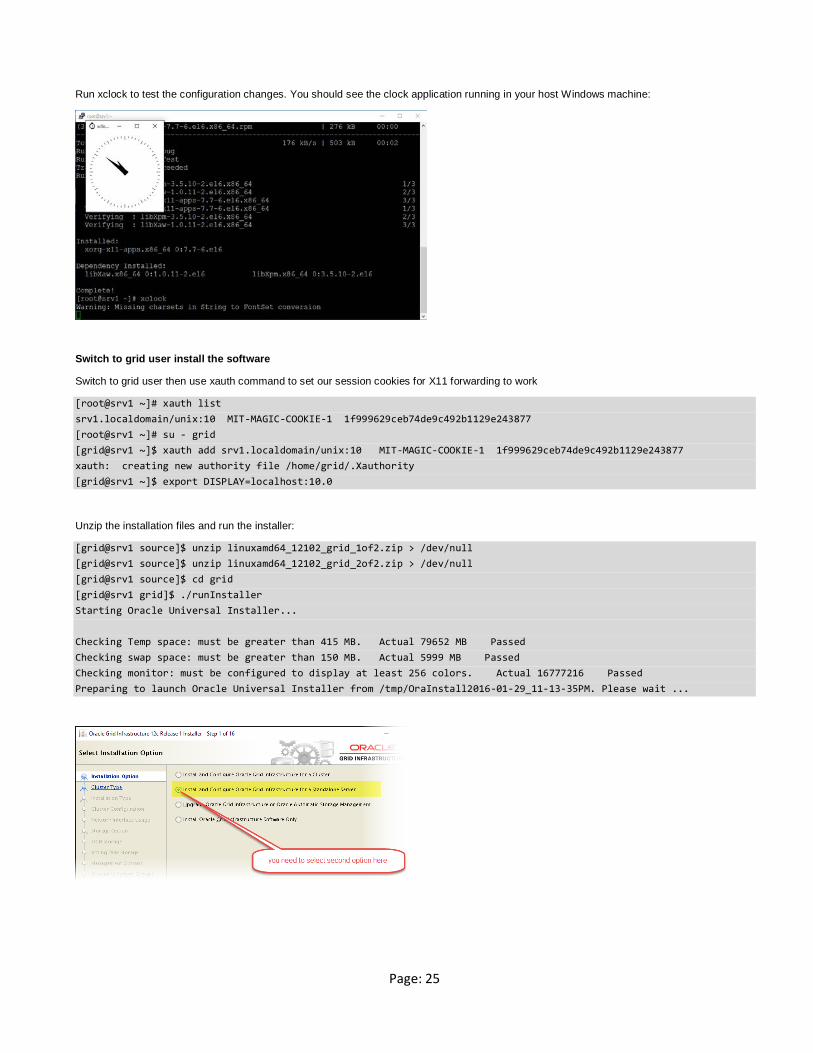
Run xclock to test the configuration changes. You should see the clock application running in your host Windows machine:
Switch to grid user install the software
Switch to grid user then use xauth command to set our session cookies for X11 forwarding to work
[root@srv1 ~]# xauth list srv1.localdomain/unix:10 MIT-MAGIC-COOKIE-1 1f999629ceb74de9c492b1129e243877 [root@srv1 ~]# su - grid [grid@srv1 ~]$ xauth add srv1.localdomain/unix:10 MIT-MAGIC-COOKIE-1 1f999629ceb74de9c492b1129e243877 xauth: creating new authority file /home/grid/.Xauthority [grid@srv1 ~]$ export DISPLAY=localhost:10.0
Unzip the installation files and run the installer:
[grid@srv1 source]$ unzip linuxamd64_12102_grid_1of2.zip > /dev/null [grid@srv1 source]$ unzip linuxamd64_12102_grid_2of2.zip > /dev/null [grid@srv1 source]$ cd grid [grid@srv1 grid]$ ./runInstaller Starting Oracle Universal Installer... Checking Temp space: must be greater than 415 MB. Actual 79652 MB Passed Checking swap space: must be greater than 150 MB. Actual 5999 MB Passed Checking monitor: must be configured to display at least 256 colors. Actual 16777216 Passed Preparing to launch Oracle Universal Installer from /tmp/OraInstall2016-01-29_11-13-35PM. Please wait ...

Page: 26
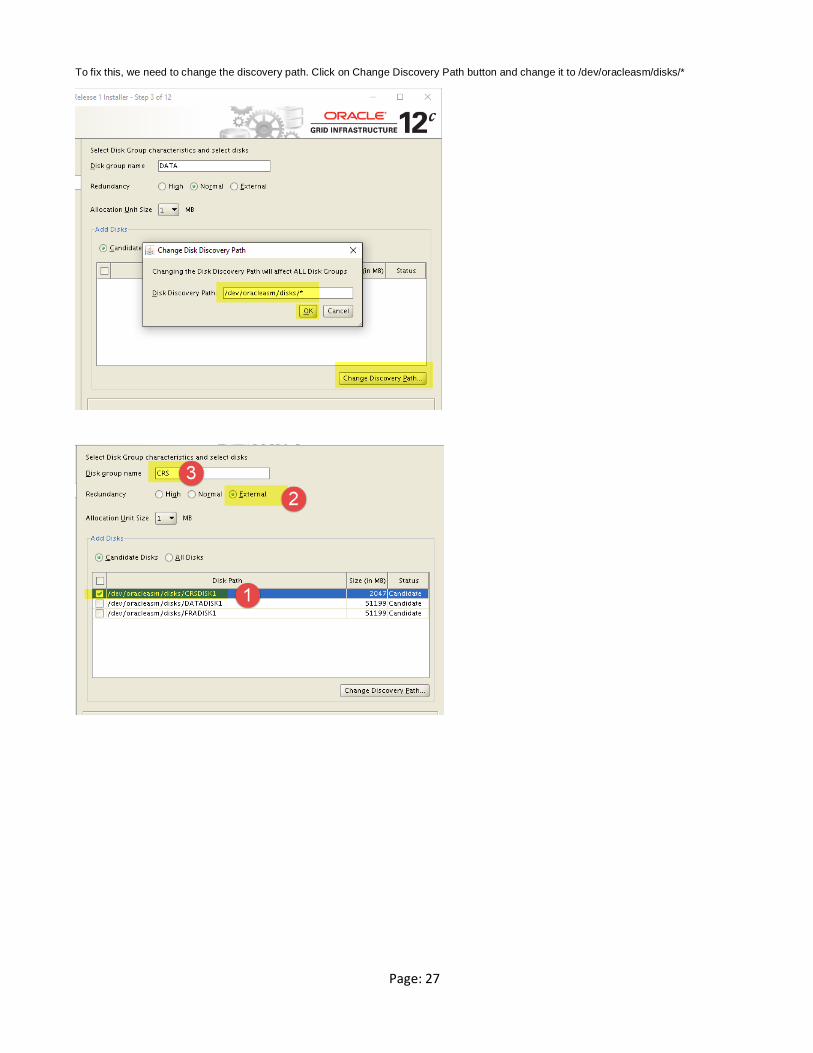
In the next wizard window, we expect to see the ASM disks. But they actually did not appear in our case, as shown below:
Page: 27
To fix this, we need to change the discovery path. Click on Change Discovery Path button and change it to /dev/oracleasm/disks/*

Page: 28

Page: 29

Page: 30

Page: 31
Check CRS services status:
crsctl status resource -t
Do not close the Putty command prompt window at this stage. Go to next section and execute the commands over there using the same Putty window. If you have already closed it, start it, login as root, and re-run the “xauth list” again, switch to grid, and re-run the commands “xauth add” and “export DISPLAY” as shown earlier.

Page: 32
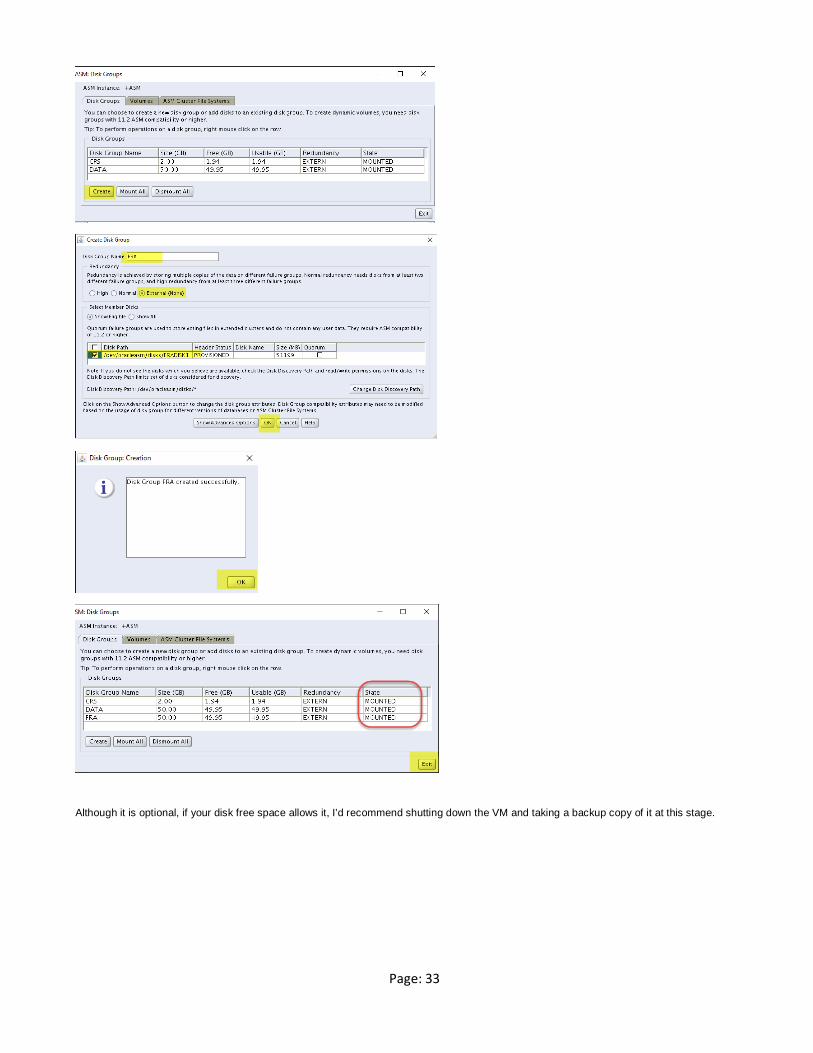
8. Create ASM disk groups As grid initiate ASM Configuration Assistant:
[grid@srv1 grid]$ asmca
Page: 33
Although it is optional, if your disk free space allows it, I’d recommend shutting down the VM and taking a backup copy of it at this stage.
Page: 34
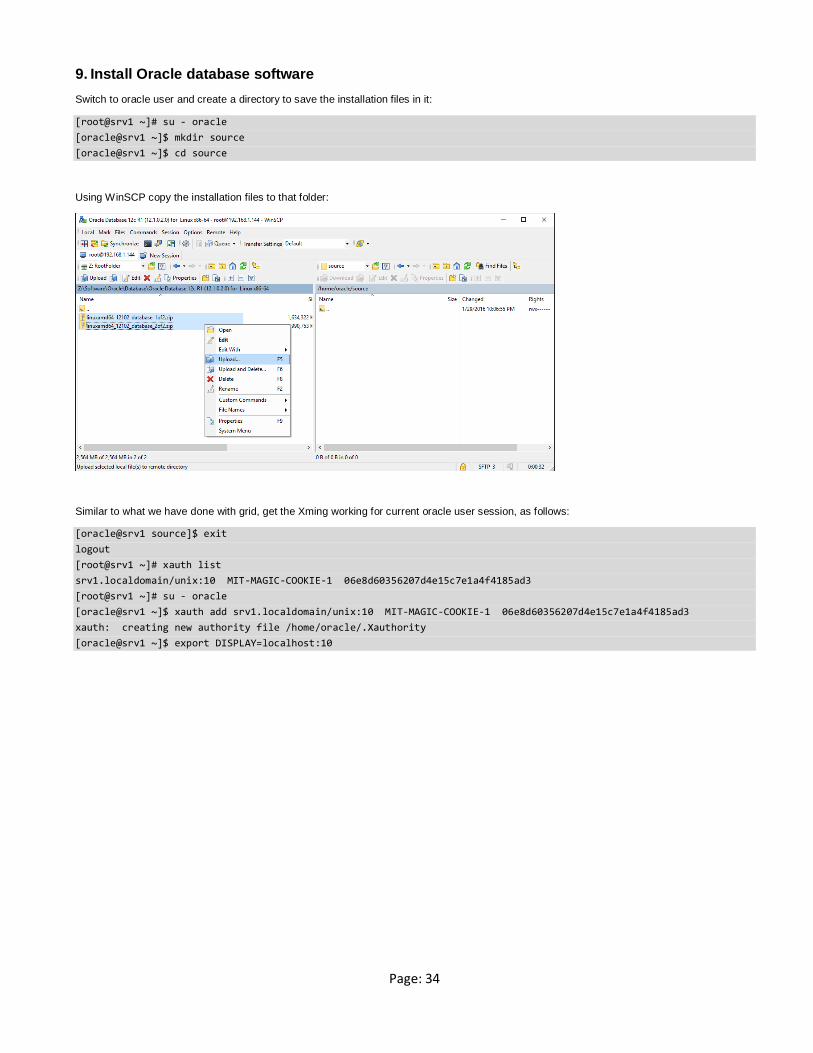
9. Install Oracle database software Switch to oracle user and create a directory to save the installation files in it:
[root@srv1 ~]# su - oracle [oracle@srv1 ~]$ mkdir source [oracle@srv1 ~]$ cd source
Using WinSCP copy the installation files to that folder:
Similar to what we have done with grid, get the Xming working for current oracle user session, as follows:
[oracle@srv1 source]$ exit logout [root@srv1 ~]# xauth list srv1.localdomain/unix:10 MIT-MAGIC-COOKIE-1 06e8d60356207d4e15c7e1a4f4185ad3 [root@srv1 ~]# su - oracle [oracle@srv1 ~]$ xauth add srv1.localdomain/unix:10 MIT-MAGIC-COOKIE-1 06e8d60356207d4e15c7e1a4f4185ad3 xauth: creating new authority file /home/oracle/.Xauthority [oracle@srv1 ~]$ export DISPLAY=localhost:10

Page: 35
To test, issue xclock command:
Unzip the installation zip files:
[oracle@srv1 ~]$ cd source/ [oracle@srv1 source]$ unzip linuxamd64_12102_database_1of2.zip > /dev/null [oracle@srv1 source]$ unzip linuxamd64_12102_database_2of2.zip > /dev/null
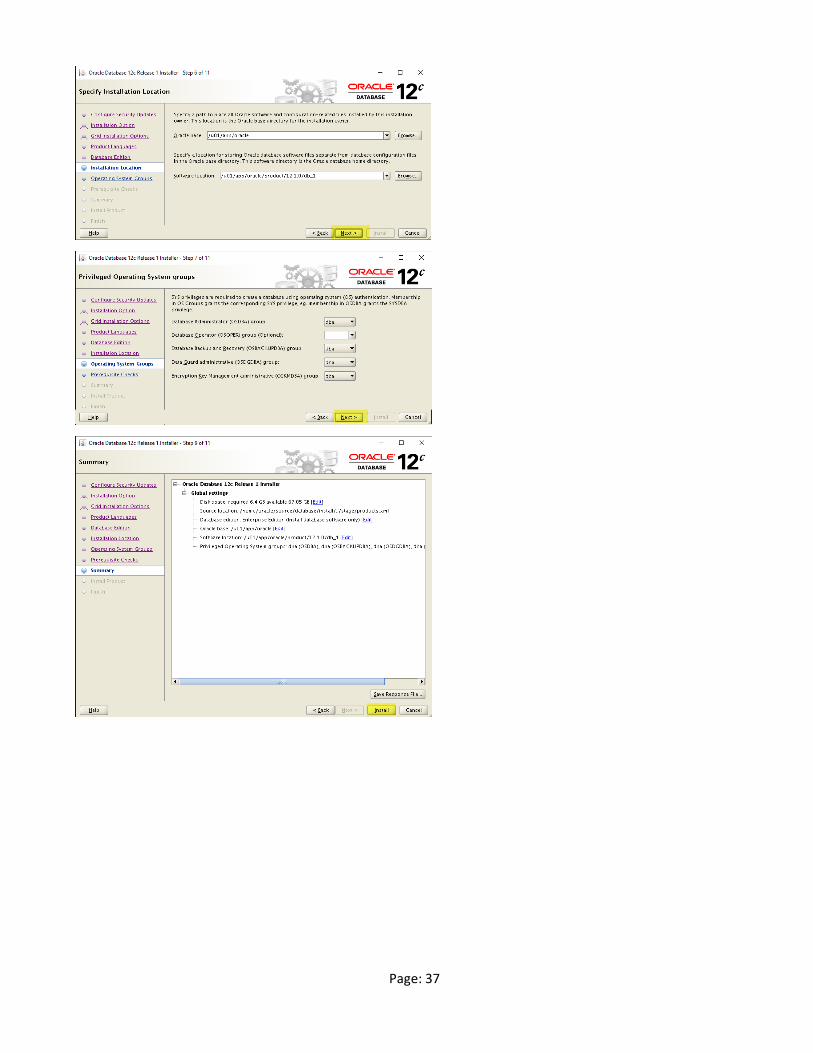
Run the installer:
[oracle@srv1 source]$ cd database/ [oracle@srv1 database]$ ./runInstaller

Page: 36
Page: 37

Page: 38

Page: 39
10. Create an Oracle database Configure a dedicate database Listener
Configure a dedicate database Listener (this is different from the default Listener running in the gird):
[oracle@srv1 database]$ netca

Page: 40
Page: 41
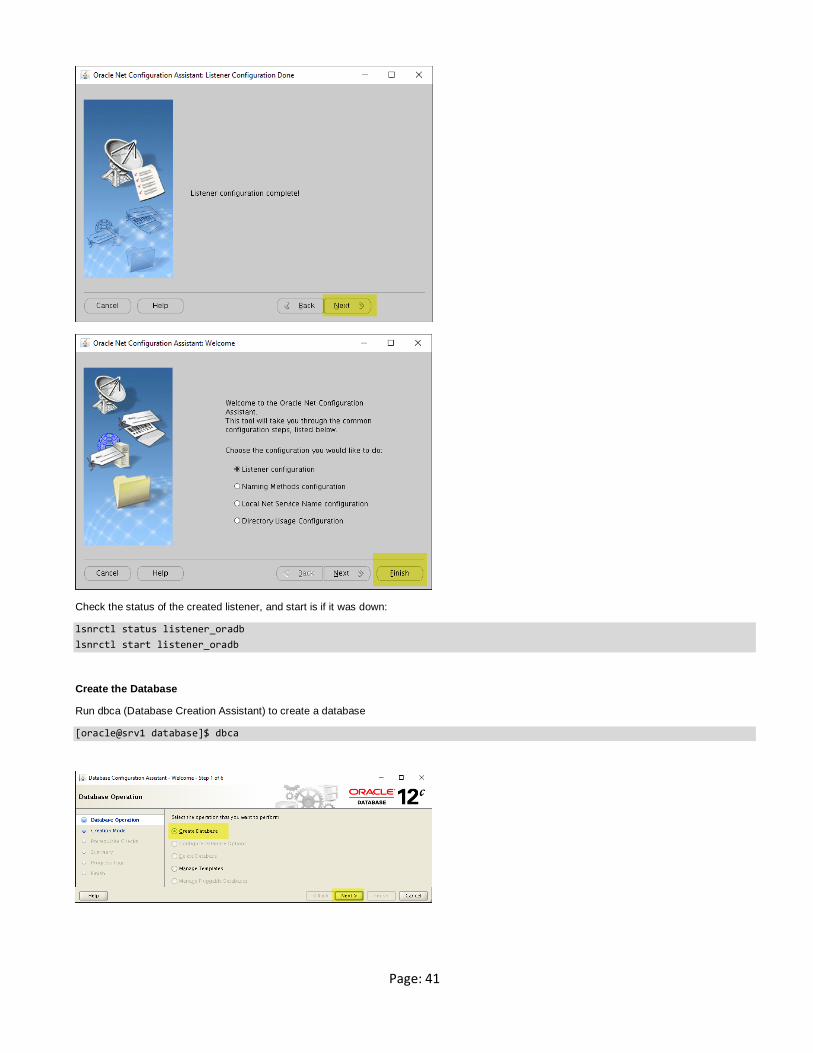
Check the status of the created listener, and start is if it was down:
lsnrctl status listener_oradb lsnrctl start listener_oradb
Create the Database
Run dbca (Database Creation Assistant) to create a database
[oracle@srv1 database]$ dbca

Page: 42

Page: 43
Page: 44
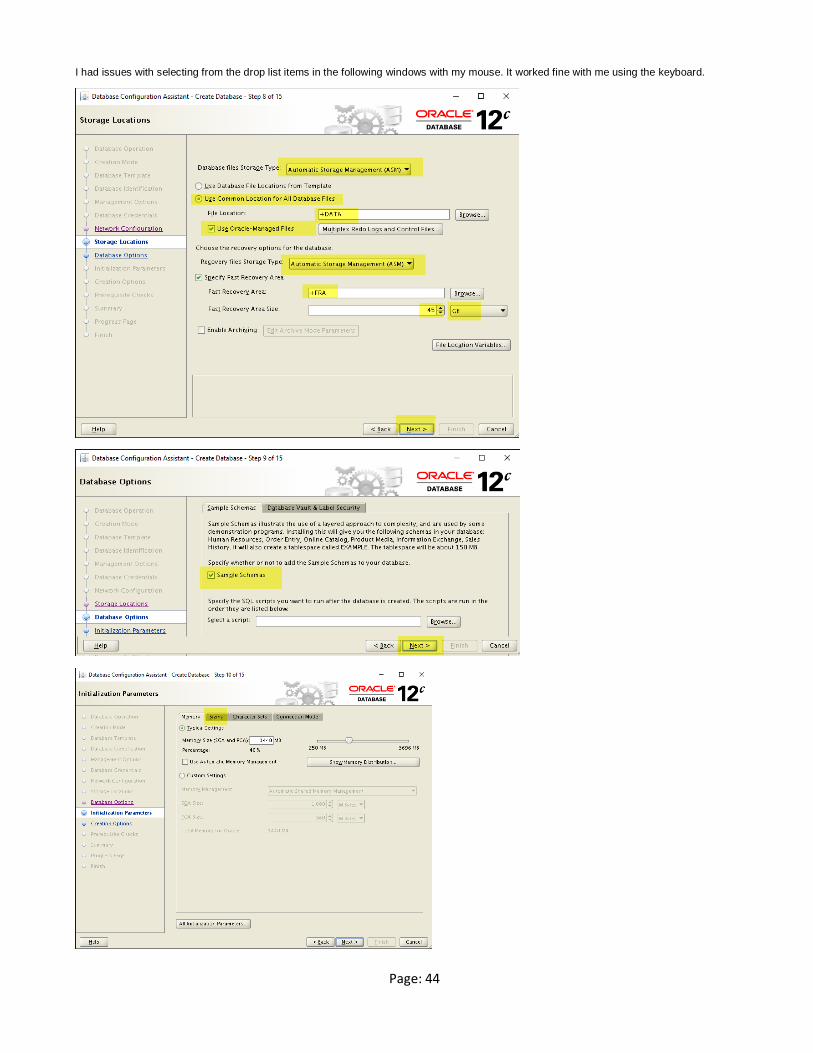
I had issues with selecting from the drop list items in the following windows with my mouse. It worked fine with me using the keyboard.

Page: 45

Page: 46
Set the control files parameter to ("+DATA/{DB_UNIQUE_NAME}/control1.ctl","+FRA/{DB_UNIQUE_NAME}/control2.ctl")

Page: 47

Page: 48
Connect to the database using sqlplus utility for testing:
[oracle@srv1 database]$ echo $ORACLE_SID oradb [oracle@srv1 database]$ sqlplus system SQL*Plus: Release 12.1.0.2.0 Production on Sat Jan 30 13:27:27 2016 Copyright (c) 1982, 2014, Oracle. All rights reserved. Enter password: Last Successful login time: Sat Jan 30 2016 13:25:43 +04:00 Connected to: Oracle Database 12c Enterprise Edition Release 12.1.0.2.0 - 64bit Production With the Partitioning, Automatic Storage Management, OLAP, Advanced Analytics and Real Application Testing options SQL> exit Disconnected from Oracle Database 12c Enterprise Edition Release 12.1.0.2.0 - 64bit Production With the Partitioning, Automatic Storage Management, OLAP, Advanced Analytics and Real Application Testing options
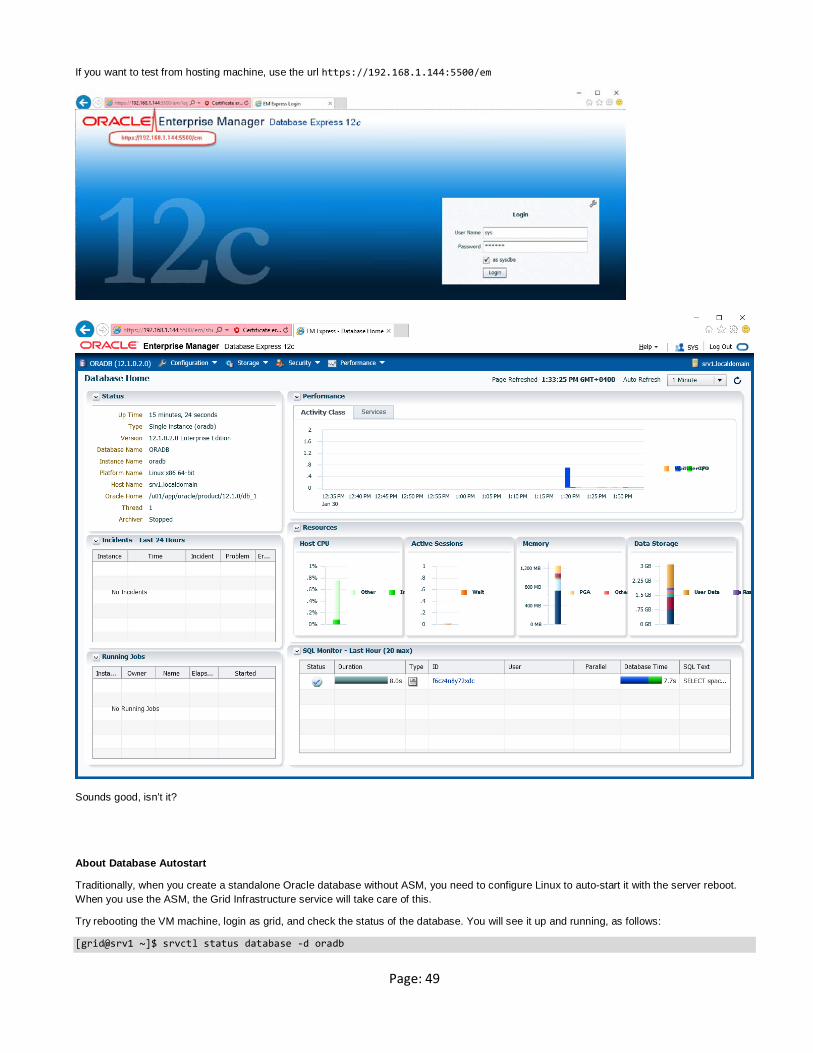
Test the Enterprise Manager Database Express
Page: 49
If you want to test from hosting machine, use the url https://192.168.1.144:5500/em
Sounds good, isn’t it?
About Database Autostart
Traditionally, when you create a standalone Oracle database without ASM, you need to configure Linux to auto-start it with the server reboot. When you use the ASM, the Grid Infrastructure service will take care of this.
Try rebooting the VM machine, login as grid, and check the status of the database. You will see it up and running, as follows:
[grid@srv1 ~]$ srvctl status database -d oradb

Page: 50
Database is running.
Practically, you do not need to do anything here. I just want to point that out.
[grid@srv1 ~]$ crsctl config has CRS-4622: Oracle High Availability Services autostart is enabled.