Oracle® Rdb for OpenVMS · 1.5 Maximum OpenVMS Version Check Added

Table of Contents
Executive Summary .............................................................................................................................. 2
Intended Audience............................................................................................................................... 2
Introduction......................................................................................................................................... 2
Prerequisites........................................................................................................................................ 2
Installing HP-UX ................................................................................................................................... 4
a) Basic Configuration ............................................................................................................... 5
b) Software Configuration .......................................................................................................... 6
c) System Configuration............................................................................................................. 6
d) File System Configuration:...................................................................................................... 8
e) Advanced Configuration: ....................................................................................................... 9
Installing Integrity VM......................................................................................................................... 12
Integrity VM Administration................................................................................................................. 12
Installing and Configuring OpenVMS Guest.......................................................................................... 13
Feedback or Suggestion ..................................................................................................................... 16
Installing OpenVMS Integrity servers Version 8.4
as a Guest OS on HP Integrity Virtual Machines
2Version 1.0
Executive Summary
This document includes the steps required to install, configure, and run OpenVMS as a guest
operating system on HP Integrity Virtual Machines (Integrity VM).
Intended Audience
This document is intended for OpenVMS system administrators who are planning to install and run
OpenVMS as a guest Operating System on Integrity VM.
Introduction
Integrity VM is a soft partitioning and virtualization technology that provides operating system
isolation, with sub-CPU allocation granularity and shared I/O. Integrity VM can be installed on
Integrity servers or hardware partition (nPartition) running HP-UX. You can install OpenVMS as a
“guest” operating system, which is an Integrity VM environment running on Integrity servers. A VM
Host administrator or OpenVMS system administrator can manage an OpenVMS guest operating
system like a discreet Integrity server or nPartition.
Prerequisites
The prerequisites to install OpenVMS guest operating system are as follows:
Systems must have VT-i (Intel Virtualization Technology for the Intel Itanium Architecture) enabled
Intel Itanium processors.
Note: Intel Itanium processor 9000 and 9100 series and higher are VT-i supported.
HP-UX 11i v3 Core #1 and HP-UX 11i v3 core #2 DVD.
Integrity VM 4.1 Field Test evaluation kit.
For HP-UX system requirements, see Chapter 2 of HP-UX 11iv3 Installation and Update guide,
September 2009 (Update 5 Release) available at:
http://docs.hp.com/en/5992-6552/index.html
OpenVMS E8.4 kit in ISO format.
Networking information, such as:
Hostname of the VM Host and each guest.
IP Address of the VM Host and each guest.
Subnet Mask of the VM Host and each guest.
IP address of one or more DNS servers and the gateway machine.
DECnet addresses of each guest (if DECnet is planned to be used).
Timezone information.
“root” account and password of the VM Host and “system” account password of each OpenVMS
guest.

3Version 1.0
Note: To find out Itanium processor type:
1. From the EFI Shell:
Execute the cpuconfig command on EFI shell:Shell> cpuconfig
CPUModule-------
# ofLogicalCPUs-------
Speed------
L3 CacheSize------
L4 CacheSize------
Family/Model(hex.)-------
Rev---
ProcessorState-------
0 2 1.6 GHz 9 MB None 20/00 C2 Active1 2 1.6 GHz 9 MB None 20/00 C2 ActiveCPU threads are turned off.
Look into the Family or Model shown in the output and map with the following table to find the
processor type.
Table 1: Processor types
2. If system is running on HP-UX 11iV3; execute the following machinfo command as
shown:
# /usr/contrib/bin/machinfo
CPU info:2 Intel(R) Itanium 2 9000 series processors (1.4 GHz, 12 MB)
processor type399 MT/s bus, CPU version C24 logical processors (2 per socket)
3. If system is running on OpenVMS, execute the clue configuration command in SDA as
shown:
$anal/sysSDA> clue config
…CPU ID 0 CPU State rc,pa,pp,cv,pv,pmv,plCPU Type Dual-Core Itanium (Intel Itanium 9000 Rev C2)
processor type
Family (hex.) Model (hex.) Processor
20 00 Itanium 9000 series
20 01 Itanium 9100 series
4Version 1.0
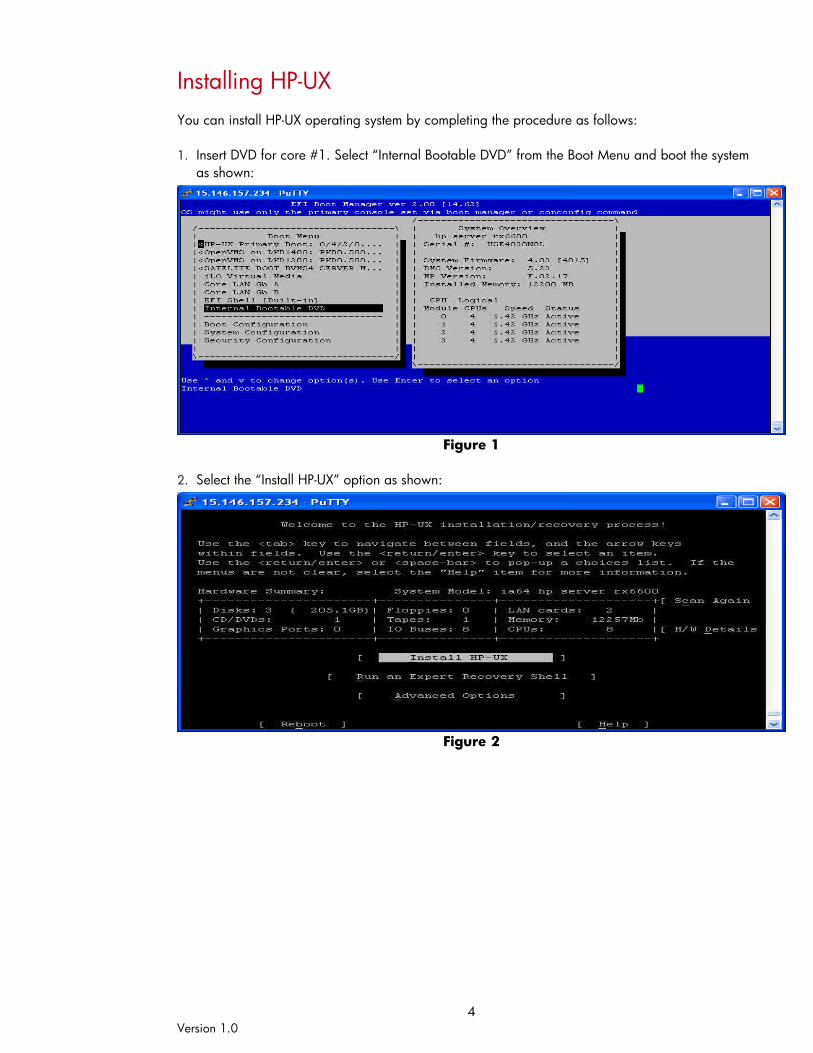
Installing HP-UX
You can install HP-UX operating system by completing the procedure as follows:
1. Insert DVD for core #1. Select “Internal Bootable DVD” from the Boot Menu and boot the system
as shown:
Figure 1
2. Select the “Install HP-UX” option as shown:
Figure 2

5Version 1.0
3. Select the “User Interface and Media” options and select “Media only installation” from Source
Location Options and Advanced Installation (recommended for disk and filesystem management)
from User Interface as shown:
Figure 3
4. Select the Media Installation Selection and select “CD/DVD Installation” as shown:
Figure 4
5. There are five tabs in the “Configuration information” screen, you can use them to specify system
configuration parameters, they are:
Basic configuration
Software configuration
System configuration
File System configuration
Advanced configuration
Note: Press the tab key to move between different tabs. Use enter and arrow keys to make selections.
a) Basic Configuration
You need to provide the following information in the basic configuration screen:
• Root Disk (select a disk where you want to install HP-UX, if multiple disks are present)
• File System (select the Logical Volume Manager with VxFS)
• Root Swap (optimal value is 2048)
• Languages (select the preferred language)
6Version 1.0
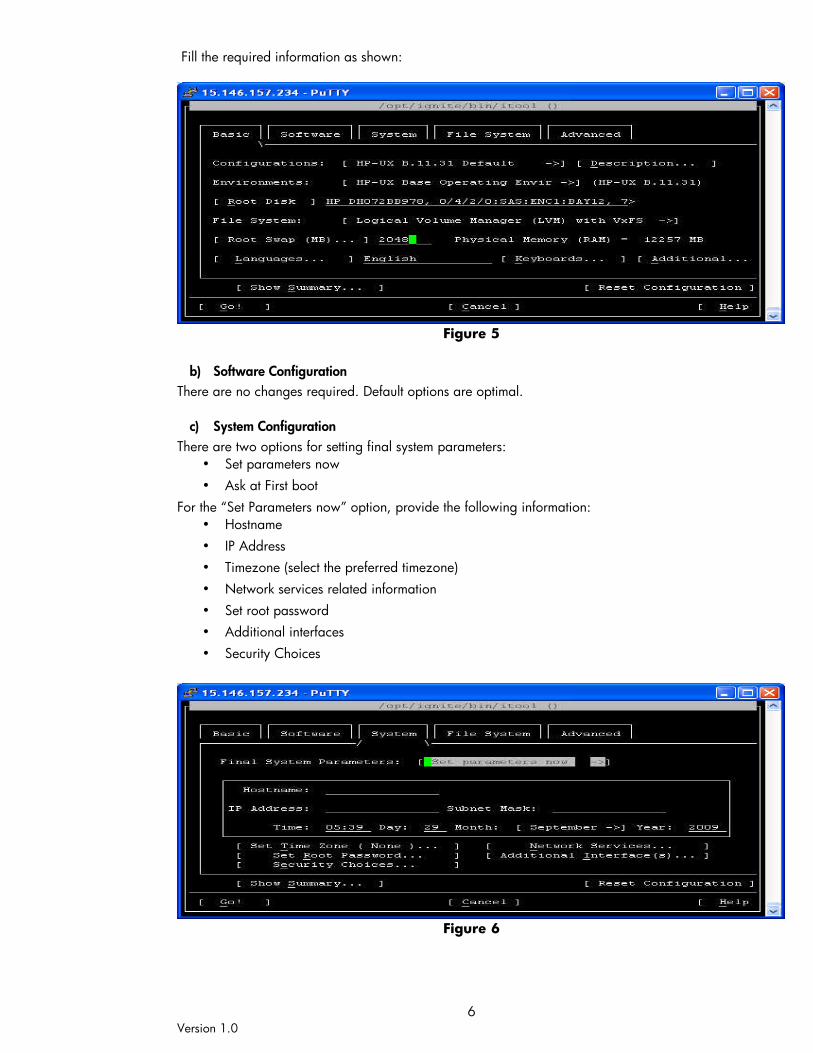
Fill the required information as shown:
Figure 5
b) Software Configuration
There are no changes required. Default options are optimal.
c) System Configuration
There are two options for setting final system parameters:
• Set parameters now
• Ask at First boot
For the “Set Parameters now” option, provide the following information:
• Hostname
• IP Address
• Timezone (select the preferred timezone)
• Network services related information
• Set root password
• Additional interfaces
• Security Choices
Figure 6

7Version 1.0
You can provide the network services information in the “Network Services” screen. You can set
Gateway and DNS information. The Destination Hop Count must be 1. NIS and XNTP options are
optional. Fill the required information as shown:
Figure 7
Select the appropriate timezone as shown:
Figure 8
Set and confirm root password as shown:
Figure 9

8Version 1.0
You can choose “Ask at first boot” option instead of “Set parameters now” in Figure 6. You must
provide the following information at first system boot:
Networking setup (standalone system or system in network)
IP Address (Dynamic IP using DHCP or Static IP)
Hostname
Timezone (Choose preferred timezone)
Network services related information (i.e. Gateway, DNS and NIS)
Set root password
Language (Choose preferred language)
Figures 10 and 11 are shown when you select the option “Ask at first boot”.
Figure 10
If you have answered “Y” to previous question, select either Static IP or Dynamic IP using DHCP as
shown:
Figure 11
Complete the procedure by entering all the required information. The system will complete its boot
process and allow you to login into the VM Host.
d) File System Configuration:
There are no changes required. Default options are optimal.

9Version 1.0
e) Advanced Configuration:
There are no changes required.
6. After filling all the required configuration information select “Go!” option and press Enter.
Figure 12
Note: Any errors encountered must be manually corrected by going back to the configuration UI and
restarting the installation process. Warning such as the selected disk will be over written, can be
ignored if the right disk is chosen, else select the Back option to go back to the configuration UI to
change the disk. Warnings related to less dump space can also be ignored. Review any other
warnings and take appropriate decision. Select "Go!" to continue with installation or Cancel If you
do not want to start the installation.
7. After successfully installing the required software from core #1, the following message is
displayed:
Figure 13
10Version 1.0
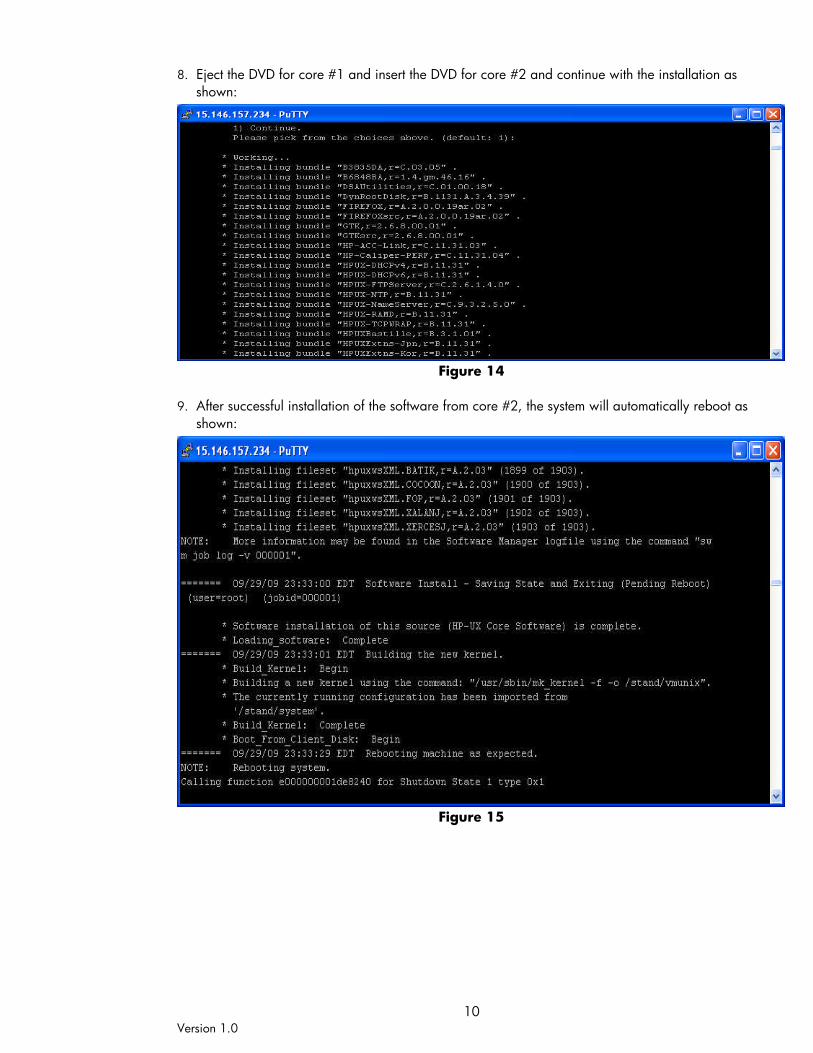
8. Eject the DVD for core #1 and insert the DVD for core #2 and continue with the installation as
shown:
Figure 14
9. After successful installation of the software from core #2, the system will automatically reboot as
shown:
Figure 15

11Version 1.0
10. After reboot select “HP-UX Primary Boot” from the “Boot” menu and boot the system as shown:
Figure 16
11. System boot now and completes the installation. The system will automatically reboot once again
after completing installation as shown:
Figure 17
12. After reboot select “HP-UX Primary Boot” from the Boot Menu and boot the system (same as step
10).
13. Login to the system.

12Version 1.0
Installing Integrity VM
Integrity VM 4.1 Field Test evaluation kit is available on the web. Download the kit on a Windows
machine and copy the kit to the VM Host. In the following example, the kit is copied to /var/depots
directory.
If Integrity VM is already installed, first remove the existing Integrity VM. Execute the swremove
command to remove Integrity VM 4.1.# swremove -x autoreboot=true T2767CC
Note: If you have installed the online migration enable bundle, include T8718AC in the above
command.
For other Integrity VM versions, see the HP Integrity Virtual Machines Installation Configuration and
Administration Guide.
After Integrity VM is removed you can execute the swinstall command to install Integrity VM.# swinstall -x autoreboot=true \> -s /var/depots/hpvm_4.1_ovms_ft_2.depot \> T2801AA VMGuestLib vmProvider VMGuestSW
======= 09/30/09 17:52:31 IST BEGIN swinstall SESSION(non-interactive) (jobid=ovmshpux-0003)
* Session started for user "root@ovmshpux".
* Beginning Selection* Target connection succeeded for "ovmshpux:/".* Source connection succeeded for
"/var/depots/HPVM_4.1_OVMS_FT_2".….….
* Analysis and Execution succeeded.
NOTE: More information may be found in the agent logfile using thecommand "swjob -a log ovmshpux-0003 @ ovmshpux:/".
Shutdown at 18:05 (in 0 minutes)
*** FINAL System shutdown message (ovmshpux) ***
System going down IMMEDIATELY
After the system reboot, Integrity VM installation is complete.
Integrity VM Administration
Use the following command to start Integrity VM:# /sbin/init.d/hpvm start
Use the following command to stop Integrity VM:# /sbin/init.d/hpvm stop

13Version 1.0
The following table lists a few HP-UX commands related to Integrity VM.
Table 2: HP-UX commands
Installing and Configuring OpenVMS Guest
This section describes how to install and configure Integrity VM guest operating system.
1. Integrity VM does not support hyperthreads. The following command checks if hyperthreading is
enabled:
# getconf SC_HT_ENABLED1
NOTE: In the output 1 indicates hyperthreading is enabled and 0 indicates hyperthreading is
disabled.
If hyperthreading is enabled you can turn it off by executing the following command and reboot
the VM Host:# /usr/sbin/setboot -m off# reboot
2. On the VM Host add the following parameter in the Integrity VM configuration file:
# ch_rc -a -p HPVMOPENVMSCAPABILITIES=1 /etc/rc.config.d/hpvmconf
3. OpenVMS E8.4 kit in ISO format is available in web downloaded form. Copy the OpenVMS E8.4
kit in ISO format to the VM Host. In the following example, the ISO file is copied to /mypath
directory.
4. Add the ISO file entry as a virtual device in Integrity VM device-management database.
# hpvmdevmgmt -a gdev:/mypath/OpenVMS.iso
To allow shared access of the ISO file between multiple guests:# hpvmdevmgmt -m gdev:/mypath/OpenVMS.iso:attr:SHARE=YES
NOTE: You can burn the DVD using OpenVMS E8.4 ISO file. Insert the DVD in the VM Host. Identify
the installation DVD drive location by executing the command on the VM Host:# ioscan -NfunC disk…disk 7 64000/0xfa00/0x4 esdisk CLAIMED DEVICE Optiarc DVD RW AD-5590A
/dev/disk/disk7 /dev/rdisk/disk7
Command Usage
hpvmcreate Creates new Integrity VM (guest)
hpvmmodify Modifies the configuration of a Integrity VM
hpvmstart Starts the VM
hpvmconsole Connect to the virtual console of a VM
hpvmstop Stops the VM
hpvmstatus Displays the status information about one or more VMs
hpvmnet Creates and controls virtual network switch (vswitch)
hpvmdevmgmt Manages the devices that are associated with the VM Host
and the guests
hpvmclone Duplicates VM Configuration
hpvmremove Permanently removes VM
14Version 1.0
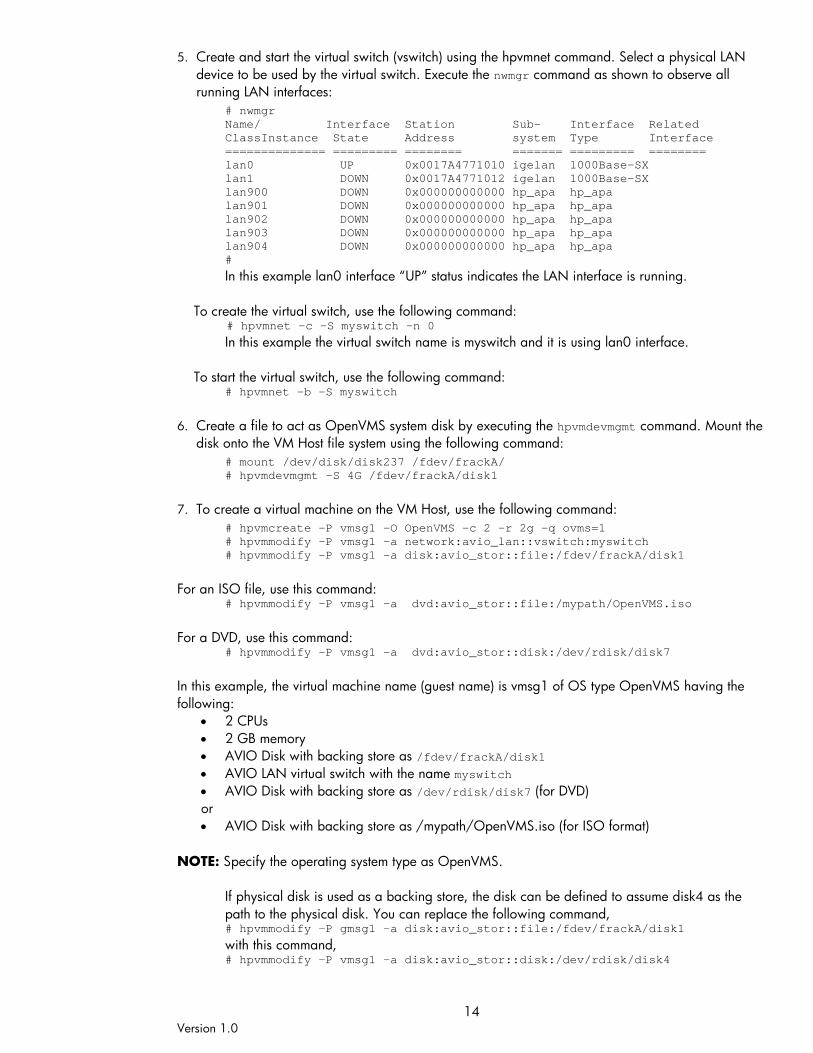
5. Create and start the virtual switch (vswitch) using the hpvmnet command. Select a physical LAN
device to be used by the virtual switch. Execute the nwmgr command as shown to observe all
running LAN interfaces:
# nwmgrName/ Interface Station Sub- Interface RelatedClassInstance State Address system Type Interface============== ========= ======== ======= ========= ========lan0 UP 0x0017A4771010 igelan 1000Base-SXlan1 DOWN 0x0017A4771012 igelan 1000Base-SXlan900 DOWN 0x000000000000 hp_apa hp_apalan901 DOWN 0x000000000000 hp_apa hp_apalan902 DOWN 0x000000000000 hp_apa hp_apalan903 DOWN 0x000000000000 hp_apa hp_apalan904 DOWN 0x000000000000 hp_apa hp_apa#
In this example lan0 interface “UP” status indicates the LAN interface is running.
To create the virtual switch, use the following command:# hpvmnet -c -S myswitch -n 0
In this example the virtual switch name is myswitch and it is using lan0 interface.
To start the virtual switch, use the following command:# hpvmnet -b -S myswitch
6. Create a file to act as OpenVMS system disk by executing the hpvmdevmgmt command. Mount the
disk onto the VM Host file system using the following command:
# mount /dev/disk/disk237 /fdev/frackA/# hpvmdevmgmt -S 4G /fdev/frackA/disk1
7. To create a virtual machine on the VM Host, use the following command:
# hpvmcreate -P vmsg1 -O OpenVMS -c 2 -r 2g -q ovms=1# hpvmmodify -P vmsg1 -a network:avio_lan::vswitch:myswitch# hpvmmodify -P vmsg1 -a disk:avio_stor::file:/fdev/frackA/disk1
For an ISO file, use this command:# hpvmmodify -P vmsg1 –a dvd:avio_stor::file:/mypath/OpenVMS.iso
For a DVD, use this command:# hpvmmodify -P vmsg1 –a dvd:avio_stor::disk:/dev/rdisk/disk7
In this example, the virtual machine name (guest name) is vmsg1 of OS type OpenVMS having the
following:
2 CPUs
2 GB memory
AVIO Disk with backing store as /fdev/frackA/disk1
AVIO LAN virtual switch with the name myswitch
AVIO Disk with backing store as /dev/rdisk/disk7 (for DVD)
or
AVIO Disk with backing store as /mypath/OpenVMS.iso (for ISO format)
NOTE: Specify the operating system type as OpenVMS.
If physical disk is used as a backing store, the disk can be defined to assume disk4 as the
path to the physical disk. You can replace the following command,# hpvmmodify -P gmsg1 –a disk:avio_stor::file:/fdev/frackA/disk1
with this command,# hpvmmodify -P vmsg1 –a disk:avio_stor::disk:/dev/rdisk/disk4
15Version 1.0
If logical volume is used as a backing store, the logical volume can be defined to assume
rlv012 as the path to the logical volume. You can replace the following command,# hpvmmodify -P vmsg1 –a disk:avio_stor::file:/fdev/frackA/disk1
with the command,# hpvmmodify -P vmsg1 –a disk:avio_stor::lv:/dev/vg01/rlv012
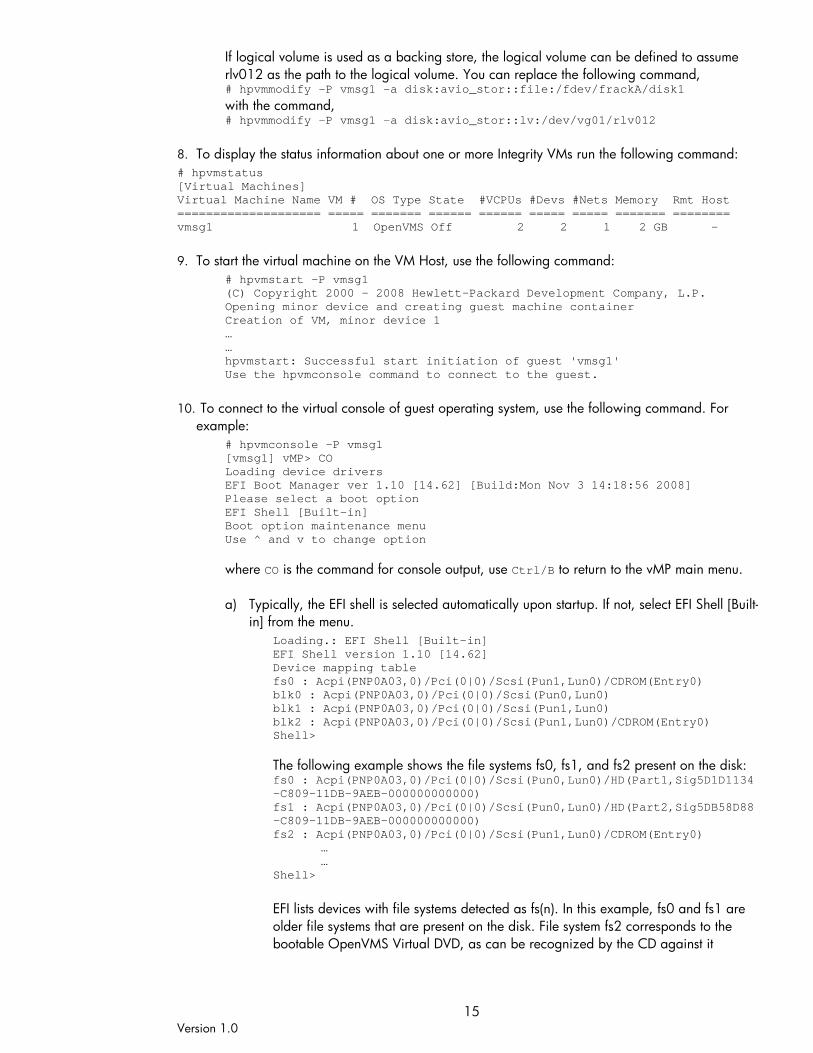
8. To display the status information about one or more Integrity VMs run the following command:
# hpvmstatus[Virtual Machines]Virtual Machine Name VM # OS Type State #VCPUs #Devs #Nets Memory Rmt Host==================== ===== ======= ====== ====== ===== ===== ======= ========vmsg1 1 OpenVMS Off 2 2 1 2 GB -
9. To start the virtual machine on the VM Host, use the following command:
# hpvmstart -P vmsg1(C) Copyright 2000 - 2008 Hewlett-Packard Development Company, L.P.Opening minor device and creating guest machine containerCreation of VM, minor device 1……hpvmstart: Successful start initiation of guest 'vmsg1'Use the hpvmconsole command to connect to the guest.
10. To connect to the virtual console of guest operating system, use the following command. For
example:
# hpvmconsole -P vmsg1[vmsg1] vMP> COLoading device driversEFI Boot Manager ver 1.10 [14.62] [Build:Mon Nov 3 14:18:56 2008]Please select a boot optionEFI Shell [Built-in]Boot option maintenance menuUse ^ and v to change option
where CO is the command for console output, use Ctrl/B to return to the vMP main menu.
a) Typically, the EFI shell is selected automatically upon startup. If not, select EFI Shell [Built-
in] from the menu.
Loading.: EFI Shell [Built-in]EFI Shell version 1.10 [14.62]Device mapping tablefs0 : Acpi(PNP0A03,0)/Pci(0|0)/Scsi(Pun1,Lun0)/CDROM(Entry0)blk0 : Acpi(PNP0A03,0)/Pci(0|0)/Scsi(Pun0,Lun0)blk1 : Acpi(PNP0A03,0)/Pci(0|0)/Scsi(Pun1,Lun0)blk2 : Acpi(PNP0A03,0)/Pci(0|0)/Scsi(Pun1,Lun0)/CDROM(Entry0)Shell>
The following example shows the file systems fs0, fs1, and fs2 present on the disk:fs0 : Acpi(PNP0A03,0)/Pci(0|0)/Scsi(Pun0,Lun0)/HD(Part1,Sig5D1D1134-C809-11DB-9AEB-000000000000)fs1 : Acpi(PNP0A03,0)/Pci(0|0)/Scsi(Pun0,Lun0)/HD(Part2,Sig5DB58D88-C809-11DB-9AEB-000000000000)fs2 : Acpi(PNP0A03,0)/Pci(0|0)/Scsi(Pun1,Lun0)/CDROM(Entry0)
……
Shell>
EFI lists devices with file systems detected as fs(n). In this example, fs0 and fs1 are
older file systems that are present on the disk. File system fs2 corresponds to the
bootable OpenVMS Virtual DVD, as can be recognized by the CD against it

16Version 1.0
b) Boot the installation DVD, which is indicated in the device-mapping table as /CDROM,
by entering the commands provided in the following example. Choose the virtual DVD
drive by using the fs command. If the virtual DVD is shown as fs2 you can switch to that
volume using fs2: For example:
fs2:\> cd efi\bootfs2:\efi\boot>bootia64.efi
Boot the OpenVMS installation virtual DVD and perform a normal OpenVMS
installation.
11. After executing the bootia64 command the standard OpenVMS Installation menu is displayed
where you can complete the OpenVMS guest operating system installation similar to the
installation of OpenVMS on a physical system.
NOTE: To return the vMP press Ctrl/B (when logged in to the VM Host through its console press
Ctrl/X.)
Feedback or Suggestion
If you have any suggestions to make this document better or more complete, submit them to
© Copyright 2010 Hewlett-Packard Development Company, L.P. The informationcontained herein is subject to change without notice. The only warranties for HPproducts and services are set forth in the express warranty statementsaccompanying such products and services. Nothing herein should be construed asconstituting an additional warranty. HP shall not be liable for technical or editorialerrors or omissions contained herein.
January 2010