Installing Exchange 2013 before installing Exchange 2013 (Best practice is to install Mailbox role...
25
Off2work INSTALLING EXCHANGE 2013
Transcript of Installing Exchange 2013 before installing Exchange 2013 (Best practice is to install Mailbox role...

Off2work
INSTALLING EXCHANGE 2013

Checklist before installing Exchange 2013 (Best practice is to install Mailbox role before CAS role):
1. Firewall disabled within domain network
2. Has static IP setup and can ping DC and other servers in the domain
3. Latest windows update
4. Windows is activated
5. Is in domain
6. Account that is going to install is member of Schema Admins, Enterprise Admins and
Organization Management
7. DC (writeable)
8. File share witness server (can’t be Exchange server or DC)
For other requirement check: http://technet.microsoft.com/en-
us/library/ff805042(v=exchg.150).aspx
1. Open Power Shell (as administrator) and run following command :
Install-WindowsFeature RSAT-ADDS
2. Then Run the following command (for mailbox role):
Install-WindowsFeature AS-HTTP-Activation, Desktop-Experience, NET-Framework-45-
Features, RPC-over-HTTP-proxy, RSAT-Clustering, RSAT-Clustering-CmdInterface, Web-Mgmt-
Console, WAS-Process-Model, Web-Asp-Net45, Web-Basic-Auth, Web-Client-Auth, Web-
Digest-Auth, Web-Dir-Browsing, Web-Dyn-Compression, Web-Http-Errors, Web-Http-
Logging, Web-Http-Redirect, Web-Http-Tracing, Web-ISAPI-Ext, Web-ISAPI-Filter, Web-Lgcy-
Mgmt-Console, Web-Metabase, Web-Mgmt-Console, Web-Mgmt-Service, Web-Net-Ext45,
Web-Request-Monitor, Web-Server, Web-Stat-Compression, Web-Static-Content, Web-
Windows-Auth, Web-WMI, Windows-Identity-Foundation
Reboot
(For CAS role)
Install-WindowsFeature AS-HTTP-Activation, Desktop-Experience, NET-Framework-45-
Features, RPC-over-HTTP-proxy, RSAT-Clustering, Web-Mgmt-Console, WAS-Process-Model,
Web-Asp-Net45, Web-Basic-Auth, Web-Client-Auth, Web-Digest-Auth, Web-Dir-Browsing,
Web-Dyn-Compression, Web-Http-Errors, Web-Http-Logging, Web-Http-Redirect, Web-Http-
Tracing, Web-ISAPI-Ext, Web-ISAPI-Filter, Web-Lgcy-Mgmt-Console, Web-Metabase, Web-
Mgmt-Console, Web-Mgmt-Service, Web-Net-Ext45, Web-Request-Monitor, Web-Server,

Web-Stat-Compression, Web-Static-Content, Web-Windows-Auth, Web-WMI, Windows-
Identity-Foundation
3. Download and extract Exchange 2013 (CU3) to a folder on your local drive:
http://www.microsoft.com/en-us/download/details.aspx?id=41175
I extracted mine to C:/Exchange 2013/
4. Install the following software in this order.
Unified Communications Managed API 4.0 Runtime
Microsoft Office 2010 Filter Pack 64 bit
Microsoft Office 2010 Filter Pack SP1 64 bit
5. Run setup.exe as administrator from extracted folder:

Click next and next again if no update found

Click next
Accept license agreement and click next

Choose use recommended settings or dont
Since we going to install mailbox role, we thick for that option

Click next
Leave default and click next
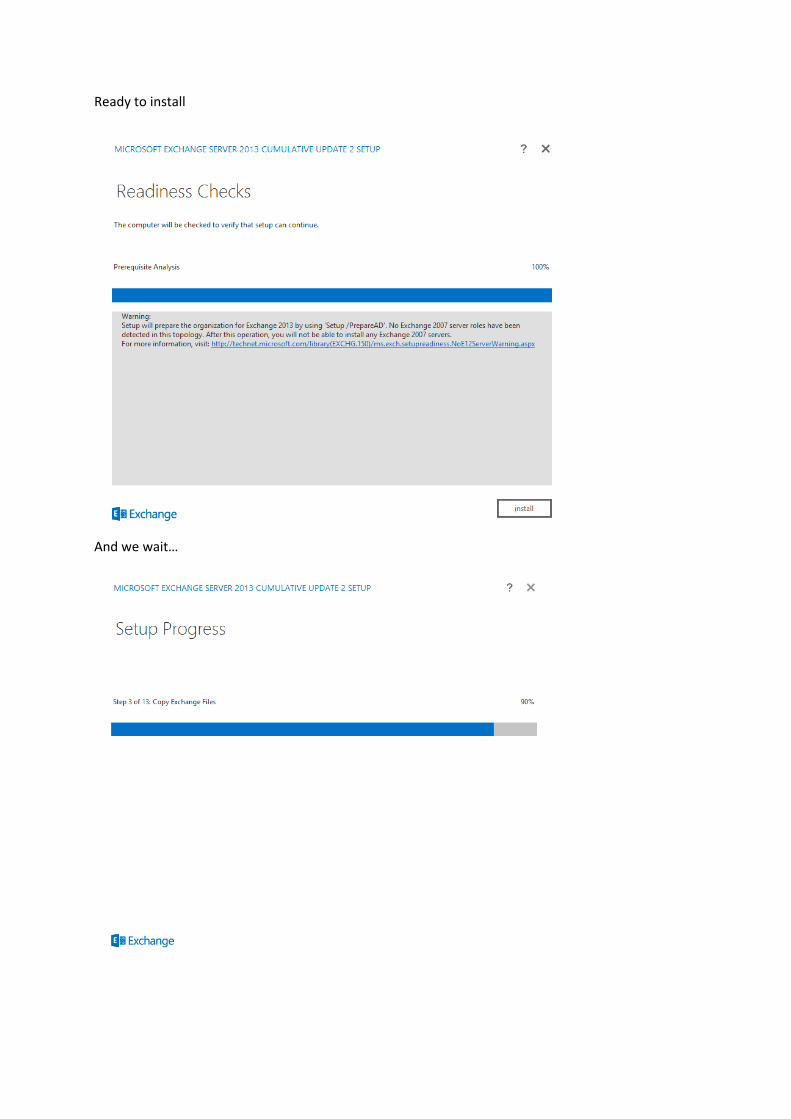
Ready to install
And we wait…

We are done!
Reboot.
To install 2nd Mailbox server, do same steps!
To install CAS role, do same steps as above but under Role selection choose CAS server role!

Configuring Exchange 2013
For us to be able to login to ECP on Exchange 2013, we need to create account on the new server(no
need if the account used to install didn’t have any mailbox, cause then mailbox will be created by
default).
On any of Exchange 2013 server, start Exchange management shell and run following command:
“Get-mailboxdatabase” so we can see the name of the new databases.
Then run the following command to create new mailbox in the new database:
“New-Mailbox –name Newadmin –userPrincipalName [email protected] –Database “Mailbox
Database 0662977193”
Give new account a password add new account to following member groups:
Domain Admins
Schema Admins
Enterprise Admins
Organization Management
Login to ecp with the following link: https://localhost/ecp (works only on CAS server)

Login to OWA with the new account and test mail workflow. Send e-mail to another user ( they must
have mailbox first )
Create new Databases
Now we are going to create new database for each of the Mailbox servers
In ECP navigate to Servers – Databases and click on + sign

*(DB01 and DB02 is database on my old Exchange server, so don’t mind those)
Before doing this, make sure you have created disk on both Mailbox servers and their drive letter
have to be the same.
Give Mailbox database a name – Choose which mailbox server it will be stored at and location for Log
folder, then click save.

Klikk OK and restart Microsoft Exchange Information Store service
Do the same for 2nd database, but this time choose 2nd Mailbox server as default storage

Save – OK and restart Microsoft Exchange Information Store service
Move arbitration mailboxes and remove default mailbox databases
After creating new mailbox databases we are going to remove default ones. This is how our mailbox
databases look like: We are going to remove those with name Mailbox Database..
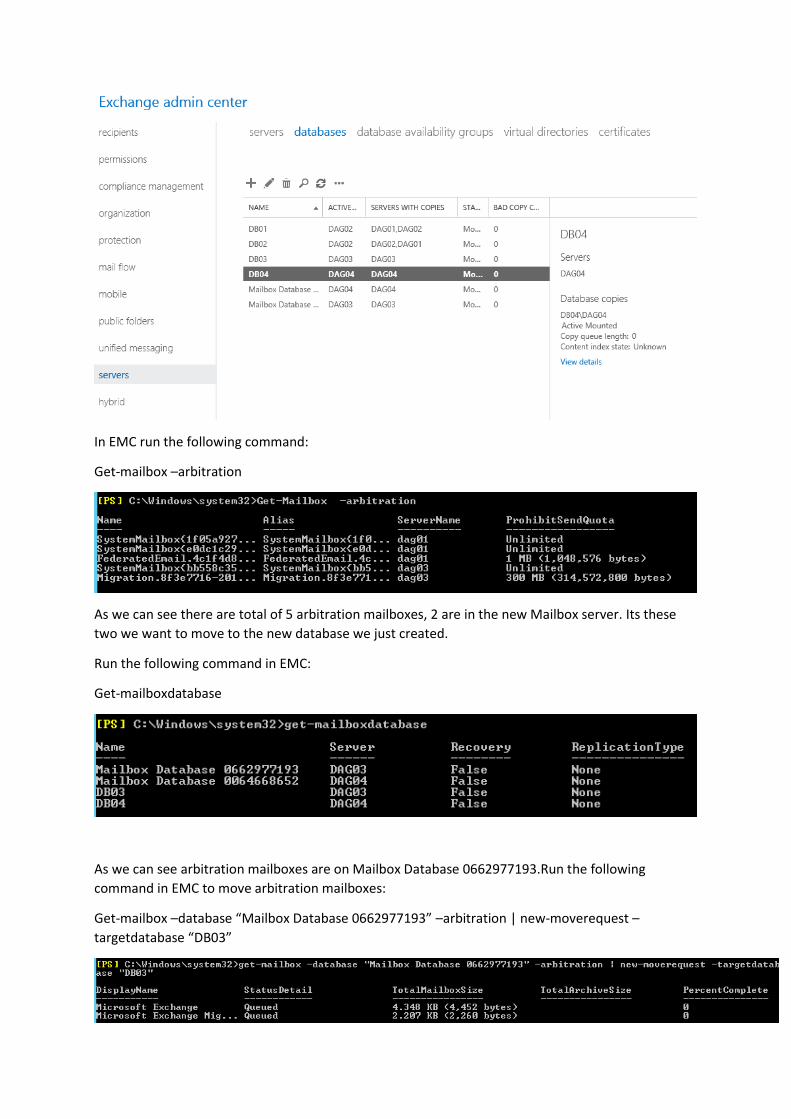
In EMC run the following command:
Get-mailbox –arbitration
As we can see there are total of 5 arbitration mailboxes, 2 are in the new Mailbox server. Its these
two we want to move to the new database we just created.
Run the following command in EMC:
Get-mailboxdatabase
As we can see arbitration mailboxes are on Mailbox Database 0662977193.Run the following
command in EMC to move arbitration mailboxes:
Get-mailbox –database “Mailbox Database 0662977193” –arbitration | new-moverequest –
targetdatabase “DB03”

Get-moverequest to get status
When status is Completed then moverequest is done.Run following command to remove completed
moverequest:
Get-MoveRequest -MoveStatus Completed | Remove-MoveRequest
Press A to confirm
To be sure that mailbox database is empty, run the following command in EMC
Get-mailbox –database “Mailbox Database 0662977193”
As we can see, we still have 1 mailbox left. Now we do another move request with the following
command:
Get-mailbox –database “Mailbox Database 0662977193” | new-moverequest –targetdatabase
“DB03”
Get-moverequest to get status, when status is completed, run Get-MoveRequest -MoveStatus
Completed | Remove-MoveRequest

Now we are ready to delete default databases. Login to ECP – servers – Databases
Mark on those you want to delete and click on trash can icon. Click yes to confirm
Error error!

Don’t worry, error message says it was able to remove database, but we have to manually remove
files and folders. Log in to mailbox server and delete all files in that folder:
Normally its under C:\Program Files\Microsoft\Exchange Server\V15\Mailbox\Mailbox Database
name
Do the same for the remaining database.

Creating Database availability group
In ECP navigate to servers – database availability group and click on + sign
Enter the following details for the new Database Availability Group:
DAG name – this should match the CNO you pre-staged earlier
Witness server – this is required for all DAGs, even those that have an odd number of members and
hence run in node majority quorum mode
Witness directory – this is optional. If you do not specify a directory Exchange will choose one for you.
IP address – the DAG requires an IP address on each IP subnet that is part of the MAPI network. If you
do not specify IP addresses the DAG will use DHCP instead.

Go to Active Directory users and computers.
Click view – advanced features
Click on computer container and get properties of the new Database availability group we just
created:
Next, grant the computer account for the first DAG member Full Control permissions for the CNO
computer account.In my case DAG03,but first click object types and thick for computers:

Then add computer and grant it full control.
Now disable the new Database availability group we just created

Adding Database Availability Group
Members
After the DAG has been created it still does not contain any actual members. These need to be added
next.
Highlight the new Database Availability Group and click the icon to manage DAG membership.

Click ok and save
Result will look like this
*Dagclust01 is DAG of my Exchange 2010 environment, so don’t mind it
Configuring database copies
In ECP navigate to servers – databases mark database you want to create copy then … icon and
choose add database copy:
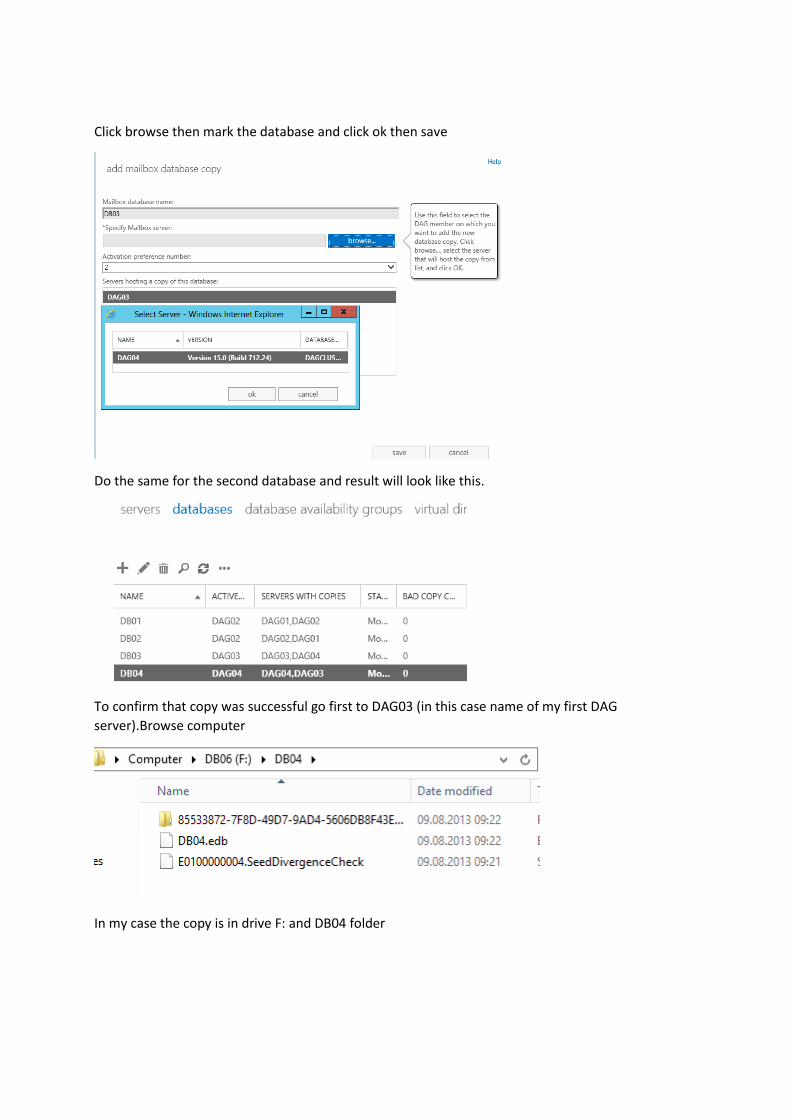
Click browse then mark the database and click ok then save
Do the same for the second database and result will look like this.
To confirm that copy was successful go first to DAG03 (in this case name of my first DAG
server).Browse computer
In my case the copy is in drive F: and DB04 folder

To see that all is well, in ECP navigate to Servers – Databases – mark on one of databases and on the
right side you should see status for Passive and Active :
We are done!
Hope this doc was helpful!
Other info you might need to check:
Create send connector (for sending e-mails to the internet):
http://technet.microsoft.com/en-us/library/jj657457(v=exchg.150).aspx
http://exchangeserverpro.com/configuring-outbound-mail-flow-in-exchange-server-2013/
Create Certificate:
http://exchangeserverpro.com/create-ssl-certificate-request-exchange-2013/