
INSTALLATION OF PRESERVED PALM TREES Manual english version.pdf · INSTALLATION OF PRESERVED PALM...
18
INSTALLATION OF PRESERVED PALM TREES PRESERVED PALM TREES INSTALLATION INSTRUCTIONS Before installing, please take a few minutes to read these simple instructions and advise on the characteristics, installation and maintenance of preserved palm trees. Dedicating some of your time to review this information will guarantee better results and a natural and lasting appearance to your indoor landscaping design. UNPACKING THE TRUNKS AND THE LEAVES The palm trees are shipped separately in two parts: trunks and leaves. The cartons that contain the leaves must be stored in an area with controlled climate. The trunks are shipped from the plant packed in plastic and protected with Styrofoam elements to facilitate handling without damage. Each trunk is identified by means of a label that shows: total height of assembled palm tree and the number of corresponding leaves. The cartons containing the leaves are identified as follows: number of leaves per carton and which boxes contain top fronds and bottom fronds. Letters identifies both the trunks and the corresponding leaves; that is to say, the leaves contained in carton A correspond to the trunk identified by the letter A and so forth. The cartons containing the trunk and corresponding leaves are marked with letters (e.g. A with A, B with B) and must be placed together, close to the installation site. Take out the leaves from the corrugated cardboard cartons, taking care not to damage them when extracting the packing material. Identify which of them correspond to the top and which to the bottom fronds. After unpacking, the trunks can be temporarily placed in a horizontal position on their Styrofoam or wood base. The Styrofoam can be used as a “filler” or support for the plants placed on the top of the decorative container. 1
Transcript of INSTALLATION OF PRESERVED PALM TREES Manual english version.pdf · INSTALLATION OF PRESERVED PALM...

!
INSTALLATION OF
PRESERVED PALM TREES ! PRESERVED PALM TREES
INSTALLATION INSTRUCTIONS !Before installing, please take a few minutes to read these simple instructions and advise on the characteristics, installation and maintenance of preserved palm trees. Dedicating some of your time to review this information will guarantee better results and a natural and lasting appearance to your indoor landscaping design. !!
UNPACKING THE TRUNKS AND THE LEAVES !The palm trees are shipped separately in two parts: trunks and leaves. The cartons that contain the leaves must be stored in an area with controlled climate. !The trunks are shipped from the plant packed in plastic and protected with Styrofoam elements to facilitate handling without damage. Each trunk is identified by means of a label that shows: total height of assembled palm tree and the number of corresponding leaves. !The cartons containing the leaves are identified as follows: number of leaves per carton and which boxes contain top fronds and bottom fronds. !Letters identifies both the trunks and the corresponding leaves; that is to say, the leaves contained in carton A correspond to the trunk identified by the letter A and so forth. !The cartons containing the trunk and corresponding leaves are marked with letters (e.g. A with A, B with B) and must be placed together, close to the installation site. !Take out the leaves from the corrugated cardboard cartons, taking care not to damage them when extracting the packing material. Identify which of them correspond to the top and which to the bottom fronds. After unpacking, the trunks can be temporarily placed in a horizontal position on their Styrofoam or wood base. !The Styrofoam can be used as a “filler” or support for the plants placed on the top of the decorative container. !
! 1

INSTALLATION OF PRESERVED PALM TREES ON THE FLOOR SLAB !!ANCHORING PIECE FOR PALM TREES SECURED DIRECTLY ON THE FLOOR !
The anchoring pieces are constituted by two elements: !Component #1 is a square metal plate. Normally, it is designed with four or eight holes geometrically placed, used to secure it with bolts to an already existing floor slab. An alternative design takes advantage of the weight of the plate itself and the soil as counterweight or ballast and does not require holes for bolts to secure to the floor slab. This alternative design is recommended in case that it is impossible to fix the bolts to the floor slab or for decorative flowerpots. In any of the designs, the size of the metal plate is established by the size and weight of the plant and by the seismic characteristics of the area. The metal plate has soldered handles to facilitate handling. !Component #2 is a 4” diameter support pole whose length is established by the weight and height of the plant. At variable intervals, there are soldered flanges or appendixes that allow a proper fit with the internal diameter of the tube that forms the palm tree stem. !Both components (#1 and #2) are soldered. (See figures A and B). !The anchoring pieces with holes must be secured to the floor by means of at least four 5/8”grip bolts (HILTI-bolts or similar) The taller plants may need eight bolts (see explanatory note about the metal plate). !The anchoring pieces without holes may be covered with gravel, sand or soil. !Usually, the anchoring pieces are delivered together with the plants. Any time before shipment, a wood template showing where the HILTI bolts or similar are to be placed can be delivered, which can be used by the general contractor to place these in advance. The depth at which the bolts must be inserted in the concrete varies in accordance with the height and weight of the plant, but is never less than 5”. Do not cut the bolts in excess; they must project 2-3” above the floor level. !The installing contractor is responsible for providing the leveling and binding nuts necessary to secure the anchoring pieces to the floor bolts. !
! 2

!
B
B
Floor slab, minimum 6"
REQUEREMENTS:
1-. Dimensions and thickness of metal base "B" x "B" x "T" 2-. The following anchoring requirements are based on maximum height of 37 feet.
Holes according to bolt size
Metal pipe, standard diameter 3 1/2"
INSTALLATION OF PRESERVED PALMSDIRECT FLOOR ANCHORING
StandardDimensions" B " " T "24" 3/4"21" 3/4"18" 1/2"15" 1/2"12" 1/2"
Metal Tubes
7'10'15'15'22' 3 1/2"
Height Diameter
3 1/2"3 1/2"3 1/2"3 1/2"
Height37'30'26'18'12'
Palm tree
" T "" B "3/4"24"3/4"21"
18" 1/2"1/2"15"1/2"12"
8 - 5/8" ø
4 - 5/8" ø
Adhesive bolt "HILTI"
Metal base
Height of Metal Pipes
Metal flanges of 1 1/2" x 1 1/2"
Metal handles, 3/8" diameter
COMPONENT 1
COMPONENT 2
PVC pipe
8 - 5/8" ø
4 - 5/8" ø4 - 5/8" ø
! 3

! INSTALLATION OF PRESERVED PALM TREES ON FLOOR SLAB
PLACING THE METAL PLATE
Natural bark adhered to PVC pipe
Floor salb fixing bolts, "HILTI" type or similar
INSTALLATION DETAILDIRECT FLOOR ANCHORING
Square base metal plate
Floor slab
Cardboard or wood template, 1 1/2"
Metal flanges: 1 1/2" x 11/2"
pene
tratio
n m
inim
um 5
"
6" m
ín
8"
1 1/
2"
Var
iabl
e tru
nk h
eigh
t
Palm tree trunk, PVC pipe, 6" diameter
Metal pipe, standard diameter 3 1/2"
"T"
Metal Base Adhesive bolt "Hilti or similar"
12" 1/2"15" 1/2"
1/2"18"21" 3/4"24" 3/4"
" B " " T "
9 1/
2"
Metal handles, 3/8" diameter
8 - 5/8" ø8 - 5/8" ø
4 - 5/8" ø4 - 5/8" ø4 - 5/8" ø
! 4

!!1-. Laying down the metal plate 2-. Marking orifices on the floor and the plate 3-. Placing anchoring system inside the trunk 4-. Adjusting wooden support to facilitate securing the trunk !!!! !!!!!!!!!! ! 1 2 ! !! !!!!!!!!!!!! !!! 3 4 !!
! 5
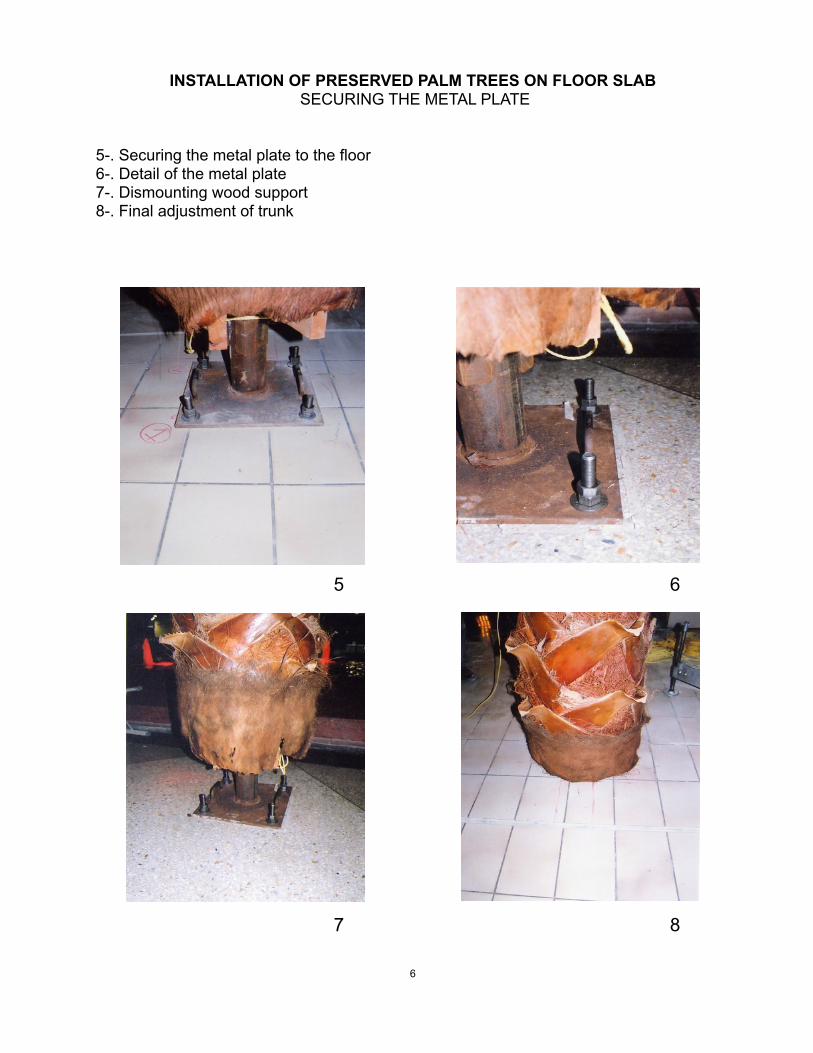
INSTALLATION OF PRESERVED PALM TREES ON FLOOR SLAB SECURING THE METAL PLATE !!
5-. Securing the metal plate to the floor 6-. Detail of the metal plate 7-. Dismounting wood support 8-. Final adjustment of trunk !!! !!!!!!!!!!!! !! 5 6 !!!!!!!!!!!!!!! 7 8 !
! 6

!INSTALLATION OF PRESERVED PALM TREES ON FLOOR SLAB
RAISING THE TRUNK ! 9-. Raising the trunk by hand 10-. Placing ropes and tensors on three points 11-. Combined raising of the trunk 12-. Securing the trunk !!!! !!!!! !!!!! ! 9 10 ! !!!!! !!!!!!! !! !
! 7

11 12 !
! 8
PLACEMENT OF LEAVES !Washingtonian Fan Palm Giant and Standard - European Fan Palm Mini
!What you must know before starting: !
1. The leaves are cut to exact and proper size. DO NOT cut the ends since this could make them break with time. !
2. All the palm leaves have a flat and a curved side. The curved side points downwards when the frond is installed. !
3. The external support rods are connected to the axis of the Washingtonian Giant and Standard palm leaves. These rods provide adequate support to the leaves and keep them at the correct angle over time. Once the leaves have been placed, the support rods must always be oriented upwards. !
4. When installing the leaves, make sure that the axis is fully inserted. Care must be taken to ensure that the rod has penetrated and touched the bottom of the trunk piece together with the leave axis. In the case of the larger leaves, since they fit by pressure, it is possible to ascertain that they have touched bottom. Sometimes it may be necessary to move the rod to one side of the orifice before inserting it in the frond. !
5. To enhance the natural aspect and the attractiveness of the plants, vary the natural angles of the leaves during the installation process. For example, do not place close together two leaves with a similar inclination angle. !
6. The number of leaves to be placed varies in relation to the height of the plant and is established by the factory.
Placement: !
1. Before starting placement, spread out all the leaves to be inserted in the trunk and proceed to make the selection. !
2. Separate the very straight stem leaves (Top Fronds) from those with a natural bend or drop (Bottom Fronds) !
3. Begin placement from the top of the frond with straight-stem leaves. Always work from the top down, until you reach the leaves with curvier stems. A natural palm always has straight-stem leaves on the top and older leaves, with stems slightly bent down, on the bottom. !
4. During the first month after installation, the leaves will start to bend slightly to acquire a more natural look.
! 9

!!Tropical Date Palm Giant and Tropical Date Palm Standard !What you must know before starting:
1. The leaves are cut to exact and proper size. DO NOT cut the ends since this could make them break with time. !
2. When installing the leaves, make sure that the axis is fully inserted. Since the larger leaves fit by pressure, it is possible to detect that they have touched bottom. !!
Placement !1. Before starting placement, spread out all the leaves to be inserted in the trunk in
order to proceed to their selection. !2. Check the leaves and select those with a small natural arc. The straighter leaves
are to be used on the top frond. !3. Begin placing the leaves from the top of the frond, working your way down and
completing one row at a time. After placing a full row, make sure that all the leaves show a similar “arc” or pattern. If one of the leaves shows an arc different from the other leaves in the row, replace it until all the rows have a similar flexion. !
! 10

INSTALLATION OF PRESERVED PALM TREES ON FLOOR SLAB PLACING THE LEAVES !
13-. Preparation of frond 14-. Placement of top fronds 15-. Placement of bottom fronds 16-. Rearrangement and final adjustment of the leaves !
!!!!!!!!!
13 14
!!!!!!!!!
! 11

15 16 INSTALLATION OF PRESERVED PALM TREES ON FLOOR SLAB
17-. Installed palm tree. !!!
!!!!!!!!!!!!!!!!!!!!!!!
17
! 12

!!
INSTALLATION OF PRESERVED PALM TREES IN CONTAINERS
!The trunk bases made of plaster are not designed to serve as definitive ballast or adequate counterweight to keep the plant upright. The purpose of these bases is to facilitate both the manufacture of the trunks and the installation process. !1. Select the minimum and/or appropriate flower pot size, that must be made of a
setting-resistant material (amount of necessary weight or ballast) based on the height of the plant, by using the following table: !!
!2. Place the trunk in the container, making sure that if you are working with the minimum
size container, the plaster base rests on the bottom of the flowerpot. The dimensions illustrated in the table above indicate the mass or weight required to keep the plant upright. If the plant is installed in a container larger than a minimum size one, it may not be necessary to fill it completely. !
Before placing the trunk in the container, it is convenient to apply a 1” thick layer of light mortar, which will absorb all possible existing off-levels. !
3. Fill the container with a mixture of light mortar (cement, gravel and expanded clay), sandbags or its equivalent to complete the volume specified in the table above (see figure C). !
4. Level and secure the palm with the aid of ropes or tensors to ensure the uprightness of the tree during the setting process. !
5. In those cases where the decorative container is not resistant to setting, make the installation in a container fit for such purpose and that complies with the requisites, placing it later inside the decorative container. Consequently, the latter must have sufficient capacity to hold the container.
Plant height Minimum Mass for Installation
NON SEISMIC AREA SEISMIC AREA
10’ and less Non specified use Proper amount to feel that the plant is firm.
Non specified use Proper amount to feel that the plant is firm.
11’ – 14’ 20” diameter x 20” depth 28” diameter x 24” depth
15´– 20’ 28” diameter x 24” depth 32” diameter x 24” depth
! 13

!!
! 14

!
INSTALLATION PRESERVED PALM IN CONTAINER
Decorative container
Insulation for mortar setting
Light mortar mixture(cement+sand+expanded clay)
Plaster base Var
iabl
e co
ntai
ner h
eigh
t (s
ee m
inim
um m
ass
tabl
e)
Materials of installation:
1-. Decorative container (resistant to setting).2-. Insulation for container setting (cardboard or plastic sheet from packing material). 3-. Mortar (cement+sand+expanded clay).4-. Ropes or tensors for leveling and securing.
Plants or decorative materialusable area
PVC pipe
Preserved palm trunk
Apron made with bark material
! 15

INSTALLATION OF PRESERVED PALM TREES IN CONTAINER !
1-. Placing the base and isolating material to dilate the mortar. 2-. Leveling the trunk with ropes or tensors for placement in container 3-. Placing the palm inside the container 4-. Pouring the mortar in the container ! !! !!!!!!!!!!!!!! ! !! 1 2 !
!!!!!!!!! ! ! 3 4
! 16

!!INSTALLATION OF PRESERVED PALM TREES
IN CONTAINERS !!5-. Rest time of the trunk (24 hours, approximately), during the casting of the mortar before the installation of de palm leaves. 6-. Installed and located palm tree in container. !!!!!!!!! !!!!!!!!!!!!!!!!! 5 6 !!!!!!!
! 17

!!!!CLEANING PRESERVED PALM TREES
!According to the site conditions, over time grime and debris may accumulate on the surface of leaves and trunks. In this situation, cleaning must be carried out as follows: !1. Evaluate the amount of grime or debris to be removed. If it is recent and has not
adhered to the surface of the leaves and trunks, often it will be enough to use a motor blower to eliminate these undesirable particles. !
2. In the event of using a blower, the operator must be particularly careful not to point the air current towards the leaves. It must be remembered that the leaves are relatively fragile and could tear or be damaged if they are not handled with care. !
3. If the amount of grime or debris is excessive and it is noted that it has adhered to the surface of the leaves or trunks, the leaves must be dismounted one by one and placed horizontally on the floor. Care must be taken to follow and maintain the same placement they had on the trunk. This will ensure that when installing them again, they will be placed on the original spots. !
4. The leaves placed horizontally on the floor can then be cleaned with a moist cloth or a soft-bristle brush. This job must be performed tenderly in order not to damage the leaves. If there is excessive grime and it is very adhered to the surface, medium pressure water can be used to complete the cleaning process. In all cases, the grime removal process must be done following the sense of the leaves vein, and working from the inside out. !
5. Once the cleaning of the leaves has been finished, they must be allowed to dry completely before replacing them on the palm tree. The drying must be done indoors, with air conditioning. !
6. On the other hand, the trunks may be cleaned with a moist cloth or brush. ! !!
! 18


