Installation of Digi Wireless Vehicle Device for use...
25
1 Installation of Digi Wireless Vehicle Device for use with VisTracks, Inc. POWER WVA: Attach the Digi WVA to the vehicle diagnostic port. Step 1 - Reset the Digi WVA device NOTE: This step is only to be followed if the device has never been setup, or the device is being changed from Push Button pairing to PIN pairing mode or vice- versa. 1. Press the WVA button on the device and hold it down for at least 10 seconds. This will reset the device to its original factory settings and is necessary for initial configuration of Wi-Fi Direct. Step 2 – Configure WiFi Direct through the following options: 2.1 Digi WVA Configuration via VisTracks Application 1. Install Barcode Scanner from the Play Store 2. Open VisTracks app (or Branded App) 3. Log into the app 4. Navigate to Manage Vehicles/Trailers screen o Preconfigured Equipment ● Tap Add button
Transcript of Installation of Digi Wireless Vehicle Device for use...

1
Installation of Digi Wireless Vehicle Device
for use with VisTracks, Inc.
POWER WVA: Attach the Digi WVA to the vehicle diagnostic port.
Step 1 - Reset the Digi WVA device
NOTE: This step is only to be followed if the device has never been setup, or the
device is being changed from Push Button pairing to PIN pairing mode or vice-
versa.
1. Press the WVA button on the device and hold it down for at least 10 seconds. This will
reset the device to its original factory settings and is necessary for initial configuration of
Wi-Fi Direct.
Step 2 – Configure WiFi Direct through the following options:
2.1 Digi WVA Configuration via VisTracks Application
1. Install Barcode Scanner from the Play Store
2. Open VisTracks app (or Branded App)
3. Log into the app
4. Navigate to Manage Vehicles/Trailers screen
o Preconfigured Equipment
● Tap Add button

2
● Select Vehicle type
● Enter Vehicle name, VIN and License Plate
● Select Digi WVA VBUS device and connection type
● Enter a Device Name
● Enter the MAC Address of the Digi VBUS device
● Enter the admin password of the Digi VBUS device on the Admin Password field
● (Note: The default admin password of the Digi VBUS device is set as “admin”.
This can also be set/change through Device Configuration and
Management>Configuration>Admin Password, refer to Step #5 of 2.2 Digi
WVA Configuration via Web Browser> b. WVA Configuration”.)
● Tap Add button to save the equipment
o Updating an Existing Equipment
● Tap Edit icon of an existing equipment you want to use for connecting to
Digi WVA VBUS device
● Select Digi WVA VBUS device and connection type
● Enter a Device Name
● Enter the MAC Address of the Digi VBUS device
● Enter the admin password of the Digi VBUS device on the Admin Password
field
● (Note: The default admin password of the Digi VBUS device is set as
“admin”. This can also be set/change through Device Configuration and
Management>Configuration>Admin Password, refer to Step #5 of 2.2 Digi
WVA Configuration via Web Browser> b. WVA Configuration”.)
● Tap Save button to save the changes made
5. After equipment creation, perform switch truck and select the newly created equipment
6. On the main dashboard, tap the ‘Connect’ button which is located below the app header to
display the ‘Connect to Vehicle’ dialog.
7. At this point, 2 options were present in order to establish a connection to the VBUS device:
Manual Connection and Auto Connection.

3
a. Manual Connection
o Tap on the Manual Connection button
o Select Digi WVA VBUS device
○ Tap on the Next button
○ The ‘Configure VBUS device’ dialog will be displayed.

4
8. At this point, there are two ways to connect to the Digi WVA device; the first time the
Digi is being configured, or connecting to an already configured device. To connect for
the first time, follow the steps below starting at step 7. If the device is already configured,
then start the connection on step 8.
9. Configure Digi VBUS device screen will then display. Connect to Digi device by scanning
QR code.
9.1 Tap on ‘Scan QR code’
9.2 Barcode Scanner app will then launched
9.3 Place Camera over QR Code

5
9.4 If the scanning of QR code is successful, then Digi WVA Configuration screen will
then be displayed.
9.5 Enter a device name on the ‘Enter Device Name’ field. Example: “Digi Test”
9.6 Select a Pairing Mode
● If you select Pin Pairing mode
o Tap on the drop-down option and select ‘Pin Pairing’
o Input a Pin on the ‘Enter Pin’ field. (Note: It requires 8-digit pin)
o Then tap ‘Configure Device’ button

6
➢ If an error was encountered during configuration process, then an Error
dialog will be displayed.
o Upon successful configuration, the device will show up in the Available
devices after the Discover Peers process
o Tap the device name you recently configured
7
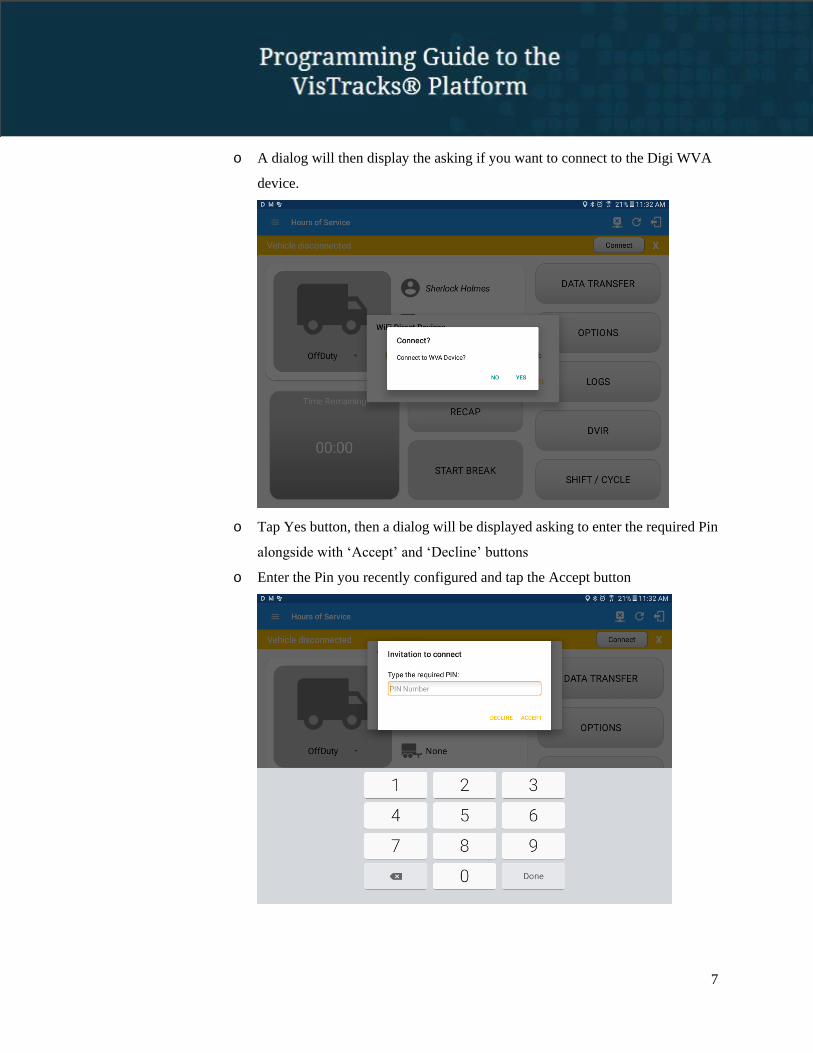
o A dialog will then display the asking if you want to connect to the Digi WVA
device.
o Tap Yes button, then a dialog will be displayed asking to enter the required Pin
alongside with ‘Accept’ and ‘Decline’ buttons
o Enter the Pin you recently configured and tap the Accept button

8
o It will then display the VBUS Progress dialog upon establishing a connection
to the selected VBUS device along with a ‘Stop Connection’ and ‘Ok’ buttons
Tap ‘Stop Connection’ button to stop establishing VBUS connection.
Tap OK button to hide the VBUS Progress dialog while establishing
VBUS connection.
➢ If the VBUS connection results to an error (given the following
situations below), an error dialog will display.
● VBUS Connection Error
o Interrupted Internet Connection
o VBUS Power Failure

9
Note: The app will automatically disconnect from the device after
attempting to connect for 1 minute and 30 seconds without receiving any
data from the VBUS device.
o Wait until the Device shows as ‘Connected’ status
● If you select Push Button mode
o Tap on the drop-down option and select ‘Push Button’
o Then tap ‘Configure Device’ button
o The device will show up in the Available devices after the Discover Peers process

10
o Hold the Digi WVA button down for 3 seconds (do not hold down for more than
3 seconds or you will have to repeat the entire process).
o After successfully pressing the Digi WVA button, the device status will then be
shown as ‘Connected’
Note: If this did not work please follow the below manual setup method to
connect to the Digi WVA in Wi-Fi direct mode. Prior to following the manual
setup method you will need to press the WVA button on the device and hold it
down for at least 10 seconds in order to reset the device to its original factory
settings.

11
10. Connect to a WiFi Direct Digi device already configured
A. For a Digi WVA device configured for PIN Pairing mode.
o Tap ‘Skip’ button
o The device will show up in the Available devices after the Discover Peers
process
o Tap the device name you recently configured
o A dialog will then display the asking if you want to connect to the Digi WVA
device.

12
o Tap Yes button, then a dialog will be displayed asking to enter the required Pin
alongside with ‘Accept’ and ‘Decline’ buttons
o Enter the Pin you recently configured and tap the Accept button
o Device should show as ‘Invited’
o Wait until the Device shows as ‘Connected’ status
B. For a Digi WVA device configured for Push Button pairing.
o Tap ‘Select Device’ button
o The device will show up in the Available devices after the Discover Peers
process
o The device should show as ‘Invited’ status
o Hold the Digi WVA button down for 3 seconds (do not hold down for more than
3 seconds or you will have to repeat the entire process). After successfully
pressing the Digi WVA button, the device status will then be shown as
‘Connected’

13
b. Auto Connection
○ Tap on the Connect button
○ The VBUS Progress dialog will then display
○ Upon establishing a connection to the VBUS device, you should hear a tone letting
you know that device is now connected.
■ Prerequisites to successfully perform Auto Connection
○ Create a Pre-configured device in the Portal’s Equipment Management
Page or in the App’s Manage Vehicles/Trailers screen
○ Set the ELD Configurations
Note: Only users with Asset admin roles can create equipment in the app.
2.2 Digi WVA Configuration via Web Browser
a. Connect to WVA hot spot
1. Go to the wireless connections on your computer. The WVA will announce itself as a
hotspot wireless network using the naming convention of wva-mac-address.

14
2. Connect to WVA on Wi-Fi using PASS from QR Label as shown below:
b. WVA Configuration
1. Open your web browser and type in the following URL in order to connect to the device
configuration homepage: 192.168.100.1
2. The following message may be displayed. If so, click on Advanced

15
3. Click on Proceed to 192.168.100.1 (unsafe)
4. Authenticate using admin for both username and password.

16
5. User is at the device configuration homepage.
c. Confirm Adapter Status
1. Click the Adapter Status tab
2. Verify there are values being displayed for the CAN Bus Statistics, example below

17
3. If the values remain as 0, click on the Refresh Once button and wait a few seconds to see
if the values change
4. If the values still do not change proceed to the section below for 'Change CAN Bus
Configuration'. Else if you see values skip to the section titled 'Configure the WVA for
Wi-Fi Direct'.
d. Change CAN Bus Configuration
1. Click the CAN Bus tab to configure the device Bus settings
2. Change the Baud Rate for CAN Bus 1 and CAN Bus 2 from 'Auto Baud' to '25000'
3. Click Apply and wait a few seconds
4. Confirm the Adapter status by following the steps described in the above section
5. Verify values are being displayed for the CAN Bus Statistics
6. If the value does not change repeat the above steps and select another baud rate
e. Configure WVA for Wi-Fi Direct
1. Click Network Services tab to get to Network Service Configuration screen.
2. Enable Web Server (HTTP)
3. Enable Web Services Events on TCP Port 5000
4. Click Apply

18
5. Wait for 2 minutes then refresh the page and confirm the above settings were applied
6. Click Wireless Network tab
19
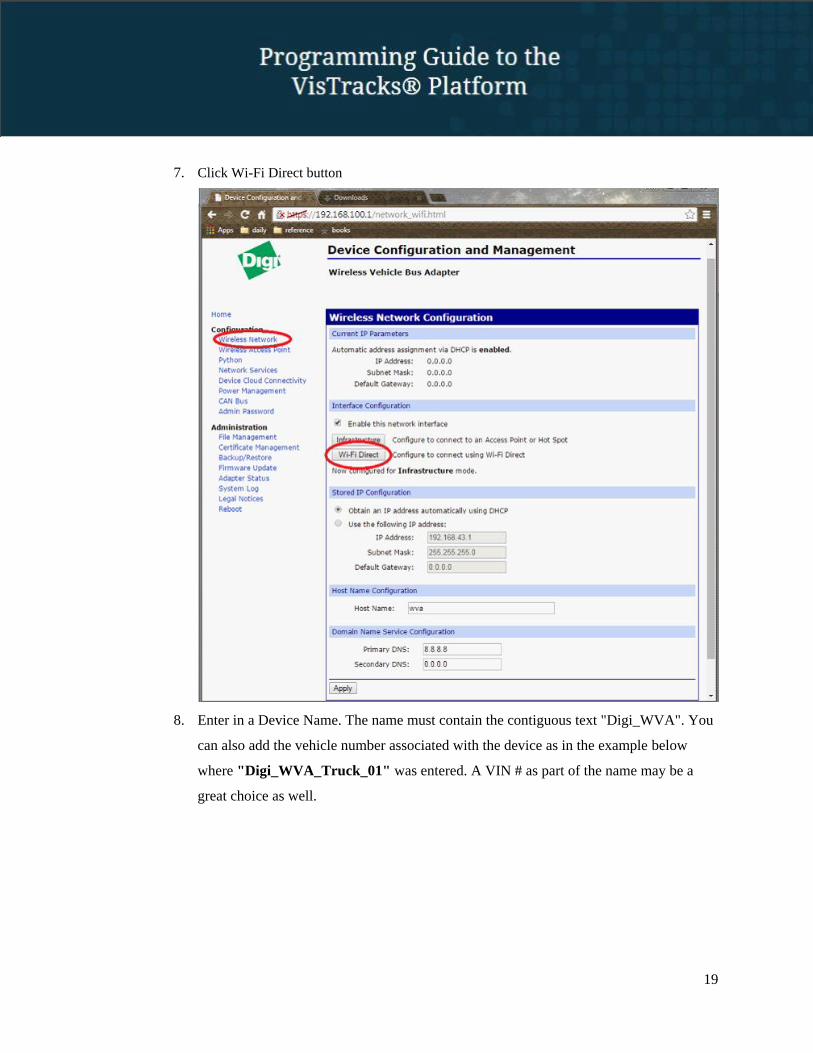
7. Click Wi-Fi Direct button
8. Enter in a Device Name. The name must contain the contiguous text "Digi_WVA". You
can also add the vehicle number associated with the device as in the example below
where "Digi_WVA_Truck_01" was entered. A VIN # as part of the name may be a
great choice as well.

20
9. Select Push Button for the WPS Method and click the Finish button.
10. User will be asked to reboot. User must reboot in order to complete the install.

21
f. Initial Pairing of Device
1. On the Android tablet tap on the Settings icon
2. Tap on Wi-Fi
3. On the Wi-Fi screen tap on the additional options icon at the top right and select Wi-Fi
Direct

22
4. Tap on the WVA Wi-Fi Direct network and immediately afterwards press the button on
the WVA device for 3 seconds. Do not press the button any longer than ten seconds as
this will reset the device and user will have to start over.
5. Once the initial pairing is complete the device is ready for use with the VisTracks
android application.
g. Launching VisTracks HOS App and connecting it to a WiFi Direct device
already configured
1. Open VisTracks App
2. Log into the app
3. On the main dashboard, tap the ‘Connect’ button which is located below the app header
4. Tap on ‘Manual Connection’ button
5. Select VBUS device - "Digi WVA"
23
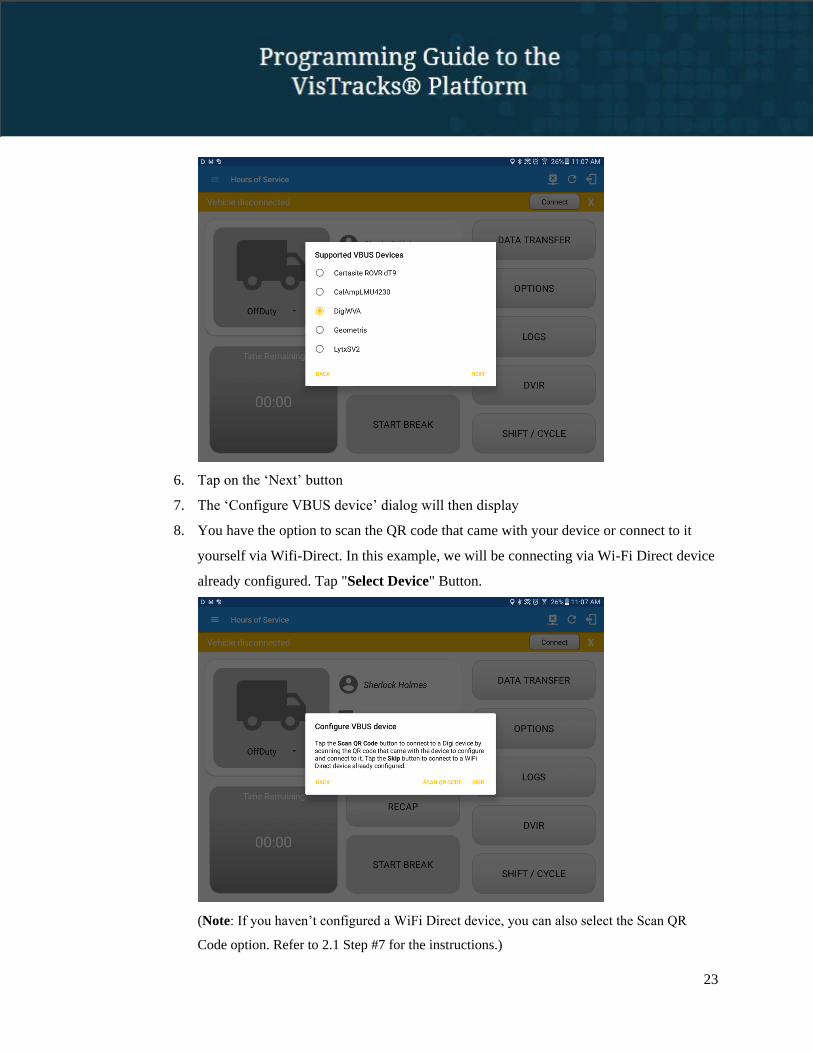
6. Tap on the ‘Next’ button
7. The ‘Configure VBUS device’ dialog will then display
8. You have the option to scan the QR code that came with your device or connect to it
yourself via Wifi-Direct. In this example, we will be connecting via Wi-Fi Direct device
already configured. Tap "Select Device" Button.
(Note: If you haven’t configured a WiFi Direct device, you can also select the Scan QR
Code option. Refer to 2.1 Step #7 for the instructions.)

24
9. Tap on the WiFi direct device name: 2016
(Note: If the WiFi Direct device is paired through ‘Push Button’ mode then you will
see the device as ‘Invited’ screen. Hold WVA button down for 3 seconds (do not hold
down for more than 3 seconds or you will have to repeat the entire process). If the WiFi
Direct device is paired through ‘Pin’ mode, then it will ask you for a PIN)
10. You should hear a tone letting you know that device is now connected.
11. To check if you are successfully connected to the Digi Test Wi-Fi Direct network,
navigate to the Main Dashboard and the VBUS status indicator should be displayed as
“Connected” which is located on the app header

25
12. You can also check on the Android Notification Bar and you should see the VBUS
Service status as “Connected”
Troubleshooting Steps
1. Exit out of the VisTracks application
2. Go to Settings on the Android device and verify that the device is connected to the WVA Wi-Fi Direct
network
3. If the network status states ‘Available’ tap on the network to initiate a connection
4. If the WVA Wi-Fi Direct network is not displayed tap on the Search button at the top of the Wi-Fi
Direct screen to search for the network
5. Once the connection has been confirmed repeat the previous section for “VisTracks Mobile App
Settings”