INSTALLATION INSTRUCTIONS - Jeep Wrangler Parts62163
7
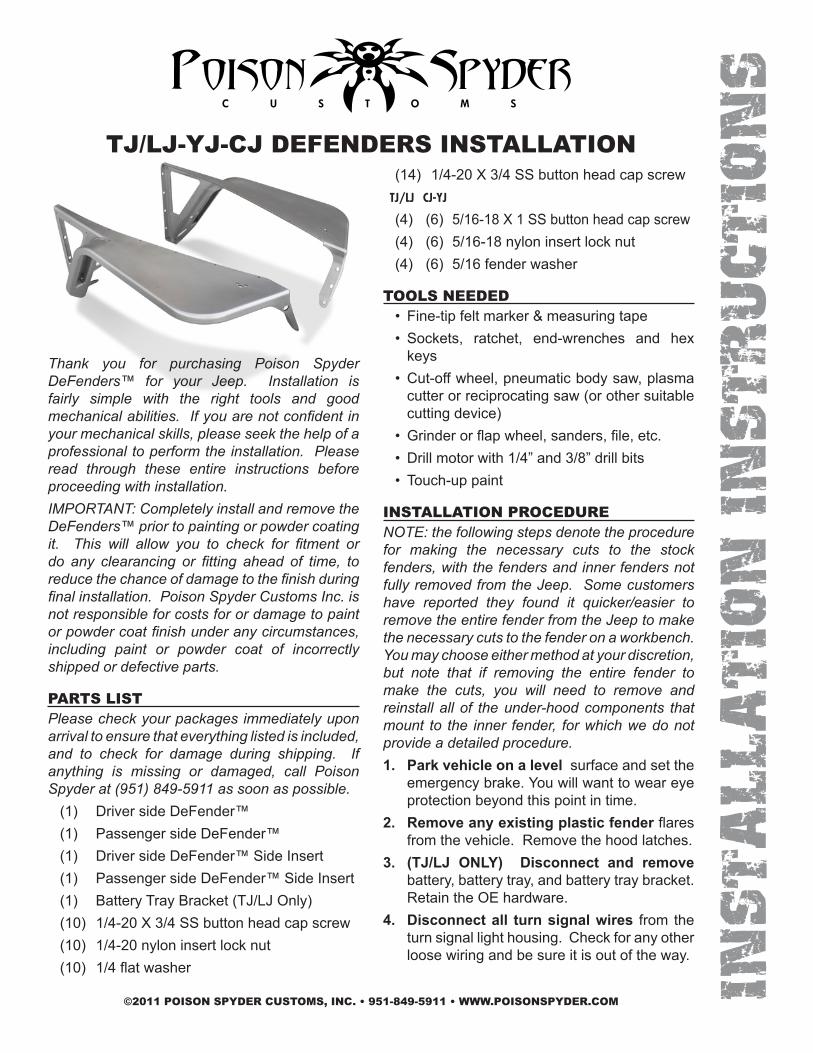
©2011 POISON SPYDER CUSTOMS, INC. • 951-849-5911 • WWW.POISONSPYDER.COM INSTALLATION INSTRUCTIONS TJ/LJ-YJ-CJ DEFENDERS INSTALLATION Thank you for purchasing Poison Spyder DeFenders™ for your Jeep. Installation is fairly simple with the right tools and good mechanical abilities. If you are not confident in your mechanical skills, please seek the help of a professional to perform the installation. Please read through these entire instructions before proceeding with installation. IMPORTANT: Completely install and remove the DeFenders™ prior to painting or powder coating it. This will allow you to check for fitment or do any clearancing or fitting ahead of time, to reduce the chance of damage to the finish during final installation. Poison Spyder Customs Inc. is not responsible for costs for or damage to paint or powder coat finish under any circumstances, including paint or powder coat of incorrectly shipped or defective parts. PARTS LIST Please check your packages immediately upon arrival to ensure that everything listed is included, and to check for damage during shipping. If anything is missing or damaged, call Poison Spyder at (951) 849-5911 as soon as possible. (1) Driver side DeFender™ (1) Passenger side DeFender™ (1) Driver side DeFender™ Side Insert (1) Passenger side DeFender™ Side Insert (1) Battery Tray Bracket (TJ/LJ Only) (10) 1/4-20 X 3/4 SS button head cap screw (10) 1/4-20 nylon insert lock nut (10) 1/4 flat washer (14) 1/4-20 X 3/4 SS button head cap screw TJ/LJ CJ-YJ (4) (6) 5/16-18 X 1 SS button head cap screw (4) (6) 5/16-18 nylon insert lock nut (4) (6) 5/16 fender washer TOOLS NEEDED • Fine-tip felt marker & measuring tape • Sockets, ratchet, end-wrenches and hex keys • Cut-off wheel, pneumatic body saw, plasma cutter or reciprocating saw (or other suitable cutting device) • Grinder or flap wheel, sanders, file, etc. • Drill motor with 1/4” and 3/8” drill bits • Touch-up paint INSTALLATION PROCEDURE NOTE: the following steps denote the procedure for making the necessary cuts to the stock fenders, with the fenders and inner fenders not fully removed from the Jeep. Some customers have reported they found it quicker/easier to remove the entire fender from the Jeep to make the necessary cuts to the fender on a workbench. You may choose either method at your discretion, but note that if removing the entire fender to make the cuts, you will need to remove and reinstall all of the under-hood components that mount to the inner fender, for which we do not provide a detailed procedure. 1. Park vehicle on a level surface and set the emergency brake. You will want to wear eye protection beyond this point in time. 2. Remove any existing plastic fender flares from the vehicle. Remove the hood latches. 3. (TJ/LJ ONLY) Disconnect and remove battery, battery tray, and battery tray bracket. Retain the OE hardware. 4. Disconnect all turn signal wires from the turn signal light housing. Check for any other loose wiring and be sure it is out of the way.
Transcript of INSTALLATION INSTRUCTIONS - Jeep Wrangler Parts62163
©2011 POISON SPYDER CUSTOMS, INC. • 951-849-5911 • WWW.POISONSPYDER.COM INST
ALLA
TION
INST
RUCT
ION
S
TJ/LJ-YJ-CJ DEFENDERS INSTALLATION
Thank you for purchasing Poison Spyder DeFenders™ for your Jeep. Installation is fairly simple with the right tools and good mechanical abilities. If you are not confident in your mechanical skills, please seek the help of a professional to perform the installation. Please read through these entire instructions before proceeding with installation.IMPORTANT: Completely install and remove the DeFenders™ prior to painting or powder coating it. This will allow you to check for fitment or do any clearancing or fitting ahead of time, to reduce the chance of damage to the finish during final installation. Poison Spyder Customs Inc. is not responsible for costs for or damage to paint or powder coat finish under any circumstances, including paint or powder coat of incorrectly shipped or defective parts.
PARTS LISTPlease check your packages immediately upon arrival to ensure that everything listed is included, and to check for damage during shipping. If anything is missing or damaged, call Poison Spyder at (951) 849-5911 as soon as possible.
(1) Driver side DeFender™(1) Passenger side DeFender™(1) Driver side DeFender™ Side Insert(1) Passenger side DeFender™ Side Insert(1) Battery Tray Bracket (TJ/LJ Only)(10) 1/4-20 X 3/4 SS button head cap screw(10) 1/4-20 nylon insert lock nut(10) 1/4flatwasher
(14) 1/4-20 X 3/4 SS button head cap screwTJ/LJ CJ-YJ
(4) (6) 5/16-18 X 1 SS button head cap screw(4) (6) 5/16-18 nylon insert lock nut(4) (6) 5/16 fender washer
TOOLS NEEDED• Fine-tip felt marker & measuring tape•Sockets, ratchet, end-wrenches and hex
keys•Cut-off wheel, pneumatic body saw, plasma
cutter or reciprocating saw (or other suitable cutting device)
• Grinderorflapwheel,sanders,file,etc.•Drill motor with 1/4” and 3/8” drill bits• Touch-up paint
INSTALLATION PROCEDURENOTE: the following steps denote the procedure for making the necessary cuts to the stock fenders, with the fenders and inner fenders not fully removed from the Jeep. Some customers have reported they found it quicker/easier to remove the entire fender from the Jeep to make the necessary cuts to the fender on a workbench. You may choose either method at your discretion, but note that if removing the entire fender to make the cuts, you will need to remove and reinstall all of the under-hood components that mount to the inner fender, for which we do not provide a detailed procedure.1. Park vehicle on a level surface and set the
emergencybrake.Youwillwanttoweareyeprotectionbeyondthispointintime.
2. Remove any existing plastic fender flaresfromthevehicle.Removethehoodlatches.
3. (TJ/LJ ONLY) Disconnect and remove battery,batterytray,andbatterytraybracket.RetaintheOEhardware.
4. Disconnect all turn signal wires from the turnsignallighthousing.Checkforanyotherloosewiringandbesureitisoutoftheway.
INST
ALLA
TION
INST
RUCT
ION
SPoison Spyder Customs • TJ/LJ-YJ-CJ DEFENDERS INSTALLATION Page 2
©2011 POISON SPYDER CUSTOMS, INC. • 951-849-5911 • WWW.POISONSPYDER.COM
FIGURE 1
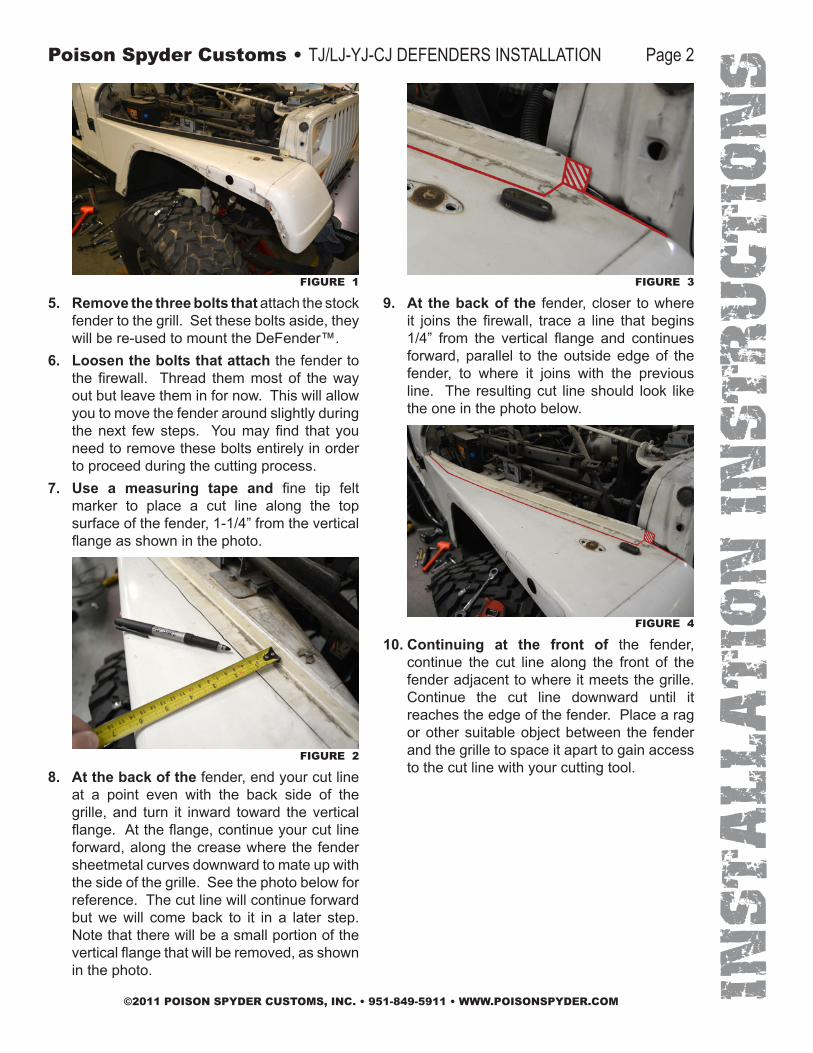
5. Remove the three bolts that attach the stock fendertothegrill.Settheseboltsaside,theywillbere-usedtomounttheDeFender™.
6. Loosen the bolts that attach the fender to the firewall. Thread themmost of thewayoutbutleavetheminfornow.Thiswillallowyou to move the fender around slightly during thenext fewsteps. Youmayfind that youneed to remove these bolts entirely in order toproceedduringthecuttingprocess.
7. Use a measuring tape and fine tip feltmarker to place a cut line along the top surface of the fender, 1-1/4” from the vertical flangeasshowninthephoto.
FIGURE 2
8. At the back of the fender, end your cut line at a point even with the back side of the grille, and turn it inward toward the vertical flange.Attheflange,continueyourcutlineforward, along the crease where the fender sheetmetal curves downward to mate up with thesideofthegrille.Seethephotobelowforreference.Thecutlinewillcontinueforwardbutwewill comeback to it in a later step.Note that there will be a small portion of the verticalflangethatwillberemoved,asshowninthephoto.
FIGURE 3
9. At the back of the fender, closer to where it joins the firewall, tracea line that begins1/4” from the vertical flange and continuesforward, parallel to the outside edge of the fender, to where it joins with the previous line. The resultingcut lineshould look liketheoneinthephotobelow.
FIGURE 4
10. Continuing at the front of the fender, continue the cut line along the front of the fenderadjacenttowhereitmeetsthegrille.Continue the cut line downward until it reachestheedgeofthefender.Placearagor other suitable object between the fender and the grille to space it apart to gain access tothecutlinewithyourcuttingtool.
INST
ALLA
TION
INST
RUCT
ION
SPoison Spyder Customs • TJ/LJ-YJ-CJ DEFENDERS INSTALLATION Page 3
©2011 POISON SPYDER CUSTOMS, INC. • 951-849-5911 • WWW.POISONSPYDER.COM
FIGURE 5
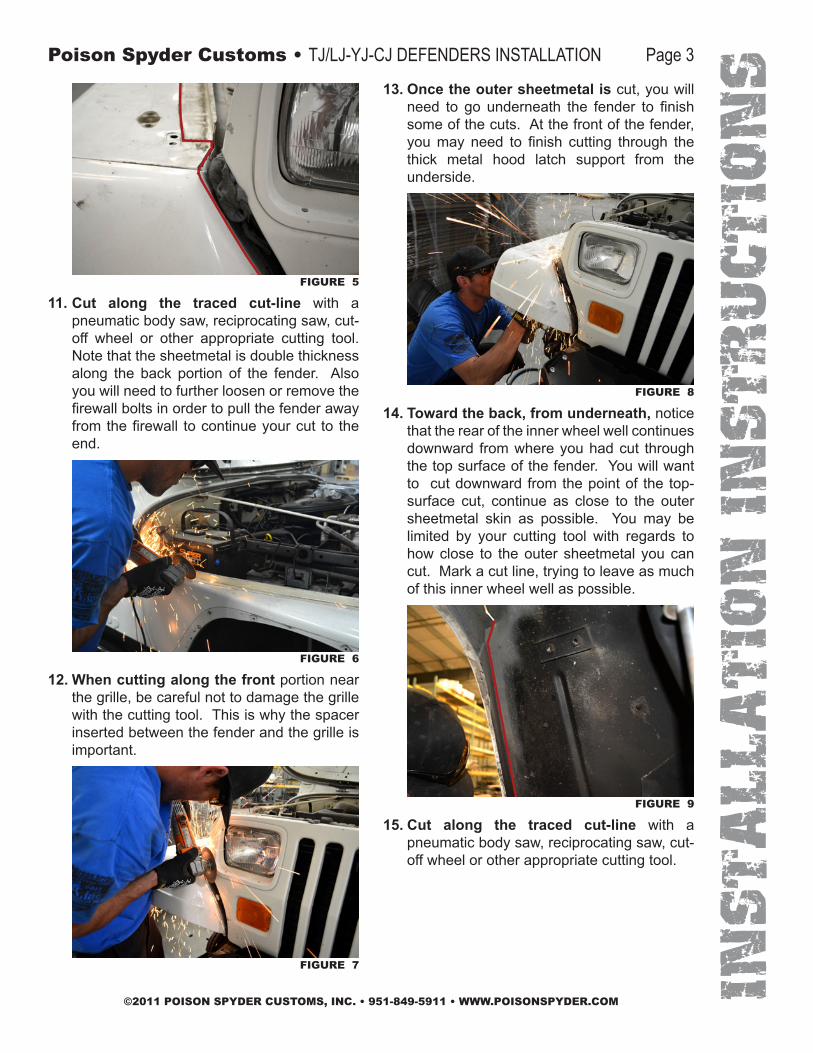
11. Cut along the traced cut-line with a pneumatic body saw, reciprocating saw, cut-off wheel or other appropriate cutting tool.Note that the sheetmetal is double thickness along the back portion of the fender. Alsoyou will need to further loosen or remove the firewallboltsinordertopullthefenderawayfromthefirewall tocontinueyourcut to theend.
FIGURE 6
12. When cutting along the front portion near the grille, be careful not to damage the grille withthecuttingtool.Thisiswhythespacerinserted between the fender and the grille is important.
FIGURE 7
13. Once the outer sheetmetal is cut, you will need to go underneath the fender to finishsomeofthecuts.Atthefrontofthefender,youmay need to finish cutting through thethick metal hood latch support from the underside.
FIGURE 8
14. Toward the back, from underneath, notice that the rear of the inner wheel well continues downward from where you had cut through thetopsurfaceofthefender.Youwillwantto cut downward from the point of the top-surface cut, continue as close to the outer sheetmetal skin as possible. You may belimited by your cutting tool with regards to how close to the outer sheetmetal you can cut.Markacutline,tryingtoleaveasmuchofthisinnerwheelwellaspossible.
FIGURE 9
15. Cut along the traced cut-line with a pneumatic body saw, reciprocating saw, cut-offwheelorotherappropriatecuttingtool.
INST
ALLA
TION
INST
RUCT
ION
SPoison Spyder Customs • TJ/LJ-YJ-CJ DEFENDERS INSTALLATION Page 4
©2011 POISON SPYDER CUSTOMS, INC. • 951-849-5911 • WWW.POISONSPYDER.COM
FIGURE 10
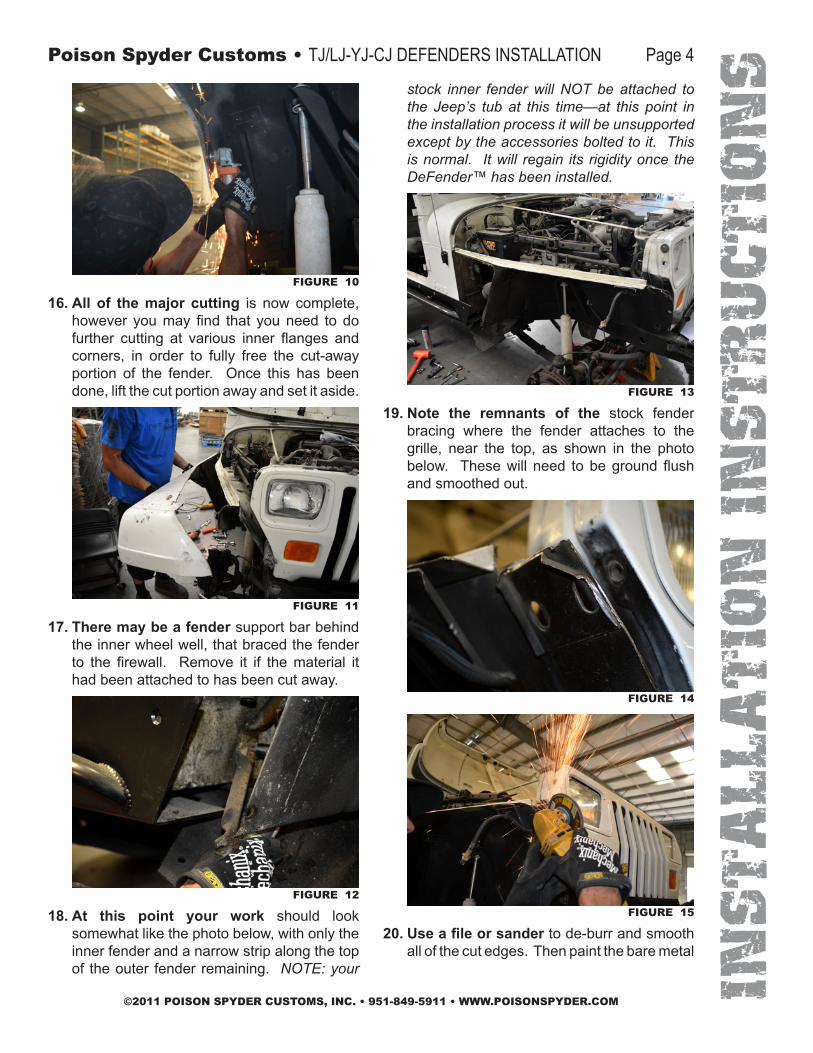
16. All of the major cutting is now complete, however youmayfind that youneed todofurther cutting at various inner flanges andcorners, in order to fully free the cut-away portion of the fender. Once this has beendone,liftthecutportionawayandsetitaside.
FIGURE 11
17. There may be a fender support bar behind the inner wheel well, that braced the fender to the firewall. Remove it if thematerial ithadbeenattachedtohasbeencutaway.
FIGURE 12
18. At this point your work should look somewhat like the photo below, with only the inner fender and a narrow strip along the top of theouter fenderremaining. NOTE: your
stock inner fender will NOT be attached to the Jeep’s tub at this time—at this point in the installation process it will be unsupported except by the accessories bolted to it. This is normal. It will regain its rigidity once the DeFender™ has been installed.
FIGURE 13
19. Note the remnants of the stock fender bracing where the fender attaches to the grille, near the top, as shown in the photo below. Thesewill need tobegroundflushandsmoothedout.
FIGURE 14
FIGURE 15
20. Use a file or sander to de-burr and smooth allofthecutedges.Thenpaintthebaremetal
INST
ALLA
TION
INST
RUCT
ION
SPoison Spyder Customs • TJ/LJ-YJ-CJ DEFENDERS INSTALLATION Page 5
©2011 POISON SPYDER CUSTOMS, INC. • 951-849-5911 • WWW.POISONSPYDER.COM
aroundallcutedgestoprotectagainstrust.Allowthepainttodrybeforeproceeding.
FIGURE 16
21. Loosen the front center body mount, located directly under the grill, as well as the two grille support rods that extend from the firewalltothegrille.ThiswillallowthegrilletofloatslightlywhilefittingtheDeFender™.
FIGURE 17
22. Carefully position the DeFender™ in place.
FIGURE 18
23. Ensure that the 1-1/4” wide strip of remaining material from the original fender is under the top surface of the DeFender™, and that the original part of the fender that bolted to the side of the grille is sandwiched between the
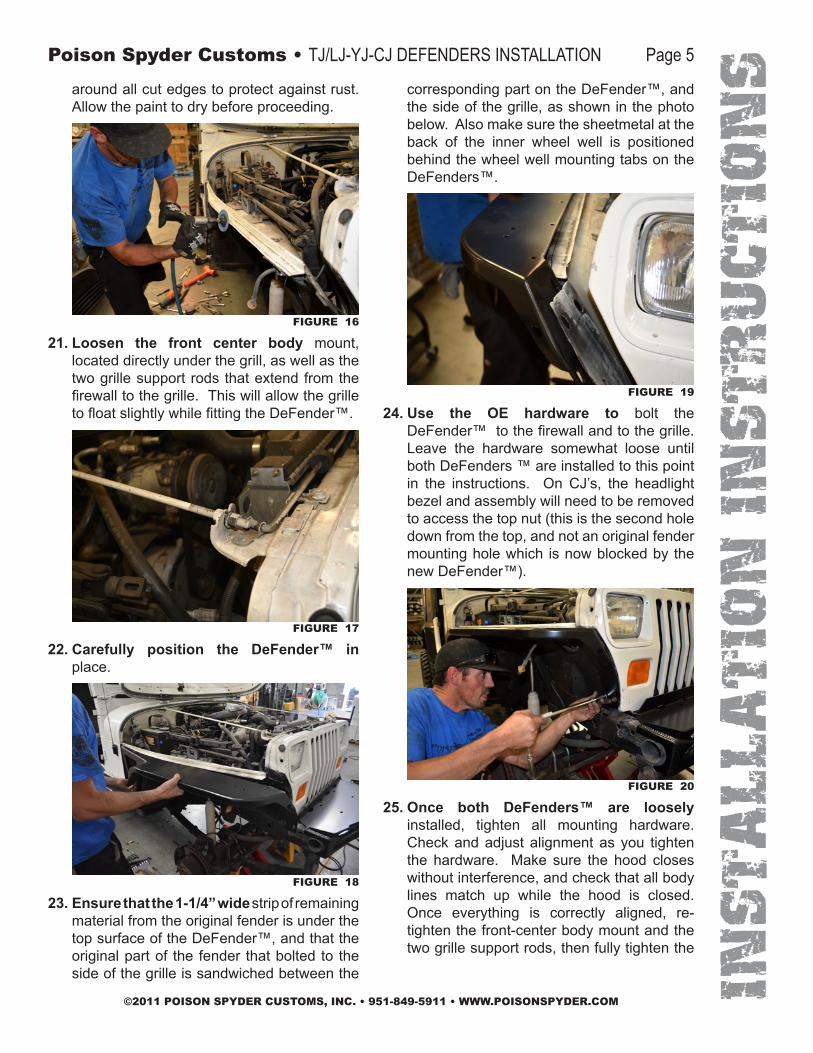
corresponding part on the DeFender™, and the side of the grille, as shown in the photo below.Alsomakesurethesheetmetalattheback of the inner wheel well is positioned behind the wheel well mounting tabs on the DeFenders™.
FIGURE 19
24. Use the OE hardware to bolt the DeFender™tothefirewallandtothegrille.Leave the hardware somewhat loose until both DeFenders ™ are installed to this point in the instructions. On CJ’s, the headlightbezel and assembly will need to be removed to access the top nut (this is the second hole down from the top, and not an original fender mounting hole which is now blocked by the newDeFender™).
FIGURE 20
25. Once both DeFenders™ are loosely installed, tighten all mounting hardware.Check and adjust alignment as you tighten the hardware. Make sure the hood closeswithout interference, and check that all body lines match up while the hood is closed.Once everything is correctly aligned, re-tighten the front-center body mount and the two grille support rods, then fully tighten the
INST
ALLA
TION
INST
RUCT
ION
SPoison Spyder Customs • TJ/LJ-YJ-CJ DEFENDERS INSTALLATION Page 6
©2011 POISON SPYDER CUSTOMS, INC. • 951-849-5911 • WWW.POISONSPYDER.COM
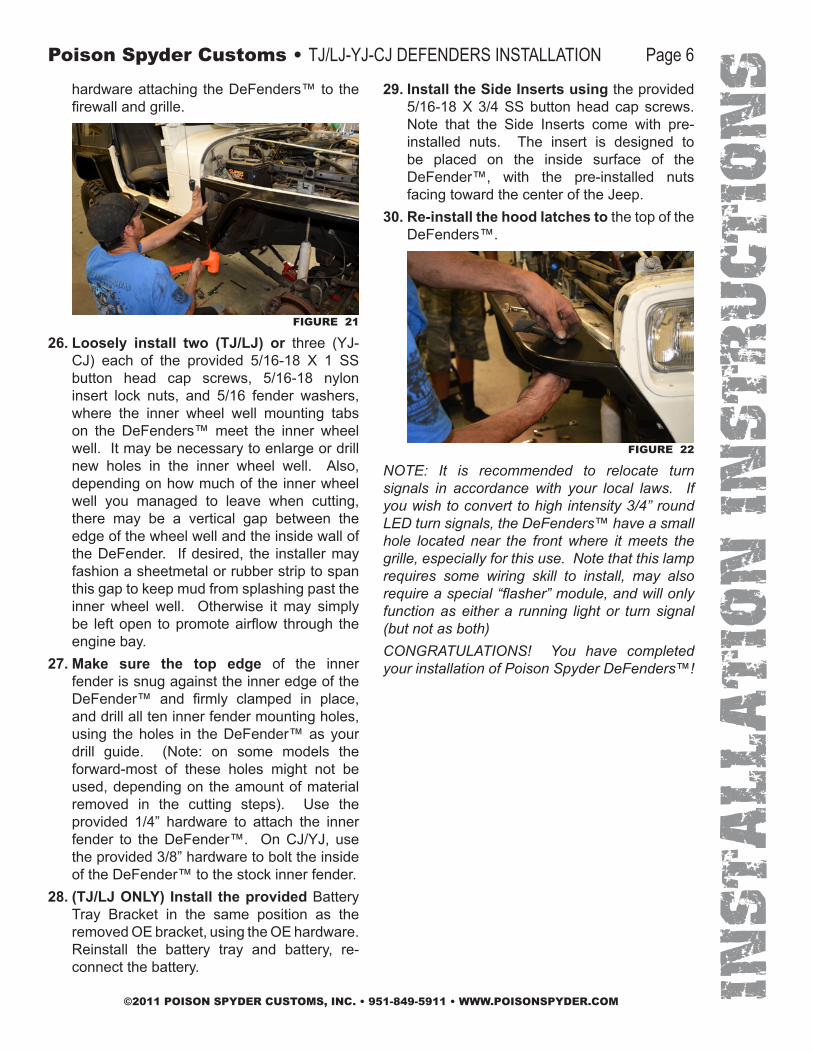
hardware attaching the DeFenders™ to the firewallandgrille.
FIGURE 21
26. Loosely install two (TJ/LJ) or three (YJ-CJ) each of the provided 5/16-18 X 1 SS button head cap screws, 5/16-18 nylon insert lock nuts, and 5/16 fender washers, where the inner wheel well mounting tabs on the DeFenders™ meet the inner wheel well.Itmaybenecessarytoenlargeordrillnew holes in the inner wheel well. Also,depending on how much of the inner wheel well you managed to leave when cutting, there may be a vertical gap between the edge of the wheel well and the inside wall of theDeFender. Ifdesired, the installermayfashion a sheetmetal or rubber strip to span this gap to keep mud from splashing past the inner wheel well. Otherwise itmay simplybe leftopen topromoteairflow through theenginebay.
27. Make sure the top edge of the inner fender is snug against the inner edge of the DeFender™ and firmly clamped in place,and drill all ten inner fender mounting holes, using the holes in the DeFender™ as your drill guide. (Note: on some models theforward-most of these holes might not be used, depending on the amount of material removed in the cutting steps). Use theprovided 1/4” hardware to attach the inner fender to theDeFender™. OnCJ/YJ, usethe provided 3/8” hardware to bolt the inside oftheDeFender™tothestockinnerfender.
28. (TJ/LJ ONLY) Install the provided Battery Tray Bracket in the same position as the removedOEbracket,usingtheOEhardware.Reinstall the battery tray and battery, re-connectthebattery.
29. Install the Side Inserts using the provided 5/16-18X3/4SSbuttonheadcapscrews.Note that the Side Inserts come with pre-installed nuts. The insert is designed tobe placed on the inside surface of the DeFender™, with the pre-installed nuts facingtowardthecenteroftheJeep.
30. Re-install the hood latches to the top of the DeFenders™.
FIGURE 22
NOTE: It is recommended to relocate turn signals in accordance with your local laws. If you wish to convert to high intensity 3/4” round LED turn signals, the DeFenders™ have a small hole located near the front where it meets the grille, especially for this use. Note that this lamp requires some wiring skill to install, may also require a special “flasher” module, and will only function as either a running light or turn signal (but not as both)CONGRATULATIONS! You have completed your installation of Poison Spyder DeFenders™!
INST
ALLA
TION
INST
RUCT
ION
SPoison Spyder Customs • TJ/LJ-YJ-CJ DEFENDERS INSTALLATION Page 7
©2011 POISON SPYDER CUSTOMS, INC. • 951-849-5911 • WWW.POISONSPYDER.COM
WARRANTYPoison Spyder Customs™ warranties all of the products we sell and distribute for one (1) year from the date of sale. These products will be free from defects in material and workmanship under normal installation, and use. Due to the intended use the powder coat finish is warranted for ninety (90) days. The finish warranty will not cover a product if it has been damaged in any way. Warranty is limited to repair or replacement. Poison Spyder Customs™ does not offer any type of labor or shipping allowance and all warranty claims are subject to inspection by Poison Spyder Customs™.At the discretion of Poison Spyder Customs™, the products in question can be repaired or replaced when found defective. Prior to any replacement or repair, written authorization must be obtained from Poison Spyder Customs™. Failure to contact us prior to having warranty work preformed will immediately void all applicable warranties; and it is then the sole responsibility of the customer to remit any payment incurred.The warranty expressed above is the sole warranty of Poison Spyder Customs™, and any other expressed or implied warranties are hereby specifically excluded and disclaimed.
HOLD HARMLESS AGREEMENT1. In purchasing a Poison Spyder Customs
Product™ I release, waive, discharge and covenant not to sue Poison Spyder Customs officers, servants, agents, or employees(hereinafter referred toasReleasees) fromany and all liability, claims, demands, actions and causes of action whatsoever arising out of or related to any loss, damage, or injury, including death, that may be sustained by me (or anyone else), any property belonging to me (or anyone else), whether caused by the negligence of the releasees or otherwise, while working on, using or any activity related tothisproduct.
2. I am fully aware of risks and hazards connected with the use of a this product and I elect to voluntarily engage in such use of this product knowing that the use may be hazardous to meandmyproperty.Ivoluntarilyassumefullresponsibility for any risks of loss, property damage or personal injury, including death,
that may be sustained by me (or anyone else), or any loss or damage to property owned by me (or anyone else), as a result of using this product, whether caused by the negligenceofreleaseesorotherwise.
3. I further agree to indemnify and hold harmless the releasees from any loss, liability, damage or costs, including court cost and attorney fees, that they may incur due to my use of a this product, whether caused by negligence ofreleaseesorotherwise.
4. It is my express intent thatthisReleaseandHold Harmless Agreement shall bind themembers of my family and spouse, if I am alive, and my heirs assigns and personal representative, if I am deceased, and shall be deemed as a release, waiver, discharge, and covenant not to sue the above named releasees.IfurtheragreethatthisWaiverofLiabilityandHoldHarmlessAgreementshallbe construed in accordance with the laws of theStateofCalifornia.
By accepting this product, I acknowledge and represent that I have read the above Waiver and Liability and Hold Harmless Agreement, understand it and accept it voluntarily as my own free act and deed; no oral presentations, statements, or inducements, apart from the foregoing written agreement, have been made; I am at least eighteen (18) years of age and fully competent; and I execute this Release for full, adequate and complete consideration fully intending to be bound by same.If you do not agree with the preceding Hold Harmless Agreement, you may return the product and receive a full refund. Please, contact a Poison Spyder Customs™ sales representative and they will issue a call tag for the product in question. Once the product has been received by Poison Spyder Customs™ a full refund will be issued.