INSTALLATION INSTRUCTIONS - northcoastmarble.com · INSTALLATION INSTRUCTIONS ... Make sure that...
9
North Coast Cultured Products INSTALLATION INSTRUCTIONS VANITY TOP ......…………………………………………….…………………... 2 PEDASTAL SINK .……………….………………………….……………………. 3 SHOWER BASE WITHOUT CAST-ON THRESHOLD ….………………….. 4 SHOWER BASE WITH CAST-ON THRESHOLD …..……………………….. 5 SHOWER/TUB WALL ……...…...…….……….………………….…………. 6-7 CORNER SHOWER SEAT ...……….………...………….…………………….. 8 CORNER CADDY ……………………………………….…………………..….. 9 PAGE #
Transcript of INSTALLATION INSTRUCTIONS - northcoastmarble.com · INSTALLATION INSTRUCTIONS ... Make sure that...

North Coast Cultured Products
INSTALLATION INSTRUCTIONS
VANITY TOP ......…………………………………………….…………………... 2
PEDASTAL SINK .……………….………………………….……………………. 3
SHOWER BASE WITHOUT CAST-ON THRESHOLD ….………………….. 4
SHOWER BASE WITH CAST-ON THRESHOLD …..……………………….. 5
SHOWER/TUB WALL ……...…...…….……….………………….…………. 6-7
CORNER SHOWER SEAT ...……….………...………….…………………….. 8
CORNER CADDY ……………………………………….…………………..….. 9
PAGE #

North Coast Cultured Products
VANITY TOP INSTALLATION
The following detailed instructions should be read completely before starting the work, and followed in sequence.
Step 1. TRIAL FIT Make sure that the vanity is level and firmly secured to the wall. Trial fit the vanity top onto the vanity to ensure the size is correct and the top is level. If the vanity top needs to be sized or scribed into the wall, use a belt or block sander with course grit (60 or 80 grit) to trim and size the ends. EXPOSED AND FINISHED ENDS CANNOT BE SANDED WITHOUT RUINING THE FINISH Step 2. INSTALL THE FAUCET Remove the vanity top and install the faucet and supply lines. When installing the drain assembly use only 100% silicone to seal the drain. DO NOT USE PLUMBER’S PUTTY (Use of plumber’s putty will void the warranty). Be sure to follow the faucet manufacturer’s instructions when tightening the nut on the underside of the bowl. DO NOT OVER-TIGHTEN The nut should only be hand-tightened in order to reduce the potential for the bowl to crack over time. Step 3. INSTALL THE VANITY TOP Place a small bead of silicone caulking on the top edge on the cabinet. Be sure not to use an excessive amount. A little goes a long way. Carefully place the vanity top on the cabinet in the same place where it was trial fitted and firmly press it into position. Wipe away any excess sealant and let set until dry.
CARE INSTRUCTIONS: All North Coast Cultured Products are covered with a bacteria-resistant gel-coat surface designed for cultured marble, onyx, granite, and engineered stone. Proper care of this gel coat will yield years of excellent use. Never clean with an abrasive powder or liquid cleanser. Use of abrasives will cause scratching and will eventually dull and destroy the finish. Use of scrub brushes should be avoided for the same reason. 409 Sprays are recommended, with either washcloths or sponges. Use of a soft, dry towel after cleaning will help to remove soap spots. To maintain luster and make cleaning easier, periodic applications of paste wax or products like gel gloss may be applied. Mild abrasives such as automotive polishing compound, toothpaste or baking soda will remove simple scratches and stains. Cigarette burns can normally be removed without noticeable effect. Additional care advice may be obtained by contacting your local North Coast Cultured Products dealer or distributor, or at www.northcoastmarble.com
KEEP YOUR NORTH COAST CULTURED PRODUCT IN A CLIMATE-CONTROLLED SPACE AND IN THE ORIGINAL PACKAGING, LAYING FLAT UNTIL INSTALLED.
North Coast Cultured Products
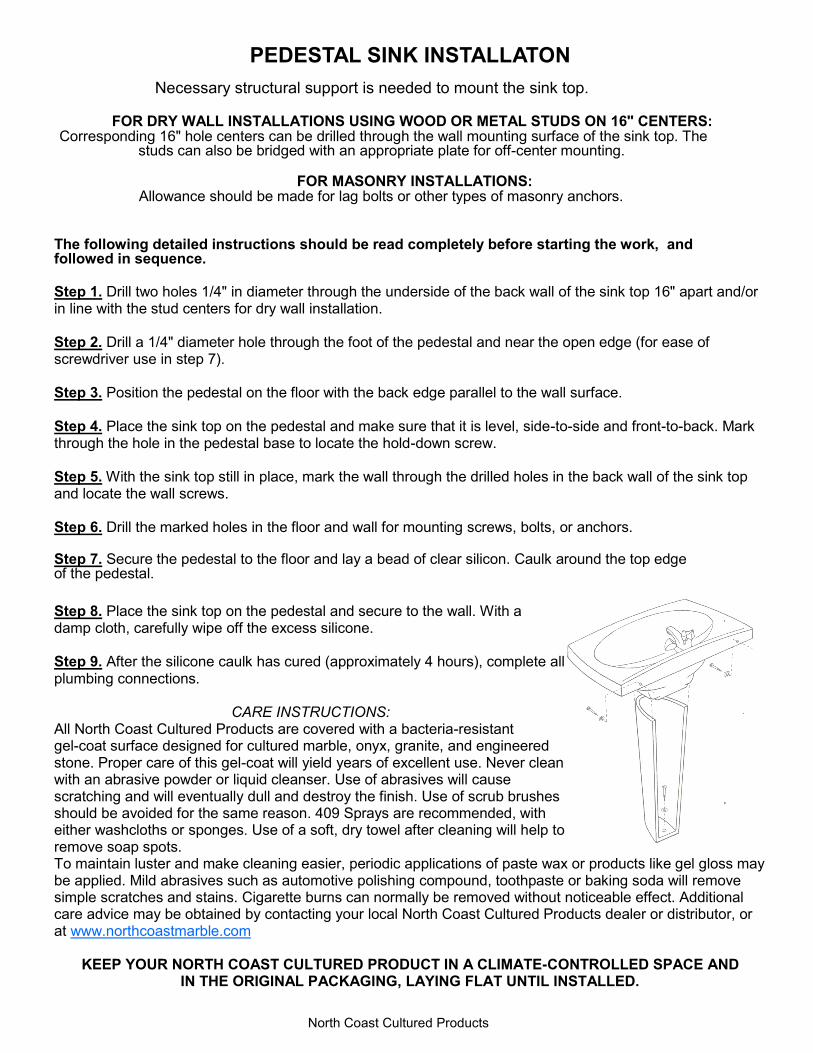
PEDESTAL SINK INSTALLATON
Necessary structural support is needed to mount the sink top.
FOR DRY WALL INSTALLATIONS USING WOOD OR METAL STUDS ON 16" CENTERS:
Corresponding 16" hole centers can be drilled through the wall mounting surface of the sink top. The studs can also be bridged with an appropriate plate for off-center mounting.
FOR MASONRY INSTALLATIONS:
Allowance should be made for lag bolts or other types of masonry anchors.
The following detailed instructions should be read completely before starting the work, and followed in sequence. Step 1. Drill two holes 1/4" in diameter through the underside of the back wall of the sink top 16" apart and/or in line with the stud centers for dry wall installation. Step 2. Drill a 1/4" diameter hole through the foot of the pedestal and near the open edge (for ease of screwdriver use in step 7). Step 3. Position the pedestal on the floor with the back edge parallel to the wall surface. Step 4. Place the sink top on the pedestal and make sure that it is level, side-to-side and front-to-back. Mark through the hole in the pedestal base to locate the hold-down screw. Step 5. With the sink top still in place, mark the wall through the drilled holes in the back wall of the sink top and locate the wall screws. Step 6. Drill the marked holes in the floor and wall for mounting screws, bolts, or anchors. Step 7. Secure the pedestal to the floor and lay a bead of clear silicon. Caulk around the top edge of the pedestal.
Step 8. Place the sink top on the pedestal and secure to the wall. With a damp cloth, carefully wipe off the excess silicone. Step 9. After the silicone caulk has cured (approximately 4 hours), complete all plumbing connections.
CARE INSTRUCTIONS: All North Coast Cultured Products are covered with a bacteria-resistant gel-coat surface designed for cultured marble, onyx, granite, and engineered stone. Proper care of this gel-coat will yield years of excellent use. Never clean with an abrasive powder or liquid cleanser. Use of abrasives will cause scratching and will eventually dull and destroy the finish. Use of scrub brushes should be avoided for the same reason. 409 Sprays are recommended, with either washcloths or sponges. Use of a soft, dry towel after cleaning will help to remove soap spots. To maintain luster and make cleaning easier, periodic applications of paste wax or products like gel gloss may be applied. Mild abrasives such as automotive polishing compound, toothpaste or baking soda will remove simple scratches and stains. Cigarette burns can normally be removed without noticeable effect. Additional care advice may be obtained by contacting your local North Coast Cultured Products dealer or distributor, or at www.northcoastmarble.com
KEEP YOUR NORTH COAST CULTURED PRODUCT IN A CLIMATE-CONTROLLED SPACE AND
IN THE ORIGINAL PACKAGING, LAYING FLAT UNTIL INSTALLED.

North Coast Cultured Products
SHOWER BASE WITHOUT CAST-ON THRESHOLD INSTALLATION
100% silicone caulking is to be used; it must be clear when installing onyx products. If 100% silicone caulking is not used your warranty will be void. Make certain that the base is lying flat on a solid surface. To eliminate potential leaking after installation, specially coated strips of fiberglass are attached to the underside of the shower base. The fiberglass overlaps the corners and extends perpendicular to the base approximately 3-4”.
The following detailed instructions should be read completely before starting the work, and followed in sequence.
Step 1. The shower base should be installed on top of an existing sub-floor or one that has been constructed prior to installation. Make sure the base lays flat on the surface and no rocking takes place. Please ensure that the 2” drain pipe extends to the sub-floor. Your shower base drain extends below the sub-floor and through the 2” drain pipe.
Step 2. Set the shower base in place. The base should be set directly against the wall studs. After the base has been set, use a water-resistant wall covering such as green board to establish the wall face. The wall covering will meet the shower floor therefore concealing the fiberglass edging on all sides but the door opening. The fourth exposed side is concealed through construction of the threshold. This threshold also creates the horizon-tal surface on which to mount the door. Step 3. On the outside fiberglass wall, stack three treated two-by-fours. Stack-ing the two-by-fours builds extra strength for the threshold opening. Use the piece measuring 3/8” x 5” and glue it to the face of the stacked two-by fours. Step 4. The piece measuring 3/8” x 4 1/2” is glued directly on to the fiber-glass on the inside of the shower pan. It may be necessary to scribe this piece to the slope of the shower floor.
Step 5. The threshold is finished by gluing the piece that measures 3/4” x 5 1/2” on to the top of the two vertical pieces measuring 3/8”. The additional width of this piece provides room for the inside and outside pieces. Seal all seams with 100% silicone caulking.
Step 6. The three remaining pieces measuring 3/8” are provided as trim material for creating a uniform look around the interior of the base. Because of the slope of the shower base to the drain, there may be a gap between the bottom of the wall panel and the shower floor. Be sure that this gap is securely sealed by scribing the 3/8” x 4 1/2” pieces to the slope of the floor and gluing it against the wall panel. Seal the seam with 100 %silicone caulking. Some adjustment of the length of these pieces may be required so a dry fit of the installation is recommended.
SPECIAL NOTE: If the custom shower base is a neo-angle installation, this process should be repeated three times. Additionally, all threshold pieces will be manufactured with a length 4” longer than the length of the opening. This will allow for miter cuts when fitting the corners together.
CARE INSTRUCTIONS: All North Coast Cultured Products are covered with a bacteria-resistant gel-coat surface designed for cultured marble, onyx, granite, and engineered stone. Proper care of this gel-coat will yield years of excellent use. Never clean with an abrasive powder or liquid cleanser. Use of abrasives will cause scratching and will eventually dull and destroy the finish. Use of scrub brushes should be avoided for the same reason. We strongly recommend using Formula 409 Stone and Steel Cleaner with either washcloths or sponges. Use of a soft, dry towel after cleaning will help to remove soap spots. To maintain luster and make cleaning easier, periodic applications of paste wax or products like gel gloss may be applied. Mild abrasives such as automotive polishing compound, toothpaste or baking soda, will remove simple scratches and stains. Cigarette burns can normally be removed without noticeable effect. Additional care advice may be obtained by contacting your local North Coast Cultured Products dealer or distributor, or at www.northcoastmarble.com
KEEP YOUR NORTH COAST CULTURED PRODUCT IN A CLIMATE-CONTROLLED SPACE AND IN THE ORIGINAL PACKAGING, LAYING FLAT UNTIL INSTALLED.
Vertical fiberglass
wall
Stack of 2X4’s Shower pan floor

North Coast Cultured Products
SHOWER BASE WITH CAST-ON THRESHOLD INSTALLATION
100% silicone caulking is to be used; it must be clear when installing onyx products. If 100% silicone caulking is not used your warranty will be void. Make certain that the base is lying flat on a solid surface. To eliminate potential leaking after installation, specially coated strips of fiberglass are attached to the underside of the shower base. The fiberglass overlaps the corners and extends perpendicular to the base approximately 3-4”. The following detailed instructions should be read completely before starting the work, and followed in sequence. Step 1. The shower base should be installed on top of an existing sub-floor or one that has been constructed prior to installation. Make sure the base lays flat on the surface and no rocking takes place. Please ensure that the 2” drain pipe extends to the sub-floor. Your shower base drain extends below the sub-floor and through the 2” drain pipe. Step 2. Set the shower base in place. The base should be set directly against the wall studs. After base has been set, use a water-resistant wall covering such as green board to establish the wall face. The wall covering is installed over the fiberglass flange of the base to the shower floor thus concealing the fiberglass on all exposed sides.
Step 3. On the outside fiberglass wall, stack three treated two-by-fours. Stacking the two-by-fours builds extra strength for the threshold opening. Use the piece measuring 3/8” x 5” and glue it to the face of the stacked two-by fours. Step 4. The threshold cap is only attached after the walls are finished with either tile or custom wall coverings such as North Coast Cultured Products custom wall panels. Step 5. You are now ready to set your door in place on the threshold cap.
SPECIAL NOTE: If the custom shower base is a neo-angle installation, this process should be repeated three times. Additionally, all threshold pieces will be manufactured with a length 4” longer than the length of the opening. This will allow for miter cuts when fitting the corners together.
CARE INSTRUCTIONS:
All North Coast Cultured Products are covered with a bacteria-resistant gel-coat surface designed for cultured marble, onyx, granite, and engineered stone. Proper care of this gel-coat will yield years of excellent use. Never clean with an abrasive powder or liquid cleanser. Use of abrasives will cause scratching and will eventually dull and destroy the finish. Use of scrub brushes should be avoided for the same reason. We strongly recommend using Formula 409 Stone and Steel Cleaner with either washcloths or sponges. Use of a soft, dry towel after cleaning will help to remove soap spots. To maintain luster and make cleaning easier, periodic applications of paste wax or products like gel gloss may be applied. Mild abrasives such as automotive polishing compound, toothpaste or baking soda, will remove simple scratches and stains. Cigarette burns can normally be removed without noticeable effect. Additional care advice may be obtained by contacting your local North Coast Cultured Products dealer or distributor, or at www.northcoastmarble.com KEEP YOUR NORTH COAST CULTURED PRODUCT IN A CLIMATE-CONTROLLED SPACE AND IN THE ORIGINAL
PACKAGING, LAYING FLAT UNTIL INSTALLED.
Vertical fiberglass
wall
Stack of 2X4’s Shower pan floor

North Coast Cultured Products
SHOWER/TUB SURROUND INSTALLATON
IMPORTANT: Read ALL instructions prior to beginning installation. Follow steps #1 through #10 in the order given. These instructions describe the steps required to install a North Coast Wall Kit properly. However, they also can be used as general guidelines for installing shower panels and panels for custom applications. If a recessed soap dish or shampoo holder is to be installed, you must first locate the back wall studs. Once found, position the location of the soap dish or shampoo holder between them and follow step #8. If existing back wall is masonry, it is recommended that a recessed soap dish or shampoo holder not be in-stalled. 100% silicone caulking is to be used; it must be clear when installing onyx panels. If 100% silicone caulking is not used the product warranty will be void. When cutting any panel, make certain that the panel is lying flat on a solid surface—do not suspend panels unsupported between saw horses. For best results, the paneling should be cut with one of the following: hole saw, fine tooth or tungsten carbide saber saw blade, hacksaw, or abrasive masonry blade for circular, portable, or table saws.
TO PREVENT BOWING OR WARPING, ALWAYS STORE PANELS FLAT WITH EACH PANEL FULLY SUPPORTED. NEVER LEAN THEM AGAINST A WALL.
Step 1. Clean walls, panels, and top of tub thoroughly. Trial-fit the back wall panels by placing outer edges tightly against the end walls. The space between the panels in the middle of the back wall will be covered by closure strip. Outline the panels on the wall with a pencil to guide you in applying the adhesive.
Step 2. When installing marble, granite, or engineered stone products, use a caulking gun and apply adhesive directly to the back wall within penciled guidelines. Run 1/4” to 3/8” beads, from left to right, across top, middle, and bottom, and from top to bottom approximately 6” to 8” apart.
When installing Onyx panels, because of the translucent nature of the material, special steps must be taken to ensure a correct installation. Onyx panels should be adhered to wall board which is neutral in color, to guard against distortion of the Onyx color. Clear mastics, trowel in a uniform manner completely covering the entire wallboard surface, and eliminate “shadow lines” which could appear if beads of adhesive were applied.
Step 3. Install the panels after applying adhesive. Press panels firmly into place and make certain overall contact is obtained with adhesive.
Step 4. Hold back-wall panels firmly into place by screwing two wood braces into back wall through the center space, or by wedging wood braces between end walls tightly against back-wall panels. Leave braces attached for several hours to allow adhesive to set firmly.
Step 5. Placing the edge of one end panel tightly against the back wall panel, mark the location and size of the plumbing supply lines. Make the openings by first drilling small holes and enlarging them to proper size with a saber saw, or by using a 1 1/4” hold saw. Holes should be 1/2” larger than size of plumbing supply line. Cover area to be drilled with masking tape and cut from the finished side to avoid chipping and splintering.

North Coast Cultured Products
Step 6. After holes are cut, repeat steps 2 and 3 for each end panel, adding a bead of adhesive around the plumbing supply lines. Make certain the in-side edges of each end panel are as tight against the back wall panels as possible. Gaps between the end panels and back wall panels of up to 1/2”, due to out-of-square walls, can be covered by inside corner molding. Any gap greater then 1/2” can be reduced by scribing and cutting the end panel to fit the slope of the back wall.
Step 7. To brace the end panels while the adhesive dries, wedge at least three, and preferably more, 1” x 4” or 2” x 4” boards (cut to size) between them. Wrap the board ends with rags or towels to protect the panels. Allow several hours for panels to dry thoroughly, and then remove braces.
Step 8. Where recessed soap dish and/or shampoo holder are to be installed, it is recommended that holes be cut after the panel has been firmly set. This can be accomplished in the same manner as described in steps #5 and #6. Secure the accessories by applying a bead of adhesive around the opening cut in the panel. Masking tape may be used to hold dishes in place until adhe-sive sets.
Step 9. To apply the closure strip and inside corner moldings, run beads of adhesive down the edge of each back panel and in the corners. Press the closure strip and inside corner moldings firmly into place and let dry for several hours. If cap molding is used, install it using the same procedure described above, but do it before installing closure strip and inside corners. Use of cap molding will require shortening the closure strip and inside corners. Masking tape may be used to hold moldings in place until adhesive sets.
Step 10. Caulk all seams and joints with 100% silicone caulking. Rubbing alcohol and tissue paper can be used to clean away excess caulking.
CARE INSTRUCTIONS: All North Coast Cultured Products are covered with a bacteria-resistant gel-coat surface designed for cultured marble, onyx, granite, and engineered stone. Proper care of this gel-coat will yield years of excel-lent use. Never clean with an abrasive powder or liquid cleanser. Use of abrasives will cause scratching and will eventually dull and destroy the finish. Use of scrub brushes should be avoided for the same reason. We strongly recommend using Formula 409 Stone and Steel Cleaner with either washcloths or sponges. Use of a soft, dry towel after cleaning will help to remove soap spots. To maintain luster and make cleaning easier, periodic applications of paste wax or products like gel gloss may be applied. Mild abrasives such as automotive polishing compound, toothpaste or baking soda, will remove simple scratches and stains. Cigarette burns can normally be removed without noticeable effect. Additional care advice may be obtained by contacting your local North Coast Cultured Products dealer or distributor, or at www.northcoastmarble.com
KEEP YOUR NORTH COAST CULTURED PRODUCT IN A CLIMATE-CONTROLLED SPACE AND IN THE ORIGINAL PACKAGING, LAYING FLAT UNTIL INSTALLED.
SHOWER/TUB SURROUND INSTALLATON

North Coast Cultured Products
CORNER SHOWER SEAT INSTALLATION
The following detailed instructions should be read completely before starting the work, and followed in sequence.
NOTE: BEFORE DRILLING HOLES IN WALL STRUCTURE, VERIFY THAT THERE ARE NO WATER PIPES OR ELECTRICAL WIRES CONCEALED
Step 1. Site Preparation: 2” x 8” backing boards are nailed in position between studs. If access can be gained to the rear side the backing boards, plan seat installation using stainless steel bolts and washers. Wall anchors or lag screws may be used in inaccessible situations and steel based hardware will need to be rust- proof.
Step 2. Drill holes through each vertical mounting face of the seat in locations as shown. Hole size will be dependent on choice of mounting hardware. Plan for using rubber washers against the cultured marble to protect the surface.
Step 3. Place the support on top of the shower pan curb and push it into the corner. Locate the seat on top of the support. Wedge as shown for proper fit (if necessary).
16”
18 ¼”
20 ¾”
Step 4. Mark holes to be drilled using pre-drilled holes in seat as guide. Remove seat and drill holes in wall paneling as required. Wipe down wall and seat surfaces with alcohol to remove wax residue. Step 5. Apply 100% silicone sealant to seat mounting surfaces and locate seat as before. Secure the seat with mounting hardware, tightening each bolt in turn. Remove support and apply silicone sealant along junction of seat and walls. Allow 24 hours curing time before actual use.
KEEP YOUR NORTH COAST CULTURED PRODUCT IN A CLIMATE-CONTROLLED SPACE AND IN THE ORIGINAL PACKAGING, LAYING FLAT UNTIL INSTALLED.

North Coast Cultured Products
CORNER CADDY INSTALLATION
Our corner caddy has been designed with an integral hook and separate cast bracket which allows it to be fitted into any 90 degree corner wall configuration, such as in a shower or above a bathtub. Before actual installation, position the accessory to check for a true fit. An “out-of-square” wall condition may be compensated for by grinding the rear surfaces of the casting to achieve a flush fit.
The following instructions detail the correct procedure for obtaining a secure attachment of the hanger bracket and installation of the corner caddy. The instructions should be read completely before starting the work, and followed in sequence. Step 1. Using a 3/16 masonry drill bit, make 2 holes in the center of the mounting bracket. Step 2. Locate the hanger bracket in the wall corner. Use the pre-drilled holes in the bracket as a drill guide, and drill through the wall panels to wood studs. DO NOT DRILL INTO THE WOOD STUDS. Step 3. Remove the hanger bracket and apply 100% silicone adhesive to the back of the hanger. Apply silicone to the screw shafts. Locate the hanger bracket, pressing it into the corner. Insert 2 1/2” x 1/8” wood screws through the bracket holes and into the wall holes. Step 4. Drive the screws firmly into the wall stud. Do not over tighten the screws as this could damage the bracket. Wipe off any excess silicone, ensuring that a waterproof seal is obtained. Make sure that the bracket is firmly attached and does not freely move when vertical or horizontal pressure is applied. Step 5. The caddy can now be mounted on the hanger bracket. Apply a bead of silicone to the back of the caddy, approximately 1” from the edge. Also, apply a small amount of silicone on the top of the hanger bracket where the hanger bracket and the holder meet. Too much silicone will not allow the holder to set to the wall. Step 6. To mount the holder, simply set it on the hanger and press it to the wall. The design of the system will allow the two pieces to grasp each other without effort. Do not put an excessive amount of force on the hanger when the holder is being mounted—it can cause the mounting hanger to become loose or even break. Step 7. Remove any excess silicone squeezed out during installation, making sure that a complete and waterproof seal is obtained. The finished installation should be allowed to cure for several hours before actual use.
KEEP YOUR NORTH COAST CULTURED PRODUCT IN A CLIMATE-CONTROLLED SPACE AND IN THE ORIGINAL PACKAGING, LAYING FLAT UNTIL INSTALLED.