Installation Instructions for Traverse Rod PWDR0021€¦ · Installation Instructions for Traverse...
2
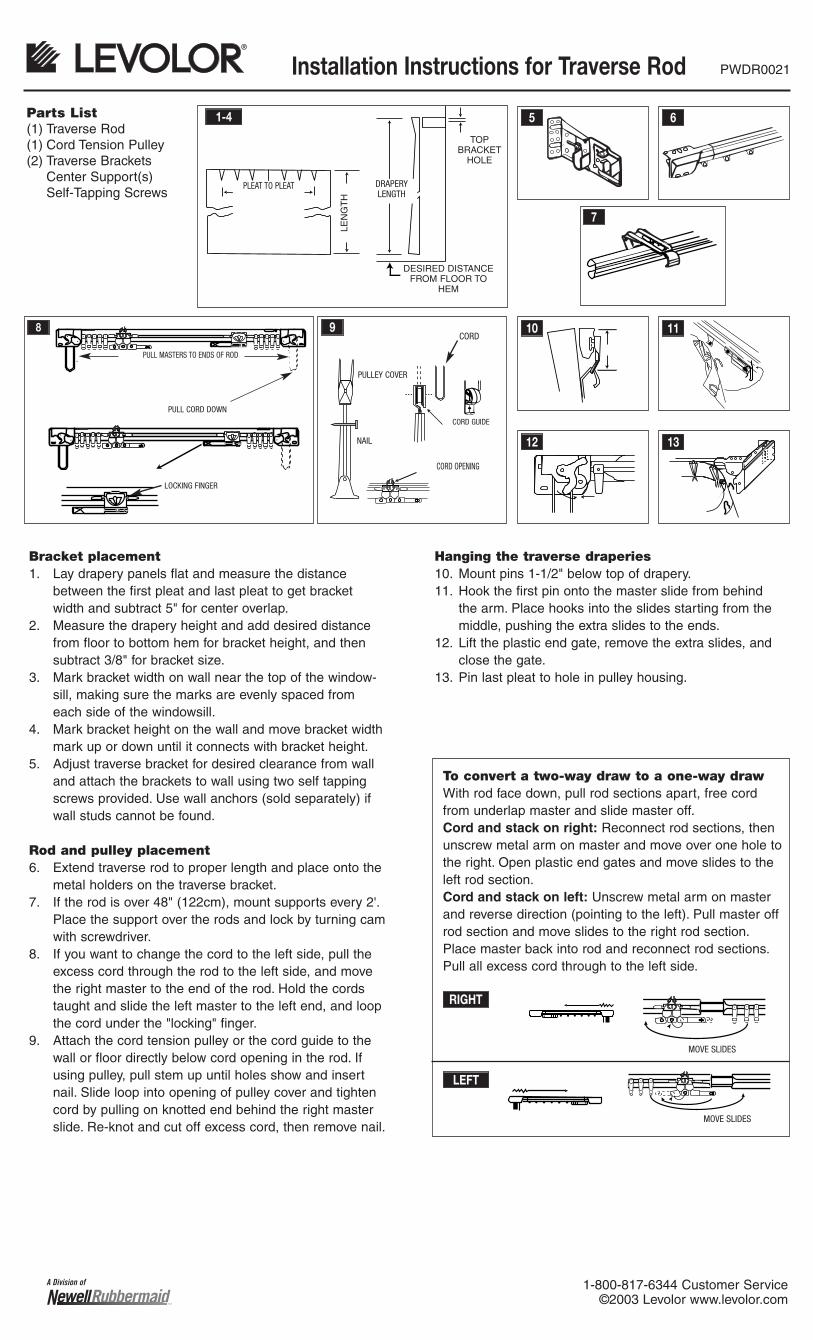
Installation Instructions for Traverse Rod TOP BRACKET HOLE DRAPERY LENGTH PLEAT TO PLEAT DESIRED DISTANCE FROM FLOOR TO HEM LENGTH 1-4 Bracket placement 1. Lay drapery panels flat and measure the distance between the first pleat and last pleat to get bracket width and subtract 5" for center overlap. 2. Measure the drapery height and add desired distance from floor to bottom hem for bracket height, and then subtract 3/8" for bracket size. 3. Mark bracket width on wall near the top of the window- sill, making sure the marks are evenly spaced from each side of the windowsill. 4. Mark bracket height on the wall and move bracket width mark up or down until it connects with bracket height. 5. Adjust traverse bracket for desired clearance from wall and attach the brackets to wall using two self tapping screws provided. Use wall anchors (sold separately) if wall studs cannot be found. Rod and pulley placement 6. Extend traverse rod to proper length and place onto the metal holders on the traverse bracket. 7. If the rod is over 48" (122cm), mount supports every 2'. Place the support over the rods and lock by turning cam with screwdriver. 8. If you want to change the cord to the left side, pull the excess cord through the rod to the left side, and move the right master to the end of the rod. Hold the cords taught and slide the left master to the left end, and loop the cord under the "locking" finger. 9. Attach the cord tension pulley or the cord guide to the wall or floor directly below cord opening in the rod. If using pulley, pull stem up until holes show and insert nail. Slide loop into opening of pulley cover and tighten cord by pulling on knotted end behind the right master slide. Re-knot and cut off excess cord, then remove nail. Hanging the traverse draperies 10. Mount pins 1-1/2" below top of drapery. 11. Hook the first pin onto the master slide from behind the arm. Place hooks into the slides starting from the middle, pushing the extra slides to the ends. 12. Lift the plastic end gate, remove the extra slides, and close the gate. 13. Pin last pleat to hole in pulley housing. 9 NAIL CORD OPENING PULLEY COVER CORD CORD GUIDE MOVE SLIDES MOVE SLIDES RIGHT LEFT To convert a two-way draw to a one-way draw With rod face down, pull rod sections apart, free cord from underlap master and slide master off. Cord and stack on right: Reconnect rod sections, then unscrew metal arm on master and move over one hole to the right. Open plastic end gates and move slides to the left rod section. Cord and stack on left: Unscrew metal arm on master and reverse direction (pointing to the left). Pull master off rod section and move slides to the right rod section. Place master back into rod and reconnect rod sections. Pull all excess cord through to the left side. Parts List (1) Traverse Rod (1) Cord Tension Pulley (2) Traverse Brackets Center Support(s) Self-Tapping Screws 7 LOCKING FINGER PULL MASTERS TO ENDS OF ROD PULL CORD DOWN 8 5 6 10 11 12 13 1-800-817-6344 Customer Service ©2003 Levolor www.levolor.com A Division of PWDR0021
Transcript of Installation Instructions for Traverse Rod PWDR0021€¦ · Installation Instructions for Traverse...
Installation Instructions for Traverse Rod
TOPBRACKET
HOLE
DRAPERYLENGTH
PLEAT TO PLEAT
DESIRED DISTANCEFROM FLOOR TO
HEM
LEN
GT
H
1-4
Bracket placement1. Lay drapery panels flat and measure the distance
between the first pleat and last pleat to get bracketwidth and subtract 5" for center overlap.
2. Measure the drapery height and add desired distancefrom floor to bottom hem for bracket height, and thensubtract 3/8" for bracket size.
3. Mark bracket width on wall near the top of the window-sill, making sure the marks are evenly spaced fromeach side of the windowsill.
4. Mark bracket height on the wall and move bracket widthmark up or down until it connects with bracket height.
5. Adjust traverse bracket for desired clearance from walland attach the brackets to wall using two self tappingscrews provided. Use wall anchors (sold separately) ifwall studs cannot be found.
Rod and pulley placement6. Extend traverse rod to proper length and place onto the
metal holders on the traverse bracket.7. If the rod is over 48" (122cm), mount supports every 2'.
Place the support over the rods and lock by turning camwith screwdriver.
8. If you want to change the cord to the left side, pull theexcess cord through the rod to the left side, and movethe right master to the end of the rod. Hold the cordstaught and slide the left master to the left end, and loopthe cord under the "locking" finger.
9. Attach the cord tension pulley or the cord guide to thewall or floor directly below cord opening in the rod. Ifusing pulley, pull stem up until holes show and insertnail. Slide loop into opening of pulley cover and tightencord by pulling on knotted end behind the right masterslide. Re-knot and cut off excess cord, then remove nail.
Hanging the traverse draperies10. Mount pins 1-1/2" below top of drapery.11. Hook the first pin onto the master slide from behind
the arm. Place hooks into the slides starting from themiddle, pushing the extra slides to the ends.
12. Lift the plastic end gate, remove the extra slides, andclose the gate.
13. Pin last pleat to hole in pulley housing.
9
NAIL
CORD OPENING
PULLEY COVER
CORD
CORD GUIDE
MOVE SLIDES
MOVE SLIDES
RIGHT
LEFT
To convert a two-way draw to a one-way drawWith rod face down, pull rod sections apart, free cordfrom underlap master and slide master off.Cord and stack on right: Reconnect rod sections, thenunscrew metal arm on master and move over one hole to the right. Open plastic end gates and move slides to theleft rod section.Cord and stack on left: Unscrew metal arm on masterand reverse direction (pointing to the left). Pull master offrod section and move slides to the right rod section.Place master back into rod and reconnect rod sections.Pull all excess cord through to the left side.
Parts List(1) Traverse Rod(1) Cord Tension Pulley(2) Traverse Brackets
Center Support(s)Self-Tapping Screws
7
LOCKING FINGER
PULL MASTERS TO ENDS OF ROD
PULL CORD DOWN
8
5 6
10 11
12 13
1-800-817-6344 Customer Service©2003 Levolor www.levolor.com
A Division of
PWDR0021
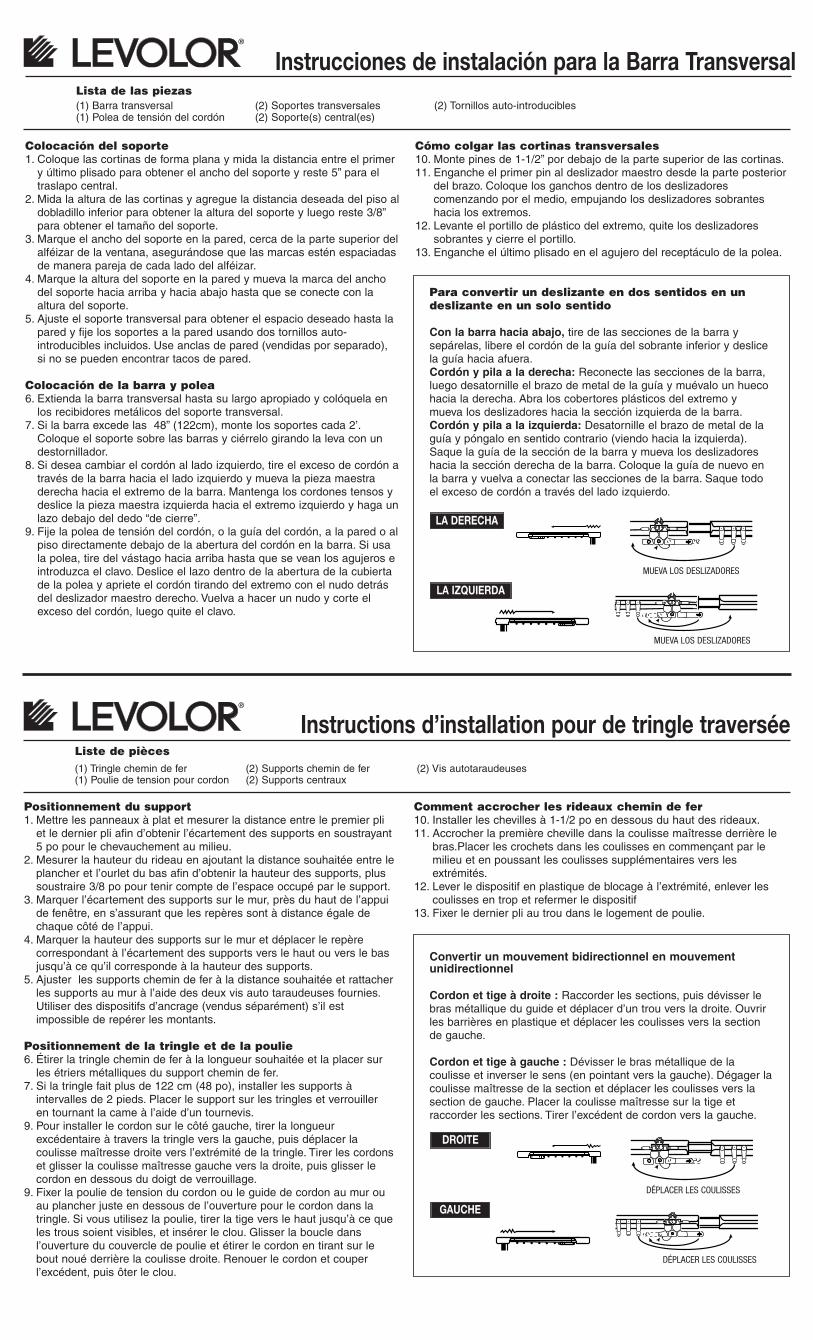
Colocación del soporte1. Coloque las cortinas de forma plana y mida la distancia entre el primer
y último plisado para obtener el ancho del soporte y reste 5” para eltraslapo central.
2. Mida la altura de las cortinas y agregue la distancia deseada del piso aldobladillo inferior para obtener la altura del soporte y luego reste 3/8”para obtener el tamaño del soporte.
3. Marque el ancho del soporte en la pared, cerca de la parte superior delalféizar de la ventana, asegurándose que las marcas estén espaciadasde manera pareja de cada lado del alféizar.
4. Marque la altura del soporte en la pared y mueva la marca del anchodel soporte hacia arriba y hacia abajo hasta que se conecte con laaltura del soporte.
5. Ajuste el soporte transversal para obtener el espacio deseado hasta lapared y fije los soportes a la pared usando dos tornillos auto-introducibles incluidos. Use anclas de pared (vendidas por separado),si no se pueden encontrar tacos de pared.
Colocación de la barra y polea6. Extienda la barra transversal hasta su largo apropiado y colóquela en
los recibidores metálicos del soporte transversal.7. Si la barra excede las 48” (122cm), monte los soportes cada 2’.
Coloque el soporte sobre las barras y ciérrelo girando la leva con undestornillador.
8. Si desea cambiar el cordón al lado izquierdo, tire el exceso de cordón através de la barra hacia el lado izquierdo y mueva la pieza maestraderecha hacia el extremo de la barra. Mantenga los cordones tensos ydeslice la pieza maestra izquierda hacia el extremo izquierdo y haga unlazo debajo del dedo “de cierre”.
9. Fije la polea de tensión del cordón, o la guía del cordón, a la pared o alpiso directamente debajo de la abertura del cordón en la barra. Si usala polea, tire del vástago hacia arriba hasta que se vean los agujeros eintroduzca el clavo. Deslice el lazo dentro de la abertura de la cubiertade la polea y apriete el cordón tirando del extremo con el nudo detrásdel deslizador maestro derecho. Vuelva a hacer un nudo y corte elexceso del cordón, luego quite el clavo.
Cómo colgar las cortinas transversales10. Monte pines de 1-1/2” por debajo de la parte superior de las cortinas.11. Enganche el primer pin al deslizador maestro desde la parte posterior
del brazo. Coloque los ganchos dentro de los deslizadorescomenzando por el medio, empujando los deslizadores sobranteshacia los extremos.
12. Levante el portillo de plástico del extremo, quite los deslizadoressobrantes y cierre el portillo.
13. Enganche el último plisado en el agujero del receptáculo de la polea.
Instrucciones de instalación para la Barra Transversal
(1) Barra transversal(1) Polea de tensión del cordón
(2) Soportes transversales(2) Soporte(s) central(es)
(2) Tornillos auto-introduciblesLista de las piezas
Positionnement du support 1. Mettre les panneaux à plat et mesurer la distance entre le premier pli
et le dernier pli afin d’obtenir l’écartement des supports en soustrayant5 po pour le chevauchement au milieu.
2. Mesurer la hauteur du rideau en ajoutant la distance souhaitée entre leplancher et l’ourlet du bas afin d’obtenir la hauteur des supports, plussoustraire 3/8 po pour tenir compte de l’espace occupé par le support.
3. Marquer l’écartement des supports sur le mur, près du haut de l’appuide fenêtre, en s’assurant que les repères sont à distance égale dechaque côté de l’appui.
4. Marquer la hauteur des supports sur le mur et déplacer le repèrecorrespondant à l’écartement des supports vers le haut ou vers le basjusqu’à ce qu’il corresponde à la hauteur des supports.
5. Ajuster les supports chemin de fer à la distance souhaitée et rattacherles supports au mur à l’aide des deux vis auto taraudeuses fournies.Utiliser des dispositifs d’ancrage (vendus séparément) s’il estimpossible de repérer les montants.
Positionnement de la tringle et de la poulie6. Étirer la tringle chemin de fer à la longueur souhaitée et la placer sur
les étriers métalliques du support chemin de fer.7. Si la tringle fait plus de 122 cm (48 po), installer les supports à
intervalles de 2 pieds. Placer le support sur les tringles et verrouilleren tournant la came à l’aide d’un tournevis.
9. Pour installer le cordon sur le côté gauche, tirer la longueurexcédentaire à travers la tringle vers la gauche, puis déplacer lacoulisse maîtresse droite vers l’extrémité de la tringle. Tirer les cordonset glisser la coulisse maîtresse gauche vers la droite, puis glisser lecordon en dessous du doigt de verrouillage.
9. Fixer la poulie de tension du cordon ou le guide de cordon au mur ouau plancher juste en dessous de l’ouverture pour le cordon dans latringle. Si vous utilisez la poulie, tirer la tige vers le haut jusqu’à ce queles trous soient visibles, et insérer le clou. Glisser la boucle dansl’ouverture du couvercle de poulie et étirer le cordon en tirant sur lebout noué derrière la coulisse droite. Renouer le cordon et couperl’excédent, puis ôter le clou.
Comment accrocher les rideaux chemin de fer10. Installer les chevilles à 1-1/2 po en dessous du haut des rideaux.11. Accrocher la première cheville dans la coulisse maîtresse derrière le
bras.Placer les crochets dans les coulisses en commençant par lemilieu et en poussant les coulisses supplémentaires vers lesextrémités.
12. Lever le dispositif en plastique de blocage à l’extrémité, enlever lescoulisses en trop et refermer le dispositif
13. Fixer le dernier pli au trou dans le logement de poulie.
Instructions d’installation pour de tringle traversée
(1) Tringle chemin de fer(1) Poulie de tension pour cordon
(2) Supports chemin de fer (2) Supports centraux
(2) Vis autotaraudeuses
Liste de pièces
Para convertir un deslizante en dos sentidos en undeslizante en un solo sentido
Con la barra hacia abajo, tire de las secciones de la barra ysepárelas, libere el cordón de la guía del sobrante inferior y deslicela guía hacia afuera.Cordón y pila a la derecha: Reconecte las secciones de la barra,luego desatornille el brazo de metal de la guía y muévalo un huecohacia la derecha. Abra los cobertores plásticos del extremo ymueva los deslizadores hacia la sección izquierda de la barra.Cordón y pila a la izquierda: Desatornille el brazo de metal de laguía y póngalo en sentido contrario (viendo hacia la izquierda).Saque la guía de la sección de la barra y mueva los deslizadoreshacia la sección derecha de la barra. Coloque la guía de nuevo enla barra y vuelva a conectar las secciones de la barra. Saque todoel exceso de cordón a través del lado izquierdo.
Convertir un mouvement bidirectionnel en mouvementunidirectionnel
Cordon et tige à droite : Raccorder les sections, puis dévisser lebras métallique du guide et déplacer d’un trou vers la droite. Ouvrirles barrières en plastique et déplacer les coulisses vers la sectionde gauche.
Cordon et tige à gauche : Dévisser le bras métallique de lacoulisse et inverser le sens (en pointant vers la gauche). Dégager lacoulisse maîtresse de la section et déplacer les coulisses vers lasection de gauche. Placer la coulisse maîtresse sur la tige etraccorder les sections. Tirer l’excédent de cordon vers la gauche.
MUEVA LOS DESLIZADORES
MUEVA LOS DESLIZADORES
LA DERECHA
LA IZQUIERDA
DÉPLACER LES COULISSES
DÉPLACER LES COULISSES
DROITE
GAUCHE