Installation Instructions for Product in2digi D JV 2 ... · Run the wire down metal pillar and...
14
Step 1 The antenna should be installed as per the manufacturer’s instructions. Remember that it needs to be a few cm away from the metal pillar (or any metal). remember to clean the inside of the windscreen or dirt will be visible after installation. If the antenna has a ground connection, please make sure it connects between the antenna and the metal work. Do not scrape the paint of the metal- work, just stick it to the body. Installation Instructions for in2digi D-JV-2 Series Digital Radio Step 3 Install the DAB unit on to the metal sur- face if possible. It is needs to be close to a good earth point. It is recommended that the select- ed power supply to the module is separately fused at 5A with an in- line fuse (not supplied) and the initial feed point is connected to a vehicle fused line and one that is disabled when then the vehicle infotainment system powers down. Appropriate power connection may be able to be derived from nearby audio system modules if adjacent to the DAB module fit- ment placing. Step 5 Add the unit to fibre optic loop using the joiners as ap- propriate - look into the connector to see the “in” and “out” of the one unit going to “input” of next unit Step 2 Run the wire down metal pillar and connect the antenna to DAB module. All spare cable should be curled up and stuck down to something metal for shielding away from other cables if possible. You must route the cable so it does not obstruct any airbag deployment, and the spare cable should be arranged in a large loop and stuck down to metal if possible Step 4 Ensure the black wire coming from the case of the DAB unit is connected to a very good ground without extending f possible. Product Information NOTE: Antenna placement, cabling and earthing is critical in any DAB installation. Please ensure you have careful- ly read this installation note Step 7 Make sure the head unit is coded correctly for MOST components—see Appendix 1. Remember DAB reception is weather and location dependent. The unit may need software and configura- tion update, although it probably has the latest or one before firmware on it, which should work DAB Unit In2digi D-JLR series Rest of the MOST network MOST Head Unit
Transcript of Installation Instructions for Product in2digi D JV 2 ... · Run the wire down metal pillar and...

Step 1
The antenna should be installed as per
the manufacturer’s instructions. Remember that it
needs to be a few cm away from the metal pillar (or
any metal). remember to clean the inside of the
windscreen or dirt will be visible after installation.
If the antenna has a ground connection, please
make sure it connects between the antenna and the
metal work. Do not scrape the paint of the metal-
work, just stick it to the body.
I n s t a l l a t i o n I n s t r u c t i o n s f o r i n 2 d i g i D - J V - 2 S e r i e s D i g i t a l R a d i o
Step 3
Install the DAB unit on to the metal sur-
face if possible. It is needs to be close to a
good earth point.
It is recommended that the select-
ed power supply to the module is
separately fused at 5A with an in-
line fuse (not supplied) and the
initial feed point is connected to a
vehicle fused line and one that is
disabled when then the vehicle
infotainment system powers down.
Appropriate power connection
may be able to be derived from
nearby audio system modules if
adjacent to the DAB module fit-
ment placing.
Step 5
Add the unit to fibre optic loop using the joiners as ap-
propriate - look into the connector to see the “in” and
“out” of the one unit going to “input” of next unit
Step 2
Run the wire down metal pillar and connect the
antenna to DAB module. All spare cable should
be curled up and stuck down to something metal
for shielding away from other cables if possible.
You must route the cable so it does not obstruct
any airbag deployment, and the spare cable
should be arranged in a large loop and stuck
down to metal if possible
Step 4
Ensure the black wire coming from the case of the
DAB unit is connected to a very good ground without
extending f possible.
P r o d u c t I n f o r m a t i o n
NOTE:
Antenna placement, cabling and earthing is critical in
any DAB installation. Please ensure you have careful-
ly read this installation note
Step 7
Make sure the head unit is coded correctly for MOST
components—see Appendix 1.
Remember DAB reception is weather and location
dependent. The unit may need software and configura-
tion update, although it probably has the latest or one
before firmware on it, which should work
DAB Unit
In2digi D-JLR series
Rest of the
MOST network
MOST
Head
Unit

I n s t a l l a t i o n o f i n 2 d i g i D - J V - 2 S e r i e s U n i t a n d a n t e n n a w i t h i n R a n g e R o v e r M o d e l Y e a r ( 2 0 1 0 t o 2 0 1 2 )
P r o d u c t I n f o r m a t i o n
NOTE:
Antenna placement, cabling and earthing is critical in any DAB installation. Please ensure you have carefully read this in-
stallation note
Location of DAB unit and antenna within the
Range Rover Vehicle

I n s t a l l a t i o n o f i n 2 d i g i D - J V - 2 S e r i e s a n d a n t e n n a w i t h i n R a n g e R o v e r S p o r t
P r o d u c t I n f o r m a t i o n
NOTE:
Antenna placement, cabling and earthling is critical in any DAB installation. Please ensure you have carefully read this
installation note
DAB UNIT
Location of DAB unit and antenna within the
Range Rover Sport vehicle

I n s t a l l a t i o n o f i n 2 d i g i D - J V - 2 a n d a n t e n n a w i t h i n L a n d R o v e r D i s c o v e r y M o d e l Y e a r ( 2 0 1 0 t o 2 0 1 2 )
P r o d u c t I n f o r m a t i o n
NOTE:
Antenna placement, cabling and earthling is critical in any DAB installation. Please ensure you have carefully read this
installation note
DAB UNIT
Location of DAB unit and antenna within the
Land Rover Discovery vehicle

I n s t a l l a t i o n o f i n 2 d i g i D - J V - 2 a n d a n t e n n a w i t h i n L a n d R o v e r F r e e l a n d e r 2 M o d e l Y e a r ( 2 0 1 0 t o 2 0 1 2 )
P r o d u c t I n f o r m a t i o n
NOTE:
Antenna placement, cabling and earthling is critical in any DAB installation. Please ensure you have carefully read this
installation note
DAB UNIT
Location of DAB unit and antenna within the
Land Rover Freelander 2 Vehicle

I n s t a l l a t i o n o f i n 2 d i g i D - J V - 2 a n d a n t e n n a w i t h i n L a n d R o v e r F r e e l a n d e r 2 M o d e l Y e a r ( 2 0 1 3 t o 2 0 1 5 )
P r o d u c t I n f o r m a t i o n
NOTE:
Antenna placement, cabling and earthling is critical in any DAB installation. Please ensure you have carefully read this
installation note
DAB UNIT
Location of DAB unit and antenna within the
Land Rover Freelander 2 Vehicle

I n s t a l l a t i o n o f i n 2 d i g i D - J V - 2 a n d a n t e n n a w i t h i n L a n d R a n g e R o v e r E v o q u e M o d e l Y e a r ( 2 0 1 2 t o 2 0 1 5 )
P r o d u c t I n f o r m a t i o n
NOTE:
Antenna placement, cabling and earthling is critical in any DAB installation. Please ensure you have carefully read this
installation note
Location of DAB unit and antenna within the
Range Rover Evoque Vehicle

I n s t a l l a t i o n o f i n 2 d i g i D - J V - 2 a n d a n t e n n a w i t h i n J a g u a r X F M o d e l Y e a r ( 2 0 0 8 t o 2 0 1 1 )
P r o d u c t I n f o r m a t i o n
NOTE:
Antenna placement, cabling and earthling is critical in any DAB installation. Please ensure you have carefully read this
installation note
DAB UNIT
Location of DAB unit and antenna within the
Jaguar XF Vehicle

I n s t a l l a t i o n o f i n 2 d i g i D - J V - 2 a n d a n t e n n a w i t h i n J a g u a r X F M o d e l Y e a r ( 2 0 1 2 t o 2 0 1 5 )
P r o d u c t I n f o r m a t i o n
NOTE:
Antenna placement, cabling and earthling is critical in any DAB installation. Please ensure you have carefully read this
installation note
DAB UNIT
Location of DAB unit and antenna within the
Jaguar XF Vehicle
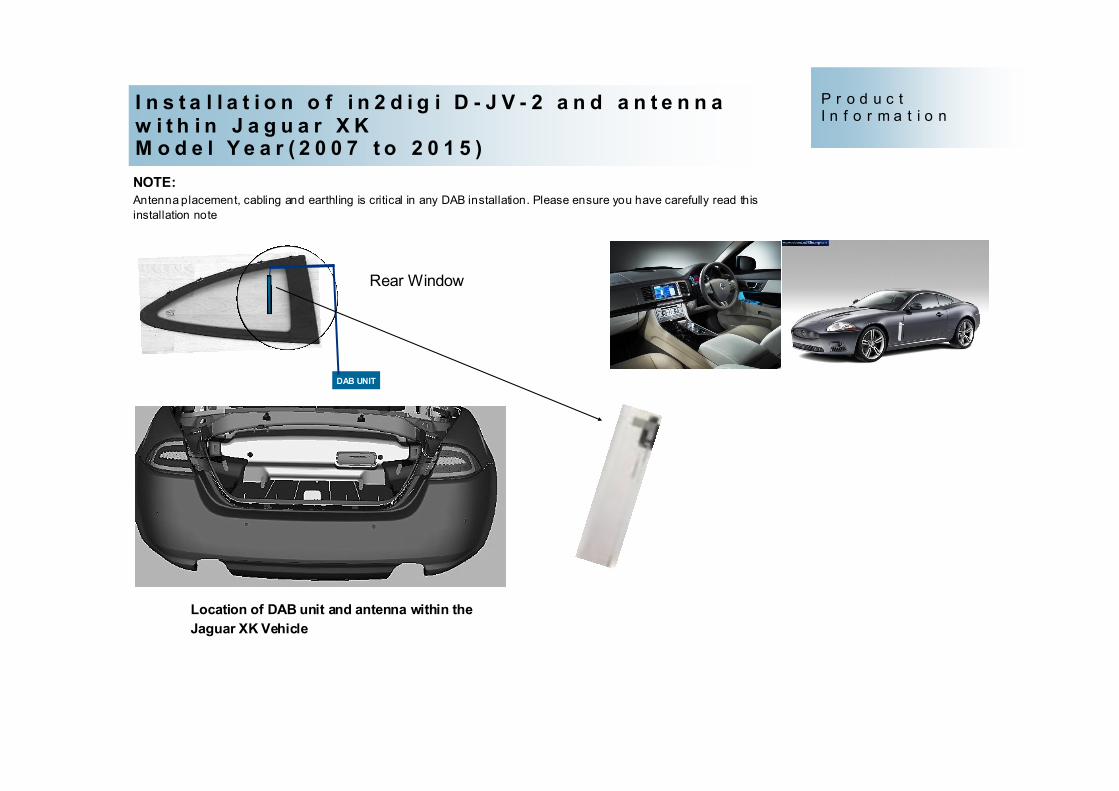
I n s t a l l a t i o n o f i n 2 d i g i D - J V - 2 a n d a n t e n n a w i t h i n J a g u a r X K M o d e l Y e a r ( 2 0 0 7 t o 2 0 1 5 )
P r o d u c t I n f o r m a t i o n
NOTE:
Antenna placement, cabling and earthling is critical in any DAB installation. Please ensure you have carefully read this
installation note
DAB UNIT
Location of DAB unit and antenna within the
Jaguar XK Vehicle
Rear Window

I n s t a l l a t i o n o f i n 2 d i g i D - J V - 2 a n d a n t e n n a w i t h i n J a g u a r X J M o d e l Y e a r ( 2 0 1 0 t o 2 0 1 5 )
P r o d u c t I n f o r m a t i o n
NOTE:
Antenna placement, cabling and earthling is critical in any DAB installation. Please ensure you have carefully read this
installation note
DAB UNIT
Location of DAB unit and antenna within the
Jaguar XJ Vehicle

i n 2 d i g i D - J V - 2 S e r i e s D i g i t a l R a d i o
USB Host Interface
DAB Antenna connector
JLR recently introduced a new SDD application to allow
the installation of the In2Digi DAB+ module.
“Add/Remove Digital Broadcasting (DAB) Accessory”
The ‘in2digi D-JLR series’ module is now available as an
optional fit accessory in Europe, Korea and Australia.
MOST 2 FO Connector
Power
Appendix 1: Instructions for Jaguar Land Rover service tool to enable in2digi DAB

i n 2 d i g i D - J V - 2 S e r i e s D i g i t a l R a d i o
Upgrading Software and Configuration : Installing new configu-
ration file and firmware can be done from website: www.in2digi.com/
support/ .Checking that the PC doesn’t change the filename of the
software update file.
Upgrading Software:
To upgrade the digital radio module D-MB-1 with new software, this is
done by inserting USB stick with to the USB port of the module contain-
ing the file “DAB_UPDA.BIN” on the USB stick when the digital radio
module is powered off.
After inserting the USB stick in the module, power on the HU and the
check that the USB stick is being read (e.g. flashing light on USB stick
for short time). This process will last less than 20 seconds. Once the led
on USB stick has stopped flashing power off the HU.
To check that the new software has been flashed into the digital radio
the files name on the USB stick will change to “DAB_UPDA.YES”. This
indicates that the software update process was successful.
Upgrading Configuration:
If a new configuration file is needed to update some internal parameters
a configuration file called “CFG_UPDA.CFG” will need to be uploaded.
Follow same instructions as with firmware update.
To check that the new configuration has been flashed into the digital ra-
dio the files name on the USB stick will change to “CFG_UPDA.YES”.
This indicates that the configuration process was successful.
USB Host Interface
DAB Antenna connector
Appendix 2:Upgrading Software for in2digi D-JV-2 Series digital Radio