Installation Guide Supplement - Forcepoint Websense Installation Guide Supplement for Integrated...
34
Installation Guide Supplement for use with Integrated Cisco Products v7.1 Websense ® Web Security Websense Web Filter
Transcript of Installation Guide Supplement - Forcepoint Websense Installation Guide Supplement for Integrated...

Instal lation Guide Supplementfor use wi th
Integrated Cisco Products
v7.1
Websense® Web Secur i tyWebsense Web Fi l ter

©1996–2009, Websense Inc.All rights reserved.10240 Sorrento Valley Rd., San Diego, CA 92121, USAPublished 2009Printed in the United States of America and Ireland.The products and/or methods of use described in this document are covered by U.S. Patent Numbers 5,983,270; 6,606,659; 6,947,985; 7,185,015; 7,194,464 and RE40,187 and other patents pending.This document may not, in whole or in part, be copied, photocopied, reproduced, translated, or reduced to any electronic medium or machine-readable form without prior consent in writing from Websense Inc.Every effort has been made to ensure the accuracy of this manual. However, Websense Inc., makes no warranties with respect to this documentation and disclaims any implied warranties of merchantability and fitness for a particular purpose. Websense Inc. shall not be liable for any error or for incidental or consequential damages in connection with the furnishing, performance, or use of this manual or the examples herein. The information in this documentation is subject to change without notice.
TrademarksWebsense is a registered trademark of Websense, Inc., in the United States and certain international markets. Websense has numerous other unregistered trademarks in the United States and internationally. All other trademarks are the property of their respective owners.Microsoft, Windows, Windows NT, Windows Server, Windows Vista and Active Directory are either registered trademarks or trademarks of Microsoft Corporation in the United States and/or other countries.Sun, Sun Java System, and all Sun Java System based trademarks and logos are trademarks or registered trademarks of Sun Microsystems, Inc., in the United States and other countries.Novell Directory Services is a registered trademark of, and eDirectory is a trademark of, Novell, Inc., in the United States and other countries.Adobe, Acrobat, and Acrobat Reader are either registered trademarks or trademarks of Adobe Systems Incorporated in the United States and/or other countries.Pentium is a registered trademark of Intel Corporation.Red Hat is a registered trademark of Red Hat, Inc., in the United States and other countries. Linux is a trademark of Linus Torvalds, in the United States and other countries.This product includes software distributed by the Apache Software Foundation (http://www.apache.org).Copyright (c) 2000 The Apache Software Foundation. All rights reserved.Other product names mentioned in this manual may be trademarks or registered trademarks of their respective companies and are the sole property of their respective manufacturers.WinPcapCopyright (c) 1999 - 2005 NetGroup, Politecnico di Torino (Italy).Copyright (c) 2005 - 2009 CACE Technologies, Davis (California).All rights reserved.Redistribution and use in source and binary forms, with or without modification, are permitted provided that the following conditions are met:• Redistributions of source code must retain the above copyright notice, this list of conditions and the following disclaimer.• Redistributions in binary form must reproduce the above copyright notice, this list of conditions and the following disclaimer in the
documentation and/or other materials provided with the distribution.• Neither the name of the Politecnico di Torino, CACE Technologies nor the names of its contributors may be used to endorse or promote
products derived from this software without specific prior written permission.THIS SOFTWARE IS PROVIDED BY THE COPYRIGHT HOLDERS AND CONTRIBUTORS "AS IS" AND ANY EXPRESS OR IMPLIED WARRANTIES, INCLUDING, BUT NOT LIMITED TO, THE IMPLIED WARRANTIES OF MERCHANTABILITY AND FITNESS FOR A PARTICULAR PURPOSE ARE DISCLAIMED. IN NO EVENT SHALL THE COPYRIGHT OWNER OR CONTRIBUTORS BE LIABLE FOR ANY DIRECT, INDIRECT, INCIDENTAL, SPECIAL, EXEMPLARY, OR CONSEQUENTIAL DAMAGES (INCLUDING, BUT NOT LIMITED TO, PROCUREMENT OF SUBSTITUTE GOODS OR SERVICES; LOSS OF USE, DATA, OR PROFITS; OR BUSINESS INTERRUPTION) HOWEVER CAUSED AND ON ANY THEORY OF LIABILITY, WHETHER IN CONTRACT, STRICT LIABILITY, OR TORT (INCLUDING NEGLIGENCE OR OTHERWISE) ARISING IN ANY WAY OUT OF THE USE OF THIS SOFTWARE, EVEN IF ADVISED OF THE POSSIBILITY OF SUCH DAMAGE.

Contents
Chapter 1 Cisco Integration . . . . . . . . . . . . . . . . . . . . . . . . . . . . . . . . . . . . . . . . . . 5
How Websense filtering works with Cisco products . . . . . . . . . . . . . . . . 5Supported Cisco integration product versions . . . . . . . . . . . . . . . . . . . . . 6Command conventions . . . . . . . . . . . . . . . . . . . . . . . . . . . . . . . . . . . . . . . 6Installation . . . . . . . . . . . . . . . . . . . . . . . . . . . . . . . . . . . . . . . . . . . . . . . . 6Migrating between integrations after installation. . . . . . . . . . . . . . . . . . . 7
Chapter 2 Configuring a Cisco Security Appliance . . . . . . . . . . . . . . . . . . . . . . . 9
Configuration procedure. . . . . . . . . . . . . . . . . . . . . . . . . . . . . . . . . . . . . . 9Parameters for the filter commands . . . . . . . . . . . . . . . . . . . . . . . . . 16
Cisco Secure ACS authentication. . . . . . . . . . . . . . . . . . . . . . . . . . . . . . 17Chapter 3 Configuring a Cisco IOS Router . . . . . . . . . . . . . . . . . . . . . . . . . . . . . 19
Startup configuration . . . . . . . . . . . . . . . . . . . . . . . . . . . . . . . . . . . . . . . 19Configuration commands . . . . . . . . . . . . . . . . . . . . . . . . . . . . . . . . . . . . 21Executable commands . . . . . . . . . . . . . . . . . . . . . . . . . . . . . . . . . . . . . . 24
Chapter 4 Configuring a Cisco Content Engine . . . . . . . . . . . . . . . . . . . . . . . . . 27
Cisco Web-based interface . . . . . . . . . . . . . . . . . . . . . . . . . . . . . . . . . . . 27Console or telnet session . . . . . . . . . . . . . . . . . . . . . . . . . . . . . . . . . . . . 28Configuring firewalls or routers . . . . . . . . . . . . . . . . . . . . . . . . . . . . . . . 29Browser access to the Internet . . . . . . . . . . . . . . . . . . . . . . . . . . . . . . . . 30Clusters . . . . . . . . . . . . . . . . . . . . . . . . . . . . . . . . . . . . . . . . . . . . . . . . . . 30
Appendix A Troubleshooting . . . . . . . . . . . . . . . . . . . . . . . . . . . . . . . . . . . . . . . . . . 31
Index . . . . . . . . . . . . . . . . . . . . . . . . . . . . . . . . . . . . . . . . . . . . . . . . . . . . . . . . . . . . . . . . . 33
Websense Installation Guide Supplement for Integrated Cisco Products 3

Contents
4 Websense Web Security and Websense Web Filter

1
Cisco IntegrationThis supplement to the Websense Web Security and Websense Web Filter Installation Guide provides information specific to integrating Websense software with Cisco® Adaptive Security Appliance (ASA), Cisco PIX® Firewall, Cisco IOS routers, and Cisco Content Engine. For general installation instructions, refer to the Installation Guide.
Integrating Websense software with a Cisco product involves the following components:
Filtering Service: The integrated Cisco product and Network Agent work with Filtering Service to filter Internet requests.Network Agent: Manages Internet protocols that are not managed by your integrated Cisco product. If Network Agent is installed, you must define the IP addresses of all proxy servers through which computers route their Internet requests. See Network Configuration in the Websense Manager Help for instructions.Configure your Cisco integration: You must direct Internet requests through your Cisco integration product, and configure it for use with Websense software.
Chapter 2: Configuring a Cisco Security Appliance discusses Cisco PIX Firewall and Adaptive Security Appliance (ASA)Chapter 3: Configuring a Cisco IOS Router discusses Cisco IOS router.Chapter 4: Configuring a Cisco Content Engine discusses Cisco Content Engine.
User authentication: To work properly, Filtering Service must be installed in the same domain (Windows), or the same root context (LDAP), as Cisco Secure ACS. If you are using DC Agent and manual authentication, this configuration is not necessary.
How Websense filtering works with Cisco products
To be filtered by Websense software, a client's Internet requests must pass through the Cisco product.
If Websense software is integrated with a Cisco PIX Firewall or ASA, browser requests must go through the PIX Firewall or ASA to reach the Internet.
Websense Installation Guide Supplement for Integrated Cisco Products 5

Cisco Integration
If Websense software is integrated with a Cisco Content Engine, client browsers must be set for proxy-based connections.
When it receives an Internet request, the Cisco product queries Filtering Service to find out if the requested site should be blocked or permitted. Filtering Service consults the policy assigned to the user. Each policy designates specific time periods and lists the category filters that are applied during those periods.
After Filtering Service determines which categories are blocked for that client, it checks the Websense Master Database.
If the site is assigned to a blocked category, the user receives a block page instead of the requested site.If the site is assigned to a permitted category, Filtering Service notifies the Cisco product that the site is not blocked, and the client is allowed to see the site.
Supported Cisco integration product versions
Websense software is compatible with the following versions of Cisco products:
Cisco PIX Firewall Software v5.3 and higherCisco ASA Software v7.0 and higherCisco Content Engine ACNS versions 5.4, 5.5 and 5.6Cisco routers with Cisco IOS Software Release 12.3 and higher
Command conventions
The following conventions are used for commands in this document:
Boldface indicates commands and keywords that are entered as shown.Angle brackets (< >) containing text in italics indicate variables that must be replaced by a value in the command.Square brackets ([ ]) indicate an optional element or value.Braces ({ }) indicate a required choice.A forward slash (/) separates each value within curly braces.Vertical bars ( | ) separate alternative, mutually exclusive elements
Installation
Refer to the Installation Guide for complete instructions on downloading and running the installer program.
6 Websense Web Security and Websense Web Filter

Cisco Integration
After launching the installer:
Select Integrated in the Integration Options window. A list of integrations is displayed.Select either Cisco Adaptive Security Appliances, Cisco Content Engine, Cisco PIX Firewall, or Cisco Routers, as appropriate for your environment, and then click Next.When prompted to select an agent for Transparent User Identification, select None if you plan to configure user authentication through your Cisco product.Follow the onscreen prompts and the instructions in the Installation Guide to finish installing Websense software.
Upgrade
If Websense software is integrated with a Cisco security appliance (PIX Firewall or ASA), the following configuration updates are recommended:
Increase the size of the security appliance’s internal buffer to handle long URL strings.Set the URL response block buffer to prevent the Web server replies from being dropped in high traffic situations.If you are upgrading your Websense system and changing your integration product, see Migrating between integrations after installation, page 7.
Migrating between integrations after installation
You can change the Cisco integration product (for example, change from a PIX Firewall to an IOS router) after installing Websense software without losing any configuration data.
1. Install and configure your new Cisco integration product. See your Cisco documentation for instructions.Ensure that it is deployed so that it can communicate with Filtering Service and Policy Server.
2. Use the Websense Backup Utility to back up the Websense configuration and initialization files. See the Websense Manager Help for instructions
3. Close all applications on the Filtering Service machine, and stop any anti-virus software.
Websense Installation Guide Supplement for Integrated Cisco Products 7
Cisco Integration
4. Remove Filtering Service. Instructions for removing components are available in the Installation Guide.
5. Restart the machine (Windows only).6. Use the Websense installer to reinstall Filtering Service. Procedures for adding
individual components can be found in the Installation Guide.7. When prompted to select an integration, select the new Cisco product, and then
follow the onscreen instructions to complete the installation.The installer adds the new integration data to the Websense software configuration file, while preserving existing configuration data.
8. Restart the machine (Windows only).9. Check to be sure that the Filtering Service has started.
Windows: Use the Services dialog box to verify that Websense Filtering Service is started.Linux: Navigate to the Websense installation directory (/opt/Websense, by default), and run the following command to verify that Websense Filtering Service is running:
./WebsenseAdmin status
For instructions on starting Websense services, see the Installation Guide.10. Open Websense Manager to identify which Filtering Service instance is
associated with each Network Agent.a. Open the Settings tab.b. Go to Settings > Network Agent and click the appropriate IP address in the
navigation pane to open the Local Settings page.c. Under Filtering Service Definition, select the IP address for the machine
running Filtering Service. During the migration, the setting may have been reset to None.
d. Log out of Websense Manager.For more information, see the discussion of configuring local settings in the Network Configuration section of Websense Manager Help.
11. If you stopped your anti-virus software, be sure to start it again.
WarningRemove Filtering Service only. Do not remove the Policy Server.
8 Websense Web Security and Websense Web Filter
2
Configuring a Cisco Security ApplianceAfter Websense software is installed, the Cisco security appliance, PIX firewall, or Adaptive Security Appliance (ASA) must be configured to work with Websense software. The Cisco firewall passes each Internet request to Filtering Service, which analyzes the request and determines whether to block or permit access, or limit access by using quotas set in Websense policies.
See the Websense Manager Help for information about implementing filtering policies.
This chapter contains instructions for configuring the Websense integration with Cisco PIX Firewall or Adaptive Security Appliance (ASA) through a console or telnet session. For information on configuring your security appliance through the management interface, see the documentation for your Cisco product, available at www.cisco.com.
Configuration procedure
To configure your security appliance to send Internet requests to Websense software for filtering:
1. Access the security appliance from a console, or from a remote terminal using telnet for access
2. Enter your password.3. Enter enable, followed by the enable password to put the security appliance into
Privilege EXEC mode.
NoteBoth the Cisco PIX Firewall and ASA are referred to as the security appliance in this chapter.
Websense Installation Guide Supplement for Integrated Cisco Products 9
Configuring a Cisco Security Appliance
4. Enter configure terminal to activate configure mode.
5. Use the url-server command to enable URL filtering by Websense software.url-server (<if_name>) host <ip_address> [timeout <seconds>] [protocol {TCP | UDP} version {1 | 4} [connections <num_conns>]]
The url-server command takes the following parameters:
NoteFor help with individual commands, enter help followed by the command. For example, help filter shows the complete syntax for the filter command and explains each option.
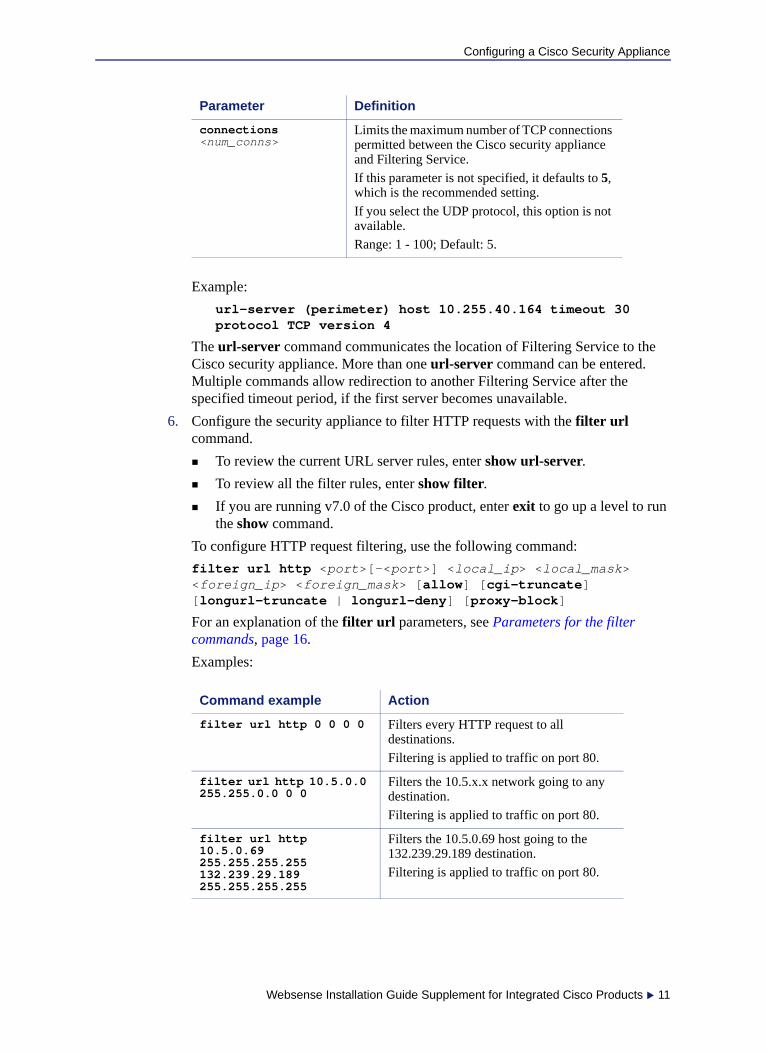
Parameter Definition
(<if_name>) The network interface where Websense Filtering Service resides. In v7.0 of the Cisco security appliance software, a value for this parameter must be entered. In v6.3.1 and earlier, <if_name> defaults to inside if not specified. You must type the parentheses ( ) when you enter a value for this parameter.
<ip_address> IP address of the machine running Filtering Service.
timeout <seconds> The amount of time, in seconds, that the security appliance waits for a response before switching to the next Filtering Service that you defined as a url-server, or, if specified, going into allow mode and permitting all requests.If a timeout interval is not specified, this parameter defaults to 30 seconds in v7.0(1) and later, and 5 seconds in earlier versions of the Cisco PIX or ASA software.
v7.0(1) and later: Range: 10 - 120; Default: 30v6.3: Range: 1 - 30; Default: 5
protocol {TCP | UDP} version {1 | 4}
Defines whether the Cisco security appliance should use TCP or UDP protocol to communicate with Filtering Service, and which version of the protocol to use. TCP is the recommended and default setting.The recommended protocol version is 4. The default is 1.
10 Websense Web Security and Websense Web Filter
Configuring a Cisco Security Appliance
Example:url-server (perimeter) host 10.255.40.164 timeout 30 protocol TCP version 4
The url-server command communicates the location of Filtering Service to the Cisco security appliance. More than one url-server command can be entered. Multiple commands allow redirection to another Filtering Service after the specified timeout period, if the first server becomes unavailable.
6. Configure the security appliance to filter HTTP requests with the filter url command.
To review the current URL server rules, enter show url-server.To review all the filter rules, enter show filter.If you are running v7.0 of the Cisco product, enter exit to go up a level to run the show command.
To configure HTTP request filtering, use the following command:filter url http <port>[-<port>] <local_ip> <local_mask> <foreign_ip> <foreign_mask> [allow] [cgi-truncate] [longurl-truncate | longurl-deny] [proxy-block]
For an explanation of the filter url parameters, see Parameters for the filter commands, page 16.Examples:
connections <num_conns>
Limits the maximum number of TCP connections permitted between the Cisco security appliance and Filtering Service. If this parameter is not specified, it defaults to 5, which is the recommended setting. If you select the UDP protocol, this option is not available. Range: 1 - 100; Default: 5.
Command example Action
filter url http 0 0 0 0 Filters every HTTP request to all destinations. Filtering is applied to traffic on port 80.
filter url http 10.5.0.0 255.255.0.0 0 0
Filters the 10.5.x.x network going to any destination. Filtering is applied to traffic on port 80.
filter url http 10.5.0.69 255.255.255.255 132.239.29.189 255.255.255.255
Filters the 10.5.0.69 host going to the 132.239.29.189 destination. Filtering is applied to traffic on port 80.
Parameter Definition
Websense Installation Guide Supplement for Integrated Cisco Products 11

Configuring a Cisco Security Appliance
Using zeroes for the last two entries, <foreign_ip> and <foreign_mask>, allows access from the specified local IP address to all Web sites, as filtered by Websense softwareYou can enter multiple filter url commands to set up different portions of the network for filtering. Set up the smaller groups first, followed by the larger groups, to assure that all groups are filtered properly. Use a general filter url command for all computers to be filtered, and then use Websense Manager to apply filtering policies to individual clients (computers, networks, users, groups, and domains [OUs]). See the Websense Manager Help for information about implementing filtering policies.
7. Configure the security appliance to filter HTTPS requests with the filter https command.
To review the current URL server rules, enter show url-server. To review all the filter rules, enter show filter.If you are running v7.0 of the Cisco product, enter exit to go up a level to run the show command.
To configure HTTPS request filtering, use the following command:filter https <port> <local_ip> <local_mask> <foreign_ip> <foreign_mask> [allow]
For an explanation of the filter https parameters, see Parameters for the filter commands, page 16.Examples:
Using zeroes for the last two entries, <foreign_ip> and <foreign_mask>, allows access from the specified local IP address to all Web sites, as filtered by Websense software.
NoteThe filter https command is supported in v6.3.1 and higher of the Cisco PIX Firewall/ASA software.
Command example Action
filter https 443 0 0 0 0 Filters every HTTPS request to all destinations. Filtering is applied to traffic on port 443.
filter https 443 10.5.0.0 255.255.0.0 0 0
Filters the 10.5.x.x network going to any destination. Filtering is applied to traffic on port 443.
filter https 443 10.5.0.69 255.255.255.255 132.239.29.189 255.255.255.255
Filters the 10.5.0.69 host going to the 132.239.29.189 destination. Filtering is applied to traffic on port 443.
12 Websense Web Security and Websense Web Filter

Configuring a Cisco Security Appliance
You can enter multiple filter https commands to set up different portions of the network for filtering. Set up the smaller groups first, followed by the larger groups, to assure that all groups are filtered properly. Use a general filter https command for all computers to be filtered, and then use Websense Manager to apply filtering policies to individual clients (computers, networks, users, groups, and domains [OUs]).See the Websense Manager Help for information about implementing filtering policies.
8. Configure the Cisco security appliance to filter FTP requests with the filter ftp command.
To review the current URL server rules, enter show url-server.To review all the filter rules, enter show filter.If you are running v7.0 of the Cisco product, enter exit to go up a level to run the show command.
To configure FTP request filtering, use the following command:filter ftp <port> <local_ip> <local_mask> <foreign_ip> <foreign_mask> [allow] [interact-block]
For an explanation of the filter ftp parameters, see Parameters for the filter commands, page 16.Examples:
Using zeroes for the last two entries, <foreign_ip> and <foreign_mask>, allows access via Websense software from the specified local IP address to all Web sites.You can enter multiple filter ftp commands to set up different portions of the network for filtering. Set up the smaller groups first, followed by the larger groups, to assure that all groups are filtered properly. Use a general filter ftp command for all computers to be filtered, and then use Websense Manager to apply filtering policies to individual clients (computers, networks, users, groups, and domains [OUs]).
NoteThe filter ftp command is supported in v6.3.1 and higher of the Cisco PIX Firewall/ASA software.
Command example Action
filter ftp 21 0 0 0 0 Filters every FTP request to all destinations.Filtering is applied to traffic on port 21.
filter ftp 21 10.5.0.0 255.255.0.0 0 0
Filters the 10.5.x.x network going to any destination. Filtering is applied to traffic on port 21.
filter ftp 21 10.5.0.69 255.255.255.255 132.239.29.189 255.255.255.255
Filters the 10.5.0.69 host going to the 132.239.29.189 destination. Filtering is applied to traffic on port 21.
Websense Installation Guide Supplement for Integrated Cisco Products 13

Configuring a Cisco Security Appliance
See the Websense Manager Help for information about implementing filtering policies.
9. After entering commands to define filtering for HTTP, HTTPS, and FTP requests, you can define any required exceptions to these filtering rules by adding the except parameter to the filter command:filter {url | https | ftp} except <local_ip> <local_mask> <foreign_ip> <foreign_mask>
This command allows you to bypass Websense filtering for traffic coming from, or going to a specified IP address or addresses.For example, suppose that the following filter command was entered to cause all HTTP requests to be forwarded to Filtering Service:filter url http 0 0 0 0
You could then enter:filter url except 10.1.1.1 255.255.255.255 0 0
This would allow any outbound HTTP traffic from the IP address 10.1.1.1 to go out unfiltered.
10. Configure the security appliance to handle long URLs using the url-block url-mempool and url-block url-size commands:
a. Increase the size of the security appliance’s internal buffer to handle long URL strings. If the URL buffer size is set too low, some Web pages may not display. To specify the amount of memory assigned to the URL buffer, enter:url-block url-mempool <memory_pool_size>
Here, <memory_pool_size> is the size of the buffer in KB. You can enter a value from 2 to 10240. The recommended value is 1500.
b. Increase the maximum permitted size of a single URL by adding the following line to the configuration:url-block url-size <long_url_size>
Here, <long_url_size> is the maximum URL size in KB. You can enter a value from 2 to 4. The recommended value is 4.
11. Configure the URL response block buffer using the url-block block command to prevent replies from the Web server from being dropped in high traffic situations.
NoteThe url-block commands are supported in v6.2 and higher of the Cisco PIX Firewall/ASA software.
NoteThe url-block commands are supported in v6.2 and higher of the Cisco PIX Firewall/ASA software.
14 Websense Web Security and Websense Web Filter

Configuring a Cisco Security Appliance
On busy networks, the lookup response from Filtering Service may not reach the security appliance before the response arrives from the Web server. The HTTP response buffer in the security appliance must be large enough to store Web server responses while waiting for a filtering decision from the Filtering Service.To configure the block buffer limit, use the following command:url-block block <block_buffer_limit>
Here, <block_buffer_limit> is the number of 1550-byte blocks to be buffered. You can enter a value from 1 to 128.
Enter show url-block to view the current configuration for all 3 url-block commands.Enter show url-block block statistics to see how the current buffer configuration is functioning. The statistics include the number of pending packets held and the number dropped. The clear url-block block statistics command clears the statistics.
12. If you need to discontinue filtering, enter the exact parameters in the original filter command, preceded by the word no.For example, if you entered the following to enable filtering:filter url http 10.0.0.0 255.0.0.0 0 0
Enter the following to disable filtering:no filter url http 10.0.0.0 255.0.0.0 0 0
Repeat for each filter command issued, as appropriate.13. Save your changes in one of the following ways:
copy run start exitwrite memory
Websense software is ready to filter Internet requests after the Websense Master Database is downloaded, and the software is activated within the Cisco security appliance. See the Websense Installation Guide and Websense Manager Help for information about configuring Websense software and downloading the Master Database.
Websense Installation Guide Supplement for Integrated Cisco Products 15

Configuring a Cisco Security Appliance
Parameters for the filter commands
The parameters used by the filter http, filter https, and filter ftp commands include the following. Note that some of the parameters listed do not apply to all 3 commands.
Parameter Applies to Definition
http <port>[-<port>]
filter http Defines which port number, or range of port numbers, the security appliance watches for HTTP requests. If you do not specify a port number, port 80 is used by default. The option to set a custom Web port or port range is only available in v5.3 and higher of the Cisco software.Note:In Cisco software versions 5.3 to 6.3, it is not mandatory to enter http before the port number; you can either enter http (to use port 80), or you can enter a port number. In Cisco software version 7.0, you must always enter http.
<port> filter httpsfilter ftp
Defines the port number the security appliance watches for https or ftp requests.The standard HTTPS port is 443.The standard FTP port is 21.
<local_ip> filter httpfilter httpsfilter ftp
IP address requesting access. You can set this address to 0.0.0.0 (or in shortened form, 0) to specify all internal clients. This address is the source for all connections to be filtered.
<local_mask> filter httpfilter httpsfilter ftp
Network mask of the local_ip address (the IP address requesting access). You can use 0.0.0.0 (or in shortened form, 0) to specify all hosts within the local network.
<foreign_ip> filter httpfilter httpsfilter ftp
IP address to which access is requested. You can use 0.0.0.0 (or in shortened form, 0) to specify all external destinations.
<foreign_mask> filter httpfilter httpsfilter ftp
Network mask of the foreign_ip address (the IP address to which access is requested). Always specify a mask value. You can use 0.0.0.0 (or in shortened form, 0) to specify all hosts within the external network.
16 Websense Web Security and Websense Web Filter

Configuring a Cisco Security Appliance
Cisco Secure ACS authentication
To identify users in a multiple domain environment, use a Websense transparent identification agent, such as DC Agent, or use Websense manual authentication.
[allow] filter httpfilter httpsfilter ftp
Lets outbound connections pass through the security appliance without filtering when Filtering Service is unavailable. If you omit this option, and Filtering Service becomes unavailable, the security appliance stops all outbound HTTP, HTTPS, or FTP traffic until Filtering Service is available again.
[cgi-truncate] filter http Sends CGI scripts to Filtering Service as regular URLs. When a URL has a parameter list starting with a question mark (?), such as a CGI script, the URL is truncated. All characters after, and including the question mark, are removed before sending the URL to Filtering Service. (Supported in Cisco PIX v6.2 and higher.)
[interact-block] filter ftp Prevents users from connecting to the FTP server through an interactive FTP client.An interactive FTP client allows users to change directories without entering the complete directory path, so Filtering Service cannot tell if the user is requesting something that should be blocked.
[longurl-truncate | longurl-deny]
filter http Specify how to handle URLs that are longer than the URL buffer size limit.
Enter longurl-truncate to send only the host name or IP address to Filtering Service. Enter longurl-deny to deny the request without sending it to Filtering Service.
(Supported in Cisco PIX v6.2 and higher.)
[proxy-block] filter http Enter this parameter to prevent users from connecting to an HTTP proxy server. (Supported in Cisco PIX v6.2 and higher.)
Parameter Applies to Definition
ImportantDo not use Cisco Secure ACS authentication with Websense filtering in a multiple domain environment. ACS cannot provide domain information about users to Websense software, and authentication fails.
Websense Installation Guide Supplement for Integrated Cisco Products 17

Configuring a Cisco Security Appliance
See the Websense Installation Guide for information about installing transparent identification agents.
See Websense Manager Help for information about configuring manual authentication, or configuring transparent identification agents.
18 Websense Web Security and Websense Web Filter

3
Configuring a Cisco IOS RouterAfter Websense software is installed, you must configure the Cisco IOS router to send HTTP requests to the Websense software. This configuration is done through a console or telnet session.
Websense software analyzes the request and tells the router whether or not to permit it. The action taken is cached in the router. The router enforces the same policy the next time the site is requested, without communicating with Filtering Service.
Startup configuration
Before Websense software can filter Internet requests, the Cisco IOS router must be configured to use Filtering Service as a URL filter.
1. Access the router’s software from a console, or from a remote terminal using telnet.
2. Enter your password.3. Enter enable and the enable password to put the router into enabled mode.4. Enter configure terminal to activate configure mode.5. Enter the following command to identify the Filtering Service machine that will
filter HTTP requests:ip urlfilter server vendor websense <ip-address> [port <port-number>] [timeout <seconds>] [retransmit <number>]
Variable Description
<ip-address> The IP address of the machine running Websense Filtering Service.
<port-number> The Filtering Service port, default 15868.
Websense Installation Guide Supplement for Integrated Cisco Products 19

Configuring a Cisco IOS Router
An example of this command is:ip urlfilter server vendor websense 12.203.9.116 timeout 8 retransmit 6
To define an additional Filtering Service as a backup, repeat the command for the IP address of the second server. The configuration settings you create in the following steps are always applied to the primary server, which is identified as the first server with which the Cisco IOS router can establish communications.
6. Enable the logging of system messages to Filtering Service by entering the following command:ip urlfilter urlf-server-log
This setting is enabled by default. When logging is enabled, the Cisco IOS router sends a log request immediately after the URL lookup request. If the destination IP address is found in the cache, Cisco IOS router does not send a URL lookup request but still sends a log request to Filtering Service.
7. Tell the Cisco IOS router how to filter URL requests by entering the following commands, in sequence:ip inspect name <inspection–name> http urlfilterinterface <type> <slot/port>ip inspect <inspection-name> {in | out}
Examples of these commands are:ip inspect name fw_url http urlfilterinterface FastEthernet 0/0ip inspect fw_url in
For this sequence to function properly, you must create an inspection rule entitled fw_url and apply that rule to the inbound interface of the router. See your Cisco documentation for information about creating and applying inspection rules.
8. To save your changes:a. Enter the exit command twice to leave the configure mode.b. Enter write memory.These commands store the configuration settings in the Cisco IOS router’s startup configuration so that they are not lost if the router is shut down or loses power.
<seconds> The amount of time the Cisco IOS router waits for a response from Filtering Service. The default timeout is 5 seconds.
<number> How many times the Cisco IOS router retransmits an HTTP request when there is no response from Filtering Service. The default is 2.
Variable Description
20 Websense Web Security and Websense Web Filter

Configuring a Cisco IOS Router
9. Use the following commands to view various aspects of your installations:
10. To discontinue filtering or to change a Filtering Service, enter the following command to remove a server configured in Step 5, page 19.no ip urlfilter server vendor websense <ip-address>
Configuration commands
These commands are used to configure the Cisco IOS router to filter HTTP requests through Websense Filtering Service. These configuration settings can be saved into the startup configuration. See Step 8 in the preceding procedure for instructions.
ip inspect name <inspection-name> http urlfilter [java-list <access-list>] [alert {on/off}] [timeout <seconds>] [audit-trail {on/off}]
This global command turns on HTTP filtering. The urlfilter value associates URL filtering with HTTP inspection rules. You may configure two or more inspections in a router, but the URL filtering feature only works with those inspections in which the urlfilter field is enabled. This setup command is required.
ip urlfilter server vendor websense <IP-address> [port <num>] [timeout <secs>] [retrans <num>]
This setup command is required to identify Filtering Service to the Cisco IOS router and configure additional values. When using this command, the Cisco IOS router checks for a primary Filtering Service—one that is active and being sent URL lookup requests. If a primary server is configured, the router marks the server being added as a secondary server.
Command Action
show ip inspect name <inspection-name>
Displays a specific inspection rule.
show ip inspect all Displays all available inspection information.
show ip urlfilter config
Displays all URL filtering information.
<command-name> ? Displays help on individual commands. For example, ip inspect ? displays the complete syntax for the inspect command, and explains each argument.
NoteTo turn off a feature or service, add the value no before the command.
Websense Installation Guide Supplement for Integrated Cisco Products 21

Configuring a Cisco IOS Router
ip urlfilter alert
This optional setting controls system alerts. By default, system alerts are enabled. The following messages can be displayed when alerts are enabled:
%URLF-3-SERVER_DOWN: Connection to the URL filter server <IP address> is down.This level three LOG_ERR type message appears when a configured Filtering Service goes down. The router marks the offline server as a secondary server. It then attempts to use a defined secondary server as the primary server. If the router cannot find another Filtering Service, the URLF-3-ALLOW_MODE message is displayed.%URLF-3-ALLOW_MODE: Connection to all URL filter servers is down and ALLOW MODE is OFF.This message appears when the router cannot find a defined Filtering Service. When the allowmode flag is set to off, all HTTP requests are blocked.%URLF-5-SERVER_UP: Connection to a URL filter server <IP address> is made. The system is returning from ALLOW MODE.This LOG_NOTICE type message is displayed when a Filtering Service is detected as being up and the system returns from the ALLOW MODE.%URLF-4-URL_TO_LONG: URL too long (more than 3072 bytes), possibly a fake packet.This LOG_WARNING message is displayed when the URL in a GET request is too long.%URLF-4-MAX_REQ: The number of pending requests has exceeded the maximum limit <num>.This LOG_NOTICE message is displayed when the number of pending requests in the system exceeds the maximum limit defined. Subsequent requests are dropped.
ip urlfilter audit-trail
This command controls the logging of messages into the syslog server and is disabled by default. The messages logged are:
Parameter Description
port <num> The Filtering Service port you entered during Websense installation. The default port number is 15868.
timeout <secs> The amount of time the Cisco IOS router waits for a response from Websense Filtering Service. The default timeout is 5 seconds.
retrans <secs> How many times the router retransmits an HTTP request when there is no response from Filtering Service. The default value is 2.
22 Websense Web Security and Websense Web Filter

Configuring a Cisco IOS Router
%URLF-6-URL_ALLOWED: Access allowed for URL <site’s URL>; client <IP address:port number> server <IP address:port number>This message is logged for each URL requested that is allowed by Websense software. The message includes the allowed URL, the source IP address/port number, and the destination IP address/port number. Long URLs (>1000 bytes) are not logged.%URLF-6-URL_BLOCKED: Access denied URL <site’s URL>; client <IP address:port number> server <IP address:port number>This message is logged for each URL requested that is blocked by Websense software. The message includes the blocked URL, the source IP address/port number, and the destination IP address/port number. Long URLs (>1000 bytes) are not logged.
ip urlfilter urlf-server-log
This command is used to control the logging of system messages to Filtering Service and is disabled by default. To allow logging (and consequently reporting) of Internet activity on your system, you must enable this feature.When logging is enabled, the Cisco IOS router sends a log request immediately after the URL lookup request. If the destination IP address is found in the cache, the router does not send a URL lookup request; it does send a log request to Filtering Service. The log message contains information such as the URL, host name, source IP address, and destination IP address.
ip urlfilter exclusive-domain <domain-name>
This optional command is used to add a domain to, or remove a domain from, the exclusive domain list. Cisco IOS router URL filtering allows you to specify a list of domain names for which the router does not send lookup requests to Filtering Service.For example, if www.yahoo.com is added to the exclusive domain list, all the HTTP traffic whose URLs are part of this domain (such as www.yahoo.com/mail/index.html, www.yahoo.com/news, and www.yahoo.com/sports) are permitted without sending a lookup request to Filtering Service.You may also specify a partial domain name. For example, you can enter .cisco.com instead of the complete domain name. In this example, all URLs with domain name that ends with this partial name (such as www.cisco.com/products, www.cisco.com/eng, people-india.cisco.com/index.html, and directory.cisco.com) are permitted without having to send a lookup request to Filtering Service. When using partial domain names, always start the name with a period. For example: ip urlfilter exclv-domain .sdsu.edu
ip urlfilter allowmode {on/off}
This command controls the default filtering policy if Filtering Service is down. If the allowmode flag is set to on, and the Cisco IOS router cannot find a Filtering Service, all HTTP requests are permitted.
Websense Installation Guide Supplement for Integrated Cisco Products 23

Configuring a Cisco IOS Router
If allowmode is set to off, all HTTP requests are blocked when Filtering Service becomes unavailable. The default for allowmode is off.
ip urlfilter packet-buffer <number>
Use this optional command to configure the maximum number of HTTP responses that the Cisco IOS router can store in its packet buffer. The default value is 200.
ip urlfilter maxrequest <number>
Use this optional command to set the maximum number of outstanding requests that can exist at a given time. When this number is exceeded, subsequent requests are dropped. The allowmode flag is not considered in this case because it is only used when Filtering Service is down. The default value is 1000.
Executable commands
These Cisco IOS router commands allow you to view configuration data and filtering information, and to control caching. These settings cannot be saved into the startup configuration.
show ip urlfilter config
This command shows configuration information, such as number of maximum requests, allowmode state, and the list of configured Filtering Services. Technical Support typically requests this information when trying to solve a problem.
show ip urlfilter statistics
This command shows statistics of the URL filtering feature, including:Number of requests sent to Filtering ServiceNumber of responses received from Filtering ServiceNumber of requests pending in the systemNumber of requests failedNumber of URLs blocked
24 Websense Web Security and Websense Web Filter

Configuring a Cisco IOS Router
debug ip urlfilter {function-trace/detailed/events}
This command enables the display of debugging information from the URL filter system.
Parameter Description
function-trace Enables the system to print a sequence of important functions that get called in this feature.
detailed Enables the system to print detailed information about various activities that occur in this feature.
events Enables the system to print various events, such as queue events, timer events, and socket events.
Websense Installation Guide Supplement for Integrated Cisco Products 25

Configuring a Cisco IOS Router
26 Websense Web Security and Websense Web Filter

4
Configuring a Cisco Content EngineAfter Websense software is installed, you must activate it within the Cisco Content Engine. This configuration is done through the Cisco Web-based interface, or through a console or telnet session.
Cisco Web-based interface
1. Open a Web browser and connect to the Cisco Content Engine at:https://<IP address>:8003 (for ACNS 5.1 and higher)http://<IP address>:8001 (for versions prior to ACNS 5.1)
Here, <IP address> is the IP address of the Content Engine machine. The default port is 8003 for ACNS 5.1 and higher.The Enter Network Password dialog box appears.
2. Enter a user name and password to access the initial management page.3. Select Caching > URL Filtering.4. Select the filtering option appropriate to your ACNS version.
For ACNS versions 5.5 and 5.6, select Websense Filtering (Remote).For ACNS version 5.4, select either Websense Filtering (Remote) or Websense Filtering (Local).
NoteIf load bypass or authentication bypass is enabled in the Content Engine, Internet requests that are rerouted are filtered by Websense software. See your Content Engine documentation for more information.
Websense Installation Guide Supplement for Integrated Cisco Products 27

Configuring a Cisco Content Engine
5. Enter the following information in the appropriate fields:
6. If Websense software is filtering on a cluster of Content Engines, configure each Content Engine with the following commands to ensure that all traffic is filtered:url-filter http websense server <ip-address> port <port-number>url-filter http websense allowmode enable
For more information on using the Web-based interface, see the Cisco documentation, available at www.cisco.com.
Console or telnet session
If you cannot access the Web-based interface, or prefer to use the command-line interface, use the procedure below to configure the Cisco Content Engine.
1. Access the Cisco Content Engine from a console, or from a remote terminal using telnet for access.
2. Enter the global configuration mode with the configure command. You must be in global configuration mode to enter global configuration commands.Console# configureConsole(config)#
3. To enable Websense URL filtering, use the url-filter global configuration command.
Field Description
Websense Filtering Service or Websense Server
The host name or IP address of the machine running Filtering Service.
Port The Filtering Service port you entered during the Websense installation.The default is 15868.
Timeout The amount of time (between 1 and 120 seconds) that the Content Engine waits for a response from Filtering Service before permitting a site. The default is 60.
28 Websense Web Security and Websense Web Filter

Configuring a Cisco Content Engine
url-filter http websense server <ip-address> port <port-number> timeout <seconds>
4. The url-filter http websense allowmode enable command configures the Content Engine to permit requests after a Websense Filtering Service timeout.
5. To save your changes:a. Enter the exit command to leave the configure mode.b. Enter write memory.
6. If the Websense software is filtering on a cluster of Content Engines, configure each Content Engine with the following commands to ensure that all traffic is filtered:url-filter http websense server <ip-address> port <port-number>url-filter http websense allowmode enable
Websense software is ready to filter Internet requests after the Websense Master Database is downloaded, and the software is activated within the Cisco Content Engine.
See Websense Manager Help for information about configuring Websense software and downloading the Master Database.
Configuring firewalls or routers
To prevent users from circumventing Websense filtering, your firewall or Internet router should be configured to allow outbound HTTP, HTTPS, and FTP requests only from the Cisco Content Engine.
The Content Engine and the Websense software transparently handle Internet requests sent from routers with Web Cache Communication Protocol (WCCP).
Variable Description
<ip-address> The host name or IP address of the machine running Filtering Service.
<port-number> The Filtering Service port you entered during the Websense installation.The default is 15868.
<seconds> The amount of time (between 1 and 120 seconds) that the Content Engine waits for a response from Filtering Service. The default is 60.
Websense Installation Guide Supplement for Integrated Cisco Products 29

Configuring a Cisco Content Engine
Network Agent cannot perform protocol filtering on traffic encapsulated with WCCP.
Browser access to the Internet
Cisco Content Engine can regulate Internet activity either transparently or non-transparently. In transparent mode, the firewall or Internet router is configured to send Internet requests to the Cisco Content Engine, which queries Filtering Service. All configuration changes can be performed through the Content Engine and any connected firewalls or routers, with no special configuration required on client computers. To run transparently, you must enable WCCP on both the Content Engine and the firewall or router.
When regulating Internet activity non-transparently, Web browsers on all client computers are configured to send Internet requests to the Content Engine. See your Cisco Content Engine documentation for instructions.
To prevent users from circumventing Websense filtering, your firewall or Internet router should be configured to allow outbound HTTP and FTP requests only from the Cisco Content Engine.
To set up promptless, browser authentication for NTLM or LDAP, refer to your Cisco documentation.
Clusters
If you have several Content Engines running in a cluster, you must configure each Content Engine to use Filtering Service as an HTTP, HTTPS, and FTP filter. Several Content Engines can use the same Filtering Service. See your Cisco Content Engine documentation for details on setting up a cluster.
NoteFor Internet connectivity, Filtering Service may require authentication through a proxy server or firewall for HTTP traffic. To allow downloads of the Websense Master Database, configure the proxy or firewall to accept clear text or basic authentication.
See the proxy or firewall documentation for configuration instructions.
See Websense Manager Help for instructions on running the Websense Master Database download.
30 Websense Web Security and Websense Web Filter

A
TroubleshootingI upgraded my Cisco PIX Firewall software to version 7.0, and Web filtering stopped working
In version 7.0(1) of the Cisco PIX Firewall software, the url-server command was changed to increase the minimum value for the timeout parameter to 10 seconds.
In previous versions, the minimum value for this parameter was 1 second, and the default value was 5 seconds.
If the timeout was set to a value less than 10 seconds, the url-server command was deleted when you upgraded your software.
To resolve this issue, simply re-enter the url-server command.
See the Cisco documentation for more information.
Websense Installation Guide Supplement for Integrated Cisco Products 31

Troubleshooting
32 Websense Web Security and Websense Web Filter
Index
AASA
authentication, 17commands
filter except, 14filter ftp, 13filter https, 12–13filter url http, 11–12url-server, 10–11
configuringconsole or TELNET session, 9–15
handling long URLs, 14help commands, 10HTTP response buffer, 14increasing internal buffer, 14response block buffer, 14
authenticationASA, 17enabled in Content Engine, 27of users, 5PIX Firewall, 17
Bbrowser
and Content Engine Internet access, 30
CCisco Routers
configuration commandsip inspect name, 21ip urlfilter alert, 22ip urlfilter allowmode, 23ip urlfilter audit-trail, 22ip urlfilter exclusive-domain, 23ip urlfilter maxrequest, 24ip urlfilter packet-buffer, 24ip urlfilter server vendor, 21ip urlfilter urlf-server-log, 23
executable commandsdebug ip urlfilter, 25show ip urlfilter config, 24show ip urlfilter statistics, 24
startup configuration, 19–21Cisco web-based interface, 27clusters, 30configuration
console sessionASA, 9–15Content Engine, 28–29PIX Firewall, 9–15
TELNET sessionASA, 9–15Content Engine, 28–29PIX Firewall, 9–15
Content Enginebrowser access to Internet, 30clusters, 30configuring
Cisco web-based interface, 27console or TELNET session, 28–29firewalls or routers, 29
Ffilter except command, 14filter ftp command, 13filter https command, 12–13filter url http command, 11–12
Hhelp commands in ASA, 10help commands in PIX Firewall, 10
NNetwork Agent
defined, 5
PPIX Firewall
authentication, 17commands
filter except, 14filter ftp, 13filter https, 12–13filter url http, 11–12url-server, 10–11
configuringconsole or TELNET session, 9–15
handling long URLs, 14help commands, 10HTTP response buffer, 14increasing internal buffer, 14response block buffer, 14
Websense Installation Guide Supplement for Integrated Cisco Products 33

Index
Ssystem requirements
Cisco integrations supported, 6
TTELNET configuration
ASA, 9–15Content Engine, 28–29PIX Firewall, 9–15
Uurl-server command, 10–11users
authenticating, 5
WWeb Cache Communication Protocol (WCCP), 29Web Filter
bypass filtering for specified IP addresses, 14Web Security
bypass filtering for specified IP addresses, 14
34 Websense Web Security and Websense Web Filter