Installation Guide Showcase 9 - HelpSystems...iii Preface Welcome to the ShowCase 9 Installation...
86
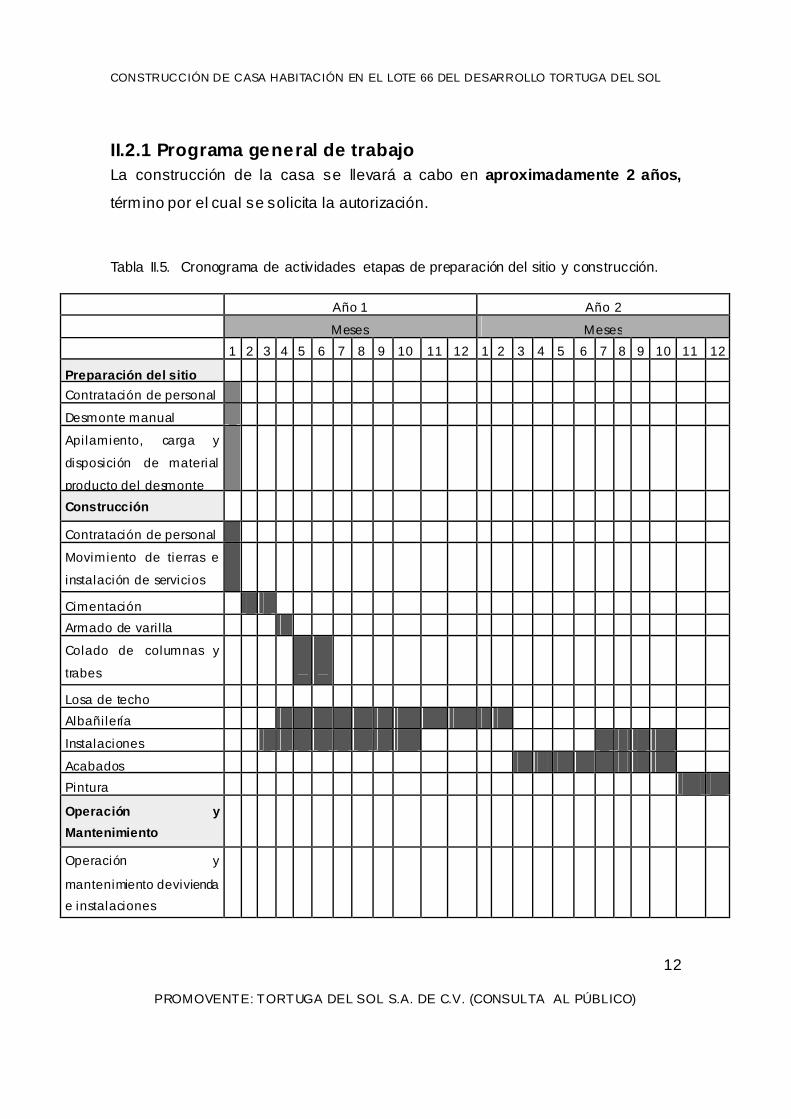
CONSTRUCCIÓN DE CASA HABITACIÓN EN EL LOTE 66 DEL DESARROLLO TORTUGA DEL SOL PROMOVENTE: TORTUGA DEL SOL S.A. DE C.V. (CONSULTA AL PÚBLICO) MANIFESTACIÓN DE IMPACTO AMBIENTAL MODALIDAD PARTICULAR SECTOR TURÍSTICO VERSIÓN PARA CONSULT A AL PÚBLICO PROYECTO CONSTRUCCIÓN DE CASA HABITACIÓN EN EL LOTE 66 DEL DESARROLLO TORTUGA DEL SOL
Transcript of Installation Guide Showcase 9 - HelpSystems...iii Preface Welcome to the ShowCase 9 Installation...

Installation GuideShowcase 9

Copyright Terms and Conditions
The content in this document is protected by the Copyright Laws of the United States of America and other countries world-wide. The unauthorized use and/or duplication of this material without express and written permission from HelpSystems is strictly prohibited. Excerpts and links may be used, provided that full and clear credit is given to HelpSystems with appropri-ate and specific direction to the original content. HelpSystems and its trademarks are properties of the HelpSystems group of companies. All other marks are property of their respective owners.
201706021907
© HelpSystems, LLC. All rights reserved. All trademarks and registered trademarks are the property of their respective owners.
www.helpsystems.com
About HelpSystemsHelpSystems is a leading provider of systems & network
management, business intelligence, and security & compliance software. We help businesses reduce data center costs by improving operational control and delivery of IT services.
Preface
Welcome to the ShowCase 9 Installation Guide. This guide provides information about the installa-tion of ShowCase 9 software. For information about the administration and maintenance of the prod-uct, see the ShowCase 9 Administrator's Guide.
About This Guide
• Chapter 1, "Technical Support," contains technical support information.
• Chapter 2, "Release Overview," contains ShowCase 9 enhancements and release notes.
• Chapter 3, "Environment Requirements," contains hardware and software prerequisites.
• Chapter 4, "Installing and Uninstalling Server Components," covers IBM i software instal-lation.
• Chapter 5, "Installing and Uninstalling Client Components," covers ShowCase client instal-lation, including network installations and silent installations.
• Chapter 6, "Setting Up a Data Source," explains how to configure ShowCase data sources.
• Chapter 7, "Connecting to the IBM i," explains how to access the server with client compo-nents.
Additional Resources
• For information about server maintenance, see the ShowCase 9 Administrator's Guide.
• For information about IBM Collaboration and Deployment Services, including installation instructions and requirements, see the documentation provided by IBM.
• For information about product features unrelated to installation, see the online help and tutorials in each application.
• For information about upgrading to ShowCase 9, see the ShowCase 9 Upgrade Guide.
iii

iv ShowCase 9 Installation Guide

Table of Contents
Technical Support 1Contacting Technical Support . . . . . . . . . . . . . . . . . . . . . . . . . . . . . . . . . . . . . . . . . . . . . . . . 1Technical Support Website . . . . . . . . . . . . . . . . . . . . . . . . . . . . . . . . . . . . . . . . . . . . . . . . . . 1
Release Overview 3Introduction . . . . . . . . . . . . . . . . . . . . . . . . . . . . . . . . . . . . . . . . . . . . . . . . . . . . . . . . . . . . . . 3
Documentation . . . . . . . . . . . . . . . . . . . . . . . . . . . . . . . . . . . . . . . . . . . . . . . . . . . . 3Release Enhancements . . . . . . . . . . . . . . . . . . . . . . . . . . . . . . . . . . . . . . . . . . . . . . . . . . . . . 4
Integration with IBM Collaboration and Deployment Services 4.2, 4.2.1 and 5.0 . 4Support for up to 1 MB of SQL (Previously 64 KB) . . . . . . . . . . . . . . . . . . . . . . . 4Running ShowCase Enterprise Server as a Windows Service . . . . . . . . . . . . . . . . 5Improved Firewall Support . . . . . . . . . . . . . . . . . . . . . . . . . . . . . . . . . . . . . . . . . . . 5Custom Metadata . . . . . . . . . . . . . . . . . . . . . . . . . . . . . . . . . . . . . . . . . . . . . . . . . . 5Configurable ShowCase Query and ShowCase Report Writer Timeouts . . . . . . . . 5Standardized LOG4J Logging . . . . . . . . . . . . . . . . . . . . . . . . . . . . . . . . . . . . . . . . 6ShowCase Warehouse Manager Server Patch Rollbacks . . . . . . . . . . . . . . . . . . . . 6IT Infrastructure Enhancements . . . . . . . . . . . . . . . . . . . . . . . . . . . . . . . . . . . . . . . 6Support for Silent Installations . . . . . . . . . . . . . . . . . . . . . . . . . . . . . . . . . . . . . . . . 7Product Renaming . . . . . . . . . . . . . . . . . . . . . . . . . . . . . . . . . . . . . . . . . . . . . . . . . . 8
Release Notes . . . . . . . . . . . . . . . . . . . . . . . . . . . . . . . . . . . . . . . . . . . . . . . . . . . . . . . . . . . . 8Known Issues . . . . . . . . . . . . . . . . . . . . . . . . . . . . . . . . . . . . . . . . . . . . . . . . . . . . . 8
Environment Requirements 11IBM i Requirements . . . . . . . . . . . . . . . . . . . . . . . . . . . . . . . . . . . . . . . . . . . . . . . . . . . . . . 11
Disk Space . . . . . . . . . . . . . . . . . . . . . . . . . . . . . . . . . . . . . . . . . . . . . . . . . . . . . . . 11JD Edwards (JDE) Requirements . . . . . . . . . . . . . . . . . . . . . . . . . . . . . . . . . . . . . 11
Server Requirements . . . . . . . . . . . . . . . . . . . . . . . . . . . . . . . . . . . . . . . . . . . . . . . . . . . . . . 12Server Installation Tips . . . . . . . . . . . . . . . . . . . . . . . . . . . . . . . . . . . . . . . . . . . . . 12Additional Considerations . . . . . . . . . . . . . . . . . . . . . . . . . . . . . . . . . . . . . . . . . . . 13
Client PC Software and Hardware Requirements . . . . . . . . . . . . . . . . . . . . . . . . . . . . . . . . 13Virtualized Environments . . . . . . . . . . . . . . . . . . . . . . . . . . . . . . . . . . . . . . . . . . . . . . . . . . 14ShowCase Warehouse Builder Requirements . . . . . . . . . . . . . . . . . . . . . . . . . . . . . . . . . . . 15
Remote DB2 Setup (for ShowCase Warehouse Builder) . . . . . . . . . . . . . . . . . . . 15Enterprise Server Requirements . . . . . . . . . . . . . . . . . . . . . . . . . . . . . . . . . . . . . . . . . . . . . 15
About the Enterprise Server . . . . . . . . . . . . . . . . . . . . . . . . . . . . . . . . . . . . . . . . . 15Enterprise Server PC Requirements . . . . . . . . . . . . . . . . . . . . . . . . . . . . . . . . . . . 16Additional Enterprise Server Requirements . . . . . . . . . . . . . . . . . . . . . . . . . . . . . 16Consistent Data Sources and Server Names . . . . . . . . . . . . . . . . . . . . . . . . . . . . . 17
Table of Contents v

Installing and Uninstalling Server Components 19Before You Install . . . . . . . . . . . . . . . . . . . . . . . . . . . . . . . . . . . . . . . . . . . . . . . . . . . . . . . . 19Beginning Server Installation . . . . . . . . . . . . . . . . . . . . . . . . . . . . . . . . . . . . . . . . . . . . . . . 20
National Language Support . . . . . . . . . . . . . . . . . . . . . . . . . . . . . . . . . . . . . . . . . . 21ShowCase Warehouse Manager Server . . . . . . . . . . . . . . . . . . . . . . . . . . . . . . . . . 21ShowCase Interlink for JD Edwards OneWorld and EnterpriseOne . . . . . . . . . . . 21ShowCase Warehouse Manager Server TCP/IP Port Configuration . . . . . . . . . . 22IBM i Work Management and CCSID Configuration . . . . . . . . . . . . . . . . . . . . . 23Security Settings . . . . . . . . . . . . . . . . . . . . . . . . . . . . . . . . . . . . . . . . . . . . . . . . . . 24Storage CCSID Configuration . . . . . . . . . . . . . . . . . . . . . . . . . . . . . . . . . . . . . . . . 25ShowCase Warehouse Builder Configuration . . . . . . . . . . . . . . . . . . . . . . . . . . . . 26IBM Collaboration and Deployment Services Plug-Ins . . . . . . . . . . . . . . . . . . . . 26Sample Database . . . . . . . . . . . . . . . . . . . . . . . . . . . . . . . . . . . . . . . . . . . . . . . . . . 26Confirm the Installation . . . . . . . . . . . . . . . . . . . . . . . . . . . . . . . . . . . . . . . . . . . . . 26
Installing IBM Collaboration and Deployment Services Plug-Ins . . . . . . . . . . . . . . . . . . . 26Uninstalling Server Components . . . . . . . . . . . . . . . . . . . . . . . . . . . . . . . . . . . . . . . . . . . . . 27
Installing and Uninstalling Client Components 29Before You Begin . . . . . . . . . . . . . . . . . . . . . . . . . . . . . . . . . . . . . . . . . . . . . . . . . . . . . . . . 29
Enterprise Server Considerations . . . . . . . . . . . . . . . . . . . . . . . . . . . . . . . . . . . . . 29Running the Installation Multiple Times . . . . . . . . . . . . . . . . . . . . . . . . . . . . . . . . 29
Installing ShowCase onto PCs . . . . . . . . . . . . . . . . . . . . . . . . . . . . . . . . . . . . . . . . . . . . . . . 29Local Installation . . . . . . . . . . . . . . . . . . . . . . . . . . . . . . . . . . . . . . . . . . . . . . . . . . 30Network Installation . . . . . . . . . . . . . . . . . . . . . . . . . . . . . . . . . . . . . . . . . . . . . . . 30Silent Installation . . . . . . . . . . . . . . . . . . . . . . . . . . . . . . . . . . . . . . . . . . . . . . . . . . 31
Installing the Add-Ins . . . . . . . . . . . . . . . . . . . . . . . . . . . . . . . . . . . . . . . . . . . . . . . . . . . . . 35Selecting Add-Ins during the Installation . . . . . . . . . . . . . . . . . . . . . . . . . . . . . . . 35Locating the Add-Ins for Excel . . . . . . . . . . . . . . . . . . . . . . . . . . . . . . . . . . . . . . . 36
Installing and Uninstalling the Web Add-Ins . . . . . . . . . . . . . . . . . . . . . . . . . . . . . . . . . . . 37Installing the Enterprise Server . . . . . . . . . . . . . . . . . . . . . . . . . . . . . . . . . . . . . . . . . . . . . . 37
Setting Up a Data Source on the Enterprise Server . . . . . . . . . . . . . . . . . . . . . . . . 38Adding a Repository Connection on the Enterprise Server . . . . . . . . . . . . . . . . . . 38Starting the Enterprise Server . . . . . . . . . . . . . . . . . . . . . . . . . . . . . . . . . . . . . . . . 38
Uninstalling ShowCase . . . . . . . . . . . . . . . . . . . . . . . . . . . . . . . . . . . . . . . . . . . . . . . . . . . . 38Uninstalling ShowCase from PCs . . . . . . . . . . . . . . . . . . . . . . . . . . . . . . . . . . . . . 38Uninstalling ShowCase from the Network . . . . . . . . . . . . . . . . . . . . . . . . . . . . . . 39
Setting Up a Data Source 41Adding a ShowCase IBM i Driver Data Source . . . . . . . . . . . . . . . . . . . . . . . . . . . . . . . . . 42Adding a non-DB2 Data Source . . . . . . . . . . . . . . . . . . . . . . . . . . . . . . . . . . . . . . . . . . . . . 43Modifying a Data Source . . . . . . . . . . . . . . . . . . . . . . . . . . . . . . . . . . . . . . . . . . . . . . . . . . . 44
Modifying a Data Source through Microsoft ODBC Administrator . . . . . . . . . . . 44
vi ShowCase 9 Installation Guide
Connecting to the IBM i 45Connecting with ShowCase PC Applications . . . . . . . . . . . . . . . . . . . . . . . . . . . . . . . . . . . 45
ShowCase Query . . . . . . . . . . . . . . . . . . . . . . . . . . . . . . . . . . . . . . . . . . . . . . . . . . 45ShowCase Report Writer . . . . . . . . . . . . . . . . . . . . . . . . . . . . . . . . . . . . . . . . . . . 45ShowCase Warehouse Builder . . . . . . . . . . . . . . . . . . . . . . . . . . . . . . . . . . . . . . . 45ShowCase Warehouse Manager Client . . . . . . . . . . . . . . . . . . . . . . . . . . . . . . . . . 46
Troubleshooting Connection Failures . . . . . . . . . . . . . . . . . . . . . . . . . . . . . . . . . . . . . . . . . 46ShowCase Query and ShowCase Report Writer . . . . . . . . . . . . . . . . . . . . . . . . . . 46TCP/IP . . . . . . . . . . . . . . . . . . . . . . . . . . . . . . . . . . . . . . . . . . . . . . . . . . . . . . . . . . 46
Index 49
Table of Contents vii

viii ShowCase 9 Installation Guide
Technical Support
Contacting Technical Support
For general ShowCase InformationHelp/Systems can be reached by calling 952-933-0609.
For technical support or informationCall our general number 952-933-0609, and ask for technical support.
-or-
Send an Email to [email protected].
For information on ShowCase products, services, and partner programsVisit the the ShowCase home page:
www.helpsystems.com/showcase
To download documentation, software, or the latest program fixesGo to the ShowCase home page:
www.helpsystems.com/showcase
Technical Support Website
Customers who are current on maintenance can apply for a personalized ID for the Help/Systems Technical Support website. If you do not already have an ID, access the Technical Support website at www.helpsystems.com/showcase and apply for an ID. Once you log in to Technical Support, you can access information such as the following:
Troubleshooting. Search Help/FACTS for a resolution and view frequently asked questions.
Documentation. Read technical support policies, browse the technical support newsletters for tech-nical issues, or view and download the latest product documentation.
Supported Platforms. Find supported software versions, release dates, end dates, IBM i and PC operating systems, and web browsers.
Upgrade Info. Order an upgrade and view upgrade information pertinent to each release.
Patches. Download patches for all supported products.
Contact Us. Find the most current technical support phone numbers, e-mail addresses, and fax num-bers.
Other Links. Find information about products, training, and upcoming events.
Technical Support 1
2 ShowCase 9 Installation Guide

Release Overview
Introduction
Whether standalone or in conjunction with IBM Collaboration and Deployment Services, ShowCase 9 provides business analysts with reporting solutions on the IBM® System i, with enterprise-class access to data, data enhancement, and security management.
ShowCase includes a variety of new features described in this chapter. Release notes are provided further below.
DocumentationThe ShowCase 9 documentation set is shown in Table 2-1.
Table 2-1ShowCase 9 documentation set
Documentation Description
ShowCase 9 Release Notes(HTML)
For the latest release notes, see the Release Notes file on the Help/Systems Technical Support website at www.helpsystems.com/showcase (login required).
ShowCase 9Installation Guide (PDF)
Release overview, environment requirements, IBM® i set-tings, virtualized environments, installing server compo-nents, installing client components, installing add-ins, configuring data sources, and troubleshooting.
ShowCase 9Administrator's Guide (PDF)
Starting and stopping the server, managing and optimizing performance, planning security, managing data, managing test and production environments, managing IBM i pass-words, server maintenance, Report Services, IBM i com-mands, sample database information, and troubleshooting.
ShowCase 9 Upgrade Guide (PDF)
Common upgrade questions, preparing for an upgrade, recommended upgrade sequence, supported upgrade paths, migration requirements, establishing a test environ-ment, uninstalling previous versions, and migrating add-ins.
Online help Extensive online help for ShowCase Report Writer, Show-Case Query, ShowCase Warehouse Builder, and Show-Case Warehouse Manager Client applications.
Release Overview 3

Release Enhancements
Integration with IBM Collaboration and Deployment Services 4.2, 4.2.1 and 5.0ShowCase 9 interoperates with IBM Collaboration and Deployment Services to deliver enterprise-class reporting solutions. You can save queries, reports, and other files to the IBM Collaboration and Deployment Services Repository, take advantage of the rich features in IBM Collaboration and Deployment Services Deployment Manager, and share information and run dynamic reports via the web-based IBM Collaboration and Deployment Services Deployment Portal. IBM Collaboration and Deployment Services provides broad content management capabilities, including versioning and cus-tom metadata, drag-and-drop publishing, flexible control over scheduled jobs, improved notification and subscription services, customizable roles and actions, and interoperability with IBM® SPSS® Statistics, IBM® SPSS® Modeler, SAS, Business Intelligence and Reporting Tools (BIRT), and other IBM Collaboration and Deployment Services operations.
Job Step Control of Individual ShowCase Warehouse Builder DefinitionsIBM Collaboration and Deployment Services users can now control individual ShowCase Ware-house Builder definitions within job steps without breaking up their existing Warehouse Builder sets. Administrator or analysts can select individual Warehouse Builder definitions within a Warehouse Builder set at the job-step level and use existing IBM Collaboration and Deployment Services func-tionality to conditionally control the flow, set notifications, and so on. For more information, see Chapter 4 in the ShowCase 9 Administrator's Guide.
Support for Microsoft Windows Server 2008 and Microsoft SQL Server 2008ShowCase supports a subset of the environments supported by IBM Collaboration and Deployment Services. ShowCase 9 adds new support for IBM Collaboration and Deployment Services installa-tions on Microsoft® Windows Server® 2008 (32-bit and 64-bit) with Microsoft® SQL Server® 2008 data sources (on a Windows OS). With ShowCase 9, Enterprise Server can also be deployed to Windows Server 2008R2.
Support for up to 1 MB of SQL (Previously 64 KB)ShowCase 9 users can now create and execute SQL statements up to 1 MB in size. ShowCase Query users can submit up to 1 MB of SQL as single run or batch jobs, and ShowCase Report Writer and ShowCase Warehouse Builder client users can create reports or definitions with up to 1 MB of SQL.
Prior to this release, SQL statements were limited to 64 KB, requiring some users to split queries into smaller queries, increasing the complexity of the process and the opportunity for error. Now business analysts can utilize the tools as they normally do and rarely encounter an issue with SQL size. Instead of spending extra time to circumvent the limit, analysts can contain the entire data extraction logic within a single SQL statement.
Note: SQL statements up to 1 MB take longer to parse and process, and the overall performance of ShowCase 9 can be impacted while processing. Some third-party components may not support 1 MB of SQL and other limitations apply. SQL statement elements should be entered within the given limits, or you may receive an "Error message unknown" message. The maximum number of SQL statement elements allowed in SQL statements are shown in Table 2-2:
4 ShowCase 9 Installation Guide

Table 2-2SQL limits
Running ShowCase Enterprise Server as a Windows ServiceShowCase Enterprise Server runs as a Microsoft Windows service program in ShowCase 9, allowing the server to start automatically without user interaction. Previously, reporting jobs could be delayed indefinitely (for example, after a reboot) until a PC user with account access started the server manu-ally. As a Windows service program, Enterprise Server is set (by default) to start automatically when the system starts. From the Properties dialog box, the startup type (Automatic, Manual, or Disabled) can be set to your preference, and the service can be manually stopped, restarted, paused, resumed, and disabled. To configure Enterprise Server service settings, choose Start\ Control Panel\Admin-istrative Tools\Services and then double-click ShowCase Enterprise Server.
Enterprise Server can still be started by choosing [All] Programs\ IBM \ShowCase 9\ShowCase Enterprise Server from the Windows Start menu. For more information about starting and stopping Enterprise Server, see Chapter 2 in the ShowCase 9 Administrator's Guide.
Improved Firewall SupportAn increased focus on security is driving more organizations to use firewalls. ShowCase 9 adminis-trators can now configure a firewall port, compressed data firewall port, and the RMI host name for ShowCase Warehouse Manager Servers using the ADDSCTCP command.
Previously, administrators could configure the firewall settings by modifying showcase.cfg under the direction of a support representative. Administrators can now configure firewall settings at installa-tion or with ADDSCTCP and RMVSCTCP after installation. The firewall settings can be validated by viewing the service table entries with WRKSRVTBLE. For more information about configuring fire-walls, see Chapter 5 in the ShowCase 9 Administrator's Guide.
Note: To ensure backward compatibility, firewall settings in the configuration file (showcase.cfg) are still supported. However, the settings in the configuration file are given lesser priority than those set at installation or with the ADDSCTCP command.
Custom MetadataShowCase 9 users can now view and update custom properties on repository objects (.dbq/.rpt) using ShowCase Query, ShowCase Report Writer, or the Microsoft Excel add-in without accessing IBM Collaboration and Deployment Services Deployment Manager and/or asking an administrator to enter such data. The user can view and update publishing properties such as Description, Keywords, and Expiration Date, and these properties are compatible (version for version) with properties set directly in IBM Collaboration and Deployment Services.
Configurable ShowCase Query and ShowCase Report Writer TimeoutsShowCase 9 administrators can optionally set a session timeout value in ShowCase Warehouse Man-ager Client so ShowCase Query, ShowCase Report Writer, and Excel\Lotus add-in users are automat-ically disconnected when their session is inactive for the specified time period (30-minute
SQL element Maximum allowed
SELECT 4095
FROM 4095
WHERE 4092-4093
HAVING 4092
ORDER BY 4095
Release Overview 5

minimum). The timeout value can be set at a global, group, or individual user level. When the time-out limit is reached, the clients are disconnected from the data source(s), a timeout message appears, and users are prompted to save unsaved data. Administrators can set a different timeout value for each data source. When multiple data sources are connected, the smallest timeout value of the con-nected data sources is used. For more information on setting timeout limits, see Chapter 3 in the ShowCase 9 Administrator's Guide.
Note: When reports and queries run against the server, the client sessions are considered active until execution completes. Timeouts will not occur during this period of execution.
Standardized LOG4J LoggingShowCase 9 switches to standardized Apache LOG4J logging, which supports rollover logging among other features. Previously, the server logs could expand without limit, hampering the ability of users to manage the files and troubleshoot problems. In ShowCase 9, logging properties are set in the showcase.cfg configuration file at /<SCSERVER>/ProdData/config, where SCSERVER is the name of the ShowCase Warehouse Manager Server installation library. Administrators can specify a maximum log file size (for example, showcasecorp.traceMaxFileSize=200MB) and when the limitation is reached, a new log file is created and logging continues in the new file. Administrators can also enable a rollover date option (for example, showcasecorp.traceR-olloverType=DATE), and each log file will roll over to a new file once the system date changes to the next day. In general, performance decreases when logging of any type is enabled. However, the new rollover logging feature will not cause performance to degrade significantly. For more informa-tion, see Chapter 5 in the ShowCase 9 Administrator's Guide.
ShowCase Warehouse Manager Server Patch RollbacksWith ShowCase 9, administrators can run the RMVSCPTF command to roll back (unapply) the most recent ShowCase Warehouse Manager Server patches. This command contains no parameters, but the server should be stopped prior to executing the command. Patches are rolled back to the prior patch level; the command restores the versions of all objects that existed before the latest patch was applied and removes all objects that did not exist prior to the latest patch. The command can roll back only one patch at a time but can be run in succession to roll back to the installation release level.
Note: The patch rollbacks rely on updated patch information in SCPTFHST (SQL table) and the availability of the backup save files and user space (created when patches are applied) in the Ware-house Manager Server installation library. If any of these is not found when the patch rollback is run, the rollback will not continue. To identify the difference between an original unaltered Warehouse Manager Server 9.0 installation from one in which patches were installed and subsequently removed, check the SCPTFLOG journal. If there are no records of patches being applied, then it is the original installation.
IT Infrastructure Enhancements
New Client EnvironmentsShowCase 9 client applications can be installed on the following Microsoft Windows operating sys-tems:
• Windows 7 Enterprise (32-bit or 64-bit)
• Windows 7 Professional (32-bit or 64-bit)
• Windows Vista Business (32-bit or 64-bit)
6 ShowCase 9 Installation Guide
• Windows Vista Ultimate (32-bit or 64-bit)
• Windows XP Professional (32-bit or 64-bit)
Note: The latest service packs from Microsoft should be installed for Windows operating systems.
Support for IBM Technology for Java (JVM)ShowCase 9 exploits the full advantages of IBM® i's high-performance JVM called IBM Technology for Java™. The 32-bit version is available for V5R4 users and the 64-bit version for IBM i 6.1 users. IBM Technology for Java Virtual Machine replaces the IBM Classic Java Virtual Machine, which had known scalability and performance issues.
JD Edwards (JDE) EnhancementsShowCase continues to support Oracle JD Edwards database releases for those customers who utilize JDE data sources in their application environment. ShowCase 9 supports JDE World A9.2, World A9.1, World A7.3, OneWorld XE, OneWorld ERP 8.0, and EnterpriseOne ERP 9.0 and Enterprise-One ERP 9.1 Tools Release 9.1.0.4. For more information, see the topic JD Edwards (JDE) Require-ments in Chapter 3 on page 11.
Other Non-DB2 Data SourcesShowCase 9 also supports these non-DB2 data sources:
• Microsoft Access® 2003 and 2007
• Microsoft Excel 2003 and 2007
• Microsoft SQL Server 2005 and 2008
• Lotus® Domino 8.5
• Oracle 10g and 11g
Support for Virtualized EnvironmentsShowCase 9 client applications can be deployed in virtualized environments such that the business analysts and report consumers can perform all of the same tasks as though the software were actually installed on their desktop machines.
Virtualized ShowCase Client EnvironmentsShowCase client applications can be deployed in these virtualized client environments.
• Citrix 4.5
• XenApp 5.0, 6.0 and 6.5
Virtualized ShowCase Enterprise Server EnvironmentsShowCase Enterprise Server can be deployed in these virtualized server environments:
• VMWare ESX Server 3.0 and 3.5
Support for Silent InstallationsShowCase 9 client applications can be installed in silent mode. In silent mode, the installation pro-cess runs without a user interface and without user intervention. A silent installation can deploy ShowCase client applications to many users and ensure that the same software is installed on each PC. When running an installation in silent mode, no messages are displayed for the end user. Instead,
Release Overview 7

a log file captures installation information, including whether the installation was successful. For more information, see the topic Silent Installation in Chapter 5 on page 31.
Product RenamingThis release marks the renaming of ShowCase Suite. ShowCase 9 supports interoperability with IBM Collaboration and Deployment Services 4.2.
Table 2-3New product names
Release Notes
For any additional, late-breaking 9.x information, see the Help/Systems Technical Support page at www.helpsystems/com/showcase.
Known Issues• Microsoft Windows operating system users may encounter a Windows Security Alert when start-
ing ShowCase Enterprise Server for the first time. Select Unblock for the server to work prop-erly.
• ShowCase queries (.dbq) and reports (.rpt) run through Enterprise Server will fail to output to PDF with Enterprise Server running as a Windows service program on Windows Vista (64-bit) or Windows 7 (64-bit) operating systems. [ECM00144215]
• ShowCase jobs executed through Enterprise Server (running as a Windows service program) will fail if the results are saved to a mapped network drive. The same job can be run successfully through Enterprise Server Console or by using UNC syntax (instead of a mapped drive) for the saved results. For more information, see http://support.microsoft.com/kb/180362/EN-US/ . [ECM00144304]
• ShowCase Query SQL queries (.dbq) of up to 1 MB with a JDE EnterpriseOne data source can fail from IBM Collaboration and Deployment Services Deployment Portal. The report execution fails while saving the report output to the repository. To resolve this issue, increase the thread pool size of WebContainer to 200 and increase the minimum heap size to 1024 MB. After mak-ing these configuration changes, the same report should run without error. [ECM00135225]
Old name New name General usage
ShowCase Suite ShowCase ShowCase
ShowCase Query ShowCase Query Query
ShowCase Report Writer ShowCase Report Writer Report Writer
ShowCase Warehouse BuilderShowCase Warehouse Builder
Warehouse Builder
ShowCase Warehouse Manager Client
ShowCase Warehouse Manager Client
Warehouse Manager Client
ShowCase Warehouse Manager Server
ShowCase Warehouse Manager Server
Warehouse Manager Server
ShowCase iSeries Driver ShowCase IBM i Driver ShowCase IBM i Driver
PASW Collaboration and Deploy-ment Services (formerly Predictive Enterprise Services)
IBM Collaboration and Deployment Services)
IBM Collaboration and Deploy-ment Services
8 ShowCase 9 Installation Guide

• ShowCase Suite 8.0 objects and Predictive Enterprise Services 3.0 objects restored into a PASW Collaboration and Deployment Services 4.0 repository replace the entire contents of the target repository. Existing objects are not preserved.
For example, if the command RSTSRVRINF is issued on a ShowCase 9 server to restore Show-Case Suite 8.0 and PES 3.0 files into a repository that already contains objects, the ShowCase and PES objects are restored to the 4.0 repository, but the existing objects in the target repository are deleted. [ECM00135589]
• A "SQL System error" message may appear while executing 1 MB of SQL through Query. After the server connection is established, the "SQL System error" message may appear if the DB2 SQE lacks sufficient memory. You may need to contact IBM support to estimate the amount of memory (Main/DASD) required to run the 1 MB SQL successfully. [ECM00127964]
• ShowCase Report Writer now supports 128-character column alias names. Previously, Report Writer supported only 101 characters in a column alias name, while Query supported 128 charac-ters. The 128-character maximum now applies to both Report Writer and Query. [ECM00128837]
• If you execute a run job with 1 MB of SQL (.dbq) through Enterprise Server, it may fail if the memory resources are not sufficient. For example, you may have defined a data source, Enter-prise Server, and credentials in the Resource Definition of IBM Collaboration and Deployment Services Deployment Manager. You've created and saved a new job with a .dbq having 1 MB of SQL in it. You run the job through Enterprise Server and after some time, the job fails with an "OutOfMemory" error. This error occurs because Query does not have sufficient memory to pro-cess the output data. The problem can be resolved by installing ShowCase Enterprise Server on a system with at least 2 GB of RAM and by setting heap size of the IBM Collaboration and Deployment Services server to 2 GB. Note: The same job could be run successfully through Report Services. [ECM00131452]
• SQL statements of 1 MB may not execute successfully on IBM® i's V5R4 (with 32-bit JVM) if the number of unions in the SQL exceeds the DB2 driver limits. Refer to the IBM i DB2 SQL documentation for limits. [ECM00126684]
• SQL statements of 1 MB with JDE World may not execute successfully. If you receive a "Null Pointer Exception" in Query connecting to a JDE World data source, you can resolve this issue by increasing the maxMemory for the Query client from 96 MB to 256 MB.
To increase the maxMemory for the Query client, open the Windows Registry Editor (Start > Run > regedit > OK). Search for the maxMemory entry on the path HKEY_LOCAL_MA-CHINE\SOFTWARE\ODBC\ODBCINST.INI\ShowCase IBM i Driver. Change the maxMemory value from 96 to 256. SQL batch jobs should now run successfully, even if you still receive a "Null Pointer Exception" error. [ECM00129852]
• If you are using Lotus Domino 8.5 as a data source with ShowCase Warehouse Builder defini-tions, you may encounter problems while running the sets. If the data source is defined as system DSN, the Lotus driver may not find the specific Domino server in the data source mapping. This is an intermittent issue with the Lotus Notes SQL Driver occurring when DSN is defined as sys-tem DSN. The workaround is to use the Enterprise Server as a console and define the data source as a user DSN instead of system DSN. [ECM00137253]
• Warehouse Builder definitions specifying an Oracle 11g data source may fail. If you receive the "JDBC driver oracle.jdbc.driver.OracleDriver not found" error message after saving and running the definition, replace <install_dir>\lib\MForacle.jar with ojdbc14.jar, and the definition should run successfully. [ECM00127283]
Release Overview 9

• ShowCase clients connecting with Oracle 11g data sources may not be able to select database links. If you are logged into the Oracle data source and receive the "[Oracle][odbc] Driver not capable" error while selecting database links, you have encountered an Oracle 11g driver limita-tion (sqora32.dll). Database links can still be retrieved with SQL against the ALL_DB_LINKS table, but some users may have not access to ALL_DB_LINKS and the retrieved database links do not include the owner and tables list. The Oracle SQL syntax requires the database link to be specified in the FROM clause after the table name with the @ character. For example:
SELECT col FROM table@<DATABASE_LINK>
Query does not support the @<DATABASE_LINK> syntax. This is a limitation of the software. [ECM00127189]
• While running an iterating job (producer-consumer) with two Query files (.dbq) that contain 1 MB of SQL each, the IBM Collaboration and Deployment Services job may hang and then fail with a "Resource has been deleted" error. The issue is with the Apache Axis third-party code used by the WebSphere application server. To run the job successfully, either increase the mem-ory resources available for the job or apply the Apache Axis patch available here: https://issues.apache.org/jira/browse/AXIS-2574. [ECM00134593]
• The sample queries and reports, optionally installed and used in the Query and Report Writer tutorials, are designed to be opened and run against the Microsoft Access database SCSam-ple90.mdb (also optionally installed). If the sample queries and reports are opened and run against an IBM i data source, change links and variable data type updates may be required.
• ShowCase client products use Microsoft WinHelp (.hlp) help systems, which require Win-Hlp32.exe. Customers using the Windows Vista or Windows 7 operating systems must download and install WinHlp32.exe to be able to open the .hlp help files, including those in the ShowCase client help systems. WinHlp32.exe is available on the Microsoft Download Center. See Micro-soft online support article 917607 at http://support.microsoft.com/kb/917607 for complete details and instructions. [ECM00138929]
10 ShowCase 9 Installation Guide
Environment Requirements
This chapter describes environment requirements for ShowCase installation and setup. If your sys-tem fails to meet the hardware and software requirements described in this chapter, ShowCase may not function properly.
ShowCase 9 can be used with IBM Collaboration and Deployment Services. For IBM Collaboration and Deployment Services requirements, see the IBM Collaboration and Deployment Services docu-mentation.
IBM i Requirements
Disk Space
Table 3-1Disk space required for server installation
Back Up Existing LibrariesYou can install the server into a new 9.x library or install over an existing 8.0 or 9.0 library. Installing 9.x over a pre-9.x library is not supported. Always back up your server library before installation. For instructions, see Chapter 5 in the ShowCase 9 Administrator's Guide.
Configure and Start TCP/IPBefore installing the servers, configure and start IBM® i TCP/IP. Someone trained in TCP/IP net-work administration should ensure the proper setup, use, and maintenance of TCP/IP. For more infor-mation on configuring TCP/IP, see Chapter 5 in the ShowCase 9 Administrator's Guide, along with your IBM i documentation.
JD Edwards (JDE) RequirementsShowCase 9 supports JD Edwards World A7.3, World A9.1, World A9.2, OneWorld XE, OneWorld ERP 8.0, and EnterpriseOne ERP 9.0/9.1 Tools Release 9.1.0.4. ShowCase 9 provides user profile, data dictionary, and cost center security support for these World software versions. Because of inter-nal changes to the World software database structure, user-developed queries or other ShowCase applications may not be interchangeable across World software release boundaries. See your JDE documentation for changes to World software database structures.
The SETJDEOWA command configures the server on the IBM® i for OneWorld integration. The command also allows ShowCase to recognize environment information for OneWorld users who do not have an IBM i user profile. For instructions, see Chapter 4 in the ShowCase 9 Administrator's Guide.
Component Space required
Server 300 MB
Temporary space300 MB (After installation, this space is freed when the installer signs off.)
Environment Requirements 11
Server Requirements
The server installation requires IBM® i 7.3, 7.2, 7.1, or 6.1 with the following Licensed Program Products (LPPs) installed:
Table 3-2Licensed Program Products (LPPs)
Note: To verify PASE is installed, type GO LICPGM, choose option 10 and look for the entry Portable App Solutions Environment. If you do not have PASE installed, install it using your IBM i SS1 installation media.
The server installation also requires the latest Java Group, DB2 Group, Cumulative Package, and HIPER Group PTFs be applied. (WRKPTFGRP Group Status value MUST be installed)
Note: The system value QALWOBJRST must be set to *ALL or *ALWPGMADP. You can display the value with the DSPSYSVAL QALWOBJRST command.
Server Installation Tips• Install the server into an existing 9.x server library or into a new library. Do not install it into a
pre-9.0 user library.
• Make sure the libraries QSYS and QSYS2 are at the top of the system portion of your interactive session library list before you install the software. Issue the DSPLIBL command to view your existing library list. If QSYS and QSYS2 aren’t the first and second libraries listed, press F3 to exit the display and issue the following command for each library listed above QSYS:
CHGSYSLIBL LIB(XXXXX) *REMOVE (where XXXXX is a library above QSYS)
This affects only the interactive session used, and does not change system values or job descrip-tions. Once the session is logged off, the library list will be reset.
Description IBM i 7.3 IBM i 7.2 IBM i 7.1 IBM i 6.1
IBM Toolbox for Java N/A N/A N/A5761JC1 *BASE
IBM Developer Kit for Java5770JV1 *BASE
5770JV1 *BASE
5761JV1 *BASE
5761JV1 *BASE
Java SE 6 (32-bit)5770JV1 option 14
5770JV1 option 11
5761JV1 option 11
5761JV1 option 11
Java SE 6 (64-bit)5770JV1 option 15
5770JV1 option 12
5761JV1 option 12
5761JV1 option 12
Extended Base Directory Support
5770SS1 option 3
5770SS1 option 3
5770SS1 option 3
N/A
QShell Interpreter5770SS1 option 30
5770SS1 option 30
5770SS1 option 30
5761SS1 option 30
Portable App Solutions Environment (PASE)
5770SS1 option 33
5770SS1 option 33
5770SS1 option 33
5761SS1 option 33
Group IBM i 7.3 IBM i 7.2 IBM i 7.1 IBM i 6.1
Java Group PTF SF99725 SF99716 SF99572 SF99562
DB2 Group PTF SF99703 SF99702 SF99701 SF99601
CUM Package SF99730 SF99720 SF99710 SF99610
HIPER Group PTF SF99729 SF99719 SF99709 SF99609
12 ShowCase 9 Installation Guide
• Configure and start IBM® i TCP/IP before you enable ShowCase TCP/IP. You do not have to enable ShowCase TCP/IP support at installation time. You can enable it later using the CHGSCSVRA command.
• Remember the IP address of your IBM i and the port number assigned to each library. You and your users need this information to complete data source setup.
• If you will be using IBM Collaboration and Deployment Services Deployment Portal for browser-based reporting, remember your Application Server port number for use in the browser (http://hostname:port/peb).
• The default setting for the QALWUSRDMN system value is *ALL. If this setting is unacceptable for your environment, before you install the server specify the following libraries for QALWUS-RDMN: QSYS, QRPLOBJ, QTEMP, and the server library (default SCSERVER). These librar-ies help the server to install correctly and help to prevent unpredictable results when you run client applications. To work with system values, use the IBM i command WRKSYSVAL and choose option 2 to change QALWUSRDMN.
Additional Considerations• The server sets *PUBLIC Exclude as the default authority to ShowCase Warehouse Manager
Client and ShowCase Warehouse Builder. A profile with *ALLOBJ authority can use Ware-house Manager Client to authorize other users to access Warehouse Manager Client or Ware-house Builder.
• The user profile QUSER should have the Maximum Allowed Storage (MAXSTG) parameter set to the default *NOMAX. Otherwise, you may have difficulty connecting through TCP/IP and run-ning large queries in batch.
Client PC Software and Hardware Requirements
The following table lists PC requirements for ShowCase software applications. For all types of client installations, you must have administrative authority to your PC to install ShowCase. For more infor-mation, see your Microsoft Windows documentation.
Table 3-3PC requirements
Component Requirement
Operating system
One of the following Microsoft Windows operating systems:• Microsoft Windows 10 (32- or 64-bit) • Microsoft Windows 8 (32- or 64-bit) • Microsoft Windows 7 Professional or Enterprise edition
(32- or 64-bit) • Microsoft Windows Vista Business or Ultimate edition
(32-or 64-bit) • Microsoft Windows XP Professional (32- or 64-bit) • Microsoft Windows Server 2008R2Note: You should also install the latest service packs for Windows operating systems.
Web browser Internet Explorer 7 or 8 or Mozilla Firefox 2.x or 3.x.
Microprocessorx86 processor, 1.8 GHz or the minimum required by your operating system.
Environment Requirements 13

Virtualized Environments
Virtualized ShowCase Client EnvironmentsEnterprise-class customers can deploy ShowCase client applications in a virtualized environment, performing all of the same tasks as though the client software were actually installed on desktop cli-ent machines. ShowCase 9 client applications can be deployed in these virtualized client environ-ments:
• Citrix 4.5
• XenApp 5.0, 6.0 and 6.5
RAM
At least 512 MB of RAM (recommended 1GB) more than the minimum required by your operating system. Additional RAM (1 GB) is recommended to run concurrent reports on the Enterprise Server.
Hard disk space
200 MB or greater available hard disk space for the follow-ing applications (space needed will vary depending on com-ponents selected): • ShowCase Warehouse Manager Client• ShowCase Warehouse Builder• ShowCase Report Writer (including IBM® ShowCase®
Query)• Query add-in for Excel• Query add-in for Lotus „Enterprise Server*• Sample filesShowCase requires Microsoft components .NET Frame-work 2.0 and WSE 2.0 SP3. If these components are not already installed, they are installed as part of the Show-Case installation and require approximately 90 MB addi-tional hard disk space. * Additional disk space (at least 20 GB) is recommended for storing intermediate results of Enterprise Server reports.
Monitor640 x 480 resolution minimum; 800 x 600 or more recom-mended.
Network protocolWarehouse Manager Client requires a TCP/IP connection to the IBM® i.
Microsoft Excel version for add-ins
Excel 2003, 2007, 2010 (32-bit only), or 2013 (32-bit only).
Microsoft Graph
If you run reports with charts through an Enterprise Server, you must install Microsoft Graph on the Enterprise Server PC. If you have Microsoft Word or Excel (or Office) installed, you will probably have Graph on your computer system by default, since it runs from within these applica-tions.
IBM Lotus version for add-ins
Lotus Millennium 9.6 or 9.8.
Other DVD drive (or network access to installation files).
Component Requirement
14 ShowCase 9 Installation Guide

Virtualized ShowCase Enterprise Server EnvironmentsShowCase Enterprise Server can be deployed in these virtualized environments:
• VMWare ESX Server 3.0
• VMWare ESX Server 3.5
ShowCase Warehouse Builder Requirements
If you are using IBM® i data sources, the following are installation requirements and recommenda-tions for ShowCase Warehouse Builder:
• You must have an IBM i for a control server. The control server must be the same ShowCase ver-sion as the client version you are installing.
• By default, only users with *ALLOBJ authority can use Warehouse Builder. To authorize users, grant them application authority in ShowCase Warehouse Manager Client.
• Distribution performance is better if the target table is not journaled. To avoid using journaled tables, verify that the target collection is created using the CRTLIB command rather than the SQL command CREATE COLLECTION. Also, open Warehouse Builder and from the Tools menu, choose Options. On the Defaults tab, verify that Create Target SQL Collection is not selected (this is the default setting).
• The job queue SCDDJOBQ is added to the subsystem you choose during installation. The maxi-mum number of jobs on the Job Queue entry of the subsystem is set to *NOMAX by default.
• A routing entry is added to the subsystem you choose during installation (if the routing entry does not exist). It uses the class QGPL/QWCPLSUP. If you want to use a different class, you can change it after the installation is complete. For details, see "Routing Entries" in Chapter 6 in the ShowCase 9 Administrator's Guide.
• If either of the server options Exclude users from libraries by default or Exclude users from tables by default is selected, you must have *ALLOBJ or data administrator authority to access all information when using Warehouse Builder to create tables.
Remote DB2 Setup (for ShowCase Warehouse Builder)To use ShowCase Warehouse Builder with remote DB2 platforms, Distributed Relational Database Architecture (DRDA) communication is required between each remote DB2 platform and the IBM® i control server. If you need help configuring DRDA, consult the documentation provided with IBM i. You can use SNA or TCP/IP communications for your DRDA connections.
The IBM i acting as the control server must have a relational database directory entry for each remote DB2 platform. To add the entry, use the ADDRDBDIRE command on your control server.
Enterprise Server Requirements
About the Enterprise ServerThe Enterprise Server is one or more PCs that process scheduled queries/reports from the server and dynamic queries/reports from the web browser and publish the results to the repository or another PC on your network. If you use more than one Enterprise Server, they will run pooled. This means that they will logically act as one server, and the server with the lightest load will process the incoming request. However, for scheduled reports, you can choose to dedicate requests to a specific Enterprise Server. Enterprise Server can be run as a Windows service program in ShowCase 9, allowing the ser-vice to start automatically without user interaction.
Environment Requirements 15
For Enterprise Server installation instructions and information about setting up and starting the Enterprise Server, see Installing the Enterprise Server on page 37.
About Report ServicesReport Services runs reports on the server and publishes the results, in different formats, without requiring a PC such as an Enterprise Server. Report Services provides a mechanism to load and inter-pret database queries and reports, retrieve data from various data sources, perform data manipulation such as calculations, and format the output into HTML or Excel. By default, Report Services is enabled through IBM Collaboration and Deployment Services Deployment Portal. All dynamic web and scheduled queries are run via Report Services provided they meet certain criteria. The Enterprise Server is still required for requests not meeting these criteria. For details about Report Services, including a list of the criteria where the Enterprise Server is required, see the ShowCase 9 Adminis-trator's Guide.
Enterprise Server PC RequirementsEnterprise Server PCs have the following requirements:
• Microsoft Windows 7 Professional or Enterprise edition (32- or 64-bit), Microsoft Windows Vista Business or Ultimate edition ((32- or 64-bit), Microsoft Windows XP Professional (32-or 64-bit), or Microsoft Server 2008R2, all with the latest Microsoft service packs installed.
Note: Enterprise Server can also be installed in virtual server environments VMWare ESX Server 3.0 or 3.5.
• 1.8 GHz microprocessor or greater, or the minimum required by your operating system
• 75 MB free disk space. Additional disk space (at least 20 GB) is recommended for storing inter-mediate results of Enterprise Server reports.
• 512 MB of RAM (1 GB recommended) or greater, more than the minimum required by your operating system. Additional RAM (1 GB) is recommended to run concurrent reports on the Enterprise Server.
• Enterprise Server (installed)
• ShowCase Query and ShowCase Report Writer (installed)
• ODBC drivers
• If you run reports with charts through an Enterprise Server, you must install Microsoft Graph on the Enterprise Server PC. If you have Microsoft Word, Excel, or Office installed, you will proba-bly have MS Graph installed on your computer system by default, since it runs from within these applications.
Important: The Enterprise Server PC and the publishing PCs must specify the same data source names and server names. After you set up the Enterprise Server, provide your publishers with the data source and server information you used.
Additional Enterprise Server RequirementsThe following issues apply when you are running ShowCase Query/ShowCase Report Writer and Enterprise Server on separate PCs, scheduling queries/reports, or enabling dynamic reports. It is important to create a consistent environment between your publishing PCs and Enterprise Server PCs to ensure scheduling and web browser-based reporting work properly. We recommend setting up your PC environments before actually publishing queries/reports.
16 ShowCase 9 Installation Guide

Publishing PCs and Enterprise Server PCs must define the same:
• Data source names (defined in Microsoft ODBC Administrator)
• Repository connection names (defined in Query or Report Writer)
• Drive and directory structures (for scheduled output)
Consistent Data Sources and Server NamesIf your Enterprise Server will be on a separate PC from your publishing PC(s), read this section before you install the Enterprise Server. For installation instructions, see Installing the Enterprise Server on page 37.
The Enterprise Server PC(s) and publishing PC(s) (the PC(s) that create and schedule queries or reports) must define the same data source names and repository connection names. After you set up your Enterprise Server and publishing PCs, verify that the same data source names and repository connection names exist on all PCs.
Note: For dynamic and scheduled reports that use Report Services, the data sources in IBM Collab-oration and Deployment Services must also match. For details about Report Services versus the Enterprise Server, see the ShowCase 9 Administrator's Guide.
Administrators: When you define data source names on the Enterprise Server, be sure to communi-cate the names to publishers so they know what to name the data sources on their PCs.
Environment Requirements 17

18 ShowCase 9 Installation Guide

Installing and Uninstalling Server Components
The ShowCase Warehouse Manager Server supports ShowCase Query, ShowCase Report Writer, ShowCase Warehouse Builder, and ShowCase Warehouse Manager Client. Table 4-1 lists client components that connect to the server.
Table 4-1Client components that connect to the server
Important: If you will be using features such as saving to the repository from Query/Report Writer, sharing reports and other files with the IBM Collaboration and Deployment Services Deployment Portal web application, scheduling reports or Warehouse Builder sets, or managing repository con-tent with IBM Collaboration and Deployment Services
Deployment Manager, you must install IBM Collaboration and Deployment Services. See the IBM Collaboration and Deployment Services documentation for installation instructions and require-ments.
After installing IBM Collaboration and Deployment Services and ShowCase, you must install Show-Case plug-ins for IBM Collaboration and Deployment Services using the IBM® i command DPLSCPKG. If you are installing on another platform such as Windows, you must install the plug-ins from the ShowCase installation media. Installation instructions are included in this chapter.
Before You Install
• If you are upgrading, read the ShowCase 9 Upgrade Guide.
• Always save existing server information with the SAVSRVRINF command before you install. For more information, see "Saving Server Information" in the ShowCase 9 Administrator's Guide.
• Read Chapter 3 of this manual for all prerequisites.
• Be certain you have installed the latest Java PTFs for IBM i. See “Server Requirements” on page 12.
• When you install the server, the installation selects a TCP/IP port number for you. If you want to select your own port number, use the WRKSRVTBLE command before the installation to find an available number. Do not select a port that is already in use.
• If you use Kerberos authentication, create a copy of the Kerberos configuration file for the cur-rent Showcase server. Installing the new server over the top of the existing server may cause the file to be overwritten by the installation process.
Client component Purpose
Query Relational and multidimensional database query tool
Report Writer Relational and multidimensional database report tool
Warehouse Builder Data cleansing, transformation, and distribution
Warehouse Manager Client Database administration
Installing and Uninstalling Server Components 19
Beginning Server Installation
1. If you are upgrading an existing ShowCase Warehouse Manager Server installation, save your current server information with the SAVSRVRINF command. For instructions, see the ShowCase 9 Administrator's Guide, Chapter 5.
2. Be certain you have installed the latest Java Group PTFs. To verify the PTFs are applied and no IPL action is required, enter the following command at an IBM® i command line: WRKPTFGRP.
The status of the Java group should be “Installed”.
3. Log on with QSECOFR or equivalent authority (*ALLOBJ, *IOSYSCFG, *SAVSYS, *JOBCTL, and *SECADM special authorities are needed).
Note: The installation will fail if the installing profile's User Profile setting is OWNER(*GRPPRF). *GRPPRF cannot own new objects created by the installing profile.
4. Ensure that the profile is not using a CCSID of 65535 (*Hex) by issuing this command at the command line: CHGJOB CCSID(37).
5. Create a Virtual Optical Drive with the following steps:
a. CRTDEVOPT DEVD(SCOPT) RSRCNAME(*VRT) TEXT('ShowCase Optical Drive') (If successful you will see a message like this: ‘Description for device SCOPT created’.)
b. VRYCFG CFGOBJ(SCOPT) CFGTYPE(*DEV) STATUS(*ON)(If successful you will see a message like this: ‘Vary on completed for device SCOPT’.)
c. CRTIMGCLG IMGCLG(SHOWCASE) DIR('/SHOWCASE') CRTDIR(*YES) (If successful you will see a message like this: ‘Image catalog SHOWCASE created in library QUSRSYS’.)
d. Copy the ISO from your PC to the iSeries:
Extract the ShowCase_9.3.0.0_Server.iso file from the ZIP file.
Using a mapped drive or iSeries Navigator, place the ShowCase_9.3.0.0_Server.iso file into the SHOWCASE directory.
e. ADDIMGCLGE IMGCLG(SHOWCASE) FROMFILE('/SHOWCASE/ShowCase_9.3.0.0_Server.iso') TEXT('ShowCase 9.3.0.0 Installation File') (If successful you will see a message like this: ‘Image catalog entry added to image catalog SHOWCASE’.)
f. LODIMGCLG IMGCLG(SHOWCASE) DEV(SCOPT)(If successful you will see a message like this: ‘Image catalog SHOWCASE loaded in device SCOPT’.)
g. To verify the mounting of the Virtual Optical Drive, issue the command DSPOPT VOL(*All) DEV(SCOPT)
6. Start the ShowCase install with the following command: LODRUN DEV(SCOPT)
7. If prompted for a path name, accept the default.
8. Follow the screen instructions and use this chapter to complete server installation. Each heading of the following sections matches a screen in the installation. The installation displays recom-mended values for the options.
20 ShowCase 9 Installation Guide

Note: If installation fails, check the job log for missing requirements. Type DSPJOBLOG at a command line and press F10. Page up or down to find the information.
National Language SupportSpecify the primary and secondary languages for the ShowCase products. Choose ENU for English lowercase or ENP for English uppercase. ShowCase commands on the IBM® i use the primary lan-guage.
ShowCase Warehouse Manager ServerSpecify the library in which to install the ShowCase Warehouse Manager Server. The screen displays current server libraries. Choose a library to upgrade or press F6 to install a new library. The default library name is SCSERVER. In addition, the root integrated file system (IFS) path used for the instal-lation is based on the specified library name (the default is /SCSERVER).
To avoid problems, do not use these characters in the library name:
Auxiliary Storage Pool (ASP) ID. If you add a library, you are prompted to enter the ASP ID. Accept the default or enter the number of the ASP from which the system should allocate storage for the server library. (IFS information installed with the server is always placed in the system ASP.)
Changing the Library after InstallationTo change the library, you must reinstall it. Before you install a new library, save the catalog files from the old library using the SAVSRVRINF command and restore them into the new library using the RSTSRVRINF command. For more information, see the ShowCase 9 Administrator's Guide.
ShowCase Customizable AuthoritiesThis allows the assignment of ownership of installed ShowCase. By default, all objects are owned by QSECOFR. In certain instances, this is not preferred. If it is necessary to assign ownership to a differ-ent profile, select 1=Enable. If there is no preference, then leave the option blank (default).
ShowCase Interlink for JD Edwards OneWorld and EnterpriseOneChoose this option to enable ShowCase Interlink for JD Edwards (JDE) World A7.3, World A9.1, World A9.2, OneWorld XE, OneWorld ERP 8.0, and EnterpriseOne ERP 9.0/9.1 tOOLS RELEASE 9.1.0.4. Type 1 next to the options and press Enter. You will be prompted for the following informa-tion:
• OneWorld release
• JDE OneWorld System library name
• Use JDE OneWorld app security (*DISABLE or *ENABLE)
• Run authority override (*YES or *NO)
• Single JDE OneWorld profile (*ENABLE or *DISABLE)
• JDE OneWorld Program library name
• Use local or remote authentication (*LOCAL or *REMOTE)
! @ # $ % ^& * ( ) - += ~ { } [ ]| \ : ; ",. < > '/ ?
Installing and Uninstalling Server Components 21

For details about JDE, including information about the SETJDEOWA command for EnterpriseOne configuration, see the ShowCase 9 Administrator's Guide.
ShowCase Warehouse Manager Server TCP/IP Port ConfigurationTCP/IP communications run ShowCase applications, and the installation requires a valid TCP/IP port number. Accept the default port number or enter a port number in the range of 6000-65535, using the IBM® i command WRKSRVTBLE to find available port numbers.
ShowCase 9 includes improved support for configuring firewalls. You can optionally configure a firewall Hostname, Firewall Port, and Compressed Data Firewall Port at installation or with the ADDSCTCP command after installation. If you use ADDSCTCP to set new firewall values, the old configuration settings should first be removed with RMVSCTCP.
Important: Record your TCP/IP port number. You will need it when installing the client software.
If you want to save data to the repository, after installation configure your server connections on each PC.
Each new port configured for ShowCase must be enabled in your network firewall to be bi-direc-tional.
To Configure the IBM Collaboration and Deployment Services Server Port Number1. Open ShowCase Query.
2. From the Tools menu, choose Repository Connections.
3. Add a new connection or choose an existing connection and click the Edit icon.
4. In the Repository Connections dialog box, enter the IBM Collaboration and Deployment Ser-vices server port number you specified during installation.
Changing TCP/IP after Installation
Note: The CHGSCSVRA command will stop the server, disconnect all current users, and stop current jobs. It will also start the server after changes have been made.
1. Add the server library name to your library list.
2. Type WRKSRVTBLE to determine if the port you want to use is available.
3. Type CHGSCSVRA, and add the new port number, subsystem, and library.
Changing Firewall Settings after InstallationAfter installation, use the ADDSCTCP and RMVSCTCP commands to configure the subsystem, TCP/IP ports, and the RMI host name used for the ShowCase Warehouse Manager Server. Configu-rable ports include the main listening port, the firewall listening port, and the compressed data port. The ports are added to the IBM® i service table and can be viewed with the WRKSRVTBLE com-mand by looking for entries beginning with SCSERVER, SCFIREWALL, and SCRMICOMP and ending with the name of the ShowCase Server library. The RMI host name is stored in a ShowCase internal object. Note: Use RMVSCTCP to remove existing configuration settings before assigning new values with ADDSCTCP.
Backward Compatibility with showcase.cfgFirewall settings can also be entered manually in the configuration file showcase.cfg, but this method is not recommended. ShowCase will check for firewall entries in showcase.cfg and use them if the firewall ports and RMI hostname are not defined elsewhere (at installation or with ADDSCTCP). Firewall entries in showcase.cfg should follow these formats:
22 ShowCase 9 Installation Guide

showcasecorp.firewallport=<port_no> showcasecorp.compression.firewallport=<port_no> showcasecorp.rmi.server.hostname=<hostname>
Firewall settings entered manually in showcase.cfg also need to be removed manually if the ADDSCTCP command is used to configure the settings later. If the firewall configuration entries in showcase.cfg conflict with firewall values set with ADDSCTCP, the ADDSCTCP settings take prece-dent.
Note: The configuration file is located by default at /<SCSERVER>/proddata/config/showcase.cfg, where SCSERVER is the name of the Warehouse Manager Server installation library.
IBM i Work Management and CCSID ConfigurationSpecify the following options for the server:
Relational subsystem and library.ShowCase Warehouse Manager Server TCP/IP jobs will run in the relational subsystem. Your current subsystem, as determined by the QCTLSBSD system value, is displayed and should not be changed.
Note: If the controlling subsystem is QBASE, then QBASE is the default. If the controlling subsystem is QCTL, then QCMN is the default. To find the controlling subsystem, type DSPSYSVAL SYSVAL(QCTLSBSD).
The subsystem description resides in the specified library. QSYS is the default.
Server CCSID (EBCDIC). The server uses the Extended Binary Coded Decimal Interchange Code (EBCDIC) coded-character set identifier (CCSID) to represent character data when interacting with DB2 and IBM® i . The recommended EBCDIC CCSID value for your system is displayed.
Client CCSID (ASCII). The server uses the ASCII CCSID for PC-based operations. This CCSID is used during startup time before the client CCSID is determined, and it supports translation to and from the EBCDIC CCSID. This does not affect what code page or encoding Windows and web cli-ents are able to run. The server supports multiple Windows and web clients on any code page or encoding that upholds translation to the EBCDIC CCSID.
The installation calculates this value based on the EBCDIC CCSID value. For example, if the EBC-DIC CCSID is 37, the matching ASCII CCSID is 1252, which supports Western European languages (English, French, German, Italian). To find valid CCSID pairs, see Table 4-2.
Changing CCSIDs after InstallationTo change the server CCSID, you must reinstall the server.
Installing and Uninstalling Server Components 23

CCSID PairsThe following EBCDIC and ASCII CCSID pairs are recommended for the server.
Table 4-2EBCDIC and ASCII CCSID pairs
Security SettingsSpecify whether your ShowCase Warehouse Manager Client users will have access to all libraries on the IBM® i (*ALL) or only libraries and files in their library list (*LIBL). This setting applies only to ShowCase client applications using the server.
Changing Security Settings after Installation1. Open ShowCase Warehouse Manager Client.
2. From the menus, choose Manage\Server Options\Security .
You can also use the IBM® i commands SETLIBACC and CHGSRVRDFT, located in the server library. SETLIBACC determines library access. CHGSRVRDFT defines default server security options. To run these commands, first add the server library (default SCSERVER) to your library list.
Country, Geographic Region, or Language GroupEBCDICCCSID(s)
MatchingASCIICCSID(s)
United States/Canada/Brazil 37, 1140 1252
Multinational #1 256 1252
Germany/Austria 273, 1141 1252
Denmark/Norway 277, 1142 1252
Finland/Sweden 278, 1143 1252
Italy 280, 1144 1252
Spain/Latin America 284, 1145 1252
United Kingdom 285, 1146 1252
France 297, 1147 1252
Greece 423, 875 1253
Multinational #5 500, 1148 1252
Korea (single-byte) 833 1040, 1088
Korea (double-byte) 933 944, 949
Chinese Simplified (single-byte) 836 1115
Chinese Simplified (double-byte) 935 1381
Chinese Traditional (single-byte) 37, 28709 904
Chinese Traditional (double-byte) 937 938
Japan (single-byte) 1027 932
Japan (double-byte) 5035 932, 943
Thailand 838, 9030 874
Central Europe (Bosnia, Croatia, Czech Republic, Hungary, etc.) 870 1250
Iceland 871, 1149 1252
Cyrillic Multinational 880, 1025 1251
Baltic 1112, 1122 1250
Hebrew 62235 1255
Arabic 62224 1256
24 ShowCase 9 Installation Guide

Storage CCSID ConfigurationThe storage CCSID value specifies the coded character set identifier that stores library, file, and col-umn alias names. It also stores data views and ShowCase Warehouse Builder distribution sets and definitions.
This value must be a ShowCase-supported, single-byte EBCDIC CCSID (or CCSID 5035 for Japa-nese double byte). Enter your CCSID value, or use *CALC or *HEX to let the installation calculate it based on your IBM® i system settings. Table 4-3 shows the EBCDIC CCSIDs supported for the ShowCase Warehouse Manager Server storage CCSID value.
Important: If you are using IBM Collaboration and Deployment Services Deployment Portal to share queries/reports, you must use a valid, specific storage CCSID. Do not use a storage CCSID of 65535 (*HEX). When installing on a DBCS system, the CCSID you choose may restrict you from using other types of CCSIDs.
Note: For the JD Edwards (JDE) SETJDEOWA command, the interactive job CCSID must be some-thing other than 65535.
Table 4-3ShowCase Warehouse Manager Server storage EBCDIC CCSIDs
Note: For general information about IBM i CCSIDs, see the documentation provided with IBM i .
Country, Geographic Region, or Language GroupEBCDICCCSID
United States/Canada/Brazil 37
Multinational #1 256
Germany/Austria 273
Denmark/Norway 277
Finland/Sweden 278
Italy 280
Spain/Latin America 284
United Kingdom 285
France 297
Greece 423, 875
Hebrew 62235
Multinational #5 500
Korea 833
Chinese Simplified 836
Chinese Traditional 37, 28709
Thailand 838
Central Europe (Bosnia, Croatia, Czech Republic, Hungary, etc.) 870
Iceland 871
Cyrillic Multinational 880, 1025
Japan (single-byte) 1027
Japan (double-byte) 5035
Iran 1097
Hexadecimal (*HEX) 65535
Installing and Uninstalling Server Components 25
Changing Storage CCSIDs after InstallationReinstall the server and specify a different CCSID.
ShowCase Warehouse Builder ConfigurationWarehouse Builder subsystem and library.ShowCase Warehouse Builder distribution jobs run in the Warehouse Builder subsystem. Your current subsystem, as determined by the QCTLSBSD system value, is displayed and should not be changed. You should use the same subsystem as your TCP/IP subsystem.
Note: If the controlling subsystem is QBASE, then QBASE is the default. If the controlling subsys-tem is QCTL, then QCMN is the default. To find the controlling subsystem, type DSPSYSVAL SYS-VAL(QCTLSBSD). The current subsystem description resides in the specified library.
IBM Collaboration and Deployment Services Plug-InsShowCase 9 is integrated with IBM Collaboration and Deployment Services.
To enable ShowCase integration with IBM Collaboration and Deployment Services, you must install plug-ins into the IBM Collaboration and Deployment Services Repository. After the ShowCase Warehouse Manager Server installation completes, see "Installing IBM Collaboration and Deploy-ment Services Plug-Ins" on page 26.
Sample DatabaseYou can install a sample database during server installation on the IBM® i . Selecting this option cre-ates a library on the IBM i called SCSAMPLE90. This library contains the files for the SCSAM-PLE90 sample database and IBM i save files for creating other sample databases. You can use the sample database while viewing the ShowCase tutorials. For more information about the sample data-bases, see Appendix B in the ShowCase 9 Administrator's Guide.
Installing the Sample Database after InstallationYou can install or reinstall the sample database later with the RSTSMPLB command. See Appendix B in the ShowCase 9 Administrator's Guide.
Confirm the InstallationAt this point, you have finished setting server installation options. If you need to make any changes to your settings, press F12 to back up and make the appropriate changes. If you are ready to proceed with the installation, press Enter.
Installing IBM Collaboration and Deployment Services Plug-Ins
To install IBM Collaboration and Deployment Services plug-ins for ShowCase on the IBM® i , after installing both products, use the following steps.
Note: If you use ShowCase Warehouse Builder and want to schedule sets in IBM Collaboration and Deployment Services Deployment Manager, you will be prompted for your Warehouse Builder con-nection information. Make sure you enter this information correctly or you will need to reinstall the plug-ins.
You must install the ShowCase 9 client applications on the same machine that hosts the IBM Collab-oration and Deployment Services clients.
26 ShowCase 9 Installation Guide

1. Verify the IBM Collaboration and Deployment Services server and the application server are running.
2. Log on to the IBM i with QSECOFR or equivalent authority (*ALLOBJ, *IOSYSCFG, *SAVSYS, *JOBCTL, and *SECADM authorities are needed).
3. To add the server library to your library list, type the command ADDLIBLE SCSERVER (where SCSERVER is the name of your ShowCase Warehouse Manager Server library).
4. Type the command DPLSCPKG and press Enter.
5. Follow the screen instructions to complete plug-ins installation. You are prompted for the loca-tion of your IBM Collaboration and Deployment Services Repository installation, your Ware-house Builder library information, and the IBM Collaboration and Deployment Services administrator user ID and password.
6. After the plug-ins installation completes, restart the IBM Collaboration and Deployment Ser-vices server and the application server.
Uninstalling Server Components
You may occasionally need to uninstall server libraries on your IBM® i system (such as test librar-ies).
To Uninstall Server Libraries1. Log on with QSECOFR or equivalent authority (*ALLOBJ, *IOSYSCFG, *SAVSYS,
*JOBCTL, and *SECADM special authorities are needed).
2. Back up any server settings you want to save. See the ShowCase 9 Administrator's Guide for instructions.
3. Verify no users are connected to the library. See the ShowCase 9 Administrator's Guide for instructions.
4. Restore the UNINSTSC utility from the UNINSTSC save file that exists in the server library by entering the following command:
RSTOBJ OBJ(*ALL) SAVLIB(QTEMP) DEV(*SAVF) SAVF(serverlib/UNINSTSC) MBROPT(*ALL) ALWOBJDIF(*ALL) RSTLIB(QTEMP)
Where serverlib is the name of the library to uninstall.
Note: This restores three objects into QTEMP.
5. Enter QTEMP/UNINSTSC and press Enter. This command cannot be submitted to batch mode.
6. Enter the name of the library you want to uninstall and press Enter to confirm.
Installing and Uninstalling Server Components 27

28 ShowCase 9 Installation Guide

Installing and Uninstalling Client Components
Before You Begin
We recommend disabling all antivirus software before installing ShowCase 9. Some antivirus soft-ware changes file properties and could prevent correct installation.
• If you are upgrading to ShowCase 9, see the ShowCase 9 Upgrade Guide at http://sup-port.spss.com.
• ShowCase 9 interoperates with IBM Collaboration and Deployment Services. If you will be using IBM Collaboration and Deployment Services features, you must install IBM Collaboration and Deployment Servicesand then install the ShowCase plug-ins after the ShowCase Warehouse Manager Server installation and IBM Collaboration and Deployment Services Repository instal-lation. For more information, see the topic Installing IBM Collaboration and Deployment Ser-vices Plug-Ins in Chapter 4 on page 26.
• If the installation detects an existing ShowCase installation, you have the option to remove it. If you choose not to remove the existing version, you must specify an installation folder other than the existing path. Installing multiple versions of ShowCase on one machine is not a supported environment.
• If you install ShowCase with a network installation, choose a new network folder for the Show-Case 9 installation.
• Before installing the client software, the Warehouse Manager Server software must be installed and running. For more information, see Chapter 4.
Enterprise Server ConsiderationsAny PC on which Enterprise Server is installed must also have ShowCase Query and ShowCase Report Writer installed to run scheduled and dynamic reports. Enterprise Servers are defined and managed in IBM Collaboration and Deployment Services Deployment Manager. In ShowCase 9, Enterprise Server runs as a Windows service program program by default, but can also run within a DOS Window if desired.
Note: You cannot use the workstation installation option to install or use Enterprise Server from the network.
Running the Installation Multiple TimesIf you install different ShowCase components at different times, the installation uses the same folder from which ShowCase was first installed. This logs installed software for easy uninstallation. You are prompted to add or remove components, reinstall selected components, or uninstall ShowCase. If you reinstall after a patch is applied, you must reapply the patch after installation.
Installing ShowCase onto PCs
There are three ways to deploy ShowCase. Choose the best method for your situation. Step-by-step instructions are provided in the following sections.
Installing and Uninstalling Client Components 29

Important: Do not use the Microsoft Add/Remove Programs application to initiate the ShowCase installation.
Local Installation. Installs ShowCase onto user PCs.
Network installation. Installs ShowCase onto the network so that users can install or run it from a shared location. A network installation allows users to choose either a local installation, which installs ShowCase onto user PCs, or a workstation installation, which installs only the required files onto user PCs (all other files reside on the network).
Silent installation. This method requires no user intervention. For more information, see the topic Silent Installation on page 31.
Local Installation1. Down load the zip file for the ShowCase Client 32-bit English (Full Install) from Help/Systems
Website (www.helpsystems.com/showcase).
2. Once the file is unzipped, double-click the setup.exe file in the \Client folder.
3. The ShowCase launch pad appears and you will be prompted to select a language (such as English or French) for the installation.
4. Choose from the ShowCase installation screen options. Follow the instructions on the screen to complete the installation.
Network InstallationDuring network installation, the administrator installs the ShowCase setup and client files onto a shared network location. End users can then run setup.exe to install files onto their local PCs (local installation) or to access files from the network (workstation installation).
Step 1: Install ShowCase onto the NetworkBefore starting the network installation, create a destination folder in the desired network location. Select this folder when prompted to browse for the destination location.
Follow the instructions for "Local Install" above. In the Install Type dialog box, choose Install to the network.
Step 2: Install ShowCase Files onto User PCsUsers have two options:
• Local installation. Installs all ShowCase files onto the PC.
• Workstation installation. Installs only the required files onto the PC and points to the product, online help, sample files, and so on, which reside on the network.
Performing a Local or Workstation Installation1. Using Windows Explorer, find the network folder where ShowCase was installed, and double-
click the setup.exe file. or From the Windows Start menu, choose Run. Browse to the network folder where the ShowCase setup.exe file is located. Select setup.exe and click OK.
2. The setup instructions on the screen will guide you through the installation. Select the Local or Workstation installation option.
30 ShowCase 9 Installation Guide

Note: If the installation detects a previous version of ShowCase, you have the option of uninstall-ing the previous version. Multiple versions of ShowCase on the same machine is not a supported environment.
Silent InstallationShowCase 9 client applications can be installed in silent mode. In silent mode, the installation pro-cess runs without a user interface and without user intervention. A silent installation can deploy ShowCase client applications to many users and ensure that the same software is installed on each PC. When running an installation in silent mode, no messages are displayed for the end user. Instead, a log file captures installation information, including whether the installation was successful.
To set up silent installations, administrators record installation settings to an InstallShield Silent (ISS) response file. Multiple response files (.iss) can be created to customize the installations for dif-ferent user groups. The installation media and response files are made available in a shared network location. The silent installations can then be launched manually (from a command line or Windows shortcut) or automatically (using a login script or other method).
The setup.exe command in the ShowCase installation directory (on the network) is used to record and run silent installations. The /r switch is used to record a silent installation, and the /s switch is used to play back a silent installation. The optional /f1 and /f2 switches are used to specify an alterna-tive location and name for the .iss file and .log file, respectively. For more information, see the topic Command Line Parameters on page 34.
• To record a silent installation, run the setup.exe /r [/f1] command. Administrators can select installation options (for a target user group) and they will automatically be recorded to the response file.
• To play back a silent installation, run the setup.exe /s [/f1] [/f2] command. The setup options contained in the response file will be used to configure the installation.
Step 1: Install ShowCase to the NetworkTo begin the process of setting up silent installations, install ShowCase to a shared network location accessible to the end users performing the silent installations. For more information, see the topic Network Installation on page 30.
Step 2: Record the Response File(s)A normal (non-silent) installation receives the necessary input from the user in the form of responses to dialog boxes. A silent installation does not prompt the user for input. A silent installation gets its user input from a different source. That source is the InstallShield Silent response file (.iss). A response file contains information similar to that which an end user would enter as responses to dia-log boxes when running a normal setup. InstallShield Silent reads the necessary input from the response file at run time. The format of response files resembles that of an .ini file, but response files have .iss extensions. A response file is a plain text file consisting of sections containing data entries.
To Record a Response File1. From a command prompt, change to the network directory where ShowCase was installed in the
previous topic. For example: N: cd \Network\Apps\ShowCase\9.0\
2. Run the following command to start the installation process and record the installation options to an InstallShield Silent file:
N:\Network\ISS\ShowCase.iss:setup.exe /r /f1"N:\Network\ISS\ShowCase.iss"
Installing and Uninstalling Client Components 31

Note: If you omit the /f1 option, the response file is written to %SystemRoot%\%WinDir%\setup.iss (for example, C:\Windows\setup.iss).
3. Complete the setup windows, actually completing a normal installation. The response file records all the settings specified. At this point, you can install the ShowCase applications in interactive mode, using setup.exe without any parameters, or in unattended (or silent) mode, by pointing to the .iss file during playback.
To Record Multiple Response Files Repeat the process above to specify different configurations for different user groups. Save each response file (.iss) under a unique filename.
Sample Response File A sample response file (setup.iss) is located in the 32-Bit English\SilentInstall\Sample folder. The file can be manually edited with a standard text editor and customized to your specification. For more information on manually authoring a response file, see the InstallShield 2010 User Guide.
Step 3: Play Back the Silent Installation1. On each machine where you want to install ShowCase silently, map to the network drives con-
taining the installation media and the .iss file.
2. Create a Windows shortcut to the setup.exe file. Rename the shortcut to something easily under-stood. Modify the properties of the shortcut in the following steps.
3. Right-click the shortcut and choose Properties. The Properties window is displayed.
4. In the Target field, add /s /f1"response_file_path" /f2"log_file_path" to the end of the command, where response_file_path is the full path and name of the response file and log_file_path is the full path and name where the log file should be created.
For example, if the response file is named rwquery.iss and is stored in the N:\ShowCase\ direc-tory and the log file should be created in the local C:\temp directory, the information in the Target field would be as follows:
setup.exe /s /f1"N:\ShowCase\rwquery.iss"/f2 "C:\temp\rwquery.log"
5. End users can double-click the customized shortcut to launch the silent installation. Different shortcuts should be created for different target groups to invoke the custom .iss file created for each user group.
Step 4: Check the Log File for ErrorsThe default name for the silent installation log file is setup.log. By default, it is created in the same directory that contains the response file used in the installation. You can specify a different name and location for setup.log using the /f2 switch with setup.exe. We recommend creating a separate log file for each user's silent installation. By specifying a local folder (instead of a shared network folder), the log file will not be overwritten by other users.
The setup.log file contains three sections.
• The first section, [InstallShield Silent], identifies the version of InstallShield Silent used in the silent setup. It also identifies the file as a log file.
• The second section, [Application], identifies the installed application's name and version, and the company name.
32 ShowCase 9 Installation Guide

• The third section, [ResponseResult], contains the result code indicating whether or not the silent setup succeeded. An integer value is assigned to the ResultCode keyname in the [Respon-seResult] section. InstallShield places one of the following return values after the ResultCode keyname:
For a successful installation, the log file should look similar to the example below:
[InstallShield Silent]Version=v5.00.000File=Log File[Application]Name=ShowCase Version= 9.0Company=Help/SystemsLang=0009
[ResponseResult]ResultCode=0
Value Description
0 Success
-1 General error
-2 Invalid mode
-3 Required data not found in the setup.iss file
-4 Not enough memory available
-5 File does not exist
-6 Cannot write to the response file
-7 Unable to write to the log file
-8 Invalid path to the InstallShield Silent response file (.iss)
-9 Not a valid list type (string or number)
-10 Data type is incorrect
-11 Unknown error during setup
-12 Dialog boxes are out of order
-51 Cannot create the specified folder
-52 Cannot access the specified file or folder
-53 Invalid option selected
Installing and Uninstalling Client Components 33

Command Line ParametersThe setup.exe command line parameters for recording and running silent installations are shown below:
Table 5-1Command line parameters for silent installations
If you want to install to a different destination path or Start menu folder than you specified while recording the silent installation, use a standard text editor to modify the response file (.iss).
• To change the directory in which files are installed, modify the szDir= statement.
• To change the name of the Start menu folder for the ShowCase, modify the szFolder= state-ment.
For example, the following lines cause the files to be installed in C:\ShowCase and the Start menu folder to be named ShowCase 9:
szDir=C:\ShowCase szFolder=ShowCase 9
For more information about the silent mode parameters, see the InstallShield 2010 User Guide.
Parameter Description
/r (record mode)
In order to run a ShowCase installation in silent mode, you must first run setup.exe with the /r option to generate a response file, which stores information about the data entered and options selected by the user at run time. Running a ShowCase installation program with the command setup.exe /r displays all the run-time dialogs, and stores the data in a file called setup.iss, created inside the system's Windows folder. To specify an alternative response file name and location, use the /f1 option, described below.
/s (silent mode)
For ShowCase, the command setup.exe /s runs the installa-tion in silent mode, by default based on the responses contained in a response file called setup.iss in the same directory. (Response files are created by running setup.exe with the /r option.) To specify an alternative file name or location of the response file, use the /f1 option.
/f1 (specify alternative response file name and path)
Using the /f1 option enables you to specify where the response file is (or where it should be created) and what its name is, as in setup.exe /s /f1"C:\Temp\setup.iss". Specify an absolute path; using a relative path gives unpredictable results. The /f1 option is available both when creating a response file (with the /r option) and when using a response file (with the /s option).
/f2 (specifyalternative log file name and path)
When running in silent mode (using the /s option), the log file is by default created in the same directory and with the same name (except for the extension) as the response file. The /f2 option enables you to specify an alternative log file location and file name, as in setup.exe /s /f2"C:\Logs\Showcase.log". Specify an absolute path; using a relative path gives unpredictable results.
34 ShowCase 9 Installation Guide

Tips and Troubleshooting
I receive an error message that reads, "Not enough disk space."This is likely an erroneous message, and the PC does have enough disk space. There are two possible solutions:
• Copy the network installation to any local drive and install from that drive. or
• Record the installation from a different PC, but one configured as close to the problem PC as possible.
Can I perform a silent installation using a folder with a space in the name?Yes, if you put quotation marks around the path name. Here is an example of a silent installation with the /f1 and /f2 parameters:
setup.exe /s /f1"N:\Applications\My ShowCase\9.0\setup.iss" /f2"C:\My Logs\setup.log"
Installing the Add-Ins
The ShowCase BIRT plug-ins can be installed during the ShowCase 9 client installation. If the BIRT client is installed after the ShowCase client installation is performed, then the ShowCase client installer should be rerun to install the plug-ins and add the ShowCase BIRT features into the BIRT installation path. This can be accomplished by deselecting all check boxes on the installer except for the one for ShowCase Driver and SQL Import Plug-ins for BIRT Designer.
The ShowCase Query add-ins for Lotus Millennium or Microsoft Excel can also be installed during ShowCase client installation. The add-ins will load successfully only if the product has been installed and used at least once prior to ShowCase installation.
Note: Users can refresh Microsoft Excel spreadsheets containing linked queries in IBM Collabora-tion and Deployment Services Deployment Portal. These "web-enabled" Excel spreadsheets are saved to the IBM Collaboration and Deployment Services Repository. The web add-ins are installed separately from the client add-ins. See Installing and Uninstalling the Web Add-Ins on page 37.
Lotus Millennium add-ins are not available through the web.
Selecting Add-Ins during the InstallationDuring client installation, when prompted to select features to install, select the checkboxes of the add-ins you want to install. For the the Lotus and Excel add-ins, select the Query checkbox first, as shown in Figure 5-1.
Installing and Uninstalling Client Components 35

Figure 5-1Selecting add-ins during installation
If you are installing ShowCase for the first time, and the installation detects a supported version of Excel and/or Lotus Millennium, the corresponding add-in(s) are selected by default.
Note: Installing the SQL Import add-in for BIRT creates new Import options on the File menu of BIRT Designer. Installing the ShowCase Query add-in for Excel or Lotus Millennium creates a ShowCase menu on the Excel or Lotus Millennium menu bar.
Locating the Add-Ins for ExcelTo use the client add-ins, you must install them during ShowCase Query installation. If, after install-ing the add-ins, you do not see the ShowCase menu on the Excel menu bar, use the following instruc-tions to locate the add-ins. If you will be using the Microsoft Office 2007 version of Excel, this process may be different. Refer to the Excel 2007 online help.
1. Open Excel, and on the Tools menu, click Add-Ins. The Add-Ins dialog box appears.
2. In the Add-Ins dialog box, select ShowCase Query Add-in and click OK, as shown in Figure 5-2.
Figure 5-2Add-Ins dialog box
36 ShowCase 9 Installation Guide

This enables the ShowCase menu on the Excel menu bar.
3. If ShowCase Query Add-in is not listed in the Add-Ins dialog box, click Browse to search for the file.
4. Navigate to the Bin directory of your ShowCase installation (for example, C:\Program Files\ShowCase\9\Bin), select SCXADD32.XLL, and click OK.
5. When ShowCase Query Add-in appears in the Add-Ins dialog box, select it and click OK. The ShowCase menu should now appear on the Excel menu bar.
For more information about add-ins, see the Query online help.
Installing and Uninstalling the Web Add-Ins
Microsoft Excel workbooks with ShowCase Query add-ins can be saved to the repository to be viewed and refreshed via the web. These "web-enabled" Excel workbooks are saved as .xlr files. Via the web, the ShowCase add-in menu in Excel allows users to dynamically refresh certain queries or all queries in the web-enabled workbook (.xlr).
Users who access these workbooks in IBM Collaboration and Deployment Services Deployment Portal do not need to have the Query client installed on their machines to refresh the workbooks. However, if a user does not have the files installed to enable add-ins or has a different version of the files installed, a small auto-download and installation through the web is required before running a workbook. This automatic web download installs various files from the server to the user's client machine and requires the user to have write authority to his or her C drive and administrative author-ity to their PC.
Important: To open .xlr workbooks, you must add your Deployment Portal URL as a trusted site. In Internet Explorer, go to Tools\ Internet Options\Security\Trusted Sites. You must also have secu-rity set to Low for your trusted sites. If security is set to Medium or High, contact your administra-tor.
For more information about Query add-ins via the web, including important items to be aware of, see the Query online help.
To uninstall the web add-in files:1. Navigate to your download location.
2. Right-click ShowCase 9.0 Web Add-in and choose Remove. The files will be deleted.
Installing the Enterprise Server
1. Install the ShowCase client on the PC designated as the Enterprise Server. For PC requirements, see Enterprise Server Requirements on page 16.
2. On the components list, select Enterprise Server. Required product files such as ShowCase Query and ShowCase Report Writer will then be selected automatically.
Note: Note: Report Services may help you avoid the need for an Enterprise Server PC. For details, see the ShowCase 9 Administrator's Guide.
Installing and Uninstalling Client Components 37

Setting Up a Data Source on the Enterprise ServerSee Chapter 6. Note that the data source name on the Enterprise Server must match the data source name on all publishing PCs. The data source name is case sensitive.
Adding a Repository Connection on the Enterprise Server1. Open ShowCase Query.
2. On the Tools menu, select Repository Connections. This opens the Repository Connections dia-log box.
3. Select Add a new server entry, and enter a name to represent the Repository connection.
4. Specify the IBM® i IP address or system name and the IBM Collaboration and Deployment Ser-vices Server port number, and click OK. Write the name and number here for reference.
IBM i IP Address or System Name: ____________________________________
IBM Collaboration and Deployment Services Server Port Number:
________________________________
5. In the Repository Connections dialog box, select Connect to the server. The connection is made when the icon beside the server name turns green.
6. Close Query.
Starting the Enterprise ServerEnterprise Server can also be configured to start and stop automatically as a Windows service pro-gram, eliminating the need to start the server manually. To configure the ShowCase Enterprise Server properties, choose Start\Control Panel\Administrative Tools\Services and then double-click ShowCase Enterprise Server.
The Enterprise Server must remain active to receive requests from the IBM® i . To stop the server, click Stop on the ShowCase Enterprise Server Properties (Windows service) dialog box.
An alternate way to start the Enterprise Server is to select it from the Windows Start menu, under [All] Programs\IBM\ShowCase 9.0\ShowCase Enterprise Server. A DOS win-dow will show that the Enterprise Server is running. The Windows Server must be stopped before this is attempted.
For each Enterprise Server that you will use, define the Enterprise Server in IBM Collaboration and Deployment Services Deployment Manager. For instructions on defining server connections, see the Deployment Manager online help or user's guide.
Uninstalling ShowCase
This section explains how to uninstall the ShowCase 9 client components. To uninstall the server components, see "Uninstalling Server Components" on page 27. To uninstall any release prior to ShowCase 9, see the documentation for that release and the ShowCase 9 Upgrade Guide at http://support.spss.com.
Uninstalling ShowCase from PCs1. From the Windows Start menu, choose Settings\Control Panel.
2. Double-click Add/Remove Programs.
38 ShowCase 9 Installation Guide

3. Choose ShowCase 9 and click Remove. A dialog box is displayed with the following options. Click Cancel to cancel the uninstallation.
• Yes, remove all ShowCase settings, files, and folders. Select this option to completely remove ShowCase. Data source definitions will not be saved.
• Uninstall, but preserve current product settings and data source information. Select this option to remove ShowCase, but save data source definitions and other files/folders in the location that the product was installed.
4. After uninstalling, reboot the computer before reinstalling ShowCase 9.
Note: If the ShowCase client patch has been applied, be sure to uninstall that first. Then, unin-stall the client.
Uninstalling ShowCase from the NetworkYou must manually delete the folder and its contents from the network drive
Installing and Uninstalling Client Components 39

40 ShowCase 9 Installation Guide

Setting Up a Data Source
To set up data sources, use the Microsoft ODBC Administrator (odbcad32.exe), installed with Show-Case PC client components. You can access it from the menus by choosing [All] Programs \ ShowCase 9 \ Microsoft ODBC Administrator.
Relational components. Set up a ShowCase IBM i Driver data source on each PC that accesses the server through ShowCase applications. You will need:
• IBM® i IP address (or server name)
• Server library port number
Non-DB2 data sources. Set up non-DB2 data sources to access the following:
• Microsoft Access or Excel 2003 or 2007
• Microsoft SQL Server 2005 or 2008
• IBM Lotus Domino 8.5
• Oracle 10g or 11g
Setting Up a Data Source 41

Adding a ShowCase IBM i Driver Data Source
1. From the Windows Start menu, choose [All] Programs \ ShowCase 9 \ Microsoft ODBC Administrator:
Figure 6-1Microsoft ODBC Administrator dialog box
2. Click Add.
3. In the Create New Data Source dialog box, select ShowCase IBM i Driver and click Finish.
Figure 6-2ShowCase IBM i Driver dialog box
4. Enter a user-defined name that represents your ShowCase IBM i Driver data source. The data source name (DSN) is used when the data source connects to the server. Adding a description is optional.
Note: If you are sharing queries, using the same data source name on all PCs will make sharing queries easier for novice users.
5. Enter the IP or Internet address assigned to your server. The address can be either an IP address number or an IP name, whichever your system is set up to use.
42 ShowCase 9 Installation Guide

6. Enter the 5-digit TCP port number assigned to the server library that contains server application software. The port number is specified during installation of ShowCase Warehouse Manager Server software.
Note: If you do not know the TCP port number, use the IBM® i command WRKSRVTBLE and search for SCSERVERlibname, where libname is the server library name.
7. If you plan to use this data source with an IBM i Independent Auxiliary Storage Pool (IASP) rather than the local database, select the Use IASP option and select an IASP from the drop-down list. The drop-down list shows all available IASPs. The Warehouse Manager Server must be running to retrieve the list of IASPs. It may take a considerable amount of time to retrieve the list of available IASP databases after clicking the drop-down list.
If you plan to use ShowCase Warehouse Builder with an IASP, you must configure separate ShowCase IBM i Driver data sources: one for the Warehouse Builder Control Server (local data-base), one for the Warehouse Builder Source Server (local database or IASP), and one for the Warehouse Builder Target Server (local database or IASP). Click Help for more information. For details about Warehouse Builder Control, Source, and Target Servers, see the Warehouse Builder online help.
8. Click OK.
For more information about all ShowCase IBM i Driver dialog box options, see the ShowCase IBM i Driver online help.
Adding a non-DB2 Data Source
Set up non-DB2 data sources to access the following:
• Microsoft Access or Excel 2003 or 2007
• Microsoft SQL Server 2005 or 2008
• Lotus Domino 8.5
• Oracle 10g or 11g
1. From the Windows Start menu, choose [All] Programs \ IBM \ ShowCase 9 \ Microsoft ODBC Administrator:
Figure 6-3Microsoft ODBC Administrator dialog box
Setting Up a Data Source 43

2. Click Add.
3. In the Create New Data Source dialog box, select the driver for your non-DB2 data source and click Finish.
4. Enter a user-defined name that represents your data source. The data source name (DSN) is used when the data source connects to the server. Adding a description is optional.
Note: If you are sharing queries, using the same data source name on all PCs will make sharing queries easier for novice users.
5. Enter the other settings required for the non-DB2 data source. Click Help for driver-specific instructions.
6. Click OK.
Modifying a Data Source
You can modify a data source if you need to change the data source name, IP address, TCP port num-ber, or other options.
Modifying a Data Source through Microsoft ODBC Administrator1. From the Windows Start menu, choose [All] Programs \ IBM \ ShowCase 9 \ Microsoft ODBC
Administrator:
You will see a dialog box similar to Figure 6-3 for your data source.
2. Select the data source to modify and click Configure. You will see a dialog box similar to Fig-ure 6-2.
3. Modify the data source setup information as necessary and click OK. Click Help for driver-spe-cific instructions.
44 ShowCase 9 Installation Guide
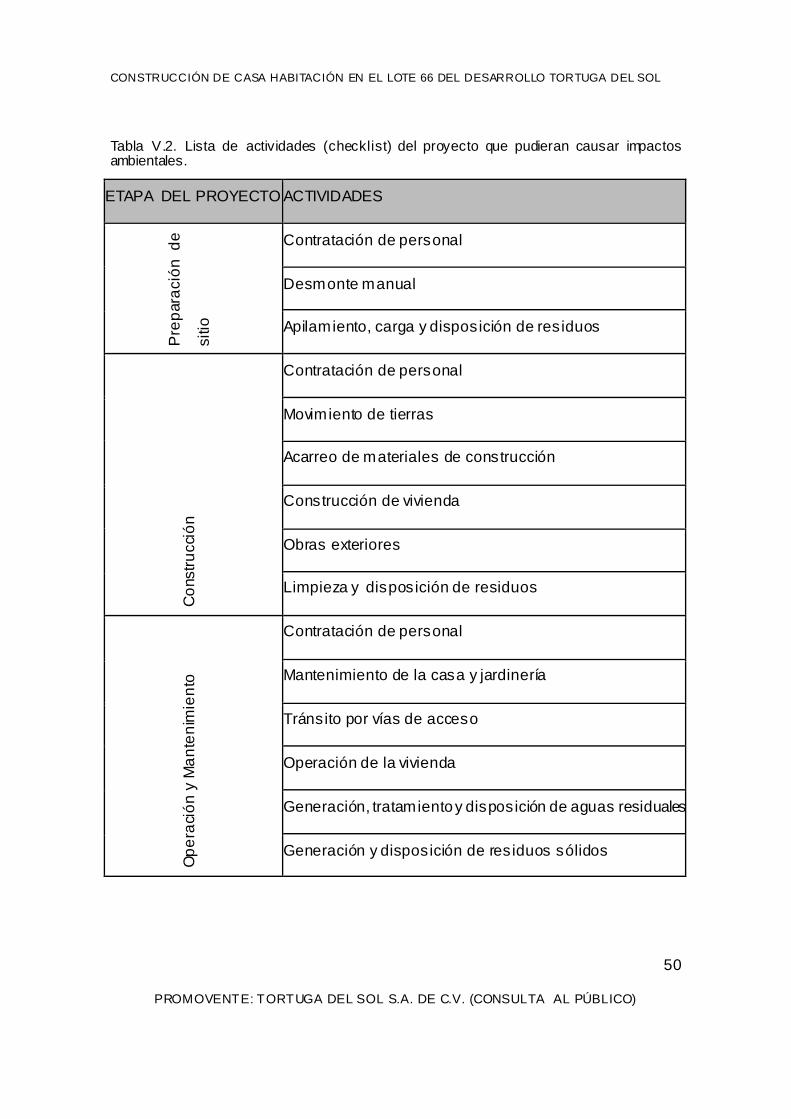
Connecting to the IBM i
You can connect to the server with any of the ShowCase client applications.
Note: The CCSID of the profile used to connect to the data source must match the server CCSID. For example, if you installed the server with an English CCSID, but connect to the server with a German user ID, you may encounter unexpected results.
Connecting with ShowCase PC Applications
• To open an application, from the Windows Start menu, choose [All] Programs \ IBM \ Show-Case 9.
ShowCase Query1. Open ShowCase Query, and from the File menu, choose New \ Query.
2. If you have not specified a default data source, Query will prompt you to select one. Select a data source and click Next.
3. In the ShowCase IBM i Driver logon dialog box, enter your user ID and password and click OK.
If your connection is successful, the Tables dialog box appears and your PC is connected to the server.
ShowCase Report Writer1. Open ShowCase Report Writer, and from the File menu, choose New \ Report.
2. In the Choose Report Style dialog box, select a style and click OK.
3. If you have not specified a default data source, Report Writer will prompt you to select one. Select a data source and click Next.
4. In the ShowCase IBM i Driver logon dialog box, enter your IBM® i user ID and password and click OK.
If your connection is successful, the Tables dialog box appears and your PC is connected to the server.
ShowCase Warehouse Builder1. Open ShowCase Warehouse Builder and select a data source to use as a control server. This is the
server library in which you want to store your distribution definitions. Click OK.
2. In the ShowCase IBM i Driver logon dialog box, enter your IBM® i user ID and password and click OK.
If your connection is successful, the Warehouse Builder Assistant dialog box appears (if enabled) and your PC is connected to the server.
Connecting to the IBM i 45

ShowCase Warehouse Manager Client1. Open ShowCase Warehouse Manager Client and select the data source to which you want to con-
nect.
2. From the File menu, choose Connect, or click the Connect tool.
3. In the ShowCase IBM i Driver logon dialog box, enter your IBM® i user ID and password and click OK.
If your logon is successful, your user ID appears in parentheses after the data source and your PC is connected to the server.
Troubleshooting Connection Failures
ShowCase Query and ShowCase Report Writer• Make sure you entered your password correctly.
• Verify your default data source.
To verify your default data source:
1. Open ShowCase Query, and from the Tools menu, choose Options.
2. On the Data Source tab, verify your default data source.
TCP/IP
Verify your IP address
Use the Microsoft ODBC Administrator to determine whether your IP address is valid.
• At the MS-DOS prompt, type PING ipaddress, where ipaddress is the IP address you want to use.
If you receive a reply similar to Reply from 172.16.1.84: bytes=32 time=84ms TTL=64, your IP address is valid and the TCP/IP connection is working.
If you receive the message Request timed out, your IP address may be incorrect or TCP/IP may not be configured correctly on either your PC or the server.
For more information, see Chapter 6.
Verify your library port number
1. At the IBM® i command line, type WRKSRVTBLE and press Enter.
2. In the Port column, look for the port number you want to use.
The port's service entry should be SCSERVER serverlib, where serverlib is the name of the server library. If you do not find the port, look for the correct library name under Service and check the correct port number for that library.
Verify that IBM's TCP/IP is active on your IBM i
1. At the IBM i command line, type WRKACTJOB JOB(QTCPIP) and press Enter.
2. If you cannot find the job, type STRTCP and press Enter to start TCP/IP on the server.
For more information on starting and stopping TCP/IP, see the ShowCase 9 Administrator's Guide.
46 ShowCase 9 Installation Guide

For more information on TCP/IP problems, see the TCP/IP documentation provided with IBM i.
Verify that the TCP/IP master job has started on the server
• At the IBM i command line, type WRKACTJOB JOB(serverlib), where serverlib is the name of the server library, and press Enter.
There should be an entry in the subsystem/job column with the same name as the library in which the server is installed. Use option 5 to work with this job and then option 11 to display the call stack. The program TCPMASTER in the library containing the installation should be the first program on the stack (use F11 to change the display until you see the program and library names).
For more information on using TCP/IP with ShowCase, see the ShowCase 9 Administrator's Guide.
Connecting to the IBM i 47

48 ShowCase 9 Installation Guide

Index
AAdditional Resources ........................................................ iii
CCCSID Configuration ....................................................... 23CCSID Pairs ..................................................................... 24Changing CCSIDs after Installation ................................. 23Changing Firewall Settings after Installation ................... 22Changing Security Settings after Installation ................... 24Changing TCP/IP after Installation .................................. 22Client Components
Enterprise Server ....................................................... 37Installing and Uninstalling ........................................ 29Network Installation .................................................. 30Silent Installation ...................................................... 31
Connecting to the IBM iShowCase Query ....................................................... 45ShowCase Report Writer .......................................... 45ShowCase Warehouse Builder .................................. 45ShowCase Warehouse Manager Client ..................... 46
DData Source
DB2 ........................................................................... 42Modifying .................................................................. 44non-DB2 Data Source ............................................... 43Setting Up ................................................................. 41
EEnhancements
Custom Metadata ........................................................ 5Firewall Support .......................................................... 5JD Edwards (JDE) ....................................................... 7Job Step Control .......................................................... 4Logging ....................................................................... 6Server Patch Rollbacks ............................................... 6Silent Installations ....................................................... 7SQL ............................................................................. 4Timeouts ...................................................................... 5Virtualized Environments ........................................... 7
Enterprise ServerConsistent Data Sources ............................................ 17Installing Client ......................................................... 37PC Requirements ....................................................... 16Requirements ............................................................ 15
Setting Up a Data Source ...........................................38Starting .......................................................................38
Excel Add-Ins ...................................................................36
IIBM i
Requirements .............................................................11IBM i Requirements
Disk Space .................................................................11Installing Add-Ins .............................................................35
Excel ..........................................................................36Web ............................................................................37
JJD Edwards (JDE)
Enhancements ..............................................................7
NNational Language Support ..............................................21Network Installation .........................................................30
RRelease
Enhancements ..............................................................4Overview .....................................................................3
RequirementsClient PC Software and Hardware .............................13Enterprise Server .......................................................15Enterprise Server PC .................................................16IBM i ..........................................................................11Server .........................................................................12ShowCase Warehouse Builder ..................................15Virtualized Environments ..........................................14
SServer
Requirements .............................................................12Server Components
Installing and Uninstalling .........................................19Uninstalling ...............................................................27
Server Installation .............................................................20CCSID Configuration ................................................23Changing CCSIDs .....................................................23Changing Firewall Settings .......................................22
Index 49

Changing Security Settings ....................................... 24Changing TCP/IP ...................................................... 22IBM i Work Management ......................................... 23National Language Support ...................................... 21Security Settings ....................................................... 24ShowCase Interlink for JD Edwards ......................... 21ShowCase Warehouse Manager Server .................... 21ShowCase Warehouse Manager Server TCP/IP Port
Configuration ......................................................... 22Storage CCSID Configuration .................................. 25
Setting Up a Data Source ................................................. 41ShowCase Warehouse Builder
Remote DB2 Setup .................................................... 15Requirements ............................................................ 15
Silent InstallCommand Line Parameters ....................................... 34
Silent Installation .............................................................. 31
TTechnical Support
Contacting ................................................................... 1
Website ........................................................................1Troubleshooting
TCP/IP .......................................................................46
UUninstalling
Server Components ....................................................27Uninstalling ShowCase .....................................................38
from PCs ....................................................................38from the Network .......................................................39
VVirtualized Environments .................................................14
ShowCase Client Environments ................................14ShowCase Enterprise Server Environments ..............15
WWeb Add-Ins .....................................................................37
50 ShowCase 9 Installation Guide