INSTALLATION GUIDE - replacement-windows-uk.com · 4 | EUROLOGIK INSTALLATION GUIDE 5 On arrival,...
16
1. Surveying 3 2. Removing the framework 5 3. Preparation of aperture 7 4. Fitting the new frame 9 5. Fitting the glazing 12 6. Finishing off 15 CONTENTS If in doubt at any stage 0800 988 3047 Installation video available on Eurocell’s YouTube page Please contact Technical for any technical support or advice Issue 1 INSTALLATION GUIDE
Transcript of INSTALLATION GUIDE - replacement-windows-uk.com · 4 | EUROLOGIK INSTALLATION GUIDE 5 On arrival,...

1. Surveying 3
2. Removing the framework 5
3. Preparation of aperture 7
4. Fitting the new frame 9
5. Fitting the glazing 12
6. Finishing off 15
CONTENTS If in doubt at any stage
0800 988 3047
Installation video available on Eurocell’s YouTube page
Please contact Technical for any technical support or advice
Issue 1
INSTALLATION GUIDE

INSTALLATION GUIDE
TRANSPORTATION AND HANDLING OF WINDOWS Windows can be transported either glazed or unglazed. Bay windows
may be supplied in separate frames and assembled on site. It is important that when the windows are in transit they are stacked in a vertical position. Take care to prevent movement and surface scratching by wedging flexible packing material between surfaces.
Prior to fitting on site windows must be checked for imperfections and damage. The majority of building materials (i.e. sand, cement) will not affect the properties of the PVC-U. However, solvent-based materials - Bitumen etc - that can be found on building sites will stain white PVC-U.
It is recommended that PVC-U windows delivered in a fully fabricated state should retain the protective film until all building work has ceased.
2 | E U R O L O G I K I N S T A L L A T I O N G U I D E

2 | E U R O L O G I K I N S T A L L A T I O N G U I D E
1. SURVEYING
FOR ALL CONFIGURATIONS OF DOOR AND WINDOWS CARRY OUT THE FOLLOWING:
1. Check the brickwork around
the opening for any defects.
2. Check if any provision needs to
be made for telephone or TV
cables. Advise the customer of
these facts before proceeding.
3. Take several measurements across the
opening to find the narrowest point,
having taken care to measure beyond
any existing sub-frame or packing.
Deduct 10mm from this dimension
to give the finished width. (5mm
allowance for expansion on each side).
4. Measure the height of the opening
in the same way as detailed above
and deduct 10mm for expansion.
5. Take a note of any existing cill and
establish if this is to be included in the
overall frame dimension (eg. stone cill).
If the cill is to be replaced take a note
of the depth of the existing reveal and
determine which cill is most appropriate
(i.e. 180mm, 150mm or the 85mm cill).
6. Check the opening is square – it is
important that the diagonals are no
more than 10mm different, if they
are then remedial work may need
to be carried out on the brickwork
to ensure the opening is square.
7. If the window is fitted deep into the
reveal check to see if the extension
blocks are necessary to ensure that
the sash operates and is not impeded.
8. If the customer has chosen a style
of window, the surveyor must check
to see if the styles are suitable
for the intended application.
Surveyor must check:
a) That the units are within the
supplier’s specification.
b) That the units are within the
max/min size limitations.
c) That the windows will
perform as designed.
d) That the windows are
acceptable to the customer.
e) That all windows meet the
requirements of current legislation.
9. The responsibility for re-plastering,
fitting of curtain rails, blinds or other
fittings or fixtures must be discussed
and agreed with customer.
Good surveying is essential to ensure a trouble free successful installation, also to avoid costly remakes caused by incorrect measuring.
When surveying it is the surveyor’s responsibility to determine that the structural openings and surrounding areas are in a state of good repair and provide the correct dimensions for manufacture.
It is not possible to provide full comprehensive surveying instruction to cover every eventuality, the following basic notes are for on-site surveying guidelines.
3

4 | E U R O L O G I K I N S T A L L A T I O N G U I D E
BAY WINDOWS
PRELIMINARY CHECKS REFERENCE LOAD BEARING WINDOWS
It must be assumed that all bay windows
are load bearing unless it can be proved
beyond doubt that alternative support is
sufficient to carry all dead and imposed
loads. Bay windows are supported by
structural mullions (brick, stone etc), bays
with small flat roofs and oriel windows
are considered non-load bearing.
The structure between and above
the bay window must be carefully
inspected for any cracks or defects.
New lead trays may be required under first
floor bays that rest on timber or stonework.
Bay windows require to be replaced along
the outside line of the existing frames.
Consequently, accurate measurement of
the external and internal angles is essential
in addition to the overall dimension. In the
same way as for flat windows wherever
possible the surveyor should draw a
template of the base of the bay using as
many dimensions as are accessible.
All bay windows must be fully reinforced
due to the method of coupling the frames
with bay poles or support members. If
bay windows are load bearing, bay poles
must be located either directly on to a
galvanised steel base plate resting on stone
cill or the masonry beneath the cill and
onto the structure at the window head.
When surveying bay windows it is important that the angles are correct, particularly for the manufacture of bay cills because no alteration can be made to the configuration once on site!
4 | E U R O L O G I K I N S T A L L A T I O N G U I D E 5
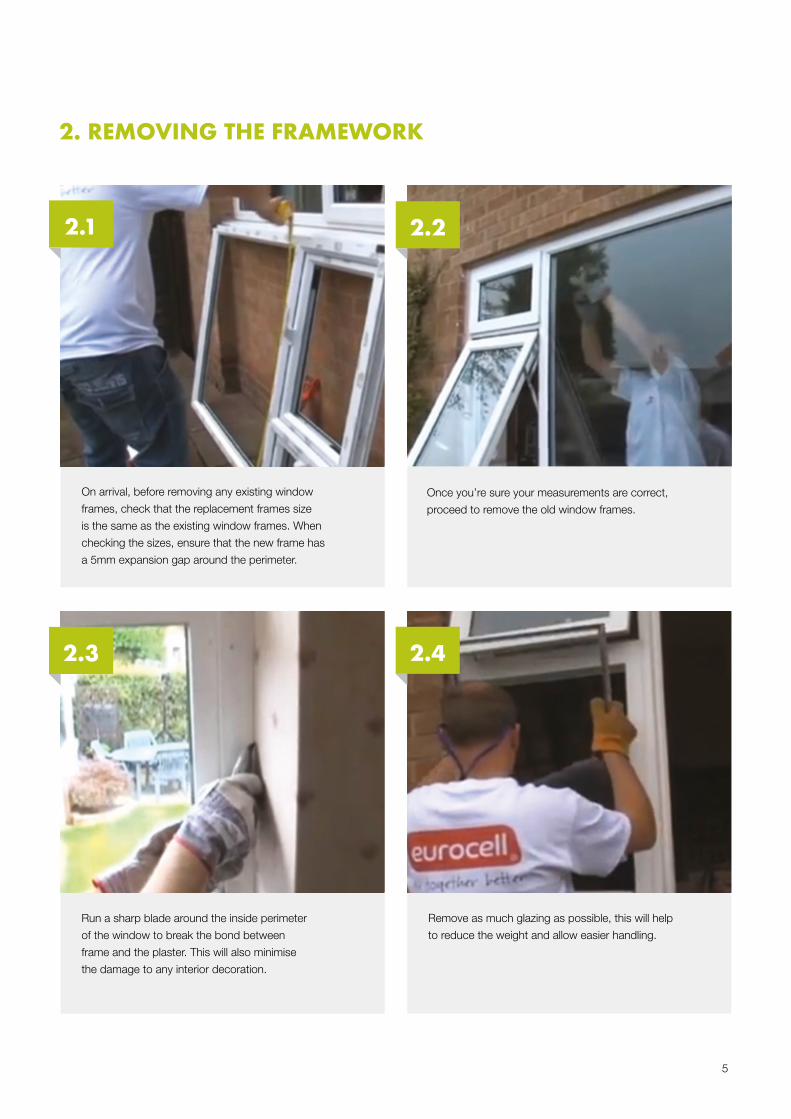
On arrival, before removing any existing window
frames, check that the replacement frames size
is the same as the existing window frames. When
checking the sizes, ensure that the new frame has
a 5mm expansion gap around the perimeter.
2.1
Run a sharp blade around the inside perimeter
of the window to break the bond between
frame and the plaster. This will also minimise
the damage to any interior decoration.
2.2
Once you’re sure your measurements are correct,
proceed to remove the old window frames.
2.3
Remove as much glazing as possible, this will help
to reduce the weight and allow easier handling.
2.4
2. REMOVING THE FRAMEWORK

6 | E U R O L O G I K I N S T A L L A T I O N G U I D E
2.5
Remove and old fixings and break the external
silicone seal with a blade. Also remove the external
brick corners, to release the old frame.
2.7
Check that mortar bed has sufficient clearance,
if not remove it.
Prepare the external cill for fitting to the new frame.
This can be done one of two ways, either fitted full width
or rebated around the brick work to achieve a neat finish.
2.8
2.6
After the removal of the frame, remove all
sealant and debris from the brick work.

6 | E U R O L O G I K I N S T A L L A T I O N G U I D E 7
3. PREPARATION OF APERTURE
New build
Templates should be used in apertures to avoid damage to the pre-finished EWS product until the building work has been completed (i.e. lintel correctly installed and DPC’s fitted).
Replacement of windows into existing building
When replacing windows attention should be paid to the checking of the surround of the aperture regarding loose brickwork and plaster.
GENERAL PREPARATIONBefore removing the existing window the replacement frame should be measured and tolerances checked against the aperture (i.e. 5mm
on either side of the window and 5mm on the top and bottom). Windows should be installed plumb and square without twist, racking
or distortion of any member to ensure that they operate correctly after installation. Eurocell window frames should be manufactured
accurately to the specified outer frame dimensions and have opening lights to fixed frame clearance for operational efficiency.
Distortion of any frame or sash member will reduce performance and create a security risk. The choice of fixing cleats or plastic
sheathed fixing bolts is usually dependent on whether the opening is already plastered. Fixing bolts are sometimes preferred to minimise
redecoration in existing houses where windows are being replaced. Both methods are suitable for new installations.

8 | E U R O L O G I K I N S T A L L A T I O N G U I D E
If fixing cleats is the chosen method of installation they should be attached to the outer frame starting at 150mm from the corner and
thereafter at a maximum of 600mm centres. The cleats should be screwed into the mainframe in the central reinforcing chamber.
If fixing screws/bolts are to be used then fixed lights should be deglazed and holes routed through the mainframe at the same
fixing distances as the cleats. Drill a hole 12mm thick through the inside face of the mainframe and then use a masonry drill
of a smaller diameter suitable for plastic sleeved fixing screws, drill through the remaining PVC-U wall and into the masonry
approximately 50 - 75mm deep. Insert flat packers adjacent to the fixing point then screw home, taking care not to over tighten.
Cap the hole on the inside of the frame with a grommet. Fixing is required on all sides of the windows.
3000
150
900 1200 1800
600 150
Use packers if required
10mm minimum
CILLSCills AC180, AC150, AS85 should normally be fixed to the
bottom edge of the mainframe prior to installation of the
window. The fixing screws should penetrate upwards into
the reinforcement section in the central chamber. The cill
should be placed on to a bed of mortar or silicone sealant.
8 | E U R O L O G I K I N S T A L L A T I O N G U I D E 9
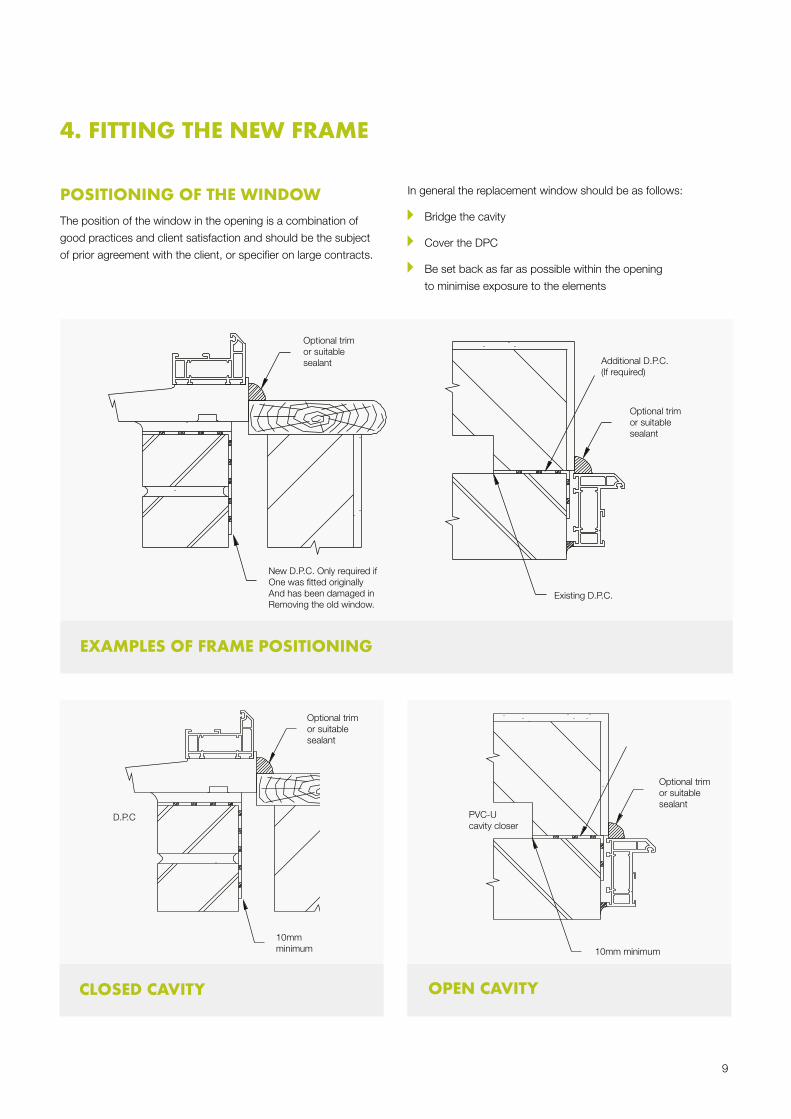
4. FITTING THE NEW FRAME
POSITIONING OF THE WINDOW The position of the window in the opening is a combination of
good practices and client satisfaction and should be the subject
of prior agreement with the client, or specifier on large contracts.
In general the replacement window should be as follows:
Bridge the cavity
Cover the DPC
Be set back as far as possible within the opening
to minimise exposure to the elements
EXAMPLES OF FRAME POSITIONING
Optional trim or suitable sealant
New D.P.C. Only required ifOne was fitted originallyAnd has been damaged inRemoving the old window.
Existing D.P.C.
Additional D.P.C.(If required)
Optional trim or suitable sealant
CLOSED CAVITY OPEN CAVITY
Optional trim or suitable sealant
D.P.C
10mm minimum 10mm minimum
PVC-U cavity closer
Optional trim or suitable sealant

1 0 | E U R O L O G I K I N S T A L L A T I O N G U I D E
Be sure to seal the ends of cill and frame assembly to
prevent moisture from tracking along the cill and into
the brickwork.
4.1
Remove any packaging from the new frame and screw
the cill onto the bottom of the frame. Make sure you select
a screw that will not penetrate the inner skin of the frame.
4.2
Carefully position the new frame into the aperture.
Centralise it and insert packers underneath to
level it and maintain the 5mm expansion gap.
4.3
Check that frame is both level and plumb, then drill
fixing holes into the frame sides. These should be
drilled approximately 150mm from the top and bottom
corners and approximately 600mm in between
(a minimum of 2 fixings per side)
4.4
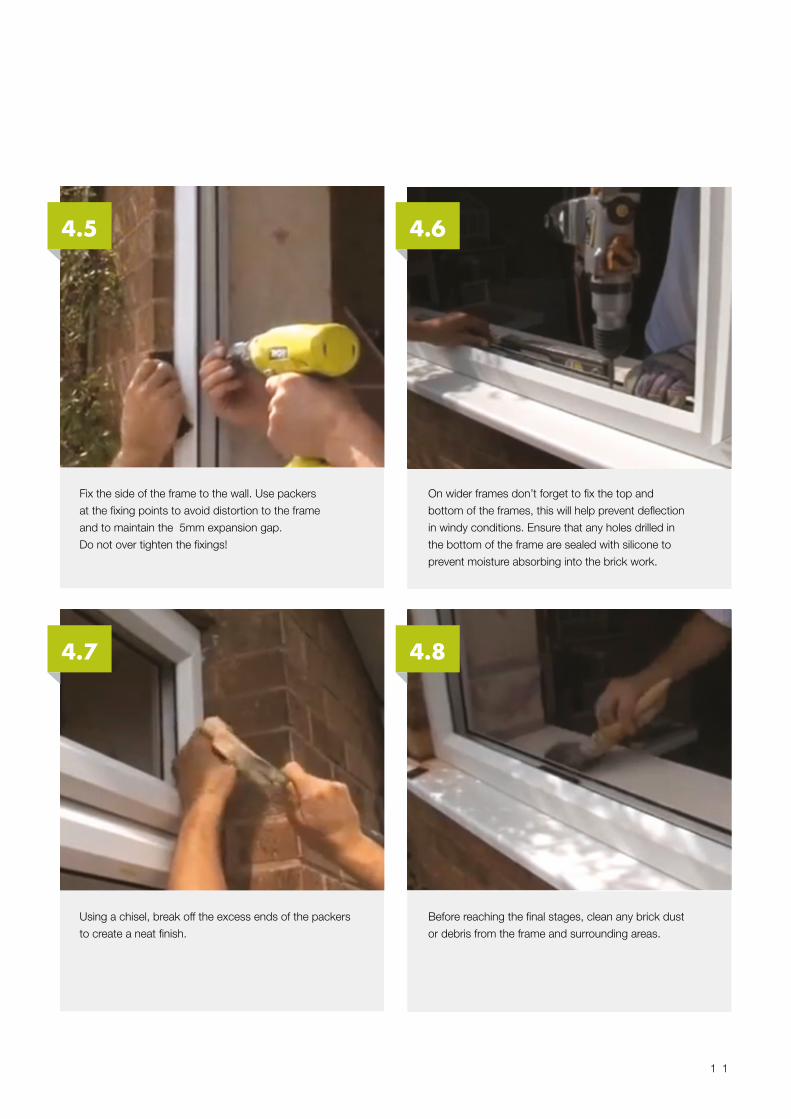
1 0 | E U R O L O G I K I N S T A L L A T I O N G U I D E 1 1
On wider frames don’t forget to fix the top and
bottom of the frames, this will help prevent deflection
in windy conditions. Ensure that any holes drilled in
the bottom of the frame are sealed with silicone to
prevent moisture absorbing into the brick work.
4.5
Fix the side of the frame to the wall. Use packers
at the fixing points to avoid distortion to the frame
and to maintain the 5mm expansion gap.
Do not over tighten the fixings!
4.6
Before reaching the final stages, clean any brick dust
or debris from the frame and surrounding areas.
4.7
Using a chisel, break off the excess ends of the packers
to create a neat finish.
4.8

1 2 | E U R O L O G I K I N S T A L L A T I O N G U I D E
5. FITTING THE GLAZING
Place each pane into position, noting that where opening
casements are hinged from the sides they should have
the glass packed at diagonally opposing corners to hold
the casement square.
5.1
Commence glazing the frame, ensuring that appropriate
glazing platforms are fitted around each aperture. These
centralise the glass and allow free passage of water to run
to the drainage slots.
5.2
As each pane is positioned, the beading can be installed
using a nylon mallet and tapped securely into place.
It is recommended that horizontal beads are installed first
and that the beads are refitted to their original position.
5.3
Make sure the area is clean and free from dust and debris.
Measure and fit any internal trims that may be required.
Trims maybe fitted using a suitable PVC-U adhesive
or silicone.
5.4
13
1 2 | E U R O L O G I K I N S T A L L A T I O N G U I D E 1 31 3
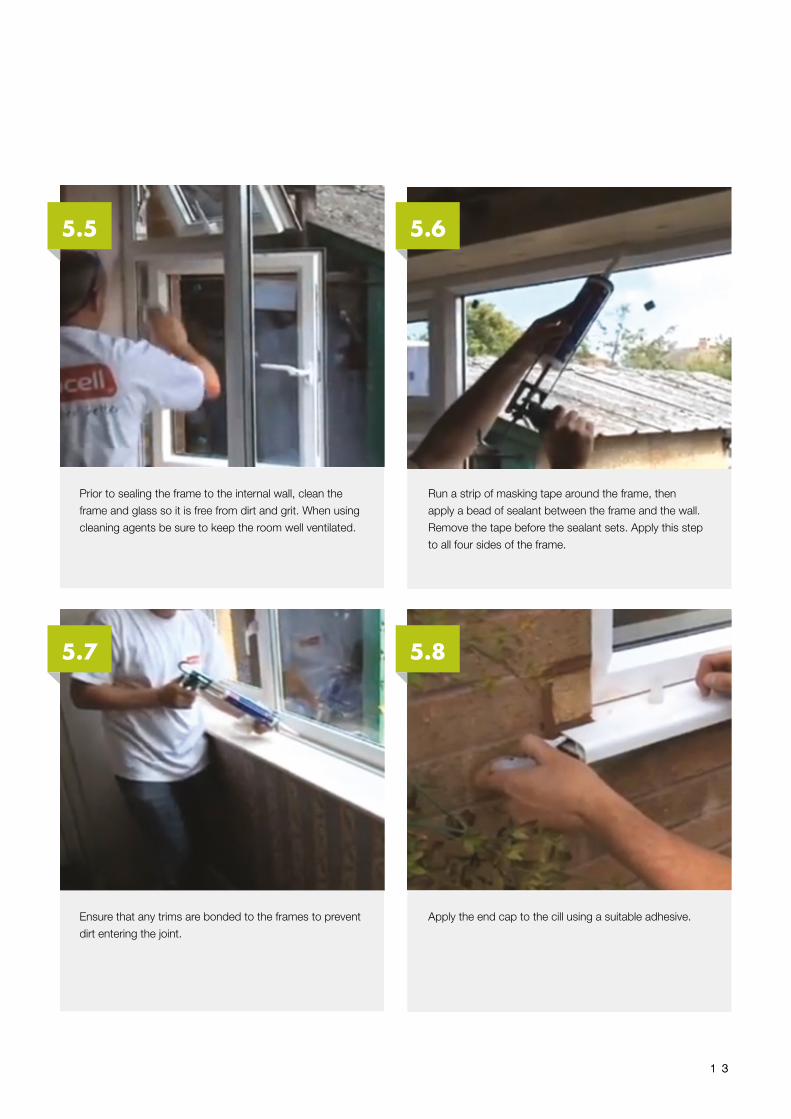
Run a strip of masking tape around the frame, then
apply a bead of sealant between the frame and the wall.
Remove the tape before the sealant sets. Apply this step
to all four sides of the frame.
5.5
Prior to sealing the frame to the internal wall, clean the
frame and glass so it is free from dirt and grit. When using
cleaning agents be sure to keep the room well ventilated.
5.6
Apply the end cap to the cill using a suitable adhesive.
5.7
Ensure that any trims are bonded to the frames to prevent
dirt entering the joint.
5.8
1 4 | E U R O L O G I K I N S T A L L A T I O N G U I D E
Having manufactured and installed the window so
that there is a 5mm gap (approx.) between mainframe
and masonry, it may be necessary to insert a flexible
foam strip to form a base for the silicone sealant.
Ensure that all the window/wall joints
are properly sealed off neatly.
Finishing work may be necessary inside the window,
i.e. re-plastering or a Eurocell finishing trim.
Internal Eurocell window board is also
recommended both for replacement and in new
buildings. For fixing of accessories to the inside
of the window i.e curtain rails and nets etc.
Screw fixing can be used into the PVC-U frame as long as
it is more than 20mm away from the welded joint. High-
low threaded screws are recommended for this use. Any
doubts please contact Eurocell Technical department.
Frames both inside and outside should be
washed down to clean off any residue of building
material, using household detergents.
The use of solvent-based cleaners is not recommended.
Silicone sealant
Foam strip(Silicone sealant saver)
EXAMPLES OF FRAME WEATHER SEALING
Silicone sealant
Silicone sealant
Foam strip
Joint width
Joint width
Joint width
Packers at fixing
Cover trim
A: joint width less than 6mm.
B: joint width 6mm to 15mm.
C: joint width over 15mm.
1 4 | E U R O L O G I K I N S T A L L A T I O N G U I D E 1 5
6. FINISHING OFF
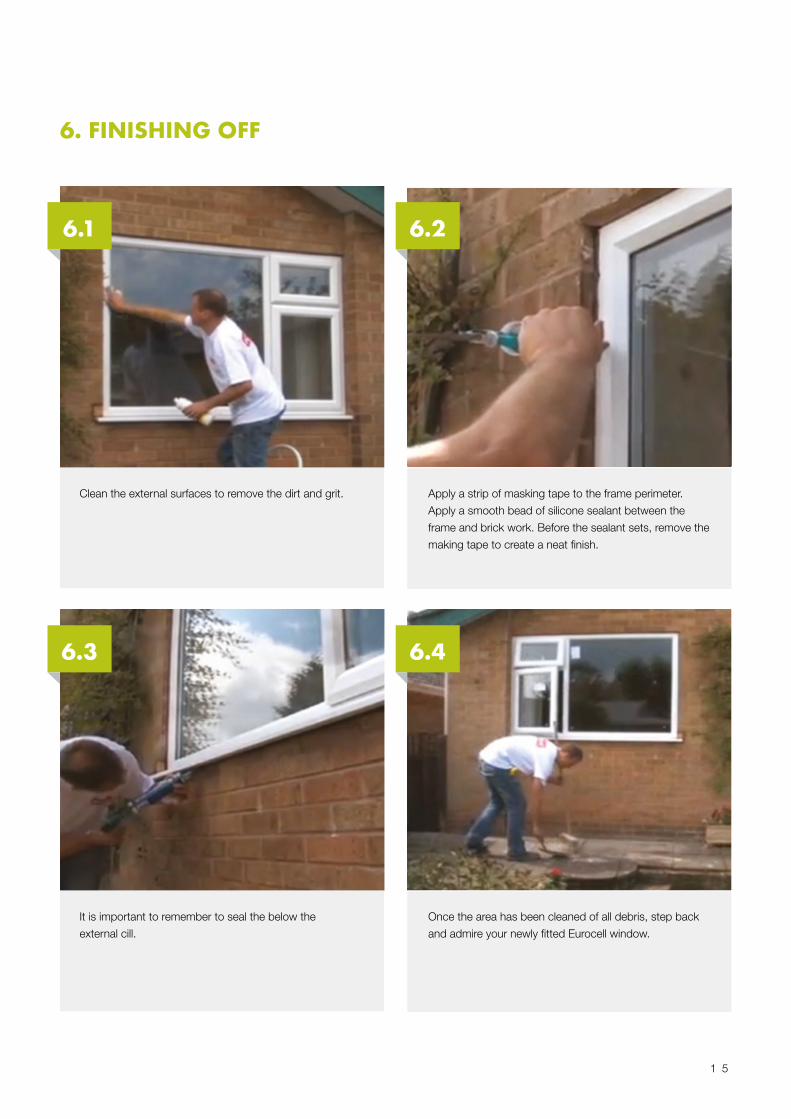
Apply a strip of masking tape to the frame perimeter.
Apply a smooth bead of silicone sealant between the
frame and brick work. Before the sealant sets, remove the
making tape to create a neat finish.
6.1
Clean the external surfaces to remove the dirt and grit.
6.2
Once the area has been cleaned of all debris, step back
and admire your newly fitted Eurocell window.
6.3
It is important to remember to seal the below the
external cill.
6.4

WINDOWGUIDE/APR15Product specification is subject to change without notification. Please also note that colours shown are illustrative only, as the printing process does not allow 100% accurate colours to be reproduced.
Visit eurocell.co.uk to find more installation guides
and installation videos for Eurocell products.
ALSO AVAILABLE