Installation Guide for Microsoft 2019 Desktop Applications
27
Installation Guide for Microsoft 2019 Desktop Applications Version 1.0
Transcript of Installation Guide for Microsoft 2019 Desktop Applications
Installation Guide for Microsoft 2019
Desktop Applications Version 1.0

Microsoft 2019 Installation Guide
Installation Guide for Microsoft 2019 Desktop Applications
April 2019
Authored by: Maryam Amri
You can find the most up-to-date technical documentation on the TechSoup Canada website at:
https://www.techsoupcanada.ca/en/community/blog/how-to-install-office-2019-for-windows
If you have any comments about this documentation, please submit your feedback to:
TechSoup Canada
1
Microsoft 2019 Installation Guide
Contents:
About this guide: 3
Step 1: Prepare for the installation 4
Step 2: Download and install the Office Deployment Tool 6
1. Download the Office deployment tool (ODT) 7
2. Install the ODT 8
3. Store ODT files on your desktop 9
Step 3: Download your configuration file 9
1. Select the XML file 9
2. Save the XML file 9
3. Software options 10
Step 4: Download and install Office through the 'Windows Command Prompt' application 13
1. Open Windows Command Prompt 13
2. Move your new ODT folder to your desktop 15
3. Command configuration 18
4. Configuration 20
Step 5: Get your activation key from the VLSC 21
1. Login to the VLSC 21
2. Retrieve your installation key 21
Step 6: Activate your software 23
Step 7: Pin your apps 24
TechSoup Canada
2
Microsoft 2019 Installation Guide
About this guide:
Do you want to install the 2019 version of Microsoft desktop applications? Are you not completely sure how to use the Office Deployment tool? Are you feeling ambitious? Then this guide was prepared for you!
In this guide we cover all the 2019 Microsoft Desktop Apps for Windows, including Office Standard 2019, Office Professional Plus 2019, Access 2019, Project Standard 2019, Project Professional 2019, Visio Standard 2019, and Visio Professional 2019.
The steps outlined in this guide apply to all 2019 Microsoft Desktop Apps. The steps to follow are:
1. Prepare for the installation 2. Download and install the Office Deployment Tool 3. Download or create your configuration file 4. Download and install Office through the Windows Command Prompt 5. Get your activation key from the VLSC 6. Activate your software 7. Pin your apps
We have laid out these precise steps for members who are not familiar with using Windows Command Prompt. We’ve even taken care of the coding for you! So anyone, whatever their level of tech or computer skills, can follow along with the steps in this guide to download and install the software.
TechSoup Canada
3
Microsoft 2019 Installation Guide
Step 1: Prepare for the installation
In this first step, you will need to run through the list of requirements you should have in place to start the download and installation of the software.
In order to install 2019 Microsoft desktop applications, you will need :
● an internet connection, ● to be running Windows 10, ● Ideally, you should be logged onto an Administrator account on your PC, but it is still possible
to do the installation from a non-administrator account, as long as you have the password for an administrator account.
You will also need to go through the following checklist:
Make sure your licence has been issued. To find out whether your licence has been issued, log on to your VLSC account and look for the licence. For more help, see Step 5.
Uninstall any previous versions of the Microsoft Software you’re installing. Note: The installation will not work if the Microsoft App is already installed, regardless of the version.
Create a folder in your desktop, and name it ODT. We will use this folder in the next steps.
Important! Check that your computer did not come pre-installed with Office 365.
TechSoup Canada
4
Microsoft 2019 Installation Guide
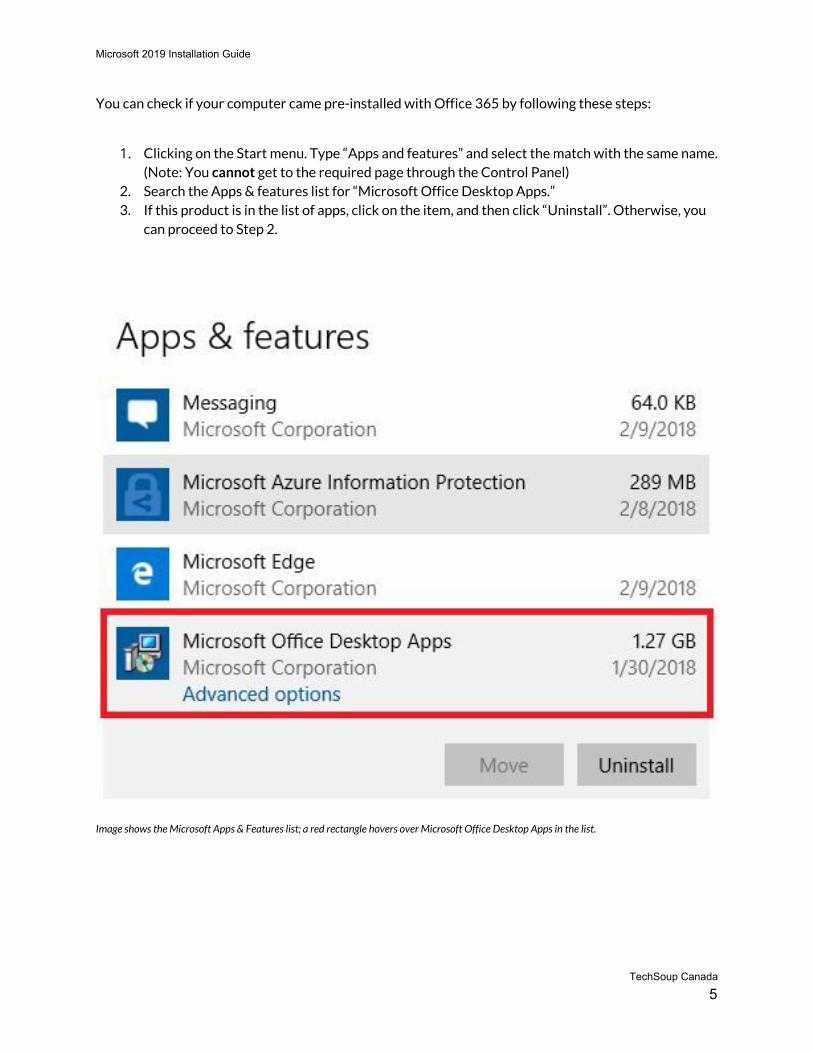
You can check if your computer came pre-installed with Office 365 by following these steps:
1. Clicking on the Start menu. Type “Apps and features” and select the match with the same name. (Note: You cannot get to the required page through the Control Panel)
2. Search the Apps & features list for “Microsoft Office Desktop Apps.” 3. If this product is in the list of apps, click on the item, and then click “Uninstall”. Otherwise, you
can proceed to Step 2.
Image shows the Microsoft Apps & Features list; a red rectangle hovers over Microsoft Office Desktop Apps in the list.
TechSoup Canada
5

Microsoft 2019 Installation Guide
Step 2: Download and install the Office Deployment Tool
In this step, you will learn how to download the Office Deployment Tool (ODT) from Microsoft.com.
1. Download the Office deployment tool (ODT):
Visit the Microsoft Download Center and click on the Download button.
Image shows the Microsoft Download Center; a red circle hovers over the Download button.
TechSoup Canada
6

Microsoft 2019 Installation Guide
2. Install the ODT:
Once the ODT has downloaded, open the file to install it. You will then be prompted to accept Microsoft’s Software Licence Terms. Note: If you are not logged into an administrator account, you will be prompted for an administrator's password.
Image shows a dialog box for The Microsoft Office Click-to-run Administrator tool; the box contains the prompt to accept Microsoft’s Software Licence Terms.
TechSoup Canada
7

Microsoft 2019 Installation Guide
3. Store ODT files in the right folder:
You will be prompted to select a folder to store the extracted files.
In order to follow the rest of this guide without any issues, we recommend storing the extracted files from the Office Deployment Tool in the new “ODT” folder in your Desktop. This is the folder we created in Step 1.
Image shows a dialog box containing a selection of options and states 'Select a folder to store the extracted files;' the ODT folder located in the Desktop directory is highlighted.
TechSoup Canada
8
Microsoft 2019 Installation Guide
Step 3: Download your configuration file
In this step, you will download the XML configuration file depending on the software version you choose.
1. Select the XML file:
You can select the XML file that you need below based on the software, version, and language you want to install. The tables below show you the available options.
Tip: Are you unsure if your computer is 64 bit or 32 bit? You can go ahead and download the 32 bit version. If you are installing multiple Microsoft 2019 products, please make sure you install the same version for all products.
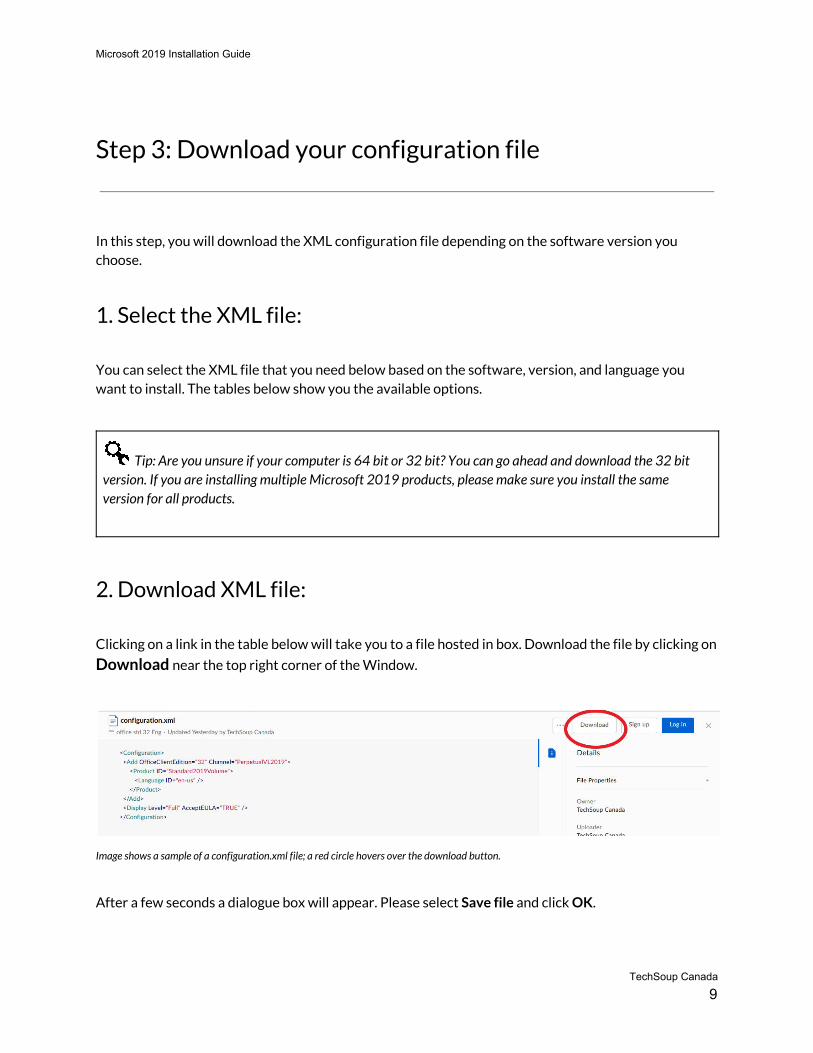
2. Download XML file:
Clicking on a link in the table below will take you to a file hosted in box. Download the file by clicking on
Download near the top right corner of the Window.
Image shows a sample of a configuration.xml file; a red circle hovers over the download button.
After a few seconds a dialogue box will appear. Please select Save file and click OK.
TechSoup Canada
9
Microsoft 2019 Installation Guide
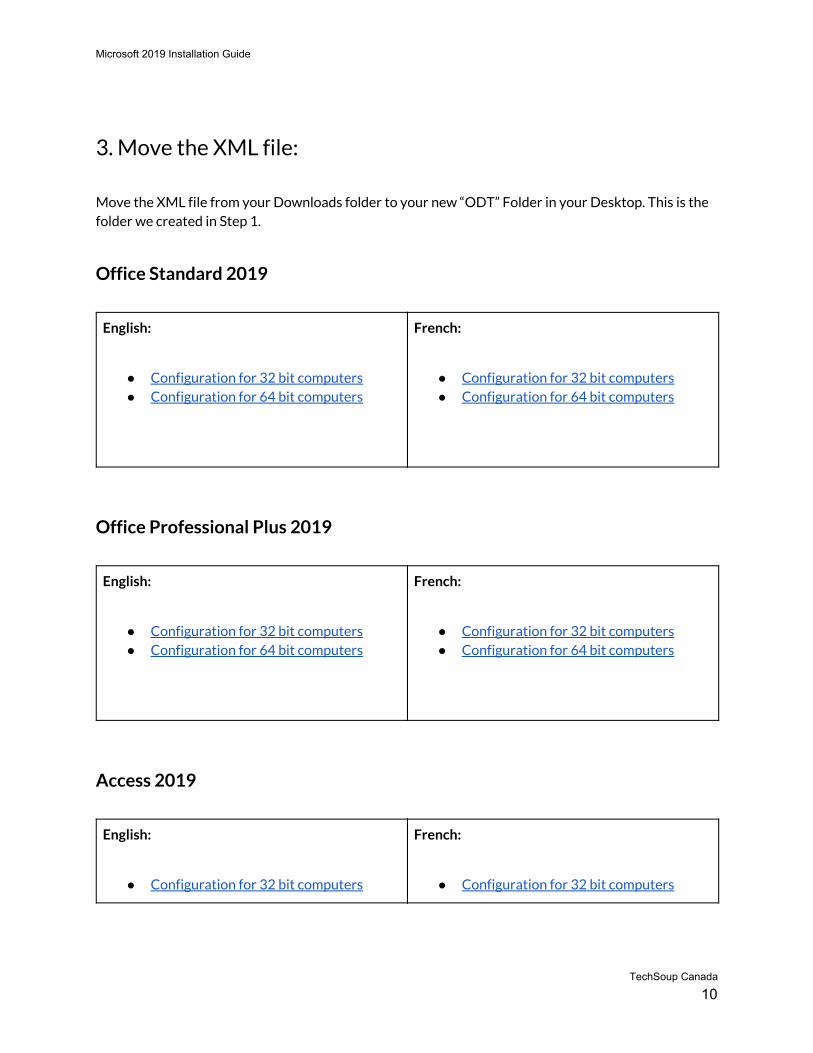
3. Move the XML file:
Move the XML file from your Downloads folder to your new “ODT” Folder in your Desktop. This is the folder we created in Step 1.
Office Standard 2019
English:
● Configuration for 32 bit computers ● Configuration for 64 bit computers
French:
● Configuration for 32 bit computers ● Configuration for 64 bit computers
Office Professional Plus 2019
English:
● Configuration for 32 bit computers ● Configuration for 64 bit computers
French:
● Configuration for 32 bit computers ● Configuration for 64 bit computers
Access 2019
English:
● Configuration for 32 bit computers
French:
● Configuration for 32 bit computers
TechSoup Canada
10

Microsoft 2019 Installation Guide
● Configuration for 64 bit computers ● Configuration for 64 bit computers
Project Standard 2019
English:
● Configuration for 32 bit computers ● Configuration for 64 bit computers
French:
● Configuration for 32 bit computers ● Configuration for 64 bit computers
Project Professional 2019
English:
● Configuration for 32 bit computers ● Configuration for 64 bit computers
French:
● Configuration for 32 bit computers ● Configuration for 64 bit computers
Visio Standard 2019
English:
● Configuration for 32 bit computers ● Configuration for 64 bit computers
French:
● Configuration for 32 bit computers ● Configuration for 64 bit computers
TechSoup Canada
11
Microsoft 2019 Installation Guide
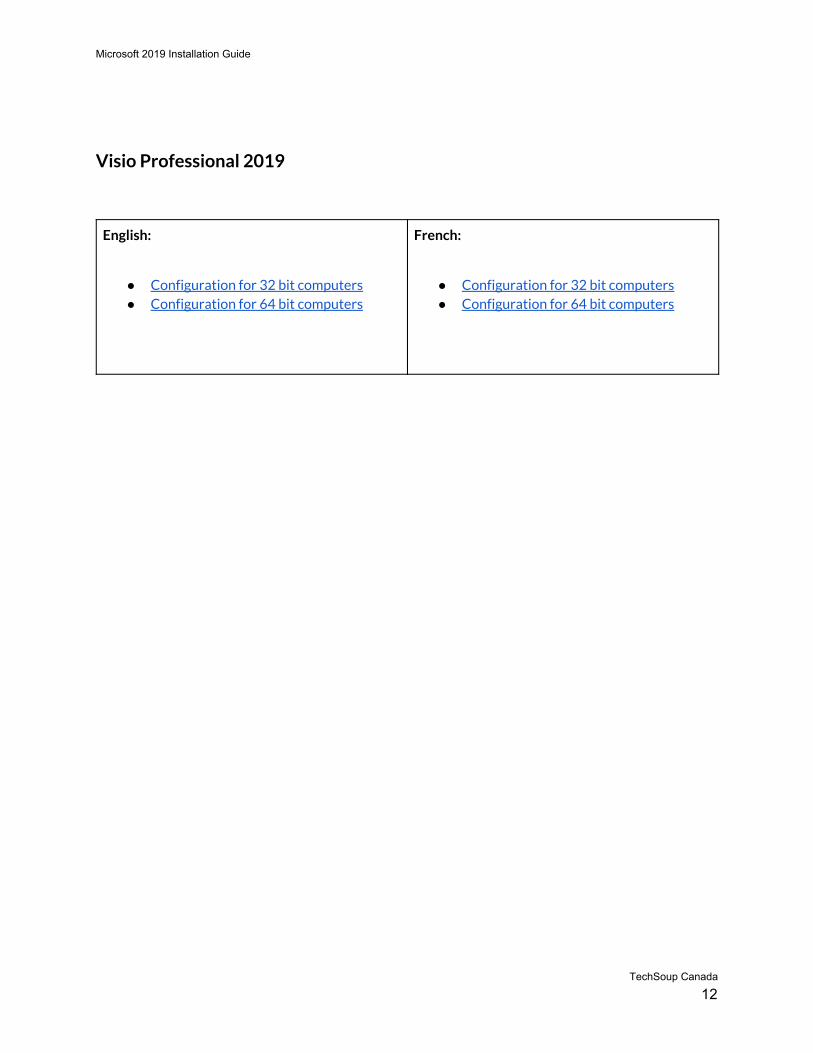
Visio Professional 2019
English:
● Configuration for 32 bit computers ● Configuration for 64 bit computers
French:
● Configuration for 32 bit computers ● Configuration for 64 bit computers
TechSoup Canada
12

Microsoft 2019 Installation Guide
Step 4: Download and install Office through the 'Windows Command Prompt' application
In this step, you will be using command functions to tell the computer to download the installation files onto your system.
The Windows Command Prompt is an application that is native to your Windows Operating System. It is used to give your computer instructions to perform a task. In this case, we will be using Windows Command Prompt to do two things:
First, you will be telling the computer to download the installation files for your Microsoft 2019 Apps from the Office Content Delivery Network (CDN).
Second, you will install those files on your computer.
If that didn’t make too much sense, don’t worry. Simply follow the instructions below.
1. Open Windows Command Prompt:
Open Windows Command Prompt by clicking on the Start button and typing cmd.
Open the application.
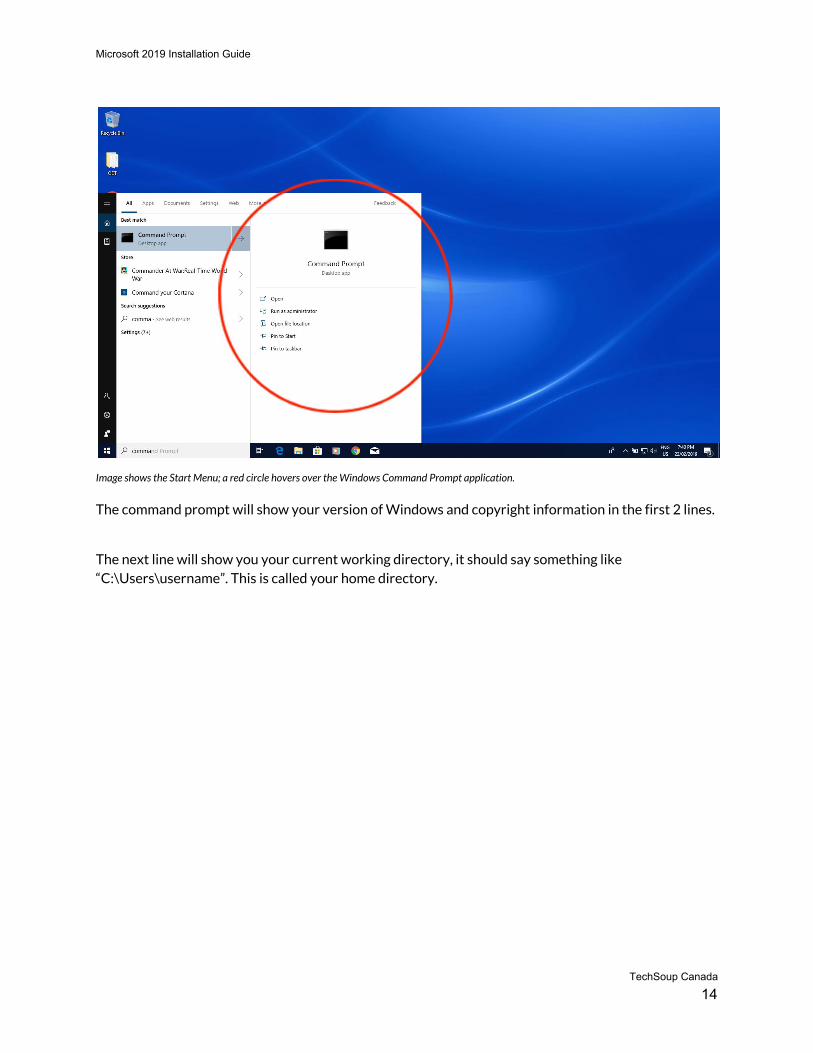
Troubleshooting: If you are using a non-administrator account on your PC, click “Run as administrator” in the left panel of the start menu, pictured below.
TechSoup Canada
13
Microsoft 2019 Installation Guide
Image shows the Start Menu; a red circle hovers over the Windows Command Prompt application.
The command prompt will show your version of Windows and copyright information in the first 2 lines.
The next line will show you your current working directory, it should say something like “C:\Users\username”. This is called your home directory.
TechSoup Canada
14

Microsoft 2019 Installation Guide
2. Change your current directory to the ODT folder on your desktop
Next, we will use the command below to get into your new ODT folder on your Desktop, which should be located inside your home directory. The ‘cd’ command changes your current working directory.
1. Copy the command:
cd Desktop\ODT
2. Paste this command by right-clicking in the command prompt
3. Once you have pasted this command, hit Enter on your keyboard to execute it. This should
change your current working directory to the ODT folder in your Desktop.
TechSoup Canada
15

Microsoft 2019 Installation Guide
Troubleshooting: Are you logged into a non-administrator account? Or is the command just not working?
If you got an error message that says “The system cannot find the path specified”, then your default directory may not be where we expected.
To navigate to the correct folder in the Command Prompt, do the following:
1. Navigate to the top of the directory tree with the following command:
cd\
Image shows an open ODT folder; a list of options from a right click is displayed over the address bar and the mouse hovers over the option of 'Copy Address.'
2. Open up your ODT folder in your Desktop. Right-click on the address bar and click Copy address.
3. Go back to your command prompt and type cd - then right click to paste the new address. The current line should look like this example:
TechSoup Canada
16

Microsoft 2019 Installation Guide
Image shows the following code: C:\>cd C:\Users\Maryam\Desktop\ODT
4. If your file is saved in the administrator’s account, copy the command below, and change <username> for the name of the administrator’s account:
cd Users\<username>\Desktop\ODT
5. Hit Enter to execute the command. This should change your current working directory to the ODT folder in your Desktop. You can now move along the third step below.
TechSoup Canada
17

Microsoft 2019 Installation Guide
3. Download your Microsoft 2019 Apps
Copy, paste, and execute the command below:
setup /download configuration.xml
The image a command prompt window. The last line reads C:\Users\Lautaro\Desktop\ODT>setup /download configuration.xml
This command can take around 10 minutes to finish executing. It will seem as though nothing is happening, but files are being downloaded to your ODT folder.
TechSoup Canada
18
Microsoft 2019 Installation Guide
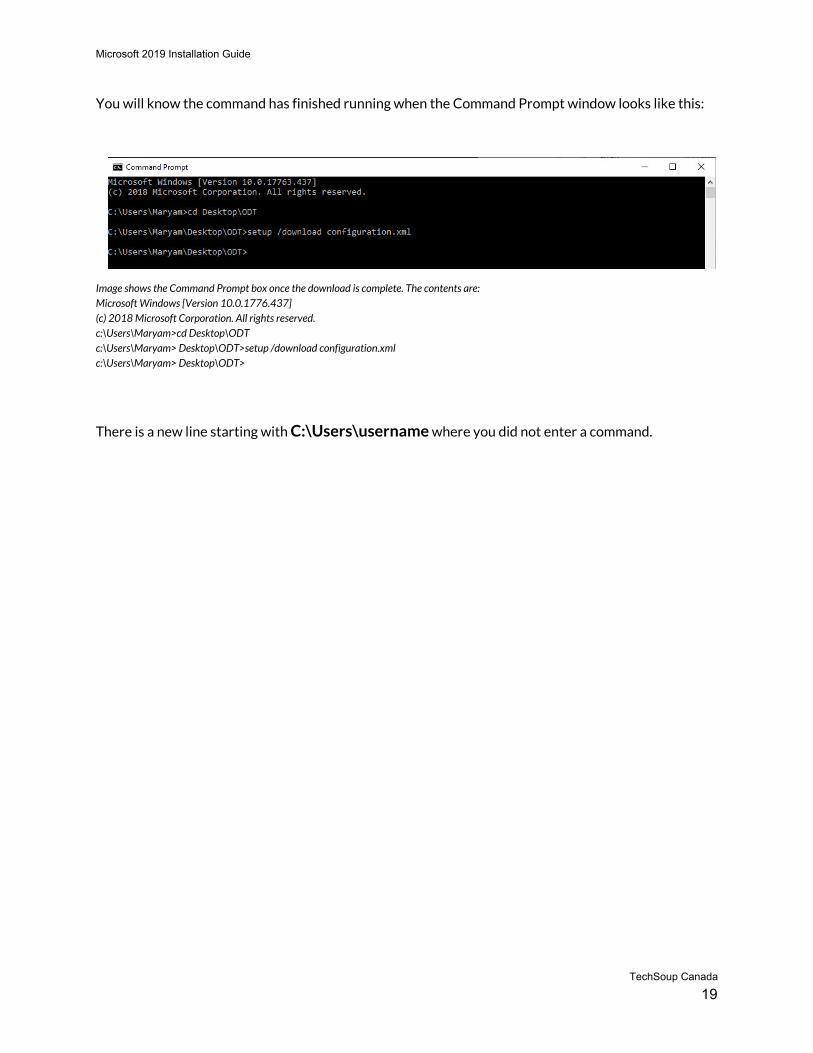
You will know the command has finished running when the Command Prompt window looks like this:
Image shows the Command Prompt box once the download is complete. The contents are: Microsoft Windows [Version 10.0.1776.437] (c) 2018 Microsoft Corporation. All rights reserved. c:\Users\Maryam>cd Desktop\ODT c:\Users\Maryam> Desktop\ODT>setup /download configuration.xml c:\Users\Maryam> Desktop\ODT>
There is a new line starting with C:\Users\username where you did not enter a command.
TechSoup Canada
19

Microsoft 2019 Installation Guide
4. Install your Microsoft 2019 Apps:
Once the previous command has finished running you must copy, paste, and execute the following command:
setup /configure configuration.xml
You will be prompted to allow Microsoft to make changes to your device. Once you agree, a display window will appear, showing the progress of your installation.
Image shows a box displaying the progress of the installation of Microsoft Office 2019.
The display window will disappear when the installation is complete.
Once this has happened, you can close the command prompt.
TechSoup Canada
20

Microsoft 2019 Installation Guide
Step 5: Get your activation key from the VLSC
In this step, you will log onto the Microsoft Volume Licensing Service Center (VLSC) to retrieve your activation key.
1. Login to the VLSC:
Go to the Volume Licensing Service Center and log in with the email listed on your TechSoup Account for Software Delivery.
2. Retrieve your installation key :
1. Once you are logged in to the VLSC, go to the Downloads and Keys tab. Find the Microsoft
2019 app you are installing in your list of products.
2. Once you have located the product, click on the Key tab. Copy the MAK key in the bottom
table.
Note: Do not copy the key under the "Office online Server 64 Bit" heading called "Setup Key" at the top.
TechSoup Canada
21

Microsoft 2019 Installation Guide
3. The image below shows the right and wrong keys. Your most recent key is the one at the bottom of the table.
Image shows the Volume Licensing Service Center; displays the Downloads and Keys tab; image displays the correct key table which is titled 'Office Standard 2019,' and the incorrect keys table which is titled ‘Office Online Server 64 bit.’
TechSoup Canada
22
Microsoft 2019 Installation Guide
Step 6: Activate your software
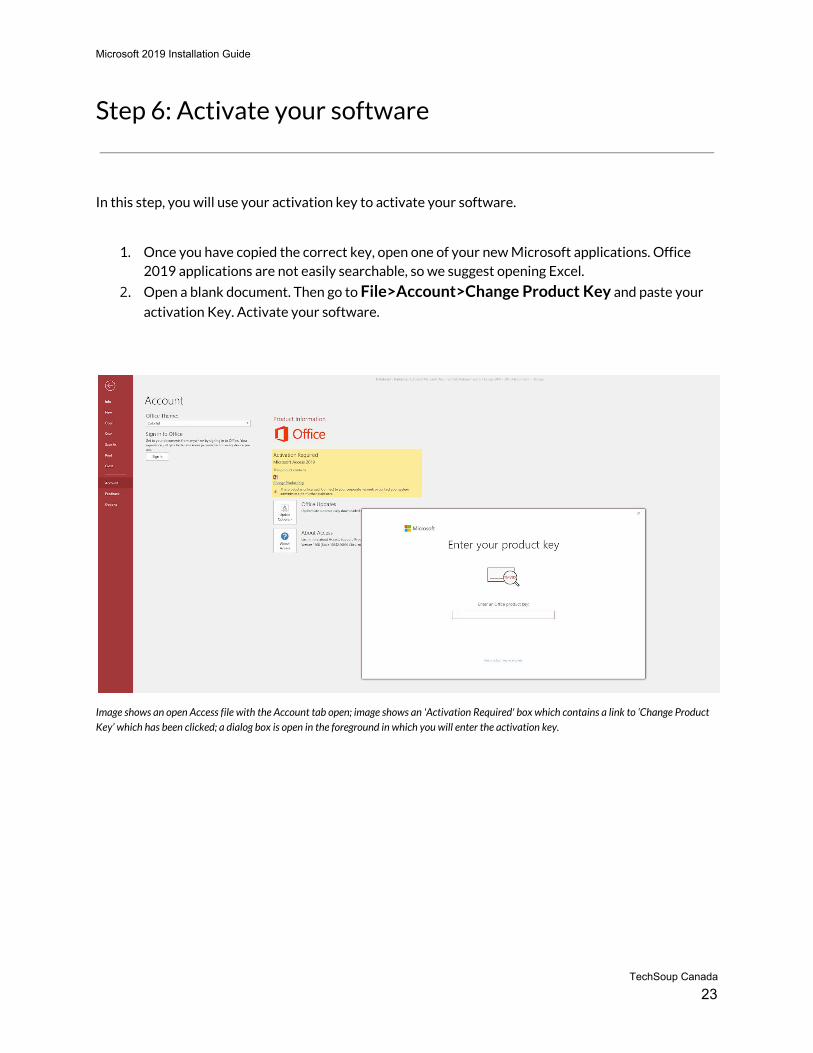
In this step, you will use your activation key to activate your software.
1. Once you have copied the correct key, open one of your new Microsoft applications. Office 2019 applications are not easily searchable, so we suggest opening Excel.
2. Open a blank document. Then go to File>Account>Change Product Key and paste your
activation Key. Activate your software.
Image shows an open Access file with the Account tab open; image shows an 'Activation Required' box which contains a link to ‘Change Product Key’ which has been clicked; a dialog box is open in the foreground in which you will enter the activation key.
TechSoup Canada
23
Microsoft 2019 Installation Guide
Step 7: Pin your apps
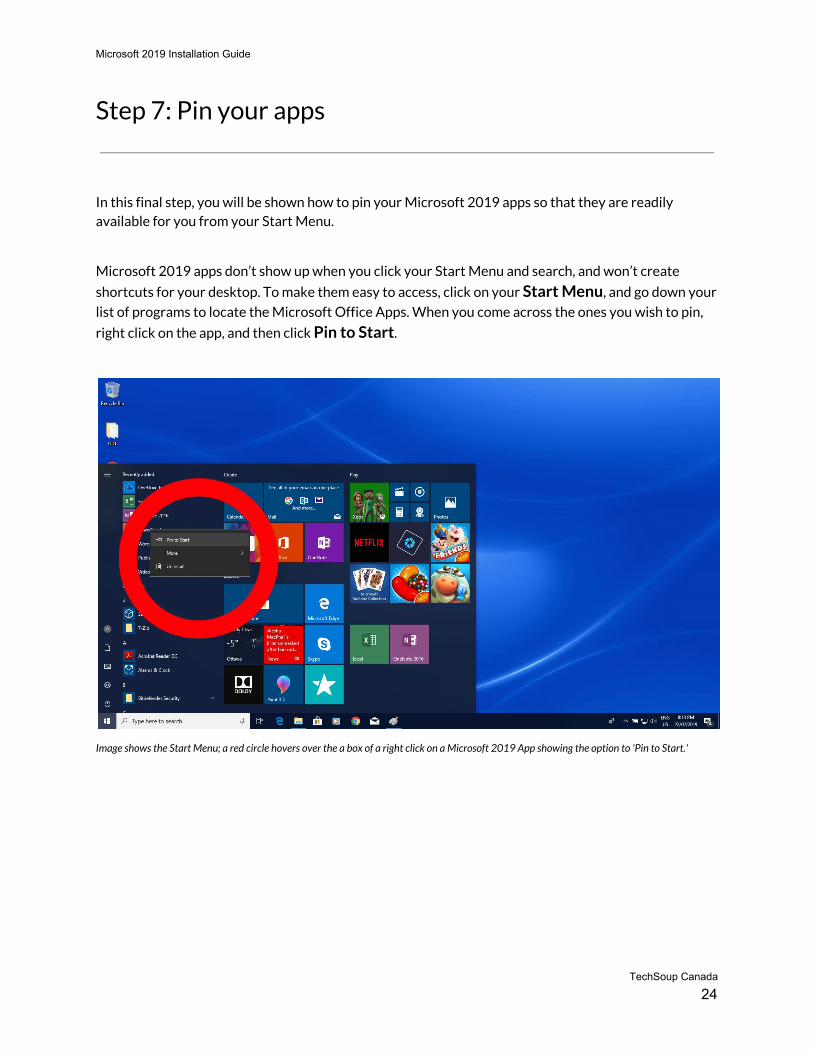
In this final step, you will be shown how to pin your Microsoft 2019 apps so that they are readily available for you from your Start Menu.
Microsoft 2019 apps don’t show up when you click your Start Menu and search, and won’t create
shortcuts for your desktop. To make them easy to access, click on your Start Menu, and go down your
list of programs to locate the Microsoft Office Apps. When you come across the ones you wish to pin,
right click on the app, and then click Pin to Start.
Image shows the Start Menu; a red circle hovers over the a box of a right click on a Microsoft 2019 App showing the option to 'Pin to Start.'
TechSoup Canada
24
Microsoft 2019 Installation Guide
The programs to pin for Office Standard 2019 are:
● Excel ● OneNote 2016 ● Outlook ● PowerPoint ● Publisher ● Sway ● Word
The programs to pin for Office Pro Plus 2019 are:
● Access ● Excel ● OneNote 2016 ● Outlook ● PowerPoint ● Publisher ● Sway ● Word
TechSoup Canada
25

Microsoft 2019 Installation Guide
Need to install another Microsoft 2019 App?
To install another Microsoft 2019 Desktop App, delete the "configuration.xml" file from your ODT folder (and your Downloads folder if it’s in both places) and redo the process starting from Step 3.
TechSoup Canada
26