Installation and Operating Instruction - Contra International · 1 Atlantis Solar Powered Air...
51
1 Atlantis Solar Powered Air Conditioner Installation and Operating Instruction Atlantis Solar Powered Air Conditioner Co.,
Transcript of Installation and Operating Instruction - Contra International · 1 Atlantis Solar Powered Air...

1
Atlantis Solar Powered Air Conditioner
Installation and Operating Instruction
Atlantis Solar Powered Air Conditioner Co.,
2
Version No.:AS_272
Notes to Users
We appreciate your purchasing Atlantis Solar Air conditioner. We will serve for you loyally.
Atlantis Solar Air conditioner is manufactured under the strictest quality control, and is
provided with excellent performance and reliable security property. For protecting your
rights and interests, for guaranteeing the eximious performance of Atlantis Solar Air
conditioner to function normally, and for ensuring you receiving the better service, we
plead you to necessarily advert to the following items.
I. The part of the Installation Guide in the Notes only provides for the
consultation of professional installers.
II. When you are going to use the Atlantis Solar Air conditioner, please be sure
to read the Notices to avoid damaging the Atlantis Solar Air conditioner or other accidents
as a result of false operations.
III. Please be sure to cut off the power of the Atlantis Solar Air conditioner, just
like the other apparatus, when you stop using.
IV. The correct installation and application assure the eximious performance of
the Atlantis Solar Air conditioner. Please read the Operation Instruction before installation,
adjustment and application.
V. This machine and the Operation Instruction are subject to ameliorate without
notice.
VI. The carried standard of the product is Q/320583FSC007-2006
VII. Please properly keep your purchase invoice, Warranty Card and Operation
Instruction.

3
CONTENTS
I. The Performance Characteristics of the Atlantis Solar Air
Conditioner…………………….3
II. The Performance Parameter………………………………………………………....4
III. The Application Notice…………………………………………………………..….…6
1. The Security Specifications………………………………………….……………….6
2. The Examination before Application………………………………………..………7
3. The Optimum Operation……………………………….……………………………..7
4. The Operating Temperature Range………………………………………………...7
IV. The Name of Each Part of the Atlantis Solar Air
Conditioner……..…………………….….8
V. Operation Manual………………………………..…………..………………….……9
1. Operation Instruction………………………………………………………………….9
2. Preparations before Application…………………………….……………………...11
VI. The Maintenance……………………………………………………………………..17
VII. The Diagnose of Common Troubles and Processing Methods……..……..…….18
VIII. The Installation Guide………………………………………………………………..20
IX. The Circuit Diagram……………..…………………………………………..……….27
X. The Packing List……………………….………………………………………….….28
XI. Three Guarantees…………………………………………………………………….29
XII. Maintenance Situation Recording…………………………………………………..30
XIII. The Maintenance Card……………………………………………………………….31
XIV. The Installation Card………………………………………………….………………32
XV. The Installation Evaluation Form……………………………………………………35

4
The Performance Characteristics of the Atlantis Solar Air Conditioner
� The product adopts both solar and electric energy. The solar energy is the
supplementary.
� According to the fluid mechanics principle and the photo-electrical complementary
effect, the Atlantis Solar Air conditioner saves energy greatly.
� The compressor, which is of the international famous brand, cools and heats
powerfully, operates most smoothly, and runs on low load. Service life is extended.
� The operation is calm and silent. The air conditioner adopts the advanced off-center
blades and foam air duct. The high performance low noise blower is adopted. The noise
reduces remarkably.
� Via auxiliary heating by electricity energy, the Atlantis Solar Air conditioner is exactly
fit for the freezing area, and brings warmth in severe cold days. It saves more electricity
compared with electric heating.
� It is provided with an elegant, graceful, grand design of a new appearance.
� It is provided with the microcomputer control technique. The remote control and the
control panel can be applied interchangeably. The operation is convenient and simple.
The air conditioner is also provided with an automatic detection display system. You will
feel beneficial, comfortable, and enjoyable with Atlantis Solar Air conditioner.
Notice: The above-mentioned advantages are the main functions of Atlantis Solar Air
conditioner. We hereby inform that they maybe slightly different literally with advertising
materials.
5
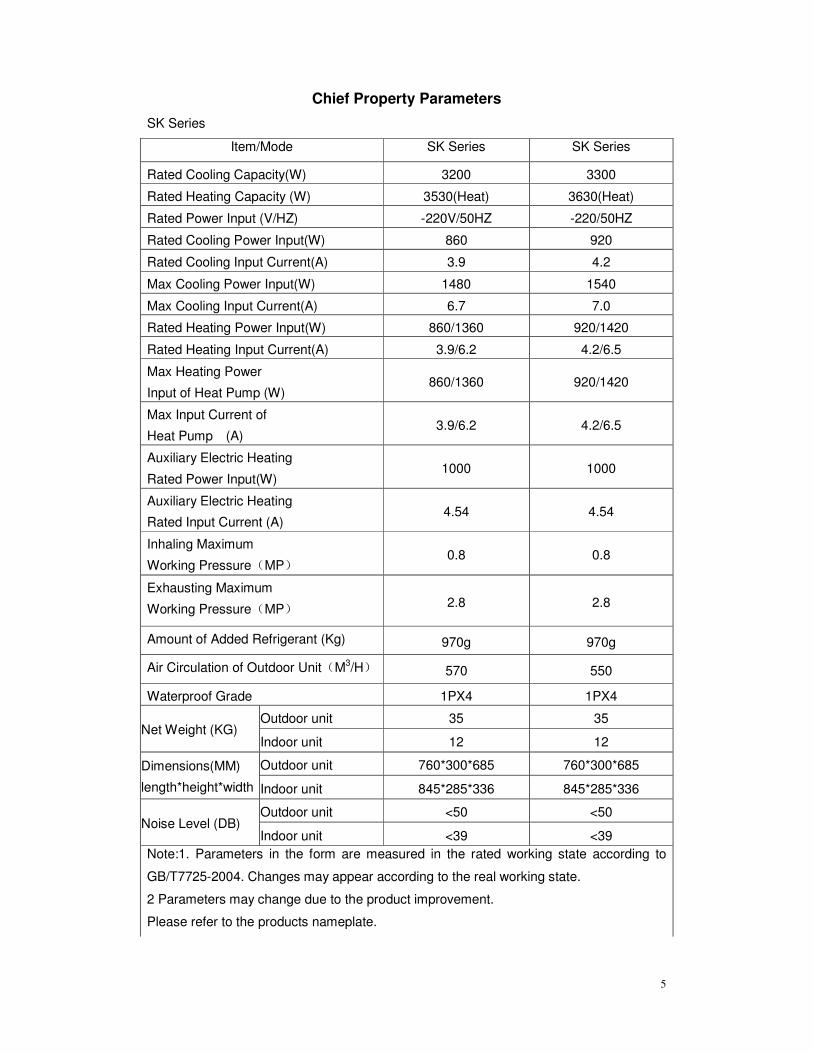
Chief Property Parameters
SK Series
Item/Mode SK Series SK Series
Rated Cooling Capacity(W) 3200 3300
Rated Heating Capacity (W) 3530(Heat) 3630(Heat)
Rated Power Input (V/HZ) -220V/50HZ -220/50HZ
Rated Cooling Power Input(W) 860 920
Rated Cooling Input Current(A) 3.9 4.2
Max Cooling Power Input(W) 1480 1540
Max Cooling Input Current(A) 6.7 7.0
Rated Heating Power Input(W) 860/1360 920/1420
Rated Heating Input Current(A) 3.9/6.2 4.2/6.5
Max Heating Power
Input of Heat Pump (W) 860/1360 920/1420
Max Input Current of
Heat Pump (A) 3.9/6.2 4.2/6.5
Auxiliary Electric Heating
Rated Power Input(W) 1000 1000
Auxiliary Electric Heating
Rated Input Current (A) 4.54 4.54
Inhaling Maximum
Working Pressure(MP) 0.8 0.8
Exhausting Maximum
Working Pressure(MP) 2.8 2.8
Amount of Added Refrigerant (Kg) 970g 970g
Air Circulation of Outdoor Unit(M3/H) 570 550
Waterproof Grade 1PX4 1PX4
Outdoor unit 35 35 Net Weight (KG)
Indoor unit 12 12
Outdoor unit 760*300*685 760*300*685 Dimensions(MM)
length*height*width Indoor unit 845*285*336 845*285*336
Outdoor unit <50 <50 Noise Level (DB)
Indoor unit <39 <39
Note:1. Parameters in the form are measured in the rated working state according to
GB/T7725-2004. Changes may appear according to the real working state.
2 Parameters may change due to the product improvement.
Please refer to the products nameplate.

6
Chief Property Parameters
SK Series
Item/Mode SK Series SK Series
Rated Cooling Capacity(W) 3500 3700
Rated Heating Capacity (W) 3850(Heat) 4070(Heat)
Rated Power Input (V/HZ) -220V/50HZ -220/50HZ
Rated Cooling Power Input(W) 1025 1050
Rated Cooling Input Current(A) 4.7 4.8
Max Cooling Power Input(W) 1785 1925
Max Cooling Input Current(A) 8.1 8.7
Rated Heating Power Input(W) 1025/1525 1050/1550
Rated Heating Input Current(A) 4.7/6.9 4.8/7.0
Max Heating Power
Input of Heat Pump (W) 1020/1520 1100/1600
Max Input Current of
Heat Pump (A) 4.6/6.9 5.0/7.2
Auxiliary Electric Heating
Rated Power Input(W) 1000 1000
Auxiliary Electric Heating
Rated Input Current (A) 4.54 4.54
Inhaling Maximum
Working Pressure(MP) 0.8 0.8
Exhausting Maximum
Working Pressure(MP) 2.8 2.6
Amount of Added Refrigerant (Kg) 1150g 1250g
Air Circulation of Outdoor Unit(M3/H) 570 550
Waterproof Grade 1PX4 1PX4
Outdoor unit 35 35 Net Weight (KG)
Indoor unit 12 12
Outdoor unit 760*300*685 760*300*685 Dimensions(MM)
length*height*width Indoor unit 845*285*336 845*285*336
Outdoor unit <50 <50 Noise Level (DB)
Indoor unit <39 <39
Note:1. Parameters in the form are measured in the rated working state according to
GB/T7725-2004. Changes may appear according to the real working state.
2 Parameters may change due to the product improvement.
Please refer to the products nameplate.
7
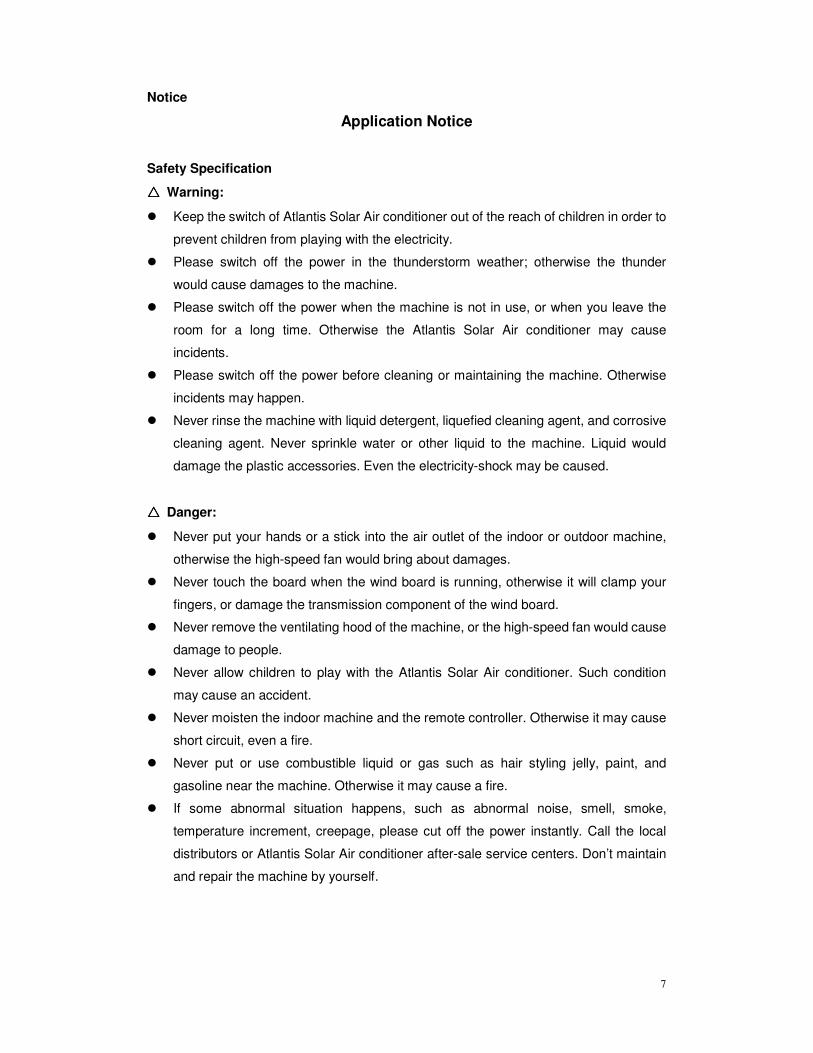
Notice
Application Notice
Safety Specification
△△△△ Warning:
� Keep the switch of Atlantis Solar Air conditioner out of the reach of children in order to
prevent children from playing with the electricity.
� Please switch off the power in the thunderstorm weather; otherwise the thunder
would cause damages to the machine.
� Please switch off the power when the machine is not in use, or when you leave the
room for a long time. Otherwise the Atlantis Solar Air conditioner may cause
incidents.
� Please switch off the power before cleaning or maintaining the machine. Otherwise
incidents may happen.
� Never rinse the machine with liquid detergent, liquefied cleaning agent, and corrosive
cleaning agent. Never sprinkle water or other liquid to the machine. Liquid would
damage the plastic accessories. Even the electricity-shock may be caused.
△△△△ Danger:
� Never put your hands or a stick into the air outlet of the indoor or outdoor machine,
otherwise the high-speed fan would bring about damages.
� Never touch the board when the wind board is running, otherwise it will clamp your
fingers, or damage the transmission component of the wind board.
� Never remove the ventilating hood of the machine, or the high-speed fan would cause
damage to people.
� Never allow children to play with the Atlantis Solar Air conditioner. Such condition
may cause an accident.
� Never moisten the indoor machine and the remote controller. Otherwise it may cause
short circuit, even a fire.
� Never put or use combustible liquid or gas such as hair styling jelly, paint, and
gasoline near the machine. Otherwise it may cause a fire.
� If some abnormal situation happens, such as abnormal noise, smell, smoke,
temperature increment, creepage, please cut off the power instantly. Call the local
distributors or Atlantis Solar Air conditioner after-sale service centers. Don’t maintain
and repair the machine by yourself.

8
Atlantis Solar Air Conditioner Application
Pre-checking
*Please check if the ground wire is rightly connected or disconnect.
*Please check if the air strainer is fixed.
*If the Atlantis Solar Air conditioner is idle for a long time, please rinse the strainer before
start-up. For more details, please consult the chapter Repair and Maintenance.
*The inlet opening and the outlet opening of the indoor and the outdoor units should be
unblocked.
Optimum operation
*Please set a proper comfortable temperature. Avoid exceedingly hot or cold, especially
where the elders, children and patients live.
* When cooling, please use curtain or shutter to avoid sunlight from shining in.
*Please shut the windows, otherwise the convection of indoor and outdoor air will
decrease the effect of cooling and heating
*If you need to set the pre-runtime, please use the remote controller.
*Never place barriers, which baffle the airflow, near the indoor and outdoor units. It will
decrease the effect of air conditioner system; even stop the running of the system.
*Please rinse the air strainer frequently. If the air strainer is blocked, it decreases effect of
cooling and heating.
Working temperature range
Mode
Temperature
Cooling Heating
Indoor Temperature above 18 oC below 31 oC
Outdoor Temperature 18 oC ~43 oC -7 oC ~24 oC
For ensuring normal working of Atlantis Solar Air conditioner, please use it in working

9
temperature range. Otherwise, the interior protection, water dripping, or low efficiency
may be induced.
Air Conditioner Components’ Names
Air Conditioner Components’ Names
Notice: The graphic example is based on the standard type Atlantis Solar Air-conditioner.
Thus, it may be different in appearance of that of yours.

10
How to use the remote controller
Operation Manual
Operation Instruction
1. Remote controller function description
Emitter: When you press this button, ‘ ’will appear on the top right corner and a beep will
be heard.
Display screen: the information of the arranged operation status displays on the display
screen.
Temperature key: Each degree centigrade elevates via pressing the ‘+’ button once. Each
degree centigrade falls via pressing the ‘-’ button once.
Mode key: The statuses of cooling, dehumidifying, ventilating and heating can be orderly
selected via pressing the button repeatedly.
Wind speed key: Via this button, the high wind speed, medium wind speed, low wind
speed, and auto wind speed can be orderly selected via pressing the button repeatedly.
Wind direction key: If you press the button once, wind door will swing in a certain range; if
you press the button again, the wind door will locate at a certain position.
Timing key: In idle mode, the exact time of the start-up and shutdown can be set via this
button. For more details, please consult Timing Set.
Clock key: Via this button, the time and the timing can be adjusted.
Sleep key: Via this button, the sleep mode and timed shutdown can be set and adjusted
during the air conditioner is running.
Switch key: The key is applied in switching on and off the air-conditioner.
Notice: No heating function is provided in the single tube cooler.

11
Display Screen Emitter
Mode
Temperature Increase
Temperature Decrease
Wind Speed
Wind Direction
Sleep
Switch
Clock
Timing

12
2. Display and Operation of the Indoor Unit
� Remote-control receiver
This part receives the infrared signal sent from the remote controller.
� Wind-speed indicator light
The lights indicates the exact wind speed such as high speed, medium speed, and low
speed by the numbers of lights.
� ‘ ’ This light is on during auto mode.
� ‘ ’ This light is on during cooling mode.
� ‘ ’ This light is on during heating mode.
� ‘ ’ This light is on during on dehumidification mode
� ‘ ’ This light is on during timing function is on.
� ‘ ’ This light is on during sleeping function is on.
� ‘ ’ This light displays temperature or time.
� ‘ ’ This light indicates a special function. If your air conditioner is not
provided with such a function, the light will not appear.
� ‘ ’ This light indicates a special function. If your air conditioner is not
provided with such a function, the light will not appear.
Wind-speed Indicator Light
Remote-control Receiver

13
How to operate the Atlantis Solar Air conditioner
Preparations before application
1. Power Connections
Notice:
�Electric socket must be connected to the ground.
�Never operate with wet hands so as to avoid electric shock.
�Electric plug must be inserted completely so as to avoid electric shock, overheating, and
fires.
④Never pull out the electric plug during the operation of the air conditioner so as to avoid
electric shock and fires.
2. Battery Installation in the Remote Controller
�Open the cover plate of the remote controller, draw the cover plate along the direction of
the arrow.
� Install two new AAA batteries with correct anode and cathode directions.
�After battery installation, LCD displays in full screen, and then displayed contents
disappear. Please press the ‘On/Off’ button, the word ‘automatic’ will be seen on the
screen.
Notice:
�When you operate remote controller, the remote controller must point to the signal
receiving window upon the air conditioner.
�The effective range of the remote controller is within 8 m.
� No barrier is between the remote controller and the signal receiving window.
� Please do not to drop remote controller to the ground.
�Please keep the remote controller away from direct solar radiation, heater, or other heat
sources.
�Please take out the batteries to avoid leaking, if it is kept idle for a long time.
�The battery life depends on the operation times of the remote controller. When the
display screen of the remote controller is not clear, or when the remote controller is stiff
and ineffective, please change new batteries.
�Never pull out the electric plug of the air conditioner during operation so as to avoid fires.
14
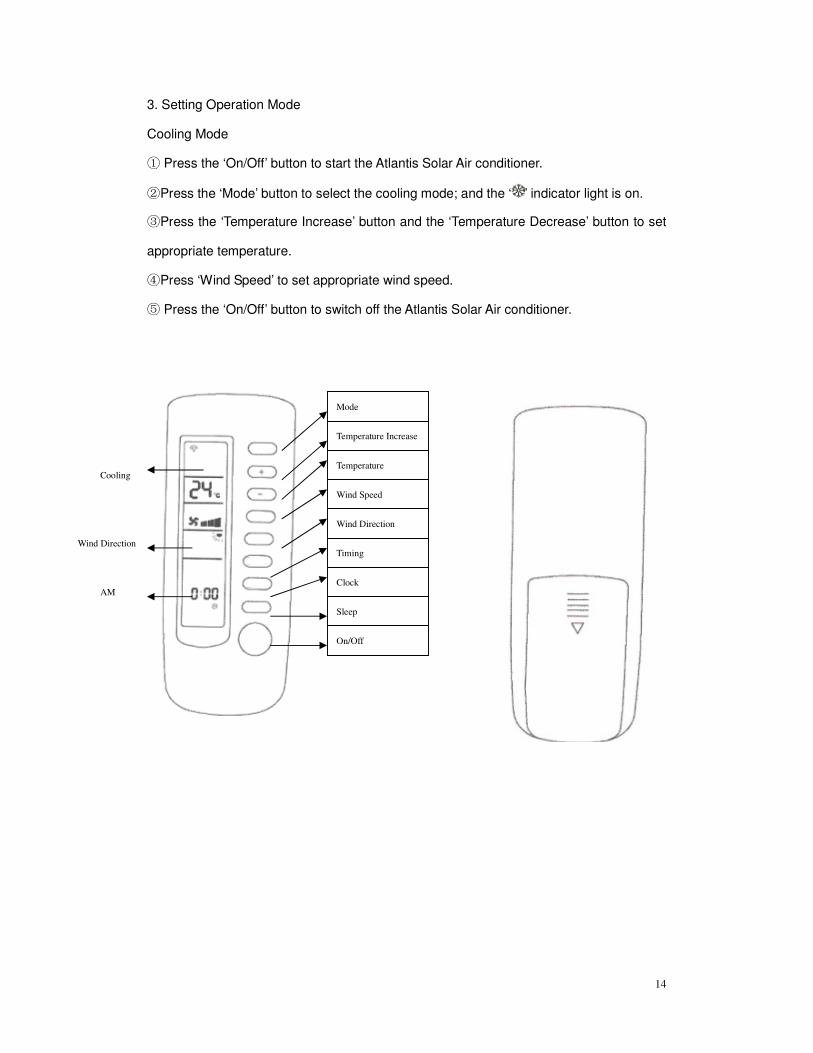
3. Setting Operation Mode
Cooling Mode
① Press the ‘On/Off’ button to start the Atlantis Solar Air conditioner.
②Press the ‘Mode’ button to select the cooling mode; and the ‘ ’ indicator light is on.
③Press the ‘Temperature Increase’ button and the ‘Temperature Decrease’ button to set
appropriate temperature.
④Press ‘Wind Speed’ to set appropriate wind speed.
⑤ Press the ‘On/Off’ button to switch off the Atlantis Solar Air conditioner.
Mode
Temperature Increase
Temperature
Wind Speed
Wind Direction
Timing
Clock
Sleep
On/Off
Cooling
Wind Direction
AM
15
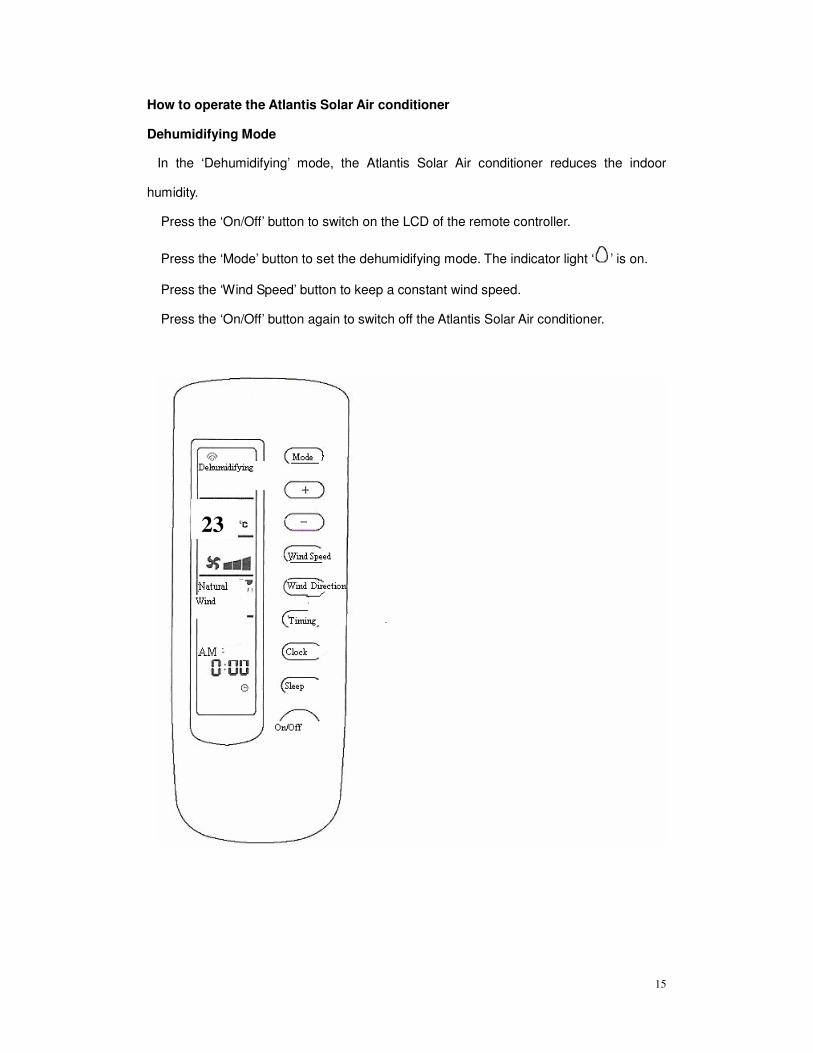
How to operate the Atlantis Solar Air conditioner
Dehumidifying Mode
�In the ‘Dehumidifying’ mode, the Atlantis Solar Air conditioner reduces the indoor
humidity.
� Press the ‘On/Off’ button to switch on the LCD of the remote controller.
� Press the ‘Mode’ button to set the dehumidifying mode. The indicator light ‘ ’ is on.
� Press the ‘Wind Speed’ button to keep a constant wind speed.
� Press the ‘On/Off’ button again to switch off the Atlantis Solar Air conditioner.
23

16
Heating Mode
① Press the ‘On/Off’ button to start the Atlantis Solar Air conditioner.
②Press the ‘Mode’ button to select the heating mode; and the ‘ ’ indicator light is on.
③Press the ‘Temperature Increase’ button and the ‘Temperature Decrease’ button to set
appropriate temperature.
④Press ‘Wind Speed’ to set appropriate wind speed.
⑤ Press the ‘On/Off’ button to switch off the Atlantis Solar Air conditioner.

17
How to operate Atlantis Solar Air conditioner
Auto Mode
� Press the ‘On/Off’ button to switch on the Atlantis Solar Air-conditioner. � Press the ‘Mode’ button to select the cooling mode; and the indicator light is on. � Press ‘Wind Speed’ to set appropriate wind speed. � Press the ‘On/Off’ button to switch off the Atlantis Solar Air conditioner. When the Atlantis Solar Air conditioner is in the auto mode, it will select the operation way according to room temperature. The temperature which is set by the remote controller is invalid.
Sleep Mode
Press ‘sleep’ button during the cooling or heating mode, the ‘sleep’ symbol will appear on the lower part of the LCD. The indicator light of the indoor machine is on. The air conditioner is in the sleep mode. To quit sleep mode, you just have to change the working mode, modify the wind speed, or press the ‘Sleep’ button again.
1. During Cooling:
When the air conditioner is cooling, during sleep mode, the appointed working
temperature will increase 1℃ after one hour. The temperature will decrease another 1℃
after another hour.
2 During Heating:
When the air conditioner is heating, during sleep mode, the appointed working
temperature will decrease 1℃ after an hour. The temperature will decrease another 1℃
after another hour.
8 hours
Decrease 1�
1 hour
1 hour
Increase 1�
Increase 1�
1 hour Decrease
Sleep Mode Start
Set Temperature
8 Hours 1 hour
Set Temperature
Sleep Mode Start

18
How to operate Atlantis Solar Air conditioner
Notice:
Heating: when the indoor temperature is comparatively low, please start the heating mode
of the Atlantis Solar Air conditioner. At first, the indoor blower does not work, in order to
avoid cool wind from blowing into the room. If the outdoor temperature is exceedingly low,
the heating efficiency will reduce. Thus, while selecting the type of the air conditioner,
please notice the possible outdoor temperature, and choose the suitable one, so as to
realize coziness.
Defrosting function: when the temperature is quite low and wet, frost and icing may
appear on the heat exchanger of the outdoor unit. Air conditioner will automatically detect
and defrost. The indoor and outdoor blower will stop working, only the compressor is at
work. Several minutes later, the heating is operating again.
Compressor protestation function: when the work modes are shifted, or the air conditioner
is switched off and then is immediately switched on, the compressor will wait for 3 minutes
before startup for protection.
4) Timing
Setting ‘Clock’
If no ‘Timing Auto Turn-on’, or ‘Timing Power Off’ is glittering on the LCD, please press the
‘Clock’ button for 3 seconds until the ‘ ’ is on. Press the ‘clock’ button once, 1 minute
will be increased. If you press the button firmly, minutes will increase rapidly. After
adjusted, please press the ‘timing’ button for 3 seconds until the ‘ ’ is off.
Setting ‘Timing Auto Turn-on’
AM

19
Before using this function, please adjust your clock exactly. The screen displays that the
Atlantis Solar Air conditioner will start working at 3 AM.
①In idle mode of the air conditioner, please press the ‘Timing’ button until the ‘Timing Auto
Turn-on’ is glittering on the LCD.
②Press the ‘Clock’ button to adjust the proper time of starting the Atlantis Solar Air
conditioner.
③Set proper mode, temperature, wind speed and ventilation door status, etc.
④If you want to cancel ‘Timing Auto Turn-on’, please press the ‘Timing’ button again.
Then please press the ‘On/Off’ button. The air conditioner will cancel the ‘Timing Auto
Turn-on’ and start the Atlantis Solar Air conditioner directly.
Timing Power Off
The LCD displays the Atlantis Solar Air conditioner will stop working at 3 PM.
� In idle mode of the air conditioner, please press the ‘Timing Power Off’ button until the
‘Timing Power Off’ is glittering on the LCD.
� Press the ‘Clock’ button to adjust the proper time of switching off the Atlantis Solar Air
conditioner. After adjustment, you can press any button to set the air conditioner such as
the ‘Temperature Increase’ button, the ‘Temperature Decrease’ button, the ‘Wind Speed’
button, the ‘Wind Direction’ button, the ‘sleep’ button, etc.
� If you want to cancel ‘Timing Power Off’, please press the ‘Timing’ button again. Then
please press the ‘On/Off’ button. The air conditioner will cancel the ‘Timing Power Off and
switch off the Atlantis Solar Air conditioner directly.
Notice: When you are setting the ‘Timing Auto Turn-on’ or the ‘Timing Power Off’, the ‘ ’
will not glitter.
AM
Timing Auto Turn-on
PM
Timing Power Off

20
5) Adjust the Wind Direction
� Horizontal direction (left/right): The airflow of horizontal direction can be adjusted
manually via wind boards.
Attention: When the Atlantis Solar Air conditioner is cooling or dehumidifying, the wind
boards should be positioned in the medium place. If the wind boards linger to the left or to
the right, the water vapor will crystallize on the wind boards.
� Vertical direction (up/down): The wind direction can be adjusted via the ‘wind direction’
button on the remote controller. Vertical directional wind boards are set to swing up
and down or are set to fix at certain point.
Attention:
*When the Atlantis Solar Air conditioner switches off, the vertical wind boards will shut
down automatically.
*Please press the ‘wind direction’ button on the remote controller to adjust the vertical
wind boards. If you adjust them manually, the positions set by the remote controller will not
accord with the actual positions. If this happens, please press ‘On/Off’ for shutting down
the wind boards. Then restart the air conditioner, the vertical wind boards will be back to
the correct positions.
*Please adjust the vertical wind boards before the air conditioner operation. During
operation, the vertical wind boards swing up and down. They may infibulate your fingers.
21
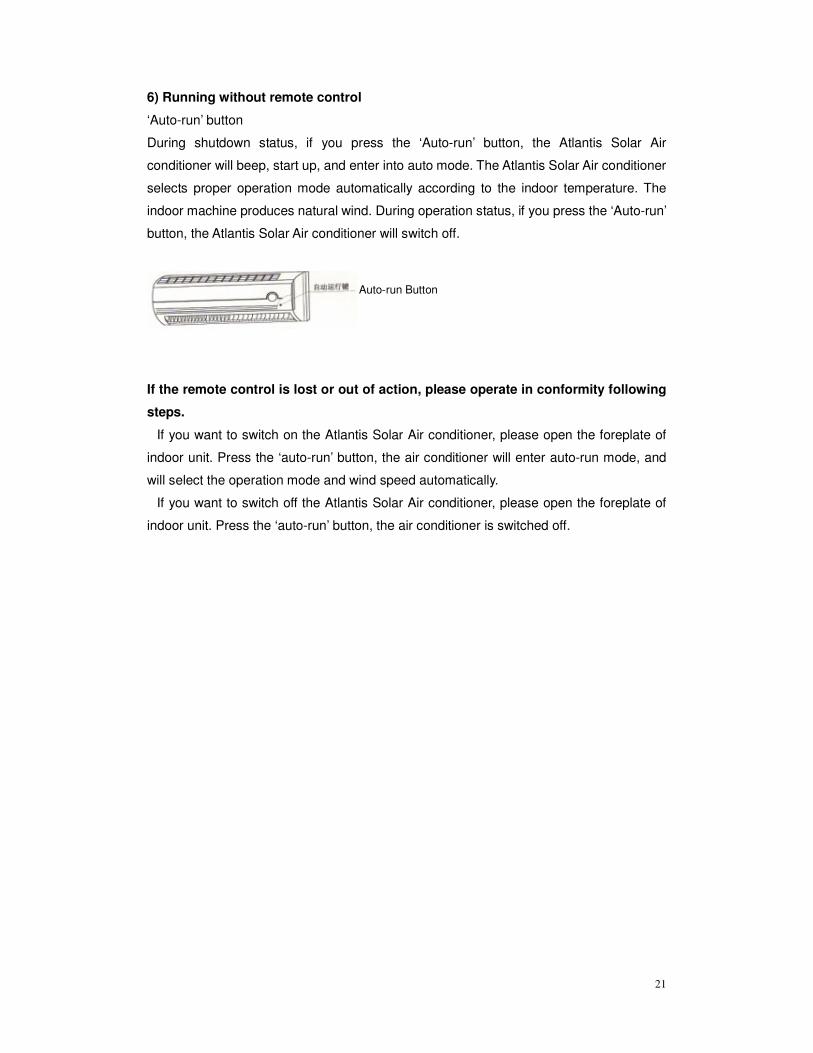
6) Running without remote control
‘Auto-run’ button
During shutdown status, if you press the ‘Auto-run’ button, the Atlantis Solar Air
conditioner will beep, start up, and enter into auto mode. The Atlantis Solar Air conditioner
selects proper operation mode automatically according to the indoor temperature. The
indoor machine produces natural wind. During operation status, if you press the ‘Auto-run’
button, the Atlantis Solar Air conditioner will switch off.
If the remote control is lost or out of action, please operate in conformity following
steps.
�If you want to switch on the Atlantis Solar Air conditioner, please open the foreplate of
indoor unit. Press the ‘auto-run’ button, the air conditioner will enter auto-run mode, and
will select the operation mode and wind speed automatically.
�If you want to switch off the Atlantis Solar Air conditioner, please open the foreplate of
indoor unit. Press the ‘auto-run’ button, the air conditioner is switched off.
Auto-run Button

22
Repair and Maintenance
Repair and Maintenance
Please cut off the electricity before repair and maintenance.
1. Check The Heat Conductor Level Periodically Or Before Starting Up.
(1) Please dismount the exhaust cap on the insulating tank.
(2) Take out the level meter; observe the liquid level mark on it.
(3) Please contact with the local distributor or the Atlantis Solar Air conditioner after sale
service center in time if the liquid is insufficient. Don’t open the machine by yourself.
2. Rinse the Air Filter
1) Dismount the filter
(1) Please open upwards the fore plate of the indoor unit.
(2) Extract downwards the two air filter screens.
2) Rinse the air filter screen
(1) Clean the filter screen by a dust collector.
(2) Wash the filter screens with clean warm water below 40℃.
3) Reinstall the filter screens after airing.
4) Close the inlet grilles of the indoor unit.
﹡Please rinse the filter screen every 15 days.

23
3. Clean the Outer Surface of the Atlantis Solar Air Conditioner
①Wipe the outer surface with soft cloth and clean water.
②Wipe the outer surface with soft cloth and neutral abluent.
Attention:
①Hot water above 40℃ may cause deformation or discoloration to the Atlantis Solar Air
conditioner’s surface.
②Volatile liquid such as thinner or gas, may damage the color of the Atlantis Solar Air
conditioner’s surface.
4. Inspection during Season Changes
1) When the air conditioner has not operated for a long time
① Please switch on the air conditioner in cooling mode in a fine weather. The moisture
inside can be removed if the machine keeps running for 6 to 8 hours.
②Please switch off the Atlantis Solar Air conditioner by the remote controller, cut off the
electricity, and take out the batteries in the remote controller.
③Clean the outdoor unit, and wrap it with a plastic film cover.
2) Air conditioner inspection before starting up during season changes
① Take off the plastic protection cover of the outdoor unit.
② Check the power circuit and connecting wire to find the possible damages.

24
③Make sure that no obstacle is in the outlets of the indoor unit or the outdoor unit.
④The drainpipe is without a crack or bruise.
⑤Rinse the filter screens and reinstall them. Switch on the air conditioner after the
electricity is connected for above half an hour.
5. Attention
a) Never place inflammables or explosive goods such as paint, shampoo, etc near the
air conditioner.
b) Never apply the air conditioner for other purposes such as blowing dry clothes and
food preservation.
c) Keep other heat sources away from the Atlantis Solar Air conditioner.
d) If the power wire or the connecting wire is damaged, please cut off the electricity and
call after sale serviceman for repair in order to avoid an accident.
e) Prepare an individual socket for the source wire of the air conditioner. The rated
current of the fuse is 15A. The copper core section area of the electric power conductor is
at least 2.5mm2.

25
Common Faults and Solutions
If your Atlantis Solar Air conditioner cannot work normally, please check the following items before maintenance. If the faults cannot be solved, please contact our Special Repair Center or the distributor.
Phenomenon Possible Reason Solution
Out of operation
1.Power failure 2. The leakage breaker tripping 3. The voltage is exceedingly low. 4. The air conditioner special fuse is burnt out. 5. The air conditioner is switched off as a result of misoperation of the timer 6. The air conditioner is on defrosting mode.
1.Re-connect the power supply 2.Contact the repair center 3. Consult the electrician or distributor. Buy a stabilizing voltage supply to ensure operation. (below 190v) 4. Change the fuse or consult the after service center. 5.Cancel the timing and reboot 6. Please wait for a moment.
Poor cooling and heating effect
1.The filters are dirty or blocked 2.A heating source or many people are indoors 3. The temperature setting is incorrect. 4. The air inlet and air outlet of the indoor machine are blocked. 5. The window or the door is open. 6. Outdoor temperature is below 0℃ while heating. 7. The liquid is insufficient in the insulated tank.
1.Clean filters to improve air flow fluency 2. Remove the heating source if possible. (Please pay attention to the air conditioner type when purchasing.) 3. Reset the temperature. 4.Remove the obstacles to ensure the airflow unhindered 5. Close the door and window to avoid cooling air or heating air from escaping. 6. Other subsidiary heating apparatuses can be applied simultaneously. 7. Contact the repair center when the liquid is in shortage.
Noise is aloud
1.Water flow sound 2.Exhausting sound 3. Arrangement is instable. 4. The operation noise is obviously unusual.
1. Cooling fluid is flowing in the machine when the air conditioner switches on and switches off. Please wait for a moment. 2. This is the sound of the four way valve switching. Please wait for a moment. 3. Please contact the distributor 4. If any unusual noise is heard, please contact the repair center.
Compressor cannot work.
1. The temperature setting is incorrect. 2. The LCD shows that the timing is ‘on’. 3. For protection, the compressor will not work in the first 3 minutes. Please wait for a moment.
1. Reset the temperature. 2. Cancel the timing and then reboot. 3. It is a normal phenomenon. Please wait for a moment.
No immediate wind blows out during heating.
If the air conditioner blows when the evaporator is at a low temperature, the wind will be uncomfortable. Please wait till the evaporator is heated.
Please wait for a moment.
The compressor starts and stops
frequently.
1. The input voltage is exceedingly low. 2. Too many appliances are applied on the same line. The voltage for the air conditioner is insufficient. 3. The heat preservation capacity of the room is poor.
1. Check the electric power source (voltage and wire diameter). When the voltage is low, and the wire diameter is too short, please buy a power stabilizer and another power cord in time or consult the electrician or the distributor. 2. Prepare a special power cord for the air conditioner. 3. Improve the heat preservation capacity of the room.
The displayer of remote controller
is not clear or not work
1. The battery is exhausted. 2. The anode and cathode are confused so as to the battery is in stalled wrongly.
1.Change another two of 7th alkaline batteries 2.Install the batteries rightly
If your Atlantis Solar Air conditioner cannot work normally, please check above items before maintenance. If the faults cannot be solved, please contact the Special Repair Center or the distributor.

26
Common Failures Diagnosis and Elimination
Non-failure Phenomena
1. When you start up or shut down the Atlantis Solar Air conditioner, sometimes you will hear sizzle sound, which is the flowing sound of the cooling agent, and is not a malfunction. 2. The Atlantis Solar Air conditioner cannot restart at once after stops, though it is switched on. Within 3 minutes, the compressor will not run for the cooling, dehumidifying and heating. 3. Sometimes, the Atlantis Solar Air conditioner inbreathes the bad smell so as to blow out the mawkish air. Under such condition, no failure is with the Atlantis Solar Air conditioner. The filter screen is to be rinsed. 4. When heating, the indoor machine and the outdoor machine may stop simultaneity, but the compressor still runs. This is to defrost. The heating performance will continue after defrosting finished. 5. When heating, the outdoor machine may generate water flow or hydrosphere. This is a result of defrosting and thawing, and is not a malfunction. 6. After the heat pump Atlantis Solar Air conditioner, which is applied in the Inner Mongolia, starts or stops, the air conditioner may beep. This is a result of self balanced pressure, and is not a malfunction. Clew of Saving Energy: Never jam the air inlet and the air outlet of the Atlantis Solar Air conditioner. The air conditioner will not run normally and may be damaged if the outlets are obstructed. When cooling, please avoid direct sun radiation into the room of the Atlantis Solar Air conditioner. Please adopt the sun shield or curtains. If the wall and ceiling of the room is heated by sunshine, the period of cooling will be long. Please always keep the air filter screen clean. Filter screen jamming will greatly reduce the efficiency of the air conditioner. Keep the window, door and any openings closed, so as to avoid cooling air escaping.
Failure Display Status List
Failure Type Display Status
Indoor Temperature Sensor Failure E1
Indoor Coiler Transmitter Failure E2
System Failure E3
Indoor Blower Failure E4
If any of the above-mentioned failures happen, please contact the distributor or the after
service center.

27
Atlantis Solar Air-conditioner Installment
The Installation Guide
Warning: Atlantis Solar Air conditioner must be installed by the professionals. Do not
install by yourself according to this instruction booklet. In order to install it correctly, please
first read the content of ‘Installation Part’. The installation of this Atlantis Solar Air
conditioner should be in accordance with the stipulation of GB17790 National Standard
Room Air Conditioners Installation Criterions and the requirements of this instruction
booklet.
After installation, the professional should give some advice to the user about how to use
and maintain the air conditioner; ask the user to read carefully and to take care of the
‘installation and application instruction ’.
Installation Notice:
Installing the air conditioner in the following places may cause malfunctions. If this can not
be avoided, please contact the Atlantis after sale service center.
� Places where the air contains oil element (lubricating oil).
� Places where the air contains the sulfide gas (sulfide hot spring).
� Places where the air contains the inflammable gas or the volatile is spread.
� Seashore alkaline land.
� Places where the high frequency equipments are arranged, such as the wireless
apparatus, the welding apparatus, and the medical equipment.
� Special surroundings.
Electrical work
Electrical work should conform to the corresponding stipulations of the GB17790 National
Standard Room Air Conditioners Installation Criterions
⊙Electric appliance security requirements during the first installation
1. If the user’s electricity environment is provided with serious security hidden danger, the
installer should refuse to install and explain clearly. Only after the security hidden danger
28
is removed, the installation can be continued.
2. Fluctuation scope of power line voltage is usually between +10%, if the voltage is not in
this scope, please take measures to regulate it.
3. A leak-protector and a master switch should be provided on the line. The fuse is
forbidden to be replaced by the copper wire and other wires. Please select the appropriate
fuse according to the maximum of the electric power consumption, which comprises 1.5 to
3 times of the maximum current of the Atlantis Solar Air conditioner and the current of
other electric appliances.
4. The power cord should be provided with effective ground wire. If not, the installer
should refuse to install and clearly explain.
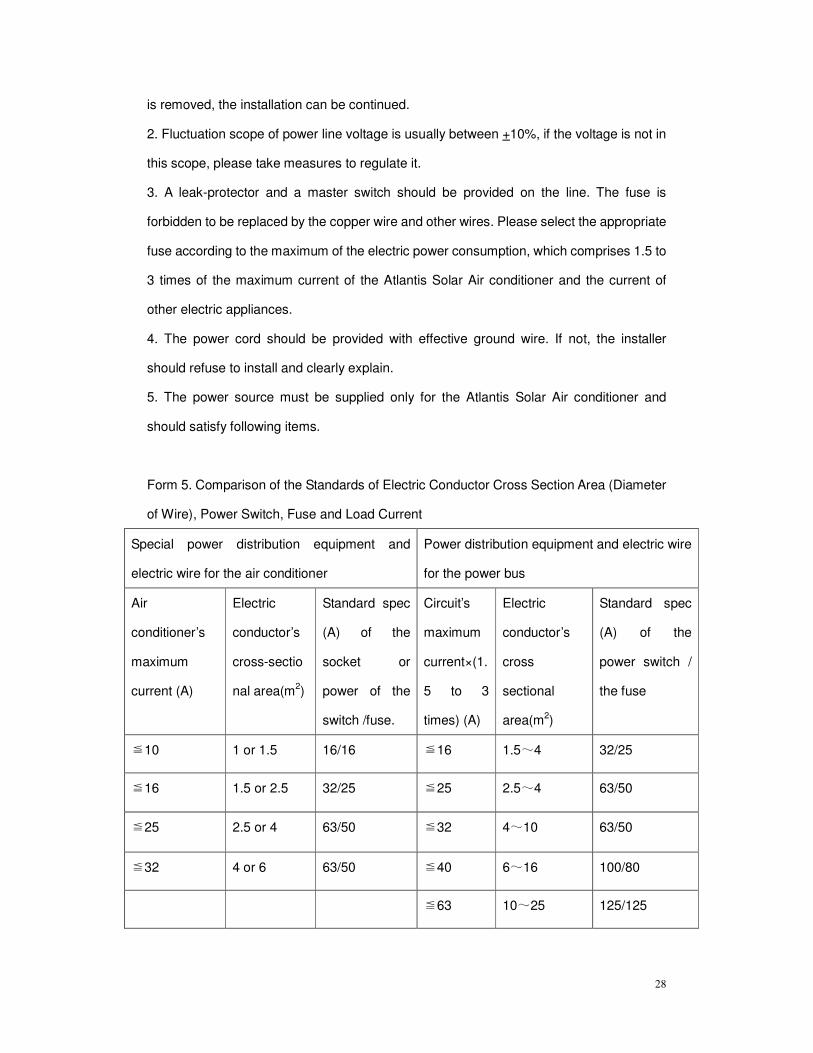
5. The power source must be supplied only for the Atlantis Solar Air conditioner and
should satisfy following items.
Form 5. Comparison of the Standards of Electric Conductor Cross Section Area (Diameter
of Wire), Power Switch, Fuse and Load Current
Special power distribution equipment and
electric wire for the air conditioner
Power distribution equipment and electric wire
for the power bus
Air
conditioner’s
maximum
current (A)
Electric
conductor’s
cross-sectio
nal area(m2)
Standard spec
(A) of the
socket or
power of the
switch /fuse.
Circuit’s
maximum
current×(1.
5 to 3
times) (A)
Electric
conductor’s
cross
sectional
area(m2)
Standard spec
(A) of the
power switch /
the fuse
≦10 1 or 1.5 16/16 ≦16 1.5~4 32/25
≦16 1.5 or 2.5 32/25 ≦25 2.5~4 63/50
≦25 2.5 or 4 63/50 ≦32 4~10 63/50
≦32 4 or 6 63/50 ≦40 6~16 100/80
≦63 10~25 125/125

29
Notice: The maximal electric current of the Atlantis Solar Air conditioner refers to the
maximal input electric current, which is printed on the brand of the indoor unit. The
maximal electric current of the circuit refers to the total summation of the maximal electric
current, which comprises the maximal electric current of the Atlantis Solar Air-conditioner
and the maximal electric current of other appliance.
The electric security requirement of installation of Atlantis Solar Air conditioner
1. Power cord of indoor and outdoor units cannot adopt polyvinyl chloride, and must adopt
chloroprene rubber wires (including high-tension signal wires). It is forbidden to lengthen
or shorten the wires by yourself. The exceedingly long wire of electric source should be
folded as large round curves. It is strictly forbidden to wind wires into small circles.
2. The ground wire must adopt yellow and green wires with adequate wire size. The
ground wire is strictly prohibited to connect to pipe of tap water, pipe of coal gas, zero line
of electric source, and overhead ground wire.
3. When you connect wires, please refer to the electric circuit diagram in the machine and
ensure everything is correct.
Please install the air conditioner at a place, which is provided with following
characteristics.
1))))Indoor Unit
① Indoor unit should be installed upon a firm vibrationless wall.
② Entrance and vent are supposed to be expedite. The hot wind and the cool wind are
supposed to should blow toward all around the room.
③ Indoor unit should be installed where it is convenient to connect with the outdoor unit.
④ Indoor unit Installation should avoid direct solar radiation.
⑤ Indoor unit should be installed where drainage is convenient.
⑥ Indoor unit Installation should consider about future maintenance. The filter screen
should be dismountable.
⑦ Indoor unit Installation should ensure the spaces which are shown in the following
picture.

30
2))))Outdoor Unit
* Outdoor unit should be installed on the solid foundation, because the infirm
foundation will increase noise and vibration.
* Please ensure that no barrier blocks the vent.
* At the seaside, please do not install the outdoor unit at a high altitude where the sea
wind is more forceful. To ensure the fan work normally, the Atlantis Solar Air conditioner
should be arranged tightly upon the wall. A baffle is to be adopted.
* Preventing wind blows to the inside of Atlantis Solar Air conditioner, epically in
places where the wind is particularly strong.
* Any barriers, which may block spreading heat, should be removed.
* If you adopt hanging installation, the wall should be composed of solid brick,
concrete, or other equally firm structure. Otherwise, please reinforce, stabilize, and secure
the Atlantis Solar Air conditioner installation. Slip, overturn and drop should be avoided.
* Design and manufacture of erecting frame should make full consideration of bearing
intension of material and structure, corrosion resistance, and convenience for installation
and maintenance. The intension of outdoor erecting frame should be able to endure the
weight above180kg. Steel components must be joined firmly, accept anticorrosive
treatment, and satisfy the standards of the GB17790-1999 National Standard Room Air
Conditioners Installation Criterions
* The foot screw of outdoor unit should be fixed by the M8 or M10 bolt.
The ceiling
More than 40 cm
More than 20cm More than 20cm Hanging plate
Left Right

31
①Outdoor unit should be installed on a solid foundation.
②If the outdoor unit quivers on the concrete foundation, please lay an aseismatic rubber
cushion.
③The unit should install vertically and horizontally, the gradient is below 5°.
④Outdoor unit installation should avoid places which some water drops spatter upon
directly, and which is near thermal spring with sulphur and nitrogen gas.
⑤Indoor unit installation should ensure the space distance shown on the right picture.

32
Installation of the Atlantis Solar Air Conditioner
2. Indoor Unit Installation
1) As shown in the following picture, pipelines are connected in five directions with the
indoor unit. When the pipelines are connected in ③ or ④ direction, please adopt the
saw to open a preformed groove on the panel. When the pipelines are connected in ⑤
direction, please adopt the saw to open a preformed groove under the panel.
2) Adopt five 5Y51 size wooden bolts to fix the board on the wall
Notice:
* If indoor unit is installed on the concrete wall, please adopt bulgy bolt.
* When you install the board, you are supposed to use weight dropper to test the board
whether it is horizontal or vertical.
* The installed board should be able to bear 50 kg.
* Ensure that the board is firm and solid.
3) Based on the junction direction of the pipeline (Please consult the following picture), a
hole which is provided with the diameter of 65 mm, is drilled in the corresponding place on
the wall. Then the wall bushing and the tube cap are placed into the hole. If the pipeline is
①Back
③Left ⑤down ②Left-back
④Right
Weight dropper Plumb-line
Marked line
Wooden bolt
The board
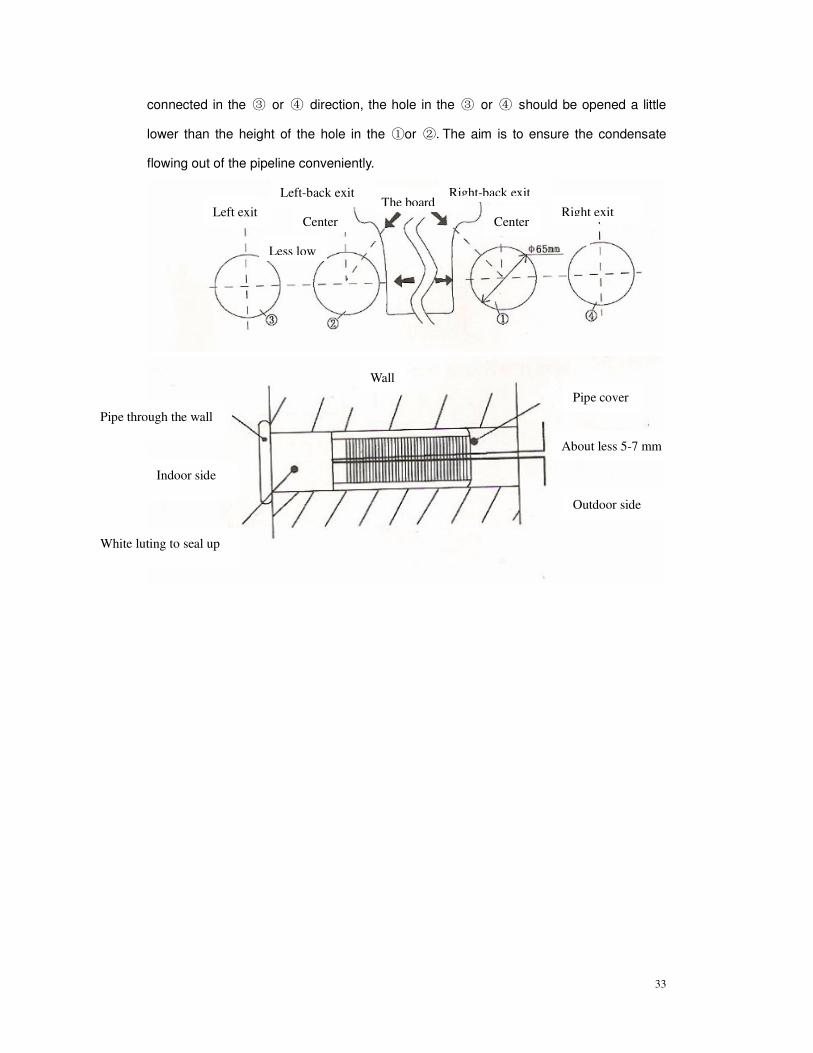
33
connected in the ③ or ④ direction, the hole in the ③ or ④ should be opened a little
lower than the height of the hole in the ①or ②.The aim is to ensure the condensate
flowing out of the pipeline conveniently.
Left exit
Less low
Center
Left-back exit The board
Center Right exit
Right-back exit
Outdoor side
Indoor side
Wall
Pipe through the wall
Pipe cover
About less 5-7 mm
White luting to seal up

34
Installation of the Atlantis Solar Air Conditioner
4) Please install the pipe of the indoor unit according to the direction of the wall hole; the
outflow pipe, the cable line, and the indoor unit should bundled by an adhesive tape. The
outflow pipe is below the other two.
5) Lead the affixed pipes going through the wall bushing, and hang up the indoor unit on
via the top hooks, the bottom long channels of the indoor unit is shown in the following
picture.
3. Installation of the outdoor unit’s insulating tank, vacuum tube and support
1) Install the insulating tank supports respectively on the panel of the outdoor unit, and
then fix them with bolts. (As shown in the following picture)
2) Install the vacuum tube bracket on the lower part of the insulating tank supports, and
then fix it with bolts. (As shown in the following picture)
3) Install the insulating tank on upper part of the insulating tank supports. (As shown in the
following picture)

35
4) Insert the vacuum tubes into the insulating tank orderly, and fix the bottom of the
vacuum tube in the bracket holes. (As shown in the following picture)
36
Atlantis Solar Air Conditioner Installation
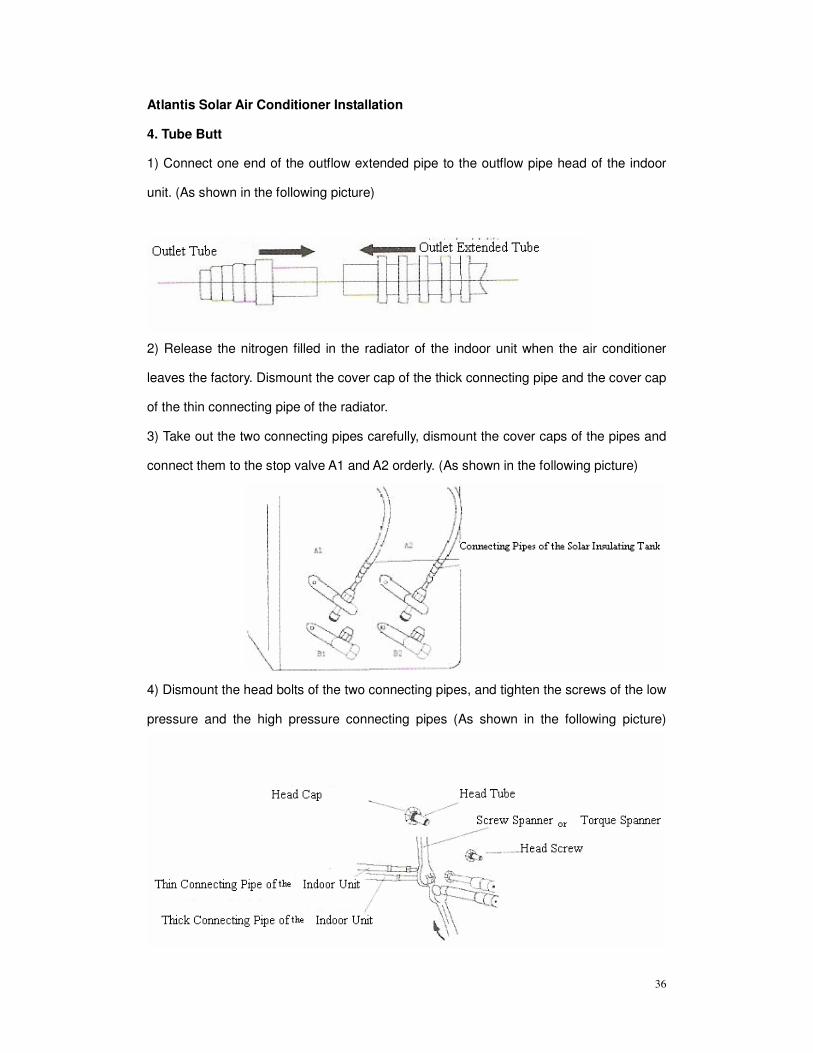
4. Tube Butt
1) Connect one end of the outflow extended pipe to the outflow pipe head of the indoor
unit. (As shown in the following picture)
2) Release the nitrogen filled in the radiator of the indoor unit when the air conditioner
leaves the factory. Dismount the cover cap of the thick connecting pipe and the cover cap
of the thin connecting pipe of the radiator.
3) Take out the two connecting pipes carefully, dismount the cover caps of the pipes and
connect them to the stop valve A1 and A2 orderly. (As shown in the following picture)
4) Dismount the head bolts of the two connecting pipes, and tighten the screws of the low
pressure and the high pressure connecting pipes (As shown in the following picture)

37
5) Dismount the head bolts on the stop valves of the low pressure and the high pressure
connecting pipes, screw one end of the thick connecting pipe and one end of the thin
connecting pipe on the stop valves of the low pressure and the high pressure connecting
pipes, and tighten the screws of the thick and thin connecting pipes by a spanner. (As
shown in the following picture)
38
Atlantis Solar Air Conditioner Installation
5. Empty the air in the insulating tank and indoor unit completely
If air, water or other impurity, which is mixed in the air conditioner system, will lead to the
working current exceedingly high, the capillary blocked, etc which will affect the
performance of the air conditioner. As a result, please eliminate air, water and other
impurity in the cooling pipe of insulated tank and side tube of indoor unit.
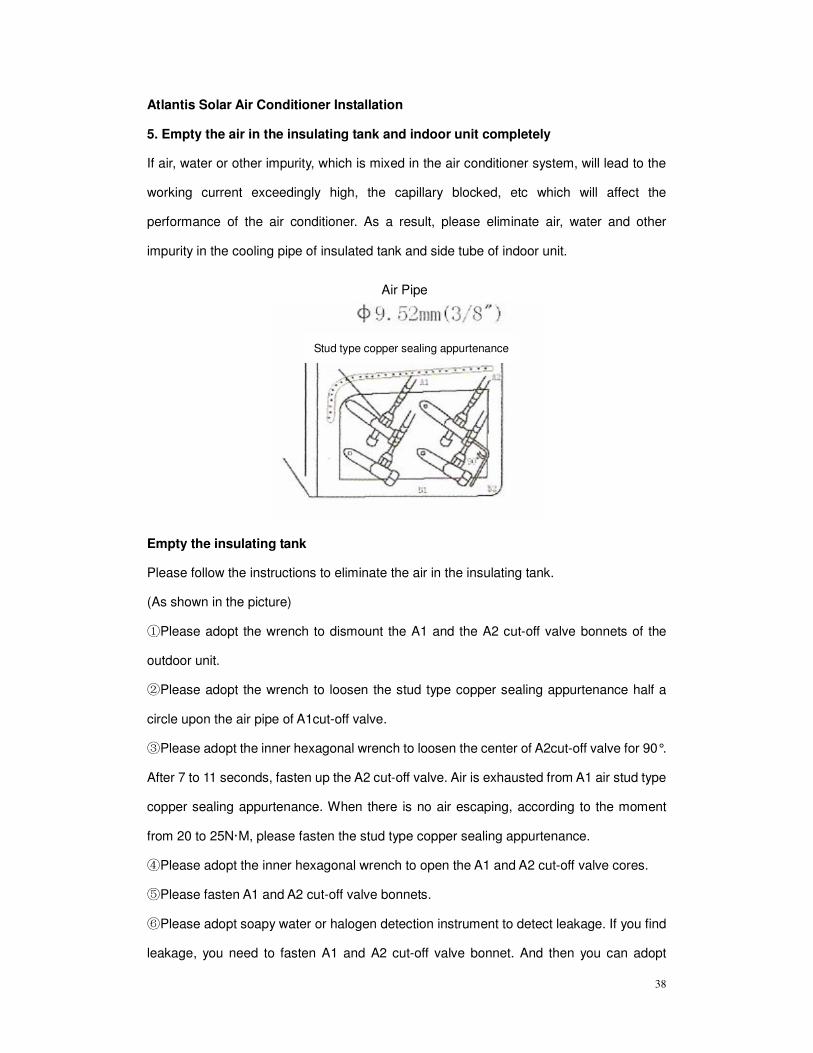
Empty the insulating tank
Please follow the instructions to eliminate the air in the insulating tank.
(As shown in the picture)
①Please adopt the wrench to dismount the A1 and the A2 cut-off valve bonnets of the
outdoor unit.
②Please adopt the wrench to loosen the stud type copper sealing appurtenance half a
circle upon the air pipe of A1cut-off valve.
③Please adopt the inner hexagonal wrench to loosen the center of A2cut-off valve for 90°.
After 7 to 11 seconds, fasten up the A2 cut-off valve. Air is exhausted from A1 air stud type
copper sealing appurtenance. When there is no air escaping, according to the moment
from 20 to 25N·M, please fasten the stud type copper sealing appurtenance.
④Please adopt the inner hexagonal wrench to open the A1 and A2 cut-off valve cores.
⑤Please fasten A1 and A2 cut-off valve bonnets.
⑥Please adopt soapy water or halogen detection instrument to detect leakage. If you find
leakage, you need to fasten A1 and A2 cut-off valve bonnet. And then you can adopt
Air Pipe
Stud type copper sealing appurtenance
39
refrigerant air from outside of the system to empty air.
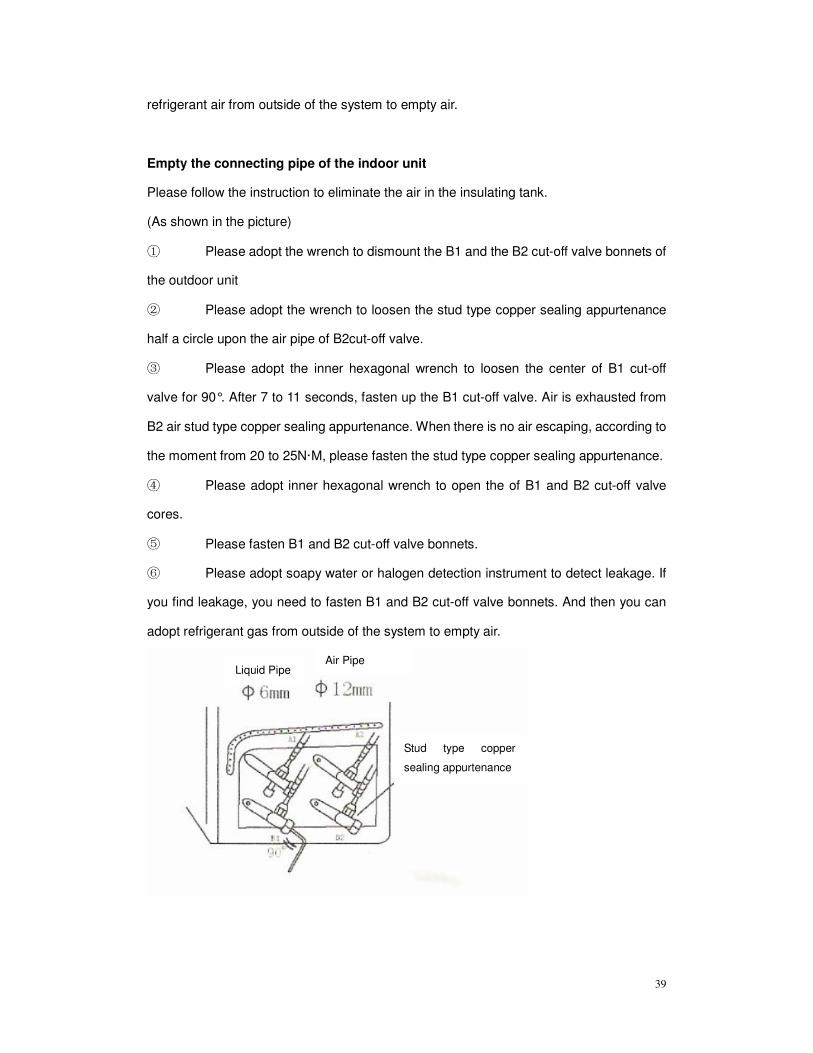
Empty the connecting pipe of the indoor unit
Please follow the instruction to eliminate the air in the insulating tank.
(As shown in the picture)
① Please adopt the wrench to dismount the B1 and the B2 cut-off valve bonnets of
the outdoor unit
② Please adopt the wrench to loosen the stud type copper sealing appurtenance
half a circle upon the air pipe of B2cut-off valve.
③ Please adopt the inner hexagonal wrench to loosen the center of B1 cut-off
valve for 90°. After 7 to 11 seconds, fasten up the B1 cut-off valve. Air is exhausted from
B2 air stud type copper sealing appurtenance. When there is no air escaping, according to
the moment from 20 to 25N·M, please fasten the stud type copper sealing appurtenance.
④ Please adopt inner hexagonal wrench to open the of B1 and B2 cut-off valve
cores.
⑤ Please fasten B1 and B2 cut-off valve bonnets.
⑥ Please adopt soapy water or halogen detection instrument to detect leakage. If
you find leakage, you need to fasten B1 and B2 cut-off valve bonnets. And then you can
adopt refrigerant gas from outside of the system to empty air.
Air Pipe Liquid Pipe
Stud type copper
sealing appurtenance

40
Atlantis Solar Air Conditioner Installation
Notice:
① When the pipe line is extended, discharge the air in the connecting pipe with
refrigerant gas, which is from the outside of the system. And then, discharge the
redundant refrigerant in degassing method.
②Installation height of the indoor unit and the outdoor unit should be below 5 m.
③The length of the pipe, which connects the indoor unit and the outdoor unit, should be
less than 10 m.
④ The refrigerant filling amount of the Atlantis Solar Air conditioner should be adjusted
according to the length of the pipe (L). The refrigerant increment G= (L- length of the
standard pipe)*80(g/m).
Connection of the Power Supply of the Outdoor Units
Dismount the outlet box of the outdoor unit; connect the triple core wire and the twin core
wire with the five jacks of the connecting terminals in accordance with their colors. As
shown in the following form, the connection method of the triple core wire of the subsidiary
electric heating pipe on the insulating barrel is that the blue wire is connected with terminal
board 4 (N), the red wire is connected with terminal board 3; the yellow/green wires are
connected with terminal board grounded.
The Terminal Board Base on the
Outdoor Units
1 2 3 4(N)
The Color of Wire Connected With
the Indoor Unit
Brown Black Red Blue Yellow/Green
Connecting with the Auxiliary
Electric Heating Tank
Red Blue Yellow/Green

41

42
Simple Principle Circuit Diagram of the Atlantis Solar Air Conditioner
outdoor circuit
electric wiring diagram label
Notice: The thermal protector is classified into externals and internals.
outdoor electric heater
blower capacitance
four-way valve
co
mpre
ssor
compressor capacitance
overload protector
thermal
protector
black white
red blue
brown yellow
green
indoor circuit
transformer
emergency switch
receive and display panel
temperature spreader

43
Packing List
Heat Collector Packing List
No. Name Unit Quantity Remarks
1 Insulated Tank Tank 1
2 Collector Tube Tube 10
3 Insulated Tank Support Support 1
4 Collector Tube Bracket Bracket 1
5 Ventilation Cap Groupware Groupware 1
6 Plastic Footstock Footstock 10
Indoor Unit Packing List
No. Name Unit Quantity Remarks
1 Indoor Unit Unit 1
2 Indoor Power Supply Connecting Line
for Outdoor Machine
Line 1
3 Power Cord Cord 1
4 Application and Installation Instruction Instruction 1
5 Remote Controller Controller 1
6 Standard AAA Battery Battery 2
Outdoor Unit Packing List
No. Name Spec Unit Quantity
1 Outdoor Unit / Unit 1
2 Low Voltage Connecting Pipe TP2MФ12*0.7*3600 Pipe 1
3 High Voltage Connecting Pipe TP2MФ6*0.6*3600 Pipe 1
4 Plastic Belting T8*200 Belting 6
5 Siphon Drainage Bellows PVCФ16*1500 Bellows 1
6 Wall Bushing Cover ABSФ60 Cover 1
7 Plastic Tape PVC 6≥0.03 Tape 1

44
Three Guarantees of Atlantis Solar Air Conditioner
If you purchase Atlantis Solar Air conditioner, you will enjoy cost-free installation by
installation and settlement barcode.
I. Cost-free guarantee repair
1. The whole machine is guaranteed for a year (from the date of invoice printing).
2. During three guarantees period, the client enjoys cost-free door-to-door service,
cost-free maintenance, and components replacement.
3. During three guarantees period, the air conditioner which needs sending for repair, the
transportation fee will be absolved.
4. The components which are not involved in the three guarantees regulations will be
charged according to the prices of Atlantis Solar company components prices. Such
replaced components will be guaranteed repairing for a year.
II. Conditions of cost-free guarantee repairs
1. Clients should be provided with Atlantis Solar Air Conditioner Installation and
Application Instruction Defects Liability Certificate, and transacts concerning procedures.
2. Clients should provide receipt, invoice, or effective certificate.
3. The air conditioner is obliged to be installed and maintained by the authorized
maintenance branches of our company.
4. The air conditioner is obliged to be within the length of warranty.
5. The failures are not result of the human error. (The force majeure factor is expelled.).
6. Fuselage barcode must accord with the content on the 1st copy of the installation card.

45
Maintenance Situation Recording
Maintenance Situation
Date Component Replacement
the 1st Maintenance
Maintenance Unit Maintenance Man Signature
Maintenance Situation
Date Component Replacement
the 2nd Maintenance
Maintenance Unit Maintenance Man Signature
Maintenance Situation
Date Component Replacement
the 3rd Maintenance
Maintenance Unit Maintenance Man Signature
Maintenance Situation
Date Component Replacement
the 4th Maintenance
Maintenance Unit Maintenance Man Signature
Maintenance Situation
Date Component Replacement
the 5th Maintenance
Maintenance Unit Maintenance Man Signature
46
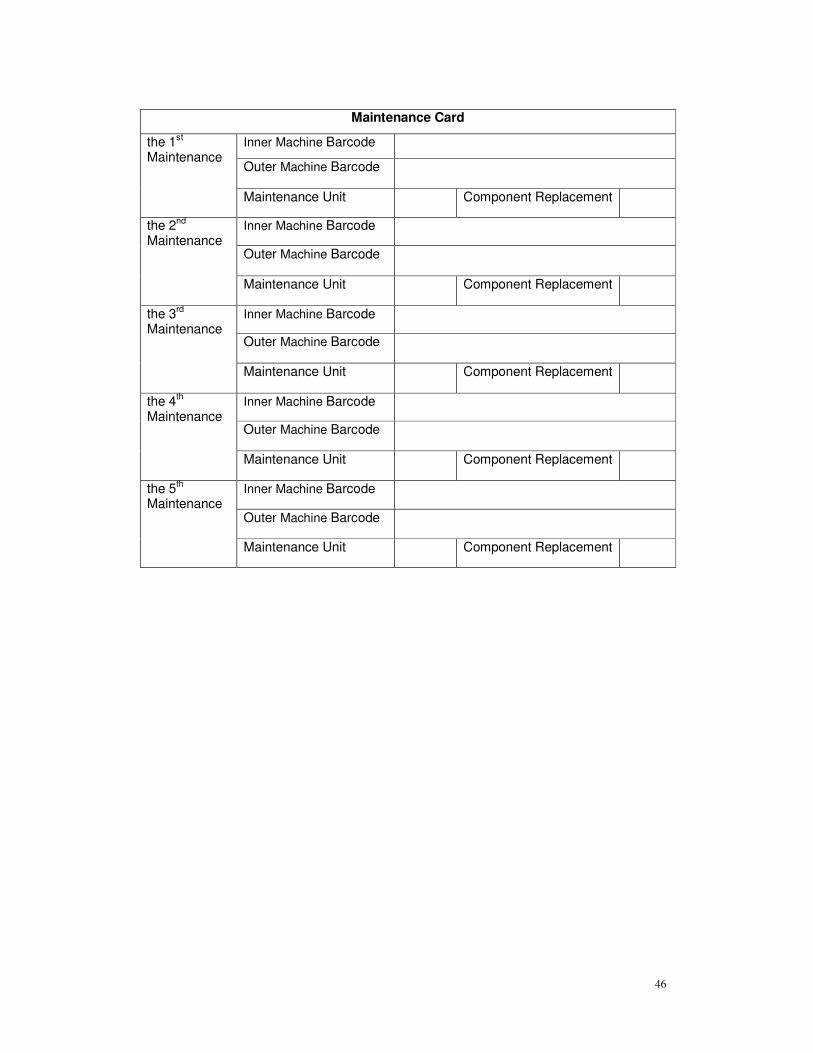
Maintenance Card
Inner Machine Barcode
Outer Machine Barcode
the 1st
Maintenance
Maintenance Unit Component Replacement
Inner Machine Barcode
Outer Machine Barcode
the 2nd Maintenance
Maintenance Unit Component Replacement
Inner Machine Barcode
Outer Machine Barcode
the 3rd
Maintenance
Maintenance Unit Component Replacement
Inner Machine Barcode
Outer Machine Barcode
the 4th
Maintenance
Maintenance Unit Component Replacement
Inner Machine Barcode
Outer Machine Barcode
the 5th
Maintenance
Maintenance Unit Component Replacement
47
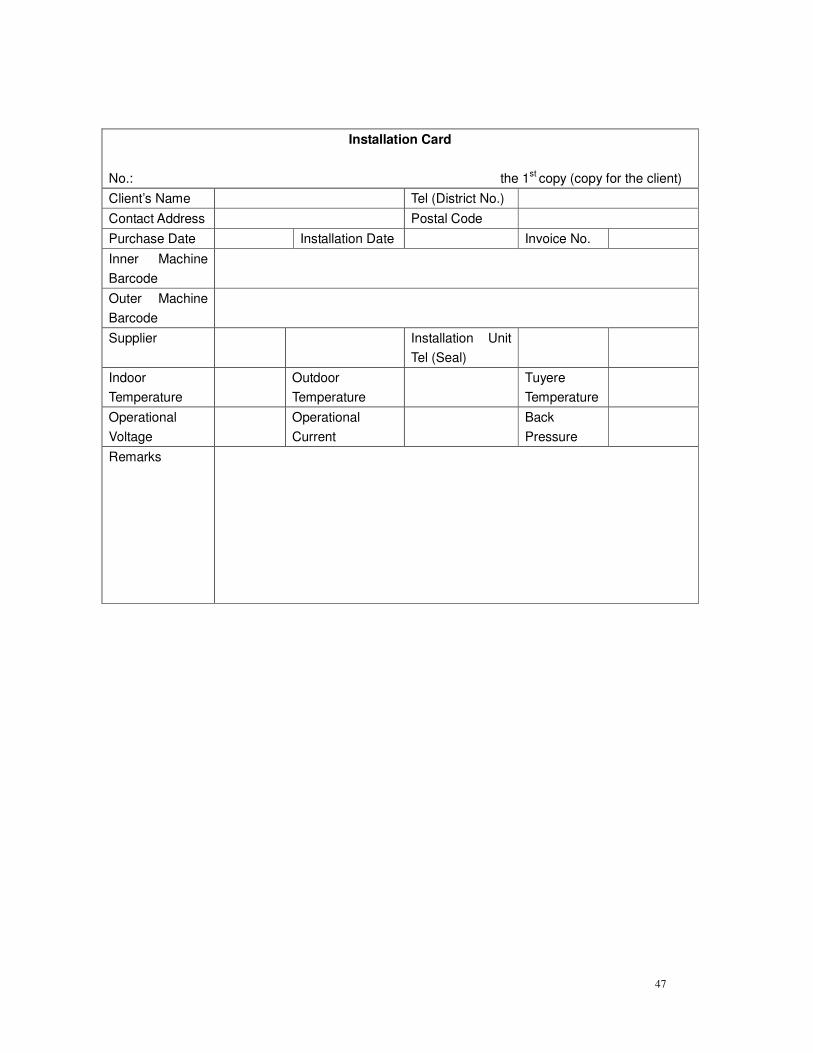
Installation Card
No.: the 1st
copy (copy for the client)
Client’s Name Tel (District No.)
Contact Address Postal Code
Purchase Date Installation Date Invoice No.
Inner Machine
Barcode
Outer Machine
Barcode
Supplier Installation Unit
Tel (Seal)
Indoor
Temperature
Outdoor
Temperature
Tuyere
Temperature
Operational
Voltage
Operational
Current
Back
Pressure
Remarks

48
Installation Card
No.: the 2nd
copy (Invoice Stub of Service Station )
Client’s Name Tel (District No.)
Contact Address Postal Code
Purchase Date Installation Date Invoice No.
Inner Machine
Barcode
Outer Machine
Barcode
Supplier Installation Unit
Tel (Seal)
Indoor
Temperature
Outdoor
Temperature
Tuyere
Temperature
Operational
Voltage
Operational
Current
Back
Pressure
Remarks

49
Installation Card
No.: the 3rd
copy (Balance Copy)
Client’s Name Tel (District No.)
Contact Address Postal Code
Purchase Date Installation Date Invoice No.
Inner Machine
Barcode
Outer Machine
Barcode
Supplier Installation Unit
Tel (Seal)
Indoor
Temperature
Outdoor
Temperature
Tuyere
Temperature
Operational
Voltage
Operational
Current
Back
Pressure
Remarks

50
Installation Evaluation Form of Atlantis Solar Air Conditioner
The respect user, we appreciate that you select Atlantis Solar Air conditioner. Air
conditioner belongs to Atlantis Solar and Wind USA. The power supply switch should be
provided with good conductive earth to avoid incidents. Please verify the work of the
installer, click on the work items implemented, cross on the work items ignored. Thank you
for your cooperation.
Whether the door-to-door service is in time or not
Whether the installer examines the leakage of the connecting pipes joints or not
Whether the drainage experiment of the inner machine is implemented or not
Whether the inner machine and the outer machine of the air conditioner are installed
solidly or not
Whether the installer introduces the rinse method of the strainer to you or not
Whether the installer does some cleaning or not
Whether the installer leaves his phone number or not
Whether the installer installs the air conditioner at your appointed place or not
Whether the connecting pipes are enswathed, neat, and good-looking or not
Whether the installer introduces the air conditioner and the maintenance to you or not
Whether the installer smokes indoors or not
Whether the installer drinks water and has meals at your home or not
Whether the installer wears the over shoe or not
Whether the installer is well mannered or not
Client Opinion Overall Service
Attitude
Satisfied Unsatisfied
Please confirm the name and
phone No. of the installer before
you fill in opinions.
Other Suggestions
or Opinions:
Client
Signature(Seal)

51
Receipt Sticking Place
Atlantis Solar
Atlantis Solar Powered Air Conditioner Co.
Add: 2302 River Road, Potsdam New york 13676
Tel: 916-226-9183 Fax:
E-mail: [email protected] web Address: http://www.atlantissolar.com


![Atlantis, the Antediluvia n World - MF.N ::: A ... · Atlantis, the Antediluvia n World by Ignatius Donnelly [1882] ... of Atlantis, "Atlantis the Antediluvian World" (ATAW). Published](https://static.fdocuments.us/doc/165x107/5e86c968c002384567510917/atlantis-the-antediluvia-n-world-mfn-a-atlantis-the-antediluvia-n-world.jpg)