Installation and Maintenance Instructions and Maintenance Instructions Model SL570 Heavy Duty Slide...
34
Doc 01-G0685 Rev D Installation and Maintenance Instructions Model SL570 Heavy Duty Slide Gate Operator Model SL540 Medium Duty Slide Gate Operator
Transcript of Installation and Maintenance Instructions and Maintenance Instructions Model SL570 Heavy Duty Slide...

Doc 01-G0685Rev D
Installation and MaintenanceInstructions
Model SL570Heavy Duty Slide Gate Operator
Model SL540Medium Duty Slide Gate Operator

2 Contents
Doc 01-G0685Rev D
ContentsGeneral Information________________________________________________________ 4
Supplied Parts and Dimensional Outline___________________________________________________ 4
Cycle Rate __________________________________________________________________________ 4
Model Classifications _________________________________________________________________ 5
Specifications _______________________________________________________________________ 5
Safety Information _________________________________________________________ 6
Safety Instructions____________________________________________________________________ 6
Safety Precautions for Open-Roller Gates and Ornamental “Grill Type” Gates ____________________ 8
Pre-Installation Check-List _________________________________________________ 10
Wiring Specifications ________________________________________________________________ 10
Features_________________________________________________________________ 12
Operator Features ___________________________________________________________________ 12
System Features_____________________________________________________________________ 13
Installation ______________________________________________________________ 15
Step 1: Set Up Post or Pad Mounting_____________________________________________________ 15
Step 2: Mounting the Operator__________________________________________________________ 17
Step 3: Gate Brackets _________________________________________________________________ 17
Step 4: Drive Chain __________________________________________________________________ 18
Electrical Disconnect Switch___________________________________________________________ 18
Step 5: Electrical Power Connections ____________________________________________________ 19
Step 6: Limit Switch Adjustments _______________________________________________________ 20
Programming ____________________________________________________________ 21
Switch #1: Operator Programming ______________________________________________________ 21
Switch #2: Timer to Close_____________________________________________________________ 22
Adjustments______________________________________________________________ 23
Step 7: Clutch Adjustment _____________________________________________________________ 23
Step 8: Brake Adjustment _____________________________________________________________ 23
Controls and Accessory Install. ______________________________________________ 24
Troubleshooting __________________________________________________________ 25
1. Power___________________________________________________________________________ 25

Contents 3
Doc 01-G0685Rev D
2. Accessories ______________________________________________________________________ 26
3. Primary Voltage Circuit ____________________________________________________________ 26
4. Low Voltage Circuit _______________________________________________________________ 27
General Reference Information_________________________________________________________ 28
Features and Program Troubleshooting Review ____________________________________________ 28
Required Maintenance – Normal Usage _______________________________________29
SL570/540 Parts List & Drawings ____________________________________________30
Exploded View _____________________________________________________________________ 30
Control Box Exploded View ___________________________________________________________ 31
Parts List __________________________________________________________________________ 32
Warranty Policy ___________________________________________________________33

4 General Information
Doc 01-G0685Rev D
General InformationSupplied Parts and Dimensional Outline
SUPPLIED PARTSInspect the operator for possible shippingdamage and shortage of parts. Some orderedaccessories may be packed separately.
Part Description Qty.7/16 Flat Washer 27/16 Spring Lock Washer 47/16 Hex Nut 4Gate Bracket 2Gate Caution Plate (á) 225/16 Hex Nut 85/16 Spring Lock Washer 83/8 Spring Lock Washer 83/8 Hex Nut 87/16 Set Screw 4Roller Chain 1Master Link 2Stop Button 02-401-sp 1
DIMENSIONAL OUTLINE
01-G0685F1
10 ¼”
16”
13 ½”
22”27 ¼”
15 3/8”7 3/8”
2”
8 ½”
17 3/8”
Figure 1
Table 1
á Install Gate Caution Plates on bothsides of the gate where they can beeasily seen.
Cycle Rate
Frequency of Use – Cycles Per Hour(cycle equals 1 full open and 1 full close)
Cycles per hourGate opening in feet30 22 18 15 12 11
12 â
16 â
20 â
24 â
30 â
40 â
50 â
60 â
Table 2
NOTE: These figures are maximum and should not be exceeded. When at all possible, try tokeep the cycles per hours at 75% of these figures.

General Information 5
Doc 01-G0685Rev D
Model Classifications
RESIDENTIAL VEHICULAR GATE OPERATOR – CLASS 1A vehicular gate operator or system intended for use in a home of one to four single familydwelling or a garage or parking area.
COMMERCIAL/GENERAL ACCESS VEHICULAR GATE OPERATOR – CLASS 2A vehicular gate operator or system intended for use in a commercial location or building such asa multi-family housing unit of five or more single family units, hotel, garages, retail store, or otherbuilding servicing the general public.
INDUSTRIAL/LIMITED ACCESS VEHICULAR GATE OPERATOR – CLASS 3A vehicular gate operator or system intended for use in an industrial location or building such as afactory or loading dock area or other locations not intended to service the general public.
RESTRICTED ACCESS VEHICULAR GATE OPERATOR – CLASS 4A vehicular gate operator or system intended for use in a guarded industrial location or buildingsuch as an airport security area or the other restricted access location not servicing the generalpublic, in which unauthorized access is prevented via supervision by security personal.
MODEL CLASS 1 CLASS 2 CLASS 3 CLASS 4SL540 â â â â
SL570 â â â â
Table 3
TYPES OF SLIDE GATESThese gate operators are intended t be used with slide gates of the following type: Trackmounted, overhead, cantilever, and track guided v-track.
Specifications
Table 4
Model H.P. Gate Speed Max. GateWeight
Max. Cant’l.Width
Max. O/HWidth
Max. V-TrackWidth
SL540 .33 12”/sec. 550 lbs. 16 ft. 24 ft. 20 ft.SL540 .50 12”/sec. 900 lbs. 20 ft. 36 ft. 26 ft.SL540 .75 12”/sec. 1000 lbs. 25 ft. 40 ft. 30 ft.SL570 .50 12”/sec. 1200 lbs. 25 ft. 40 ft. 30 ft.SL570 .75 12”/sec. 1500 lbs. 30 ft. 45 ft. 45 ft.SL570 1.00 12”/sec. 1800 lbs. 32 ft. 50 ft. 48 ft.

6 Safety Information
Doc 01-G0685Rev D
Safety InformationVehicular gate systems provide convenience and security. Gate systems are comprised of manycomponent parts. The gate operator is only one component. Each gate system is specificallydesigned for an individual application.
Gate operating system designers, installers and users must take into account the possible hazardsassociated with each individual application. Improperly designed, installed or maintained systems cancreate risks for the user as well as the bystander. Gate systems design and installation must reducepublic exposure to potential hazards.
A gate operator can create high levels of force, in its function as a component part of a gate system.Therefore, safety features must be incorporated into every design. Specific safety features include:
Gate Edges Enclosed Track Vertical Posts
Guards for exposedrollers
Photo-electric Sensors Instructional andPrecautionary Signage
Screen Mesh
Important instructions follow. These instructions are intended to highlight certain safety related issues.These instructions are not intended to be comprehensive. Because each application is unique, it is theresponsibility of the purchaser, designer, installer and end user to ensure that the total gate system issafe for its intended use.
Safety InstructionsSelect instructions are highlighted with this precautionary symbol (see left margin). Failure to followthese selected instructions can result in serious injury or death.
STEP 1: BEFORE INSTALLATION
1 Confirm gate operator model is specified by Installation and Maintenance Manual forapplication type, gate size and frequency or use.
2 Confirm ALL appropriate safety features, such as gate edges, photo-electric sensors,vertical posts and enclosed tracks, are specified.
3 Confirm gate system design reduces pinch points and protects against entrapment.
4 Confirm gate system design has pedestrian access separate from vehicular entrance.
5 Confirm gate system design reduces traffic backup.
6 Confirm warning signage is included in design.
7 Confirm gate moves freely before installation of operator
8 Repair or service worn or damaged gate hardware before installation of operator.
9 To avoid installation hazards, review the gate system operation and installationprocedures, such as manual disconnect mechanism procedure.
10 Confirm control design prohibits unauthorized use.

Safety Information 7
Doc 01-G0685Rev D
STEP 2: DURING INSTALLATION
1 Disconnect power at service panel before making any electrical connection.
2 Avoid pinch points, be aware of all moving parts.
3 Adjust clutch or load sensing device to minimum force setting.
4 Do not over-tighten cutch or adjust force setting above minimum.
5 Install controls where user cannot touch gate while operating controls.
6 Install controls where user has full view of gate operation.
7 Install two or more warning signs on the gate to alert persons in the area of automatic gateoperation. Warning signs must be conspicuous.
8 Install operator inside fence line. DO NOT install operator on public side of fence line.
9 Secure gate operator cover.
STEP 3: AFTER INSTALLATION
1 Test all safety features.
2 Train end user about basic functions and safety features of gate system.
3 Leave Installation and Maintenance Manual and Safety Instructions with end user.

8 Safety Information
Doc 01-G0685Rev D
Safety Precautions for Open-Roller Gates and Ornamental “Grill
OPEN-ROLLER GATESInjuries occur when people get their or feet caught between the top or bottom of the gate and thegate roller. This potential pinch-point should be guarded against at all times. Enclosed style gatetracks are available for refitting of these rollers from many fence suppliers. Also, roller guards areavailable for installing over the rollers.
One more contact sensors shall be located at the leading edge, trailing edge, and post-mountedboth inside and outside of a vehicular horizontal slide gate.
Figure 2

Safety Information 9
Doc 01-G0685Rev D
ORNAMENTAL “GRILL TYPE” GATESInjuries occur when people put their hands and arms through openings in the grill and the gate isoperated. They cannot retract their arm and it gets caught between the moving gate grill and thestationary fence post or fence. This potential hazard can be averted by placing a 4’ screen meshon the gate to prevent access through openings anywhere the gate may travel. See SafetyBrochure for details.
Figure 3

10 Pre-Installation Check-List
Doc 01-G0685Rev D
Pre-Installation Check-ListΦ Check the gate. It must operate smoothly and freely. If necessary, lubricate, adjust, or repair the
gate prior to operate installation. The gate must be level and plumb.
Φ Some gates may only be as wide as the gate opening. They may require a back frame to beconstructed to allow for chain attachments.
Φ Double check the size and weight of the gate to make sure that this operator is proper for thisapplication.
Φ If wiring has already been installed, check to make sure it meets the following specification andrequirements.
01-G0685F2
BACKFRAME
GATE OPENING 3 FT. MIN.
2 FT.
Figure 4
Wiring SpecificationsRefer to Table 5.
A. The distances shown in Table 5 are measured in feet from the operator the power source.
B. These calculations are based on the National Electrical Code and allows for a 5% voltagedrop.
C. Supply voltage must be within 10% of the operator’s rating under load conditions.
D. There calculations are based on stranded copper wire.
E. It is highly recommended that only 90% of the distances shown be used; this will allow for a10% safety factor.
F. For dual units, the distance shown should be cut in half.
G. Permanent wiring is to be employed as required by local codes.
H. All local codes must be strictly adhered to. It is very important that operator is properlygrounded.
I. Do not run control wires in the same conduit with power wires.
J. Do not run multi conductor or parallel conductor cable for controls.
K. All power wiring should be dedicated and protected.

Pre-Installation Check-List 11
Doc 01-G0685Rev D
Single Phase 3 PhaseWIRE
GAUGE HP 115 VAC 230 VAC 230 VAC 460 VAC 575 VAC
6
1/31/23/41
1-1/22
684473324237158--
3,0772,0511,231947648437
4,7372,8422,0301,421947711
14,21114,2117,1055,6844,0602,842
35,52717,76411,8428,8825,9214,441
8
1/31/23/41
1-1/22
432299204149100--
1,9421,295777597409299
2,9901,7941,281897589448
8,9698,9694,4843,5872,5621,794
22,42211,2117,4745,6053,7372,803
10
1/31/23/41
1-1/22
2711871289462--
1,218812,487,375,256187
1,8761,125804563375281
5,6275,6272,8142,2511,6081,125
14,0687,0344,6893,5172,3451,758
12
1/31/23/41
1-1/22
170117805939--
763509305235161117
1,175705503352235175
3,5243,5241,7621,4101,007705
8,8104,4052,9372,2031,4681,101
Table 5
NOTE: Calculated using NEC guidelines. Local codes and conditions must be reviewed for suitabilityof wire installation. Master/Slave units must be installed on separate circuits.
Control WiringVolt Max. Dist. (Ft.) Wire Gage24 1000 18
Table 6

12 Features
Doc 01-G0685Rev D
FeaturesOperator Features
SOLENOID ACTIVATED, CALIPER DISCBRAKEThe brake minimizes over travel caused by gatecoasting. An added feature of the brake is toassist in preventing backdriving of the gate. Thebrake is spring applied whenever the motor is notrunning. Anytime the motor is running, theelectric solenoid physically releases the brake.Important: periodically check and adjust thebrake mechanism. See page 29.
MOTORSThe SL540 & SL570 utilize a 56 frame, basemounted, dual voltage, TEFC (totally enclosedfan cooled) motor. The single phase motors alsoincorporate a start switch. The familyincorporates motor H.P. from 1/3 to 1 and singlephase voltages 115 and 230. The 3-phasevoltages are 230, 460 and 575.
01-G0685F20MOTOR (SINGLE PHASE SHOWN)
CALIPER DISCBRAKE ASSY.
BRAKE SOLENOID
Figure 5
PRESSURE TYPE SLIPPING CLUTCHThe operator clutch mechanism works similar tothat of a clutch in a car. It allows the operator togradually start the gate moving, rather than tryingto instantaneously start moving the gate. Thisclutch mechanism must be adjusted properly.When it left the factory, it was purposely loosenedso that it will not operate the gate. You musttighten the clutch spring lock nut so it is tightenough to operate the gate, yet loose enough sothat if the gate meets an obstruction, the clutchwill slip easily. This clutch system will requireperiodic maintenance. See page 29.
01-G0685F3
CLUTCHSYSTEM
MECHANICALDISCONNECT
Figure 6
WARNINGThis friction clutch system is not an automatic reversing device. It only serves to minimizedamage to the gate operator and gate, and also to hopefully minimize vehicle damage. If youneed an external automatic obstruction sensing device, items such as gate edges and photobeams are available to help protect pedestrians.

Features 13
Doc 01-G0685Rev D
MECHANICAL DISCONNECTRefer to Figure 6. The operator can be disconnected from the gate, so the gate can be manuallyopened or closed. The manual disconnect lever is located on the side of the operator. Simply pullthe lever outwards away from the frame and the operator is now disconnected. To re-engage theoperator to the gate, push the lever back towards the frame. The operator, when electricallyoperated will automatically re-engage with the gate.
System FeaturesACTIVITY LED
Steady indication when gate is at either openor close limit.
1 flash per second when gate is off a limit innormal operation
2 flashes per second when entrapment levelone has occurred.
AUDIBLE WARNING DEVICEIf the operator should have a second inherentobstruction in sequence with the first; i.e. back toback, the sounder will activate for 5 minutes then shutoff. Also the sounder can be programmed to comeon 2 seconds prior to gate movement and stay onduring gate movement.
01-G0685F4
Figure 7
THREE BUTTON CONTROL (SEQUENCE OFOPERATION)Open, stop, close, close id programmable. Stop willoverride all other functions. If closing, open willcause the operator to stop and reverse to full open.Will close from open limit or midstop only. If SW1 pin1 is on three button station will only close theoperator from the open limit or from mid-stop. If SW1pin 1 is off, the input will work as a single button(open, close, stop). 01-G0685F5
SWITCH #1
Figure 8
SINGLE BUTTON CONTROL (SEQUENCE OF OPERATION)Open to open limit, close open. If power has been interrupted, will always open with firstactivation.
CLOSE SINGLE BUTTON SELECTThe single button (programmable) control can be programmed to either function as a single buttoncontrol or to function as a close button only.

14 Features
Doc 01-G0685Rev D
DIGITAL MICROPROCESSORThis is the main circuit board for the operator. It contains all the logic and intelligence for thesystem. All the system programming is done on this circuit board. All solid state, with anemergency back-up system that works even if the processor is missing.
INHERENT OBSTRUCTION PROTECTIONThe limit shaft is equipped with an R.P.M. sensor. When the gate meets an obstruction, the lossof r.p.m’s. will cause the gate to reverse. A second obstruction will cause the gate to stop. Arenewed wired input will restart the gate.
EXTERNAL OBSTRUCTION CIRCUITThis circuit can be used with either a gate edge or a photo beam system. When either of the twodevices mentioned are activated, the operator will react in a similar manner to the inherentobstruction described above.
NOTE: If external entrapment protection is required by the class of operator, both an openand closed protection device must be used.
SPECIAL NOTE ABOUT OBSTRUCTION SENSING FROM EITHER INTERNAL OREXTERNAL SYSTEMSThe operator will stop if it senses two sequential obstructions. If will not activate form anyautomatic system, including the built in time delay to close. Either a manual device such as apushbutton within site of the gate and operator, or the stop button supplied with the operator mustbe activated to resume the operator back to its normal operation.
OPEN ONLY CIRCUITSeparate open circuits for line-of sight devices and out-of-sight devices such as open loops orradio controls.
LOOP CONTROL CIRCUITSVehicle control devices such as opening or security loop detectors are connected to this circuit
TIME DELAY TO REVERSE CIRCUITAllows the gate to come to a complete stop before reversing direction. Approximately ½ secondbetween stop and reverse.
NOTE: This feature is defeated when either the inherent or external obstruction circuitsare activated.

Installation 15
Doc 01-G0685Rev D
InstallationPlease note that there are two basic types of power unit mounting, concrete pad or post mounting.Choose the proper mounting for your application. The installation illustrations shown are for right handunits; for left hand units, everything will be just the opposite.
If there is existing concrete at the area of power unit mounting, use the dimensioning procedure calledout in pad mounting instructions. It is suggested that ½” threaded anchors (not supplied) be used tosecure the unit. If needed, shim the unit to ensure that it is level and parallel with the gate.
Step 1: Set Up Post or Pad Mounting
STEP 1A: CONCRETE PAD
1 Layout concrete pad as detailed.
2 Locate electrical conduit, as required, prior to pouring concrete.
3 Pour concrete, insuring that pad is level and above the ground line.
4 Locate four (4) 1/2:” threaded anchors, not supplied, as detailed. Important: Anchorsmust be positioned accurately and securely in concrete.
5 Allow concrete to set for at least two days before installing power unit.
01-G0685F21
REAR OF GATEOR BACKFRAME
FENCE LINE5”
8 ½”
7”
3”
22”
1”
36”
4” MIN.
18”
1” MIN.2”- 4”
1/2” MOUNTINGBOLTS ORANCHORS
CONDUITAS REQ’D.
DEPTH ASREQUIRED BYLOCAL CODES
OR BELOWFROST LINE
Figure 9
16 Installation
Doc 01-G0685Rev D
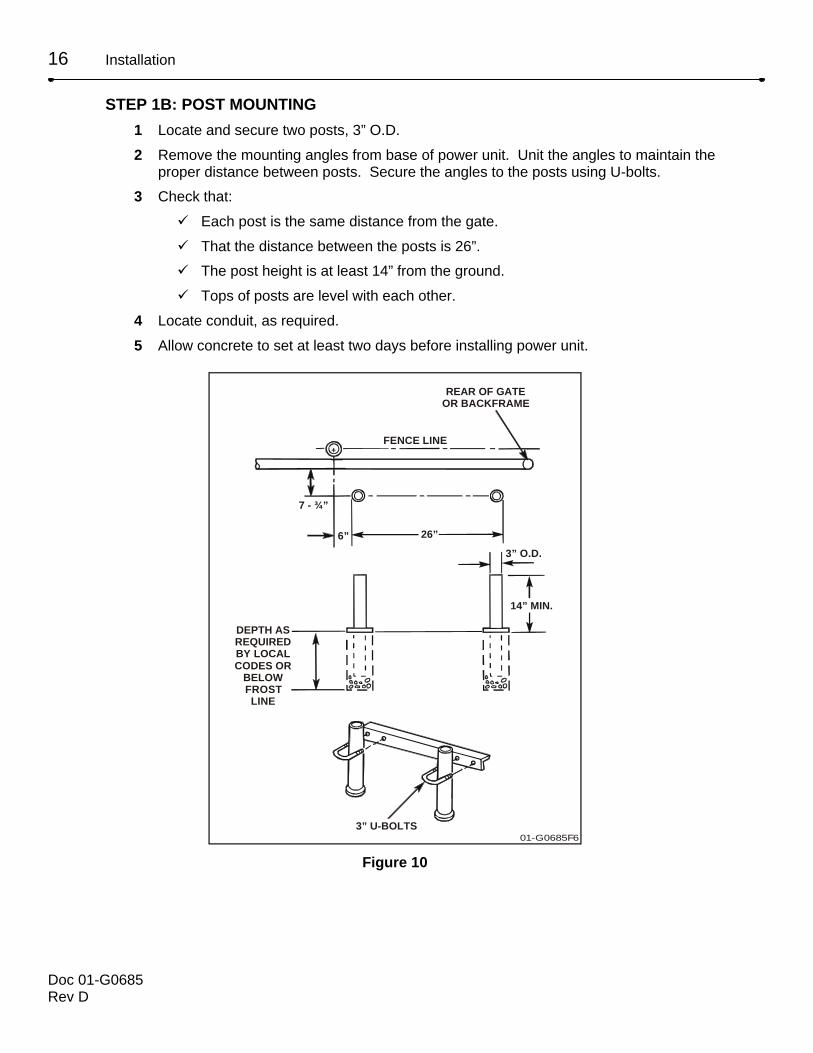
STEP 1B: POST MOUNTING
1 Locate and secure two posts, 3” O.D.
2 Remove the mounting angles from base of power unit. Unit the angles to maintain theproper distance between posts. Secure the angles to the posts using U-bolts.
3 Check that:
ü Each post is the same distance from the gate.
ü That the distance between the posts is 26”.
ü The post height is at least 14” from the ground.
ü Tops of posts are level with each other.
4 Locate conduit, as required.
5 Allow concrete to set at least two days before installing power unit.
01-G0685F6
REAR OF GATEOR BACKFRAME
FENCE LINE
7 - ¾”
6” 26”
3” O.D.
14” MIN.
DEPTH ASREQUIREDBY LOCALCODES OR
BELOWFROSTLINE
3” U-BOLTS
Figure 10

Installation 17
Doc 01-G0685Rev D
Step 2: Mounting the OperatorSTEP 2A: MOUNTING TO PADCarefully secure the power unit to theconcrete pad with the drive and idlersprockets facing the gate. It is veryimportant that the unit is level and parallelto the gate.
01-G0685F22
Figure 11
STEP 2B: MOUNTING TO POSTRemove the angle braces and carefullysecure the power unit to the posts with driveand idler sprockets facing the gate. It isvery important that the power unit is leveland parallel to the gate.
01-G0685F7
Figure 12
Step 3: Gate BracketsSecure gate bracket to the vertical front and rearposts of the gate.
NOTE: If a back frame was added, thensecure rear gate bracket to the back frame.
Important: The large slotted holes in gatebrackets must be level and in line with the bottomof the idler sprockets and each other. Slide thegate to the full open and full closed positions tcheck alignments.
01-G0685F8
“OUTSIDE”
GATE
GATEBRACKET
“INSIDE”
SETSCREW
2” U-BOLTSWITH LOCK-WASHERS &
NUTS
MASTER LINKASSSEMBLY
EYEBOLT WITH FLAT WASHERS,LOCKWASHERS, & HEX NUTS
Figure 13

18 Installation
Doc 01-G0685Rev D
Step 4: Drive ChainImportant: Operator must be disengaged. Refer to Mechanical Disconnect on page 13. Also, referto Figure 13 as you perform the steps below.
1 Connect both threaded eye bolts to each of drive chain. Then attach one eye bolt to the reargate bracket.
2 Thread chain around drive and idler sprockets and pull towards the front gate bracket.
3 If required, cut chain to proper length, then attach the front eye bolt to the front gate bracket.
4 Carefully check the alignment of gate brackets to the idler sprockets in both the vertical andhorizontal directions.
5 Adjust the nuts on eye bolts t remove excessive chain slack. Important: The suggestedamount of chain slack is no more than 1” of chain slack for every 10 ft. to total chain length.Do not over tighten chain.
NOTE: It is suggested that after the drive chain is properly installed and adjusted, thegate brackets be welded to the gate.
SUGGESTIONIt is recommended that for gates over 20 feet in length, some type of chain support be added tothe gate to prevent excessive chain sag. Please not that chain supports must be located aminimum of ¾” below the idler sprocket shield and must note exceed ¾” beyond the centerline ofthe chain.
NOTE ABOUT SOME TYPES OF CANTILEVER GATESWith some cantilever gates over 20 feet long, you may need to add a brace along the length of thegate to prevent the gate from bowing with chain is tightened. This may also be required on somestyles of gates that are constructed out of aluminum. Note that if positioned properly, this bracecan also be used as a chain support.
BEFORE PROCEEDING PLEASE READ THIS
Electrical Disconnect SwitchThroughout the course of installationyou will be required to disconnectelectrical power.
This can be done by locating theelectrical power disconnect switch onthe control panel and placing it in thedesired position, as shown on the labelnear it.
01-G0685F9
ELECTRICAL DISCONNECT SWITCH
Figure 14

Installation 19
Doc 01-G0685Rev D
Step 5: Electrical Power Connections
CAUTIONMake sure power is disconnected at the main power source and at the operator’s electricaldisconnect switch before proceeding.
Secure all electrical power connections inside the power wiring compartment located on the outsideend of control panel. Use the electrical wiring supplied with this unit.
All single phase operators will have – L1 (neutral), L2 (hot) and ground.
All three phase operators will have – L1, L2, L3 and ground.
It is very important that operator is properly grounded.
NOTE: Permanent wiring is to be employed as required by local codes.
Important: On the phase operators the power connections must be properly phased. If they arephased wrong the gate operator will run backwards. To correct this situation, disconnect power atmain power source and at the operator’s electrical disconnect switch. Then, reverse any two of thethree power leads.
01-G0685F16WIRING COMPARTMENT
COVER
WIRINGCOMPARTMENT “POWER”
Figure 15

20 Installation
Doc 01-G0685Rev D
Step 6: Limit Switch Adjustments
1 By using the mechanical disconnect, manually open the gate to its full open position.
2 Remove control panel cover and locate the rotary limit switch assembly. Disengage thedetent plate from the limit nuts, as shown.
3 Depending on “hand” of the operator, rotate the open limit nut until it makes contact with theopen limit switch lever and trips the open limit switch activation button.
4 Adjust the other limit nut so that it is near the open limit nut but not touching.
5 Manually close the gate to its full closed position.
6 Disengage the detent plate and rotate the close limit nut until it makes contact with the closelimit switch lever and trips the close switch.
7 Re-engage the detent plate into both limit nuts and also re-engage the mechanicaldisconnect.
01-G0685F11
LIMIT NUTCLOSE WHEN L.H.OPEN WHEN R.H.
LIMIT NUTOPEN WHEN L.H.
CLOSE WHEN R.H.
R.P.M. SENSOR
DETENT PLATE
LIMIT SWITCHCLOSE WHEN L.H.OPEN WHEN R.H.
LIMIT SWITCHOPEN WHEN L.H.
CLOSE WHEN R.H.
Figure 16
DO NOT RUN OPERATOR UNTIL INSTRUCTED!OPERATOR MUST BE PROGRAMMED BEFORE OPERATION

Programming 21
Doc 01-G0685Rev D
Programming
01-G0610F13
Figure 17
Switch #1: Operator Programming
POLE #1: SINGLE/CLOSE BUTTONON = Close button onlyOFF = Open/Close button
POLE #2: RIGHT HAND / LEFT HANDON = Left Hand (gate will open to the left)OFF = Right Hand (gate will open to the right—inside of
fence looking out)Figure 18POLE #3: WARNING DEVICE
ON = Warning device will turn on 3 seconds before gatestarts to move in either direction.
OFF = Warning device disabled.
POLE #4: MASTER/SLAVE – SINGLE UNITON = Master or Single UnitOFF = Slave Unit
RED LED INFORMATION
RED LED INFORMATIONContinuous ON = Unit is on a limit.
Blinking 1 flash per second = Normal operation (gate travel or midstop).
Blinking 2 flashes per second = Entrapment level 1 (operator reverse to limit).to limit).

22 Programming
Doc 01-G0685Rev D
POLE #1 POLE #2 POLE #3 POLE #4
TOTAL TIMEWARNING
DEVICEDISABLED
TOTAL TIMEWARNING
DEVICEENABLED
ON ON ON ON DISABLED DISABLEDOFF ON ON ON 1 SEC. 4 SEC.ON OFF ON ON 13 SEC. 16 SEC.OFF OFF ON ON 26 SEC. 2 SEC.ON ON OFF ON 40 SEC. 43 SEC.OFF ON OFF ON 52 SEC. 55 SEC.ON OFF OFF ON 65 SEC. 68 SEC.OFF OFF OFF ON 78 SEC. 81 SEC.ON ON ON OFF 104 SEC. 107 SEC.OFF ON ON OFF 117 SEC. 120 SEC.ON OFF ON OFF 129 SEC. 132 SEC.OFF OFF ON OFF 141 SEC. 144 SEC.ON ON OFF OFF 155 SEC. 158 SEC.OFF ON OFF OFF 167 SEC. 170 SEC.ON OFF OFF OFF 180 SEC. 183 SEC.OFF OFF OFF OFF 194 SEC. 197 SEC.
Table 7
Switch #2: Timer to CloseTimer to close is locked out at the factory. To activate the timer to close, follow steps below:
01-G0610F14
Figure 19
1 Move safety jumper from bottom two pins to top two pins. Then set time per the chart
2 During normal operation, if the operator stops on a limit, or mid travel, the operator will timeout per the chart below and automatically close.
3 To lock the timer to close program and disable, simply return the jumper to the bottom twopins, or turn on all pins of SW#2.
IMPORTANT NOTE: When using master/slave, only set the time for the master operator.The slave operator must be set to disabled position (all poles on).

Adjustments 23
Doc 01-G0685Rev D
AdjustmentsStep 7: Clutch AdjustmentThe clutch left the factory completely loosened. Inthis position, it will not allow the operator to movethe gate, so it must be adjusted. Due to the internalspeed sensor, you may get obstruction sensingreaction during the clutch adjustment procedure.You must adjust the clutch so that it produces justenough force to move the gate, but yet will easilyslip when the gate meets with an obstruction. Toadjust the clutch mechanism, either tighten orloosen the lock nut on the end of the intermediateshaft, as shown in Figure 20.
CLUTCHADJUSTMENT
LOCK NUT
01-G0685F10
Figure 20
CAUTIONThe friction clutch is not an automatic reversing device. It minimizes damage to the gate operatorand gate. It can also limit major vehicle damage, if adjusted properly. This operator incorporatesan internal obstruction sensor system, but it is highly recommended that external obstructionsensing devices such as gate edges or photo beams systems be incorporated into the gatesystem to aid in the protection of any possible pedestrian traffic. Periodic inspection of the clutchsystem and all internal and external sensor systems is required to ensure their proper operation.
Step 8: Brake AdjustmentTo minimize limit overtravel, this operator incorporates a solenoid activated caliper type brakesystem. It has been factory set but will require periodical checks and possible adjustments. Toadjust:
1 Tighten lock nut on brake lever untilbrake lever is horizontal.
2 Loosen lock nut until brake lever drops1/8” to 3/8”.
3 Operate gate briefly and check leverposition. If the 1/8” to 3/8” dimension isnot maintained in the power offposition, tighten or loosen the lock nutas required.
BRAKE LEVER SHOULD BECLOSE TO HORIZONTAL
WHEN MOTOR IS RUNNING
1/8” TO 3/8”
BRAKE LEVER SHOULD BEAS SHOWN HERE WHENMOTOR IS NOT RUNNING
01-G0685F23
Figure 21
NOTE: Do not over tighten the brake. Operator should run freely with the brake lever in thehorizontal position.

24 Controls and Accessory Install.
Doc 01-G0685Rev D
Controls and Accessory Install.See wiring diagram for more information. See p. 10 for wiring distances and wire gaugeinformation.
All inputs are normally open and momentary, except the stop (NC), and emergency close andemergency open (constant pressure). The following instructions are based upon UL 325, dated Marchof 1999 and include recommendations for significant increase in safety.
We strongly recommend that you follow the UL guidelines presented throughout the manual.Installation device instructions – always follow the instructions provided by the manufacturer wheninstalling and adjusting any control device. If these instructions are contrary to the advice given here,call for assistance.
RECEIVER
CONTROL PANEL
TERMINAL STRIP
RADIO1 2 3
ON SIDE OF
R1
R3
R2
GATE LOCKPOWER
E- OPEN
E- CLOSESECURITY LOOPThis input is for vehicles only and does not
provide UL secondary safety for persons. This functions as an wireless open unless on the
close limit where it is defeated - thus preventingvehicles from entering.
These are constant pressure inputs thatbypasses the processor and may be used in
an emergency even if the processor fails.Note left/right switch effects direction.
STOP BUTTON- REQUIRED -
This is a normally closed input and the operator will not run unless this is installed!
USE POWER TO MATCH GATE LOCK
REQUIREMENTS, NOT TO EXCEED115V 10A.
For warning devices,call the factory
24V
AC
OPEN BUTTONCaution - Only wired devices in sight of the
gate may be used with this input.
WIRELESS OPEN BUTTONAny device can be used here and the radio(R2) Is wired here internally by the factory.
Note, on a second inherent obstruction, thisinput will not function (disabled).
CLOSE/SINGLE BUTTON
5 7
5 8
5 6 5 4
SAFETY OPEN Will reverse (close) the gate if active. If struck
again during a reversal the gate will stop.
SECONDARY SAFETYIt is recommended that secondary safeties always be used for both the open and close directions. Use safety edges. In the device must sense people.
Loops cannot be used.
any case,
SAFETY CLOSEWill reverse (open) the gate if active. If stuck
again during a reversal the gate will stop.May defeat the timer to close.
9
OPEN
5 10
CLOSE
5
23
1
3 5
13 14
Use shielded twisted pair.do not run with power wiring.
MASTER/SLAVE
11
11
12
12
01-G0610F16Figure 22
NOTE: Numbers shown inside a box are on the J1 terminal strip on the circuit board.Connections shown here are field connections. The radio receiver may be ordered factoryinstalled.

Troubleshooting 25
Doc 01-G0685Rev D
TroubleshootingWhen troubleshooting, one of the first things to do is try to isolate the problem area. The four (4) mainareas to check out are:
Power
Accessories
Operator’s Primary Voltage
Operator’s Low Voltage
1. PowerAlways use extreme caution! Some possible symptoms of power problems include:
The obvious one is – the operator will not run.
The operator runs slow.
Circuit breakers or fuses keep tripping.
Motor overload keeps tripping.
Operator starts but then stops..
1A.Using a V.O.M. take a voltage reading at the control transformer’s primary terminals. You shouldget a reading as follows:
Nominal Volt. Min. Max.120v. 108 132230v. 207 253
Table 8
If you get a reading that does not fall into the minimum/maximum area, then check out your mainpower supply. Also, make sure that the operator was ordered with the proper voltage and phase.Another item to check is the wire run from the power supply to the operator. Double check thegauge of the wire versus the distance.
1B.If the voltage reading is O.K. from 1A, then take the same voltage reading with the operatorrunning. If voltage drops below the minimum with this reading, then there could be an excessivecurrent draw somewhere.
1C.In some cases, power drops can occur at only specific times during the day or night. This can becaused by increased power demands in a general area at a specific time.

26 Troubleshooting
Doc 01-G0685Rev D
2. AccessoriesAdd-on accessories can create many of the problems that are credited to the operator. Manyapplications have more than one accessory item attached to the operator and some of these itemseven draw their power from the operator.
Some of the symptoms that can show up because of accessories:
The operator won’t close.
The operator won’t open.
The operator will not run.
The operator begins to run then stops or reverses.
2A.Whenever the problem is thought to be an accessory and there are more than one connected tothe operator, always disconnect one accessory at a time and then test the system. This willhopefully isolate which item is causing the problem.
2B.If an accessory item is being used as an access control device (used to open or close), falls in theclosed position or sends out a continuous signal. The operator will hold the gate in one positionuntil the signal from the accessory is removed.
2C.In some applications, the gate may begin to move then either stop or stop and reverse within acouple of seconds. This can be caused by an external obstruction device that has failed.
2D.If there are many accessories attached to and powered by the operator, there may be too muchcurrent draw for the operator’s control transformer. This operator can only supply approximately 2amps @ 24 vac. Double check all accessories for their current requirements.
3. Primary Voltage CircuitUse extreme caution when troubleshooting the primary voltage circuit! There are three (5) itemsin this circuit that could be causing trouble, and they are:
Motor
Transformer
Brake solenoid
Contactor
Power disconnect switch
3A.The first thing to check is the incoming power. Is it there at the incoming side of the powerdisconnect switch?

Troubleshooting 27
Doc 01-G0685Rev D
3B.If there is power, then check for it at the transformer primary terminals. If there is voltage at theswitch and none at the transformer, then you probably have a bad power disconnect and it shouldbe replaced.
3C.If 3A and 3B check out O.K., then manually disconnect the operator from the gate. Verycarefully, using a screwdriver with an insulated handle, press down on the open side of thecontactor. Then, do the same to the close side of the contactor. Then, do the same to the closeside of the contactor. Did the operator run in both directions? If it did, the problem may be in thelow voltage control circuit, if it did not, then the problem is either in the contactor or the motor.
NOTE: Some motors have the overload built into the motor itself, while other units have aseparate overload in the controller.
3D.If the contactor is suspected to be causing the problem, first carefully check all wiring connectionsat the contacts. DISCONNECT POWER! USING A V.O.M. take continuity readings across thecontacts of the contactor. Place one probe on 1 and the other on 2. You should get NOcontinuity, now press down on the contactor, you should get a continuity reading. Repeat this onall the of the contactor’s contact points.
Figure 23
4. Low Voltage Circuit
4A.The first thing to check is the circuit breaker.
4B.The secondary voltage must be between 22 and 30 vac. This voltage can be checked at thecircuit board at terminals J1-3 & J1-11.
4C.The contactor coils receive 24 vac. to activate the motor in either the open or close direction.There are two contactor coils (one for open and one for close).
4D.The limit switches are S.P.D.T. (single pole, double throw). These limit switches are what tells theoperator to shut off at either the full open or full close position.

28 Troubleshooting
Doc 01-G0685Rev D
4E.The R.P.M. Sensor is counting the r.p.m ‘s of the wheel that is attached to the shaft. There are norepairable parts for the sensor of wheel. The only thing that should be checked is the wireharness. Make sure that the wires are crimpled and fully seated into the housing. Also make surethat the housing is fully seated into the circuit board.
4F.The circuit board is the “brains” of the entire system. It is a non-repairable item. In many cases,un-awareness of the different programs and their functions can make it look like there is aproblem when in actuality it is just a missed or wrong program setting. Make sure that all theconnections wires on the “J1” terminal board are installed correctly. There MUST also be a stopbutton connected to J1-3 and J1-5.
General Reference Information
THE GATEDouble check the gate and its related hardware. Does the gate move freely? If it doesn’t, this canaffect the internal obstruction sensor.
WIRING DIAGRAMAlways reference the wiring diagram that was supplied with the operator. Note that some of theaccessory items may have their own wiring diagram.
If you cannot correct the problem or if you feel you will require technical assistance, contact yourlocal distributor or dealer. If you do not have a distributor or dealer, then contact us for technicalassistance. Please when calling for assistance, make sure you have the gate operator modelnumber, voltage, phase, horsepower and a list of all accessories that are attached to the operator.
Features and Program Troubleshooting ReviewThe internal obstruction sensor (r.p.m. sensor) will cause the operator to either stop or reverse if itsenses a slow down in gate speed. A damaged or poorly working gate can trip the sensor and cause“phantom” reversing or stopping. Also if the operator’s clutch is slipping too much, this can cause thesame situation.

Required Maintenance – Normal Usage 29
Doc 01-G0685Rev D
Required Maintenance – Normal UsageCheck at least once every
Month intervals 1 3 6 12Internal speedsensor Check for proper operation á
External safetysystems Check for proper operation á
Gate caution signs Make sure they are present á
Clutch systemá Check & adjust if required á
Brake system Check & adjust if required á
Manual disconnect Check & operate á
Drive chain (D) (E) Check for excessive slack &lubricate
á
Sprockets & pulleys Check for excessive slack &lubricate
á
Gate Inspect for wear or damage á
Accessories Check all for proper operation á
Electrical Inspect all wire connections á
Frame bolts Check for tightness á
Total unit Inspect for wear or damage
Co
mp
lete Ch
eck Ou
t
Table 9
áá Important: A clutch that is set too loose will give false, inherent entrapment and reverse orstop the gate.
NOTES:
A. Caution: When servicing, alwaysdisconnect operator from electrical powersupply.
B. Severe or high cycle usage will requiremore frequent maintenance checks.
C. Inspection and service should always beperformed anytime a malfunction isobserved or suspected.
D. Limit switches may have to be reset afterany major drive chain adjustments.
E. If lubrication chain, use only a proper chainlub spray or a lightweight motor oil. Neveruse grease or silicone spray.
F. When servicing, please do some “homecleaning” of the operator an the area aroundthe operator. Pick up any debris in the area.Clean the operator if needed.
G. It is suggested that while you are at the site,you take some voltage readings of theoperator. Using a VOM, double check theincoming voltage to the operator to make sureit is within ten percent of the operator’s rating.
H. While you are at the site, now would be agood time to let the owner or manager knowabout any new items available or any safetyitems that could and should be added to thesite.

30 SL570/540 Parts List & Drawings
Doc 01-G0685Rev D
SL570/540 Parts List & DrawingsExploded View
01-G 0685F14
46
51
80
Figure 24

SL570/540 Parts List & Drawings 31
Doc 01-G0685Rev D
Control Box Exploded View
01-G0685F15
79
72
73 75
7678
74
7771
81
Figure 25

32 SL570/540 Parts List & Drawings
Doc 01-G0685Rev D
Parts List
Ref. # Part # Description Ref. # Part # Description1 MG24732 BRAKE/CLUTCH PLATE KIT 32 MG3101990 POWER SWITCH3 MG24734 40B-11T TIMER SPROCKET 33 76-G0537 ALARM ASSY.4 MG9200040 SL540 OUTPUT 41B-17T SPROCKET KIT 34 MG4100316-P SIDE PLATE (PULLEY SIDE)5 MG24736 SL570 OUTPUT 50B-15T SPROCKET KIT 35 10-G0571-P END CHANNEL6 MG24740-T OUTER COVER ASSY. KIT 36 MG4100621-P MOUNTING ANGLE
7A 25-2006 6A OVERLOAD FUSE, 1-PH 37 MG4100639 BRAKE LEVER7B 25-2008 8A OVERLOAD FUSE, 1-PH 38 MG4100932-P BELT SHIELD7C 25-2010 10A OVERLOAD FUSE, 1-PH 39 MG4100933-P CHAIN & SPROCKET SHIELD7D 25-2015 15A OVERLOAD FUSE, 1-PH 40 MG4100966 LIMIT DETENT7E 25-2020 20A OVERLOAD FUSE, 1-PH 41 MG4100967 LIMIT DENT SPRING7F 25-4001 1A OVERLOAD FUSE, 3-PH 42 MG4100977 LIMIT SUPPORT BRACKET7G 25-4001-5 1.5A OVERLOAD FUSE, 3-PH 43 MG4101051-P COVER STOP7H 25-4002-5 2.5A OVERLOAD FUSE, 3-PH 44 23-10041 LIMIT SWITCH7I 25-4004 4A OVERLOAD FUSE, 3-PH 45 MG4101349-P SIDE PLATE (DRIVE SIDE)9 MG49157 41A-48T SPROCKET KIT 46 MG4101498 INTERMEDIATE SHAFT10 MG49158 DISCONNECT SPRING KIT 47 21-3260 50VA TRANSFORMER11 MG49159 BRAKE LINK KIT 48 21-10298 100VA TRANSFORMER12 MG49161 48B-11T TIMER SPROCKET KIT 49 69-G2000 S3 PCB13 MG49162 41B-9T SPROCKET KIT 50 MG4101507 OUTPUT SHAFT14 MG49163 DISCONNECT PLATE KIT 51 10-G0546 CONTROL BOX MOUNTING PLATE15 MG49164 CLUTCH SPRING KIT 52 MG4101513 SOLENOID LINK LINER16 MG49165 OUTPUT SHAFT CLIP RING KIT 53 MG4200311 BRAKE PUCK AND LEVER ASSY.17 MG49166 IDLER SHAFT KIT 54 MG4200349 LIMIT SWITCH BRACKET ASSY.18 MG49167 SL540 41B-15T IDLER SPROCKET KIT 55 MG4200350 LIMIT PLATE AND BEARING ASSY.19 MG49169 SL570 50B-12T IDLER SPROCKET KIT 56 MG4200400 COVER HINGE20 MG49171 IDLER SHAFT CLIP RING KIT 57 MG4200789 DISCONNECT ARM ASSY.21 MG49146 #41 ROLLER CHAIN KIT 58 MG4200843 FRAME AND NUTSERT ASSY.
22A 20-3050-5T MOTOR - 1/2HP 575V 3PH 59 MG4200902 SL540 PULLEY ASSY.22B 20-3075-5T MOTOR - 3/4HP 575V 3PH 60 MG4201093 SL570 PULLEY ASSY.
22C MG1010022 MOTOR - 1/2HP 115V 1PH 61 MG4200913SL540 BEARING PLATE ASSY. (DRIVESIDE)
22D MG1010023 MOTOR - 3/4HP 115V 1PH 62 MG4200915SL570 BEARING PLATE ASSY. (DRIVESIDE)
22E MG1010024 MOTOR - 1/2HP 208/230V 1PH 63 MG4200914SL540 BEARING PLATE ASSY.(PULLEY SIDE)
22F MG1010025 MOTOR - 3/4HP 208/230V 1PH 64 MG4200916SL570 BEARING PLATE ASSY.(PULLEY SIDE)
22G MG1010026 MOTOR - 1/3HP 115V 1PH 65 MG4200947 SL540 INTERMEDIATE SHAFT ASSY.22H MG1010027 MOTOR - 1/3HP 208/230V 1PH 66 MG4201129 SL570 INTERMEDIATE SHAFT ASSY.22I MG1010028 MOTOR - 1HP 208/230V 1PH 67 MG8230002 THRUST WASHER
22J MG1010029 MOTOR - 1HP 115V 1PH 68 MG8260018
SL570 FLANGETTE BEARINGNOTE: SL540 BEARINGS ARE BRONZEAND PRESSED IN TO THE SIDEPLATES. IT IS RECOMMENDED THATTHE ENTIRE SIDE PLATE ASSY. BEORDERED.
22K MG1030002 MOTOR - 1/2HP 208/230/460V 3PH 69 MG49177 LIMIT CHAIN KIT22L MG1030004 MOTOR - 3/4HP 208/230/460V 3PH 70 K-73SL540-3311 CONTROL BOX ASSY.22M MG1030007 MOTOR - 1HP 208/230/460V 3PH 71 MG4101510 BRAKE SOLENOID LINK22N MG1030013 MOTOR - 1HP 575V 3PH 72 13-10024 LIMIT NUTS23 MG3100374 MOTOR PULLEY 73 29-18163 16 POLE MAGNET24 22-120 120V BRAKE SOLENOID 74 10-G0470 LIMIT ASSY. END PLATE
25 22-240 240V BRAKE SOLENOID 75 12-G0506 FLANGE BEARING IN LIMIT ASSY.
26 22-575-1 575V BRAKE SOLENOID 76 74-G0487-M HALL EFFECT SENSOR ASSY.27 MG3100742 CLUTCH FACING 77 74-G0504 LIMIT SHAFT ASSY.28 03-8024 24V CONTACTOR 78 10-G0483 HALL SENSOR MOUNTING BRACKET29 MG3600942 5/8" SET COLLAR 79 MG49283 LIMIT SWITCH ASSY. KIT30 MG3601049 SL570 COGGED V-BELT 80 MG8260014 5/8" BORE RADIAL BEARING31 MG4101526 SL540 SOLID V-BELT 81 MG49284 U-NUT KIT

Warranty Policy 33
Doc 01-G0685Rev D
Warranty PolicySeller warrants that the goods are free from defect in materials and/or workmanship for a period of oneyear from the date of shipment from the F.O.B. point. Goods returned to Seller for warranty repairwithin the warranty period, which upon receipt by Seller are confirmed to be defective and covered bythis limited warranty, will be repaired or replaced (at Seller’s sole option) at no cost and returned pre-paid. Defective parts will be repaired or replaced with new or factory-rebuilt parts at Seller’s soleoption. Authorization instructions for the return of any goods must be obtained by Buyer from Sellerbefore returning the goods. The goods must be returned with complete identification, freight prepaid,and in accordance with Seller’s instructions or they will not be accepted. In no event will Seller beresponsible for goods returned without proper authorization or identification.
THIS LIMITED WARRANTY IS IN LIEU OF ANY OTHER WARRANTIES, EXPRESS OR IMPLIED,INCLUDING ANY IMPLIED WARRANTY OF MERCHANTABILITY OR FITNESS FOR APARTICULAR PURPOSE, OR OTHERWISE, AND OF ANY OTHER OBLIGATIONS OR LIABILITYON SELLER’S PART. THIS LIMITED WARRANTY DOES NOT COVER NON-DEFECT DAMAGE,DAMAGE CAUSED BY IMPROPER INSTALLATION, OPERATION OR CARE (INCLUDING, BUTNOT LIMITED TO ABUSE, MISUSE, FAILURE TO PROVIDE REASONABLE AND NECESSARYMAINTENANCE, OR ANY ALTERATIONS TO THIS PRODUCT), LABOR CHARGES FORDISMANTLING OR REINSTALLING A REPAIRED OR REPLACED UNIT, OR REPLACEMENTBATTERIES. UNDER NO CIRCUMSTANCES SHALL SELLER BE LIABLE FOR CONSEQUENTIAL,INCIDENTAL OR SPECIAL DAMAGES ARISING IN CONNECTION WITH THE USE, OR INABILITYTO USE, THIS PRODUCT. IN NO EVENT SHALL SELLER’S LIABILITY FOR BREACH OFWARRANTY, BREACH OF CONTRACT, NEGLIGENCE OR STRICT LIABILITY EXCEED THE COSTOF THE PRODUCT COVERED HEREBY. NO PERSON IS AUTHORIZED TO ASSUME FOR USANY OTHER LIABILITY IN CONNECTION WITH THE SALE OF THIS PRODUCT. Some states donot allow the exclusion or limitation of consequential, incidental or special damages, so the abovelimitation or exclusion may not apply to you. This limited warranty gives you specific legal rights, andyou may also have other rights which vary from state to state.

COPYRIGHT 2001ALL RIGHTS RESERVED
This document is protected by copyright and may not be copied or adapted without the prior writtenconsent of LiftMaster. This documentation contains information proprietary to LiftMaster and suchinformation may not be distributed without the prior written consent of LiftMaster. The software andfirmware included in the LiftMaster product as they relate to this documentation are also protected bycopyright and contain information proprietary to LiftMaster.
FOR TECHNICAL SUPPORT
Call our toll free numbers:
(800) 323-2276(800) 998-9197
Installation and service information isavailable six days a week.
TO ORDER REPAIR PARTS
Call our toll free numbers:
(800) 528-2806(800) 998-9197
Prepare to provide the followinginformation when ordering repair parts:
� Part Number� Part Name� Model Number