
Installation and Configuration Guide - PACS Support · ii Installation and Configuration Guide...
158
Installation and Configuration Guide for UNIX Informix Red Brick Decision Server Version 6.0 November 1999 Part No. 000-6368
Transcript of Installation and Configuration Guide - PACS Support · ii Installation and Configuration Guide...
Installation andConfiguration Guide
for UNIX
Informix Red Brick Decision Server
Version 6.0November 1999Part No. 000-6368

ii Installation and Config
Published by Informix Press Informix Corporation4100 Bohannon DriveMenlo Park, CA 94025-1032
© 1999 Informix Corporation. All rights reserved. The following are trademarks of Informix Corporationor its affiliates, one or more of which may be registered in the United States or other jurisdictions:
Answers OnLineTM; C-ISAM; Client SDKTM; DataBlade; Data DirectorTM; Decision FrontierTM;Dynamic Scalable ArchitectureTM; Dynamic ServerTM; Dynamic ServerTM, Developer EditionTM;Dynamic ServerTM with Advanced Decision Support OptionTM; Dynamic ServerTM with ExtendedParallel OptionTM; Dynamic ServerTM with MetaCube; Dynamic ServerTM with Universal Data OptionTM;Dynamic ServerTM with Web Integration OptionTM; Dynamic ServerTM, Workgroup EditionTM;Dynamic Virtual MachineTM; Enterprise Decision ServerTM; FormationTM; Formation ArchitectTM;Formation Flow EngineTM; Gold Mine Data Access; IIF.2000TM; i.ReachTM; i.SellTM; Illustra; Informix;Informix 4GL; Informix InquireSM; Informix Internet Foundation.2000TM; InformixLink;Informix Red Brick Decision ServerTM; Informix Session ProxyTM; Informix VistaTM; InfoShelfTM;InterforumTM; I-SpyTM; MediazationTM; MetaCube; NewEraTM; ON-BarTM; OnLine Dynamic ServerTM;OnLine/Secure Dynamic ServerTM; OpenCase; OrcaTM; PaVERTM; Red Brick and Design;Red Brick Data MineTM; Red Brick Mine BuilderTM; Red Brick DecisionscapeTM; Red Brick ReadyTM;Red Brick Systems; Regency Support; Rely on Red BrickSM; RISQL; Solution DesignSM; STARindexTM;STARjoinTM; SuperView; TARGETindexTM; TARGETjoinTM; The Data Warehouse Company;The one with the smartest data wins.TM; The world is being digitized. We’re indexing it.SM;Universal Data Warehouse BlueprintTM; Universal Database ComponentsTM; Universal Web ConnectTM;ViewPoint; VisionaryTM; Web Integration SuiteTM. The Informix logo is registered with the United StatesPatent and Trademark Office. The DataBlade logo is registered with the United States Patent andTrademark Office.
Documentation Team: Laura Kremers, Barbara Nomiyama, Jerry Tattershall
GOVERNMENT LICENSE RIGHTS
Software and documentation acquired by or for the US Government are provided with rights as follows:(1) if for civilian agency use, with rights as restricted by vendor’s standard license, as prescribed in FAR 12.212;(2) if for Dept. of Defense use, with rights as restricted by vendor’s standard license, unless superseded by anegotiated vendor license, as prescribed in DFARS 227.7202. Any whole or partial reproduction of software ordocumentation marked with this legend must reproduce this legend.
uration Guide for UNIX

Table of Contents
Table ofContents
IntroductionIn This Introduction . . . . . . . . . . . . . . . . . 3About This Guide . . . . . . . . . . . . . . . . . . 3
Types of Users . . . . . . . . . . . . . . . . . . 4Software Dependencies . . . . . . . . . . . . . . . 4
New Features . . . . . . . . . . . . . . . . . . . . 5Documentation Conventions . . . . . . . . . . . . . . 5
Syntax Notation . . . . . . . . . . . . . . . . . 6Syntax Diagrams . . . . . . . . . . . . . . . . . 7Keywords and Punctuation . . . . . . . . . . . . . 9Identifiers and Names . . . . . . . . . . . . . . . 9Icon Conventions . . . . . . . . . . . . . . . . . 10
Customer Support . . . . . . . . . . . . . . . . . . 10New Cases . . . . . . . . . . . . . . . . . . . 11Existing Cases . . . . . . . . . . . . . . . . . . 12Troubleshooting Tips . . . . . . . . . . . . . . . . 12
Related Documentation . . . . . . . . . . . . . . . . 13Additional Documentation . . . . . . . . . . . . . . . 15
Online Manuals . . . . . . . . . . . . . . . . . 15Printed Manuals . . . . . . . . . . . . . . . . . 16
Informix Welcomes Your Comments . . . . . . . . . . . . 16

iv Install
Chapter 1 Preparing for InstallationIn This Chapter . . . . . . . . . . . . . . . . . . . 1-3Preview of Preparation Tasks . . . . . . . . . . . . . . 1-4
Platform-Specific Considerations . . . . . . . . . . . 1-4Determining the System Shell . . . . . . . . . . . . . . 1-5Verifying Operating-System Version and Disk Space . . . . . . 1-6
Operating-System Version . . . . . . . . . . . . . 1-7Disk Space . . . . . . . . . . . . . . . . . . . 1-8Considerations for NFS File Systems . . . . . . . . . . 1-8
Configuring Operating-System Parameters . . . . . . . . . 1-9Determining the Locale . . . . . . . . . . . . . . . . 1-10
Locale Components . . . . . . . . . . . . . . . . 1-10Defining the Locale . . . . . . . . . . . . . . . . 1-11
Selecting a Warehouse Logical Name . . . . . . . . . . . 1-12Selecting an IPC Key for the Daemon . . . . . . . . . . . 1-13Determining the TCP/IP Ports . . . . . . . . . . . . . 1-15Creating the redbrick Account . . . . . . . . . . . . . 1-16
Access to the redbrick Account . . . . . . . . . . . . 1-17Creating the redbrick Directory . . . . . . . . . . . . . 1-18Providing License Keys . . . . . . . . . . . . . . . . 1-18Choosing an Installation Procedure . . . . . . . . . . . . 1-18Checklist of Preparation Steps . . . . . . . . . . . . . 1-19
Chapter 2 Installing Informix Red Brick Decision ServerIn This Chapter . . . . . . . . . . . . . . . . . . . 2-3Before You Begin . . . . . . . . . . . . . . . . . . 2-4Preview of Installation Tasks . . . . . . . . . . . . . . 2-5Mounting and Unmounting the CD-ROM Device . . . . . . . 2-6
Mounting the CD-ROM Device . . . . . . . . . . . . 2-6Unmounting the CD-ROM Device . . . . . . . . . . . 2-7
Running the Installation Script . . . . . . . . . . . . . 2-7Starting the Installation . . . . . . . . . . . . . . 2-7Stopping the Installation . . . . . . . . . . . . . . 2-10Specifying the Warehouse Directory . . . . . . . . . . 2-10Specifying the Locale . . . . . . . . . . . . . . . 2-11Installing the Administration Database . . . . . . . . . 2-13Installing the Sample Database . . . . . . . . . . . . 2-14Providing IPC Key and User Information . . . . . . . . 2-14Specifying the Base TCP/IP Port for the Daemon. . . . . . 2-15Specifying the Maximum Number of Servers . . . . . . . 2-16
ation and Configuration Guide for UNIX

Finishing the First Phase of Installation . . . . . . . . 2-16Enabling Red Brick Decision Server and Optional Products . . . 2-17
Product Licenses for Red Brick . . . . . . . . . . . 2-18Product Licenses for Web Connections . . . . . . . . . 2-19Product License for Red Brick Decision Server for
Workgroups . . . . . . . . . . . . . . . 2-20Entering License Keys . . . . . . . . . . . . . . 2-20
Starting the Red Brick Decision Server Daemons . . . . . . . 2-22Verifying the Red Brick Decision Server Installation . . . . . 2-24Checklist of Installation Tasks . . . . . . . . . . . . . 2-26
Chapter 3 Installing a New ReleaseIn This Chapter . . . . . . . . . . . . . . . . . . 3-3Running Two Releases of Red Brick Decision Server . . . . . 3-4
Preview of Installation Tasks . . . . . . . . . . . . 3-5Installing Red Brick Decision Server. . . . . . . . . . 3-6Redirecting Client Applications for Test Purposes . . . . . 3-6Migrating Databases to the New Release . . . . . . . . 3-7Upgrading Databases. . . . . . . . . . . . . . . 3-7Migrating Users to the New Release. . . . . . . . . . 3-9
Replace an Existing Warehouse with a New Release . . . . . 3-10Shutting Down the Daemons . . . . . . . . . . . . 3-10Installing the New Release . . . . . . . . . . . . . 3-10Starting the Daemons. . . . . . . . . . . . . . . 3-11Upgrading Existing Databases . . . . . . . . . . . 3-11Announcing the New Release . . . . . . . . . . . . 3-11
Checklists of Installation Tasks . . . . . . . . . . . . . 3-12
Chapter 4 Installing Red Brick Client ProductsIn This Chapter . . . . . . . . . . . . . . . . . . 4-3Before You Begin . . . . . . . . . . . . . . . . . . 4-4Mounting and Unmounting the CD-ROM Device . . . . . . 4-4Running the Installation Script . . . . . . . . . . . . . 4-5Installing Client Products . . . . . . . . . . . . . . . 4-7
Specifying the Installation Directory . . . . . . . . . 4-7Specifying the Host Name . . . . . . . . . . . . . 4-8Specifying the Base TCP/IP Port for the Daemon . . . . . 4-8
Installing Additional Red Brick Client Products . . . . . . . 4-9Checklist of Installation Tasks . . . . . . . . . . . . . 4-9
Table of Contents v
vi Install
Chapter 5 Miscellaneous Administrative TasksIn This Chapter . . . . . . . . . . . . . . . . . . . 5-3Administering Warehouse Daemons . . . . . . . . . . . 5-3
Checking the Status of an Active Daemon . . . . . . . . 5-3Stopping an Active Daemon . . . . . . . . . . . . . 5-4Configuring Daemons for Automatic Startup . . . . . . . 5-4
Changing the Simultaneous Connections Limit . . . . . . . . 5-4Changing the redbrick User ID . . . . . . . . . . . . . 5-5
Adding a New User ID. . . . . . . . . . . . . . . 5-5Changing the Name of the User ID . . . . . . . . . . 5-7
Appendix A Warehouse Directories and Files
Appendix B Recommended Locale Specifications
Appendix C Platform-Specific Information: IBM RISC System/6000
Appendix D Platform-Specific Information: Digital AlphaServer
Appendix E Platform-Specific Information: HP 9000 Computer
Appendix F Platform-Specific Information: Sun SPARC-Based Systems
Appendix G Platform-Specific Information: Silicon Graphics Servers
Appendix H Platform-Specific Information: Sequent Symmetry System
Appendix I Platform-Specific Information: NCR WorldMark Servers
Index
ation and Configuration Guide for UNIX

Introduction
Introduction
In This Introduction . . . . . . . . . . . . . . . . . . 3
About This Guide . . . . . . . . . . . . . . . . . . . 3Types of Users . . . . . . . . . . . . . . . . . . . 4Software Dependencies . . . . . . . . . . . . . . . . 4
New Features . . . . . . . . . . . . . . . . . . . . . 5
Documentation Conventions . . . . . . . . . . . . . . . 5Syntax Notation . . . . . . . . . . . . . . . . . . 6Syntax Diagrams . . . . . . . . . . . . . . . . . . 7Keywords and Punctuation . . . . . . . . . . . . . . 9Identifiers and Names . . . . . . . . . . . . . . . . 9Icon Conventions . . . . . . . . . . . . . . . . . . 10
Customer Support . . . . . . . . . . . . . . . . . . . 10New Cases . . . . . . . . . . . . . . . . . . . . 11Existing Cases . . . . . . . . . . . . . . . . . . . 12Troubleshooting Tips . . . . . . . . . . . . . . . . . 12
Related Documentation . . . . . . . . . . . . . . . . . 13
Additional Documentation . . . . . . . . . . . . . . . . 15Online Manuals . . . . . . . . . . . . . . . . . . 15Printed Manuals . . . . . . . . . . . . . . . . . . 16
Informix Welcomes Your Comments . . . . . . . . . . . . . 16

2 Installa
tion and Configuration Guide for UNIX
In This IntroductionThis Introduction provides an overview of the information in this documentand describes the conventions it uses.
About This GuideThis guide describes how to install Informix Red Brick Decision Server andconfigure it for use on the following UNIX platforms:
■ IBM RISC System/6000 with the AIX operating system
■ Digital AlphaServer with the Digital UNIX operating system
■ HP 9000 Computer with the HP-UX operating system
■ Sun SPARC-based system with the Solaris operating system
■ Silicon Graphics Server with the IRIX operating system
■ Sequent Symmetry System with the DYNIX/ptx operating system
■ NCR WorldMark Server with the NCR UNIX SVR4 MP-RAS
Appendixes C through I of this guide also contain platform-specific infor-mation for Red Brick Decision Server running on each of the supportedplatforms. Information common to all UNIX platforms is found in the Admin-istrator’s Guide.
Introduction 3
Types of Users
Types of UsersThis guide is written for the following users:
■ Database administrators
■ Performance engineers
This guide assumes that you have the following background:
■ A working knowledge of your computer, your operating system,and the utilities that your operating system provides
■ Some experience working with relational databases or exposure todatabase concepts
■ Some experience with computer programming
■ Some experience with database server administration, operating-system administration, or network administration
Software DependenciesThis guide assumes that you are using Informix Red Brick Decision Server,Version 6.0, as your database server.
Red Brick Decision Server includes the Aroma database, which contains salesdata about a fictitious coffee and tea company. The database tracks dailyretail sales in stores owned by the Aroma Coffee and Tea Company. Thedimensional model for this database consists of a fact table and itsdimensions.
For information about how to create and populate the demonstrationdatabase, see the Administrator’s Guide. For a description of the database andits contents, see the SQL Self-Study Guide.
The scripts that you use to install the demonstration database reside in theredbrick_dir/sample_input directory, where redbrick_dir is the Red BrickDecision Server directory on your system.
4 Installation and Configuration Guide for UNIX

New Features
New FeaturesThe following section describes new database server features relevant to thisdocument. For a comprehensive list of new features, see the release notes.
■ Informix Red Brick JDBC Driver, which allows Java programs toaccess database management systems
■ Parallel versioned load
Documentation ConventionsInformix Red Brick documentation uses the following notation and syntaxconventions:
■ Computer input and output, including commands, code, andexamples, appear in Courier.
■ Information that you enter or that is being emphasized in an exampleappears in Courier bold to help you distinguish it from other text.
■ Filenames, system-level commands, and variables appear in italic orCourier italic , depending on the context.
■ Document titles always appear in Palatino italic.
■ Names of database tables and columns are capitalized (Sales table,Dollars column). Names of system tables and columns are in alluppercase (RBW_INDEXES table, TNAME column).
Introduction 5
Syntax Notation
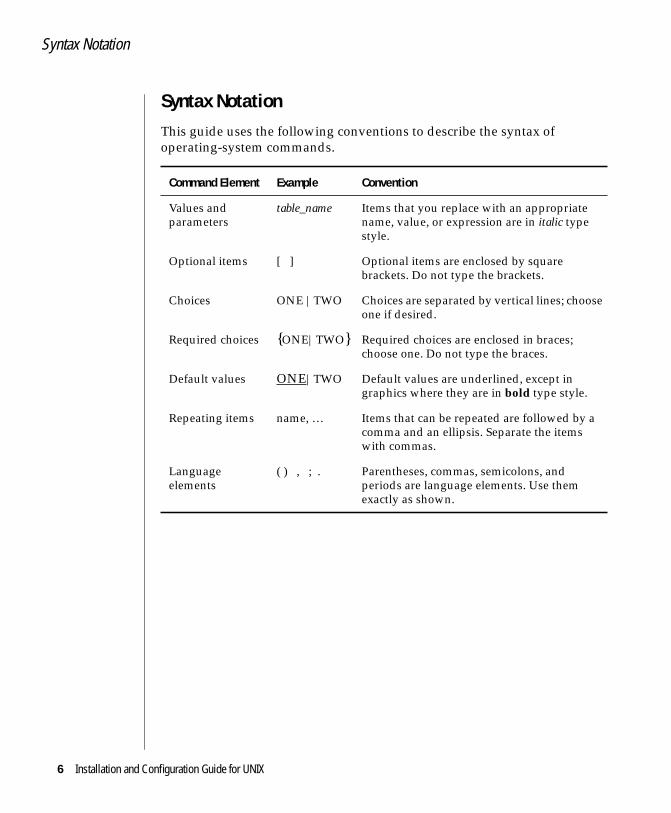
Syntax NotationThis guide uses the following conventions to describe the syntax ofoperating-system commands.
Command Element Example Convention
Values andparameters
table_name Items that you replace with an appropriatename, value, or expression are in italic typestyle.
Optional items [ ] Optional items are enclosed by squarebrackets. Do not type the brackets.
Choices ONE |TWO Choices are separated by vertical lines; chooseone if desired.
Required choices {ONE|TWO} Required choices are enclosed in braces;choose one. Do not type the braces.
Default values ONE|TWO Default values are underlined, except ingraphics where they are in bold type style.
Repeating items name, … Items that can be repeated are followed by acomma and an ellipsis. Separate the itemswith commas.
Languageelements
( ) , ; . Parentheses, commas, semicolons, andperiods are language elements. Use themexactly as shown.
6 Installation and Configuration Guide for UNIX

Syntax Diagrams
Syntax DiagramsThis guide uses diagrams built with the following components to describethe syntax for statements and all commands other than system-levelcommands.
Component Meaning
Statement begins.
Statement syntax continues on next line. Syntaxelements other than complete statements end withthis symbol.
Statement continues from previous line. Syntaxelements other than complete statements beginwith this symbol.
Statement ends.
Required item in statement.
Optional item.
Required item with choice. One and only one itemmust be present.
Optional item with choice. If a default value exists,it is printed in bold.
Optional items. Several items are allowed; acomma must precede each repetition.
SELECT
DISTINCT
DBA TO
SELECT ONCONNECT TO
ASC
DESC
,
ASC
DESC
Introduction 7

Syntax Diagrams
The preceding syntax elements are combined to form a diagram as follows.
Complex syntax diagrams such as the one for the following statement arerepeated as point-of-reference aids for the detailed diagrams of their compo-nents. Point-of-reference diagrams are indicated by their shadowed corners,gray lines, and reduced size.
The point-of-reference diagram is then followed by an expanded diagram ofthe shaded portion—in this case, the INPUT_CLAUSE.
REORG table_name
INDEX
,
( )index_name
RECALCULATE RANGES OPTIMIZE ON
;
OFF
segment_clause
LOAD
DATA
INPUT_CLAUSE
DISCARD_CLAUSE
TABLE_CLAUSE ;criteria_clauseoptimize_clause comment_clause
FORMAT_CLAUSE
)( 'FILENAME '
INPUTFILE
INDDN
START RECORD START_ROWSTART_ROW STOP RECORD STOP_ROW
TAPE DEVICE 'DEVICE_NAME '
FILENAME
8 Installation and Configuration Guide for UNIX

Keywords and Punctuation
Keywords and PunctuationKeywords are words reserved for statements and all commands exceptsystem-level commands. When a keyword appears in a syntax diagram, it isshown in uppercase characters. You can write a keyword in uppercase orlowercase characters, but you must spell the keyword exactly as it appears inthe syntax diagram.
Any punctuation that occurs in a syntax diagram must also be included inyour statements and commands exactly as shown in the diagram.
Identifiers and NamesVariables serve as placeholders for identifiers and names in the syntaxdiagrams and examples. You can replace a variable with an arbitrary name,identifier, or literal, depending on the context. Variables are also used torepresent complex syntax elements that are expanded in additional syntaxdiagrams. When a variable appears in a syntax diagram, an example, or text,it is shown in lowercase italic.
The following syntax diagram uses variables to illustrate the general form ofa simple SELECT statement.
When you write a SELECT statement of this form, you replace the variablescolumn_name and table_name with the name of a specific column and table.
SELECT column_name FROM table_name
Introduction 9
Icon Conventions
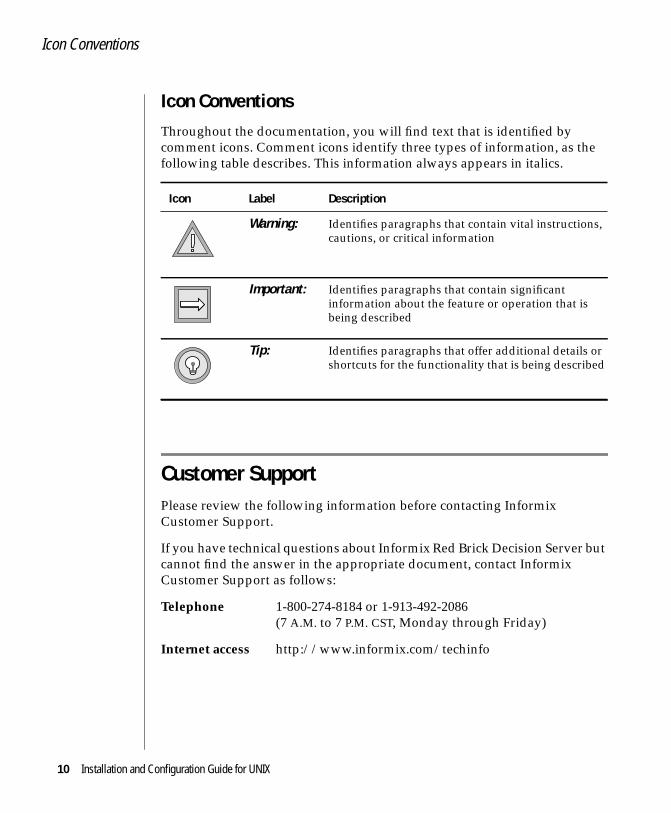
Icon ConventionsThroughout the documentation, you will find text that is identified bycomment icons. Comment icons identify three types of information, as thefollowing table describes. This information always appears in italics.
Customer SupportPlease review the following information before contacting InformixCustomer Support.
If you have technical questions about Informix Red Brick Decision Server butcannot find the answer in the appropriate document, contact InformixCustomer Support as follows:
Icon Label Description
Warning: Identifies paragraphs that contain vital instructions,cautions, or critical information
Important: Identifies paragraphs that contain significantinformation about the feature or operation that isbeing described
Tip: Identifies paragraphs that offer additional details orshortcuts for the functionality that is being described
Telephone 1-800-274-8184 or 1-913-492-2086(7 A.M. to 7 P.M. CST, Monday through Friday)
Internet access http://www.informix.com/techinfo
10 Installation and Configuration Guide for UNIX
New Cases
For nontechnical questions about Red Brick Decision Server, contactInformix Customer Support as follows:
New CasesTo log a new case, you must provide the following information:
■ Red Brick Decision Server version
■ Platform and operating-system version
■ Error messages returned by Red Brick Decision Server or theoperating system
■ Concise description of the problem, including any commands oroperations performed before you received the error message
■ List of Red Brick Decision Server or operating-system configurationchanges made before you received the error message
For problems concerning client-server connectivity, you must provide thefollowing additional information:
■ Name and version of the client tool that you are using
■ Version of Informix Red Brick ODBC Driver or Informix Red BrickJDBC Driver that you are using, if applicable
■ Name and version of client network or TCP/IP stack in use
■ Error messages returned by the client application
■ Server and client locale specifications
Telephone 1-800-274-8184(7 A.M. to 7 P.M. CST, Monday through Friday)
Internet access http://www.informix.com/services
Introduction 11

Existing Cases
Existing CasesThe support engineer who logs your case or first contacts you will alwaysgive you a case number. This number is used to keep track of all the activitiesperformed during the resolution of each problem. To inquire about the statusof an existing case, you must provide your case number.
Troubleshooting TipsYou can often reduce the time it takes to close your case by providing thesmallest possible reproducible example of your problem. The more you canisolate the cause of the problem, the more quickly the support engineer canhelp you resolve it:
■ For SQL query problems, try to remove columns or functions or torestate WHERE, ORDER BY, or GROUP BY clauses until you can isolatethe part of the statement causing the problem.
■ For Table Management Utility load problems, verify the data typemapping between the source file and the target table to ensurecompatibility. Try to load a small test set of data to determinewhether the problem concerns volume or data format.
■ For connectivity problems, issue the ping command from the client tothe host to verify that the network is up and running. If possible, tryanother client tool to see if the same problem arises.
12 Installation and Configuration Guide for UNIX
Related Documentation
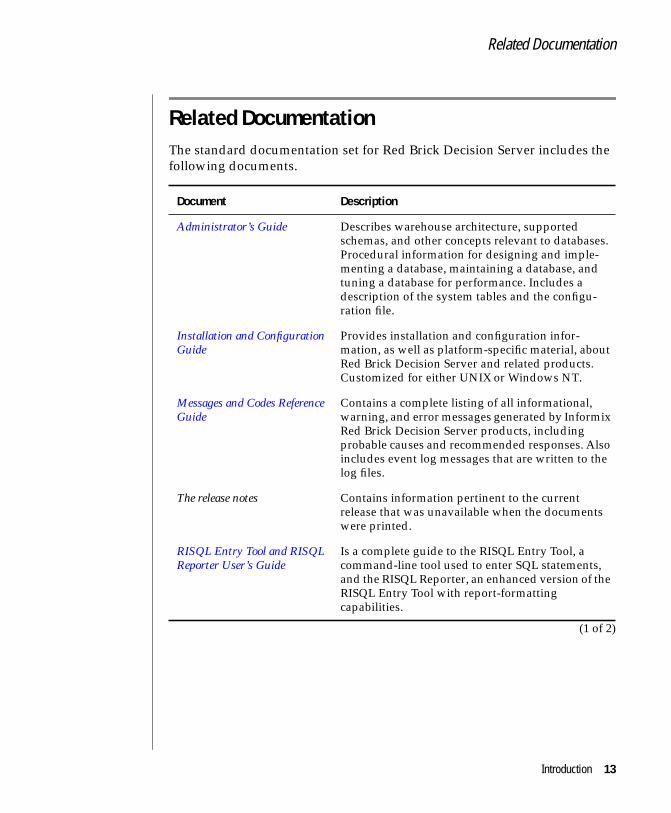
Related DocumentationThe standard documentation set for Red Brick Decision Server includes thefollowing documents.
Document Description
Administrator’s Guide Describes warehouse architecture, supportedschemas, and other concepts relevant to databases.Procedural information for designing and imple-menting a database, maintaining a database, andtuning a database for performance. Includes adescription of the system tables and the configu-ration file.
Installation and ConfigurationGuide
Provides installation and configuration infor-mation, as well as platform-specific material, aboutRed Brick Decision Server and related products.Customized for either UNIX or Windows NT.
Messages and Codes ReferenceGuide
Contains a complete listing of all informational,warning, and error messages generated by InformixRed Brick Decision Server products, includingprobable causes and recommended responses. Alsoincludes event log messages that are written to thelog files.
The release notes Contains information pertinent to the currentrelease that was unavailable when the documentswere printed.
RISQL Entry Tool and RISQLReporter User’s Guide
Is a complete guide to the RISQL Entry Tool, acommand-line tool used to enter SQL statements,and the RISQL Reporter, an enhanced version of theRISQL Entry Tool with report-formattingcapabilities.
(1 of 2)
Introduction 13
Related Documentation
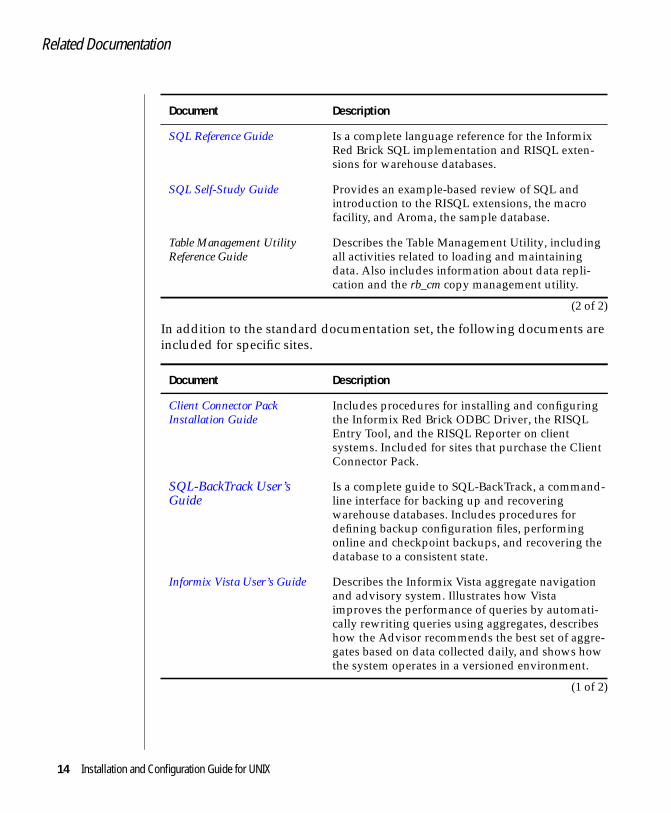
In addition to the standard documentation set, the following documents areincluded for specific sites.
SQL Reference Guide Is a complete language reference for the InformixRed Brick SQL implementation and RISQL exten-sions for warehouse databases.
SQL Self-Study Guide Provides an example-based review of SQL andintroduction to the RISQL extensions, the macrofacility, and Aroma, the sample database.
Table Management UtilityReference Guide
Describes the Table Management Utility, includingall activities related to loading and maintainingdata. Also includes information about data repli-cation and the rb_cm copy management utility.
Document Description
Client Connector PackInstallation Guide
Includes procedures for installing and configuringthe Informix Red Brick ODBC Driver, the RISQLEntry Tool, and the RISQL Reporter on clientsystems. Included for sites that purchase the ClientConnector Pack.
SQL-BackTrack User’sGuide
Is a complete guide to SQL-BackTrack, a command-line interface for backing up and recoveringwarehouse databases. Includes procedures fordefining backup configuration files, performingonline and checkpoint backups, and recovering thedatabase to a consistent state.
Informix Vista User’s Guide Describes the Informix Vista aggregate navigationand advisory system. Illustrates how Vistaimproves the performance of queries by automati-cally rewriting queries using aggregates, describeshow the Advisor recommends the best set of aggre-gates based on data collected daily, and shows howthe system operates in a versioned environment.
(1 of 2)
Document Description
(2 of 2)
14 Installation and Configuration Guide for UNIX
Additional Documentation
Additional references you might find helpful include:
■ An introductory-level book on SQL
■ An introductory-level book on relational databases
■ Documentation for your hardware platform and operating system
Additional DocumentationFor additional information, you might want to refer to the followingdocuments, which are available as online and printed manuals.
Online ManualsAn Answers OnLine CD that contains Informix manuals in electronic formatis provided with your Informix products. You can install the documentationor access it directly from the CD. For information about how to install, read,and print online manuals, see the installation insert that accompaniesAnswers OnLine.
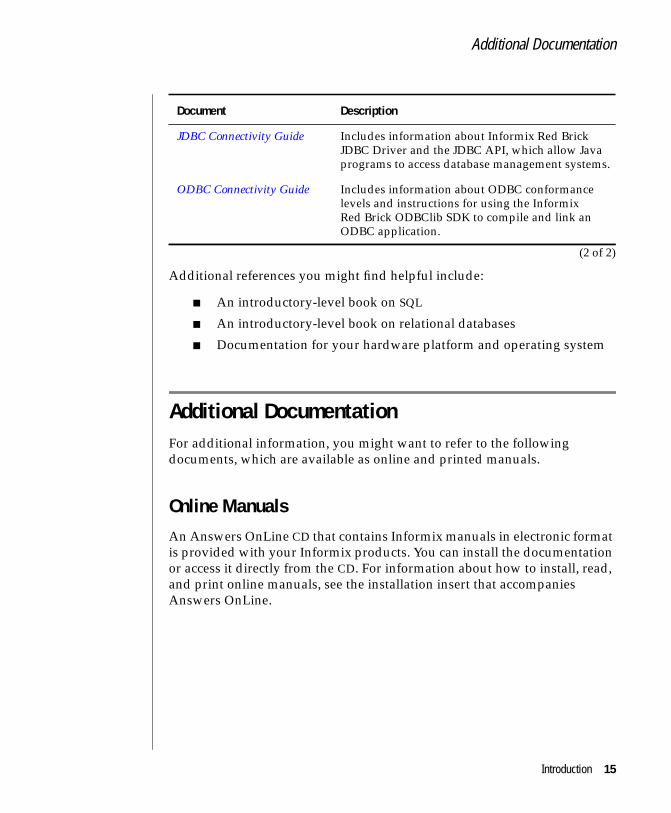
JDBC Connectivity Guide Includes information about Informix Red BrickJDBC Driver and the JDBC API, which allow Javaprograms to access database management systems.
ODBC Connectivity Guide Includes information about ODBC conformancelevels and instructions for using the InformixRed Brick ODBClib SDK to compile and link anODBC application.
Document Description
(2 of 2)
Introduction 15

Printed Manuals
Printed ManualsTo order printed manuals, call 1-800-331-1763 or send email [email protected]. Please provide the following information whenyou place your order:
■ The documentation that you need
■ The quantity that you need
■ Your name, address, and phone number
Informix Welcomes Your CommentsLet us know what you like or dislike about our manuals. To help us withfuture versions of our manuals, we want to know about any corrections orclarifications that you would find useful. Include the following information:
■ The name and version of the manual that you are using
■ Any comments that you have about the manual
■ Your name, address, and phone number
Write to us at the following address:
Informix Software, Inc.SCT Technical Publications Department4100 Bohannon DriveMenlo Park, CA 94025
If you prefer to send electronic mail, our address is:
The doc alias is reserved exclusively for reporting errors and omissions in ourdocumentation.
We appreciate your suggestions.
16 Installation and Configuration Guide for UNIX

1Chapter
Preparing for Installation
In This Chapter . . . . . . . . . . . . . . . . . . . . 1-3
Preview of Preparation Tasks . . . . . . . . . . . . . . . 1-4Platform-Specific Considerations. . . . . . . . . . . . . 1-4
Determining the System Shell . . . . . . . . . . . . . . . 1-5
Verifying Operating-System Version and Disk Space . . . . . . . 1-6Operating-System Version . . . . . . . . . . . . . . . 1-7Disk Space . . . . . . . . . . . . . . . . . . . . 1-8Considerations for NFS File Systems . . . . . . . . . . . 1-8
Configuring Operating-System Parameters . . . . . . . . . . 1-9
Determining the Locale . . . . . . . . . . . . . . . . . 1-10Locale Components . . . . . . . . . . . . . . . . . 1-10
Language . . . . . . . . . . . . . . . . . . . 1-10Territory . . . . . . . . . . . . . . . . . . . . 1-11Code Page . . . . . . . . . . . . . . . . . . . 1-11Collation Sequence . . . . . . . . . . . . . . . . 1-11
Defining the Locale . . . . . . . . . . . . . . . . . 1-11
Selecting a Warehouse Logical Name . . . . . . . . . . . . 1-12
Selecting an IPC Key for the Daemon . . . . . . . . . . . . 1-13
Determining the TCP/IP Ports . . . . . . . . . . . . . . . 1-15
Creating the redbrick Account . . . . . . . . . . . . . . . 1-16Access to the redbrick Account . . . . . . . . . . . . . 1-17

1-2 Insta
Creating the redbrick Directory. . . . . . . . . . . . . . . 1-18
Providing License Keys . . . . . . . . . . . . . . . . . 1-18
Choosing an Installation Procedure . . . . . . . . . . . . . 1-18
Checklist of Preparation Steps . . . . . . . . . . . . . . . 1-19
llation and Configuration Guide for UNIX

In This ChapterThis chapter will help you gather information and set up your environmentin preparation for installing Red Brick Decision Server or Red Brick DecisionServer for Workgroups. After you have worked through this chapter, youwill be ready to respond to the prompts from the installation script, and youwill have configured some required operating-system parameters ahead oftime.
If you are installing Red Brick Decision Server for the first time, complete thepreparation steps discussed here before beginning the procedure in Chapter2, “Installing Informix Red Brick Decision Server.” If Red Brick DecisionServer is already installed on your system and you want to install a newrelease, review this chapter before following the instructions in Chapter 3,“Installing a New Release.” If you want to install only Red Brick clientproducts, follow the procedures in Chapter 4, “Installing Red Brick ClientProducts.”
Important: Whether you are installing your first Red Brick Decision Server or a newrelease, read the release notes that accompany the software before beginning thepreparation tasks.
Procedures in this chapter apply to both Red Brick Decision Server and RedBrick Decision Server for Workgroups unless stated otherwise.
Preparing for Installation 1-3
Preview of Preparation Tasks
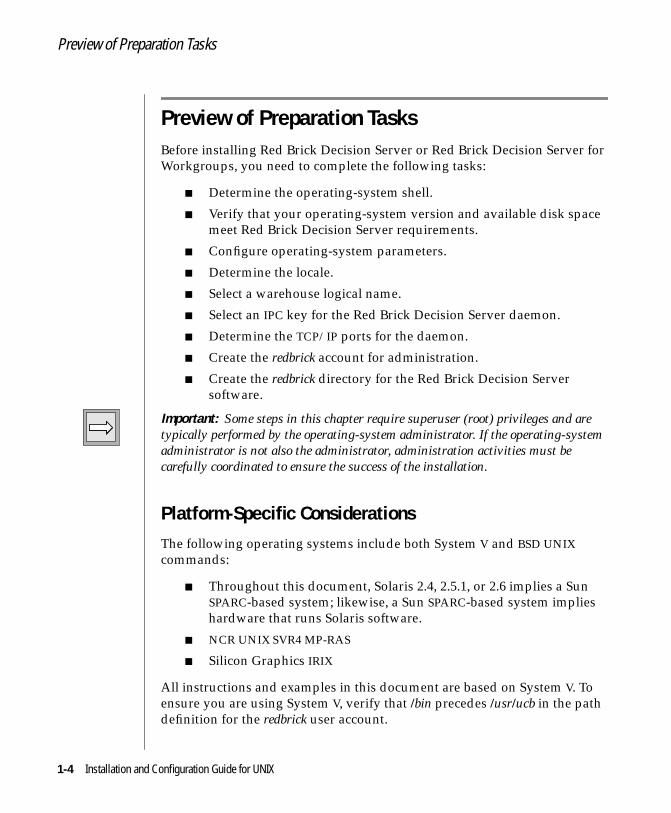
Preview of Preparation TasksBefore installing Red Brick Decision Server or Red Brick Decision Server forWorkgroups, you need to complete the following tasks:
■ Determine the operating-system shell.
■ Verify that your operating-system version and available disk spacemeet Red Brick Decision Server requirements.
■ Configure operating-system parameters.
■ Determine the locale.
■ Select a warehouse logical name.
■ Select an IPC key for the Red Brick Decision Server daemon.
■ Determine the TCP/IP ports for the daemon.
■ Create the redbrick account for administration.
■ Create the redbrick directory for the Red Brick Decision Serversoftware.
Important: Some steps in this chapter require superuser (root) privileges and aretypically performed by the operating-system administrator. If the operating-systemadministrator is not also the administrator, administration activities must becarefully coordinated to ensure the success of the installation.
Platform-Specific ConsiderationsThe following operating systems include both System V and BSD UNIXcommands:
■ Throughout this document, Solaris 2.4, 2.5.1, or 2.6 implies a SunSPARC-based system; likewise, a Sun SPARC-based system implieshardware that runs Solaris software.
■ NCR UNIX SVR4 MP-RAS
■ Silicon Graphics IRIX
All instructions and examples in this document are based on System V. Toensure you are using System V, verify that /bin precedes /usr/ucb in the pathdefinition for the redbrick user account.
1-4 Installation and Configuration Guide for UNIX

Determining the System Shell
Determining the System ShellSome steps in the installation procedure are shell dependent. To determinethe shell, enter:
$ ps -p $$
The ps utility returns a line that indicates which shell you are using. The linelooks different depending on your platform but ends with one of thefollowing lines:
ksh Korn shellsh Bourne shellcsh C shell
For example, the following result of a ps -p command on an HP-UX systemshows that the Korn shell is being used:
PID TTY TIME COMMAND15588 ttys1 0:00 ksh
The operating system command-line prompt is shell specific, with thefollowing default prompts:
■ Korn and Bourne shells: $
■ C shell: %
For all shells, the default superuser prompt is a pound symbol (#). The Kornshell prompt ($) is used throughout this guide, except for commands specificto the C shell, which are shown with the C-shell prompt (%).
Preparing for Installation 1-5

Verifying Operating-System Version and Disk Space
Verifying Operating-System Version and Disk SpaceTo install and run Red Brick Decision Server, you must be running the appro-priate version of your operating-system software, depending upon yourplatform. (Contact your Red Brick Systems representative for informationabout the most current supported software versions). The following tableshows the operating-system versions currently supported.
You must also have the following system hardware and memory available:
■ A CD-ROM drive.
■ A minimum of 100 megabytes of free disk space on the file systemwhere Red Brick Decision Server will be installed, except Sunsystems, which require 145 megabytes.
■ A minimum of 32 megabytes of RAM, with at least 128 megabytespreferred for large-system configurations supporting 20 or moreconcurrent users.
In addition to the disk space required to install Red Brick Decision Serveritself, you need sufficient disk space to store and manage the databases inRed Brick Decision Server. For information about how to estimate the diskspace required for your database, refer to the Administrator’s Guide.
Platform Supported Operating-System Versions
IBM RISC/System 6000 AIX Version 4.3.2 or later
Digital AlphaServer Digital UNIX Version 4.0
HP 9000 Computer HP-UX Release 10.0
NCR WorldMark Server NCR UNIX SVR4 MP-RAS Version 2.03 or 3.0
Sequent Symmetry System DYNIX/ptx Version 4.2.3 or later
Sun SPARC-Based System Solaris Version 2.4, 2.5.1, or 2.6
Silicon Graphics Server IRIX Version 6.2 or 6.4
1-6 Installation and Configuration Guide for UNIX
Operating-System Version
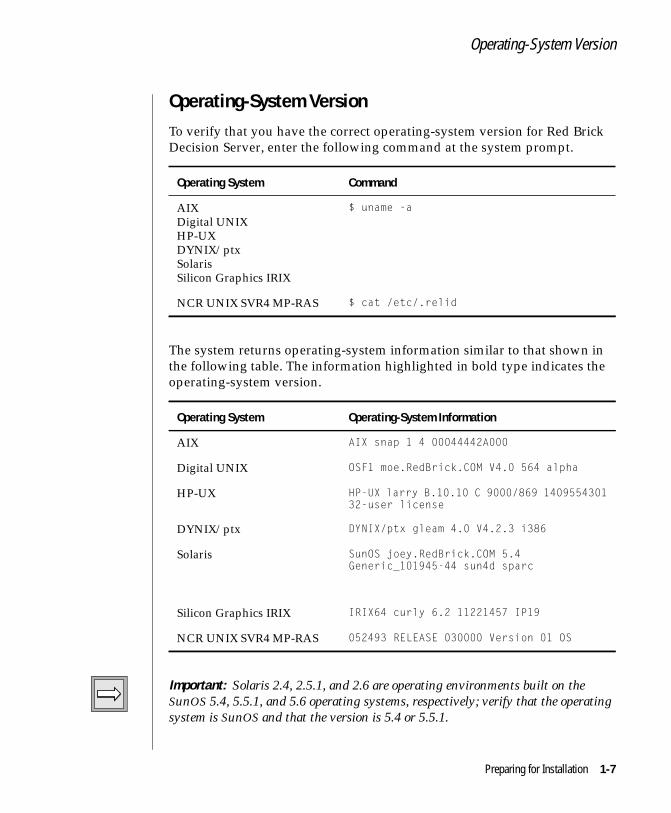
Operating-System VersionTo verify that you have the correct operating-system version for Red BrickDecision Server, enter the following command at the system prompt.
The system returns operating-system information similar to that shown inthe following table. The information highlighted in bold type indicates theoperating-system version.
Important: Solaris 2.4, 2.5.1, and 2.6 are operating environments built on theSunOS 5.4, 5.5.1, and 5.6 operating systems, respectively; verify that the operatingsystem is SunOS and that the version is 5.4 or 5.5.1.
Operating System Command
AIXDigital UNIXHP-UXDYNIX/ptxSolarisSilicon Graphics IRIX
$ uname -a
NCR UNIX SVR4 MP-RAS $ cat /etc/.relid
Operating System Operating-System Information
AIX AIX snap 1 4 00044442A000
Digital UNIX OSF1 moe.RedBrick.COM V4.0 564 alpha
HP-UX HP-UX larry B.10.10 C 9000/869 140955430132-user license
DYNIX/ptx DYNIX/ptx gleam 4.0 V4.2.3 i386
Solaris SunOS joey.RedBrick.COM 5.4Generic_101945-44 sun4d sparc
Silicon Graphics IRIX IRIX64 curly 6.2 11221457 IP19
NCR UNIX SVR4 MP-RAS 052493 RELEASE 030000 Version 01 OS
Preparing for Installation 1-7

Disk Space
Disk SpaceDetermine how much disk space is available on the file system where youwant to install Red Brick Decision Server. Be sure to use a file system withenough free space to provide the storage needed for Red Brick DecisionServer, optional Informix Red Brick products, and the sample database.
Use the operating-system df command to determine the available disk spaceon your file systems.
The system responds with a list of the various file systems and available diskspace on each. Because the commands display the available space in 1-kilobyte blocks, look for a file system with at least 100,000 kilobytes (100megabytes) for Red Brick Decision Server.
If you need more information about how to identify the amount of disk spaceavailable on your system, refer to your operating-system documentation oronline reference pages, or check with your system administrator.
Considerations for NFS File SystemsWarehouse databases must be created and loaded on the same type ofcomputer as the computer from which they will be accessed. For example, ifyou create and load a database using an AIX server, that database can beaccessed only from an AIX server. The physical files that contain thatdatabase, the rbw.config file, and its directory must reside on a local filesystem. They can reside on any local file system.
Operating System Command Default Block Size
AIX
HP-UX
NCR UNIX SVR4 MP-RAS
$ df 1,024 bytes(1 kilobyte)
Solaris
Digital UNIX
DYNIX/ptx
Silicon Graphics IRIX
$ df -k 512 bytes(1/2 kilobyte)
1-8 Installation and Configuration Guide for UNIX
Configuring Operating-System Parameters
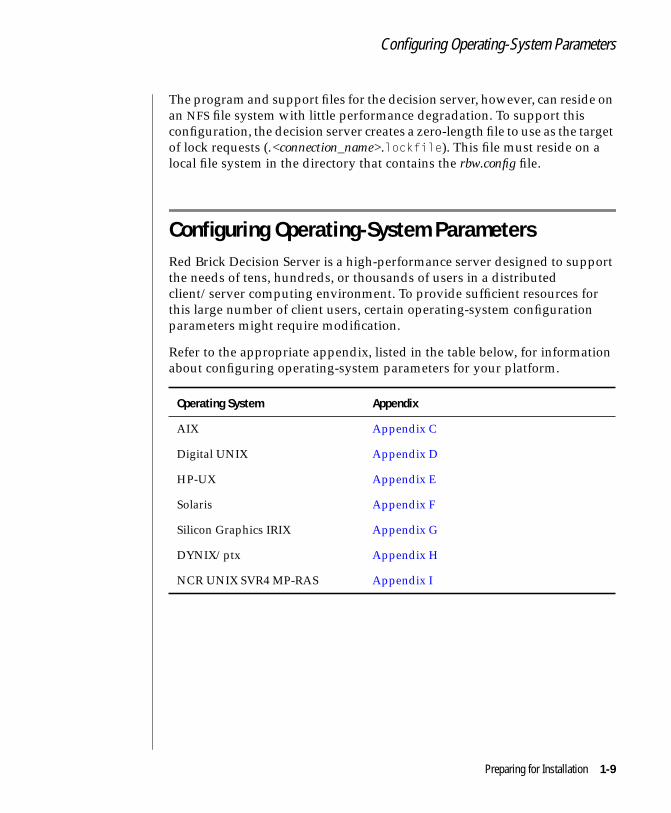
The program and support files for the decision server, however, can reside onan NFS file system with little performance degradation. To support thisconfiguration, the decision server creates a zero-length file to use as the targetof lock requests (.<connection_name>.lockfile). This file must reside on alocal file system in the directory that contains the rbw.config file.
Configuring Operating-System ParametersRed Brick Decision Server is a high-performance server designed to supportthe needs of tens, hundreds, or thousands of users in a distributedclient/server computing environment. To provide sufficient resources forthis large number of client users, certain operating-system configurationparameters might require modification.
Refer to the appropriate appendix, listed in the table below, for informationabout configuring operating-system parameters for your platform.
Operating System Appendix
AIX Appendix C
Digital UNIX Appendix D
HP-UX Appendix E
Solaris Appendix F
Silicon Graphics IRIX Appendix G
DYNIX/ptx Appendix H
NCR UNIX SVR4 MP-RAS Appendix I
Preparing for Installation 1-9
Determining the Locale
Determining the LocaleDuring the installation process, you will be asked to specify a locale. A localeis the unique combination of a language and a location. The locale youspecify will apply to all databases created for this installation.
For more information about locale specifications, refer to the Administrator’sGuide.
Locale ComponentsA locale consists of the following four components:
■ Language
■ Territory
■ Code page
■ Collation sequence
Each component is described briefly in the following sections.
Language
The language component, in conjunction with the territory, controls whichtranslation is used. In general, text strings are accepted and displayed in theuser’s chosen language. These strings include information and warningmessages, object names, month and day names, and character data returnedin query results. However, the fixed elements of a programming language,such as the keywords used in SQL statements, are not translated.
1-10 Installation and Configuration Guide for UNIX
Defining the Locale
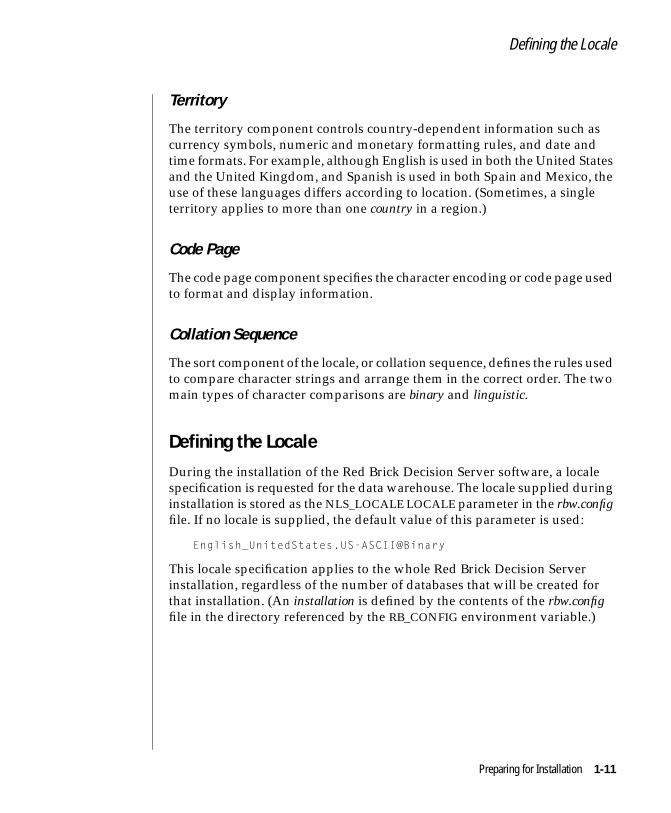
Territory
The territory component controls country-dependent information such ascurrency symbols, numeric and monetary formatting rules, and date andtime formats. For example, although English is used in both the United Statesand the United Kingdom, and Spanish is used in both Spain and Mexico, theuse of these languages differs according to location. (Sometimes, a singleterritory applies to more than one country in a region.)
Code Page
The code page component specifies the character encoding or code page usedto format and display information.
Collation Sequence
The sort component of the locale, or collation sequence, defines the rules usedto compare character strings and arrange them in the correct order. The twomain types of character comparisons are binary and linguistic.
Defining the LocaleDuring the installation of the Red Brick Decision Server software, a localespecification is requested for the data warehouse. The locale supplied duringinstallation is stored as the NLS_LOCALE LOCALE parameter in the rbw.configfile. If no locale is supplied, the default value of this parameter is used:
English_UnitedStates.US-ASCII@Binary
This locale specification applies to the whole Red Brick Decision Serverinstallation, regardless of the number of databases that will be created forthat installation. (An installation is defined by the contents of the rbw.configfile in the directory referenced by the RB_CONFIG environment variable.)
Preparing for Installation 1-11
Selecting a Warehouse Logical Name
To specify a locale that is different from the default locale specification, youmust define each of its four components—language, territory, code page, andcollation sequence. Refer to Appendix B for a list of locale specifications thatRed Brick Decision Server supports. Record your locale specification in thefollowing table.
Selecting a Warehouse Logical NameThe default for the warehouse logical name is the literal name RB_HOST. Thisname corresponds to the IPC key (SHMEM) in the rbw.config file. For a fulldescription of the rbw.config file, refer to the Administrator’s Guide.
For standard installations, the installation script provides a default value forthe warehouse logical name (RB_HOST). If you are planning to run twoversions (for example, Version 5.1 and Version 6.0) simultaneously or if youwant to use a name that is different from the default value, record a differentwarehouse logical name in the following table.
Locale specification (English_UnitedStates.US-ASCII@Binary BY DEFAULT):
Language:
Territory:
Code page:
Collation sequence:
Logical name of daemon (RB_HOST by default):
1-12 Installation and Configuration Guide for UNIX

Selecting an IPC Key for the Daemon
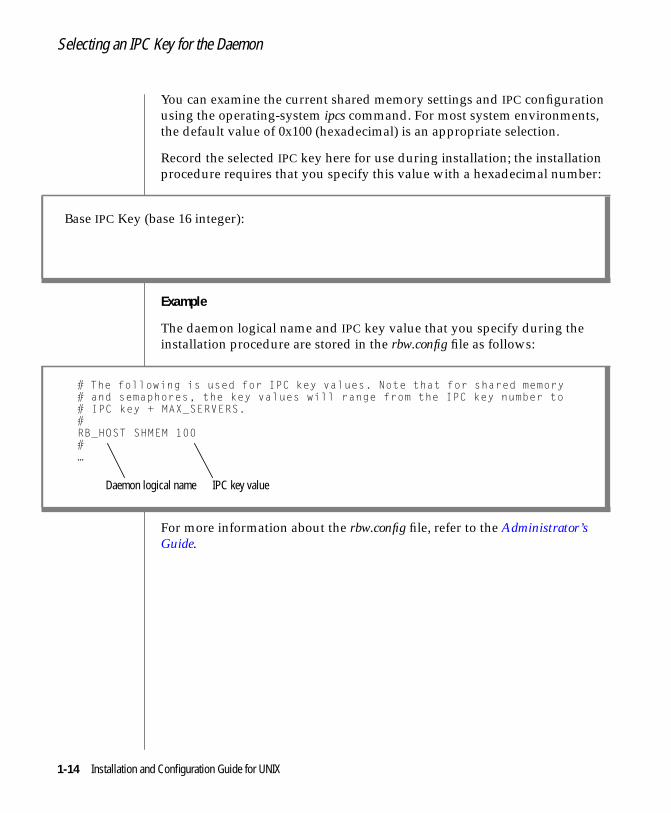
Selecting an IPC Key for the DaemonRed Brick Decision Server uses a shared memory segment for interprocesscommunication. During the installation process, you must supply an inter-process communication (IPC) key value for Red Brick Decision Server to usefor its shared memory communication.
The Red Brick Decision Server daemon allocates IPC resources based on theIPC key value, which is supplied by the user for the RB_HOST SHMEM entryin the rbw.config file during the installation process. This value allocatesadditional IPC resources for each additional server that will be supported bythe daemon, as specified by the MAX_SERVERS entry in the rbw.config file. TheIPC key value has two requirements:
■ The number must be different from any other IPC key value so thatRed Brick Decision Server processes do not conflict with otherprocesses.
Important: When running two versions of Red Brick Decision Server simulta-neously for new-release testing purposes, you must use unique IPC key values foreach version.
■ The number forms the base for a list of IPC entries in the sharedmemory environment. This list must allow at least as many entries asthe maximum number of users who will have concurrent access tothe warehouse. (This value includes concurrent Web users.)Therefore, select an IPC key that allows at least that many free IPCslots before the next reserved entry.
Suppose MAX_SERVERS is set to 50, and 100 is specified as the base IPC key:
RBWAPI MAX_SERVERS 50RBW_HOST1 SHMEM 100
Then any additional IPC key values specified must be greater than 100 by atleast 32 (50 in decimal is 32 in hexadecimal). For example, a new IPC keyvalue of 120 might result in a resource conflict, while a value of 140 wouldprovide sufficient range between the IPC keys to accommodate the specifiedMAX_SERVERS value:
RBW_HOST2 SHMEM 140
Preparing for Installation 1-13
Selecting an IPC Key for the Daemon
You can examine the current shared memory settings and IPC configurationusing the operating-system ipcs command. For most system environments,the default value of 0x100 (hexadecimal) is an appropriate selection.
Record the selected IPC key here for use during installation; the installationprocedure requires that you specify this value with a hexadecimal number:
Example
The daemon logical name and IPC key value that you specify during theinstallation procedure are stored in the rbw.config file as follows:
For more information about the rbw.config file, refer to the Administrator’sGuide.
Base IPC Key (base 16 integer):
# The following is used for IPC key values. Note that for shared memory# and semaphores, the key values will range from the IPC key number to# IPC key + MAX_SERVERS.#RB_HOST SHMEM 100#…
Daemon logical name IPC key value
1-14 Installation and Configuration Guide for UNIX
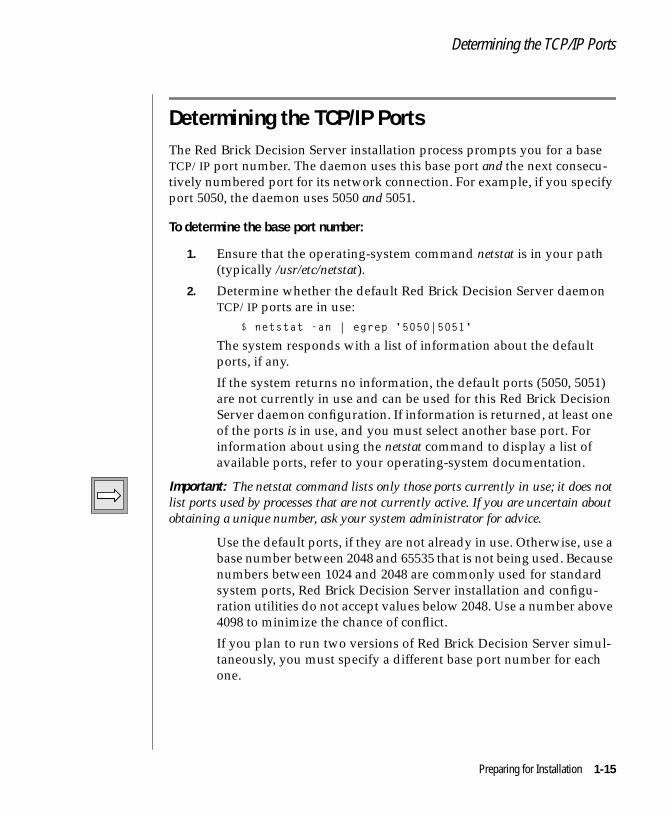
Determining the TCP/IP Ports
Determining the TCP/IP PortsThe Red Brick Decision Server installation process prompts you for a baseTCP/IP port number. The daemon uses this base port and the next consecu-tively numbered port for its network connection. For example, if you specifyport 5050, the daemon uses 5050 and 5051.
To determine the base port number:
1. Ensure that the operating-system command netstat is in your path(typically /usr/etc/netstat).
2. Determine whether the default Red Brick Decision Server daemonTCP/IP ports are in use:
$ netstat -an | egrep '5050|5051'
The system responds with a list of information about the defaultports, if any.
If the system returns no information, the default ports (5050, 5051)are not currently in use and can be used for this Red Brick DecisionServer daemon configuration. If information is returned, at least oneof the ports is in use, and you must select another base port. Forinformation about using the netstat command to display a list ofavailable ports, refer to your operating-system documentation.
Important: The netstat command lists only those ports currently in use; it does notlist ports used by processes that are not currently active. If you are uncertain aboutobtaining a unique number, ask your system administrator for advice.
Use the default ports, if they are not already in use. Otherwise, use abase number between 2048 and 65535 that is not being used. Becausenumbers between 1024 and 2048 are commonly used for standardsystem ports, Red Brick Decision Server installation and configu-ration utilities do not accept values below 2048. Use a number above4098 to minimize the chance of conflict.
If you plan to run two versions of Red Brick Decision Server simul-taneously, you must specify a different base port number for eachone.
Preparing for Installation 1-15
Creating the redbrick Account
3. Record your Red Brick Decision Server daemon base port in thefollowing table.
Creating the redbrick AccountBefore you begin installing Red Brick Decision Server, you must create a useraccount to be used for installation and all subsequent database adminis-tration activity. This account is also used as the effective execution user ID forwarehouse server processes (rbwsvr), and all database files and directories areowned exclusively by this user. The default name for this account is redbrick,although you can choose any name. Throughout the Red Brick DecisionServer documentation, this user account is referred to as redbrick, and thisuser ID is used for all administration activities at the operating-system level.
As a superuser, create the redbrick account using the appropriate systemmanagement tool, depending upon your platform. The following table liststhe system management tools for each platform; for more information abouteach tool, refer to your operating-system documentation or online referencepages.
Red Brick Warehouse Daemon base port:
Platform System Management Tool
AIX AIX System Management Interface Tool (SMIT)
Digital UNIX Digital UNIX adduser script
HP-UX System Administration Manager tool (SAM)
NCR UNIX SVR4 MP-RAS NCR UNIX SVR4 MP-RAS sysadm tool
(1 of 2)
1-16 Installation and Configuration Guide for UNIX
Access to the redbrick Account
You do not need to create additional operating-system user accounts if allusers of the data warehouse will connect via client tools. However, if thewarehouse will be accessed by local users via the RISQL Entry Tool or RISQLReporter, you need to create accounts that give those users login access to thesystem. Also, you must provide database access for all Red Brick DecisionServer users (whether they connect via client tools or the RISQL tools) byusing the SQL GRANT authorization command. For details, refer to theAdministrator’s Guide.
Tip: Users connecting to a Red Brick Decision Server database via RISQL Entry Toolor RISQL Reporter running on a remote system do not need operating-system useraccounts.
Access to the redbrick AccountTo ensure that files created by the redbrick user have the correct access, makesure that umask for this account is set to 077. Look for the following line at theend of both the .cshrc and .profile files for the redbrick user:
umask 077
If this line is not present in both files, enter it as shown previously. Thisumask setting provides the following file access for the redbrick user:
redbrick: rwx (read, write, execute)group: --- (none)other: --- (none)
DYNIX/ptx ptx/ADMIN tool
Solaris Solaris Administration Tool
Silicon Graphics IRIX Graphical system manager tool
Platform System Management Tool
(2 of 2)
Preparing for Installation 1-17
Creating the redbrick Directory
Creating the redbrick DirectoryThe redbrick user must have read, write, and execute access to the directorywhere the warehouse software will be installed. Throughout this document,this directory is referred to as the redbrick directory (redbrick_dir in examples),although you can name it whatever you choose.
Create this directory in the file system where you have decided to install thewarehouse software. In most cases, this directory is the home directory forthe redbrick user created in the previous section.
Providing License KeysRed Brick Decision Server requires that you provide a valid license key beforeyou start the daemon. In addition, if you purchased optional Informix RedBrick products (for example, the Vista option), you must enable theseproducts with license keys before using them.
The menu-driven installation script provides an interface for entering licensekeys directly into the Red Brick Decision Server configuration file. Thisprocedure is described in Chapter 2, “Installing Informix Red Brick DecisionServer.”A license key for a licensed option is provided on a one-pagedocument that is delivered with Red Brick Decision Server when an optionalproduct is purchased.
Choosing an Installation ProcedureIf you are installing Red Brick Decision Server for the first time, you are readyto begin the installation procedure described in Chapter 2, “InstallingInformix Red Brick Decision Server.”
If you already have Red Brick Decision Server and want to install and workwith a new version of the software before converting your existing databasesto that new version, refer to Chapter 3, “Installing a New Release.”
1-18 Installation and Configuration Guide for UNIX

Checklist of Preparation Steps
Checklist of Preparation Steps
Action Page
1. Determine the operating-system shell. 1-5
2. Verify that you are running the correct version of youroperating system.
1-6
3. Verify that you have sufficient disk space to install and runthe software and configure NFS file systems, if applicable.
1-8
4. Set up your environment by configuring the operating-systemparameters discussed in the appropriate appendix for yourplatform.
1-9
5. Determine a locale for your installation. 1-10
6. Select a warehouse logical name (default is RB_HOST). 1-12
7. Select an IPC key for the daemon. 1-13
8. Determine the TCP/IP base port for the daemon. 1-15
9. As a superuser, create the redbrick account and verify file accessfor the redbrick user (umask 077 should appear in the .cshrc and.profile files).
1-16
10. Create the redbrick directory in the file system where you willinstall the software.
1-17
11. Have your license keys ready; one for each product or option youhave purchased is provided in a separate document delivered withthe CD-ROM.
1-18
12. Go to Chapter 2, “Installing Informix Red Brick Decision Server” orChapter 3, “Installing a New Release” for installation instructions:
■ First-time warehouse—Chapter 2
■ Existing warehouse—Chapter 2 and Chapter 3
Preparing for Installation 1-19


2Chapter
Installing Informix Red BrickDecision Server
In This Chapter . . . . . . . . . . . . . . . . . . . . 2-3
Before You Begin . . . . . . . . . . . . . . . . . . . 2-4
Preview of Installation Tasks . . . . . . . . . . . . . . . 2-5
Mounting and Unmounting the CD-ROM Device . . . . . . . . 2-6Mounting the CD-ROM Device . . . . . . . . . . . . . 2-6Unmounting the CD-ROM Device . . . . . . . . . . . . 2-7
Running the Installation Script . . . . . . . . . . . . . . . 2-7Starting the Installation . . . . . . . . . . . . . . . . 2-7Stopping the Installation . . . . . . . . . . . . . . . 2-10Specifying the Warehouse Directory . . . . . . . . . . . 2-10Specifying the Locale . . . . . . . . . . . . . . . . . 2-11
Specifying the Language . . . . . . . . . . . . . . 2-11Specifying the Territory . . . . . . . . . . . . . . 2-12Specifying the Code Page . . . . . . . . . . . . . . 2-12Specifying the Sort Component . . . . . . . . . . . . 2-12Verifying the Locale Specification . . . . . . . . . . . 2-13
Installing the Administration Database . . . . . . . . . . 2-13Installing the Sample Database . . . . . . . . . . . . . 2-14Providing IPC Key and User Information . . . . . . . . . . 2-14
Providing the IPC Key Number . . . . . . . . . . . . 2-15Specifying the Base TCP/IP Port for the Daemon . . . . . . . 2-15Specifying the Maximum Number of Servers . . . . . . . . 2-16 Finishing the First Phase of Installation . . . . . . . . . . 2-16
Enabling Red Brick Decision Server and Optional Products . . . . . 2-17Product Licenses for Red Brick . . . . . . . . . . . . . 2-18Product Licenses for Web Connections. . . . . . . . . . . 2-19

2-2 Insta
Product License for Red Brick Decision Server forWorkgroups . . . . . . . . . . . . . . . . . 2-20
Entering License Keys . . . . . . . . . . . . . . . . 2-20
Starting the Red Brick Decision Server Daemons. . . . . . . . . 2-22
Verifying the Red Brick Decision Server Installation . . . . . . . 2-24
Checklist of Installation Tasks . . . . . . . . . . . . . . . 2-26
llation and Configuration Guide for UNIX

In This ChapterThis chapter explains how to install Red Brick Decision Server or Red BrickDecision Server for Workgroups. The procedures in this chapter apply toboth products unless otherwise stated. The installation procedure installs thesoftware, as well as a sample database named Aroma, a utility directorynamed util, and all optional Informix Red Brick products. As part of theinstallation procedure, you also must enable the license keys for Red BrickDecision Server and any optional products you purchased.
The installation procedure uses a script named INSTALL.ISO which displays amenu of installation options. You can use the script to perform any of thefollowing tasks:
■ Install a full-feature or maintenance release of Red Brick DecisionServer.
■ Install a partial update, or patch, release.
■ Enable optional Informix Red Brick products with a license key.
For more information about installing an update release, refer to the releasenotes distributed with your update release CD-ROM and Chapter 3,“Installing a New Release.”
Red Brick Decision Server installation is typically done by the system ordatabase administrator and should be done from the redbrick user account.
Installing Informix Red Brick Decision Server 2-3

Before You Begin
Before You BeginRead the release notes delivered with the software and complete the prein-stallation tasks described in Chapter 1, “Preparing for Installation.”
The procedures described in the following sections describe the basic instal-lation process for Red Brick Decision Server. If you plan to run twoconcurrent releases of Red Brick Decision Server or if you are replacing thecurrent release with a new release, refer to Chapter 3, “Installing a NewRelease” for additional information.
The following conditions will prevent you from successfully installing thesoftware:
■ Incorrect user privileges
■ Insufficient disk space
■ Media failure (damaged CD-ROM)
If you see an error message during installation, make sure you haveread/write privileges on the redbrick directory and that you have sufficientdisk space for the warehouse software. For more information about systemrequirements, refer to “Verifying Operating-System Version and Disk Space”on page 1-6.
If you are still unable to install the warehouse and the sample database, or ifthe CD-ROM is damaged, contact Informix Customer Support as described in“Customer Support” on page 10.
2-4 Installation and Configuration Guide for UNIX

Preview of Installation Tasks
Preview of Installation TasksTo install Red Brick Decision Server, perform the following tasks:
■ As the superuser, mount the CD-ROM device.
■ Log in as the redbrick user and change to the directory where youwant to install the Red Brick Decision Server software. If you areinstalling a new release of Red Brick Decision Server, you must use adirectory other than the existing redbrick directory.
■ Run the installation script, responding to the prompts as required.
■ Enable Red Brick Decision Server with a valid license key.
■ Enable additional products or options with valid license keys, ifapplicable.
■ As the redbrick user, start the daemon processes (rbwapid, rbwadmd,and rbwlogd).
■ As the redbrick user, run the verification script to verify your RedBrick Decision Server software installation.
■ If you are installing a new release of Red Brick Decision Server,follow the additional instructions in Chapter 3, “Installing a NewRelease.” Chapter 3 contains information about running two releasesof Red Brick Decision Server, replacing an existing warehouse witha new release, upgrading databases, and migrating users to a newrelease.
Installing Informix Red Brick Decision Server 2-5

Mounting and Unmounting the CD-ROM Device
Mounting and Unmounting the CD-ROM DeviceThis section describes the procedure for mounting and unmounting yourCD-ROM device. You must be the superuser to mount and unmount theCD-ROM. To install Red Brick Decision Server, you must first mount theCD-ROM for your platform. When you have completed the installation, youcan unmount the CD-ROM for other uses.
Important: If you need additional information about mounting your CD-ROMdevice, refer to your operating-system documentation.
Mounting the CD-ROM DeviceUse the appropriate mount command, depending on your platform, tomount your CD-ROM device where device_name is the name of your CD-ROMdevice, and /cdrom is an existing directory where you want to mount thedevice, as the following table shows.
Platform Mount Command
AIX $ /etc/mount -v cdrfs -o ro device_name/cdrom
Digital UNIX $ /usr/sbin/mount -t cdfs -o noversiondevice_name /cdrom
HP-UX 10.0 $ /usr/sbin/mount -F cdfs -o cdcasedevice_name /cdrom
Solaris No mount command is needed; mounting occursautomatically when the CD-ROM is inserted into thedevice. The Logical Volume Manager must berunning.
Silicon Graphics IRIX $ /usr/etc/mediad -r device_name$ /sbin/mount -t iso9660 -o notranslatedevice_name /CDROM
DYNIX/ptx $ /etc/mount -f cdfs -o toupper /dev/dsk/cd0/cdrom
NCR UNIX SVR4 MP-RAS $ /etc/mount -F cdfs device_name /cdrom
2-6 Installation and Configuration Guide for UNIX
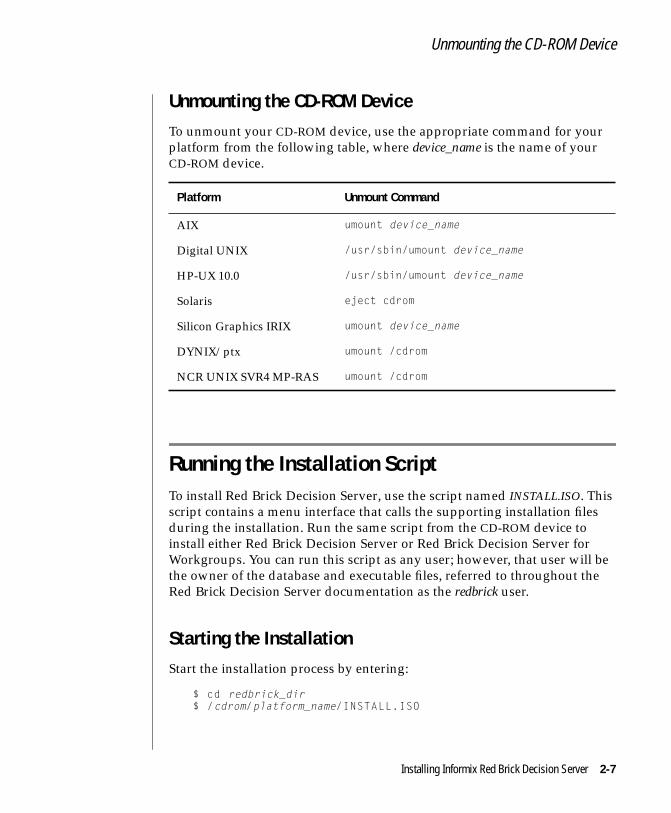
Unmounting the CD-ROM Device
Unmounting the CD-ROM DeviceTo unmount your CD-ROM device, use the appropriate command for yourplatform from the following table, where device_name is the name of yourCD-ROM device.
Running the Installation ScriptTo install Red Brick Decision Server, use the script named INSTALL.ISO. Thisscript contains a menu interface that calls the supporting installation filesduring the installation. Run the same script from the CD-ROM device toinstall either Red Brick Decision Server or Red Brick Decision Server forWorkgroups. You can run this script as any user; however, that user will bethe owner of the database and executable files, referred to throughout theRed Brick Decision Server documentation as the redbrick user.
Starting the InstallationStart the installation process by entering:
$ cd redbrick_dir$ /cdrom/platform_name/INSTALL.ISO
Platform Unmount Command
AIX umount device_name
Digital UNIX /usr/sbin/umount device_name
HP-UX 10.0 /usr/sbin/umount device_name
Solaris eject cdrom
Silicon Graphics IRIX umount device_name
DYNIX/ptx umount /cdrom
NCR UNIX SVR4 MP-RAS umount /cdrom
Installing Informix Red Brick Decision Server 2-7

Starting the Installation
Always include the full pathname for the INSTALL.ISO script. In thisexample, redbrick_dir is the directory in which you want to install Red BrickDecision Server; /cdrom is the directory where your CD-ROM device ismounted; and platform_name is the appropriate platform from the followingtable.
The aix64, hpx64, and sol64 names specify the 64-bit version of Red BrickDecision Server. When you use a 64-bit machine and run a 64-bit version ofthe operating system, you can choose either version of Red Brick DecisionServer; otherwise, you must use a 32-bit version of the server.
For example, if your platform is HP-UX, enter:
$ /cdrom/hpx/INSTALL.ISO
If your platform is Silicon Graphics IRIX, enter:
$ /cdrom/sgi/INSTALL.ISO
The command is case sensitive.
Platform platform_name
AIX aix, aix64
Digital UNIX dec
HP-UX hpx, hpx64
NCR UNIX SVR4 MP-RAS NCR
DYNIX/ptx PTX
Solaris sol, sol64
Silicon Graphics IRIX sgi
2-8 Installation and Configuration Guide for UNIX

Starting the Installation
The main Red Brick Decision Server Installation Menu is displayed.
To install a full or maintenance release, type 1 and press RETURN. Thefollowing output is displayed.
From this point on, the installation script prompts you for information andtakes the necessary actions as you respond.
Default values appear in brackets ([ ]) throughout the installation procedure.To use a default value, press RETURN. To use another value, type that valueand press RETURN.
Tip: If you have not logged in as the recommended default user redbrick, the instal-lation script displays the following warning:
You are not logged in with the recommended default user'redbrick.' You may continue, but all future UNIXadministration tasks for this installation must be done asuser <username>.Continue? (y|n) [n]:
You can choose to continue the installation using the user name specified inthe message, or stop the installation, log in as the redbrick user, and restart theinstallation.
########################################################## ## Red Brick Installation Menu ## ##########################################################
1. Install Full or Maintenance Release2. Install Update Release3. Install Client Connectivity Products4. Enable Red Brick Products
Enter "q" to quit.Enter item number and press Return. >
Installation Script for Red Brick Warehouse(C) Copyright 1991-1999 Informix Software, Inc.All rights reserved.Starting installation on Fri Sep 17 10:05:32 PDT 1999.Current directory is redbrick_dir.
Installing Informix Red Brick Decision Server 2-9
Stopping the Installation
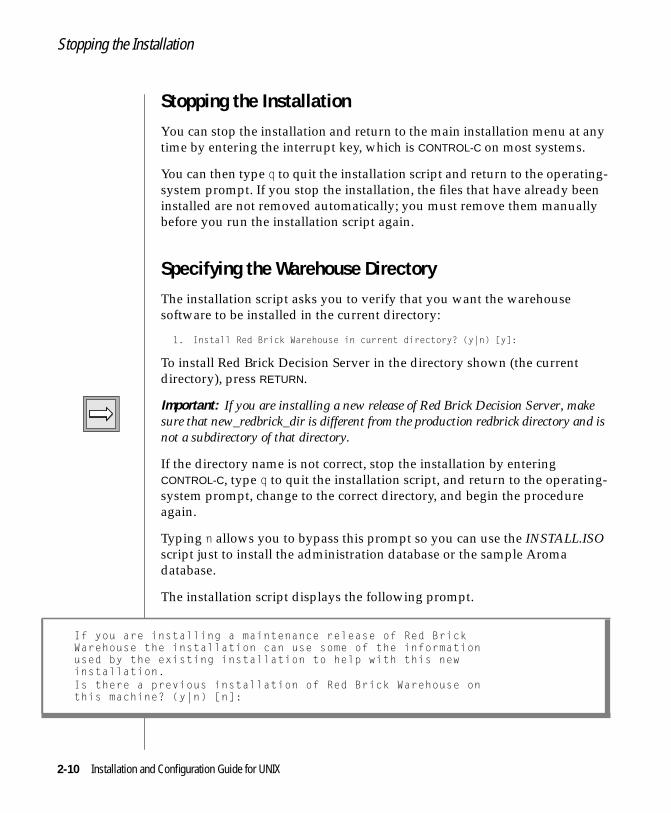
Stopping the InstallationYou can stop the installation and return to the main installation menu at anytime by entering the interrupt key, which is CONTROL-C on most systems.
You can then type q to quit the installation script and return to the operating-system prompt. If you stop the installation, the files that have already beeninstalled are not removed automatically; you must remove them manuallybefore you run the installation script again.
Specifying the Warehouse DirectoryThe installation script asks you to verify that you want the warehousesoftware to be installed in the current directory:
1. Install Red Brick Warehouse in current directory? (y|n) [y]:
To install Red Brick Decision Server in the directory shown (the currentdirectory), press RETURN.
Important: If you are installing a new release of Red Brick Decision Server, makesure that new_redbrick_dir is different from the production redbrick directory and isnot a subdirectory of that directory.
If the directory name is not correct, stop the installation by enteringCONTROL-C, type q to quit the installation script, and return to the operating-system prompt, change to the correct directory, and begin the procedureagain.
Typing n allows you to bypass this prompt so you can use the INSTALL.ISOscript just to install the administration database or the sample Aromadatabase.
The installation script displays the following prompt.
If you are installing a maintenance release of Red BrickWarehouse the installation can use some of the informationused by the existing installation to help with this newinstallation.Is there a previous installation of Red Brick Warehouse onthis machine? (y|n) [n]:
2-10 Installation and Configuration Guide for UNIX

Specifying the Locale
Important: If you are installing Red Brick Decision Server in a directory that alreadycontains an rbw.config file, this prompt does not appear.
If you are installing a new release of Red Brick Decision Server, type y andpress RETURN. The script displays the following message.
Type the full pathname of the directory where the software for the currentRed Brick Decision Server is installed and press RETURN.
Specifying the LocaleThe installation script asks you to supply a locale for the installation.
To use the default locale, press RETURN. If you specified a different locale inthe section “Defining the Locale” on page 1-11, type n and press RETURN.
Specifying the Language
If you choose not to use the default locale for the installation, the script asksyou to supply a language.
The list contains the names of all the languages that are supported by RedBrick Decision Server.
Enter the directory where the current Red Brick Warehouseis installed:
Specify a locale for this warehouse installation; this locale will apply toall databases created for this installation.Do you want to use the following default locale?English_UnitedStates.US_ASCII@Binary (y|n) [y]:
1) English2) German3) French4) ...
Enter the number of the language component to use [1]:
Installing Informix Red Brick Decision Server 2-11

Specifying the Locale
To select the default language, English, press RETURN. To select anotherlanguage, type the number of the language and press RETURN.
Specifying the Territory
The installation script asks you to specify a territory for the installation. Therecommended territories for the language you choose are shown; forexample, if you choose Japanese, the prompt displays the following choices.
Type the number of the territory and press RETURN.
Specifying the Code Page
The installation script asks you to specify a code page. The recommendedcode pages for the language you choose are shown; for example, if youchoose Japanese, the prompt displays the following choices.
Specifying the Sort Component
The installation script asks you to specify a sort component. The recom-mended sort components for the language you choose are shown; forexample, if you choose Japanese, the prompt displays the following choices.
The supported territories for the language Japanese are:1) Japan
Enter the number of the territory component to use [1]:
The supported code pages for the language Japanese are:1) JapanEUC2) MS9323) UTF-8
Enter the number of the code page component to use [1]:
The supported sort components for the language Japanese are:1) Binary
Enter the number of the sort component to use [1]:
2-12 Installation and Configuration Guide for UNIX
Installing the Administration Database
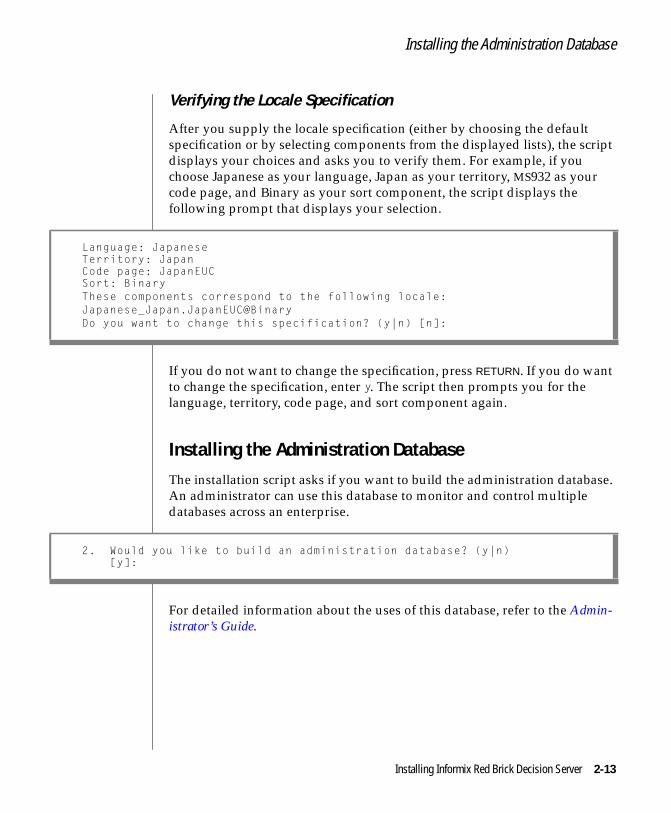
Verifying the Locale Specification
After you supply the locale specification (either by choosing the defaultspecification or by selecting components from the displayed lists), the scriptdisplays your choices and asks you to verify them. For example, if youchoose Japanese as your language, Japan as your territory, MS932 as yourcode page, and Binary as your sort component, the script displays thefollowing prompt that displays your selection.
If you do not want to change the specification, press RETURN. If you do wantto change the specification, enter y. The script then prompts you for thelanguage, territory, code page, and sort component again.
Installing the Administration DatabaseThe installation script asks if you want to build the administration database.An administrator can use this database to monitor and control multipledatabases across an enterprise.
For detailed information about the uses of this database, refer to the Admin-istrator’s Guide.
Language: JapaneseTerritory: JapanCode page: JapanEUCSort: BinaryThese components correspond to the following locale:Japanese_Japan.JapanEUC@BinaryDo you want to change this specification? (y|n) [n]:
2. Would you like to build an administration database? (y|n)[y]:
Installing Informix Red Brick Decision Server 2-13

Installing the Sample Database
Installing the Sample DatabaseThe installation script asks if you want to install the sample database files.
The installation verification procedure requires the sample database namedAroma, which is also used extensively in the examples provided in Red BrickDecision Server documentation. Therefore, most sites should install thesample database. The Aroma scripts, data, and database require approxi-mately 16 megabytes of disk space and can be removed later if they are nolonger needed. This database does not count against the two-database limitfor Red Brick Decision Server for Workgroups.
To install the sample database files, press RETURN. If you do not want to installthe sample database files, type n and press RETURN.
Providing IPC Key and User InformationThe installation script asks you for the logical name of the IPC key that theRed Brick Decision Server daemon will support.
To use the default logical name (RB_HOST), press RETURN. Alternatively, typethe name you recorded in the section “Selecting a Warehouse Logical Name”on page 1-12 and press RETURN.
3. To verify the installation, you must install the sampledatabase (Aroma). Install the sample database? (y|n) [y]:
4. Enter the logical name of the base IPC key to be supportedby the Red Brick Warehouse daemon [RB_HOST]:
2-14 Installation and Configuration Guide for UNIX

Specifying the Base TCP/IP Port for the Daemon
Providing the IPC Key Number
The installation script asks you to specify the IPC key number, which formsthe base for a list of IPC entries in the shared memory environment.
If you are installing a new release and you intend to run two releases of RedBrick Decision Server simultaneously during the test period, choose adifferent IPC key from the one used for your existing installation. The newkey must be different from other reserved IPC keys and must allow at least asmany entries as the maximum number of concurrent warehouse users,including concurrent Web users.
Specifying the Base TCP/IP Port for the DaemonThe installation script asks for the base TCP/IP port to be used to connect tothe Red Brick Decision Server daemon.
Informix recommends using the default port (5050) for the Red Brick DecisionServer daemon. To use the default port, press RETURN. The daemon uses thedefault port and the next consecutively numbered port, for example, 5050and 5051. Alternatively, type the number you recorded in “Determining theTCP/IP Ports” on page 1-15 and press RETURN.
If you are installing a new release, you must use a set of ports other than theone you used for your existing installation. For example, use 5052 and 5053.
5. Enter the base IPC key used for shared memory(base sixteen integer) to be used by the Red BrickWarehouse daemon [100]:
7. Enter the TCP/IP port number used to connect to the Red BrickWarehouse daemon [5050]:
Installing Informix Red Brick Decision Server 2-15
Specifying the Maximum Number of Servers
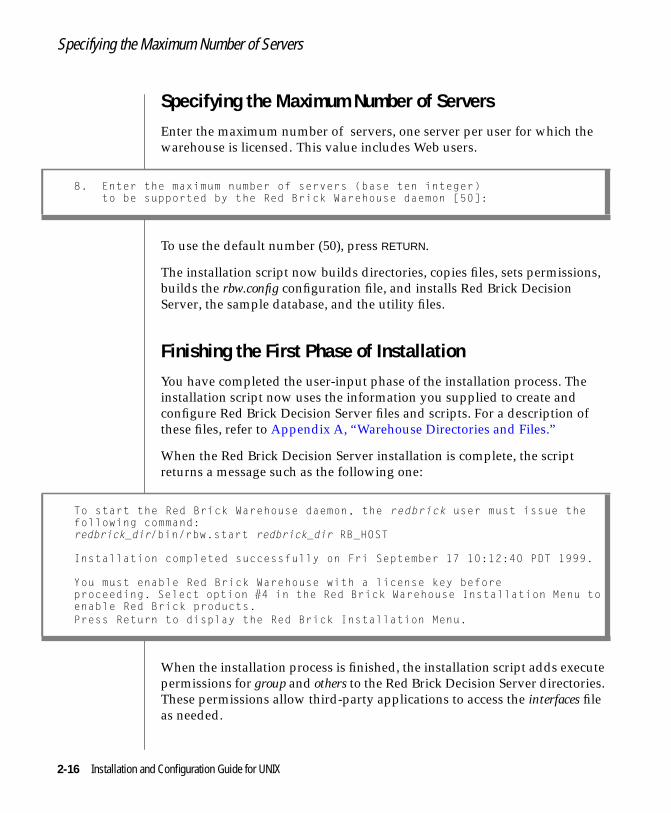
Specifying the Maximum Number of ServersEnter the maximum number of servers, one server per user for which thewarehouse is licensed. This value includes Web users.
To use the default number (50), press RETURN.
The installation script now builds directories, copies files, sets permissions,builds the rbw.config configuration file, and installs Red Brick DecisionServer, the sample database, and the utility files.
Finishing the First Phase of InstallationYou have completed the user-input phase of the installation process. Theinstallation script now uses the information you supplied to create andconfigure Red Brick Decision Server files and scripts. For a description ofthese files, refer to Appendix A, “Warehouse Directories and Files.”
When the Red Brick Decision Server installation is complete, the scriptreturns a message such as the following one:
When the installation process is finished, the installation script adds executepermissions for group and others to the Red Brick Decision Server directories.These permissions allow third-party applications to access the interfaces fileas needed.
8. Enter the maximum number of servers (base ten integer)to be supported by the Red Brick Warehouse daemon [50]:
To start the Red Brick Warehouse daemon, the redbrick user must issue thefollowing command:redbrick_dir/bin/rbw.start redbrick_dir RB_HOST
Installation completed successfully on Fri September 17 10:12:40 PDT 1999.
You must enable Red Brick Warehouse with a license key beforeproceeding. Select option #4 in the Red Brick Warehouse Installation Menu toenable Red Brick products.Press Return to display the Red Brick Installation Menu.
2-16 Installation and Configuration Guide for UNIX
Enabling Red Brick Decision Server and Optional Products
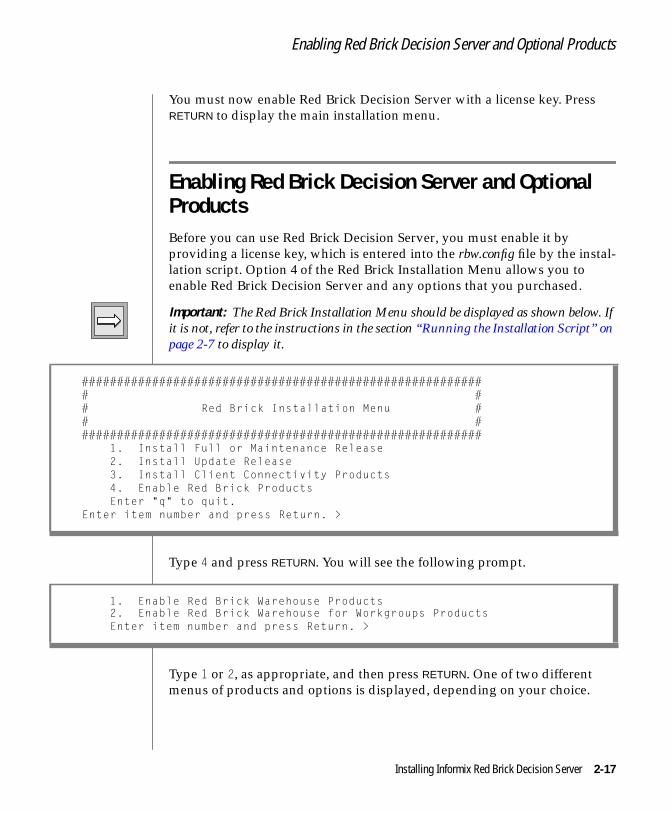
You must now enable Red Brick Decision Server with a license key. PressRETURN to display the main installation menu.
Enabling Red Brick Decision Server and OptionalProductsBefore you can use Red Brick Decision Server, you must enable it byproviding a license key, which is entered into the rbw.config file by the instal-lation script. Option 4 of the Red Brick Installation Menu allows you toenable Red Brick Decision Server and any options that you purchased.
Important: The Red Brick Installation Menu should be displayed as shown below. Ifit is not, refer to the instructions in the section “Running the Installation Script” onpage 2-7 to display it.
Type 4 and press RETURN. You will see the following prompt.
Type 1 or 2, as appropriate, and then press RETURN. One of two differentmenus of products and options is displayed, depending on your choice.
########################################################## ## Red Brick Installation Menu ## ##########################################################
1. Install Full or Maintenance Release2. Install Update Release3. Install Client Connectivity Products4. Enable Red Brick ProductsEnter "q" to quit.
Enter item number and press Return. >
1. Enable Red Brick Warehouse Products2. Enable Red Brick Warehouse for Workgroups ProductsEnter item number and press Return. >
Installing Informix Red Brick Decision Server 2-17

Product Licenses for Red Brick
Product Licenses for Red BrickIf you select option 1, Enable Red Brick Products, a list similar to thefollowing is displayed. The list shows the product license options for RedBrick Decision Server.
############################################################# # # # Red Brick Product License # # # #############################################################
1. RED_BRICK_WAREHOUSE 2. RED_BRICK_WAREHOUSE_10 3. RED_BRICK_WAREHOUSE_25 4. RED_BRICK_WAREHOUSE_50 5. RED_BRICK_WAREHOUSE_75 6. RED_BRICK_WAREHOUSE_100 7. RED_BRICK_WAREHOUSE_150 8. RED_BRICK_WAREHOUSE_200 9. RED_BRICK_WAREHOUSE_250 10. RED_BRICK_WAREHOUSE_500 11. PTMU_OPTION 12. BACKUP_RESTORE 13. AUTO_AGGREGATE 14. RED_BRICK_DATA_MINE 15. RED_BRICK_VISTA 16. WEB_CONNECTIONS
Enter "q" to quit.
Enter item number and press Return. >
2-18 Installation and Configuration Guide for UNIX

Product Licenses for Web Connections
Product Licenses for Web ConnectionsIf you select item 16 from the Red Brick Products list above, the installationprogram returns the following list.
############################################################# # # # Enable Web Connection License # # # #############################################################
1. WEB_CONNECTIONS_5 2. WEB_CONNECTIONS_10 3. WEB_CONNECTIONS_20 4. WEB_CONNECTIONS_30 5. WEB_CONNECTIONS_50 6. WEB_CONNECTIONS_75 7. WEB_CONNECTIONS_100 8. WEB_CONNECTIONS_150 9. WEB_CONNECTIONS_250 10. WEB_CONNECTIONS_500 11. WEB_CONNECTIONS_UNLIMITED
Enter "q" to quit.
Enter item number and press Return. >
Installing Informix Red Brick Decision Server 2-19
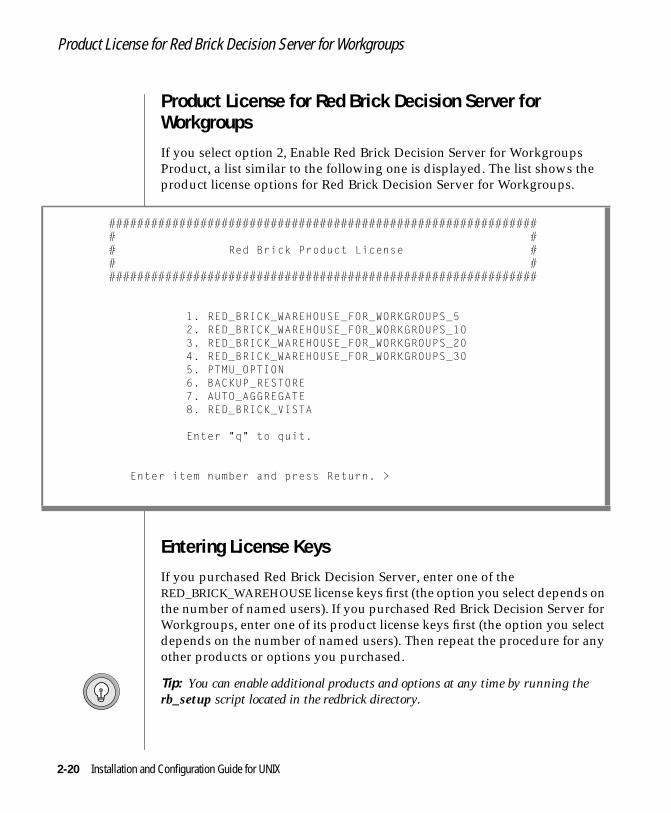
Product License for Red Brick Decision Server for Workgroups
Product License for Red Brick Decision Server forWorkgroupsIf you select option 2, Enable Red Brick Decision Server for WorkgroupsProduct, a list similar to the following one is displayed. The list shows theproduct license options for Red Brick Decision Server for Workgroups.
Entering License KeysIf you purchased Red Brick Decision Server, enter one of theRED_BRICK_WAREHOUSE license keys first (the option you select depends onthe number of named users). If you purchased Red Brick Decision Server forWorkgroups, enter one of its product license keys first (the option you selectdepends on the number of named users). Then repeat the procedure for anyother products or options you purchased.
Tip: You can enable additional products and options at any time by running therb_setup script located in the redbrick directory.
############################################################# # # # Red Brick Product License # # # #############################################################
1. RED_BRICK_WAREHOUSE_FOR_WORKGROUPS_5 2. RED_BRICK_WAREHOUSE_FOR_WORKGROUPS_10 3. RED_BRICK_WAREHOUSE_FOR_WORKGROUPS_20 4. RED_BRICK_WAREHOUSE_FOR_WORKGROUPS_30 5. PTMU_OPTION 6. BACKUP_RESTORE 7. AUTO_AGGREGATE 8. RED_BRICK_VISTA
Enter "q" to quit.
Enter item number and press Return. >
2-20 Installation and Configuration Guide for UNIX

Entering License Keys
For example, to enable Red Brick Decision Server for Workgroups for a 20-user license, type the appropriate number (3 in the example list shown) andpress RETURN.
The script prompts you for a license key.
Enter your license key (a string of characters, numbers, or both), as printedon the one-page document delivered with the software. Each product listedin the menu has a separate license key document. You must enter the keyexactly as it appears in the document.
If you enter a valid license key, the system responds.
The license key you provide is entered in the rbw.config file by the installationscript. If you enter the license key incorrectly, a message like this is displayed.
Re-enter the license key and press RETURN.
After you enter all the license keys for the products and options youpurchased, type q to exit the Red Brick Product License menu, and type qagain to exit the rb_setup script. You can now start the Red Brick DecisionServer daemon, as described in the following section.
Enter your license key for RED_BRICK_WAREHOUSE_FOR_WORKGROUPS_20and press Return. >
LICENSE_KEY RED_BRICK_WAREHOUSE_FOR_WORKGROUPS_20license_string entered in ./rbw.configPress Return to continue.
Key license_string not valid for RED_BRICK_WAREHOUSE_FOR_WORKGROUPS_20Enter your license key forRED_BRICK_WAREHOUSE_FOR_WORKGROUPS_20 and press Return. >
Installing Informix Red Brick Decision Server 2-21

Starting the Red Brick Decision Server Daemons
Starting the Red Brick Decision Server DaemonsTo run Red Brick Decision Server, you need to start the warehouse daemonprocess (rbwapid), which in turn starts the administration and log daemonprocesses (rbwadmd and rbwlogd). The warehouse, administration, and logdaemons are described in the Administrator’s Guide.
To start the daemons as a background task
1. To exit the installation menu, type q and press RETURN.
2. Log in as the redbrick user.
3. To ensure that you are in the redbrick directory, enter:# cd redbrick_dir
redbrick_dir is the full pathname of the directory containing theRed Brick Decision Server directories and files.
4. To start the daemons, type:# ./bin/rbw.start config_path RB_HOST_name
After the daemons have started successfully, a message reflectingyour specific installation parameters is returned to both the terminalwhere the rbw.start script was run and the rbwapid.log file.
config_path Full pathname (beginning with /) to thedirectory containing the rbw.config file. Theinstallation procedure installs this file in theredbrick directory.
RB_HOST_name Logical name for the warehouse daemonprocess. This value is RB_HOST by default, but itcan be any value that matches the value youspecified on page 2-14. This name correspondsto the name assigned to the IPC key (SHMEM) inthe rbw.config file.
2-22 Installation and Configuration Guide for UNIX
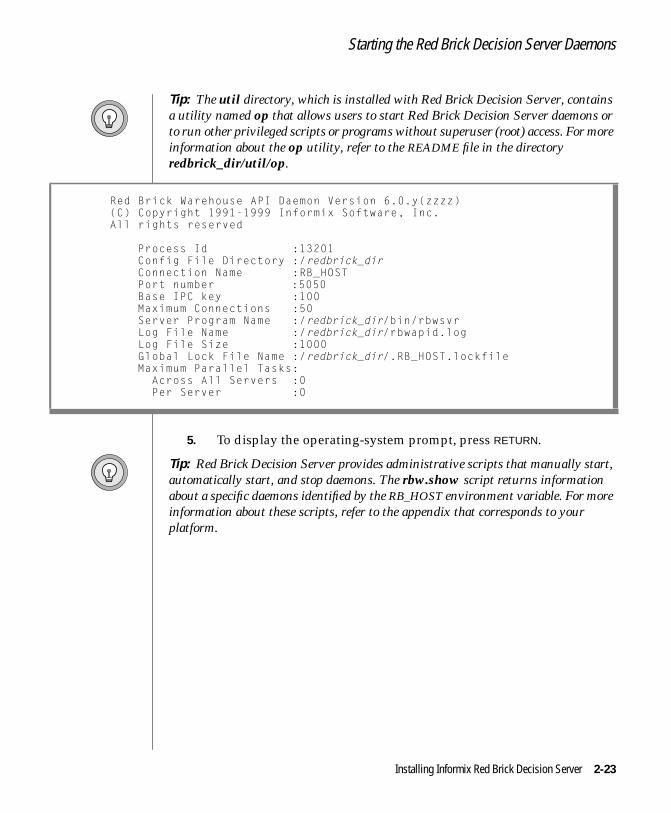
Starting the Red Brick Decision Server Daemons
Tip: The util directory, which is installed with Red Brick Decision Server, containsa utility named op that allows users to start Red Brick Decision Server daemons orto run other privileged scripts or programs without superuser (root) access. For moreinformation about the op utility, refer to the README file in the directoryredbrick_dir/util/op.
5. To display the operating-system prompt, press RETURN.
Tip: Red Brick Decision Server provides administrative scripts that manually start,automatically start, and stop daemons. The rbw.show script returns informationabout a specific daemons identified by the RB_HOST environment variable. For moreinformation about these scripts, refer to the appendix that corresponds to yourplatform.
Red Brick Warehouse API Daemon Version 6.0.y(zzzz)(C) Copyright 1991-1999 Informix Software, Inc.All rights reserved
Process Id :13201Config File Directory :/redbrick_dirConnection Name :RB_HOSTPort number :5050Base IPC key :100Maximum Connections :50Server Program Name :/redbrick_dir/bin/rbwsvrLog File Name :/redbrick_dir/rbwapid.logLog File Size :1000Global Lock File Name :/redbrick_dir/.RB_HOST.lockfileMaximum Parallel Tasks: Across All Servers :0 Per Server :0
Installing Informix Red Brick Decision Server 2-23

Verifying the Red Brick Decision Server Installation
Verifying the Red Brick Decision Server InstallationAfter the installation script runs and you have started the daemon processes,run the verification script to verify that Red Brick Decision Server wasinstalled correctly.
To verify the installation, change to the redbrick directory and enter:
$ ./bin/rbw.verify config_path RB_HOST_name
where:
config_path Full pathname (beginning with /) to the directorycontaining the rbw.config file. The installation procedureinstalls this file in the redbrick directory.
RB_HOST_name Logical name for the warehouse daemon process. Thisvalue is RB_HOST by default, but can be any value thatmatches the value you specified in “Providing IPC Keyand User Information” on page 2-14. This name corre-sponds to the name assigned to the IPC key (SHMEM) inthe rbw.config file.
2-24 Installation and Configuration Guide for UNIX
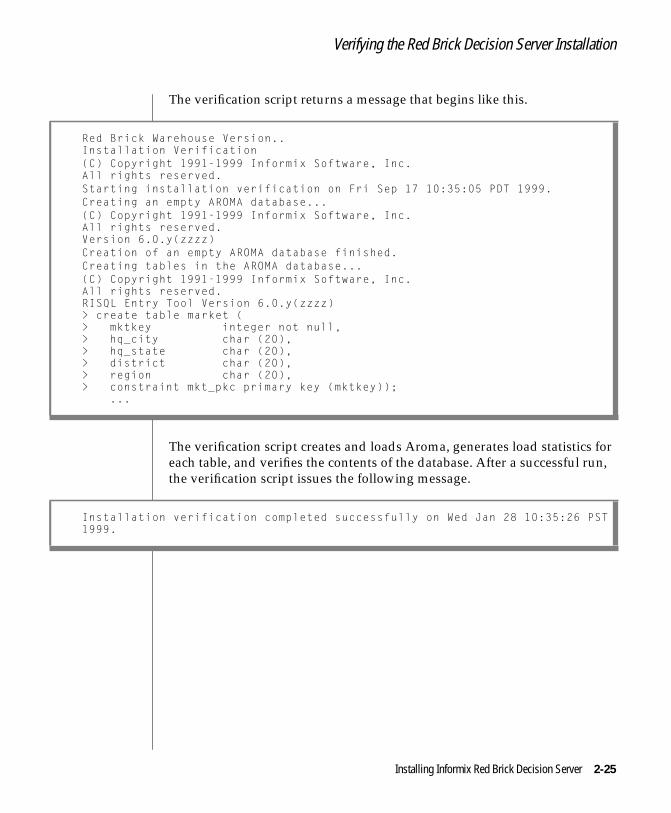
Verifying the Red Brick Decision Server Installation
The verification script returns a message that begins like this.
The verification script creates and loads Aroma, generates load statistics foreach table, and verifies the contents of the database. After a successful run,the verification script issues the following message.
Red Brick Warehouse Version..Installation Verification(C) Copyright 1991-1999 Informix Software, Inc.All rights reserved.Starting installation verification on Fri Sep 17 10:35:05 PDT 1999.Creating an empty AROMA database...(C) Copyright 1991-1999 Informix Software, Inc.All rights reserved.Version 6.0.y(zzzz)Creation of an empty AROMA database finished.Creating tables in the AROMA database...(C) Copyright 1991-1999 Informix Software, Inc.All rights reserved.RISQL Entry Tool Version 6.0.y(zzzz)> create table market (> mktkey integer not null,> hq_city char (20),> hq_state char (20),> district char (20),> region char (20),> constraint mkt_pkc primary key (mktkey));
...
Installation verification completed successfully on Wed Jan 28 10:35:26 PST1999.
Installing Informix Red Brick Decision Server 2-25
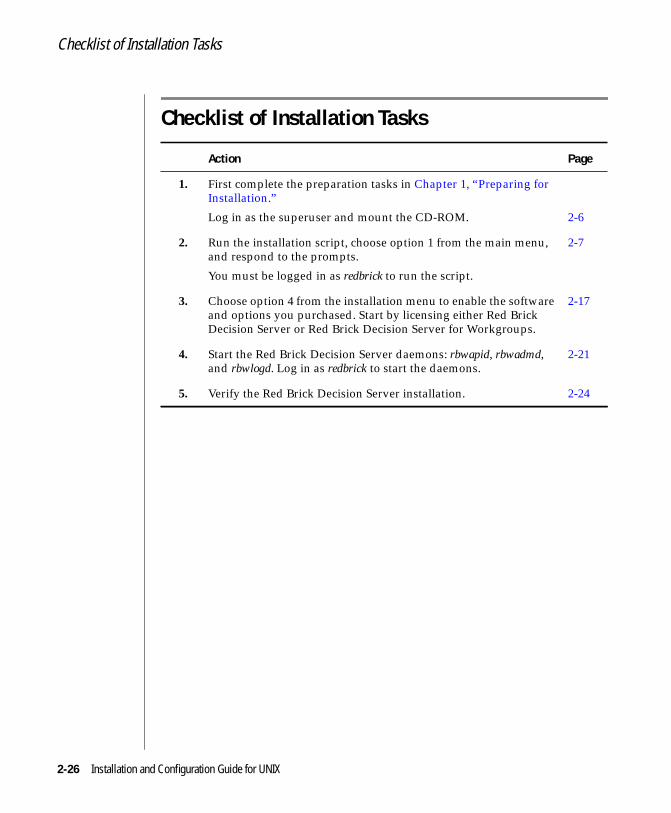
Checklist of Installation Tasks
Checklist of Installation Tasks
Action Page
1. First complete the preparation tasks in Chapter 1, “Preparing forInstallation.”
Log in as the superuser and mount the CD-ROM. 2-6
2. Run the installation script, choose option 1 from the main menu,and respond to the prompts.
You must be logged in as redbrick to run the script.
2-7
3. Choose option 4 from the installation menu to enable the softwareand options you purchased. Start by licensing either Red BrickDecision Server or Red Brick Decision Server for Workgroups.
2-17
4. Start the Red Brick Decision Server daemons: rbwapid, rbwadmd,and rbwlogd. Log in as redbrick to start the daemons.
2-21
5. Verify the Red Brick Decision Server installation. 2-24
2-26 Installation and Configuration Guide for UNIX

3Chapter
Installing a New Release
In This Chapter . . . . . . . . . . . . . . . . . . . . 3-3
Running Two Releases of Red Brick Decision Server . . . . . . . 3-4Preview of Installation Tasks . . . . . . . . . . . . . . 3-5Installing Red Brick Decision Server . . . . . . . . . . . 3-6Redirecting Client Applications for Test Purposes . . . . . . . 3-6Migrating Databases to the New Release . . . . . . . . . . 3-7Upgrading Databases . . . . . . . . . . . . . . . . 3-7
Upgrade Messages . . . . . . . . . . . . . . . . 3-8Migrating Users to the New Release . . . . . . . . . . . 3-9
Replace an Existing Warehouse with a New Release . . . . . . . 3-10Shutting Down the Daemons . . . . . . . . . . . . . . 3-10Installing the New Release . . . . . . . . . . . . . . . 3-10Starting the Daemons . . . . . . . . . . . . . . . . 3-11Upgrading Existing Databases . . . . . . . . . . . . . 3-11Announcing the New Release . . . . . . . . . . . . . . 3-11
Checklists of Installation Tasks . . . . . . . . . . . . . . . 3-12

3-2 Insta
llation and Configuration Guide for UNIX
In This ChapterThis chapter is for existing Red Brick customers who want to install a newfeature or maintenance release of Red Brick Decision Server or Red BrickDecision Server for Workgroups. The procedures in this chapter apply toboth products unless otherwise stated.
The installation script installs the warehouse software, including the sampledatabase named Aroma and the utility directory named util, as well as alloptional Informix Red Brick products. The script also includes a licensingmechanism that you use to enable the software and any optional productsyou purchase.
To install Red Brick Decision Server over an existing installation, you can useeither of the following methods:
■ You can keep the existing release of Red Brick Decision Serverrunning at your site and, for test purposes, install the new release ina separate directory with separate runtime configuration settings.For a description of this method, see “Running Two Releases of RedBrick Decision Server” on page 3-4.
■ You can replace the existing release with the new release. For adescription of this method, see “Replace an Existing Warehouse witha New Release” on page 3-9.
To decide which method to use, consider the level of change in the release,the system resources, and the production status of the implementation atyour site.
Installing a New Release 3-3
Running Two Releases of Red Brick Decision Server
For example, suppose the new release represents a major upgrade to yourexisting software, you have room on your system to run two concurrentwarehouse servers and store two databases, and your warehouse is in full-production mode. In that case, overwriting the existing system is unwise.Instead, you need to install the new release in a separate directory, test it tosee how the changes affect your implementation, and then upgrade theproduction databases later.
On the other hand, if the new release is a maintenance release that containsfew functional changes to the production environment, you might decide toskip the test step and overwrite the existing release immediately.
Depending on the level of change between your installed release and the newrelease, you might have to upgrade existing databases with the TableManagement Utility before the new server can access them. “UpgradingDatabases” on page 3-7 describes this operation in detail.
For more information about the level of change in this release and whetheryou need to upgrade your existing databases, refer to the release notesdistributed with Red Brick Decision Server.
Warning: Earlier releases of the software cannot access an upgraded database, andInformix recommends that for test purposes you use newly loaded data or copies ofyour current databases.
Running Two Releases of Red Brick Decision ServerThe procedure for installing and simultaneously running two releases of RedBrick Decision Server is similar to the first-time installation procedure exceptfor directory name and location and some configuration parameters.
You need not shut down any existing daemons to perform this installation.Full production use of the existing release can continue.
3-4 Installation and Configuration Guide for UNIX

Preview of Installation Tasks
The installation procedure for Red Brick Decision Server uses a script namedINSTALL.ISO, which displays a menu of installation options. These options letyou do any of the following tasks:
■ Install a full-feature or maintenance release of Red Brick DecisionServer.
■ Install a partial update, or patch, release.
■ Enable an additional Informix Red Brick product with a license key.
For more information about installing an update release, refer to the releasenotes that are distributed with that release.
Red Brick Decision Server installation is typically done by the system ordatabase administrator as the redbrick user.
As long as you do not overwrite the current installation with a new release,you can install a new release of Red Brick Decision Server while users areaccessing the currently installed release.
Preview of Installation TasksTo install a new release of Red Brick Decision Server, you perform thefollowing tasks:
■ Select an installation directory to hold the new release of Red BrickDecision Server (new_redbrick_dir). This directory must be differentfrom the existing redbrick directory.
■ Follow the installation instructions in Chapter 2 to install Red BrickDecision Server and verify your installation.
■ Upgrade your test databases.
■ Test the new features of Red Brick Decision Server, and then migrateproduction databases to the new release.
■ Upgrade production databases to the new release.
■ Migrate users to the new release.
■ Optionally, replace the existing release of Red Brick Decision Serverwith the new release.
Installing a New Release 3-5
Installing Red Brick Decision Server
Warning: Database backups created with Red Brick Decision Server for the existingrelease might not be compatible with the new release you are installing. (For details,refer to the release notes.) If you might need access to backups, do not remove yourexisting warehouse software from your system.
Installing Red Brick Decision ServerThe procedure for installing Red Brick Decision Server is described inChapter 2, “Installing Informix Red Brick Decision Server.” When installinga new version of Red Brick Decision Server in addition to your existing instal-lation, you must select an installation directory that is different from yourexisting installation directory. For example, if your current installation is inredbrick_dir, then you might install your new installation in a directory namednew_redbrick_dir.
You must also select a warehouse logical name that is different from thelogical name you used for your existing installation. For example, if yourexisting warehouse logical name is RB_HOST, you might chooseRB_HOST_TEST as the logical name for your new installation.
Follow the instructions in “Running the Installation Script” on page 2-7, andthen continue with the instructions in the remainder of this chapter.
Redirecting Client Applications for Test PurposesRedirect the client-application systems that you want to use for testing thenew release by specifying the TCP/IP ports you chose during the installation(for example, 5052 and 5053). You can do this by adding a new Data SourceName (DSN) that points to the new port or by modifying an existing DSN topoint to the new port.
At this point, you now have two independent warehouses running.
If you are going to use existing databases to test the new release, you mustupgrade them to the new release as described in the following sections.
3-6 Installation and Configuration Guide for UNIX
Migrating Databases to the New Release
Migrating Databases to the New ReleaseAfter you test the new release of Red Brick Decision Server and becomefamiliar with the new features and changes from previous releases, migrateyour production databases to the new release. There are three ways to do this:
■ Use the UPGRADE command provided with the new release toupgrade existing databases if necessary.
■ Run an UNLOAD operation with the existing release of the TMU, re-create all tables and other database objects in the new server, andreload (LOAD) with the new TMU.
■ Run a LOAD DATA operation with the data input files for the existingdatabase using the new server release.
Only the UPGRADE procedure is described in this guide, in “UpgradingDatabases” on page 3-7. For information about unloading and reloading dataor loading from original data input files, refer to the Table Management UtilityReference Guide.
Important: Databases created under previous releases are not always compatiblewith new server releases. For example, if you need to access a database backup thatwas created with a previous release of Red Brick Decision Server, you might needaccess to a compatible server release. To check compatibility, refer to the release notesfor the new release.
Upgrading DatabasesTo upgrade an individual database, use the TMU and specify a control filecontaining the UPGRADE statement.
Important: Upgrades are not required for all new releases; check the current releasenotes for compatibility issues.
The upgrade operation creates backup copies of certain files for yourdatabase (such as the RB_DEFAULT_IDX file), which you can delete when youare satisfied that the upgrade process was successful. Which files are backedup varies from upgrade to upgrade.
Important: Make sure all database files (for example, system table files or PSUs onNFS file systems) are online before upgrading.
Installing a New Release 3-7

Upgrading Databases
To upgrade each database
1. Create a TMU control file that contains an UPGRADE statement asspecified in the Table Management Utility Reference Guide or the releasenotes for the version you are installing.
2. Start the TMU, using a command of the form:$ rb_tmu -d db_name control_file dba_username dba_password
Depending on the releases involved in a given upgrade, you might have toperform a REORG operation on your databases after the upgrade. To find outwhether this operation is necessary, refer to the current release notes.
For more information about TMU syntax, refer to the Table Management UtilityReference Guide.
Upgrade Messages
If a database referenced by a logical database name in the rbw.config file or adatabase named with the RISQL Entry Tool or RISQL Reporter -d startupoption does not point to a valid database, the TMU issues a message such asthe following.
db_name Database to upgrade. This is the logical databasename, as defined in the new_redbrick_dir/rbw.configfile. If you do not use the -d option, the TMU uses thelogical database name specified by the RB_PATHenvironment variable.
control_file Name of file that contains the UPGRADE statement.
dba_username,dba_password
Username and password for the user with DBAauthorization for the database to be upgraded.
** FATAL ** (519) Directory '/db/sample_db/aroma' does not contain a valid RedBrick Warehouse database. Missing'/db/sample_db/aroma/RB_DEFAULT_LOCKS'.
3-8 Installation and Configuration Guide for UNIX
Migrating Users to the New Release
If the database is already a valid Version 6.0 database, the TMU issues amessage such as the following message.
After the database has been successfully upgraded, the TMU issues a messagesuch as the following message.
Migrating Users to the New ReleaseYou are now ready to migrate users to the new release. This takes only a fewsteps.
To migrate users to the new release
1. Back up your existing production databases.
2. Run the UPGRADE script, as described in previous sections, to makedatabases compatible with the new release.
3. If necessary, perform a REORG operation to ensure referentialintegrity and optimal performance. To find out whether you need toperform a REORG operation, refer to the release notes for the currentrelease.
4. Redefine users’ existing environment variables to point to thedirectory containing the new release software(new_redbrick_dir/bin).
The production version of the new Red Brick Decision Server release is nowready for use.
** ERROR ** (558) UPGRADE command does not need to be run ondatabase /db/sample_db/aroma.
** INFORMATION ** (559) UPGRADE of Red Brick Warehousedatabase /db/sample_db/aroma successful.
Installing a New Release 3-9
Replace an Existing Warehouse with a New Release
Replace an Existing Warehouse with a New ReleaseIf the new release you are installing is a maintenance release that contains fewsubstantial changes from the release running in your productionenvironment, you can install the new release directly in the redbrick directoryrather than set up a test directory. To install the new release in a directory thatcontains a previous release, you need to perform the following tasks:
■ Shut down the Red Brick Decision Server daemons.
■ Install the new software.
■ Start the new Red Brick Decision Server daemons.
■ Upgrade the existing databases, if necessary.
■ Announce that the new release is available to the users.
These tasks are described in the following sections.
Shutting Down the DaemonsYou can shut down the daemons in three steps.
To shut down the daemons
1. Log in as the redbrick user.
2. Change to the directory that contains the Red Brick Decision Serverbinary files and stop the daemons (rbwapid, rbwadmd, and rbwlogd):
# cd redbrick_dir/bin# ./rbw.stop RB_HOST
3. Continue as the redbrick user.
Installing the New ReleaseFollow the instructions in Chapter 2, “Installing Informix Red Brick DecisionServer,” to install the new release in your redbrick directory. When you installa new release in the existing redbrick directory, use the same logical name andIPC key that you used for the existing installation.
3-10 Installation and Configuration Guide for UNIX

Starting the Daemons
As each program file is created during the installation process, you will beprompted to specify the location where you want the existing release backedup.
Tip: You might want to back up the existing release at this time in case you needaccess to backup copies of databases that were created with the earlier release. Thesefiles can eventually be removed from your system.
During installation, you are asked if you want to install a new rbw.config fileor retain the existing one. If you choose to retain the existing file, it will besaved as rbw.config.TIME. To use a parameter value from the existingrbw.config file, copy the parameter from the old file and put it into the newone.
Enable each optional Informix Red Brick product you purchased with a validlicense key at this time.
Starting the DaemonsAfter installing the software and entering license keys, start the daemonprocesses, as described under “Starting the Red Brick Decision ServerDaemons” on page 2-22.
Upgrading Existing DatabasesUpgrade existing databases, as described under “Migrating Databases to theNew Release” on page 3-6.
Announcing the New ReleaseFinally, describe the changes and improvements this release offers the usersat your site.
Installing a New Release 3-11
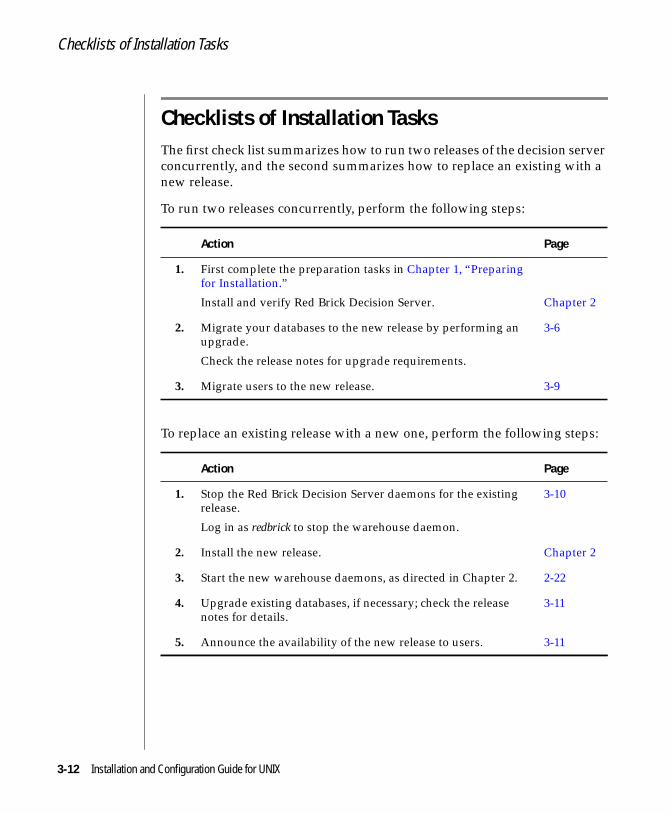
Checklists of Installation Tasks
Checklists of Installation TasksThe first check list summarizes how to run two releases of the decision serverconcurrently, and the second summarizes how to replace an existing with anew release.
To run two releases concurrently, perform the following steps:
To replace an existing release with a new one, perform the following steps:
Action Page
1. First complete the preparation tasks in Chapter 1, “Preparingfor Installation.”
Install and verify Red Brick Decision Server. Chapter 2
2. Migrate your databases to the new release by performing anupgrade.
Check the release notes for upgrade requirements.
3-6
3. Migrate users to the new release. 3-9
Action Page
1. Stop the Red Brick Decision Server daemons for the existingrelease.
Log in as redbrick to stop the warehouse daemon.
3-10
2. Install the new release. Chapter 2
3. Start the new warehouse daemons, as directed in Chapter 2. 2-22
4. Upgrade existing databases, if necessary; check the releasenotes for details.
3-11
5. Announce the availability of the new release to users. 3-11
3-12 Installation and Configuration Guide for UNIX
4Chapter
Installing Red Brick ClientProducts
In This Chapter . . . . . . . . . . . . . . . . . . . . 4-3
Before You Begin . . . . . . . . . . . . . . . . . . . 4-4
Mounting and Unmounting the CD-ROM Device . . . . . . . . 4-4
Running the Installation Script . . . . . . . . . . . . . . . 4-5
Installing Client Products . . . . . . . . . . . . . . . . 4-7Specifying the Installation Directory . . . . . . . . . . . 4-7Specifying the Host Name . . . . . . . . . . . . . . . 4-8Specifying the Base TCP/IP Port for the Daemon . . . . . . . 4-8
Installing Additional Red Brick Client Products . . . . . . . . . 4-9
Checklist of Installation Tasks . . . . . . . . . . . . . . . 4-9

4-2 Insta
llation and Configuration Guide for UNIX
In This ChapterThe client installation process allows you to install client products separatelyfrom the Red Brick Decision Server installation procedure. When Red BrickDecision Server is installed, the client products are automatically installed onthe same computer; however, the client installation procedure described inthis chapter lets you install Informix Red Brick client products on computersother than the computer where the Red Brick Decision Server is installed.This gives client users access to Red Brick Decision Server databases whileeliminating the need for them to have accounts on the server computer.
This chapter explains how to install the following Red Brick Decision Serverclient products on UNIX platforms:
■ RISQL Entry Tool, which lets you access Red Brick Decision Serverdatabases on computers that run UNIX or Windows NT
■ RISQL Reporter, which provides all the features of the RISQL EntryTool and lets you format reports with data retrieved from databases
■ Red Brick ODBCLib Software Developer’s Kit (SDK), which providesthe static libraries you need to build custom UNIX client applications
The client installation procedure installs the client software in a directory youdefine.
The client installation procedure uses the INSTALL.ISO script, which displaysa menu of installation options. You can install one or more client products.
Installing Red Brick Client Products 4-3

Before You Begin
Before You BeginRead the release notes delivered with the software. The release notes discussimportant information that was unavailable when this document wasprinted.
The procedures described in the following sections describe the basic instal-lation process for Red Brick Decision Server client products.
These conditions can block an installation of the software:
■ Incorrect user privileges
■ Insufficient disk space
■ Media failure (damaged CD-ROM)
If you see an error message during the installation, make sure you have readand write privileges on the directory into which you are installing the clientproducts and that you have sufficient disk space for the software. For moreinformation about system requirements, refer to “Verifying Operating-System Version and Disk Space” on page 1-6.
If you are still unable to install the client products or if the CD-ROM isdamaged, follow directions in “Customer Support” on page 10.
Mounting and Unmounting the CD-ROM DeviceTo install Red Brick Decision Server client products, you must first mount theCD-ROM for your platform. After you complete the installation, you canunmount the CD-ROM for other uses.
For information, refer to “Mounting and Unmounting the CD-ROM Device”on page 2-6.
4-4 Installation and Configuration Guide for UNIX

Running the Installation Script
Running the Installation ScriptUse the INSTALL.ISO script to install Red Brick Decision Server clientproducts. This script contains a menu interface that calls the supportinginstallation files during the installation. You can run this script as any user(that is, you do not need to be the redbrick user).
To start the installation process, enter the following command:
$ cd client_dir$ /cdrom/platform_name/INSTALL.ISO
Always include the full pathname for the INSTALL.ISO script. In thiscommand, client_dir is the directory in which you want to install clientproducts, /cdrom is the directory where your CD-ROM device is mounted, andplatform_name is the appropriate value as shown in the following table.
The aix64, hpx64, and sol64 names specify the 64-bit version of Red BrickDecision Server. If you are using a 64-bit machine and are running a 64-bitversion of the operating system, you can choose either version of Red BrickDecision Server; otherwise, you must use a 32-bit version.
For example, if your platform is HP-UX, type:
$ /cdrom/hpx/INSTALL.ISO
Platform platform_name
AIX aix, aix64
Digital UNIX dec
HP-UX hpx, hpx64
NCR UNIX SVR MP-RAS NCR
DYNIX/ptx PTX
Solaris sol, sol64
Silicon Graphics IRIX SGI
Installing Red Brick Client Products 4-5
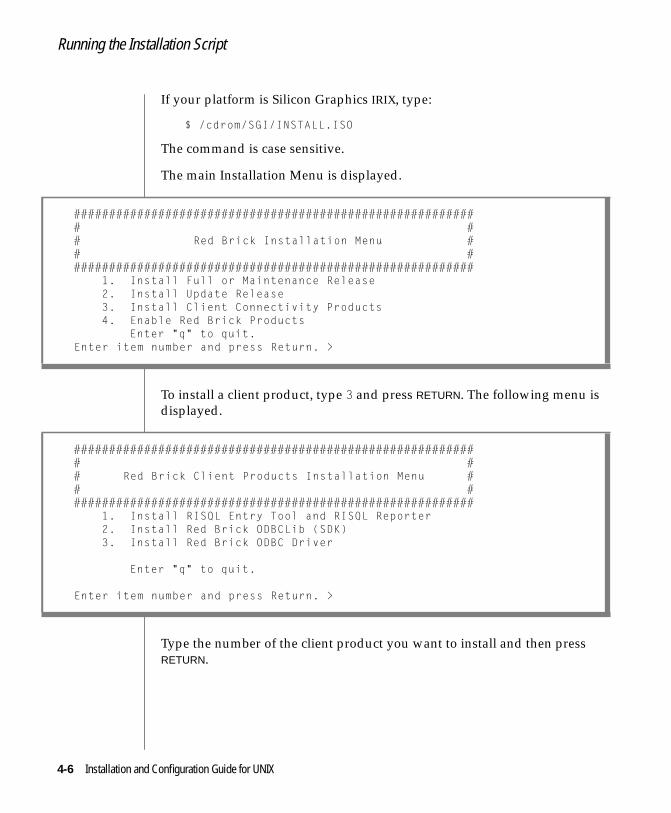
Running the Installation Script
If your platform is Silicon Graphics IRIX, type:
$ /cdrom/SGI/INSTALL.ISO
The command is case sensitive.
The main Installation Menu is displayed.
To install a client product, type 3 and press RETURN. The following menu isdisplayed.
Type the number of the client product you want to install and then pressRETURN.
########################################################## ## Red Brick Installation Menu ## ##########################################################
1. Install Full or Maintenance Release2. Install Update Release3. Install Client Connectivity Products4. Enable Red Brick Products
Enter "q" to quit.Enter item number and press Return. >
########################################################## ## Red Brick Client Products Installation Menu ## ##########################################################
1. Install RISQL Entry Tool and RISQL Reporter2. Install Red Brick ODBCLib (SDK)3. Install Red Brick ODBC Driver
Enter "q" to quit.
Enter item number and press Return. >
4-6 Installation and Configuration Guide for UNIX
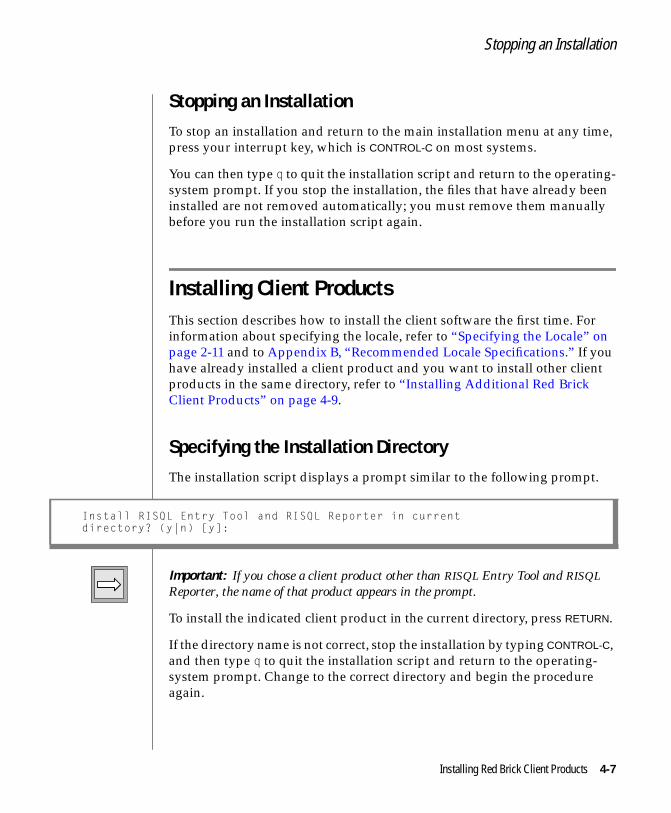
Stopping an Installation
Stopping an InstallationTo stop an installation and return to the main installation menu at any time,press your interrupt key, which is CONTROL-C on most systems.
You can then type q to quit the installation script and return to the operating-system prompt. If you stop the installation, the files that have already beeninstalled are not removed automatically; you must remove them manuallybefore you run the installation script again.
Installing Client ProductsThis section describes how to install the client software the first time. Forinformation about specifying the locale, refer to “Specifying the Locale” onpage 2-11 and to Appendix B, “Recommended Locale Specifications.” If youhave already installed a client product and you want to install other clientproducts in the same directory, refer to “Installing Additional Red BrickClient Products” on page 4-9.
Specifying the Installation DirectoryThe installation script displays a prompt similar to the following prompt.
Important: If you chose a client product other than RISQL Entry Tool and RISQLReporter, the name of that product appears in the prompt.
To install the indicated client product in the current directory, press RETURN.
If the directory name is not correct, stop the installation by typing CONTROL-C,and then type q to quit the installation script and return to the operating-system prompt. Change to the correct directory and begin the procedureagain.
Install RISQL Entry Tool and RISQL Reporter in currentdirectory? (y|n) [y]:
Installing Red Brick Client Products 4-7
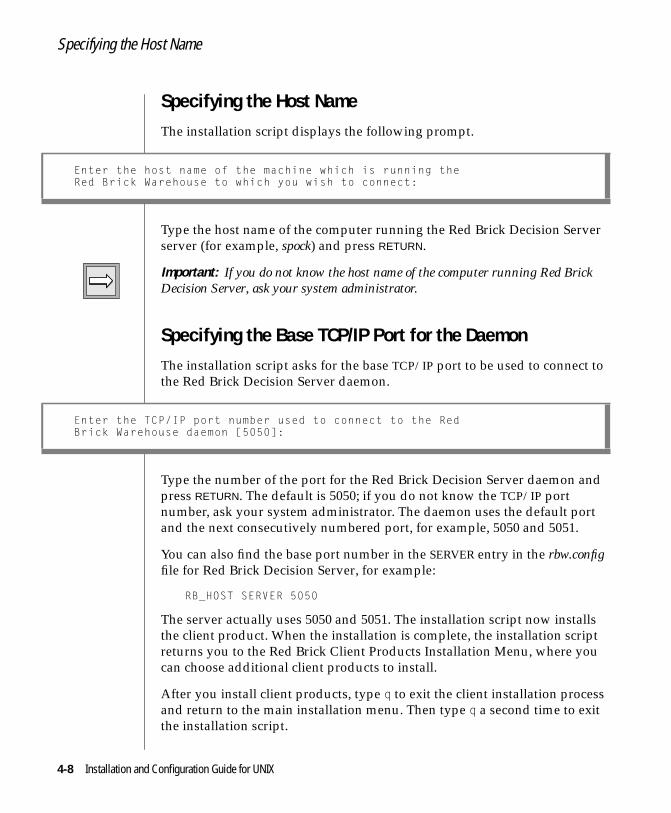
Specifying the Host Name
Specifying the Host NameThe installation script displays the following prompt.
Type the host name of the computer running the Red Brick Decision Serverserver (for example, spock) and press RETURN.
Important: If you do not know the host name of the computer running Red BrickDecision Server, ask your system administrator.
Specifying the Base TCP/IP Port for the DaemonThe installation script asks for the base TCP/IP port to be used to connect tothe Red Brick Decision Server daemon.
Type the number of the port for the Red Brick Decision Server daemon andpress RETURN. The default is 5050; if you do not know the TCP/IP portnumber, ask your system administrator. The daemon uses the default portand the next consecutively numbered port, for example, 5050 and 5051.
You can also find the base port number in the SERVER entry in the rbw.configfile for Red Brick Decision Server, for example:
RB_HOST SERVER 5050
The server actually uses 5050 and 5051. The installation script now installsthe client product. When the installation is complete, the installation scriptreturns you to the Red Brick Client Products Installation Menu, where youcan choose additional client products to install.
After you install client products, type q to exit the client installation processand return to the main installation menu. Then type q a second time to exitthe installation script.
Enter the host name of the machine which is running theRed Brick Warehouse to which you wish to connect:
Enter the TCP/IP port number used to connect to the RedBrick Warehouse daemon [5050]:
4-8 Installation and Configuration Guide for UNIX
Installing Additional Red Brick Client Products
Installing Additional Red Brick Client ProductsAfter you install one Red Brick client product, you can install subsequentclient products in the same directory without having to specify the locale,host, and TCP/IP port information each time.
After you install one client product, the installation script returns you to theRed Brick Client Products Installation Menu. Type the number of the nextproduct you want to install and press RETURN.
The script asks if you want to install the client product in the currentdirectory. If you type y, the installation proceeds without asking you furtherquestions. If you type n, you are prompted for the directory in which youwant to install the software, and you must enter the locale, port, and hostinformation in response to prompts from the installation script.
After you install client products, type q to exit the client installation processand return to the main installation menu. Then type q a second time to exitthe installation script.
To run any UNIX ODBC applications that use DSNs (data source names), a filenamed .odbc.ini must exist in the home directories of each user of these appli-cations. For more information about the .odbc.ini file, refer to the ODBCConnectivity Guide.
Checklist of Installation TasksTo install Red Brick Client products, perform the following steps:
Action Pages
1. Mount the CD-ROM device.
For more information about mounting the CD-ROM device, referto Chapter 2, “Installing Informix Red Brick Decision Server.”
4-4
2. Run the installation script, choose option 3 from the main menu,and respond to the prompts.
4-5
Installing Red Brick Client Products 4-9


5Chapter
Miscellaneous AdministrativeTasks
In This Chapter . . . . . . . . . . . . . . . . . . . . 5-3
Administering Warehouse Daemons . . . . . . . . . . . . . 5-3Checking the Status of an Active Daemon . . . . . . . . . 5-3Stopping an Active Daemon . . . . . . . . . . . . . . 5-4Configuring Daemons for Automatic Startup . . . . . . . . 5-4
Changing the Simultaneous Connections Limit . . . . . . . . . 5-4
Changing the redbrick User ID. . . . . . . . . . . . . . . 5-5Adding a New User ID . . . . . . . . . . . . . . . . 5-5Changing the Name of the User ID . . . . . . . . . . . . 5-7

5-2 Insta
llation and Configuration Guide for UNIX
In This ChapterThis chapter contains some information that you might need during instal-lation or configuration of Red Brick Decision Server. This information iscommon to all supported UNIX platforms. For platform-specific systemadministration information, refer to the appropriate appendix.
This chapter explains the following administrative tasks:
■ Administering warehouse daemons
■ Changing the simultaneous connections limit
■ Changing the redbrick user ID
Administering Warehouse DaemonsRed Brick Decision Server provides commands and configuration settings forchecking the status of specific rbwapid, rbwadmd, and rbwlogd daemons;stopping a specific daemon; and configuring a daemon to start automaticallywhenever the operating system starts.
Checking the Status of an Active DaemonTo obtain information about an active daemon and its associated processes,set the environment variables RB_CONFIG and RB_HOST for that daemon andthen run the script rbw.show.
$ cd redbrick_dir$ ./bin/rbw.show
Miscellaneous Administrative Tasks 5-3

Stopping an Active Daemon
Stopping an Active DaemonTo stop an active daemon, run the script rbw.stop as the redbrick user.
# cd redbrick_dir# ./bin/rbw.stop RB_HOST
RB_HOST is the logical name of the specific daemon to be stopped.
Important: The util directory, which can be installed with Red Brick DecisionServer, contains a utility named op that allows users to start Red Brick DecisionServer daemons or to run other privileged scripts or programs without superuser(root) access. For more information about the op utility, refer to the README file inthe redbrick_dir/util/op directory.
Configuring Daemons for Automatic StartupFor information about how to configure the Red Brick Decision Serverdaemon for automatic startup, refer to the appendix appropriate to yourplatform.
Changing the Simultaneous Connections LimitRed Brick Decision Server limits the number of connections it accepts to thevalue specified in the warehouse configuration file, rbw.config. This valueincludes Web users and is specified as:
RBWAPI MAX_SERVERS
The default value is 50.
For more information about the connections limit and how to change it, referto the Administrator’s Guide.
5-4 Installation and Configuration Guide for UNIX
Changing the redbrick User ID
Changing the redbrick User IDYou can designate any user to install the Red Brick Decision Server softwareand be the owner of the database files. By default, this user is named redbrick,but you can change the user ID that owns the software and database files atany time.
You can change the user ID that owns the software and database files in eitherof the two following ways:
■ Add a new user ID and change the ownership of files.
■ Change the name of the user ID.
These two methods are described in the following sections.
Adding a New User IDPerform the following procedure to add a new UNIX user ID that owns thesoftware and database files. It is easier to add this user ID before you installRed Brick Decision Server, but you can add a new user ID and change theownership of the software and database files at any time.
1. Locate the directories of all the files that the database uses and recordtheir names and locations. The following are locations where files areused by Red Brick Decision Server:
■ All files specified when you perform the query:select location from rbw_storage;
■ The database directories
■ The redbrick_dir/bin directory
■ The $RB_CONFIG directory
■ Any other directories owned by the user ID that owns thedatabase files
■ Any other directories that contain files owned by the user ID thatowns the database files
Miscellaneous Administrative Tasks 5-5

Adding a New User ID
2. Create a new UNIX user ID (named redbrick, for example). The newuser ID must belong to the same group as the previous user ID thatowned the database files (goldmine, for example). For informationabout creating a new UNIX user ID, refer to your operating-systemdocumentation.
3. Shut down all Red Brick Decision Server processes and daemons.These all run as the user ID that owns the database files.
4. As the root user, issue the following command:% find <directory_list> -user goldmine -print
directory_list is the list of directories from step 1, and goldmine is theuser ID that owns the database files. This command lists the files anddirectories for which ownership will be changed.
Important: Save the output from this command to a file and then verify that you havenot inadvertently changed the ownership of any file.
5. Enter one of the following commands to change the owner of the fileslisted in step 4.
% find <directory_list> -user goldmine -ok chownredbrick {} \;
or% find <directory_list> -user goldmine -exec chownredbrick {} \;
The only difference between these two commands is that thecommand with the -ok flag prompts you before each operation andthe command with the -exec flag changes the owner withoutprompting you for approval.
6. Add a line to your rbw.config file similar to the following:# Changed <goldmine> to <redbrick> by <name> on <date>.
7. If you have not already installed the current version, do so now asthe user you just created (for example, redbrick).
When you finish this procedure, run the rbw.start script to start the daemonprocesses.
5-6 Installation and Configuration Guide for UNIX
Changing the Name of the User ID
Changing the Name of the User IDTo change the owner of the Red Brick Decision Server software and databasefiles, edit the name field in your UNIX user database. To do this, either editthe password file (and shadow file on some systems) directly or use anadministrative tool supplied with your UNIX operating system. For moreinformation about the UNIX user database, refer to your operating-systemdocumentation.
Important: You must have superuser (root) privileges to perform these operations.
Although this method is quick and easy, the drawback is that it changes theoriginal user ID definition. To run previous versions of the server, you mustuse the goldmine user ID. If you changed the name of goldmine to redbrick, forexample, you could no longer run Version 5.1 or earlier versions of the server.
Miscellaneous Administrative Tasks 5-7

AAppendix
Warehouse Directoriesand Files
This appendix describes a typical warehouse directory structure,built using the standard configuration provided by the InformixRed Brick Decision Server installation procedure. Throughoutthe Red Brick Systems documentation, the warehouse directoryis referred to as the redbrick directory or redbrick_dir.
Directories and FilesThe following illustration is a graphical representation of thedirectory hierarchy. A brief description of each significant filefollows the illustration.

Directories and Files
.rbretrc
.rbwrcbin/.connection_name.lockfile.connection_name.mapfileinstall.loglocale/messages/
RBENUSA.MBRBJAJPN.MBRCENUSA.MBRCJAJPN.MBRLENUSA.MB
rb_setuprbwcli.installrbmtrbw.bootrbw.configrbw.installrbw.updaterbwapid.logrbwapid.pidsample_input/aroma_db/admin_db/logs/util/
READMEdba_scripts/op/service/readacct/
aroma.rbwrcaroma.tmuaroma_create.risqlaroma_class.txtaroma_deal.txtaroma_line_items.txtaroma_market.txtaroma_orders.txt
rb_cmrb_creatorrb_deleterrb_ptmurb_sample.cleanuprb_tmurb_translaterb_upgrade.allrbw.findserverrbw.servermonrbw.showrbw.startrbw.stoprbw.verifybwadmdrbwapidrbwcrtrrisqlrpt
WarehouseProgramDirectory
Aroma
Typical User Account Directory
redbrick
user_account_name.rbretrc.rbwrc
SampleDataDirectory
Directory
aroma_period.txtaroma_product.txtaroma_promo.txtaroma_sales.txtaroma_store.txtaroma_supplier.txt
rbwdbsbdrbwdeltrrbwlogdrbwlogmsgrbwlogviewrbwpchkrbwsvrrbwvcdrisqlsqlrpt
A-2 Installation and Configuration Guide for UNIX

Directories and Files
Figure A-1 describes the directories and files in the redbrick directory. In theName column, directories are marked with a slash (/) character, and theircontents are indented.
Figure A-1Directories and Files Under redbrick Directory
Name Description
.rbretrc Initialization files for the RISQL Entry Tool or the RISQLReporter at warehouse and user levels.
.rbwrc Initialization files for the server at the warehouse,database, and user levels.
bin/ Directory for warehouse server binary files and scripts.
rb_cm Utility used to move data between warehouse databasesacross networks.
rb_creator Script that creates the data dictionary and control tables fora warehouse by executing rbwcrtr.
rb_deleter Script that deletes the default-named files for a warehousedatabase.
.RB_HOST.semaphores Contains a list of semaphores used by a warehouse instal-lation, where RB_HOST is the value of your RB_HOSTenvironment variable.
.RB_HOST.shared-memory
Contains a list of shared memory keys used by awarehouse installation, where RB_HOST is the value ofyour RB_HOST environment variable.
rb_ptmu Optional binary file for the Parallel Table ManagementUtility (Parallel TMU).
rb_sample.cleanup Sample script to include in the startup file for automaticcleanup of temporary files.
rb_tmu Binary file for the Table Management Utility (TMU).
rb_translate Translation-support file.
rb_upgrade.all Script that upgrades all databases built with previousreleases to the current release.
(1 of 4)
Warehouse Directories and Files A-3
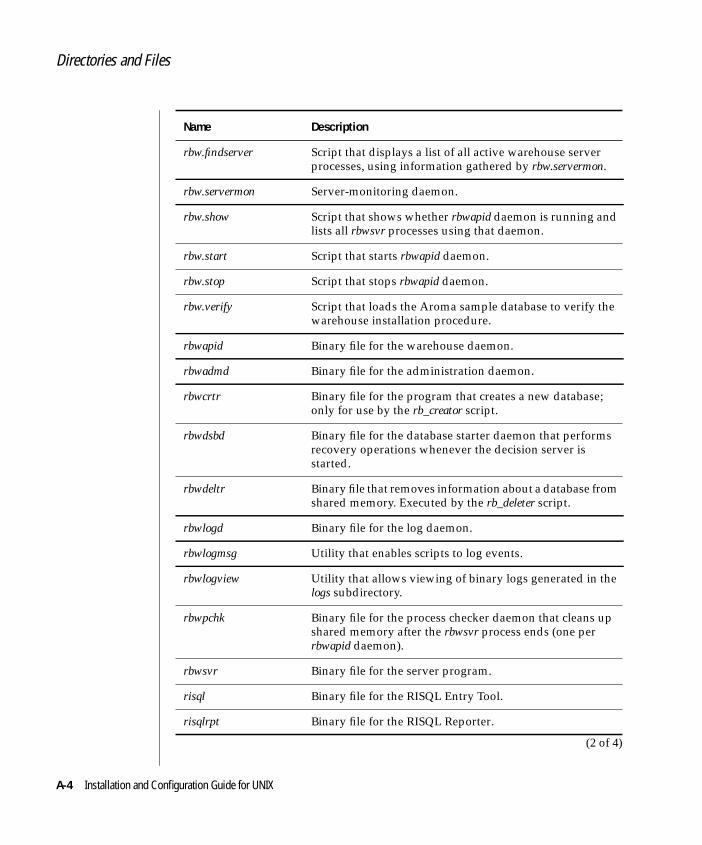
Directories and Files
rbw.findserver Script that displays a list of all active warehouse serverprocesses, using information gathered by rbw.servermon.
rbw.servermon Server-monitoring daemon.
rbw.show Script that shows whether rbwapid daemon is running andlists all rbwsvr processes using that daemon.
rbw.start Script that starts rbwapid daemon.
rbw.stop Script that stops rbwapid daemon.
rbw.verify Script that loads the Aroma sample database to verify thewarehouse installation procedure.
rbwapid Binary file for the warehouse daemon.
rbwadmd Binary file for the administration daemon.
rbwcrtr Binary file for the program that creates a new database;only for use by the rb_creator script.
rbwdsbd Binary file for the database starter daemon that performsrecovery operations whenever the decision server isstarted.
rbwdeltr Binary file that removes information about a database fromshared memory. Executed by the rb_deleter script.
rbwlogd Binary file for the log daemon.
rbwlogmsg Utility that enables scripts to log events.
rbwlogview Utility that allows viewing of binary logs generated in thelogs subdirectory.
rbwpchk Binary file for the process checker daemon that cleans upshared memory after the rbwsvr process ends (one perrbwapid daemon).
rbwsvr Binary file for the server program.
risql Binary file for the RISQL Entry Tool.
risqlrpt Binary file for the RISQL Reporter.
Name Description
(2 of 4)
A-4 Installation and Configuration Guide for UNIX

Directories and Files
rbwvcd Binary file for the vacuum cleaner daemon.
.connection_name.lockfile
Temporary file created for warehouse use as the target ofPOSIX locks.
install.log File containing identification number and date when thewarehouse software was installed.
locale/ Directory containing the locale description.
messages/ Directory containing the messages file for the language ofchoice (for example, English) and a corresponding log file.
rb_setup Program used to install Informix Red Brick Decision Serverand to activate Red Brick products with license keys.
rbwcli.install Script used for installation of Red Brick client products.
rbmt Script used for tape control.
rbw.boot Script for automatic startup of rbwapid during systembootup.
rbw.config Text file containing configuration parameters.
rbw.install Script used by rb_setup that controls the installationprocedure.
rbw.update Script used by rb_setup that runs the installation procedurefor update releases.
rbwapid.log File where log entries are written; an _old extensionindicates the previous log file.
rbwapid.pid File containing process ID (PID), product version, andrbwapid.log header information.
Name Description
(3 of 4)
Warehouse Directories and Files A-5

Directories and Files
sample_input/ Directory containing files used to create Aroma, the sampledatabase. File contents are indicated by their extensions asfollows:
■ .tmu—Control statements for the Table ManagementUtility; for example, LOAD DATA
■ .risql—SQL and RISQL commands; for example,CREATE TABLE
■ .txt—Data input for the tables
aroma_db/ Sample database built by the rbw.verify program thatresults from the sample_input files.
admin_db/ Administration database built for the installation.
logs/ Default directory that contains log files created by the logdaemon (rbwlogd).
util/ Directory containing collection of miscellaneous tools andutilities for use with Red Brick Decision Server. For infor-mation on contents and use, refer to the README file inthis directory.
Name Description
(4 of 4)
A-6 Installation and Configuration Guide for UNIX

BAppendix
Recommended LocaleSpecifications
This appendix identifies the languages, territories, code pages,and collation sequences supported by the Informix Red Brickproducts. The following table lists the logical combinations ofthese locale components; however, you can use any combinationin a locale specification.
LocalesThe values shown in boldface in the following table are thedefault values for the corresponding language when you specifyan incomplete locale. For example, the default code page forGerman is Latin1.
For more information on locales, see the Administrator’s Guide.

Locales
Language TerritoryCode Page(Character Set) Sort
English UnitedStatesAustraliaCanadaSouth AfricaUnitedKingdom
US-ASCIILatin1MS1252UTF-8IBM037IBM285
BinaryDefault
German GermanyAustriaGerman-Switzerland
Latin1MS1252ISO-8859-9UTF-8IBM273
DefaultBinary
French FranceFrench-BelgiumFrench-CanadaFrench-Switzerland
Latin1MS1252ISO-8859-9UTF-8IBM297
DefaultBinary
Spanish SpainArgentinaChileMexico
Latin1MS1252ISO-8859-9UTF-8
SpanishTraditionalSpanishBinary
Italian ItalyItalian-Switzerland
Latin1MS1252ISO-8859-9UTF-8IBM280
DefaultBinary
Portuguese PortugalBrazil
Latin1MS1252ISO-8859-9UTF-8IBM037
DefaultBinary
Norwegian Norway Latin1MS1252ISO-8859-9UTF-8
DanishBinary
(1 of 5)
B-2 Installation and Configuration Guide for UNIX

Locales
Swedish Sweden Latin1MS1252ISO-8859-9UTF-8
SwedishBinary
Danish Denmark Latin1MS1252ISO-8859-9UTF-8
DanishBinary
Finnish Finland Latin1MS1252ISO-8859-9UTF-8
FinnishBinary
Japanese Japan JapanEUCMS932UTF-8IBM930
Binary
CanadianFrench French-Canada Latin1MS1252ISO-8859-9UTF-8IBM297
DefaultBinary
TraditionalChinese Taiwan EUC-TWMS950UTF-8IBM937
Binary
SimplifiedChinese China MS936UTF-8IBM935
Binary
Albanian Albania ISO-8859-2MS1250Latin1MS1252ISO-8859-9UTF-8
DefaultBinary
Language TerritoryCode Page(Character Set) Sort
(2 of 5)
Recommended Locale Specifications B-3

Locales
Arabic SaudiArabia ISO-8859-6MS1256UTF-8
DefaultBinary
Bulgarian Bulgaria ISO-8859-5MS1251UTF-8
DefaultBinary
Byelorussian Belarus ISO-8859-5MS1251UTF-8
DefaultBinary
Catalan Catalonia Latin1MS1252ISO-8859-9UTF-8
DefaultBinary
Croatian Croatia ISO-8859-2MS1250UTF-8
CroatianBinary
Czech CzechRepublic ISO-8859-2MS1250UTF-8
CzechBinary
Dutch NetherlandsDutch-Belgium
Latin1MS1252ISO-8859-9UTF-8IBM037
DefaultBinary
Estonian Estonia ISO-8859-4ISO-8859-10MS1257UTF-8
EstonianBinary
Farsi Iran ISO-8859-6UTF-8
DefaultBinary
Greek Greece ISO-8859-7MS1253UTF-8
DefaultBinary
Language TerritoryCode Page(Character Set) Sort
(3 of 5)
B-4 Installation and Configuration Guide for UNIX

Locales
Hebrew Israel ISO-8859-8MS1255UTF-8
DefaultBinary
Hungarian Hungary ISO-8859-2MS1250UTF-8
HungarianBinary
Korean Korea MS949MS1361UTF-8
Binary
Latvian Latvia ISO-8859-4ISO-8859-10MS1257UTF-8
LatvianBinary
Lithuanian Lithuania ISO-8859-4ISO-8859-10MS1257UTF-8
LithuanianBinary
Macedonian Macedonia ISO-8859-5MS1251UTF-8
DefaultBinary
Romanian Romania ISO-8859-2MS1250UTF-8
RomanianBinary
Russian Russia ISO-8859-5MS1251UTF-8
DefaultBinary
Serbian Yugoslavia ISO-8859-2MS1250UTF-8
DefaultBinary
CyrillicSerbian Yugoslavia ISO-8859-5MS1251UTF-8
DefaultBinary
Language TerritoryCode Page(Character Set) Sort
(4 of 5)
Recommended Locale Specifications B-5
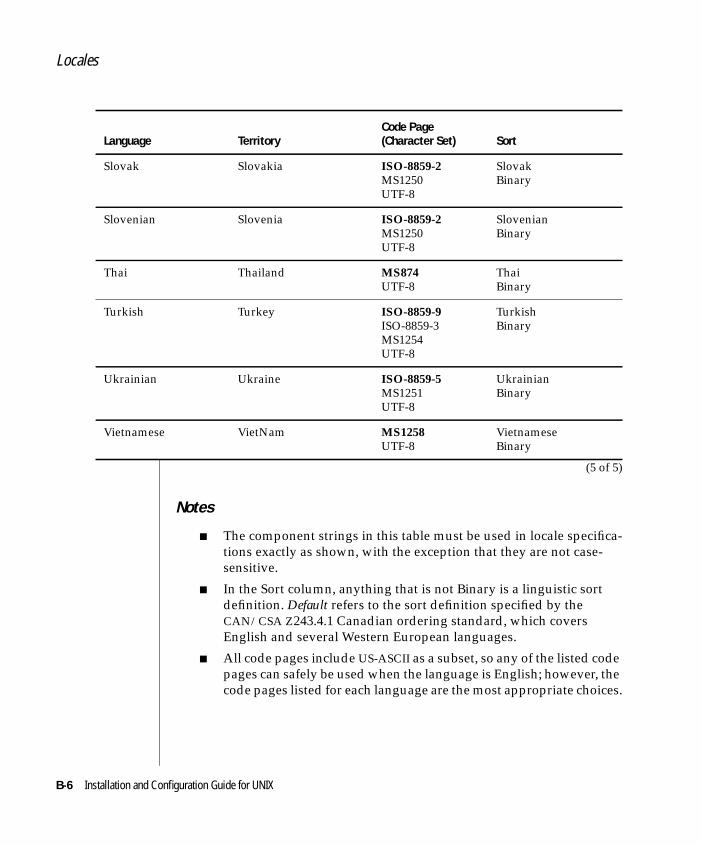
Locales
Notes
■ The component strings in this table must be used in locale specifica-tions exactly as shown, with the exception that they are not case-sensitive.
■ In the Sort column, anything that is not Binary is a linguistic sortdefinition. Default refers to the sort definition specified by theCAN/CSA Z243.4.1 Canadian ordering standard, which coversEnglish and several Western European languages.
■ All code pages include US-ASCII as a subset, so any of the listed codepages can safely be used when the language is English; however, thecode pages listed for each language are the most appropriate choices.
Slovak Slovakia ISO-8859-2MS1250UTF-8
SlovakBinary
Slovenian Slovenia ISO-8859-2MS1250UTF-8
SlovenianBinary
Thai Thailand MS874UTF-8
ThaiBinary
Turkish Turkey ISO-8859-9ISO-8859-3MS1254UTF-8
TurkishBinary
Ukrainian Ukraine ISO-8859-5MS1251UTF-8
UkrainianBinary
Vietnamese VietNam MS1258UTF-8
VietnameseBinary
Language TerritoryCode Page(Character Set) Sort
(5 of 5)
B-6 Installation and Configuration Guide for UNIX
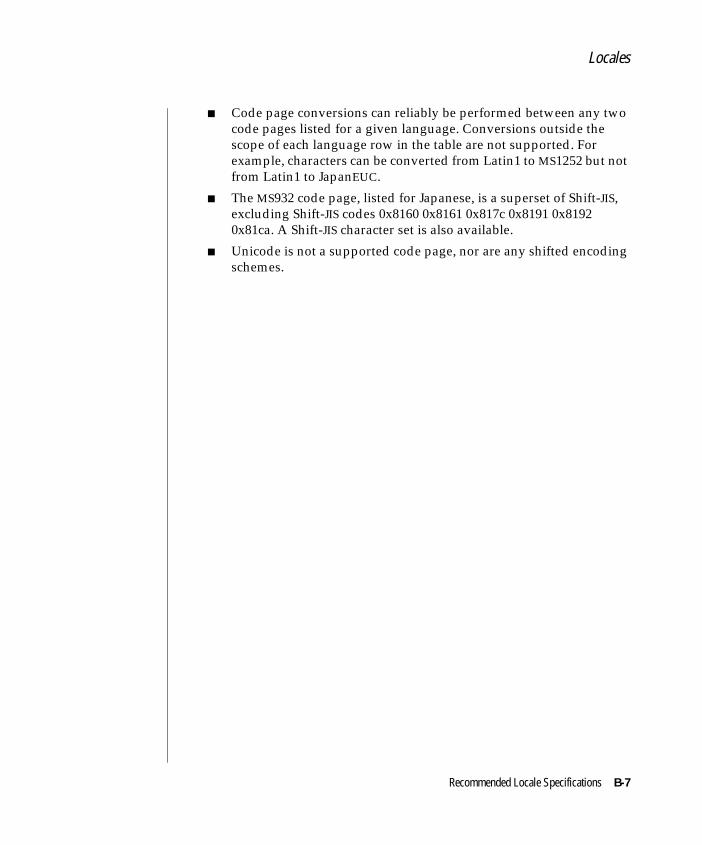
Locales
■ Code page conversions can reliably be performed between any twocode pages listed for a given language. Conversions outside thescope of each language row in the table are not supported. Forexample, characters can be converted from Latin1 to MS1252 but notfrom Latin1 to JapanEUC.
■ The MS932 code page, listed for Japanese, is a superset of Shift-JIS,excluding Shift-JIS codes 0x8160 0x8161 0x817c 0x8191 0x81920x81ca. A Shift-JIS character set is also available.
■ Unicode is not a supported code page, nor are any shifted encodingschemes.
Recommended Locale Specifications B-7

CAppendix
Platform-SpecificInformation: IBM RISCSystem/6000
This appendix contains administration information for RedBrick Decision Server, much of which is specific to the IBM RISCSystem/6000 under the AIX operating environment.Configuring Operating-System ParametersRed Brick Decision Server is a high-performance server designedto support the needs of tens or hundreds of users in a distributedclient/server computing environment. To provide sufficientresources for this large number of client users, you might need tomodify selected operating-system configuration parameters.
General Guidelines■ To run other applications concurrently on the same
system as Red Brick Decision Server, you might need toincrease selected parameter values as recommended inthis section.
■ If no specific value for an operating-system parameter isspecified in this guide, Informix recommends that youuse the default value.

Number of Users and Parallel Query Processes
■ The parameter settings recommended here assume that only oneversion of Red Brick Decision Server is running on your system. Ifyou plan to run two versions simultaneously (as described inChapter 3, “Installing a New Release”) and both installations will beheavily loaded concurrently, you might need to modify yourparameter settings.
■ Modifying your AIX configuration is a complex system-adminis-tration task requiring superuser privileges. For information aboutthe procedures used to make the necessary configuration changes,refer to “Changing Operating System Parameters” in the IBM AIXHypertext Information Base publication.
Number of Users and Parallel Query ProcessesSome configuration parameters depend on the maximum number of userslicensed for your warehouse installation, the value of the parameterTOTALQUERYPROCS in the rbw.config file, or both. If either of these param-eters changes, you might have to adjust other operating-system parametersin turn. Therefore, you might want to configure your operating system tosupport a projected number of users or a larger TOTALQUERYPROCS value.This allows you to expand your system without having to make adjustmentslater.
For AIX, you need to set the maximum number of processes allowed per userto the maximum number of concurrent users to be supported in yourwarehouse configuration, plus the value of TOTALQUERYPROCS in therbw.config file, plus 5. You can use the “System Environments” section of theSystem Management Interface Tool (SMIT) to make this change.
Limits File SettingsEnsure that there is no maximum file size limit set for the redbrick user in thefile /etc/security/limits. Also, the maximum soft data size must be set to 524288and the maximum soft stack size to 16384. Be sure to check these settings forboth the default user and the redbrick user. If your system is properlyconfigured, you will see lines in the file like this:
fsize = -1data = 524288stack = 16384
C-2 Installation and Configuration Guide for UNIX

Configuring Daemons for Automatic Startup
Configuring Daemons for Automatic StartupThe following commands let you configure the warehouse daemon forautomatic startup, list entries in the /etc/inittab file (which contains instruc-tions for automatic startup), and remove entries from the /etc/inittab file.
■ To configure the warehouse daemon for automatic startup when theoperating system starts, log in as superuser and issue the followingcommand:
# mkitab 'rbwapid:2:once:/bin/sh -c "ulimit -dunlimited; \redbrick_dir/bin/rbw.start config_pathRB_HOST > \/dev/console 2>&1"'
This command modifies the /etc/inittab file. You must be superuser tomodify this file.
■ To list all entries in the inittab file, enter:# lsitab -a
■ To remove the rbwapid entry from the inittab file, enter:# rmitab rbwapid
When you use this procedure, the warehouse daemon runs as the superuser.You can also configure the warehouse daemon to automatically start but runas the redbrick user.
Starting the Daemon as the redbrick UserTo configure the warehouse daemon to run as the redbrick user, you mustmodify the rbw.boot script by replacing the following line:
/redbrick_dir/bin/rbw.start /redbrick_dir RB_HOST
with
su -c "/redbrick_dir/bin/rbw.start /redbrick_dir RB_HOST"
where:
■ redbrick_dir is the directory for Red Brick Decision Server.
■ RB_HOST is the name of your server.
Platform-Specific Information: IBM RISC System/6000 C-3

DAppendix
Platform-SpecificInformation: DigitalAlphaServer
This appendix contains administration information for InformixRed Brick Decision Server, much of which is specific to theDigital AlphaServer under the Digital UNIX operatingenvironment.Configuring Operating-System ParametersInformix Red Brick Decision Server is a high-performance serverdesigned to support the needs of tens or hundreds of users in adistributed client/server computing environment. To providesufficient resources for this large number of client users, youmight have to modify selected operating-system configurationparameters.
General Guidelines■ To run other applications concurrently on the same
system as Red Brick Decision Server, you might need toincrease the parameter values recommended in thissection.
■ If no specific value for an operating-system parameter isspecified in this guide, use the default value.
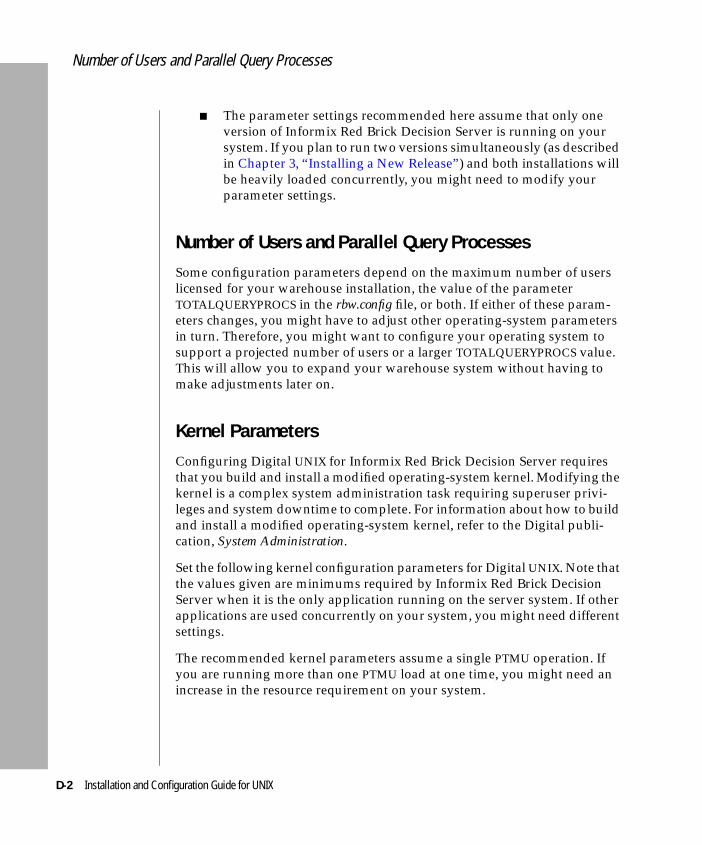
Number of Users and Parallel Query Processes
■ The parameter settings recommended here assume that only oneversion of Informix Red Brick Decision Server is running on yoursystem. If you plan to run two versions simultaneously (as describedin Chapter 3, “Installing a New Release”) and both installations willbe heavily loaded concurrently, you might need to modify yourparameter settings.
Number of Users and Parallel Query ProcessesSome configuration parameters depend on the maximum number of userslicensed for your warehouse installation, the value of the parameterTOTALQUERYPROCS in the rbw.config file, or both. If either of these param-eters changes, you might have to adjust other operating-system parametersin turn. Therefore, you might want to configure your operating system tosupport a projected number of users or a larger TOTALQUERYPROCS value.This will allow you to expand your warehouse system without having tomake adjustments later on.
Kernel ParametersConfiguring Digital UNIX for Informix Red Brick Decision Server requiresthat you build and install a modified operating-system kernel. Modifying thekernel is a complex system administration task requiring superuser privi-leges and system downtime to complete. For information about how to buildand install a modified operating-system kernel, refer to the Digital publi-cation, System Administration.
Set the following kernel configuration parameters for Digital UNIX. Note thatthe values given are minimums required by Informix Red Brick DecisionServer when it is the only application running on the server system. If otherapplications are used concurrently on your system, you might need differentsettings.
The recommended kernel parameters assume a single PTMU operation. Ifyou are running more than one PTMU load at one time, you might need anincrease in the resource requirement on your system.
D-2 Installation and Configuration Guide for UNIX
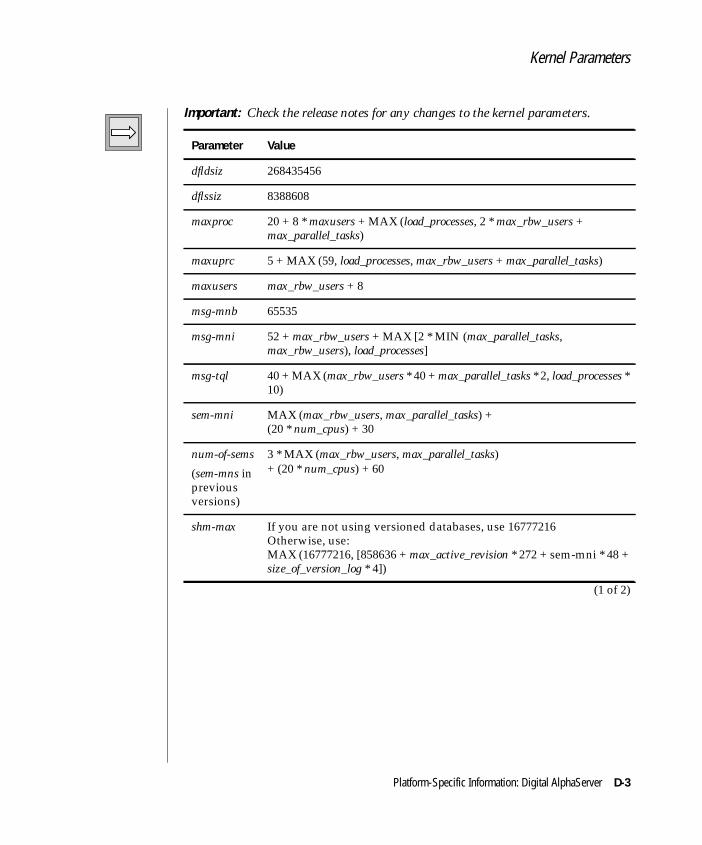
Kernel Parameters
Important: Check the release notes for any changes to the kernel parameters.
Parameter Value
dfldsiz 268435456
dflssiz 8388608
maxproc 20 + 8 * maxusers + MAX (load_processes, 2 * max_rbw_users +max_parallel_tasks)
maxuprc 5 + MAX (59, load_processes, max_rbw_users + max_parallel_tasks)
maxusers max_rbw_users + 8
msg-mnb 65535
msg-mni 52 + max_rbw_users + MAX [2 * MIN (max_parallel_tasks,max_rbw_users), load_processes]
msg-tql 40 + MAX (max_rbw_users * 40 + max_parallel_tasks * 2, load_processes *10)
sem-mni MAX (max_rbw_users, max_parallel_tasks) +(20 * num_cpus) + 30
num-of-sems
(sem-mns inpreviousversions)
3 * MAX (max_rbw_users, max_parallel_tasks)+ (20 * num_cpus) + 60
shm-max If you are not using versioned databases, use 16777216Otherwise, use:MAX (16777216, [858636 + max_active_revision * 272 + sem-mni * 48 +size_of_version_log * 4])
(1 of 2)
Platform-Specific Information: Digital AlphaServer D-3
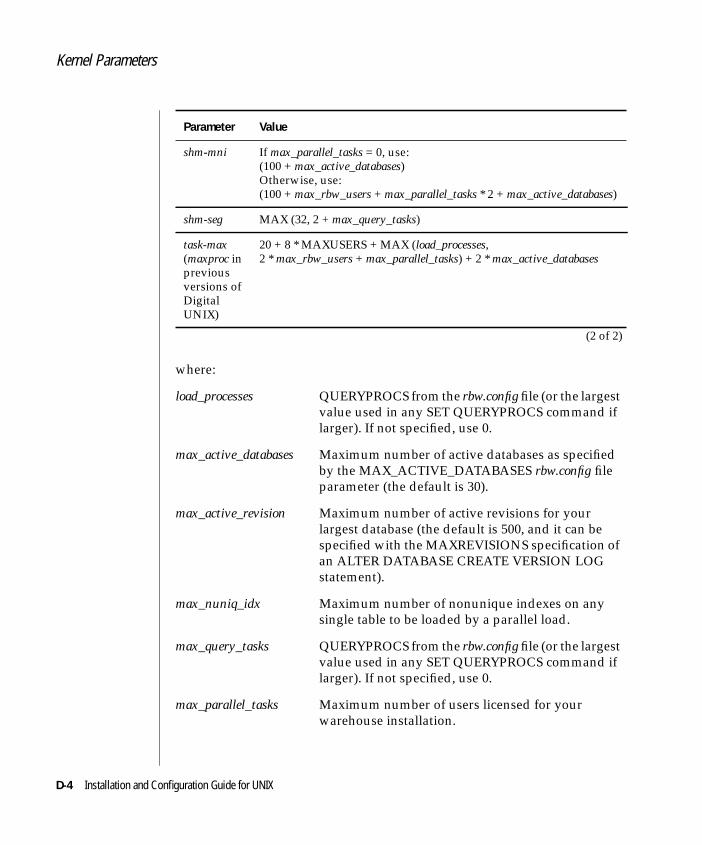
Kernel Parameters
where:
shm-mni If max_parallel_tasks = 0, use:(100 + max_active_databases)Otherwise, use:(100 + max_rbw_users + max_parallel_tasks * 2 + max_active_databases)
shm-seg MAX (32, 2 + max_query_tasks)
task-max(maxproc inpreviousversions ofDigitalUNIX)
20 + 8 * MAXUSERS + MAX (load_processes,2 * max_rbw_users + max_parallel_tasks) + 2 * max_active_databases
load_processes QUERYPROCS from the rbw.config file (or the largestvalue used in any SET QUERYPROCS command iflarger). If not specified, use 0.
max_active_databases Maximum number of active databases as specifiedby the MAX_ACTIVE_DATABASES rbw.config fileparameter (the default is 30).
max_active_revision Maximum number of active revisions for yourlargest database (the default is 500, and it can bespecified with the MAXREVISIONS specification ofan ALTER DATABASE CREATE VERSION LOGstatement).
max_nuniq_idx Maximum number of nonunique indexes on anysingle table to be loaded by a parallel load.
max_query_tasks QUERYPROCS from the rbw.config file (or the largestvalue used in any SET QUERYPROCS command iflarger). If not specified, use 0.
max_parallel_tasks Maximum number of users licensed for yourwarehouse installation.
Parameter Value
(2 of 2)
D-4 Installation and Configuration Guide for UNIX

Configuring Daemons for Automatic Startup
Important: The sem-mni, shm-max, shm-mni, msg-mnb, msg-tql, and msg-mniparameters need to be set in the /etc/sysconfigtab file.
Configuring Daemons for Automatic StartupTo configure the warehouse daemon for automatic startup when theoperating system starts:
1. Log in as superuser (root).
2. Copy the rbw.boot file generated by the install script into the/sbin/init.d directory:
# cd redbrick_dir# cp rbw.boot /sbin/init.d
3. Create a link to the rbw.boot file for the Digital AlphaServer rc3 scriptto execute during initialization:
# ln -s /sbin/init.d/rbw.boot /sbin/rc3.d/S99rbw
(S99 instructs the script to start after all other processes are running.)
4. Create a link to cleanly shut down the daemons when the systemshuts down:
# ln -s /sbin/init.d/rbw.boot /sbin/rc2.d/K00rbw
(K00 instructs the script to kill before other processes stop.)
When you use this procedure, the warehouse daemon runs as the superuser.You can also configure the warehouse daemon to automatically start but runas the redbrick user.
max_rbw_users Maximum number of concurrent server sessions asspecified in the MAX_SERVERS parameter in therbw.config file.
num_cpus The number of CPUs on the machine.
size_of_version_log The size, in kilobytes, of the version log for yourlargest database.
Platform-Specific Information: Digital AlphaServer D-5
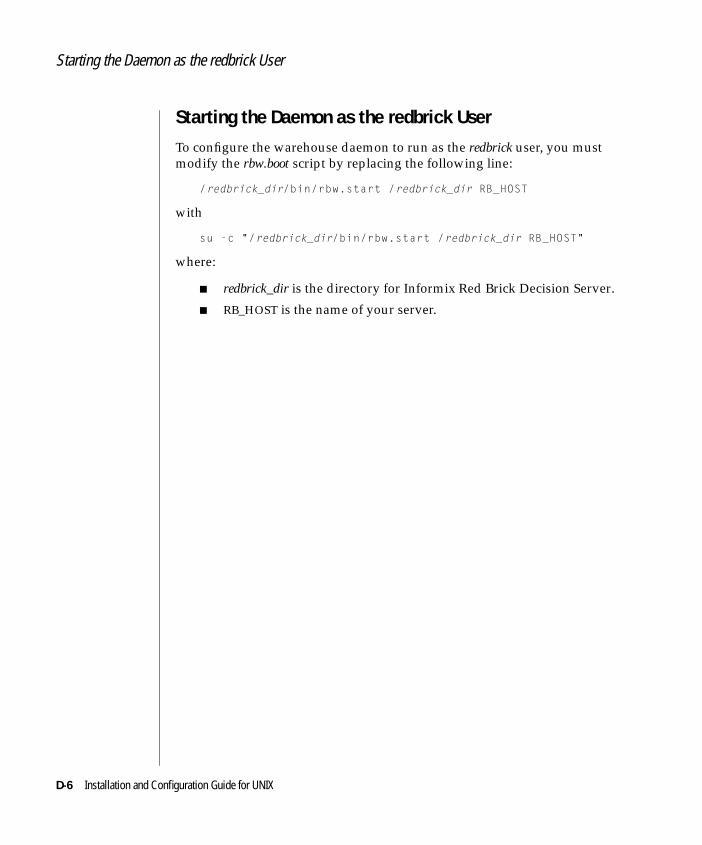
Starting the Daemon as the redbrick User
Starting the Daemon as the redbrick UserTo configure the warehouse daemon to run as the redbrick user, you mustmodify the rbw.boot script by replacing the following line:
/redbrick_dir/bin/rbw.start /redbrick_dir RB_HOST
with
su -c "/redbrick_dir/bin/rbw.start /redbrick_dir RB_HOST"
where:
■ redbrick_dir is the directory for Informix Red Brick Decision Server.
■ RB_HOST is the name of your server.
D-6 Installation and Configuration Guide for UNIX

EAppendix
Platform-SpecificInformation: HP 9000Computer
This appendix contains administration information for RedBrick Decision Server, much of which is specific to the HP 9000Computer under the HP-UX operating environment.Configuring Operating-System ParametersRed Brick Decision Server is a high-performance server designedto support the needs of tens or hundreds of users in a distributedclient/server computing environment. To provide sufficientresources for this large number of client users, you might need tomodify selected operating-system configuration parameters.
General Guidelines■ To run other applications concurrently on the same
system as Red Brick Decision Server, you might need toincrease the parameter values recommended in thissection.
■ If no specific value for an operating-system parameter isspecified in this guide, use the default value.
■ The parameter settings recommended here assume thatonly one version of Red Brick Decision Server is runningon your system. If you plan to run two versions simulta-neously (as described in Chapter 3, “Installing a NewRelease”) and both installations will be heavily loadedconcurrently, you might need to modify your parametersettings.

Number of Users and Parallel Query Processes
Number of Users and Parallel Query ProcessesSome configuration parameters depend on the maximum number of userslicensed for your warehouse installation, the value of the parameterTOTALQUERYPROCS in the rbw.config file, or both. If either of these param-eters changes, you might have to adjust other operating-system parametersin turn. Therefore, you might want to configure your operating system tosupport a projected number of users or a larger TOTALQUERYPROCS value.This will allow you to expand your warehouse system without having tomake adjustments later on.
Kernel ParametersConfiguring HP-UX for Red Brick Decision Server requires that you build andinstall a modified operating-system kernel. Modifying the kernel is acomplex system administration task requiring superuser privileges andsystem downtime to complete. For information about how to build andinstall a modified operating-system kernel, refer to the Hewlett-Packardpublication, System Administration Tasks Manual.
Set the kernel configuration parameters for HP-UX as the following tableshows. Note that the values given are minimums required by Red BrickDecision Server when it is the only application running on the server system.If other applications are used concurrently on your system, you might needdifferent settings.
The recommended kernel parameters assume a single PTMU operation. Ifyou are running more than one PTMU load at one time, you might need anincrease in the resource requirement on your system.
Important: Check the release notes for any changes to the kernel parameters.
Parameter Value
bufpages 0
maxfiles max_PSUs + 50
maxfiles_lim MAX (1024, max_PSUs + 100)
(1 of 3)
E-2 Installation and Configuration Guide for UNIX

Kernel Parameters
maxuprc 5 +MAX (20, load_processes, max_rbw_users + max_parallel_tasks)
msgmap msgtql + 2
msgmnb 65535
msgmni 52 + max_rbw_users + MAX [2 * MIN (max_parallel_tasks,max_rbw_users), load_processes]
msgseg MIN (32767, MAX (2048, msgmni * 40))
msgssz 64
msgtql MAX [(MAX_RBW_USERS * 40 + MAX_PARALLEL_TASKS * 2),LOAD_PROCESSES * 10)]
nbuf 0
nfile 16 * (NPROC + 16 + MAXUSERS)/10 + 32 + 2 * NPTY +
(max PSU/table + max PSU/index) * number of tables in fact-to-fact join * expected number of concurrent users
nflocks Same as NFILE.
nproc 30 + 8 * MAXUSERS + MAX (load_processes,2 * max_rbw_users + max_parallel_tasks) + 2 * max_active_databases
num-of-sems 3 * MAX (max_rbw_users, max_parallel_tasks) + (2 * num_cpus) + 60
semmni MAX (max_rbw_users, max_parallel_tasks) +(20 * num_cpus) + 30
semmns 3 * MAX (max_rbw_users, max_parallel_tasks) +(20 * num_cpus) + 60
semmap max_rbw_users + 27
Parameter Value
(2 of 3)
Platform-Specific Information: HP 9000 Computer E-3

Kernel Parameters
where:
shmseg MAX (12, 2 + max_query_tasks)
shmmax If you are not using versioned databases, use 67108864Otherwise, use:MAX (67108864, [1120904 + max_active_revision * 272 + semmni *48 + size_of_version_log * 4])
shmmni If max_parallel_tasks = 0, use (100 + max_active_databases)Otherwise, useMIN (1024, max_rbw_users + 100 + max_parallel_tasks * 2) +max_active_databases
load_processes If no parallel load or parallel REORG operations, use0. Otherwise, use:3 + (3 * num_cpus) + max_nuniq_idx
max_active_databases Maximum number of active databases as specifiedby the MAX_ACTIVE_DATABASES rbw.config fileparameter (the default is 30).
max_active_revision Maximum number of active revisions for yourlargest database (the default is 500, and it can bespecified with the MAXREVISIONS specification ofan ALTER DATABASE CREATE VERSION LOGstatement).
max_nuniq_idx Maximum number of nonunique indexes on anysingle table to be loaded by a parallel load.
max_query_tasks QUERYPROCS from the rbw.config file (or the largestvalue used in any SET QUERYPROCS command iflarger). If not specified, use 0.
max_parallel_tasks TOTALQUERYPROCS from the rbw.config file. If notspecified, use 0.
max_PSUs Maximum number of PSUs (files) that you expect toassign to a database. For help in determining thisnumber, refer to the Administrator’s Guide.
Parameter Value
(3 of 3)
E-4 Installation and Configuration Guide for UNIX
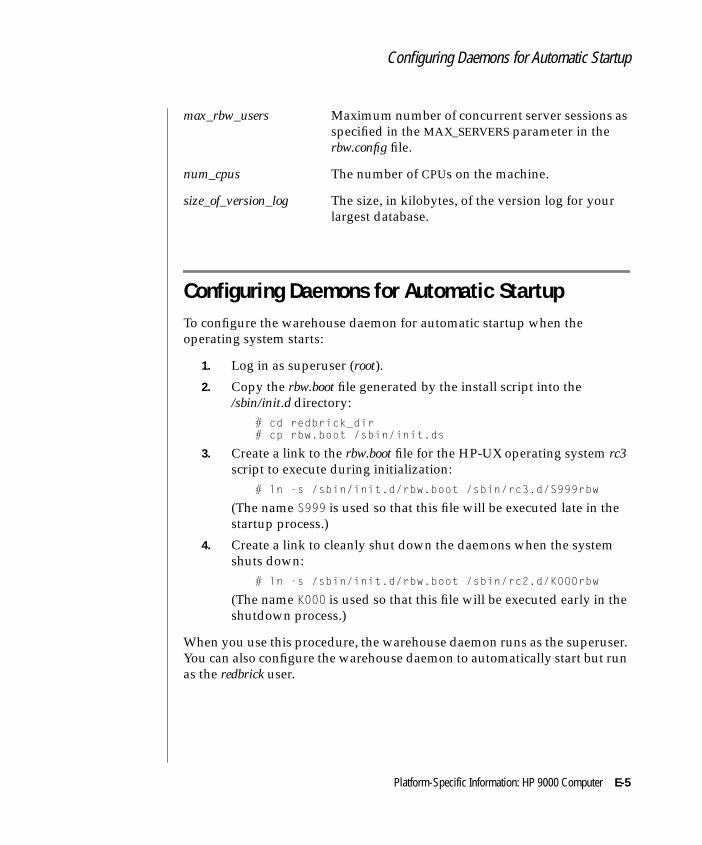
Configuring Daemons for Automatic Startup
Configuring Daemons for Automatic StartupTo configure the warehouse daemon for automatic startup when theoperating system starts:
1. Log in as superuser (root).
2. Copy the rbw.boot file generated by the install script into the/sbin/init.d directory:
# cd redbrick_dir# cp rbw.boot /sbin/init.ds
3. Create a link to the rbw.boot file for the HP-UX operating system rc3script to execute during initialization:
# ln -s /sbin/init.d/rbw.boot /sbin/rc3.d/S999rbw
(The name S999 is used so that this file will be executed late in thestartup process.)
4. Create a link to cleanly shut down the daemons when the systemshuts down:
# ln -s /sbin/init.d/rbw.boot /sbin/rc2.d/K000rbw
(The name K000 is used so that this file will be executed early in theshutdown process.)
When you use this procedure, the warehouse daemon runs as the superuser.You can also configure the warehouse daemon to automatically start but runas the redbrick user.
max_rbw_users Maximum number of concurrent server sessions asspecified in the MAX_SERVERS parameter in therbw.config file.
num_cpus The number of CPUs on the machine.
size_of_version_log The size, in kilobytes, of the version log for yourlargest database.
Platform-Specific Information: HP 9000 Computer E-5

Starting the Daemon as the redbrick User
Starting the Daemon as the redbrick UserTo configure the warehouse daemon to run as the redbrick user, you mustmodify the rbw.boot script by replacing the following line:
/redbrick_dir/bin/rbw.start /redbrick_dir RB_HOST
with
su -c "/redbrick_dir/bin/rbw.start /redbrick_dir RB_HOST"
where:
■ redbrick_dir is the directory for Red Brick Decision Server.
■ RB_HOST is the name of your server.
E-6 Installation and Configuration Guide for UNIX

FAppendix
Platform-SpecificInformation: SunSPARC-Based Systems
This appendix contains administration information for RedBrick Decision Server, much of which is specific to SunSPARC-based systems under the Solaris operating environment.Configuring Operating-System ParametersRed Brick Decision Server is a high-performance server designedto support the needs of tens or hundreds of users in a distributedclient/server computing environment. To provide sufficientresources for this large number of client users, you might need tomodify selected operating-system configuration parameters.
General Guidelines■ To run other applications concurrently on the same
system as Red Brick Decision Server, you might need toincrease the parameter values recommended in thissection.
■ If no specific value for an operating-system parameter isspecified in this guide, use the default value.
■ The parameter settings recommended here assume thatonly one version of Red Brick Decision Server is runningon your system. If you plan to run two versions simulta-neously (as described in Chapter 3, “Installing a NewRelease”) and both installations will be heavily loadedconcurrently, you might need to modify your parametersettings.

Number of Users and Parallel Query Processes
Number of Users and Parallel Query ProcessesSome configuration parameters depend on the maximum number of userslicensed for your warehouse installation, the value of the parameterTOTALQUERYPROCS in the rbw.config file, or both. If either of these param-eters changes, you might have to adjust other operating-system parametersin turn. Therefore, you might want to configure your operating system tosupport a projected number of users or a larger TOTALQUERYPROCS value.This will allow you to expand your warehouse system without having tomake adjustments later on.
Kernel ParametersConfiguring Solaris for Red Brick Decision Server requires that you modifythe operating-system kernel parameters. Modifying the kernel is a complexsystem administration task requiring superuser privileges and systemdowntime to complete. For information about modifying kernel parameters,refer to the SunSoft publication System Configuration and Installation Guide.
To configure the Solaris operating environment, first verify that the SUNWipcpackage is installed. If it is not installed, install it before you install Red BrickDecision Server; then set the kernel parameters to the values shown in thefollowing table. (These values are minimums required by Red Brick DecisionServer when it is the only application running on the server system. If otherapplications are used concurrently, you might need different settings.)
The recommended kernel parameters assume a single PTMU operation. Ifyou are running more than one PTMU load at one time, you might need anincrease in the resource requirement on your system.
Important: Check the release notes for any changes to the kernel parameters.
F-2 Installation and Configuration Guide for UNIX
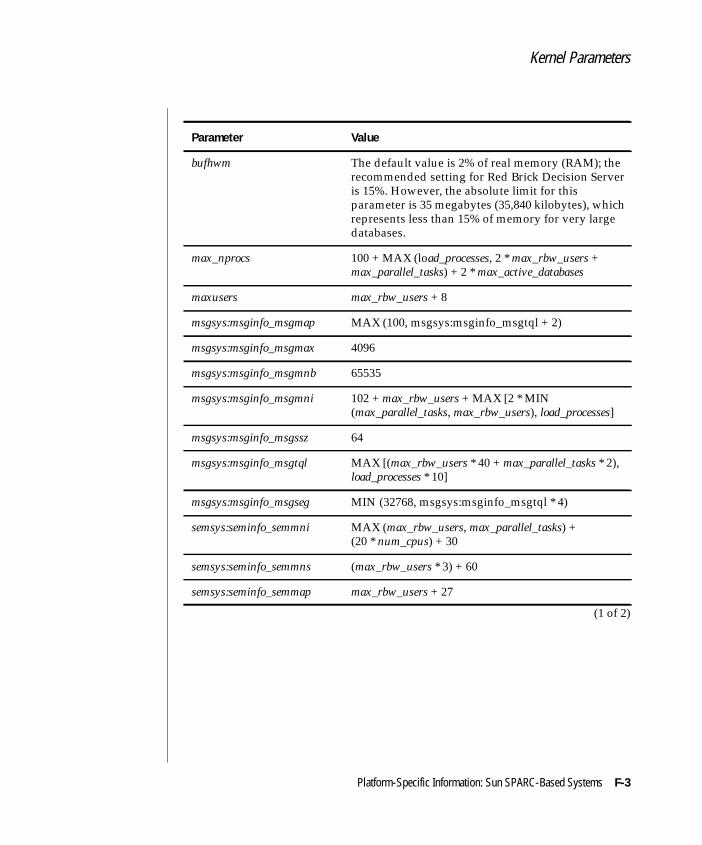
Kernel Parameters
Parameter Value
bufhwm The default value is 2% of real memory (RAM); therecommended setting for Red Brick Decision Serveris 15%. However, the absolute limit for thisparameter is 35 megabytes (35,840 kilobytes), whichrepresents less than 15% of memory for very largedatabases.
max_nprocs 100 + MAX (load_processes, 2 * max_rbw_users +max_parallel_tasks) + 2 * max_active_databases
maxusers max_rbw_users + 8
msgsys:msginfo_msgmap MAX (100, msgsys:msginfo_msgtql + 2)
msgsys:msginfo_msgmax 4096
msgsys:msginfo_msgmnb 65535
msgsys:msginfo_msgmni 102 + max_rbw_users + MAX [2 * MIN(max_parallel_tasks, max_rbw_users), load_processes]
msgsys:msginfo_msgssz 64
msgsys:msginfo_msgtql MAX [(max_rbw_users * 40 + max_parallel_tasks * 2),load_processes * 10]
msgsys:msginfo_msgseg MIN (32768, msgsys:msginfo_msgtql * 4)
semsys:seminfo_semmni MAX (max_rbw_users, max_parallel_tasks) +(20 * num_cpus) + 30
semsys:seminfo_semmns (max_rbw_users * 3) + 60
semsys:seminfo_semmap max_rbw_users + 27
(1 of 2)
Platform-Specific Information: Sun SPARC-Based Systems F-3
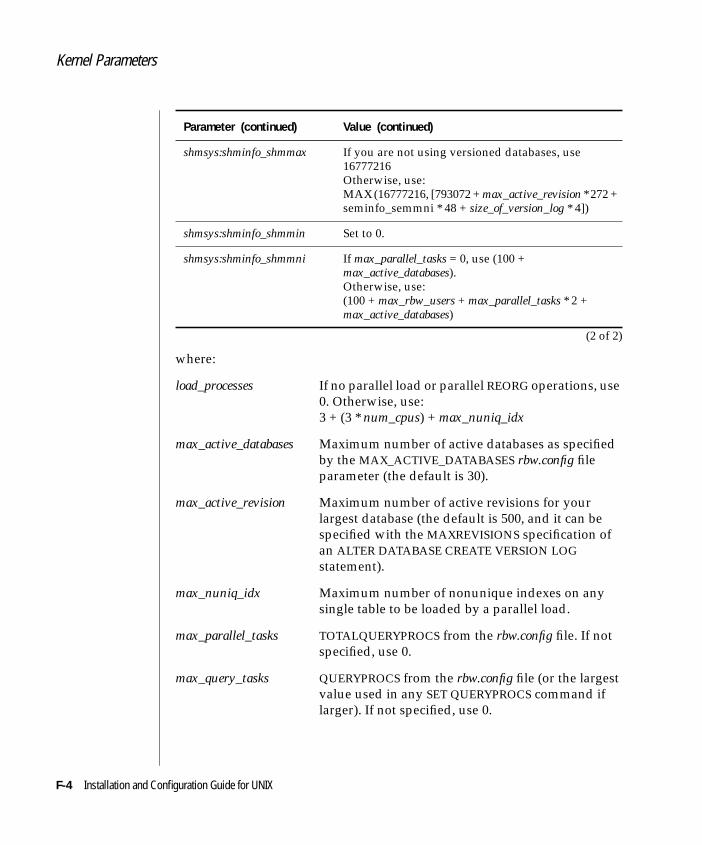
Kernel Parameters
where:
shmsys:shminfo_shmmax If you are not using versioned databases, use16777216Otherwise, use:MAX (16777216, [793072 + max_active_revision * 272 +seminfo_semmni * 48 + size_of_version_log * 4])
shmsys:shminfo_shmmin Set to 0.
shmsys:shminfo_shmmni If max_parallel_tasks = 0, use (100 +max_active_databases).Otherwise, use:(100 + max_rbw_users + max_parallel_tasks * 2 +max_active_databases)
load_processes If no parallel load or parallel REORG operations, use0. Otherwise, use:3 + (3 * num_cpus) + max_nuniq_idx
max_active_databases Maximum number of active databases as specifiedby the MAX_ACTIVE_DATABASES rbw.config fileparameter (the default is 30).
max_active_revision Maximum number of active revisions for yourlargest database (the default is 500, and it can bespecified with the MAXREVISIONS specification ofan ALTER DATABASE CREATE VERSION LOGstatement).
max_nuniq_idx Maximum number of nonunique indexes on anysingle table to be loaded by a parallel load.
max_parallel_tasks TOTALQUERYPROCS from the rbw.config file. If notspecified, use 0.
max_query_tasks QUERYPROCS from the rbw.config file (or the largestvalue used in any SET QUERYPROCS command iflarger). If not specified, use 0.
Parameter (continued) Value (continued)
(2 of 2)
F-4 Installation and Configuration Guide for UNIX
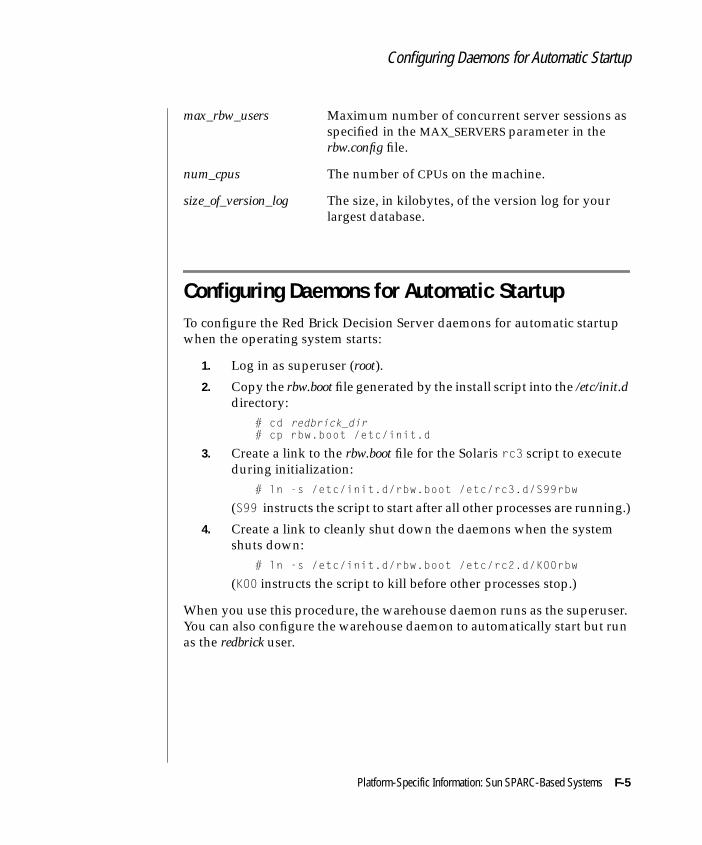
Configuring Daemons for Automatic Startup
Configuring Daemons for Automatic StartupTo configure the Red Brick Decision Server daemons for automatic startupwhen the operating system starts:
1. Log in as superuser (root).
2. Copy the rbw.boot file generated by the install script into the /etc/init.ddirectory:
# cd redbrick_dir# cp rbw.boot /etc/init.d
3. Create a link to the rbw.boot file for the Solaris rc3 script to executeduring initialization:
# ln -s /etc/init.d/rbw.boot /etc/rc3.d/S99rbw
(S99 instructs the script to start after all other processes are running.)
4. Create a link to cleanly shut down the daemons when the systemshuts down:
# ln -s /etc/init.d/rbw.boot /etc/rc2.d/K00rbw
(K00 instructs the script to kill before other processes stop.)
When you use this procedure, the warehouse daemon runs as the superuser.You can also configure the warehouse daemon to automatically start but runas the redbrick user.
max_rbw_users Maximum number of concurrent server sessions asspecified in the MAX_SERVERS parameter in therbw.config file.
num_cpus The number of CPUs on the machine.
size_of_version_log The size, in kilobytes, of the version log for yourlargest database.
Platform-Specific Information: Sun SPARC-Based Systems F-5
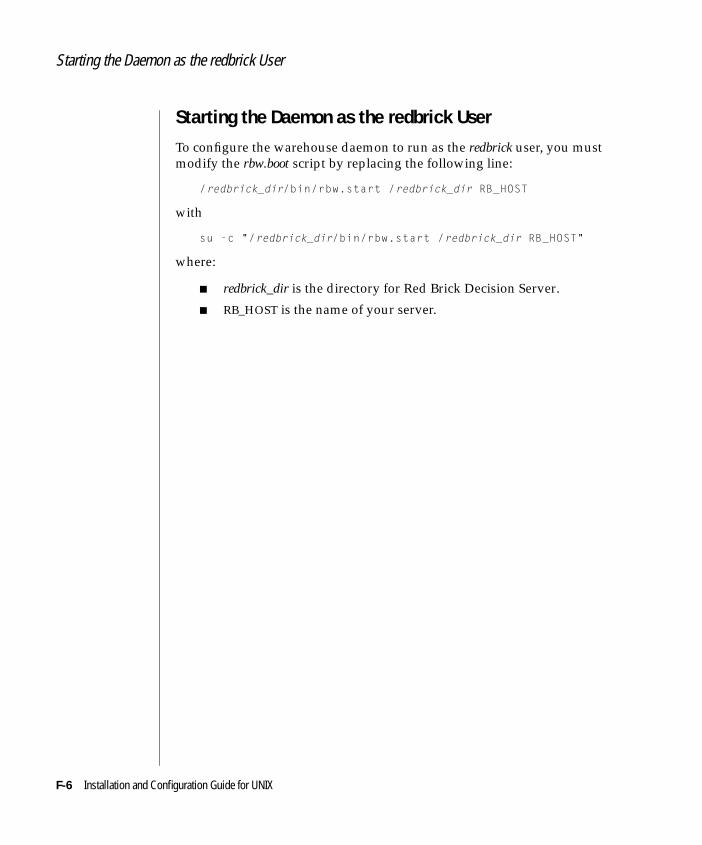
Starting the Daemon as the redbrick User
Starting the Daemon as the redbrick UserTo configure the warehouse daemon to run as the redbrick user, you mustmodify the rbw.boot script by replacing the following line:
/redbrick_dir/bin/rbw.start /redbrick_dir RB_HOST
with
su -c "/redbrick_dir/bin/rbw.start /redbrick_dir RB_HOST"
where:
■ redbrick_dir is the directory for Red Brick Decision Server.
■ RB_HOST is the name of your server.
F-6 Installation and Configuration Guide for UNIX

GAppendix
Platform-SpecificInformation: SiliconGraphics Servers
This appendix contains administration information for RedBrick Decision Server, much of which is specific to the SiliconGraphics Server under the IRIX operating environment.Configuring Operating-System ParametersRed Brick Decision Server is a high-performance server designedto support the needs of tens or hundreds of users in a distributedclient/server computing environment. To provide sufficientresources for this large number of client users, you might need tomodify selected operating-system configuration parameters.
General Guidelines■ To run other applications concurrently on the same
system as Red Brick Decision Server, you might need toincrease the parameter values recommended in thissection.
■ If no specific value for an operating-system parameter isspecified in this guide, use the default value.
■ The parameter settings recommended here assume thatonly one version of Red Brick Decision Server is runningon your system. If you plan to run two versions simulta-neously (as described in Chapter 3, “Installing a NewRelease”) and both installations will be heavily loadedconcurrently, you might need to modify your parametersettings.
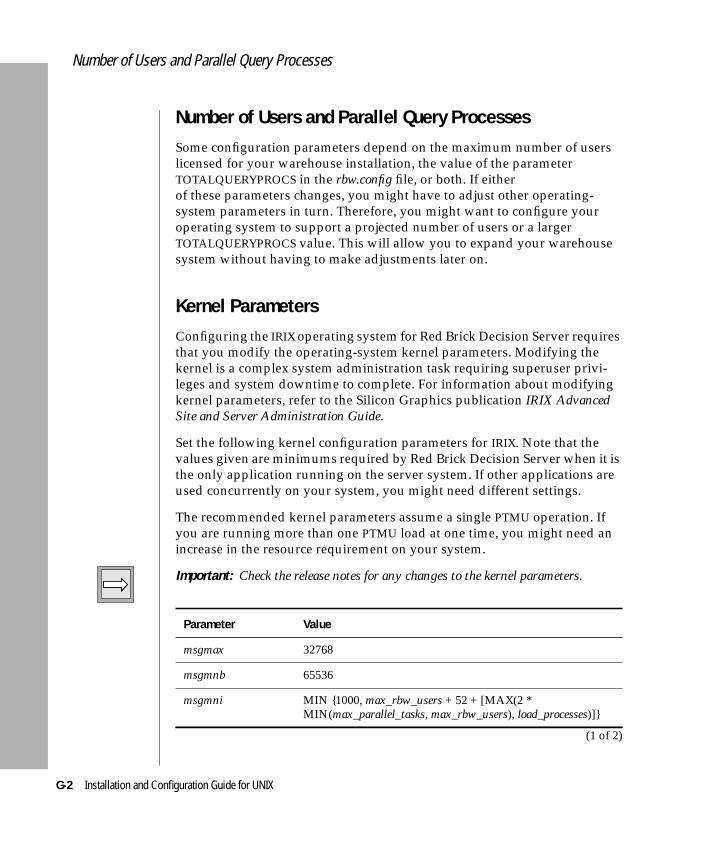
Number of Users and Parallel Query Processes
Number of Users and Parallel Query ProcessesSome configuration parameters depend on the maximum number of userslicensed for your warehouse installation, the value of the parameterTOTALQUERYPROCS in the rbw.config file, or both. If eitherof these parameters changes, you might have to adjust other operating-system parameters in turn. Therefore, you might want to configure youroperating system to support a projected number of users or a largerTOTALQUERYPROCS value. This will allow you to expand your warehousesystem without having to make adjustments later on.
Kernel ParametersConfiguring the IRIX operating system for Red Brick Decision Server requiresthat you modify the operating-system kernel parameters. Modifying thekernel is a complex system administration task requiring superuser privi-leges and system downtime to complete. For information about modifyingkernel parameters, refer to the Silicon Graphics publication IRIX AdvancedSite and Server Administration Guide.
Set the following kernel configuration parameters for IRIX. Note that thevalues given are minimums required by Red Brick Decision Server when it isthe only application running on the server system. If other applications areused concurrently on your system, you might need different settings.
The recommended kernel parameters assume a single PTMU operation. Ifyou are running more than one PTMU load at one time, you might need anincrease in the resource requirement on your system.
Important: Check the release notes for any changes to the kernel parameters.
Parameter Value
msgmax 32768
msgmnb 65536
msgmni MIN {1000, max_rbw_users + 52 + [MAX(2 *MIN(max_parallel_tasks, max_rbw_users), load_processes)]}
(1 of 2)
G-2 Installation and Configuration Guide for UNIX
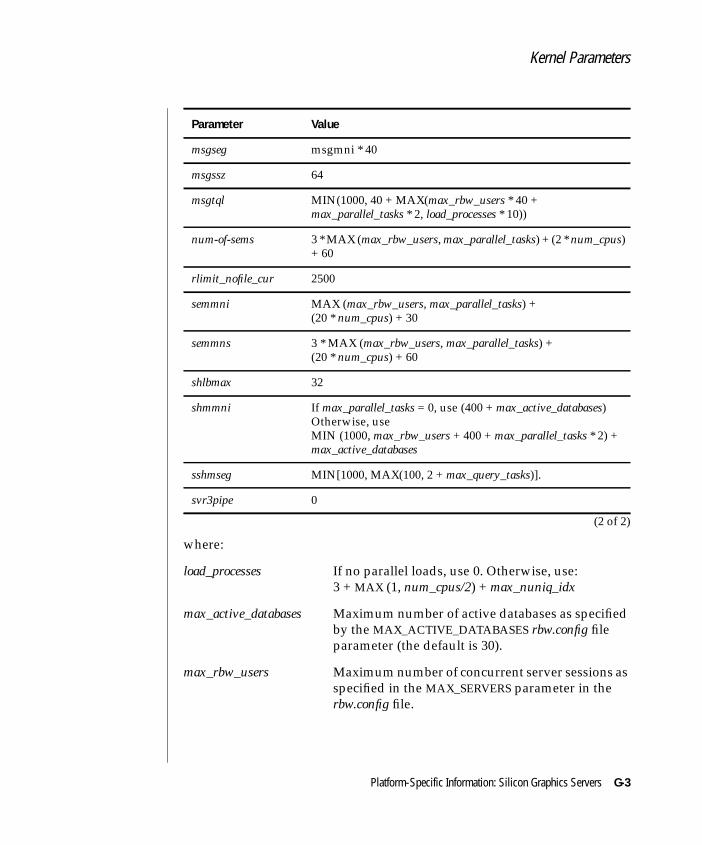
Kernel Parameters
where:
msgseg msgmni * 40
msgssz 64
msgtql MIN(1000, 40 + MAX(max_rbw_users * 40 +max_parallel_tasks * 2, load_processes * 10))
num-of-sems 3 * MAX (max_rbw_users, max_parallel_tasks) + (2 * num_cpus)+ 60
rlimit_nofile_cur 2500
semmni MAX (max_rbw_users, max_parallel_tasks) +(20 * num_cpus) + 30
semmns 3 * MAX (max_rbw_users, max_parallel_tasks) +(20 * num_cpus) + 60
shlbmax 32
shmmni If max_parallel_tasks = 0, use (400 + max_active_databases)Otherwise, useMIN (1000, max_rbw_users + 400 + max_parallel_tasks * 2) +max_active_databases
sshmseg MIN[1000, MAX(100, 2 + max_query_tasks)].
svr3pipe 0
load_processes If no parallel loads, use 0. Otherwise, use:3 + MAX (1, num_cpus/2) + max_nuniq_idx
max_active_databases Maximum number of active databases as specifiedby the MAX_ACTIVE_DATABASES rbw.config fileparameter (the default is 30).
max_rbw_users Maximum number of concurrent server sessions asspecified in the MAX_SERVERS parameter in therbw.config file.
Parameter Value
(2 of 2)
Platform-Specific Information: Silicon Graphics Servers G-3
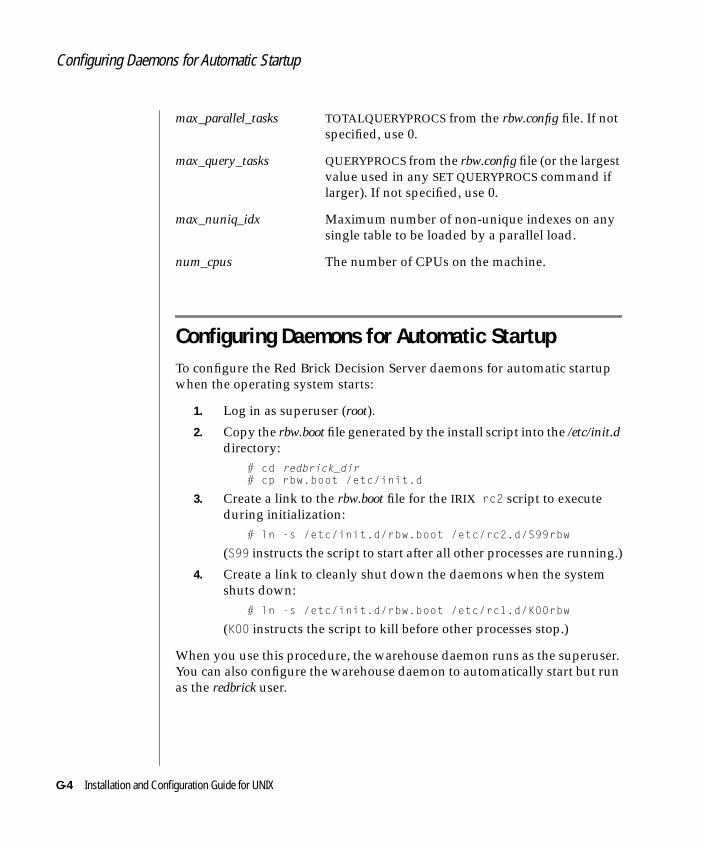
Configuring Daemons for Automatic Startup
Configuring Daemons for Automatic StartupTo configure the Red Brick Decision Server daemons for automatic startupwhen the operating system starts:
1. Log in as superuser (root).
2. Copy the rbw.boot file generated by the install script into the /etc/init.ddirectory:
# cd redbrick_dir# cp rbw.boot /etc/init.d
3. Create a link to the rbw.boot file for the IRIX rc2 script to executeduring initialization:
# ln -s /etc/init.d/rbw.boot /etc/rc2.d/S99rbw
(S99 instructs the script to start after all other processes are running.)
4. Create a link to cleanly shut down the daemons when the systemshuts down:
# ln -s /etc/init.d/rbw.boot /etc/rc1.d/K00rbw
(K00 instructs the script to kill before other processes stop.)
When you use this procedure, the warehouse daemon runs as the superuser.You can also configure the warehouse daemon to automatically start but runas the redbrick user.
max_parallel_tasks TOTALQUERYPROCS from the rbw.config file. If notspecified, use 0.
max_query_tasks QUERYPROCS from the rbw.config file (or the largestvalue used in any SET QUERYPROCS command iflarger). If not specified, use 0.
max_nuniq_idx Maximum number of non-unique indexes on anysingle table to be loaded by a parallel load.
num_cpus The number of CPUs on the machine.
G-4 Installation and Configuration Guide for UNIX

Starting the Daemon as the redbrick User
Starting the Daemon as the redbrick UserTo configure the warehouse daemon to run as the redbrick user, you mustmodify the rbw.boot script by replacing the following line:
/redbrick_dir/bin/rbw.start /redbrick_dir RB_HOST
with
su -c "/redbrick_dir/bin/rbw.start /redbrick_dir RB_HOST"
where:
■ redbrick_dir is the directory for Red Brick Decision Server.
■ RB_HOST is the name of your server.
Platform-Specific Information: Silicon Graphics Servers G-5


HAppendix
Platform-SpecificInformation: SequentSymmetry System
This appendix contains administration information for RedBrick Decision Server, much of which is specific to the SequentSymmetry System under the DYNIX/ptx operating environment.Configuring Operating-System ParametersRed Brick Decision Server is a high-performance server designedto support the needs of tens or hundreds of users in a distributedclient/server computing environment. To provide sufficientresources for this large number of client users, you might need tomodify selected operating-system configuration parameters.
General Guidelines■ To run other applications concurrently on the same
system as Red Brick Decision Server, you might need toincrease the parameter values recommended in thissection.
■ If no specific value for an operating-system parameter isspecified in this guide, use the default value.
■ The parameter settings recommended here assume thatonly one version of Red Brick Decision Server is runningon your system. If you plan to run two versions simulta-neously (as described in Chapter 3, “Installing a NewRelease”) and both installations will be heavily loadedconcurrently, you might need to modify your parametersettings.
Number of Users and Parallel Query Processes
Number of Users and Parallel Query ProcessesSome configuration parameters depend on the maximum number of userslicensed for your warehouse installation, the value of the parameterTOTALQUERYPROCS in the rbw.config file, or both. If either of these param-eters changes, you might have to adjust other operating-system parametersin turn. Therefore, you might want to configure your operating system tosupport a projected number of users or a larger TOTALQUERYPROCS value.This will allow you to expand your warehouse system without having tomake adjustments later on.
Kernel ParametersConfiguring DYNIX/ptx for Red Brick Decision Server requires that youbuild and install a modified operating system kernel. Modifying the kernel isa complex system administration task requiring superuser privileges andsystem downtime to complete. For more information about how to build andinstall a modified kernel, refer to the DYNIX/ptx System Configuration andPerformance Guide, published by Sequent.
Set the following kernel configuration parameters for DYNIX/ptx Version 4.x.The values given are minimums required by Red Brick Decision Server whenit is the only application running on the server system. If other applicationsare used concurrently, you might need different settings.
The recommended kernel parameters assume a single PTMU operation. Ifyou are running more than one PTMU load at one time, you might need anincrease in the resource requirement on your system.
Important: Check the release notes for any changes to the kernel parameters.
Parameter Value
maxusers MIN (1024, max_rbw_users + 64)
msgmap MSGMNI * 4
msgmnb 65535
(1 of 2)
H-2 Installation and Configuration Guide for UNIX

Kernel Parameters
where:
When you modify the kernel, consider the following sections regarding TCPconnections, semaphores, and tuning parameters for DYNIX/ptx.
msgmni 52 + max_rbw_users + MAX[2 * MIN (max_parallel_tasks,max_rbw_users), load_processes]
msgseg MIN (32767, MSGMNI * 40)
msgssz 64
msgtql 40 + MAX (max_rbw_users * 40 + max_parallel_tasks * 2, load_processes* 10)
nproc PROC_MULT * MAXUSERS + 20 + MAX (load_processes, 2 *max_rbw_users + max_parallel_tasks)
shmmax MAX(16 megabytes,max_rbw_users * 4200 + max_parallel_tasks * 104 + 32768)
shmmni If max_parallel_tasks = 0, use 100.Otherwise, use
max_rbw_users + 100 + 2 * max_parallel_tasks
load_processes If no parallel loads, use 0. Otherwise, use:3 + MAX (1, num_cpus/2) + max_nuniq_idx
max_nuniq_idx Maximum number of nonunique indexes on any singletable to be loaded by a parallel load.
max_parallel_tasks TOTALQUERYPROCS from the rbw.config file. If notspecified, use 0.
max_rbw_users Maximum number of concurrent server sessions asspecified in the MAX_SERVERS parameter in therbw.config file.
num_cpus The number of CPUs on the computer.
Parameter Value
(2 of 2)
Platform-Specific Information: Sequent Symmetry System H-3
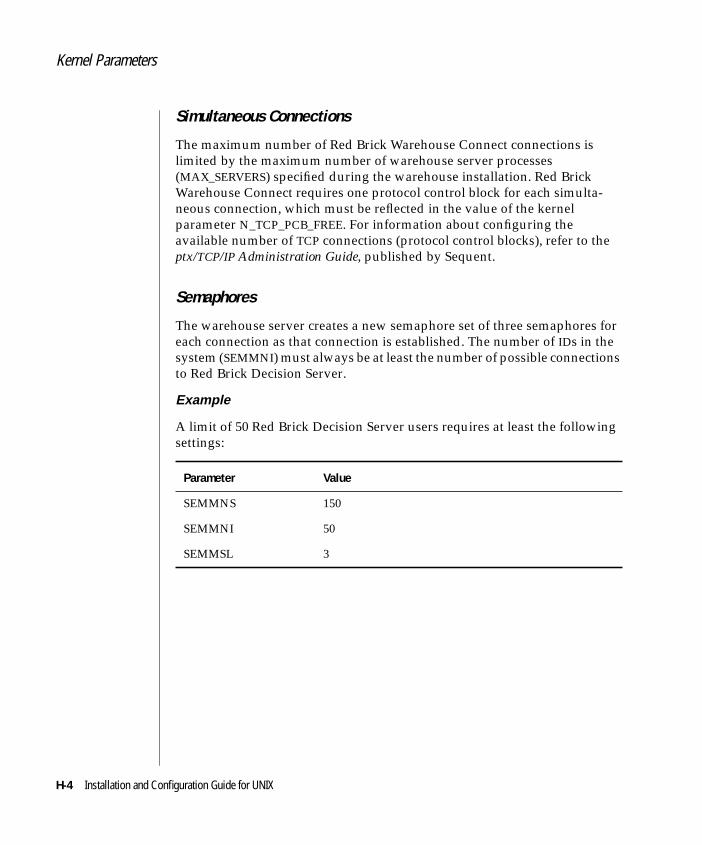
Kernel Parameters
Simultaneous Connections
The maximum number of Red Brick Warehouse Connect connections islimited by the maximum number of warehouse server processes(MAX_SERVERS) specified during the warehouse installation. Red BrickWarehouse Connect requires one protocol control block for each simulta-neous connection, which must be reflected in the value of the kernelparameter N_TCP_PCB_FREE. For information about configuring theavailable number of TCP connections (protocol control blocks), refer to theptx/TCP/IP Administration Guide, published by Sequent.
Semaphores
The warehouse server creates a new semaphore set of three semaphores foreach connection as that connection is established. The number of IDs in thesystem (SEMMNI) must always be at least the number of possible connectionsto Red Brick Decision Server.
Example
A limit of 50 Red Brick Decision Server users requires at least the followingsettings:
Parameter Value
SEMMNS 150
SEMMNI 50
SEMMSL 3
H-4 Installation and Configuration Guide for UNIX
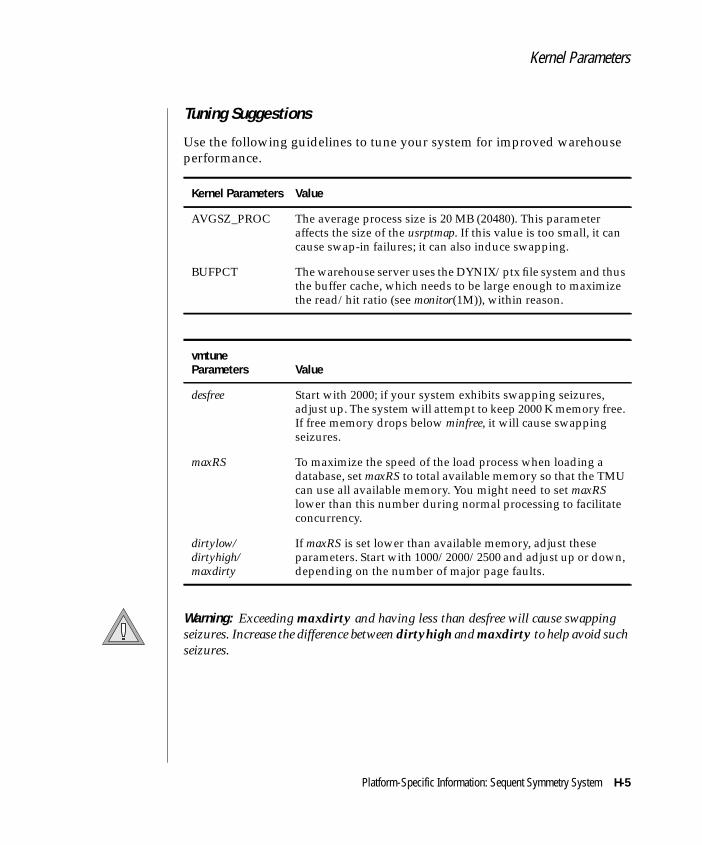
Kernel Parameters
Tuning Suggestions
Use the following guidelines to tune your system for improved warehouseperformance.
Warning: Exceeding maxdirty and having less than desfree will cause swappingseizures. Increase the difference between dirtyhigh and maxdirty to help avoid suchseizures.
Kernel Parameters Value
AVGSZ_PROC The average process size is 20 MB (20480). This parameteraffects the size of the usrptmap. If this value is too small, it cancause swap-in failures; it can also induce swapping.
BUFPCT The warehouse server uses the DYNIX/ptx file system and thusthe buffer cache, which needs to be large enough to maximizethe read/hit ratio (see monitor(1M)), within reason.
vmtuneParameters Value
desfree Start with 2000; if your system exhibits swapping seizures,adjust up. The system will attempt to keep 2000 K memory free.If free memory drops below minfree, it will cause swappingseizures.
maxRS To maximize the speed of the load process when loading adatabase, set maxRS to total available memory so that the TMUcan use all available memory. You might need to set maxRSlower than this number during normal processing to facilitateconcurrency.
dirtylow/dirtyhigh/maxdirty
If maxRS is set lower than available memory, adjust theseparameters. Start with 1000/2000/2500 and adjust up or down,depending on the number of major page faults.
Platform-Specific Information: Sequent Symmetry System H-5

Configuring Daemons for Automatic Startup
Configuring Daemons for Automatic StartupTo configure the Red Brick Decision Server daemons for automatic startupwhen the operating system starts:
1. Log in as superuser (root).
2. Copy the rbw.boot file generated by the install script into the /etc/init.ddirectory:
# cd redbrick_dir# cp rbw.boot /etc/init.d
3. Create a link to the rbw.boot file for the Sequent UNIX System V rc2script to execute during initialization:
# ln -s /etc/init.d/rbw.boot /etc/rc2.d/S99rbw
(S99 instructs the script to start after all other processes are running.)
4. Create a link to cleanly shut down the daemons when the systemshuts down:
# ln -s /etc/init.d/rbw.boot /etc/rc1.d/K00rbw(K00 instructs the script to kill before other processes stop.)
When you use this procedure, the warehouse daemon runs as the superuser.You can also configure the warehouse daemon to automatically start but runas the redbrick user.
Starting the Daemon as the redbrick UserTo configure the warehouse daemon to run as the redbrick user, you mustmodify the rbw.boot script by replacing the following line:
/redbrick_dir/bin/rbw.start /redbrick_dir RB_HOST
with
su -c "/redbrick_dir/bin/rbw.start /redbrick_dir RB_HOST"
where:
■ redbrick_dir is the directory for Red Brick Decision Server.
■ RB_HOST is the name of your server.
H-6 Installation and Configuration Guide for UNIX
IAppendix
Platform-SpecificInformation: NCRWorldMark Servers
This appendix contains administration information for RedBrick Decision Server, much of which is specific to the NCRWorldMark Servers under the NCR UNIX SVR4 MP-RAS operatingenvironment.Configuring Operating-System ParametersRed Brick Decision Server is a high-performance server designedto support the needs of tens or hundreds of users in a distributedclient/server computing environment. To provide sufficientresources for this large number of client users, you might need tomodify selected operating-system configuration parameters.
General Guidelines■ To run other applications concurrently on the same
system as Red Brick Decision Server, you might need toincrease the parameter values recommended in thissection.
■ If no specific value for an operating-system parameter isspecified in this guide, use the default value.
Number of Users and Parallel Query Processes
■ The parameter settings recommended here assume that only oneversion of Red Brick Decision Server is running on your system. Ifyou plan to run two versions simultaneously (as described inChapter 3, “Installing a New Release”) and both installations will beheavily loaded concurrently, you might need to modify yourparameter settings.
Number of Users and Parallel Query ProcessesSome configuration parameters depend on the maximum number of userslicensed for your warehouse installation, the value of the parameterTOTALQUERYPROCS in the rbw.config file, or both. If either of these param-eters changes, you might have to adjust other operating-system parametersin turn. Therefore, you might want to configure your operating system tosupport a projected number of users or a larger TOTALQUERYPROCS value.This will allow you to expand your warehouse system without having tomake adjustments later on.
Kernel ParametersConfiguring NCR UNIX SVR4 MP-RAS for Red Brick Decision Server requiresthat you build and install a modified operating system kernel. Modifying thekernel is a complex system administration task requiring superuser privi-leges and system downtime to complete. For information about how to buildand install a modified operating system kernel, refer to the NCR publication,Administrator Guide: Command Line Interface System Configuration (Volume 3).
Verify that the ipc, msg, sem, and shm modules are configured into yourcurrent kernel configuration. If they are not, follow the instructions in theNCR documentation to include these modules.
Set the following kernel configuration parameters for NCR UNIX SVR4 MP-RAS. The values given are minimums required by Red Brick Decision Serverwhen it is the only application running on the server system. If other appli-cations are used concurrently, you might need different settings.
The recommended kernel parameters assume a single PTMU operation. Ifyou run more than one PTMU load at one time, you might need an increasein the resource requirement on your system.
I-2 Installation and Configuration Guide for UNIX

Kernel Parameters
Important: Check the release notes for any changes to the kernel parameters.
Parameter Value
SEMMNI max_rbw_users + 25
NUM-OF-SEMS 3 * MAX (max_rbw_users, max_parallel_tasks) + (2 * num_cpus)+ 60
SEMMAP max_rbw_users + 27
SFNOLIM MIN (1024, (max_PSUs + 64))
FLCKREC 2000
MAXUP MAX (30, max_rbw_users + max_parallel_tasks + 5)
SHMMAX MAX(16 MEGABYTES, max_rbw_users * 4200 +max_parallel_tasks * 104 + 32768)
NPROC 55 + MAX(load_processes, 2 * max_rbw_users + max_parallel_tasks)
NINODE* 350 + (max_rbw_users * 2)
UFSNINODE* 350 + (max_rbw_users * 2)
SHMMNI If max_parallel_tasks = 0, use 100.Otherwise, use
MIN(500, max_rbw_users + 100 + 2 * max_parallel_tasks)
MSGMAP 400
MSGMAX 4096
MSGMNI MIN (1000, 2 * max_rbw_users + 50)
MSGTQL 100
HVMMLIM 0x7FFFFFFF
SVMMLIM 0x7FFFFFFF
HDATLIM 0x7FFFFFFF
(1 of 2)
Platform-Specific Information: NCR WorldMark Servers I-3

Kernel Parameters
where:
Important: If the above recommendations yield values such that MAXUP exceeds thesystem maximum of 400 and /or NPROC exceeds the system maximum of 5104,reduce max_rbw_users and/or max_parallel_tasks.
The maximum value for NINODE and UFSNINODE is 5000. If max_rbw_usersexceeds 2325, set these parameters to 5000.
NCR UNIX does not allow a message queue to be any longer than 4K. Also, the totalspace available for all message queues is fixed at 8K.
SDATLIM 0x7FFFFFFF
HSTKLIM 0x7FFFFFFF
SSTKLIM 0x1000000
load_processes If no parallel loads, use 0. Otherwise, use:3 + MAX (1, num_cpus/2) + max_nuniq_idx
max_nuniq_idx Maximum number of nonunique indexes on any singletable to be loaded by a parallel load.
max_parallel_tasks TOTALQUERYPROCS from the rbw.config file. If notspecified, use 0.
max_rbw_users Maximum number of concurrent server sessions asspecified in the MAX_SERVERS parameter in the rbw.con-fig file.
num_cpus The number of CPUs on the UNIX.
Parameter Value
(2 of 2)
I-4 Installation and Configuration Guide for UNIX
Configuring Daemons for Automatic Startup
Configuring Daemons for Automatic StartupTo configure the Red Brick Decision Server daemons for automatic startupwhen the operating system starts:
1. Log in as superuser (root).
2. Copy the rbw.boot file generated by the install script into the /etc/init.ddirectory:
# cd redbrick_dir# cp rbw.boot /etc/init.d
3. Create a link to the rbw.boot file for the NCR UNIX SVR4 MP-RAS rc3script to execute during initialization:
# ln -s /etc/init.d/rbw.boot /etc/rc3.d/S99rbw
(S99 instructs the script to start after all other processes are running.)
4. Create a link to cleanly shut down the daemons when the systemshuts down:
# ln -s /etc/init.d/rbw.boot /etc/rc2.d/K00rbw
(K00 instructs the script to kill before other processes stop.)
When you use this procedure, the warehouse daemon runs as the superuser.You can also configure the warehouse daemon to automatically start but runas the redbrick user.
Starting the Daemon as the redbrick UserTo configure the warehouse daemon to run as the redbrick user, you mustmodify the rbw.boot script by replacing the following line:
/redbrick_dir/bin/rbw.start /redbrick_dir RB_HOST
with
su -c “/redbrick_dir/bin/rbw.start /redbrick_dir RB_HOST”
where:
■ redbrick_dir is the directory for Red Brick Decision Server.
■ RB_HOST is the name of your Red Brick Decision Server.
Platform-Specific Information: NCR WorldMark Servers I-5

@
Index
O QCA B D E F G H I J K L M N P R S T U V W X Y Z
Index
Aaccounts, creating 1-17addresses for client
applications C-3, D-6, E-5, E-6,F-6, G-5, H-6, I-5
administrationdatabase (admin_db) 2-13non-platform-specific
tasks 5-3 to 5-7platform-specific tasks
AIX C-1 to C-3Digital UNIX D-1 to D-5DYNIX/ptx H-1 to H-6HP-UX E-1 to E-5IRIX G-1 to G-4NCR UNIX SVR4 MP-RAS I-1Solaris F-1 to F-5
AIXoperating-system parameters C-2requirements 1-6System Management Interface
Tool (SMIT) C-2version, determining 1-7
API daemon, starting 2-22Aroma database
aroma_db directory, defined A-6input files A-6installing 2-14
AVGSZ_PROC parameter H-5
Bbackups, database 3-6BIN directory, warehouse
defined A-3
Bourne shell 1-5bufhwm parameter F-3bufpages parameter E-2BUFPCT parameter H-5
CC shell 1-5cases, tracked by technical
support Intro-12cautions
database files online beforeupgrading 3-7
CD-ROM devicemounting 2-6unmounting 2-7
character setconversions B-7specifying 2-12
client applicationsinstallation 4-3 to 4-9logical addresses C-3, D-6, E-5,
E-6, F-6, G-5, H-6, I-5comment icons Intro-10concurrent users, maximum H-4configuration file
defined A-5location 2-22retaining when installing new
release 3-11configuration parameters, kernel
AIX C-1Digital UNIX D-2DYNIX/ptx H-2HP-UX E-2IRIX G-2
O QCA B D E F G H I J K L M N P R S T U V W X Y Z @
NCR UNIX SVR4 MP-RAS I-2Solaris F-2
connection_name.lockfile,defined A-5
contact information Intro-16conventions
syntax diagrams Intro-7syntax notation Intro-6
Ddaemons
administration (rbwadmd) 2-22configuring for automatic
startup 5-4logging (rbwlogd) 2-22rbwapid
checking active warehouse 5-3starting 2-22stopping 5-4
starting warehouseAIX C-3Digital UNIX D-5DYNIX/ptx H-6HP-UX E-5IRIX G-4NCR UNIX SVR4 MP-RAS I-5Solaris F-5
warehouse 2-22data size parameter (AIX) C-2databases
access to 1-17Aroma, See Aroma databasebackward compatibility 3-6, 3-7migrating to new release 3-7REORG operation for
upgrade 3-8upgrading 3-7
database, administration(admin_db) 2-13
demonstration databasescript to install Intro-4
dependencies, software Intro-4desfree parameter H-5dfldsiz parameter D-3dflssiz parameter D-3Digital AlphaServer 1-6, D-1 to D-5
Digital UNIXkernel parameters D-2requirements 1-6version, determining 1-6, 1-7, 1-8
directory structure, warehouse A-1dirtylow/dirtyhigh
parameters H-5disk space, determining
available 1-8documentation
list of Red Brick DecisionServer Intro-13
types ofonline manuals Intro-15printed manuals Intro-16
DYNIX/ptxrequirements 1-6version, determining 1-6, 1-7, 1-8
Eenvironment setup 1-3 to 1-19etc/sysconfigtab file, for kernel
parameters D-5
Ffeatures of this product,
new Intro-5file size, for redbrick user (AIX) C-2fsize parameter (AIX) C-2
GGRANT command 1-17
HHP 9000 Computer 1-6, E-1 to E-5HP-UX
kernel parameters E-2requirements 1-6version, determining 1-7
IIBM RISC System/6000 1-6,
C-1 to C-3icons
important Intro-10tip Intro-10warning Intro-10
important paragraphs, iconfor Intro-10
Informix CustomerSupport Intro-10
installation, client productsmain menu 4-6removing files 4-7RISQL Entry Tool 4-7RISQL Reporter 4-7running the script 4-5troubleshooting 4-4
installation, first-time 2-3 to 2-26checklist of tasks 2-26main menu 2-9maximum servers (users) 2-16redbrick directory 2-10removing files 2-10running the script 2-7sample database 2-14stopping the script 2-10troubleshooting 2-4verifying 2-24
installation, of newreleases 3-3 to 3-12
backing up existing release 3-6,3-11
checklist of tasks 3-12, 4-9during use of existing
warehouse 3-5maintenance releases 3-10patches 3-5updates 3-5
INSTALL.ISO script 2-7, 3-5, 4-5install.log file
defined A-5IPC keys
example definition 1-14selecting 1-13sharing 1-13specifying 2-14
2 Installation and Configuration Guide for UNIX

O QCA B D E F G H I J K L M N P R S T U V W X Y Z @
IRIXrequirements 1-6version, determining 1-6
Kkernel parameters
AIX C-1DYNIX/ptx H-1, H-3HP-UX E-5IRIX G-1, G-4IRIX64 H-1Solaris F-5
keywordsin syntax diagrams Intro-9
Korn shell 1-5
Llicensing
Red Brick Decision Server 1-18limits, file size for redbrick C-2LOAD DATA operation, database
migration 3-7load_processes parameter,
defined D-4, E-4, F-4, G-3,H-3, I-4
localecomponents 1-10
character set 1-11collation sequence 1-11language 1-10territory 1-11
determining 1-10 to 1-12list of supported B-1
lock files 1-9
Mmaintenance releases,
installing 3-10maxdirty parameter H-5maxfiles parameter E-2maxfiles_lim parameter E-2maximum number of users C-2,
D-2, E-2, F-2, G-2, H-2, I-2maxproc parameter D-3, D-4
maxRS parameter H-5maxuprc parameter D-3, E-3maxuser parameter F-3maxusers parameter D-3max_active_databases parameter,
defined D-4, D-5, E-4, E-5, F-4,F-5, G-3
max_nprocs parameter F-3max_nuniq_idx parameter,
defined D-4, E-4, F-4, G-4,H-3, I-4
max_parallel_tasks parameter,defined D-4, E-4, F-4, G-4,H-3, I-4
max_PSUs parameter, defined E-4max_query_tasks parameter,
defined D-4, E-4, F-4, G-4max_rbw_users parameter D-3max_rbw_users parameter,
defined D-5, E-5, F-5, G-3,H-3, I-4
MAX_SERVERS parameter 5-4,H-4
memory requirements (RAM) 1-6message queue parameters D-2,
E-2, F-2, G-2, H-2, I-2messages directory
defined A-5migration
databases 3-7users 3-9
msgmap parameter E-3msgmax parameter G-2msgmnb parameter E-3, G-2msg-mnb parameter D-3msgmni parameter E-3, G-2msg-mni parameter D-3msgseg parameter E-3, G-3msgssz parameter E-3, G-3msgsys
msginfo parameters F-3msgtql parameter E-3, G-3msg-tql parameter D-3
Nnbuf parameter E-3NCR UNIX SVR4 MP-RAS
kernel parameters I-1, I-5requirements 1-6version, determining 1-6
NCR WorldMark Servers 1-6, I-1netstat command 1-15new features of this product Intro-5nfile parameter E-3nflocks parameter E-3NFS file systems, configuring 1-8notation conventions Intro-5nproc parameter E-3num-of-sems parameter D-3, E-3,
G-3num_cpus parameter, defined D-5,
E-5, F-5, G-4, H-3, I-4N_TCP_PCB_FREE parameter H-4
Oonline manuals Intro-15operating system
parameters 1-6, H-1requirements 1-6version 1-6
Pparallel-query processes C-2, D-2,
E-2, F-2, G-2, H-2, I-2parameters
message queue D-2, E-2, F-2, G-2,H-2, I-2
tuning H-5vmtune H-5
patch releases, installing 2-3, 3-5printed manuals Intro-16processes, parallel query C-2, D-2,
E-2, F-2, G-2, H-2, I-2processes, See daemonsprotocol control block H-4
Index 3

@O QCA B D E F G H I J K L M N P R S T U V W X Y Z
RRAM requirements 1-6rbmt script
defined A-5.rbretrc file
defined A-3rbwadmd daemon 2-22rbwapid daemons
automatic startupDigital UNIX D-5DYNIX/ptx H-6HP-UX E-5IRIX G-4NCR UNIX SVR4 MP-RAS I-5Solaris F-5
checking active 5-3starting 2-22stopping 5-4
rbwapid filedefined A-4
rbwapid.log filedefined A-5
rbwapid.pid filedefined A-5
rbwcli.install scriptdefined A-5
rbwcrtr filedefined A-4
rbwlogd daemon 2-22rbwlogd file
defined A-4rbwlogmsg file
defined A-4rbwlogview file
defined A-4.rbwrc file
defined A-3rbwsvr file
defined A-4rbwsvr processes
checking active 5-3rbw.boot A-5rbw.config file
defined A-5location 2-22retaining when installing new
release 3-11
rbw.findserver scriptdefined A-4
rbw.install filedefined A-5
rbw.servermon daemondefined A-4
rbw.show scriptdefined A-4running 5-3
rbw.start scriptdefined A-4running 2-22
rbw.stop scriptdefined A-4running 5-4
rbw.verify scriptdefined A-4running 2-24
rb_cm filedefined A-3
rb_creator scriptdefined A-3
RB_DEFAULT_IDX file 3-7rb_deleter script
defined A-3RB_HOST environment variable
defined 1-12starting daemons 2-22verifying installation 2-24
.RB_HOST.semaphore file,defined A-3
.RB_HOST.sharedmemory file,defined A-3
rb_ptmu filedefined A-3
rb_sample.cleanup scriptdefined A-3
rb_setup script 2-20defined A-5
rb_tmu filedefined A-3
rb_translate filedefined A-3
rb_upgrade.all scriptdefined A-3
Red Brick Decision Serverlicensing 1-18starting 2-22stopping 5-4
redbrick accountcreating 1-16file size (AIX) C-2
redbrick directoryfiles and directories, defined A-3illustrated A-2
redbrick privilegesstarting/stopping daemons 2-22
redbrick useraccess to files 1-17and redbrick directory 1-18running installation script as 2-7
releases, running two Red BrickDecision Server 3-4
REORG operationdatabase upgrades 3-8user migration 3-9
RISQL Entry Toolinstalling 4-7user accounts 1-17
risql filedefined A-4
RISQL Reporteruser accounts 1-17
risqlrpt filedefined A-4
rlimit_nofile_cur parameter G-3root privileges, See superuser
privileges
Ssample_input directory
defined A-6semaphores H-4semmap parameter E-3SEMMNI parameter H-4semmni parameter E-3, G-3sem-mni parameter D-3SEMMNS parameter H-4semmns parameter E-3, G-3SEMMSL parameter H-4semsys
seminfo parameters F-3Sequent Symmetry System 1-6,
H-1 to H-6servers, maximum number 2-16sharing IPC keys 1-13
4 Installation and Configuration Guide for UNIX

O QCA B D E F G H I J K L M N P R S T U V W X Y Z @
shell, determining the system 1-5shlbmax parameter G-3shmmax parameter E-4shm-max parameter D-3shmmni parameter E-4, G-3shm-mni parameter D-4shmseg parameter E-4shm-seg parameter D-4shmsys
shminfo parameters F-4Silicon Graphics server 1-6,
G-1 to G-4SMIT, See System Management
Interface Toolsoftware dependencies Intro-4Solaris
kernel parameters F-2operating system 1-4requirements 1-6version, determining 1-7
sshmseg parameter G-3stack size parameter (AIX) C-2stopping
rbwapid daemons 5-4Sun SPARC-based systems 1-6,
F-1 to F-5SunOS, See SolarisSUNWipc package F-2superuser privileges
required during installation 1-4support
technical Intro-10svr3pipe parameter G-3syntax diagrams
conventions for Intro-7keywords in Intro-9variables in Intro-9
syntax notation Intro-5sysconfigtab file, for kernel
parameters D-5System Management Interface Tool
(SMIT) C-2system requirements
database Intro-4software Intro-4
Ttask_max parameter D-4TCP/IP ports
specifying 2-15, 4-8technical support Intro-10tip icons Intro-10TOTALQUERYPROCS
parameter C-2, D-2, E-2, F-2,G-2, H-2, I-2
troubleshootinggeneral problems Intro-12
tuning parameters H-5
UUNIX ODBC applications 4-9UNLOAD operations, database
migration 3-7update releases, installing 2-3, 3-5UPGRADE statements 3-7user accounts
creating 1-17RISQL Entry Tool 1-17
usersmaximum number of 2-16, C-2,
D-2, E-2, F-2, G-2, H-2, I-2migrating to new release 3-9
users, types of Intro-4util directory
defined A-6
Vvariables, in syntax
diagrams Intro-9verify scripts
warehouse installation 2-24vmtune parameters H-5
Wwarehouse
administration, non-platform-specific 5-3 to 5-7
administration, platform-specificAIX C-1 to C-3
Digital UNIX D-1 to D-5DYNIX/ptx H-1 to H-6HP-UX E-1 to E-5IRIX G-1 to G-4NCR UNIX SVR4 MP-RAS I-1Solaris F-1 to F-5
daemonsstarting 2-22stopping 5-4TCP/IP ports 2-15, 4-8
daemons, administering 5-3directory structure A-1
warning icons Intro-10
Symbols#, superuser prompt 1-5$, shell prompt 1-5%, shell prompt 1-5.connection_name.lockfile
defined A-5target of lock requests 1-9
Index 5