
Installation and Configuration Manual -...
191
Installation and Configuration Manual Intellicus Suite ©Intellicus Technologies [email protected] www.intellicus.com Intellicus Web-based Reporting Suite Release 4.4
Transcript of Installation and Configuration Manual -...

Installation and Configuration Manual
Intellicus Web-based Reporting Suite Release 4.4
Intellicus Suite
©Intellicus Technologies [email protected] www.intellicus.com

IInntteelllliiccuuss
WWeebb--bbaasseedd RReeppoorrttiinngg SSuuiittee RREELLEEAASSEE 44..44
IINNTTEELLLLIICCUUSS SSUUIITTEE
IINNSSTTAALLLLAATTIIOONN AANNDD CCOONNFFIIGGUURRAATTIIOONN MMAANNUUAALL

Copyright © 2009 Intellicus Technologies This document and its content is copyrighted material of Intellicus Technologies. The content may not be copied or derived from, through any means, in parts or in whole, without a prior written permission from Intellicus Technologies. All other product names are believed to be registered trademarks of the respective companies. Dated: - February 2009.

AAcckknnoowwlleeddggeemmeennttss Intellicus acknowledges using of a set of third-party libraries to extend support to the functionalities that they provide. These libraries are developed by respective companies / individuals and are available for use under various license types. Intellicus choose to use GNU LGPL licensed libraries. Intellicus doesn’t intent to or claim copyright, ownership or intellectual property rights of any of the libraries mentioned hereby. Software developed by the Apache Software Foundation (http://www.apache.org/) and covered under Apache Software Foundation Binary Code License Agreement:
• xmlParserAPIs.jar • xercesImpl.jar • xml-apis.jar • serializer.jar • xalan.jar
Covered under Apache Software Foundation Software License Agreement Open source APL:
• log4ij.jar Software developed by The Mozilla Foundation (http://www.mozilla.org/) and covered under Mozilla Public License.
• iText-2.0.7.jar • js.jar
Software developed by Jexcelapi project of Sourceforge (http://jexcelapi.sourceforge.net/) and covered under JExcelApi GNU LGPL.
• jxl.jar Software developed by Flagstone Software Ltd (http://www.flagstonesoftware.com/) and covered under BSD license agreement.
• transform.jar • translate.jar
Software developed by Sun Microsystem Inc. (http://www.sun.com/) and covered by Binary Code License Agreement.
• activation.jar • jai_codec.jar • jai_core.jar
Software developed by Sybase Inc (www.sybase.com) and covered under Sybase Binary Code License Agreement.
• jconn3.jar Software developed by Microsoft Corporation (http://msdn.microsoft.com/en-us/data/aa937724.aspx) and available for redistribution under MICROSOFT SQL SERVER 2005 JDBC DRIVER REDISTRIBUTION LICENSE: • Microsoft SQL Server 2005 JDBC Driver
Software developed by GNU Project (http://www.gnu.org) and covered under GNU Lesser General Public License.
• jtds-1.2.jar • jtds-1.2.2.jar
Software developed by Christophe Dolivet (http://www.cdolivet.net/editarea/) and released under "LGPL", "Apache" and "BSD" licenses.
• EditArea, a javascript editor for source code.

Installation and Configuration Manual i
About this Document The document illustrates the installation and configuration of the Intellicus web-based reporting tool. Users who are familiar with the concepts and terminology of the operating system will have quicker grasp on the document. Intellicus installs on the following platforms: • Windows
• Linux
• Solaris
• AIX
• HP UX
Note: Make sure that the machine where Intellicus is being installed has decompression utilities WinZip (for Windows based machines) and gunzip (for Solaris/Linux based machines) installed.
Important: To install and configure Intellicus, the installer must have sufficient rights to install software on that machine. Installer must be either an administrator or be granted required rights by the administrator.
IInnssttaalllliinngg IInntteelllliiccuuss This section identifies the steps to install Intellicus on different platforms.
UUnn--iinnssttaalllliinngg IInntteelllliiccuuss This section identifies steps to uninstall Intellicus from the computer.
CCoonnffiigguurraattiioonn A newly installed Intellicus works using pre-set default properties. The section provides instructions to configure the Intellicus components to meet specific requirements. The section details various Properties, steps to create Database connections, applying the License, etc.
PPeerrffoorrmmaannccee OOppttiimmiizzaattiioonn This section demonstrates the factors to be considered to optimize the performance of the Intellicus server and portal.
Installation and Configuration Manual ii
IInn tthhiiss ddooccuummeenntt,, tthhee ffoolllloowwiinngg ccoonnvveennttiioonnss aarree uusseedd:: As per the mouse usage convention, Click implies pressing the left button of the mouse (for a right-handed user). The Filenames and the Path information are in Verdana font. Screen elements, like screen names, dialog boxes, buttons are in bold text. Values of options buttons or dropdown boxes, list boxes are in italics. The following symbols are used to denote:
Note:
Important:
Warning:
Tip:

Installation and Configuration Manual iii
Contents
Pre-Installation Instructions for Windows ............................1 Hardware Pre-requisites ................................................................... 1 Application Program Pre-requisites ..................................................... 1
Installing Intellicus on Windows ..........................................3
Post-Installation Instructions for Windows.........................15 If the Web Server does not start .......................................................16 Changing the port number ...............................................................16 Starting the web Interface ...............................................................17 Security Modes of Intellicus .............................................................17
Uninstalling Intellicus on Windows .....................................19
Installing Intellicus on Linux ..............................................21 System Pre-requisites: ....................................................................21
Installing the product ................................................................................ 22 Multilingual support ................................................................................... 22 Starting Intellicus ...................................................................................... 22 Stopping Intellicus .................................................................................... 24 Making Intellicus Start automatically ........................................................... 24
Installing Intellicus on Solaris ............................................27 System Pre-requisites: ....................................................................27
Installing the product ................................................................................ 28 Multilingual support ................................................................................... 28 Starting Intellicus ...................................................................................... 28 Stopping Intellicus .................................................................................... 30 Making Intellicus Start automatically ........................................................... 30
Installing Intellicus on AIX.................................................33 System Pre-requisites: ....................................................................33
To install Intellicus Web Reporting suite ...................................................... 34 Multilingual support ................................................................................... 35 Starting Intellicus ...................................................................................... 35 Stopping Intellicus .................................................................................... 37 Making Intellicus Start automatically ........................................................... 37
Installing Intellicus on HP-UX ............................................39 System Pre-requisites: ....................................................................39
To install Intellicus Web Reporting suite ...................................................... 40
Installation and Configuration Manual iv
Multilingual support ................................................................................... 40 Starting Intellicus ...................................................................................... 40 Stopping Intellicus .................................................................................... 42 Making Intellicus Start automatically ........................................................... 42
Running Intellicus Portal under SSL....................................44 Prerequisite .............................................................................................. 44 Configuring SSL ........................................................................................ 44
Updating Tomcat Configuration File ...................................................44 Accessing Intellicus running under SSL ..............................................46 Accepting the certificate ..................................................................46
Deploying Intellicus web application in WebLogic ...............49 Download Intellicus web application for WebLogic......................................... 50 To Create WebLogic Domain for Intellicus .................................................... 50
Create Domain in Web Logic 8.1 on Linux & Solaris ..............................50 To Create WebLogic Domain on Windows ............................................55
To deploy Intellicus as Web Application ....................................................... 59 To change the Listener Port .............................................................63
Deploying Intellicus web application in IBM WebSphere ......65 Deploying Intellicus web application using WAR file ...................................... 65
Download Intellicus web application ..................................................65 Installing Intellicus (using WAR file) ..................................................66
Deploying Intellicus using EAR file .............................................................. 74 Installing Intellicus.........................................................................75 Unzip Client.zip folder .....................................................................80 Setting path of ReportClient.properties ..............................................81
Deploying Intellicus in Oracle App. Server ..........................86
Deploying Intellicus in SunOne App. Server ........................97 Prerequisites .................................................................................97 Deployment process .......................................................................97
IIS redirection for Intellicus............................................. 103 Redirection related files ............................................................................103 Unzipping IntellicusIISRedirector.zip ..........................................................105 Making required changes in server.xml file ..................................................106
Virtual host related changes........................................................... 106 Changing AJP Port (optional step) ................................................... 107
Making required changes in IntellicusWorkers.properties file .........................108
Installation and Configuration Manual v
Creating virtual Directory in IIS .................................................................109 Configure Intellicus_redirector.properties....................................................113
Configure Intellicus redirector ISAPI Filter (IIS 5) .............................. 114 Configure Intellicus redirector ISAPI Filter (IIS 6) .............................. 116 TCP Port setting........................................................................... 120 The URL ..................................................................................... 120
Intellicus Configurations .................................................. 121 Loading common configuration page ................................................ 121
Report Server configuration.......................................................................122 Configuring Report Server .........................................................................123
The Property Details ..................................................................... 124 Default values ............................................................................. 136
Working with Server Logs..........................................................................137 To download log files .................................................................... 137 To purge one or more log files ........................................................ 137
Database Connection configuration ............................................................138 To filter list of Connections ............................................................ 139 To add a connection ..................................................................... 140 The entry details.......................................................................... 140 Provider specific details for database connection ................................ 141 Access Rights to use a Connection................................................... 146 Multiple Instances of MS SQL Server 2000 ........................................ 147 OCI and OCI_TNS connections on Solaris.......................................... 148 When Oracle 8 client or Oracle 9 client is installed on Windows ............ 148 To Test a database connection's validity ........................................... 150 To update a connection detail ......................................................... 150 To remove a connection detail ........................................................ 150 To refresh metadata caching .......................................................... 150 Which data connection will a report use? .......................................... 151 Downloading database configuration file ........................................... 152 Connection icon on Intellicus Portal ................................................. 153
Applying Intellicus License ........................................................................154 Generating License request file ....................................................... 154 Deploying a License ...................................................................... 155 Studio Licensing .......................................................................... 155
Intellicus Portal Configuration....................................................................156 Configuring through Property file .................................................... 156
Configuring Client (Portal) .........................................................................157 Web Component .......................................................................... 157 Logging ...................................................................................... 158 How to Change the details ............................................................. 158
Installation and Configuration Manual vi
Tuning and Performance Optimization .............................. 159 Configuring Report Server .........................................................................159
Maximum Memory ........................................................................ 159 Threads...................................................................................... 160 Database connections ................................................................... 161 Security Features ......................................................................... 162 Audit Logging .............................................................................. 162 Client Timeout ............................................................................. 162 Access Control ............................................................................. 163 Repository Cache Timeout ............................................................. 163 Logging Level .............................................................................. 163
Configuring Web Portal .............................................................................163 Server Timeout ............................................................................ 163 Maximum memory ........................................................................ 164 Threads...................................................................................... 164
Sample Cases ..........................................................................................166 Sample Case 1 ............................................................................ 166 Sample Case 2 ............................................................................ 166
Support............................................................................ 169 Website...................................................................................... 169 FTP ........................................................................................... 169
Appendix.......................................................................... 171 Getting and using third party components ...................................................171
MSSQL 2000 database connection ................................................... 171 MYSQL database connection ........................................................... 172 Driver for MSSQL (Windows Authentication) ...................................... 174
Table of Figures ............................................................... 175

Pre-Installation Instructions for Windows
Installation and Configuration Manual 1
11 Pre-Installation Instructions for Windows This chapter provides information that you need to know before installing Intellicus. It will help avoid problems during the installation process. Hardware Pre-requisites The following resources are minimally required on a candidate machine to install Intellicus.
• Operating System: Windows 2000/2003, XP, Vista • Memory: 256 MB of RAM or more • Storage Space: 1 GB or more
Application Program Pre-requisites Server Machine The following application programs are required on the machine where Intellicus is installed. • User may need to have WinZip installed on the machine.
• The person working on installation of Intellicus must have administrative privileges on the machine.
End User Machine The following application programs are required on the machine where Intellicus is accessed through web. • Internet Explorer 6.0 or above, Netscape 4.7 or above, or Mozilla Fire fox 2
or above browser application.
• Plug-ins/applications for opening MS Excel, MS Word and PDF format files.

Installing Intellicus on Windows
Installation and Configuration Manual 3
22 Installing Intellicus on Windows The Intellicus product CD is setup for automatic run. However, it is also possible to install Intellicus manually. If you have downloaded Intellicus from the Intellicus website, unzip the Intellicus Windows_setup_xx_xx.zip file to get the setup.exe.
Important: You must have Administrator Privileges on the machine on which Intellicus is being installed.
Double-click the setup.exe file. This invokes the installation wizard that guides you through the installation process. Here, installation program starts configuring windows installer. After the configuration is over, the welcome screen of the installation wizard is displayed.
Note: In case you have already installed this application on the computer, a message box would prompt to uninstall Intellicus. If not then next step shows up.
Tip: To abort the installation process, at any stage of installation, you can click the Cancel button.
Figure1 shows the Welcome Screen. Click the Next button to proceed. License Agreement screen appears.

Installing Intellicus on Windows
Installation and Configuration Manual 4
Figure 1: Welcome Screen Figure 2 shows the License Agreement screen.
Figure 2: License Agreement Screen. Read the License Agreement.

Installing Intellicus on Windows
Installation and Configuration Manual 5
If you agree, then click Yes button to proceed to the Customer And Usage Details screen. Figure 3 shows the Customer Information Screen.
Figure 3: Customer Information.
User Name/ Company Name
Please specify the User Name and the Company Name. User has an option to install this application for use by either all users (Select Anyone who uses this computer) or only by the administrator (Select only for me). Click Next to move onto the next screen. Figure 4 shows Installation Options screen.
Installing Intellicus on Windows
Installation and Configuration Manual 6
Figure 4: Installation Options
Express Install
Select this option to: • Install all the components of Intellicus.
• Install Intellicus at the default location set in the installation program.
Selective Install
Select this option to: • Install one or more selected components of Intellicus.
• Install the application at a location different than the default.
Click Next to proceed to Installation Location screen.

Installing Intellicus on Windows
Installation and Configuration Manual 7
Figure 5: Option to change the destination folder By default, the application is installed at path: C:\Program Files\Intellicus. User has the option to either go with the default destination location or specify a different destination (installation) location. Click Browse and specify the destination location to change it. When you click Browse button, Choose Folder screen appears. On this screen, you may specify path in the Path area. If you do not remember the path, you can also select it from Directories area.
Figure 6: Specifying Installation folder
Installing Intellicus on Windows
Installation and Configuration Manual 8
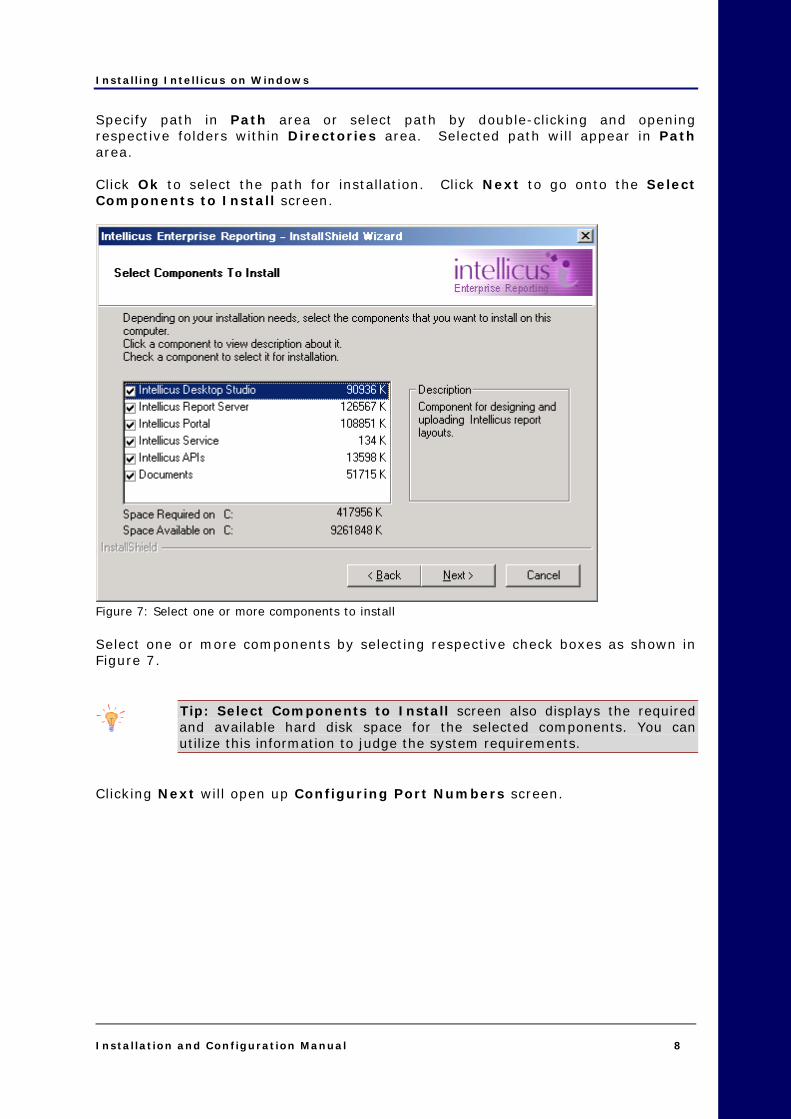
Specify path in Path area or select path by double-clicking and opening respective folders within Directories area. Selected path will appear in Path area. Click Ok to select the path for installation. Click Next to go onto the Select Components to Install screen.
Figure 7: Select one or more components to install Select one or more components by selecting respective check boxes as shown in Figure 7.
Tip: Select Components to Install screen also displays the required and available hard disk space for the selected components. You can utilize this information to judge the system requirements.
Clicking Next will open up Configuring Port Numbers screen.
Installing Intellicus on Windows
Installation and Configuration Manual 9
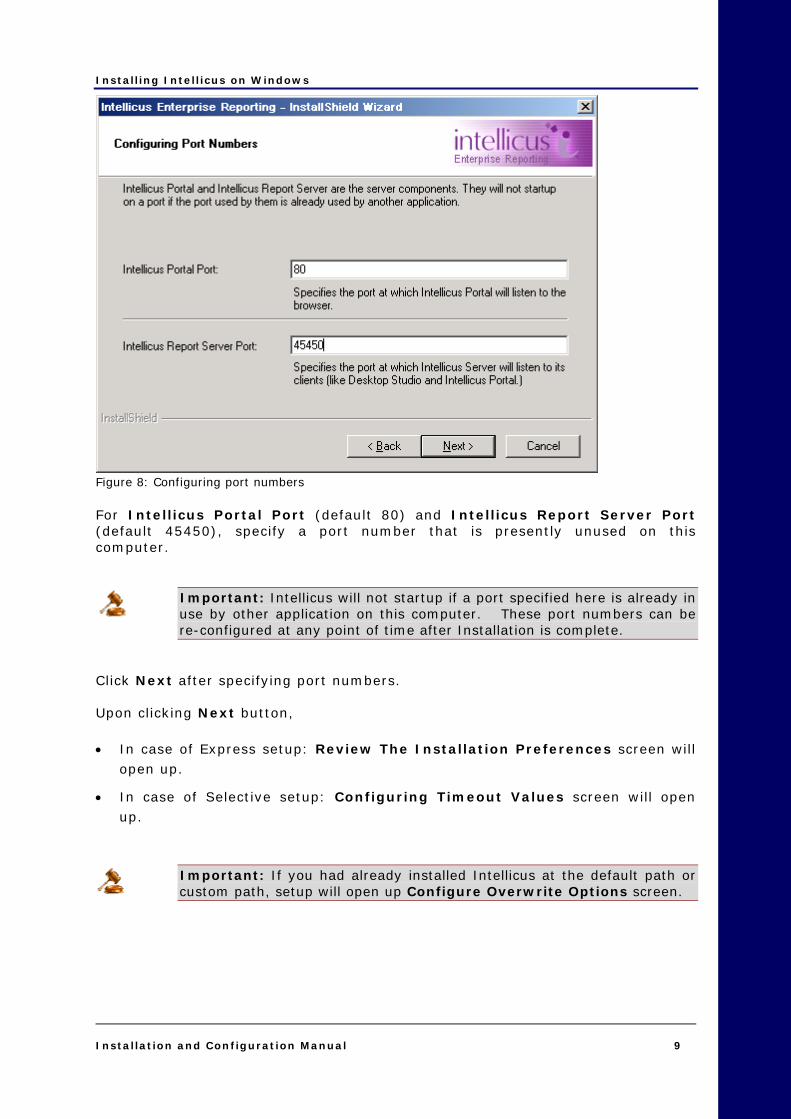
Figure 8: Configuring port numbers For Intellicus Portal Port (default 80) and Intellicus Report Server Port (default 45450), specify a port number that is presently unused on this computer.
Important: Intellicus will not startup if a port specified here is already in use by other application on this computer. These port numbers can be re-configured at any point of time after Installation is complete.
Click Next after specifying port numbers. Upon clicking Next button, • In case of Express setup: Review The Installation Preferences screen will
open up.
• In case of Selective setup: Configuring Timeout Values screen will open up.
Important: If you had already installed Intellicus at the default path or custom path, setup will open up Configure Overwrite Options screen.

Installing Intellicus on Windows
Installation and Configuration Manual 10
Intellicus does not remove some of the folders after un-installation so that you can backup the configuration files. If you have made configuration changes during the previous installation, on Configuration Overwrite Options page, you can select the files that SETUP SHOULD REPLACE.
Figure 9: Select the files that setup should replace Click Next to proceed. Upon clicking Next button, • In case of Express setup: Review The Installation Preferences screen will
open up.
• In case of Selective setup: Configuring Timeout Values screen will open up.
Installing Intellicus on Windows
Installation and Configuration Manual 11
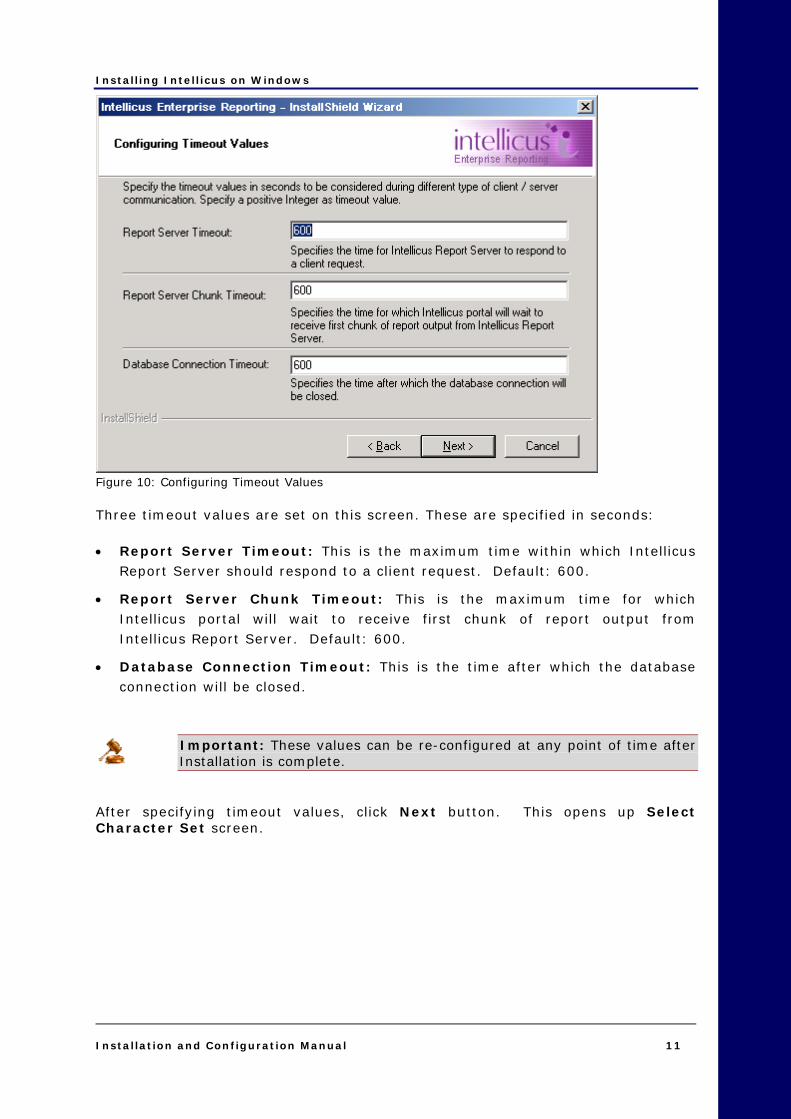
Figure 10: Configuring Timeout Values Three timeout values are set on this screen. These are specified in seconds: • Report Server Timeout: This is the maximum time within which Intellicus
Report Server should respond to a client request. Default: 600.
• Report Server Chunk Timeout: This is the maximum time for which Intellicus portal will wait to receive first chunk of report output from Intellicus Report Server. Default: 600.
• Database Connection Timeout: This is the time after which the database connection will be closed.
Important: These values can be re-configured at any point of time after Installation is complete.
After specifying timeout values, click Next button. This opens up Select Character Set screen.

Installing Intellicus on Windows
Installation and Configuration Manual 12
Figure 11: Selecting character set Intellicus can provide multilingual support using UTF-8 character set. To configure starter files multilingual support, select option UTF-8.
Important: This value can be re-configured at any point of time after Installation is complete.
After selecting Character Set value, click Next button. This opens up Review the Installation Preferences screen.

Installing Intellicus on Windows
Installation and Configuration Manual 13
Figure 12: Review the installation preferences screen Verify the information that is provided. Click Back to go back and change any settings if required. Click Next to go onto the Installation Progress screen.
Figure 13: Installation Progress screen
Installing Intellicus on Windows
Installation and Configuration Manual 14
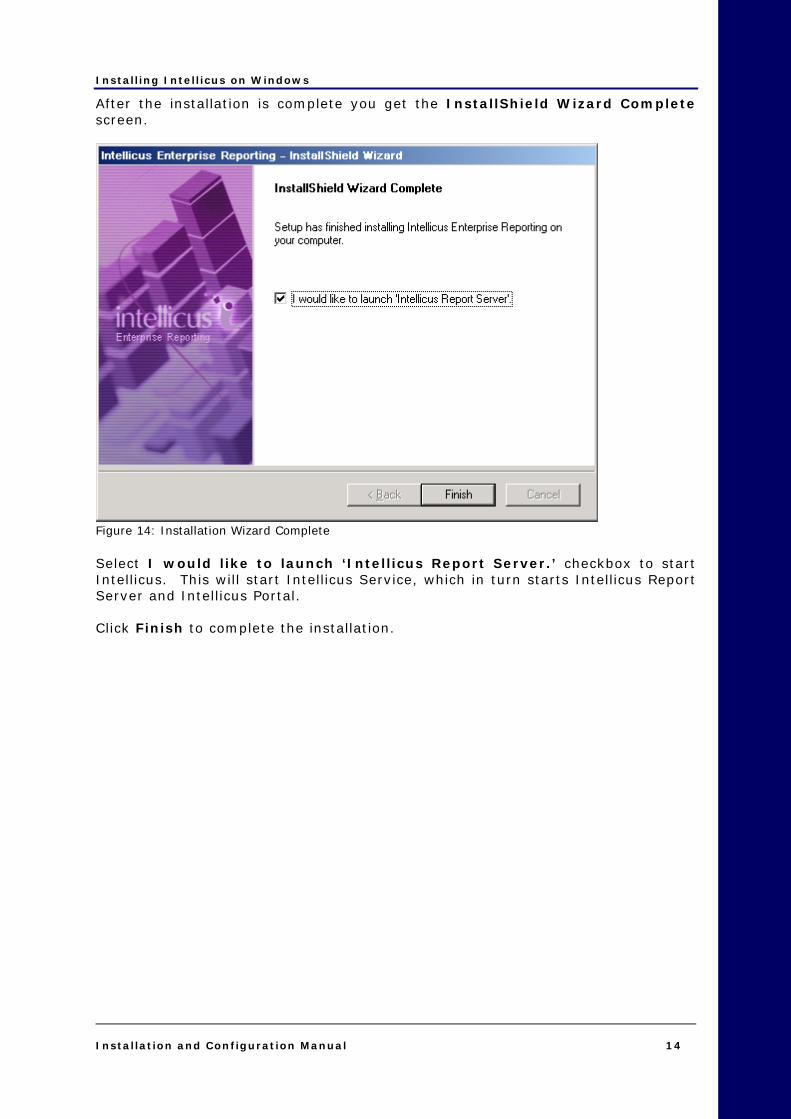
After the installation is complete you get the InstallShield Wizard Complete screen.
Figure 14: Installation Wizard Complete Select I would like to launch ‘Intellicus Report Server.’ checkbox to start Intellicus. This will start Intellicus Service, which in turn starts Intellicus Report Server and Intellicus Portal. Click Finish to complete the installation.
Post-Installation Instructions for Windows
Installation and Configuration Manual 15
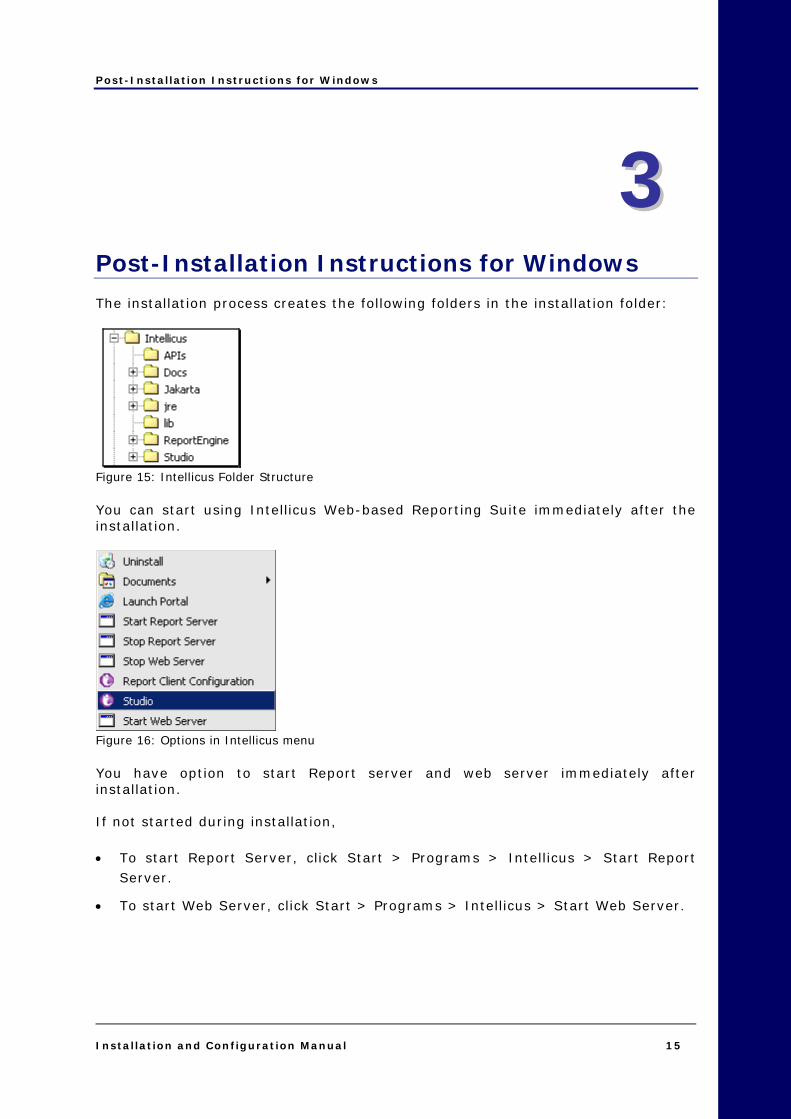
33 Post-Installation Instructions for Windows The installation process creates the following folders in the installation folder:
Figure 15: Intellicus Folder Structure You can start using Intellicus Web-based Reporting Suite immediately after the installation.
Figure 16: Options in Intellicus menu You have option to start Report server and web server immediately after installation. If not started during installation, • To start Report Server, click Start > Programs > Intellicus > Start Report
Server.
• To start Web Server, click Start > Programs > Intellicus > Start Web Server.

Post-Installation Instructions for Windows
Installation and Configuration Manual 16
The Web Server and the Report Server will now start automatically when you restart the machine. Intellicus service icon appearing in system tray indicates running-status of the servers.
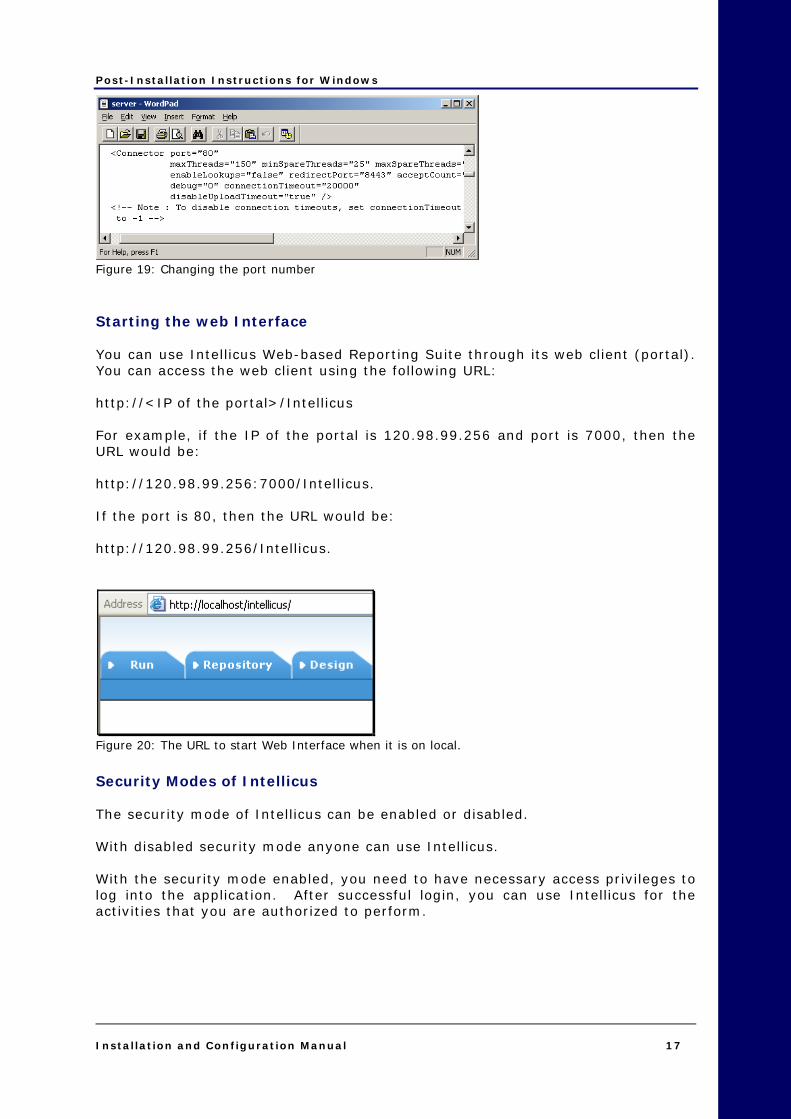
Figure 17: The service icon on system tray If the Web Server does not start Intellicus is set to run on port 80. The Web Server will not start if this port is used by any other application. To start the Web Server change the port from 80 to the one that is free. Changing the port number Here is the information about how to change the port number when Jakarta Web Server is used. The port number information is stored in server.xml file.
Figure 18: Location of server.xml To change the port number:
1. Open server.xml in a text editor. 2. Change the value of Connector port to a number that is free. 3. Save the changes.
Post-Installation Instructions for Windows
Installation and Configuration Manual 17
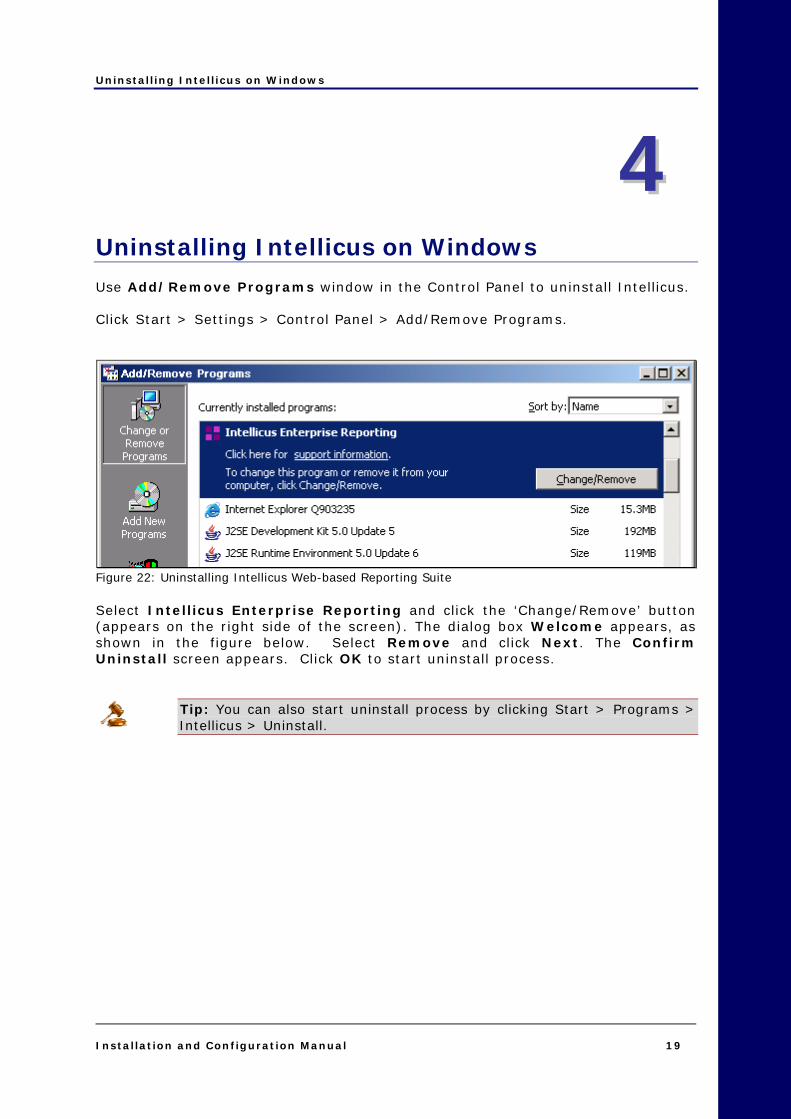
Figure 19: Changing the port number Starting the web Interface You can use Intellicus Web-based Reporting Suite through its web client (portal). You can access the web client using the following URL: http://<IP of the portal>/Intellicus For example, if the IP of the portal is 120.98.99.256 and port is 7000, then the URL would be: http://120.98.99.256:7000/Intellicus. If the port is 80, then the URL would be: http://120.98.99.256/Intellicus.
Figure 20: The URL to start Web Interface when it is on local. Security Modes of Intellicus The security mode of Intellicus can be enabled or disabled. With disabled security mode anyone can use Intellicus. With the security mode enabled, you need to have necessary access privileges to log into the application. After successful login, you can use Intellicus for the activities that you are authorized to perform.

Post-Installation Instructions for Windows
Installation and Configuration Manual 18
When security mode is enabled, the first page you receive is authentication page. You need to specify following login details: • User Name
• Password
• Organization (under Options)
Figure 21: Login details When Intellicus is run with Demo License, users having names: Admin, Designer and User are already created. The screen is divided in two parts: Login (left side of the screen) and DEMO LOGIN (right side of the screen). You have to feed respective User Name and Password to carry out respective tasks.
Uninstalling Intellicus on Windows
Installation and Configuration Manual 19
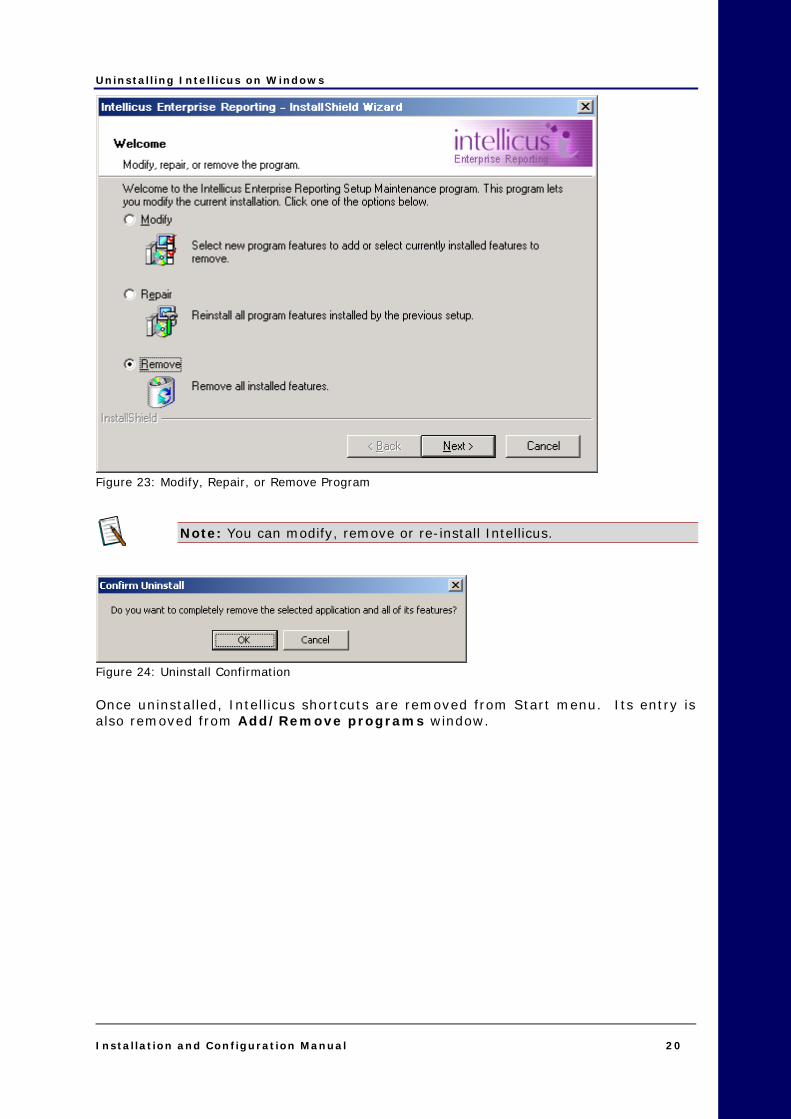
44 Uninstalling Intellicus on Windows Use Add/Remove Programs window in the Control Panel to uninstall Intellicus. Click Start > Settings > Control Panel > Add/Remove Programs.
Figure 22: Uninstalling Intellicus Web-based Reporting Suite Select Intellicus Enterprise Reporting and click the ‘Change/Remove’ button (appears on the right side of the screen). The dialog box Welcome appears, as shown in the figure below. Select Remove and click Next. The Confirm Uninstall screen appears. Click OK to start uninstall process.
Tip: You can also start uninstall process by clicking Start > Programs > Intellicus > Uninstall.
Uninstalling Intellicus on Windows
Installation and Configuration Manual 20
Figure 23: Modify, Repair, or Remove Program
Note: You can modify, remove or re-install Intellicus.
Figure 24: Uninstall Confirmation Once uninstalled, Intellicus shortcuts are removed from Start menu. Its entry is also removed from Add/Remove programs window.
Installing Intellicus on Linux
Installation and Configuration Manual 21
55 Installing Intellicus on Linux Instructions for installation and running Intellicus on Linux are organized into the following sections: • Installing the product.
• Starting the Intellicus Report Server.
• Starting the Intellicus web server.
• Starting the Intellicus suite in browser.
• Logging into the Intellicus.
• Stopping the Intellicus Report Server.
• Stopping the Intellicus web server.
• Daemon script to start Intellicus automatically as soon as the system is booted / restarted.
System Pre-requisites: • Memory: 256 MB of RAM or more.
• Storage Space: 1 GB or more.
• Internet Browser: Internet Explorer 6.0 or a higher version.
• gunzip (To extract Intellicus files).
Important: To be able to install Intellicus, you are required to have administrative privileges on the machine.

Installing Intellicus on Linux
Installation and Configuration Manual 22
Installing the product Decompress intellicuslinux.tar.gz in the home directory.
gunzip intellicuslinux.tar.gz This will create intellicuslinux.tar. Untar the file intellicuslinux.tar.
tar -xvf intellicuslinux.tar This creates a folder called Intellicus. All files get copied into this folder.
Note: This Setup doesn't contain a demo repository. Create a connection in ReportEngine.dat and point it to the user’s database for creating a repository.
Multilingual support You can have multilingual support in Intellicus to provide following benefits to the users. • To display multilingual data from database in reports.
• To display multilingual data in Parameter combo.
• To be able to specify multilingual data in filter, parameter as well as SQL Editor.
Starting Intellicus
To Start the ReportServer
Report Server is located in the /Intellicus/reportengine/bin folder. To start the Report Server, run the file run.sh.
./run.sh To Start the ReportServer with multilingual support
./ UTF8_run.sh This file passes -Dfile.encoding=utf-8 as the command line java option. As an alternative, you can also rename the files:
Installing Intellicus on Linux
Installation and Configuration Manual 23
1. Rename the file run.sh (for example, as E_run.sh) . 2. Rename the file UTF8_run.sh as run.sh .
Now onwards you can run run.sh to start the ReportServer with multilingual support.
To start Intellicus Webserver
Intellicus Webserver is located in the /Intellicus/jakarta/bin folder. To start the Intellicus Webserver, run the file startup.sh.
./startup.sh To start the webserver with multilingual support
./UTF8_startup.sh This file calls UTF8_ Catalina.sh. UTF8_ Catalina.sh passes -Dfile.encoding=utf-8 as the command line java option. As an alternative, you can also rename the files:
1. Rename the file startup.sh (for example, as E_startup.sh) . 2. Rename the file UTF8_startup.sh as startup.sh .
Now onwards you can run startup.sh to start the webserver with multilingual support.
To start Intellicus Web Reporting suite
1. Open the browser. 2. In address bar, specify the following URL:
http:// <IP of the Webserver>/Intellicus For example, http://120.98.99.256/Intellicus If user has changed the Webserver port, specify the following URL:
http://<IP of the webserver:port number>/Intellicus. For example, if the changed port number is 7000, the URL would be:
http://120.98.99.256:7000/Intellicus
Installing Intellicus on Linux
Installation and Configuration Manual 24
Logging into Intellicus Web reporting suite
User needs to provide following information to log into Intellicus. User Name: Admin Password: Admin Organization Name: Intellica Click Login after entering required information.
Stopping Intellicus
To Stop the Report Server
Run the file shutdown.sh. This file is available in intellicus/reportengine/bin folder.
./shutdown.sh
To stop the Webserver
Run the file shutdown.sh. This file is located in the Intellicus/jakarta/bin folder.
./shutdown.sh
Making Intellicus Start automatically The steps to setup the daemon script on a Linux box is given below:
1. Open the Intellicus.sh from Intellicus/APIs folder and specify the home path for Intellicus (the folder where Intellicus was untared). The configuration parameter to be modified is:
Intellicus_home= <path where Intellicus was untared>
2. Place the Intellicus.sh script file in specific folders. The command is
For Red Hat / Fedora,
cp Intellicus.sh /etc/rc.d/init.d/ For S.U.S.E and Debain,
cp Intellicus.sh /etc/init.d/
Installing Intellicus on Linux
Installation and Configuration Manual 25
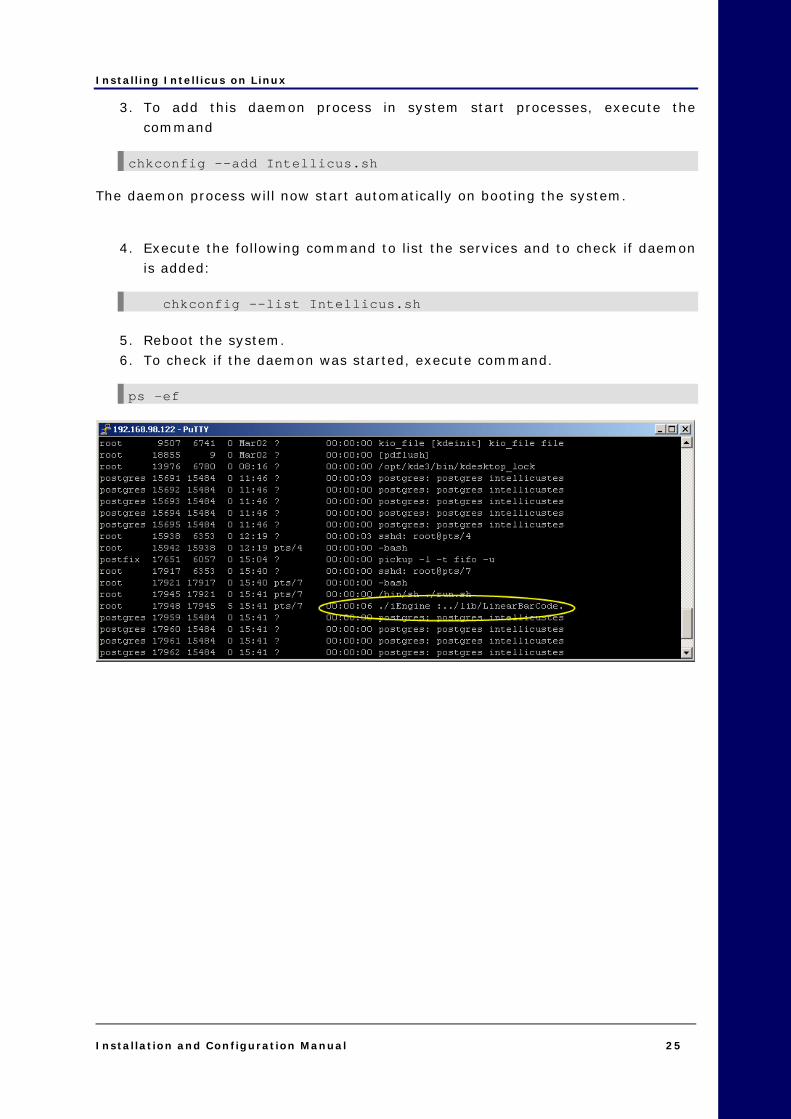
3. To add this daemon process in system start processes, execute the command
chkconfig --add Intellicus.sh
The daemon process will now start automatically on booting the system.
4. Execute the following command to list the services and to check if daemon is added:
chkconfig --list Intellicus.sh
5. Reboot the system. 6. To check if the daemon was started, execute command.
ps –ef


Installing Intellicus on Solaris
Installation and Configuration Manual 27
66 Installing Intellicus on Solaris Instructions for installation and running on Solaris are organized into the following sections: • Installing of the product.
• Starting the Intellicus ReportServer.
• Starting the Intellicus Webserver.
• Starting the Intellicus suite in browser.
• Logging into the Intellicus.
• Stopping the Intellicus ReportServer.
• Stopping the Intellicus Webserver.
System Pre-requisites: • Memory: 256 MB of RAM or more.
• Storage Space: 1 GB or more.
• Internet Browser: Internet Explorer 6.0 or a higher version.
• Gunzip: To extract Intellicus files.
Important: The person working on installation of Intellicus must have required administrative privileges on the machine.
Installing Intellicus on Solaris
Installation and Configuration Manual 28
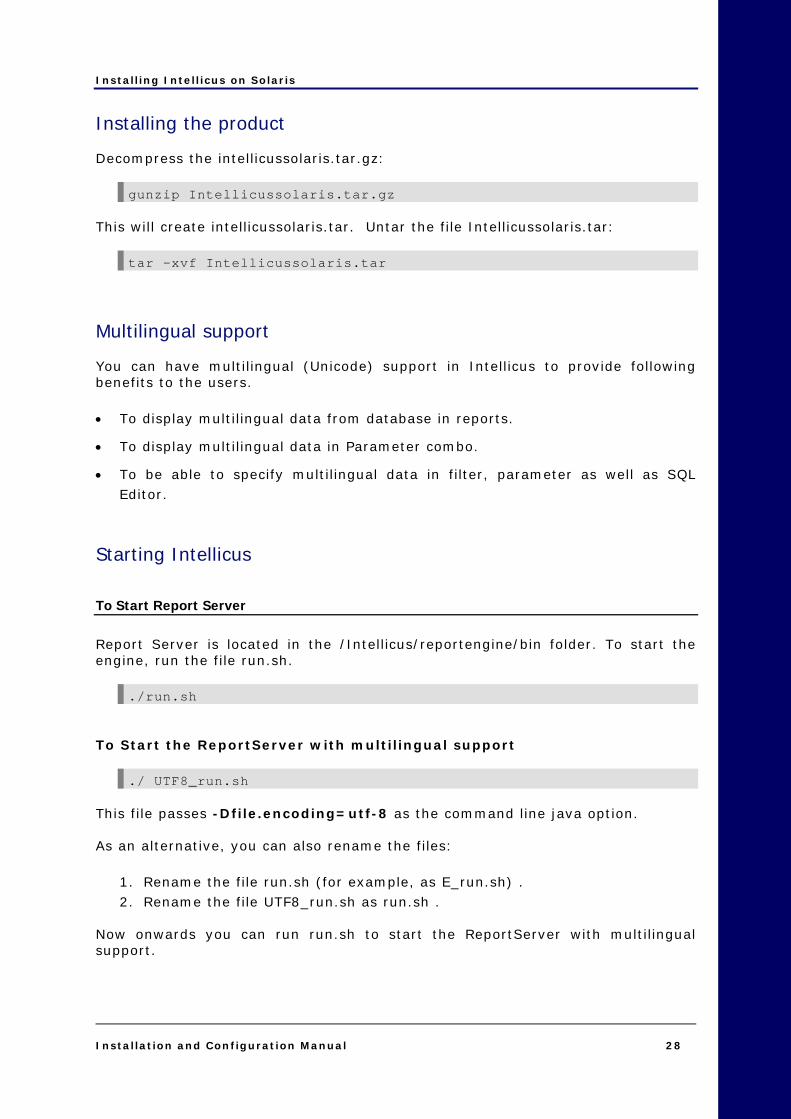
Installing the product Decompress the intellicussolaris.tar.gz:
gunzip Intellicussolaris.tar.gz This will create intellicussolaris.tar. Untar the file Intellicussolaris.tar:
tar -xvf Intellicussolaris.tar
Multilingual support You can have multilingual (Unicode) support in Intellicus to provide following benefits to the users. • To display multilingual data from database in reports.
• To display multilingual data in Parameter combo.
• To be able to specify multilingual data in filter, parameter as well as SQL Editor.
Starting Intellicus
To Start Report Server
Report Server is located in the /Intellicus/reportengine/bin folder. To start the engine, run the file run.sh.
./run.sh To Start the ReportServer with multilingual support
./ UTF8_run.sh This file passes -Dfile.encoding=utf-8 as the command line java option. As an alternative, you can also rename the files:
1. Rename the file run.sh (for example, as E_run.sh) . 2. Rename the file UTF8_run.sh as run.sh .
Now onwards you can run run.sh to start the ReportServer with multilingual support.

Installing Intellicus on Solaris
Installation and Configuration Manual 29
To Start the Intellicus Webserver
Webserver is located in the /Intellicus/jakarta/bin folder. To start the web server, run the file startup.sh.
./startup.sh To start the webserver with multilingual support
./UTF8_startup.sh This file calls UTF8_ Catalina.sh. UTF8_ Catalina.sh passes -Dfile.encoding=utf-8 as the command line java option. As an alternative, you can also rename the files:
1. Rename the file startup.sh (for example, as E_startup.sh) . 2. Rename the file UTF8_startup.sh as startup.sh .
Now onwards you can run startup.sh to start the webserver with multilingual support.
To start the Intellicus Web Reporting suite
1. Open the browser. 2. In the address bar, specify the following URL:
http://<IP of the Webserver>/Intellicus
For example, http://120.98.99.256/Intellicus If user has changed the webserver port, specify the following URL:
http://<IP of the Webserver:port number>/Intellicus For example, if the changed port number is 7000, the URL would be: http://120.98.99.256:7000/Intellicus
Logging into Intellicus web Reporting suite
Intellicus needs the following information to log into Intellicus: User Name: Admin Password: Admin Organization Name: Intellica After providing above details in corresponding entry boxes, click Login button.

Installing Intellicus on Solaris
Installation and Configuration Manual 30
Stopping Intellicus
To Stop the ReportServer
Run the file shutdown.sh . This file is available in Intellicus/reportengine/bin folder.
./shutdown.sh
To Stop the WebServer
Run the file shutdown.sh. This file is available in Intellicus/jakarta/bin folder.
./shutdown.sh
Making Intellicus Start automatically Here are the steps that need to be followed to setup the daemon script on a Solaris box:
1. Open Intellicus.sh from Intellicus/APIs folder and specify the home path for Intellicus (the folder where Intellicus was untared). Line in the intellicus.sh to be changed is,
Intellicus_home= <path where Intellicus was untared>
2. Place Intellicus.sh script file in specific folders. The command is
For Red Hat / Fedora,
cp Intellicus.sh /etc/rc.d/init.d/ For S.U.S.E and Debain,
cp Intellicus.sh /etc/init.d/
3. To add this daemon process in system start processes, execute the command.
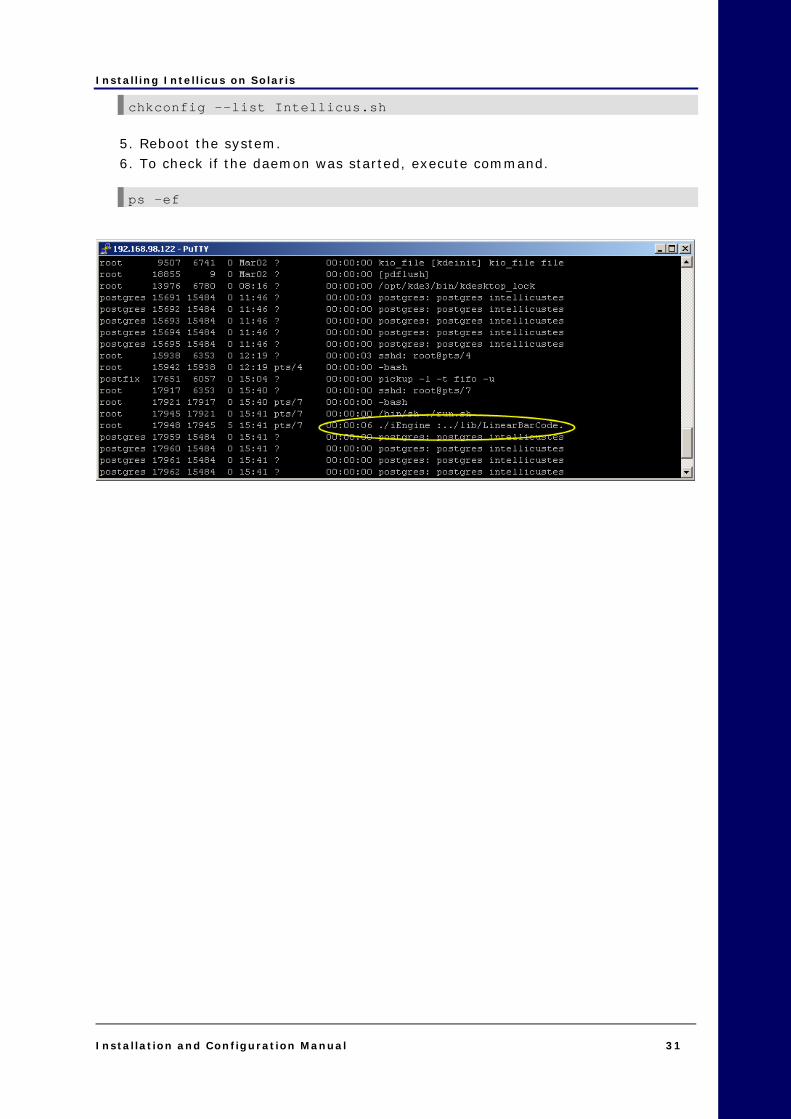
chkconfig --add intellicus.sh
Now on, this daemon process will start upon system boot. 4. Execute the following command to list all services and check if the daemon was added:
Installing Intellicus on Solaris
Installation and Configuration Manual 31
chkconfig --list Intellicus.sh
5. Reboot the system. 6. To check if the daemon was started, execute command.
ps –ef

Installing Intellicus on AIX
Installation and Configuration Manual 33
77 Installing Intellicus on AIX Instructions for installation and running Intellicus on AIX are organized into the following sections: • Installing of the JDK.
• Installation of the product.
• Starting the Intellicus ReportServer.
• Starting the Intellicus WebServer.
• Starting the Intellicus suite in browser.
• Logging into the Intellicus.
• Stopping the Intellicus ReportServer.
• Stopping the Intellicus Webserver.
System Pre-requisites: • Memory: 256 MB of RAM or more.
• Storage Space: 1 GB or more.
• Internet Browser: Internet Explorer 6.0 or a higher version.
• gunzip (To extract Intellicus files).
• JDK 5
Important: The person working on installation of Intellicus must have required administrative privileges on the machine.
The machine where Intellicus will be installed needs to have JDK. Intellicus does not ship JDK along with its installation. You need to download JDK 5 from IBM’s site: http://www-128.ibm.com/developerworks/eserver/library/es-JavaOnAix_install.html

Installing Intellicus on AIX
Installation and Configuration Manual 34
Important: Depending on the machine user is using, (32 bit or 64 bit) user needs to make sure that the right version of JDK is installed.
To install or upgrade the JDK or SDK, go to the directory where you have unpackaged the files (for example /tmp/java_inst), then run the following commands:
Inutoc
Smitty installp Execute the following steps after the SMIT menu interface is displayed: • Select Install Software.
• Enter/for INPUT device /directory for software, then press Enter to continue.
• With the cursor on SOFTWARE to install, press F4 to view and select the software to install.
• With the cursor on ACCEPT new license agreements? press Tab to accept the license agreement.
• Then press Enter twice to begin the installation.
To install Intellicus Web Reporting suite Decompress the intellicusAIX.tar.gz:
gunzip intellicusAIX.tar.gz This will create intellicusAIX.tar. Untar the file intellicusAIX.tar:
tar -xvf intellicusAIX.tar
Confirm the JRE path
Confirm that the directory path where JDK is installed is /usr/java14. If the path is different from the one specified, you might need to make changes in the run.sh, shutdown.sh, and startup.sh files. To update run.sh and shutdown.sh files of report server:
1. Go to /Intellicus/reportengine/bin. 2. Open run.sh and shutdown.sh file in vi editor mode. 3. Modify the LIBPATH by modifying the parameter
LIBPATH=".":/usr/java14/jre/bin:/usr/java14/jre/bin/classic.

Installing Intellicus on AIX
Installation and Configuration Manual 35
4. Save run.sh and the shutdown.sh file.
To update startup.sh and shutdown.sh files of Jakarta web server:
1. Go to /Intellicus/jakarta/bin. 2. Open startup.sh and shutdown.sh file in vi editor mode. 3. Modify the jre home by modifying the parameter
JAVA_HOME=/usr/java14 4. Save startup.sh and the shutdown.sh file.
Multilingual support You can have multilingual (Unicode) support in Intellicus to provide following benefits to the users. • To display multilingual data from database in reports.
• To display multilingual data in Parameter combo.
• To be able to specify multilingual data in filter, parameter as well as SQL Editor.
Starting Intellicus
To start Report Server
Report Server is located at /Intellicus/reportengine/bin folder. To start the engine (report server), run the file run.sh.
./run.sh To Start the ReportServer with multilingual support
./ UTF8_run.sh This file passes -Dfile.encoding=utf-8 as the command line java option. As an alternative, you can also rename the files:
1. Rename the file run.sh (for example, as E_run.sh) . 2. Rename the file UTF8_run.sh as run.sh .
Now onwards you can run run.sh to start the ReportServer with multilingual support.

Installing Intellicus on AIX
Installation and Configuration Manual 36
To start the Intellicus Webserver
Webserver is located at /Intellicus/jakarta/bin folder. To start the Webserver, run the file startup.sh.
./startup.sh To start the webserver with multilingual support
./UTF8_startup.sh This file calls UTF8_ Catalina.sh. UTF8_ Catalina.sh passes -Dfile.encoding=utf-8 as the command line java option. As an alternative, you can also rename the files:
1. Rename the file startup.sh (for example, as E_startup.sh) . 2. Rename the file UTF8_startup.sh as startup.sh .
Now onwards you can run startup.sh to start the webserver with multilingual support.
To start the Intellicus Web Reporting suite
1. Start the browser. 2. In address bar, specify the following URL:
http://<IP of the webserver>/Intellicus
For example, http://120.98.99.256/Intellicus If you have changed the webserver port, specify the following URL:
http://<IP of the webserver:port number>/intellicus. For example, if the changed port number is 7000, URL would be: http://120.98.99.256:7000/Intellicus
Logging into Intellicus web Reporting suite
User needs the following information to log into the Intellicus: User Name: Admin Password: Admin Organization Name: Intellica After providing above details in corresponding entry boxes, click Login button.

Installing Intellicus on AIX
Installation and Configuration Manual 37
Stopping Intellicus
To Stop the ReportServer
Run the file shutdown.sh. This file is available in Intellicus/reportengine/bin folder.
./shutdown.sh
To Stop the Webserver
Run the file shutdown.sh. This file is available in Intellicus/jakarta/bin folder.
./shutdown.sh
Making Intellicus Start automatically The steps that need to be followed to setup the daemon script on a AIX box are:
1. Open intellicus.sh from Intellicus/APIs folder and specify the home path for Intellicus (the folder where Intellicus was untared). Line in the Intellicus.sh to be changed is,
intellicus_home= <path where intellicus was untared>
2. Place Intellicus.sh script file in specific folders. The command is
For Red Hat / Fedora,
cp intellicus.sh /etc/rc.d/init.d/ For S.U.S.E and Debain,
cp intellicus.sh /etc/init.d/
3. To add this daemon process in system start processes, execute the command
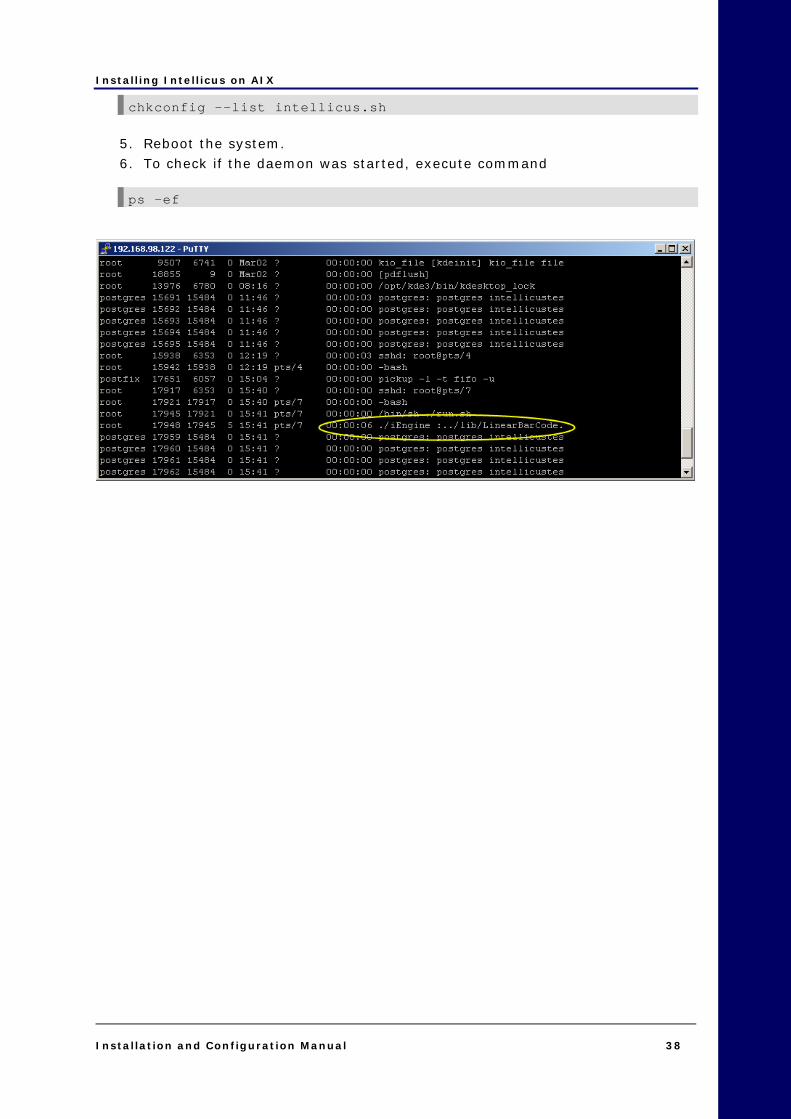
chkconfig --add intellicus.sh
Now on, this daemon process will start upon system boot.
4. To list all services and init levels to check that the daemon was added, execute command
Installing Intellicus on AIX
Installation and Configuration Manual 38
chkconfig --list intellicus.sh
5. Reboot the system. 6. To check if the daemon was started, execute command
ps –ef

Installing Intellicus on HP-UX
Installation and Configuration Manual 39
88 Installing Intellicus on HP-UX Instructions for installation and running Intellicus Web Reporting suite on HP-UX includes: • Installing the product.
• Starting the Intellicus ReportServer.
• Starting the Intellicus Webserver.
• Starting the Intellicus suite in browser.
• Logging into the Intellicus.
• Stopping the Intellicus ReportServer.
• Stopping the Intellicus Webserver.
Hardware and software requirements
System Pre-requisites: • Memory: 256 MB of RAM or more.
• Storage Space: 1 GB or more.
• Internet Browser: Internet Explorer 6.0 or a higher version.
• gunzip (To extract Intellicus files).
Important: The person working on installation of Intellicus must have required administrative privileges on the machine.
Installing Intellicus on HP-UX
Installation and Configuration Manual 40
To install Intellicus Web Reporting suite Decompress the intellicusHPUX.tar.gz:
gunzip intellicusHPUX.tar.gz This will create intellicusHPUX.tar. Untar the file intellicusHPUX.tar:
tar -xvf intellicusHPUX.tar
Multilingual support You can have multilingual (Unicode) support in Intellicus to provide following benefits to the users. • To display multilingual data from database in reports.
• To display multilingual data in Parameter combo.
• To be able to specify multilingual data in filter, parameter as well as SQL Editor.
Starting Intellicus
To start Report Server
Report Server is located in the /intellicus/reportengine/bin folder. To start the engine, run the file run.sh.
./run.sh To Start the ReportServer with multilingual support
./ UTF8_run.sh This file passes -Dfile.encoding=utf-8 as the command line java option. As an alternative, you can also rename the files:
1. Rename the file run.sh (for example, as E_run.sh) . 2. Rename the file UTF8_run.sh as run.sh .
Now onwards you can run run.sh to start the ReportServer with multilingual support.
Installing Intellicus on HP-UX
Installation and Configuration Manual 41
To start the Intellicus Web Server
Web Server is located in the /intellicus/jakarta/bin folder. To start the web server, run the file startup.sh.
./startup.sh To start the webserver with multilingual support
./UTF8_startup.sh This file calls UTF8_ Catalina.sh. UTF8_ Catalina.sh passes -Dfile.encoding=utf-8 as the command line java option. As an alternative, you can also rename the files:
1. Rename the file startup.sh (for example, as E_startup.sh) . 2. Rename the file UTF8_startup.sh as startup.sh .
Now onwards you can run startup.sh to start the webserver with multilingual support.
To start the Intellicus Web Reporting suite
1. Open the browser. 2. In address bar, specify the following URL:
http://<IP of the webserver>/intellicus
For example, http://120.98.99.256/Intellicus If user has changed the webserver port, specify the following URL:
http://<IP of the webserver:port number>/intellicus For example, if the changed port number is 7000, the URL would be: http://120.98.99.256:7000/intellicus
Logging into Intellicus web Reporting suite
User needs the following information to log into the Intellicus: User Name: Admin Password: Admin Organization Name: Intellica Click Login after entering information mentioned above.
Installing Intellicus on HP-UX
Installation and Configuration Manual 42
Stopping Intellicus
To stop the ReportServer
Run the file shutdown.sh. This file is available in Intellicus/reportengine/bin folder.
./shutdown.sh
To stop the WebServer
Run the file shutdown.sh. This file is available in intellicus/jakarta/bin folder.
./shutdown.sh
Making Intellicus Start automatically Here are the steps that need to be followed to setup the daemon script on a HP- UX box:
1. Open intellicus.sh from Intellicus/APIs folder and specify the home path for Intellicus (the folder where Intellicus was untared). The configuration page to be modified is,
intellicus_home= <path where intellicus was untared>
2. Place intellicus.sh script file in specific folders.
For Red Hat / Fedora,
cp intellicus.sh /etc/rc.d/init.d/ For S.U.S.E and Debain,
cp intellicus.sh /etc/init.d/
3. To add this daemon process in the system start processes, execute the command
chkconfig --add intellicus.sh
The daemon process will now start, automatically on booting the system. 4. Execute the following command to list all services and to check if the daemon was added:

Installing Intellicus on HP-UX
Installation and Configuration Manual 43
chkconfig --list intellicus.sh
5. Reboot the system. 6. To check if the daemon was started, execute command
ps –ef
Running Intellicus Portal under SSL
Installation and Configuration Manual 44
99 Running Intellicus Portal under SSL Intellicus is by default installed to work without use of SSL (Secure Socket Layer). Web browsers and web servers can communicate over a secured connection using Secure Socket Layer. In this, data by the sender is encrypted before it is being sent. On the other side, it is decrypted before it is processed. Trapping of encrypted data over the Internet is difficult making it relatively secure.
Prerequisite At the time of installation, Intellicus by default installs tomcat web server. Given here are the instructions of configuring Tomcat to work under SSL. Before going ahead, make sure Intellicus is already installed.
Configuring SSL This involves updating Tomcat configuration file. Updating Tomcat Configuration File Changes related to secure socket are made in Tomcat configuration file: server.xml. This file has been placed at following location at the time of Installation of Intellicus: <Intellicus Install Path>\jakarta\conf\server.xml
Running Intellicus Portal under SSL
Installation and Configuration Manual 45
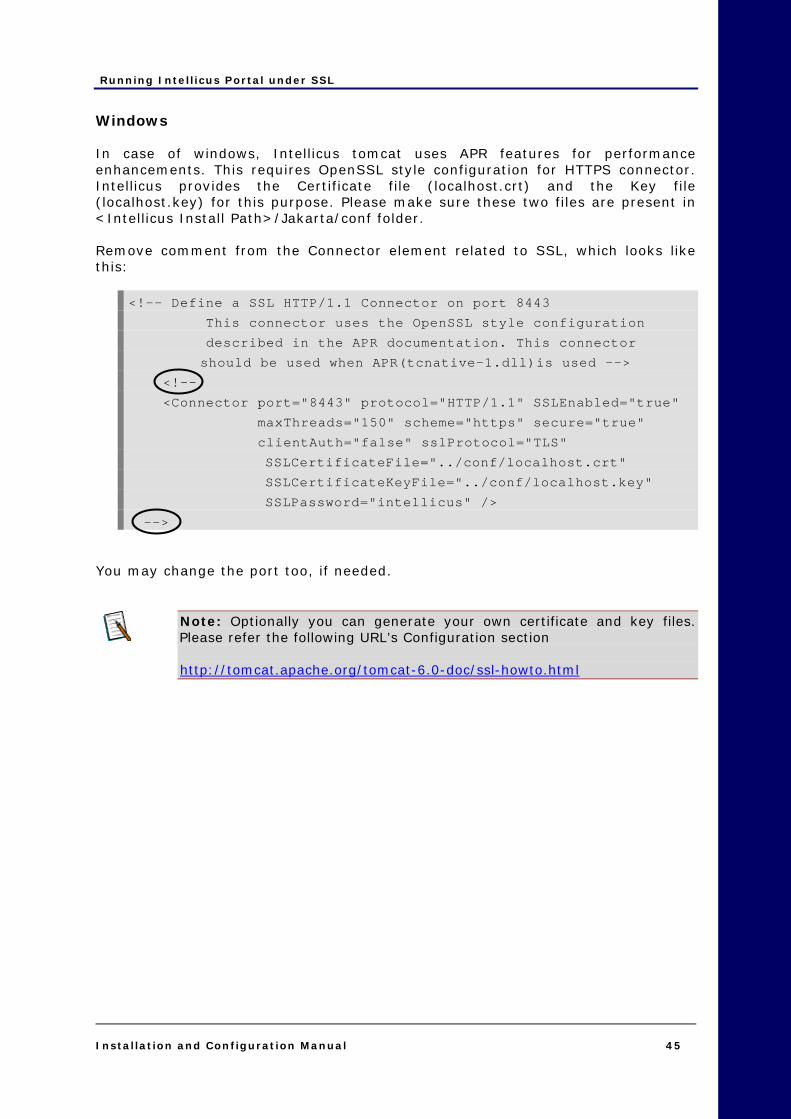
Windows In case of windows, Intellicus tomcat uses APR features for performance enhancements. This requires OpenSSL style configuration for HTTPS connector. Intellicus provides the Certificate file (localhost.crt) and the Key file (localhost.key) for this purpose. Please make sure these two files are present in <Intellicus Install Path>/Jakarta/conf folder. Remove comment from the Connector element related to SSL, which looks like this:
<!-- Define a SSL HTTP/1.1 Connector on port 8443
This connector uses the OpenSSL style configuration
described in the APR documentation. This connector
should be used when APR(tcnative-1.dll)is used -->
<!--
<Connector port="8443" protocol="HTTP/1.1" SSLEnabled="true"
maxThreads="150" scheme="https" secure="true"
clientAuth="false" sslProtocol="TLS"
SSLCertificateFile="../conf/localhost.crt"
SSLCertificateKeyFile="../conf/localhost.key"
SSLPassword="intellicus" />
--> You may change the port too, if needed.
Note: Optionally you can generate your own certificate and key files. Please refer the following URL’s Configuration section http://tomcat.apache.org/tomcat-6.0-doc/ssl-howto.html
Running Intellicus Portal under SSL
Installation and Configuration Manual 46
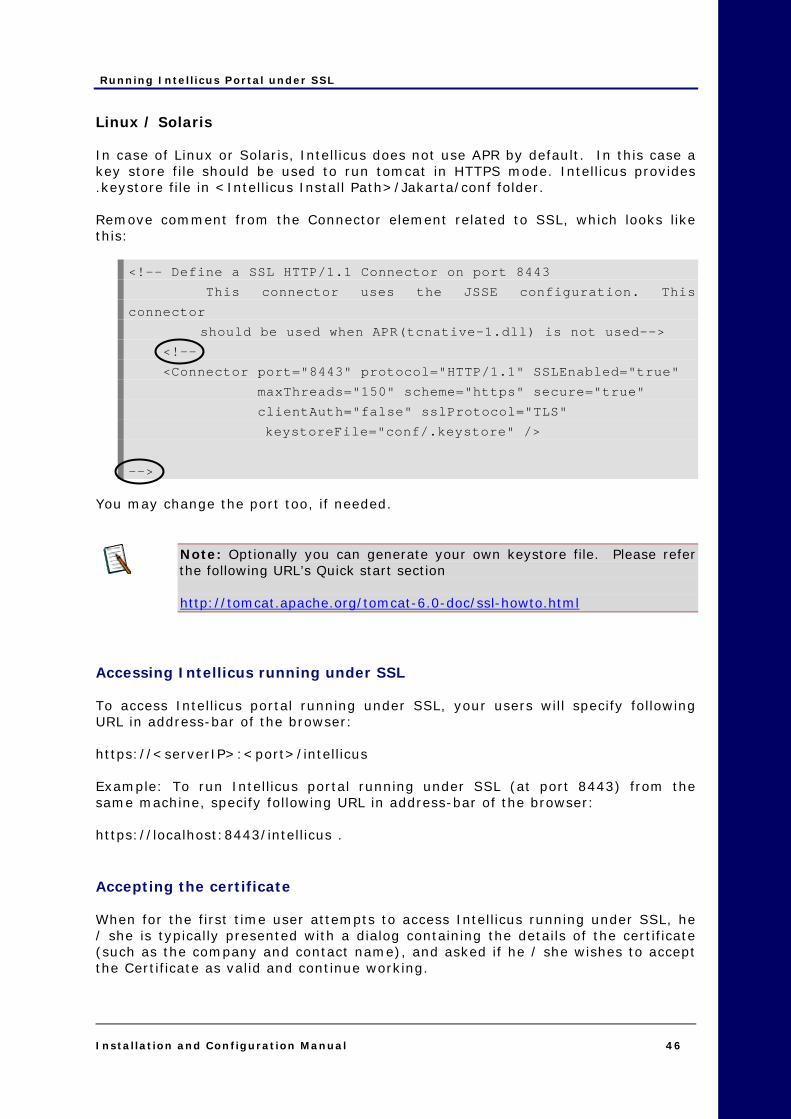
Linux / Solaris In case of Linux or Solaris, Intellicus does not use APR by default. In this case a key store file should be used to run tomcat in HTTPS mode. Intellicus provides .keystore file in <Intellicus Install Path>/Jakarta/conf folder. Remove comment from the Connector element related to SSL, which looks like this:
<!-- Define a SSL HTTP/1.1 Connector on port 8443
This connector uses the JSSE configuration. This
connector
should be used when APR(tcnative-1.dll) is not used-->
<!--
<Connector port="8443" protocol="HTTP/1.1" SSLEnabled="true"
maxThreads="150" scheme="https" secure="true"
clientAuth="false" sslProtocol="TLS"
keystoreFile="conf/.keystore" />
--> You may change the port too, if needed.
Note: Optionally you can generate your own keystore file. Please refer the following URL’s Quick start section http://tomcat.apache.org/tomcat-6.0-doc/ssl-howto.html
Accessing Intellicus running under SSL To access Intellicus portal running under SSL, your users will specify following URL in address-bar of the browser: https://<serverIP>:<port>/intellicus Example: To run Intellicus portal running under SSL (at port 8443) from the same machine, specify following URL in address-bar of the browser: https://localhost:8443/intellicus . Accepting the certificate When for the first time user attempts to access Intellicus running under SSL, he / she is typically presented with a dialog containing the details of the certificate (such as the company and contact name), and asked if he / she wishes to accept the Certificate as valid and continue working.

Running Intellicus Portal under SSL
Installation and Configuration Manual 47
Some browsers will provide an option for permanently accepting a given Certificate as valid. In this case, the user will not be bothered with a prompt each time he / she visit your site. Other browsers, it becomes necessary to accept the certificate during each visit to the site.


Deploying Intellicus web application in WebLogic
Installation and Configuration Manual 49
1100 Deploying Intellicus web application in WebLogic The chapter provides instructions to deploy Intellicus in WebLogic on Linux platform: • Install the Intellicus Web-based Reporting Suite.
• Start the Intellicus ReportServer.
• Create Domain for Intellicus application in WebLogic.
• Deploy the Intellicus in WebLogic as a Web Application.
• Start the Intellicus web application in WebLogic
Target Audience It is technical in nature and is written for users who have knowledge of the following: • Linux administration.
• Web Logic Server Application Server administration.
Important: Intellicus web application can be deployed inside WEBLOGIC Server, whereas Intellicus Report Server always needs to be run separately.
Steps to deploy Intellicus application in WebLogic The steps are as follows:
1. Download and place Intellicuswebapplication.tar.gz in WebLogic at <home folder>/bea/user_projects/domains/mydomain.
2. Decompress the file intellicuswebapplication.tar.gz. 3. Create Intellicus domain in WebLogic. Click here for Steps. 4. Deploy Intellicus application in the WebLogic domain.

Deploying Intellicus web application in WebLogic
Installation and Configuration Manual 50
Download Intellicus web application for WebLogic Intellicus provides separate download of Intellicuswebapplication.tar.gz (name shall be followed by version). Contact Intellicus support to receive a link for that download. Unzip the gz after downloading it.
gunzip intellicuswebapplication.tar.gz This will create intellicuswebapplication.tar.
To Create WebLogic Domain for Intellicus Steps to create domain in WebLogic on Linux, Solaris and Windows platforms are: Create Domain in Web Logic 8.1 on Linux & Solaris Steps to create a domain for Intellicus in WebLogic while working through Console are given below. Click on directory bea/weblogic81/common/bin and run config.sh. The file runs in Console Mode. Step 1: Create or Extend a Configuration
Figure 25: Create or Extend a Configuration Selects option Create a new WebLogic configuration. Specify point 1 and press Enter key.

Deploying Intellicus web application in WebLogic
Installation and Configuration Manual 51
Step 2: Select a Domain Template
Figure 26: Select a Domain Template Select option Basic WebLogic Server Domain. Specify point 2 and press Enter key. Step 3: Choose Configuration Option
Figure 27: Choose Configuration Option Select Yes to run the wizard in express mode. Specify point1 and press Enter key.
Deploying Intellicus web application in WebLogic
Installation and Configuration Manual 52
Step 4: Configure Administrative User name and User password
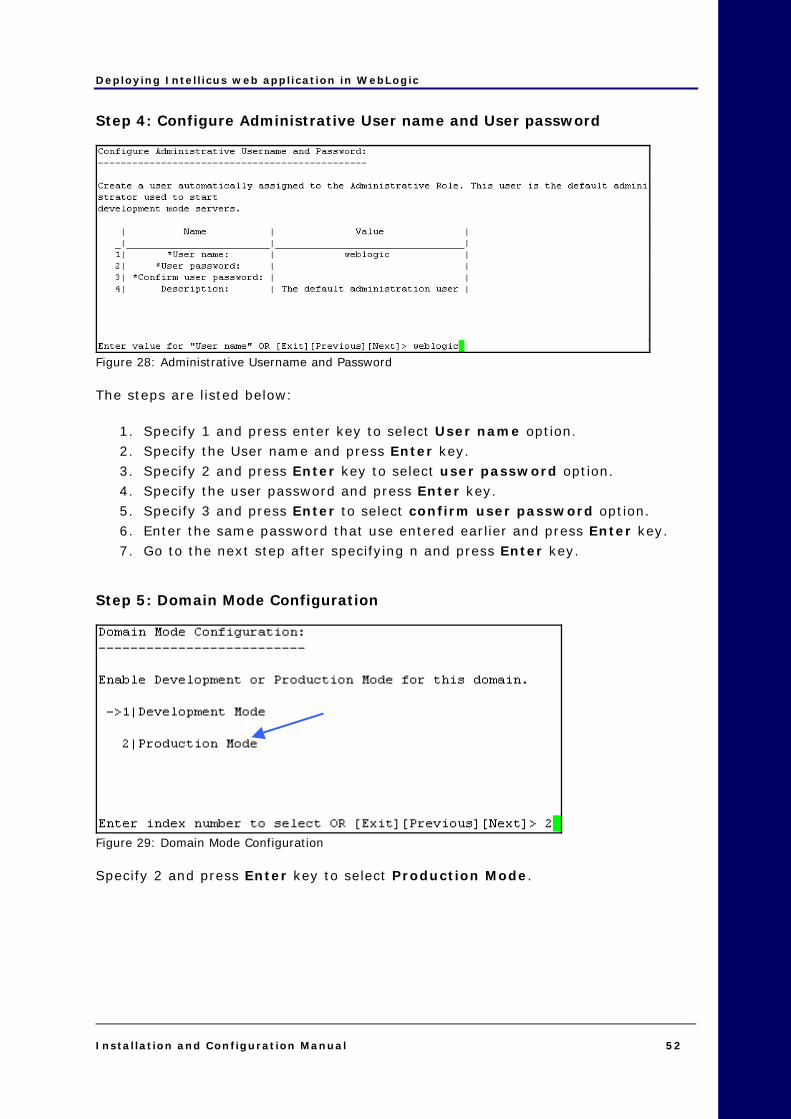
Figure 28: Administrative Username and Password The steps are listed below:
1. Specify 1 and press enter key to select User name option. 2. Specify the User name and press Enter key. 3. Specify 2 and press Enter key to select user password option. 4. Specify the user password and press Enter key. 5. Specify 3 and press Enter to select confirm user password option. 6. Enter the same password that use entered earlier and press Enter key. 7. Go to the next step after specifying n and press Enter key.
Step 5: Domain Mode Configuration
Figure 29: Domain Mode Configuration Specify 2 and press Enter key to select Production Mode.

Deploying Intellicus web application in WebLogic
Installation and Configuration Manual 53
Step 6: Java SDK Selection
Figure 30: Java SDK Selection Select 2 and press Enter key to select Sun SDK 1.4.2_05 @/root/bea/jdk1420_05 Step 7: Select the target domain directory for this configuration
Figure 31: Target Domain Directory Specify the path and press Enter key to mention the path where that extracted Intellicus web application will be placed. Step 8: Edit Domain Information
Figure 32: Domain Information Specify name of the domain. The steps are listed below:
1. Specify 1 and press Enter key to choose to specify name. 2. Press Enter key after specifying name.

Deploying Intellicus web application in WebLogic
Installation and Configuration Manual 54
3. Specify 1 and press Enter key to modify name (accept the change in the name),
4. Go to the next step after specifying n and press Enter key. Domain is created.
Figure 33: Domain is created Step 9: Extract Intellicus web application files into WebLogic Domain Extract the contents from the file intellicuswebapplication.tar to the /root/bea/user_projects/domain/intellicus folder.
tar -xvf intellicuswebapplication.tar This will extract the Intellicus web application files. Click here to go to step to Start Intellicus Application in WebLogic.
Deploying Intellicus web application in WebLogic
Installation and Configuration Manual 55
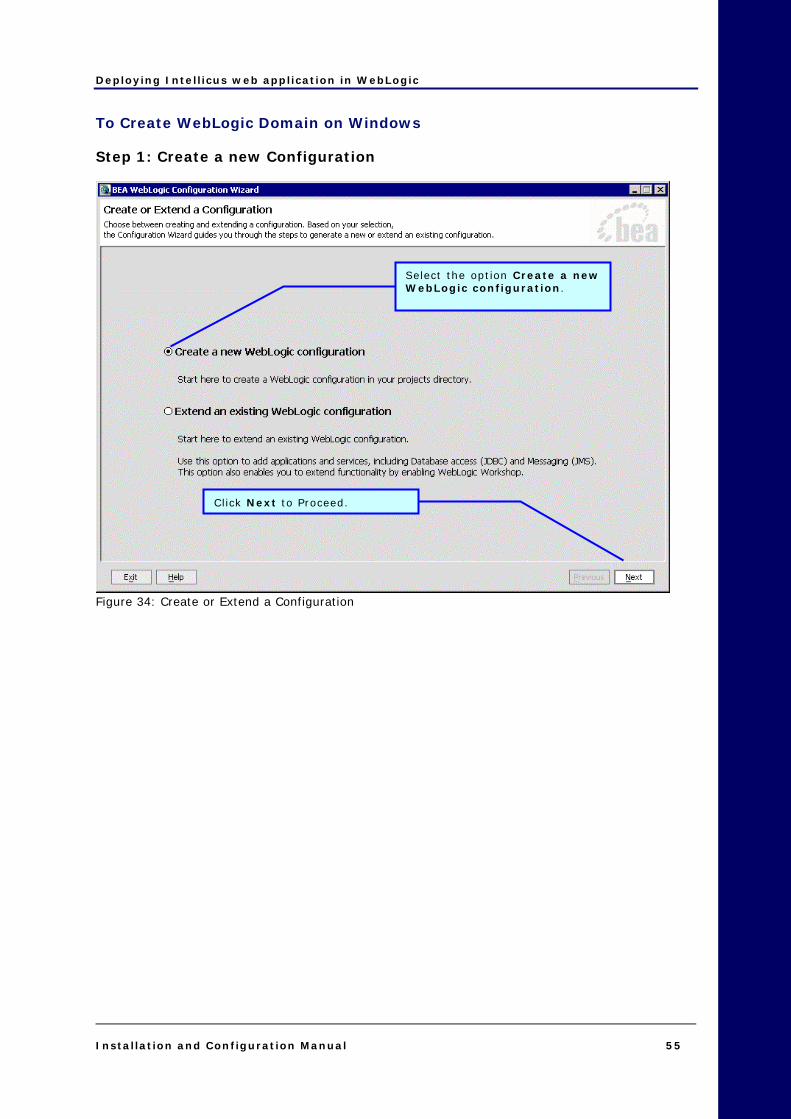
To Create WebLogic Domain on Windows Step 1: Create a new Configuration
Figure 34: Create or Extend a Configuration
Select the option Create a newWebLogic configuration.
Click Next to Proceed.
Deploying Intellicus web application in WebLogic
Installation and Configuration Manual 56
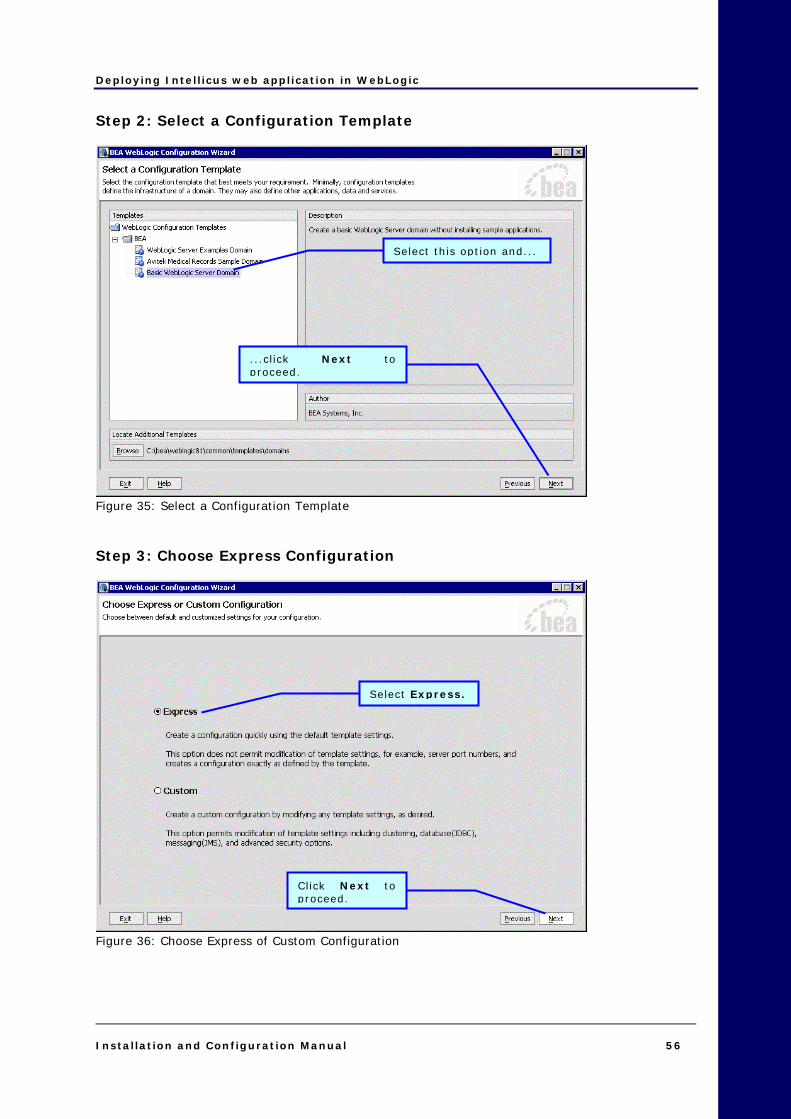
Step 2: Select a Configuration Template
Figure 35: Select a Configuration Template Step 3: Choose Express Configuration
Figure 36: Choose Express of Custom Configuration
Select this option and...
...click Next toproceed.
Select Express.
Click Next toproceed.

Deploying Intellicus web application in WebLogic
Installation and Configuration Manual 57
Step 4: Configure Admin Username and Password
Figure 37: Configure Administrative Username and Password Step 5: Configure Server Start Mode and Java SDK
Figure 38: Configure Server Start Mode and Java SDK
Specify User name and Password.
Click Next to Proceed.
Select Development Mode.
Select SDK 1.4.2.
Click Next to proceed.

Deploying Intellicus web application in WebLogic
Installation and Configuration Manual 58
Step 6: Configuration Summary
Figure 39: Create WebLogic Configuration Step 7: Final step
Figure 40: Creating Configuration – The final step
Specify required information and click Create.
To complete the processclick Done.
Deploying Intellicus web application in WebLogic
Installation and Configuration Manual 59
To deploy Intellicus as Web Application This activity is done on the web interface of WebLogic Admin Console. To get WebLogic Admin Console, specify the following URL in the browser window:
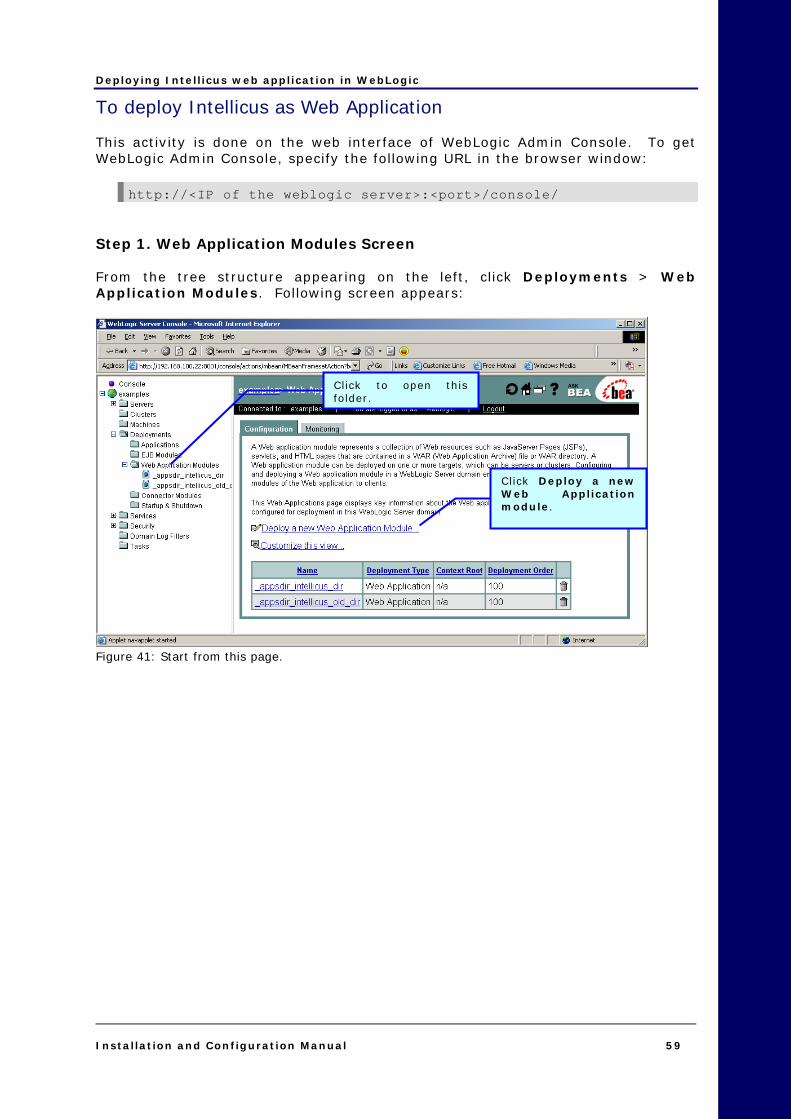
http://<IP of the weblogic server>:<port>/console/ Step 1. Web Application Modules Screen From the tree structure appearing on the left, click Deployments > Web Application Modules. Following screen appears:
Figure 41: Start from this page.
Click Deploy a newWeb Applicationmodule.
Click to open thisfolder.

Deploying Intellicus web application in WebLogic
Installation and Configuration Manual 60
Step 2. Deploy a Web Application module Screen
Figure 42: Select applications option. Step 3. Select the archive
Figure 43: Select Intellicus application
Click Applications.
Click Target Module toproceed.
Domains will be listed here.Select the option thatrepresents Intellicus.
Click Target Module toproceed.

Deploying Intellicus web application in WebLogic
Installation and Configuration Manual
Step 4. Select target for application module
Figure 44: Selecting the server Step 5. Complete application creation
Figure 45: This page will appear.
Select the options representingIntellicus server.
Click Continue to proceed.
Scroll down thispage....
61

Deploying Intellicus web application in WebLogic
Installation and Configuration Manual 62
Figure 46: Click Deploy. Intellicus Web-based Reporting suite is deployed and is ready for use. Run the startWebLogic.sh located at
<home folder>/bea/user_projects/domains/mydomain.
./startWebLogic.sh To start the Intellicus Web-based Reporting Suite Launch the browser and in specify the following URL in its address bar:
http://<IP of the Webserver>:<Port>/Intellicus Replace <IP of the Webserver> with the actual IP. Replace <Port> with the actual Port. For example, http://120.98.99.256:7001/Intellicus. If user has changed the Webserver port, specify the following URL:
http://<IP of the webserver:port number>/intellicus. For example, if the changed port number is 7000, the URL would be: http://120.98.99.256:7000/Intellicus .
... and click Deploy tocomplete process.
Deploying Intellicus web application in WebLogic
Installation and Configuration Manual 63
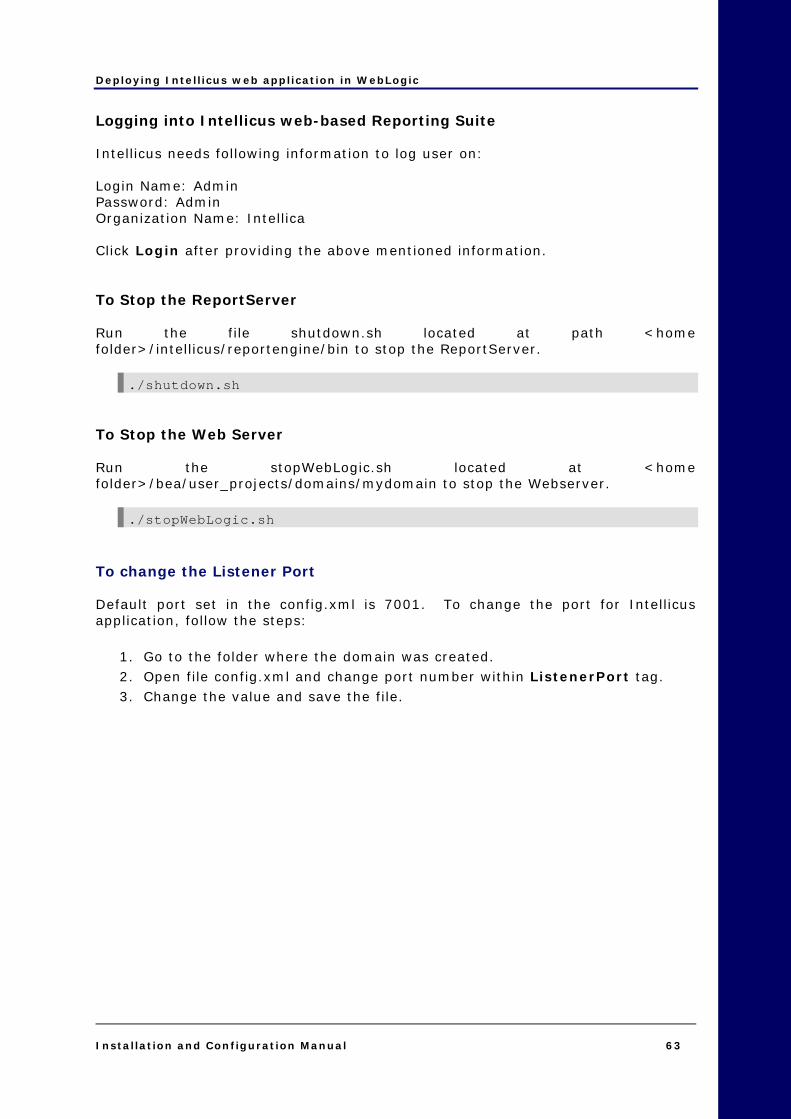
Logging into Intellicus web-based Reporting Suite Intellicus needs following information to log user on: Login Name: Admin Password: Admin Organization Name: Intellica Click Login after providing the above mentioned information. To Stop the ReportServer Run the file shutdown.sh located at path <home folder>/intellicus/reportengine/bin to stop the ReportServer.
./shutdown.sh To Stop the Web Server Run the stopWebLogic.sh located at <home folder>/bea/user_projects/domains/mydomain to stop the Webserver.
./stopWebLogic.sh To change the Listener Port Default port set in the config.xml is 7001. To change the port for Intellicus application, follow the steps:
1. Go to the folder where the domain was created. 2. Open file config.xml and change port number within ListenerPort tag. 3. Change the value and save the file.

Deploying Intellicus web application in IBM WebSphere
Installation and Configuration Manual 65
1111 Deploying Intellicus web application in IBM WebSphere The chapter provides instructions to deploy Intellicus in IBM WebSphere using: • Intellicus WAR file
• Intellicus EAR file
Target Audience It is technical in nature and is written for users who have knowledge in following: • IBM WebSphere Application Server administration.
Important: Intellicus web application can be deployed inside WebSphere Server, whereas Intellicus Report Server always needs to be run separately.
Deploying Intellicus web application using WAR file Steps to deploy Intellicus application in WebSphere The steps are as follows: • Download and place intellicuswebapplication.tar.gz.
• Decompress the file intellicuswebapplication.tar.gz
Download Intellicus web application For Solaris / Linux / AIX Intellicus provides separate download of Intellicuswebapplication.tar.gz (name shall be followed by version). Contact Intellicus support to receive a link for that download. Unzip the gz after downloading it.
gunzip intellicuswebapplication.tar.gz

Deploying Intellicus web application in IBM WebSphere
Installation and Configuration Manual 66
This will create intellicuswebapplication.tar. For Windows For Windows installation, Intellicus.war is included in setup.exe (Intellicus setup file). This is stored in /intelllicus/API filder. Installing Intellicus (using WAR file) This activity is done on the web interface of WebSphere Admin Console. To get WebSphere Admin Consol, specify URL where IBM WebSphere application server is running. Following page appears:
Figure 47: Specify login information Specify User ID and click Log in. This is the name that you used to login on this machine.
Specify the user namethat you used to loginon this machine.
Followed by clicking LogIn button.
Deploying Intellicus web application in IBM WebSphere
Installation and Configuration Manual 67
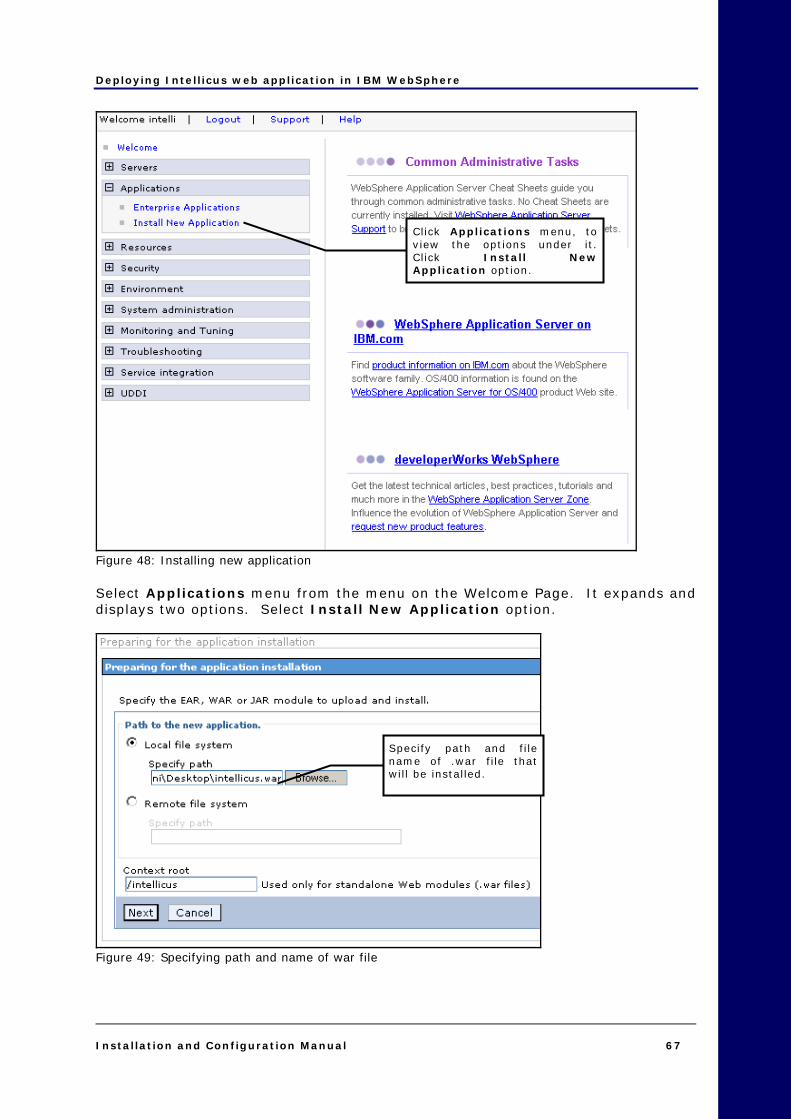
Figure 48: Installing new application Select Applications menu from the menu on the Welcome Page. It expands and displays two options. Select Install New Application option.
Figure 49: Specifying path and name of war file
Click Applications menu, toview the options under it.Click Install NewApplication option.
Specify path and filename of .war file thatwill be installed.
Deploying Intellicus web application in IBM WebSphere
Installation and Configuration Manual 68
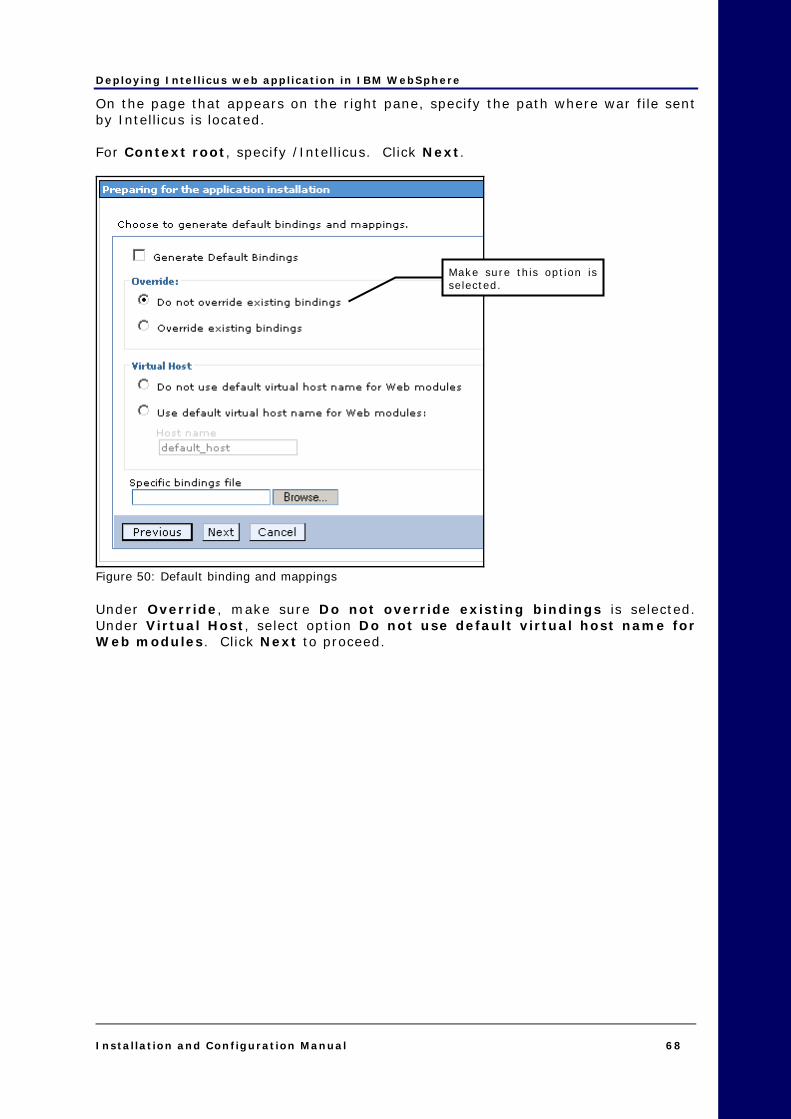
On the page that appears on the right pane, specify the path where war file sent by Intellicus is located. For Context root, specify /Intellicus. Click Next.
Figure 50: Default binding and mappings Under Override, make sure Do not override existing bindings is selected. Under Virtual Host, select option Do not use default virtual host name for Web modules. Click Next to proceed.
Make sure this option isselected.

Deploying Intellicus web application in IBM WebSphere
Installation and Configuration Manual 69
Figure 51: Application Security Warnings Click Continue to proceed.

Deploying Intellicus web application in IBM WebSphere
Installation and Configuration Manual 70
Figure 52: Selecting installation options Make sure only the option Distribute application is selected. Click Next to proceed.
Figure 53: Mapping modifiers to servers Click Next to proceed. If another options appear on the same page, you may ignore them.
We need to have onlythis option selected.
Specify Intellicus here.

Deploying Intellicus web application in IBM WebSphere
Installation and Configuration Manual 71
Figure 54: Mapping virtual hosts for Web modules Select intellicus.war and click Next to proceed.
Figure 55: View summary and click Finish to go ahead Click Finish to proceed.
Check the checkboxrepresenting Intellicusweb module.

Deploying Intellicus web application in IBM WebSphere
Installation and Configuration Manual 72
Figure 56: Messages appearing Above page will appear.
Figure 57: Click Save to Master Configuration link Click the link Save to Master Configuration.
Figure 58: Click Save Click Save to complete the work. From Enterprise Applications page of WebSphere Administration Console, start Intellicus application.
Click on the link to save theconfiguration.
Deploying Intellicus web application in IBM WebSphere
Installation and Configuration Manual 73
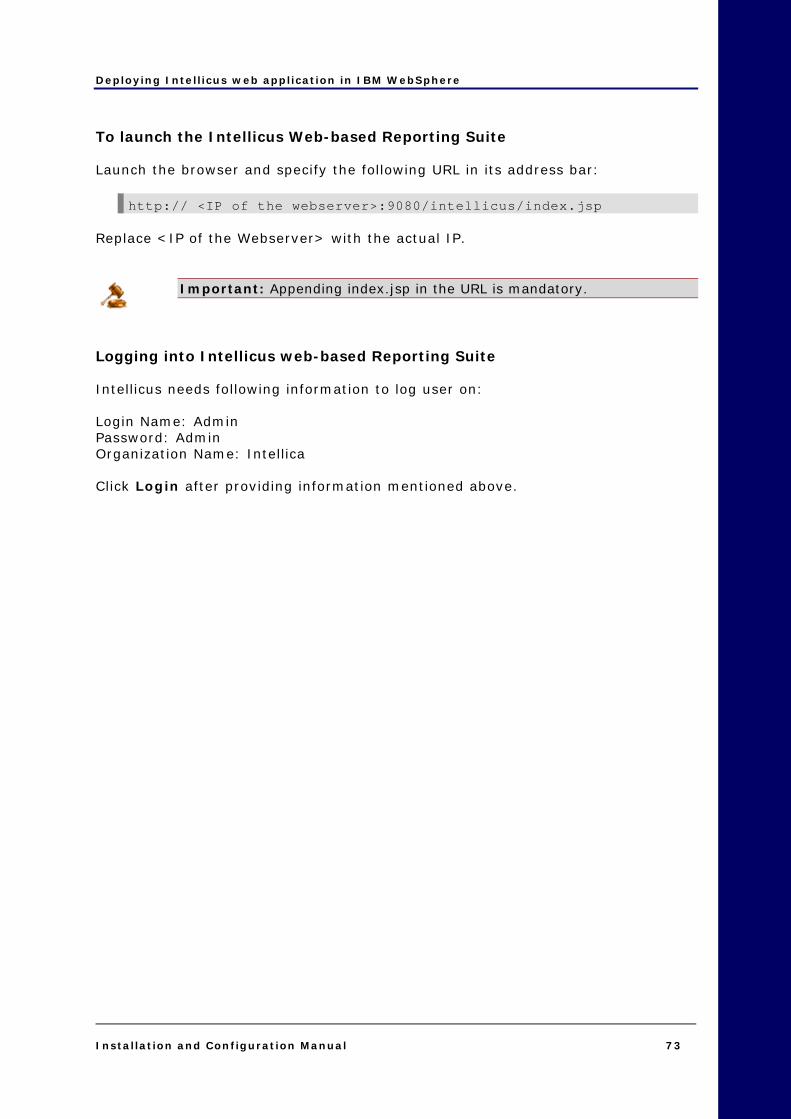
To launch the Intellicus Web-based Reporting Suite Launch the browser and specify the following URL in its address bar:
http:// <IP of the webserver>:9080/intellicus/index.jsp Replace <IP of the Webserver> with the actual IP.
Important: Appending index.jsp in the URL is mandatory. Logging into Intellicus web-based Reporting Suite Intellicus needs following information to log user on: Login Name: Admin Password: Admin Organization Name: Intellica Click Login after providing information mentioned above.

Deploying Intellicus web application in IBM WebSphere
Installation and Configuration Manual 74
Deploying Intellicus using EAR file Intellicus web-based reporting solution can be deployed on most of the popular web servers. This document explains how to deploy Intellicus web component on IBM WebSphere 6.1. Intellicus web component has all the portal related files organized in a folder structure and shipped as an EAR file. This also includes files like property files and log files. Client folder (which has property files) can be kept outside Intellicus folder at any location, so that they can be managed from outside the web server. The process of deploying Intellicus web component in IBM WebSphere 6.1 involves following activities: 1. Installing Intellicus web application Intellicus_ws.ear contains following files: • intellicus.war (Intellicus web component archive)
• META-INF folder having application.xml, ibm-application-bnd.xmi, MANIFEST.MF and was.policy
2. Unzip Client.zip to get the Client folder structure This file contains a folder structure having property files and other run time folders. By taking this structure out of Intellicus portal component folders, you can manually change property values from this location.
Note: Folder arrangement or file placement inside client folder should not be modified.
3. Setting property file path This involves, specifying property file name and path in JVM configuration of WebSphere.

Deploying Intellicus web application in IBM WebSphere
Installation and Configuration Manual 75
Installing Intellicus Here are the steps to install Intellicus portal component in WebSphere 6.1. You will need intellicus_ws.ear file to install Intellicus web component. This file is placed in APIs folder where Intellicus setup was run. You can also download intellicus_ws.ear from Intellicus web site. In case of difficulties, contact your vendor support. In a browser, open IBM WebSphere console and login as Administrator.
Figure 59 Preparing for the application installation page will appear.
Figure 60 Install New Application page will appear.
Browse to the pathwhere intellicus_ws.earfile was placed.
Click Next.
Click Install NewApplication, underApplications menu.
Deploying Intellicus web application in IBM WebSphere
Installation and Configuration Manual 76
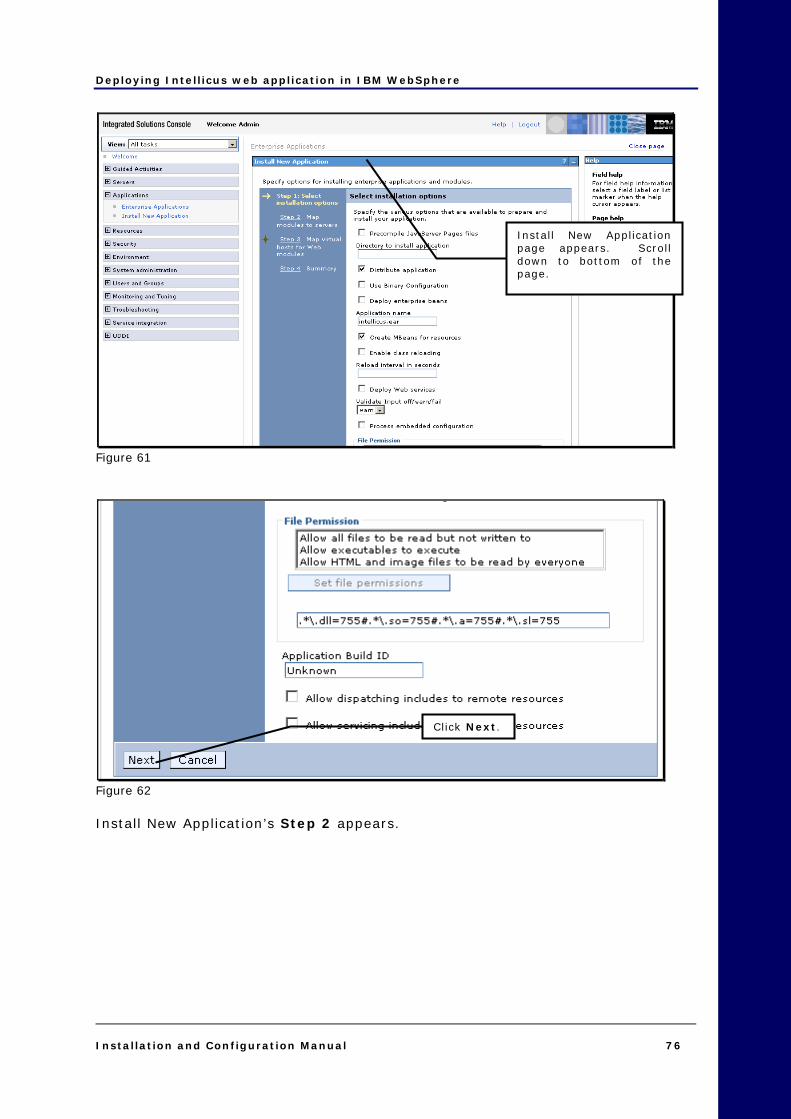
Figure 61
Figure 62 Install New Application’s Step 2 appears.
Install New Applicationpage appears. Scrolldown to bottom of thepage.
Click Next.

Deploying Intellicus web application in IBM WebSphere
Installation and Configuration Manual 77
Figure 63 Install New Application’s Step 3 appears.
Figure 64 Install New Application’s Step 4 appears.
Click Next.
Click Next.

Deploying Intellicus web application in IBM WebSphere
Installation and Configuration Manual 78
Figure 65
Figure 66
On Step 4, scroll down tothe bottom of the page.
Click Finish.
Deploying Intellicus web application in IBM WebSphere
Installation and Configuration Manual 79
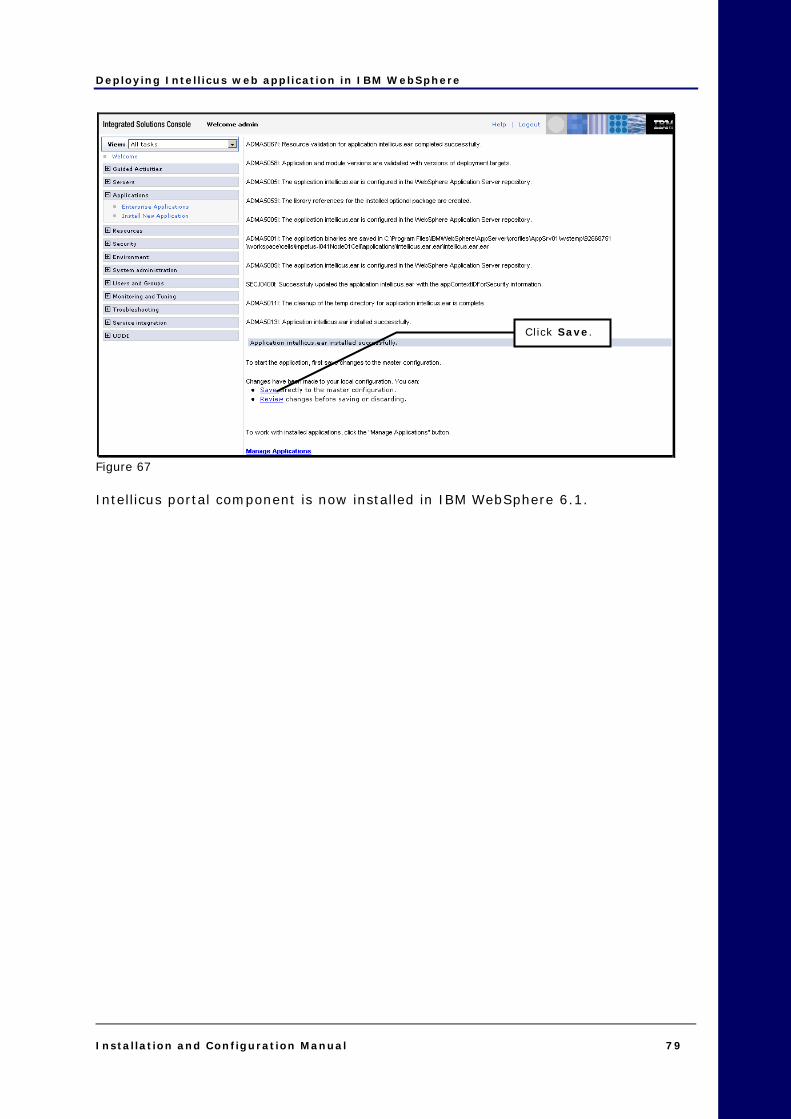
Figure 67 Intellicus portal component is now installed in IBM WebSphere 6.1.
Click Save.
Deploying Intellicus web application in IBM WebSphere
Installation and Configuration Manual 80
Unzip Client.zip folder Being a report generation and publishing tool, Intellicus generates different types of files at folder location that is accessible by Web server. Here is the description of those folders: • client/config: Holds all property files that control behavior of Intellicus
applications and modules.
• client/logs: Creates Intellicus Web client log files in rotation mode.
• client/reports: Creates temporary HTML pages of report output when user is navigating back and forth on report pages. For Intellicus to comply with report security, this folder should be secured well.
• client/temp: Creates temporary files related to list cache etc.
• client/lang: Ships with language library files. You can add or enhance these files according your language needs on Intellicus pages.
Client.zip is available on Report server at path: <installation path>/Intellicus/APIs. Copy this file to the location where you want Intellicus Client folder to reside and Unzip it. This will create following folder structure and the files within: client folder config folder ReportClient.properties adhoc.properties HtmlToolBar.properties Portal.properties temp folder logs folder reports folder lang folder en_US.xls After you have unzipped the file, you can make changes related to Report Server IP and Port in ReportClient.properties file. If changes in ReportClient.properties are made manually, you may need to re-start Web server for bringing the new values to effect. If changes are made using Intellicus Administration UI, then you may not need re-starting of the web server.
Deploying Intellicus web application in IBM WebSphere
Installation and Configuration Manual 81
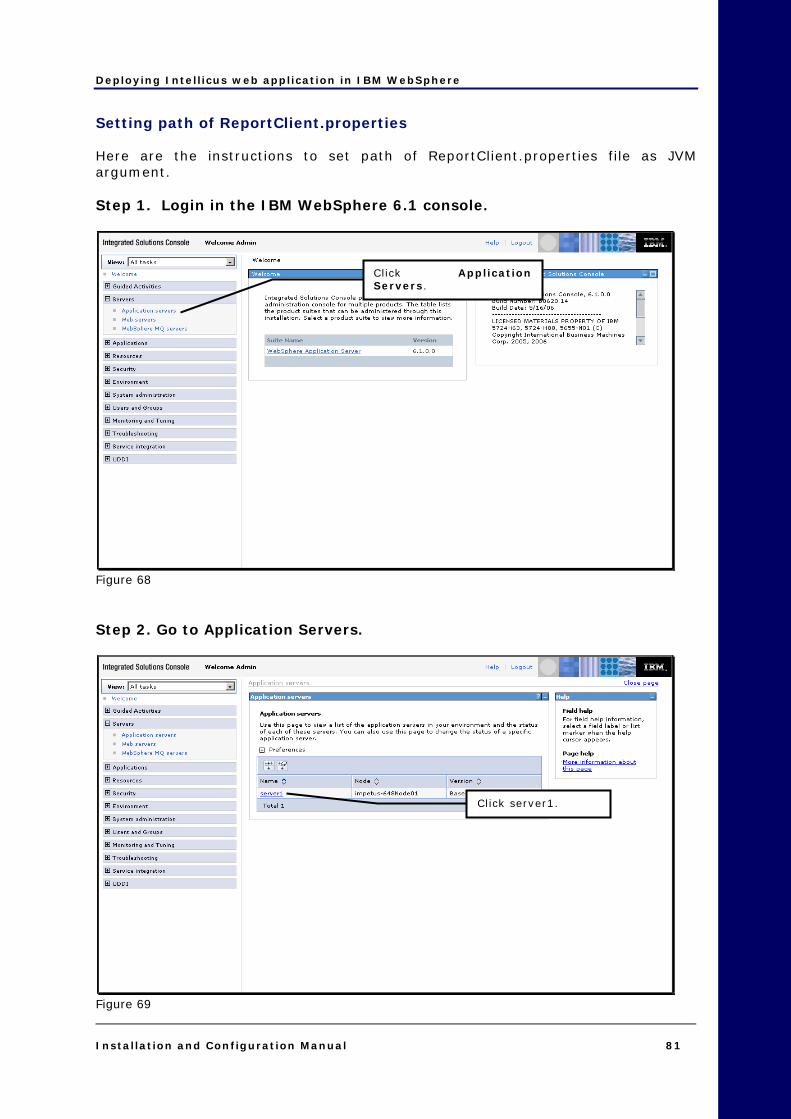
Setting path of ReportClient.properties Here are the instructions to set path of ReportClient.properties file as JVM argument. Step 1. Login in the IBM WebSphere 6.1 console.
Figure 68 Step 2. Go to Application Servers.
Figure 69
Click server1.
Click ApplicationServers.

Deploying Intellicus web application in IBM WebSphere
Installation and Configuration Manual 82
Step 3. Go to Server Infrastructure > Process definition.
Figure 70
Figure 71 Process Definition page appears.
Click Process Definitionunder Java and ProcessManagement.
Scroll down the page to bringServer Infrastructure on-screen.

Deploying Intellicus web application in IBM WebSphere
Installation and Configuration Manual 83
Step 4. Specify the path.
Figure 72 Java Virtual Machine page appears.
Figure 73
Scroll down the page to bringGeneric JVM Arguments on-screen.
Click Java Virtual Machinelink.
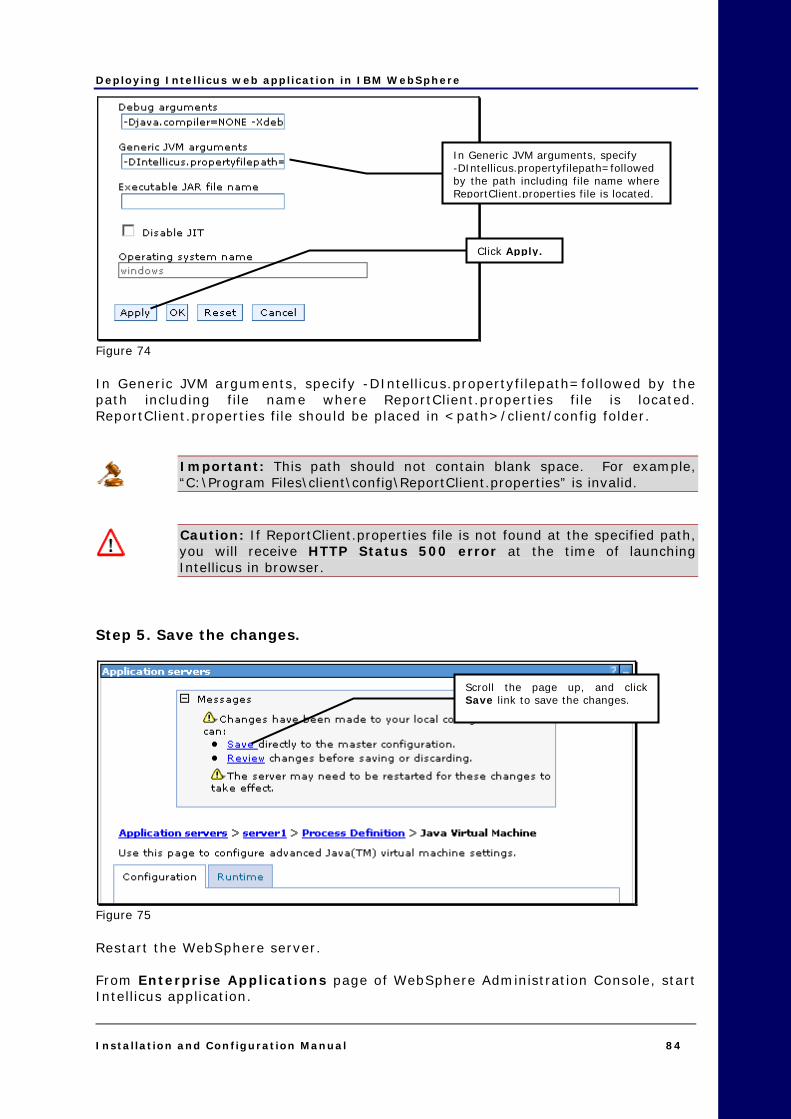
Deploying Intellicus web application in IBM WebSphere
Installation and Configuration Manual 84
Figure 74 In Generic JVM arguments, specify -DIntellicus.propertyfilepath=followed by the path including file name where ReportClient.properties file is located. ReportClient.properties file should be placed in <path>/client/config folder.
Important: This path should not contain blank space. For example, “C:\Program Files\client\config\ReportClient.properties” is invalid.
Caution: If ReportClient.properties file is not found at the specified path, you will receive HTTP Status 500 error at the time of launching Intellicus in browser.
Step 5. Save the changes.
Figure 75 Restart the WebSphere server. From Enterprise Applications page of WebSphere Administration Console, start Intellicus application.
In Generic JVM arguments, specify -DIntellicus.propertyfilepath=followed by the path including file name where ReportClient.properties file is located.
Scroll the page up, and click Save link to save the changes.
Click Apply.

Deploying Intellicus web application in IBM WebSphere
Installation and Configuration Manual 85
To launch the Intellicus Web-based Reporting Suite Launch the browser and specify the following URL in its address bar:
http:// <IP of the webserver>:9080/intellicus/index.jsp
Important: Appending index.jsp in the URL is mandatory. Replace <IP of the Webserver> with the actual IP. Logging into Intellicus web-based Reporting Suite Intellicus needs following information to log user on: Login Name: Admin Password: Admin Organization Name: Intellica Click Login after providing information mentioned above.

Deploying Intellicus in Oracle App. Server
Installation and Configuration Manual 86
1122 Deploying Intellicus in Oracle App. Server This chapter provides steps to deploy Intellicus in Oracle application server. Step 1. Start SOA suite. Click Start > Program > Oracle > Start SOA Suite.
Figure 76: Starting Oracle Application Server window Starting Oracle Application Server window opens.
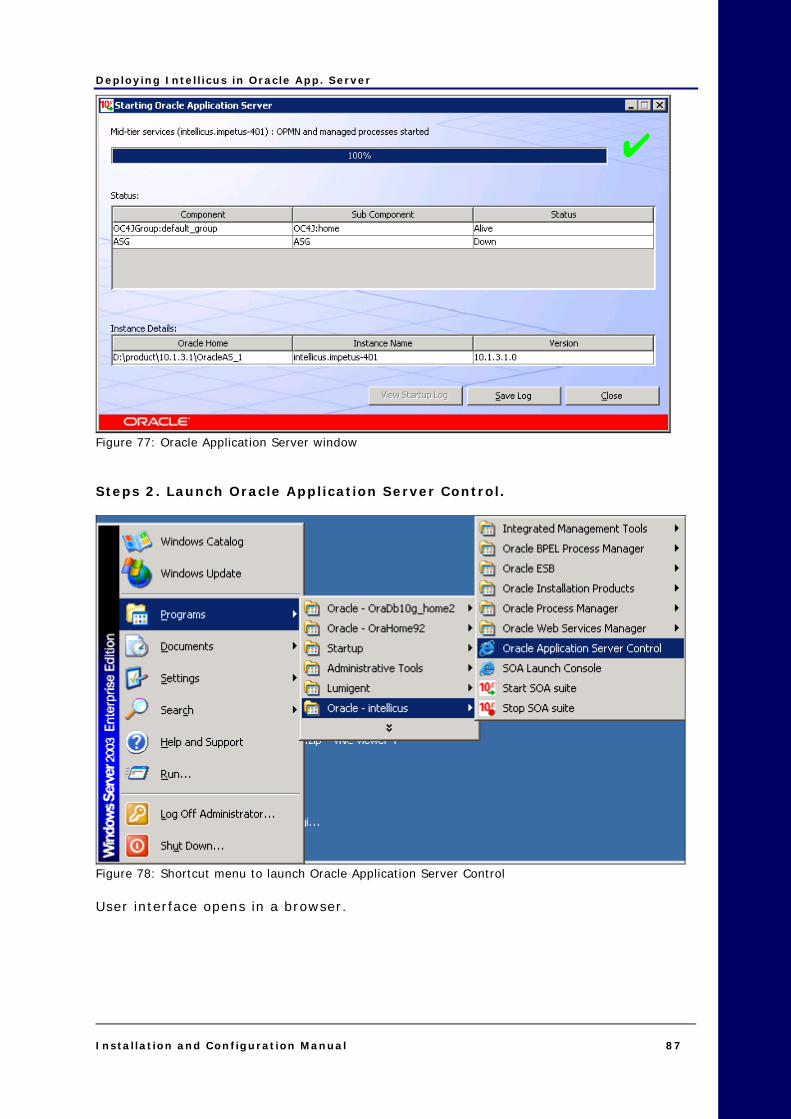
Deploying Intellicus in Oracle App. Server
Installation and Configuration Manual 87
Figure 77: Oracle Application Server window Steps 2. Launch Oracle Application Server Control.
Figure 78: Shortcut menu to launch Oracle Application Server Control User interface opens in a browser.

Deploying Intellicus in Oracle App. Server
Installation and Configuration Manual 88
Figure 79: Specify credentials Specify Username and Password. Click Login to proceed. Cluster Topology page will open after successful login. Step 3. Click home option on OC4J Instance.
Figure 80: OC4J home page OC4J:HOME page appears.
Click home.
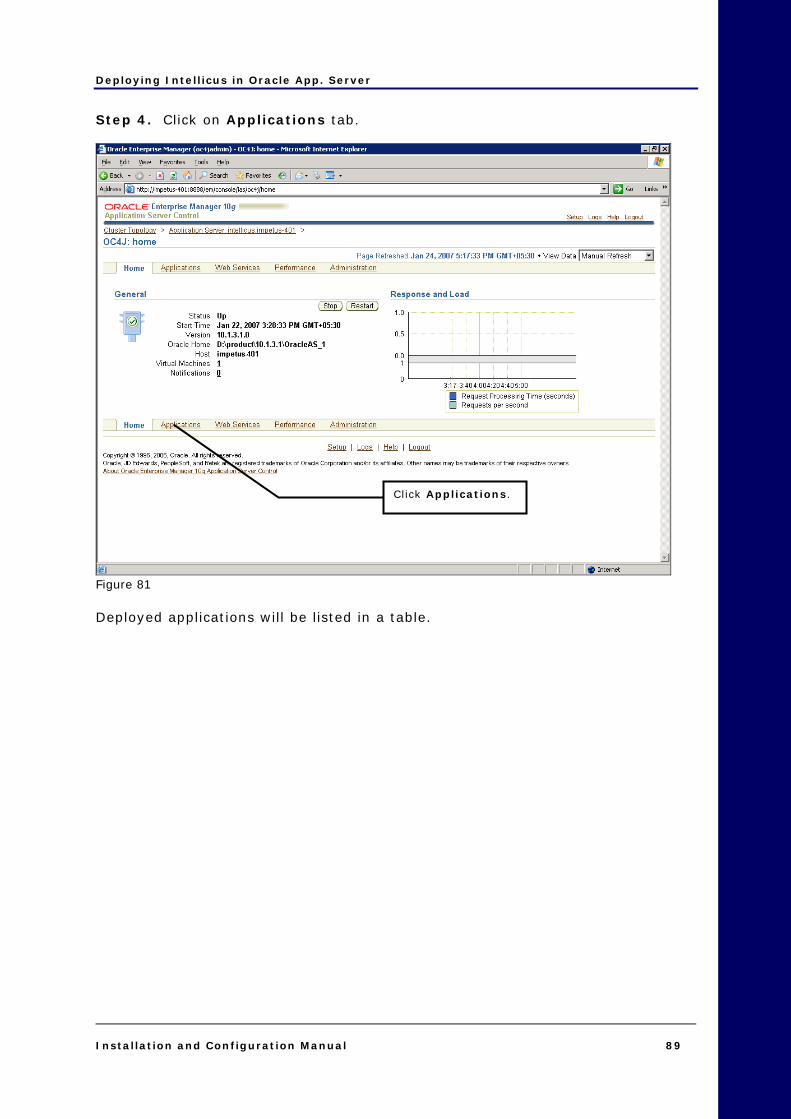
Deploying Intellicus in Oracle App. Server
Installation and Configuration Manual 89
Step 4. Click on Applications tab.
Figure 81 Deployed applications will be listed in a table.
Click Applications.
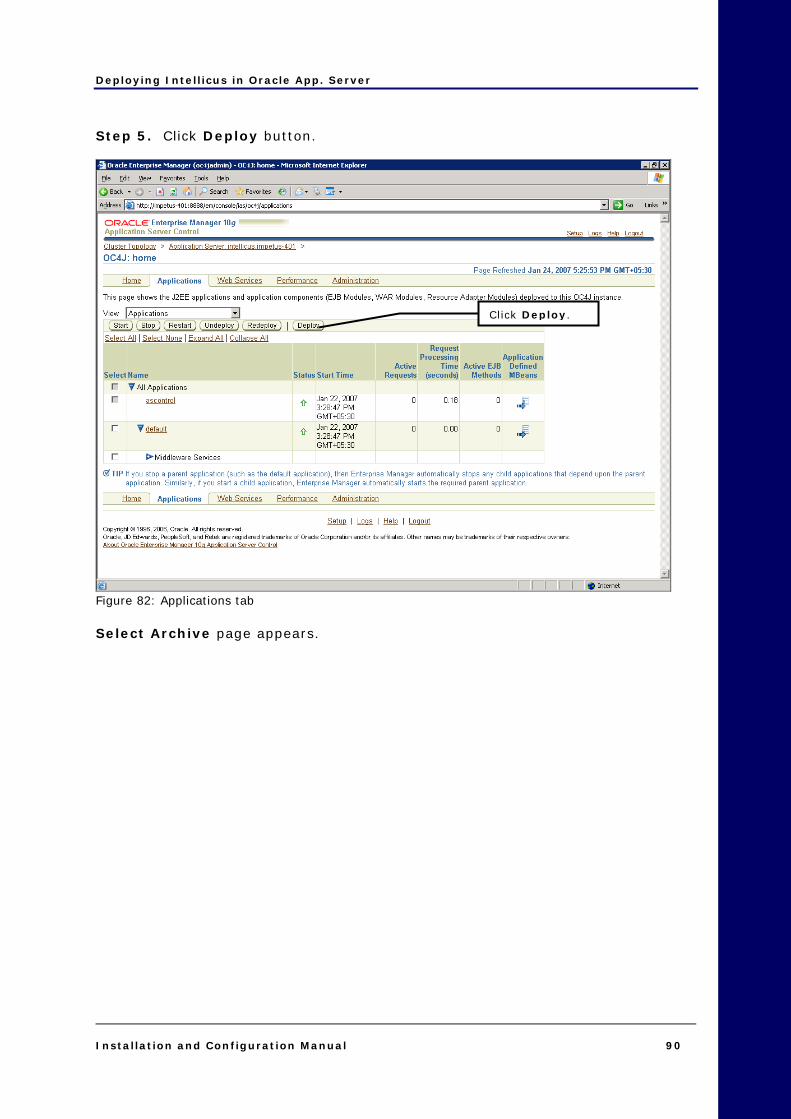
Deploying Intellicus in Oracle App. Server
Installation and Configuration Manual 90
Step 5. Click Deploy button.
Figure 82: Applications tab Select Archive page appears.
Click Deploy.
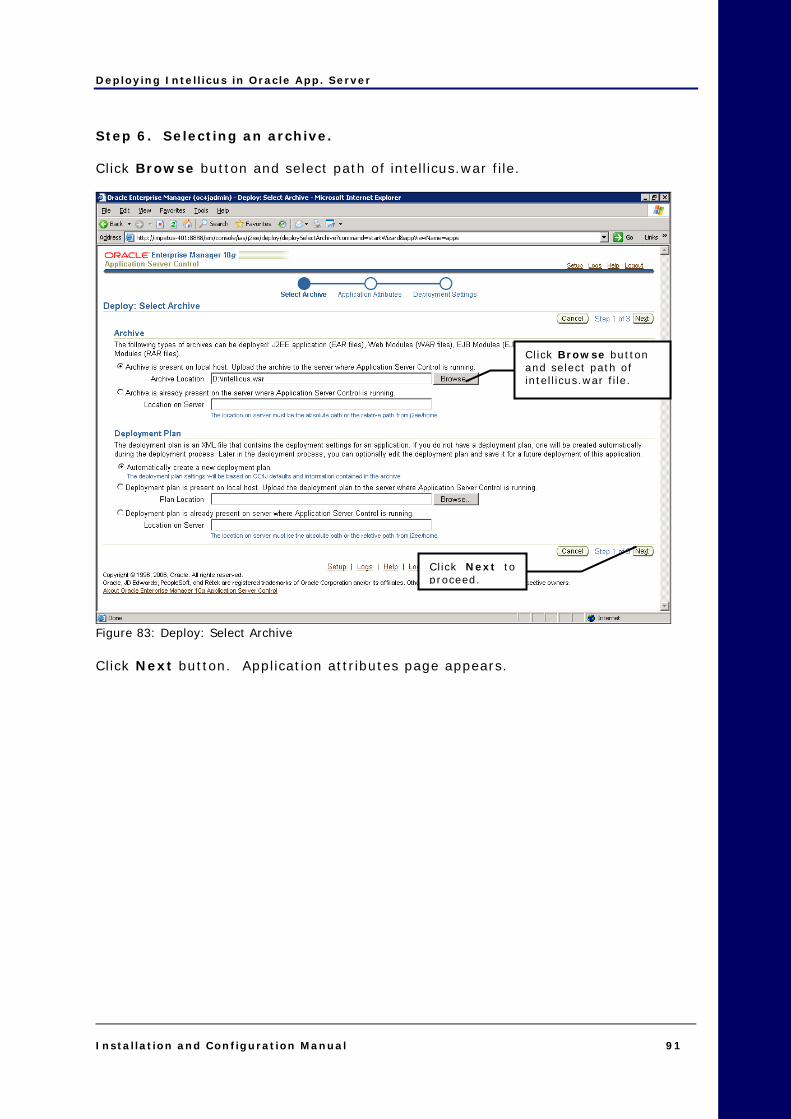
Deploying Intellicus in Oracle App. Server
Installation and Configuration Manual 91
Step 6. Selecting an archive. Click Browse button and select path of intellicus.war file.
Figure 83: Deploy: Select Archive Click Next button. Application attributes page appears.
Click Browse button and select path of intellicus.war file.
Click Next toproceed.
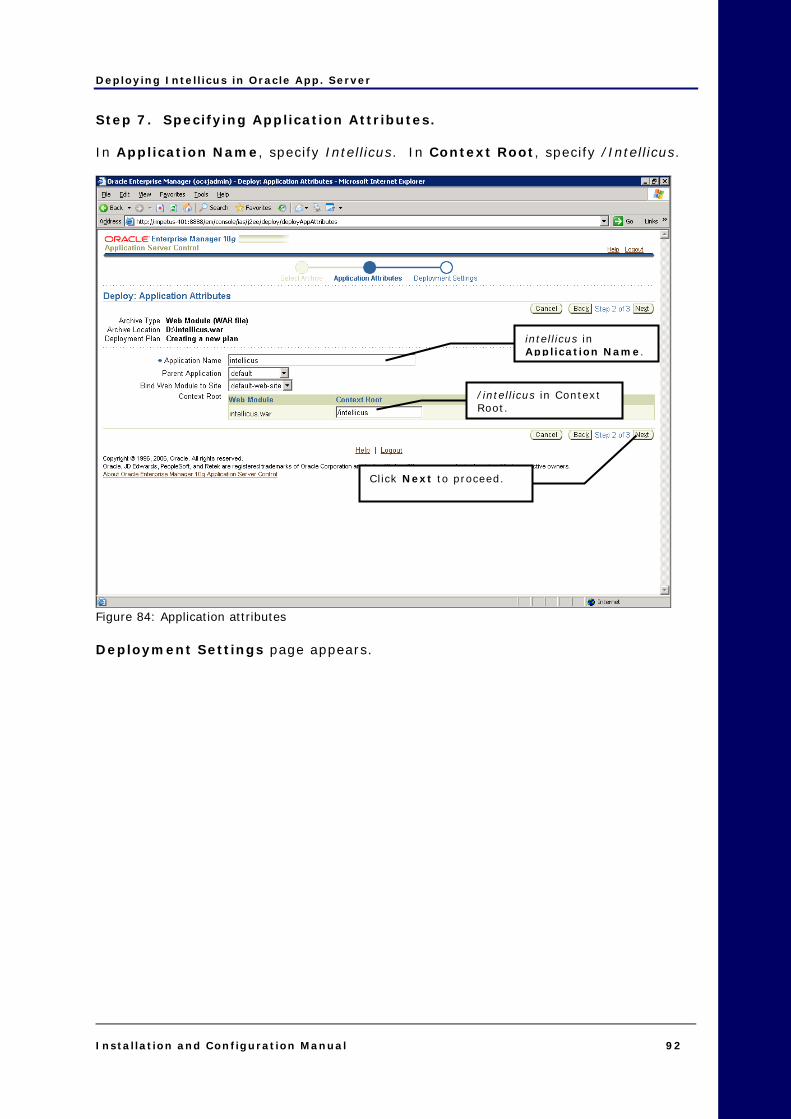
Deploying Intellicus in Oracle App. Server
Installation and Configuration Manual 92
Step 7. Specifying Application Attributes. In Application Name, specify Intellicus. In Context Root, specify /Intellicus.
Figure 84: Application attributes Deployment Settings page appears.
intellicus in Application Name.
/intellicus in Context Root.
Click Next to proceed.
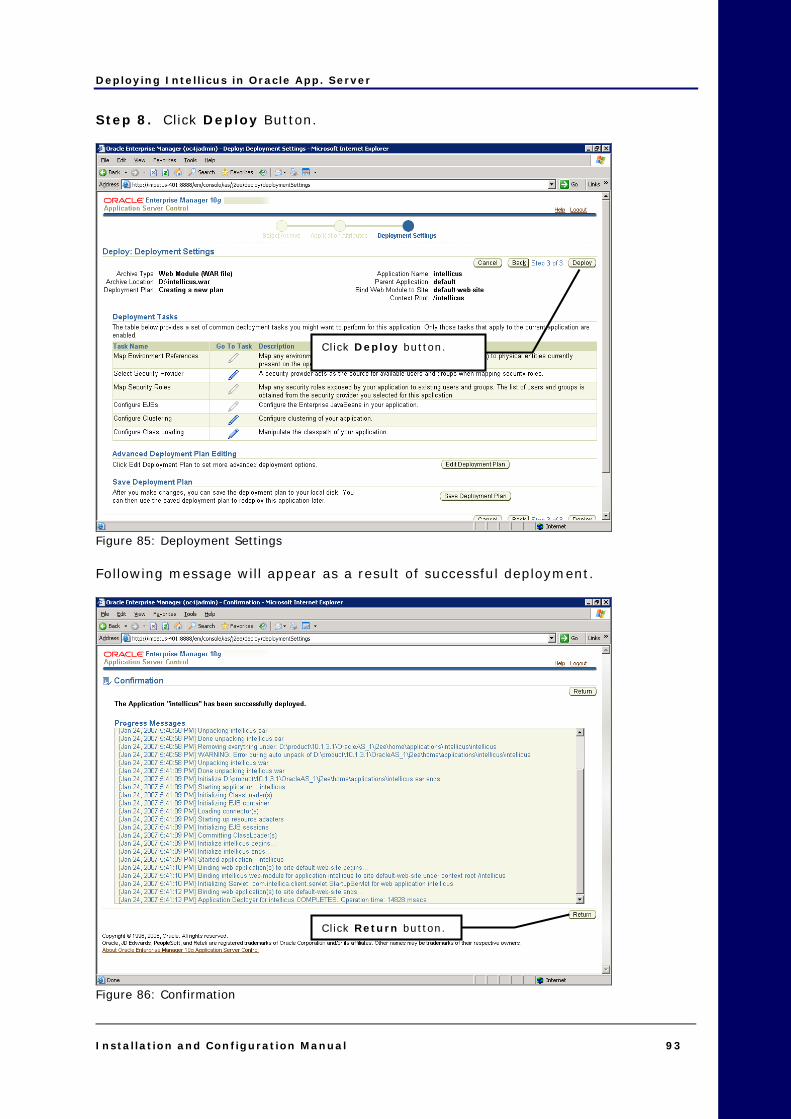
Deploying Intellicus in Oracle App. Server
Installation and Configuration Manual 93
Step 8. Click Deploy Button.
Figure 85: Deployment Settings Following message will appear as a result of successful deployment.
Figure 86: Confirmation
Click Deploy button.
Click Return button.
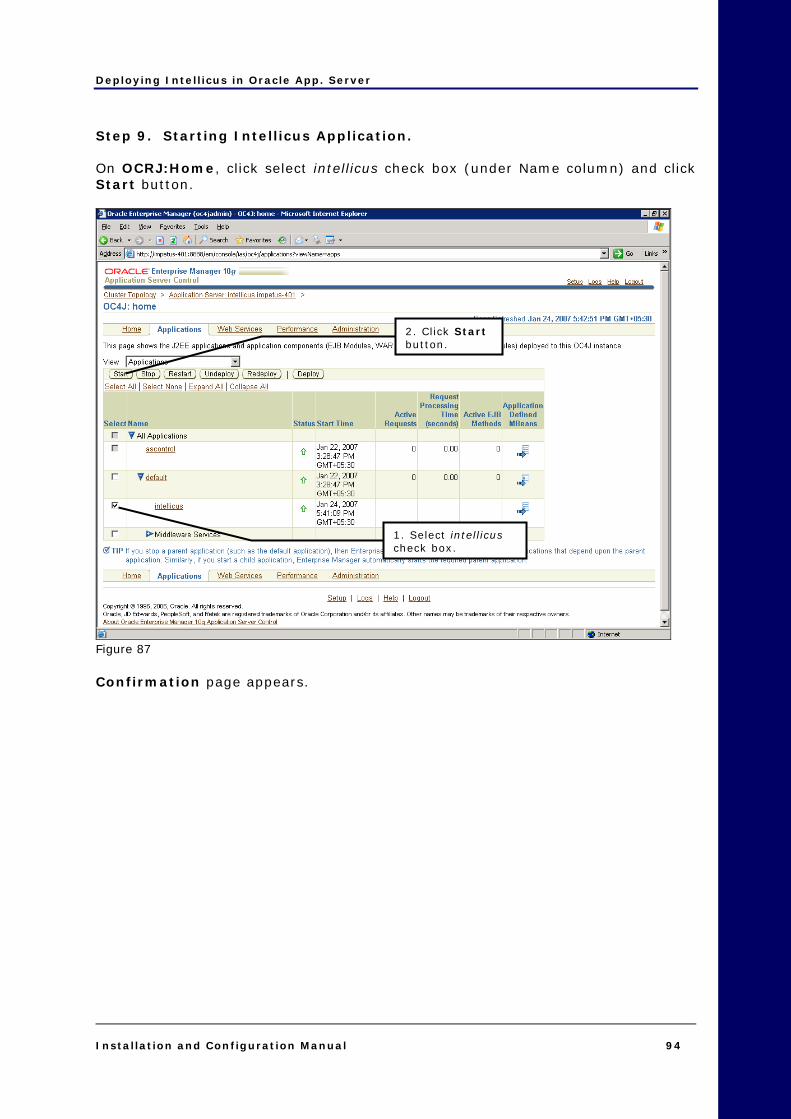
Deploying Intellicus in Oracle App. Server
Installation and Configuration Manual 94
Step 9. Starting Intellicus Application. On OCRJ:Home, click select intellicus check box (under Name column) and click Start button.
Figure 87 Confirmation page appears.
2. Click Start button.
1. Select intellicus check box.
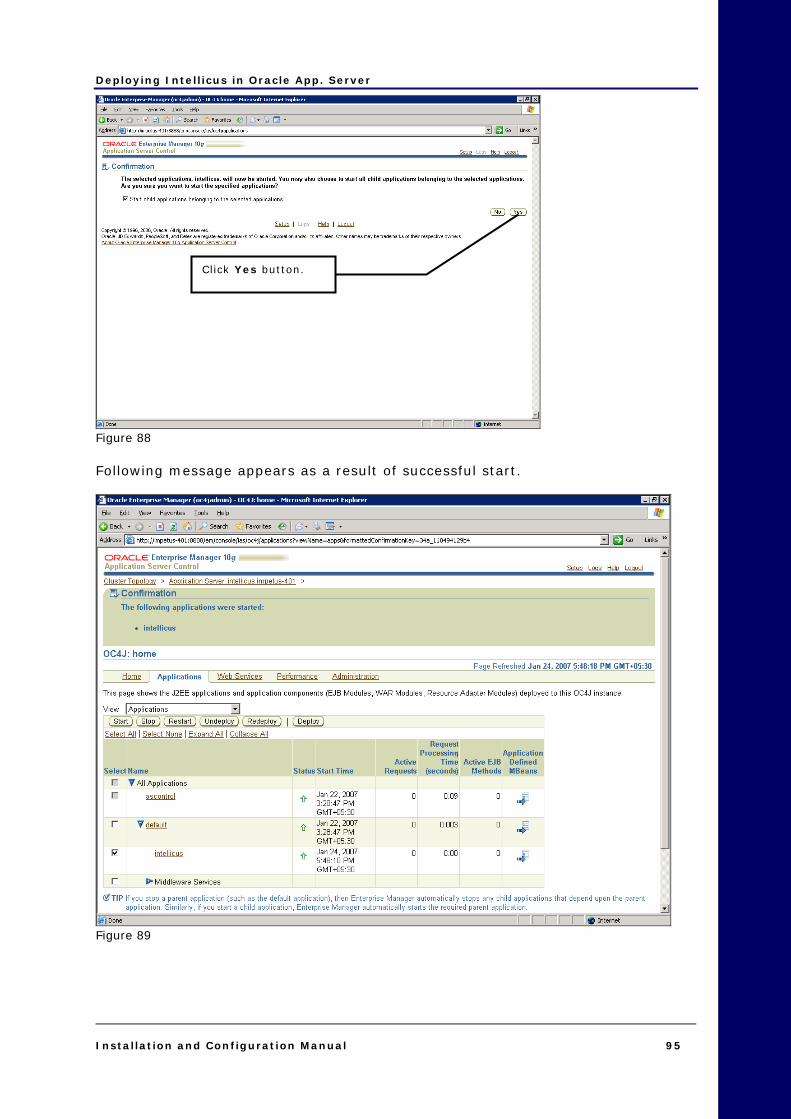
Deploying Intellicus in Oracle App. Server
Installation and Configuration Manual 95
Figure 88 Following message appears as a result of successful start.
Figure 89
Click Yes button.

Deploying Intellicus in Oracle App. Server
Installation and Configuration Manual 96
Specify following URL in address-bar of a browser as per following syntax to access the application. http://MachineIP:Port/intellicus/index.html. • MachineIP: IP of your computer where Intellicus web application is running.
• Port: Port for Oracle Application Server. Port number 8888 is default for oracle application server.
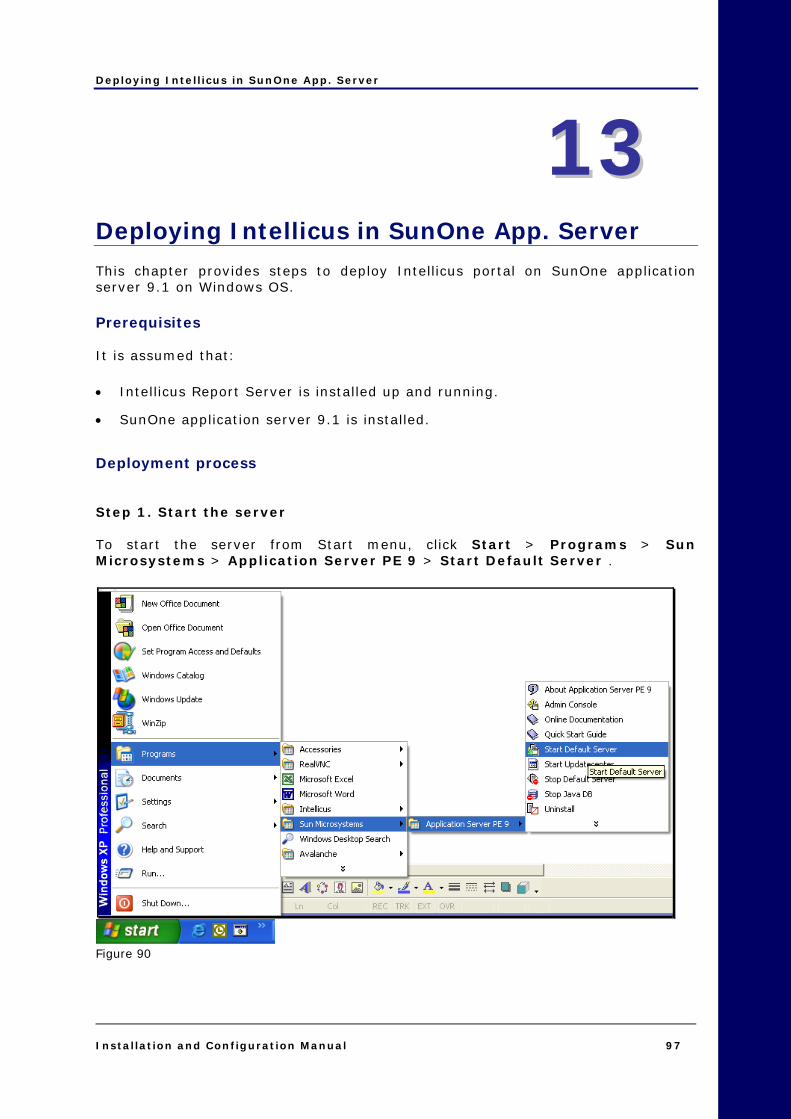
Deploying Intellicus in SunOne App. Server
Installation and Configuration Manual 97
1133 Deploying Intellicus in SunOne App. Server This chapter provides steps to deploy Intellicus portal on SunOne application server 9.1 on Windows OS. Prerequisites It is assumed that: • Intellicus Report Server is installed up and running.
• SunOne application server 9.1 is installed.
Deployment process Step 1. Start the server To start the server from Start menu, click Start > Programs > Sun Microsystems > Application Server PE 9 > Start Default Server .
Figure 90

Deploying Intellicus in SunOne App. Server
Installation and Configuration Manual 98
Step 2. Getting the Admin console After the server is up and running, open the Admin console. To get Admin Console, click Start > Programs > Sun Microsystems > Application Server PE 9 > Admin Console. It will open Server Application Login screen in a new browser window.
Figure 91 Specify user name and password. This should be the one that was specified on the Admin Configuration screen during Installation process. Click Login button. Common Tasks page appears.

Deploying Intellicus in SunOne App. Server
Installation and Configuration Manual 99
Figure 92 Under Deployment section, click Deploy Web Application (.war). Deploy Enterprise Applications/Modules page appears.
Click Deploy WebApplication (.war)

Deploying Intellicus in SunOne App. Server
Installation and Configuration Manual 100
Figure 93 intellicus.war is located in \Intellicus\APIs folder. Click Browse to select intellicus.war file located in this folder. For example, if Intellicus is installed in C:\Program Files, then path of war file will be C:\Program Files\Intellicus\APIs\intellicus.war. Click OK after selecting the path. Web Applications page appears.
Click Browse to selectintellicus.war file underIntellicus/APIs folder.
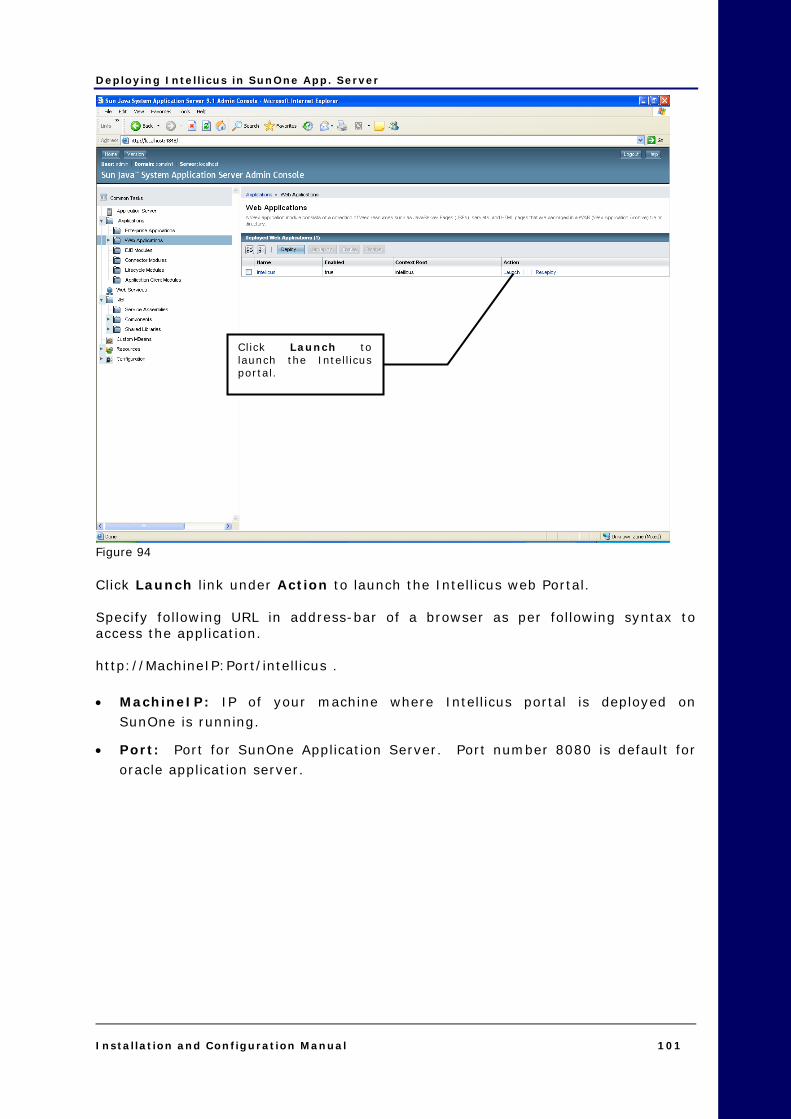
Deploying Intellicus in SunOne App. Server
Installation and Configuration Manual 101
Figure 94 Click Launch link under Action to launch the Intellicus web Portal. Specify following URL in address-bar of a browser as per following syntax to access the application. http://MachineIP:Port/intellicus . • MachineIP: IP of your machine where Intellicus portal is deployed on
SunOne is running.
• Port: Port for SunOne Application Server. Port number 8080 is default for oracle application server.
Click Launch tolaunch the Intellicusportal.

IIS redirection for Intellicus
Installation and Configuration Manual 103
1144 IIS redirection for Intellicus Intellicus web portal is a JSP based portal. This cannot be deployed directly in MS Internet Information Services. IIS redirection is required in order to deploy Intellicus web application in IIS.
Note: Before proceeding, we request you to make sure Intellicus web portal as well as Intellicus Report Server is installed and running.
Major steps for IIS redirection are:
1. Unzip IntellicusIISRedirector.zip in <PATH>\Inetpub\wwwroot folder. 2. Create virtual host related changes in server.xml file in Intellicus web
server. 3. Make redirection port related changes in Server.xml and
IntellicusWorkers.properties file. 4. Create a virtual directory in the IIS named “Intellicus”. 5. Configure Intellicus_Redirector.properties. 6. Configure Intellicus Redirector ISAPI filter. 7. Re-start IIS.
Redirection related files Intellicus provides a file IntellicusIISRedirector.zip having required files for redirection. This file is available at path: <intellicus install path>\APIs\iRedirector\ . This zip file contains: • Intellicus_Redirector.dll: This IIS server plug-in is made available by
Intellicus. This file processes and redirects client requests to Intellicus web server.
• Intellicus_Redirector.properties: This file stores essential information that is needed by Intellicus_redirector.dll. User may open this file using any text editor to view/modify the information.

IIS redirection for Intellicus
Installation and Configuration Manual 104
• IntellicusUriWorkerMap.properties: This file maps URL-Path patterns to workers.
• IntellicusWorkers.properties: This file describes the host(s) and port(s) used by the workers (Intellicus web server processes).

IIS redirection for Intellicus
Installation and Configuration Manual 105
Unzipping IntellicusIISRedirector.zip When you unzip IntellicusIISRedirector.zip in <PATH>\Inetpub\wwwroot\, it will create a folder named “Intellicus” along with folder structure and files within.
Figure 95: Files unzipped in C:\Inetpub\wwwroot folder.
IIS redirection for Intellicus
Installation and Configuration Manual 106
Making required changes in server.xml file Following changes needs to be done in server.xml file: • Virtual host related changes
• Change AJP Port (optional step)
This file is available at <Intellicus install path>\Jakarta\conf Virtual host related changes Virtual host related changes are made in <Context> node available in server.xml file. When Intellicus runs stand alone, the <Context> node reads:
<Context path="/intellicus" docBase="intellicus">
<Manager pathname="">
</Manager>
</Context> When Intellicus is run under a host application, path needs to be changed from “/Intellicus” as per virtual directory name of host application under IIS. For example, if virtual directory name is “HostApp” then path should be “/HostApp/Intellicus”.
<Context path="/HostApp/intellicus" docBase="intellicus">
<Manager pathname="">
</Manager>
</Context> The <Context> node in the file server.xml has to be changed so that it matches with the folder structure setup in IIS. Similarly, you need to have one <Context> node for each host application.

IIS redirection for Intellicus
Installation and Configuration Manual 107
Changing AJP Port (optional step) User may wish to modify redirection-port related information (AJP port) in server.xml file from default 8009 to another one.
Figure 96: Modify redirection port entry in server.xml file Re-start tomcat before proceeding.

IIS redirection for Intellicus
Installation and Configuration Manual 108
Making required changes in IntellicusWorkers.properties file You need to make required changes in <PATH>\Inetpub\wwwroot\Intellicus\bin\IntellicusWorkers.properties file. The changes are: • AJP port (same as provided in server.xml)
• Provide Host IP where Intellicus web server is running
• AJP Protocol type
Save the file after making required changes.
Figure 97: Set port, host and worker type details in IntellicusWorkers.properties file.
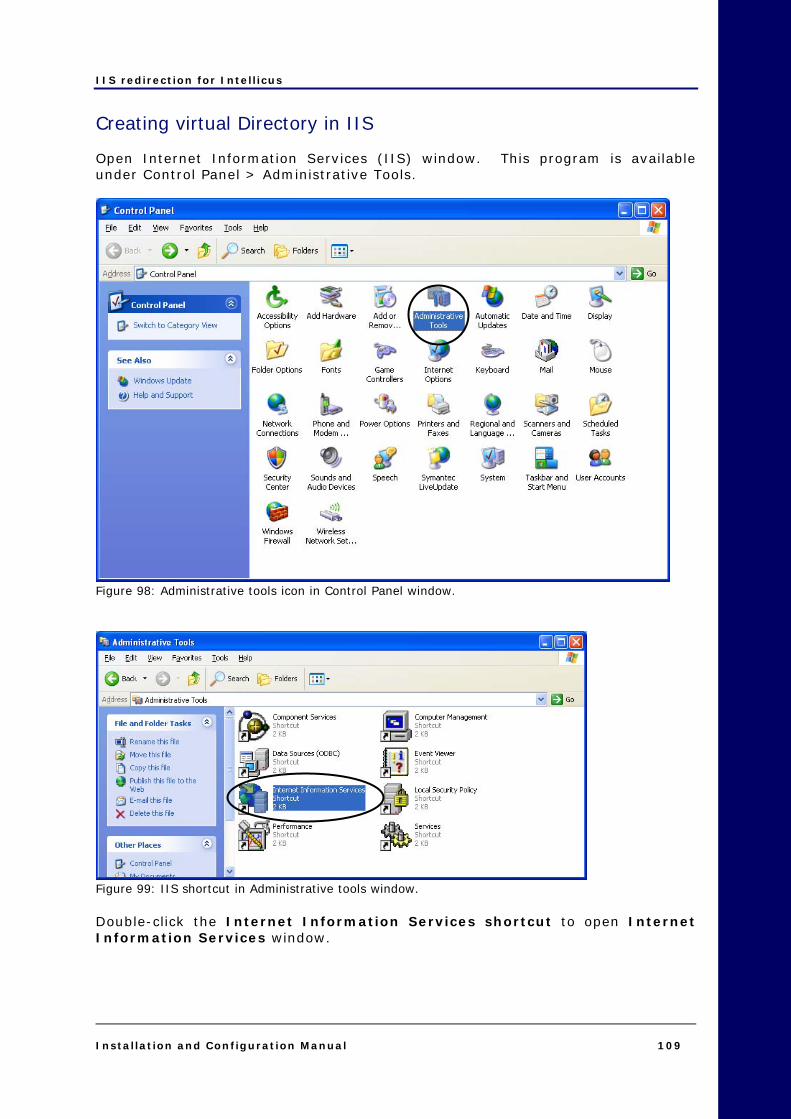
IIS redirection for Intellicus
Installation and Configuration Manual 109
Creating virtual Directory in IIS Open Internet Information Services (IIS) window. This program is available under Control Panel > Administrative Tools.
Figure 98: Administrative tools icon in Control Panel window.
Figure 99: IIS shortcut in Administrative tools window. Double-click the Internet Information Services shortcut to open Internet Information Services window.

IIS redirection for Intellicus
Installation and Configuration Manual 110
Figure 100: Creating a Virtual directory for the web site (Intellicus)
Figure 101: First screen of Virtual Directory Creating Wizard
To get a context menu right-click the mouse.Click its option Virtual Directory… to createa new virtual directory.
Click Next to proceed.
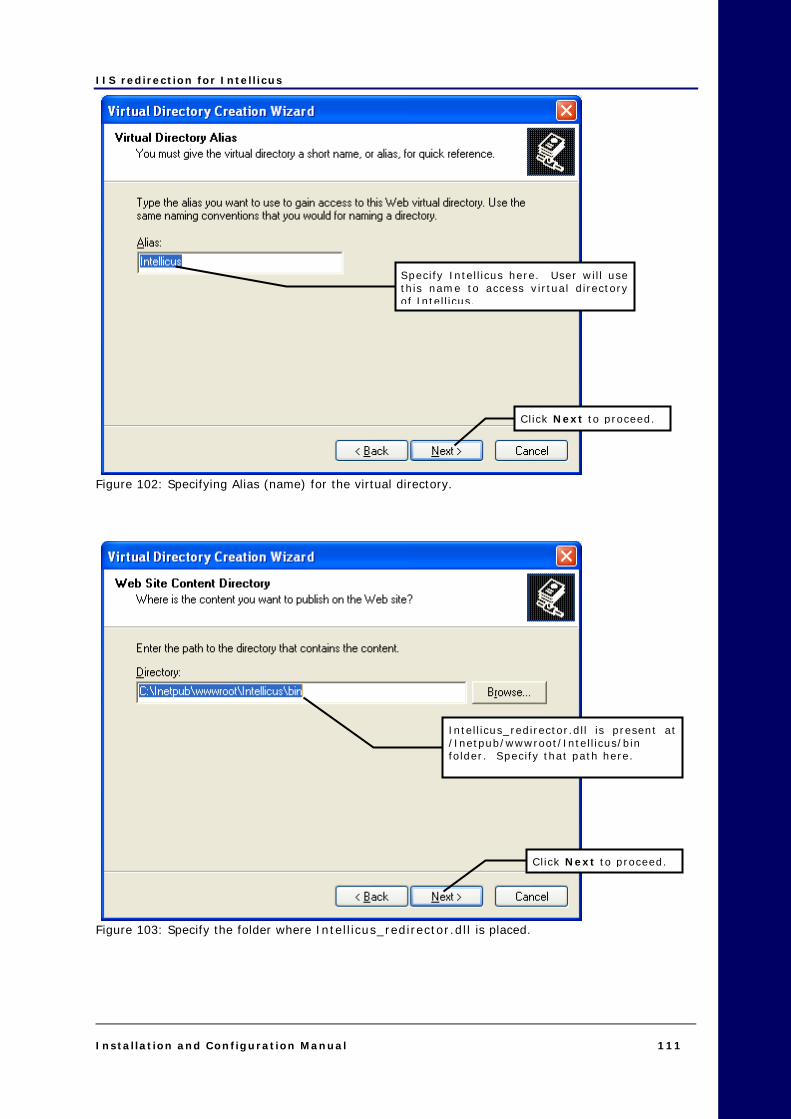
IIS redirection for Intellicus
Installation and Configuration Manual 111
Figure 102: Specifying Alias (name) for the virtual directory.
Figure 103: Specify the folder where Intellicus_redirector.dll is placed.
Specify Intellicus here. User will usethis name to access virtual directoryof Intellicus.
Click Next to proceed.
Intellicus_redirector.dll is present at/Inetpub/wwwroot/Intellicus/bin folder. Specify that path here.
Click Next to proceed.
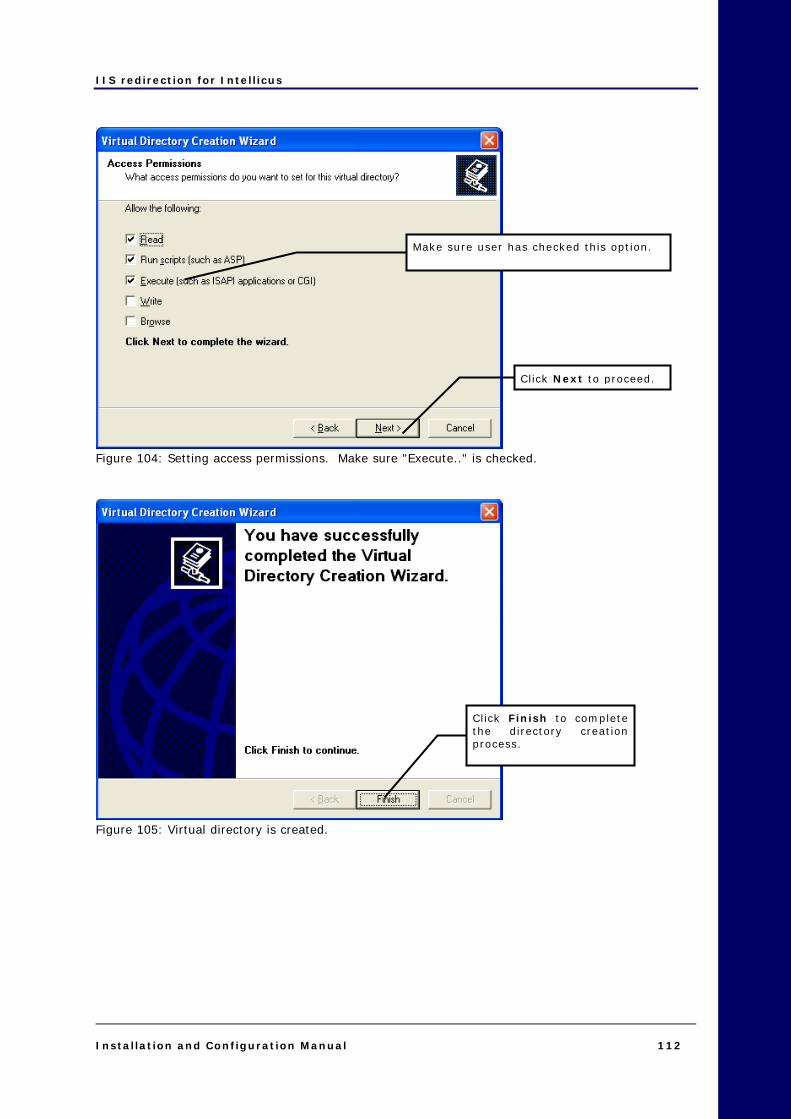
IIS redirection for Intellicus
Installation and Configuration Manual 112
Figure 104: Setting access permissions. Make sure "Execute.." is checked.
Figure 105: Virtual directory is created.
Make sure user has checked this option.
Click Next to proceed.
Click Finish to completethe directory creationprocess.
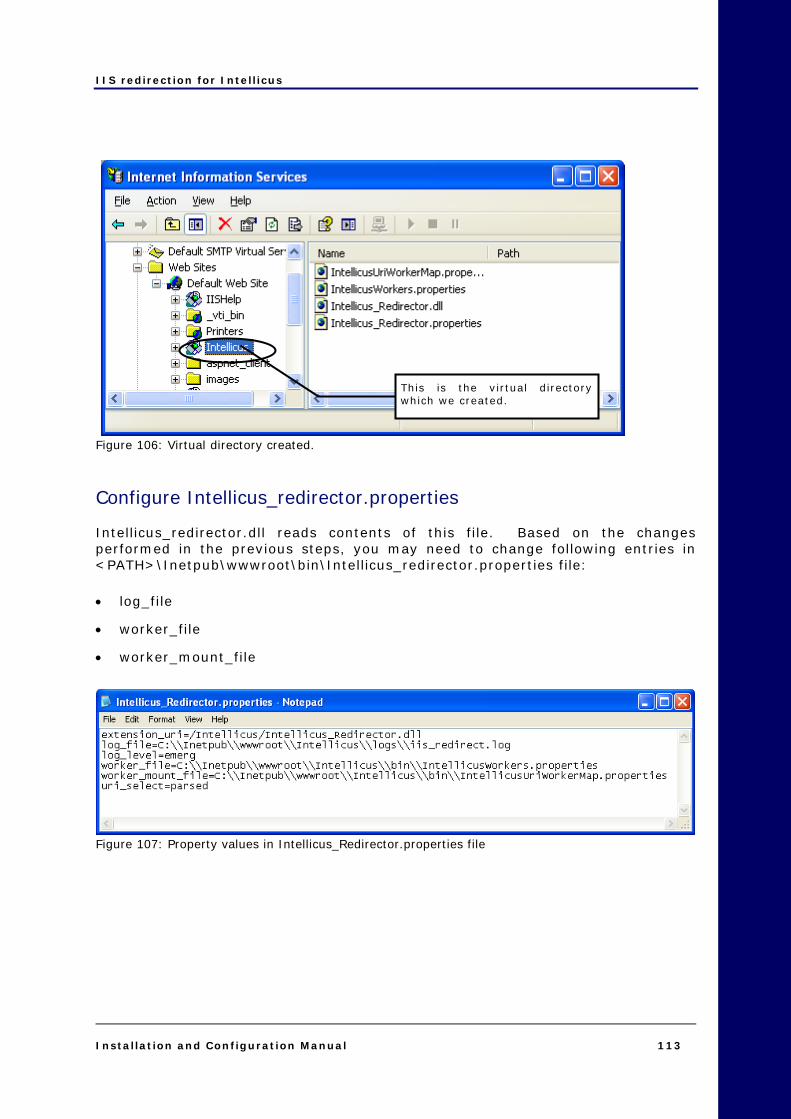
IIS redirection for Intellicus
Installation and Configuration Manual 113
Figure 106: Virtual directory created.
Configure Intellicus_redirector.properties Intellicus_redirector.dll reads contents of this file. Based on the changes performed in the previous steps, you may need to change following entries in <PATH>\Inetpub\wwwroot\bin\Intellicus_redirector.properties file: • log_file
• worker_file
• worker_mount_file
Figure 107: Property values in Intellicus_Redirector.properties file
This is the virtual directorywhich we created.
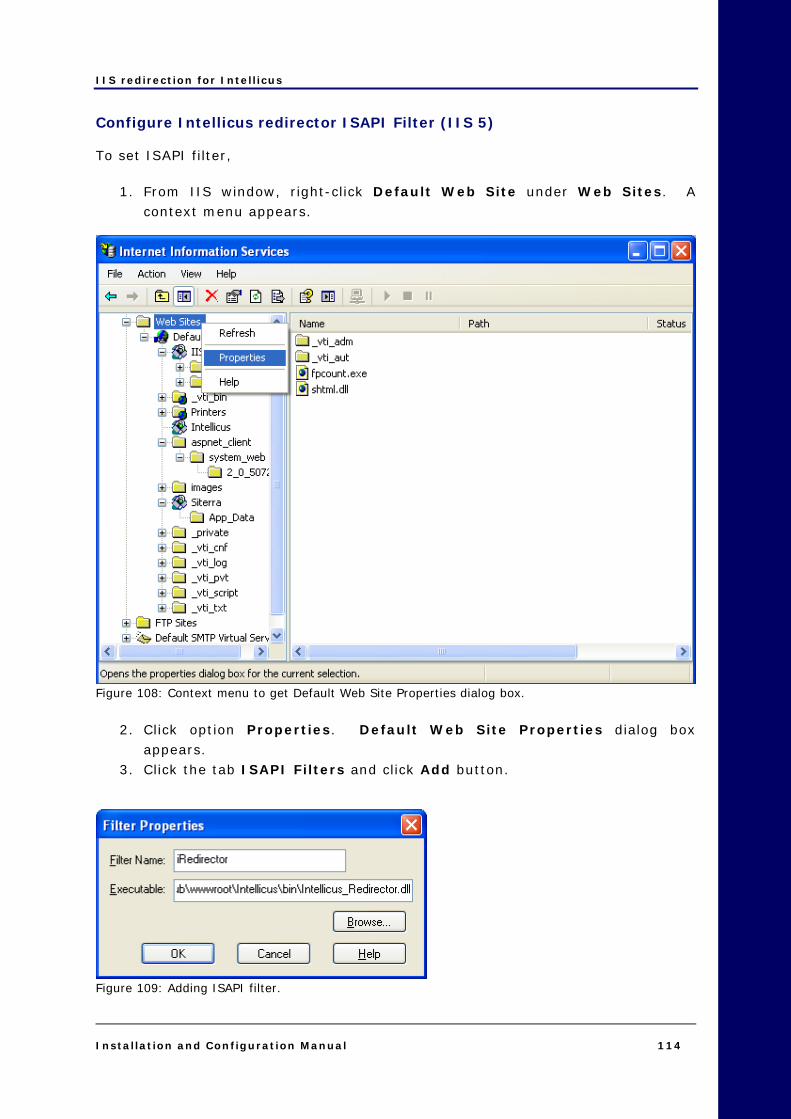
IIS redirection for Intellicus
Installation and Configuration Manual 114
Configure Intellicus redirector ISAPI Filter (IIS 5) To set ISAPI filter,
1. From IIS window, right-click Default Web Site under Web Sites. A context menu appears.
Figure 108: Context menu to get Default Web Site Properties dialog box.
2. Click option Properties. Default Web Site Properties dialog box appears.
3. Click the tab ISAPI Filters and click Add button.
Figure 109: Adding ISAPI filter.
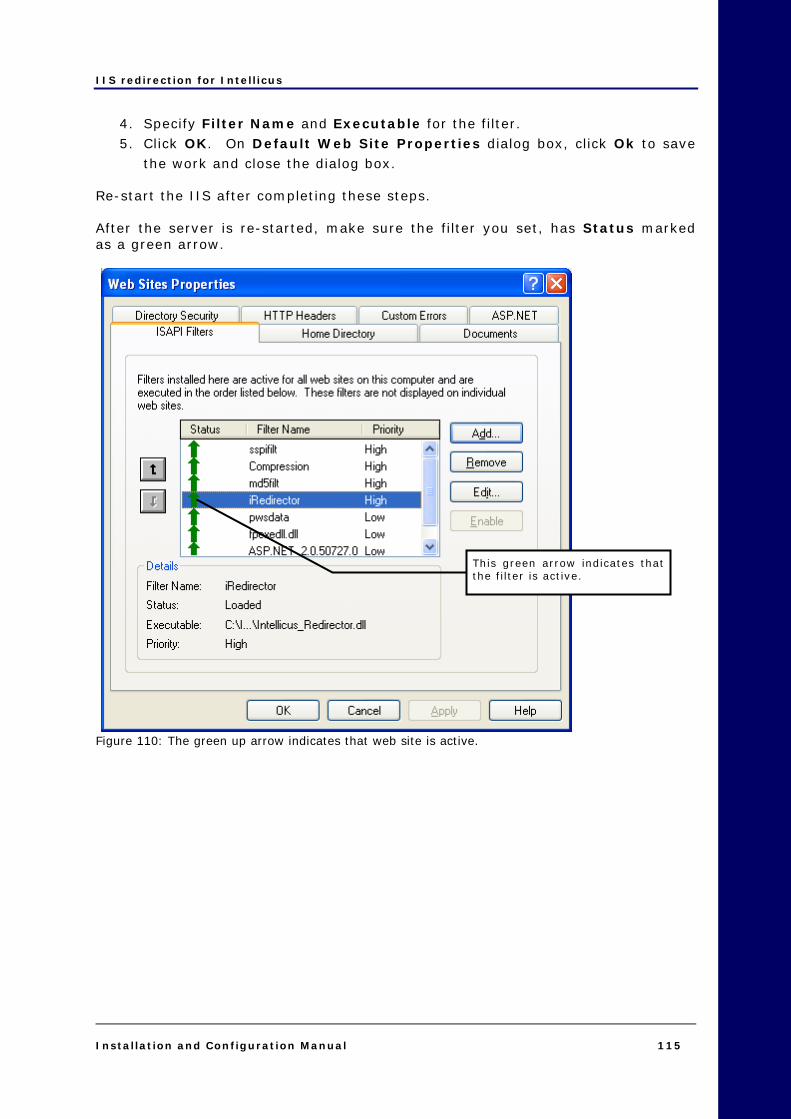
IIS redirection for Intellicus
Installation and Configuration Manual 115
4. Specify Filter Name and Executable for the filter. 5. Click OK. On Default Web Site Properties dialog box, click Ok to save
the work and close the dialog box. Re-start the IIS after completing these steps. After the server is re-started, make sure the filter you set, has Status marked as a green arrow.
Figure 110: The green up arrow indicates that web site is active.
This green arrow indicates thatthe filter is active.
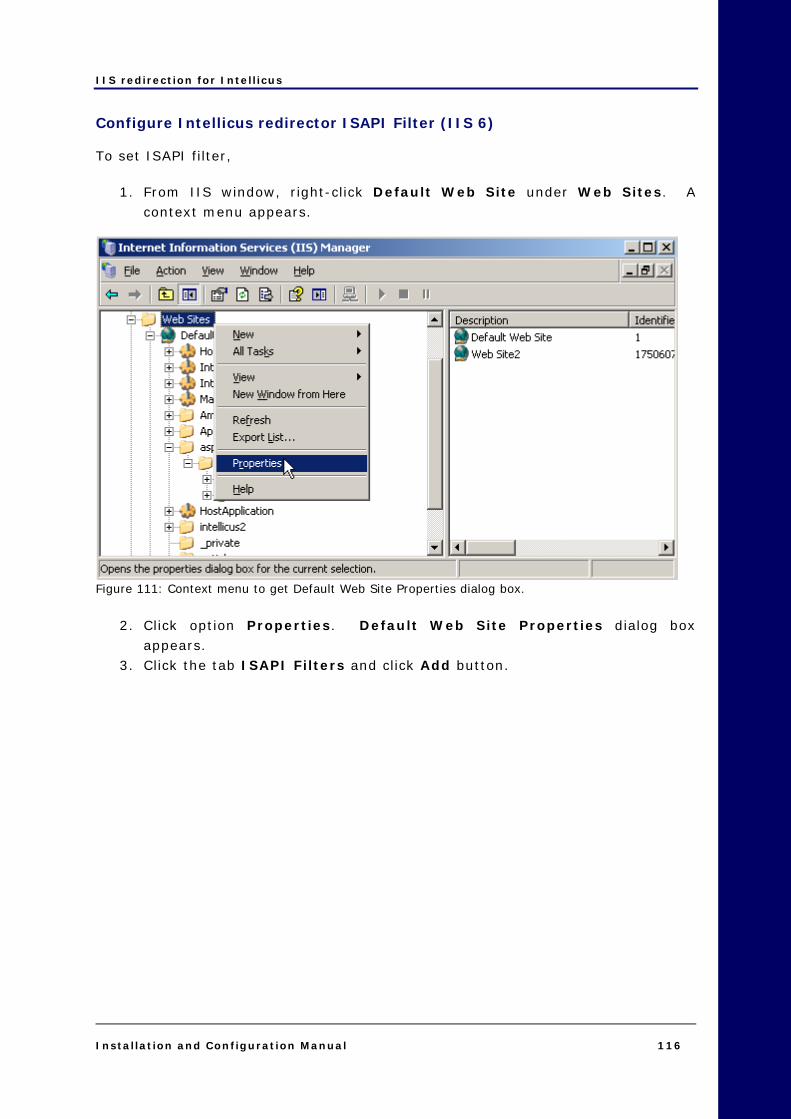
IIS redirection for Intellicus
Installation and Configuration Manual 116
Configure Intellicus redirector ISAPI Filter (IIS 6) To set ISAPI filter,
1. From IIS window, right-click Default Web Site under Web Sites. A context menu appears.
Figure 111: Context menu to get Default Web Site Properties dialog box.
2. Click option Properties. Default Web Site Properties dialog box appears.
3. Click the tab ISAPI Filters and click Add button.

IIS redirection for Intellicus
Installation and Configuration Manual 117
Figure 112: Adding ISAPI filter.
4. Specify Filter Name and Executable for the filter. 5. Click OK. On Default Web Site Properties dialog box, click Ok to save
the work and close the dialog box. 6. In the left pane of the IIS manager, select Web Service Extensions and
select Add a new Web service extension.

IIS redirection for Intellicus
Installation and Configuration Manual 118
Figure 113
7. Name the extension Intellicus-Jakarta and add the <path>\Inetpub\wwwroot\Intellicus\bin\Intellicus_Redirector.dll to the required files section.
8. Select the check box - Set extension status to Allowed.
Figure 114
9. Click OK to close New Web Service Extension dialog box.

IIS redirection for Intellicus
Installation and Configuration Manual 119
Re-start the IIS after completing these steps. After the server is re-started, make sure the filter you set, has Status marked as a green arrow.
Figure 115: The green up arrow indicates that web site is active.
This green arrow appears afterthe first hit.
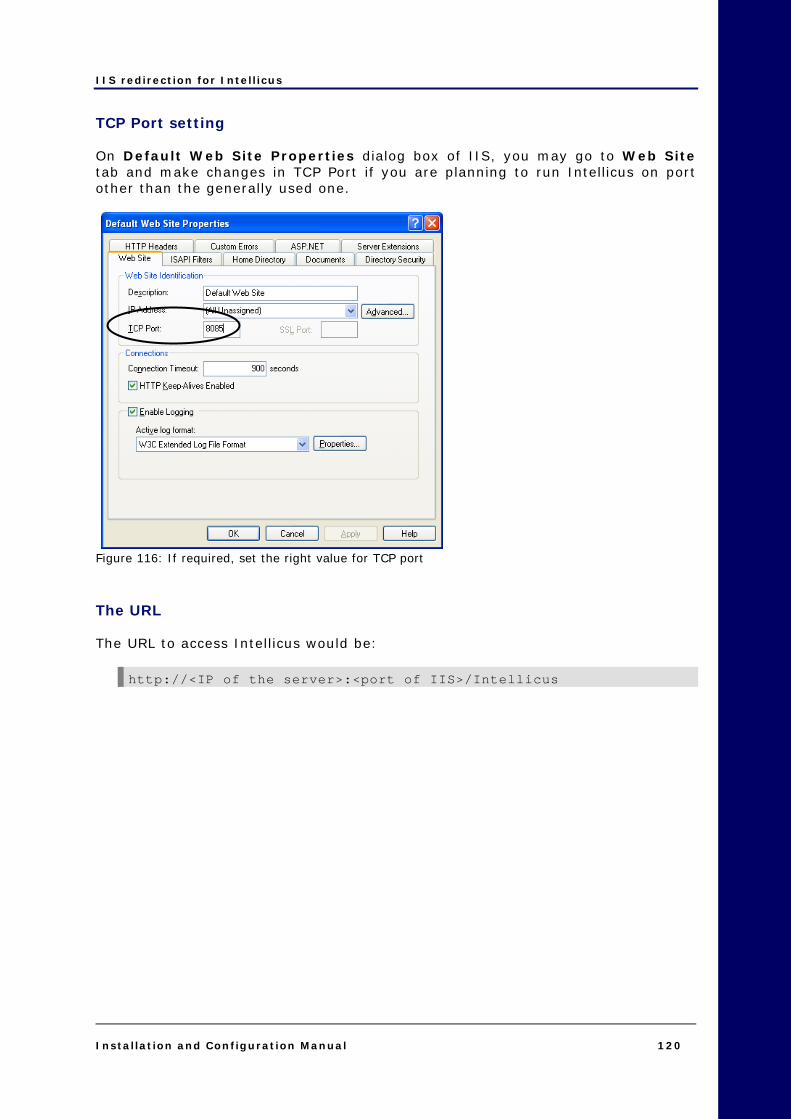
IIS redirection for Intellicus
Installation and Configuration Manual 120
TCP Port setting On Default Web Site Properties dialog box of IIS, you may go to Web Site tab and make changes in TCP Port if you are planning to run Intellicus on port other than the generally used one.
Figure 116: If required, set the right value for TCP port The URL The URL to access Intellicus would be:
http://<IP of the server>:<port of IIS>/Intellicus
Intellicus Configurations
Installation and Configuration Manual 121
1155 Intellicus Configurations Intellicus Web-based Reporting Suite may be configured to meet your specific usage and performance requirements. The configuration information is stored in a property file. Each time the server is started, it reads the configuration information from this property file. If a parameter is not set in the property file, Intellicus will work considering default values. We suggest you to configure the server before deploying the application. Configuration of server will give you more control over the application.
Note: Only the user having Super Administrator’s privileges would be able to configure the server.
Configuration includes: • Server Properties.
• Database Connections.
• Licensing details.
• Portal Properties.
All of these activities are carried out on Configuration page of Intellicus Web Interface. Before going ahead with configuration, please make sure that the report server and web server is running. Loading common configuration page On the Intellicus Portal menu, select Administration > Configure.
Figure 117: The Configuration menu option If Intellicus is running under security mode disabled, Administration tab will not appear on the screen and so, the Configure page. To get Configure Page, specify the following URL in the address bar of the browser:

Intellicus Configurations
Installation and Configuration Manual 122
If web server is running on local machine,
http://localhost/intellicus/pattern/conf In other cases,
http://<IP>/Intellicus/pattern/conf <IP> is IP of the machine where web server is running. Screen having Configure page will appear. You can carry out configuration related activities.
Report Server configuration The configuration parameters are stored in ReportEngine.properties file. This file is stored at path: \\<IntellicusIinstallationDirectory>\ReportEngine\Config\ReportEngine.properties. If the application is stored in C:\Intellicus, then, the path where property file is stored would be: C:\Intellicus\ReportEngine\Config\ReportEngine.properties.
Intellicus Configurations
Installation and Configuration Manual 123
Configuring Report Server Report server’s configuration is achieved by setting properties associated with it. This is done on Server page of portal. From the menu, select Administration > Configuration > Server.
Figure 118 : The Configuration menu option The page lists all the properties for server configuration.
Note: This information of Report Server is stored in ReportEngine.properties file available at path: <path>\intellicus\ReportEngine\Config\ReportEngine. You as an administrator can directly change properties values by editing the file.

Intellicus Configurations
Installation and Configuration Manual 124
The Property Details
Important: Properties listed on this page appear here because they (as well as the possible values) are available in ReportServerProperties.xml file at path: <path>\intellicus\ReportEngine\Config . If you don’t find a property here, make sure it is rightly defined in ReportServerProperties.xml file. If you don’t want a property to appear on this page, you may comment it in the file.
Listener IP Address Specify an IP address for this property to make Report Server listen to the requests coming from the specified IP only. Keeping it blank will make Report Server listen to requests coming from any IP. Default: blank LISTENER_IPADDRESS=127.0.0.1 Listener Port This is the port to be used for communication between Intellicus report server and client (portal and Desktop Studio). Valid value for the port is any integer greater than zero. New value set for this property will come into effect after server re-start. Default Value: 45450 Example: LISTENER_PORT=45450
Note: The report server will not boot up in case the port number specified is in use by any other application.
Database Connection TimeOut (seconds) This is the time in seconds after which the database connection will be closed, if not used for that many seconds. Valid value for this timeout is any integer greater than zero. Default: 600 Example: If DATABASE_CONNECTION_TIMEOUT is set to 50, report server will close the connection with a database if there is no communication between report server and database server for 50 seconds. Security This property is used to enable or disable security features of Intellicus. If it is set to enable, users will have to provide their login using their username and password to work with Intellicus. They will be allowed to use only those features for which they have been provided the access rights. If it is set to disable, all the features of Intellicus will be available to everyone. New value set for this property comes into effect after server re-start.

Intellicus Configurations
Installation and Configuration Manual 125
Default: enable. Example: SECURITY_FEATURES=enable
Note: When security is disabled, all the user dependent features like data masking will not be available.
Warning: When Report Server is running in Non-Secured Mode, any user can access any report.
Audit Log Audit Log feature can be used to monitor access pattern of reports by different users. From drop-down, select enable to activate audit log feature. Select disable if audit logging is not required. Default: disable. Example: AUDIT_LOG=disable Request Queue Size Report server places all requests in queue before executing them. This property is to set maximum number of requests that can be queued. After the queue is completely filled, server ignores all client requests, until number of requests in queue is reduced to a number less than the property value. Specify an integer value that is greater than zero. New value set for this property will come into effect after server re-start. Default: 1000. Example: QUEUE_SIZE=1000 Page chunksize This property is to set the number of report pages that will be sent to the client (portal) at a time (in one batch). Default: 10. Example: PAGE_CHUNKSIZE=10 Log Level This property is to set the level of criticality to be considered for logging. Valid values are DEBUG, INFO, WARN, ERROR, FATAL. Default: ERROR. Example: LOG_LEVEL = ERROR Click Log Files to view the server log files. You can choose to download or purge any / all log files appearing in the list for analysis. XML Data Source Folder This property is to set directory for XML data source reports. If the specified directory is not found, report server will not be able to run the report that uses xml data coming from XML file. Default: ../xmldata. Example: XML_DATA_SOURCE_DIRECTORY=../xmldata

Intellicus Configurations
Installation and Configuration Manual 126
Temporary Folder This property is to set folder where temporary files will be stored. If the specified folder is not found, the server will create the folder. In case server is not able to create the folder, all the features that need to create temporary files will not work. Default: ../temp. Example: TEMP=../temp Log Folder This property is to set folder where report server log files will be stored. The log file name is ReportEngine.log. If the specified folder is not found, the server will create folder with that name. In case server is not able to create the folder, then command prompt will be used as the logger. Default: ../logs. Example: LOG=../logs
Note: When log file size reaches 10 MB server renames it and starts logging in a new file.
Exec Threads These threads handles report execution requests. Specify number of report execution requests that should be served simultaneously. Default: 5. Example: EXEC_THREADS=5 Service Threads This thread handles all the requests (except report execution). Specify number of service requests that should be served simultaneously. Default: 5. Example: SERVICE_THREADS=5 Cancel Threads This thread handles report-canceling task (stopping execution of a report). Specify number of cancel request that should be served simultaneously. Default: 5 Example: CANCEL_THREADS=5
Note: Report Server will limit the number of threads to the licensed number of users even if a higher number of threads is set in property file. Report server will not give any error in such case.
Font Folder Specify the folder where font files are stored. Intellicus supports TTF format of fonts. In case of invalid value (font not found in the folder), Arial fonts included in report server will be used. Default: c:/winnt/fonts. Example: FONT_DIRECTORY=c:/winnt/fonts

Intellicus Configurations
Installation and Configuration Manual 127
Left margin Offset This property is to set left margin compensating factor for printing. This is set in terms of points. (1 point = 1/72 inch). A valid value is zero or any integer. Default: 0. Example: LEFT_MARGIN_OFFSET=0 Top Margin Offset This property is to set top margin compensating factor for printing. This is set in terms of points. (1 point = 1/72 inch). A valid value is zero or any integer. Default: 0. Example: TOP_MARGIN_OFFSET=0 Scale Offset This property is to set scaling compensating factor for printing. A valid value is any real number between –1.0 and 1.0. Default: 0. Example: SCALE_OFFSET=0.0 Client Session Timeout (seconds) This is the time in seconds for which report server will wait to receive a response from the client (portal). If the client does not respond within time specified here, server will close the session with that client request. Specify 0 (infinite timeout) or a positive integer. Default: 120. Example: CLIENT_SESSION_TIMEOUT=600 Remote Session Timeout (seconds) This property is to set time in seconds after which the remote session will be closed. This is when the server acts as a client. Specify 0 (Intellicus server should never close the connection) or a positive integer. Default: 50. Example: REMOTE_SESSION_TIMEOUT=50 RTF Field Control Map This property is to set the map of plain text character to RTF equivalent control. It is used in embedded field values to apply RTF formatting on plain text. Syntax:RTF_FIELD_CONTROL_MAP=plainText1:RTFControl1;plainText2:RTFControl2; (String) Default:\n:\\par ; Example: RTF_FIELD_CONTROL_MAP=\n:\\par ; Data Source Fetch Size This is the number of records to be fetched from the data source at a time (in one read). Specify a positive integer. Default: 50 Example: DATA_SOURCE_FETCH_SIZE=50
Intellicus Configurations
Installation and Configuration Manual 128
Note: Value set in this property will not remain effective for MySQL database.
Authentication Cache Validity This property is to set the time out in minutes for authentication cache. Specify –1 to disable caching and 0 for Infinite validity. Valid value is any positive integer. Default:15 Example: CSA_TIMEOUT=15 Report Cache path This property is to set the report cache directory. Reports will be cached in this directory (folder). New value set for this property will come into effect after server re-start. Default:../rpg Example: CACHE_PATH=../rpg Audit Log Purge Time (days) Audit log is a record of reports generated by report server. This property sets the number of days after which audit log should be deleted. Record of report generation will be deleted after the number of days specified in this property has passed. Default: 30 Example: AUDITLOG_PURGE_TIME=30 Cache Purge Time (minutes) This property is to set the time in minutes after which cache should be purged. Specify a positive integer. Default: 30 Example: For CACHE_PURGE_TIME=30 report server will purge reports that are cached for more than 30 minutes. Cache Purge Frequency (minutes) This is the interval in minutes after which a thread will be executed to purge audited reports / published reports / cached reports (which has exceeded CACHE PURGE TIME. Default: 30 Example: CACHE_PURGE_FREQUENCY=10 Standard Colors This property is to set color patterns (presently used in charts). Specify color values (hexadecimal / integer) separated by semicolon. default: 0x00CCFF;0xCC99FF;0XFF9999;0xCCFF66;0xF3DFC3;0xFFFF66;0xFFB200;0x0099CC;0x99CC33;0x999900;0xFFFF99;0XC7C3F3 Example: STANDARD_COLORS=0x00CCFF;0xCC99FF;0XFF9999;0xCCFF66;0xF3DFC3;0xFFFF66;0xFFB200;0x0099CC;0x99CC33;0x999900;0xFFFF99;0XC7C3F3
Intellicus Configurations
Installation and Configuration Manual 129
Authorization cache timeout (minutes) This property is to set the timeout for caching of authorization information. This time is specified in minutes. When this property is turned on, authorization information will be cached at the end of the timeout interval. Specify 0 to turn this feature off. A valid value for this feature is any positive integer. Default=15 Example: For AUTHORIZATION_CACHE_TIMEOUT=15 server will run thread to cache authorization information every 15 minutes. Repository Cache Timeout (minutes) This property is to set the time out in minutes for caching of category and report layouts information. When this property is turned on, repository information (categories and report layouts) will be cached at the end of timeout interval or as soon as the user makes any changes, which ever occurs earlier. Default=15 Example=For REPOSITORY_CACHE_TIMEOUT=15, report server will cache reports and repository information as and when a change occurs, or at the end of every 15 minutes (whichever occurs earlier). Sort Area Size Per Exec This property is to set the number of records that can reside in memory for all sort threads of a report. Property can be given a value more than 0. Default: 600.
Note: Sort Area Size Per Exec property will work in coordination with Sort Threads Per Exec property explained later on the page.
File Data Source Path This property is to set the path for the data source files. Default: ../filesource. FILE_DATA_SOURCE_PATH=../filesource Email From Address This property is to set the email address which will be displayed as the from (sender’s) address in the mails. Default: Intellicus Automated Reporting System <[email protected]> Example: EMAIL_FROM_ADDRESS=Intellicus Automated Reporting System <[email protected]> Host URL This is the host url (URL to be specified to run Intellicus application) which will be sent as part of email. Syntax: HOST_URL=[Host URL](String) Default: http://localhost/intellicus Example: HOST_URL=http://localhost/Intellicus

Intellicus Configurations
Installation and Configuration Manual 130
Job Success Mail To When a scheduled job is successfully completed, Intellicus can notify users about successful completion. Specify email IDs where mails should be sent in case a schedule is successfully implemented. Make use of comma or semi colon to separate two email IDs. Syntax: JOB_SUCCESS_MAIL_TO=[email addresses separated by comma or semi colon](string) Example: [email protected],[email protected] Job Success Mail Subject When a scheduled job is successfully completed, Intellicus can notify users about successful completion. Specify here subject that the mail should carry. Syntax: JOB_SUCCESS_MAIL_SUBJECT=[Subject](string) Example: JOB_SUCCESS_MAIL_SUBJECT=Scheduled Job implemented successfully Default: JOB_SUCCESS_MAIL_SUBJECT=Scheduled Job ‘<%JOB_NAME%>’ notification - Success Job Error Mail To When a scheduled job fails, Intellicus can notify users about the failure. Specify email IDs where mails should be sent in case a schedule fails. Make use of comma or semi colon to separate two email IDs. Syntax: JOB_ERROR_MAIL_TO=[email addresses separated by comma or semi colon](string) Example: [email protected],[email protected] Job Error Mail Subject When a scheduled job fails, Intellicus can notify users about the failure. Specify here subject that the mail should carry. Syntax: JOB_ERROR_MAIL_SUBJECT=[Subject](string) Example: JOB_ERROR_MAIL_SUBJECT=Scheduled job failed Default: JOB_ERROR_MAIL_SUBJECT=Schedule job ‘<%JOB_NAME%>’ notification – Failure Scheduler Job Dispatch Queue Size This property is to set the maximum number of jobs that can be spawned at a time. A valid value is zero or any positive integer. New value set for this property will come into effect after server re-start. Default: 50. Example: SCHD_JOB_DISPATCH_QUEUE_SIZE=50 Scheduler Job Dispatch Threads This property is to set the maximum number of schedules that can be executed concurrently. New value set for this property will come into effect after server re-start. Default: 10. Example: SCHD_JOB_DISPATCH_THREADS=10
Important: Effective threads will be governed by license.

Intellicus Configurations
Installation and Configuration Manual 131
SMTP Server This property is to set Server IP address or domain name (as IP or URL) that should be used to mail the scheduled reports. All email communications such as notifications and report delivery is done by Intellicus using this mail server. Example: SMTP_SERVER=127.0.0.1 SMTP Authentication Set this property to Enable if the server used to send mails from Intellicus needs user authentication to send the mail. Set it to Disable if it doesn’t. SMTP Server User This property is to set the User ID for the SMTP Server. User needs to set a valid user if your SMTP server authenticates before sending mails. SMTP Server Password This property is to set the password to be used for SMTP Server. Hyperlink Relative path This property is to set location of InteraController.jsp. Intellicus uses this file to create hyperlink in a report that will open a child report when clicked. Default value for this property will work fine when Intellicus is deployed as a stand-alone application. Provide path for InteraController.jsp when the folder structure for Intellicus web application is changed and the file is not available at the default location. Syntax: HYPERLINK_RELATIVE_PATH=[hyperlink relative path](string) Default: HYPERLINK_RELATIVE_PATH=../../../InteraController.jsp Data Caching This property is to enable/disable data caching. When a SQL is fired, report server caches result-set. This increases turnaround time for the report generation for the 1st time. The cached data is used for further generation requests for the same report (for example, re-running an adhoc report using different filters). This is effective for all the reports using same SQL and same data connection. Default: disable. Example: DATA_CACHING=disable Dashboard Threads This property is to set the number of threads for dashboard reports. Intellicus maintains separate thread-pool for reports running via dashboards. Number of threads allocated for dashboard will be minimum of value of this property and licensed threads. Default: 3 DB_EXEC_THREADS=3
Important: Effective threads will be governed by license.

Intellicus Configurations
Installation and Configuration Manual 132
Helper Exec Threads EXEC THREADS property handles number of Report execution requests that can be handled. When all the report exec threads are busy and one more report exec request is received, in such cases, if any of the report exec thread is waiting for database operation to get completed, the new report execution request is passed on to Helper Exec threads. For example, when this property is set to 3, three of such report exec requests can be handled this way. Specify number of helper requests that should be served simultaneously. Cache File Compression This property presently controls database meta-data caching. Compression of meta-data files makes data unreadable and improves performance. Meta-data in uncompressed form is readable. Default: enable. Example: CACHE_FILES_COMPRESSION=enable Compress Network Data This property is to enable or disable compression of network data. Client (portal) as well as report server can communicate with each other in compressed mode resulting in performance improvement. To compress network data, set this property to enable. Set this property to disable to continue the communication in uncompressed mode. Default: disable. COMPRESS_NETWORK_DATA=enable Withhold Purge Till Archive When enabled, this property postpones purge process until next archive process is completed. This way it makes sure that the published reports are not purged before archiving. Default: ARCHIVE_BEFORE_PURGING=disable Archive Frequency (days) This is interval in number of days at the end of which report server will auto-archive published reports. Set a value that is positive integer. Default: ARCHIVE_FREQUENCY=30 Archive Directory This is the folder where report server will store archive files. Default: ARCHIVE_DIRECTORY= ../archives Saved Report Approval Required This to enable or disable work flow process. When approval process is activated, each published report needs to be approved by super administrator or user having required rights before it can be made available for users to view. Value set to enable will activate the process. Default: enable Example: SAVED_REPORT_APPROVAL_REQUIRED=enable

Intellicus Configurations
Installation and Configuration Manual 133
Exit On Error This property is used to auto-restart the report server. Set it to enable if report server should auto-restart on a critical error like out of memory error. If the property is set to disable, report server will not be able to recover in case of critical error. Default: disable Example: EXIT_ON_ERROR=disable Chunks in Memory Number of report pages chunks that can reside in memory. Specify a value that is more than 2. Default: 4 Example: CHUNKS_IN_MEMORY=4. Output Buffer Size The maximum size of MEMORY to be used to store report output chunks. Specify in terms of MB or KB. Default: 2.5 MB Example: OUTPUT_BUFFER_SIZE=2.5MB Following properties are used by fault prevention mechanism: Memory Trigger Notification This property governs the behavior of the system in high memory situations. The Trigger Level is the %age of total memory used out of allotted memory. After this level is reached, report server will invoke an event & set the ReTrigger Level, so next event will be invoked when ReTrigger Level is exceeded. The Trigger Level should not exceed 100 & should not be less than 50. Default:90 Example: MEMORY_TRIGGER_LEVEL=90 . Memory Retrigger Level This property governs the behavior of the system in low memory situations. The ReTrigger Level is the %age of total memory used out of allotted memory. After this level is reached, which Report server will invoke an event & set the Trigger Level. The ReTrigger Level should not exceed 100 & should not be less than 40. Default: 70 or 10 less than MEMORY TRIGGER LEVEL. Example: MEMORY_RETRIGGER_LEVEL= 70 . Memory Trigger Notification This is to enable/disable notifications when memory Usage of Report Server exceeds the MEMORY TRIGGER LEVEL. Default: enable Example: MEMORY_TRIGGER_NOTIFICATION=enable.
Intellicus Configurations
Installation and Configuration Manual 134
Exec Rejection on Memory Trigger This is to enable/disable execution rejection on Memory Trigger feature i.e. Report Server will reject the execution request and block all the scheduled jobs launched when used Memory + DEFAULT MEMORY USAGE PER EXEC is more than MEMORY TRIGGER LEVEL. Default: ENABLE Example: EXEC_REJECTION_ON_MEMORY_TRIGGER=ENABLE . Default Memory Usage Per Exec Value set as average resource utilization per execution. Default:50. Example: DEFAULT_MEMORY_USAGE_PER_EXEC=50 . Scheduler job History Purge Time This is the schedule job history purge time specified in days. Specify 0 to disable history purging. Default:7. Example: SCHD_JOB_HISTORY_PURGE_TIME=7 . Time Diff For Trigger Notification This is minimum time diff after which Memory Trigger Notification will be sent. Default:30. Example: TIME_DIFF_FOR_TRIGGER_NOTIFICATION=30 . Clone User System Params This property is defined to enable/disable the cloning of User & System Parameters across the detail sections. Default: enable. Example:CLONE_USER_SYSTEM_PARAMS=disable. Cached Output Formats This property defines the output format for which report output needs to be cached. Default: <empty> Example: CACHED_OUTPUT_FORMATS=PDF,XML . Drilldown Max URL Length This property defines the method to be used for HTTP request submission. If the length of drilldown URL is more than the property value, post method will be used. In other case, get method will be used. Default: 2000. Example: DRILLDOWN_MAX_URL_LENGTH=2000 .

Intellicus Configurations
Installation and Configuration Manual 135
Repeat Report Exec Request This property defines what to do if the server receives request of a report that is being presently served. If the property is set to Allow All then it will allow all the report execution requests. If it is Deny New, than server will not accept the newly received request. If it is Prompt Cancel portal will prompt the user to cancel new request or request that is presently being served. Default: deny_new Example: REPEAT_REPORT_EXEC_REQUEST=deny_new IRL Cache Size The maximum size of IRL cache. This can be specified in terms of number of IRLs, or memory size (KB, MB). Default: 10 Example: IRL_CACHE_SIZE=10 Published Reports Visibility To decide who should be able to view published reports. Set Global to make the published report visible to all users. Set Organization to make the published report visible only to the organization to which the user (the one who publishes the report) belongs. Default: Global. Default Browser When portal requests report output in HTML format, it is also expected to send Browser type. Value set in this property will be applied if browser type is not received from portal. Set IE to use MS Internet Explorer as browser type. For any other browsers, set OTHERS. Default: IE. Text Output Encoding This can be used to set application's file encoding like that of system's file encoding. Doing so enables Intellicus to generate any text based output (TEXT / CSV / RAWTEXT) in specified file encoding. The file encoding must be a valid canonical name for java.lang API. Default value is blank i.e. Report Server will use system's default file encoding. Default: (blank) Sort Threads Per Exec This is the number of threads to be created (per report request) at runtime to perform sorting of records. This property is hot deployed. Default: 4.

Intellicus Configurations
Installation and Configuration Manual 136
Deployment Type This is the configuration for scheduler. Specify STANDALONE if Intellicus is running as standalone. Specify CLUSTERED if Intellicus is running in the form of a cluster. Default: STANDALONE Example: DEPLOYMENT_TYPE=STANDALONE Utility Thread Pool Initial Size Utility threads are used to carryout internal processes by Intellicus Report Server. This property defines initial size of utility threads. Default: 5
Note: If all the threads are busy, new threads will be automatically created.
Utility Thread Pool Purge Time This property defines the waiting time for an extended thread (created on demand post-initialisation) from the pool after which it will be purged. Specify value in seconds. Default: 50 Default values In any of the following cases report server will consider default properties: • ReportEngine.properties is not found at the right location.
• A property being checked by report server is not set at all.

Intellicus Configurations
Installation and Configuration Manual 137
Working with Server Logs Actions taken by server are logged in log files. Actions that are logged will depend on value set in Log Level property on Server page. When the log file size reaches 10 MB, server automatically renames the log file and opens another one. This page lists all the log files that the server has created but not yet purged. Latest log file, ReportEngine.log is used by server.
Figure 119: Server Log Files dialog To download log files
1. Select files by checking respective check-boxes. To download all the log files, check the checkbox available in the header row.
2. Click Download Log button. Logs will be archived as a zip file and downloaded to the specified location.
As you go on selecting the files from the list, following information is displayed just below the table. • Number of selected files
• Total file size
• Approximate zip file size
To purge one or more log files
1. Select files by checking respective check-boxes. To purge all the log files, check the checkbox available in the header row.
2. Click Purge Log button.
Note: ReportEngine.log file would not be purged.

Intellicus Configurations
Installation and Configuration Manual 138
Database Connection configuration
Important: Whenever a report connection is given, Intellicus creates a set of tables (around 20) for repository purpose. The names of these tables start with INTERA_ for your identification purposes. DO NOT DELETE OR DROP these tables otherwise important information including report layouts may get lost.
Intellicus Server supports multiple database connections. A database connection needs to be configured for Intellicus to fetch data for reports and to access metadata. A user with Super Administrator privileges can setup database connections. To get Database connections page click Administration > Configure > Databases.
Figure 120: Connection Configuration page The table on the top of the page displays existing connections in application. • Name: Name of the database connection.
• Provider: Data provider used for the connection.
• Default: A tick indicates that the connection is default database connection.
• Repository: Intellicus metadata is stored in repository. A tick indicates that the connection is repository connection.
• Status: Indicates availability of a connection. A green circle indicates that the connection is valid (available). Red circle indicates that the connection is

Intellicus Configurations
Installation and Configuration Manual 139
presently not available. An R near the status indicates that the connection requires User name and Password at run time.
Click connection name to view its complete details. On this screen, you can • Add a new database connection
• Update an existing database connection
• Remove an existing database connection
• Test a database connection's validity
• Work with Access rights on selected data connection
To filter list of Connections List of connections can be filtered by: • Starting character (Starts with)
• Characters that appear anywhere in the connection name (Contains)
Figure 121: Filtering list of connections
1. On Connections page, check the option on right of . 2. To get the right option there, click and select Start with or Contains. 3. Specify character(s) in the textbox.
The list will be filtered (not case sensitive) as per the criteria.

Intellicus Configurations
Installation and Configuration Manual 140
To add a connection
Figure 122: Adding a data connection
1. Click Add button. All the entry boxes are getting cleared. 2. In Connection Name entry box, specify name of the new connection. 3. In respective entry boxes, specify information for new connection. 4. Optionally, click Test button to test the validity of the connection detail. 5. Click Save Button.
The new connection is set. The entry details Connection Name: Name is required to uniquely identify the connection. The users designing reports using Intellicus Report designer will select database connection by this name. Provider: Select the right database provider from available options. If you do not know the provider, select Others. Intellicus will need some specific information based on the Database Provider that you have selected.
Note: If you are using a database that is derived from PostgreSQL, (for example, EnterpriseDB) select POSTGRES as database provider.

Intellicus Configurations
Installation and Configuration Manual 141
Provider specific details for database connection Intellicus will need some specific information based on the Database Provider that you have selected. They are: CACHEDB • Server: The IP or name of the machine where database server is running.
• Port: The port at which database server is listening.
• Namespace: This is a unique name that identifies a specific namespace on CACHE database.
DB2 • Server: The IP or name of the machine where database server is running.
• Port: The port at which database server is listening.
• Database: Specify name of the database to connect to using this connection.
• Schema (optional): Specify the schema to be used for the specified user for this database connection.
MSSQL • Driver version: Select the driver version of MSSQL Database to connect to
using this connection.
• Authentication Mode: Select Server Authentication if you want the Database server should authenticate. You need to provide user name and password for the database. Select Windows Authentication to use the credentials used for windows authentication. In this case, Windows user name and password used to log into the machine where Intellicus report server is running will be used for authentication.
• Driver Type: Select Microsoft or JTDS based on the driver you want system to use.
• Server: The port at which database server is listening.
• Port: The port at which database server is listening.
• Database: Specify name of the database to connect to using this connection.

Intellicus Configurations
Installation and Configuration Manual 142
MYSQL • Server: The port at which database server is listening.
• Port: The port at which database server is listening.
• Fetch size: Specify -1 to receive one by one record as a stream. This is good if you have a very large recordset. Leave it blank to receive entire recordset at a time.
Important: Value set in Report Server property Data Source Fetch Size will not remain effective for MySQL database.
• SID: This is a unique name that identifies a specific database from number of
databases on a server.
• Driver version: Select the right driver version for MYSQL.
ODBC • DSN: Specify the System DSN created for the ODBC connection.
ORACLE • Driver type: Select one of the driver you are using to connect to the
database.
• Driver version: From options, select the driver verson.
• Server: The port at which database server is listening.
• Port: The port at which database server is listening.
• SID: This is a unique name that identifies a specific database from number of databases on a server.
ORACLE_THIN • Server: The port at which database server is listening.
• Port: The port at which database server is listening.
• SID: This is a unique name that identifies a specific database from number of databases on a server.

Intellicus Configurations
Installation and Configuration Manual 143
POSTGRES • Server: The port at which database server is listening.
• Port: The port at which database server is listening.
• SID: This is a unique name that identifies a specific database from number of databases on a server.
Note: If you are using a database that is derived from PostgreSQL, (for example, EnterpriseDB) select POSTGRES as database provider.
SYBASE • Driver type: Select the driver type to be used to connect with this database.
• Server: The port at which database server is listening.
• Port: The port at which database server is listening.
• Database: Specify name of the database to connect to using this connection.
OTHERS
Note: Before specifying driver details for OTHERS connection, you need to add respective driver using Add Driver button on Databases page.
• Driver class name: Specify the driver class name for the driver.
• URL: Construct the URL including all the parameters required to access the database server.

Intellicus Configurations
Installation and Configuration Manual 144
Uploading a database driver If you are using a driver that is not listed in Provider drop-down, you can upload respective device driver file and then use it as OTHER driver in provider list.
Figure 123: Add Driver dialog box
1. Click Add Driver button to open Add Driver dialog box. 2. In Driver File entry box, specify the driver file name along with the path. 3. Click Upload button.
The file will be updated and success message will appear. Failure message will appear in case driver could not be uploaded. Click Close button to close the dialog box. Details on Database tab Username and Password: Specify Username and Password that should be used to connect to the database. This is in case the database requires specific Username and Password for connection. Blank: Select this checkbox if the Username and Password is not required to connect to the database. Runtime: Select this checkbox if the user will provide the user name and password at the time of connecting to the database. URL: Value will appear automatically based on the data provider. However, you can specify the URL by physically keying in the entry box.
Note: In case of OTHER database driver, URL will not be automatically created. It needs to be specified.
Mask URL: Select this checkbox if you want the URL to be masked. Charset Encoding: Select UTF-8 if the database is created or started with UTF-8 encoding. In other case, leave it blank.
Intellicus Configurations
Installation and Configuration Manual 145
Read Only: As an integral part of reporting activity, user may need to create an SQL. Select this checkbox to make sure only SQLs having read operations are executed on this connection. This way, you make sure your database is safe against accidental or incorrect execution of any Create, Update or Delete queries.
Important: Intellicus does not have any control over Procedures executed on Read Only connections. A procedure will execute even if it has statements performing other than read operations.
Is Default: This is a check box. Select this check box for setting this connection as the default connection of report server. All reports on this server will run on this database connection, unless specified for using a named connection. Is Repository: Select this check box to set this connection as repository connection of the server. Intellicus creates and stores its metadata information in several tables in this schema.
Note: The user for this connection must have Create table privilege for successfully using it as repository database. If repository connection is changed, you need to re-start the report server.
Pool Settings Details This is to optimise the speed for reports running for a database.
Figure 124: Connection pool settings Initial Connections: This number specifies the number of connections to be opened up initially.
Note: Connections are opened when report server starts. For connections where Runtime checkbox is selected, Report Server opens connections at the setup time only if user credentials were provided at that time. If not, then they are opened at the time of first request.
Incremental Size: When number of connections exceeds the number specified in Initial Connections, this number decides how many more connections should be opened up at a time. For example, if Initial Connections is 10 and Incremental Size is 3, then if the number of connections exceeds 10, 3 more connections are opened up.
Intellicus Configurations
Installation and Configuration Manual 146
Maximum Connections: Specify the maximum number of connections that can be opened. If requests received are more than this number, excess requests are queued until connections are made available. Resubmit Time (sec.): Specify the waiting-time in seconds before re-submitting the request. Cache
Figure 125: Cache settings Data Cache Purge Frequency: When a report is generated, Intellicus takes the SQL from the report, fetches and caches the record-set on report server before using it for generating report. Data Cache purge frequency is the time in minutes after which the record-set fetched will be deleted. MetaData Cache Purge Frequency: This decides purge frequency of metadata (table names, field names, etc) for selected data connection. When a database connection is setup for the first time, Intellicus caches the metadata. If this is set to NEVER, Intellicus will never delete and refresh the metadata. If this is set to BOOTUP, every time Intellicus is booted, metadata for this data connection will be deleted and refreshed.
Tip: Set MetaData Cache Purge Frequency to BOOTUP only when a database is undergoing frequent changes in terms of number of tables, fields, etc.
Important: When user is setting up a connection for a database on Oracle database server, make sure user has installed the right version of driver that is compatible with the version of database server.
Access Rights to use a Connection After a connection is setup, it is available to all the users (Everyone). You can grant or revoke access rights to use a connection. To view the users who are given access rights for selected connection, Select the connection from Connection List and click Access Rights button. A window having access right details opens.

Intellicus Configurations
Installation and Configuration Manual 147
Figure 126: Assigning access rights A check indicates that access is granted to all members of respective organization, a user or members of a role. To provide access rights for selected connection
1. Select the connection and click Modify button. 2. Click Access Rights button. 3. Select checkbox to provide rights to respective user / role. Alternatively,
select organization name to provide rights to all the users within that organization.
4. Click Set button to save the changes and close the dialog box. Click Reset button to get back the preferences that were set at the time of opening the dialog box. Multiple Instances of MS SQL Server 2000 Each of the instances of MS SQL Server listens on a specific port. To use multiple instances of MS SQL Server in Intellicus, user needs to create one database connection for each of the instances. For these connections, server IP will remain the same for all the connections, but port will be unique to each of the connection.
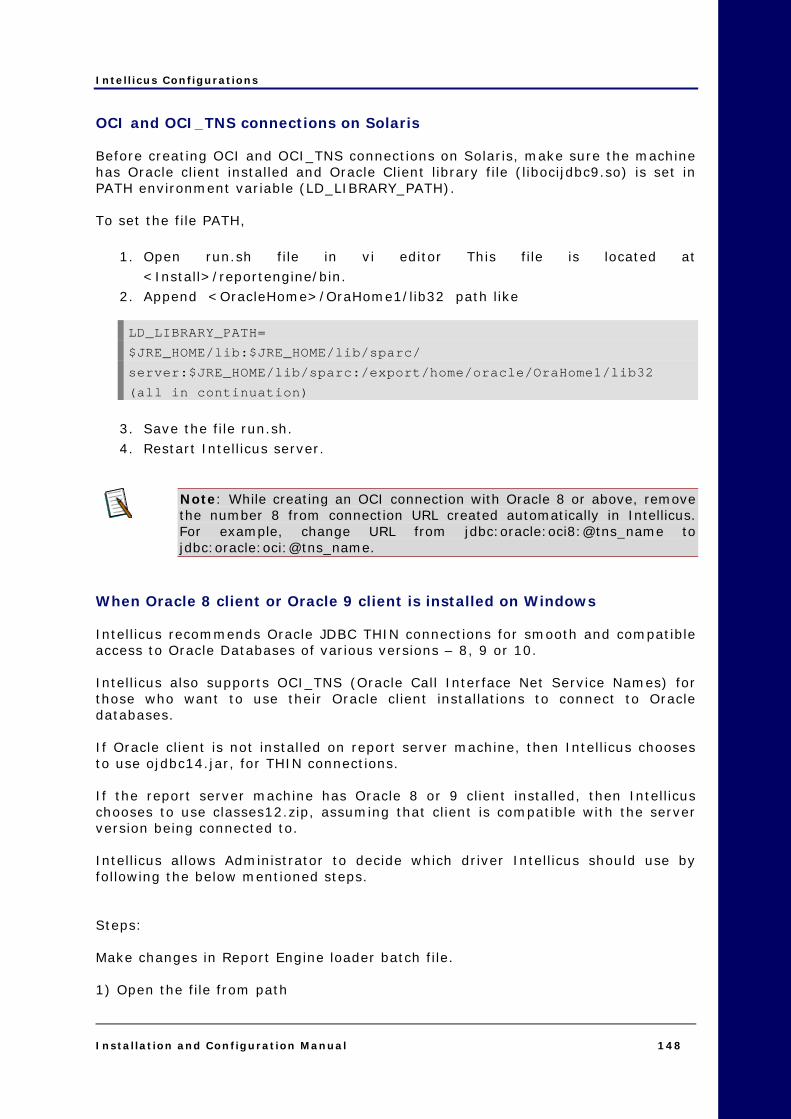
Intellicus Configurations
Installation and Configuration Manual 148
OCI and OCI_TNS connections on Solaris Before creating OCI and OCI_TNS connections on Solaris, make sure the machine has Oracle client installed and Oracle Client library file (libocijdbc9.so) is set in PATH environment variable (LD_LIBRARY_PATH). To set the file PATH,
1. Open run.sh file in vi editor This file is located at <Install>/reportengine/bin.
2. Append <OracleHome>/OraHome1/lib32 path like
LD_LIBRARY_PATH=
$JRE_HOME/lib:$JRE_HOME/lib/sparc/
server:$JRE_HOME/lib/sparc:/export/home/oracle/OraHome1/lib32
(all in continuation)
3. Save the file run.sh. 4. Restart Intellicus server.
Note: While creating an OCI connection with Oracle 8 or above, remove the number 8 from connection URL created automatically in Intellicus. For example, change URL from jdbc:oracle:oci8:@tns_name to jdbc:oracle:oci:@tns_name.
When Oracle 8 client or Oracle 9 client is installed on Windows Intellicus recommends Oracle JDBC THIN connections for smooth and compatible access to Oracle Databases of various versions – 8, 9 or 10. Intellicus also supports OCI_TNS (Oracle Call Interface Net Service Names) for those who want to use their Oracle client installations to connect to Oracle databases. If Oracle client is not installed on report server machine, then Intellicus chooses to use ojdbc14.jar, for THIN connections. If the report server machine has Oracle 8 or 9 client installed, then Intellicus chooses to use classes12.zip, assuming that client is compatible with the server version being connected to. Intellicus allows Administrator to decide which driver Intellicus should use by following the below mentioned steps. Steps: Make changes in Report Engine loader batch file. 1) Open the file from path
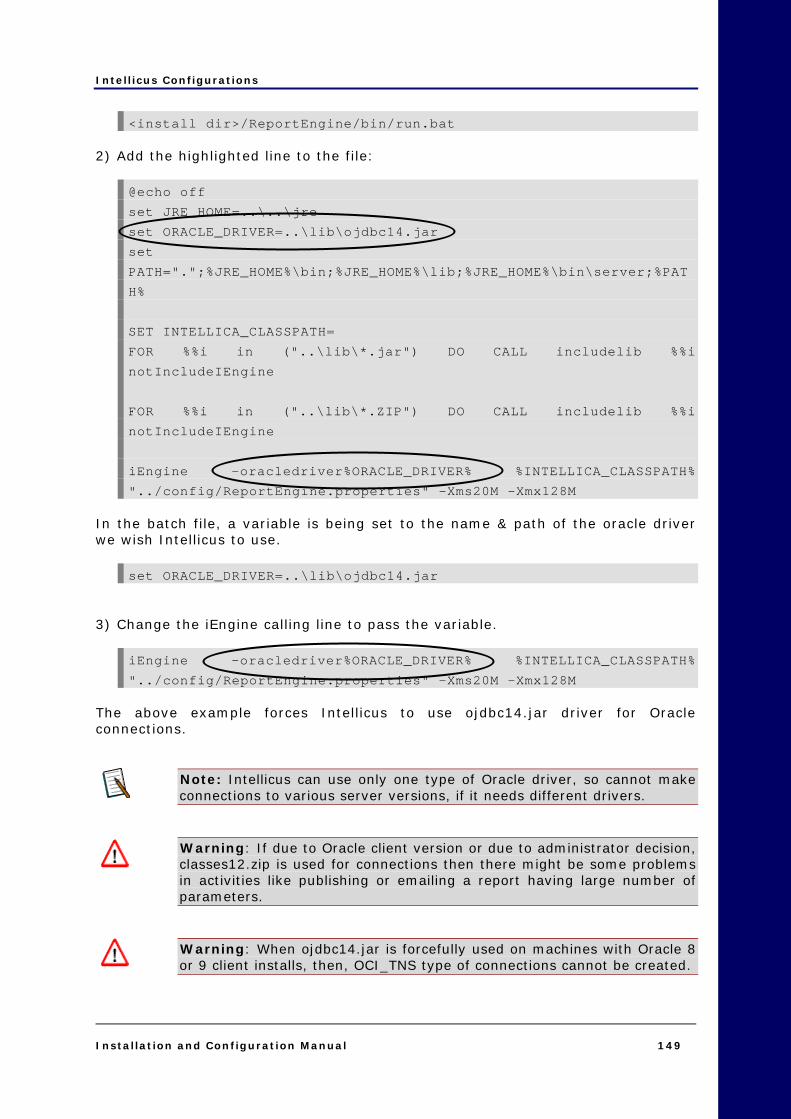
Intellicus Configurations
Installation and Configuration Manual 149
<install dir>/ReportEngine/bin/run.bat
2) Add the highlighted line to the file:
@echo off
set JRE_HOME=..\..\jre
set ORACLE_DRIVER=..\lib\ojdbc14.jar
set
PATH=".";%JRE_HOME%\bin;%JRE_HOME%\lib;%JRE_HOME%\bin\server;%PAT
H%
SET INTELLICA_CLASSPATH=
FOR %%i in ("..\lib\*.jar") DO CALL includelib %%i
notIncludeIEngine
FOR %%i in ("..\lib\*.ZIP") DO CALL includelib %%i
notIncludeIEngine
iEngine –oracledriver%ORACLE_DRIVER% %INTELLICA_CLASSPATH%
"../config/ReportEngine.properties" -Xms20M -Xmx128M In the batch file, a variable is being set to the name & path of the oracle driver we wish Intellicus to use.
set ORACLE_DRIVER=..\lib\ojdbc14.jar 3) Change the iEngine calling line to pass the variable.
iEngine -oracledriver%ORACLE_DRIVER% %INTELLICA_CLASSPATH%
"../config/ReportEngine.properties" -Xms20M -Xmx128M The above example forces Intellicus to use ojdbc14.jar driver for Oracle connections.
Note: Intellicus can use only one type of Oracle driver, so cannot make connections to various server versions, if it needs different drivers.
Warning: If due to Oracle client version or due to administrator decision, classes12.zip is used for connections then there might be some problems in activities like publishing or emailing a report having large number of parameters.
Warning: When ojdbc14.jar is forcefully used on machines with Oracle 8 or 9 client installs, then, OCI_TNS type of connections cannot be created.

Intellicus Configurations
Installation and Configuration Manual 150
To Test a database connection's validity
1. Select the connection by clicking respective connection name in the table. The information set up for the selected connection appears in respective entry boxes.
2. Click Modify button. 3. Click Test button.
If the selected connection is valid, Connection Test Succeeded message will appear. To update a connection detail On Databases tab of Configure page,
1. Select the connection by clicking on a connection name in the table. 2. Click Modify button. The information set up for the selected connection
appears in respective entry boxes. 3. Specify new information where required. 4. Optionally, click Test button to test the validity of the connection detail. 5. Click Save button.
To remove a connection detail On Databases tab of Configure page,
1. Select the connection by clicking on a connection name in the table. The information set up for the selected connection appears in respective entry boxes.
2. Click Delete button. A dialog confirming delete operation appears. 3. Click Ok to proceed with the deletion.
To refresh metadata caching Metadata is cached at the time of database connection creation. It is refreshed depending on the value set in MetaData Cache Purge Frequency. To refresh the metadata manually,
1. Select the data connection for which metadata needs to be refreshed. 2. Click Refresh Schema button. 3. Click Yes on the confirm refresh dialog box to proceed.
When you click Yes, a request is sent to the report server to get the metadata information for the selected database connection.

Intellicus Configurations
Installation and Configuration Manual 151
Which data connection will a report use? The data appearing on the report is fetched from a database using a data connection. Based on the edition of Intellicus and license, user can set one or more data connection in Intellicus. Database (data connection) to be used to run reports can be set in following ways: • While actually running the report.
• While specifying just after login into Intellicus (at session level). This remains default for any type of database use (report running, running queries, etc).
• By setting up on User Preferences page.
• By specifying it as part of Report Details (while uploading a report through portal or through cab).
• By specifying it while designing the report (IRL file).
• By specifying a default data connection.
When a report is being run, Intellicus will use the data connection in following order:
1. Use the data connection that was selected while actually running the report from Report Delivery Options page.
2. If the connection was not selected on Report Delivery Options page, use the database connection selected at the time of login into Intellicus (session level).
3. If the connection was not selected while login, use the connection selected on User Preferences page.
4. If a connection is not selected on User Preferences page, use the connection selected while deploying the report (report details).
5. If a connection is not selected as report details, use the connection selected while designing the report (irl file).
6. If a connection is not selected in the irl file, use the default connection set in Intellicus on Connection Configuration page.
Can I change this order? Order is controlled by values specified in <CONNECTIONPRIOIRTY> tag in ProviderInfo.xml located at path: <installation path>\Intellicus\ReportEngine\Config . Values (and the default sequence) are:
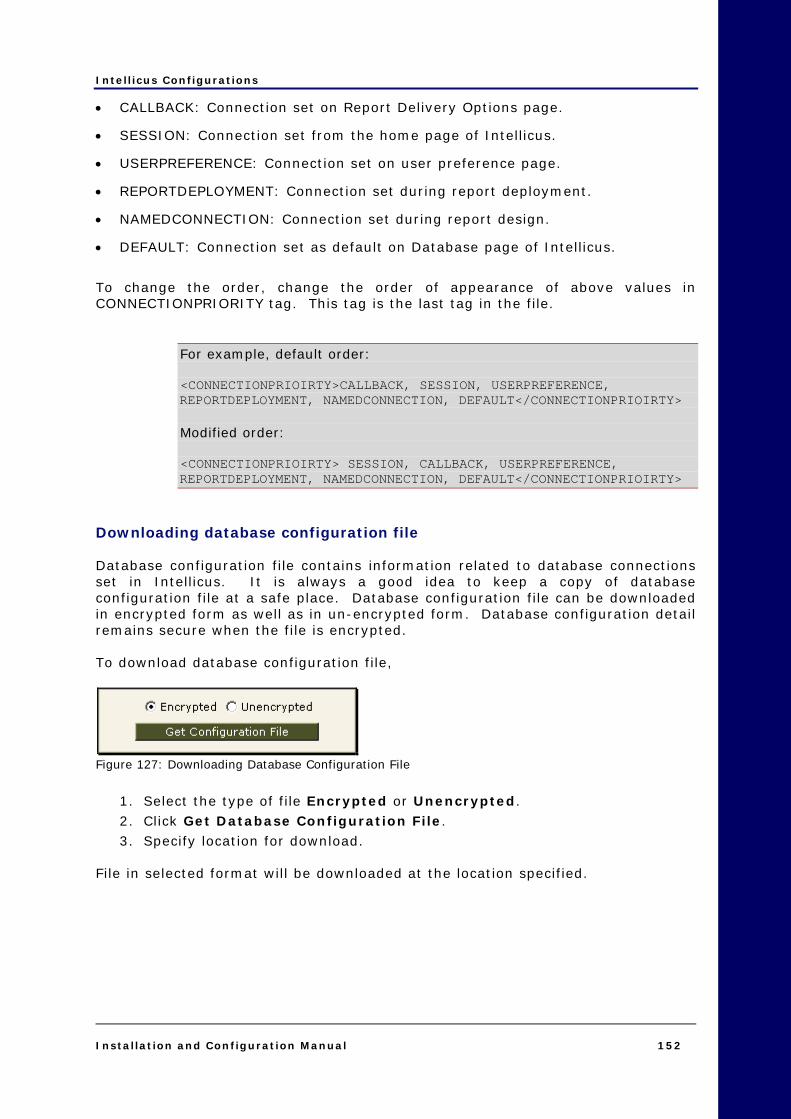
Intellicus Configurations
Installation and Configuration Manual 152
• CALLBACK: Connection set on Report Delivery Options page.
• SESSION: Connection set from the home page of Intellicus.
• USERPREFERENCE: Connection set on user preference page.
• REPORTDEPLOYMENT: Connection set during report deployment.
• NAMEDCONNECTION: Connection set during report design.
• DEFAULT: Connection set as default on Database page of Intellicus.
To change the order, change the order of appearance of above values in CONNECTIONPRIORITY tag. This tag is the last tag in the file.
For example, default order: <CONNECTIONPRIOIRTY>CALLBACK, SESSION, USERPREFERENCE, REPORTDEPLOYMENT, NAMEDCONNECTION, DEFAULT</CONNECTIONPRIOIRTY> Modified order: <CONNECTIONPRIOIRTY> SESSION, CALLBACK, USERPREFERENCE, REPORTDEPLOYMENT, NAMEDCONNECTION, DEFAULT</CONNECTIONPRIOIRTY>
Downloading database configuration file Database configuration file contains information related to database connections set in Intellicus. It is always a good idea to keep a copy of database configuration file at a safe place. Database configuration file can be downloaded in encrypted form as well as in un-encrypted form. Database configuration detail remains secure when the file is encrypted. To download database configuration file,
Figure 127: Downloading Database Configuration File
1. Select the type of file Encrypted or Unencrypted. 2. Click Get Database Configuration File. 3. Specify location for download.
File in selected format will be downloaded at the location specified.

Intellicus Configurations
Installation and Configuration Manual 153
Connection icon on Intellicus Portal Intellicus portal has Connection icon near top right of the page. This displays the data connection applicable at that point of time (session-default).
Figure 128: Connection Icon: reports will be run using SalesData connection Clicking that button, user can select a database connection that should be used while running any report in that session of Intellicus. To select a connection,
Figure 129: Setting Data Connection for session
1. Click Connection icon. Connect to dialog appears. 2. In Select Connection dropdown box, select the connection that you need
to use from connections listed (it lists all the valid connections and for ones you need to provide runtime credentials).
3. If the connection name you have selected needs user name and password, entry boxes User Name and Password will appear. Specify the respective information.
4. If you want the selected connection to be saved as your preferences, select (check) Save in my preferences checkbox.
5. Click Connect. When a connection that needs user name and password is selected upon clicking Connect, Intellicus will test the connection. If the connection is successful, information will be updated else an error will be prompted. When a connection that does not need user name and password is selected, upon clicking Connect, Intellicus will update the information.
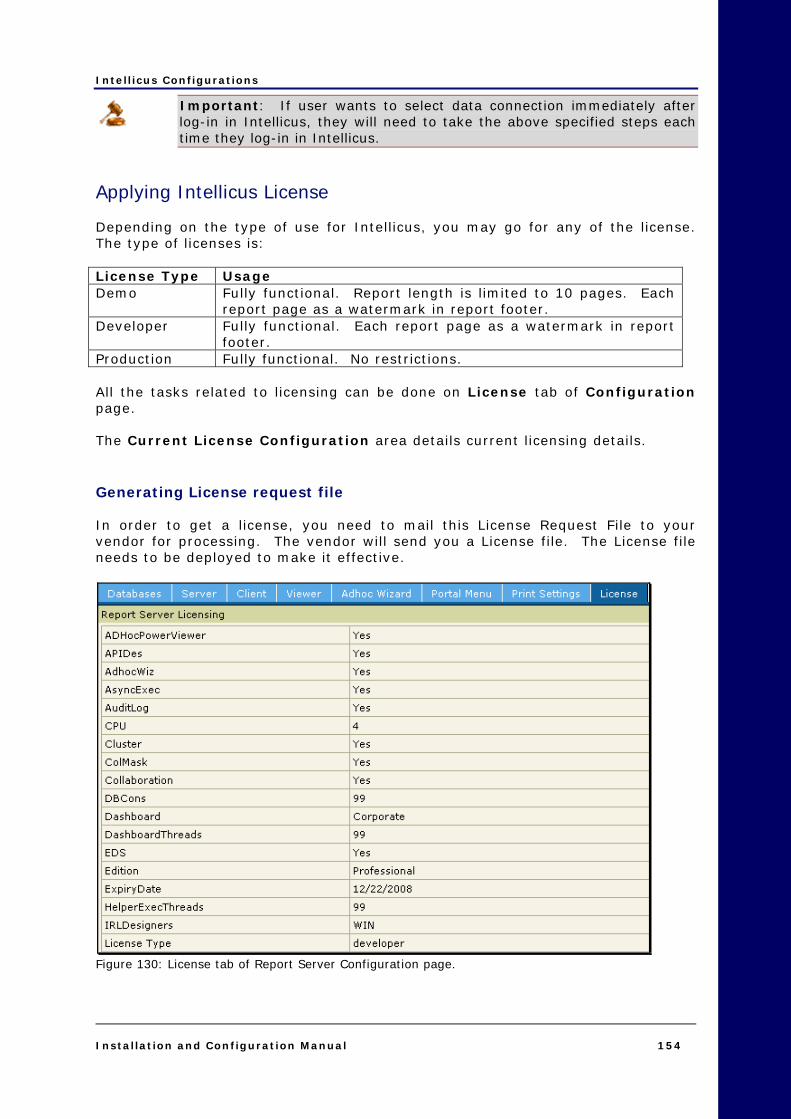
Intellicus Configurations
Installation and Configuration Manual 154
Important: If user wants to select data connection immediately after log-in in Intellicus, they will need to take the above specified steps each time they log-in in Intellicus.
Applying Intellicus License Depending on the type of use for Intellicus, you may go for any of the license. The type of licenses is: License Type Usage Demo Fully functional. Report length is limited to 10 pages. Each
report page as a watermark in report footer. Developer Fully functional. Each report page as a watermark in report
footer. Production Fully functional. No restrictions. All the tasks related to licensing can be done on License tab of Configuration page. The Current License Configuration area details current licensing details. Generating License request file In order to get a license, you need to mail this License Request File to your vendor for processing. The vendor will send you a License file. The License file needs to be deployed to make it effective.
Figure 130: License tab of Report Server Configuration page.
Intellicus Configurations
Installation and Configuration Manual 155
Deploying a License As stated above, once you receive the License file from your vendor, you need to deploy the license. This process is carried out on License tab of Report Server Configuration page. To deploy a license,
1. In Select new license file entry box, specify path along with name of the new license file that you have received from your vendor. Click Browse button to locate and select the file.
2. Click Deploy License button to deploy the newly received license. The license will be applied. Studio Licensing Desktop Studio For Intellicus Desktop Studio, User Based licensing and Seat Based licensing is available. User Based licensing for Desktop Studio In Desktop Studio header and within User Based area,
1. From Organization dropdown box, select the organization to which the user belongs. Designer Users list includes all the users of selected organization who are given Standard Report Designer access privileges.
2. To allocate a user license, select the user and shift it to Allocated Users list by clicking arrow button. Use will appear in Allocated Users list.
3. Click Save button. Seat Based licensing for Desktop Studio In Desktop Studio header and within Seat Based area,
1. From Organization dropdown box, select the organization to which the user belongs. Designer Users list includes all the users of selected organization who are given Standard Report Designer access privileges.
2. To allocate a user license, select the user and shift it to Allocated Users list by clicking arrow button. User will appear in Allocated Users list.
3. Click Save button.

Intellicus Configurations
Installation and Configuration Manual 156
Web Studio User based licensing is available for Web Studio. Users who will be designing reports using Intellicus Web Studio are allocated licenses. In Web Studio area,
1. From Organization dropdown box, select the organization to which the user belongs. Designer Users list includes all the users of selected organization who are given Standard Report Designer access privileges.
2. To allocate a user license, select the user and shift it to Allocated Users list by clicking arrow button. Use will appear in Allocated Users list.
3. Click Save button.
Intellicus Portal Configuration This decides the address of Intellicus Report Server and the port at which it listens to its clients. This information may be configured to meet your specific usage and performance requirements. However, if not configured, Intellicus will continue to run using the default property values. We suggest configuring portal before you actually deploy the application. This will give you more control over use of the application.
Note: Only the user having Super Administrator’s privileges would be able to configure the portal.
Configuring through Property file The client configuration properties are stored in ReportClient.properties file. This file is stored in WebApps folder of respective Web server at this path: <Intellicus Application>\client\config. This process is carried out on Portal Configuration page of the Web Interface.

Intellicus Configurations
Installation and Configuration Manual 157
Configuring Client (Portal) As a part of report client configuration, communication details and logging preferences are stored. This process is carried on Portal Configuration page. Click Administration > Configure > Client.
Figure 131: Client Configuration using Web Interface.
Note: If Intellicus is running under security disabled, specify following URL in the browser’s address bar to get this page. If user is using the computer used as web server, http://localhost/intellicus/pattern/conf and then click Client tab. In other cases, http://<IP of the server>/Intellicus/pattern/conf and then click Client tab.
Web Component Report Server IP: This is the report server for client to connect. The default IP is 127.0.0.1 (if report server and web portal are on the same machine). Report Server Port: This is the port number at which report server listens to client (portal). This should be the same as the one configured in report server. Default is 45450.

Intellicus Configurations
Installation and Configuration Manual 158
Tip: After providing values for Report Server IP and Report Server Port, click Test Connection button to check if Intellicus Report Server is up and running at specified IP and Port. When you click Test Connection button, portal responds with respective message.
Report Server Time out: This is the maximum time in seconds for the server to respond. If the server does not respond within specified time, client (portal) will display error message Server not responding to user. Default is 600 (seconds). Html Viewer Time Out: This is the time in seconds for which client will wait before closing the communication thread between report server and client (portal) while running HTML reports. This generally happens when user switches over to some other page leaving the current process before completion. Default is 30. Report Server Chunk Time Out: This is the time in seconds for which client will wait to receive 1st chunk of report output from report server. Default is 600. Logging Logging Enabled: To log activities performed by client (portal), select Yes. Select No to disable logging. Default is Yes. Log Level: This property sets the level of criticality to be considered for logging. Options available in the drop down list are: Debug, Info, Warn, Error and Fatal. Default is ERROR. How to Change the details Change values as required. Click Save button to save the changes. Buttons • Test Connection: To check if Intellicus Report Server is up and running at
specified IP and Port.
• Purge Log: Deletes all old log files. It does not delete current log file.
• Download Log: Downloads and opens the current log.
• Save: Saves changes made in client configuration.
• Cancel: Abandon the changes.

Tuning and Performance Optimization
Installation and Configuration Manual 159
1166 Tuning and Performance Optimization
Configuring Report Server It has been discussed what can be configured for the best performance of the Report Server. Maximum Memory Performance of Intellicus Report Server will depend on the minimum and maximum memory allocated to the Report Server. If the available memory is less, the performance of Intellicus will get adversely affected.
Note: When report server crosses the maximum memory it crashes after giving “out of memory” error.
The memory for the Report Server can be controlled in the following ways: Set Maximum Memory Consumed by Report Server To set the maximum and minimum RAM to be consumed by Intellicus Report server, you need to change a line in run.bat file. This file is located at following path: <Folder path>\Intellicus\ReportEngine\bin It has the line:
iEngine %INTELLICA_CLASSPATH% "../config/ReportEngine.properties"
-Xms128M -Xmx512M In the above example, -Xms128M indicates minimum RAM consumption and -Xmx512M indicates maximum RAM allowed. If you want to use 512 as minimum and 1GB as maximum, replace above values with -Xms512M –Xmx1024M.
Note: If you have 1 GB RAM on the machine, and running Report server as well as portal on the same machine, then allocate equal RAM that is 512 MB RAM each for maximum usage.

Tuning and Performance Optimization
Installation and Configuration Manual 160
Threads Threads work efficiently depending on number of processors on the machine: • Too many threads with fewer processors give poor performance.
• Too less threads makes reports work in synchronous mode. (Users need to wait longer for response).

Tuning and Performance Optimization
Installation and Configuration Manual 161
Ideal number of threads per CPU: Processor Threads Intel 20 Sun Sparc 25 If the average concurrent hit is 6 and you configure this number to 5 then one of the users will complain about slow response. This problem will become obvious when all 5 users run long reports. If you have 4 processors, it is ideal to configure 80 to 100 threads.
Note: Report Server will limit the number of threads to the licensed number of users even if a higher number of threads is set in property file. Report server will not give any error in such case.
Warning: Maximum processors that will be allowed to run the report server will depend on license you have purchased. Report Server will refuse to start if it is launched on a machine that has more number of processors than mentioned in purchased license.
Example: USER_THREADS=5 This property is set in ReportEngine.properties file.
Note: Increased number of users using Intellicus means more users will need database. This will need a higher number of open database connections. If you increase the number of USER_THREADS, we suggest increasing number of open database connections too.
Database connections Each report execution consumes a database connection during the period of fetching data for that report. If a report has sub report or unbound chart, that report consumes two connections.
Note: Please check with usage licensing from your database vendor about valid maximum connections.
This information is set on databases page of Portal. Click Administration > Configuration > Databases.

Tuning and Performance Optimization
Installation and Configuration Manual 162
For the selected database connection, specify adequate values for the following: • Initial Connections = Increases response speed, as connection creation is a
time consuming activity. Keep it higher as per availability. But higher number than 25 takes higher booting time.
• Maximum Connections = Maximum reports that are expected to fetch data concurrently (consider extra for sub reports and charts).
• Incremental size
• Resubmit time (in sec.) = keep it higher such as 10 minutes or above.
Important: You need to restart the report server if these properties are changed for repository connection.
Security Features Security features take some time to ensure security on the contents and reports. If you do not want security, you may disable the security.
Warning: When Report Server is running in security disabled mode, any user can access any report.
Example: SECURITY_FEATURES=disable . This property is set in ReportEngine.properties file. Audit Logging Audit Logging takes some time to keep track of and record user-activities (who saw, which report and when) related information. If you do not want to keep track of this and record the information, you may prefer to switch off Audit Logging. Example: AUDIT_LOG=disable This property is set in ReportEngine.properties file. Client Timeout Report Engine tries to stream report to portal in chunks. If portal won't respond to report chunks being sent, server waits for this amount of time (in seconds) before deciding that portal is not going to receive the report. When this time out occurs, report server stops running of that report and logs error.
Tuning and Performance Optimization
Installation and Configuration Manual 163
Default is 600 second, which is good enough for normal network conditions. Increase it, if network conditions are bad and report server and portal deployed distantly. DO NOT increase this timeout to a too big number, because one of the report engine's threads will be 'consumed' unnecessarily during this period, causing no response to other users. Example: CLIENT_SESSION_TIMEOUT=120 This property is set in ReportEngine.properties file. Access Control Access Control is provided at Category Level, Report Level and at Action level. Category level access control makes listings and other requests work faster than report level access granting. Repository Cache Timeout Repository Listing Cache will be updated at this interval from database repository. Set this to a very high number for fast listings, such as 1440 for Report server to build fresh cache once a day. (24 x 60 = 1440) Example: REPOSITORY_CACHE_TIMEOUT=15 This property is set in ReportEngine.properties file. Logging Level Set the logging level to ERROR. Error level DEBUG and INFO mode records more data to the log file resulting in decreased performance levels. Use DEBUG or WARNING only to analyze problems or errors. Example: LOG_LEVEL=ERROR This property is set in ReportEngine.properties file.
Configuring Web Portal Here we have discussed what can be configured for the best performance of the Web Portal. Server Timeout Each request for the report goes to report server via portal. Based on the number of threads configured, report server serves those many reports. There might be extra reports than the number of available report server threads. So, this request goes in a queue and waits for its turn to be served.
Tuning and Performance Optimization
Installation and Configuration Manual 164
On another case, a report might have a complex SQL statement that takes long time to fetch even the first few rows. In such cases, portal waits for the report response for the time specifies here. If your system has any of the above possibilities, increase this time. When the timeout occurs and report is not started being streamed, the portal closes the request and shows the error page. Example: SERVER_TIME_OUT=120 This property is set in ReportClient.properties file. This file is located at path: <folder path>\Intellicus\Jakarta\webapps\intellicus\client\config Maximum memory This memory is the maximum memory that portal is going to use to serve reports. Note that all reports are served via portal. While Multi-page Reports viewed in html will need the least maximum memory, large reports viewed in PDF shall need higher levels of maximum memory. This number can be as high as hardware can afford. A default and minimum suggested value is 128 MB, for 25 or above concurrent usage 512 MB is must. Even higher value is recommended if reports are large.
Note: When portal crosses the maximum memory it crashes. The memory for the Web Portal can be controlled in the following ways: Set Maximum Memory Consumed by Web Server To set the maximum and minimum RAM to be consumed by Intellicus Web server, you need to change a line in run.bat file. This file is located at following path: <folder path>\Jakarta\bin\ For example,
%java_home%\bin\java -cp bootstrap.jar -Dcatalina.home=.. -
Djava.endorsed.dirs=..\common\endorsed -Djava.io.tmpdir=..\temp -
Xms128M -Xmx512M org.apache.catalina.startup.Bootstrap start In the above example, -Xms128M -Xmx512M indicates minimum and maximum memory respectively. Threads To set the number of threads, change value specified in maxThreads in server.xml file. This file is located at following path:

Tuning and Performance Optimization
Installation and Configuration Manual 165
<folder path>\Intellicus\Jakarta\conf If portal doesn’t respond to more users increase the above number. Default value is 150.

Tuning and Performance Optimization
Installation and Configuration Manual 166
Sample Cases Sample Case 1 Report Server and Web portal for 10 concurrent users running on Single Processor. Machine • OS =Windows 2K Professional, Windows 2K Server, Window XP
• RAM = 512MB
• Processor = Pentium 4
Report Server • Maximum Memory = 256 MB
• User Threads = 10
• Client session Time Out = 120 Sec.
• Log Level = ERROR
• Minimum Default Database connection = 15
• Minimum Repository Database connection = 15
Portal • Maximum Memory = 128 MB
• Server Time Out = 120 Sec.
• Log Level = ERROR
Sample Case 2 Report Server and Web Server Configuration, on Distributed Environment for 50 users. Machine • OS =Windows 2K Professional, Windows 2K Server, Window XP
• RAM = 2GB
• Processor = Pentium 4 x 4 866 Mhz
Report Server • Maximum Memory = 1 GB

Tuning and Performance Optimization
Installation and Configuration Manual 167
• User Threads = 50
• Client Session Time Out = 120 Sec.
• Log Level = ERROR
• Minimum Default Database connection = 55
• Minimum Repository Database connection = 55
Portal • Maximum Memory = 512 MB
• Server Time Out = 120 Sec.
• Log Level = ERROR

Support
Installation and Configuration Manual 169
1177 Support For problems with installation, configuration or while using the application, you may email a description of the problem to [email protected], with your contact details and full details of the problem. Although we have taken care to capture and incorporate all aspects of Intellicus Reporting Tool in the documents, if you find any inconsistencies or discrepancies please inform us on [email protected] . Website http://www.Intellicus.com Our website is updated periodically with the product updates, white papers, product extensions, press releases and much more. FTP ftp://ftp.Intellicus.com You can download the product upgrades and sample reports from this site.

Appendix
Installation and Configuration Manual 171
Appendix
Getting and using third party components Intellicus supports a set of third-party libraries to extend support to the functionalities that they provide. These functions are: • To connect with MSSQL Database
• To connect with MSSQL 2005 database
• To connect with MYSQL database
• To use Intellicus functionalities from Yahoo! Messenger
MSSQL 2000 database connection You may need to create this type of database connection in Intellicus if choose to use MSSQL 2000 database server as your Intellicus repository database or report database. To be able to create this type of connection, you will need three jars made available by Microsoft. Files you will need You need to have following files to create MSSQL 2000 database connection: • msbase.jar
• mssqlserver.jar
• msutil.jar
Download location You may download these files from following location: http://www.microsoft.com/downloads/details.aspx?familyid=07287B11-0502-461A-B138-2AA54BFDC03A&displaylang=en Windows Download file: setup.exe. Steps: Run setup.exe file. It will create “lib” folder having following files: • msbase.jar
• mssqlserver.jar

Appendix
Installation and Configuration Manual 172
• msutil.jar
Copy these files to folder: <Intellicus install path>\ReportEngine\lib <Intellicus install path>\ReportEngine\MSSQL\2000 Linux Download file: mssqlserver.tar. Steps: Untar this file and copy the files in folder: <Intellicus install path>\ReportEngine\lib <Intellicus install path>\ReportEngine\MSSQL\2000 MYSQL database connection You may need to create this type of database connection in Intellicus if choose to use MYSQL database server as your Intellicus repository database or report database. To be able to create this type of connection, you will need a jar made available by Sun Microsystems. File you will need • For MYSQL 3.1: mysql-connector-java-3.1.14-bin.jar or latest.
• For MYSQL 5: mysql-connector-java-5.0.7-bin.jar or latest.
Download Location For MYSQL 3.1: You may download the file from the following link if you are using MYSQL 3.1: http://dev.mysql.com/downloads/connector/j/3.1.html Download file: mysql-connector-java-3.1.14-bin.jar or latest jar (as zip or tar, depending on the OS on which it will be deployed). Steps: Extract the above file and place the above file in folder: <Intellicus install path>\ReportEngine\lib <Intellicus install path>\ReportEngine\MYSQL\3.1 For MYSQL 5.0: You may download the file from the following link if you are using MYSQL 5.0: http://dev.mysql.com/downloads/connector/j/5.0.html

Appendix
Installation and Configuration Manual 173
Download file: mysql-connector-java-5.0.7-bin.jar or latest jar (as zip or tar, depending on the OS on which it will be deployed). Steps: Extract the above file and place the above file in folder: <Intellicus install path>\ReportEngine\MYSQL\5.0

Appendix
Installation and Configuration Manual 174
Driver for MSSQL (Windows Authentication) If you choose to use Windows Authentication and Microsoft driver while configuring the connection to use MSSQL provider, you will need sqljdbc_auth.dll file.
This file is a part of MSSQL jdbc driver installation available at the following location: http://msdn.microsoft.com/en-us/data/aa937724.aspx . Place this file at path: <install path>\Intellicus\ReportEngine\bin .
Note: This will come into effect after report server re-start.

Table of Figures
Installation and Configuration Manual 175
Table of Figures Figure 1: Welcome Screen ....................................................................... 4 Figure 2: License Agreement Screen. ......................................................... 4 Figure 3: Customer Information. ............................................................... 5 Figure 4: Installation Options ................................................................... 6 Figure 5: Option to change the destination folder......................................... 7 Figure 6: Specifying Installation folder....................................................... 7 Figure 7: Select one or more components to install ...................................... 8 Figure 8: Configuring port numbers ........................................................... 9 Figure 9: Select the files that setup should replace .....................................10 Figure 10: Configuring Timeout Values ......................................................11 Figure 11: Selecting character set ............................................................12 Figure 12: Review the installation preferences screen ..................................13 Figure 13: Installation Progress screen .....................................................13 Figure 14: Installation Wizard Complete ....................................................14 Figure 15: Intellicus Folder Structure........................................................15 Figure 16: Options in Intellicus menu .......................................................15 Figure 17: The service icon on system tray ................................................16 Figure 18: Location of server.xml.............................................................16 Figure 19: Changing the port number .......................................................17 Figure 20: The URL to start Web Interface when it is on local. .......................17 Figure 21: Login details..........................................................................18 Figure 22: Uninstalling Intellicus Web-based Reporting Suite ........................19 Figure 23: Modify, Repair, or Remove Program ...........................................20 Figure 24: Uninstall Confirmation .............................................................20 Figure 25: Create or Extend a Configuration ..............................................50 Figure 26: Select a Domain Template .......................................................51 Figure 27: Choose Configuration Option ....................................................51 Figure 28: Administrative Username and Password ......................................52 Figure 29: Domain Mode Configuration......................................................52 Figure 30: Java SDK Selection .................................................................53 Figure 31: Target Domain Directory..........................................................53 Figure 32: Domain Information ................................................................53 Figure 33: Domain is created ..................................................................54 Figure 34: Create or Extend a Configuration ..............................................55 Figure 35: Select a Configuration Template................................................56 Figure 36: Choose Express of Custom Configuration ....................................56 Figure 37: Configure Administrative Username and Password ........................57 Figure 38: Configure Server Start Mode and Java SDK .................................57 Figure 39: Create WebLogic Configuration .................................................58 Figure 40: Creating Configuration – The final step.......................................58 Figure 41: Start from this page. ..............................................................59
Table of Figures
Installation and Configuration Manual 176
Figure 42: Select applications option. .......................................................60 Figure 43: Select Intellicus application......................................................60 Figure 44: Selecting the server................................................................61 Figure 45: This page will appear. .............................................................61 Figure 46: Click Deploy. .........................................................................62 Figure 47: Specify login information .........................................................66 Figure 48: Installing new application ........................................................67 Figure 49: Specifying path and name of war file .........................................67 Figure 50: Default binding and mappings...................................................68 Figure 51: Application Security Warnings...................................................69 Figure 52: Selecting installation options ....................................................70 Figure 53: Mapping modifiers to servers ....................................................70 Figure 54: Mapping virtual hosts for Web modules ......................................71 Figure 55: View summary and click Finish to go ahead .................................71 Figure 56: Messages appearing................................................................72 Figure 57: Click Save to Master Configuration link.......................................72 Figure 58: Click Save.............................................................................72 Figure 59.............................................................................................75 Figure 60.............................................................................................75 Figure 61.............................................................................................76 Figure 62.............................................................................................76 Figure 63.............................................................................................77 Figure 64.............................................................................................77 Figure 65.............................................................................................78 Figure 66.............................................................................................78 Figure 67.............................................................................................79 Figure 68.............................................................................................81 Figure 69.............................................................................................81 Figure 70.............................................................................................82 Figure 71.............................................................................................82 Figure 72.............................................................................................83 Figure 73.............................................................................................83 Figure 74.............................................................................................84 Figure 75.............................................................................................84 Figure 76: Starting Oracle Application Server window ..................................86 Figure 77: Oracle Application Server window..............................................87 Figure 78: Shortcut menu to launch Oracle Application Server Control ............87 Figure 79: Specify credentials .................................................................88 Figure 80: OC4J home page ....................................................................88 Figure 81.............................................................................................89 Figure 82: Applications tab .....................................................................90 Figure 83: Deploy: Select Archive ............................................................91 Figure 84: Application attributes ..............................................................92 Figure 85: Deployment Settings...............................................................93 Figure 86: Confirmation .........................................................................93

Table of Figures
Installation and Configuration Manual 177
Figure 87.............................................................................................94 Figure 88.............................................................................................95 Figure 89.............................................................................................95 Figure 90.............................................................................................97 Figure 91.............................................................................................98 Figure 92.............................................................................................99 Figure 93........................................................................................... 100 Figure 94........................................................................................... 101 Figure 95: Files unzipped in C:\Inetpub\wwwroot folder. ............................ 105 Figure 96: Modify redirection port entry in server.xml file .......................... 107 Figure 97: Set port, host and worker type details in IntellicusWorkers.properties
file. ............................................................................................. 108 Figure 98: Administrative tools icon in Control Panel window. ..................... 109 Figure 99: IIS shortcut in Administrative tools window............................... 109 Figure 100: Creating a Virtual directory for the web site (Intellicus) ............. 110 Figure 101: First screen of Virtual Directory Creating Wizard....................... 110 Figure 102: Specifying Alias (name) for the virtual directory. ...................... 111 Figure 103: Specify the folder where Intellicus_redirector.dll is placed.......... 111 Figure 104: Setting access permissions. Make sure "Execute.." is checked. ... 112 Figure 105: Virtual directory is created. .................................................. 112 Figure 106: Virtual directory created. ..................................................... 113 Figure 107: Property values in Intellicus_Redirector.properties file............... 113 Figure 108: Context menu to get Default Web Site Properties dialog box. ...... 114 Figure 109: Adding ISAPI filter. ............................................................. 114 Figure 110: The green up arrow indicates that web site is active. ................ 115 Figure 111: Context menu to get Default Web Site Properties dialog box. ...... 116 Figure 112: Adding ISAPI filter. ............................................................. 117 Figure 113 ......................................................................................... 118 Figure 114 ......................................................................................... 118 Figure 115: The green up arrow indicates that web site is active. ................ 119 Figure 116: If required, set the right value for TCP port ............................. 120 Figure 117: The Configuration menu option ............................................. 121 Figure 118 : The Configuration menu option............................................. 123 Figure 119: Server Log Files dialog ........................................................ 137 Figure 120: Connection Configuration page .............................................. 138 Figure 121: Filtering list of connections................................................... 139 Figure 122: Adding a data connection ..................................................... 140 Figure 123: Add Driver dialog box .......................................................... 144 Figure 124: Connection pool settings ...................................................... 145 Figure 125: Cache settings ................................................................... 146 Figure 126: Assigning access rights ........................................................ 147 Figure 127: Downloading Database Configuration File ................................ 152 Figure 128: Connection Icon: reports will be run using SalesData connection . 153 Figure 129: Setting Data Connection for session ....................................... 153 Figure 130: License tab of Report Server Configuration page. ..................... 154

Table of Figures
Installation and Configuration Manual 178
Figure 131: Client Configuration using Web Interface. ............................... 157

Installation and Configuration Manual 179