Installation and Configuration Guide -...
124
SAS ® Documentation SAS ® Visual Analytics 7.1 Installation and Configuration Guide (Non-distributed SAS ® LASR ™ ) Also applies to SAS ® Visual Statistics
-
Upload
phungkhanh -
Category
Documents
-
view
238 -
download
6
Transcript of Installation and Configuration Guide -...

SAS® Documentation
SAS® Visual Analytics 7.1Installation and Configuration Guide(Non-distributed SAS® LASR™ )
Also applies to SAS® Visual Statistics

The correct bibliographic citation for this manual is as follows: SAS Institute Inc. 2014. SAS® Visual Analytics 7.1: Installation and Configuration Guide (Non-distributed SAS® LASR™). Cary, NC: SAS Institute Inc.
SAS® Visual Analytics 7.1: Installation and Configuration Guide (Non-distributed SAS® LASR™)
Copyright © 2014, SAS Institute Inc., Cary, NC, USA
All rights reserved. Produced in the United States of America.
For a hard-copy book: No part of this publication may be reproduced, stored in a retrieval system, or transmitted, in any form or by any means, electronic, mechanical, photocopying, or otherwise, without the prior written permission of the publisher, SAS Institute Inc.
For a web download or e-book: Your use of this publication shall be governed by the terms established by the vendor at the time you acquire this publication.
The scanning, uploading, and distribution of this book via the Internet or any other means without the permission of the publisher is illegal and punishable by law. Please purchase only authorized electronic editions and do not participate in or encourage electronic piracy of copyrighted materials. Your support of others' rights is appreciated.
U.S. Government License Rights; Restricted Rights: The Software and its documentation is commercial computer software developed at private expense and is provided with RESTRICTED RIGHTS to the United States Government. Use, duplication or disclosure of the Software by the United States Government is subject to the license terms of this Agreement pursuant to, as applicable, FAR 12.212, DFAR 227.7202-1(a), DFAR 227.7202-3(a) and DFAR 227.7202-4 and, to the extent required under U.S. federal law, the minimum restricted rights as set out in FAR 52.227-19 (DEC 2007). If FAR 52.227-19 is applicable, this provision serves as notice under clause (c) thereof and no other notice is required to be affixed to the Software or documentation. The Government's rights in Software and documentation shall be only those set forth in this Agreement.
SAS Institute Inc., SAS Campus Drive, Cary, North Carolina 27513-2414.
October 2014
SAS provides a complete selection of books and electronic products to help customers use SAS® software to its fullest potential. For more information about our offerings, visit support.sas.com/bookstore or call 1-800-727-3228.
SAS® and all other SAS Institute Inc. product or service names are registered trademarks or trademarks of SAS Institute Inc. in the USA and other countries. ® indicates USA registration.
Other brand and product names are trademarks of their respective companies.


Contents
Using This Book . . . . . . . . . . . . . . . . . . . . . . . . . . . . . . . . . . . . . . . . . . . . . . . . . . . . . . . . . . . . viiRecommended Reading . . . . . . . . . . . . . . . . . . . . . . . . . . . . . . . . . . . . . . . . . . . . . . . . . . . . ix
Chapter 1 • Deploying SAS Visual Analytics (Non-distributed LASR) . . . . . . . . . . . . . . . . . . . . . . . . 1What Is Covered in This Document? . . . . . . . . . . . . . . . . . . . . . . . . . 2SAS Visual Statistics Installation Instructions . . . . . . . . . . . . . . . . . . . 3Deployment Process Overview . . . . . . . . . . . . . . . . . . . . . . . . . . . . . . 4Step 1: Create a SAS Software Depot . . . . . . . . . . . . . . . . . . . . . . . . 4Step 2: Check for Documentation Updates . . . . . . . . . . . . . . . . . . . . 10Step 3: Prepare Your Environment . . . . . . . . . . . . . . . . . . . . . . . . . . 11Step 4: Install and Configure SAS . . . . . . . . . . . . . . . . . . . . . . . . . . 16Step 5: Perform Post-Deployment Steps . . . . . . . . . . . . . . . . . . . . 105Step 6: Add SAS Users . . . . . . . . . . . . . . . . . . . . . . . . . . . . . . . . . . 106Step 7: Validate Your SAS Visual Analytics Deployment . . . . . . . . 112

vi Contents

Using This Book
Audience
This guide documents the installation and initial configuration of SAS Visual Analytics for a non-distributed SAS LASR Analytic Server for a traditional, on-premises deployment. This guide does not include deploying any other SAS product beyond SAS Visual Analytics for non-distributed SAS LASR Analytic Server. If you are upgrading, see the SAS Guide to Software Updates, available at http://support.sas.com/documentation/cdl/en/whatsdiff/66129/PDF/default/whatsdiff.pdf.
Although the majority of figures in this guide are from a Microsoft Windows deployment, the experience is, for the most part, identical on Linux. Differences in the deployment between operating systems are noted.
For documentation about:
n deploying SAS Visual Analytics for a distributed SAS LASR Analytic Server on an analytics cluster
n converting your SAS LASR Analytic Servers to run in distributed mode
see the SAS Visual Analytics: Installation and Configuration Guide (Distributed SAS LASR), available at http://support.sas.com/documentation/solutions/va/index.html.
vii

Documentation Conventions
SAS Installation Directory
The phrase SAS installation directory refers to a host path. (The SAS installation directory is sometimes referred to as SAS Home.) For example: C:\Program Files\SASHome.
SAS Configuration Directory
The phrase SAS configuration directory refers to a host path that includes a configuration name and level. For example: C:\SAS\Config\Lev1.
For more information, see the topic, “Overview of the Configuration Directory Structure,” in the SAS Intelligence Platform: System Administration Guide, available at http://support.sas.com/documentation/cdl/en/bisag/67481/HTML/default/
viewer.htm#n0v5rampodzajbn1w825qtg5lzil.htm.
viii

Recommended Reading
Here is the recommended reading list for this title:
n SAS Guide to Software Updates
n SAS LASR Analytic Server: Reference Guide
n SAS Visual Analytics: User's Guide
n System Requirements—SAS Visual Analytics (Non-distributed Mode), available at http://support.sas.com/documentation/installcenter/en/ikvisanlytofrndmsr/
68018/HTML/default/
n SAS offers instructor-led training and self-paced e-learning courses to help you administer SAS Visual Analytics. For more information about the courses available, see support.sas.com/admintraining.
For a complete list of SAS books, go to support.sas.com/bookstore. If you have questions about which titles you need, please contact a SAS Book Sales Representative:
SAS BooksSAS Campus DriveCary, NC 27513-2414Phone: 1-800-727-3228Fax: 1-919-677-8166E-mail: [email protected] address: support.sas.com/bookstore
ix

x

1Deploying SAS Visual Analytics (Non-distributed LASR)
What Is Covered in This Document? . . . . . . . . . . . . . . . . . . . . . . . . . . . . . . . . . . . 2
SAS Visual Statistics Installation Instructions . . . . . . . . . . . . . . . . . . . . . . . 3
Deployment Process Overview . . . . . . . . . . . . . . . . . . . . . . . . . . . . . . . . . . . . . . . . . . 4
Step 1: Create a SAS Software Depot . . . . . . . . . . . . . . . . . . . . . . . . . . . . . . . . . . 4
Step 2: Check for Documentation Updates . . . . . . . . . . . . . . . . . . . . . . . . . . 10
Step 3: Prepare Your Environment . . . . . . . . . . . . . . . . . . . . . . . . . . . . . . . . . . . . 11Overview of Prepare Your Environment . . . . . . . . . . . . . . . . . . . . . . . . . . . . . 11Review Your Pre-Installation Checklist . . . . . . . . . . . . . . . . . . . . . . . . . . . . . . 11Set Up User Accounts . . . . . . . . . . . . . . . . . . . . . . . . . . . . . . . . . . . . . . . . . . . . . . . . . 11Set Up an Operating System Group . . . . . . . . . . . . . . . . . . . . . . . . . . . . . . . . . 13Download and Install Required Third-Party Software . . . . . . . . . . . . . 14
Step 4: Install and Configure SAS . . . . . . . . . . . . . . . . . . . . . . . . . . . . . . . . . . . . . 16
Step 5: Perform Post-Deployment Steps . . . . . . . . . . . . . . . . . . . . . . . . . . . 105
Step 6: Add SAS Users . . . . . . . . . . . . . . . . . . . . . . . . . . . . . . . . . . . . . . . . . . . . . . . . 106
Step 7: Validate Your SAS Visual Analytics Deployment . . . . . . . 112
1

What Is Covered in This Document?
This document is designed to help you quickly and efficiently deploy SAS Visual Analytics with a non-distributed SAS LASR Analytic Server on a single machine.
You use a program provided by SAS called the SAS Deployment Wizard to perform the actual installation and initial configuration of SAS Visual Analytics. The deployment wizard is an easy-to-use program that prompts you for the necessary information to automatically install and configure SAS Visual Analytics.
The deployment wizard prompts you for information that might require input from your site’s IT team. Some of the answers that you provide (such as user names and passwords) should be recorded because you (or someone at your site) will need this information later to use and administer SAS Visual Analytics.
Figure 1.1 Example of a SAS Deployment Wizard Page
This document gives you step-by-step instructions to successfully deploy SAS Visual Analytics. If you find that you require more information about the deployment wizard configuration prompts, you can do the following:
2 Chapter 1 / Deploying SAS Visual Analytics (Non-distributed LASR)

n Click the Help button on the wizard page for the prompt in question.
Figure 1.2 Location of the Help Button on a SAS Deployment Wizard Page
n See the SAS Visual Analytics: Installation and Configuration Guide (Distributed SAS LASR), available at http://support.sas.com/documentation/solutions/va/index.html.
If you find that you need more information about using the deployment wizard itself, see the SAS Deployment Wizard and SAS Deployment Manager: User's Guide, available at http://support.sas.com/documentation/installcenter/en/ikdeploywizug/66034/PDF/
default/user.pdf.
SAS Visual Statistics Installation Instructions
If SAS Visual Statistics is part of your order, then when you perform the steps in this document for installing and configuring SAS Visual Analytics, you are also installing and configuring SAS Visual Statistics.
SAS Visual Statistics Installation Instructions 3

Deployment Process Overview
The following list summarizes the steps required to install and configure SAS Visual Analytics on a single machine:
1 Create a SAS Software Depot.
2 Check for documentation updates.
3 Prepare your environment.
4 Install and configure SAS Visual Analytics.
5 Perform post-deployment steps.
6 Add SAS Visual Analytics users to the system.
7 Validate your SAS Visual Analytics deployment.
Subsequent sections in this guide provide the step-by-step instructions that you need to complete these tasks.
Although the majority of figures in this guide are from a Microsoft Windows deployment, the experience is, for the most part, identical on Linux. Differences in the deployment between operating systems are noted.
Step 1: Create a SAS Software Depot
SAS Visual Analytics must be installed from a SAS Software Depot, which is a repository for your SAS software media. If you already have a SAS Software Depot, skip to “Step 3: Prepare Your Environment” on page 11.
4 Chapter 1 / Deploying SAS Visual Analytics (Non-distributed LASR)

Figure 1.3 Windows Explorer Displaying a SAS Software Depot
Note: If you receive your SAS Visual Analytics order by electronic software download (ESD), refer to your software order e-mail (SOE) for instructions on how to download your SAS order and create a SAS Software Depot. If you have already downloaded your SAS order, your SAS Software Depot is automatically created for you. Proceed to “Step 2: Check for Documentation Updates” on page 10.
If your installation media is in DVD format, create a SAS Software Depot by following these steps:
1 Insert Disk 1 into your DVD drive.
2 If the SAS Deployment Wizard does not automatically launch, open the DVD in Windows Explorer, right-click setup.exe, and select Run as administrator.
Step 1: Create a SAS Software Depot 5

3 When prompted, select your language, and click OK.
4 On the Select Deployment Task page of the SAS Deployment Wizard, select Create or Add to a SAS Software Depot.
6 Chapter 1 / Deploying SAS Visual Analytics (Non-distributed LASR)

5 On the Specify Order Details page, click Next.
Step 1: Create a SAS Software Depot 7

6 On the Specify Order Options page, select Include complete order contents, and click Next.
7 On the Specify SAS Software Depot Directory page, specify the location where you want to create your SAS Software Depot, and click Next. The location can be on the local machine or it can be on a network drive.
8 Chapter 1 / Deploying SAS Visual Analytics (Non-distributed LASR)

8 If the directory that you specify does not exist, the wizard prompts you. If you want it to create the directory for you, click Yes.
9 On the Final Review page, click Start to create the SAS Software Depot.
Step 1: Create a SAS Software Depot 9

Step 2: Check for Documentation Updates
It is very important to check for late-breaking installation information in SAS Notes and to review the system requirements for your SAS software.
n SAS Notes
n system requirements
See the system requirements for SAS Visual Analytics (non-distributed), available at http://support.sas.com/documentation/installcenter/en/ikvisanlytofrsr/68017/
HTML/default/.
10 Chapter 1 / Deploying SAS Visual Analytics (Non-distributed LASR)

Step 3: Prepare Your Environment
Overview of Prepare Your Environment
Before you can deploy your SAS software, you need to prepare your server machine. This includes:
n Review your pre-installation checklist.
n Set up required operating system user accounts.
n Create the required operating system group.
n Install third-party software required by SAS Visual Analytics.
Review Your Pre-Installation Checklist
Your SAS software order contains a pre-installation checklist that gives a comprehensive list of actions that you must do to prepare your system before deploying SAS Visual Analytics.
The checklist is located in your SAS Software Depot in the plan_files directory. Checklists are bundled with deployment plans, topology diagrams, and other documents. All of these are available on support.sas.com.
Set Up User Accounts
User accounts that are needed for your SAS deployment can be either local accounts on the machine on which you are deploying SAS, or domain accounts that have access to the machine. Although you can use your own account names, SAS recommends using the names that are listed in the following table. If you choose to use different account names, be sure to record the names for future reference.
Step 3: Prepare Your Environment 11

Table 1.1 Pre-installation Checklist for User Accounts
User AccountOperating System
Recommended User IDUser Rights Needed
SAS Installer Both my-domain\sasormy-machine\sas
Windows Log on as a batch job
Linux The group that you designate as the primary group for the SAS installer must contain the SAS Spawned Servers account.
SAS Spawned Servers*
Both my-domain\sassrvormy-machine\sassrv
Windows Log on as a batch job
Linux Member of a group that is the primary group for the SAS installer. (This group does not have to be the primary group for the SAS Spawned Servers account.)
SAS First User* Both my-domain\sasdemoormy-machine\sasdemo
Windows Log on as a batch job
Linux
* The SAS Deployment Wizard automatically assigns the Log on as a batch job right to the SAS Spawned Servers account and SAS First User account.
The accounts that are listed in the preceding table have the following purposes:
n SAS Installer is used to install SAS. After you create the account, log on to the machine with this account to perform the deployment. It is recommended that this account remain available for future SAS maintenance and updates.
12 Chapter 1 / Deploying SAS Visual Analytics (Non-distributed LASR)

n SAS Spawned Servers is the process owner for SAS Stored Process Servers and SAS Pooled Workspace Servers on the machine. During the SAS deployment, the SAS Deployment Wizard prompts you to enter the account name and password for this account.
n SAS First User is used for demonstration purposes. This account is often referred to as sasdemo. During the SAS deployment, the SAS Deployment Wizard prompts you to specify the account name for this account. The SAS First User account is not a required account. However, it is used for the purposes of this installation guide.
Set Up an Operating System Group
Set Up the SAS Server Users Group (Windows)
To run SAS on Windows, users must have the Log on as a batch job right on the machine that hosts the server. We recommend that you create a group on the server, add SAS users to the group, and then assign that group the Log on as a batch job right.
Note: The SAS Deployment Wizard automatically assigns the Log on as a batch job right for the SAS Spawned Servers account and SAS First User account.
To create the SAS Server Users group and assign the Log on as a batch job right, do the following:
1 Click Start. In the Search programs and files field, enter Computer Management, and select it from the Start menu when it appears.
2 Expand Local Users and Groups.
3 Right-click Groups, and select New Group.
4 Name the group “SAS Server Users,” and click Create.
5 Assign the Log on as a batch job right to the new SAS Server Users group.
Click Start. In the Search programs and files field, enter Local Security Policy, and select it from the Start menu when it appears.
Step 3: Prepare Your Environment 13

6 In the left pane of the Local Security Policy window, expand Local Policies, and click User Rights Assignment.
7 In the right pane under the Policy column, double-click Log on as a batch job. This displays the Log on as a batch job Properties dialog box.
8 On the Local Security Setting tab, click Add User or Group. In the Enter the object names to select field, enter SAS Server Users, and click Check Names to select the SAS Server Users group. Then, click OK to return to the Log on as a Batch Job Properties dialog box. Verify that the new group that you created appears in the text box on the Local Security Setting tab.
9 Click OK to close the dialog box and return to the Local Security Policy window.
In the future, any new SAS users that you add to your SAS system can be granted the Log on as a batch job right by adding them to the SAS Server Users group in Windows. Because the SAS Server Users group was assigned the Log on as a batch job right, it is not necessary to explicitly assign this right to users in the Local Security Policy window.
Set Up the sas Group (Linux)
To run SAS on Linux, you should create an operating system group (sas) and make it the primary group for the Linux SAS installer user. The SAS Spawned Servers account should be made a member of the sas group. (Members of this group are given access to certain directories and files created by the SAS Deployment Wizard.)
For information about creating groups and adding user accounts, see your Linux documentation.
Download and Install Required Third-Party Software
SAS Visual Analytics requires that your machine have the following third-party software installed:
n Windows PowerShell
14 Chapter 1 / Deploying SAS Visual Analytics (Non-distributed LASR)

Windows PowerShell is a configuration management and task automation framework from Microsoft that is required by SAS Visual Analytics.
Later, you are prompted for the Windows PowerShell installation path here: Step 18 on page 32.
n Python
Python is a general-purpose programming language required by SAS Information Retrieval Studio.
Later, you are prompted for the Python installation path here: Step 17 on page 31.
n JUnit
To run certain test suites, the SAS Deployment Tester requires JUnit, which is an open-source framework for writing and running tests in the Java programming language.
Later, you are prompted for the JUnit installation path here: Step 55 on page 69.
If you need any of this software, you can download it from SAS Support for Additional Software Products.
If your machine does not have this third-party software, note the location where you installed it. (See the following table.)
Table 1.2 Pre-installation Checklist for Third-Party Software
Third-Party Software Default Installation Path Actual Installation Path
Windows PowerShell C:\Windows\System32\WindowsPowerShell\v1.0
Python C:\Python27
JUnit C:\junit\junit-4.8.1.jar
Step 3: Prepare Your Environment 15

Step 4: Install and Configure SAS
To install and configure SAS Visual Analytics, you use a standard deployment plan. A deployment plan is similar to a recipe that tells the SAS Deployment Wizard how to install your software order.
Later in this topic, you are asked to choose between two standard deployment plans that are labeled SAS Visual Analytics, two machines. The first machine contains the SAS Visual Analytics server tier, middle tier, and administrative clients. The second machine contains administrative clients. These two plans differ only in that one plan is used for a Windows server and middle tier, and the other plan is used for a Linux server and middle tier.
This topic describes how to deploy SAS Visual Analytics on the server and middle tier machine. If you want to deploy on additional client machines, then rerun the deployment wizard on one or more additional machines, making sure to select Step 4: Clients on the Select Deployment Step and Products to Install page on page 23.
Note: Actually, these deployment plans can accommodate additional machines if you want to cluster your SAS Metadata Server (Step 2) or your middle tier (Step 3). For more information, see SAS Visual Analytics: Installation and Configuration Guide (Distributed SAS LASR).
To install and configure SAS Visual Analytics on a single machine, follow these steps:
1 Log on to the machine using the SAS installer account that you created earlier or using an account that is a member of the Windows Administrators group.
2 Temporarily disable all anti-virus, anti-malware, anti-spyware, and firewall software. These types of programs can interfere with the deployment process and block files as they are being copied and extracted.
3 On Windows, start Windows Explorer, and navigate to the highest-level directory in your SAS Software Depot. Right-click setup.exe, and select Run as administrator.
16 Chapter 1 / Deploying SAS Visual Analytics (Non-distributed LASR)

On Linux, navigate to the highest-level directory in your SAS Software Depot, and run setup.sh.
Step 4: Install and Configure SAS 17

4
Choose Language
n From the drop-down list, select the language that you want the SAS Deployment Wizard to use when it displays text, and click OK.
18 Chapter 1 / Deploying SAS Visual Analytics (Non-distributed LASR)

5
Select Deployment Task
n Select Install SAS Software, and click Next.
Step 4: Install and Configure SAS 19

6
Specify SAS Home
n If you want to specify a different location where SAS is installed other than the default, enter this path in SAS Home. Click Next.
Although your SAS installation directory (which the wizard refers to as SAS Home) and SAS configuration directories can share the same parent directory, one directory cannot reside inside another. Also, the SAS installation directory should not be a directory within your SAS Software Depot.
20 Chapter 1 / Deploying SAS Visual Analytics (Non-distributed LASR)

7
Select Deployment Type
n Confirm that Perform a Planned Deployment, Install SAS Software, and Configure SAS Software are all selected. Click Next.
Step 4: Install and Configure SAS 21

8
Specify Deployment Plan
n Select Select a standard deployment plan.
n On Windows, from the drop-down menu, select SAS Visual Analytics, two machines, wx6.
n On Linux, from the drop-down menu, select SAS Visual Analytics, two machines, lax and wx6. Click Next.
22 Chapter 1 / Deploying SAS Visual Analytics (Non-distributed LASR)

9
Select Deployment Step and Products to Install
n In Deployment Step, make sure that Step 1: Server and Middle Tier is selected. Click Next.
Step 4: Install and Configure SAS 23

10
Specify SAS Installation Data File
n Click Browse, locate your SAS installation data file, and then click Next.
24 Chapter 1 / Deploying SAS Visual Analytics (Non-distributed LASR)

11
Select Language Support
n Click Clear All. (English remains selected as the default language.)
n Add any additional languages that you want SAS to support, and then click Next.
Step 4: Install and Configure SAS 25

12
Select Regional Settings
n Accept the default value of English (United States), or select a different language, region, and locale in Language (Region) [Locale]. Click Next.
26 Chapter 1 / Deploying SAS Visual Analytics (Non-distributed LASR)

13
Select Authentication Type (Linux only)
n Do not change any of the default values displayed on this page. Click Next.
Step 4: Install and Configure SAS 27

14
Note: Generally speaking, you should not change any port values unless a port is already used by another application. See your pre-installation checklist for the complete list of ports that SAS Visual Analytics requires. For more information, see “Review Your Pre-Installation Checklist” on page 11.
Specify Remote Communication Configuration
n Do not change the default information that is displayed on this page. Click Next.
28 Chapter 1 / Deploying SAS Visual Analytics (Non-distributed LASR)

15
Checking System
n Wait while the SAS Deployment Wizard checks your system. When it is finished, click Next.
Step 4: Install and Configure SAS 29

16
Review Required Software
n Review the list of third-party software that is required for the SAS software that you are installing on the current machine. Click Next.
30 Chapter 1 / Deploying SAS Visual Analytics (Non-distributed LASR)

17
Specify Software Location
n Click Next.
If the path is incorrect, the wizard does not proceed. In this case, enter the correct path where the third-party software is installed that you recorded in Table 1.2 on page 15. Click Next.
Step 4: Install and Configure SAS 31

18
Specify Software Location
n Click Next.
If the path is incorrect, the wizard does not proceed. In this case, enter the correct path where the third-party software is installed that you recorded in Table 1.2 on page 15. Click Next.
32 Chapter 1 / Deploying SAS Visual Analytics (Non-distributed LASR)

19
Select Configuration Prompting Level
n Make sure that Typical is selected, and click Next.
Step 4: Install and Configure SAS 33

20
Specify Configuration Information
n Do not change the default information that is displayed on this page. Click Next.
34 Chapter 1 / Deploying SAS Visual Analytics (Non-distributed LASR)

21
Local Machine Name
n In Fully-qualified Local Host Name, enter the complete name of the local host.
The fully qualified local host name typically takes the form of the local host name plus the domain name server (for example, MyMachine.example.com).
TIP If you do not know the domain name used at your site, check with your system administrator.
n In Short Local Host Name, enter a short host name.
The short local host name is the abbreviated, more common method of referring to the host, usually only a single word (for example, MyMachine).
Step 4: Install and Configure SAS 35

22
Migration Information
n Do not select Perform migration. Click Next.
36 Chapter 1 / Deploying SAS Visual Analytics (Non-distributed LASR)

23
Windows Options (Windows only)
n Do not change any of the default values displayed on this page. Click Next.
Step 4: Install and Configure SAS 37

24
Windows Shortcuts (Windows only)
n In Create Windows Shortcuts, make sure that For All Users is selected. Click Next.
38 Chapter 1 / Deploying SAS Visual Analytics (Non-distributed LASR)

25
Integrated Windows Authentication
n Do not select Use Integrated Windows authentication. Click Next.
Step 4: Install and Configure SAS 39

26
Token Based Authentication
n Do not select Use SAS token authentication. Click Next.
40 Chapter 1 / Deploying SAS Visual Analytics (Non-distributed LASR)

27
SAS Metadata Server
n Do not change the default information that is displayed on this page. Click Next.
Step 4: Install and Configure SAS 41

28
SAS Metadata Server: Override Backup Location
n Do not change the default information that is displayed on this page. Click Next.
42 Chapter 1 / Deploying SAS Visual Analytics (Non-distributed LASR)

29
SAS Metadata Server: Override Service Login Account (Windows only)
n Do not change the default information that is displayed on this page. Click Next.
Step 4: Install and Configure SAS 43

30
Deployment Accounts: Type of Accounts
n Do not change the default information that is displayed on this page. Click Next.
44 Chapter 1 / Deploying SAS Visual Analytics (Non-distributed LASR)

31
External Account: Installer
n In the relevant fields, enter the user ID and password for the Installer account that you are using to install and configure SAS. (This should be the user account under which you are currently logged on.)
Prefix the user ID with either the domain or machine name (for example, domain\user-ID or machine-name\user-ID). Click Next.
Step 4: Install and Configure SAS 45

32
Automatic Script Execution (Linux only)
n Select Run setuid.sh with my ID and password for the deployment wizard to attempt to run the script with the credentials that you provide.
You see this page on Linux for SAS products that require you run the setuid.sh script with sudo privileges. If you select this option, you will be asked on a subsequent page for the sudo password (if you are deploying a metadata server, you have already provided this information), and as it installs your software, the deployment wizard attempts to run the script with the credentials you provided.
If you do not select this option, you will have to run setuid.sh manually during installation (and configuration if you have chosen to configure) is complete. Note that setuid.sh must be run as root in order to complete successfully. If you have any concerns with the SAS Deployment Wizard running as root or you do not know the sudo information for the machine that you are installing on, you should not select this option. For more information, see Step 87 on page 102.
46 Chapter 1 / Deploying SAS Visual Analytics (Non-distributed LASR)

33
SAS Internal Account: Unrestricted Administrator
n Enter and confirm the password that will be used for the internal sasadm@saspw account. Click Next.
Note: Remember this password as you will need it in the future.
Step 4: Install and Configure SAS 47

34
SAS Internal Account: Trusted User
n Enter and confirm the password that will be used for the internal sastrust@saspw account. Click Next.
Note: Remember this password as you will need it in the future.
48 Chapter 1 / Deploying SAS Visual Analytics (Non-distributed LASR)
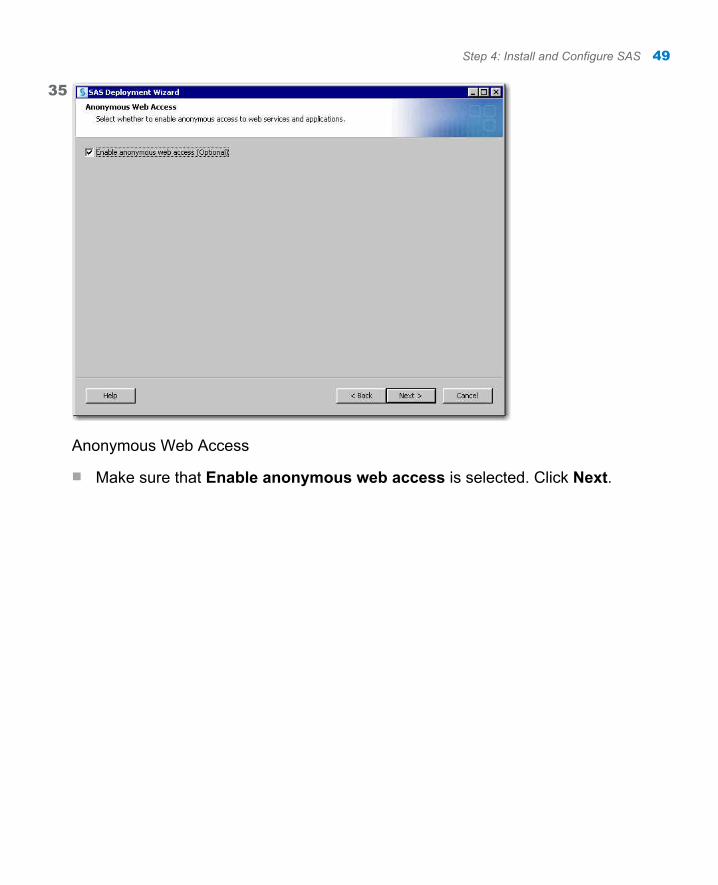
35
Anonymous Web Access
n Make sure that Enable anonymous web access is selected. Click Next.
Step 4: Install and Configure SAS 49

36
SAS Internal Account: Anonymous Web User
n Enter and confirm the password that will be used for the internal webanon@saspw account. Click Next.
Note: Remember this password as you will need it in the future.
50 Chapter 1 / Deploying SAS Visual Analytics (Non-distributed LASR)

37
SAS Visual Analytics: Allow Guest Access
n Do not change any of the default values displayed on this page. Click Next.
Step 4: Install and Configure SAS 51

38
External Account: SAS Spawned Servers Account
n In the relevant fields, enter the user ID and password for the SAS Spawned Servers account.
Note: Remember this password as you will need it in the future.
Prefix the user ID with either the domain or machine name (for example, domain\user-ID or machine-name\user-ID). Click Next.
52 Chapter 1 / Deploying SAS Visual Analytics (Non-distributed LASR)

39
Deployment Accounts: First User
n Select Set up a First User Identity. Click Next.
The SAS First User account, which is often referred to as sasdemo, is used for demonstration purposes. Although it is not required, the SAS First User account can be used to validate your deployment.
Step 4: Install and Configure SAS 53

40
External Account: First User
n In External User ID, enter the user ID for the SAS First User account.
Prefix the user ID with either the domain or machine name (for example, domain\user-ID or machine-name\user-ID). Click Next.
54 Chapter 1 / Deploying SAS Visual Analytics (Non-distributed LASR)

41
Server Encryption
n Do not change the default information that is displayed on this page. Click Next.
Step 4: Install and Configure SAS 55

42
Estimated System Size
n Do not change the default information that is displayed on this page. Click Next.
56 Chapter 1 / Deploying SAS Visual Analytics (Non-distributed LASR)

43
E-mail Server
n In Host Name, enter the host name for an SMTP e-mail server at your site. SAS uses this server to send e-mail alerts for system-related issues to an administrator. Click Next.
TIP If you do not know the name of the SMTP e-mail server at your site, check with your system administrator.
Step 4: Install and Configure SAS 57

44
E-mail Addresses
n In Recipient E-mail Address, enter a valid e-mail address that the SAS can use to send e-mail alerts for system-related issues. Click Next.
58 Chapter 1 / Deploying SAS Visual Analytics (Non-distributed LASR)

45
SAS Object Spawner
n Do not change the default information that is displayed on this page. Click Next.
Step 4: Install and Configure SAS 59

46
SAS Object Spawner: Port Bank
n Do not change the default information that is displayed on this page. Click Next.
60 Chapter 1 / Deploying SAS Visual Analytics (Non-distributed LASR)

47
SAS Application Server: Server Context
n Do not change the default information that is displayed on this page. Click Next.
Step 4: Install and Configure SAS 61

48
SAS Workspace Server
n Do not change the default information that is displayed on this page. Click Next.
62 Chapter 1 / Deploying SAS Visual Analytics (Non-distributed LASR)

49
SAS Pooled Workspace Server
n Do not change the default information that is displayed on this page. Click Next.
Step 4: Install and Configure SAS 63

50
SAS Stored Process Server
n Do not change the default information that is displayed on this page. Click Next.
64 Chapter 1 / Deploying SAS Visual Analytics (Non-distributed LASR)

51
SAS Stored Process Server: Multibridge Connections
n Do not change the default information that is displayed on this page. Click Next.
Step 4: Install and Configure SAS 65

52
SAS Web Infrastructure Platform Data Server
n Enter and confirm a password that SAS will create for the dbmsowner user ID. Click Next.
Note: Remember this password as you will need it in the future.
n Do not change the default information that is displayed on this page.
66 Chapter 1 / Deploying SAS Visual Analytics (Non-distributed LASR)

53
SAS DATA Step Batch Server
n Do not change the default information that is displayed on this page. Click Next.
Step 4: Install and Configure SAS 67

54
Operating System Services Scheduling Server
n Do not change the default information that is displayed on this page. Click Next.
68 Chapter 1 / Deploying SAS Visual Analytics (Non-distributed LASR)

55
SAS Deployment Tester Server
n Do not change the default port information that is displayed on this page.
n In JUnit JAR File, enter the JAR file path (for example, C:\junit\junit-4.8.1.jar) or click Browse to select it. Click Next.
Step 4: Install and Configure SAS 69

56
SAS Web Server: Automated or Manual Configuration Option
n Do not change the default information that is displayed on this page. Click Next.
70 Chapter 1 / Deploying SAS Visual Analytics (Non-distributed LASR)

57
SAS Web Server: Configuration
n Do not change the default information that is displayed on this page. Click Next.
Step 4: Install and Configure SAS 71

58
SAS Web Application Server: JMS Configuration
n Do not change the default information that is displayed on this page. Click Next.
72 Chapter 1 / Deploying SAS Visual Analytics (Non-distributed LASR)

59
SAS Web Application Server: Cache Locator Configuration
n Do not change the default information that is displayed on this page. Click Next.
Step 4: Install and Configure SAS 73

60
SAS Web Application Server: Server Configuration
n Do not change the default information that is displayed on this page. Click Next.
74 Chapter 1 / Deploying SAS Visual Analytics (Non-distributed LASR)

61
SAS Web Application Server: Server Ports
n Do not change the default information that is displayed on this page. Click Next.
Step 4: Install and Configure SAS 75

62
Web Applications: Automatic Deployment
n Do not change the default information that is displayed on this page. Click Next.
76 Chapter 1 / Deploying SAS Visual Analytics (Non-distributed LASR)

63
Scheduling Services Cache Locator
n Do not change the default information that is displayed on this page. Click Next.
Step 4: Install and Configure SAS 77

64
Scheduling Services DIP JobRunner
n Do not change the default information that is displayed on this page. Click Next.
78 Chapter 1 / Deploying SAS Visual Analytics (Non-distributed LASR)

65
SAS Web Application Themes
n Do not change the default information that is displayed on this page. Click Next.
Step 4: Install and Configure SAS 79

66
IP Multicast Version (Linux only)
n Do not change the default information that is displayed on this page. Click Next.
80 Chapter 1 / Deploying SAS Visual Analytics (Non-distributed LASR)

67
IP Multicast
n Do not change the default information that is displayed on this page. Click Next.
Step 4: Install and Configure SAS 81

68
SAS Content Server: Repository Directory
n Do not change the default information that is displayed on this page. Click Next.
82 Chapter 1 / Deploying SAS Visual Analytics (Non-distributed LASR)

69
SAS Web Infrastructure Platform Database: JDBC Properties
n Enter and confirm a password that SAS will create for the SharedServices user ID. Click Next.
Note: Remember this password as you will need it in the future.
Step 4: Install and Configure SAS 83

70
SAS Environment Manager: Administration Database Configuration
n Enter and confirm a password that SAS will create for the adminowner user ID. Click Next.
Note: Remember this password as you will need it in the future.
n Do not change the default user ID information that is displayed on this page.
84 Chapter 1 / Deploying SAS Visual Analytics (Non-distributed LASR)

71
SAS Internal Account: SAS Environment Manager Service Account
n Enter and confirm a password that SAS will create for the SAS Environment Manager service account (sasevs@saspw). Click Next.
Note: Remember this password as you will need it in the future.
The password must contain at least six characters. Make sure that you supply the same password that was specified in any previous SAS Environment Manager configuration prompts.
Step 4: Install and Configure SAS 85

72
SAS Environment Manager: Configuration
n Do not change the default information that is displayed on this page. Click Next.
86 Chapter 1 / Deploying SAS Visual Analytics (Non-distributed LASR)

73
SAS Environment Manager: Database Configuration
n Enter and confirm a password and an encryption passphrase that the deployment wizard will use when creating credentials for the EVManager user ID. Click Next.
Note: Remember this password and passphrase as you will need them in the future.
The password must contain at least six characters.
The passphrase must be at least eight characters long and can contain letters and numbers only.
Step 4: Install and Configure SAS 87

74
SAS Environment Manager Agent Configuration
n Do not change the default information that is displayed on this page. Click Next.
88 Chapter 1 / Deploying SAS Visual Analytics (Non-distributed LASR)

75
SAS Environment Manager Enablement Kit Database Credentials
n Enter and confirm a password that SAS will create for the default SAS Environment Manager Enablement Kit user ID. Click Next. Do not change the user ID information that is displayed on this page.
Note: Remember this password as you will need it in the future.
Step 4: Install and Configure SAS 89

76
SAS Flex Application Themes
n Do not change the default information that is displayed on this page. Click Next.
90 Chapter 1 / Deploying SAS Visual Analytics (Non-distributed LASR)

77
SAS Visual Analytics High-Performance Configuration Information
n Do not change any of the default values displayed on this page. Click Next.
Step 4: Install and Configure SAS 91

78
SAS Visual Analytics Public Data Provider
n Do not change any of the default values displayed on this page. Click Next.
92 Chapter 1 / Deploying SAS Visual Analytics (Non-distributed LASR)

79
SAS Visual Analytics Public Data Library Information
n Do not change any of the default values displayed on this page. Click Next.
Step 4: Install and Configure SAS 93

80
SAS Visual Analytics AutoLoad Location
n Do not change any of the default values displayed on this page. Click Next.
94 Chapter 1 / Deploying SAS Visual Analytics (Non-distributed LASR)

81
SAS Visual Analytics: SAS LASR Analytic Server Library
n Do not change any of the default values displayed on this page. Click Next.
Step 4: Install and Configure SAS 95

82
SAS Visual Analytics: Public LASR Libraries
n Do not change any of the default values displayed on this page. Click Next.
96 Chapter 1 / Deploying SAS Visual Analytics (Non-distributed LASR)

83
SAS Visual Analytics Services Database Credentials
n Enter and confirm the password to be used for the vatadm account. Click Next. Do not change the user ID information that is displayed on this page.
Note: Remember this password as you will need it in the future.
Step 4: Install and Configure SAS 97

84
SAS Visual Analytics Transport Service: Whitelist Mobile Devices
n Do not change any of the default values displayed on this page. Click Next.
98 Chapter 1 / Deploying SAS Visual Analytics (Non-distributed LASR)

85
SAS Deployment Backup and Recovery Tool: Enable Central Vault
n Do not change the default information that is displayed on this page. Click Next.
TIP If you are deploying a SAS solution, you should refer to your solution-specific documentation to complete your deployment.
Step 4: Install and Configure SAS 99

86
Deployment Summary
n Make one of the following choices:
o Click Start to begin installing SAS files and writing the configuration to the current machine.
The deployment wizard launches the installation and configuration process and provides an on-going status update.
o Click Back to navigate to earlier wizard pages to change installation and configuration information previously entered.
o Click Cancel to terminate the wizard session. Note that you will lose installation and configuration information previously entered.
CAUTION! If you encounter a situation in which the deployment wizard reports a configuration failure, leave the error message displayed and do not continue. Consult additional documentation and, if necessary, contact SAS Technical Support. Moving past an error most often results in having to delete your deployment and start over.
100 Chapter 1 / Deploying SAS Visual Analytics (Non-distributed LASR)

On Windows, the deployment wizard checks to make sure that your machine contains the minimum system requirements necessary to run SAS 9.4. Sometimes it is necessary to reboot your machine after the wizard has installed certain system components. When this occurs, the wizard prompts you to log back on to the machine and continues to the next configuration step in your SAS deployment process.
Step 4: Install and Configure SAS 101

87
Insufficient Permissions (Linux only)
n Keeping this dialog box displayed, run the setuid.sh script as root, and then click Retry.
n You will not see this dialog box if you chose earlier to run setuid.sh as sudo using your password. For more information, see Step 32 on page 46.
102 Chapter 1 / Deploying SAS Visual Analytics (Non-distributed LASR)

88
Deployment Complete
n Green check marks next to every item on this page indicate that your deployment completed successfully. Click Next.
n If your deployment was successful, then you are ready to perform the post-deployment steps that are documented in “Step 5: Perform Post-Deployment Steps” on page 105.
n If you received errors during your deployment, then contact SAS Technical Support at mailto:[email protected]. Attach to your e-mail the files listed in Appendix 3, “Review SAS Deployment Tool Documents, Reports, and Logs,” in SAS Intelligence Platform: Installation and Configuration Guide.
Step 4: Install and Configure SAS 103

89
Additional Resources
n Click Finish to close the SAS Deployment Wizard.
104 Chapter 1 / Deploying SAS Visual Analytics (Non-distributed LASR)

90
Configuration Guidelines and Details
n To complete your SAS deployment, review Configuration Guidelines and Details and perform the steps listed.
Configuration Guidelines and Details (Instructions.html) is automatically generated by the deployment wizard and has post-installation steps specific to your SAS order that you must perform.
Step 5: Perform Post-Deployment Steps
After your deployment has completed, there are some post-deployment steps specific for your SAS order that are documented in your Instructions.html file. Located in SAS-configuration-directory\Documents, Instructions.html provides the steps for checking that your SAS servers are running and that your web applications were properly deployed.
Step 5: Perform Post-Deployment Steps 105

Figure 1.4 Configuration Guidelines and Details (Instructions.html)
If you have not already done so, use Instructions.html and perform all the post-deployment steps that it contains.
Remember to restart any anti-virus, anti-malware, anti-spyware, and firewall software that you disabled to deploy SAS.
Proceed to “Step 6: Add SAS Users”
Step 6: Add SAS Users
Now that you have deployed SAS and successfully validated that your software is working properly, it is time to add your SAS users to the SAS system. Adding host or domain accounts for SAS users to the SAS metadata gives each user a SAS metadata identity. This enables SAS users to use the software and access SAS metadata objects.
106 Chapter 1 / Deploying SAS Visual Analytics (Non-distributed LASR)

For more information, see SAS Management Console: Guide to Users and Permissions, available at http://support.sas.com/documentation/cdl/en/mcsecug/64770/PDF/default/mcsecug.pdf.
Perform the following steps to add SAS users to SAS metadata:
1 Grant the host or domain accounts for each user the required Log on as a batch job right. You can do this by adding the user accounts to the SAS Server Users group that was created in the section “Set Up an Operating System Group” on page 13.
2 Create a metadata identity for each user. Follow these steps using SAS Management Console:
a
From the Windows Start menu, select All Programs SAS SAS Management Console.
Step 6: Add SAS Users 107

b
In the Log On dialog box, enter the credentials for the SAS Unrestricted User (sasadm@saspw) and the password specified when you deployed SAS.
108 Chapter 1 / Deploying SAS Visual Analytics (Non-distributed LASR)

c
Select User Manager.
d Select Actions New User.
Step 6: Add SAS Users 109

e
In the Name text box, enter the name of the user.
f Click the Accounts tab, and then click New.
110 Chapter 1 / Deploying SAS Visual Analytics (Non-distributed LASR)

g
Enter the fully qualified user ID (for example, domain\user-ID or machine\user-ID). Leave the Password field blank and keep the default value DefaultAuth for the Authentication Domain field.
h Click OK.
i Then, click OK again.
Proceed to “Step 7: Validate Your SAS Visual Analytics Deployment”.
Step 6: Add SAS Users 111

Step 7: Validate Your SAS Visual Analytics Deployment
Below is a list of suggestions that you can use to validate your non-distributed SAS Visual Analytics deployment. The SAS Visual Analytics documentation referenced is available at http://support.sas.com/documentation/onlinedoc/va/index.html.
Table 1.3 Validation Suggestions for SAS Visual Analytics
Purpose ActionsMore Information
Create an account for use later in the validation.
1 Use the SAS LASR Analytic Server installer account (sas), or create a new administrator account such as saslasradm.
2 Assign the Windows user right Log on as a batch job to the account.
See your operating system documentation.
Create a SAS identity for use later in the validation.*
In SAS Management Console:
1 Define a SAS Visual Analytics Administrator (use the account created previously (saslasradm)).
2 Assign the administrator to the Visual Analytics Data Administrators and Visual Data Builder Administrators groups.
SAS Management Console: Guide to Users and Permissions
Create sample data for use later in the validation.
In SAS Management Console, define a library and register a table.(You can use Sashelp: !SASROOT/sashelp.)
SAS Intelligence Platform: Data Administration Guide
Validate that the home page is running and valid logins are accepted.
Log on to the home page as saslasradm.(http://VA-host.example.com/SASVisualAnalyticsHub)
SAS Visual Analytics: User's Guide
112 Chapter 1 / Deploying SAS Visual Analytics (Non-distributed LASR)

Purpose ActionsMore Information
Demonstrate that SAS Visual Analytics Administrator is functional and able to communicate with the SAS LASR Analytic Server.
On the home page, click Administrator. Then, do the following:
1 Start a SAS LASR Analytic Server.
2 Add a SAS table directly to SAS LASR Analytic Server.
SAS Visual Analytics: Administration Guide
Demonstrate that SAS Visual Data Builder is functional.*
On the home page, click Create Data Query. Then, do the following:
1 Create a data query.
2 Click Home in the banner to return to the home page.
SAS Visual Analytics: User's Guide
Demonstrate that SAS Visual Analytics Explorer is functional.**
On the home page, click Create Exploration. Then, do the following:
1 Create an exploration.
2 Click Home in the banner to return to the home page.
SAS Visual Analytics: User's Guide
Demonstrate that SAS Visual Analytics Viewer is functional.
On the home page, click Create Report. Then, do the following:
1 Create a report.
2 Click Home in the banner to return to the home page.
SAS Visual Analytics: User's Guide
Demonstrate that SAS Visual Analytics Designer is functional.
On the home page, click on a report.Use the object inspector on the home page to view details about the report, and then click View.
SAS Visual Analytics: User's Guide
Step 7: Validate Your SAS Visual Analytics Deployment 113

Purpose ActionsMore Information
Demonstrate that SAS Mobile BI is operable.
Deploy SAS Mobile BI.View a SAS Visual Analytics report on a mobile device.
SAS Visual Analytics: User's Guide
* SAS Visual Data Builder requires that an identity be a member of the Visual Data Builder Administrators group. Members of the Visual Analytics Data Administrators group do not have access to SAS Visual Data Builder.
** Some SAS orders do not contain the SAS Visual Analytics Explorer.
Now that you have verified your deployment, you are ready to begin using SAS Visual Analytics.
For information about how to use SAS Visual Analytics, see SAS Visual Analytics: User's Guide, available at http://support.sas.com/documentation/cdl/en/vaug/67500/PDF/default/vaug.pdf.
114 Chapter 1 / Deploying SAS Visual Analytics (Non-distributed LASR)