Install OpFlex Plugin on Ubuntu with...
8
Install OpFlex Plugin on Ubuntu with Juju This chapter contains the following sections: • Prerequisites, on page 1 • Server Preparation, on page 2 • Site-Preparation, on page 2 • Installation, on page 3 • Example of the Configuration juju-aci-ocata.yaml File, on page 5 • Adding an OpenStack External Network, on page 7 Prerequisites This section describes the prerequisites for installing opflex plugin on Ubuntu with Juju. • Working knowledge of Ubuntu Linux • Experience in deployment of OpenStack using MAAS and Juju • Some experience in APIC UI maybe required • Working ACI Fabric • MAAS setup on Ubuntu Xenial with Juju2 • Minimum of 4 servers with at least one fabric interface Install OpFlex Plugin on Ubuntu with Juju 1
Transcript of Install OpFlex Plugin on Ubuntu with...

Install OpFlex Plugin on Ubuntu with Juju
This chapter contains the following sections:
• Prerequisites, on page 1• Server Preparation, on page 2• Site-Preparation, on page 2• Installation, on page 3• Example of the Configuration juju-aci-ocata.yaml File, on page 5• Adding an OpenStack External Network, on page 7
PrerequisitesThis section describes the prerequisites for installing opflex plugin on Ubuntu with Juju.
• Working knowledge of Ubuntu Linux
• Experience in deployment of OpenStack using MAAS and Juju
• Some experience in APIC UI maybe required
• Working ACI Fabric
• MAAS setup on Ubuntu Xenial with Juju2
• Minimum of 4 servers with at least one fabric interface
Install OpFlex Plugin on Ubuntu with Juju1

Figure 1: Typical Network Topology
Server PreparationThis section describes the server preparation.
• The OpenStack nodes need to be connected to the leaf switches either in direct mode or VPC/bondedmode.
• The MTU of the interfaces should be greater than 1600.
• The bonding should be setup using 802.3ad
Site-PreparationThis section describes how to prepare the site by downloading opflex released archive file from the softwaredownload link and setting up an apt repository on the repo server. Charms support both signed and un-signedrepositories.
Step 1 Take note of the following:
• APIC IP addresses
• APIC credentials
• AAEP created for deployment
Install OpFlex Plugin on Ubuntu with Juju2
Install OpFlex Plugin on Ubuntu with JujuServer Preparation

For example, my-aep in the Example of the Configuration juju-aci-ocata.yaml File, on page 5.
• Infra VLAN ID
• opflex_peer_ip and opflex_remote_ip parameters
The opflex_remote_ip address matches the anycast ip address assigned to interface Loopback 1023 on theleaf switches. The opflex_peer_ip address for the OpFlex peer is the anycast IP address assigned to the SVIof the infra VLAN on the leaf switches.
• An ID string to identify this OpenStack instance (APIC_SYSTEM_ID)
• Server interface name that is connected to fabric.
For example, 'eth2' or 'bond0'.
Step 2 Install, configure MAAS and Juju.
For more information, see the Ubuntu documentation.
Step 3 Download theDebian packages for Openstack <Release_Name>ACI plugins gzip file matching your OpenStack, ACIrelease and create a Debian/Ubuntu repo.a) Go to the Software Download link:
https://software.cisco.com/download/home/285968390/type
b) Click APIC OpenStack and Container Plugins.c) Choose the Debian packages for Openstack <Release_Name> ACI plugins gzip file matching your OpenStack, ACI
release and click the download icon.
Step 4 Untar and extract the files.Step 5 Take note of the repo URL. The "deb http://1.11.1.1/ubuntu ocata32 main" repo URL is used as an
example in the Example of the Configuration juju-aci-ocata.yaml File, on page 5.
Requirements for the config juju-aci-ocata.yaml file:
• Nodes are connected to leaf in a vPC/Linux bonding configuration. The bonded device name is "bond0". If it is asingle interface, replace it with the interface name. For example, "eth1", "ens9".
• APIC is configuredwith a default VLAN3901 (infra VLAN). Replace this number with whatever VLAN is configuredon APIC.
• The AAEP created for deployment is my-aep.
• The URL for the created package repo is "deb http://1.11.1.1/ubuntu ocata32 main".
• APIC_SYSTEM_ID is "juju2-ostack".
InstallationThis section describes how to install the opflex plugin on Ubuntu with Juju charm by downloading from thesoftware download link, untar and extract the files on the Juju server under a directory.
Install OpFlex Plugin on Ubuntu with Juju3
Install OpFlex Plugin on Ubuntu with JujuInstallation
Step 1 Download the Juju charms for ACI plugins for Openstack <Release_Name> gzip file matching your OpenStack andACI release.a) Go to the Software Download link:
https://software.cisco.com/download/home/285968390/type
b) Click APIC OpenStack and Container Plugins.c) Choose the Juju charms for ACI plugins for Openstack <Release_Name> matching your OpenStack, ACI release
and click the download icon.
Step 2 Untar and extract the files into a directory on the Juju server. For example, /home/ubuntu/charms/xenial.
To support Openstack deployment on ACI fabric using Juju, the following charms from upstream had to bemodified:
• charm-neutron-gateway
• charm-neutron-api
In addition, the following new charms were developed:
• charm-neutron-api-plugin-aci (runs as sub-ordinate to neutron-api)
• charm-neutron-aci-opflex (runs as sub-ordinate to nova-compute and charm-neutron-gateway)
• charm-openstack-dashboard-plugin-gbp (runs as sub-ordinate to openstack-dashboard)
Additionally, when using the ACI plugin the security groups are implemented in vswitch. For the bestperformance, nova should be configured with NoopFirewallDriver as below. Currently, Ubuntu Juju charmdoes not allow that to be configured and adds an extra bridge as it uses the OVSHybridFirewallDriver and hassome performance impact. You can ignore the extra bridge as it does not create or correct any issues.
Note
Step 3 Create a configuration juju-aci-ocata.yaml file and place it in a directory. For example, /home/ubuntu.
For more information, see Example of the Configuration juju-aci-ocata.yaml File
Step 4 Deploy the charms and add relations. Below is a sample script for deployment of the ACI charms:juju bootstrap maas maas-controller --config=config.yamljuju add-machine -n 4
CONFIG=/home/ubuntu/juju-aci-ocata.yaml
juju deploy --config=$CONFIG cs:trusty/mysql --to lxd:1juju config mysql max-connections=1300juju deploy --config=$CONFIG rabbitmq-server --to lxd:1
sleep 120
juju deploy --config=$CONFIG keystone --to lxd:1juju add-relation keystone:shared-db mysql:shared-db
juju deploy --config=$CONFIG glance --to lxd:1juju add-relation glance:identity-service keystone:identity-servicejuju add-relation glance:shared-db mysql:shared-db
juju deploy /home/noiro/charms/xenial/charm-neutron-api --series xenial--config=$CONFIG neutron-api --to 1
Install OpFlex Plugin on Ubuntu with Juju4
Install OpFlex Plugin on Ubuntu with JujuInstallation

juju add-relation neutron-api:amqp rabbitmq-server:amqpjuju add-relation neutron-api:identity-service keystone:identity-servicejuju add-relation neutron-api:shared-db mysql:shared-db
juju deploy /home/noiro/charms/xenial/charm-neutron-api-plugin-aci --series xenial--config=$CONFIG neutron-api-plugin-acijuju add-relation neutron-api-plugin-aci neutron-apijuju add-relation neutron-api-plugin-aci:amqp rabbitmq-server:amqpjuju add-relation neutron-api-plugin-aci:shared-db mysql:shared-db
juju deploy /home/noiro/charms/xenial/charm-neutron-gateway --series xenial--config=$CONFIG neutron-gateway --to 3juju add-relation neutron-gateway:amqp rabbitmq-server:amqpjuju add-relation neutron-gateway:neutron-plugin-api neutron-api:neutron-plugin-api
juju deploy --config=$CONFIG nova-cloud-controller --to lxd:1juju add-relation nova-cloud-controller:amqp rabbitmq-server:amqpjuju add-relation nova-cloud-controller:identity-service keystone:identity-servicejuju add-relation nova-cloud-controller:image-service glance:image-servicejuju add-relation nova-cloud-controller:neutron-api neutron-api:neutron-apijuju add-relation nova-cloud-controller:shared-db mysql:shared-dbjuju add-relation nova-cloud-controller:quantum-network-serviceneutron-gateway:quantum-network-service
juju deploy --config=$CONFIG nova-compute --to 2juju add-relation nova-compute:amqp rabbitmq-server:amqpjuju add-relation nova-compute:cloud-compute nova-cloud-controller:cloud-computejuju add-relation nova-compute:image-service glance:image-servicejuju add-relation nova-compute:shared-db mysql:shared-db
juju deploy /home/noiro/charms/xenial/charm-neutron-aci-opflex --config=$CONFIG neutron-aci-opflexjuju add-relation neutron-aci-opflex:neutron-plugin-api neutron-api:neutron-plugin-apijuju add-relation neutron-aci-opflex:neutron-plugin nova-compute:neutron-pluginjuju add-relation neutron-aci-opflex:amqp rabbitmq-server:amqpjuju add-relation neutron-aci-opflex:quantum-network-service neutron-gateway:quantum-network-service
juju deploy --config=$CONFIG openstack-dashboard --to 0juju add-relation openstack-dashboard:identity-service keystone:identity-service
juju deploy /home/noiro/charms/xenial/charm-openstack-dashboard-plugin-gbp --series xenial--config=$CONFIG openstack-dashboard-plugin-gbp
juju add-relation openstack-dashboard-plugin-gbp openstack-dashboard
Example of the Configuration juju-aci-ocata.yaml FileThis is an example of the configuration juju-aci-ocata.yaml file.mysql:max-connections: 1300
keystone:openstack-origin: 'cloud:xenial-ocata'admin-password: 'noir0123'log-level: 'DEBUG'verbose: truedebug: true
nova-cloud-controller:openstack-origin: 'cloud:xenial-ocata'
Install OpFlex Plugin on Ubuntu with Juju5
Install OpFlex Plugin on Ubuntu with JujuExample of the Configuration juju-aci-ocata.yaml File

network-manager: Neutronconsole-access-protocol: novnc
neutron-gateway:plugin: aciopenstack-origin: 'cloud:xenial-ocata'data-port: 'br-data:bond0'vlan-ranges: physnet1:250:300enable-isolated-metadata: trueenable-metadata-network: trueaci-repo: 'deb http://1.11.1.1/ubuntu ocata32 main'aci-apic-system-id: juju2-ostackaci-encap: vxlanaci-uplink-interface: bond0aci-infra-vlan: 3901
neutron-api:openstack-origin: 'cloud:xenial-ocata'neutron-plugin: acineutron-security-groups: true#vlan-ranges: physnet1:250:300
neutron-aci-opflex:aci-repo: 'deb http://1.11.1.1/ubuntu ocata32 main'aci-apic-system-id: juju2-ostackaci-encap: vxlanaci-uplink-interface: bond0aci-infra-vlan: 3901
rabbitmq-server:## Cinder is deployed in two parts: one for the API and scheduler## (which can live in a container), one for the volume service (which## cannot, at least not for the LVM/iSCSI backend)cinder-api:openstack-origin: 'cloud:xenial-ocata'enabled-services: api,scheduler
cinder-volume:openstack-origin: 'cloud:xenial-ocata'enabled-services: volume# Adjust this to match the block device on your volume hostblock-device: vdb
glance:openstack-origin: 'cloud:xenial-ocata'
heat:openstack-origin: 'cloud:xenial-ocata'
mysql:openstack-dashboard:openstack-origin: 'cloud:xenial-ocata'webroot: /vip_iface: bond0
nova-compute:openstack-origin: 'cloud:xenial-ocata'virt-type: kvm
#### ACI##neutron-api-plugin-aci:aci-repo: 'deb http://1.11.1.1/ubuntu ocata32 main'aci-apic-hosts: 10.3.12.1aci-apic-username: adminaci-apic-password: k%jiou^aci-apic-entity-profile: my-aepaci-apic-system-id: juju2-ostackaci-encap: vxlanaci-vlan-ranges: 250:300aci-connection-json: '{"101": ["srv1:vpc-1-25/101-102-1-25", "srv2:vpc-1-26/101-102-1-26",
"srv3:vpc-1-27/101-102-1-27", "srv4:vpc-1-28/101-102-1-28", "srv5:vpc-1-29/101-102-1-29"],
Install OpFlex Plugin on Ubuntu with Juju6
Install OpFlex Plugin on Ubuntu with JujuExample of the Configuration juju-aci-ocata.yaml File
"102": ["srv1:vpc-1-25/101-102-1-25", "srv2:vpc-1-26/101-102-1-26","srv3:vpc-1-27/101-102-1-27","srv4:vpc-1-28/101-102-1-28", "srv5:vpc-1-29/101-102-1-29"]}'aci-vpc-pairs: '101:102'
#openstack-dashboard-plugin-gbp:aci-repo: 'deb http://1.11.1.1/ubuntu ocata32 main'
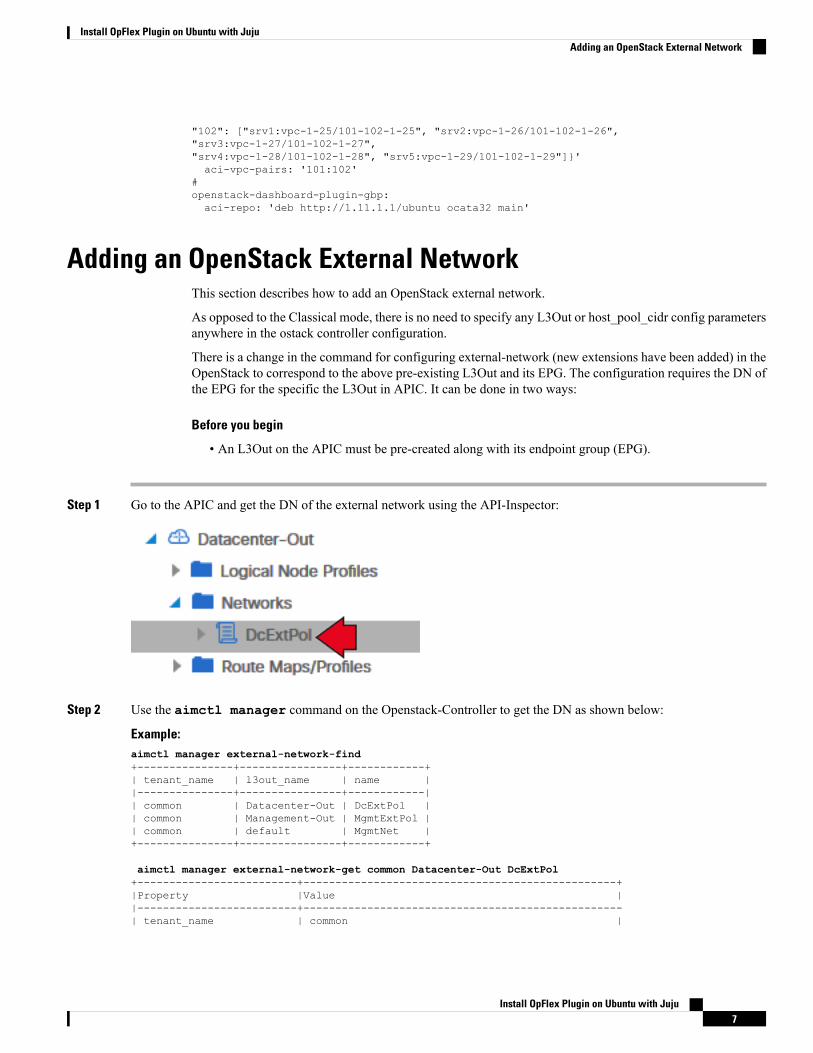
Adding an OpenStack External NetworkThis section describes how to add an OpenStack external network.
As opposed to the Classical mode, there is no need to specify any L3Out or host_pool_cidr config parametersanywhere in the ostack controller configuration.
There is a change in the command for configuring external-network (new extensions have been added) in theOpenStack to correspond to the above pre-existing L3Out and its EPG. The configuration requires the DN ofthe EPG for the specific the L3Out in APIC. It can be done in two ways:
Before you begin
• An L3Out on the APIC must be pre-created along with its endpoint group (EPG).
Step 1 Go to the APIC and get the DN of the external network using the API-Inspector:
Step 2 Use the aimctl manager command on the Openstack-Controller to get the DN as shown below:
Example:aimctl manager external-network-find+---------------+----------------+------------+| tenant_name | l3out_name | name ||---------------+----------------+------------|| common | Datacenter-Out | DcExtPol || common | Management-Out | MgmtExtPol || common | default | MgmtNet |+---------------+----------------+------------+
aimctl manager external-network-get common Datacenter-Out DcExtPol+-------------------------+-------------------------------------------------+|Property |Value ||-------------------------+--------------------------------------------------| tenant_name | common |
Install OpFlex Plugin on Ubuntu with Juju7
Install OpFlex Plugin on Ubuntu with JujuAdding an OpenStack External Network

| l3out_name | Datacenter-Out || name | DcExtPol || display_name | || nat_epg_dn | || provided_contract_names | [] || consumed_contract_names | [] || monitored | True || dn | uni/tn-common/out-Datacenter-Out/instP-DcExtPol |+---------------------------------------------------------------------------+
See the example for L3Out: Datacenter-Out.Note
Now the DN from above can be used to create the external network.
For Distributed NAT:
Example:neutron net-create Datacenter-Out --router:external True --shared --apic:distinguished_names \type=dict ExternalNetwork=uni/tn-common/out-Datacenter-Out/instP-DcExtPol
For No NAT:
Example:neutron net-create Datacenter-Out --router:external True --shared --apic:distinguished_names \type=dict ExternalNetwork=uni/tn-common/out-Datacenter-Out/instP-DcExtPol --apic:nat_type ""
For Floating IPs, add a subnet to external network with the desired floating IP pool cidr.
For SNAT, add a subnet to the external network as below:
Example:neutron subnet-create Datacenter-Out 10.104.21.0/24 --name ext-subnet --disable-dhcp --gateway \10.104.21.1 --apic:snat_host_pool True
For GBP external connectivity, first create the external segment using the SNAT subnet:
Example:gbp external-segment-create Datacenter-Out --subnet-id <SNAT Subnet>
Now this segment can be used as usual to create the network service policy.
Example:gbp nat-pool-create nat-pool-0 --ip-pool 10.104.31.0/24 \--external-segment Datacenter-Out gbp network-service-policy-create --network-service-params \type=ip_pool,name=nat-pool-0,value=nat_pool net-svc-nat-0
Install OpFlex Plugin on Ubuntu with Juju8
Install OpFlex Plugin on Ubuntu with JujuAdding an OpenStack External Network