Install Guide - UNIX Oracle CSE Guide - UNIX Oracle CSE.pdf · GuardIEn Install Guide - UNIX Oracle...
16
© Information Engineering Technology Ltd 2020 www.iet.uk Information Engineering Technology Install Guide - UNIX Oracle CSE Release 8.7.3
Transcript of Install Guide - UNIX Oracle CSE Guide - UNIX Oracle CSE.pdf · GuardIEn Install Guide - UNIX Oracle...
© Information Engineering Technology Ltd 2020 www.iet.uk
Information Engineering Technology
Install Guide - UNIX Oracle CSE
Release 8.7.3
GuardIEn Install Guide - UNIX Oracle CSE Page 2
Table Of Contents Introduction ............................................................................................................................................................................... 3
Architecture .................................................................................................................................................................................... 3 Communications ............................................................................................................................................................................. 3
About The Installation Guides .................................................................................................................................................... 4
Software for Download .............................................................................................................................................................. 4
Server Install – UNIX / Oracle CSE ............................................................................................................................................... 5 Pre-Requisites ................................................................................................................................................................................. 5 Who Should Perform this Installation? ........................................................................................................................................... 5 Upgrading an earlier 8.6.* installation ............................................................................................................................................ 5 Upgrading from a Previous GuardIEn Release ................................................................................................................................ 5 Download Files ................................................................................................................................................................................ 6 Transfer Files to Server ................................................................................................................................................................... 6 Database Architecture .................................................................................................................................................................... 6 Preparing for Set-Up ....................................................................................................................................................................... 7 Install Software ............................................................................................................................................................................. 10 Install Database ............................................................................................................................................................................. 12
Verify Install is OK .................................................................................................................................................................... 13 Start / Stop the GuardIEn TE ......................................................................................................................................................... 13 Test Connection to GuardIEn TE ................................................................................................................................................... 13
Initial Customisation ................................................................................................................................................................ 14 Entering your Activation Code ...................................................................................................................................................... 14 Define Users .................................................................................................................................................................................. 14 Define PAD Listing System Parameters ......................................................................................................................................... 15 Create Queues .............................................................................................................................................................................. 15 Housekeeping ............................................................................................................................................................................... 15 GuardIEn Exits ............................................................................................................................................................................... 15 Customer Scripts ........................................................................................................................................................................... 16 Other considerations .................................................................................................................................................................... 16
GuardIEn Install Guide - UNIX Oracle CSE Page 3
Introduction
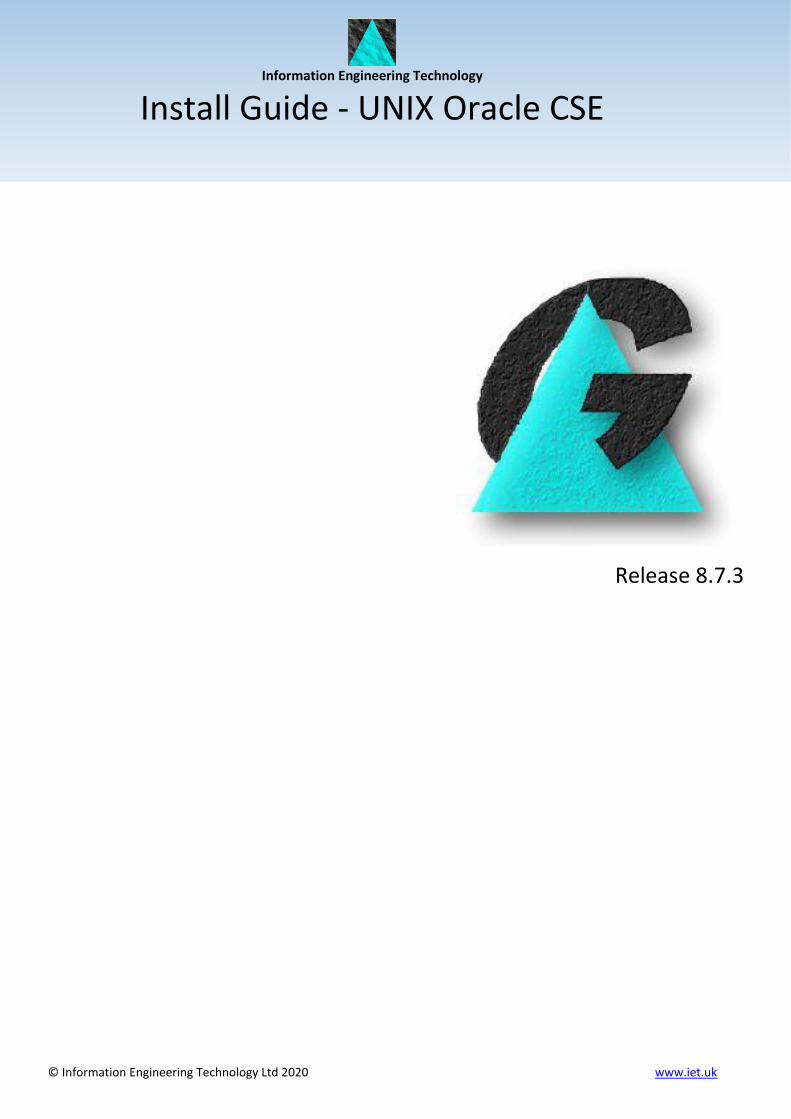
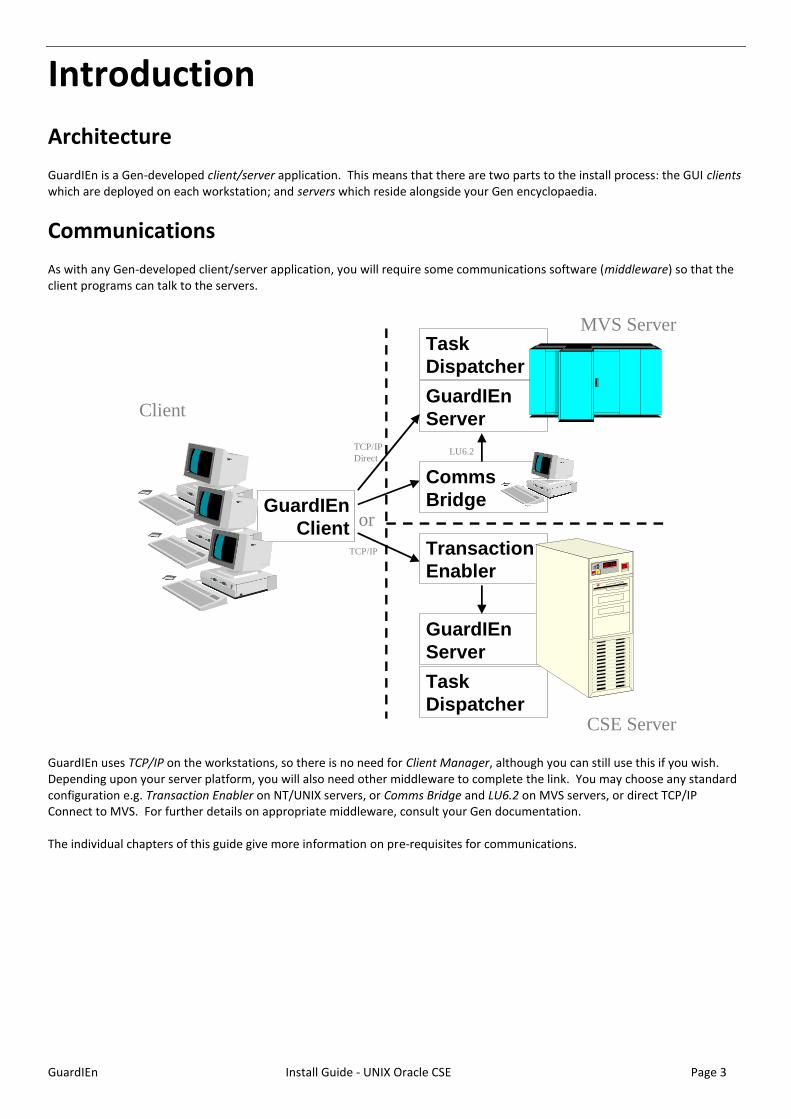
Architecture GuardIEn is a Gen-developed client/server application. This means that there are two parts to the install process: the GUI clients which are deployed on each workstation; and servers which reside alongside your Gen encyclopaedia.
Communications As with any Gen-developed client/server application, you will require some communications software (middleware) so that the client programs can talk to the servers.
GuardIEn
ClientTransaction
Enabler
Comms
Bridge
GuardIEn
Server
GuardIEn
Server
Task
Dispatcher
MVS Server
CSE Server
Client
or
TCP/IP
LU6.2TCP/IP
Direct
Task
Dispatcher
GuardIEn uses TCP/IP on the workstations, so there is no need for Client Manager, although you can still use this if you wish. Depending upon your server platform, you will also need other middleware to complete the link. You may choose any standard configuration e.g. Transaction Enabler on NT/UNIX servers, or Comms Bridge and LU6.2 on MVS servers, or direct TCP/IP Connect to MVS. For further details on appropriate middleware, consult your Gen documentation. The individual chapters of this guide give more information on pre-requisites for communications.
GuardIEn Install Guide - UNIX Oracle CSE Page 4
About The Installation Guides There are a number of documents to help you with the install process. Below is a quick summary of what they are and which ones you will need to use:
• Install Guide – Client.doc: You always need to perform Client Installs for each workstation where you wish to use GuardIEn, regardless of server platform.
• Install Guide - <Platform/Ency>.doc: You will also need to perform a Server Install. Choose the appropriate one depending on your encyclopaedia platform. GuardIEn servers are always installed on the same server as your encyclopaedia. If you eventually intend to use GuardIEn with multiple encyclopaedias then you should choose the server most capable of handling the workload for the first, or main, install. There are different versions of this install guide for each server platform. THIS DOCUMENT relates to UNIX Oracle. If your server is a different platform, please locate the appropriate version of this guide now.
• Verification: The server install guides also include chapters on how to verify that the installation is ok and perform essential initial customisation. You MUST work through these sections after you have performed the client and server installs.
There are also further documents available that may be relevant to you. These increase the flexibility and automation possible using GuardIEn:
• Multiple Encyclopaedias.doc: If you have multiple encyclopaedias (CSE only), this document shows you how to configure GuardIEn to access and manage them.
• Remote Builds.doc: If you intend to perform construction (generation/installation) using GuardIEn, and your application’s target platform is not the same as your encyclopaedia platform, then you can use this guide to see how you can complete the configuration to allow fully automated remote builds. The guide is available with the GuardIEn Remote Installation software that can be downloaded from the IET web site.
• Technical Papers: There are also various papers on technical issues which you may wish to tackle with your GuardIEn install. These documents are included in the online help installed with the GuardIEn client.
Software for Download All IET software is available for download from our web site at www.iet.uk. Software is secured on the web site, so you will need to contact IET for a Userid/Password. If you have no access to the Internet you should contact IET who will be able to supply the software by another means. Download the relevant files for your platforms (client + one server) into a temporary directory on a workstation. The individual install chapters in this guide detail the files you will need and what you should do with them.
GuardIEn Install Guide - UNIX Oracle CSE Page 5
Server Install – UNIX / Oracle CSE You should follow this chapter if you have an Oracle CSE residing on a UNIX server (HP-UX and AIX are supported).
Pre-Requisites
• UNIX (AIX 7.1 TL1 or better, or HP-UX 11i v3 Itanium on request. HP-UX PA-RISC is NOT supported)
• UNIX account for the GuardIEn software
• Oracle database server 12c or 11g
• Oracle 12c SQL*Net client
• For AIX only, XL C/C++ Enterprise Edition for AIX v 12 runtime libraries are required
• C Compilers required for changing GuardIEn exits (HP: ANSI C and C++ Compilers, AIX: XL C/C++ Enterprise Edition for AIX v12)
• For AIX, ICU Unicode libraries release 5.5.1; HP-UX requirements to be confirmed
• Gen 8.5 or higher CSE
• Gen 8.5 or higher Transaction Enabler (AEFAD/AEFUF)
• 500Mb temporary free disk space on a workstation to unzip the installation files
• 150Mb disk space on the server for the GuardIEn database
• 500Mb disk space on the server for the GuardIEn software
• An additional 450Mb free space for the temporary .tar file. This will be freed once the files have been extracted from the tar file.
• An Oracle instance to store GuardIEn data (normally DBIEFD for default CSE installations)
• Ensure that the initDBIEFD.ora (or similar) database initialisation file has a value of at least 300 for the parameter process. This is required so that GuardIEn does not run out of process threads during server execution.
• Also in the initDBIEFD.ora file you must ensure that you set the open_cursors parameter to at least 350. This parameter is not normally in the .ora file by default so you may need to add it as a new line at the end of the file.
• If you are upgrading a Multi-CSE installation you should contact IET or your distributor first to plan how this should be done.
Who Should Perform this Installation? A person who is with familiar with installing Gen-developed applications and is also familiar with basic management of Oracle should perform this installation. They should also have a good working knowledge of UNIX.
Upgrading an earlier 8.6.* installation If you are upgrading to a later service pack from an earlier release of GuardIEn 8.6, then you should transfer the gdinst85 and gdn86.tar files as normal and execute gdinst86. This will detect that this is an update to an existing 8.6 installation and refresh the executables. Note that you should have stopped the TE & TD before commencing the upgrade. Once the files have been extracted, the install program will compare the exits against newer versions supplied by IET and prompt you to copy the exits. If you have implemented any customisations to the exits, do not copy them. Instead you should perform manual difference analysis on the exits. Once this is complete, you must re-build the user exits.
Upgrading from a Previous GuardIEn Release This guide also details how you can upgrade an existing installation of GuardIEn from a previous release to Release 8.6. The installation process is very similar to a new install – any differences are noted in the instructions. It is strongly recommended that you backup your existing GuardIEn installation (in particular any customised scripts you have made / changed) until you have completed this installation, and / or install the new software to a different directory. If you are upgrading an existing installation and are not yet at GuardIEn Release8.6, you must upgrade the database to Release 8.6 before upgrading the database to Release 8.7. Details of how to this are found in the Database Installation section below.
GuardIEn Install Guide - UNIX Oracle CSE Page 6
Download Files The following files should be downloaded from the web site into a temporary directory on your workstation e.g. c:\temp\gdninst\svr87\:
File Name Unix variant
gduoi87*.exe HP-UX Integrity/Itanium (on request)
gduoa87*.exe AIX
• Execute the downloaded file. This is a self-extracting program that will extract the following files:
File Name Contents Transfer
gdinst87 Script file to start installation ASCII
gdn87.tar Archive file BINARY
Transfer Files to Server
• Create a GuardIEn root directory on the server, for example /software/gdn
• Transfer the above files (gdinst87 and gdn87.tar) to the GuardIEn root directory. Note that the ‘Transfer’ column indicates whether the file should be transferred as an ASCII or BINARY file. It is vital that you transfer the files correctly.
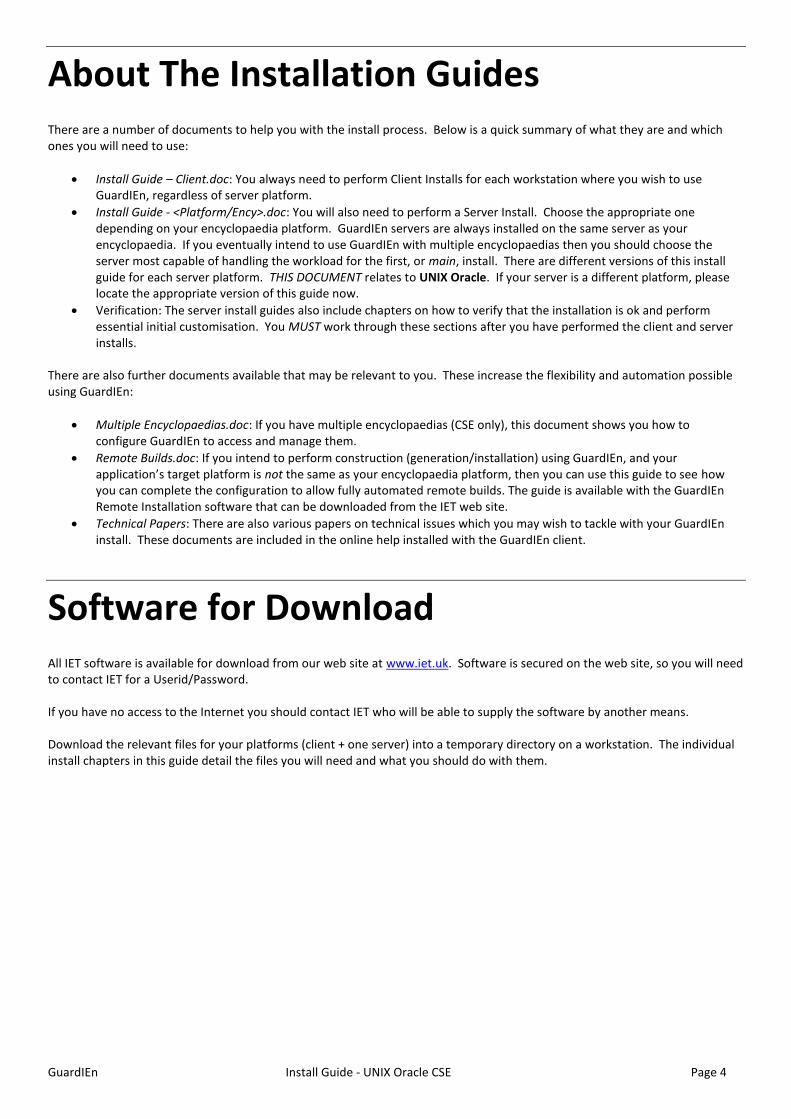
Database Architecture The GuardIEn Servers and Queue Daemon connect to the database using a userid that owns the GuardIEn tables. This could be the same userid that owns the encyclopaedia tables, but it is recommended that you create a separate userid for GuardIEn and then point to the encyclopaedia tables using synonyms. The set-up program does this by default.
In the figure above, the separate userids are shown as grey boxes with the relevant tables and synonyms shown within the boxes.
GuardIEn Install Guide - UNIX Oracle CSE Page 7
Preparing for Set-Up
Enable UNIX User Account
The GuardIEn servers will need to be executed using a user account that has the following access:
1) Read / Write access to the GuardIEn software directories 2) Read / Write access to the GuardIEn HOME directory 3) Read / Execute access to the Gen software 4) Read / Execute access to the Oracle runtime software
It is recommended that a separate user account be created for the GuardIEn software.
Start Set-Up
• Logon to the UNIX server using Telnet. It is recommended that you install the software using the UNIX user account that will be used to run the GuardIEn servers.
• Change to the GuardIEn root directory, i.e. cd /software/gdn
• Make the gdinst86 script executable, i.e. chmod +x gdinst87
• Execute the gdinst86 script, i.e. ./gdinst87 The first time you execute gdinst87, it will extract the remaining installation files from the tape archive (tar) file, so this will take some time. Review the messages output by tar to verify that the tape extract completed successfully. Once the files have been extracted, you should see this menu:
---------------------------------------------------------------- GuardIEn Setup Main Menu - UNIX Oracle Servers 1 - Configure Environment and Prepare Scripts 2 - Install Release R8.7 Software 3 - Install/Upgrade Database to Release R8.7 B - Browse output file X - Exit ---------------------------------------------------------------- Enter Option:
Prepare Scripts
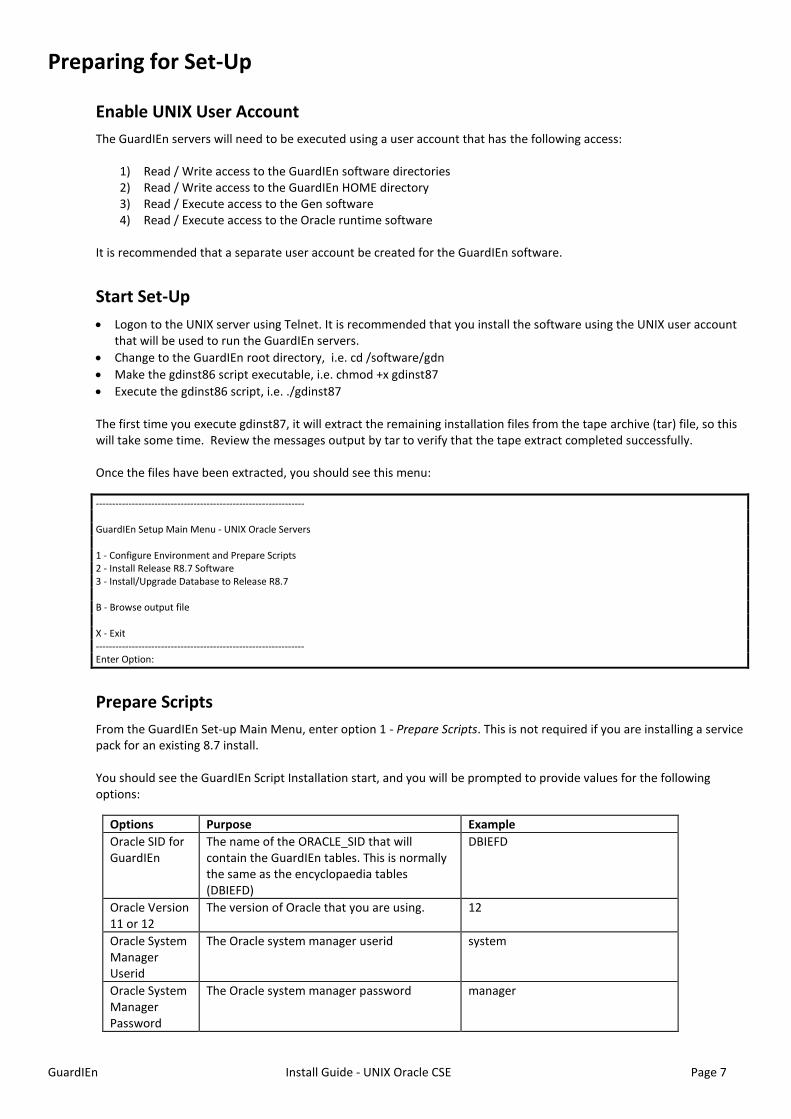
From the GuardIEn Set-up Main Menu, enter option 1 - Prepare Scripts. This is not required if you are installing a service pack for an existing 8.7 install. You should see the GuardIEn Script Installation start, and you will be prompted to provide values for the following options:
Options Purpose Example
Oracle SID for GuardIEn
The name of the ORACLE_SID that will contain the GuardIEn tables. This is normally the same as the encyclopaedia tables (DBIEFD)
DBIEFD
Oracle Version 11 or 12
The version of Oracle that you are using. 12
Oracle System Manager Userid
The Oracle system manager userid system
Oracle System Manager Password
The Oracle system manager password manager
GuardIEn Install Guide - UNIX Oracle CSE Page 8
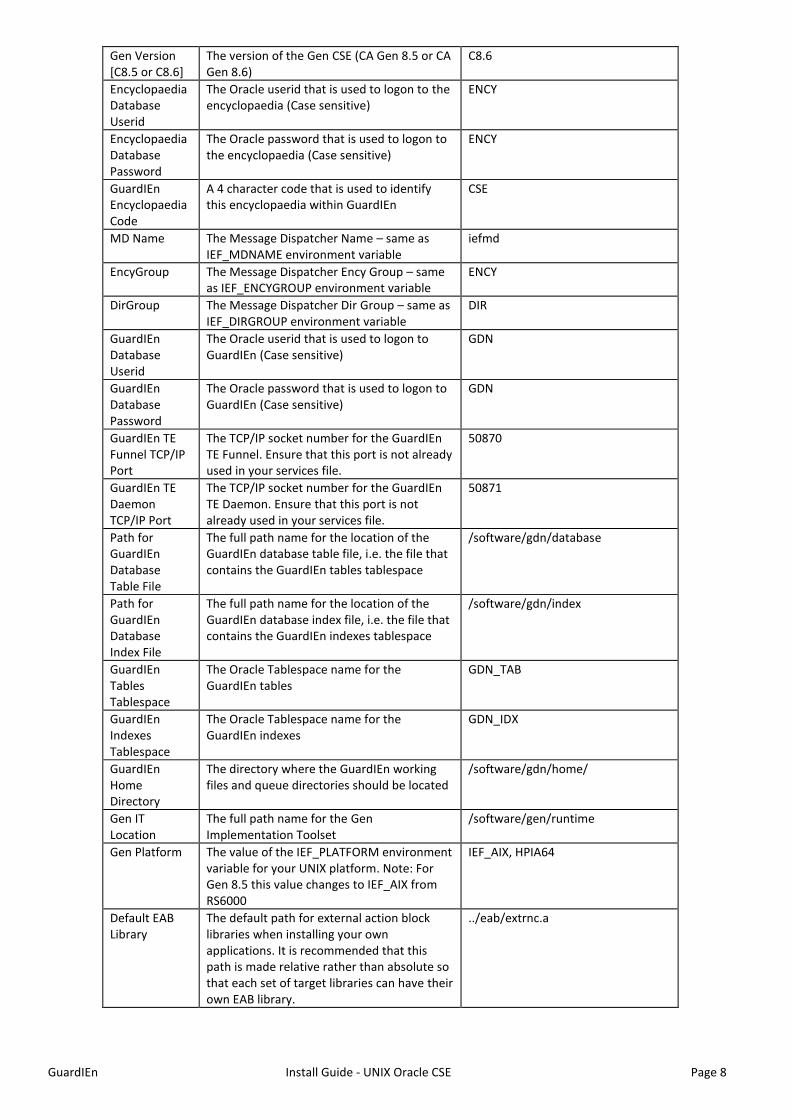
Gen Version [C8.5 or C8.6]
The version of the Gen CSE (CA Gen 8.5 or CA Gen 8.6)
C8.6
Encyclopaedia Database Userid
The Oracle userid that is used to logon to the encyclopaedia (Case sensitive)
ENCY
Encyclopaedia Database Password
The Oracle password that is used to logon to the encyclopaedia (Case sensitive)
ENCY
GuardIEn Encyclopaedia Code
A 4 character code that is used to identify this encyclopaedia within GuardIEn
CSE
MD Name The Message Dispatcher Name – same as IEF_MDNAME environment variable
iefmd
EncyGroup The Message Dispatcher Ency Group – same as IEF_ENCYGROUP environment variable
ENCY
DirGroup The Message Dispatcher Dir Group – same as IEF_DIRGROUP environment variable
DIR
GuardIEn Database Userid
The Oracle userid that is used to logon to GuardIEn (Case sensitive)
GDN
GuardIEn Database Password
The Oracle password that is used to logon to GuardIEn (Case sensitive)
GDN
GuardIEn TE Funnel TCP/IP Port
The TCP/IP socket number for the GuardIEn TE Funnel. Ensure that this port is not already used in your services file.
50870
GuardIEn TE Daemon TCP/IP Port
The TCP/IP socket number for the GuardIEn TE Daemon. Ensure that this port is not already used in your services file.
50871
Path for GuardIEn Database Table File
The full path name for the location of the GuardIEn database table file, i.e. the file that contains the GuardIEn tables tablespace
/software/gdn/database
Path for GuardIEn Database Index File
The full path name for the location of the GuardIEn database index file, i.e. the file that contains the GuardIEn indexes tablespace
/software/gdn/index
GuardIEn Tables Tablespace
The Oracle Tablespace name for the GuardIEn tables
GDN_TAB
GuardIEn Indexes Tablespace
The Oracle Tablespace name for the GuardIEn indexes
GDN_IDX
GuardIEn Home Directory
The directory where the GuardIEn working files and queue directories should be located
/software/gdn/home/
Gen IT Location
The full path name for the Gen Implementation Toolset
/software/gen/runtime
Gen Platform The value of the IEF_PLATFORM environment variable for your UNIX platform. Note: For Gen 8.5 this value changes to IEF_AIX from RS6000
IEF_AIX, HPIA64
Default EAB Library
The default path for external action block libraries when installing your own applications. It is recommended that this path is made relative rather than absolute so that each set of target libraries can have their own EAB library.
../eab/extrnc.a
GuardIEn Install Guide - UNIX Oracle CSE Page 9
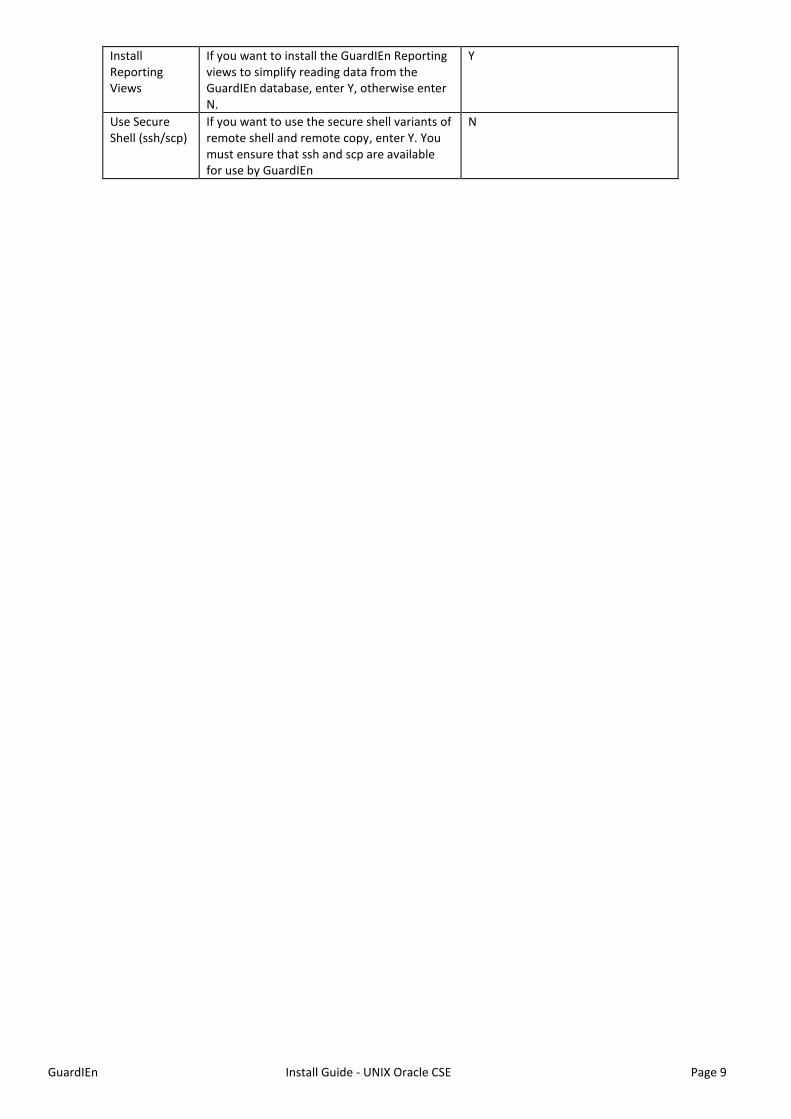
Install Reporting Views
If you want to install the GuardIEn Reporting views to simplify reading data from the GuardIEn database, enter Y, otherwise enter N.
Y
Use Secure Shell (ssh/scp)
If you want to use the secure shell variants of remote shell and remote copy, enter Y. You must ensure that ssh and scp are available for use by GuardIEn
N
GuardIEn Install Guide - UNIX Oracle CSE Page 10
Once you have entered all of the requested options, they are displayed for confirmation:
Confirm Installation Options ------------------------------------------------------------------------ Oracle SID for GuardIEn / Oracle Version : DBIEFD / 12 Oracle System Manager Userid / Password : system / manager Gen Version : C8.6 Encyclopaedia Database Userid / Password : ENCY / ENCY GuardIEn Encyclopaedia Code : CSE Encyclopaedia Message Dispatcher Details : iefmd / ENCY / DIR GuardIEn Database Userid / Password : GDN / GDN GuardIEn TE TCP/IP Ports Funnel / Daemon : 50870 / 50871 Path for GuardIEn Database Table File : /apps/gdn/database Path for GuardIEn Database Index File : /apps/gdn/database GuardIEn Tables Tablespace name : GDN_TAB GuardIEn Indexes Tablespace name : GDN_IDX GuardIEn Home Directory : /apps/gdn/home/ Gen IT Location : /apps/gen86/runtime Gen Platform : IEF_AIX Default EAB Library : ../eab/extrnc.a Install Reporting Views : Y Use Secure Shell (ssh/scp) : N ------------------------------------------------------------------------ Are these options correct [Y/n]?Y
If the options are correct, press ‘Y’ or just press <Enter>. If you wish to correct them enter ‘N’. Once you have confirmed the options, the installation script files will be tailored to reflect the new options and you will be asked to press <Enter> to return to the Main Menu.
Install Software From the GuardIEn Set-up Main Menu, enter option 2 - Install Release 8.7 software. You will then see the GuardIEn Software Installation Menu.
---------------------------------------------------------------- GuardIEn Software Installation Menu 1 - Compile Exits and Build API executables B - Browse output file X - Exit to Main Menu ---------------------------------------------------------------- Enter Option:
Customise Exits
If you wish to customise any of the GuardIEn user exits, then you might want to do this now before proceeding. The exits are located in the svr87/setup/exits directory. See the section on GuardIEn Exits later in this guide. The exits are dynamically linked however, so you can install the default versions provided, then make your customisations later and rebuild the dynamic exit library using this option again. If you would like to skip this step and use the default versions, then follow these steps: - open a telnet session and navigate to the directory where GuardIEn has been installed, e.g. /software/gdn - change directory to the "inqload" directory using the command "cd svr87/inqload" - check whether the exits libraries already exist using "ls libg*exit*" - If the list shows only libraries with "default" in their name, then copy these to the same name, but remove the
default qualifier, e.g for AIX "cp -p libgdexit.default.so.a libgdexit.so.a", repeat these for all results which have a "default" but no associated "non-default" library (Note: the suffix of the libraries will depend on the variant of Unix being used).
Compile Exits
Select option 1 to compile the Exits.
GuardIEn Install Guide - UNIX Oracle CSE Page 11
Change Code Page
If your server is not running on code page 819 for 1252 clients then you will need to change the code page for the servers. This is done by customising the GDINITCP exit.
GuardIEn Install Guide - UNIX Oracle CSE Page 12
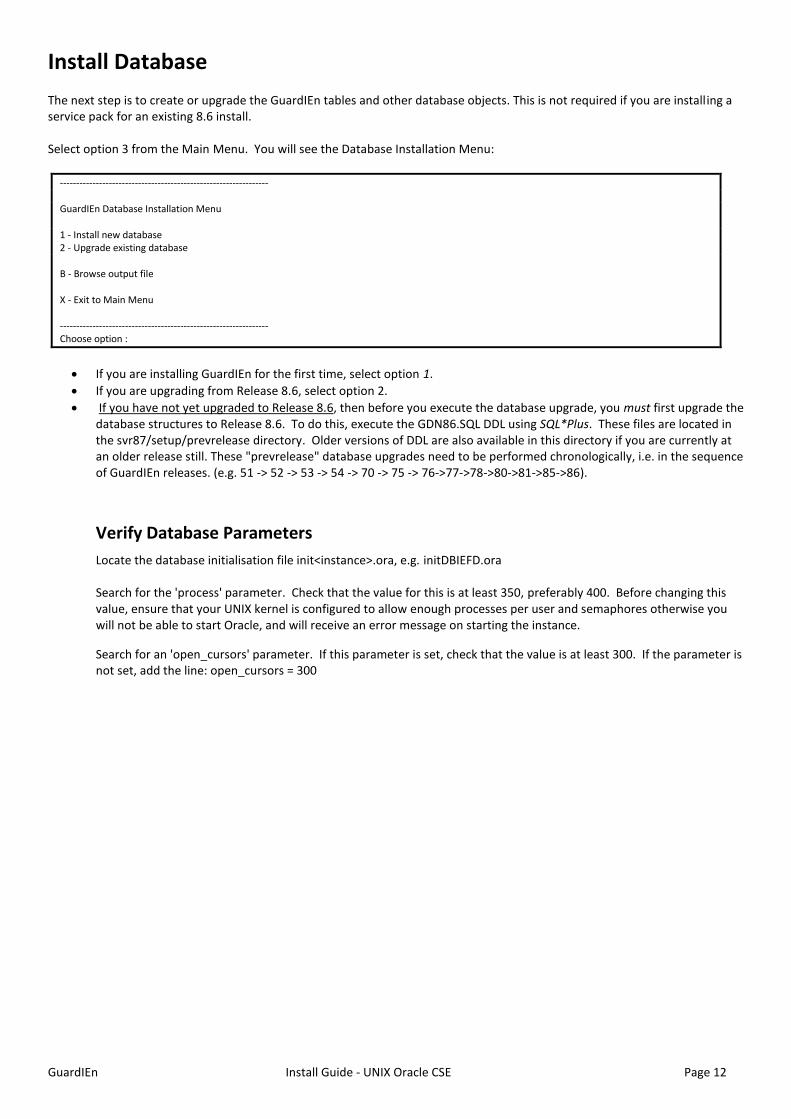
Install Database The next step is to create or upgrade the GuardIEn tables and other database objects. This is not required if you are installing a service pack for an existing 8.6 install. Select option 3 from the Main Menu. You will see the Database Installation Menu:
---------------------------------------------------------------- GuardIEn Database Installation Menu 1 - Install new database 2 - Upgrade existing database B - Browse output file X - Exit to Main Menu ---------------------------------------------------------------- Choose option :
• If you are installing GuardIEn for the first time, select option 1.
• If you are upgrading from Release 8.6, select option 2.
• If you have not yet upgraded to Release 8.6, then before you execute the database upgrade, you must first upgrade the database structures to Release 8.6. To do this, execute the GDN86.SQL DDL using SQL*Plus. These files are located in the svr87/setup/prevrelease directory. Older versions of DDL are also available in this directory if you are currently at an older release still. These "prevrelease" database upgrades need to be performed chronologically, i.e. in the sequence of GuardIEn releases. (e.g. 51 -> 52 -> 53 -> 54 -> 70 -> 75 -> 76->77->78->80->81->85->86).
Verify Database Parameters
Locate the database initialisation file init<instance>.ora, e.g. initDBIEFD.ora Search for the 'process' parameter. Check that the value for this is at least 350, preferably 400. Before changing this value, ensure that your UNIX kernel is configured to allow enough processes per user and semaphores otherwise you will not be able to start Oracle, and will receive an error message on starting the instance.
Search for an 'open_cursors' parameter. If this parameter is set, check that the value is at least 300. If the parameter is not set, add the line: open_cursors = 300
GuardIEn Install Guide - UNIX Oracle CSE Page 13
Verify Install This chapter helps you verify that your installation is ok and that you can start GuardIEn and log on.
Start / Stop the GuardIEn TE Logon to the Unix Server using Telnet, or equivalent. Execute the startte script located in the GuardIEn /scripts path to start the transaction enabler. To stop, use the stopte script located in the GuardIEn /scripts path to stop the transaction enabler.
Test Connection to GuardIEn TE The following procedure tests the connection between GuardIEn clients and servers:
• Launch GuardIEn’s System Administration Client on a PC where you installed the GuardIEn Clients. This program should be available through a Start Menu Shortcut. The GuardIEn clients use direct TCP/IP connections to the TE by default, so there is no need to use Client Manager. However, it is still possible to utilise Client Manager instead if you prefer – contact IET for details on how this can be achieved.
• A logon panel should be displayed and a dialog should appear asking you to enter your GuardIEn Site Activation Key. If this dialog appears ok then it proves that you can connect to the GuardIEn Server and that the server can access the GuardIEn database.
GuardIEn Install Guide - UNIX Oracle CSE Page 14
Initial Customisation If you are performing a new installation you will need to enter some information into GuardIEn in order to make it available. This will involve:
• Entering your Activation Code
• Defining Users
• Registering Aggregate Sets
• Defining Queues
• Housekeeping
• User Exits
• Customer scripts If you are upgrading from Release 8.6 or installing a remote GuardIEn server then the only steps you need to review are the Activation Code, Housekeeping and the User Exits steps. When upgrading from a previous release please ensure you have reassessed and then re-applied any localised customisations to any runtime scripts (like, for example, the script to start the GuardIEn TE). All items in this section assume that the GuardIEn Server is available and that you can connect to it using TCP/IP or the Client Manager. You must also have installed the GuardIEn client software.
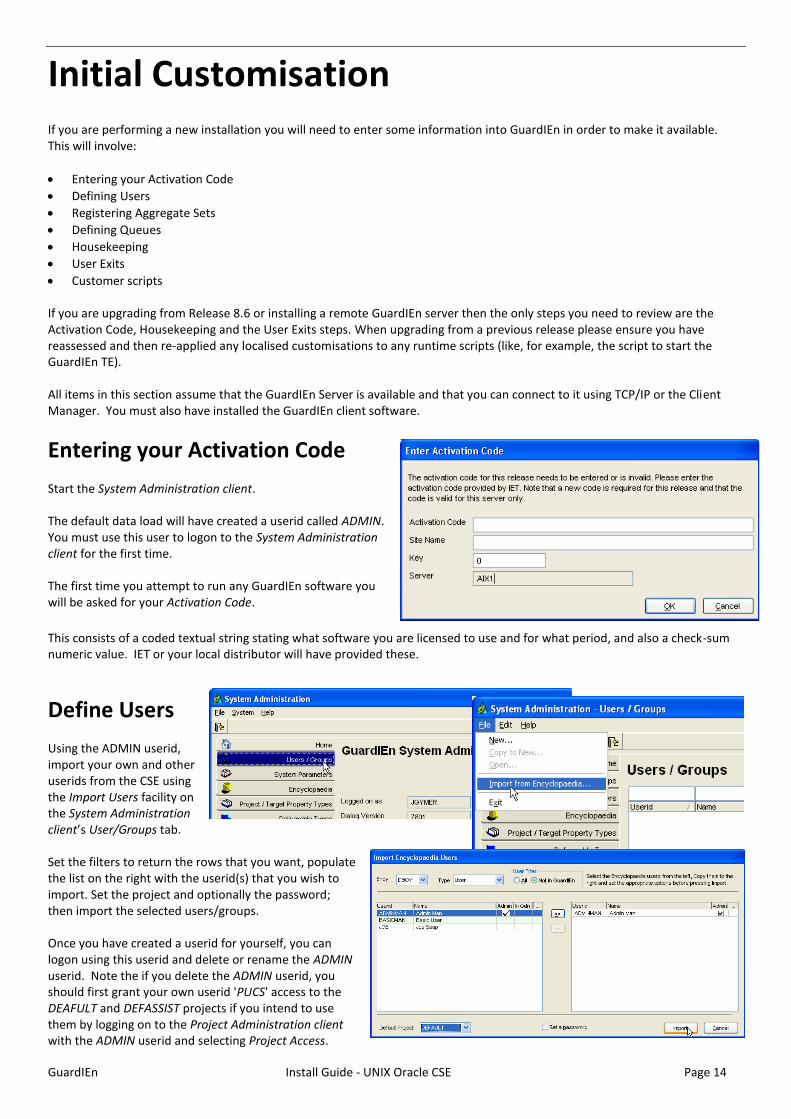
Entering your Activation Code Start the System Administration client. The default data load will have created a userid called ADMIN. You must use this user to logon to the System Administration client for the first time. The first time you attempt to run any GuardIEn software you will be asked for your Activation Code.
This consists of a coded textual string stating what software you are licensed to use and for what period, and also a check-sum numeric value. IET or your local distributor will have provided these.
Define Users Using the ADMIN userid, import your own and other userids from the CSE using the Import Users facility on the System Administration client’s User/Groups tab. Set the filters to return the rows that you want, populate the list on the right with the userid(s) that you wish to import. Set the project and optionally the password; then import the selected users/groups. Once you have created a userid for yourself, you can logon using this userid and delete or rename the ADMIN userid. Note the if you delete the ADMIN userid, you should first grant your own userid 'PUCS' access to the DEAFULT and DEFASSIST projects if you intend to use them by logging on to the Project Administration client with the ADMIN userid and selecting Project Access.
GuardIEn Install Guide - UNIX Oracle CSE Page 15
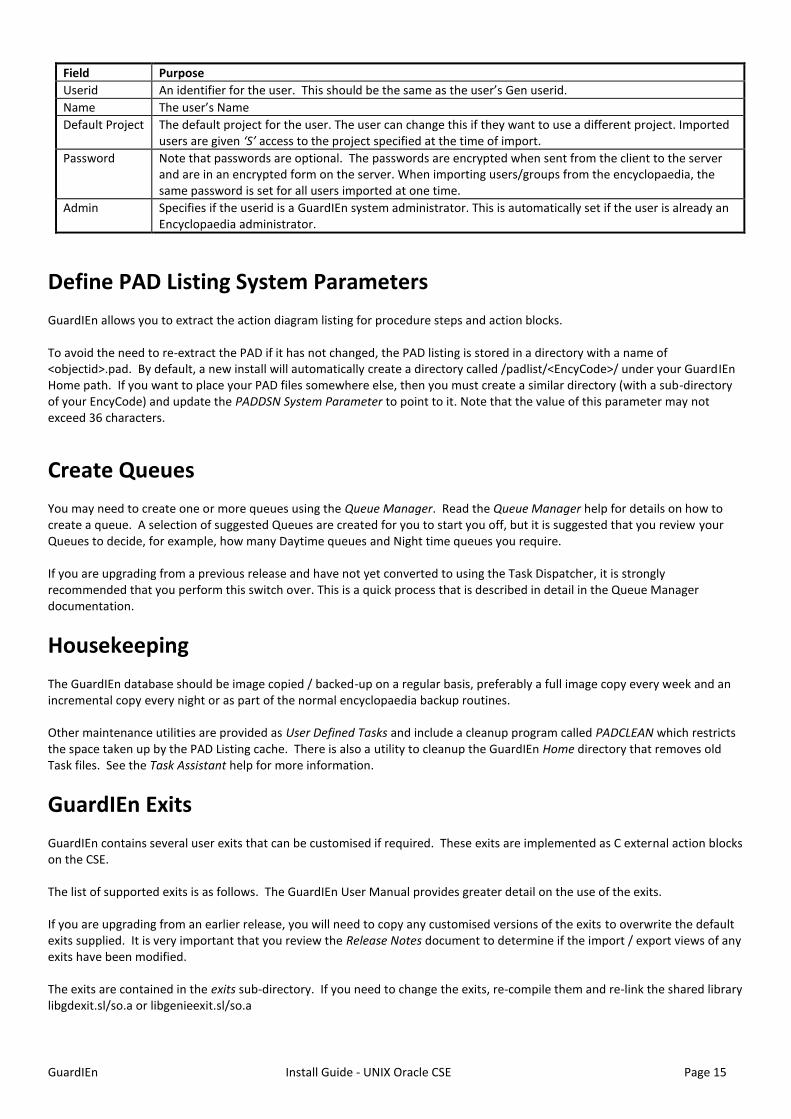
Field Purpose
Userid An identifier for the user. This should be the same as the user’s Gen userid.
Name The user’s Name
Default Project The default project for the user. The user can change this if they want to use a different project. Imported users are given ‘S’ access to the project specified at the time of import.
Password Note that passwords are optional. The passwords are encrypted when sent from the client to the server and are in an encrypted form on the server. When importing users/groups from the encyclopaedia, the same password is set for all users imported at one time.
Admin Specifies if the userid is a GuardIEn system administrator. This is automatically set if the user is already an Encyclopaedia administrator.
Define PAD Listing System Parameters GuardIEn allows you to extract the action diagram listing for procedure steps and action blocks. To avoid the need to re-extract the PAD if it has not changed, the PAD listing is stored in a directory with a name of <objectid>.pad. By default, a new install will automatically create a directory called /padlist/<EncyCode>/ under your GuardIEn Home path. If you want to place your PAD files somewhere else, then you must create a similar directory (with a sub-directory of your EncyCode) and update the PADDSN System Parameter to point to it. Note that the value of this parameter may not exceed 36 characters.
Create Queues You may need to create one or more queues using the Queue Manager. Read the Queue Manager help for details on how to create a queue. A selection of suggested Queues are created for you to start you off, but it is suggested that you review your Queues to decide, for example, how many Daytime queues and Night time queues you require. If you are upgrading from a previous release and have not yet converted to using the Task Dispatcher, it is strongly recommended that you perform this switch over. This is a quick process that is described in detail in the Queue Manager documentation.
Housekeeping The GuardIEn database should be image copied / backed-up on a regular basis, preferably a full image copy every week and an incremental copy every night or as part of the normal encyclopaedia backup routines. Other maintenance utilities are provided as User Defined Tasks and include a cleanup program called PADCLEAN which restricts the space taken up by the PAD Listing cache. There is also a utility to cleanup the GuardIEn Home directory that removes old Task files. See the Task Assistant help for more information.
GuardIEn Exits GuardIEn contains several user exits that can be customised if required. These exits are implemented as C external action blocks on the CSE. The list of supported exits is as follows. The GuardIEn User Manual provides greater detail on the use of the exits. If you are upgrading from an earlier release, you will need to copy any customised versions of the exits to overwrite the default exits supplied. It is very important that you review the Release Notes document to determine if the import / export views of any exits have been modified. The exits are contained in the exits sub-directory. If you need to change the exits, re-compile them and re-link the shared library libgdexit.sl/so.a or libgenieexit.sl/so.a
GuardIEn Install Guide - UNIX Oracle CSE Page 16
Customer Scripts If you need to rework any scripts that were customised in a previous release of GuardIEn, or create new customised scripts, then these should be places in the "svr87/custom" directory. This directory has been placed ahead of the standard GuardIEn scripts directory in the PATH for the TE and TD so that any script with a name the same as a standard GuardIEn script, which is found in this directory, will be used in preference to the standard script. This protects your customisations from future upgrades.
Other considerations If you have Oracle 11.2, and Patchset 10098816 installed, then you need to edit the startte and starttd scripts after installation to remove or comment-out the following Oracle environment variable: ORA_OCI_NO_OPTIMIZED_FETCH=1; export ORA_OCI_NO_OPTIMIZED_FETCH The Task Dispatcher (TD) and Transaction Enabler (TE) should both be re-started after this change is made.


![VERITAS NetBackup 6[1].0 on Unix-Oracle](https://static.fdocuments.us/doc/165x107/546854cbaf79594f098b45bb/veritas-netbackup-610-on-unix-oracle.jpg)