Install and Configure CCS Projects for SwitcherWare Library
24
Using SwitcherWare Library Install and Configure CCS Projects for SwitcherWare Library APPLICATION NOTE Table of Contents Introduction 2 Quick Start .................................................................... 2 Support Material ........................................................... 2 Feature Requests and Bug Reports ............................. 2 Requirements ................................................................ 2 Microcontroller Variants ................................................ 2 SwitcherWare Library 3 Install ............................................................................. 3 Folder Structure ............................................................ 3 Library Filename ........................................................... 4 Reference the SwitcherWare Library ............................ 5 Support Code Generation Tools 6 Code Composer Studio ................................................ 6 C2000Ware ................................................................... 6 CCS Workspaces 8 Create a New Workspace ............................................. 8 Set the Build Variables .................................................. 8 Using Workspaces ........................................................ 9 Import an Example SwitcherWare Project 10 Create a New SwitcherWare Project 11 Create a New CCS Project ......................................... 11 Add #include Search Paths ........................................ 11 Add Predefined Symbols ............................................ 13 Add Libraries and Library Search Paths ..................... 14 Add Build Resources .................................................. 15 Library Build Symbols 18 MCU Target Symbols .................................................. 18 Math Type Symbols .................................................... 18 Setting Library Build Symbols in a CCS Project ......... 19 CCS Path Variables 20 Setting Path Variables Manually ................................. 20 Importing Path Variables From a .ini File .................... 21 Building the SwitcherWare Library 23 Revision History 24 DD00051 SwitcherGear Application Note – Using SwitcherWare Library Denkinetic Pty Ltd Revision 3 – 22 Nov 2019 [email protected]
Transcript of Install and Configure CCS Projects for SwitcherWare Library

Using SwitcherWare LibraryInstall and Configure CCS Projects for SwitcherWare Library
APPLICATION NOTE
Table of ContentsIntroduction 2
Quick Start .................................................................... 2Support Material ........................................................... 2Feature Requests and Bug Reports ............................. 2Requirements ................................................................ 2Microcontroller Variants ................................................ 2
SwitcherWare Library 3Install ............................................................................. 3Folder Structure ............................................................ 3Library Filename ........................................................... 4Reference the SwitcherWare Library ............................ 5
Support Code Generation Tools 6Code Composer Studio ................................................ 6C2000Ware ................................................................... 6
CCS Workspaces 8Create a New Workspace ............................................. 8Set the Build Variables .................................................. 8Using Workspaces ........................................................ 9
Import an Example SwitcherWare Project 10
Create a New SwitcherWare Project 11Create a New CCS Project ......................................... 11Add #include Search Paths ........................................ 11Add Predefined Symbols ............................................ 13Add Libraries and Library Search Paths ..................... 14Add Build Resources .................................................. 15
Library Build Symbols 18MCU Target Symbols .................................................. 18Math Type Symbols .................................................... 18Setting Library Build Symbols in a CCS Project ......... 19
CCS Path Variables 20Setting Path Variables Manually ................................. 20Importing Path Variables From a .ini File .................... 21
Building the SwitcherWare Library 23
Revision History 24
DD00051 SwitcherGear Application Note – Using SwitcherWare Library Denkinetic Pty LtdRevision 3 – 22 Nov 2019 [email protected]

Using SwitcherWare Library APPLICATION NOTE
IntroductionThis document explains how to install the SwitcherWare Library and how to use it with projects in the Code Composer Stu-dio (CCS) integrated development environment for Texas Instruments (TI) microcontrollers.
Quick Start Initial setup of the SwitcherWare Library and support tools:
▸ Install the SwitcherWare Library▸ Install support code generation tools
For each new code project:▸ Create a new workspace in CCS▸ Import a SwitcherWare example or starter project
OR▸ Create a new project & configure to use SwitcherWare Library
Support MaterialThe following support documentation is available for the SwitcherWare Library:
Using SwitcherWare Library Application Note (this document). SwitcherWare Library help files (*.chm) is the primary reference that describes all resources in the library. Located in the
document folder of the installed package.
Feature Requests and Bug ReportsPlease send all requests for new features and bug reports to [email protected].
RequirementsThe SwitcherWare Library is designed to be used with the Code Composer Studio integrated development environmentand C2000 microcontrollers (MCU) from Texas Instruments.
Microcontroller VariantsVariants of the SwitcherWare library target different MCUs in the C2000 family.
The library has been designed to provide a consistent experience across the MCU types. However, there are some minordifferences between MCU families: newer devices have improved peripherals; more powerful devices have peripherals thatare not available in low-cost devices; etc.
The effect of these differences in the use of the SwitcherWare Library is minor. Consult the SwitcherWare Library help filesand explore the starter projects for your MCU for detailed information.
Denkinetic Pty Ltd 2 / 24

APPLICATION NOTE Using SwitcherWare Library
SwitcherWare LibraryThe SwitcherWare Library is available as a library-only package (Lib), or as a library plus source code package (LibSrc).The library only package is supplied with every SwitcherGear controller. The library plus source code package enables youto modify and build the library, and is available for purchase from Denkinetic.
InstallThe SwitcherWare Library is installed using an installer application that copies the library files and support files to a folderon your hard drive.
The installer application has a naming format like this:
Install SwitcherWare vX.X.X Lib.exeInstall SwitcherWare vX.X.X LibSrc.exe
where X.X.X is the version number of the SwitcherWare Library.
Run the installer by double-clicking the installer icon in Windows Explorer.
Follow the installer instructions.
You should allow the installer to install the SwitcherWare Library into the following default path on your computer:
/Denkinetic/SwitcherWare
Various resources in the library package are pre-configured for this location. If you choose to install in a different location, itis a simple task to modify the path variables to match your custom install path – see the section CCS Path Variables onpage 20.
The installer will place the SwitcherWare Library package into a sub-directory called SwitcherWare_XX_XX_XX, whereXX_XX_XX represents the version number of the SwitcherWare Library. This naming scheme allows multiple versions of thelibrary to be installed side-by-side, and makes it easy to upgrade the library and swap versions.
Folder StructureThe SwitcherWare Library package is organised with the following folder structure. Some important files are also shown.
3 / 24 Denkinetic Pty Ltd

Using SwitcherWare Library APPLICATION NOTE
SwitcherWare_XX_XX_XX
ccs
document
SwitcherWare F2833x.chm
SwitcherWare F2837xD.chm
examples
F2833x
F2837xD
cmd
include
source
include
SwitcherWare.h
library
SwitcherGear
cmd
include
source
toolbox
include
source
History.txt
vars.ini
Folder Name Folder Contents
ccs CCS projects for building the SwitcherWare Library. (Library plus source code package only.)
document Help files for the SwitcherWare Library.
examples CCS projects that demonstrate various Library features and application projects
F2833xF2837xD
Headers and support files for library features that are MCU target-specific.
cmd Linker Command Files files for mapping code resources into MCU memory.
include Headers files for the SwitcherWare Library.
source Source files for the SwitcherWare Library. (Library plus source code package only.)
library Target-specific SwitcherWare static library files.
SwitcherGear Header and support files for library features that are SwitcherGear hardware-specific.
toolbox Header files for library features that are target-independent.
Library FilenameThe SwitcherWare package includes many variants of the SwitcherWare Library. These are different builds of the library forspecific use cases. The library files use the suffix .lib and have a naming format that includes the name of the targetMCU, followed by none or more options.
SwitcherWare <MCU> <OPT>.lib
Denkinetic Pty Ltd 4 / 24

APPLICATION NOTE Using SwitcherWare Library
<MCU> Target MCU
F28335 Texas Instruments TMS320F28335, all package types
F28377DZWT Texas Instruments TMS320F28377D, ZWT package
MC28377D1 SwitcherGear MC28377D1 microcontroller module
<OPT> Option
FPU Library variant with IQMath types mapped to native floating-point – see section Math Type Symbols on page 18.
CPU1CPU2
Library variant that targets a specific CPU on multi-CPU microcontrollers.
DBG Library variant with debug features enabled.
Debug FeaturesDebug variants are intended for use during application development. The debug variants of the SwitcherWare Library havethe following features:
Debug Feature Purpose
Compiler optimisation turned OFF
Facilitates stepping through the library source code. When optimisation is turned on, the compiler changes the order of execution to improve execution speed. This causes source stepping to become erratic. This feature is only relevant when the library plus source code package is installed.
Serial monitor A diagnostic text stream is transmitted from a serial port. The stream contains a short description of various configuration tasks and events as they occur. See the help files for details.
Reference the SwitcherWare LibraryThe file SwitcherWare.h is the top-level header file for the SwitcherWare Library. It includes all of the other header files inthe library. Add the following statement at the top of each of your own source and header files that references Switcher -Ware Library objects and code.
#include <SwitcherWare.h>
Alternatively, if you know the specific SwitcherWare header files that your source files require, you can #include just thosefiles.
5 / 24 Denkinetic Pty Ltd

Using SwitcherWare Library APPLICATION NOTE
Support Code Generation ToolsTo use the SwitcherWare library, you must also install the following code generation tools.
Code Composer StudioCode Composer Studio (CCS) is an integrated development environment for Texas Instruments (TI) microcontrollers. It in -cludes a suite of tools used to develop and debug embedded applications.
CCS is typically used to develop applications in C/C++ with SwitcherWare. However, you must install CCS even if you in-tend to use model-based graphical programming and automatic code generation (e.g. Simulink, Powersim, etc.) becausethe C/C++ compilers are required to build the executable file for the MCU.
Download CCS InstallerDownload the latest version of Code Composer Studio for free from the Texas Instruments website.
http://processors.wiki.ti.com/index.php/Download_CCS
Installers are available as web installers and off-line installers.
Install CCSExecute the installer application and follow the installation instructions.
The “Typical” installation option will install code generation tools for all TI MCUs and multiple debug probes, includingthose required by SwitcherWare.
To reduce the installation size, you can choose the “Custom” installation option. In this case, you must ensure that theC2000 code generation tools and the drivers for your debug probe are installed.
LicensingFor CCS version 7 and greater, the licence to use CCS is free.
Minimum Required Version
You must ensure that your version of CCS meets the minimum requirement for the SwitcherWare Library.
The minimum version of CCS required for a particular version of SwitcherWare Library is contained in the file History.txt.As you install newer versions of the SwitcherWare Library, you must ensure that your CCS installation meets the minimumversion requirements.
A minimum CCS version is required because the SwitcherWare Library and example projects are built using the C/C++compilers associated with a particular version of CCS. You will encounter errors when importing projects if your version ofCCS does not support the same compiler.
C2000WareThe C2000Ware package must be installed because it provides the device support header files and the C/C++ run-time lib-raries for the C2000 MCUs. C2000Ware also provides much reference material for the C2000 family of MCUs and includesthe datasheets and user guides for all MCUs, application libraries and simple example projects for the MCUs.
Install C2000WareDownload C2000Ware from the TI website and install on your PC.
Denkinetic Pty Ltd 6 / 24

APPLICATION NOTE Using SwitcherWare Library
http://www.ti.com/tool/c2000ware
You can also access the website from the App Centre in Code Composer Studio. Select the menu View > CCS App
Centre. Find C2000Ware under the Standalone Software heading and click the Download button.
If C2000Ware is already installed on your PC, it is recommended that you update to the latest version.
7 / 24 Denkinetic Pty Ltd

Using SwitcherWare Library APPLICATION NOTE
CCS WorkspacesCode Composer Studio uses workspaces to collect together the resources for a particular job, and can contain multiple in -dividual code projects.
For basic code development with SwitcherWare, the simplest way to use workspaces is to use a separate workspace foreach code application that you are working on. Each Workspace contains only one project, which contains your applica -tion code and references to the SwitcherWare Library.
Create a New WorkspaceUse the Eclipse Launcher dialogue box to select existing workspaces and create new ones. If enabled in the preferences,
this dialogue box will be displayed when CCS is started, or you can select the menu item File > Switch Workspace >
Other… .
To create a new workspace, enter a location for the workspace by either typing into the text edit box or clicking the Browse
button. Then click on the Launch button to create the new workspace and show it in a new CCS session window.
Set the Build VariablesSee the section Importing Path Variables From a .ini File on page 21 for information on setting the SwitcherWare path vari-ables for the workspace.
Alternatively, you can copy the preferences from another workspace that is already configured with the path variables andyour other personalised preferences. Open the workspace that contains the configured preferences:
▸ Select the menu item File > Export… to show the export dialogue box.
▸ Select the item General > Preferences and follow the prompts. Open the newly created workspace:
▸ Select the menu item File > Import… to show the import dialogue box.
▸ Select the item General > Preferences and follow the prompts.
Denkinetic Pty Ltd 8 / 24

APPLICATION NOTE Using SwitcherWare Library
Using WorkspacesYou can enable the CCS preferences to show the Eclipse Launcher dialogue box each time that CCS is run. This is useful ifyou have multiple workspaces that you use regularly. Conversely, if you use only one workspace, then you can disable thisfeature.
Select the menu item Window > Preferences to show the CCS Preferences dialogue box.
In the left side navigation pane, select General > Startup and Shutdown > Workspaces.
Enable or disable the Prompt for workspace on startup check box according to your preference.
You can switch workspaces at anytime by selecting the File > Switch Workspace menu item.
You can have multiple workspaces open at the same time by running multiple instances of CCS.
9 / 24 Denkinetic Pty Ltd
Using SwitcherWare Library APPLICATION NOTE
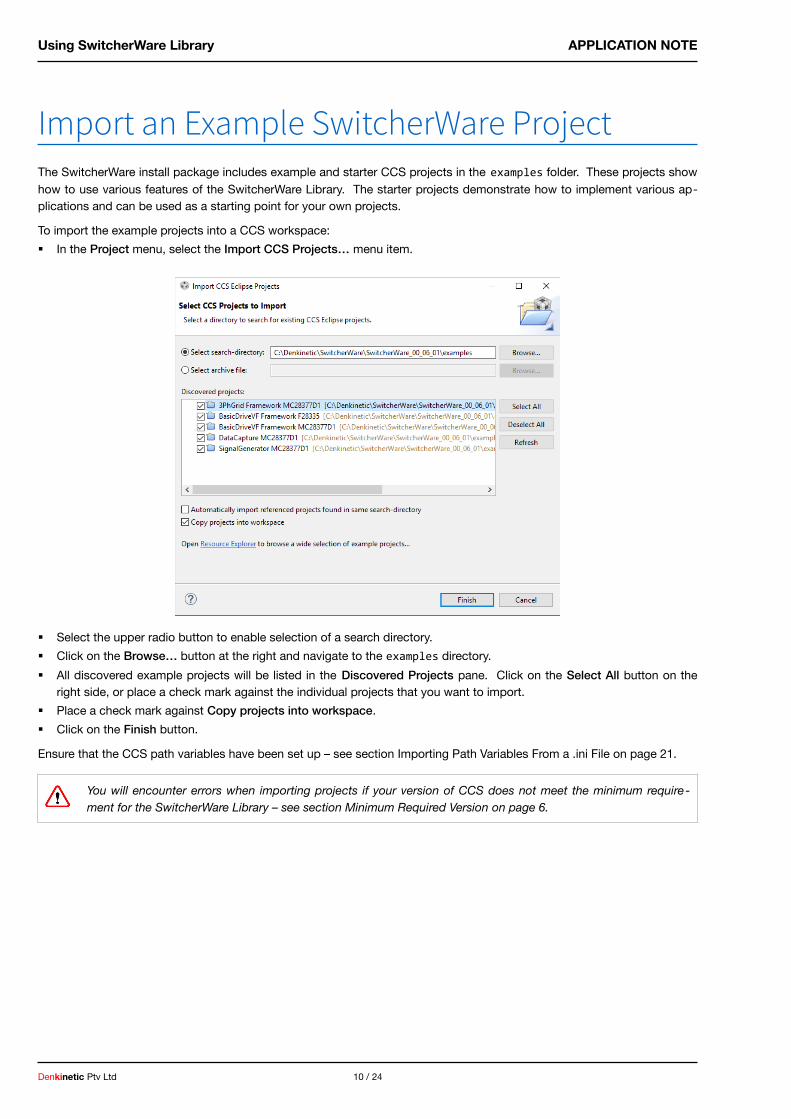
Import an Example SwitcherWare ProjectThe SwitcherWare install package includes example and starter CCS projects in the examples folder. These projects showhow to use various features of the SwitcherWare Library. The starter projects demonstrate how to implement various ap-plications and can be used as a starting point for your own projects.
To import the example projects into a CCS workspace:
In the Project menu, select the Import CCS Projects… menu item.
Select the upper radio button to enable selection of a search directory.
Click on the Browse… button at the right and navigate to the examples directory.
All discovered example projects will be listed in the Discovered Projects pane. Click on the Select All button on theright side, or place a check mark against the individual projects that you want to import.
Place a check mark against Copy projects into workspace.
Click on the Finish button.
Ensure that the CCS path variables have been set up – see section Importing Path Variables From a .ini File on page 21.
You will encounter errors when importing projects if your version of CCS does not meet the minimum require-ment for the SwitcherWare Library – see section Minimum Required Version on page 6.
Denkinetic Pty Ltd 10 / 24
APPLICATION NOTE Using SwitcherWare Library
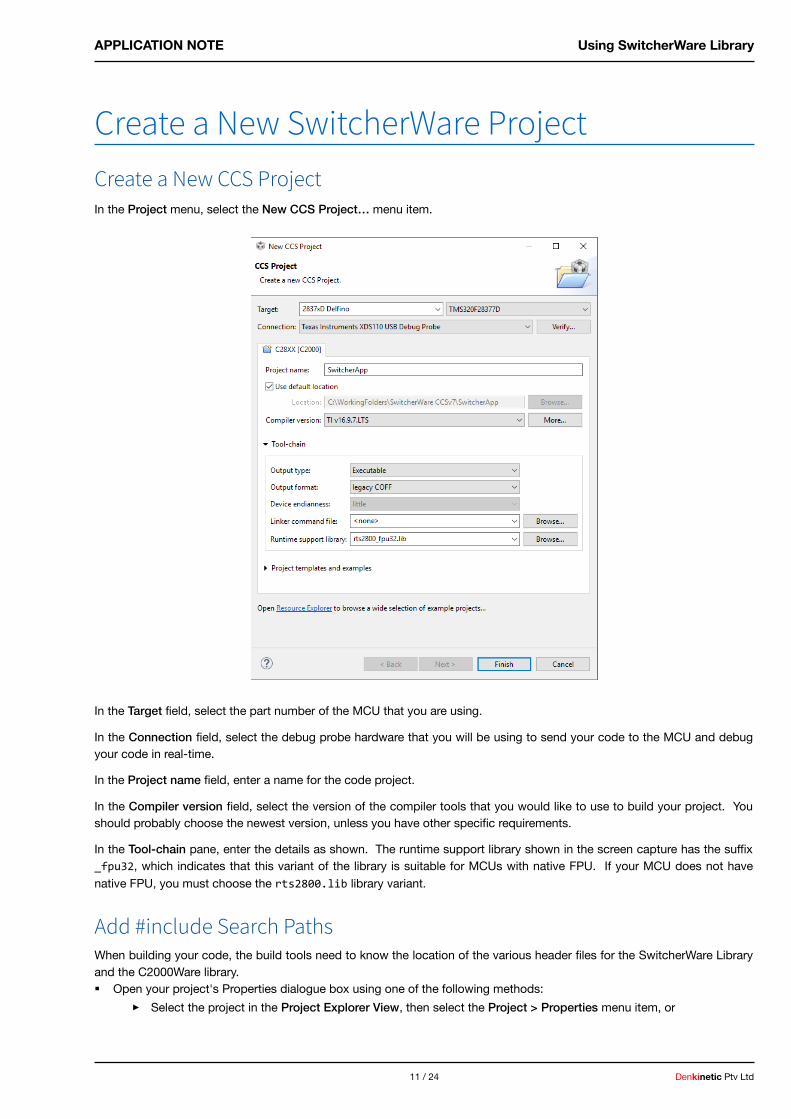
Create a New SwitcherWare ProjectCreate a New CCS ProjectIn the Project menu, select the New CCS Project… menu item.
In the Target field, select the part number of the MCU that you are using.
In the Connection field, select the debug probe hardware that you will be using to send your code to the MCU and debugyour code in real-time.
In the Project name field, enter a name for the code project.
In the Compiler version field, select the version of the compiler tools that you would like to use to build your project. Youshould probably choose the newest version, unless you have other specific requirements.
In the Tool-chain pane, enter the details as shown. The runtime support library shown in the screen capture has the suffix_fpu32, which indicates that this variant of the library is suitable for MCUs with native FPU. If your MCU does not havenative FPU, you must choose the rts2800.lib library variant.
Add #include Search PathsWhen building your code, the build tools need to know the location of the various header files for the SwitcherWare Libraryand the C2000Ware library. Open your project's Properties dialogue box using one of the following methods:
▸ Select the project in the Project Explorer View, then select the Project > Properties menu item, or
11 / 24 Denkinetic Pty Ltd

Using SwitcherWare Library APPLICATION NOTE
▸ Right-click the project name in the Project Explorer View to show the context menu, then select the Propertiesmenu item.
In the navigation pane on the left side, select Build > C2000 Compiler > Include Options to show the Include Optionspage.
You need to add the following search paths. Each path consists of a path variable followed by a relative path extension.For the device-specific paths or path extensions, ensure that you use the path option that corresponds to your MCU.
Path Variable Path Extension
DeviceSupportF2833x orDeviceSupportF2837xD
common/include
DeviceSupportF2833x orDeviceSupportF2837xD
headers/include
LibraryFPUFastRTS include
LibraryIQmath include
LibrarySwitcherWare include
LibrarySwitcherWare F2833x/include orF2837xD/include
LibrarySwitcherWare SwitcherGear/include
LibrarySwitcherWare toolbox/include
Add each search path using the following steps:
In the Add dir to #include search path pane, click on the Add icon to open the Add directory path dialogue box.
Denkinetic Pty Ltd 12 / 24
APPLICATION NOTE Using SwitcherWare Library
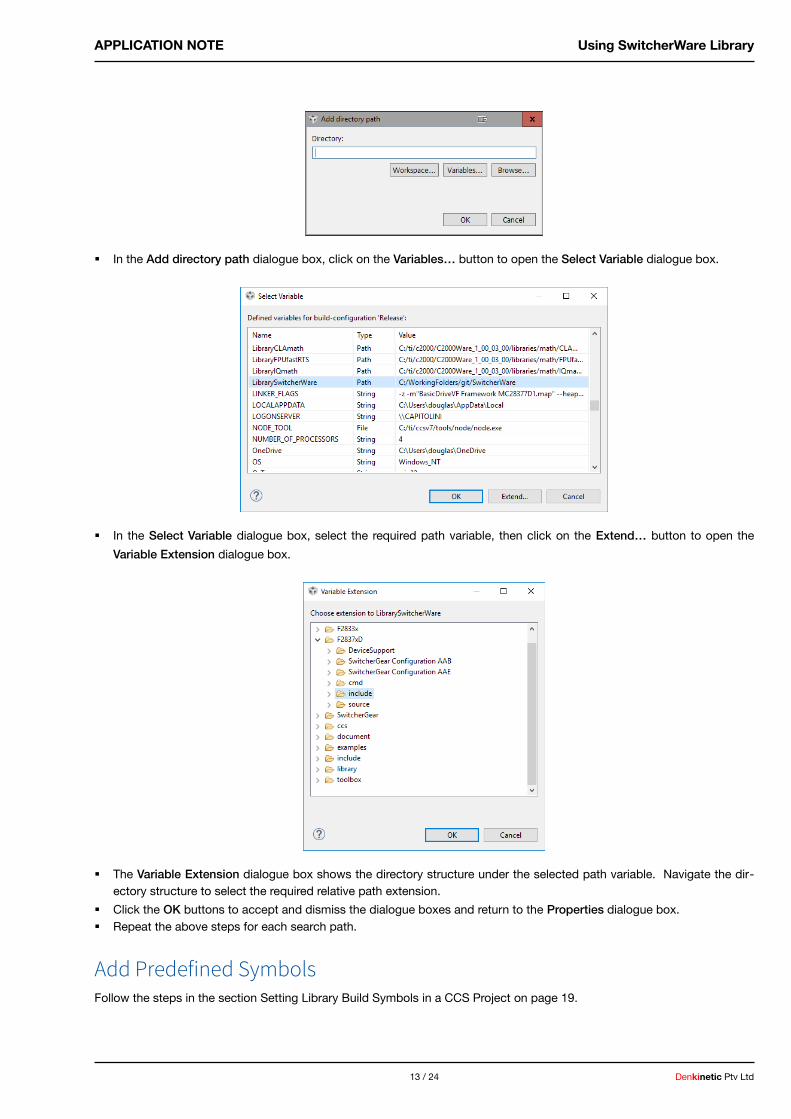
In the Add directory path dialogue box, click on the Variables… button to open the Select Variable dialogue box.
In the Select Variable dialogue box, select the required path variable, then click on the Extend… button to open the
Variable Extension dialogue box.
The Variable Extension dialogue box shows the directory structure under the selected path variable. Navigate the dir-ectory structure to select the required relative path extension.
Click the OK buttons to accept and dismiss the dialogue boxes and return to the Properties dialogue box. Repeat the above steps for each search path.
Add Predefined SymbolsFollow the steps in the section Setting Library Build Symbols in a CCS Project on page 19.
13 / 24 Denkinetic Pty Ltd

Using SwitcherWare Library APPLICATION NOTE
Add Libraries and Library Search PathsWhen building your code, the linker needs to know which library files to use and their location.
Open your project's Properties dialogue box and navigate to Build > C2000 Linker > File Search Path.
The upper pane on the right side (Include library) lists the libraries that will be linked into the project. The lower pane (Add
<dir> to library search path) lists the file system locations where the build tools should look for these library files. You cansee that each path consists of a path variable (inside the curly braces) followed by a relative path specifier.
In this screen capture, the library name and search paths are specified separately (in the two panes, above). It is also pos-sible to specify a library by using its full path name, in which case the corresponding search path entry is not required.
Add the following libraries to the upper pane, according to your target MCU.
Target MCU SwitcherWare Library C2000Ware Library
F28335 SwitcherWare F28335 <OPT>.librts2800_fpu32_fast_supplement.libIQmath_fpu32.lib
F28377DZWT SwitcherWare F28377DZWT <OPT>.librts2800_fpu32_fast_supplement.libIQmath_fpu32.lib
MC28377D1 SwitcherWare MC28377D1 <OPT>.librts2800_fpu32_fast_supplement.libIQmath_fpu32.lib
You must choose the variant of the SwitcherWare Library that corresponds to your target MCU and desired build options –see section Library Filename on page 4 for a description of the features of library variants denoted by <OPT> in the tableabove.
The rts2800_fpu32_fast_supplement.lib library is only required if your MCU has native support for FPU.
You need to add the following search paths to the lower pane. Each path consists of a path variable followed by a relativepath extension. For the device-specific paths or path extensions, ensure that you use the path option that corresponds toyour MCU. Add each search path using the same steps that are given in section Add #include Search Paths on page 11.
Denkinetic Pty Ltd 14 / 24

APPLICATION NOTE Using SwitcherWare Library
Path Variable Path Extension
LibrarySwitcherWare library
LibraryFPUFastRTS lib
LibraryIQmath lib
Set Link OrderThe rts2800_fpu32_fast_supplement library provides versions of some maths functions that are faster than the imple-mentations in the standard rts2800_fpu32 library. In order to make sure that the faster versions are used, the link order ofthese two libraries must be set.
Open your project's Properties dialogue box, navigate to Build, then select the Link Order tab.
The names of both libraries must appear in the list. If one or both are missing, click on the Add… button, select the
missing libraries from the list, then click the OK button. The rts2800_fpu32_fast_supplement library must appear higher in the list than the rts2800_fpu32 library. If not, se-
lect one library and use the Up and Down buttons to move it into order.
Add Build ResourcesVarious other resources are required to build your project. To reduce clutter in your project, we suggest that you create thefollowing folders inside the project and sort the resources into them:
SwitcherGear Configuration SwitcherWare TexasInstruments
15 / 24 Denkinetic Pty Ltd

Using SwitcherWare Library APPLICATION NOTE
To make a new folder, right-click on the project name and select the New > Folder… menu item.
The simplest way to add existing files to the project is to drag them from a file explorer window into the CCS project win-dow. When you release the mouse button for the drag, you will be asked whether you want to copy the files into the pro -ject, or add a link to the files to the project.
For linked files, you can specify that the path of the dragged files be converted so that it is an extension to a particular pathvariable. The effect is equivalent to defining the path to the dragged files as an extended path variable. In the descriptionsbelow, the correct path variable for each resource type is shown in the curly braces.
The following sections indicate which resources are required, where they can be found and how they should be added toyour project (copied or linked).
SwitcherGear ConfigurationThe SwitcherGear Configuration document defines how the modules and signals for a SwitcherGear controller are con-figured. It is a spreadsheet document in ODS format. The document can generate source and header files that allow easyaccess to the controller hardware from the application code.
Each SwitcherGear controller is provided with a configuration document and the associated source & header files. These
resources should be copied into the SwitcherGear Configuration folder.
Headers Linker Command FileThe headers linker command file (CMD file) contains the information about the memory location of every MCU low-levelconfiguration register. The C2000Ware package provides a header CMD file for each family of C2000 MCUs.
The C2000Ware header CMD files can be found at the following paths:
${DeviceSupportF2833x}\headers\cmd${DeviceSupportF2837xD}\headers\cmd
You should choose a nonBIOS variant, (unless you are using TI BIOS). A link to this resource should be added into theTexasInstruments folder.
Application Linker Command File (SwitcherWare)The application linker command file (CMD file) defines where the various parts of the application (executable code, vari -ables, constants, etc.) should be placed in the target MCU’s memory (e.g. flash, local RAM, shared RAM, etc.)
The SwitcherWare Library package includes application CMD files that can be found at the paths:
${LibrarySwitcherWare}\F2833x\cmd${LibrarySwitcherWare}\F2837xD\cmd
Denkinetic Pty Ltd 16 / 24
APPLICATION NOTE Using SwitcherWare Library
A link to one of these resources should be added into the SwitcherWare folder.
Application Linker Command File (C2000Ware)Alternatively, the C2000Ware package provides many application CMD files that can be used for various memory usagescenarios. For example, flash scenarios should be used for field-deployed applications that must run code from flashmemory. RAM scenarios can be used to debug code from RAM, which is quicker to program than flash, but cannot be de -ployed into the field. You should only use these files if a suitable file is not available in the SwitcherWare package. Youmust check the details of each file to determine if the linker strategy is suitable for your application.
The C2000Ware CMD files can be found at the paths:
${DeviceSupportF2833x}\common\cmd${DeviceSupportF2837xD}\common\cmd
A link to one of these resources should be added into the TexasInstruments folder.
CodeStartBranchThe SwitcherWare package provides a CodeStart_X.asm assembler file for each family of C2000 MCUs, which can befound at the following paths:
${LibrarySwitcherWare}\F2833x\source\${LibrarySwitcherWare}\F2837xD\source\
A link to this resource should be added into the SwitcherWare folder.
SwitcherGear Build ResourcesSome SwitcherGear hardware makes use of additional build resources. For example, you need to include the CMD file forthe MC28377D1 microcontroller module if you use the external SDRAM. These CMD files that can be found at the path:
${LibrarySwitcherWare}\SwitcherGear\cmd
A link to these resources should be added into the SwitcherWare folder.
17 / 24 Denkinetic Pty Ltd
Using SwitcherWare Library APPLICATION NOTE
Library Build SymbolsThe SwitcherWare Library is available in various build variants. The build variants exist to cater for different target devicesand library options. The options that are enabled in each build variant are controlled by the setting of pre-processor sym-bols at the time that the library is built.
You need to understand this because your project must set the same pre-processor symbols as the variant of the Switcher-Ware Library you are using.
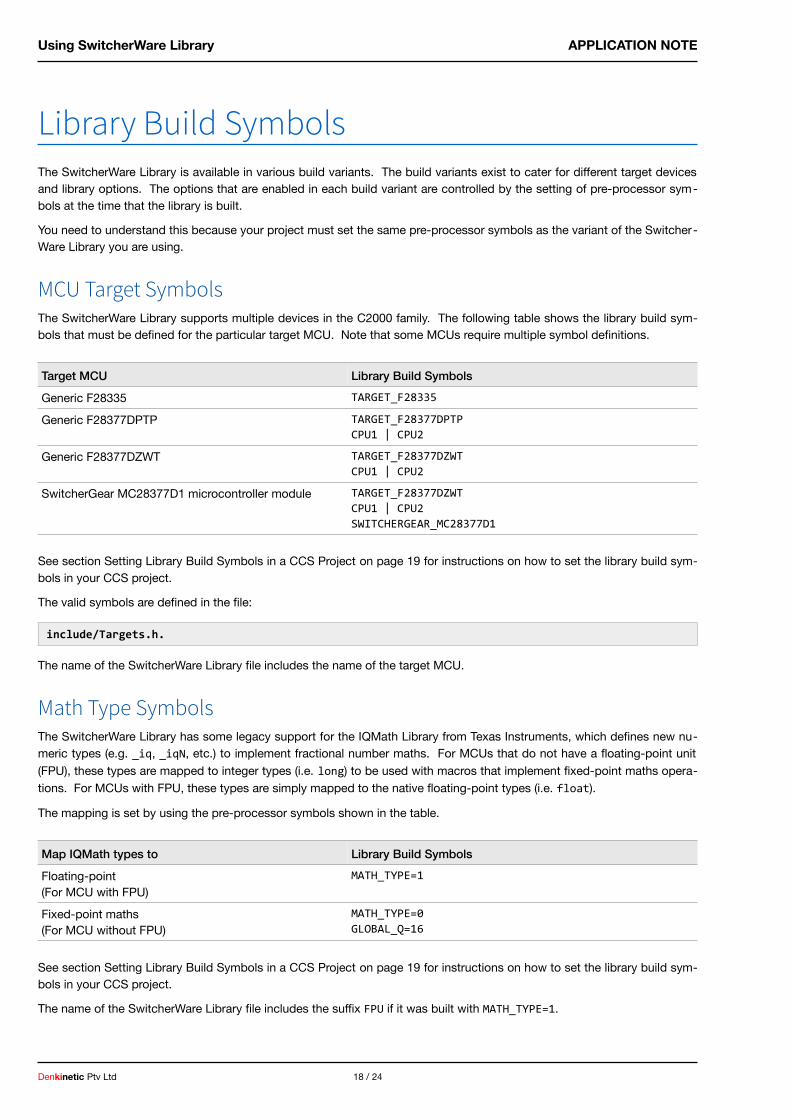
MCU Target SymbolsThe SwitcherWare Library supports multiple devices in the C2000 family. The following table shows the library build sym-bols that must be defined for the particular target MCU. Note that some MCUs require multiple symbol definitions.
Target MCU Library Build Symbols
Generic F28335 TARGET_F28335
Generic F28377DPTP TARGET_F28377DPTPCPU1 | CPU2
Generic F28377DZWT TARGET_F28377DZWTCPU1 | CPU2
SwitcherGear MC28377D1 microcontroller module TARGET_F28377DZWTCPU1 | CPU2SWITCHERGEAR_MC28377D1
See section Setting Library Build Symbols in a CCS Project on page 19 for instructions on how to set the library build sym-bols in your CCS project.
The valid symbols are defined in the file:
include/Targets.h.
The name of the SwitcherWare Library file includes the name of the target MCU.
Math Type SymbolsThe SwitcherWare Library has some legacy support for the IQMath Library from Texas Instruments, which defines new nu-meric types (e.g. _iq, _iqN, etc.) to implement fractional number maths. For MCUs that do not have a floating-point unit(FPU), these types are mapped to integer types (i.e. long) to be used with macros that implement fixed-point maths opera-tions. For MCUs with FPU, these types are simply mapped to the native floating-point types (i.e. float).
The mapping is set by using the pre-processor symbols shown in the table.
Map IQMath types to Library Build Symbols
Floating-point(For MCU with FPU)
MATH_TYPE=1
Fixed-point maths(For MCU without FPU)
MATH_TYPE=0GLOBAL_Q=16
See section Setting Library Build Symbols in a CCS Project on page 19 for instructions on how to set the library build sym-bols in your CCS project.
The name of the SwitcherWare Library file includes the suffix FPU if it was built with MATH_TYPE=1.
Denkinetic Pty Ltd 18 / 24

APPLICATION NOTE Using SwitcherWare Library
You only need to use IQMath if you need fixed-point maths on a MCU without a FPU. Or if you want to write portable codethat can be compiled for MCUs with and without FPU. You should consult the IQMath Libary documentation for usage.
If you will only ever target MCUs with FPU, you must still set the MATH_TYPE symbol, but you can ignore the IQMath nu-meric types and just declare your variables as float.
Setting Library Build Symbols in a CCS ProjectThe library build symbols are set in a CCS project by pre-defining them in the project properties. Open your project's Properties dialogue box using one of the following methods:
▸ Select the project in the Project Explorer View, then select the Project > Properties menu item, or
▸ Right-click the project name in the Project Explorer View to show the context menu, then select the Propertiesmenu item.
In the navigation pane on the left side, select Build > C2000 Compiler > Predefined Symbols to show the PredefinedSymbols page.
Click the icon buttons to add, remove and edit symbols in the list.
19 / 24 Denkinetic Pty Ltd

Using SwitcherWare Library APPLICATION NOTE
CCS Path VariablesCCS path variables are the simplest way to refer to external code resources in your projects.
A path variable contains a string value that is a path to a folder in the file system. You can extend the path variable to referto a sub-folder inside the path variable’s path.
For example, to access resources in the SwitcherWare Library you should create this path variable
[path] LibrarySwitcherWare = C:/Denkinetic/SwitcherWare/SwitcherWare_00_07_00
To illustrate the usage of path variables, the following path strings extend this single path variable to refer to the four in-clude folders needed to use the SwitcherWare Library with a F2837xD target. The ${} syntax substitutes the string value ofthe path variable.
${LibrarySwitcherWare}/include${LibrarySwitcherWare}/F2837xD/include${LibrarySwitcherWare}/SwitcherGear/include${LibrarySwitcherWare}/toolbox/include
This is shorter to type and clearer to read. But more importantly, any change of the single path variable automaticallypropagates to the four library paths. This makes it simple to switch to a different version of the library, or to move the lib -rary.
Setting Path Variables ManuallyPath variables should be set at the workspace level in CCS. This means that the path variables will be available to all pro -jects in the workspace.
In the Window menu, select the Preferences menu item.
In the navigation pane on the left side, navigate to Code Composer Studio > Build > Variables.
To add a new path variable, click the Add… button to open the Define a New Build Variable dialogue box. Make sure
to select Path in the Type: drop-down list.
Denkinetic Pty Ltd 20 / 24
APPLICATION NOTE Using SwitcherWare Library
To edit an existing variable, select the variable and click the Edit… button.
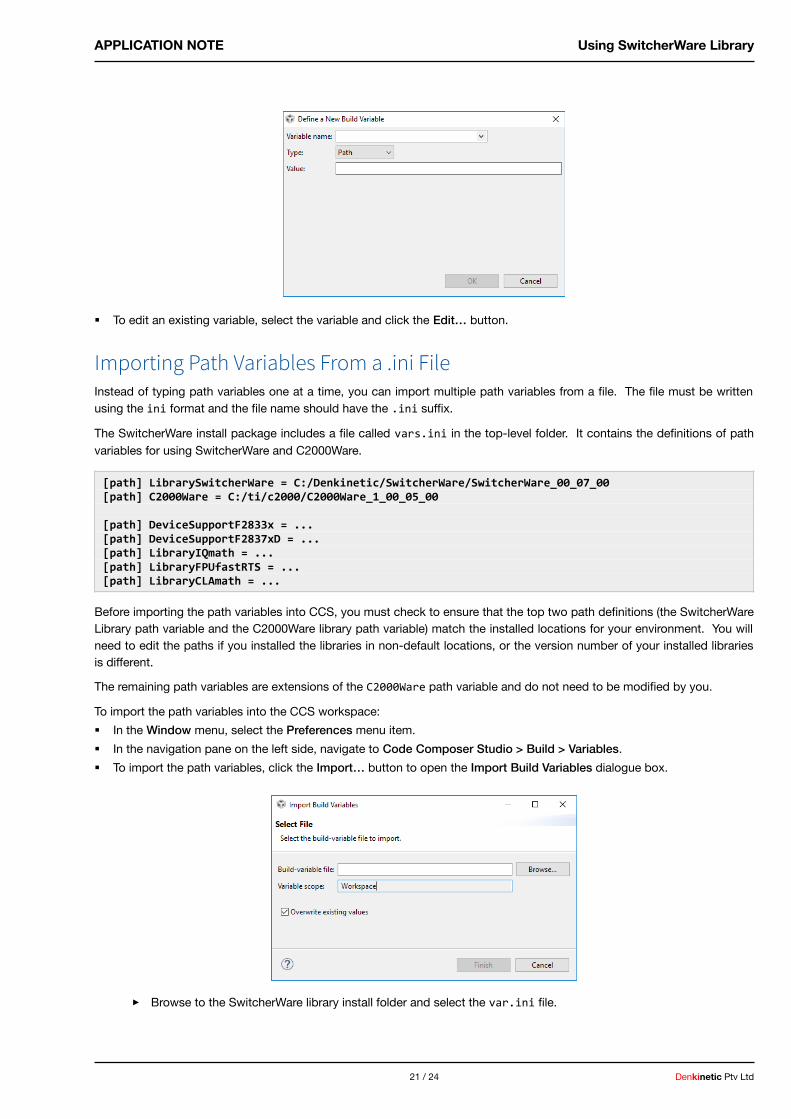
Importing Path Variables From a .ini FileInstead of typing path variables one at a time, you can import multiple path variables from a file. The file must be writtenusing the ini format and the file name should have the .ini suffix.
The SwitcherWare install package includes a file called vars.ini in the top-level folder. It contains the definitions of pathvariables for using SwitcherWare and C2000Ware.
[path] LibrarySwitcherWare = C:/Denkinetic/SwitcherWare/SwitcherWare_00_07_00[path] C2000Ware = C:/ti/c2000/C2000Ware_1_00_05_00
[path] DeviceSupportF2833x = ...[path] DeviceSupportF2837xD = ...[path] LibraryIQmath = ...[path] LibraryFPUfastRTS = ...[path] LibraryCLAmath = ...
Before importing the path variables into CCS, you must check to ensure that the top two path definitions (the SwitcherWareLibrary path variable and the C2000Ware library path variable) match the installed locations for your environment. You willneed to edit the paths if you installed the libraries in non-default locations, or the version number of your installed librariesis different.
The remaining path variables are extensions of the C2000Ware path variable and do not need to be modified by you.
To import the path variables into the CCS workspace:
In the Window menu, select the Preferences menu item.
In the navigation pane on the left side, navigate to Code Composer Studio > Build > Variables.
To import the path variables, click the Import… button to open the Import Build Variables dialogue box.
▸ Browse to the SwitcherWare library install folder and select the var.ini file.
21 / 24 Denkinetic Pty Ltd

Using SwitcherWare Library APPLICATION NOTE
▸ Make sure the Overwrite existing values check box is selected.
Denkinetic Pty Ltd 22 / 24

APPLICATION NOTE Using SwitcherWare Library
Building the SwitcherWare LibraryThe source file package for SwitcherWare includes CCS projects for building the SwitcherWare libraries. The projects arelocated in the ccs folder of the install location.
You can use the Import CCS Projects method to import the projects into a new CCS workspace. See section Import an Ex-ample SwitcherWare Project on page 16 for details on how to import projects.
You should consider whether to check the Copy projects into workspace option, or not. If you do not make a copy,changes that you make to the source code and the resulting library builds will modify the installed SwitcherWare librarypackage. Changes will affect all projects that link with the installed package.
If you do make a copy, changes to the source code and resulting library builds affect only the copied project (and not theinstalled SwitcherWare library package). Use this option if you want to make an isolated change for the purpose of one ap-plication project.
It is not always desirable to directly modify the SwitcherWare Library to make changes in library behaviour. Rememberthat, if you move to any updated version of the SwitcherWare Library, you must re-apply all your custom changes.
For C functions, you can define new functions in your project. You can even over-ride C functions by linking your new func-tion ahead of the SwitcherWare Library function – see section Set Link Order on page 15.
For C++ classes, you can create a sub-class in your own application project of any class that is defined in the Switcher -Ware Library. The sub-class inherits all behaviour from the parent class. You can modify the behaviour by over-riding anyof the member functions and adding new member variables. The details for this are beyond the scope of this document –you should consult a reference such as The C++ Programming Language by Bjarne Stroustrup.
23 / 24 Denkinetic Pty Ltd

Using SwitcherWare Library APPLICATION NOTE
Denkinetic Pty Ltd 24 / 24
Revision HistoryRevision Date Changes From Previous Release
1 19 Feb 2018 Original release.
2 04 Jan 2019 Updated for SwitcherWare v0.7.0. Added Quick Start and re-order sections. Added tables for path variables and libraries.
3 22 Nov 2019 Updated for SwitcherWare v0.7.2. Added graphical representation of library folder structure. Added information about minimum CCS version. Added more information about library build variants. Updated document format.