Instagram as a Tool for Advocacy - AgChat 2014 Cultivate and Connect Conference, Austin, Texas

Instagram Connect Pro © MageComp.com
Instagram Connect Pro Extension
User Manual
Instagram Connect integrates Instagram with your Magento Store to display Instagram
images based on user names or hashtags.
Table of Content
1. Extension Installation Guide
2. Configuration
3. Home Page Settings
4. Product Page Settings
5. Popup Settings
6. UTM Tracking Settings
7. Updating & Approving Images
8. Approved Images Manager
9. CMS Page Setting
10. Instagram Images on Frontend
11. Use Instagram as widget
12. Deactivation of Extension in Case of Emergency
13. FAQs
Instagram Connect Pro © MageComp.com
1. Extension Installation Guide
Go to My downloadable products. The file that you download normally is a zip or tgz
file.
It’s required to disable cache in the administration panel of your site. Go to
System/Cache Management. Choose all caches and take action “Disable” then submit.
Also disable the Compilation if it is ON. So, make sure that Caching and Compilation is
disabled before installing the extension, you can enable it again after the installation.
Use FTP client (such as Filezilla, WinSCP, cuteFtp) to upload or copy all folders in the zip
package to your Magneto site root folder. This will not overwrite any existing files, just
add new files to the folder structure.
You will need to install the extension in your custom theme if you are using. Just make
sure about these files to be uploaded in custom theme.
app/design/frontend/default/default to
app/design/frontend/YourThemeFolder/PackageFolder
skin/design/frontend/default/default to
skin/design/frontend/YourThemeFolder/PackageFolder
After uploading is done, enable the Cache and if you keep Compilation On then re-run
the Compilation.
Navigate to System/Configuration, if you can see the extension tab, it is installed
properly.
Now if you get Access denied error when click on the extension tab, you need to log out
admin panel and log in again.
Go to front-end and try to process, make sure that everything is OK.
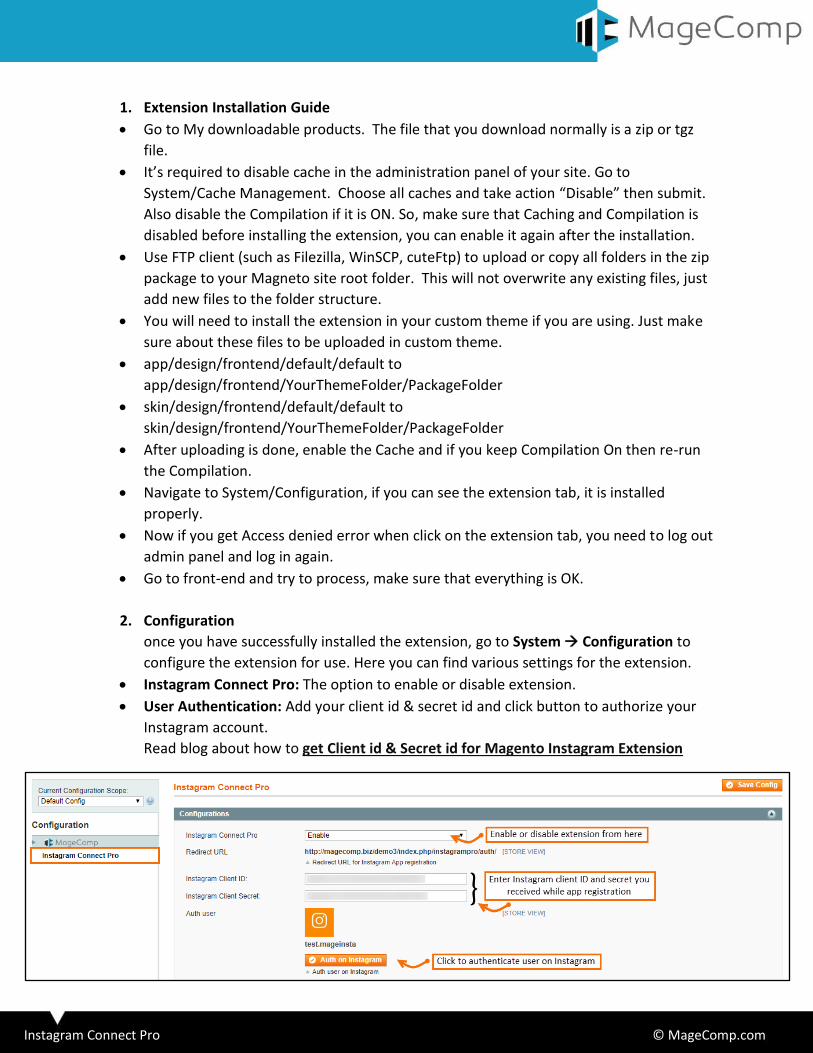
2. Configuration
once you have successfully installed the extension, go to System Configuration to
configure the extension for use. Here you can find various settings for the extension.
Instagram Connect Pro: The option to enable or disable extension.
User Authentication: Add your client id & secret id and click button to authorize your
Instagram account.
Read blog about how to get Client id & Secret id for Magento Instagram Extension

Instagram Connect Pro © MageComp.com
Update Images By: Select option to update Instagram images by, either users or
hashtags.
Users: type self to fetch your Instagram account images.
No. of Images to Fetch: Enter number of images to fetch based on usernames or
hashtags added.
No. of Images to Show on Instagram page: Enter number of images to show on
Instagram page.
Show Instagram Images in Left Sidebar: Set YES to show Instagram images in left
sidebar.
No. of Images to Show on Left Sidebar: Enter number of images to show in left sidebar.
Show Instagram Images in Right Sidebar: Set YES to show Instagram images in right
sidebar.
No. of Images to Show on Right Sidebar: Enter number of images to show in right
sidebar.
3. Home Page Settings
Show images on home page: Set YES to show images on homepage
Number of images to show on homepage: Enter the number of images you want to
show on homepage

Instagram Connect Pro © MageComp.com
4. Product Page Settings
Show images on product page: Set YES to show images on product page
Number of images to show on product page: Enter the number of images you want to
show on product page
In More View Section: Set YES to show images in more view section.
In Product Detail Section: Set YES to show images in product detail section.
In Product Tab Section: Set YES to show images in product tab section.
5. Popup Settings
Select Instagram Popup View: Select one of the three views of Instagram popup to
show in frontend.
Auto Play Video in popup: Select YES to auto play Instagram videos in popup.
Instagram Connect Pro © MageComp.com
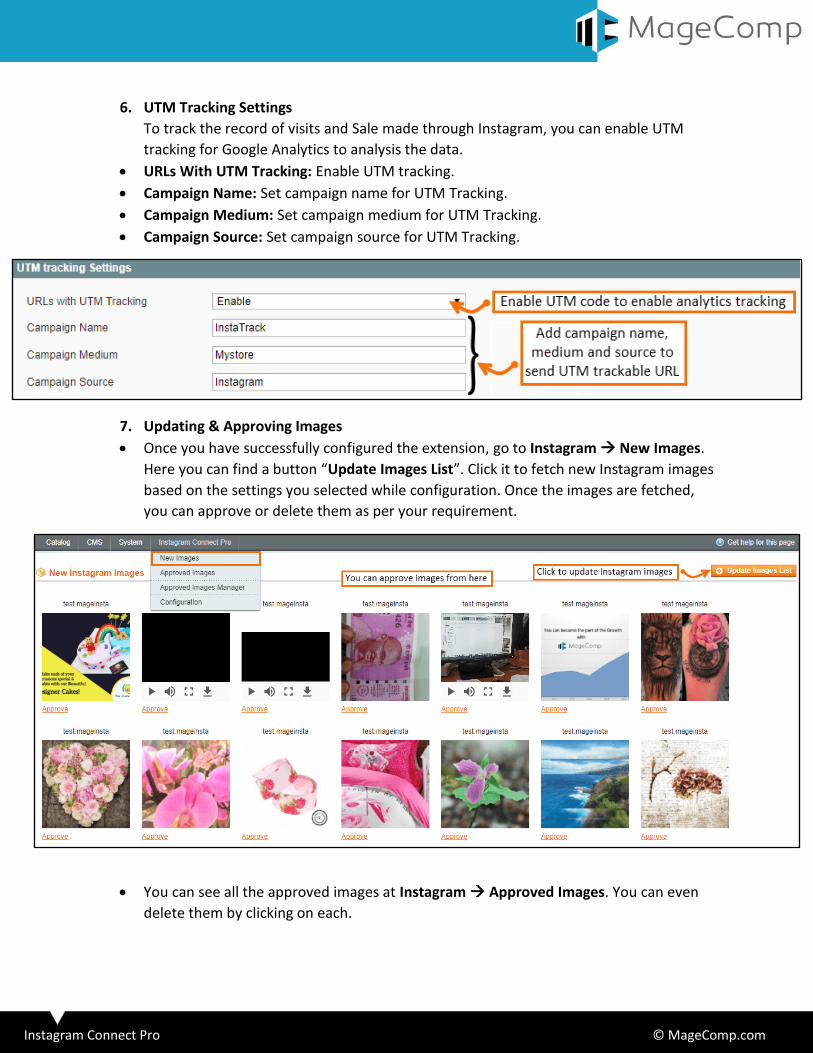
6. UTM Tracking Settings
To track the record of visits and Sale made through Instagram, you can enable UTM
tracking for Google Analytics to analysis the data.
URLs With UTM Tracking: Enable UTM tracking.
Campaign Name: Set campaign name for UTM Tracking.
Campaign Medium: Set campaign medium for UTM Tracking.
Campaign Source: Set campaign source for UTM Tracking.
7. Updating & Approving Images
Once you have successfully configured the extension, go to Instagram New Images.
Here you can find a button “Update Images List”. Click it to fetch new Instagram images
based on the settings you selected while configuration. Once the images are fetched,
you can approve or delete them as per your requirement.
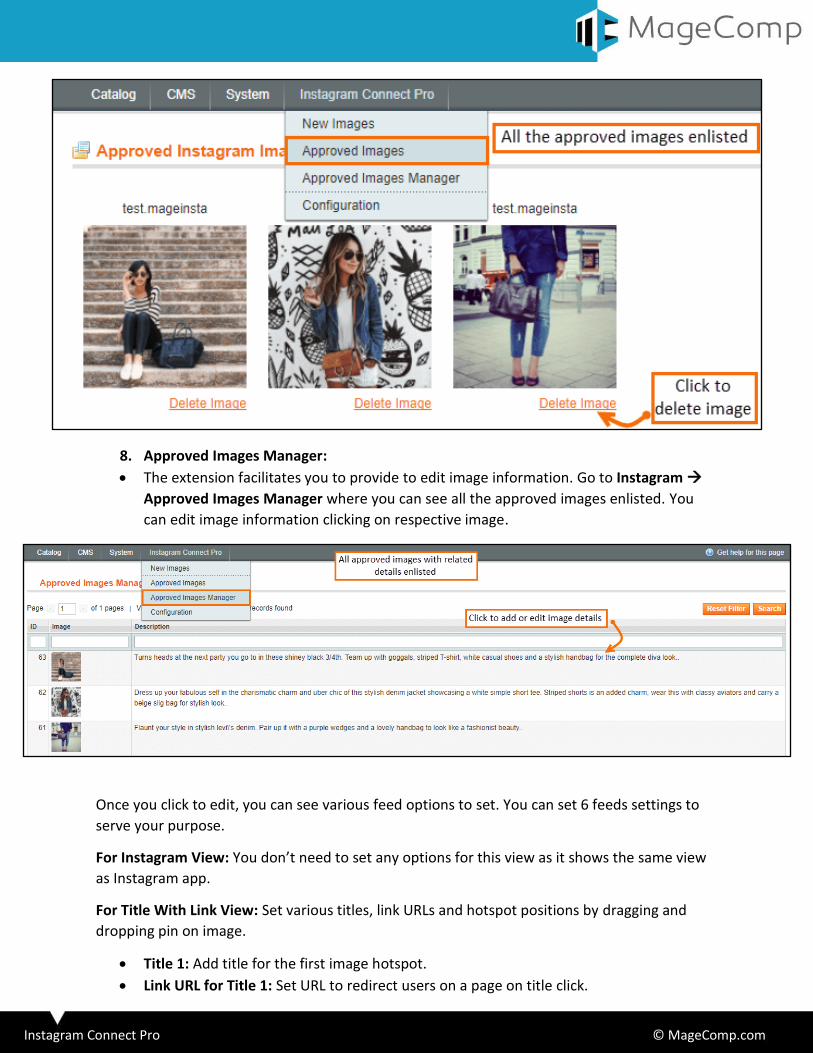
You can see all the approved images at Instagram Approved Images. You can even
delete them by clicking on each.
Instagram Connect Pro © MageComp.com
8. Approved Images Manager:
The extension facilitates you to provide to edit image information. Go to Instagram
Approved Images Manager where you can see all the approved images enlisted. You
can edit image information clicking on respective image.
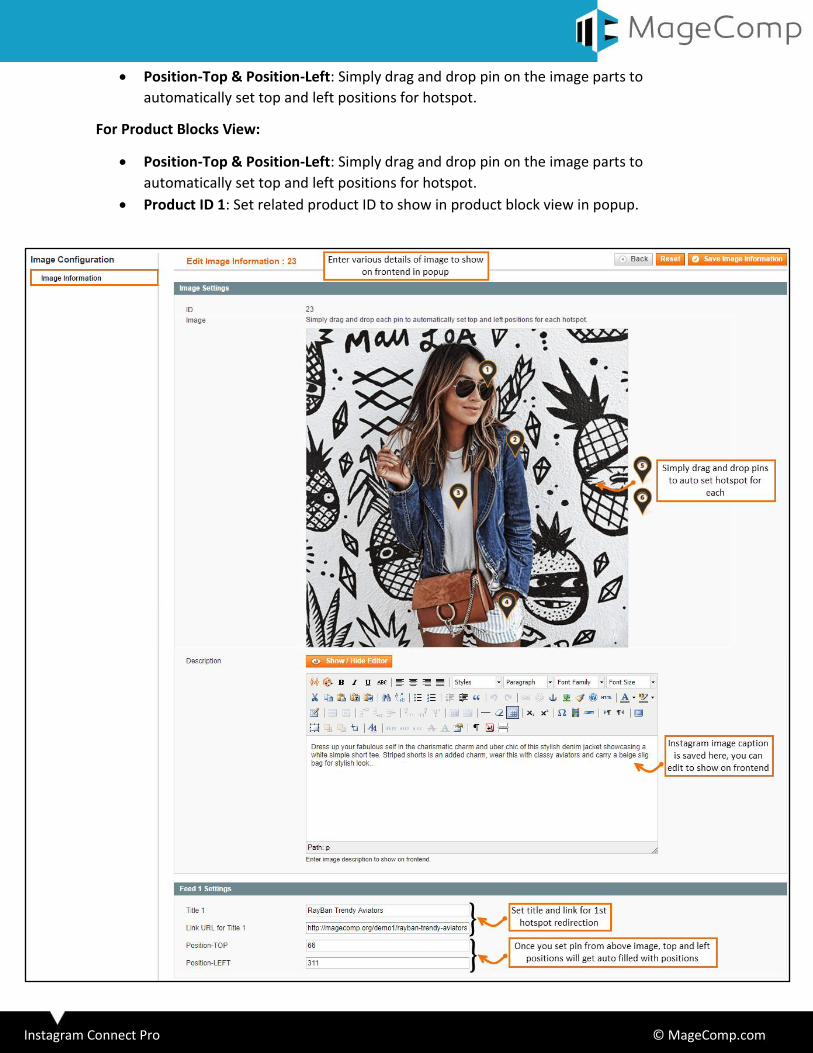
Once you click to edit, you can see various feed options to set. You can set 6 feeds settings to
serve your purpose.
For Instagram View: You don’t need to set any options for this view as it shows the same view
as Instagram app.
For Title With Link View: Set various titles, link URLs and hotspot positions by dragging and
dropping pin on image.
Title 1: Add title for the first image hotspot.
Link URL for Title 1: Set URL to redirect users on a page on title click.
Instagram Connect Pro © MageComp.com
Position-Top & Position-Left: Simply drag and drop pin on the image parts to
automatically set top and left positions for hotspot.
For Product Blocks View:
Position-Top & Position-Left: Simply drag and drop pin on the image parts to
automatically set top and left positions for hotspot.
Product ID 1: Set related product ID to show in product block view in popup.
Instagram Connect Pro © MageComp.com
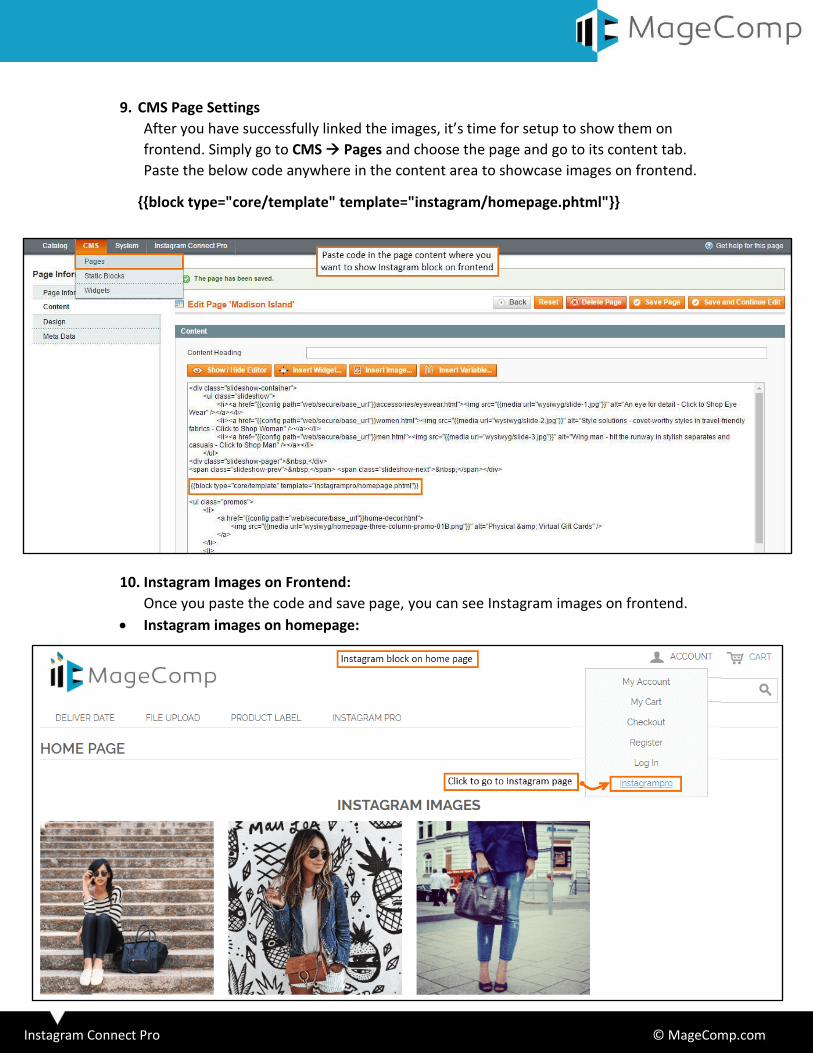
9. CMS Page Settings
After you have successfully linked the images, it’s time for setup to show them on
frontend. Simply go to CMS Pages and choose the page and go to its content tab.
Paste the below code anywhere in the content area to showcase images on frontend.
{{block type="core/template" template="instagram/homepage.phtml"}}
10. Instagram Images on Frontend:
Once you paste the code and save page, you can see Instagram images on frontend.
Instagram images on homepage:
Instagram Connect Pro © MageComp.com
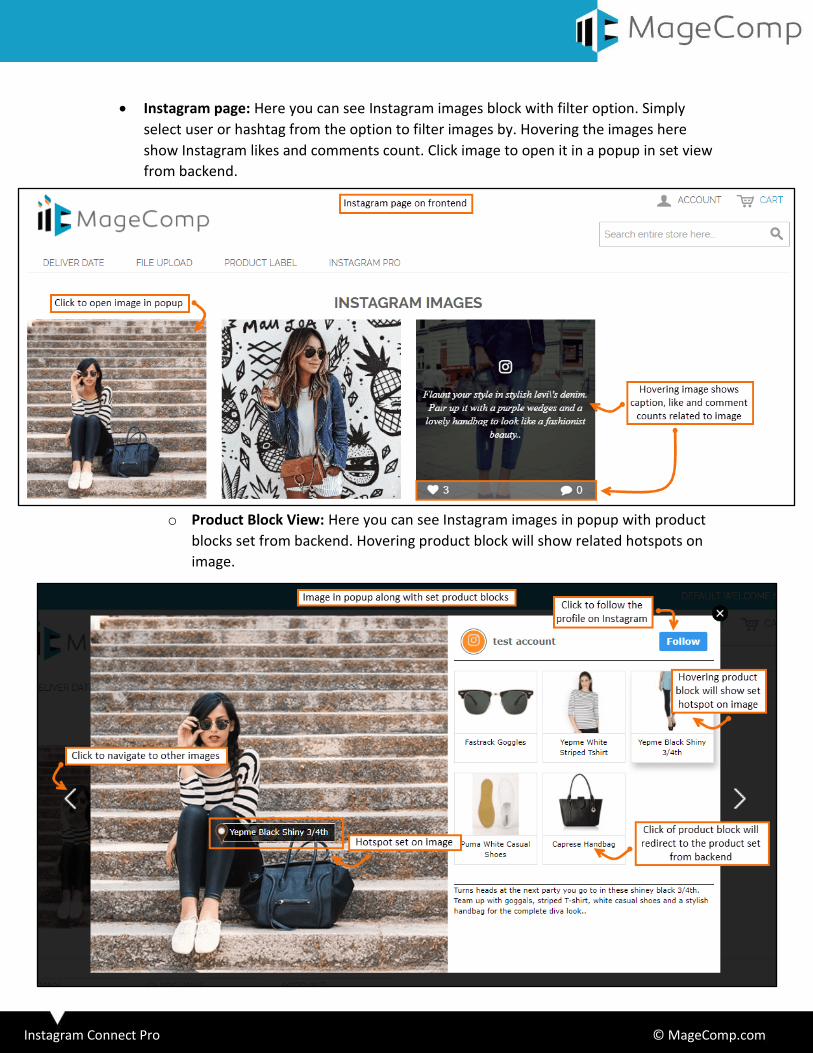
Instagram page: Here you can see Instagram images block with filter option. Simply
select user or hashtag from the option to filter images by. Hovering the images here
show Instagram likes and comments count. Click image to open it in a popup in set view
from backend.
o Product Block View: Here you can see Instagram images in popup with product
blocks set from backend. Hovering product block will show related hotspots on
image.
Instagram Connect Pro © MageComp.com
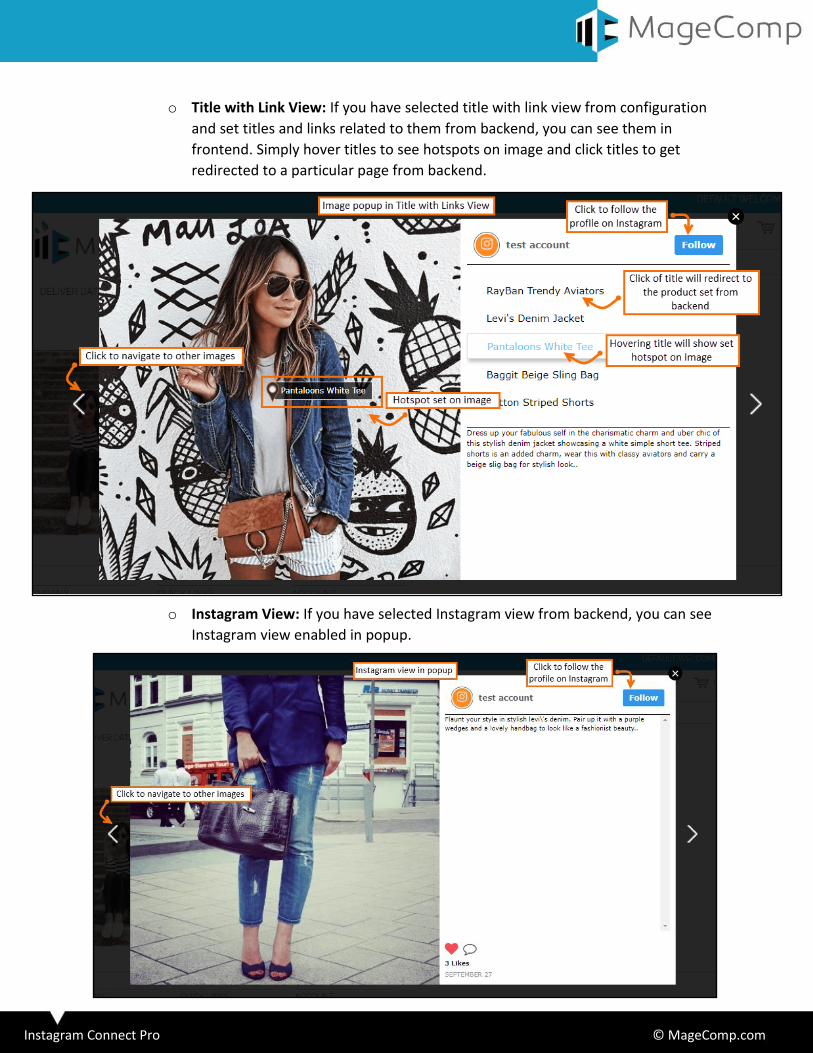
o Title with Link View: If you have selected title with link view from configuration
and set titles and links related to them from backend, you can see them in
frontend. Simply hover titles to see hotspots on image and click titles to get
redirected to a particular page from backend.
o Instagram View: If you have selected Instagram view from backend, you can see
Instagram view enabled in popup.
Instagram Connect Pro © MageComp.com
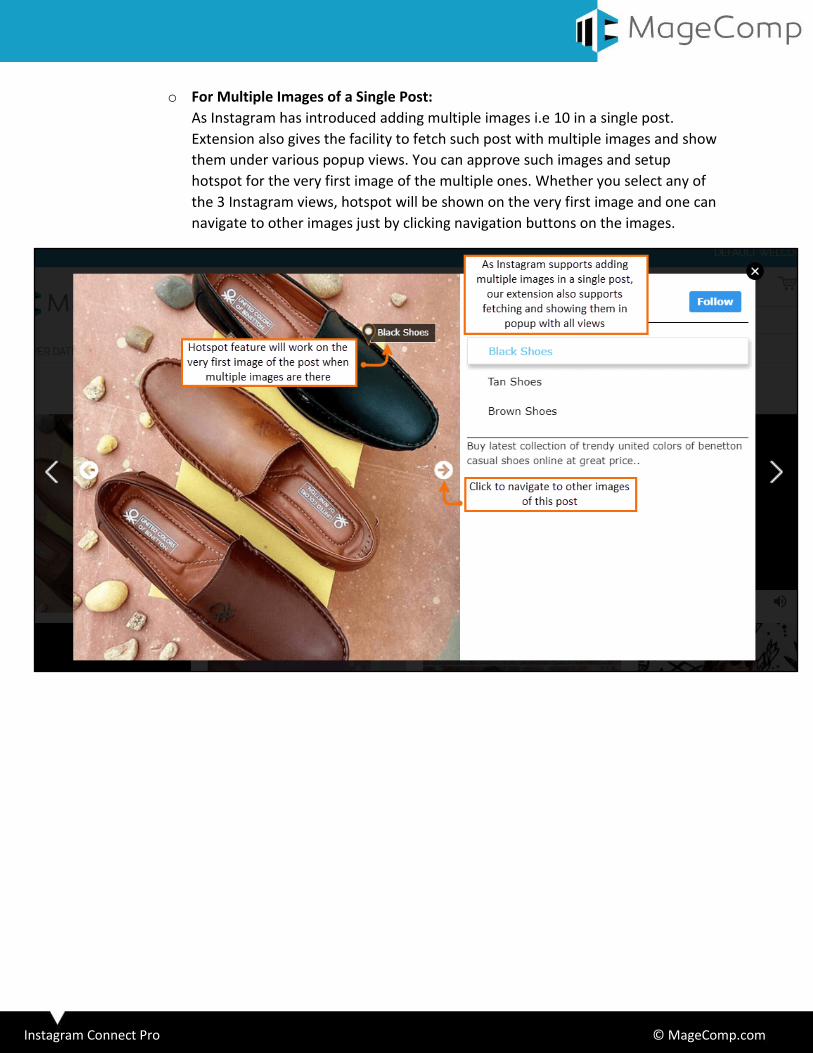
o For Multiple Images of a Single Post:
As Instagram has introduced adding multiple images i.e 10 in a single post.
Extension also gives the facility to fetch such post with multiple images and show
them under various popup views. You can approve such images and setup
hotspot for the very first image of the multiple ones. Whether you select any of
the 3 Instagram views, hotspot will be shown on the very first image and one can
navigate to other images just by clicking navigation buttons on the images.

Instagram Connect Pro © MageComp.com
Instagram image block in sidebar:
11. Use Instagram as widget:
Instagram extension can also be used as widget. For that go to CMS Widgets and click
on “Add New Widget Instance”. Select type as “Magecomp Instagrampro” and select
design theme. Add widget Title and enter Sort Order. From layout Updates set “Display
On” as where you want to display Instagram block through this widget. Also select Block
Reference to position the widget block on the page.

Instagram Connect Pro © MageComp.com
o Once you have set widget, you can see it on a page and position where you
have set.
12. Deactivation of Extension in Case of Emergency
Manually delete all the files and content from following folders in your Magento root:
var/cache/*
var/session/*
Make sure you’ve uploaded all files from the downloaded package.
Go to app/etc/modules/Magecomp_Instagrampro.xml and replace
<active>true</active> with <active>false</active>
Then repeat Step 1 and if something goes wrong, please contact us at https://magecomp.com/support/
13. FAQs
What if I get “Access denied” error after installation of the extension?
Whenever you get Access denied error while clicking on the extension tab after
installation, log out admin panel and re-login.
How can I display the Instagram images in other CMS pages?
The extension facilitates to display Instagram images on frontend in any CMS page
simply by pasting the below code in content part of CMS page. {{block type="core/template" template="instagram/homepage.phtml"}}

Instagram Connect Pro © MageComp.com
Thank You!
Take a look at our other feature rich extensions:
WhatsApp Share extension facilitates sharing and promoting product details through WhatsApp messaging app and Whatsapp Web just with a finger touch. Know More…
social login extension allows your customers to login with Facebook, Google +, Twitter, Yahoo and LinkedIn. Know More…