Inspired by the cover to Max Lucado's book, · Inspired by the cover to Max Lucado's book, He Chose...
3
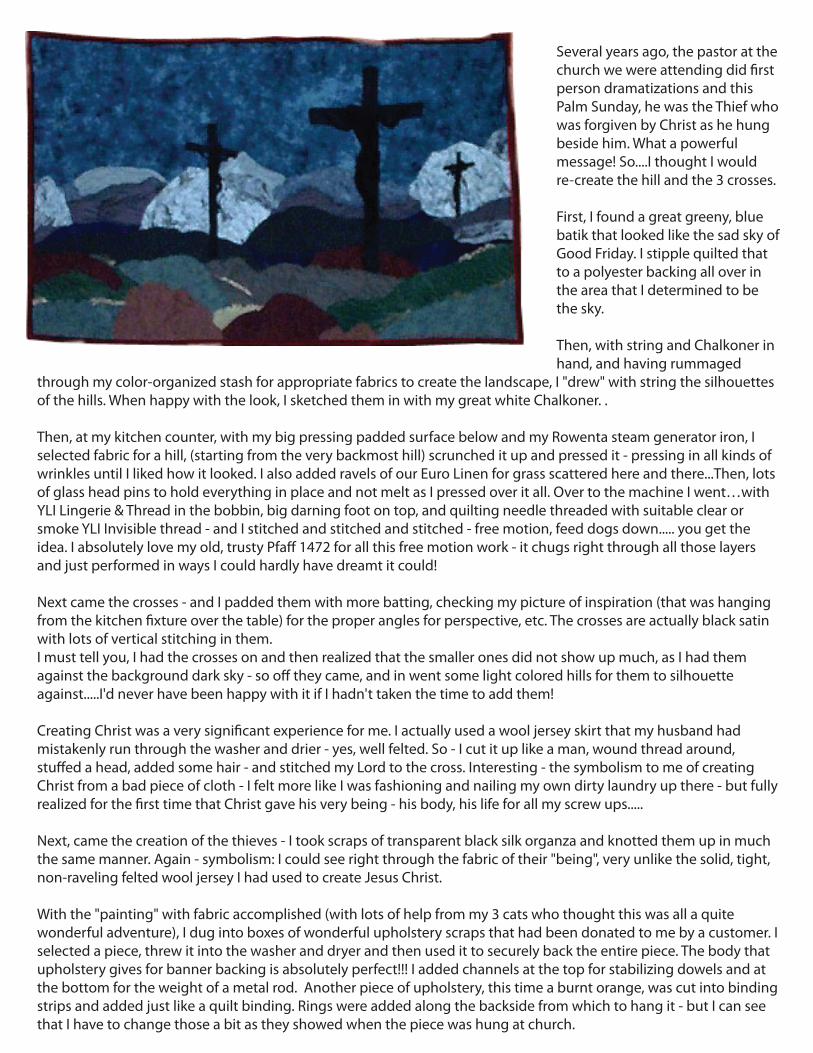
Several years ago, the pastor at the church we were attending did first person dramatizations and this Palm Sunday, he was the Thief who was forgiven by Christ as he hung beside him. What a powerful message! So....I thought I would re-create the hill and the 3 crosses. First, I found a great greeny, blue batik that looked like the sad sky of Good Friday. I stipple quilted that to a polyester backing all over in the area that I determined to be the sky. Then, with string and Chalkoner in hand, and having rummaged through my color-organized stash for appropriate fabrics to create the landscape, I "drew" with string the silhouettes of the hills. When happy with the look, I sketched them in with my great white Chalkoner. . Then, at my kitchen counter, with my big pressing padded surface below and my Rowenta steam generator iron, I selected fabric for a hill, (starting from the very backmost hill) scrunched it up and pressed it - pressing in all kinds of wrinkles until I liked how it looked. I also added ravels of our Euro Linen for grass scattered here and there...Then, lots of glass head pins to hold everything in place and not melt as I pressed over it all. Over to the machine I went…with YLI Lingerie & Thread in the bobbin, big darning foot on top, and quilting needle threaded with suitable clear or smoke YLI Invisible thread - and I stitched and stitched and stitched - free motion, feed dogs down..... you get the idea. I absolutely love my old, trusty Pfaff 1472 for all this free motion work - it chugs right through all those layers and just performed in ways I could hardly have dreamt it could! Next came the crosses - and I padded them with more batting, checking my picture of inspiration (that was hanging from the kitchen fixture over the table) for the proper angles for perspective, etc. The crosses are actually black satin with lots of vertical stitching in them. I must tell you, I had the crosses on and then realized that the smaller ones did not show up much, as I had them against the background dark sky - so off they came, and in went some light colored hills for them to silhouette against.....I'd never have been happy with it if I hadn't taken the time to add them! Creating Christ was a very significant experience for me. I actually used a wool jersey skirt that my husband had mistakenly run through the washer and drier - yes, well felted. So - I cut it up like a man, wound thread around, stuffed a head, added some hair - and stitched my Lord to the cross. Interesting - the symbolism to me of creating Christ from a bad piece of cloth - I felt more like I was fashioning and nailing my own dirty laundry up there - but fully realized for the first time that Christ gave his very being - his body, his life for all my screw ups..... Next, came the creation of the thieves - I took scraps of transparent black silk organza and knotted them up in much the same manner. Again - symbolism: I could see right through the fabric of their "being", very unlike the solid, tight, non-raveling felted wool jersey I had used to create Jesus Christ. With the "painting" with fabric accomplished (with lots of help from my 3 cats who thought this was all a quite wonderful adventure), I dug into boxes of wonderful upholstery scraps that had been donated to me by a customer. I selected a piece, threw it into the washer and dryer and then used it to securely back the entire piece. The body that upholstery gives for banner backing is absolutely perfect!!! I added channels at the top for stabilizing dowels and at the bottom for the weight of a metal rod. Another piece of upholstery, this time a burnt orange, was cut into binding strips and added just like a quilt binding. Rings were added along the backside from which to hang it - but I can see that I have to change those a bit as they showed when the piece was hung at church.
Transcript of Inspired by the cover to Max Lucado's book, · Inspired by the cover to Max Lucado's book, He Chose...
Several years ago, the pastor at the church we were attending did �rst person dramatizations and this Palm Sunday, he was the Thief who was forgiven by Christ as he hung beside him. What a powerful message! So....I thought I would re-create the hill and the 3 crosses.
First, I found a great greeny, blue batik that looked like the sad sky of Good Friday. I stipple quilted that to a polyester backing all over in the area that I determined to be the sky.
Then, with string and Chalkoner in hand, and having rummaged
through my color-organized stash for appropriate fabrics to create the landscape, I "drew" with string the silhouettes of the hills. When happy with the look, I sketched them in with my great white Chalkoner. .
Then, at my kitchen counter, with my big pressing padded surface below and my Rowenta steam generator iron, I selected fabric for a hill, (starting from the very backmost hill) scrunched it up and pressed it - pressing in all kinds of wrinkles until I liked how it looked. I also added ravels of our Euro Linen for grass scattered here and there...Then, lots of glass head pins to hold everything in place and not melt as I pressed over it all. Over to the machine I went…with YLI Lingerie & Thread in the bobbin, big darning foot on top, and quilting needle threaded with suitable clear or smoke YLI Invisible thread - and I stitched and stitched and stitched - free motion, feed dogs down..... you get the idea. I absolutely love my old, trusty Pfa� 1472 for all this free motion work - it chugs right through all those layers and just performed in ways I could hardly have dreamt it could!
Next came the crosses - and I padded them with more batting, checking my picture of inspiration (that was hanging from the kitchen �xture over the table) for the proper angles for perspective, etc. The crosses are actually black satin with lots of vertical stitching in them. I must tell you, I had the crosses on and then realized that the smaller ones did not show up much, as I had them against the background dark sky - so o� they came, and in went some light colored hills for them to silhouette against.....I'd never have been happy with it if I hadn't taken the time to add them!
Creating Christ was a very signi�cant experience for me. I actually used a wool jersey skirt that my husband had mistakenly run through the washer and drier - yes, well felted. So - I cut it up like a man, wound thread around, stu�ed a head, added some hair - and stitched my Lord to the cross. Interesting - the symbolism to me of creating Christ from a bad piece of cloth - I felt more like I was fashioning and nailing my own dirty laundry up there - but fully realized for the �rst time that Christ gave his very being - his body, his life for all my screw ups.....
Next, came the creation of the thieves - I took scraps of transparent black silk organza and knotted them up in much the same manner. Again - symbolism: I could see right through the fabric of their "being", very unlike the solid, tight, non-raveling felted wool jersey I had used to create Jesus Christ.
With the "painting" with fabric accomplished (with lots of help from my 3 cats who thought this was all a quite wonderful adventure), I dug into boxes of wonderful upholstery scraps that had been donated to me by a customer. I selected a piece, threw it into the washer and dryer and then used it to securely back the entire piece. The body that upholstery gives for banner backing is absolutely perfect!!! I added channels at the top for stabilizing dowels and at the bottom for the weight of a metal rod. Another piece of upholstery, this time a burnt orange, was cut into binding strips and added just like a quilt binding. Rings were added along the backside from which to hang it - but I can see that I have to change those a bit as they showed when the piece was hung at church.

Inspired by the cover to Max Lucado's book, He Chose The Nails, as suggested by my son, Je�, I set out to re-create this look of a cross of nails and thorns. I actually purchased big old nails at the hardware store - and begged a church farmer friend for barbed wire to do it exactly as on the book cover, but that didn't turn out to be quite the look I was really looking for - anyway, I work better with fabric than wire and nails.....
So, back into the upholstery boxes where I found a grey coarsely woven fabric from which I cut 9" long x 3" wide pieces with a point at one end. I folded the long edges into the center and stitched a straight line. Then I inserted a wire so that I could later bend and twist it, and then pulled up both folded edges to the center back and hand stitched to create a "round" nail. Adding a folded square of fabric on top by hand created the head to the nail. I think I made about 11 nails.
God worked it out that I ran into a friend while shopping. I was telling her about my work and wishing I could �nd real thorns for the "crown" and she said there was a haw-thorn tree in her back yard!! So - a trip to snip from that tree provided all I needed for fashioning the thorns. I wired the thorns together into a crown and stitched them down, once I had decided upon �nal place-ment and snipped o� the backmost thorns so that it would lie �at against the background.
For the background, I selected from our sale fabrics this o�-white wool crepe gauze, layered it on quilt batting and stipple quilted all over it.
My son selected the font from the computer, sized it and �ipped it horizontally so that I could just trace the letters onto Steam a Seam 2 without having to �ip them myself - truly cool! (Have you tried Steam A Seam 2 yet? It is this great stu� like Stitch Witchery - BUT, it has paper on both sides, and is tacky enough to adhere temporar-ily with just a touch - then when you have it exactly where you want it, you fuse with the iron!! Truly a cool new notion!!!) I had envisioned the cross in the center of the hanging all along, but Je� convinced me to set the cross o� to the left and right justify the lettering. He has a real eye - I highly suggest not trying to make all the deci-sions of banners by yourself! Solicit the help and talents of others in your family, and in your church!
A textured, striped rayon that I padded and added to the sides and for top tabs created the side and lowermost binding. The bottom shape of the banner was also decided by laying string down until I was pleased. I think the shape conveys part of the severity of the sacri�ce of Christ as well.
No stain in hand, I used shoe polish and a rag to stain the rod - a 1" dowel - and the �nials. All purchased at Lowe's hardware store. I plan to use the same �nials on other rods, decreasing the expense, as they just screw in.

This banner was created with really just combining cotton quilting fabrics backed with Steam a Seam 2 on the same o�-white wool crepe as the 'He Did This For You' banner - so they would look good hanging together. The gold is the won-derful Quick Bias Tape from Clover. SUPER simple - and for a banner, doesn't even need to be stitched. I love the use of the purple at the base and up the middle of the cross to denote the Kingship of our Lord, Jesus.
I encourage you to use your sewing skills to create inspirational ban-ners for YOUR place of worship. Be creative - in the same spirit that God created you!


![Home Page []0.7000 max 35 min 65 max 85 max 125 max 1 50 max I .5 max I max NO 1 STRIP 75 max 25 min 0.03 max 15 max 40 max Specific Gravity @ 150C Distillation:](https://static.fdocuments.us/doc/165x107/5f201a8f5d3b4e45a5210259/home-page-07000-max-35-min-65-max-85-max-125-max-1-50-max-i-5-max-i-max-no.jpg)