INsite for CA-PRTF Training Guide
41
INsite for CA-PRTF Training Guide CONTENTS INsite Installation Instructions: Setting Up INsite for the First Time for Non-Network Systems....................................... 2 INsite Installation Instructions: Setting Up INsite for the First Time for Network Systems............................................... 5 PATCH PROCEDURES ........................................................................................................................................................... 8 Modules Used for CA-PRTF ............................................................................................................................................... 10 Supporting Data – WrapAround Facilitator Info ............................................................................................................... 11 System Utilities – User Maintenance ................................................................................................................................ 12 Client Processing – Tabs used for CA-PRTF ....................................................................................................................... 13 Client Processing – Intake a New Consumer/Basic Demographics................................................................................... 14 Client Processing – Income ............................................................................................................................................... 15 Client Processing: MDS Reporting .................................................................................................................................... 16 Client Processing: CCB\Waiver : Initial CCB process ....................................................................................................... 17 Client Processing: CCB\Waiver : Update CCB process (make changes in time period where there is currently an approved CCB.) ................................................................................................................................................................. 20 Client Processing: CCB\Waiver : Annual CCB process (complete when Initial CCB expires and every year thereafter) 23 Data Entry Worksheets ..................................................................................................................................................... 26 Putting Someone on a Waiting List ................................................................................................................................... 28 Targeting Information ....................................................................................................................................................... 29 Medicaid Waiver Provider Database ................................................................................................................................ 30 Local Hot Lists ................................................................................................................................................................... 34 FTP Import and Export ...................................................................................................................................................... 35 EDS Paid Claims ................................................................................................................................................................. 37 INsite Security for CA-PRTF Users ..................................................................................................................................... 40 Where is my INsite folder?................................................................................................................................................ 41
Transcript of INsite for CA-PRTF Training Guide

INsite for CA-PRTF Training Guide
CONTENTS INsite Installation Instructions: Setting Up INsite for the First Time for Non-Network Systems....................................... 2
INsite Installation Instructions: Setting Up INsite for the First Time for Network Systems............................................... 5
PATCH PROCEDURES ........................................................................................................................................................... 8
Modules Used for CA-PRTF ............................................................................................................................................... 10
Supporting Data – WrapAround Facilitator Info ............................................................................................................... 11
System Utilities – User Maintenance ................................................................................................................................ 12
Client Processing – Tabs used for CA-PRTF ....................................................................................................................... 13
Client Processing – Intake a New Consumer/Basic Demographics ................................................................................... 14
Client Processing – Income ............................................................................................................................................... 15
Client Processing: MDS Reporting .................................................................................................................................... 16
Client Processing: CCB\Waiver : Initial CCB process ....................................................................................................... 17
Client Processing: CCB\Waiver : Update CCB process (make changes in time period where there is currently an
approved CCB.) ................................................................................................................................................................. 20
Client Processing: CCB\Waiver : Annual CCB process (complete when Initial CCB expires and every year thereafter) 23
Data Entry Worksheets ..................................................................................................................................................... 26
Putting Someone on a Waiting List ................................................................................................................................... 28
Targeting Information ....................................................................................................................................................... 29
Medicaid Waiver Provider Database ................................................................................................................................ 30
Local Hot Lists ................................................................................................................................................................... 34
FTP Import and Export ...................................................................................................................................................... 35
EDS Paid Claims ................................................................................................................................................................. 37
INsite Security for CA-PRTF Users ..................................................................................................................................... 40
Where is my INsite folder?................................................................................................................................................ 41
Page | 2
INsite Installation Instructions: Setting Up INsite for the First Time for Non-Network Systems
___Install the software.
1. Insert the CD
2. Double click on ‘My Computer’
3. Select (double click) your CD drive (probably D)
4. Double click on the VFP6 Workstation folder.
a. Double click on the ‘Setup’ icon (one with the picture of the computer monitor)
b. You should see screens for which the ‘Next’ prompt should be selected.
c. When the installation is complete you will get a screen that will offer a Finish option. Select that.
5. Going back to the folders on the INsite CD, double click on the INsite folder.
a. Double click on the ‘Setup’ icon. It will ask you to confirm that you want to install INsite. Say ‘Yes’ to
continue. It will start to open the install program (may take a few minutes).
b. You should see screens for which the ‘Next’ prompt should be selected.
c. When the installation is complete you will get a screen that will offer a Finish option. Select that.
6. Double click on the AR505enu.exe icon. Proceed in a similar fashion as noted above. This installs Acrobat
Reader, if your computer already has Acrobat Reader installed you can skip this step.
___Create a shortcut for your desktop.
There are various ways to create an icon; the following is a very simple way. After installing the INsite software, follow
the instructions below:
1. Right click on your desktop
2. Select New-Shortcut
3. A Create Shortcut dialog box will appear
4. Click on the browse button
5. Browse to your C: drive
6. Double click on your INsite folder
7. Find the am_main.exe or am_main with no extension (depending on how your computer is set-up)
8. Double click on am_main or single click and click open
9. This will bring you back to the dialog box; verify that c:\Insite\am_main.exe is in the command line
10. Click next
11. You can change the name to INsite if you like, this is the name that will appear under the icon on your desktop
12. Click Finish
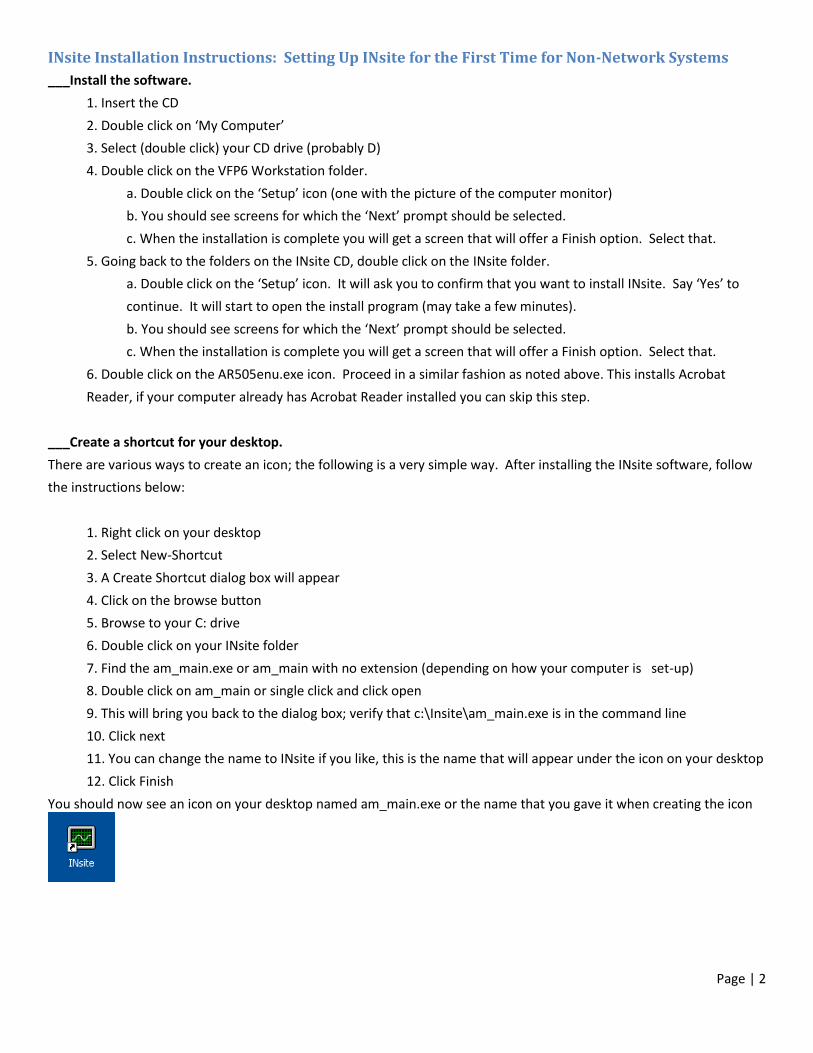
You should now see an icon on your desktop named am_main.exe or the name that you gave it when creating the icon

Page | 3
___Log into INsite.
1. Double click the shortcut. You will be prompted for an Operator Name & Password. Choose ‘Supervisor’ and
use ‘XXXX’ to log in.
2. The first time you log in you will also be asked what you want your ‘Encrypted PDF password’ to be. This will be
used when/if you print documents to the Encrypted PDF Printer. You will want this password to be something
you can remember and not a password you use for other things because you will need to provide it to the
people to whom you send the encrypted documents. It can be changed later.
___Make sure your Agency information gets filled in.
1. Click on the button for “supporting data”.
2. Click on the button for “agency name”.
3. Enter your agency number . Make sure it is consistent with what has been provided by Roeing. If INsite does
not accept the Area Number, you can download the latest list of authorized INsite agencies from the Web.
a. If needed download the latest list of authorized INsite agencies by going to the following address on
the web: http://www.roeing.com/software/installs.html
b. On this page, click on the 'AuthDate.Exe' link. You will be asked if you want to run or save the file,
choose to 'Save'. You can save the file anywhere on the computer, just make a note of where you saved
it.
c. Once the file has been saved. Use My Computer to locate the file. Be sure you do not have the INsite
program open. The file-unpacking program will open. If you have installed INSITE on a network drive,
please note the Destination box. The drive letter should be the drive where your INSITE is installed. The
file will need to be unpacked to the INsite\dbfs directory. If you have installed INSITE on your C: drive,
you do not need to change anything.
d. When you have verified the Destination, click "Finish". It will ask you if you want to replace the
existing file. You can say 'Yes' each time it asks (twice).

Page | 4
4. Check the appropriate boxes at the top.
Is this being run on a remote system? Check this if you are operating on a system that is not a
central/network system or workstation.
Is this an independent case mgr. Or DD provider offering TCM services system? Check this if you are not an
Area Agency on Aging. (You may need to exit & come back into this page, if you don’t see this question).
Is your agency a Community Mental Health Center? – check this if your agency works with CA-PRTF.
5. Enter the Unique ID (you can make one up – just be sure it’s unique to this system).
6. If this is a remote system, enter the amount of days between backups (we recommend seven).
7. Enter your name, address, and phone number.
8. Starting date of next fiscal year – always July 1.
9. You do not need to enter OMPP path.
If you wish you may also complete the information on the other tabs (Demographic Categories, Contact Categories,
and/or Waiting List Categories). This feature allows you to collect additional demographic, contact, and/or waiting list
information that is not already recorded in INsite.
___Make sure your version of INsite is Up to Date.
To get totally updated to the most current version of INsite, you will need to use the Patch program to get and apply the
latest updates. Open the patch program by using 'My Computer'. Locate the INsite folder and open it. Look for a file
name patch_2 (patch_2.exe, depending upon your Windows settings), double click to start the patch program. For
additional help, click the F1 key while the patch program is open.
___Make sure your Supporting Data is up to date.
When all of the above steps are complete, go to Export>>FTP Import & ExportàSend/Receive and hit Receive Only. After
you have received everything, go to the Process Imports tab and hit Process All. This will update the data in the
Medicaid Waiver Provider Database as well as the DART client information.
Once you have processed all the files, you can return to the Agency Information screen (Supporting Data >>> Agency
Name). Go to the CCB INfo tab, click the folder and find your agency's name in the list.
REMOTE SYSTEM: you will need to import Supporting Data (field.zip) from the Central System to get the
Vendors/Medicaid Waiver Provider Database/Case Manager list up to date.
Page | 5
INsite Installation Instructions: Setting Up INsite for the First Time for Network Systems
___Install the Shared Database Directory
From any network workstation:
1. Insert the CD
2. Double click on ‘My Computer’
3. Select (double click) your CD drive (probably D).
4. Double click on the INsite folder.
5. Double click on the ‘Setup’ icon
6. You should see screens for which the ‘Next’ prompt should be selected.
8. On the screen that asks about Destination, change the drive letter to the appropriate network drive where you
want it installed.
9. When the installation is complete you will get a screen that will offer a Finish option. Select that.
At each workstation that will be utilizing INsite, complete the following steps:
___Install the Workstation Supporting Files
1. Double click on the VFP6 Workstation folder.
2. Double click on the ‘Setup’ icon (one with the picture of the computer screen monitor)
3. You should see screens for which the ‘Next’ prompt should be selected.
4. When the installation is complete you will get a screen that will offer a Finish option. Select that.
5. Going back to the folders on the INsite CD, double click on the AR505enu.exe icon. Proceed in a similar fashion
as noted above. This installs Acrobat Reader, if your computer already has Acrobat Reader installed you can skip
this step.
___Create a shortcut for your desktop.
There are various ways to create an icon; the following is a very simple way. After installing the INsite software, follow
the instructions below:
1. Right click on your desktop
2. Select New-Shortcut
3. A Create Shortcut dialog box will appear
4. Click on the browse button
5. Browse to your C: drive
6. Double click on your INsite folder
7. Find the am_main.exe or am_main with no extension (depending on how your computer is set-up)
8. Double click on am_main or single click and click open
9. This will bring you back to the dialog box; verify that c:\Insite\am_main.exe is in the command line
10. Click next
Page | 6
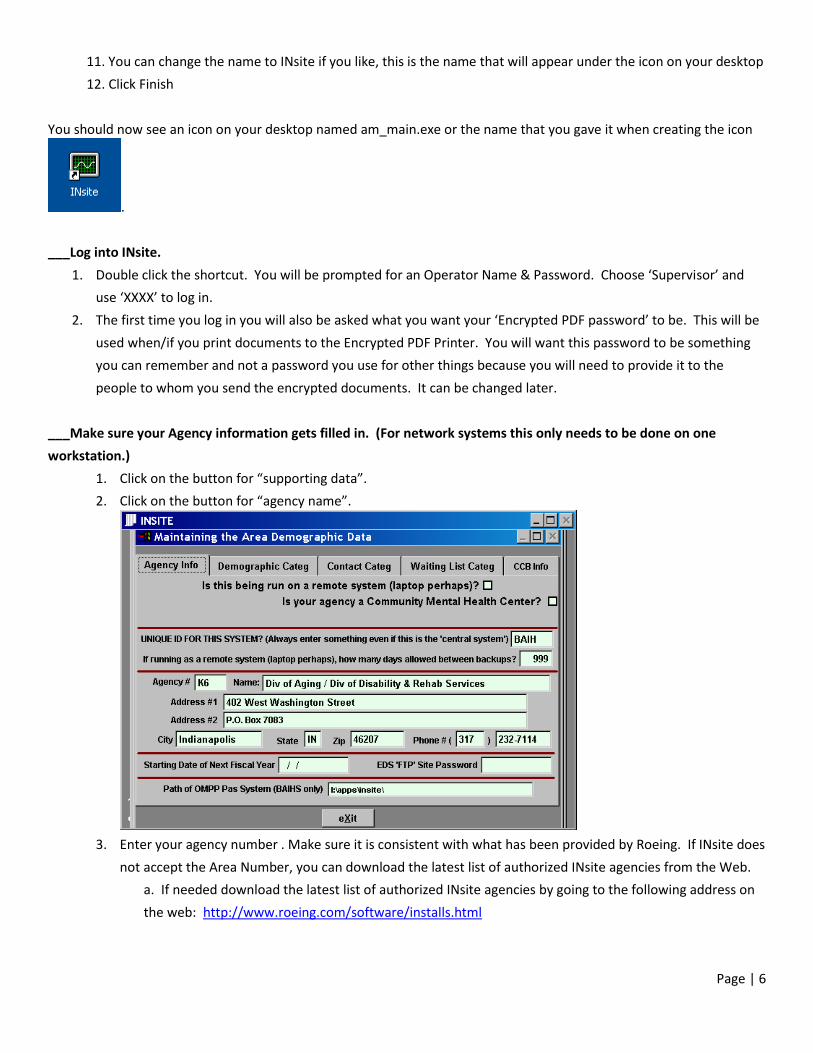
11. You can change the name to INsite if you like, this is the name that will appear under the icon on your desktop
12. Click Finish
You should now see an icon on your desktop named am_main.exe or the name that you gave it when creating the icon
.
___Log into INsite.
1. Double click the shortcut. You will be prompted for an Operator Name & Password. Choose ‘Supervisor’ and
use ‘XXXX’ to log in.
2. The first time you log in you will also be asked what you want your ‘Encrypted PDF password’ to be. This will be
used when/if you print documents to the Encrypted PDF Printer. You will want this password to be something
you can remember and not a password you use for other things because you will need to provide it to the
people to whom you send the encrypted documents. It can be changed later.
___Make sure your Agency information gets filled in. (For network systems this only needs to be done on one
workstation.)
1. Click on the button for “supporting data”.
2. Click on the button for “agency name”.
3. Enter your agency number . Make sure it is consistent with what has been provided by Roeing. If INsite does
not accept the Area Number, you can download the latest list of authorized INsite agencies from the Web.
a. If needed download the latest list of authorized INsite agencies by going to the following address on
the web: http://www.roeing.com/software/installs.html

Page | 7
b. On this page, click on the 'AuthDate.Exe' link. You will be asked if you want to run or save the file,
choose to 'Save'. You can save the file anywhere on the computer, just make a note of where you saved
it.
c. Once the file has been saved. Use My Computer to locate the file. Be sure you do not have the INsite
program open. The file-unpacking program will open. If you have installed INSITE on a network drive,
please note the Destination box. The drive letter should be the drive where your INSITE is installed. The
file will need to be unpacked to the INsite\dbfs directory. If you have installed INSITE on your C: drive,
you do not need to change anything.
d. When you have verified the Destination, click "Finish". It will ask you if you want to replace the
existing file. You can say 'Yes' each time it asks (twice).
4. Check the appropriate boxes at the top.
Is this being run on a remote system? Check this if you are operating on a system that is not a
central/network system or workstation.
Is this an independent case mgr. Or DD provider offering TCM services system? Check this if you are not an
Area Agency on Aging. (You may need to exit & come back into this page, if you don’t see this question).
Is your agency a Community Mental Health Center? – check this if your agency works with CA-PRTF.
5. Enter the Unique ID (you can make one up – just be sure it’s unique to this system).
6. If this is a remote system, enter the amount of days between backups (we recommend seven).
7. Enter your name, address, and phone number.
8. Starting date of next fiscal year – always July 1.
9. You do not need to enter OMPP path.
If you wish you may also complete the information on the other tabs (Demographic Categories, Contact Categories,
and/or Waiting List Categories). This feature allows you to collect additional demographic, contact, and/or waiting list
information that is not already recorded in INsite.
___Make sure your version of INsite is Up to Date.
To get totally updated to the most current version of INsite, you will need to use the Patch program to get and apply the
latest updates. Open the patch program by using 'My Computer'. Locate the INsite folder and open it. Look for a file
name patch_2 (patch_2.exe, depending upon your Windows settings), double click to start the patch program. For
additional help, click the F1 key while the patch program is open.
___Make sure your Supporting Data is up to date.
When all of the above steps are complete, go to Export>>>FTP Import & Export>>>Send/Receive and hit Receive Only.
After you have received everything, go to the Process Imports tab and hit Process All. This will update the data in the
Medicaid Waiver Provider Database as well as the DART client information.
Once you have processed all the files, you can return to the Agency Information screen (Supporting Data >>> Agency
Name). Go to the 'CCB Info' tab, click the folder and find your agency's name in the list.

Page | 8
PATCH PROCEDURES Roeing will notify users when there are updates to INsite. The Patch program is used to get those updates. You can
start the Patch program by using My Computer or Windows Explorer to open your INsite folder. Locate the file named
Patch_2.exe and double click.
These are the steps to follow from there:
SELECTIONS
Click on Yes/No "Update?" button/s. Set to "Yes" to update INsite and all of its sub-programs like I&R, Nutrition, and the
Medicaid Billing Module. Set to "Yes" to update Help-Files (this increases download time and is optional, but
recommended if you wish to use the online Help). Click on "Yes" to update the PAS Module when necessary (Applies to
AAA’s Only).
Page | 9
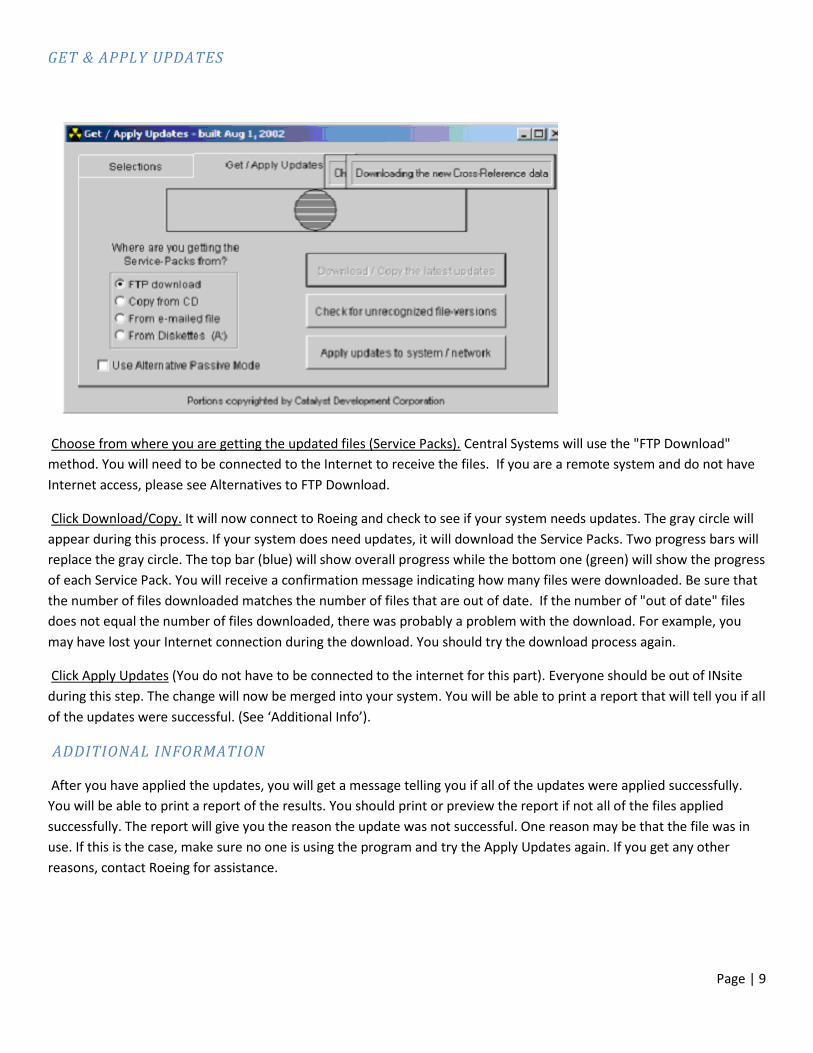
GET & APPLY UPDATES
Choose from where you are getting the updated files (Service Packs). Central Systems will use the "FTP Download"
method. You will need to be connected to the Internet to receive the files. If you are a remote system and do not have
Internet access, please see Alternatives to FTP Download.
Click Download/Copy. It will now connect to Roeing and check to see if your system needs updates. The gray circle will
appear during this process. If your system does need updates, it will download the Service Packs. Two progress bars will
replace the gray circle. The top bar (blue) will show overall progress while the bottom one (green) will show the progress
of each Service Pack. You will receive a confirmation message indicating how many files were downloaded. Be sure that
the number of files downloaded matches the number of files that are out of date. If the number of "out of date" files
does not equal the number of files downloaded, there was probably a problem with the download. For example, you
may have lost your Internet connection during the download. You should try the download process again.
Click Apply Updates (You do not have to be connected to the internet for this part). Everyone should be out of INsite
during this step. The change will now be merged into your system. You will be able to print a report that will tell you if all
of the updates were successful. (See ‘Additional Info’).
ADDITIONAL INFORMATION
After you have applied the updates, you will get a message telling you if all of the updates were applied successfully.
You will be able to print a report of the results. You should print or preview the report if not all of the files applied
successfully. The report will give you the reason the update was not successful. One reason may be that the file was in
use. If this is the case, make sure no one is using the program and try the Apply Updates again. If you get any other
reasons, contact Roeing for assistance.

Page | 10
Modules Used for CA-PRTF
Red Circles (used most often)
Client Processing: all consumer-related info (demographics, contacts, CCB’s, etc.)
Export: used to send/receive data to/from DMHA.
Local Hot Lists: used to keep track of when CCB’s, LOC’s and MDS reports are due.
Yellow Circles (used, but not as often)
Reports: various reports
Provider Database: info about certified providers. Generate ‘Pick List’.
Paid Claims: used monthly to update paid claim info
Supporting Data: primarily used to update list of WrapAround Facilitators
Release Notes: Help documents

Page | 11
Supporting Data – WrapAround Facilitator Info
Each WrapAround Facilitator is assigned an ID # for INsite which is separate from the EDS
number. It will begin with ‘PZ6’.
In order for the WrapAround Facilitators to be available to assign to a consumer in Client
Processing, there is some additional information that needs to be entered by the
CMHC.
•Initially, DMHA staff will assign this number and enter the info into INsite about the WrapAround Facilitator. (Name, phone #, e-mail address, CMHC affiliated with).
•When DMHA enters the information initially, it will be exported to the CMHC’s via the FTP Send/Receive process.
•The CMHC will need to click on the following in INsite:
Supporting Data
Case Management
Case Managers
Retrieve one of the CMHC's
WF's
Click 'Edit' at the bottom of
the screen.
Put a check next to
'Display in Key Drop
Down Lists(....)'
Save & repeat for all of the
CMHC's WF's. Exit when finished.
NOTE
The WrapAround Facilitator can
follow these same steps to update
their email address/phone
number if that info changes after
the initial setup.

Page | 12
System Utilities – User Maintenance
.
INsite is installed with one user, Supervisor, that has been assigned all rights. If you want to add new users or change the password for Supervisor (highly recommended), you will need to follow these steps:
System Utilities
Add/Maintain Users
Add a new operator
Enter the password (must be at least four characters) (Escreen password is not
required.)
Save new password.
Repeat for any additional users. Exit
when finished.
NOTE
When finished, the new user(s) must be assigned security
rights for INsite. Please refer to INsite Security for
complete details
Page | 13
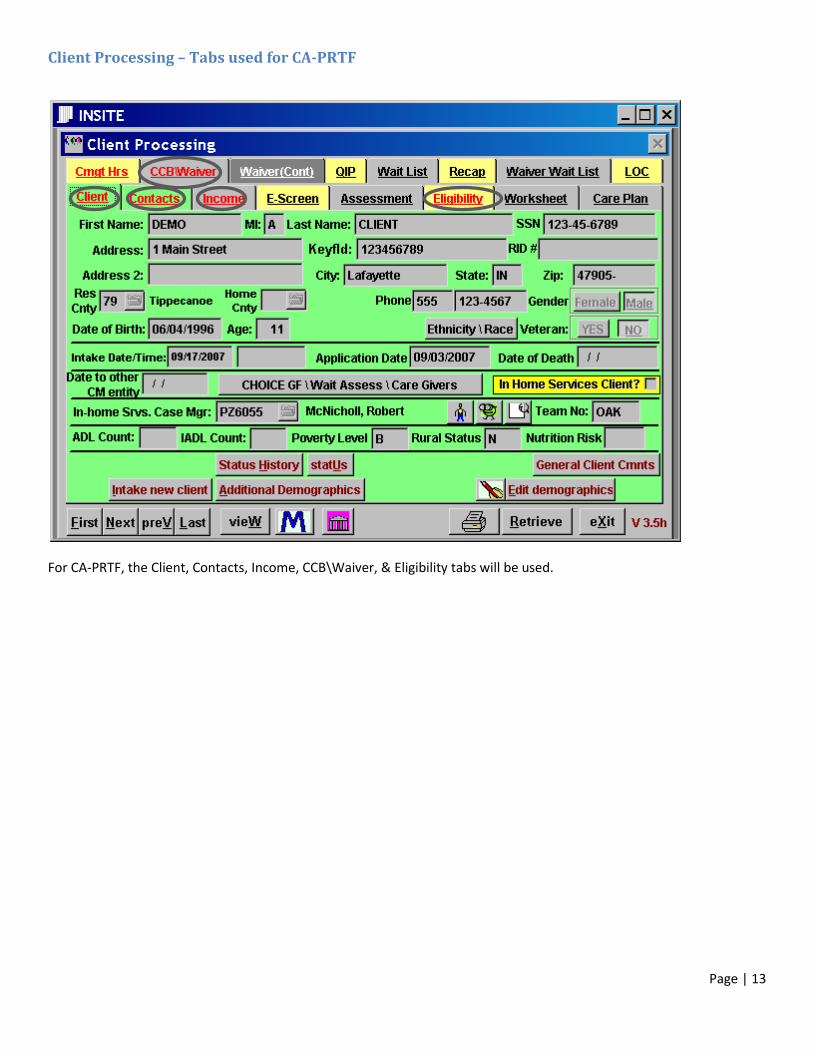
Client Processing – Tabs used for CA-PRTF
For CA-PRTF, the Client, Contacts, Income, CCB\Waiver, & Eligibility tabs will be used.

Page | 14
Client Processing – Intake a New Consumer/Basic Demographics
INtake a New ClientEnter SSN, Name, DOB,
& # in Household.Save
Edit demographicsEnter address, phone,
race & ethnicity, & WF.
Also mark sex, veteran status, & enter RID # if
know.Save
Additional demographics
Enter marital status, location, referral,& living arrangement.
Enter at least two diagnoses (the
second one can be deferred).
Save
Enter Current Caregiver
Click 'CHOICE GF\Wait
Assess\Care Givers
Enter Caregiver Information
Save

Page | 15
Income TabEdit Monthly Income/Ded
uctions
Edit Monthly Income
Enter income (can
put it all under other).
Save & proceed to Deductions. (No need to
enter anything on this screen.)
Exit
Client Processing – Income
Page | 16
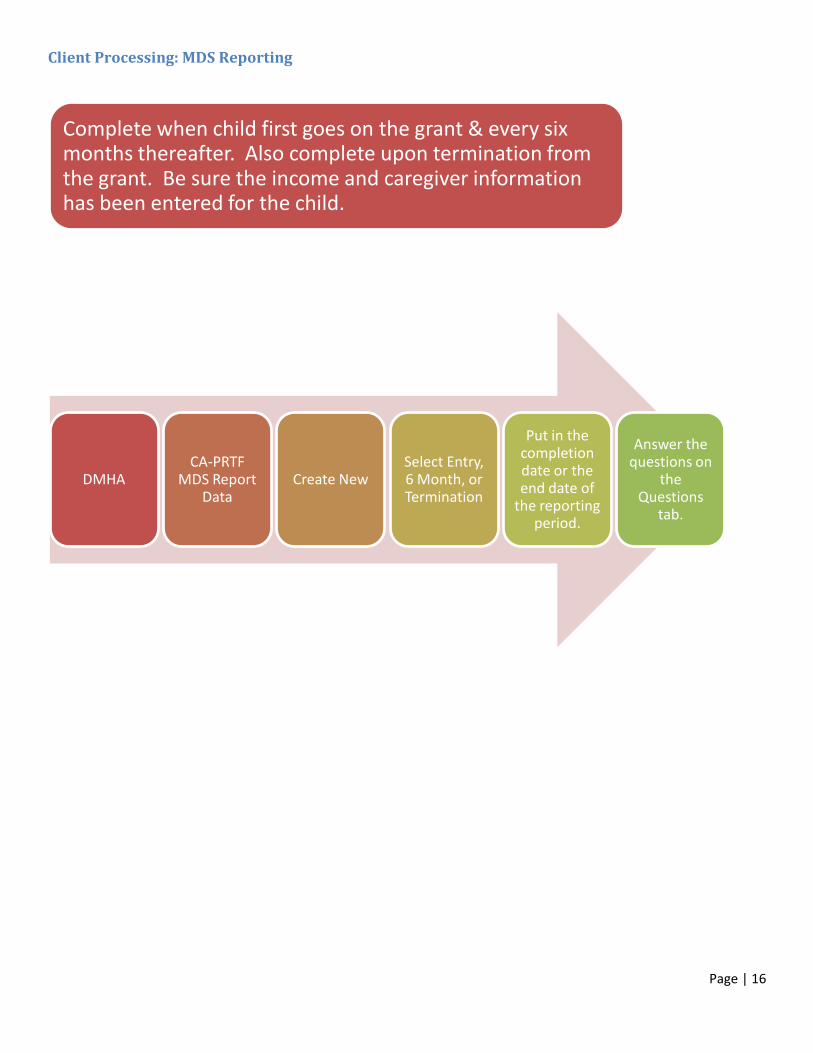
Client Processing: MDS Reporting
Complete when child first goes on the grant & every six months thereafter. Also complete upon termination from the grant. Be sure the income and caregiver information has been entered for the child.
DMHACA-PRTF
MDS Report Data
Create NewSelect Entry, 6 Month, or Termination
Put in the completion date or the end date of
the reporting period.
Answer the questions on
the Questions
tab.
Page | 17
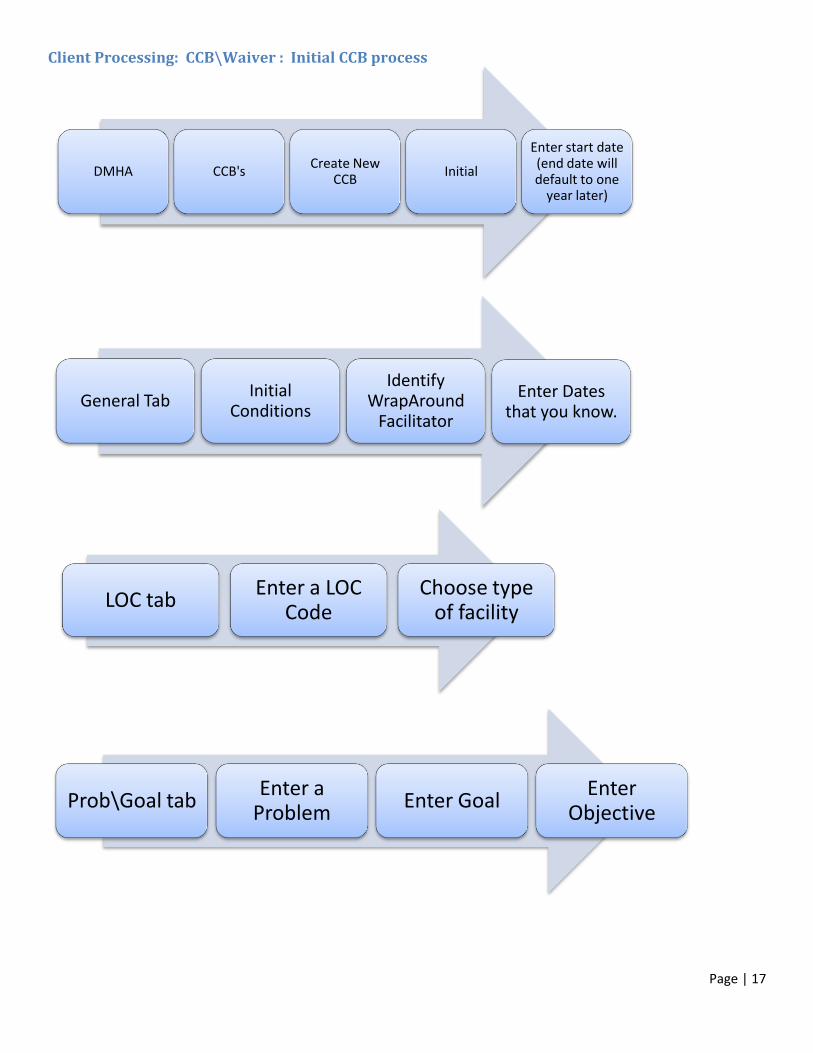
Client Processing: CCB\Waiver : Initial CCB process
DMHA CCB'sCreate New
CCBInitial
Enter start date (end date will default to one
year later)
General TabInitial
Conditions
Identify WrapAround
Facilitator
Enter Dates that you know.
LOC tabEnter a LOC
CodeChoose type
of facility
Prob\Goal tabEnter a
ProblemEnter Goal
Enter Objective

Page | 18
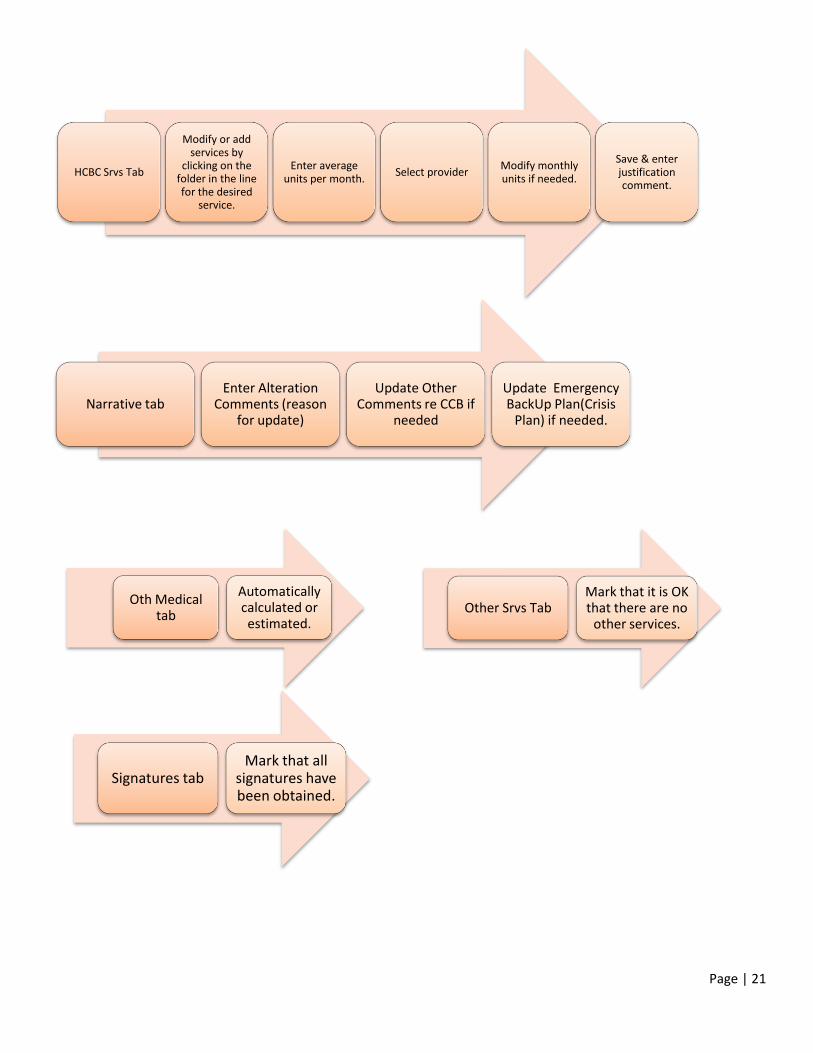
HCBC Srvs Tab
Modify or add services by
clicking on the folder in the line for the
desired service.
Enter average units per month.
Select providerModify monthly units if needed.
Save & enter justification comment.
Narrative tabEnter Other
Comments re CCB
Enter Emergency BackUp Plan(Crisis
Plan)
Oth Medical tab
Automatically calculated or
estimated.Other Srvs Tab
Mark that it is OK that there are no
other services.
Signatures tabMark that all
signatures have been obtained.
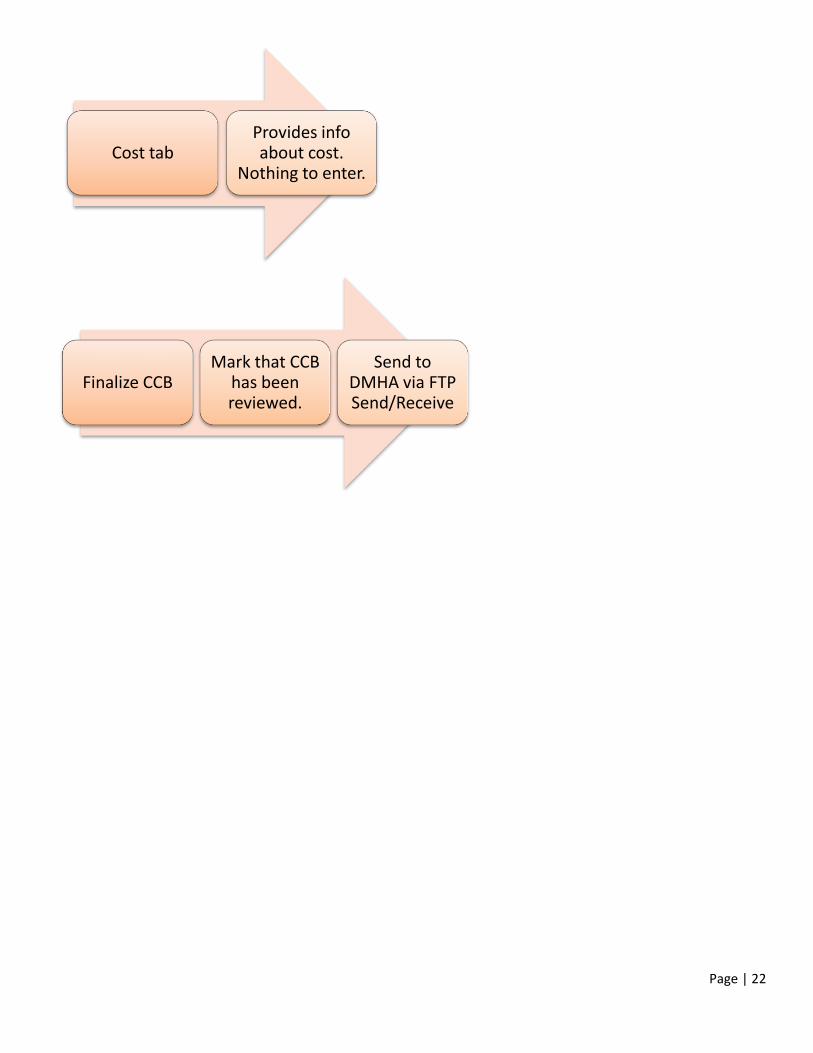
Cost tabProvides info about cost.
Nothing to enter.

Page | 19
DMHA CCB'sConfirm
starting date of Initial CCB
Select the CCB that
needs to have the start date
conirmed
Make sure their is a Medicaid
effective date & discharge
date if needed.
Enter the start date* & Proceed with confirmation
Mark that any pending items are satisfied.
Change units in first month
if needed.
*Note
The Start Date cannot be:
In the future
Prior to the Level of Care date
Prior to the Medicaid Eligibility Date
Prior to the original start date of the CCB
To Confirm the Starting Date of the CCB:
Once the start date is confirmed, send it to DMHA via FTP Send/Receive. You will get a final approval letter along with a Notice
of Action. At this point, the providers can begin providing services.
Finalize CCBMark that CCB
has been reviewed.
Send to DMHA via FTP Send/Receive
When approved & everything is ready to go (medicaid issues, etc.),
confirm start date of CCB.
DMHA CCB'sConfirm starting date of
Initial CCB.

Page | 20
Client Processing: CCB\Waiver : Update CCB process (make changes in time period where there is currently an approved CCB.)
DMHA CCB's Create New CCB Update
Choose type of update needed -
most likely "Update Services -Not Annual Plan"
General TabInfo will copy over from the currently
approved CCB.
Identify WrapAround
Facilitator
LOC tabInfo will copy over from the
currently approved CCB.
Prob\Goal tabUpdate problem
if needed.Update Goal if
needed.Update Objective
if needed.
Page | 21
HCBC Srvs Tab
Modify or add services by
clicking on the folder in the line for the desired
service.
Enter average units per month.
Select providerModify monthly units if needed.
Save & enter justification comment.
Narrative tabEnter Alteration
Comments (reason for update)
Update Other Comments re CCB if
needed
Update Emergency BackUp Plan(Crisis
Plan) if needed.
Oth Medical tab
Automatically calculated or estimated.
Other Srvs TabMark that it is OK that there are no
other services.
Signatures tabMark that all
signatures have been obtained.
Page | 22
Cost tabProvides info about cost.
Nothing to enter.
Finalize CCBMark that CCB
has been reviewed.
Send to DMHA via FTP Send/Receive

Page | 23
Client Processing: CCB\Waiver : Annual CCB process (complete when Initial CCB expires and every year thereafter)
DMHA CCB'sCreate
New CCBAnnual
General TabInfo will copy over from the currently
approved CCB.
Identify WrapAround
Facilitator
LOC tabInfo will copy over from the currently
approved CCB.
If LOC is over a year old, mark that the
LOC is pending.
Prob\Goal tabUpdate
problemUpdate Goal
Update Objective

Page | 24
HCBC Srvs Tab
Add services by clicking on the
folder in the line for the desired
service. Services from previous plan will be in the list in red.
Enter average units per month.
Select providerModify monthly units if needed.
Save & enter justification comment.
Narrative tabUpdate Other
Comments re CCB.
Update Emergency BackUp Plan(Crisis
Plan).
Oth Medical tab
Automatically calculated or estimated.
Other Srvs TabMark that it is OK that there are no
other services.
Signatures tabMark that all
signatures have been obtained.

Page | 25
Finalize CCBMark that CCB
has been reviewed.
Send to DMHA via FTP Send/Receive
Cost tabProvides info about cost.
Nothing to enter.

Page | 26
Data Entry Worksheets A Data Entry Worksheet must be done when the status of a consumer changes including being terminated from the
waiver or being denied waiver acceptance upon application. This includes when a consumer must be put on a waiting
list. Go to the section ‘Putting Someone on a Waiting List’ for specific instructions on that.
To access the Data Entry Worksheet screen, in Client Processing, click on the CCB\waiver tab for the consumer. Click the
DMHA button. Then click "Data Entry Worksheet ".
Complete the items on the screen that appears:
Choose CA-PRTF.
Choose the type of DEW: o Termination: for consumers who have been on this waiver and are now going off. If you have not entered a
Termination MDS report, you will not be able to continue. Complete the Termination MDS report and then complete the DEW.
o Denial: for consumers who have never been on this waiver. o Interrupt: for consumers who are on this waiver but are going off but expect to return in a short period of time. o Re-start: for consumers who have been interrupted
Reason for termination/denial goes here.

Page | 27
Identify the reason code.
Fill in the effective date.
If the denial reason is Code K (waiting list), you will need to fill in the Application date & time.
Additional comments are required in the comment area.
When complete, click 'Save'. The system will be checked for accuracy and let you know if anything is missing. If not, you can print it if desired.
Once complete, the DEW will export the next time you complete that function.
The buttons marked "POC," CCB," "DDP," Claims," "Hstry- Chgs," allow you to view those items for reference.
The "Delete" button deletes the DEW that you are working on, and the "Cancel" button cancels the changes you have
made to that particular DEW.

Page | 28
. You can view where your clients stand on the wait list by following these steps.
DMHA>>CA-PRTF Position on Waiting List
When you have exported the DEW and it is received at the State, they will send back the
StateWide Wait LIst data via the FTP Send/Receive Process.
Or you can print the Statewide waiting list so that you can see the wait list position for all
of your agency's clients by clicking on
DMHA >> Print State Wide Waiting List
Putting Someone on a Waiting List
Complete Data Entry Worksheet in INsite:
View State Wide Waiting List
Complete CA-PRTF application with parent/guardian signature.
Verify that applicant has Medicaid. If they have an ineligible category, assist parent/guardian with contacting DFR case worker to ensure they are in the
correct category.
Complete demographic information in INsite within 10 business days of
receiving signed application.
DMHA >> Data Entry Worksheet
Select CA-PRTF and DenialChoose reason Code K
(Waiting List)
Enter Denial Date (Same as Application Signature Date)
and enter time the Application was signed.
Also enter comments such as ‘No slots available at this
time.’
Save and export via the FTP Send/Receive process.
Page | 29
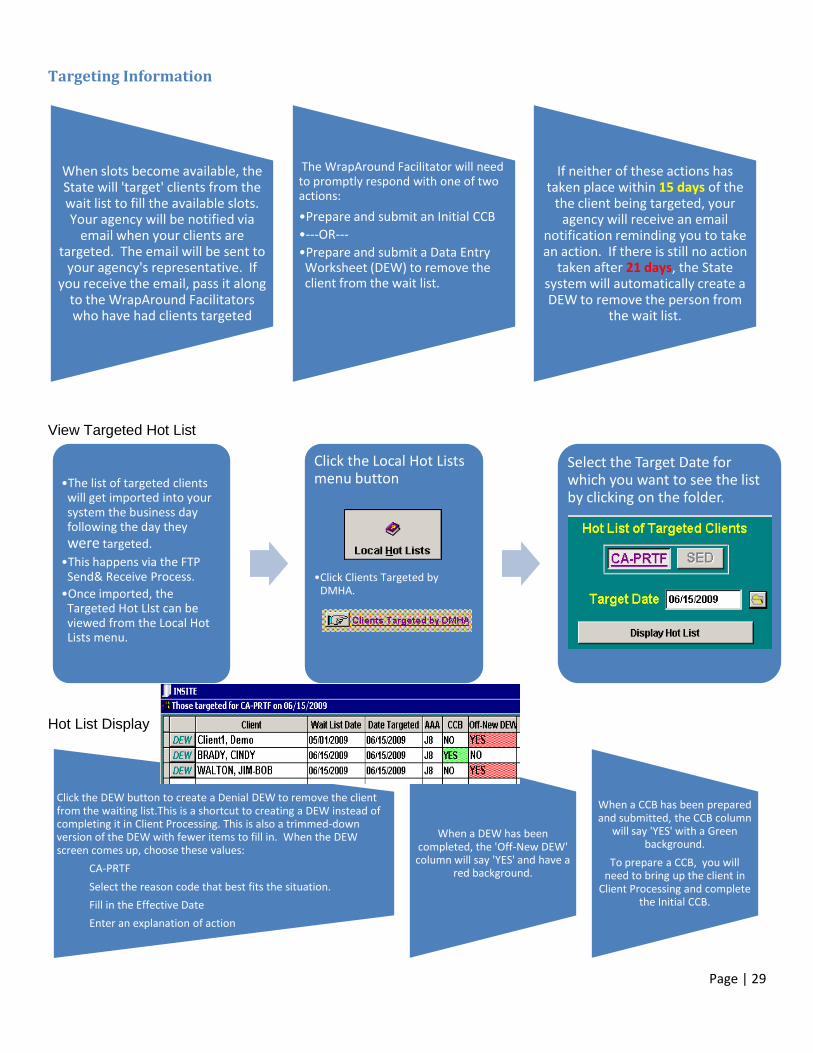
•The list of targeted clients will get imported into your system the business day following the day they
were targeted.
•This happens via the FTP Send& Receive Process.
•Once imported, the Targeted Hot LIst can be viewed from the Local Hot Lists menu.
Click the Local Hot Lists menu button
•Click Clients Targeted by DMHA.
Select the Target Date for which you want to see the list by clicking on the folder.
Targeting Information
View Targeted Hot List
Hot List Display
When slots become available, the State will 'target' clients from the wait list to fill the available slots. Your agency will be notified via
email when your clients are targeted. The email will be sent to
your agency's representative. If you receive the email, pass it along
to the WrapAround Facilitators who have had clients targeted
The WrapAround Facilitator will need to promptly respond with one of two actions:
•Prepare and submit an Initial CCB
•---OR---
•Prepare and submit a Data Entry Worksheet (DEW) to remove the client from the wait list.
If neither of these actions has taken place within 15 days of the
the client being targeted, your agency will receive an email
notification reminding you to take an action. If there is still no action
taken after 21 days, the State system will automatically create a DEW to remove the person from
the wait list.
Click the DEW button to create a Denial DEW to remove the client from the waiting list.This is a shortcut to creating a DEW instead of completing it in Client Processing. This is also a trimmed-down version of the DEW with fewer items to fill in. When the DEW screen comes up, choose these values:
CA-PRTF
Select the reason code that best fits the situation.
Fill in the Effective Date
Enter an explanation of action
When a DEW has been completed, the 'Off-New DEW' column will say 'YES' and have a
red background.
When a CCB has been prepared and submitted, the CCB column
will say 'YES' with a Green background.
To prepare a CCB, you will need to bring up the client in
Client Processing and complete the Initial CCB.

Page | 30
Medicaid Waiver Provider Database
The icon pictured above can be found on the INsite Main Menu as well as on several screens within Client Processing.
Clicking it will launch the Medicaid Waiver Provider Database.
The MWP Database is maintained by the Medicaid Waiver Provider Specialist and is intended to provide up to date
information to the field about the certification status of waiver providers. The MW Provider Specialist is currently in the
process of updating and verifying the accuracy of the information for all providers. As information is confirmed for a
provider, that provider’s information is released for the field to access.
The MWP Database can be used to look up information about a given provider and to generate a variety of reports.
The information within the MWP Database cannot be changed in the field. If there are inaccuracies in your provider’s
information, please contact the Medicaid Waiver Provider Specialist. Updates to the MWP Database are distributed to
the field on a regular basis through the FTP Export/Import process.
Using the MWP Database
1. Click on the various header buttons to find provider information.

Page | 31
2. Click ‘Show HQ’ to go to this provider’s Headquarters i.e. Parent Company.
3. Click ‘Search’ to search for a provider.
Click on the ‘Services’ Header to view the services for which the provider is certified.
Click on the waiver you want to see the services for in the Wavier box.
The certified services will be checked with the certification date displayed. The Active? Column will be checked if the
provider is actively providing that service. For example, a provider may be short-staffed for a particular service and want
to be considered inactive for that service temporarily.
On the above screen, click the “Services Per Waiver” button to change the display to “Waivers Per Service”. This will
show the services in the left box. Clicking on a particular service on the left will display the funding sources for which
that service can be provided in the box on the right.

Page | 32
REPORTS/PICKLISTS
To generate various reports from the MWP Database, click on Reports to get a drop down menu of available reports.
Who Provides What: This will generate a listing of providers for the criteria specified. You can select certain counties,
services, and waivers.
Choosing “Who Provides What” from the Reports Drop Down Menu will launch this screen:
1. Put a check in the box next to the count(y/ies) you are interested in. Note: your agency’s counties will be displayed at
the top of the list.
2. Put a check in the box next to the service you are interested in.
3. Put a check in the box next to the waiver you are interested in.
4. Select the type of report you are interested in by selected a choice in the upper right hand corner. See below for
report type descriptions.

Page | 33
5. When you have made all of your choices, click.
Formats of the Who Provides What Report
INFO SHEET: Will list all of the providers who match the selected criteria and will include their basic information as well
as all of the services and waivers for which they are certified. When running the Info Sheet Report, you will be
prompted for which type of Info Sheet you desire. You can get the Providers who match the criteria with all of their
Services & Waivers listed or with just the Services and Waivers you have specified when running the report.
PICK LIST: This format can be used for indicating client Provider Choice. The PICK LIST can only be generated if one
service and one waiver have been chosen. It will display the providers certified for the chosen waiver, service, & county
(multiple counties can be selected). It will have a line next to each provider’s name where the client can initial to
indicate his or her choice. It also has a signature section. The Pick List will display the Providers randomly.
MAIL LABELS: Lists the providers who match the selected criteria in a mailing label format.
RECEIVING UPDATES TO THE MWP Database
Changes made to the MWP Database are incorporated in the files exported to the field via the FTP Import/Export
process.

Page | 34
Local Hot Lists
Local Hots ListsChoose what type of
hot list you want to see (MDS or CCB)
Choose a time period. Selecting 30 days will
show you overdue items as well as those
due in the next 30 days.
Local Hot Lists are quick reports that you can run to keep track of when certain documents are due.

Page | 35
FTP Import and Export You will use FTP Import/Export to receive updates to case manager lists, Medicaid Provider information, and actions
(decisions) on CCBs from the state and send CCBs, DDPs, and other client data.
To SEND/RECEIVE data click on the ‘EXPORT’ button on the INsite main menu.
Then choose the ‘FTP Import/Export’ button.
Then check to gather the Daily Waiver Update and click on the ‘Gather Data’ button.
If you get a warning message that says you cannot gather because you have not sent out the last export file you will
need to go to the FTP Send/Receive tab and do a send only first. Then go back and gather new data to be exported.
After gathering data you will need to go to the SEND/RECEIVE tab.

Page | 36
YOU MUST BE CONNECTED TO THE INTERNET TO DO THE NEXT STEP.
Select the Send/Receive button to export and import at the same time. Select the Send Only button to only export
data. Select the Receive Only button to only import data. Most of the time you will want to Send/Receive at the same
time.
After receiving data you must go to the Process Imports tab to process the data and select the Process All button to
apply updates to the system.
Click one of these.

Page | 37
EDS Paid Claims
EDS, a private company, processes Medicaid claims. EDS provides a report that can be used by case managers to track their clients’ Medicaid payment data used on the CCB. Roeing Corporation will coordinate the request and receipt of this report on a monthly basis. The report from EDS will include all Medicaid paid claims and prior approvals in the past 9 months for all active CA-PRTF clients.
Look-Up Paid Claims for a Client
The Look-Up module allows the INsite user to review Medicaid Claims and Prior Authorizations data for a specific client. Select Look-Up Paid Claims for a Client from the Paid Claims (EDS) menu. The following screen will appear.

Page | 38
In the field provided, enter a few letters of the client’s last name then select OK. You may leave the field blank to pull up the list of all clients. Click on the Select button adjacent to the appropriate client. . If there are no Medicaid claims or prior authorizations for that client, a message like the following will appear.
If Medicaid data exists for that client, a screen like the following will appear. The data is grouped by procedure code and month. For instance, if there were multiple claims for ‘Commercial Ambulatory Service’ in the same month, those claims would be totaled together. Prior Authorizations are listed individually.
Select Show Details to display a particular procedure code in reverse chronological order. The detail shows all transactions for the procedure code, not just those for the month selected. To get a total for a service, highlight the desired service and select Show Details. The screen will look like the following. The total dollars for the highlighted service is shown at the bottom of the screen.

Page | 39
Retrieve Paid Claims
Select Retrieve Paid Claims from EDS from the Paid Claims menu. The following screen will appear.
Select Retrieve Claims from EDS. Your system will begin retrieving data from EDS. Remember to be connected to the internet when completing this step. Process Download File Once the EDS file is retrieved, the file needs to be expanded/unzipped and decrypted. Select Process Download File. IMPORTANT: All INsite users on the network must be out of the Medicaid claims viewer before the new files can be processed.
Step 1
Step 2

Page | 40
INsite Security for CA-PRTF Users
When a new user is added in INsite, they are assigned very limited rights. In order for the new user to be able to gain
access to all of the functions they need, they will need to be assigned to the appropriate security group in the INsite
Security module.
Logging in and getting started
The INsite Security module can be launched by clicking on in the INsite folder. Click here
to find out where your INsite folder is located.
You will need to log in to the module. This login is NOT the same as your INsite login name and password.
The default Security module login ID is Supervisor and the default password is xxxx. The following screen will
appear:
Assigning Users to Groups
A new INsite user will need to be assigned to a group.

Page | 41
You can now exit the Security Module. The new user can log in and will be able to access the INsite functions.
Where is my INsite folder?
The INsite folder contains the main program file and all of the other things that INsite needs to run including the data.
To find out where your INsite folder is log in to INsite. In the lower left-hand corner of the INsite Main Screen you will
see the current date. Below that is the path where the INsite folder is located either on your local drive or on the
network.
Click on ‘Group
Members’ on the
Security Main Menu.
Click ‘Add’.
Select the application from the list
(INsite).
Select the INsite user from the
list.
Choose a Security
Group for that user –Basic Insite
Supervi
Click 'Save'.