Inorganic User Guide
23
Virtual ChemLab Inorganic Qualitative Analysis Student Guide Brigham Young University
-
Upload
calvintavarez -
Category
Documents
-
view
218 -
download
0
Transcript of Inorganic User Guide

8/8/2019 Inorganic User Guide
http://slidepdf.com/reader/full/inorganic-user-guide 1/23
Virtual ChemLab
Inorganic Qualitative Analysis
Student Guide
Brigham Young University

8/8/2019 Inorganic User Guide
http://slidepdf.com/reader/full/inorganic-user-guide 2/23
i
Table of Contents
Overview..................................................................................................................1
The Inorganic Chemistry Laboratory ...................................................................2Quick Start ..........................................................................................................2
The Simulation.....................................................................................................4Laboratory...........................................................................................................5
Test Tubes .....................................................................................................6
Pictures ..........................................................................................................7Reagents........................................................................................................7Buttons ..........................................................................................................7Disposal Bucket ..............................................................................................8Pull-Down TV..................................................................................................8
Stockroom...........................................................................................................9
Known Solutions ...........................................................................................10Practice Unknowns........................................................................................11
Assigned Unknowns ......................................................................................13
Lab Book ...........................................................................................................13
The Electronic Lab Book .....................................................................................14Overview...........................................................................................................14Typing/Editing Notes..........................................................................................15
Navigation.........................................................................................................15Functions...........................................................................................................16
Reporting ..........................................................................................................17Web Options......................................................................................................19

8/8/2019 Inorganic User Guide
http://slidepdf.com/reader/full/inorganic-user-guide 3/23
1
Overview
Welcome to Virtual ChemLab: Inorganic, a realistic and complete simulation of inorganic
qualitative analysis. In this virtual laboratory, students are free to make the choices and decisionsthat they would confront in an actual qualitative experiment and, in turn, experience the resulting
consequences. The general features of the simulation include 26 cations that can be added to testtubes in any combination, 11 reagents that can be added to the test tubes in any sequence and any
number of times, necessary laboratory manipulations, a lab book for recording results andobservations, and a stockroom for creating test tubes with known mixtures, generating practice
unknowns, or retrieving instructor assigned unknowns. The simulation uses over 2500 actual pictures to show the results of reactions and over 220 videos to show the different flame tests.
With 26 cations that can be combined in any order or combination and 11 reagents that can beadded in any order, there are in excess of 10
16possible outcomes in the simulation.
The Virtual ChemLab simulations are available as a client/server installation or as a
standalone/student installation. In the client/server mode (a typical computer lab installation)electronic assignments and notebook submissions are handled directly through the local area
network. In the student mode, there is no direct connection to receive assignments or submitresults; consequently, the simulations are limited to working locally without electronic
assignments. As a result, performing paper assignments or exploratory work is the typicalapplication for a student version. However, a web connectivity option has been provided that
enables the exchange of electronic assignments and notebook results using a regular internetconnection. Some computer lab installations may find this to be the favored mode of operation as
well.
Please note that this manual provides information principally for the client/server or web-enabledversion of Virtual ChemLab. While reading through the users guide, keep in mind that a student
version of the software is almost identical except for two main differences. (1) In a studentversion, the hallway is bypassed entirely, and the simulation starts in the general chemistry
laboratory. (2) No instructor assignments can be given or received, although practice unknownswill be available. Note, however, that a student version can be converted to a web-enabled
version by turning on the web connectivity option and creating a local user account. Details onthe web connectivity option can be found in the electronic lab book section of this manual.

8/8/2019 Inorganic User Guide
http://slidepdf.com/reader/full/inorganic-user-guide 4/23
2
Figure 1. The “hallway” leading into the different virtual rooms in Virtual ChemLab. TheOrganic Chemistry door accesses the virtual organic laboratory, the Stockroom door
accesses the Instructor Utilities, and the General Chemistry door accesses fivedifferent general chemistry laboratories.
The Inorganic Chemistry Laboratory
Quick Start
From the hallway (Figure 1), click on the General Chemistry door and enter your password. If
you do not know your password, contact your instructor. If you are receiving assignmentsthrough a regular internet connection either at home or in a computer lab (instead of a direct
client/server connection), you will need to first create a local user account for the currentcomputer you are using by clicking on the Add New User button. To add a new user, you will
need to provide your user ID, password, and the URL address for your web connection. Thesewill be provided by your instructor. This only needs to be done once for each computer you use.

8/8/2019 Inorganic User Guide
http://slidepdf.com/reader/full/inorganic-user-guide 5/23
3
If you find that you have automatically bypassed the card reader and have been placed in thelaboratory but must still activate yourself as a user to receive assignments, click on any lab book
and select the Web Options button. Details on how to use the web connectivity feature are foundin the Electronic Lab Book section below.
Once in the laboratory (shown in Figure 2), you will find five different laboratory benches thatrepresent five different general chemistry laboratories. Mousing over each of these laboratory benches pops up the name of the selected experiment. To access the inorganic qualitative
analysis laboratory, click on the Inorganic laboratory bench at the far left. To the right in thelaboratory next to the quantum optics table is a chalkboard used to display messages from the
instructor or display a summary of assignments. If one or more messages are available from theinstructor, the text “Messages” will be displayed repeatedly on the chalkboard. Clicking on the
chalkboard will bring up a larger image of the chalkboard where messages and assignments can be viewed. Messages can be deleted by clicking on the eraser.
Once inside the inorganic laboratory, go to the stockroom counter by clicking on the stockroom
window. Inside the stockroom, known solutions can be made by clicking and dragging a test tubefrom the box of test tubes, dropping it on the holder, and then adding cations by clicking on the bottles. Practice unknowns can be created by clicking on the “Unknowns” sign underneath the
small test tube rack. Test tubes are returned to the laboratory by clicking on the Return to Labarrow or by clicking on the Done button underneath the test tube in the test tube holder.
In the laboratory, up to 12 test tubes can be stored in the test tube rack on the lab bench. To add
reagents to a test tube, click and drag a test tube from the rack and place it in the test tube holder.
Figure 2. The general chemistry laboratory. The general chemistry laboratory contains fivedifferent laboratories, each of which is accessed by clicking on the appropriate lab
bench. The chalkboard to the right in the laboratory is used to access messages fromthe instructor and to see a summary of assignments.

8/8/2019 Inorganic User Guide
http://slidepdf.com/reader/full/inorganic-user-guide 6/23
4
Once a test tube is in the holder, reagents can be added by clicking a reagent bottle once.Changes in the test tube will be shown in the display window with an appropriate picture.
Laboratory manipulations such as centrifuging, decanting, pH, and heat are performed byclicking buttons at the bottom of the laboratory. Test tubes are disposed of by dragging them to
the disposal bucket.
Other important items in the laboratory include the pull-down TV in the upper left corner, wherethe contents of test tubes containing known solutions are displayed. Help is also accessed
through the pull-down TV. The electronic lab book is accessed by clicking the laboratorynotebook laying on the lab bench. The notebook is used to record procedures and observations
and to report the results of practice unknowns and assignments. The general chemistry laboratoryis accessed by clicking the door.
The Simulation
The primary purpose of the simulation is to teach the thinking processes that are the foundation
of an inorganic qualitative analysis laboratory. To achieve this, the simulation is designed toallow a student to enter a virtual inorganic qualitative analysis instructional laboratory, where
they are free to make the choices and decisions that they would confront in an actual laboratoryenvironment and, in turn, experience the resulting consequences.
To achieve this goal and to keep the simulation at a manageable size and complexity, a few
assumptions and restrictions have been applied:
(1) The cations are the nitrates and are dissolved in water to form a 0.02 M solution except for NH4
+, which is a 1 M solution.
(2) Additional cations cannot be added once the test tube is in the laboratory.
(3) The reagents have concentrations of 3 M for HNO3, NaOH, and NH3, 0.1 M for the Na2S, 3%
H2O2, and 1 M for the NaCl, Na2SO4, and Na2CO3 solutions.
(4) The pH 4, pH 7, and pH 10 solutions are inert buffers and are added in sufficient quantity toset the pH of the solution to the indicated value.
(5) Reagents are added in excess.
(6) After decanting, precipitates are rinsed with an appropriate solution so the precipitate does
not dissolve.

8/8/2019 Inorganic User Guide
http://slidepdf.com/reader/full/inorganic-user-guide 7/23
5
Laboratory
The essential features of the laboratory (shown in Figure 3) are described subsequently startingfrom the upper left hand corner of the lab and proceeding clockwise.
• Pull-Down TV . In the upper left-hand corner of the laboratory above the periodic table is a
small handle which, when clicked, pulls down a TV and can display information in twodifferent modes. In tutorial mode, the TV lists the chemical formulas of the relevant species
for the active solution in the test tube holder. The TV will also show the contents of test tubes
in the rack when they are moused over. Tutorial mode is automatically turned off for practiceunknowns and assignments. In help mode, the TV lists the help menu for the laboratory.
• Periodic Table. A periodic table is provided for use in the virtual laboratory. Mousing over an individual element in the table provides an enlarged image of the table entry for that
element showing the element abbreviation, atomic number, and molecular weight.
Figure 3. The virtual inorganic chemistry laboratory.

8/8/2019 Inorganic User Guide
http://slidepdf.com/reader/full/inorganic-user-guide 8/23
6
• Door. Clicking the door exits the inorganic laboratory and returns the user to the generalchemistry laboratory.
• Charts. Hanging on the wall to the right of the door are two charts for an Odor Key and a pH
Key. The odor key provides an interpretation of color for the different noses when a solution
is smelled. The pH key is used to interpret the color of the pH paper.
• Stockroom. Clicking the stockroom window brings the user to the stockroom counter. While
at the stockroom counter, test tubes containing known mixtures of cations can be made, practice unknowns can be created, and assignments can be accepted. All of these test tubes
can be returned to the laboratory for further laboratory work.
• Disposal Bucket . To the right of the lab bench is a disposal bucket for discarding test tubesthat are no longer needed in the laboratory. All test tubes in the laboratory can be cleared at
once by clicking the disposal bucket.
• Buttons. At the bottom of the laboratory are 10 buttons used for performing differentlaboratory manipulations.
• Picture Window. The picture window is used to display real pictures depicting the contents
of the various test tubes. The picture window is also used to show videos of the flame tests.
• Test Tube Holder . The test tube holder is used to hold the active test tube for which reagentscan be added and laboratory manipulations can be performed.
• Reagents. To the right of the test tube holder are 11 reagents that can be added to the active
test tube in any order and any combination. Reagents are added by clicking the selected bottle once.
• Test Tube Rack . On the back of the lab bench are two test tube racks that can store up to 12
test tubes. Test tubes are moved from the rack to the holder or to the disposal bucket byclicking and dragging.
• Lab Book. The lab book is used to record procedures and observations while doing
experiments in the virtual laboratory. Assignments are also submitted through the lab book for automatic grading.
Test Tubes
Test tubes in the virtual laboratory are used and generally manipulated as they would be in an
actual laboratory. The test tube rack is used for storing test tubes and the holder is used for adding reagents and performing other laboratory manipulations. As an added feature in the
virtual laboratory, test tubes that are dragged from the rack and dropped over an existing testtube in the holder, or vise versa, automatically switch positions. Test tubes that are brought from
the stockroom take the first available slot to the left in the rack.

8/8/2019 Inorganic User Guide
http://slidepdf.com/reader/full/inorganic-user-guide 9/23
7
Test tubes that are created in the stockroom or in the laboratory (by decanting or dividing) arenot automatically labeled. Test tubes can be labeled by clicking on the label area and typing an
appropriate description. The label is stored by pressing Enter . The first five or six letters of thelabel are displayed on the test tube, but the full label is displayed above the picture window.
Pictures
The test tubes that are manipulated in the virtual laboratory are given colors that show the
approximate color of the contents. For the current test tube in the holder, an actual picture of thecontents is shown in the picture window. Pictures of the test tubes in the rack can also be seen by
mousing over the test tube of interest. Flame tests are also shown in the same picture windowusing 10 second video clips.
Reagents
The available reagents that can be added to the active test tube in the holder are on the right of
the lab bench. Reagents are added by clicking the appropriate bottle and are always added inexcess. The reagents have concentrations of 3 M for HNO3, NaOH, and NH3, 0.1 M for the
Na2S, 3% H2O2, and 1 M for the NaCl, Na2SO4, and Na2CO3 solutions. When the pH 4, 7, or 10reagents are selected, the pH of the solution is set to the indicated value. Depending on the speed
of your computer or the number of cations in the test tube, it may take up to several seconds todetermine the results of adding a particular reagent. Some patience might be required.
Buttons
The bottom row of buttons are used for performing various laboratory manipulations on the test
tube in the holder. Starting from left to right, these buttons perform the following functions:
(1) Centrifuges the contents of the active solution.
(2) Plays a 10 second video showing a flame test of the active solution.
(3) Plays a 10 second video showing a flame test of the active solution using a cobalt filter.(The cobalt filter is usually necessary to filter out masking colors from other cations, usually Na+, that interfere with the K + color.)
(4) Decants the solution from the active test tube into a new test tube leaving any precipitate
behind. (The new test tube is placed in the first available slot from the left in the test tube
rack and is not labeled. If the rack is full, decanting is not possible.)
(5) Divides or makes a copy of the active test tube and, again, the copy is placed in the first
available slot from the left.
(6) Heats the solution. (The presence of the hot plate on the lab bench is equivalent to placingthe test tube in a beaker of boiling water.)

8/8/2019 Inorganic User Guide
http://slidepdf.com/reader/full/inorganic-user-guide 10/23
8
(7) Measures the pH of the solution using pH paper. (The color of the pH paper indicates the pHof the solution. A pH Color Key is hanging on the wall in the virtual laboratory.)
(8) Measures the pH of the vapor above the test tube in a manner similar to the pH of the
solution.
(9) Smells the contents of the test tube with the color of the nose indicating the smell. (A bluenose smells like NH3, a red nose smells like H2S or rotten egg gas, and a neutral nose has no
smell.)
(10) Stirs the contents of the test tube.
Disposal Bucket
Unwanted test tubes can be disposed of by dragging and dropping the test tube in the disposal bucket. All the test tubes in the laboratory can be disposed of at once by clicking on the disposal
bucket. As in an actual laboratory, there is no way to undispose an already disposed test tube.
Pull-Down TV
Located above the chalkboard is a small handle that, when clicked, pulls down a television. Thetelevision has two different display modes, each of which is described subsequently.
Tutorial. The tutorial mode is used to display the laboratory help menu and the list of cations in
the active test tube. This list reflects the changes to the cations as various reagents are added tothe test tube or other laboratory manipulations are performed. The cation list is the main tutorial
or learning tool when exploring the chemistry of the cations. The cation tutorial is not active for
assignments or practice unknowns.
Help. In help mode, the table of contents for the laboratory help is listed on the TV. Clicking a
subject listed in the table of contents brings up the help window.

8/8/2019 Inorganic User Guide
http://slidepdf.com/reader/full/inorganic-user-guide 11/23
9
Stockroom
The stockroom (shown in Figure 4) is used to prepare test tubes containing known combinations
of cations, make a practice unknown, or receive an assignment. The essential features of thestockroom are described as follows:
• Bottles. The bottles on the shelves contain the indicated cation at a concentration of 0.02 M
except NH4+, which has a concentration of 1.0 M. Cations are added to a test tube by clicking
once on the bottle.
• Unknown Rack. To the right of the bottles on the middle shelf is a small two-test tube rack where test tubes containing unknowns are placed. The left slot is used for instructor assignments and the right slot is used for practice unknowns.
• “Unknowns” Sign. The “Unknowns” sign underneath the unknown rack is used to access the
practice unknown dialog screen. The practice unknown screen is used to define randomizedunknowns for practicing and self-testing.
Figure 4. A view of the inorganic stockroom.

8/8/2019 Inorganic User Guide
http://slidepdf.com/reader/full/inorganic-user-guide 12/23
10
• Test Tube Box. The test tube box contains empty test tubes for making known solutions. Toget a new test tube, click the test tube box, and drag the test tube to the holder on the
stockroom counter.
• Test Tube Holder. The test tube holder is used to hold test tubes when cations are added to
make known solutions. The holder is also used for placement of unknowns obtained from theunknown rack. The label area on the test tube can be clicked to label the test tube. A Done button appears underneath the test tube and is used to return the test tube to the laboratory.
• Water Bottle. The water bottle is used to add water to a test tube. The water bottle is not
active if cations are already present in the test tube, and adding cations after water has beenadded is the same as adding the cations to the test tube directly.
• Picture Window. The picture window is used to show an actual picture depicting the solution
in the holder. The picture window also shows pictures of the unknowns in the unknown rack when they are moused over.
• Disposal Bucket. The disposal bucket is used to discard test tubes that are in the holder.
Discarding a practice unknown generates a new random unknown and places the unknown inthe unknown rack. Discarding an assigned unknown places the unknown back in the
unknown rack.
• Bell . As in most stockrooms, the bell is used to access Help for the stockroom.
• Return to Lab Arrow. Clicking the Return to Lab arrow returns the user to the laboratory. If a test tube is in the holder at the time the arrow is pressed, then that test tube is also returned
to the laboratory. Remember, test tubes that are returned to the laboratory are placed in thefirst available position to the left in the test tube rack.
Known Solutions
Known combinations of cations are created by grabbing a test tube from the test tube box and
placing it in the holder. Cations are added by clicking the bottles on the stockroom shelves.Water can be added by clicking the water bottle. An actual picture of the contents of the test tube
is shown in the picture window as cations are added. As in an actual laboratory, cations may not be removed from the test tube once added, but a test tube may be discarded by dragging it to the
disposal bucket. Once a test tube has been prepared, it can be labeled and then taken to thelaboratory by clicking Done or by clicking on the Return to Lab arrow. Clicking Done allows
more solutions to be made.

8/8/2019 Inorganic User Guide
http://slidepdf.com/reader/full/inorganic-user-guide 13/23
11
Practice Unknowns
The practice unknown screen (shown in Figure 5) is accessed by clicking on the “Unknowns”
label underneath the unknown rack. A practice unknown is then created by selecting or defininga set of cations from which a certain number of cations will be randomly selected. The number of
cations that will be selected from the defined set is also randomly determined as defined by thespecified minimum and maximum limits. The minimum limit defines the minimum number of
cations that can be selected from the set and the maximum defines the maximum number.
• Selecting the Cation Set. To define the set of cations, simply click the corresponding bottles
on the shelves. A cation can be removed from the set by clicking the bottle again. Note thatthe number of cations in the set must be at least equal to the number specified in theMinimum setting.
• Setting Maximum. To set the maximum number of cations that can be included in the
unknown, use the arrow keys to the right of the Maximum box. The up arrow adds 1 to thecurrent number, and the down arrow subtracts 1. Note that Maximum cannot be set to less
Figure 5. The practice unknown screen. This screen is accessed by clicking on the“Unknowns” label underneath the unknown rack.

8/8/2019 Inorganic User Guide
http://slidepdf.com/reader/full/inorganic-user-guide 14/23
12
than 1. Note also that Maximum cannot be greater than the number of cations in the set.However, the number of cations in the set may exceed Maximum.
• Setting Minimum. To set the minimum number of cations that can be included in the
unknown, use the arrow keys to the right of the Minimum box. The up arrow adds 1 to the
current number, and the down arrow subtracts 1. Note that if Minimum is set to zero, thenwater (or no cations) can be assigned as a possible unknown. Note also that Minimum can beequal to but cannot exceed Maximum.
• Saving the Unknown. To exit the Practice Unknown screen and generate random practice
unknowns, click on the green Save arrow, which replaced the Return to Lab arrow that was inthe stockroom. The first practice unknown will be placed in the right slot of the unknown
rack in the stockroom.
• Cancel . To cancel making a practice unknown and return to the stockroom, click thedisposal bucket.
Figure 6. Location of instructor assigned unknowns in the stockroom.

8/8/2019 Inorganic User Guide
http://slidepdf.com/reader/full/inorganic-user-guide 15/23
13
Assigned Unknowns
Test tubes containing unknowns assigned by the instructor are located in the unknown rack and
occupy the left slot. When available, these assignments can be brought to the laboratory by
clicking and dragging the test tube to the holder and then clicking Done or the Return to Labarrow. Only one unknown is allowed out in the laboratory at a time.
Lab Book
The laboratory notebook is used to write and save experimental procedures and observations for
each student and to submit the results of assignments for automatic grading. The notebook isorganized by sections and pages. New pages can be created as needed for each section. The first
section is labeled Practice and is always the section that is available to the student anytime aninstructor assignment is not out in the laboratory. When an assignment is accepted for the first
time, a new section is created in the lab book (named with the assignment number) where only
the notes associated with that assignment can be recorded. Each assignment will have its ownsection, and these sections can only be modified while the assignment is out in the laboratory.Once an assignment has been submitted for grading, no other modifications are allowed. After an
assignment has been submitted, an extra page is added to the end of the section where gradinginformation will be posted.
The lab book is launched by clicking once on the lab book located on the bench top. Detailed
information on how to use the lab book is located in the lab book sections that follow.
8/8/2019 Inorganic User Guide
http://slidepdf.com/reader/full/inorganic-user-guide 16/23
14
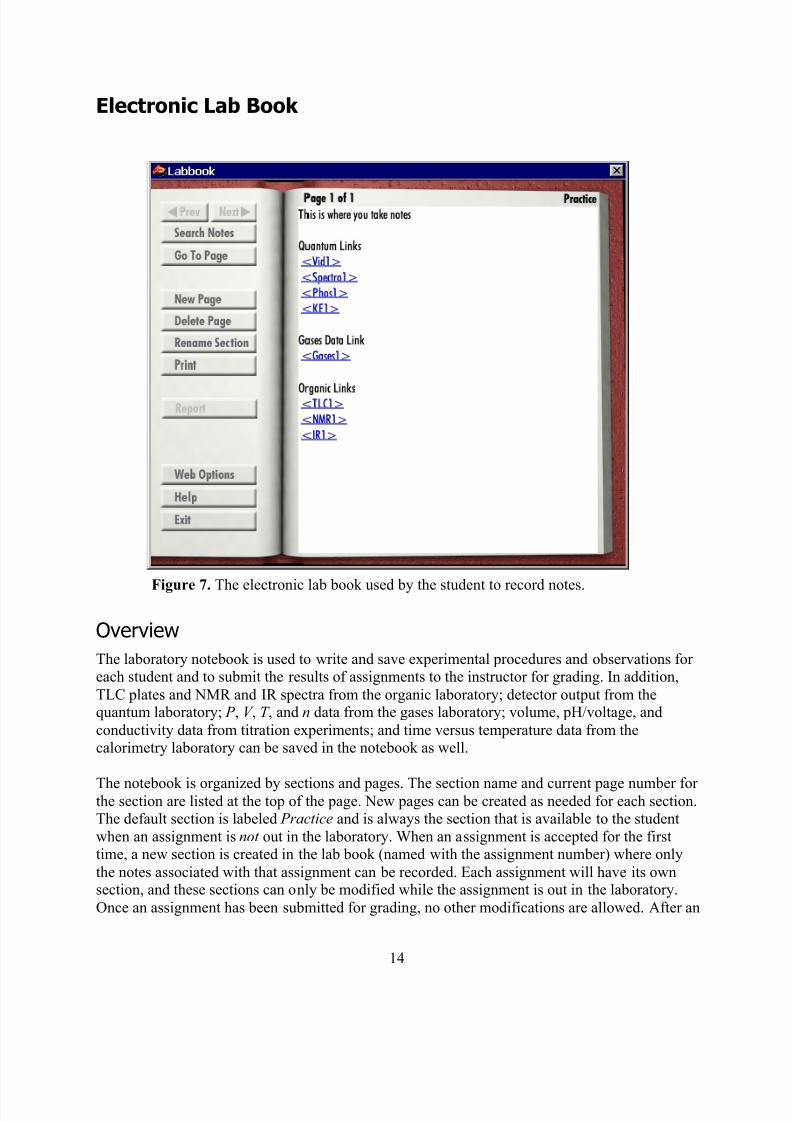
Electronic Lab Book
Overview
The laboratory notebook is used to write and save experimental procedures and observations for each student and to submit the results of assignments to the instructor for grading. In addition,
TLC plates and NMR and IR spectra from the organic laboratory; detector output from thequantum laboratory; P , V , T , and n data from the gases laboratory; volume, pH/voltage, and
conductivity data from titration experiments; and time versus temperature data from thecalorimetry laboratory can be saved in the notebook as well.
The notebook is organized by sections and pages. The section name and current page number for the section are listed at the top of the page. New pages can be created as needed for each section.The default section is labeled Practice and is always the section that is available to the student
when an assignment is not out in the laboratory. When an assignment is accepted for the firsttime, a new section is created in the lab book (named with the assignment number) where only
the notes associated with that assignment can be recorded. Each assignment will have its ownsection, and these sections can only be modified while the assignment is out in the laboratory.
Once an assignment has been submitted for grading, no other modifications are allowed. After an
Figure 7. The electronic lab book used by the student to record notes.

8/8/2019 Inorganic User Guide
http://slidepdf.com/reader/full/inorganic-user-guide 17/23
15
assignment has been submitted, an extra page is added to the end of the section where gradinginformation will be posted. Note that electronic assignments can only be accepted and submitted
for a client/server installation or when web connectivity has been enabled.
Typing/Editing Notes and Inserting Links
To start recording notes on the current page, click the page until a cursor appears.
Notes can be typed as normal until the bottom of the page. New pages are not automaticallycreated. Text can be inserted past the end of the page (and accessed using the arrow keys), but
text that extends beyond the end of the page is not accessible to the instructor during grading.Text is always inserted when typed, and text can be deleted with both the forward and backward
delete keys. Blocks of text can be marked using conventional methods, which in turn, can be cut,copied, and pasted using Ctrl-x, Ctrl-c, and Ctrl-v, respectively, for PC computers or Cmd-x,
Cmd-c, and Cmd-v for Macintosh. Mouse clicks or arrow keys are used to move around on the page. No other keys are defined for the lab book.
When you generate TLC plates, NMR spectra, and IR spectra in the organic laboratory; detector
output from the quantum laboratory; P , V , T , and n data from the gases laboratory; volume, pH/voltage, and conductivity data from the titration laboratory; or time versus temperature data
from the calorimetry laboratory, you can save these results to the lab book by pressing the Saveor Record button on the appropriate window. Each TLC, NMR, IR, detector output, gas data,
titration data, or calorimetry data saved in the lab book is saved as a link (in blue or red) with aunique label and is placed on the last line of the current page. Clicking a link displays the saved
item as it was originally shown in the laboratory. NMR spectra and IR spectra saved from thespectra library are labeled as such. Gas, titration, or calorimetry data that were saved during an
experiment are displayed as a table in a display window and can be copied and pasted into aspreadsheet program for further analysis. Links can be deleted from the lab book by deleting the
entire link label, and links can be moved by adding or deleting text around a link. Links cannot be moved using cut (or copy) and paste commands.
Navigation
Moving around inside the lab book from page to page and section to section is accomplishedusing the four buttons grouped at the top of the left page of the lab book. The functionality for
each of these buttons is described in the sections that follow.
Prev/Next
The Previous and Next buttons are used to go to the previous or next page in the current section.
If a page in either the downward or the upward direction is not available in the section, the button is grayed out and not active.
Search Notes
The Search Notes button is used to specify a word or an exact phrase that can be searched for inthe current section or in the entire lab book. Shown on the right is the Search dialog area that is
placed on the left page of the lab book when the Search Notes button has been pressed. The text

8/8/2019 Inorganic User Guide
http://slidepdf.com/reader/full/inorganic-user-guide 18/23
16
box is used to enter the word or words that will be searched for. TheSearch button initiates the search for the word or words typed in the
text box. If a match is found, the page with the match will be shownon the right page of the lab book with the match highlighted. Pressing
the Search button again will search for the next occurrence. After a
match has been found, pressing the OK button will close the Searchdialog and switch the lab book to the new page. Pressing the Cancel button closes the Search dialog and keeps the lab book on the old
page. The Current Section and All Sections radio buttons specifywhether the search is to be made on the current section or over all
sections in the lab book, respectively.
Go To Page
The Go To Page button is used to jump to any page in any of the sections in the lab book. Shownin the accompanying figure is the
dialog box that is displayed when theGo To Page button is pressed. The
first box lists the available sections inthe lab book by name. Clicking one of
these will then list the available pagesfor the highlighted section in the
second box. Clicking one of the pageswill switch the lab book to the
indicated page and section. Pressingthe Cancel button keeps the lab book
on the old page.
Functions
Grouped below the navigation buttons are a set of buttons which perform various functions in thelab book. These functions are described in the sections that follow.
New Page
This button creates a new page at the end of the current section. The button is only active when
you are on the last page of the section. Pages cannot be inserted elsewhere in the section.
Delete Page
This button deletes the current page in the currently selected section. A warning is given beforethe deletion occurs.
Rename Section
This buttons brings up a dialog box that allows the name of the current section to be changed. By default, the first section

8/8/2019 Inorganic User Guide
http://slidepdf.com/reader/full/inorganic-user-guide 19/23
17
in the lab book is given the name Practice, and other sections that are added to the lab book for each assignment are given the name Assignment n where n represents the assignment number.
The practice section is for keeping notes when exploring and learning in the laboratory, and theassignment sections are used for keeping notes during assignments and are eventually graded by
the instructor. The Rename Section function allows these default names to be changed.
This button brings up a dialog box that allows either the current page or the current section to be printed to a user-selected printer. Links cannot be printed.
Report
This button allows the current assignment to be submitted to the instructor for grading and is
only active when an assignment is out in the laboratory. Upon submitting an assignment for grading, further modifications to the assignment section are locked out and an extra page is
added to the end of the section containing grading information specific to the assignment. The
exception to this is when an Inorganic or Titration practice unknown is submitted which onlyreveals the actual contents or concentration of the unknown and no grading is performed. If webconnectivity has been enabled (see the Web Options button below) then, after submitting the
assignment, the student will be prompted to update these results to the server immediately. If Automatic Updates has been selected, this update is performed automatically after submitting the
assignment.
• Inorganic Assignments – Pressing the Report button for an inorganic assignment brings up areport window where the possible cations in the unknown are listed. To report the contents of
the unknown, click the appropriate tiles corresponding to the cations present in the unknown.For assigned unknowns, these selections can be saved by pressing the Save button allowing
the user to return to the lab for further work on the unknown. The Save button is disabled for practice unknowns. When the assigned or practice unknown is ready for grading, click the
Submit button, which in turn, brings up a warning box stating that no further modificationscan be made to the assignment. Clicking OK submits the unknown and then marks each
cation in the unknown as correct (green) or incorrect (red). For assigned unknowns, the scoreis also posted, and the entire grading report is written on the last page of the assignment
section.
• Quantum Assignments – Pressing the Report button for a quantum assignment brings up atext box warning the student that submitting an assignment prevents further modification of
the assignment section. Selecting OK brings up a second warning box which, when OK is
selected again, submits the assignment, closes the lab book, and clears the laboratory.Grading information is placed on the last page of the section.
• Gases Assignments – Pressing the Report button for a gases assignment brings up a text boxwarning the student that submitting an assignment prevents further modification of the
assignment section. Selecting OK brings up a second warning box which, when OK isselected again, submits the assignment, closes the lab book, and clears the laboratory.
Grading information is placed on the last page of the section.

8/8/2019 Inorganic User Guide
http://slidepdf.com/reader/full/inorganic-user-guide 20/23
18
• Titration Assignments – Pressing the Report button for a titration assignment brings up adialog box which asks the student to enter the concentration or weight percent of theunknown or unknowns that were assigned. A warning is also given about locking out the
section after the assignment has been submitted. Selecting OK brings up a second warning box which, when OK is selected again, submits the entered values, submits the section notes,
pops up a text box with the correct values, closes the lab book, and clears the laboratory. Thecorrect concentrations and/or weight percents, the entered concentrations and/or weight
percents, and grading information is placed on the last page of the section.
• Calorimetry Assignments – Pressing the Report button for a calorimetry assignment brings upa dialog box, which asks the student to enter the heat of reaction, solution, or combustion or
the heat capacity of the unknown or unknowns that were assigned. Note that it is important to play close attention to the units that are requested. A warning is also given about locking out
the section after the assignment has been submitted. Selecting OK brings up a secondwarning box which, when OK is selected again, submits the entered values, submits the
section notes, pops up a text box with the correct values, closes the lab book, and clears thelaboratory. The correct values, the entered values, and grading information is placed on the
last page of the section.
Figure 8. The report window for reporting inorganic assignments. Use the Return to Notes button to cancel the submission process.

8/8/2019 Inorganic User Guide
http://slidepdf.com/reader/full/inorganic-user-guide 21/23
19
Web Options
Overview. This button is the main access point for the web connectivity option of the program.
The Virtual ChemLab simulations can be installed in a client/server mode or in astandalone/student mode. In the client/server mode (a typical computer lab installation)
electronic assignments and notebook submissions are handled directly through the local areanetwork. In the student mode, there is no direct connection to receive assignments or submit
results and, therefore, the simulations are limited to working locally without electronicassignments. Consequently, paper assignments or exploratory work are the typical applications
for a student version. With the Web Options function, a web-based connection can be establishedand configured to enable the exchange of electronic assignments and notebook results without a
direct network connection. Some computer lab installations may find this to be the favored modeof operation as well.
The information that is needed to setup web connectivity is (1) a user ID, (2) a password (often
your student ID), and (3) the URL for the web connection. This information must be provided bythe instructor or system administrator. Once this information has been obtained, you will then
only need an active network connection either through a dialup service, cable modem, DSLservice, regular campus access, or any other valid means. Note that a network connection is onlynecessary when updating notebook results and receiving assignments. All other activity in the
simulations can be performed off-line.
Figure 9. The Web Options page used for establishing and configuring
web connectivity. Web connectivity allows for the exchange of electronic assignments and notebook results via the internet.

8/8/2019 Inorganic User Guide
http://slidepdf.com/reader/full/inorganic-user-guide 22/23
20
Shown in Figure 9 is the Web Options page after it has been enabled for web connectivity. Thereare four functions performed on this page: (1) Enable web connectivity, (2) Create local user
accounts by specifying the user ID, password, and URL, (3) Retrieve from and update to theweb, and (4) Delete local user accounts. Descriptions of each button and text field are given
below.
Enable Web Connection. Clicking this button turns on the web connectivity functionality andallows local user accounts to be created (see Create Account below). As shown in Figure 9, the
web connectivity has already been enabled. Once at least one user account has been successfullycreated, the web connectivity functionality cannot be disabled until all local accounts have been
deleted (see Delete below).
Create Account. Because class assignments, notebooks, and grades are unique to each studentregistered in the ChemLab database, a unique account must be created for each user on each
computer. Clicking the Create Account button allows a new local user account to be created byentering a valid user ID, password, and URL. There are two important considerations to keep in
mind when creating accounts. First, before any accounts are created, access to the laboratories isimmediate and bypasses the card reader requesting password (student ID) information. The first
account can only be created in the lab book using the Create Account button, and subsequententry into the laboratories will require providing the correct password at the card reader. After
the first account has been created, new local accounts can be created using the Add New User button on the card reader. Second, for computer lab installations, each user cannot be guaranteed
of using the same computer each time they access the program. Consequently, their local accountwill not always be found on the computer available to them. The Add New User button on the
card reader will be useful to create local accounts as needed when using different computers.
User ID. To create a local account, a valid user ID must be entered in this field. This user ID will be provided by the instructor and is case sensitive. The user ID is typically the first 6 letters of
the last name followed by the first and middle initials (for example, SmithJD). The entered user ID is saved by clicking on the Save button or by pressing Enter or Tab. Using Enter or Tab will
automatically advance the cursor to the password field.
Password. A password is also necessary to create a local account and will be provided by theinstructor. The password is also case sensitive. The password entered here will also be the same
password (usually a student ID) that will be used to enter into the laboratory at the card reader (see Create Account ). The entered password is saved by clicking on the Save button or by
pressing Enter or Tab. Using Enter or Tab will automatically advance the cursor to the URLfield.
URL. The actual web connectivity functionality works by passing assignment and notebook
information between the student and a central database via a servlet engine running on a webserver at a certain URL address. The exact (case sensitive) URL address that will be used to pass
assignment and notebook information must be specified in this field. The URL address will be provided by the instructor. Note that the most recent valid URL address will become the default
address for any subsequent local user accounts; however, each local user may have a uniqueURL address. Also note that most URL addresses will be longer than the length of the text box

8/8/2019 Inorganic User Guide
http://slidepdf.com/reader/full/inorganic-user-guide 23/23
provided. Text at the end of the URL can be accessed by using the arrow keys. Pressing Enter or the Save button will initiate the account validation process. An internet connection is necessary
in order to validate the user ID and password information.
Enable Automatic Updates. Checking this box will enable automatic updates (both receiving
from and sending to the server) when entering the laboratory at the card reader, exiting alaboratory, and when submitting assignments. This option is recommended when an internetconnection is continuously available. This option is also permanently selected for computer lab
installations using web connectivity.
Send Updates. Clicking on this button will immediately send the notebook and assignmentinformation up to the server where they will be collected by the instructor. This button is the only
location where updates can be sent to the server on demand; however, warnings are given toupdate to the server when exiting laboratories and submitting assignments. If the Send Updates
button has been clicked even though there have been no changes made to the notebook, awarning is given indicating that an update is not needed. If an update is still selected (by
clicking Yes at the prompt), then an update will be forced to the server replacing any oldinformation.
Receive Updates. Clicking on this button will immediately collect any new assignments,
messages, or grading information posted by the instructor. This button is the only location whereupdates can be received from the server on demand; however, an update can be performed
automatically at the card reader if Enable Automatic Updates has been selected. If the ReceiveUpdates button has been clicked even though there have been no changes made to the
information on the server, a warning is given indicating that an update is not needed. If an updateis still selected (by clicking Yes at the prompt), then an update will be forced from the server
replacing any old information stored locally.
Save. Clicking the Save button saves any text entered in the User ID, Password, or URL fields.Clicking Save in the URL box also initiates the account validation process with the server.
Cancel. Clicking the Cancel button cancels the account creation process and resets the Web
Options page back to its initial state. Clicking Cancel does not cancel any web operations thatmay be in progress.
Delete. Clicking on this button deletes the current local account from the local hard drive and
returns the user back to the hallway. Deleting all the local user accounts returns the software back to the original installed state and disables the web connectivity option. A warning is given
before the actual account deletion occurs.