Contentsdevweb.mris.com/sites/default/files/pdfs/Matrix_Manual_5_3...The information contained in...
166
Copyright © 2011 - Metropolitan Regional Information Systems, Inc i The information contained in this manual may be copyrighted and/or confidential. All rights reserved.
Transcript of Contentsdevweb.mris.com/sites/default/files/pdfs/Matrix_Manual_5_3...The information contained in...

Copyright © 2011 - Metropolitan Regional Information Systems, Inc i The information contained in this manual may be copyrighted and/or confidential. All rights reserved.
Copyright © 2011 - Metropolitan Regional Information Systems, Inc ii The information contained in this manual may be copyrighted and/or confidential. All rights reserved.
Contents Introduction ....................................................................................................................................... v
Purpose ........................................................................................................................................ v
Support Center ............................................................................................................................. v
Module 1: Home .............................................................................................................................. 1
1.1 Tabs ....................................................................................................................................... 2
1.2 Widgets .................................................................................................................................. 3
1.2.1 News ............................................................................................................................... 9
1.2.2 Recent Contacts ........................................................................................................... 10
1.2.3 Recent Email+ Visitors ................................................................................................. 11
1.2.4 My Favorite Searches ................................................................................................... 12
1.2.5 MLS Quick Search ........................................................................................................ 14
1.2.6 External Links ............................................................................................................... 14
1.2.7 My Carts ....................................................................................................................... 15
1.3 Carts .................................................................................................................................... 16
1.4 Speed Bar ............................................................................................................................ 20
1.4.1 Speed Bar Search as Primary Search Method ............................................................ 21
1.4.2 Modify General Searches with Speed Bar ................................................................... 26
1.4.3 Revealing and Hiding the Speed Bar ........................................................................... 27
Module 2 – Search ........................................................................................................................ 28
2.1 Perform a Search ................................................................................................................ 29
2.1.1 Navigation ..................................................................................................................... 29
2.1.2 Enter Search Criteria .................................................................................................... 30
2.1.3 Add/Remove Additional Fields ..................................................................................... 32
2.1.4 Map Search .................................................................................................................. 36
2.1.5 Search Page Action Buttons ......................................................................................... 44
2.1.6 Run Search ................................................................................................................... 45
2.1.7 Save Search ................................................................................................................. 47

Copyright © 2011 - Metropolitan Regional Information Systems, Inc iii The information contained in this manual may be copyrighted and/or confidential. All rights reserved.
2.2 Search Results .................................................................................................................... 49
2.2.1 Sort Search Results ...................................................................................................... 49
2.2.2 Explore Individual Listings ............................................................................................ 53
2.2.3 Full Listing ..................................................................................................................... 54
2.3 Work with Selected Listings ................................................................................................. 59
2.3.1 Email Listings................................................................................................................ 60
2.3.2 Report ........................................................................................................................... 62
2.3.3 CMA .............................................................................................................................. 65
2.3.4 Map ............................................................................................................................... 84
2.3.5 Stats .............................................................................................................................. 90
2.3.6 Right Action Button Functions ...................................................................................... 93
2.3.7 Search Selected ........................................................................................................... 98
Module 3 – My Matrix .................................................................................................................... 99
3.1 Summary ........................................................................................................................... 100
3.2 Contacts ............................................................................................................................. 101
3.2.1 Search Contacts ......................................................................................................... 101
3.2.2 Edit Contact Details .................................................................................................... 102
3.2.3 Delete, Inactivate or Reactivate Contact .................................................................... 104
3.2.4 Add New Contact ........................................................................................................ 106
3.2.5 Contact Auto Emails ................................................................................................... 107
3.2.6 Contact Saved Searches ............................................................................................ 112
3.2.7 Contact CMAs............................................................................................................. 113
3.2.8 Contact Sent Email ..................................................................................................... 114
3.2.9 Start CMA ................................................................................................................... 116
3.2.10 Import and Export Contacts ...................................................................................... 116
3.3 Auto Email ......................................................................................................................... 118
3.3.1 Update Auto Email ...................................................................................................... 119
3.3.2 Auto Email Action Buttons .......................................................................................... 120
Copyright © 2011 - Metropolitan Regional Information Systems, Inc iv The information contained in this manual may be copyrighted and/or confidential. All rights reserved.
3.3.3 Reactivate Auto Email ................................................................................................ 120
3.4 Saved Searches ................................................................................................................ 122
3.4.1 Update Saved Searches ............................................................................................. 123
3.4.2 Saved Searches Action Buttons ................................................................................. 124
3.5 Sent Email ......................................................................................................................... 125
3.6 CMAs ................................................................................................................................. 126
3.6.1 Start New CMA ........................................................................................................... 128
3.7 Watched Listings ............................................................................................................... 129
3.8 My Listings ......................................................................................................................... 131
3.9 Settings .............................................................................................................................. 132
3.9.1 Email Signature .......................................................................................................... 132
3.9.2 Header and Footer ..................................................................................................... 133
3.9.3 Manage Speed Bar Shortcuts .................................................................................... 134
3.9.4 Team Settings............................................................................................................. 135
3.9.5 Custom Displays ......................................................................................................... 141
3.9.6 Custom Export ............................................................................................................ 143
Module 4 – Finance ..................................................................................................................... 145
Module 5 – Roster ....................................................................................................................... 146
5.1 Search for Agent ................................................................................................................ 146
5.2 Email Agent ....................................................................................................................... 148
5.3 Search for Office ................................................................................................................ 149
Module 6 – Tax ............................................................................................................................ 151
Module 7 – Open House .............................................................................................................. 153
Module 8 – Foreclosure ............................................................................................................... 155
Module 9 – RETechnology .......................................................................................................... 160
Module 10 – Help......................................................................................................................... 161
Copyright © 2011 - Metropolitan Regional Information Systems, Inc v The information contained in this manual may be copyrighted and/or confidential. All rights reserved.
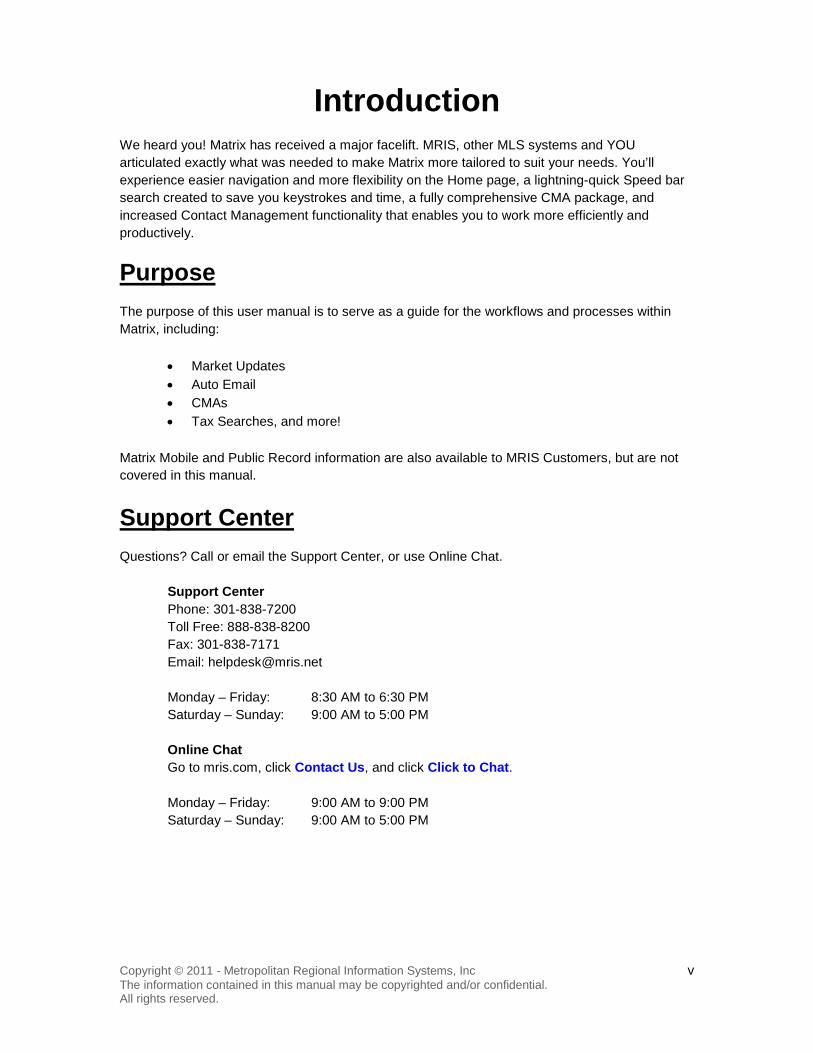
Introduction We heard you! Matrix has received a major facelift. MRIS, other MLS systems and YOU articulated exactly what was needed to make Matrix more tailored to suit your needs. You’ll experience easier navigation and more flexibility on the Home page, a lightning-quick Speed bar search created to save you keystrokes and time, a fully comprehensive CMA package, and increased Contact Management functionality that enables you to work more efficiently and productively.
Purpose The purpose of this user manual is to serve as a guide for the workflows and processes within Matrix, including:
• Market Updates • Auto Email • CMAs • Tax Searches, and more!
Matrix Mobile and Public Record information are also available to MRIS Customers, but are not covered in this manual.
Support Center Questions? Call or email the Support Center, or use Online Chat.
Support Center Phone: 301-838-7200 Toll Free: 888-838-8200 Fax: 301-838-7171 Email: [email protected]
Monday – Friday: 8:30 AM to 6:30 PM Saturday – Sunday: 9:00 AM to 5:00 PM
Online Chat Go to mris.com, click Contact Us, and click Click to Chat. Monday – Friday: 9:00 AM to 9:00 PM Saturday – Sunday: 9:00 AM to 5:00 PM

Copyright © 2011 - Metropolitan Regional Information Systems, Inc 1 The information contained in this manual may be copyrighted and/or confidential. All rights reserved.
Module 1: Home The Matrix Home page contains your workload at-a-glance and is comprised of several sections. The top of the page contains links to the MRIS Website and other MRIS products, such as Keystone. Below the links are ten tabs which link to other pages within Matrix. Each tab is discussed in a module within this manual. Beneath the links is the Speed bar, a quick search functionality. The main area of the page contains eight widgets, which provide direct access to Matrix pages. To customize the Home page, the widgets can be collapsed, hidden and rearranged.
Copyright © 2011 - Metropolitan Regional Information Systems, Inc 2 The information contained in this manual may be copyrighted and/or confidential. All rights reserved.
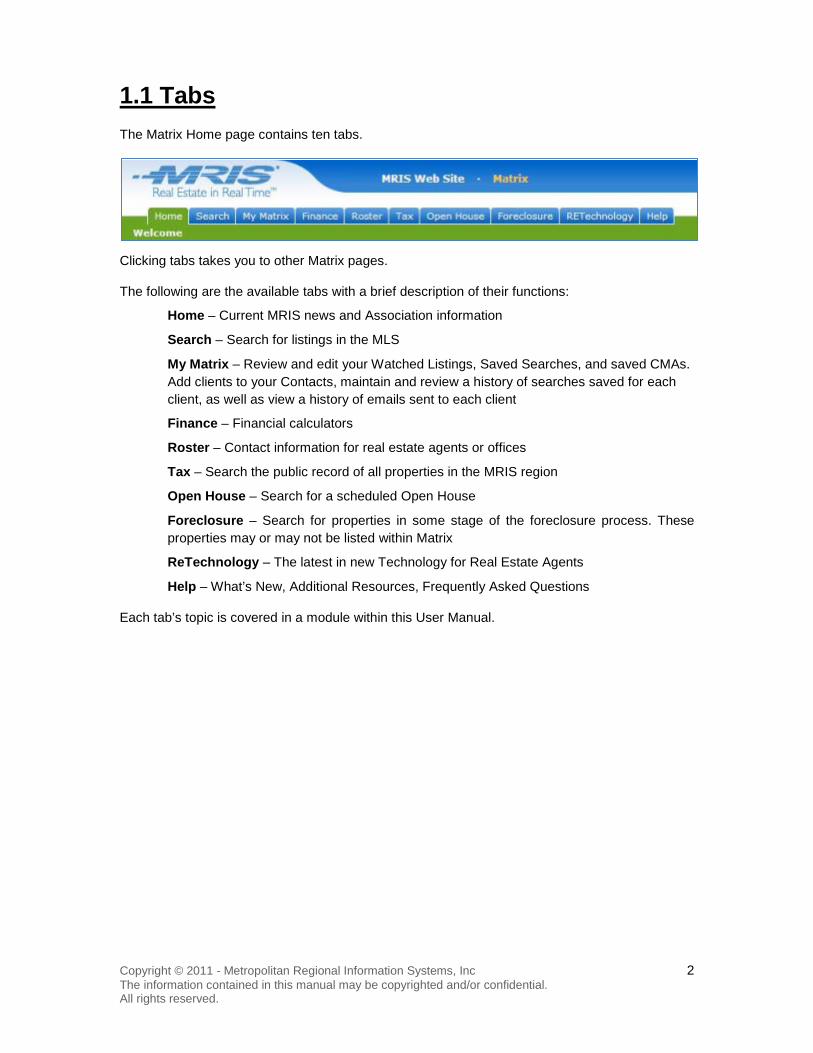
1.1 Tabs The Matrix Home page contains ten tabs.
Clicking tabs takes you to other Matrix pages.
The following are the available tabs with a brief description of their functions:
Home – Current MRIS news and Association information
Search – Search for listings in the MLS
My Matrix – Review and edit your Watched Listings, Saved Searches, and saved CMAs. Add clients to your Contacts, maintain and review a history of searches saved for each client, as well as view a history of emails sent to each client
Finance – Financial calculators
Roster – Contact information for real estate agents or offices
Tax – Search the public record of all properties in the MRIS region
Open House – Search for a scheduled Open House
Foreclosure – Search for properties in some stage of the foreclosure process. These properties may or may not be listed within Matrix
ReTechnology – The latest in new Technology for Real Estate Agents
Help – What’s New, Additional Resources, Frequently Asked Questions
Each tab’s topic is covered in a module within this User Manual.
Copyright © 2011 - Metropolitan Regional Information Systems, Inc 3 The information contained in this manual may be copyrighted and/or confidential. All rights reserved.
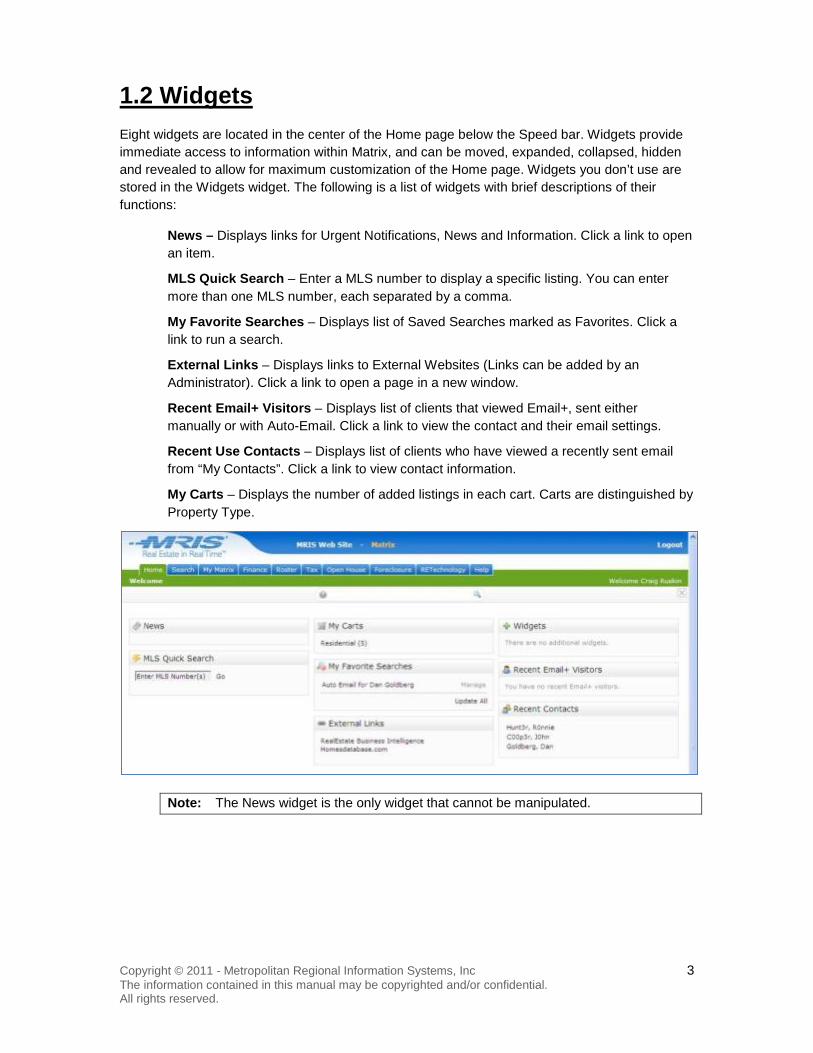
1.2 Widgets Eight widgets are located in the center of the Home page below the Speed bar. Widgets provide immediate access to information within Matrix, and can be moved, expanded, collapsed, hidden and revealed to allow for maximum customization of the Home page. Widgets you don’t use are stored in the Widgets widget. The following is a list of widgets with brief descriptions of their functions:
News – Displays links for Urgent Notifications, News and Information. Click a link to open an item.
MLS Quick Search – Enter a MLS number to display a specific listing. You can enter more than one MLS number, each separated by a comma.
My Favorite Searches – Displays list of Saved Searches marked as Favorites. Click a link to run a search.
External Links – Displays links to External Websites (Links can be added by an Administrator). Click a link to open a page in a new window.
Recent Email+ Visitors – Displays list of clients that viewed Email+, sent either manually or with Auto-Email. Click a link to view the contact and their email settings.
Recent Use Contacts – Displays list of clients who have viewed a recently sent email from “My Contacts”. Click a link to view contact information.
My Carts – Displays the number of added listings in each cart. Carts are distinguished by Property Type.
Note: The News widget is the only widget that cannot be manipulated.

Copyright © 2011 - Metropolitan Regional Information Systems, Inc 4 The information contained in this manual may be copyrighted and/or confidential. All rights reserved.
Move a Widget
Step 1: Place the cursor over the top bar of the widget you want to move. The cursor shape changes to a four-pointed cross.
Step 2: Click and drag the widget to the preferred position on the Home page. The position of other widgets may adjust to accommodate the new position of the widget you have just moved.
1
2

Copyright © 2011 - Metropolitan Regional Information Systems, Inc 5 The information contained in this manual may be copyrighted and/or confidential. All rights reserved.
Collapse a Widget
Step 1: Place the cursor over the top bar of the widget you want to collapse. The icons display, and the cursor shape changes to a pointed finger.
Step 2: Click the up arrow icon.
The widget is collapsed.
2
Copyright © 2011 - Metropolitan Regional Information Systems, Inc 6 The information contained in this manual may be copyrighted and/or confidential. All rights reserved.
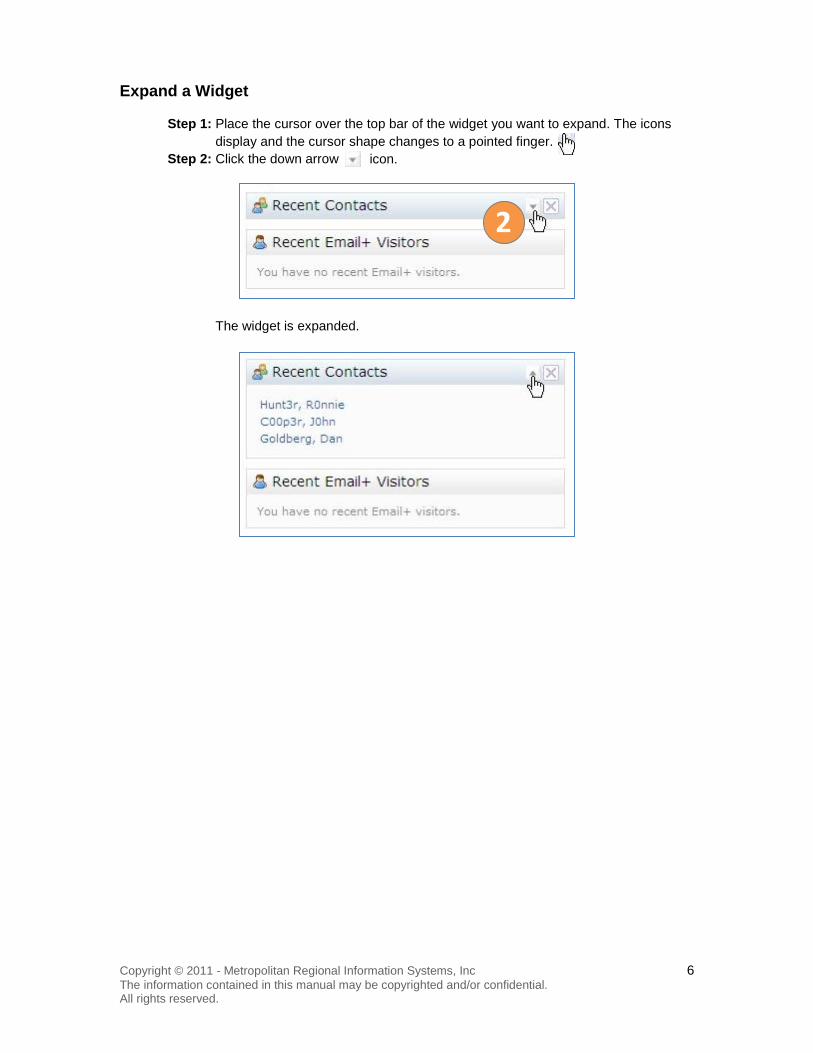
Expand a Widget
Step 1: Place the cursor over the top bar of the widget you want to expand. The icons display and the cursor shape changes to a pointed finger.
Step 2: Click the down arrow icon.
The widget is expanded.
2
Copyright © 2011 - Metropolitan Regional Information Systems, Inc 7 The information contained in this manual may be copyrighted and/or confidential. All rights reserved.
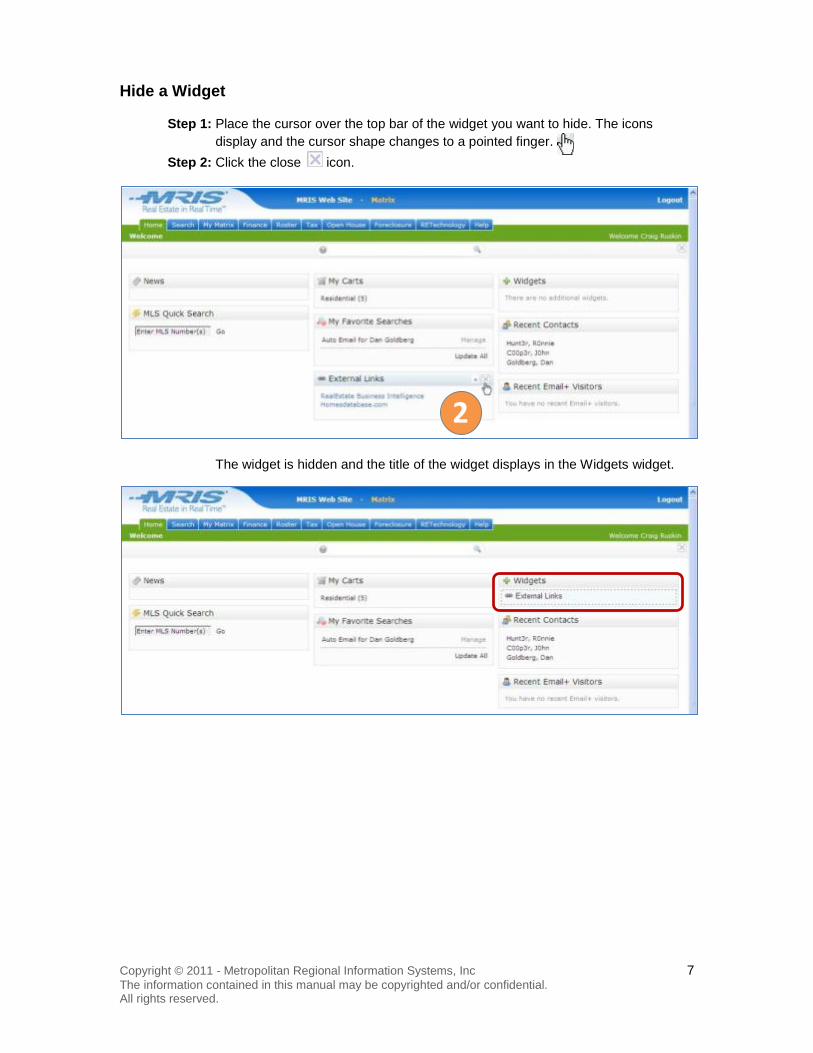
Hide a Widget
Step 1: Place the cursor over the top bar of the widget you want to hide. The icons display and the cursor shape changes to a pointed finger.
Step 2: Click the close icon.
The widget is hidden and the title of the widget displays in the Widgets widget.
2

Copyright © 2011 - Metropolitan Regional Information Systems, Inc 8 The information contained in this manual may be copyrighted and/or confidential. All rights reserved.
Reveal a Widget
Step 1: In the Widgets widget, place the cursor over the title of the widget to reveal. The cursor shape changes to a four-pointed cross and the title is surrounded by a dashed box.
Step 2: Click and drag the title of the widget to the preferred location on the Home page.
1
2
Copyright © 2011 - Metropolitan Regional Information Systems, Inc 9 The information contained in this manual may be copyrighted and/or confidential. All rights reserved.
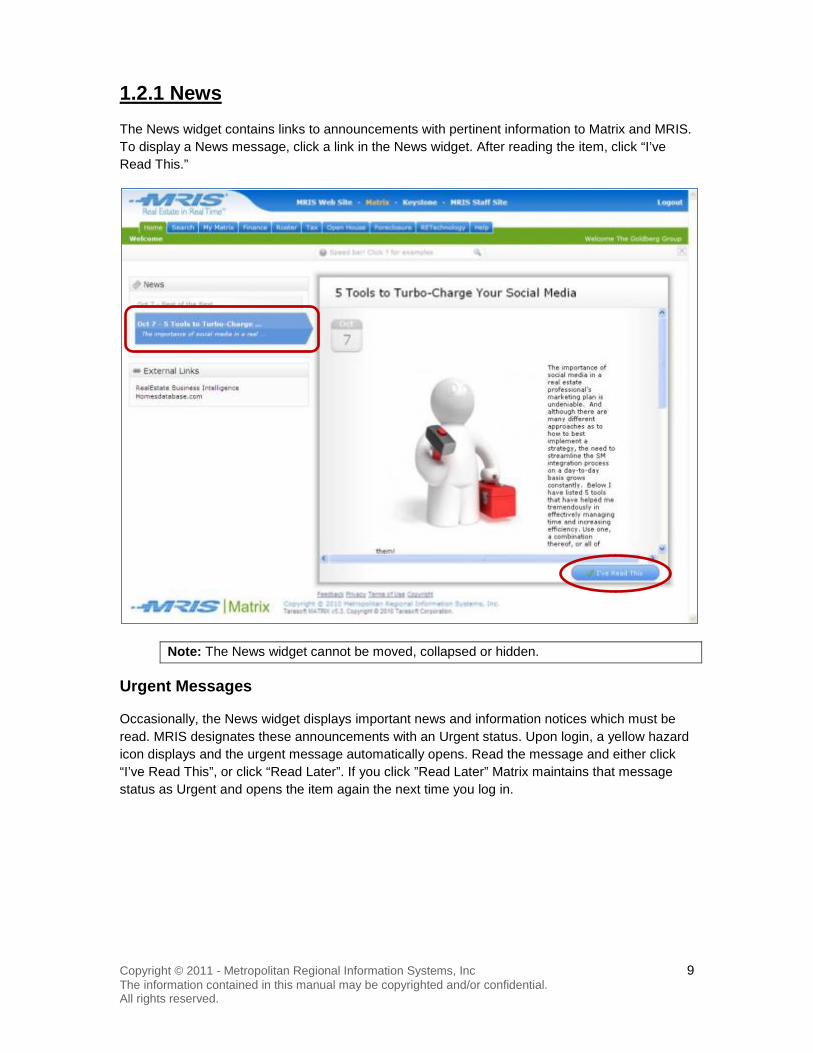
1.2.1 News The News widget contains links to announcements with pertinent information to Matrix and MRIS. To display a News message, click a link in the News widget. After reading the item, click “I’ve Read This.”
Note: The News widget cannot be moved, collapsed or hidden.
Urgent Messages
Occasionally, the News widget displays important news and information notices which must be read. MRIS designates these announcements with an Urgent status. Upon login, a yellow hazard icon displays and the urgent message automatically opens. Read the message and either click “I’ve Read This”, or click “Read Later”. If you click ”Read Later” Matrix maintains that message status as Urgent and opens the item again the next time you log in.
Copyright © 2011 - Metropolitan Regional Information Systems, Inc 10 The information contained in this manual may be copyrighted and/or confidential. All rights reserved.
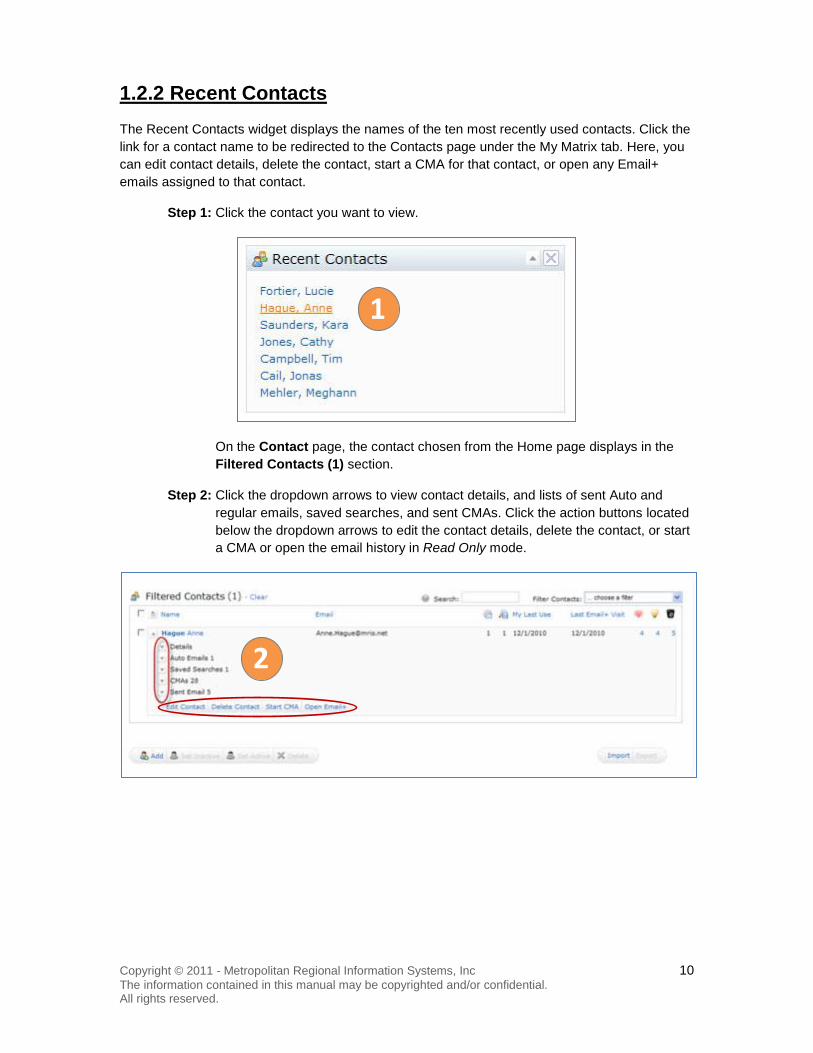
1.2.2 Recent Contacts The Recent Contacts widget displays the names of the ten most recently used contacts. Click the link for a contact name to be redirected to the Contacts page under the My Matrix tab. Here, you can edit contact details, delete the contact, start a CMA for that contact, or open any Email+ emails assigned to that contact.
Step 1: Click the contact you want to view.
On the Contact page, the contact chosen from the Home page displays in the Filtered Contacts (1) section.
Step 2: Click the dropdown arrows to view contact details, and lists of sent Auto and regular emails, saved searches, and sent CMAs. Click the action buttons located below the dropdown arrows to edit the contact details, delete the contact, or start a CMA or open the email history in Read Only mode.
1
2

Copyright © 2011 - Metropolitan Regional Information Systems, Inc 11 The information contained in this manual may be copyrighted and/or confidential. All rights reserved.
1.2.3 Recent Email+ Visitors The Recent Email+ Visitors widget displays the names of the ten most recent contacts who have last visited the Email+ portal. Click the link for a contact name to be redirected to the Contacts page under the My Matrix tab. Here, you can edit contact details, delete the contact, start a CMA for that contact, or open any Email+ emails assigned to that contact.
Step 1: Click the contact you want to view.
Step 2: On the Contact page, the contact chosen from the Home page displays in the Filtered Contacts (1) section. Click the dropdown arrows to view contact details, and lists of sent Auto and regular emails, saved searches, and sent CMAs. Click the action buttons located below the dropdown arrows to edit the contact details, delete the contact, or start a CMA or open the email history in Read Only mode.
1
2
Copyright © 2011 - Metropolitan Regional Information Systems, Inc 12 The information contained in this manual may be copyrighted and/or confidential. All rights reserved.
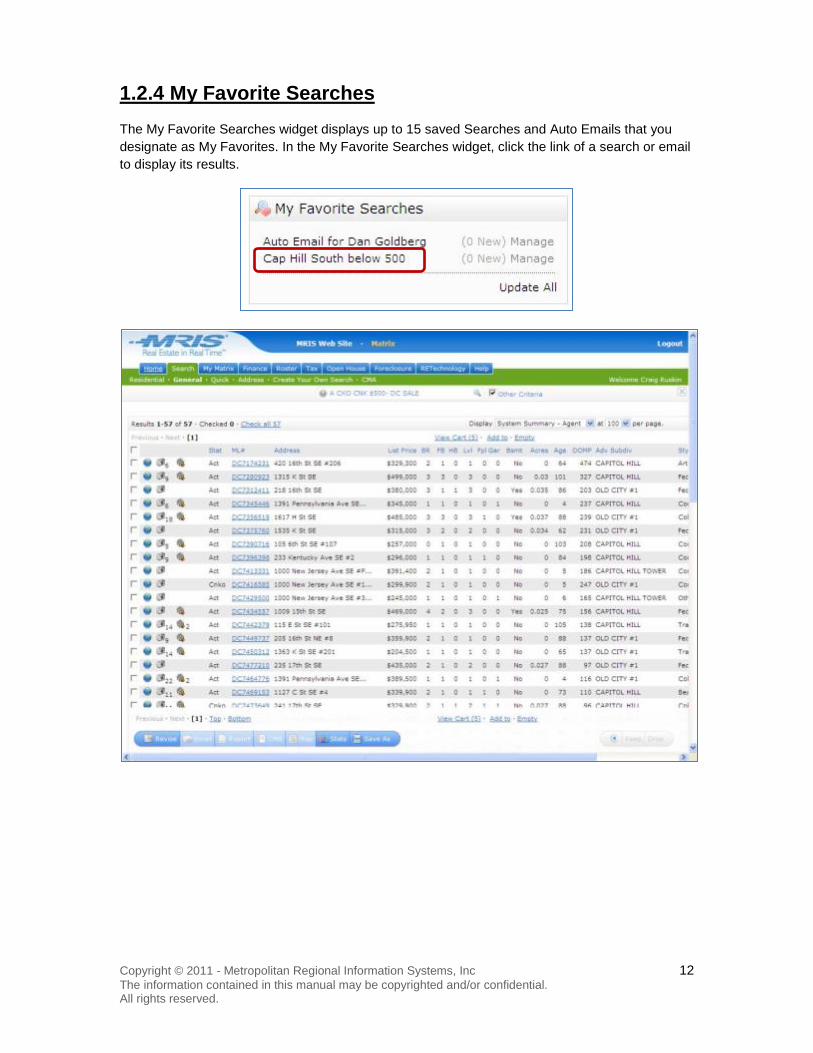
1.2.4 My Favorite Searches The My Favorite Searches widget displays up to 15 saved Searches and Auto Emails that you designate as My Favorites. In the My Favorite Searches widget, click the link of a search or email to display its results.
Copyright © 2011 - Metropolitan Regional Information Systems, Inc 13 The information contained in this manual may be copyrighted and/or confidential. All rights reserved.
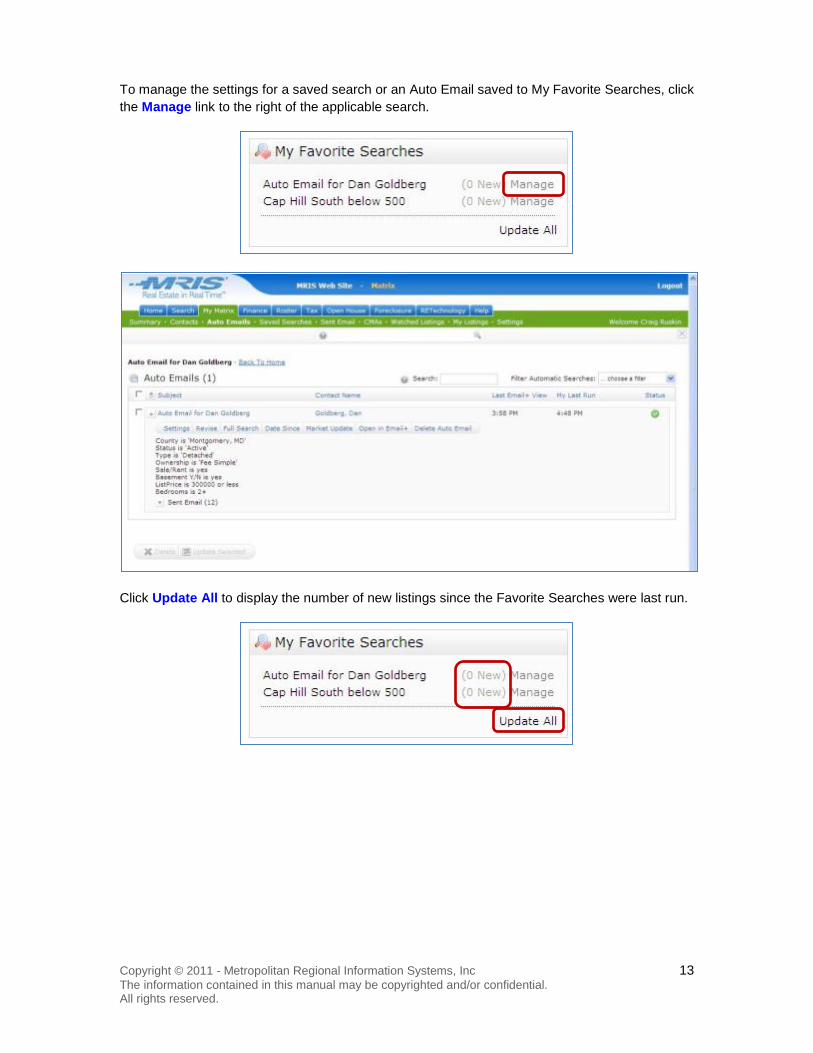
To manage the settings for a saved search or an Auto Email saved to My Favorite Searches, click the Manage link to the right of the applicable search.
Click Update All to display the number of new listings since the Favorite Searches were last run.

Copyright © 2011 - Metropolitan Regional Information Systems, Inc 14 The information contained in this manual may be copyrighted and/or confidential. All rights reserved.
1.2.5 MLS Quick Search The MLS Quick Search widget enables you to search for one or more specific listings.
Step 1: In the Enter MLS Number(s) field, enter a MLS number. To find more than one listing, enter more than one MLS number, each separated by a comma.
Step 2: Click Go.
The listing or listings display.
1.2.6 External Links The External Links widget displays links to external websites. Your Matrix Administrator can add links to websites. To open an external website in a new window, click the applicable link.
1 2

Copyright © 2011 - Metropolitan Regional Information Systems, Inc 15 The information contained in this manual may be copyrighted and/or confidential. All rights reserved.
1.2.7 My Carts The My Carts widget displays links for up to five carts, with one cart per property type search (Residential, Lot & Land, Commercial, Multi-Family, Cross Property). Carts are repositories for listings you select after a search is completed. Click a cart’s link retrieve the listings in that cart. The cart’s link contains the number of items in the cart. Carts are detailed in Carts section of this module.
Copyright © 2011 - Metropolitan Regional Information Systems, Inc 16 The information contained in this manual may be copyrighted and/or confidential. All rights reserved.
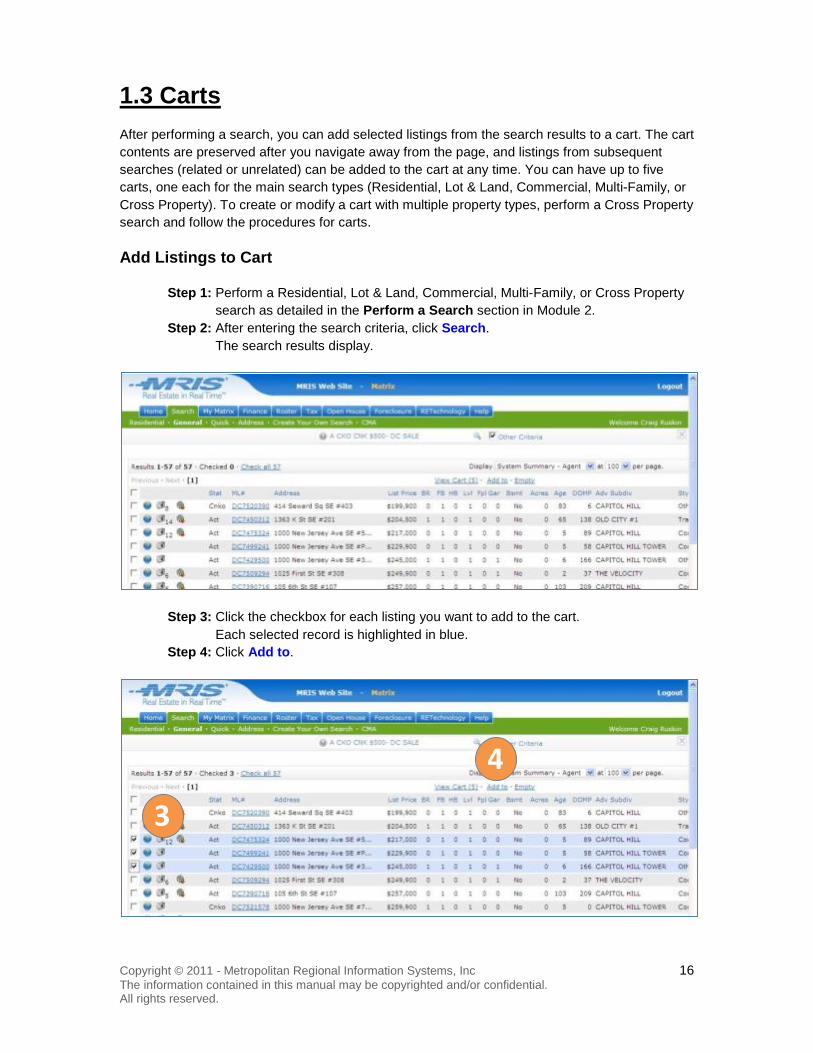
1.3 Carts After performing a search, you can add selected listings from the search results to a cart. The cart contents are preserved after you navigate away from the page, and listings from subsequent searches (related or unrelated) can be added to the cart at any time. You can have up to five carts, one each for the main search types (Residential, Lot & Land, Commercial, Multi-Family, or Cross Property). To create or modify a cart with multiple property types, perform a Cross Property search and follow the procedures for carts.
Add Listings to Cart
Step 1: Perform a Residential, Lot & Land, Commercial, Multi-Family, or Cross Property search as detailed in the Perform a Search section in Module 2.
Step 2: After entering the search criteria, click Search. The search results display.
Step 3: Click the checkbox for each listing you want to add to the cart. Each selected record is highlighted in blue.
Step 4: Click Add to.
3
4

Copyright © 2011 - Metropolitan Regional Information Systems, Inc 17 The information contained in this manual may be copyrighted and/or confidential. All rights reserved.
The listing(s) are added to the cart. Links in Matrix for the cart are updated to reflect the new total number of items in the cart.
View Cart Contents When a user returns to the Search page, the Cart (X) links indicate if a cart has been created and how many listings are currently in that individual cart for each property type. Clicking the Cart (X) link next to a property type displays the items in that Cart.
Copyright © 2011 - Metropolitan Regional Information Systems, Inc 18 The information contained in this manual may be copyrighted and/or confidential. All rights reserved.
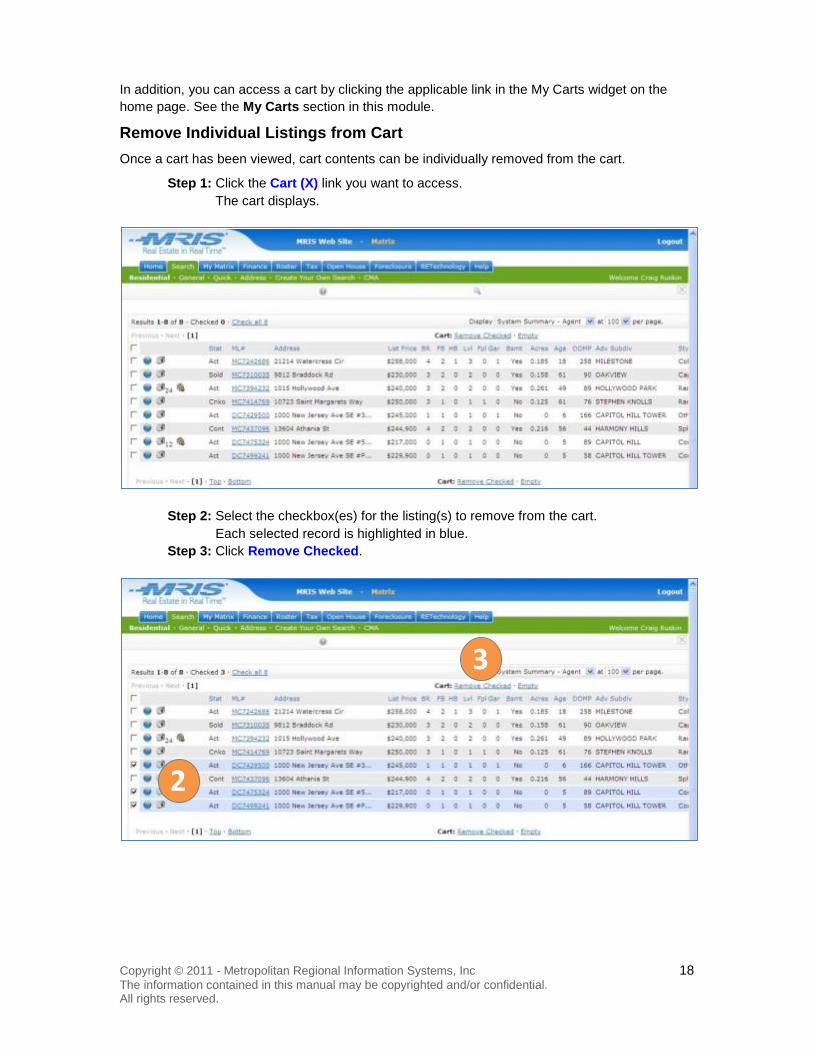
In addition, you can access a cart by clicking the applicable link in the My Carts widget on the home page. See the My Carts section in this module.
Remove Individual Listings from Cart Once a cart has been viewed, cart contents can be individually removed from the cart.
Step 1: Click the Cart (X) link you want to access. The cart displays.
Step 2: Select the checkbox(es) for the listing(s) to remove from the cart. Each selected record is highlighted in blue.
Step 3: Click Remove Checked.
2
3
Copyright © 2011 - Metropolitan Regional Information Systems, Inc 19 The information contained in this manual may be copyrighted and/or confidential. All rights reserved.
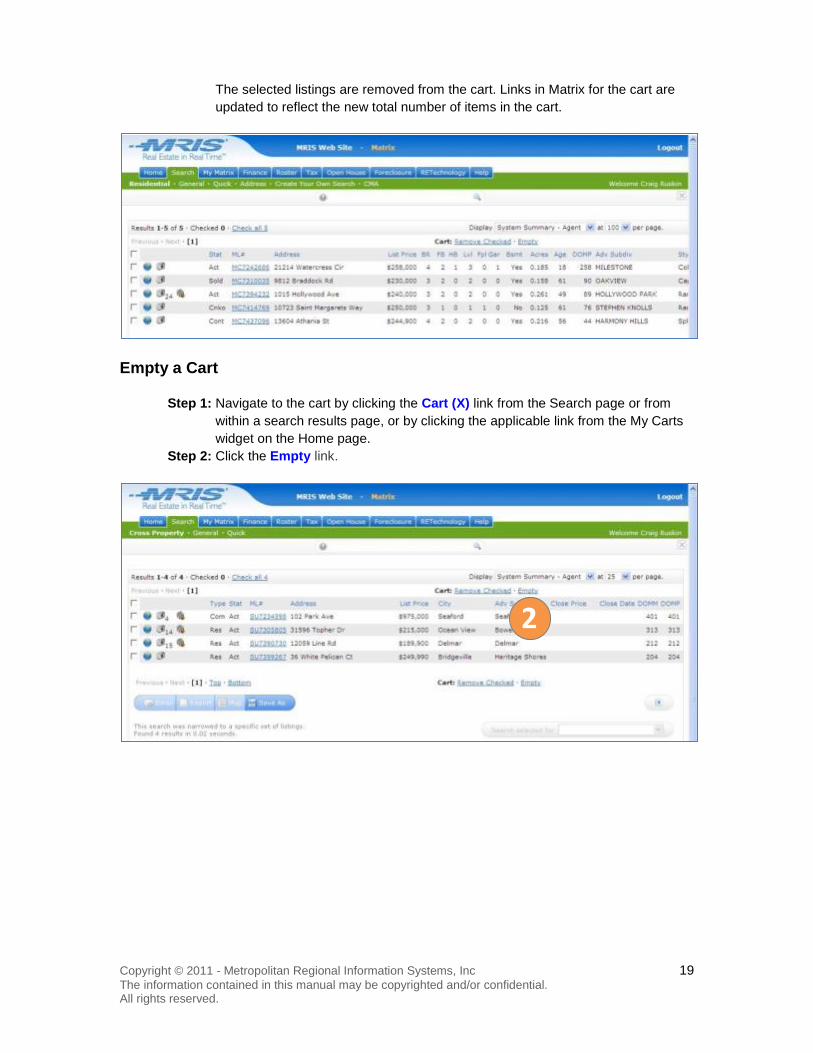
The selected listings are removed from the cart. Links in Matrix for the cart are updated to reflect the new total number of items in the cart.
Empty a Cart
Step 1: Navigate to the cart by clicking the Cart (X) link from the Search page or from within a search results page, or by clicking the applicable link from the My Carts widget on the Home page.
Step 2: Click the Empty link.
2
Copyright © 2011 - Metropolitan Regional Information Systems, Inc 20 The information contained in this manual may be copyrighted and/or confidential. All rights reserved.
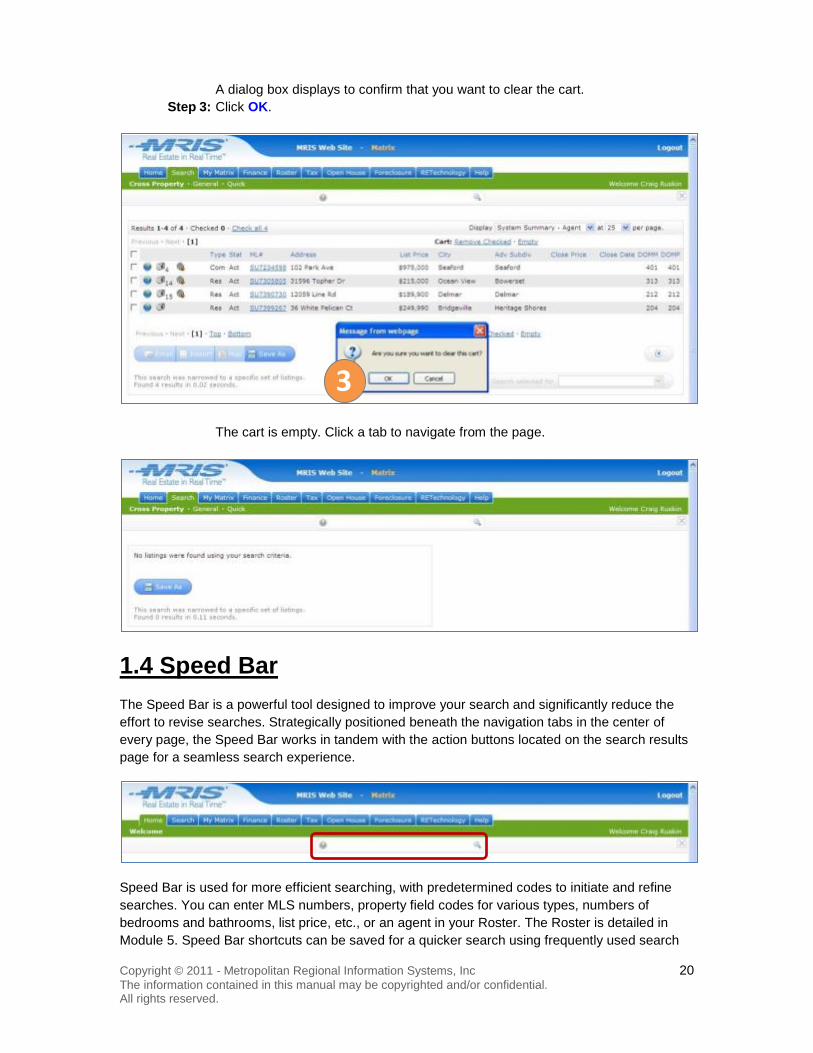
A dialog box displays to confirm that you want to clear the cart. Step 3: Click OK.
The cart is empty. Click a tab to navigate from the page.
1.4 Speed Bar The Speed Bar is a powerful tool designed to improve your search and significantly reduce the effort to revise searches. Strategically positioned beneath the navigation tabs in the center of every page, the Speed Bar works in tandem with the action buttons located on the search results page for a seamless search experience.
Speed Bar is used for more efficient searching, with predetermined codes to initiate and refine searches. You can enter MLS numbers, property field codes for various types, numbers of bedrooms and bathrooms, list price, etc., or an agent in your Roster. The Roster is detailed in Module 5. Speed Bar shortcuts can be saved for a quicker search using frequently used search
3
Copyright © 2011 - Metropolitan Regional Information Systems, Inc 21 The information contained in this manual may be copyrighted and/or confidential. All rights reserved.
criteria. Speed bar can be used as the main search method for a search, or to refine searches. More information about searches is detailed in Module 2.
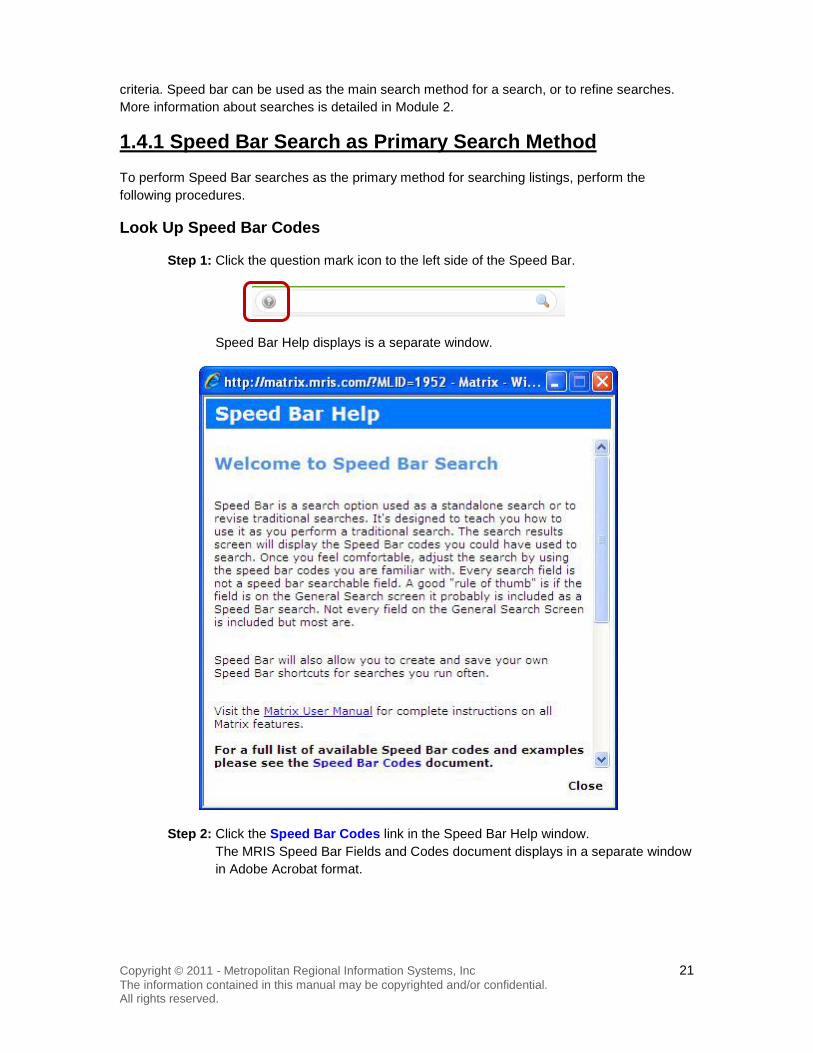
1.4.1 Speed Bar Search as Primary Search Method To perform Speed Bar searches as the primary method for searching listings, perform the following procedures.
Look Up Speed Bar Codes
Step 1: Click the question mark icon to the left side of the Speed Bar.
Speed Bar Help displays is a separate window.
Step 2: Click the Speed Bar Codes link in the Speed Bar Help window. The MRIS Speed Bar Fields and Codes document displays in a separate window in Adobe Acrobat format.

Copyright © 2011 - Metropolitan Regional Information Systems, Inc 22 The information contained in this manual may be copyrighted and/or confidential. All rights reserved.
Enter Speed Bar Search
Speed bar searches are searches you use often, including broad searches that can be modified as needed. In this example, an agent enters a search for listings which are active, or have contingencies with or without kickout, in Capitol Hill, with 3 or more bedrooms.
Step 1: Click in the Speed Bar and enter the codes for the search terms. In this example, the codes are: A CKO CNK ADV Capitol Hill 3+
Note: Rather than entering BR for bedroom or BA for bathroom, Matrix automatically determines that when a single digit is entered, it refers to bedrooms. If a second single digit is entered, Matrix determines it refers to bathrooms. For example:
3 = 3 bedrooms 3 2 = 3 bedrooms and 2 bathrooms 3+ 2+ = 3 or more bedrooms and 2 or more bathrooms.
Step 2: Click the Search icon.
The search results display.
1 2

Copyright © 2011 - Metropolitan Regional Information Systems, Inc 23 The information contained in this manual may be copyrighted and/or confidential. All rights reserved.
Save Speed Bar Shortcut
In this example, the agent saves the speed bar search performed in the preceding procedure.
Step 1: After a speed bar search results are displayed, click Save As. A small window displays to the right.
Step 2: Click New Speed Bar Shortcut.
1
2

Copyright © 2011 - Metropolitan Regional Information Systems, Inc 24 The information contained in this manual may be copyrighted and/or confidential. All rights reserved.
The My Matrix page displays. Step 3: In the Speed Box Shortcut field, enter a unique description for the search that is
easily remembered. Note: Do not remove the backslash (/) already populated in the field.
Text is limited to a total of 20 characters, including the backslash. A shortcut name may not include spaces, symbols or punctuation In this example, the Shortcut is named /CapHill3+
Step 4: Optionally, enter a more detailed description for the shortcut in the Description (Optional) field.
Step 5: Click Save.
The search results display, with a notification that the shortcut is created
3
5
4

Copyright © 2011 - Metropolitan Regional Information Systems, Inc 25 The information contained in this manual may be copyrighted and/or confidential. All rights reserved.
Retrieve Speed Bar Shortcut
Step 1: In the Speed Bar, enter the Shortcut name, starting with the backslash. Step 2: Click the Search icon.
The search results display.
1 2

Copyright © 2011 - Metropolitan Regional Information Systems, Inc 26 The information contained in this manual may be copyrighted and/or confidential. All rights reserved.
Modify Speed Bar Shortcut Results
Modify the results of a Speed Bar Shortcut search by entering additional codes.
Step 1: In the Speed Bar, enter additional field codes as necessary. Follow the Look Up Speed Bar Codes procedure in this module, if needed. In this example, the field code BS is added to return only listings with Basements
Step 2: Click the Search icon.
The modified search results display.
1.4.2 Modify General Searches with Speed Bar To modify the results of a general search with the Speed Bar, perform the following procedure.
Step 1: Perform a general searching using the methods detailed in Module 2 of this manual. The codes from that search automatically populate the speed bar. Search terms which are not Speed Bar Codes (e.g., Zip Codes) are not listed in the Speed Bar, and are accessed by clicking Other Criteria.
1 2
Copyright © 2011 - Metropolitan Regional Information Systems, Inc 27 The information contained in this manual may be copyrighted and/or confidential. All rights reserved.
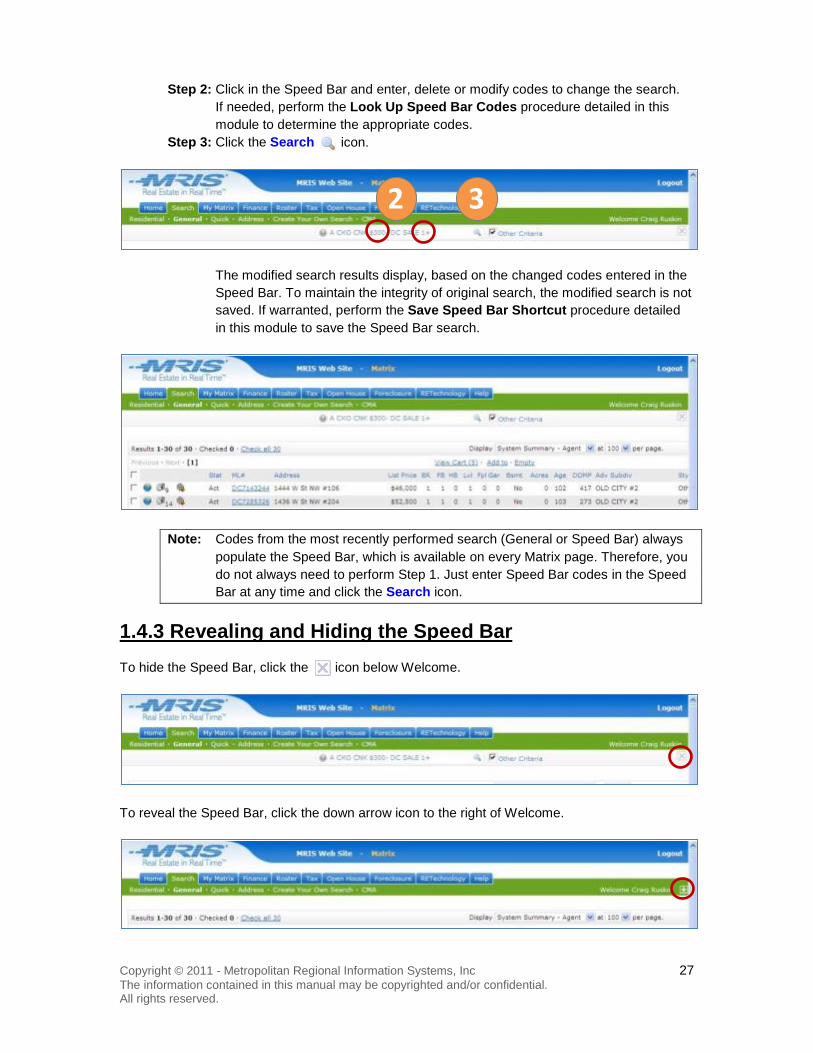
Step 2: Click in the Speed Bar and enter, delete or modify codes to change the search. If needed, perform the Look Up Speed Bar Codes procedure detailed in this module to determine the appropriate codes.
Step 3: Click the Search icon.
The modified search results display, based on the changed codes entered in the Speed Bar. To maintain the integrity of original search, the modified search is not saved. If warranted, perform the Save Speed Bar Shortcut procedure detailed in this module to save the Speed Bar search.
Note: Codes from the most recently performed search (General or Speed Bar) always populate the Speed Bar, which is available on every Matrix page. Therefore, you do not always need to perform Step 1. Just enter Speed Bar codes in the Speed Bar at any time and click the Search icon.
1.4.3 Revealing and Hiding the Speed Bar To hide the Speed Bar, click the icon below Welcome.
To reveal the Speed Bar, click the down arrow icon to the right of Welcome.
2 3
Copyright © 2011 - Metropolitan Regional Information Systems, Inc 28 The information contained in this manual may be copyrighted and/or confidential. All rights reserved.
Module 2 – Search Matrix provides a comprehensive and powerful tool to search for property listings. The Search functionality is inclusive for all property types and listing statuses, and contains all listings entered by MRIS customers. Search results have up-to-date information at your fingertips, including changes in listing price or status.
The Search page contains 22 search links, organized to help direct a search using two main criteria simultaneously: property type and search type.
Click any of the searches under the Residential property type to limit a search to Residential listings. Similarly, click any of the searches under Lot & Land, Commercial, or Multi-Family property types to limit a search to Lot & Land, Commercial, or Multi-Family listings, respectively. The two Cross Property searches do not limit the search to a specific property type.
For each of the Residential, Lot & Land, Commercial, Multi-Family property types, there are five search types: General, Quick, Address, Create Your Own Search and CMA. Cross Property searches include only General and Quick searches.
General search pages display a broad range of search criteria from which to enter.
Quick search pages contain a limited number of criteria such as ML#, County, Status, and fields with Listing and Selling Agent information.
Address search pages contain search criteria to easily locate property geographically.
Create Your Own Searches search pages contain just two fields, County and Status. Add additional fields to customize the search. Fields added to a search page remain on the search page for future searches until they are removed.
CMA search pages contain search criteria commonly used in creating a Comparative Market Analysis (CMA). After the search results display, follow the procedures in the CMA section of this Module to create the CMA report. CMA reports can be generated from any search results page, not just CMA search results pages.
All searches, regardless of property type and search type follow the same basic steps:
First, navigate to the search page and specify search criteria. Optionally, add and remove additional criteria, select a map, customize the way search results display, and check criteria and counts. After inputting criteria, click Search to enact the search. Optionally, save the search.
Note: You can also search listings with the Speed Bar by following the procedures in the Speed Bar section in Module 1 of this user manual. Search results display in a General search results page for the applicable Property Type. Follow the procedures in the Search Results and Work with Selected Listings sections in this module to explore the Speed Bar Search results and work with listings.
After obtaining search results, you can sort the results, view individual listings and their details, and watch a listing. You can also work with one or more listings from within the search results, by creating emails to contacts, reports, CMAs, and generating statistics.
Copyright © 2011 - Metropolitan Regional Information Systems, Inc 29 The information contained in this manual may be copyrighted and/or confidential. All rights reserved.
2.1 Perform a Search The following procedures guide you through the steps to create a search. Of the procedures that follow, only Navigation, Enter Search Criteria and Run Search are required. All other procedures are optional.
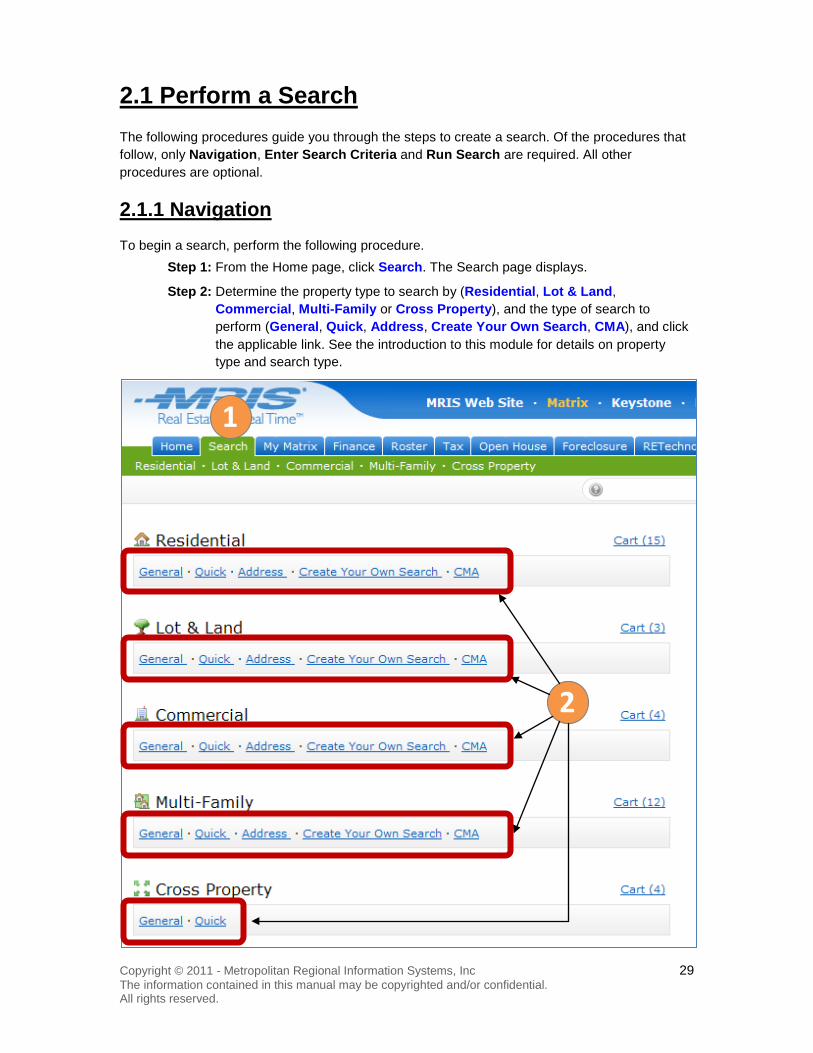
2.1.1 Navigation To begin a search, perform the following procedure.
Step 1: From the Home page, click Search. The Search page displays.
Step 2: Determine the property type to search by (Residential, Lot & Land, Commercial, Multi-Family or Cross Property), and the type of search to perform (General, Quick, Address, Create Your Own Search, CMA), and click the applicable link. See the introduction to this module for details on property type and search type.
2
1
Copyright © 2011 - Metropolitan Regional Information Systems, Inc 30 The information contained in this manual may be copyrighted and/or confidential. All rights reserved.
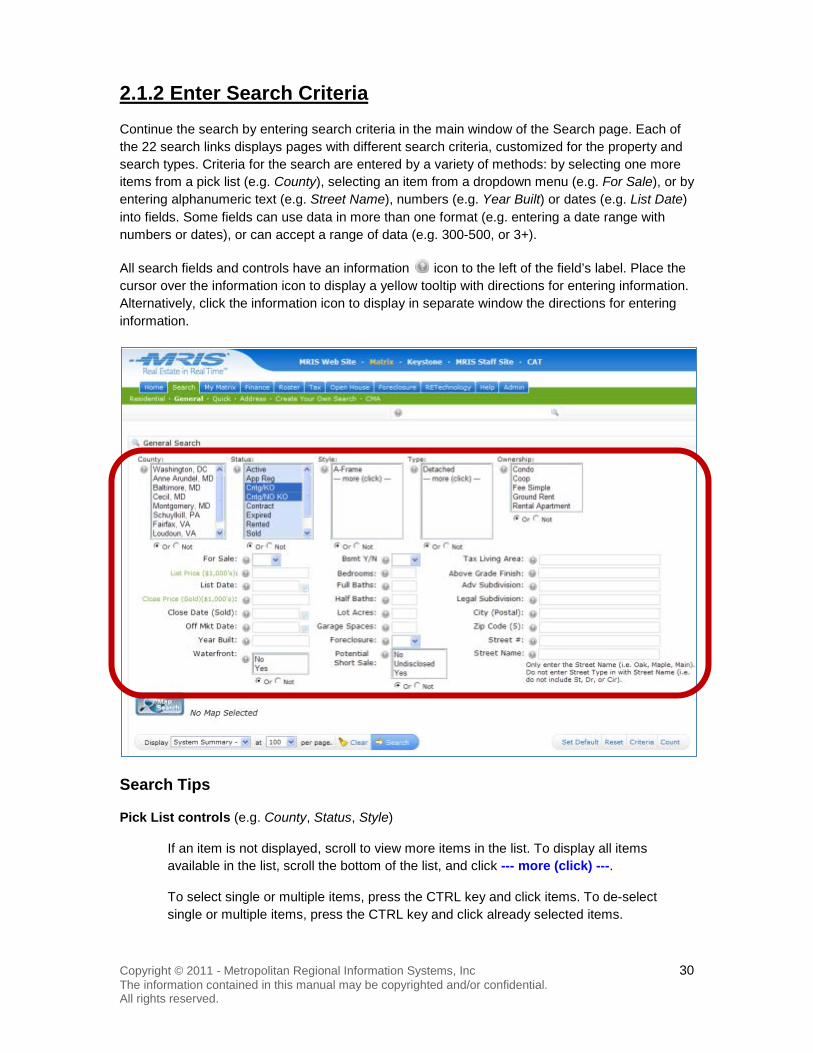
2.1.2 Enter Search Criteria Continue the search by entering search criteria in the main window of the Search page. Each of the 22 search links displays pages with different search criteria, customized for the property and search types. Criteria for the search are entered by a variety of methods: by selecting one more items from a pick list (e.g. County), selecting an item from a dropdown menu (e.g. For Sale), or by entering alphanumeric text (e.g. Street Name), numbers (e.g. Year Built) or dates (e.g. List Date) into fields. Some fields can use data in more than one format (e.g. entering a date range with numbers or dates), or can accept a range of data (e.g. 300-500, or 3+).
All search fields and controls have an information icon to the left of the field’s label. Place the cursor over the information icon to display a yellow tooltip with directions for entering information. Alternatively, click the information icon to display in separate window the directions for entering information.
Search Tips
Pick List controls (e.g. County, Status, Style)
If an item is not displayed, scroll to view more items in the list. To display all items available in the list, scroll the bottom of the list, and click --- more (click) ---.
To select single or multiple items, press the CTRL key and click items. To de-select single or multiple items, press the CTRL key and click already selected items.

Copyright © 2011 - Metropolitan Regional Information Systems, Inc 31 The information contained in this manual may be copyrighted and/or confidential. All rights reserved.
Use the And/Or/Not radio buttons as needed in conjunction with selecting multiple items from a pick list. Each field defaults to “Or”.
And retrieves listings that match ALL of the Item(s) selected Or retrieves listings that match ANY of the Items selected Not retrieves listings that DO NOT have the item(s) selected
Text fields (e.g. Adv Subdivision, City (Postal), Street Name)
Use the asterisk ( * ) as a wildcard, or substitute for any portion of the name of which you are unsure. For example: Beth* entered in the City field would search for all listings beginning with Beth: Bethesda, Bethany, etc.
Use the exclamation mark ( ! ) before or after text entered within the search to indicate exclusion. It can be used separately, or in combination with the wildcard (the asterisk). For example: !Beth* entered in the City field would exclude listings beginning with Beth: Bethesda, Bethany, etc.
Use a comma ( , ) to separate multiple items in a list. For example: Bethesda, Rockville
Number fields that accept ranges (e.g. Bedrooms, Full Bath)
Use an exact number, the minus sign or the plus sign. For example:
2 to find exactly two bedrooms 2- to find 2 or fewer bedrooms 2+ to find 2 or more bedrooms 2-5 to find a range of bedrooms from 2 to 5 bedrooms
Price fields that accept ranges (e.g. List Price)
Do not include commas or dollar signs in criteria. Prices are entered in thousands; the three trailing zeros are not needed. Use decimals for values less than $1000. Search for a range by using a dash ( - ) between the two numbers. Use + or > to indicate greater than or equal to; Use – or < to indicate less than or equal to. For example:
100 for exactly $100,000 200- or <200 for less than or equal to $200,000 200+ or >200 for greater than or equal to $200,000 650-700 for a sale price of $650,000 - $700,000 .75-1 for a rent price of $750 to $1000
Dates (e.g. List Date)
Click the calendar icon to select a date from a pop up calendar. Or, enter dates/numbers:
For a single date, enter the date in the mm/dd/yyyy format: 7/20/2003 For a range of dates, use a dash between two dates: 7/28/2003-7/31/2003 Enter a number and a + to search from the current date, backward: 180+ to search the range of 180 days back through the present date

Copyright © 2011 - Metropolitan Regional Information Systems, Inc 32 The information contained in this manual may be copyrighted and/or confidential. All rights reserved.
Enter a date and a + or a > for dates greater than or equal to the date entered: 7/31/2003+ or >7/31/2003 Enter date and a – or a < for dates less than or equal to the date entered: 7/31/2003- or <7/31/2003
2.1.3 Add/Remove Additional Fields Matrix has dozens of criteria (fields) that do not show up automatically on a search page. However, you can add any of these fields to the search page to further customize a search. Perform the following procedures to add and remove fields to a search. If you do not need to add search fields, skip these procedures. For each search page, added fields remain on the page for each subsequent search until they are removed.
Note: These procedures are required when creating a Create Your Own Search search. Since a Create Your Own Search search initially includes only the County and Status fields, performing the following procedures fleshes out the search.
Add Additional Fields
Step 1: Click Add (or Add/Remove) to the right of Additional Fields.
1
Copyright © 2011 - Metropolitan Regional Information Systems, Inc 33 The information contained in this manual may be copyrighted and/or confidential. All rights reserved.
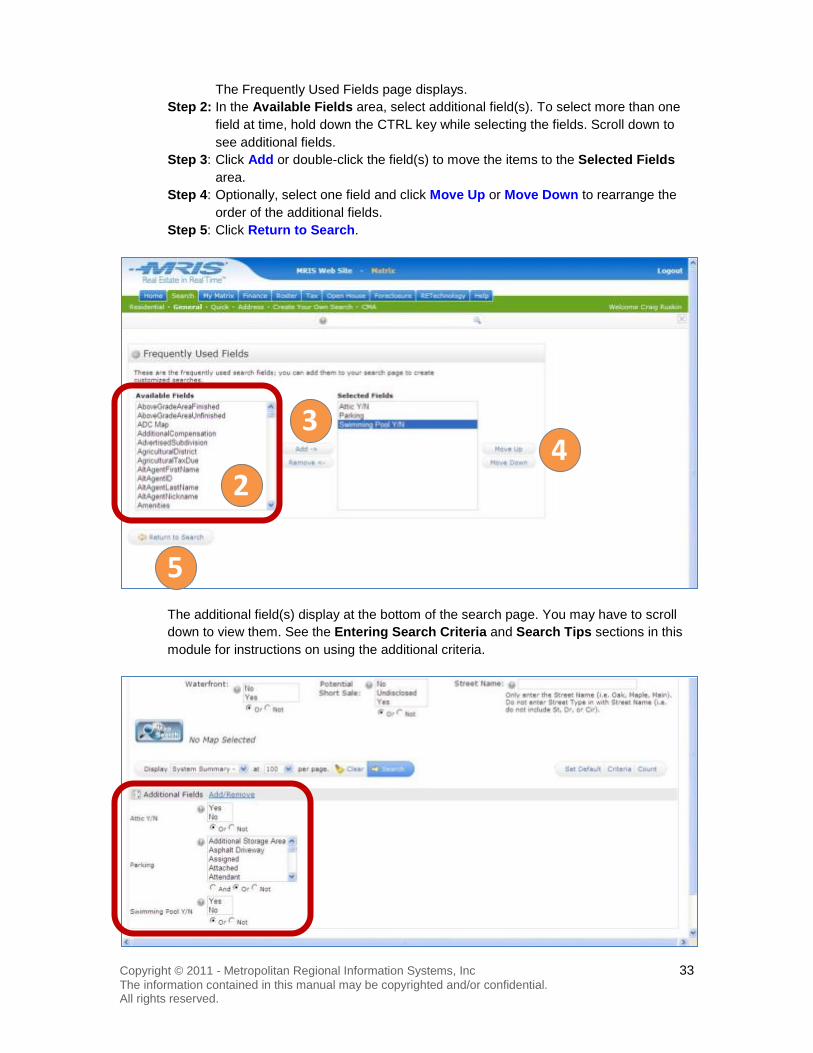
The Frequently Used Fields page displays. Step 2: In the Available Fields area, select additional field(s). To select more than one
field at time, hold down the CTRL key while selecting the fields. Scroll down to see additional fields.
Step 3: Click Add or double-click the field(s) to move the items to the Selected Fields area.
Step 4: Optionally, select one field and click Move Up or Move Down to rearrange the order of the additional fields.
Step 5: Click Return to Search.
The additional field(s) display at the bottom of the search page. You may have to scroll down to view them. See the Entering Search Criteria and Search Tips sections in this module for instructions on using the additional criteria.
3
2
5
4

Copyright © 2011 - Metropolitan Regional Information Systems, Inc 34 The information contained in this manual may be copyrighted and/or confidential. All rights reserved.
Remove Additional Fields
Step 1: Click Add/Remove to the right of Additional Fields.
The Frequently Used Fields page displays. Step 2: In the Selected Fields area, click the fields to remove. To select more than one
field at time, hold down the CTRL key while selecting the fields. Step 3: Click Remove.
1
2
3
Copyright © 2011 - Metropolitan Regional Information Systems, Inc 35 The information contained in this manual may be copyrighted and/or confidential. All rights reserved.
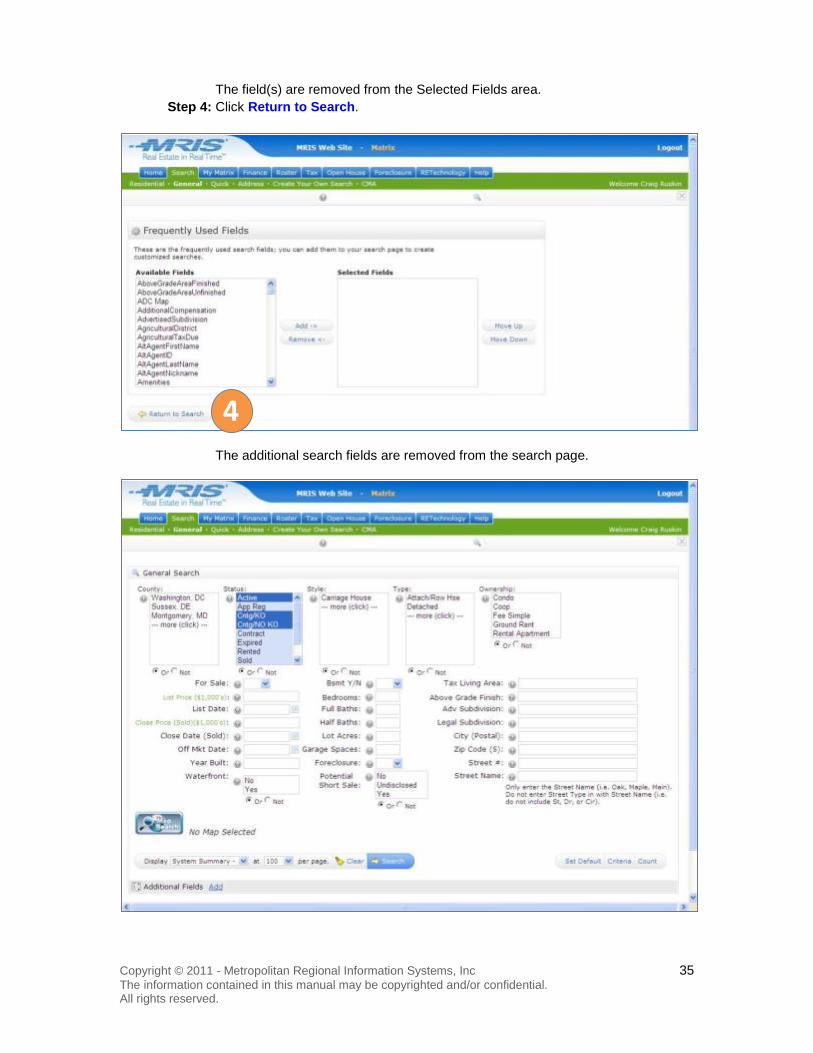
The field(s) are removed from the Selected Fields area. Step 4: Click Return to Search.
The additional search fields are removed from the search page.
4
Copyright © 2011 - Metropolitan Regional Information Systems, Inc 36 The information contained in this manual may be copyrighted and/or confidential. All rights reserved.
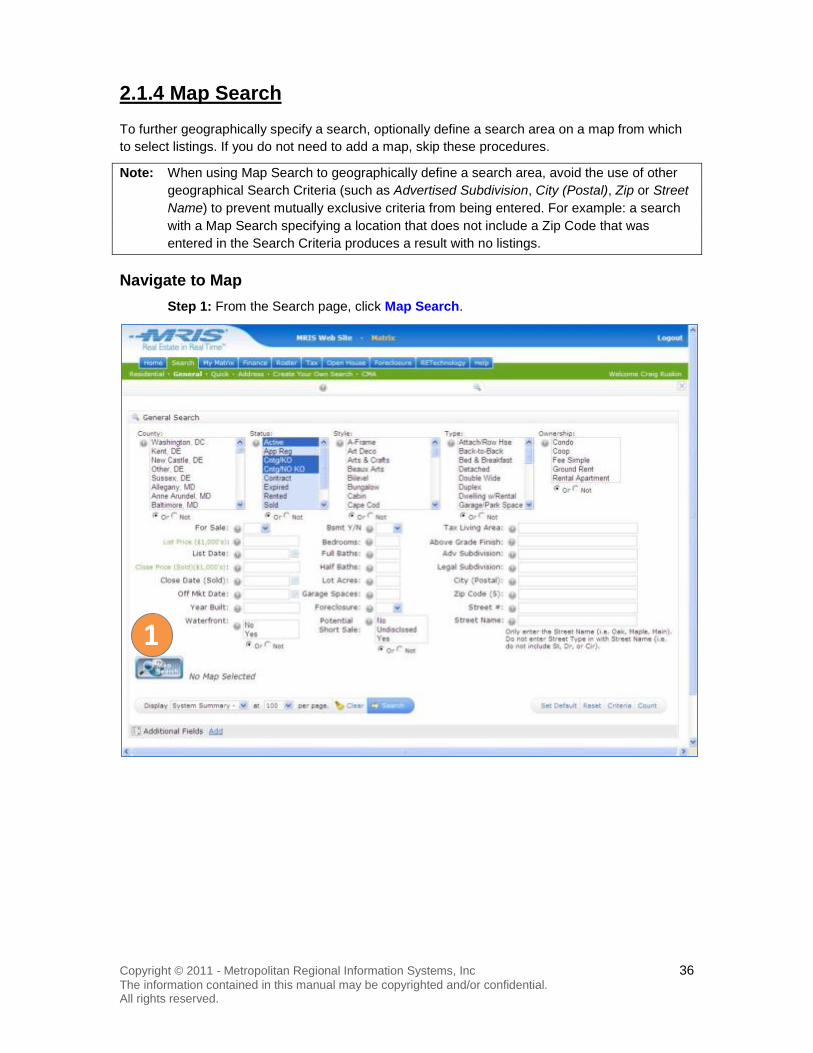
2.1.4 Map Search To further geographically specify a search, optionally define a search area on a map from which to select listings. If you do not need to add a map, skip these procedures.
Note: When using Map Search to geographically define a search area, avoid the use of other geographical Search Criteria (such as Advertised Subdivision, City (Postal), Zip or Street Name) to prevent mutually exclusive criteria from being entered. For example: a search with a Map Search specifying a location that does not include a Zip Code that was entered in the Search Criteria produces a result with no listings.
Navigate to Map Step 1: From the Search page, click Map Search.
1
Copyright © 2011 - Metropolitan Regional Information Systems, Inc 37 The information contained in this manual may be copyrighted and/or confidential. All rights reserved.
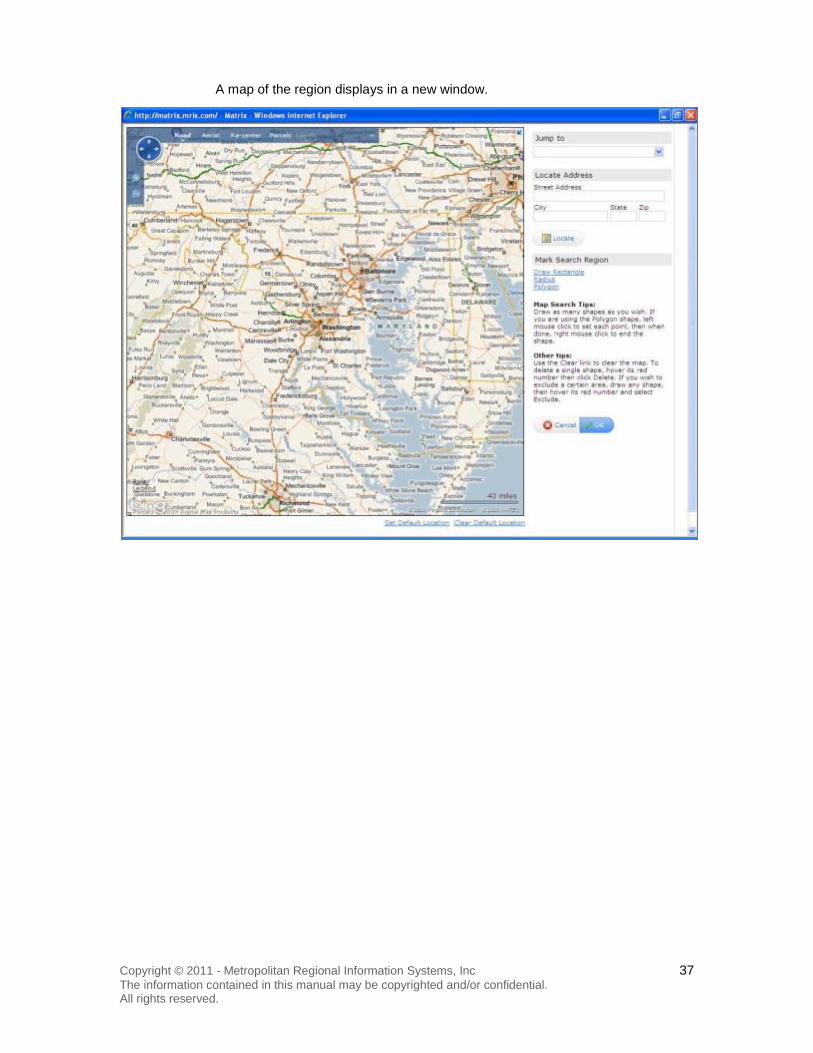
A map of the region displays in a new window.

Copyright © 2011 - Metropolitan Regional Information Systems, Inc 38 The information contained in this manual may be copyrighted and/or confidential. All rights reserved.
Adjust the Map
To adjust the map to the desired location or zoom level, or to change the information displayed, perform one or more of the functions below:
Click the Jump to dropdown arrow and select a County from the dropdown list. You may have to scroll down for the applicable item. The map is now zoomed in and centered over the selected county.
Enter address information into the Street Address, City, State and Zip fields in the Locate Address area. Click Locate. The map is now zoomed in and centered over the entered location.
Copyright © 2011 - Metropolitan Regional Information Systems, Inc 39 The information contained in this manual may be copyrighted and/or confidential. All rights reserved.
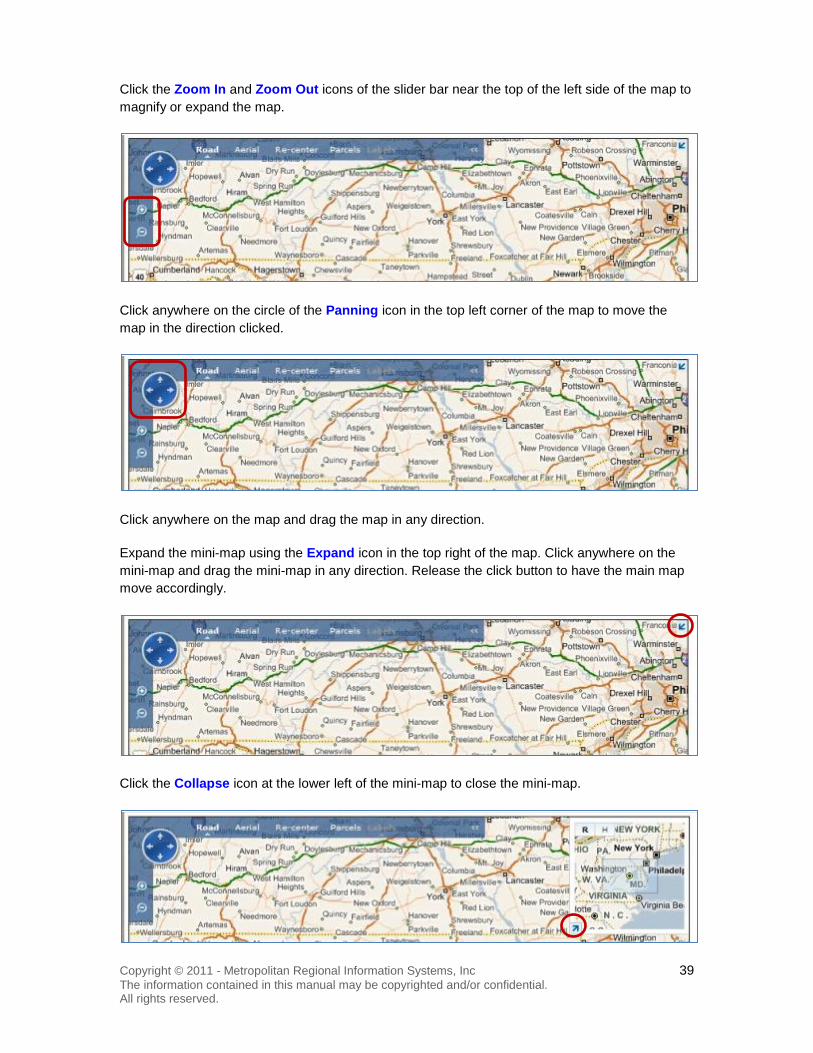
Click the Zoom In and Zoom Out icons of the slider bar near the top of the left side of the map to magnify or expand the map.
Click anywhere on the circle of the Panning icon in the top left corner of the map to move the map in the direction clicked.
Click anywhere on the map and drag the map in any direction.
Expand the mini-map using the Expand icon in the top right of the map. Click anywhere on the mini-map and drag the mini-map in any direction. Release the click button to have the main map move accordingly.
Click the Collapse icon at the lower left of the mini-map to close the mini-map.

Copyright © 2011 - Metropolitan Regional Information Systems, Inc 40 The information contained in this manual may be copyrighted and/or confidential. All rights reserved.
Click Road to display a standard street map. This is the default view.
Click Aerial to display a satellite view of the map.
While in Aerial view, click Labels to display street and place name information. Click Labels again to hide street and place name information.
Click Parcels to display individual parcels. Note that this function is available only in select locations and at a high zoom level.
If you have moved the map after drawing a search area (see Draw Search Area, below), click Re-center to reposition the map so that search area is at the center.

Copyright © 2011 - Metropolitan Regional Information Systems, Inc 41 The information contained in this manual may be copyrighted and/or confidential. All rights reserved.
Draw Search Area After adjusting the map to your specifications, draw the search area from which listings will be retrieved. Shapes include Rectangle, Circle (Radius), and Polygon. Draw as many shapes as needed. To erase the entire search area, click Clear.
Draw Rectangle
Step 1: Click Draw Rectangle. Step 2: Move the cursor to where you would like to place a corner of the rectangle on the
map, and click. A red circle with a number in it displays where you clicked.
Step 3: Without releasing the click button, move the cursor diagonally to where you would like to set the opposing corner, and then release the click button. The rectangular search area displays on the map.
Draw Circle
Step 1: Click Radius. Step 2: Move the cursor to where you would like to place the center of the circle on the
map, and click. A red circle with a number in it displays where you clicked.
Step 3: Without releasing the click button, move the cursor away from the center of the circle to expand the circle’s radius. The radius length is displayed as you move the cursor.
Step 4: Release the click button to set the circle’s radius. The circular search area displays on the map.

Copyright © 2011 - Metropolitan Regional Information Systems, Inc 42 The information contained in this manual may be copyrighted and/or confidential. All rights reserved.
Draw Polygon
Step 1: Click Polygon. Step 2: Move the cursor to where you would like to set a corner of the polygon on the
map, and click. A red circle with a number in it displays where you clicked.
Step 3: Move the cursor to a desired area of the map and click to set another corner of the polygon.
Step 4: Repeat Step 3 as needed for each corner of the polygon. Step 5: Right-click to finish drawing the polygon.
The polygonal search area displays on the map.
To remove one shape, place the cursor over its red number, and click Delete Section in the tooltip that displays.
Set Search Area To set the search area, click OK.

Copyright © 2011 - Metropolitan Regional Information Systems, Inc 43 The information contained in this manual may be copyrighted and/or confidential. All rights reserved.
The Search page displays with a Map Area Selected notice to confirm that the geographic search area is set.
To clear the search area, click Clear Map.
To modify the search area, click Map Search again, and follow the procedures in this section.
Set or Clear Default Map Location To have the map display the same area each time you create a map search, perform the procedures in the Adjust the Map section in this module, and click Set Default Location. To reset the map to display the entire MRIS coverage area when you create a map search, click Clear Default Location.
Copyright © 2011 - Metropolitan Regional Information Systems, Inc 44 The information contained in this manual may be copyrighted and/or confidential. All rights reserved.
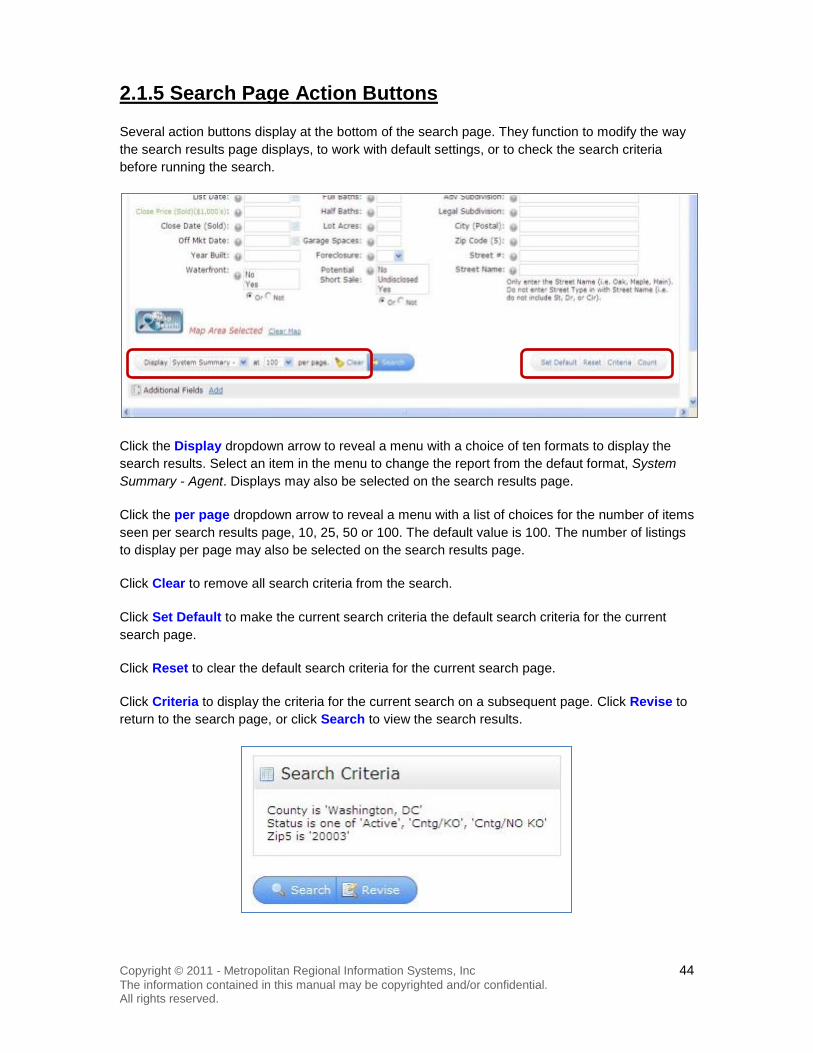
2.1.5 Search Page Action Buttons
Several action buttons display at the bottom of the search page. They function to modify the way the search results page displays, to work with default settings, or to check the search criteria before running the search.
Click the Display dropdown arrow to reveal a menu with a choice of ten formats to display the search results. Select an item in the menu to change the report from the defaut format, System Summary - Agent. Displays may also be selected on the search results page.
Click the per page dropdown arrow to reveal a menu with a list of choices for the number of items seen per search results page, 10, 25, 50 or 100. The default value is 100. The number of listings to display per page may also be selected on the search results page.
Click Clear to remove all search criteria from the search.
Click Set Default to make the current search criteria the default search criteria for the current search page.
Click Reset to clear the default search criteria for the current search page.
Click Criteria to display the criteria for the current search on a subsequent page. Click Revise to return to the search page, or click Search to view the search results.

Copyright © 2011 - Metropolitan Regional Information Systems, Inc 45 The information contained in this manual may be copyrighted and/or confidential. All rights reserved.
Click Count to display the number it items that will be returned in the search on a subsequent page. Click Revise to return to the search page, or click Search to view the search results.
2.1.6 Run Search
When you have entered all the search criteria, click Search to run the search.

Copyright © 2011 - Metropolitan Regional Information Systems, Inc 46 The information contained in this manual may be copyrighted and/or confidential. All rights reserved.
The search results page displays with the listings found based on the search criteria.
Copyright © 2011 - Metropolitan Regional Information Systems, Inc 47 The information contained in this manual may be copyrighted and/or confidential. All rights reserved.
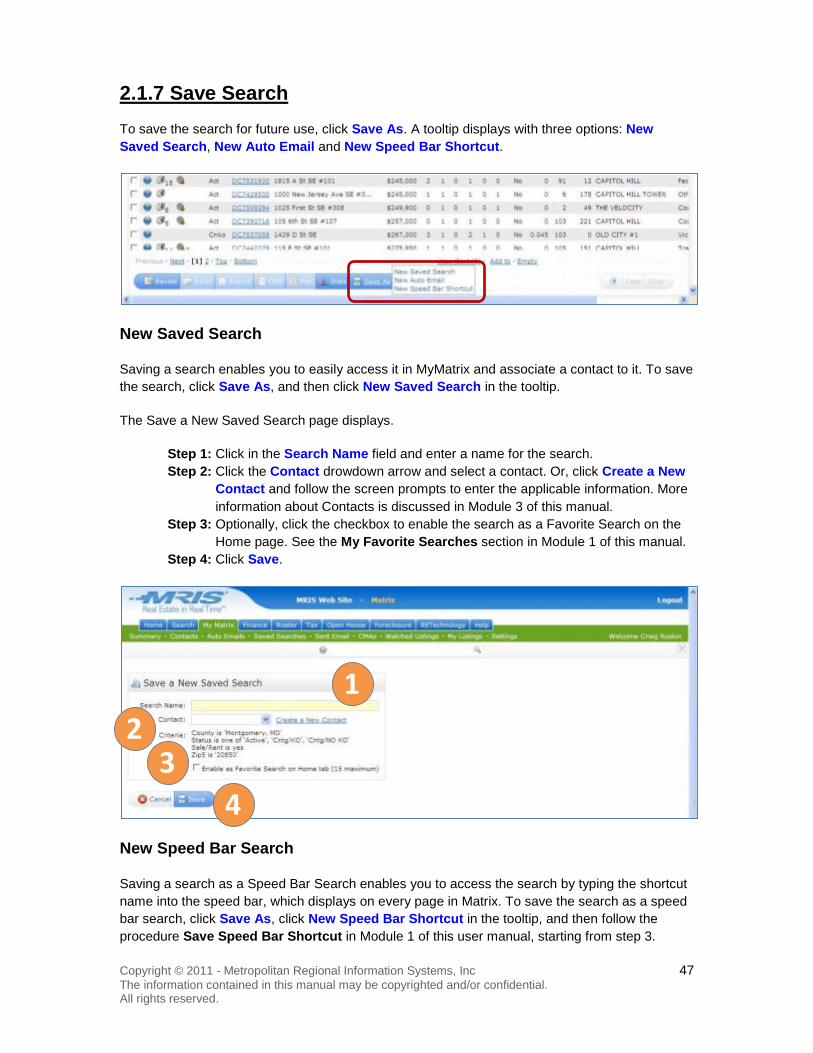
2.1.7 Save Search To save the search for future use, click Save As. A tooltip displays with three options: New Saved Search, New Auto Email and New Speed Bar Shortcut.
New Saved Search
Saving a search enables you to easily access it in MyMatrix and associate a contact to it. To save the search, click Save As, and then click New Saved Search in the tooltip.
The Save a New Saved Search page displays.
Step 1: Click in the Search Name field and enter a name for the search. Step 2: Click the Contact drowdown arrow and select a contact. Or, click Create a New
Contact and follow the screen prompts to enter the applicable information. More information about Contacts is discussed in Module 3 of this manual.
Step 3: Optionally, click the checkbox to enable the search as a Favorite Search on the Home page. See the My Favorite Searches section in Module 1 of this manual.
Step 4: Click Save.
New Speed Bar Search
Saving a search as a Speed Bar Search enables you to access the search by typing the shortcut name into the speed bar, which displays on every page in Matrix. To save the search as a speed bar search, click Save As, click New Speed Bar Shortcut in the tooltip, and then follow the procedure Save Speed Bar Shortcut in Module 1 of this user manual, starting from step 3.
1 2
3 4

Copyright © 2011 - Metropolitan Regional Information Systems, Inc 48 The information contained in this manual may be copyrighted and/or confidential. All rights reserved.
New Auto Email
Saving a search as an Auto Email enables you to send the search results as an Auto-Email to a client. To save the search, click Save As, and then click New Auto Email in the tooltip.
The Save a New Auto Email page displays.
Step 1: Click the Contact drowdown arrow and select a contact. Or, click Create a New Contact and follow the screen prompts to enter the applicable information. More information about Contacts is in Module 3 of this manual. Optionally, click the checkbox to blind carbon copy yourself on all the Auto Emails generated from this search.
Step 2: Enter a subect for the Auto Email in the Subject field. Step 3: Enter a message for the body of the email in the Message field. Step 4: Optionally, click the checkbox to enable the search as a Favorite Search on the
Home page. See the My Favorite Searches section in Module 1 of this manual. Step 5: Choose the ASAP, Daily, or Monthly radio button in the Schedule area. Select
ASAP to send the Auto Email as soon as possible. Select Daily and then select the applicable time/day checkboxes to set the times and days the Auto Email is sent. The All AM and the All PM checkboxes set the Auto Email to run each morning, or evening, respectively. Select Monthly to send the Auto Email on the first of each month at midnight.
Step 6: Click Save.
1
2 3
4
5
6
Copyright © 2011 - Metropolitan Regional Information Systems, Inc 49 The information contained in this manual may be copyrighted and/or confidential. All rights reserved.
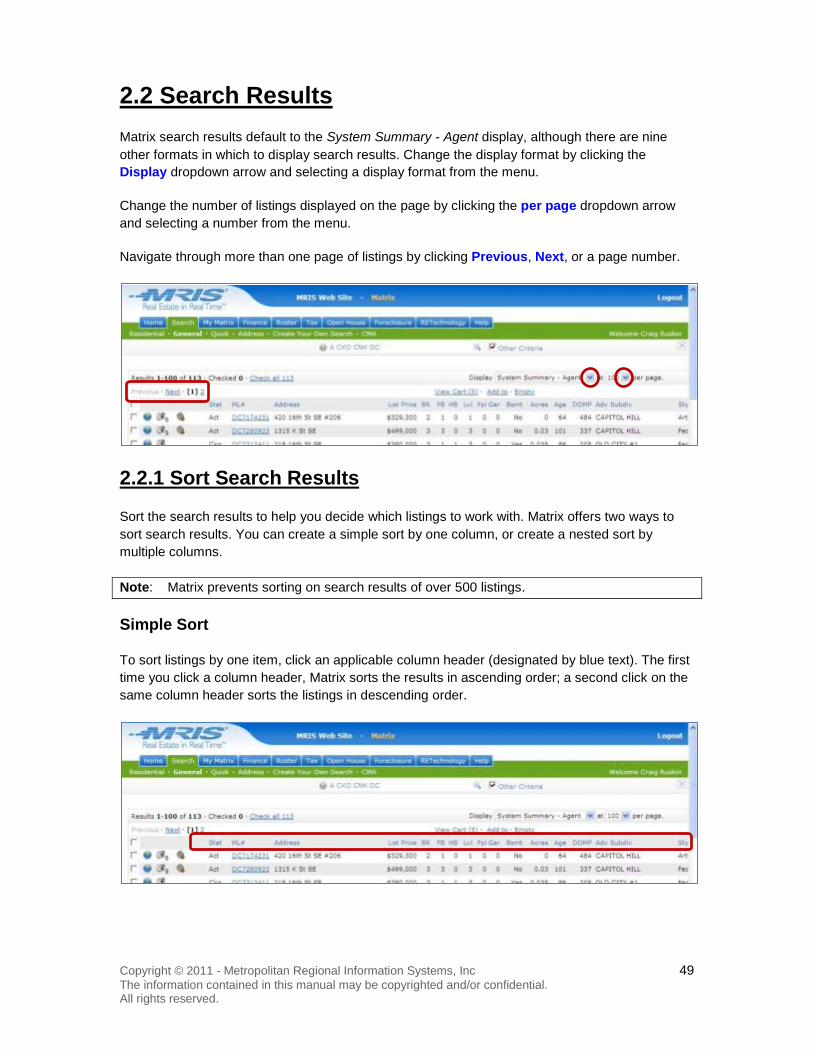
2.2 Search Results Matrix search results default to the System Summary - Agent display, although there are nine other formats in which to display search results. Change the display format by clicking the Display dropdown arrow and selecting a display format from the menu.
Change the number of listings displayed on the page by clicking the per page dropdown arrow and selecting a number from the menu.
Navigate through more than one page of listings by clicking Previous, Next, or a page number.
2.2.1 Sort Search Results
Sort the search results to help you decide which listings to work with. Matrix offers two ways to sort search results. You can create a simple sort by one column, or create a nested sort by multiple columns.
Note: Matrix prevents sorting on search results of over 500 listings.
Simple Sort
To sort listings by one item, click an applicable column header (designated by blue text). The first time you click a column header, Matrix sorts the results in ascending order; a second click on the same column header sorts the listings in descending order.

Copyright © 2011 - Metropolitan Regional Information Systems, Inc 50 The information contained in this manual may be copyrighted and/or confidential. All rights reserved.
Nested Sort
A nested sort enables you to sort by more than one column at the same time. To create a nested sort, perform the following procedure.
Step 1: Click Sort.
Note: If the Sort button is not visible, click the expand arrow to the left of Keep to unhide it.
1
Copyright © 2011 - Metropolitan Regional Information Systems, Inc 51 The information contained in this manual may be copyrighted and/or confidential. All rights reserved.
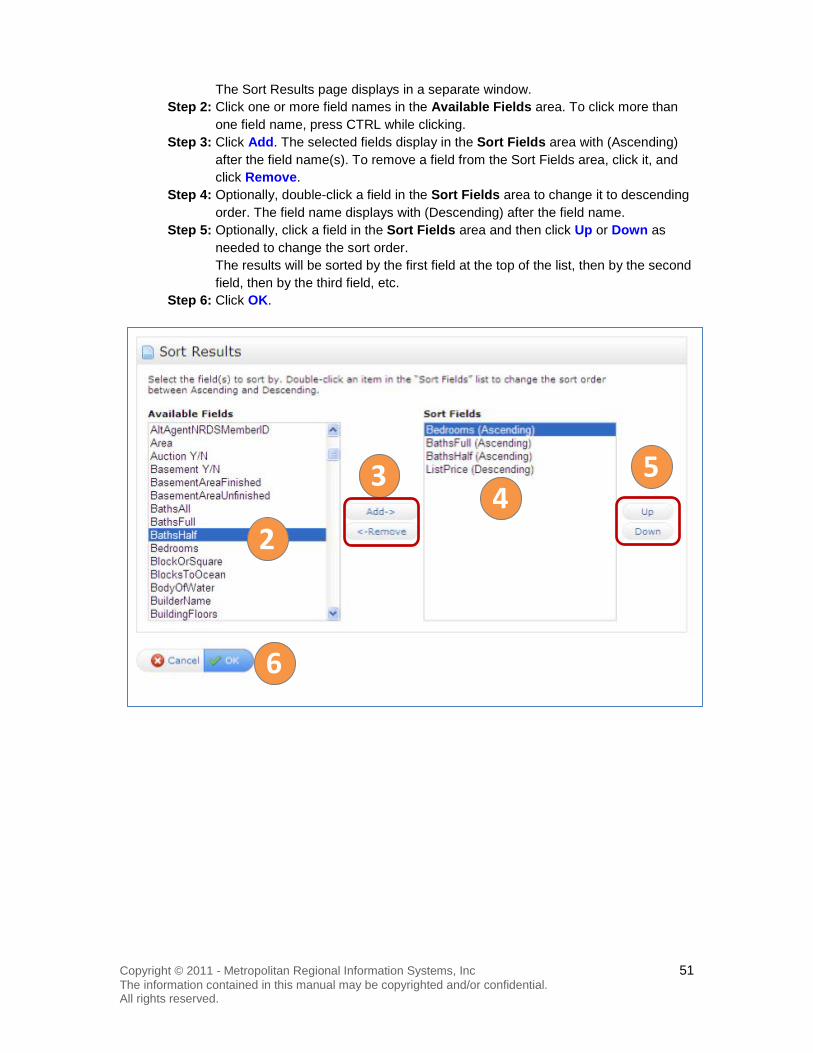
The Sort Results page displays in a separate window. Step 2: Click one or more field names in the Available Fields area. To click more than
one field name, press CTRL while clicking. Step 3: Click Add. The selected fields display in the Sort Fields area with (Ascending)
after the field name(s). To remove a field from the Sort Fields area, click it, and click Remove.
Step 4: Optionally, double-click a field in the Sort Fields area to change it to descending order. The field name displays with (Descending) after the field name.
Step 5: Optionally, click a field in the Sort Fields area and then click Up or Down as needed to change the sort order. The results will be sorted by the first field at the top of the list, then by the second field, then by the third field, etc.
Step 6: Click OK.
2
3 4
5
6

Copyright © 2011 - Metropolitan Regional Information Systems, Inc 52 The information contained in this manual may be copyrighted and/or confidential. All rights reserved.
The Sort Results page closes and the Search Results page displays with the new sort order.
Copyright © 2011 - Metropolitan Regional Information Systems, Inc 53 The information contained in this manual may be copyrighted and/or confidential. All rights reserved.
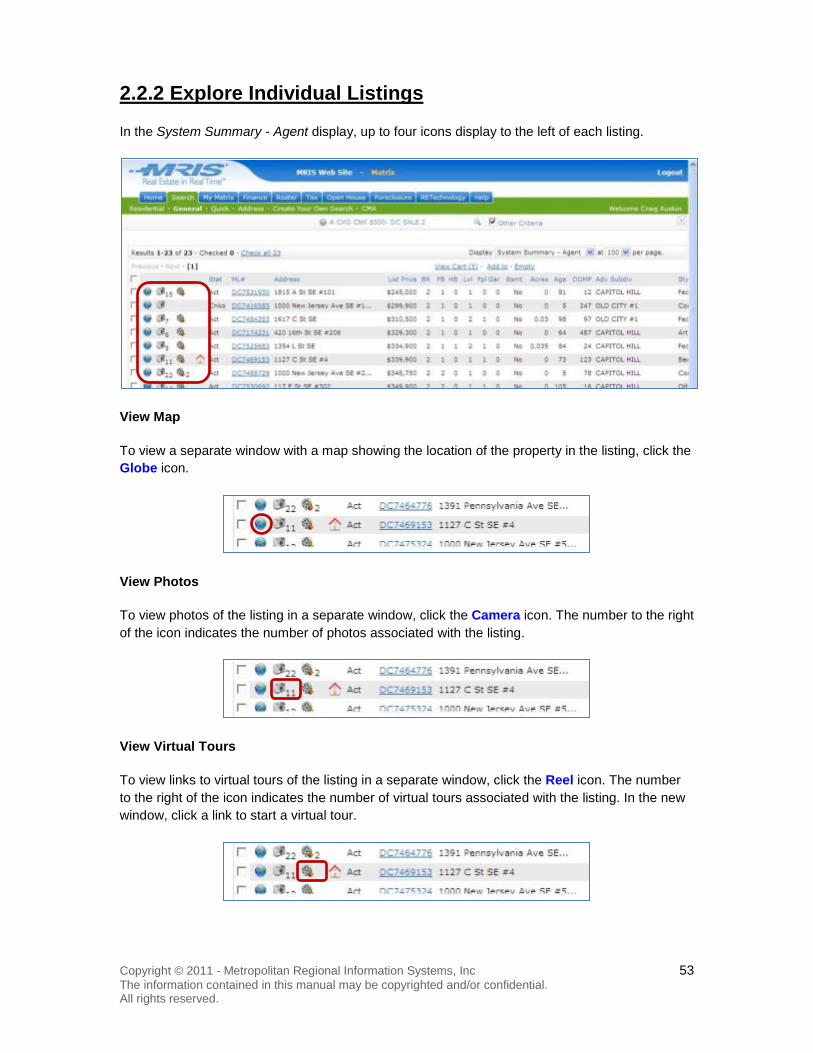
2.2.2 Explore Individual Listings
In the System Summary - Agent display, up to four icons display to the left of each listing.
View Map
To view a separate window with a map showing the location of the property in the listing, click the Globe icon.
View Photos
To view photos of the listing in a separate window, click the Camera icon. The number to the right of the icon indicates the number of photos associated with the listing.
View Virtual Tours
To view links to virtual tours of the listing in a separate window, click the Reel icon. The number to the right of the icon indicates the number of virtual tours associated with the listing. In the new window, click a link to start a virtual tour.
Copyright © 2011 - Metropolitan Regional Information Systems, Inc 54 The information contained in this manual may be copyrighted and/or confidential. All rights reserved.
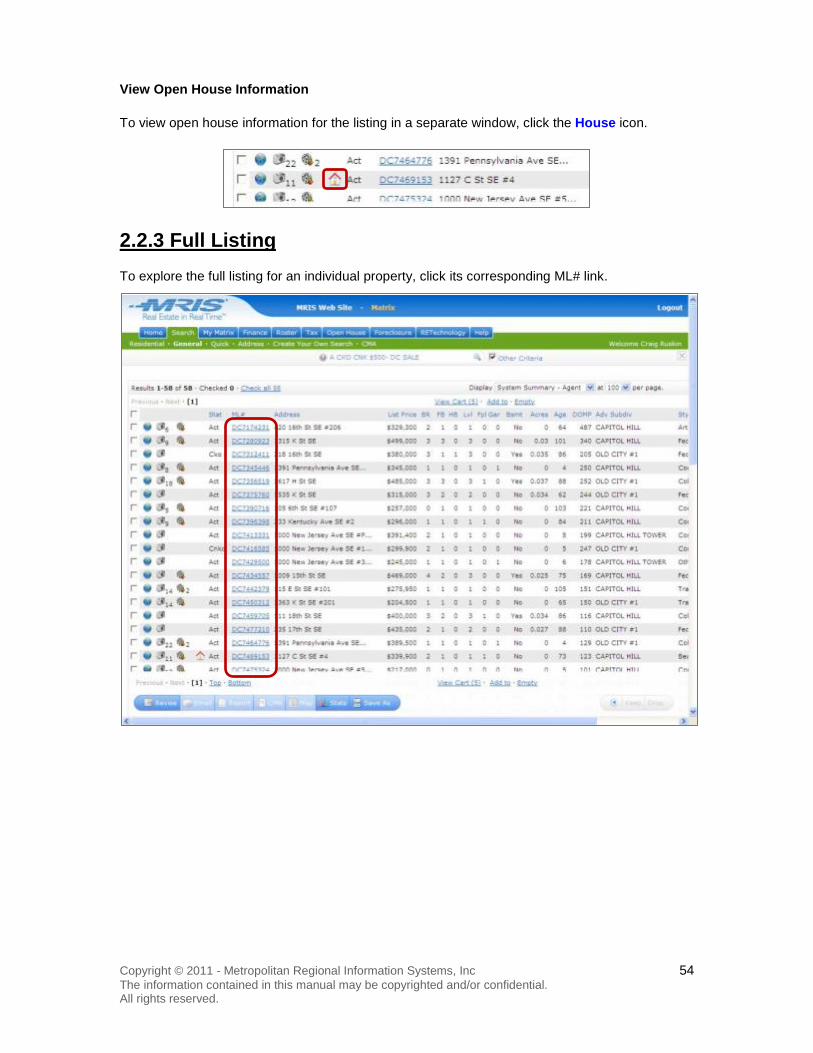
View Open House Information
To view open house information for the listing in a separate window, click the House icon.
2.2.3 Full Listing To explore the full listing for an individual property, click its corresponding ML# link.
Copyright © 2011 - Metropolitan Regional Information Systems, Inc 55 The information contained in this manual may be copyrighted and/or confidential. All rights reserved.
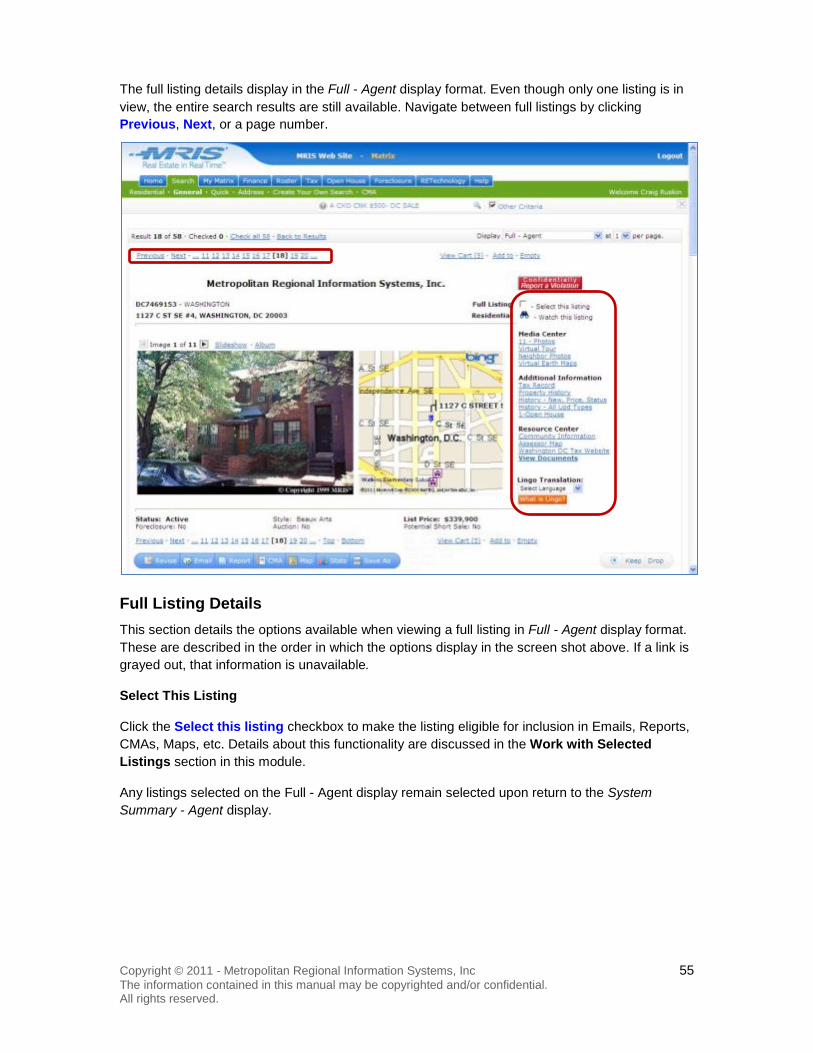
The full listing details display in the Full - Agent display format. Even though only one listing is in view, the entire search results are still available. Navigate between full listings by clicking Previous, Next, or a page number.
Full Listing Details This section details the options available when viewing a full listing in Full - Agent display format. These are described in the order in which the options display in the screen shot above. If a link is grayed out, that information is unavailable.
Select This Listing
Click the Select this listing checkbox to make the listing eligible for inclusion in Emails, Reports, CMAs, Maps, etc. Details about this functionality are discussed in the Work with Selected Listings section in this module.
Any listings selected on the Full - Agent display remain selected upon return to the System Summary - Agent display.
Copyright © 2011 - Metropolitan Regional Information Systems, Inc 56 The information contained in this manual may be copyrighted and/or confidential. All rights reserved.
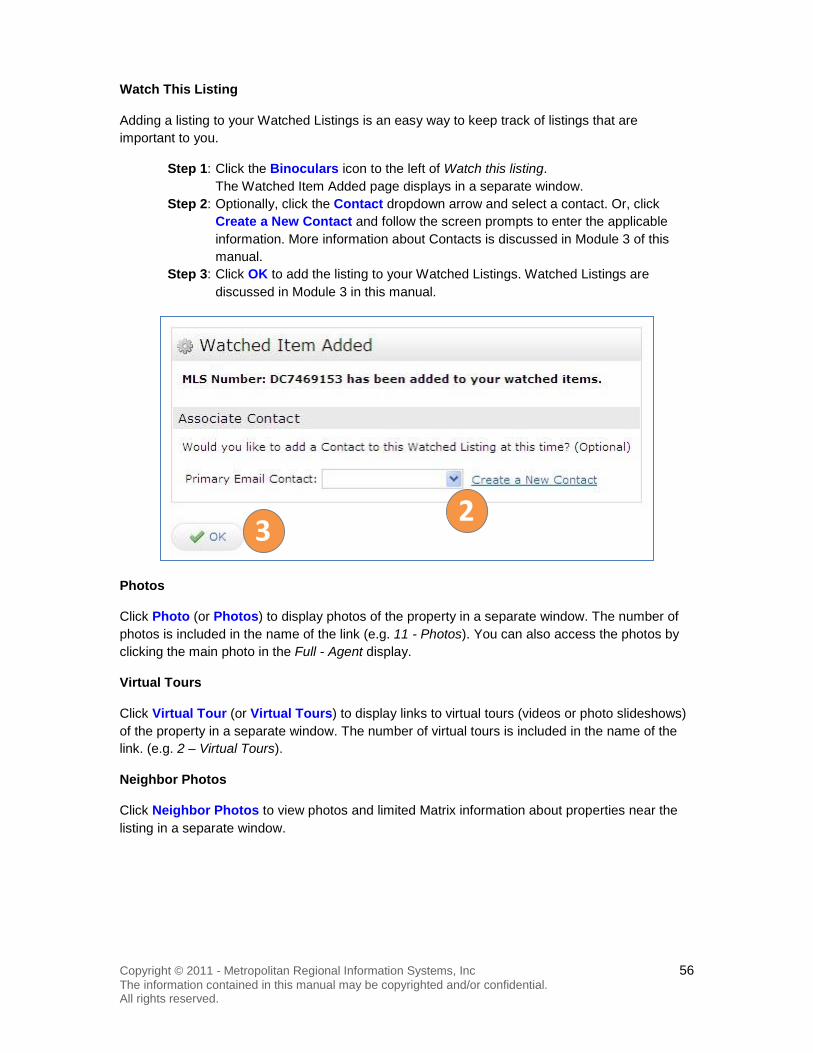
Watch This Listing
Adding a listing to your Watched Listings is an easy way to keep track of listings that are important to you.
Step 1: Click the Binoculars icon to the left of Watch this listing. The Watched Item Added page displays in a separate window.
Step 2: Optionally, click the Contact dropdown arrow and select a contact. Or, click Create a New Contact and follow the screen prompts to enter the applicable information. More information about Contacts is discussed in Module 3 of this manual.
Step 3: Click OK to add the listing to your Watched Listings. Watched Listings are discussed in Module 3 in this manual.
Photos
Click Photo (or Photos) to display photos of the property in a separate window. The number of photos is included in the name of the link (e.g. 11 - Photos). You can also access the photos by clicking the main photo in the Full - Agent display.
Virtual Tours
Click Virtual Tour (or Virtual Tours) to display links to virtual tours (videos or photo slideshows) of the property in a separate window. The number of virtual tours is included in the name of the link. (e.g. 2 – Virtual Tours).
Neighbor Photos
Click Neighbor Photos to view photos and limited Matrix information about properties near the listing in a separate window.
2 3
Copyright © 2011 - Metropolitan Regional Information Systems, Inc 57 The information contained in this manual may be copyrighted and/or confidential. All rights reserved.
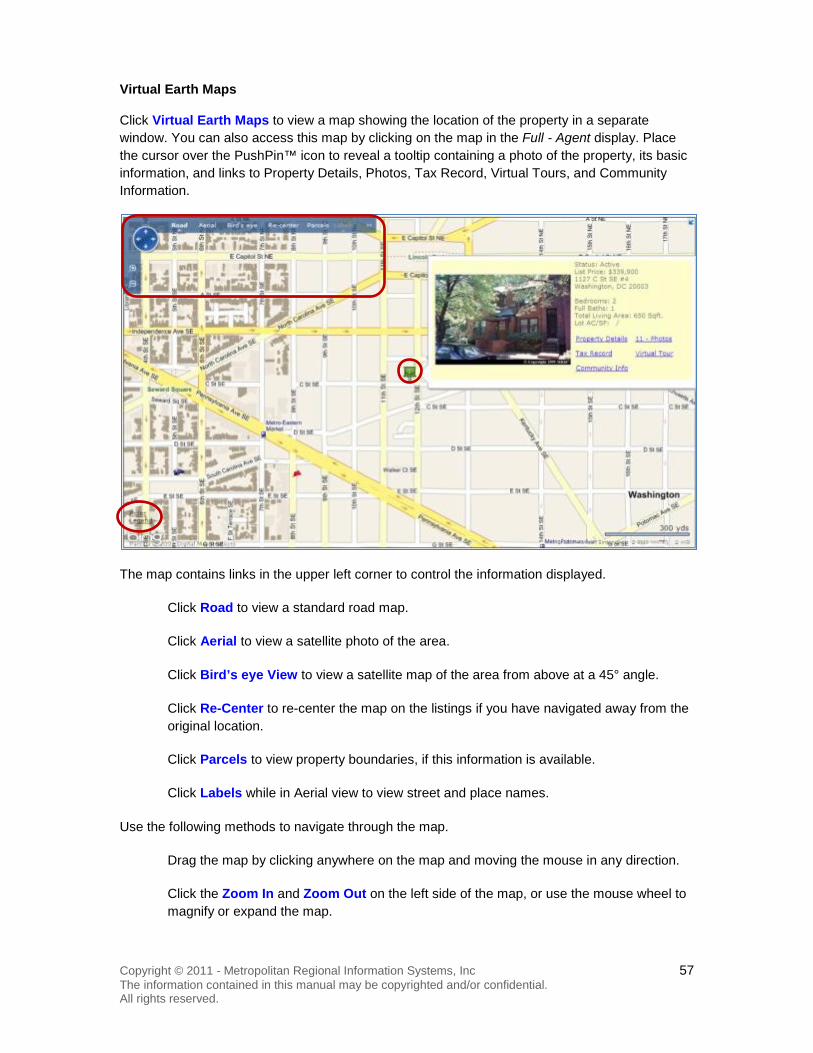
Virtual Earth Maps
Click Virtual Earth Maps to view a map showing the location of the property in a separate window. You can also access this map by clicking on the map in the Full - Agent display. Place the cursor over the PushPin™ icon to reveal a tooltip containing a photo of the property, its basic information, and links to Property Details, Photos, Tax Record, Virtual Tours, and Community Information.
The map contains links in the upper left corner to control the information displayed.
Click Road to view a standard road map.
Click Aerial to view a satellite photo of the area.
Click Bird’s eye View to view a satellite map of the area from above at a 45° angle.
Click Re-Center to re-center the map on the listings if you have navigated away from the original location.
Click Parcels to view property boundaries, if this information is available.
Click Labels while in Aerial view to view street and place names.
Use the following methods to navigate through the map.
Drag the map by clicking anywhere on the map and moving the mouse in any direction.
Click the Zoom In and Zoom Out on the left side of the map, or use the mouse wheel to magnify or expand the map.
Copyright © 2011 - Metropolitan Regional Information Systems, Inc 58 The information contained in this manual may be copyrighted and/or confidential. All rights reserved.
Click anywhere on the circle of the Panning icon in the top left corner of the map to move the map in the direction clicked.
Expand the mini-map using the Expand icon in the top right of the map. Click anywhere on the mini-map and drag the mini-map in any direction. Release the click button to have the main map move accordingly.
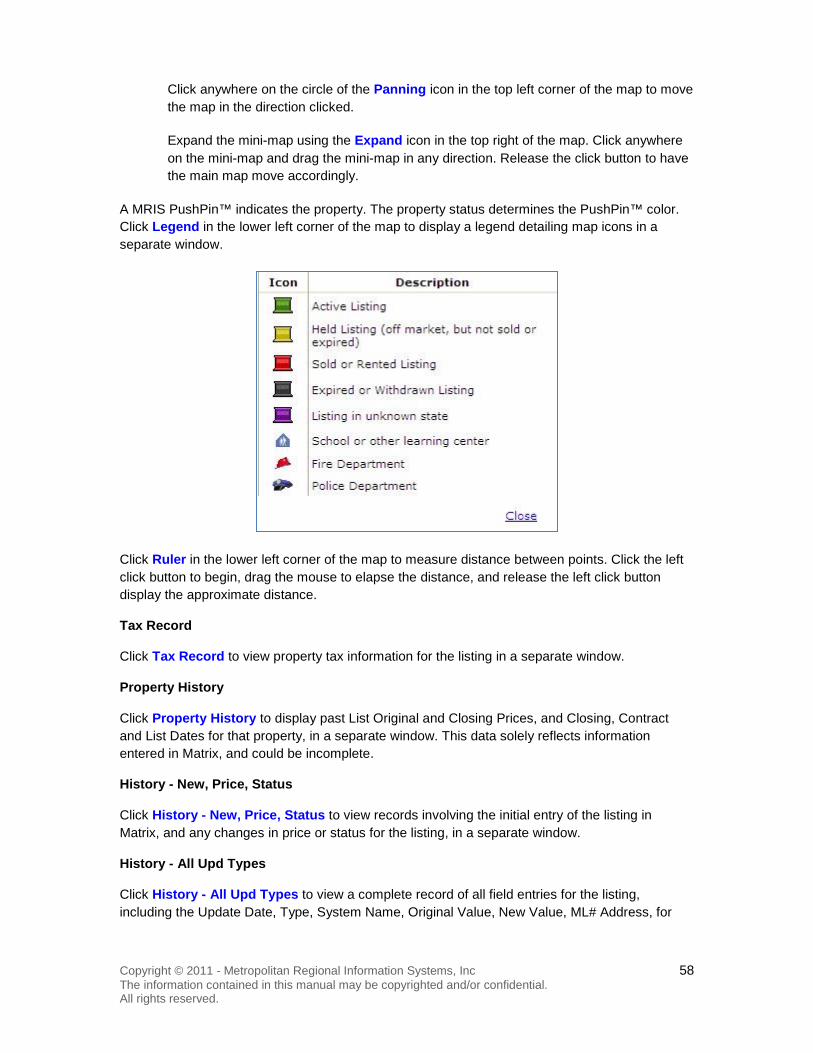
A MRIS PushPin™ indicates the property. The property status determines the PushPin™ color. Click Legend in the lower left corner of the map to display a legend detailing map icons in a separate window.
Click Ruler in the lower left corner of the map to measure distance between points. Click the left click button to begin, drag the mouse to elapse the distance, and release the left click button display the approximate distance.
Tax Record
Click Tax Record to view property tax information for the listing in a separate window.
Property History
Click Property History to display past List Original and Closing Prices, and Closing, Contract and List Dates for that property, in a separate window. This data solely reflects information entered in Matrix, and could be incomplete.
History - New, Price, Status
Click History - New, Price, Status to view records involving the initial entry of the listing in Matrix, and any changes in price or status for the listing, in a separate window.
History - All Upd Types
Click History - All Upd Types to view a complete record of all field entries for the listing, including the Update Date, Type, System Name, Original Value, New Value, ML# Address, for

Copyright © 2011 - Metropolitan Regional Information Systems, Inc 59 The information contained in this manual may be copyrighted and/or confidential. All rights reserved.
each field, in a separate window. Click Updated By at the end of a record to display the Agent who updated the listing and his/her Office information in another separate window.
Open House
Click Open House to view information for an upcoming open house for that listing, in a separate window.
Community Information
Click Community Information to display a separate window with comparative statistical neighborhood, city, county and national information. Tabs across the top provide information, and include the following topics: Housing, People, Schools, Environment, and Quality of Life. The Map tab displays a map of the neighborhood with functionality similar to the Virtual Earth Map.
Assessor Map
Click Assessor Map to display a Property Detail Report provided by Realist, containing the property’s Owner Information, Characteristics, and Last Market Sale data, in a separate browser window.
County Tax Website
Click the County Tax Website link (such as Washington DC Tax Website) to search and display real property assessment records, via the county’s on-line public information database, in a separate browser window.
View Documents
Click View Documents to display public documents associated with the MLS# for that listing, in a separate browser.
Lingo Translation
Click the Lingo Translation dropdown arrow to and select a language from the menu to display a version of the Full-Agent display in another language, in a separate browser.
2.3 Work with Selected Listings Matrix enables you to easily share listings with your contacts. After search results display, click one or more checkboxes to select listings. These listings can then be emailed, compiled into a report, and included as comparables in a CMA. In addition, you can generate a map with the listings or a set of summary statistics about the listings, use the right action buttons to further manipulate the listings, and quickly search selected listings for information.
Copyright © 2011 - Metropolitan Regional Information Systems, Inc 60 The information contained in this manual may be copyrighted and/or confidential. All rights reserved.
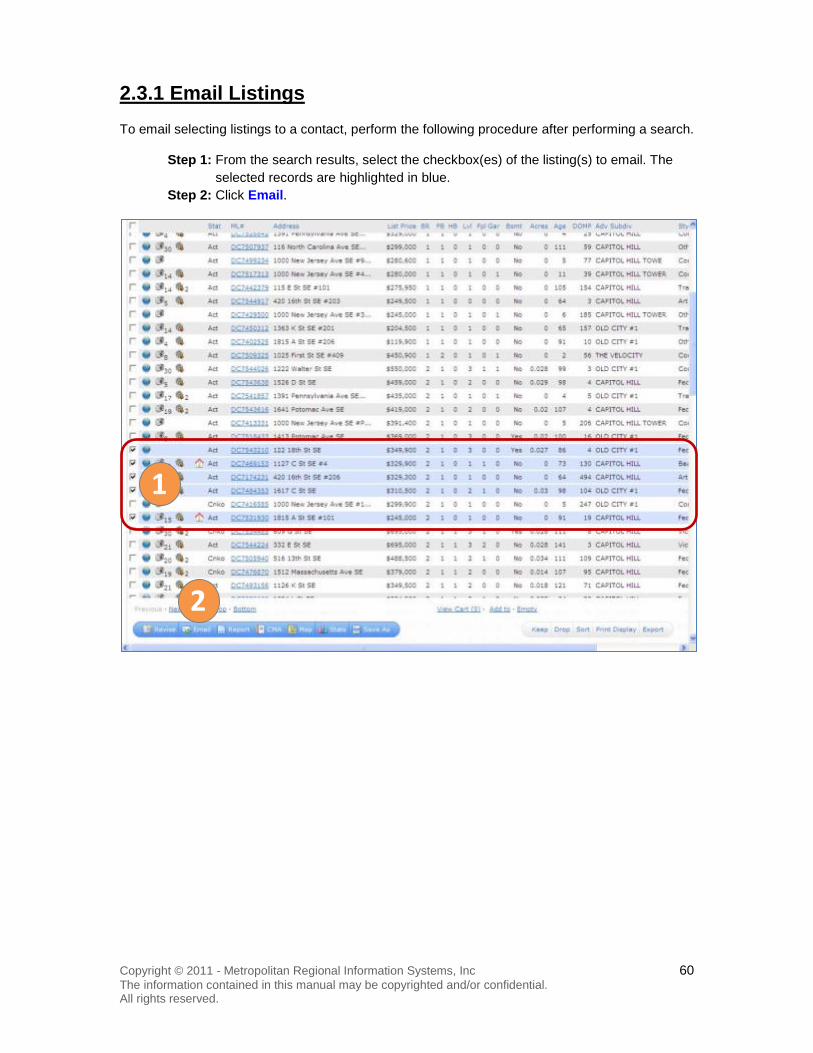
2.3.1 Email Listings To email selecting listings to a contact, perform the following procedure after performing a search.
Step 1: From the search results, select the checkbox(es) of the listing(s) to email. The selected records are highlighted in blue.
Step 2: Click Email.
1
2
Copyright © 2011 - Metropolitan Regional Information Systems, Inc 61 The information contained in this manual may be copyrighted and/or confidential. All rights reserved.
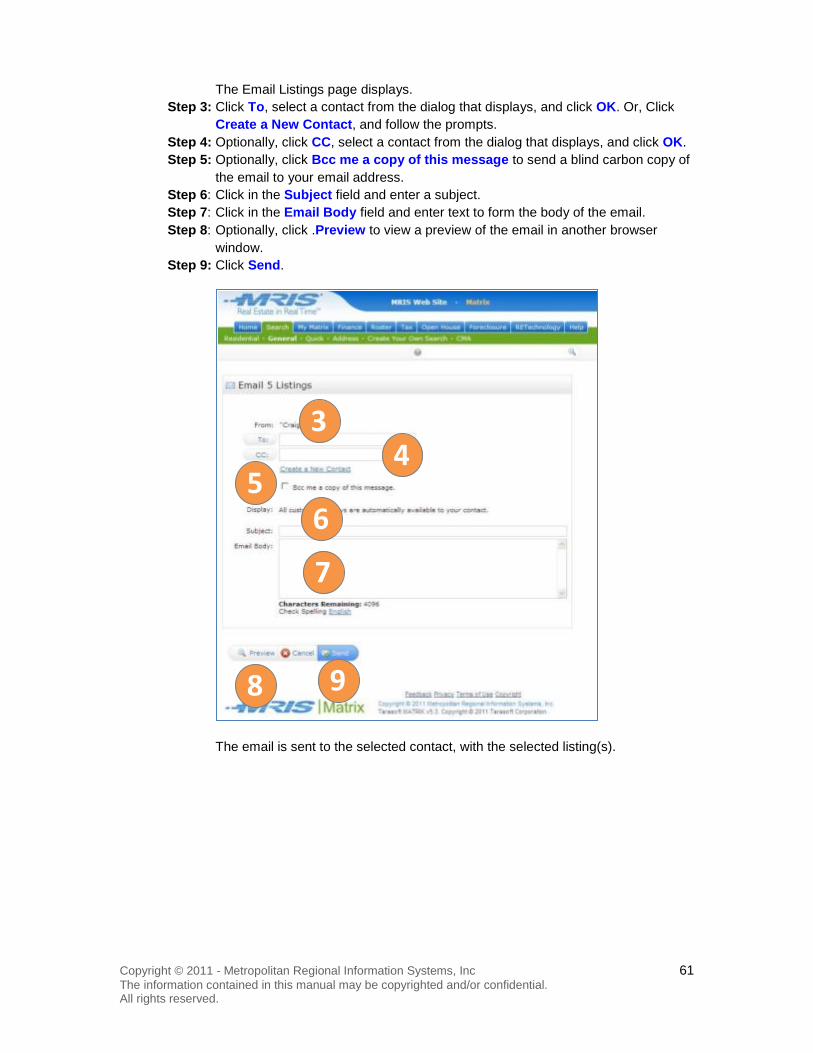
The Email Listings page displays. Step 3: Click To, select a contact from the dialog that displays, and click OK. Or, Click
Create a New Contact, and follow the prompts. Step 4: Optionally, click CC, select a contact from the dialog that displays, and click OK. Step 5: Optionally, click Bcc me a copy of this message to send a blind carbon copy of
the email to your email address. Step 6: Click in the Subject field and enter a subject. Step 7: Click in the Email Body field and enter text to form the body of the email. Step 8: Optionally, click .Preview to view a preview of the email in another browser
window. Step 9: Click Send.
The email is sent to the selected contact, with the selected listing(s).
9 8
7
6 5
4 3
Copyright © 2011 - Metropolitan Regional Information Systems, Inc 62 The information contained in this manual may be copyrighted and/or confidential. All rights reserved.
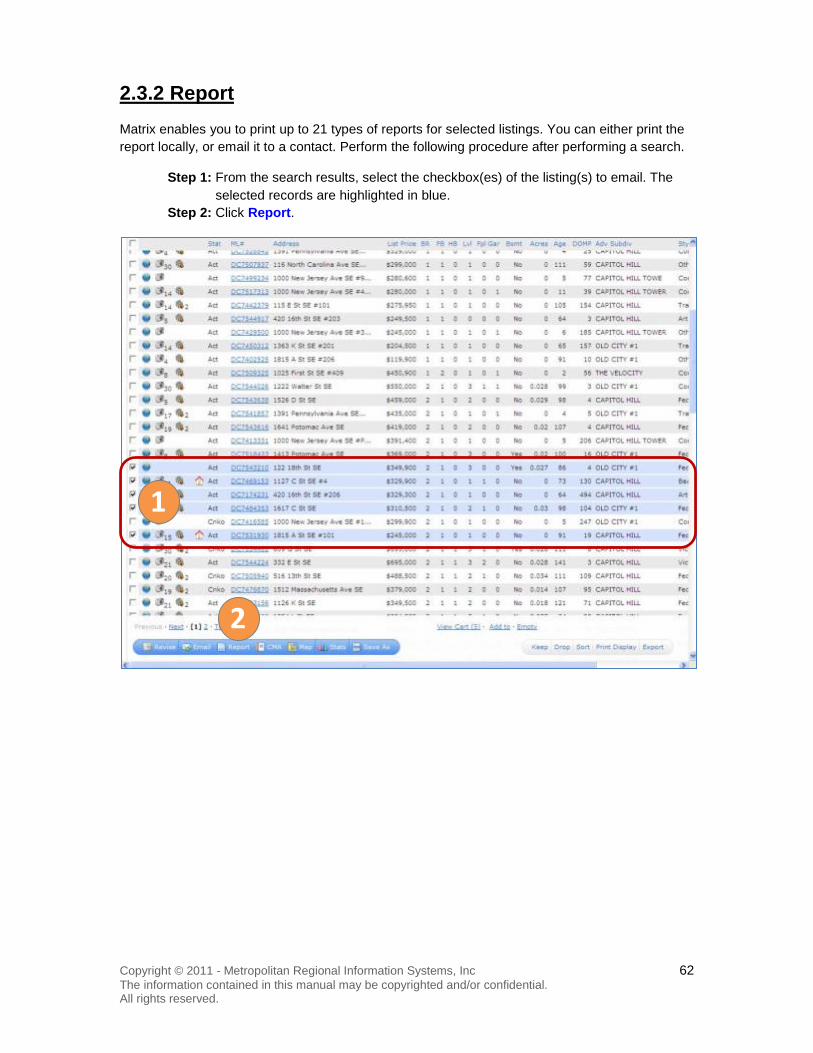
2.3.2 Report Matrix enables you to print up to 21 types of reports for selected listings. You can either print the report locally, or email it to a contact. Perform the following procedure after performing a search.
Step 1: From the search results, select the checkbox(es) of the listing(s) to email. The selected records are highlighted in blue.
Step 2: Click Report.
1
2

Copyright © 2011 - Metropolitan Regional Information Systems, Inc 63 The information contained in this manual may be copyrighted and/or confidential. All rights reserved.
The Print Listings page displays. Step 3: Click a report from the Report list to select a report. To select additional reports,
press CTRL while clicking. Step 4: Click the Select Print Type dropdown arrow and select either Adobe PDF or
Microsoft Word from the menu, as applicable.
To print a report locally, continue with the Step 5, and stop. To send an email of the report to a client skip Step 5 and continue the procedure at Step 6.
Step 5: Click Generate. The report opens in a separate window, either in Adobe PDF or Microsoft Word format.
5
4
3

Copyright © 2011 - Metropolitan Regional Information Systems, Inc 64 The information contained in this manual may be copyrighted and/or confidential. All rights reserved.
To optionally send an email of the report to a contact, continue with the procedure below.
The Email Reports page displays. Step 6: Click To, select a contact from the dialog that displays, and click OK. Or, Click
Create a New Contact, and follow the prompts. Step 7: Optionally, click CC, select a contact from the dialog that displays, and click OK. Step 8: Optionally, click Bcc me a copy of this message to send a blind carbon copy
of the report to your email address. Step 9: Click in the Subject field and enter a subject. Step 10: Click in the Email Body field and enter text to form the body of the email for the
report. Step 11: Click Send.
The email is sent to the selected contact, with the selected report(s).
8 7
6
9 10
11

Copyright © 2011 - Metropolitan Regional Information Systems, Inc 65 The information contained in this manual may be copyrighted and/or confidential. All rights reserved.
2.3.3 CMA Matrix offers a robust, important tool for buyer’s or seller’s agents – the Comparative Market Analysis (CMA). A CMA is a tool to help determine the probable sale price of a property, taking into account recent sales, pending sales, and current listings that are within the same neighborhood and have similar characteristics as the subject property.
The Matrix CMA is easily created from the results of a search for comparable properties, and uses a wizard to guide you through the process. Once finished, you can email the CMA to a contact or save it for future editing. The wizard is comprised of eight steps, represented by tabs. Where you are in the process of completing the CMA is depicted in the wizard, which is displayed on each CMA page in Matrix. You can toggle back and forth between any CMA page at any time by clicking a tab in the wizard. In the example below, the wizard indicates that the user is on the Start page.
At each page in the wizard, perform a specific task to complete the CMA:
Start Select a contact to send the CMA to and enter a description.
Pages Select the topics to be contained in the CMA.
Subject Enter data into subject property fields manually, enter a subject property with a Residential ML# or Tax TaxID, or search for a subject property using a Residential listing or a Tax record.
Cover Enter the contact’s information, your information and optionally upload subject property and agent/broker photos.
Comparables Confirm the comparable properties from the search, search for more comparables, or add comparables from the listings in a cart.
Adjustments Add or subtract monetary values from comparable properties based on the differences between them and the subject property.
Pricing Enter a suggested list price for the subject property, and any notes.
Finish View the CMA in Adobe pdf format, and email the CMA to a contact.
Note: At any time during the creation of the CMA, you may save the CMA by clicking the Save icon to the right of Finish. Matrix Autosaves the CMA periodically while you work on it. Discard the CMA by clicking the red and white x icon at the right of the wizard.
Perform all the procedures in this section to complete a CMA.
Copyright © 2011 - Metropolitan Regional Information Systems, Inc 66 The information contained in this manual may be copyrighted and/or confidential. All rights reserved.
Search for Comparables
Step 1: Using the procedures described in the Search section of this module, perform a search for properties similar to the subject property. A CMA search type can be helpful by providing default search criteria to aide you in the CMA search.
Step 2: When you have determined the CMA comparables, click CMA to start the wizard.
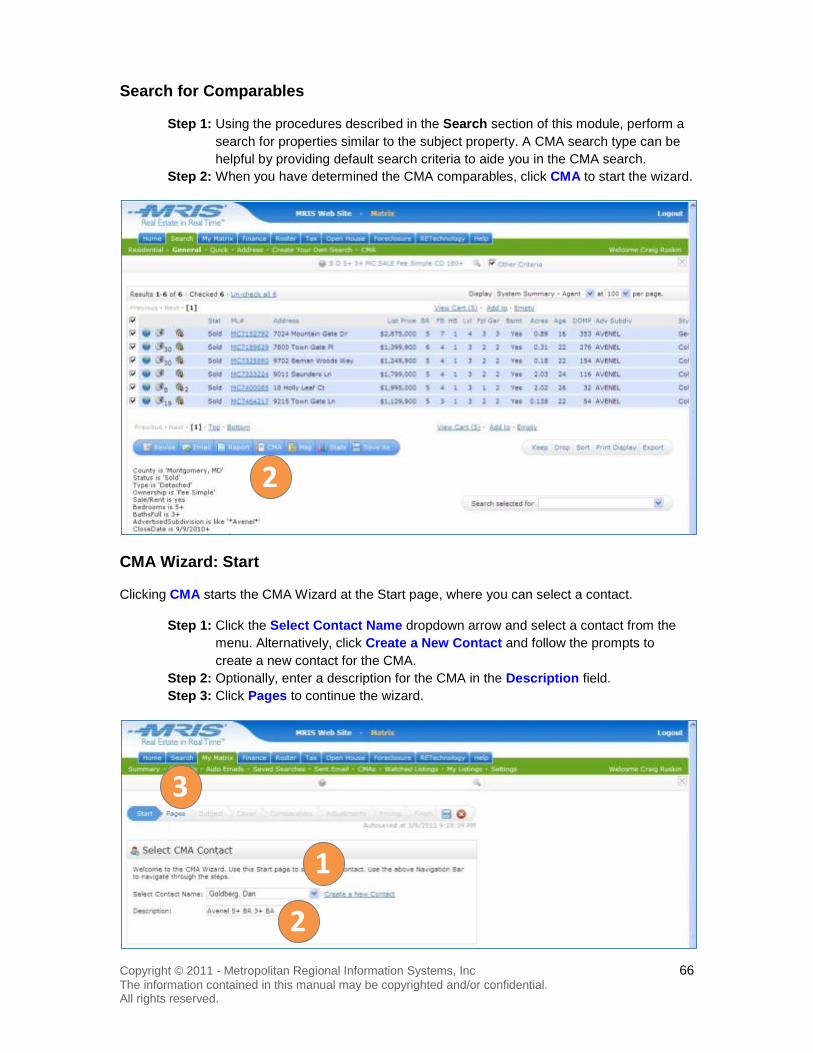
CMA Wizard: Start
Clicking CMA starts the CMA Wizard at the Start page, where you can select a contact.
Step 1: Click the Select Contact Name dropdown arrow and select a contact from the menu. Alternatively, click Create a New Contact and follow the prompts to create a new contact for the CMA.
Step 2: Optionally, enter a description for the CMA in the Description field. Step 3: Click Pages to continue the wizard.
2
1
2
3
Copyright © 2011 - Metropolitan Regional Information Systems, Inc 67 The information contained in this manual may be copyrighted and/or confidential. All rights reserved.
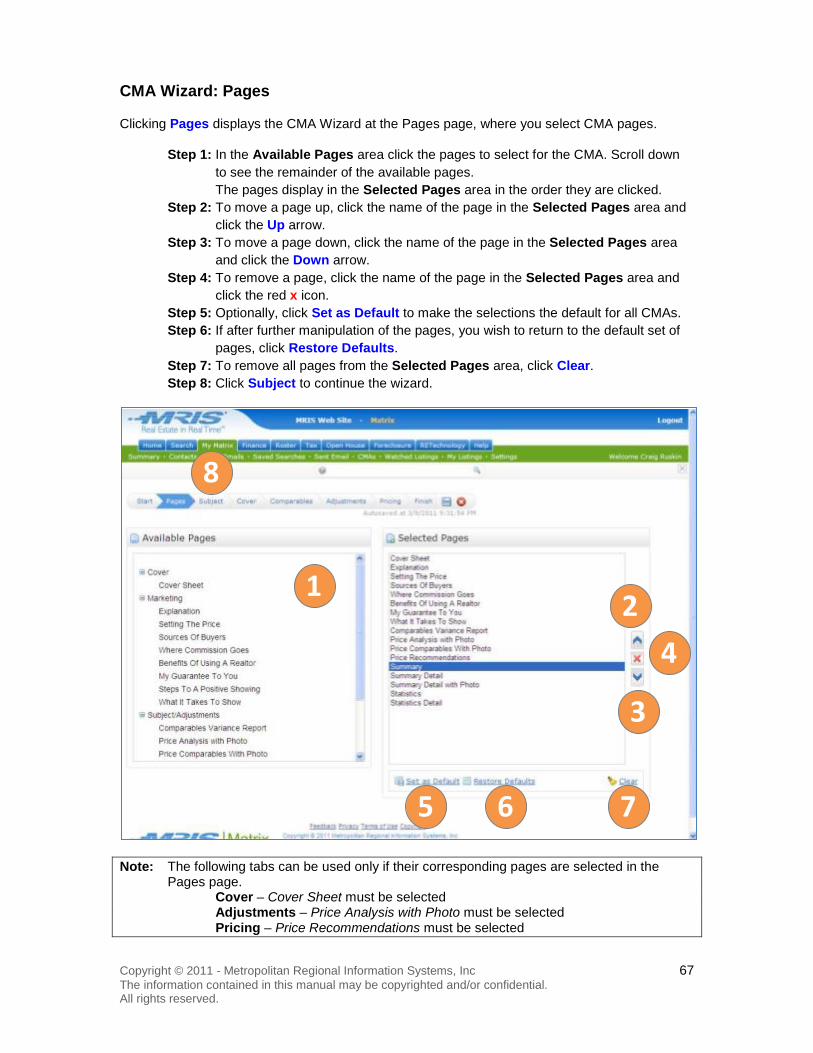
CMA Wizard: Pages
Clicking Pages displays the CMA Wizard at the Pages page, where you select CMA pages.
Step 1: In the Available Pages area click the pages to select for the CMA. Scroll down to see the remainder of the available pages. The pages display in the Selected Pages area in the order they are clicked.
Step 2: To move a page up, click the name of the page in the Selected Pages area and click the Up arrow.
Step 3: To move a page down, click the name of the page in the Selected Pages area and click the Down arrow.
Step 4: To remove a page, click the name of the page in the Selected Pages area and click the red x icon.
Step 5: Optionally, click Set as Default to make the selections the default for all CMAs. Step 6: If after further manipulation of the pages, you wish to return to the default set of
pages, click Restore Defaults. Step 7: To remove all pages from the Selected Pages area, click Clear. Step 8: Click Subject to continue the wizard.
Note: The following tabs can be used only if their corresponding pages are selected in the Pages page.
Cover – Cover Sheet must be selected Adjustments – Price Analysis with Photo must be selected Pricing – Price Recommendations must be selected
1 2
3
4
5 6 7
8

Copyright © 2011 - Metropolitan Regional Information Systems, Inc 68 The information contained in this manual may be copyrighted and/or confidential. All rights reserved.
CMA Wizard: Subject
Clicking Subject displays the CMA Wizard at the Subject page, where you choose the subject property and enter its information. Matrix offers several methods to do this: you can type in the subject property fields manually, enter a Residential ML# or Tax TaxID and click Fill, or you can determine a subject property by searching Matrix for Residential listings or Tax records and then transferring the property’s information to an auto-fill form.
Perform one of the following five procedures to input a subject property.
Manually Enter Subject Property Fields
Step 1: Click Type in the subject property fields manually.
1
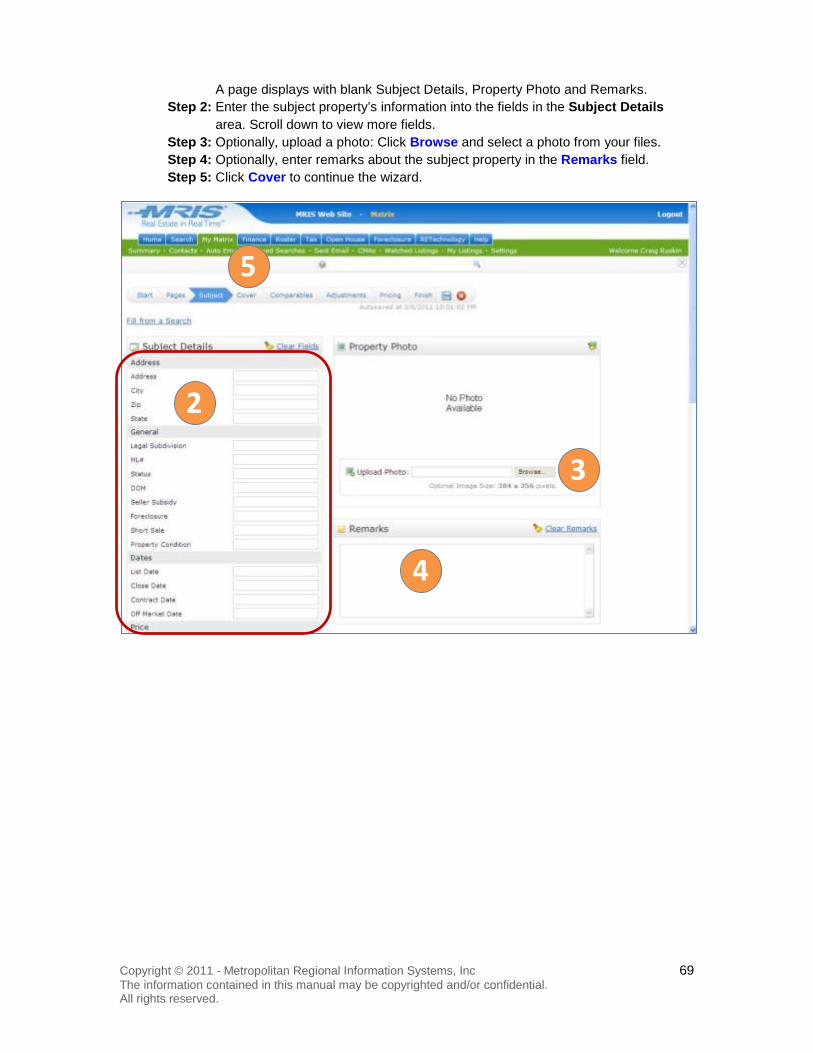
Copyright © 2011 - Metropolitan Regional Information Systems, Inc 69 The information contained in this manual may be copyrighted and/or confidential. All rights reserved.
A page displays with blank Subject Details, Property Photo and Remarks. Step 2: Enter the subject property’s information into the fields in the Subject Details
area. Scroll down to view more fields. Step 3: Optionally, upload a photo: Click Browse and select a photo from your files. Step 4: Optionally, enter remarks about the subject property in the Remarks field. Step 5: Click Cover to continue the wizard.
2
3
4
5

Copyright © 2011 - Metropolitan Regional Information Systems, Inc 70 The information contained in this manual may be copyrighted and/or confidential. All rights reserved.
Enter Residential ML#
Step 1: Enter a Residential ML# in the Enter a Residential ML# to auto-fill form field. Step 2: Click Fill.
The listing’s information auto-populates the Subject Details, Property Photo and Remarks areas.
Step 3: Click Cover to continue the wizard.
1 2
3
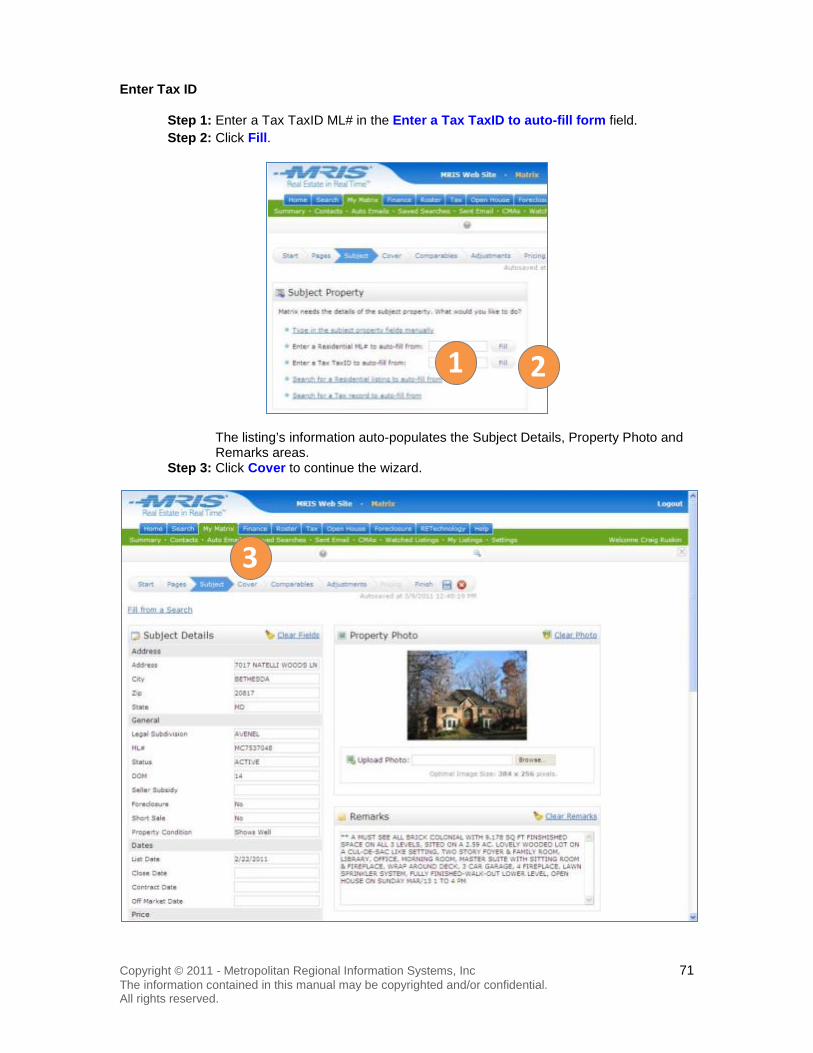
Copyright © 2011 - Metropolitan Regional Information Systems, Inc 71 The information contained in this manual may be copyrighted and/or confidential. All rights reserved.
Enter Tax ID
Step 1: Enter a Tax TaxID ML# in the Enter a Tax TaxID to auto-fill form field. Step 2: Click Fill.
The listing’s information auto-populates the Subject Details, Property Photo and Remarks areas.
Step 3: Click Cover to continue the wizard.
1 2
3
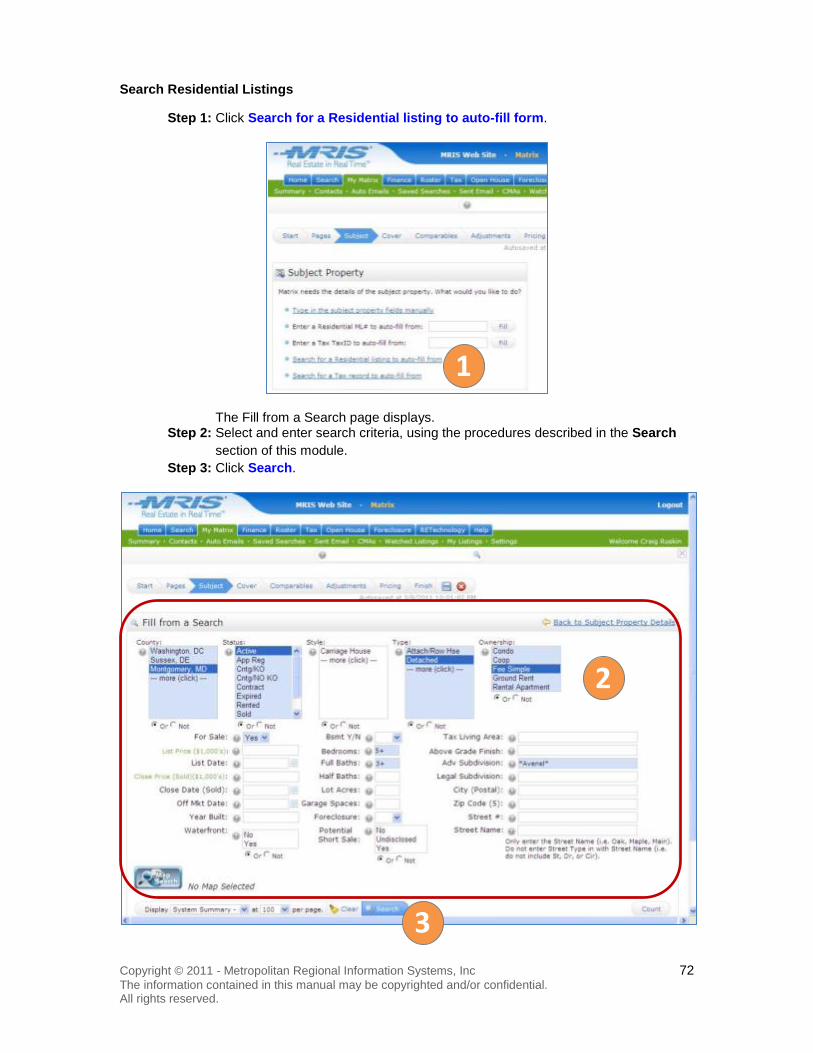
Copyright © 2011 - Metropolitan Regional Information Systems, Inc 72 The information contained in this manual may be copyrighted and/or confidential. All rights reserved.
Search Residential Listings
Step 1: Click Search for a Residential listing to auto-fill form.
The Fill from a Search page displays. Step 2: Select and enter search criteria, using the procedures described in the Search
section of this module. Step 3: Click Search.
1
2
3
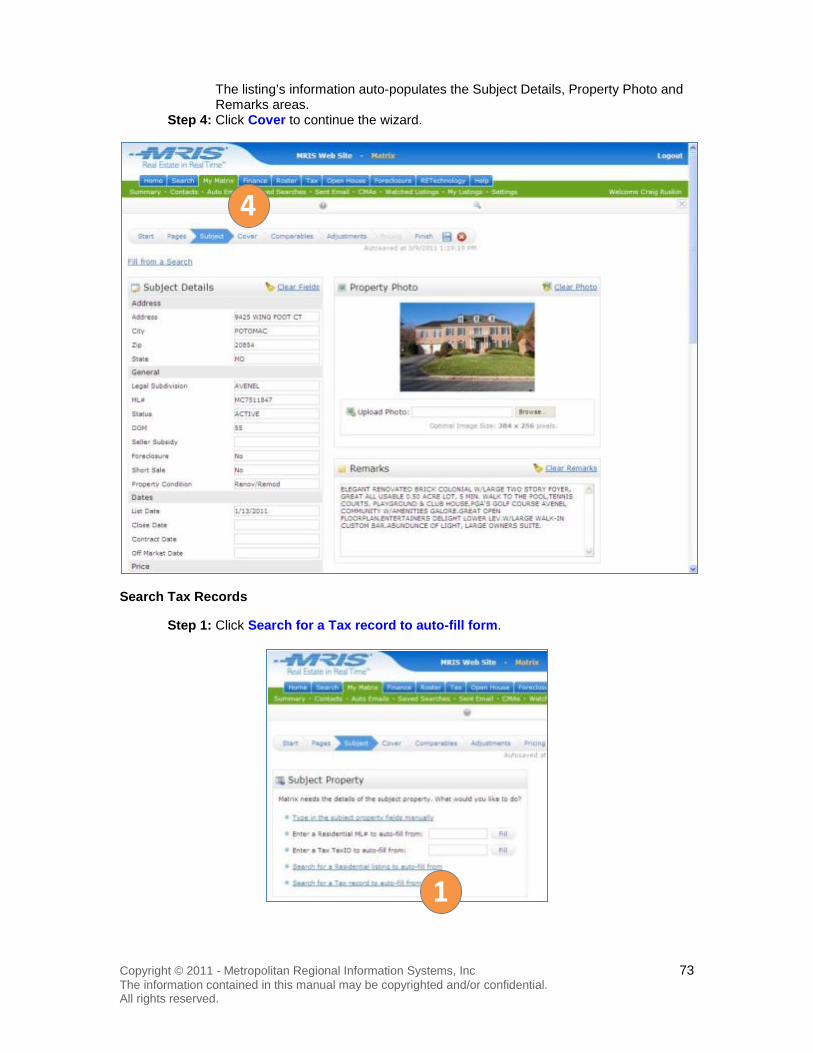
Copyright © 2011 - Metropolitan Regional Information Systems, Inc 73 The information contained in this manual may be copyrighted and/or confidential. All rights reserved.
The listing’s information auto-populates the Subject Details, Property Photo and Remarks areas.
Step 4: Click Cover to continue the wizard.
Search Tax Records
Step 1: Click Search for a Tax record to auto-fill form.
4
1
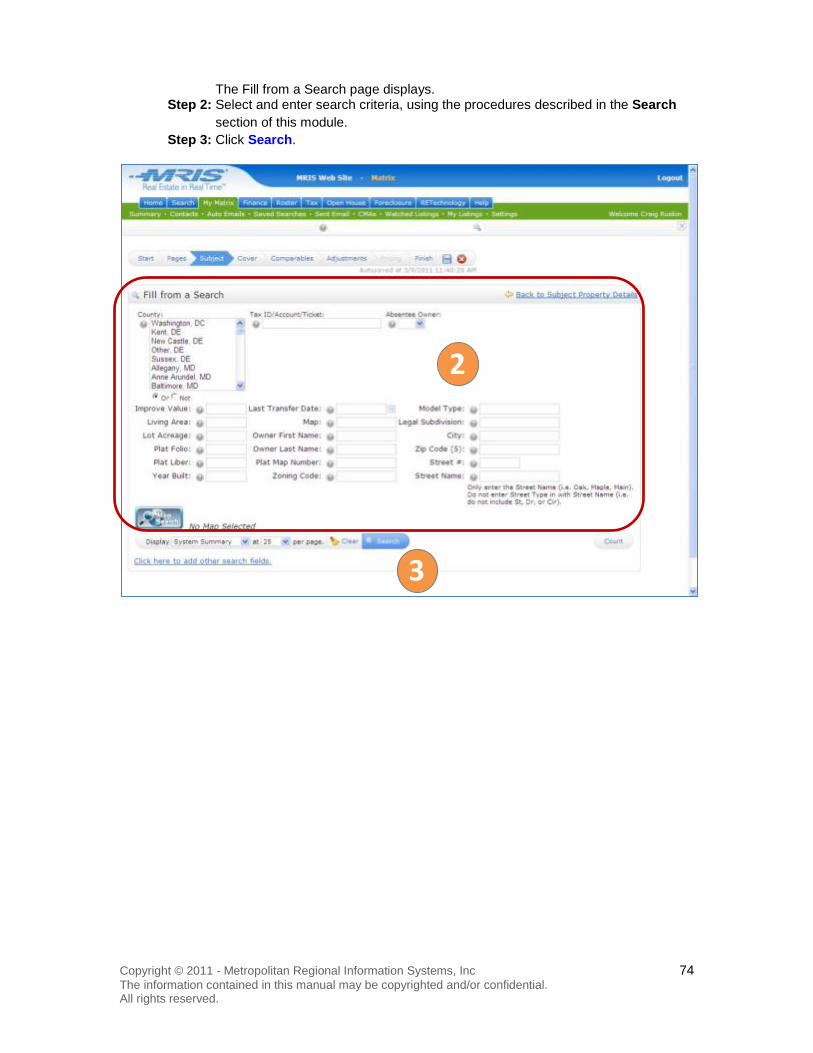
Copyright © 2011 - Metropolitan Regional Information Systems, Inc 74 The information contained in this manual may be copyrighted and/or confidential. All rights reserved.
The Fill from a Search page displays. Step 2: Select and enter search criteria, using the procedures described in the Search
section of this module. Step 3: Click Search.
2
3
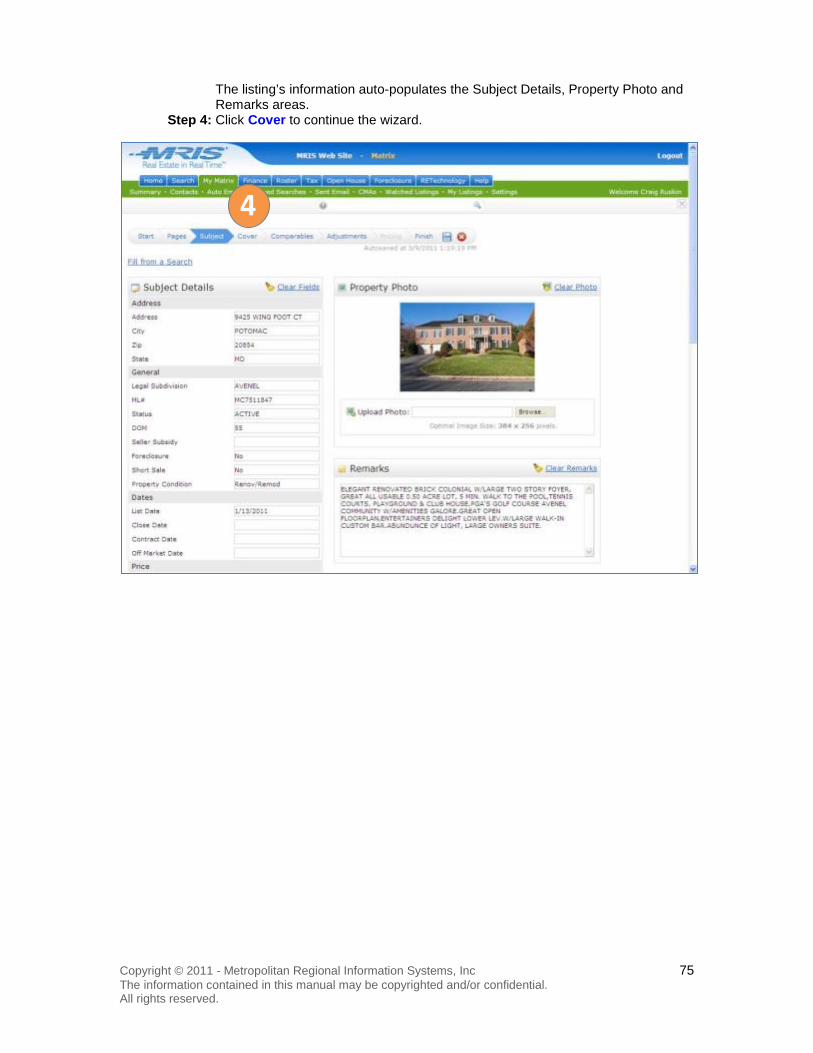
Copyright © 2011 - Metropolitan Regional Information Systems, Inc 75 The information contained in this manual may be copyrighted and/or confidential. All rights reserved.
The listing’s information auto-populates the Subject Details, Property Photo and Remarks areas.
Step 4: Click Cover to continue the wizard.
4
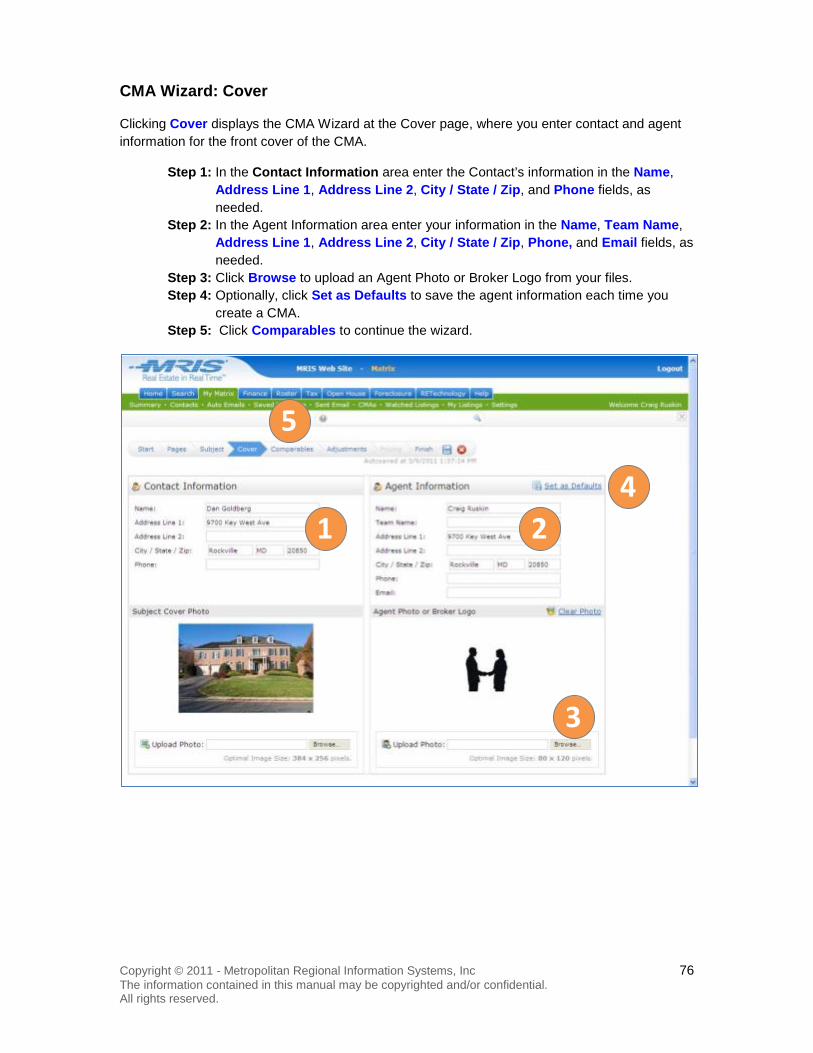
Copyright © 2011 - Metropolitan Regional Information Systems, Inc 76 The information contained in this manual may be copyrighted and/or confidential. All rights reserved.
CMA Wizard: Cover
Clicking Cover displays the CMA Wizard at the Cover page, where you enter contact and agent information for the front cover of the CMA.
Step 1: In the Contact Information area enter the Contact’s information in the Name, Address Line 1, Address Line 2, City / State / Zip, and Phone fields, as needed.
Step 2: In the Agent Information area enter your information in the Name, Team Name, Address Line 1, Address Line 2, City / State / Zip, Phone, and Email fields, as needed.
Step 3: Click Browse to upload an Agent Photo or Broker Logo from your files. Step 4: Optionally, click Set as Defaults to save the agent information each time you
create a CMA. Step 5: Click Comparables to continue the wizard.
5
1 2
3
4
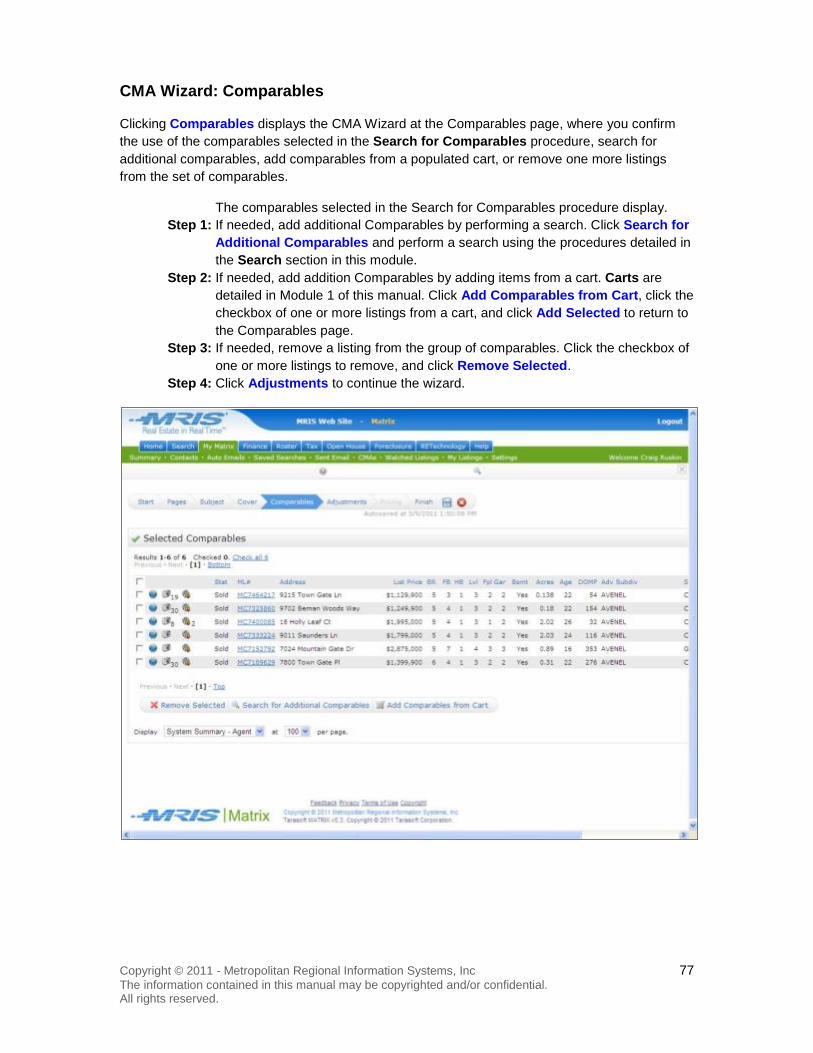
Copyright © 2011 - Metropolitan Regional Information Systems, Inc 77 The information contained in this manual may be copyrighted and/or confidential. All rights reserved.
CMA Wizard: Comparables
Clicking Comparables displays the CMA Wizard at the Comparables page, where you confirm the use of the comparables selected in the Search for Comparables procedure, search for additional comparables, add comparables from a populated cart, or remove one more listings from the set of comparables.
The comparables selected in the Search for Comparables procedure display. Step 1: If needed, add additional Comparables by performing a search. Click Search for
Additional Comparables and perform a search using the procedures detailed in the Search section in this module.
Step 2: If needed, add addition Comparables by adding items from a cart. Carts are detailed in Module 1 of this manual. Click Add Comparables from Cart, click the checkbox of one or more listings from a cart, and click Add Selected to return to the Comparables page.
Step 3: If needed, remove a listing from the group of comparables. Click the checkbox of one or more listings to remove, and click Remove Selected.
Step 4: Click Adjustments to continue the wizard.

Copyright © 2011 - Metropolitan Regional Information Systems, Inc 78 The information contained in this manual may be copyrighted and/or confidential. All rights reserved.
CMA Wizard: Adjustments
Clicking Adjustments displays the CMA Wizard at the Adjustments page, where you adjust values of the features of the comparable properties negatively or positively by comparing them with the features of the subject property. Matrix offers two views to input the data: Single Line Mode or Detail Mode. You can toggle back and forth between the two views by clicking View in Single Line Mode from the Detail view or View in Detail Mode from the Single Line view.
Adjust Comparables in Single Line Mode
Step 1: For each comparable property, enter positive or negative dollar amounts in the fields as applicable for features which need to be adjusted. The Subject property is on the top line and its features cannot be adjusted. The comparable properties are listed in rows beneath the subject property. Features are listed in columns. Click the Left and Right arrows or the Scroll Bar to view more features to adjust.
Note: Enter positive dollar amounts by with or without a plus sign (e.g. 3000 or +3000). Enter negative dollar amounts using a minus sign (e.g. -3000).
Step 2: Click Pricing to continue with the Wizard.
1
2
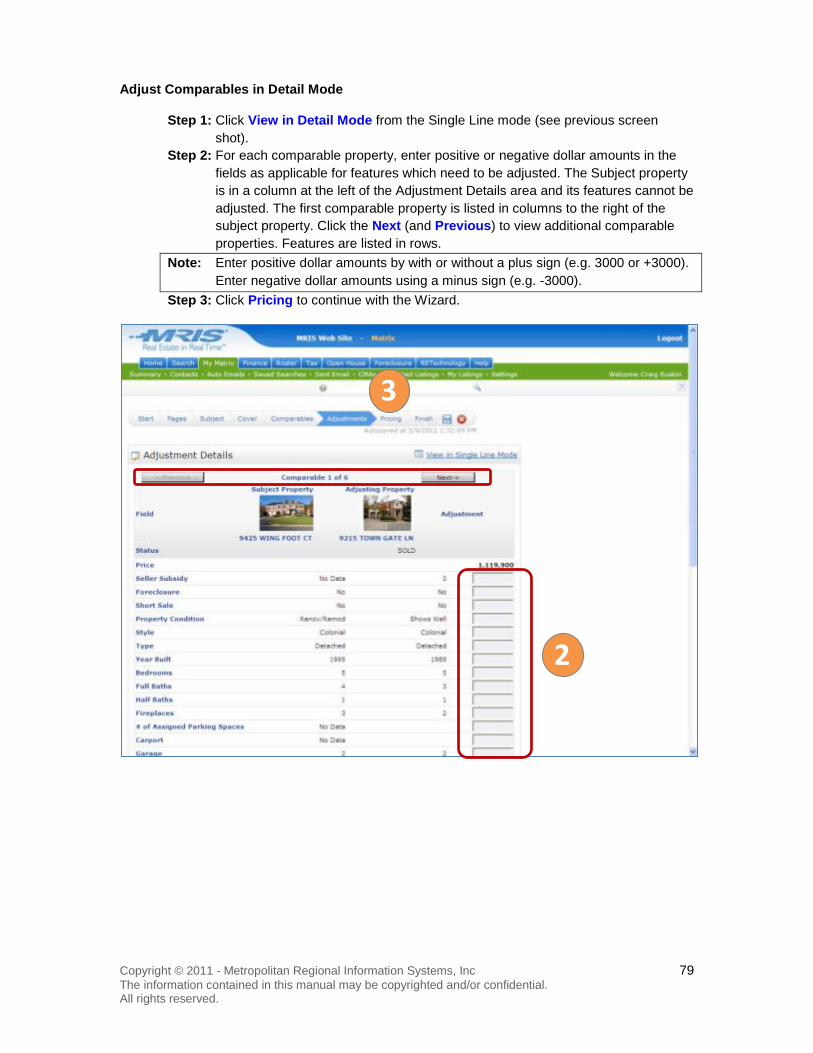
Copyright © 2011 - Metropolitan Regional Information Systems, Inc 79 The information contained in this manual may be copyrighted and/or confidential. All rights reserved.
Adjust Comparables in Detail Mode
Step 1: Click View in Detail Mode from the Single Line mode (see previous screen shot).
Step 2: For each comparable property, enter positive or negative dollar amounts in the fields as applicable for features which need to be adjusted. The Subject property is in a column at the left of the Adjustment Details area and its features cannot be adjusted. The first comparable property is listed in columns to the right of the subject property. Click the Next (and Previous) to view additional comparable properties. Features are listed in rows.
Note: Enter positive dollar amounts by with or without a plus sign (e.g. 3000 or +3000). Enter negative dollar amounts using a minus sign (e.g. -3000).
Step 3: Click Pricing to continue with the Wizard.
3
2
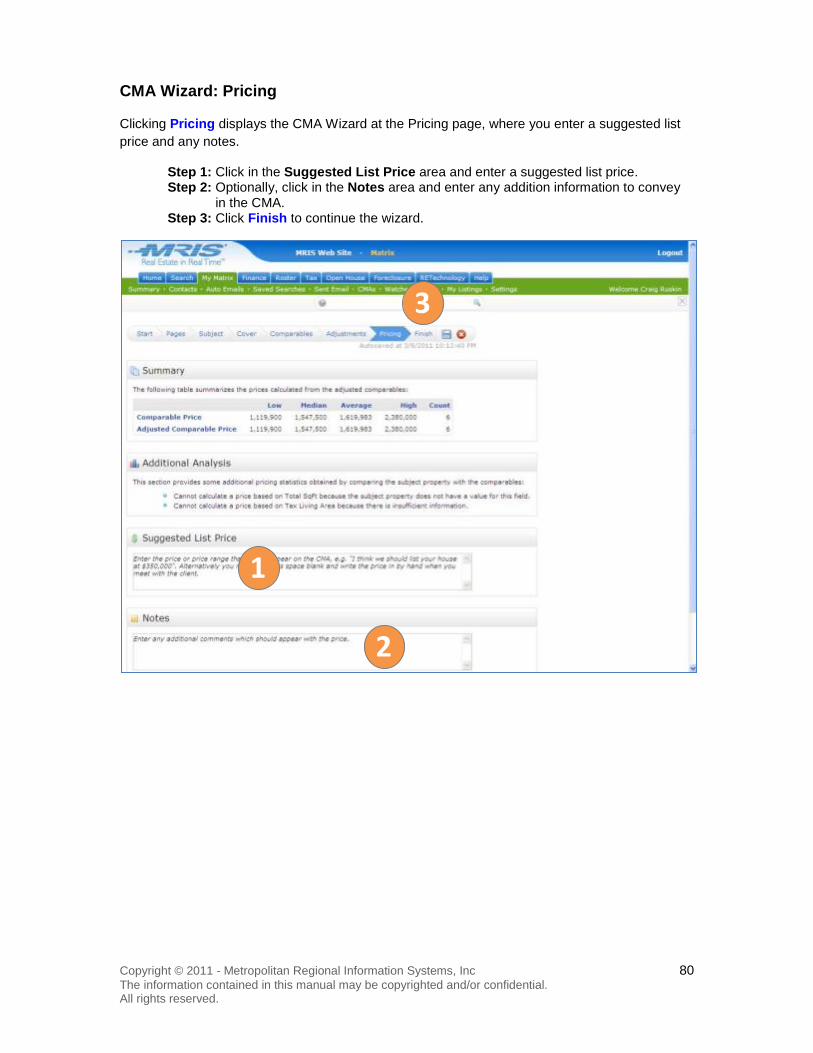
Copyright © 2011 - Metropolitan Regional Information Systems, Inc 80 The information contained in this manual may be copyrighted and/or confidential. All rights reserved.
CMA Wizard: Pricing
Clicking Pricing displays the CMA Wizard at the Pricing page, where you enter a suggested list price and any notes.
Step 1: Click in the Suggested List Price area and enter a suggested list price. Step 2: Optionally, click in the Notes area and enter any addition information to convey
in the CMA. Step 3: Click Finish to continue the wizard.
3
2
1
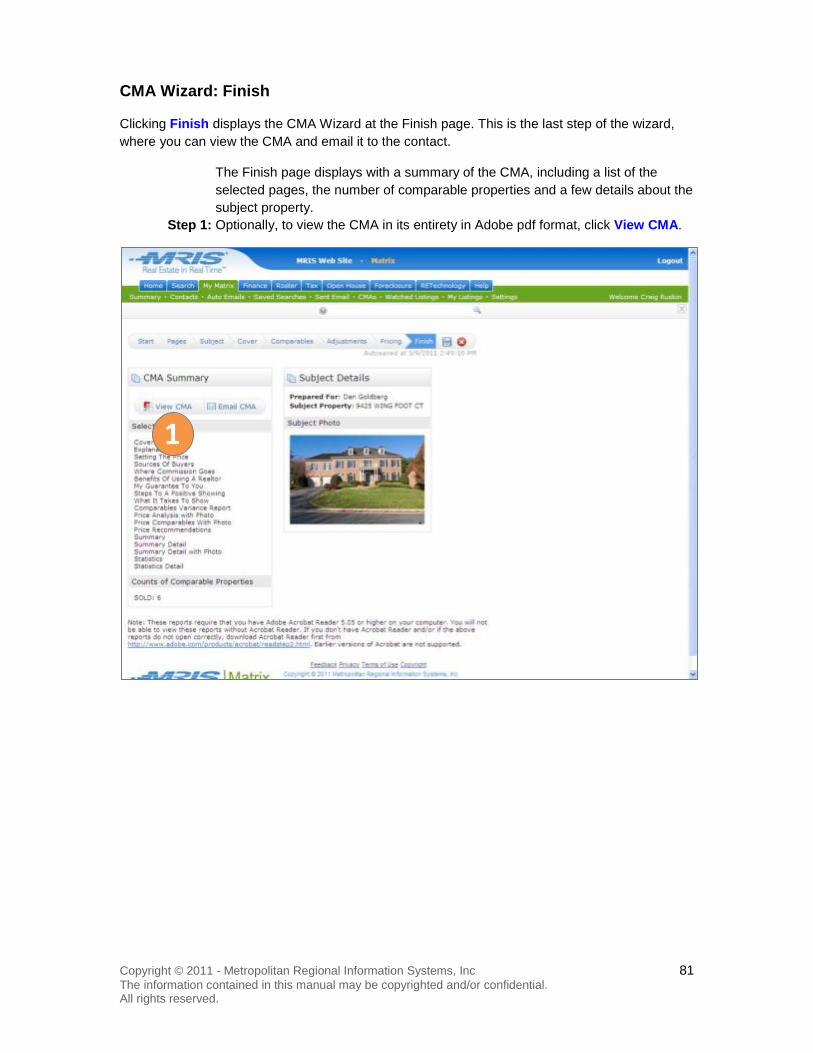
Copyright © 2011 - Metropolitan Regional Information Systems, Inc 81 The information contained in this manual may be copyrighted and/or confidential. All rights reserved.
CMA Wizard: Finish
Clicking Finish displays the CMA Wizard at the Finish page. This is the last step of the wizard, where you can view the CMA and email it to the contact.
The Finish page displays with a summary of the CMA, including a list of the selected pages, the number of comparable properties and a few details about the subject property.
Step 1: Optionally, to view the CMA in its entirety in Adobe pdf format, click View CMA.
1

Copyright © 2011 - Metropolitan Regional Information Systems, Inc 82 The information contained in this manual may be copyrighted and/or confidential. All rights reserved.
A separate window displays with the entire CMA in Adobe pdf format.
Step 2: To email the CMA to the contact, click Email CMA.
2

Copyright © 2011 - Metropolitan Regional Information Systems, Inc 83 The information contained in this manual may be copyrighted and/or confidential. All rights reserved.
The Email CMA page displays. The contact is populated in the To field. Step 3: Optionally, to change or add contacts to receive the CMA, click To, select a
contact from the dialog that displays, and click OK. Or, Click Create a New Contact, and follow the prompts.
Step 4: Optionally, click CC and select a contact from the dialog that displays, and click OK.
Step 5: Optionally, click Bcc me a copy of this message to send a blind carbon copy of the email to your email address.
Step 6: Click in the Subject field, and enter a subject. Step 7: Click in the Email Body field, and enter text to form the body of the email. Step 8: Click Send.
The CMA is emailed to the contact(s) specified.
3 4
5 6
7
8
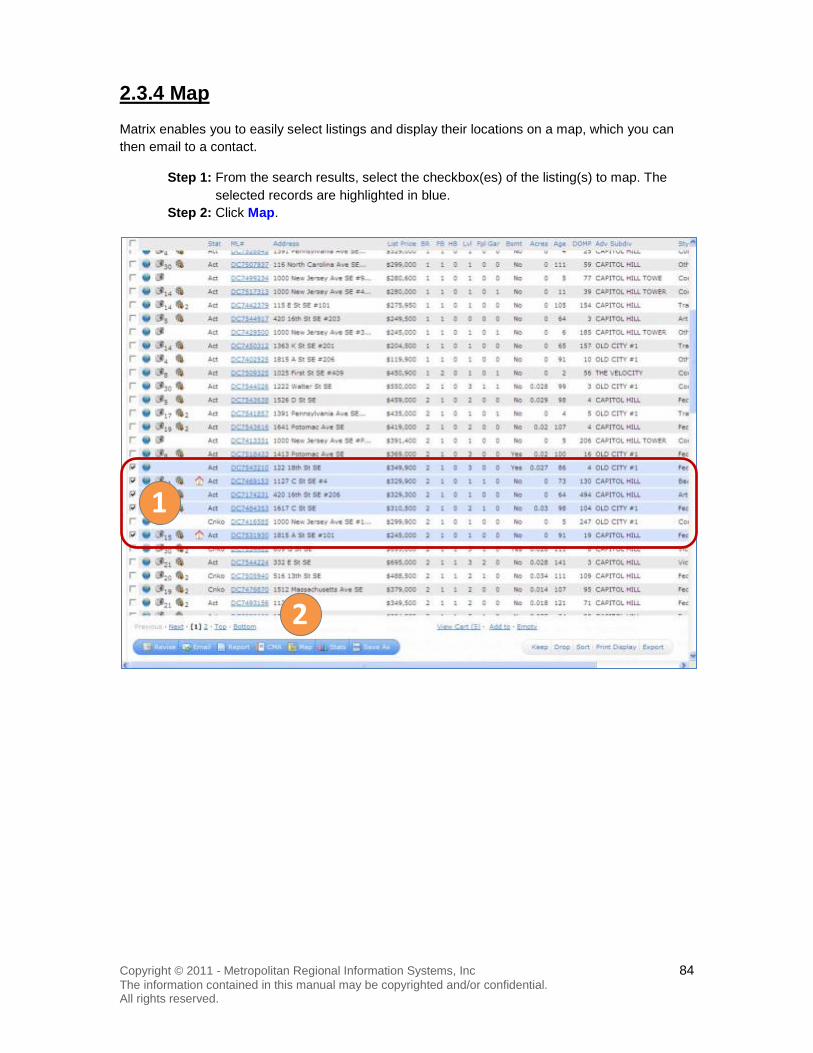
Copyright © 2011 - Metropolitan Regional Information Systems, Inc 84 The information contained in this manual may be copyrighted and/or confidential. All rights reserved.
2.3.4 Map Matrix enables you to easily select listings and display their locations on a map, which you can then email to a contact.
Step 1: From the search results, select the checkbox(es) of the listing(s) to map. The selected records are highlighted in blue.
Step 2: Click Map.
1
2

Copyright © 2011 - Metropolitan Regional Information Systems, Inc 85 The information contained in this manual may be copyrighted and/or confidential. All rights reserved.
A map of the selected listings displays, with pushpins indicating location of the properties.
Step 3: Click Get Directions to generate a set of directions between the properties on the map.
3
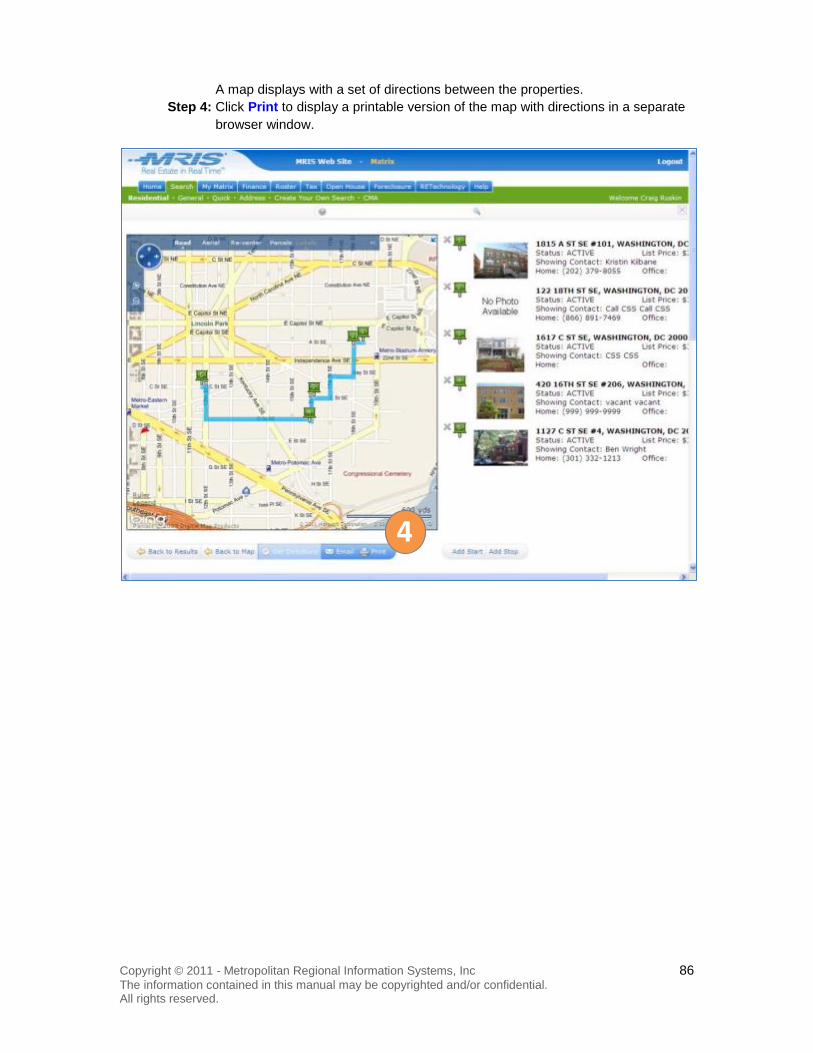
Copyright © 2011 - Metropolitan Regional Information Systems, Inc 86 The information contained in this manual may be copyrighted and/or confidential. All rights reserved.
A map displays with a set of directions between the properties. Step 4: Click Print to display a printable version of the map with directions in a separate
browser window.
4

Copyright © 2011 - Metropolitan Regional Information Systems, Inc 87 The information contained in this manual may be copyrighted and/or confidential. All rights reserved.
Step 5: Click the Display Directions As dropdown arrow and select a display type from the menu. The selections offer choices of the number and types of maps to include with the printed directions. Print the map using the browser’s print functionality.
5
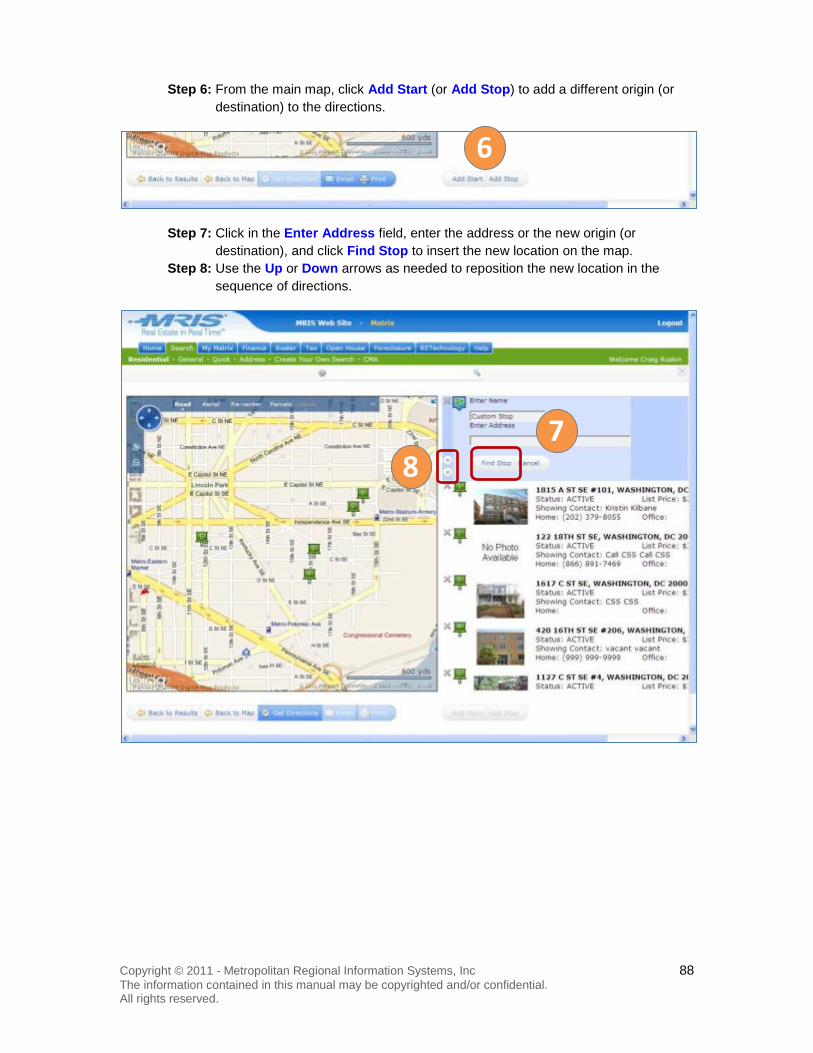
Copyright © 2011 - Metropolitan Regional Information Systems, Inc 88 The information contained in this manual may be copyrighted and/or confidential. All rights reserved.
Step 6: From the main map, click Add Start (or Add Stop) to add a different origin (or destination) to the directions.
Step 7: Click in the Enter Address field, enter the address or the new origin (or destination), and click Find Stop to insert the new location on the map.
Step 8: Use the Up or Down arrows as needed to reposition the new location in the sequence of directions.
6
7 8
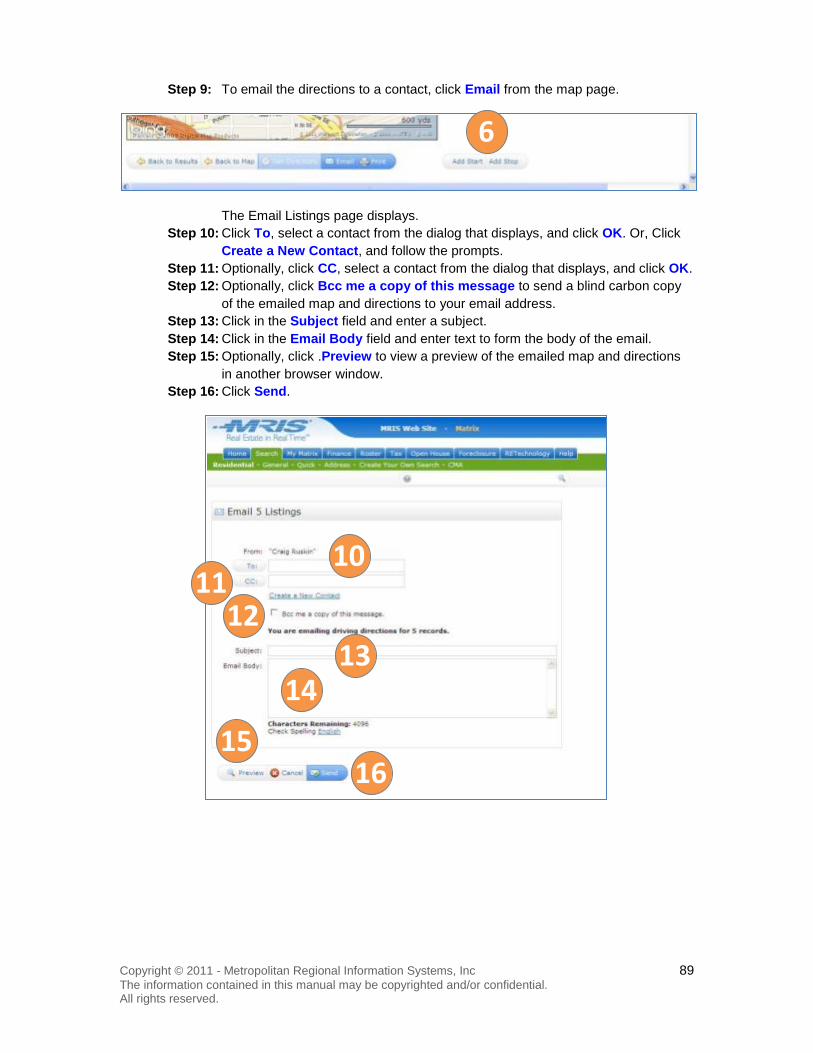
Copyright © 2011 - Metropolitan Regional Information Systems, Inc 89 The information contained in this manual may be copyrighted and/or confidential. All rights reserved.
Step 9: To email the directions to a contact, click Email from the map page.
The Email Listings page displays. Step 10: Click To, select a contact from the dialog that displays, and click OK. Or, Click
Create a New Contact, and follow the prompts. Step 11: Optionally, click CC, select a contact from the dialog that displays, and click OK. Step 12: Optionally, click Bcc me a copy of this message to send a blind carbon copy
of the emailed map and directions to your email address. Step 13: Click in the Subject field and enter a subject. Step 14: Click in the Email Body field and enter text to form the body of the email. Step 15: Optionally, click .Preview to view a preview of the emailed map and directions
in another browser window. Step 16: Click Send.
6
14
16 15
13 12
11 10

Copyright © 2011 - Metropolitan Regional Information Systems, Inc 90 The information contained in this manual may be copyrighted and/or confidential. All rights reserved.
2.3.5 Stats Matrix can display basic statistics about a group of selected listings.
Step 1: From the search results, select the checkboxes of the listings. The selected records are highlighted in blue.
Step 2: Click Stats.
1
2

Copyright © 2011 - Metropolitan Regional Information Systems, Inc 91 The information contained in this manual may be copyrighted and/or confidential. All rights reserved.
The Basic Statistics – grouped by Status page displays with summary statistics for the selected properties, grouped by status.
Step 3: Click the dropdown arrow and select Prices Grouped by Status from the menu.
3

Copyright © 2011 - Metropolitan Regional Information Systems, Inc 92 The information contained in this manual may be copyrighted and/or confidential. All rights reserved.
The Price comparisons page displays with price information for the selected properties, grouped by status.
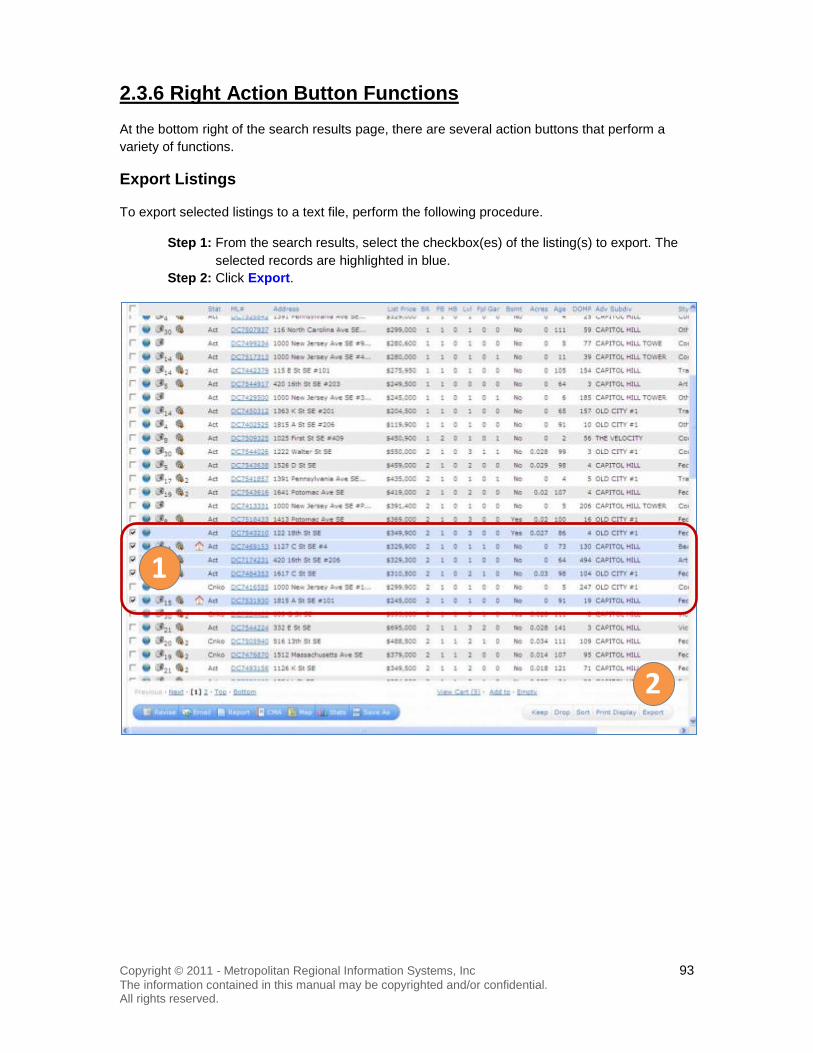
Copyright © 2011 - Metropolitan Regional Information Systems, Inc 93 The information contained in this manual may be copyrighted and/or confidential. All rights reserved.
2.3.6 Right Action Button Functions At the bottom right of the search results page, there are several action buttons that perform a variety of functions.
Export Listings
To export selected listings to a text file, perform the following procedure.
Step 1: From the search results, select the checkbox(es) of the listing(s) to export. The selected records are highlighted in blue.
Step 2: Click Export.
1
2

Copyright © 2011 - Metropolitan Regional Information Systems, Inc 94 The information contained in this manual may be copyrighted and/or confidential. All rights reserved.
Step 3: Click the Export file format dropdown arrow and select a format from the displayed menu.
Step 4: Click Export.
A confirmation dialog displays. Step 5: Click Save to save the text file to your computer.
3 4
5
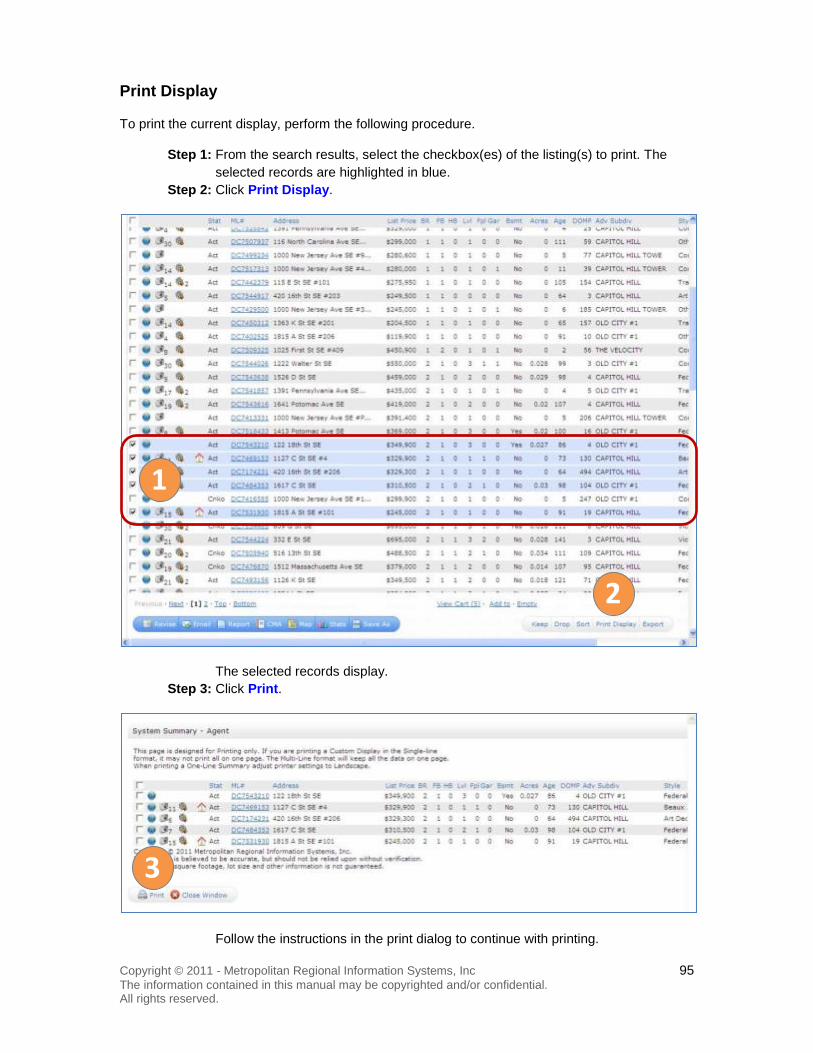
Copyright © 2011 - Metropolitan Regional Information Systems, Inc 95 The information contained in this manual may be copyrighted and/or confidential. All rights reserved.
Print Display
To print the current display, perform the following procedure.
Step 1: From the search results, select the checkbox(es) of the listing(s) to print. The selected records are highlighted in blue.
Step 2: Click Print Display.
The selected records display. Step 3: Click Print.
Follow the instructions in the print dialog to continue with printing.
1
2
3

Copyright © 2011 - Metropolitan Regional Information Systems, Inc 96 The information contained in this manual may be copyrighted and/or confidential. All rights reserved.
Keep and Drop
Use Keep to display selected listings on a single page without the unselected listings. You can perform all procedures in this section (Work with Selected Listings) with kept listings.
Step 1: From the search results, select the checkbox(es) of the listing(s) to print. The selected records are highlighted in blue.
Step 2: Click Keep.
The listings display on a page without the other listings from the search. Perform any of the procedures described in this section to further manipulate the listings.
1
2
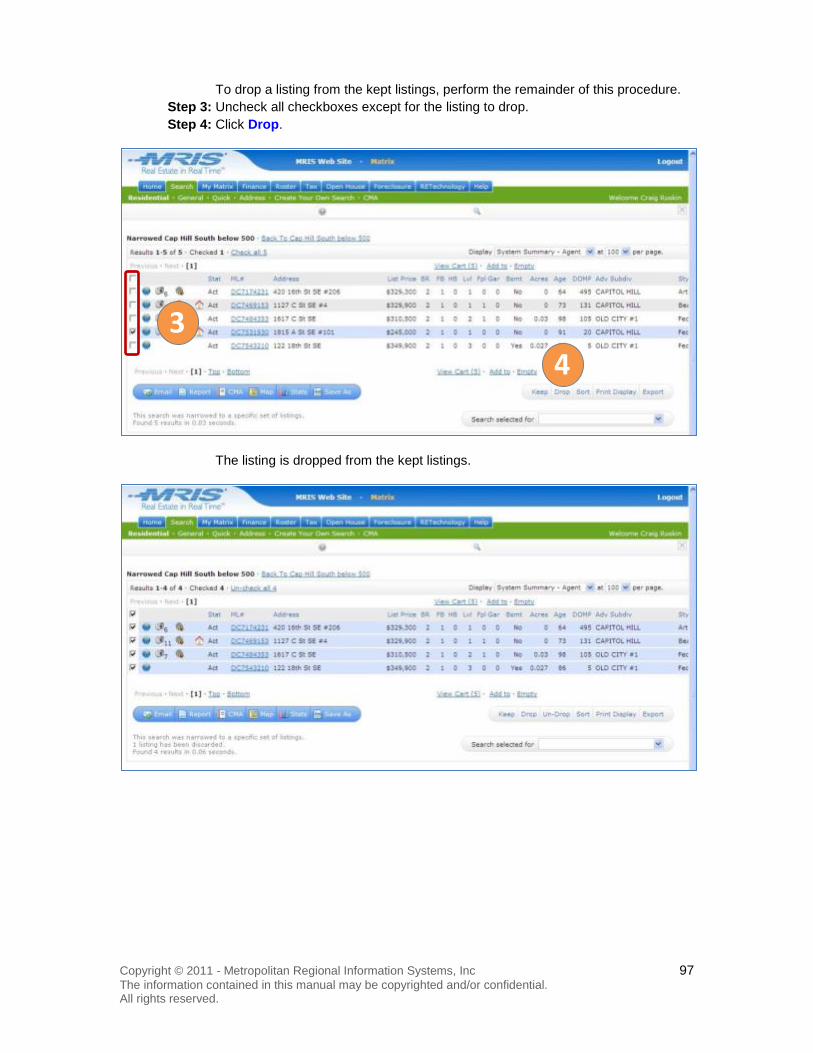
Copyright © 2011 - Metropolitan Regional Information Systems, Inc 97 The information contained in this manual may be copyrighted and/or confidential. All rights reserved.
To drop a listing from the kept listings, perform the remainder of this procedure. Step 3: Uncheck all checkboxes except for the listing to drop. Step 4: Click Drop.
The listing is dropped from the kept listings.
3 4
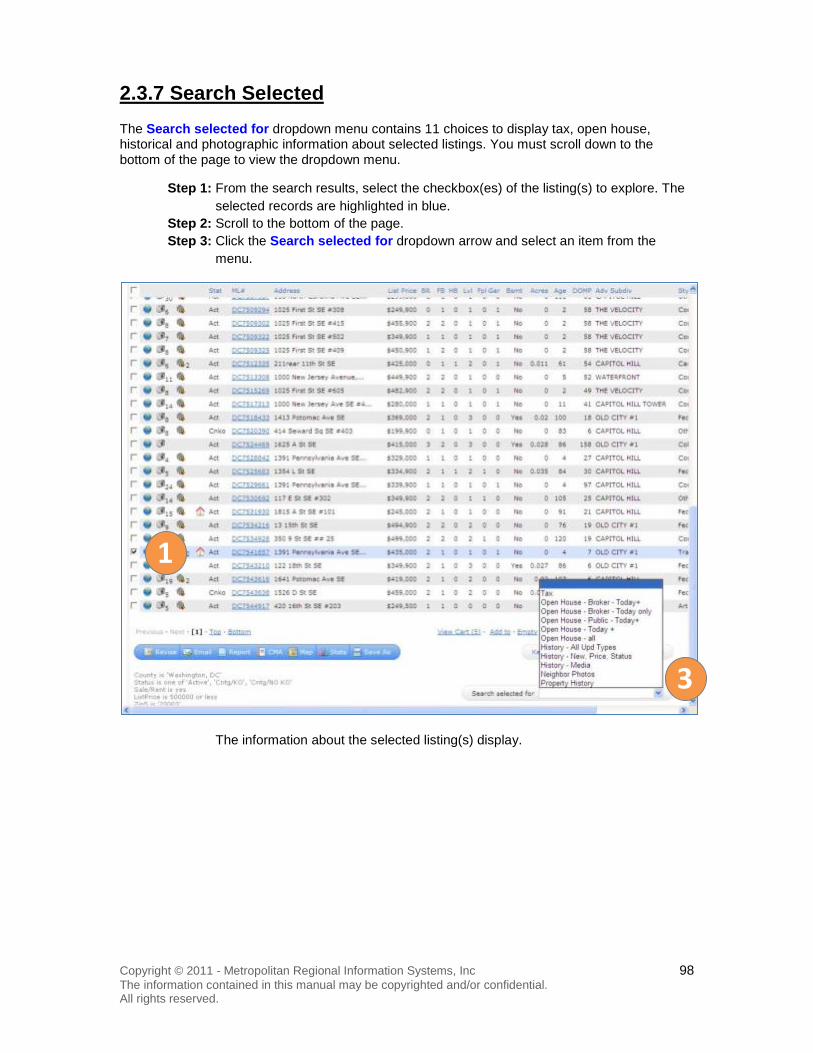
Copyright © 2011 - Metropolitan Regional Information Systems, Inc 98 The information contained in this manual may be copyrighted and/or confidential. All rights reserved.
2.3.7 Search Selected The Search selected for dropdown menu contains 11 choices to display tax, open house, historical and photographic information about selected listings. You must scroll down to the bottom of the page to view the dropdown menu.
Step 1: From the search results, select the checkbox(es) of the listing(s) to explore. The selected records are highlighted in blue.
Step 2: Scroll to the bottom of the page. Step 3: Click the Search selected for dropdown arrow and select an item from the
menu.
The information about the selected listing(s) display.
3
1
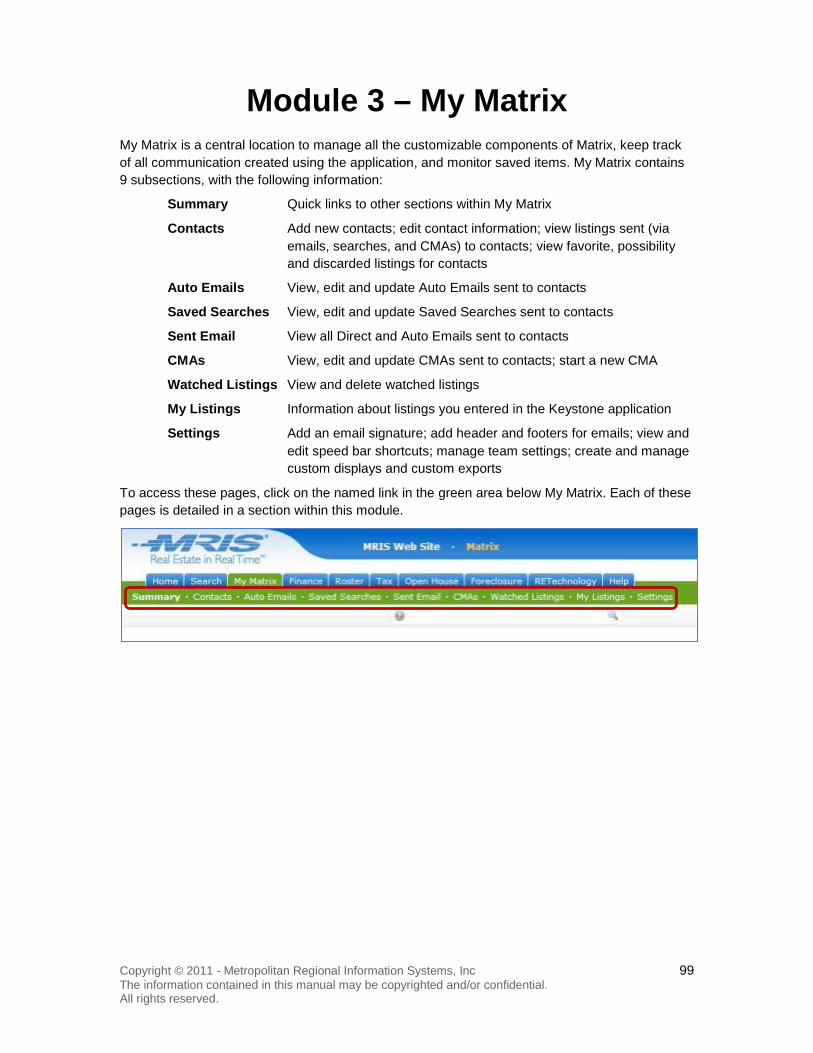
Copyright © 2011 - Metropolitan Regional Information Systems, Inc 99 The information contained in this manual may be copyrighted and/or confidential. All rights reserved.
Module 3 – My Matrix My Matrix is a central location to manage all the customizable components of Matrix, keep track of all communication created using the application, and monitor saved items. My Matrix contains 9 subsections, with the following information:
Summary Quick links to other sections within My Matrix
Contacts Add new contacts; edit contact information; view listings sent (via emails, searches, and CMAs) to contacts; view favorite, possibility and discarded listings for contacts
Auto Emails View, edit and update Auto Emails sent to contacts
Saved Searches View, edit and update Saved Searches sent to contacts
Sent Email View all Direct and Auto Emails sent to contacts
CMAs View, edit and update CMAs sent to contacts; start a new CMA
Watched Listings View and delete watched listings
My Listings Information about listings you entered in the Keystone application
Settings Add an email signature; add header and footers for emails; view and edit speed bar shortcuts; manage team settings; create and manage custom displays and custom exports
To access these pages, click on the named link in the green area below My Matrix. Each of these pages is detailed in a section within this module.

Copyright © 2011 - Metropolitan Regional Information Systems, Inc 100 The information contained in this manual may be copyrighted and/or confidential. All rights reserved.
3.1 Summary To navigate to My Matrix, click the My Matrix tab. The Summary page displays. The links displayed in the main area of the page take to you the applicable area within My Matrix. For example, the Auto Emails link located below Contacts in the main portion of the page navigates you to the same page as the Auto Emails link beneath My Matrix.
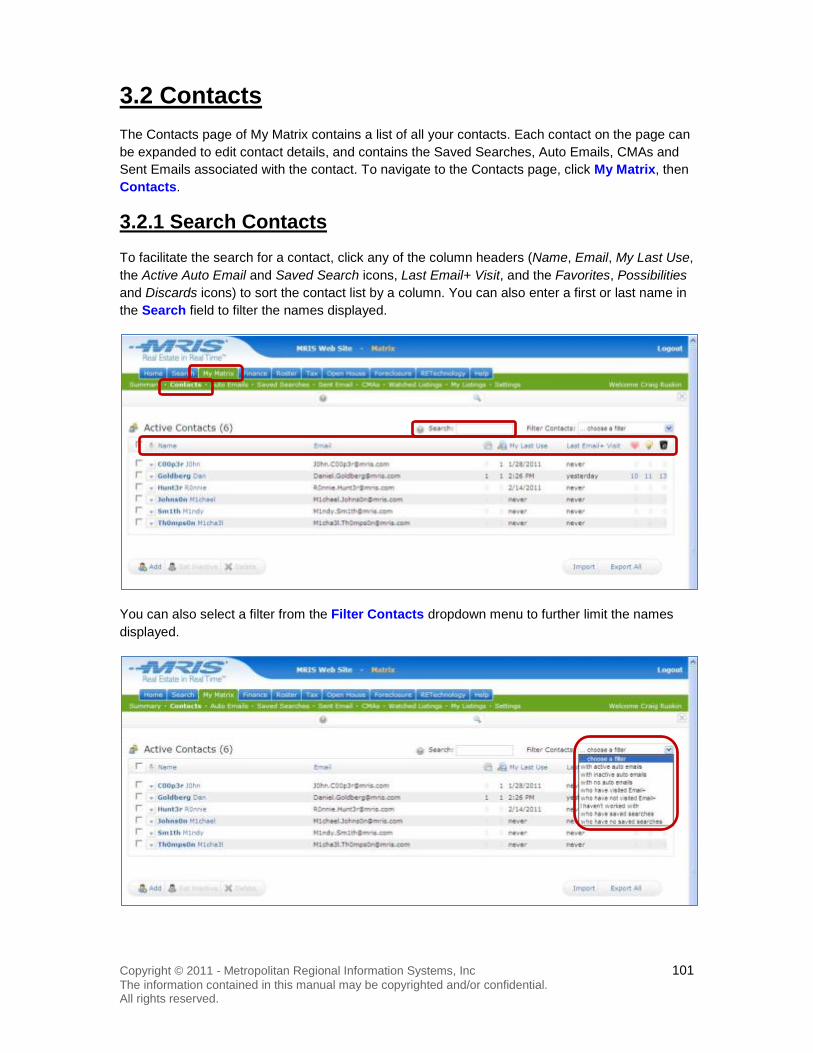
Copyright © 2011 - Metropolitan Regional Information Systems, Inc 101 The information contained in this manual may be copyrighted and/or confidential. All rights reserved.
3.2 Contacts The Contacts page of My Matrix contains a list of all your contacts. Each contact on the page can be expanded to edit contact details, and contains the Saved Searches, Auto Emails, CMAs and Sent Emails associated with the contact. To navigate to the Contacts page, click My Matrix, then Contacts.
3.2.1 Search Contacts To facilitate the search for a contact, click any of the column headers (Name, Email, My Last Use, the Active Auto Email and Saved Search icons, Last Email+ Visit, and the Favorites, Possibilities and Discards icons) to sort the contact list by a column. You can also enter a first or last name in the Search field to filter the names displayed.
You can also select a filter from the Filter Contacts dropdown menu to further limit the names displayed.

Copyright © 2011 - Metropolitan Regional Information Systems, Inc 102 The information contained in this manual may be copyrighted and/or confidential. All rights reserved.
3.2.2 Edit Contact Details Click the name of a contact or the arrow to the left of the name to expand the contact information. As applicable, up to five links display: Details, Auto Emails, Saved Searches, CMAs, and Sent Emails. When clicked, each of these links displays a submenu.
Click Details (or the arrow icon to its left) to display the current information for the contact. To edit contact details, click Edit Contact.
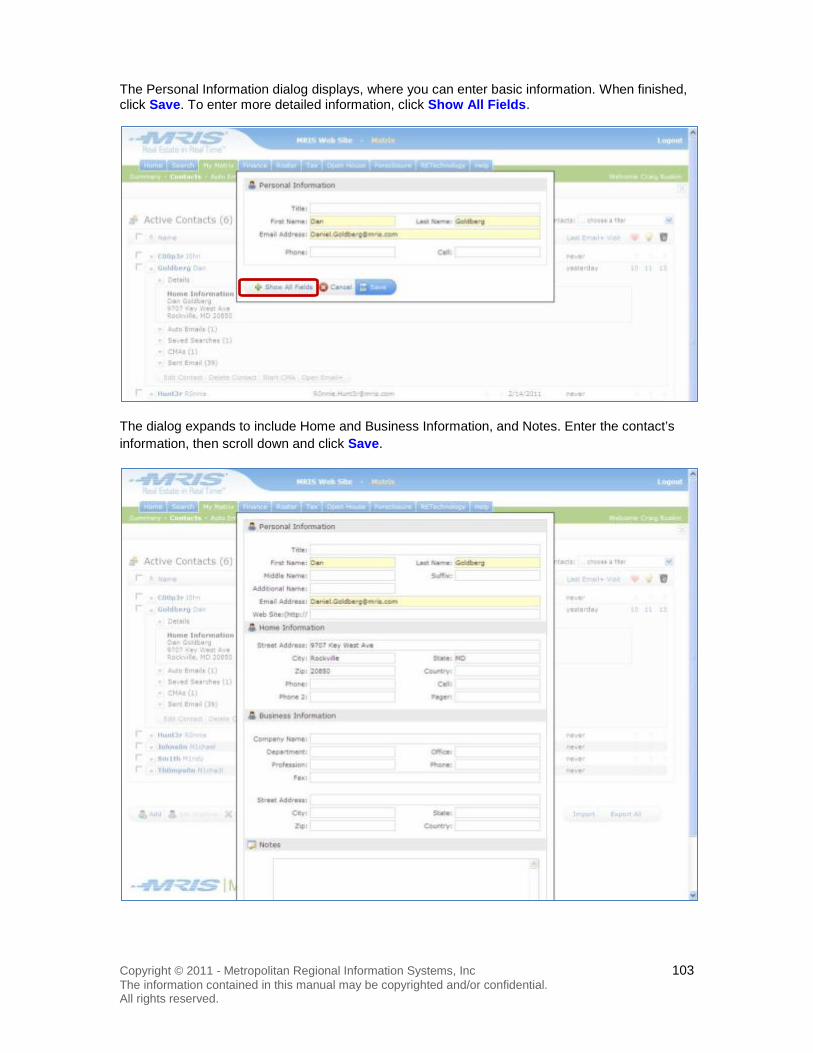
Copyright © 2011 - Metropolitan Regional Information Systems, Inc 103 The information contained in this manual may be copyrighted and/or confidential. All rights reserved.
The Personal Information dialog displays, where you can enter basic information. When finished, click Save. To enter more detailed information, click Show All Fields.
The dialog expands to include Home and Business Information, and Notes. Enter the contact’s information, then scroll down and click Save.
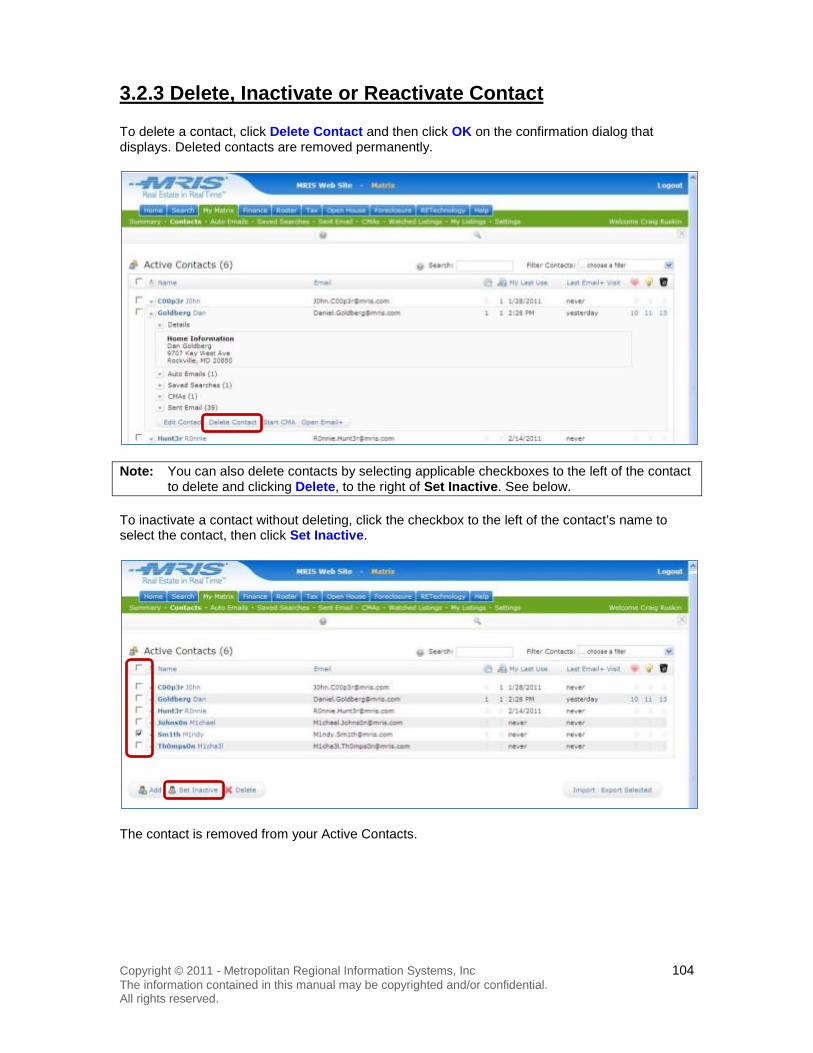
Copyright © 2011 - Metropolitan Regional Information Systems, Inc 104 The information contained in this manual may be copyrighted and/or confidential. All rights reserved.
3.2.3 Delete, Inactivate or Reactivate Contact
To delete a contact, click Delete Contact and then click OK on the confirmation dialog that displays. Deleted contacts are removed permanently.
Note: You can also delete contacts by selecting applicable checkboxes to the left of the contact to delete and clicking Delete, to the right of Set Inactive. See below.
To inactivate a contact without deleting, click the checkbox to the left of the contact’s name to select the contact, then click Set Inactive.
The contact is removed from your Active Contacts.

Copyright © 2011 - Metropolitan Regional Information Systems, Inc 105 The information contained in this manual may be copyrighted and/or confidential. All rights reserved.
To reactivate a contact, click Show Inactive.
The Inactive Contacts page displays. Click the checkbox to the left of the contact’s name to select the contact and click Set Active.
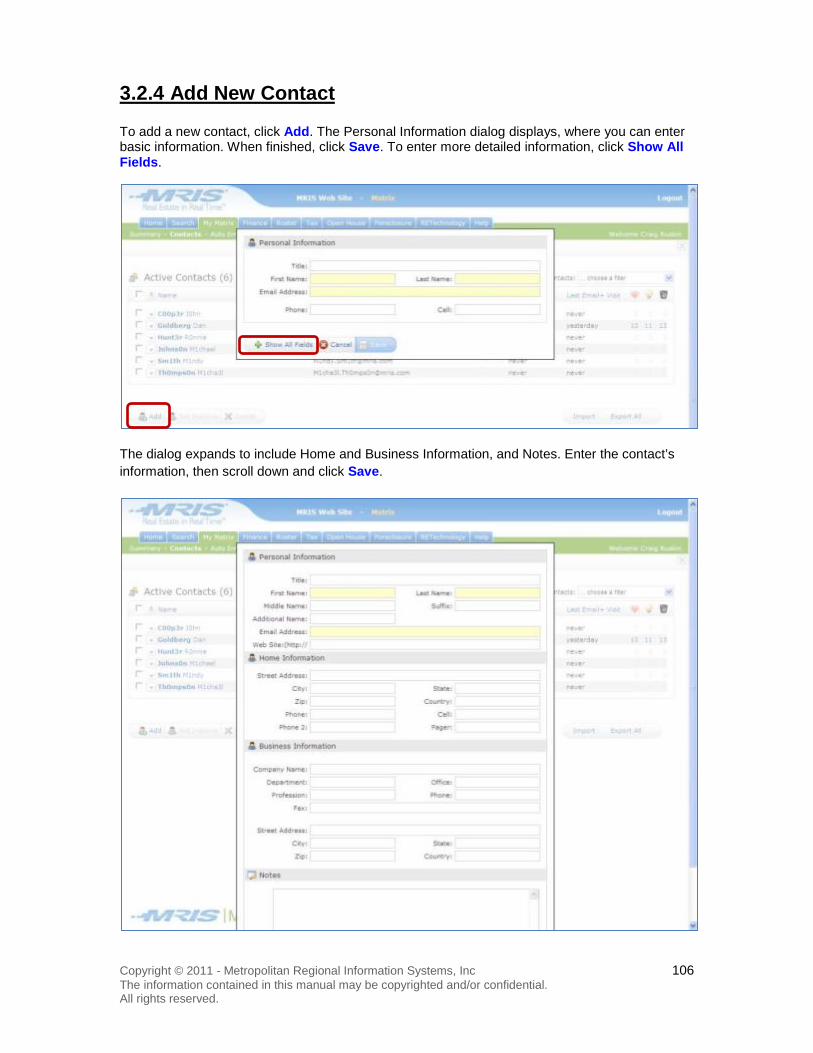
Copyright © 2011 - Metropolitan Regional Information Systems, Inc 106 The information contained in this manual may be copyrighted and/or confidential. All rights reserved.
3.2.4 Add New Contact
To add a new contact, click Add. The Personal Information dialog displays, where you can enter basic information. When finished, click Save. To enter more detailed information, click Show All Fields.
The dialog expands to include Home and Business Information, and Notes. Enter the contact’s information, then scroll down and click Save.

Copyright © 2011 - Metropolitan Regional Information Systems, Inc 107 The information contained in this manual may be copyrighted and/or confidential. All rights reserved.
3.2.5 Contact Auto Emails To view the Auto Emails associated with the contact, click Auto Emails or the arrow icon to the left. A list of Auto Emails displays detailing each email’s last Email+ view, last run, and its current status.
To view options for a particular Auto Email, click the link for the email, or the arrow icon to the left. Perform actions on the Auto Email by clicking one of the action buttons, explained below.

Copyright © 2011 - Metropolitan Regional Information Systems, Inc 108 The information contained in this manual may be copyrighted and/or confidential. All rights reserved.
To change the settings for an Auto Email, click Settings. The Settings page for the selected email displays. If applicable, make any modifications to the settings. Follow the procedure in the New Auto Email subsection of the Save Search section in Module 2 of this manual for instructions about Auto-Email settings. When finished, click Save.

Copyright © 2011 - Metropolitan Regional Information Systems, Inc 109 The information contained in this manual may be copyrighted and/or confidential. All rights reserved.
To revise the search associated with the Auto-Email, click Revise (see the beginning of this section for button location). The Search page for the selected email displays. If applicable, make any modifications to the search. Follow the procedures in the Perform a Search section in Module 2 of this manual for instructions on running a search.
Click Full Search (see the beginning of this section for button location) to display the searched listings associated with this Auto Email.
Click Date Since (see the beginning of this section for button location) to display the listings which are new or changed since the last time the search was run.

Copyright © 2011 - Metropolitan Regional Information Systems, Inc 110 The information contained in this manual may be copyrighted and/or confidential. All rights reserved.
Click Market Update to display the Market Update Options page for the Auto Email. (See the beginning of this section for button location.)
Optionally, select one or more Update Types to include specific types of updates you want included in the search (for example, only changes in price, only new listings, etc.).
Select either the Use Last Run Date or Specify Update Date/Range radio button. Use Last Run Date performs a search that includes all data after the last time the search was run. To use Specify Update Date/Range, enter a specific date to include updates from that date, or a range of dates to include updates to the search between two dates. Follow the date input instructions displayed on the screen.
Click Search to run the updated search.

Copyright © 2011 - Metropolitan Regional Information Systems, Inc 111 The information contained in this manual may be copyrighted and/or confidential. All rights reserved.
Click Open in Email+ to view a read-only version of the Auto Email sent to the contact in a separate window. (See the beginning of this section for the Open in Email+ button location.) Here, you can view the listings the contact has marked as Favorites, Possibilities and Discarded to better understand the contact’s needs.
Click Delete Auto Email to delete the Auto Email. (See the beginning of this section for button location.) Click OK on the confirmation dialog that displays.

Copyright © 2011 - Metropolitan Regional Information Systems, Inc 112 The information contained in this manual may be copyrighted and/or confidential. All rights reserved.
3.2.6 Contact Saved Searches To view the Saved Searches associated with the contact, click Saved Searches or the arrow icon to the left. A list of saved searches displays detailing the last run and its description.
To view options for a particular Saved Search, click the link for the Saved Search, or the arrow icon to the left. Perform actions on the Saved Search by clicking one of the action buttons. The Saved Search action buttons perform similarly to the action buttons detailed in the Contact Auto Emails section of this module; See that section for instructions.
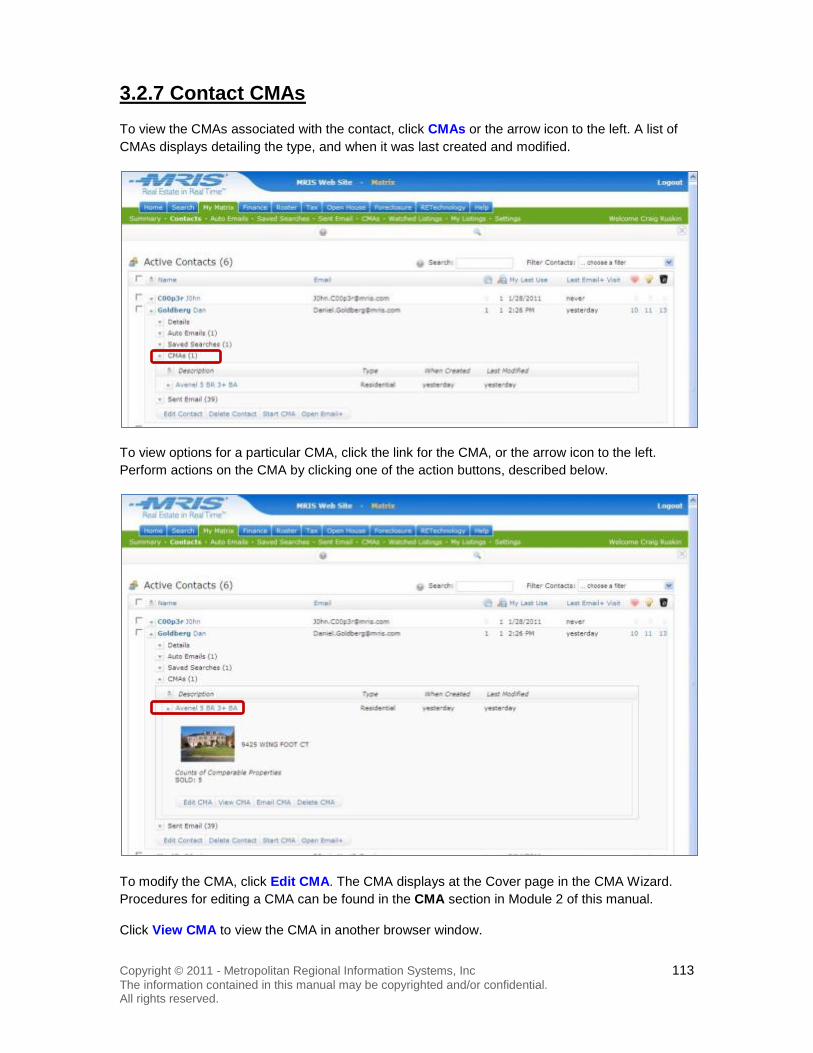
Copyright © 2011 - Metropolitan Regional Information Systems, Inc 113 The information contained in this manual may be copyrighted and/or confidential. All rights reserved.
3.2.7 Contact CMAs To view the CMAs associated with the contact, click CMAs or the arrow icon to the left. A list of CMAs displays detailing the type, and when it was last created and modified.
To view options for a particular CMA, click the link for the CMA, or the arrow icon to the left. Perform actions on the CMA by clicking one of the action buttons, described below.
To modify the CMA, click Edit CMA. The CMA displays at the Cover page in the CMA Wizard. Procedures for editing a CMA can be found in the CMA section in Module 2 of this manual.
Click View CMA to view the CMA in another browser window.

Copyright © 2011 - Metropolitan Regional Information Systems, Inc 114 The information contained in this manual may be copyrighted and/or confidential. All rights reserved.
Click Email CMA to display the Finish page of the CMA Wizard. Here, you can enter information into fields on the page to send the email to the contact. Procedures for emailing a CMA can be found in the CMA Wizard: Finish subsection of the CMA section in Module 2 of this manual, starting at Step 3.
Click Delete CMA to delete the CMA. Click OK on the confirmation dialog that displays.
3.2.8 Contact Sent Email To view all sent email associated with the contact, click Sent Email or the arrow icon to the left. A list of emails displays detailing the Date Sent, Type (Auto Email or Direct Email) Subject, its Contents (which can be clicked and to view the contents as a search results page), and when the email was viewed. The ten most recently sent emails display. To view all sent emails for this contact, click View all Sent Emails.

Copyright © 2011 - Metropolitan Regional Information Systems, Inc 115 The information contained in this manual may be copyrighted and/or confidential. All rights reserved.
To perform more actions on a sent email, click on the link with the email’s Date. For Auto Emails, the action buttons displayed perform similarly to the action buttons detailed in the Contact Auto Emails section of this module; See that section for instructions.
After clicking a date link for a Direct Email, you can view the email in a read-only version of Email+ by clicking Open in Email+.
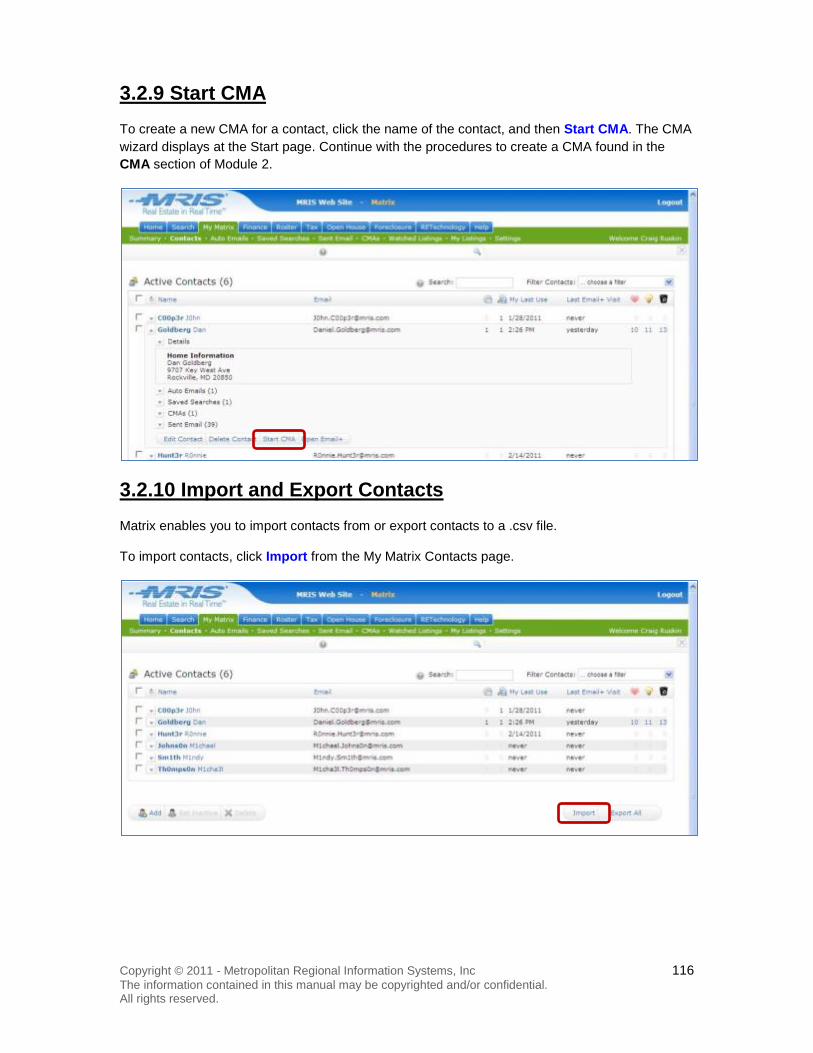
Copyright © 2011 - Metropolitan Regional Information Systems, Inc 116 The information contained in this manual may be copyrighted and/or confidential. All rights reserved.
3.2.9 Start CMA To create a new CMA for a contact, click the name of the contact, and then Start CMA. The CMA wizard displays at the Start page. Continue with the procedures to create a CMA found in the CMA section of Module 2.
3.2.10 Import and Export Contacts Matrix enables you to import contacts from or export contacts to a .csv file.
To import contacts, click Import from the My Matrix Contacts page.
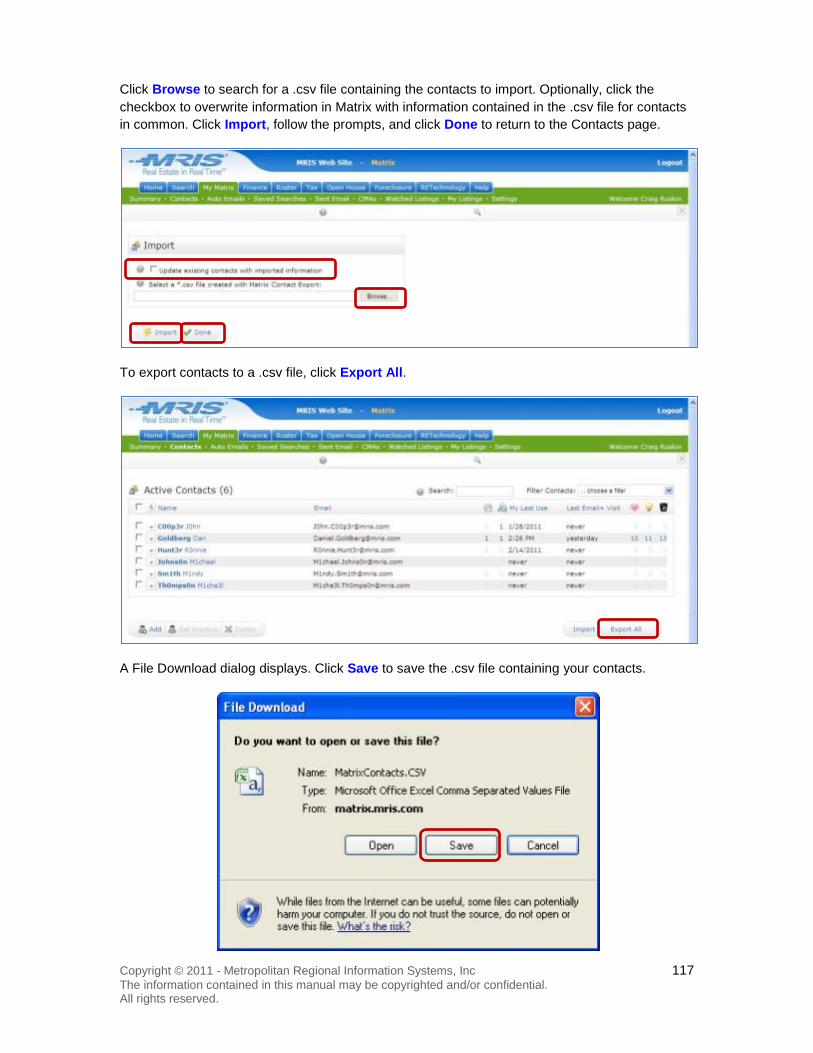
Copyright © 2011 - Metropolitan Regional Information Systems, Inc 117 The information contained in this manual may be copyrighted and/or confidential. All rights reserved.
Click Browse to search for a .csv file containing the contacts to import. Optionally, click the checkbox to overwrite information in Matrix with information contained in the .csv file for contacts in common. Click Import, follow the prompts, and click Done to return to the Contacts page.
To export contacts to a .csv file, click Export All.
A File Download dialog displays. Click Save to save the .csv file containing your contacts.
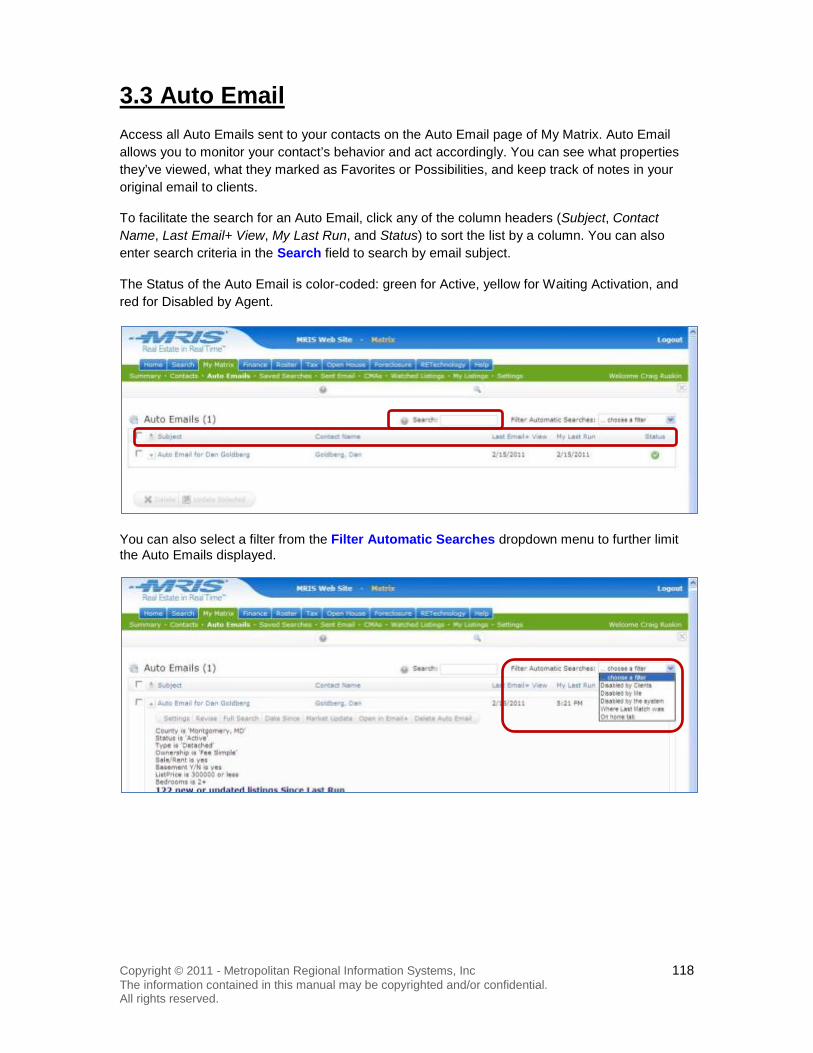
Copyright © 2011 - Metropolitan Regional Information Systems, Inc 118 The information contained in this manual may be copyrighted and/or confidential. All rights reserved.
3.3 Auto Email Access all Auto Emails sent to your contacts on the Auto Email page of My Matrix. Auto Email allows you to monitor your contact’s behavior and act accordingly. You can see what properties they’ve viewed, what they marked as Favorites or Possibilities, and keep track of notes in your original email to clients.
To facilitate the search for an Auto Email, click any of the column headers (Subject, Contact Name, Last Email+ View, My Last Run, and Status) to sort the list by a column. You can also enter search criteria in the Search field to search by email subject.
The Status of the Auto Email is color-coded: green for Active, yellow for Waiting Activation, and red for Disabled by Agent.
You can also select a filter from the Filter Automatic Searches dropdown menu to further limit the Auto Emails displayed.

Copyright © 2011 - Metropolitan Regional Information Systems, Inc 119 The information contained in this manual may be copyrighted and/or confidential. All rights reserved.
3.3.1 Update Auto Email To update an Auto Email, click the checkbox to the left of the email link, then click Update Selected.
The Market Update Options page displays.
Optionally, select one or more Update Types to include specific types of updates you want included in the search (for example, only changes in price, only new listings, etc.).
Select either Use Last Run Date or Specify Update Date/Range radio button. Use Last Run Date performs a search that includes all data after the last time the search was run. To use Specify Update Date/Range, enter a specific date to include updates from that date, or a range of dates to include updates to the search between two dates. Follow the date input instructions displayed on the screen.
Click Run Update to run the updated search.

Copyright © 2011 - Metropolitan Regional Information Systems, Inc 120 The information contained in this manual may be copyrighted and/or confidential. All rights reserved.
3.3.2 Auto Email Action Buttons To view options for a particular Auto Email, click the link for the email, or the arrow icon to the left. Perform actions on the Auto Email by clicking one of the action buttons. The action buttons are the same as the ones that display when expanding an Auto Email in Contacts. For instructions on using the Auto Email action buttons, see the Contact Auto Email section in this module.
3.3.3 Reactivate Auto Email Auto Emails are automatically deactivated when a contact does not open them for 45 days. To reactivate an deactivated email, perform the following procedure.
Step 1: Click Settings.
1
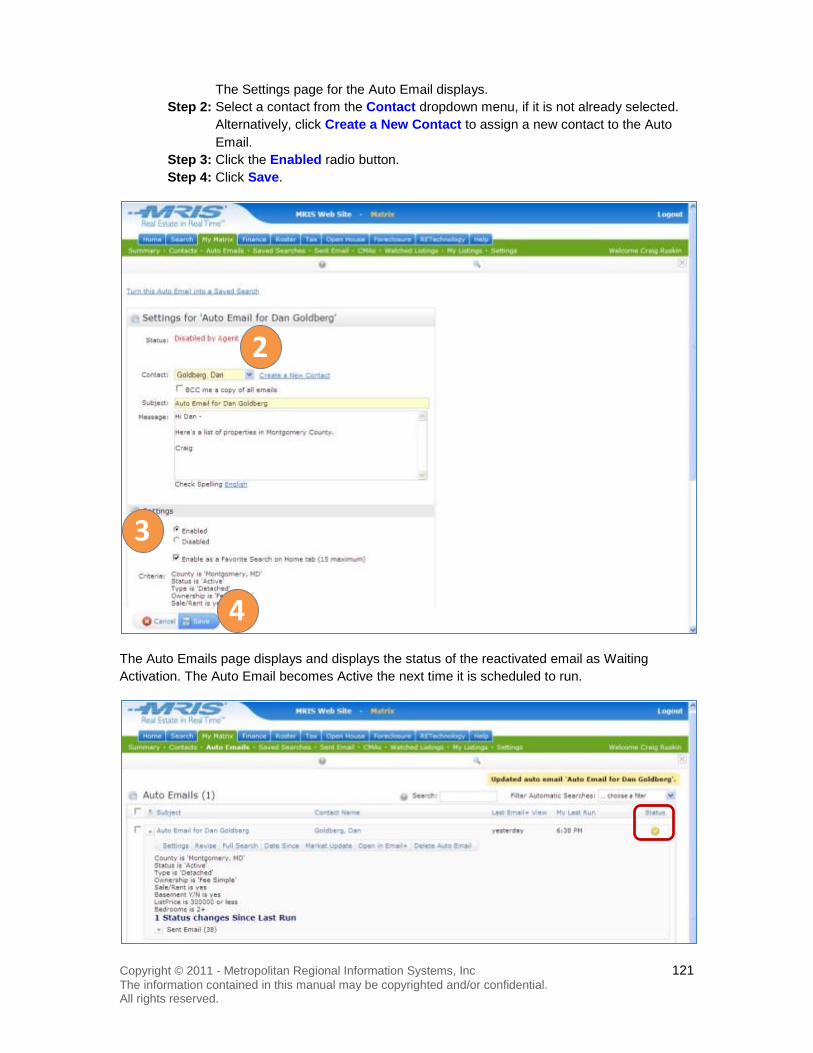
Copyright © 2011 - Metropolitan Regional Information Systems, Inc 121 The information contained in this manual may be copyrighted and/or confidential. All rights reserved.
The Settings page for the Auto Email displays. Step 2: Select a contact from the Contact dropdown menu, if it is not already selected.
Alternatively, click Create a New Contact to assign a new contact to the Auto Email.
Step 3: Click the Enabled radio button. Step 4: Click Save.
The Auto Emails page displays and displays the status of the reactivated email as Waiting Activation. The Auto Email becomes Active the next time it is scheduled to run.
2
3
4

Copyright © 2011 - Metropolitan Regional Information Systems, Inc 122 The information contained in this manual may be copyrighted and/or confidential. All rights reserved.
3.4 Saved Searches Access the searches you have saved on the Saved Searches page of My Matrix.
To facilitate the search for a Saved Search, click any of the column headers (Subject, Contact Name, Description, My Last Run) to sort the list by a column. You can also enter search criteria in the Search field to search by subject.
You can also select a filter from the Filter Saved Searches dropdown menu to further limit the Saved Searches displayed.
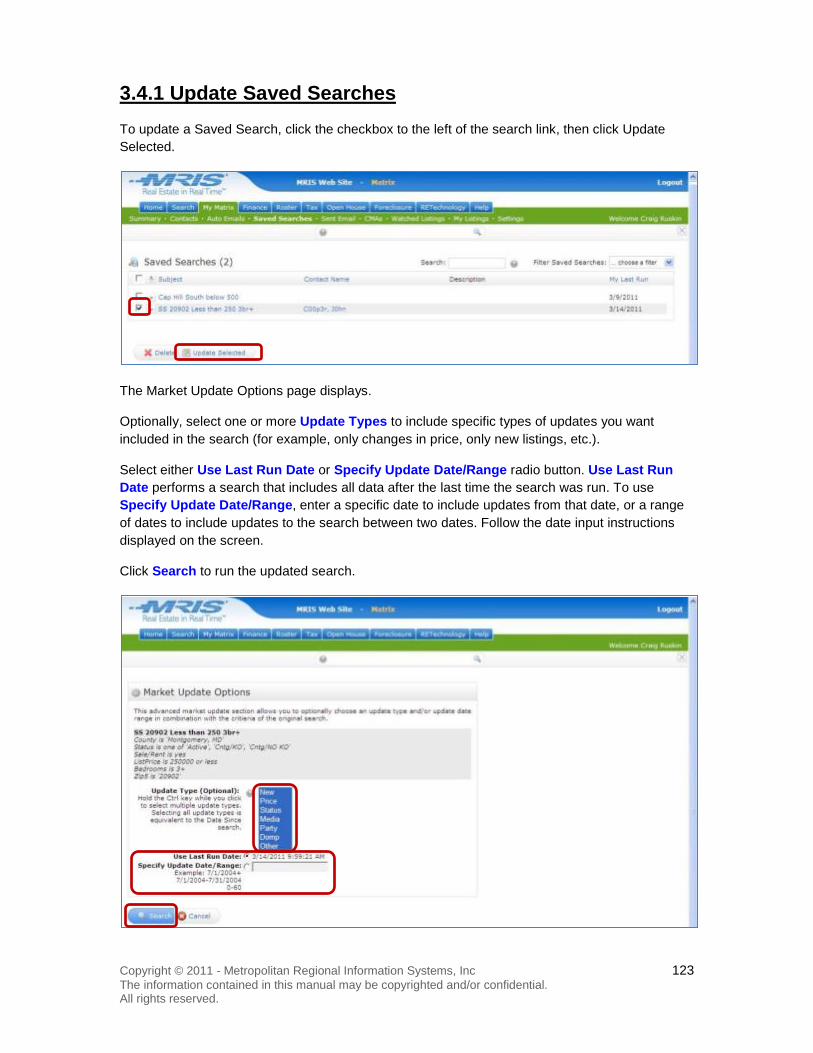
Copyright © 2011 - Metropolitan Regional Information Systems, Inc 123 The information contained in this manual may be copyrighted and/or confidential. All rights reserved.
3.4.1 Update Saved Searches To update a Saved Search, click the checkbox to the left of the search link, then click Update Selected.
The Market Update Options page displays.
Optionally, select one or more Update Types to include specific types of updates you want included in the search (for example, only changes in price, only new listings, etc.).
Select either Use Last Run Date or Specify Update Date/Range radio button. Use Last Run Date performs a search that includes all data after the last time the search was run. To use Specify Update Date/Range, enter a specific date to include updates from that date, or a range of dates to include updates to the search between two dates. Follow the date input instructions displayed on the screen.
Click Search to run the updated search.

Copyright © 2011 - Metropolitan Regional Information Systems, Inc 124 The information contained in this manual may be copyrighted and/or confidential. All rights reserved.
3.4.2 Saved Searches Action Buttons To view options for a particular Saved Search, click the link for the search, or the arrow icon to the left. Perform actions on the Saved Search by clicking one of the action buttons. The action buttons are the same as the ones that display when expanding a Saved Search in Contacts, and similar to the ones that display in Auto Email (on either the My Matrix Contacts page or on My Matrix Auto Email page). For instructions on using the Saved Search action buttons, see the Contact Auto Email section in this module.
Settings for a Saved Search are less complex than the settings for an Auto Email. As applicable, revise the Search Name in the Search Name field, change the contact by selecting another contact from the Contact dropdown menu or click Create a New Contact and follow the prompts to select a new contact for the search, and then click Save to return to the Saved Searches page.

Copyright © 2011 - Metropolitan Regional Information Systems, Inc 125 The information contained in this manual may be copyrighted and/or confidential. All rights reserved.
3.5 Sent Email Access the email you have sent to contacts on the Sent Email page of My Matrix.
To facilitate the search for a Sent Email, click any of the clickable column headers (Date Sent, Recipients Type, Subject, Viewed) to sort the list by a column. You can also enter search criteria in the Search field to search by recipient.
You can also select a filter from the Show Emails sent dropdown menu to further limit the emails that are displayed. Click a link under Contents to display the listings in a search results page.
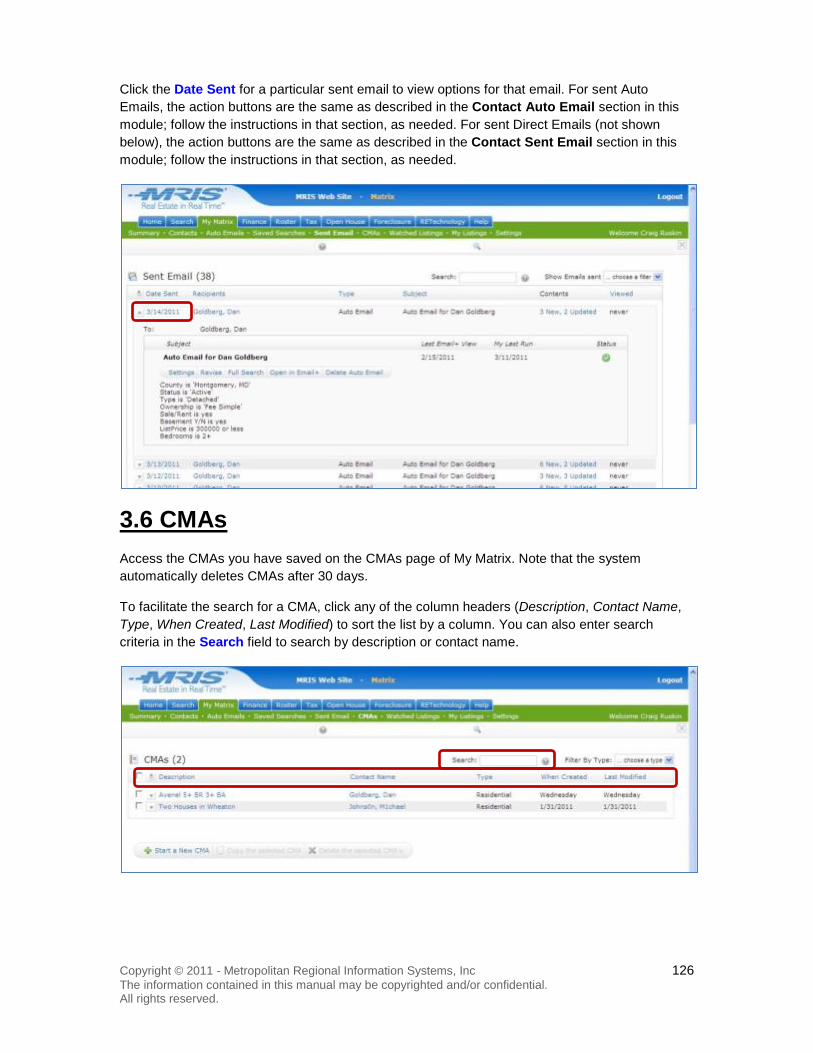
Copyright © 2011 - Metropolitan Regional Information Systems, Inc 126 The information contained in this manual may be copyrighted and/or confidential. All rights reserved.
Click the Date Sent for a particular sent email to view options for that email. For sent Auto Emails, the action buttons are the same as described in the Contact Auto Email section in this module; follow the instructions in that section, as needed. For sent Direct Emails (not shown below), the action buttons are the same as described in the Contact Sent Email section in this module; follow the instructions in that section, as needed.
3.6 CMAs Access the CMAs you have saved on the CMAs page of My Matrix. Note that the system automatically deletes CMAs after 30 days.
To facilitate the search for a CMA, click any of the column headers (Description, Contact Name, Type, When Created, Last Modified) to sort the list by a column. You can also enter search criteria in the Search field to search by description or contact name.
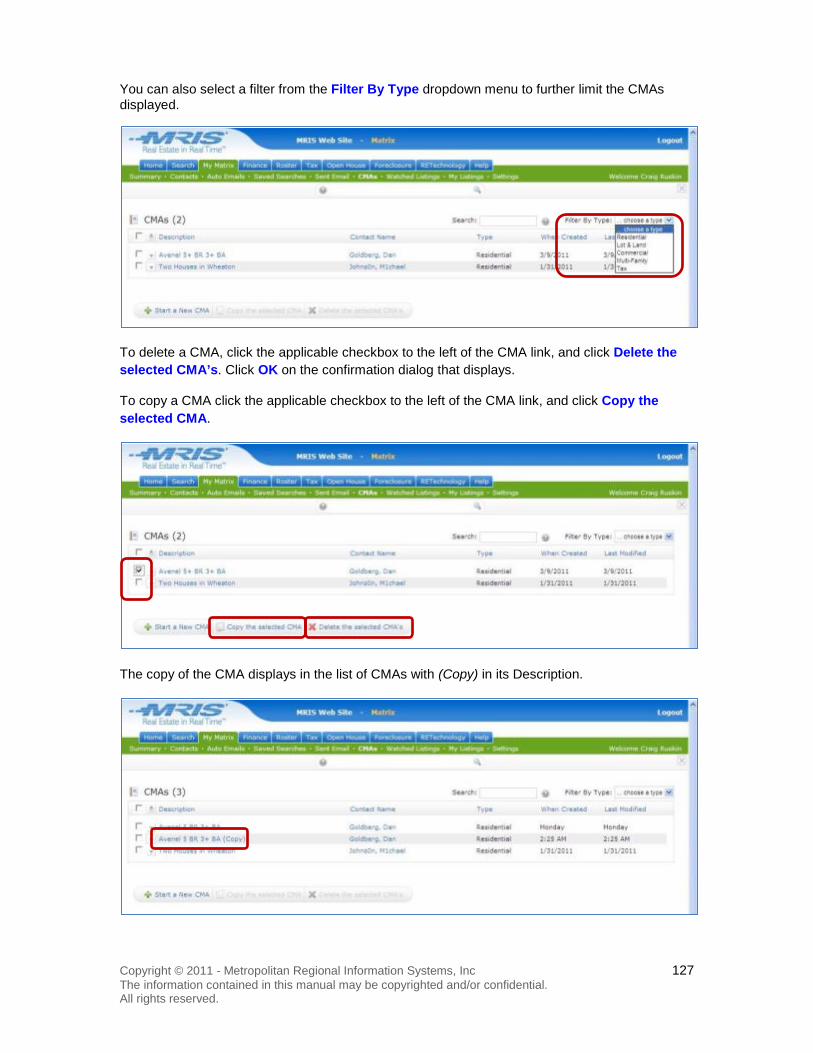
Copyright © 2011 - Metropolitan Regional Information Systems, Inc 127 The information contained in this manual may be copyrighted and/or confidential. All rights reserved.
You can also select a filter from the Filter By Type dropdown menu to further limit the CMAs displayed.
To delete a CMA, click the applicable checkbox to the left of the CMA link, and click Delete the selected CMA’s. Click OK on the confirmation dialog that displays.
To copy a CMA click the applicable checkbox to the left of the CMA link, and click Copy the selected CMA.
The copy of the CMA displays in the list of CMAs with (Copy) in its Description.
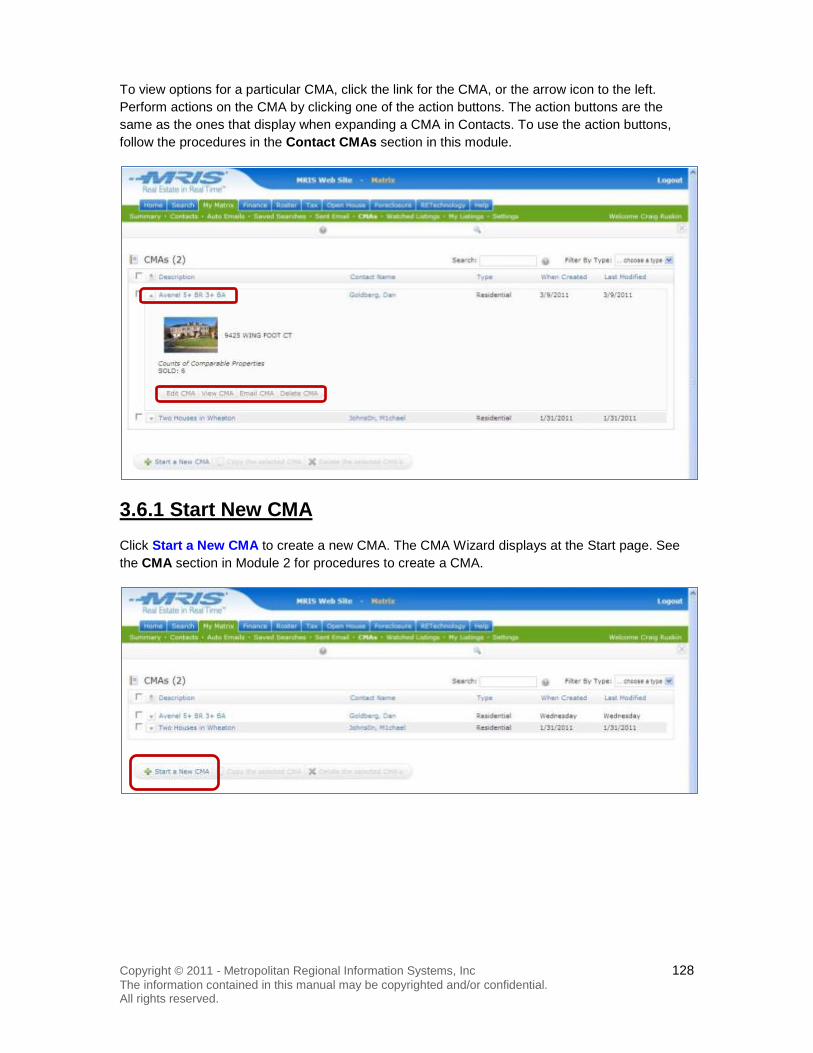
Copyright © 2011 - Metropolitan Regional Information Systems, Inc 128 The information contained in this manual may be copyrighted and/or confidential. All rights reserved.
To view options for a particular CMA, click the link for the CMA, or the arrow icon to the left. Perform actions on the CMA by clicking one of the action buttons. The action buttons are the same as the ones that display when expanding a CMA in Contacts. To use the action buttons, follow the procedures in the Contact CMAs section in this module.
3.6.1 Start New CMA Click Start a New CMA to create a new CMA. The CMA Wizard displays at the Start page. See the CMA section in Module 2 for procedures to create a CMA.
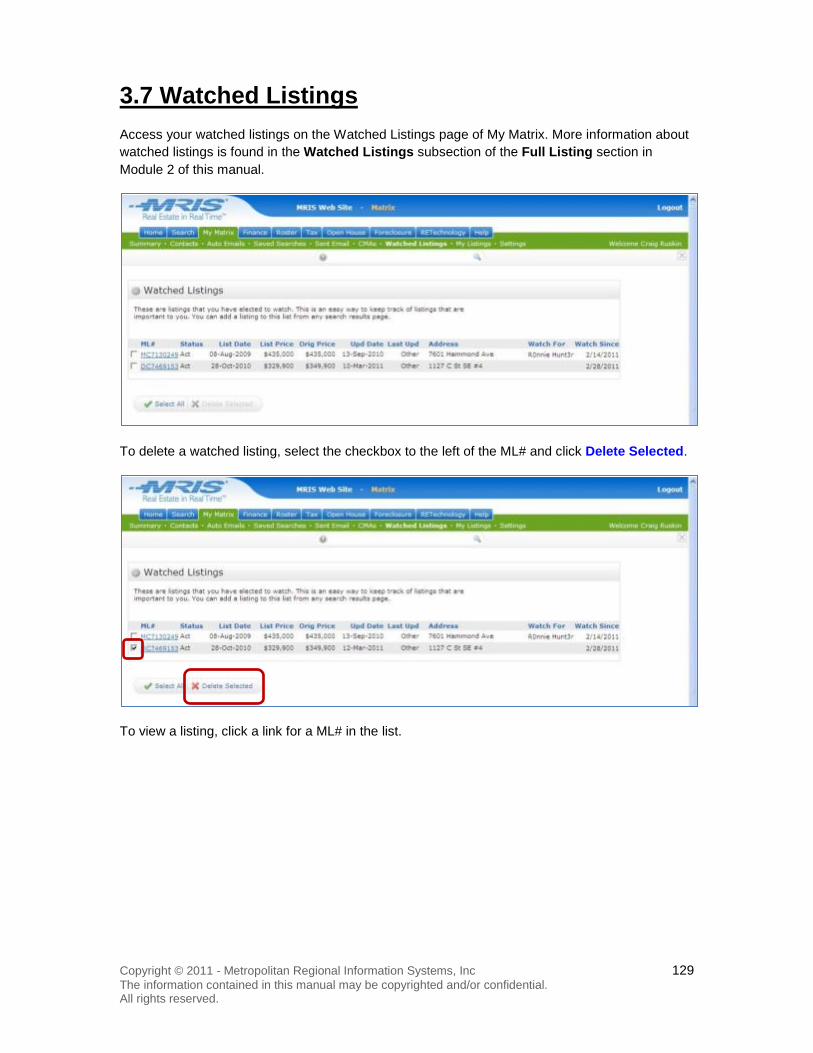
Copyright © 2011 - Metropolitan Regional Information Systems, Inc 129 The information contained in this manual may be copyrighted and/or confidential. All rights reserved.
3.7 Watched Listings Access your watched listings on the Watched Listings page of My Matrix. More information about watched listings is found in the Watched Listings subsection of the Full Listing section in Module 2 of this manual.
To delete a watched listing, select the checkbox to the left of the ML# and click Delete Selected.
To view a listing, click a link for a ML# in the list.
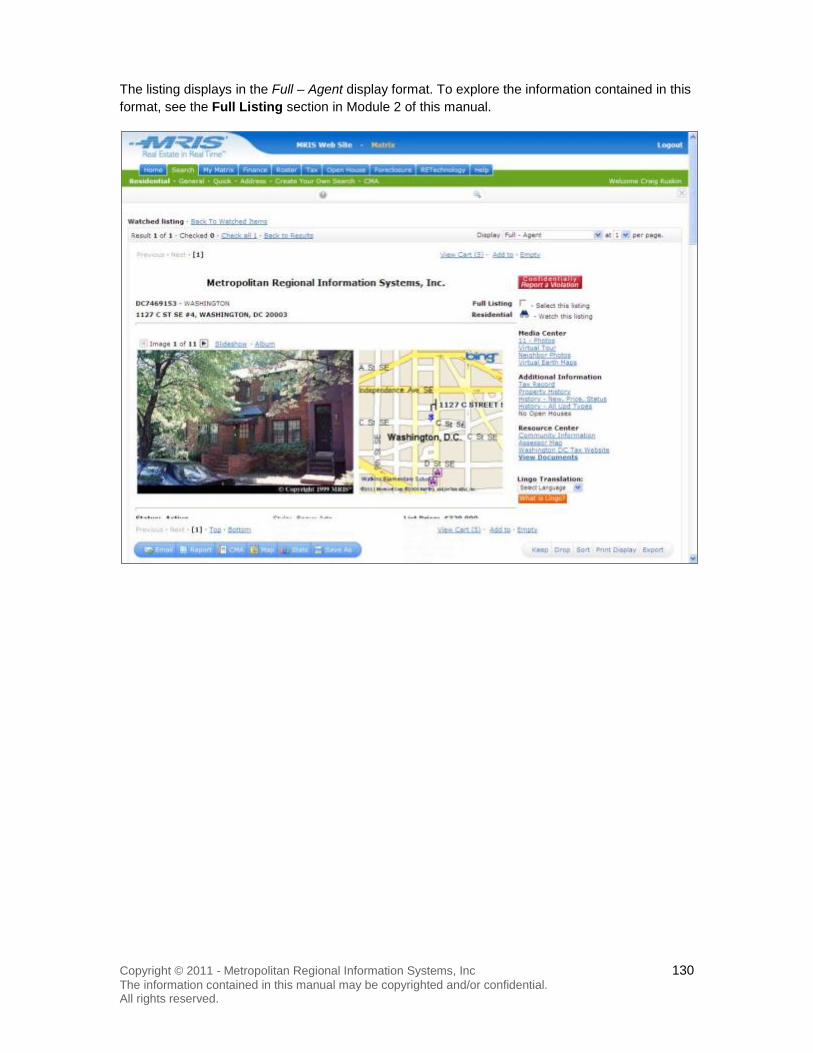
Copyright © 2011 - Metropolitan Regional Information Systems, Inc 130 The information contained in this manual may be copyrighted and/or confidential. All rights reserved.
The listing displays in the Full – Agent display format. To explore the information contained in this format, see the Full Listing section in Module 2 of this manual.
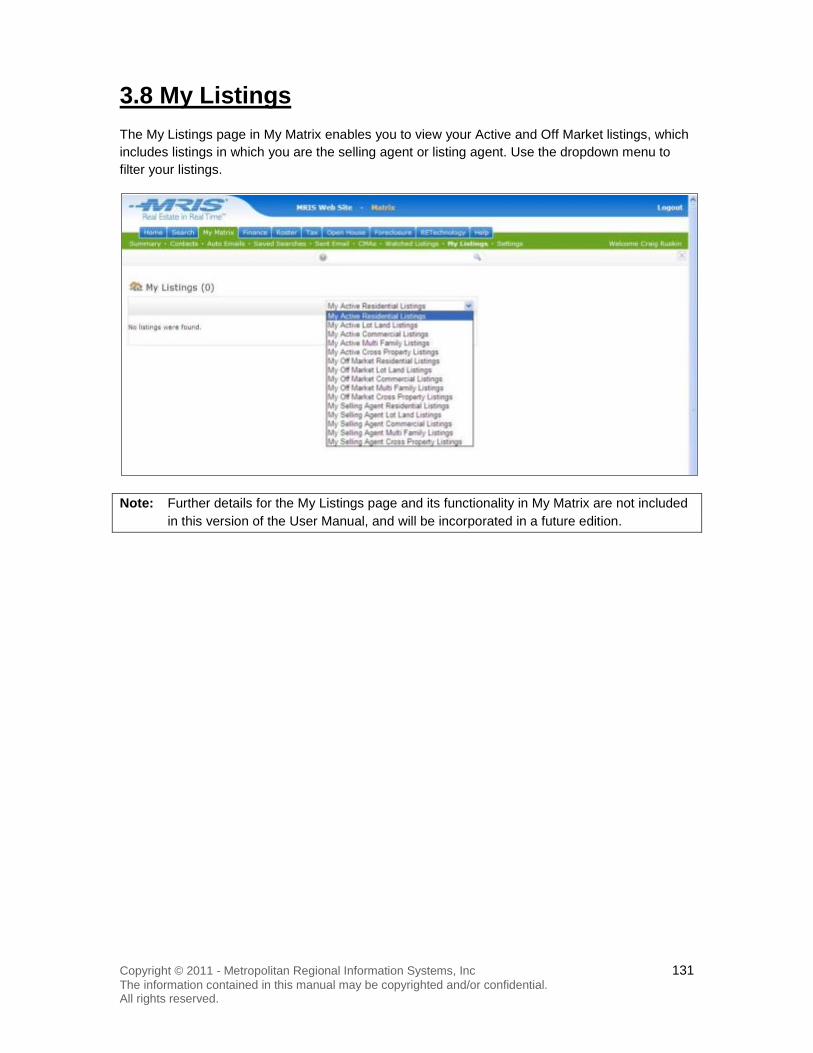
Copyright © 2011 - Metropolitan Regional Information Systems, Inc 131 The information contained in this manual may be copyrighted and/or confidential. All rights reserved.
3.8 My Listings The My Listings page in My Matrix enables you to view your Active and Off Market listings, which includes listings in which you are the selling agent or listing agent. Use the dropdown menu to filter your listings.
Note: Further details for the My Listings page and its functionality in My Matrix are not included in this version of the User Manual, and will be incorporated in a future edition.
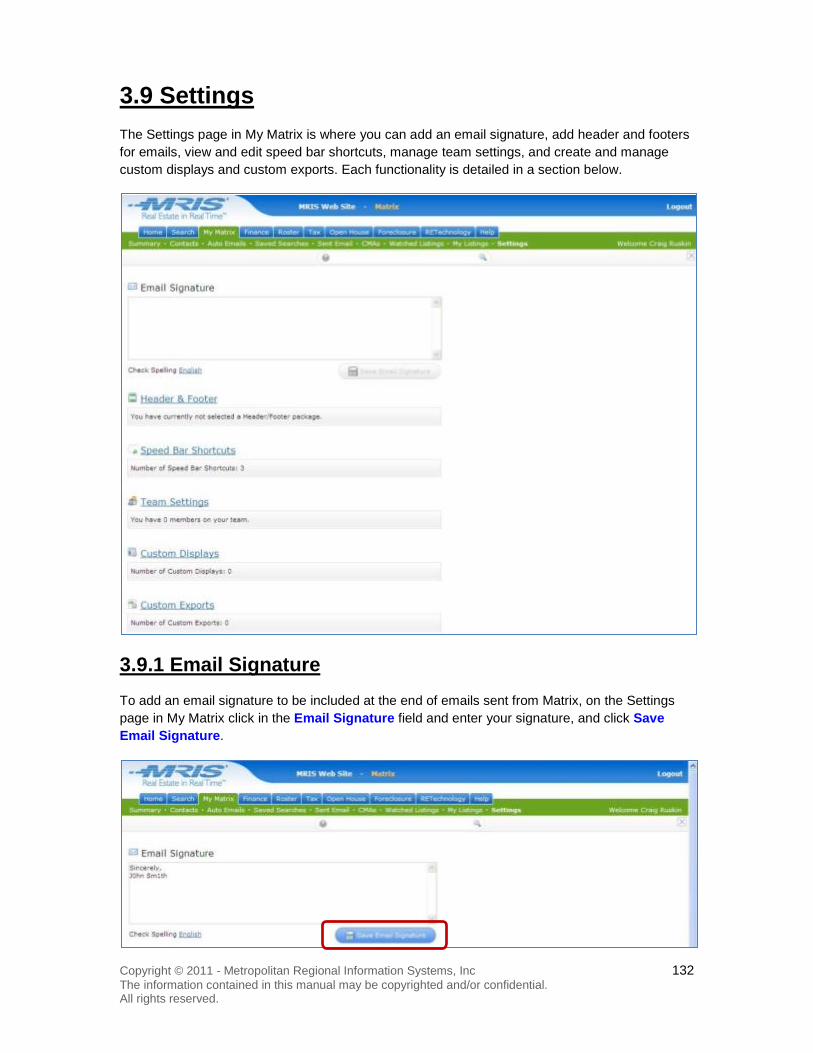
Copyright © 2011 - Metropolitan Regional Information Systems, Inc 132 The information contained in this manual may be copyrighted and/or confidential. All rights reserved.
3.9 Settings The Settings page in My Matrix is where you can add an email signature, add header and footers for emails, view and edit speed bar shortcuts, manage team settings, and create and manage custom displays and custom exports. Each functionality is detailed in a section below.
3.9.1 Email Signature To add an email signature to be included at the end of emails sent from Matrix, on the Settings page in My Matrix click in the Email Signature field and enter your signature, and click Save Email Signature.
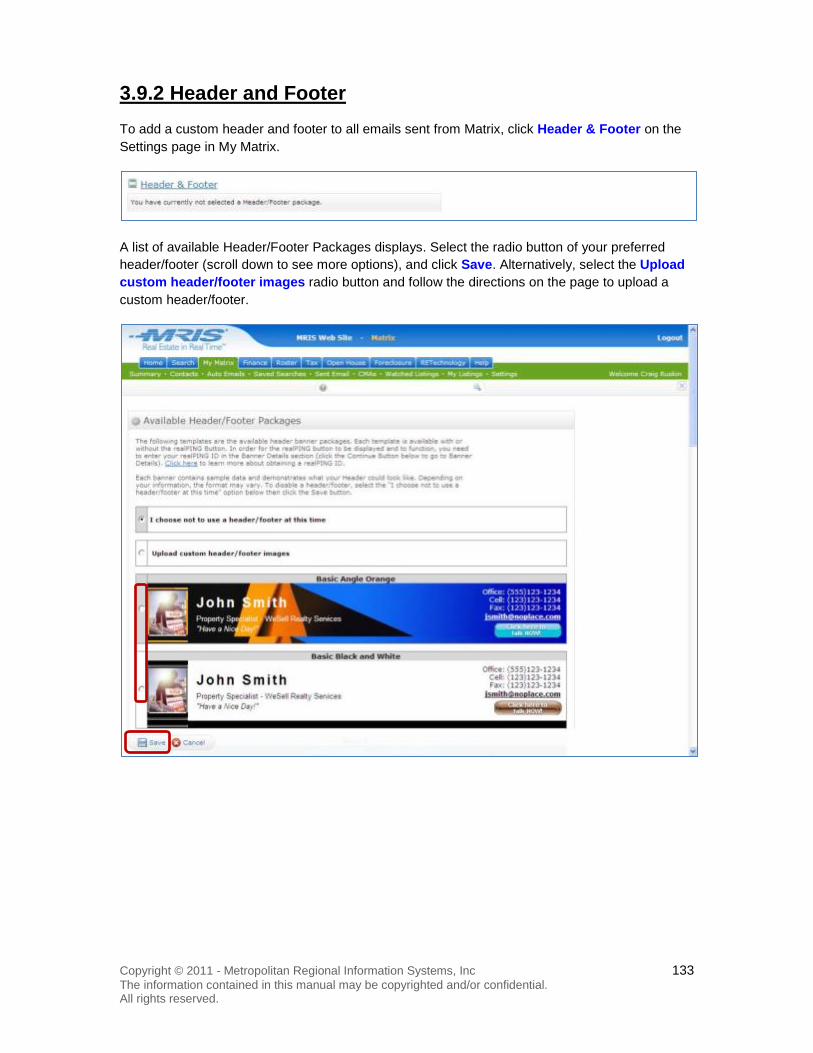
Copyright © 2011 - Metropolitan Regional Information Systems, Inc 133 The information contained in this manual may be copyrighted and/or confidential. All rights reserved.
3.9.2 Header and Footer To add a custom header and footer to all emails sent from Matrix, click Header & Footer on the Settings page in My Matrix.
A list of available Header/Footer Packages displays. Select the radio button of your preferred header/footer (scroll down to see more options), and click Save. Alternatively, select the Upload custom header/footer images radio button and follow the directions on the page to upload a custom header/footer.

Copyright © 2011 - Metropolitan Regional Information Systems, Inc 134 The information contained in this manual may be copyrighted and/or confidential. All rights reserved.
3.9.3 Manage Speed Bar Shortcuts To manage the Speed Bar Shortcuts you have created, click Speed Bar Shortcuts on the Settings page in My Matrix.
Speed Bar Shortcuts are detailed in Speed Bar section of Module 1 of this manual. To delete a Speed Bar Shortcut, click the checkbox to the left of the Shortcut link, and click Delete. To modify a Speed Bar Shortcut, click its link.
The search page displays with the current search criteria for the shortcut. Modify the shortcut by changing the criteria for the search using the procedures in the Perform a Search section of Module 2 in this manual.

Copyright © 2011 - Metropolitan Regional Information Systems, Inc 135 The information contained in this manual may be copyrighted and/or confidential. All rights reserved.
3.9.4 Team Settings To manage Matrix team settings, click Team Settings on the Settings page in My Matrix
The Team Settings page displays.
Note: Further details for the Team Settings page and its functionality in My Matrix have not been updated since the last version of the User Manual. An edited version of the information used in the last version of the manual appears below and contains some images from a prior version of Matrix. Updated Team Settings procedures will be incorporated in a future edition of this manual.
About Matrix Teams
Many agents work as part of a real estate team. Teams may consist of two or more agents watching each other’s business while on vacation or groups of agents who work as a team. There are many different descriptions of teams. The Matrix Teams functionality will make it possible for you to add other agents to your team, and also make it possible for another agent to add you to their team.
Team Notification on the Home Page A notification displays on the Matrix Home page to let Team Owners see how many people are members of the team. Click Manage Team Settings beneath the notification to navigate to the Team Settings page in My Matrix.
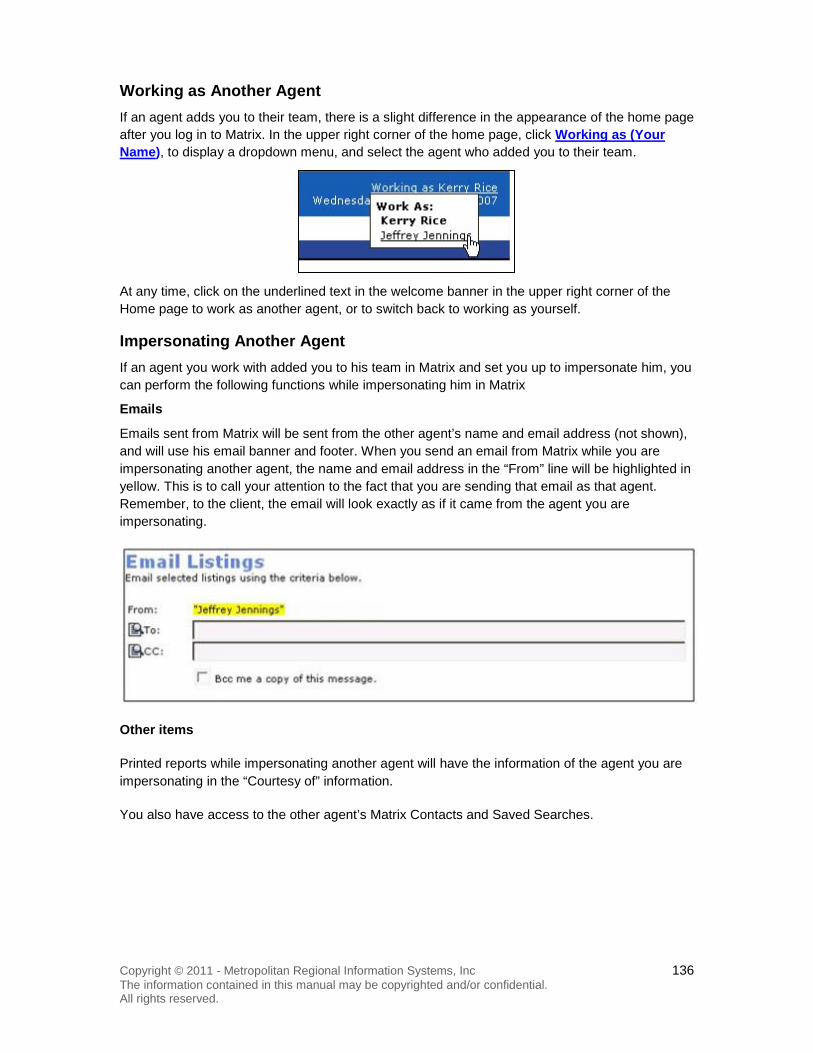
Copyright © 2011 - Metropolitan Regional Information Systems, Inc 136 The information contained in this manual may be copyrighted and/or confidential. All rights reserved.
Working as Another Agent If an agent adds you to their team, there is a slight difference in the appearance of the home page after you log in to Matrix. In the upper right corner of the home page, click Working as (Your Name), to display a dropdown menu, and select the agent who added you to their team.
At any time, click on the underlined text in the welcome banner in the upper right corner of the Home page to work as another agent, or to switch back to working as yourself.
Impersonating Another Agent If an agent you work with added you to his team in Matrix and set you up to impersonate him, you can perform the following functions while impersonating him in Matrix
Emails
Emails sent from Matrix will be sent from the other agent’s name and email address (not shown), and will use his email banner and footer. When you send an email from Matrix while you are impersonating another agent, the name and email address in the “From” line will be highlighted in yellow. This is to call your attention to the fact that you are sending that email as that agent. Remember, to the client, the email will look exactly as if it came from the agent you are impersonating.
Other items
Printed reports while impersonating another agent will have the information of the agent you are impersonating in the “Courtesy of” information.
You also have access to the other agent’s Matrix Contacts and Saved Searches.

Copyright © 2011 - Metropolitan Regional Information Systems, Inc 137 The information contained in this manual may be copyrighted and/or confidential. All rights reserved.
Choosing the individual or Team name when Printing from Matrix
An option is available to email as an individual or team name when impersonating the team. Click the Allow Team Members the option of switching between their own names and the Team Name when printing and emailing to Team Contacts checkbox. This option will only affect teams for which the team owner has set up a Team name in Matrix.
To allow team members the option to choose between their own individual name or the Team name, select the I impersonate this Team radio button and click the Allow Team Members the option of switching between their own names and the Team Name when printing and emailing to Team Contacts checkbox.
Note: This option does not apply when the user selects the Print Display button.
Working on Behalf of another Agent
If an agent you work with added you to their team in Matrix and set you up to work on behalf of him/her, you are able to send Emails from Matrix. However, the email contains your name and email address (not shown) on his behalf, and uses your email banner and footer (if you have chosen one) and email signature (see graphic below).
You also have access to the following:
Print reports (any reports that you print while working on behalf of another agent will indicate that they were printed by you on behalf of the other agent, Matrix Contacts and any Saved Searches.
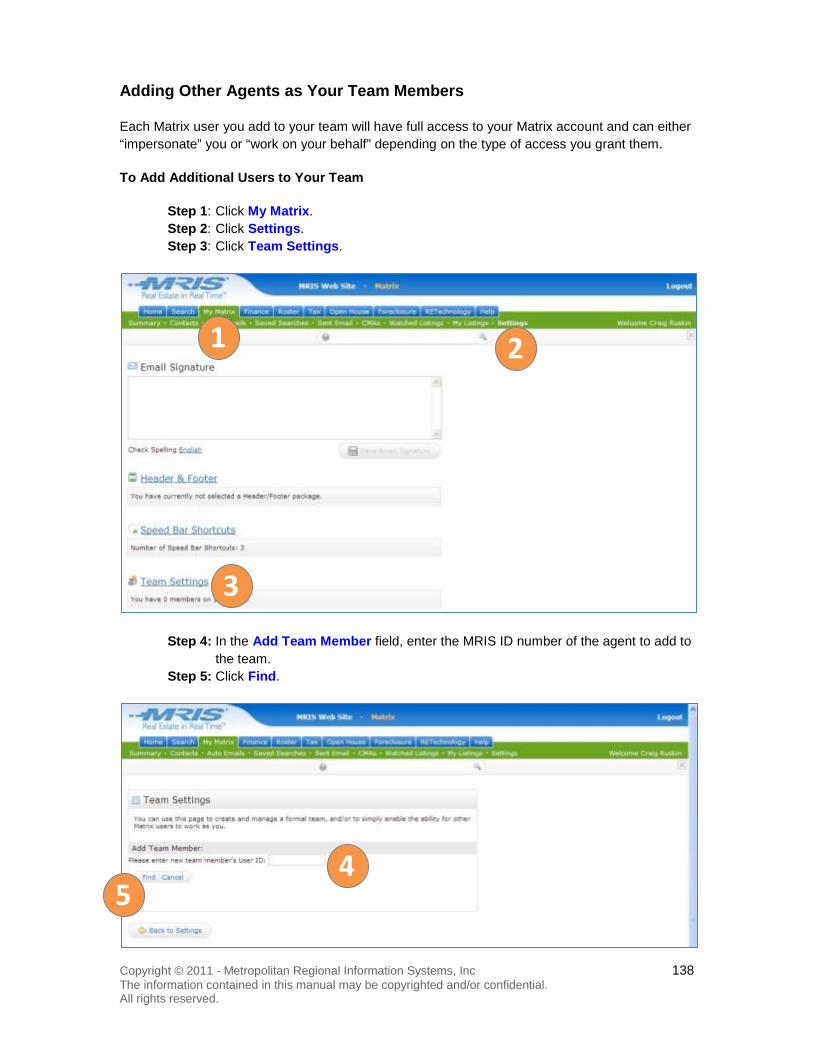
Copyright © 2011 - Metropolitan Regional Information Systems, Inc 138 The information contained in this manual may be copyrighted and/or confidential. All rights reserved.
Adding Other Agents as Your Team Members
Each Matrix user you add to your team will have full access to your Matrix account and can either “impersonate” you or “work on your behalf” depending on the type of access you grant them.
To Add Additional Users to Your Team
Step 1: Click My Matrix. Step 2: Click Settings. Step 3: Click Team Settings.
Step 4: In the Add Team Member field, enter the MRIS ID number of the agent to add to the team.
Step 5: Click Find.
1 2
3
4 5

Copyright © 2011 - Metropolitan Regional Information Systems, Inc 139 The information contained in this manual may be copyrighted and/or confidential. All rights reserved.
Step 6: You can choose whether to have the team member impersonate your or work on behalf of you. Matrix automatically defaults to the “impersonate” role. If you want to have the team member instead work on behalf of you, you must select the Have this team member Work on Behalf of Me radio button.
Step 7: Click Add.
6
7

Copyright © 2011 - Metropolitan Regional Information Systems, Inc 140 The information contained in this manual may be copyrighted and/or confidential. All rights reserved.
The team settings page displays with the added enabled team member with the selected role.
Click Edit to change the role you gave this team member.
To delete a team member, click the checkbox for the team member and click the Delete.
To add a team name, click in the My team/doing business as name (optional) field, enter the team name, and click OK.
Temporarily Disabling Your Team
To temporarily disable your team, navigate to Team Settings using Steps 1 through 3 of the Adding Other Agents as Your Team Members procedure in this section, and click Click here if you wish to disable this team function. A confirmation page displays.

Copyright © 2011 - Metropolitan Regional Information Systems, Inc 141 The information contained in this manual may be copyrighted and/or confidential. All rights reserved.
3.9.5 Custom Displays
Note: Procedures and uses for the Custom Displays page and its functionality in My Matrix have not been fully detailed. The following provides navigation and rudimentary steps.
To customize the way fields display on pages in Matrix, click Custom Displays on the Settings page in My Matrix.
The Manage Customs Displays page displays. Select a table type from the Table Type dropdown menu, select a table from the Table dropdown menu, and click Add.
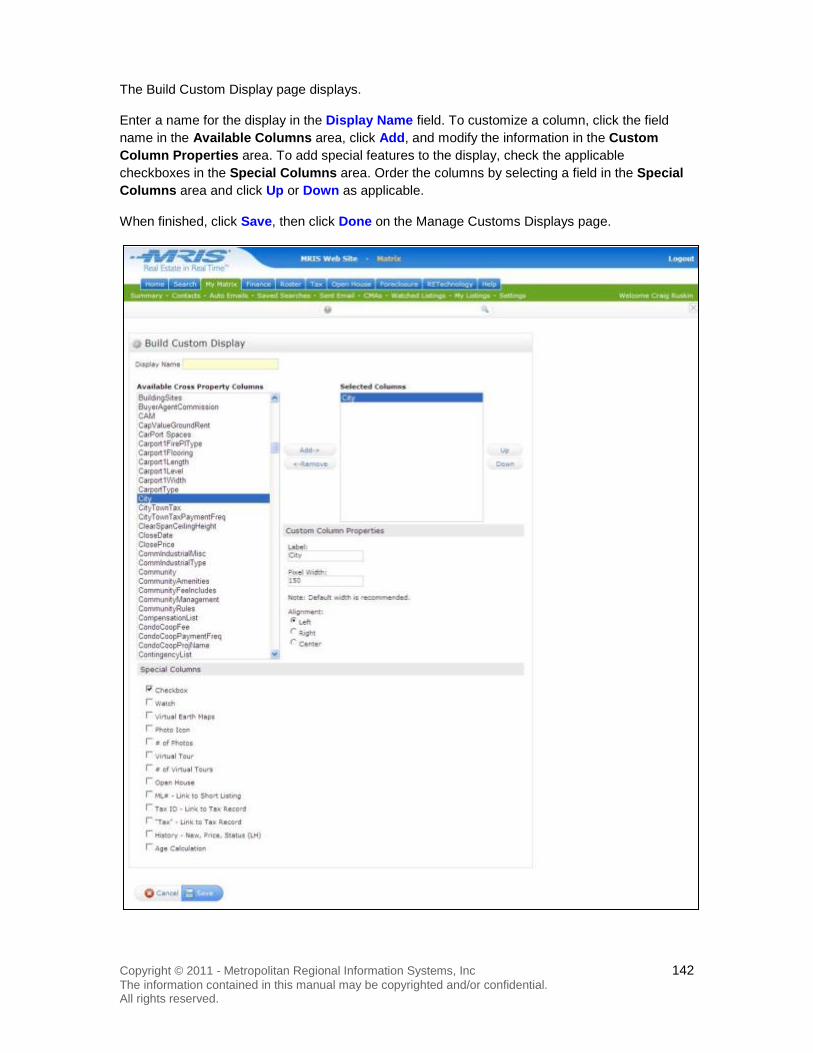
Copyright © 2011 - Metropolitan Regional Information Systems, Inc 142 The information contained in this manual may be copyrighted and/or confidential. All rights reserved.
The Build Custom Display page displays.
Enter a name for the display in the Display Name field. To customize a column, click the field name in the Available Columns area, click Add, and modify the information in the Custom Column Properties area. To add special features to the display, check the applicable checkboxes in the Special Columns area. Order the columns by selecting a field in the Special Columns area and click Up or Down as applicable.
When finished, click Save, then click Done on the Manage Customs Displays page.

Copyright © 2011 - Metropolitan Regional Information Systems, Inc 143 The information contained in this manual may be copyrighted and/or confidential. All rights reserved.
3.9.6 Custom Export
Note: Procedures and uses for the Custom Export page and its functionality in My Matrix have not been fully detailed. The following provides navigation and rudimentary steps.
To customize the way listings data is exported in Matrix, click Custom Export on the Settings page in My Matrix.
The Manage Customs Exports page displays. Select a table type from the Table Type dropdown menu, select a table from the Table dropdown menu, and click Add Export.
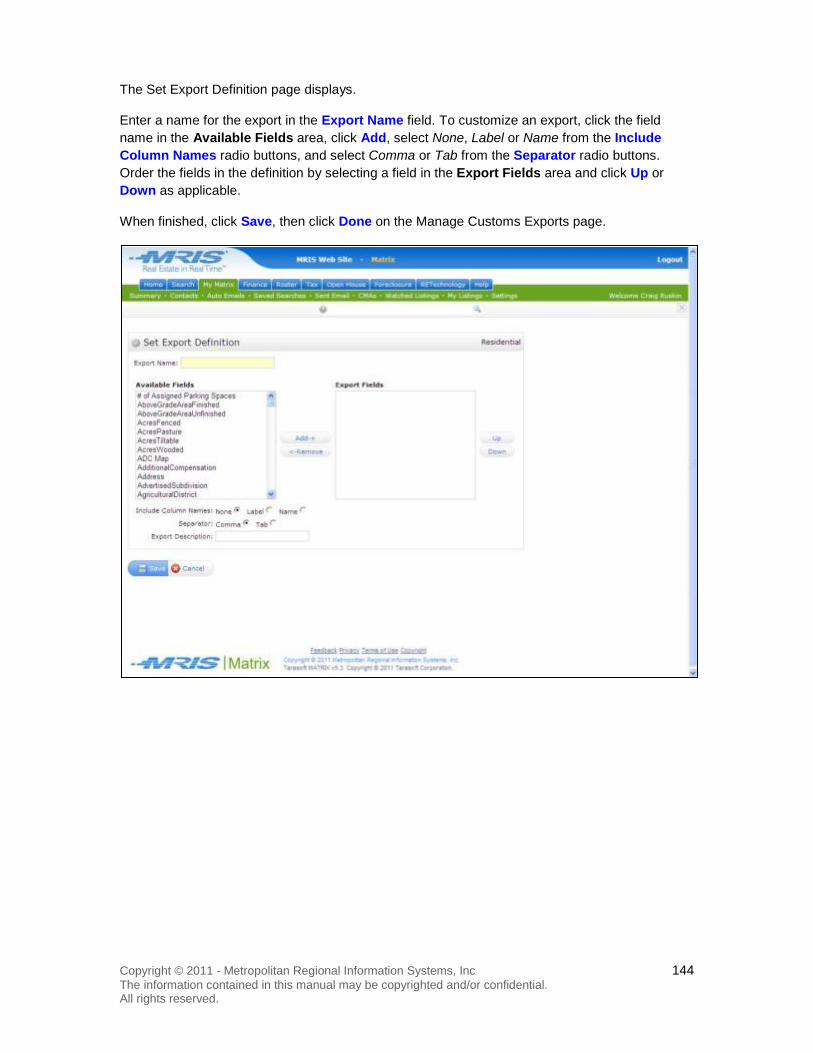
Copyright © 2011 - Metropolitan Regional Information Systems, Inc 144 The information contained in this manual may be copyrighted and/or confidential. All rights reserved.
The Set Export Definition page displays.
Enter a name for the export in the Export Name field. To customize an export, click the field name in the Available Fields area, click Add, select None, Label or Name from the Include Column Names radio buttons, and select Comma or Tab from the Separator radio buttons. Order the fields in the definition by selecting a field in the Export Fields area and click Up or Down as applicable.
When finished, click Save, then click Done on the Manage Customs Exports page.

Copyright © 2011 - Metropolitan Regional Information Systems, Inc 145 The information contained in this manual may be copyrighted and/or confidential. All rights reserved.
Module 4 – Finance As a Realtor® you may play the role of trusted advisor, attorney, appraiser, best friend, or inspector. But in reality, the only role you’re licensed for is that of a real estate agent. In an effort to be the best agent you can be, you probably ensure your clients are armed with enough information to be comfortable with any transaction.
The Financial Tab has several calculators that may enrich your client’s knowledge and comfort with the home buying process. The calculators cover home and personal financing, investment and retirement. Navigate to this resource by clicking Finance, and click a link to display a calculator.

Copyright © 2011 - Metropolitan Regional Information Systems, Inc 146 The information contained in this manual may be copyrighted and/or confidential. All rights reserved.
Module 5 – Roster The Roster page serves as a convenient tool to help you find other agents by name or by office. Through the Roster, an agent can be emailed directly from Matrix without looking up the contact information in another email program. Office contact information is also available in the Roster.
5.1 Search for Agent To search for an agent, perform the following procedure.
Step 1: Click Roster. Step 2: Click Search for Agent.
The Search for Agent Search page displays. Step 3: Enter search criteria in the Agent ID, Last Name, First Name, Nickname,
Company Name and/or Broker Code fields. Step 4: Click Search.
1
2
3
4

Copyright © 2011 - Metropolitan Regional Information Systems, Inc 147 The information contained in this manual may be copyrighted and/or confidential. All rights reserved.
The search results display.
1

Copyright © 2011 - Metropolitan Regional Information Systems, Inc 148 The information contained in this manual may be copyrighted and/or confidential. All rights reserved.
5.2 Email Agent To email an agent after obtaining their record the search results, continue with this procedure.
Step 1: Click the name of the agent to email. (See previous page.) Step 2: Click Email Agent.
Your default email server client will display a blank email to be sent. The agent’s email information auto-populates the “To:” line
Step 3: Create the email as you normally would in your email client. In most email clients, you enter the Subject line, type the message, and click Send.
2
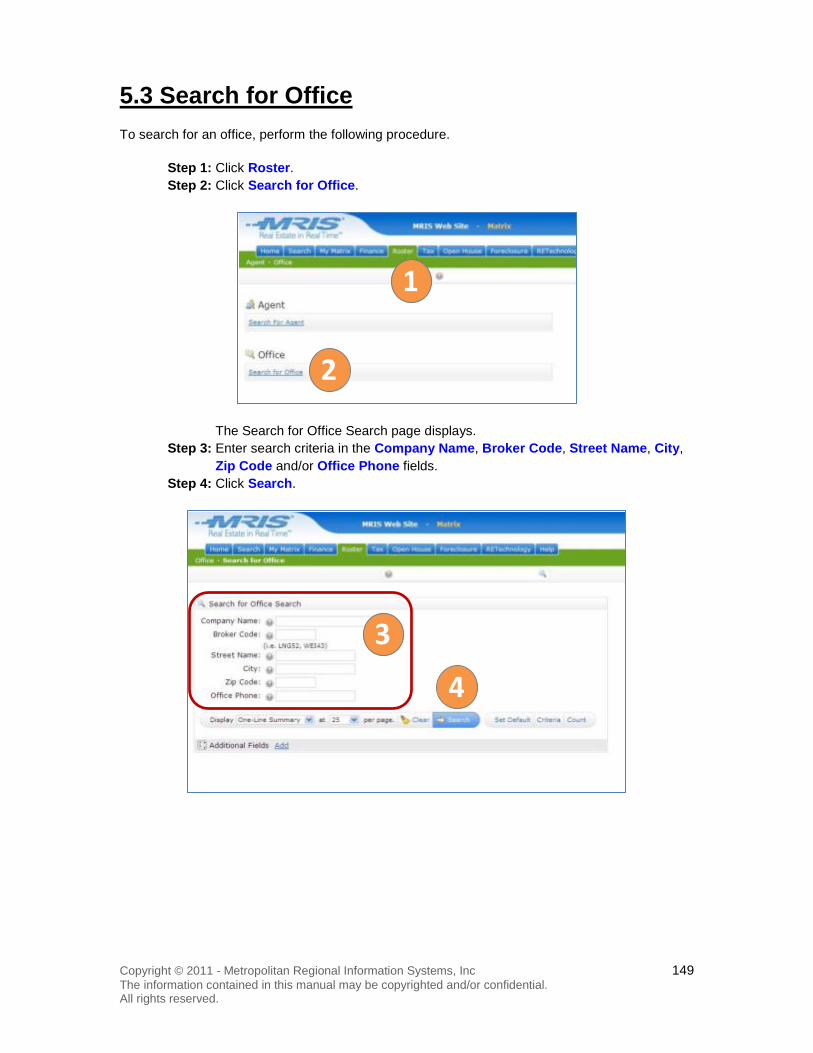
Copyright © 2011 - Metropolitan Regional Information Systems, Inc 149 The information contained in this manual may be copyrighted and/or confidential. All rights reserved.
5.3 Search for Office To search for an office, perform the following procedure.
Step 1: Click Roster. Step 2: Click Search for Office.
The Search for Office Search page displays. Step 3: Enter search criteria in the Company Name, Broker Code, Street Name, City,
Zip Code and/or Office Phone fields. Step 4: Click Search.
1
2
3
4
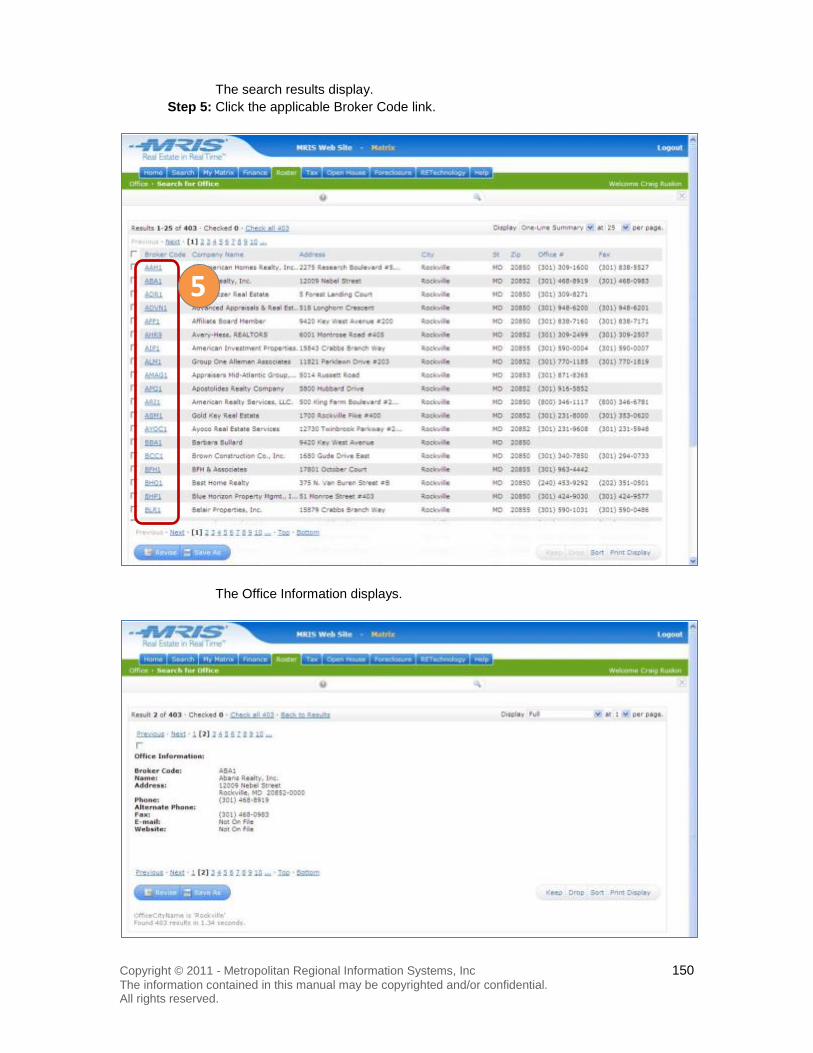
Copyright © 2011 - Metropolitan Regional Information Systems, Inc 150 The information contained in this manual may be copyrighted and/or confidential. All rights reserved.
The search results display. Step 5: Click the applicable Broker Code link.
The Office Information displays.
5

Copyright © 2011 - Metropolitan Regional Information Systems, Inc 151 The information contained in this manual may be copyrighted and/or confidential. All rights reserved.
Module 6 – Tax The Tax page enables you to search for tax records via five different tax search types.
The General search page enables you to search for properties using the County, Tax ID, Absentee Owner, Lot Acreage, Plat Folio, Plat Liber and Year Built fields, among others.
The Quick search page enables you to search by County, TaxID/Account/Ticket or Map Search fields.
The Address (Property) search page enables you to search by the Property Address.
The Address (Mailing) search enables you to search by the Owner’s Mailing Address fields.
The Create Your Own Search search page contains just two fields, County and Map Search. Add additional fields to customize the search. Fields added to a search page remain on the search page for future searches until they are removed.
All tax searches, regardless of search type and search type follow the same basic steps:
First, navigate to the search page and specify search criteria. Optionally, add and remove additional criteria, select a map, customize the way search results display, and check criteria and counts. After inputting criteria, click Search to enact the search. Optionally, save the search.
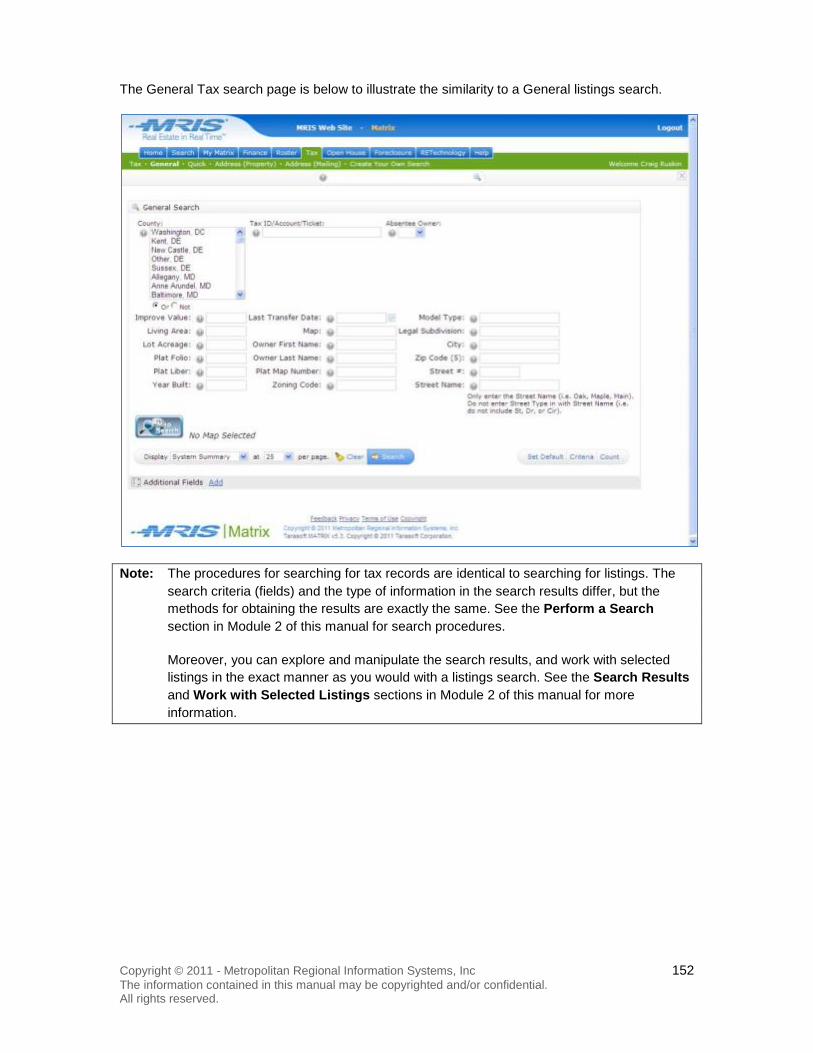
Copyright © 2011 - Metropolitan Regional Information Systems, Inc 152 The information contained in this manual may be copyrighted and/or confidential. All rights reserved.
The General Tax search page is below to illustrate the similarity to a General listings search.
Note: The procedures for searching for tax records are identical to searching for listings. The search criteria (fields) and the type of information in the search results differ, but the methods for obtaining the results are exactly the same. See the Perform a Search section in Module 2 of this manual for search procedures.
Moreover, you can explore and manipulate the search results, and work with selected listings in the exact manner as you would with a listings search. See the Search Results and Work with Selected Listings sections in Module 2 of this manual for more information.

Copyright © 2011 - Metropolitan Regional Information Systems, Inc 153 The information contained in this manual may be copyrighted and/or confidential. All rights reserved.
Module 7 – Open House The Open House page enables you to search for open houses using two search types.
The General search page enables you to search for properties using the same search criteria found in General Residential listings searches.
The Quick/Address search page enables you to search using the same search criteria found in Address Residential listings searches, plus some extra fields pertaining to open houses.
All open house searches, regardless of search type and search type follow the same basic steps:
First, navigate to the search page and specify search criteria. Optionally, add and remove additional criteria, select a map, customize the way search results display, and check criteria and counts. After inputting criteria, click Search to enact the search. Optionally, save the search.
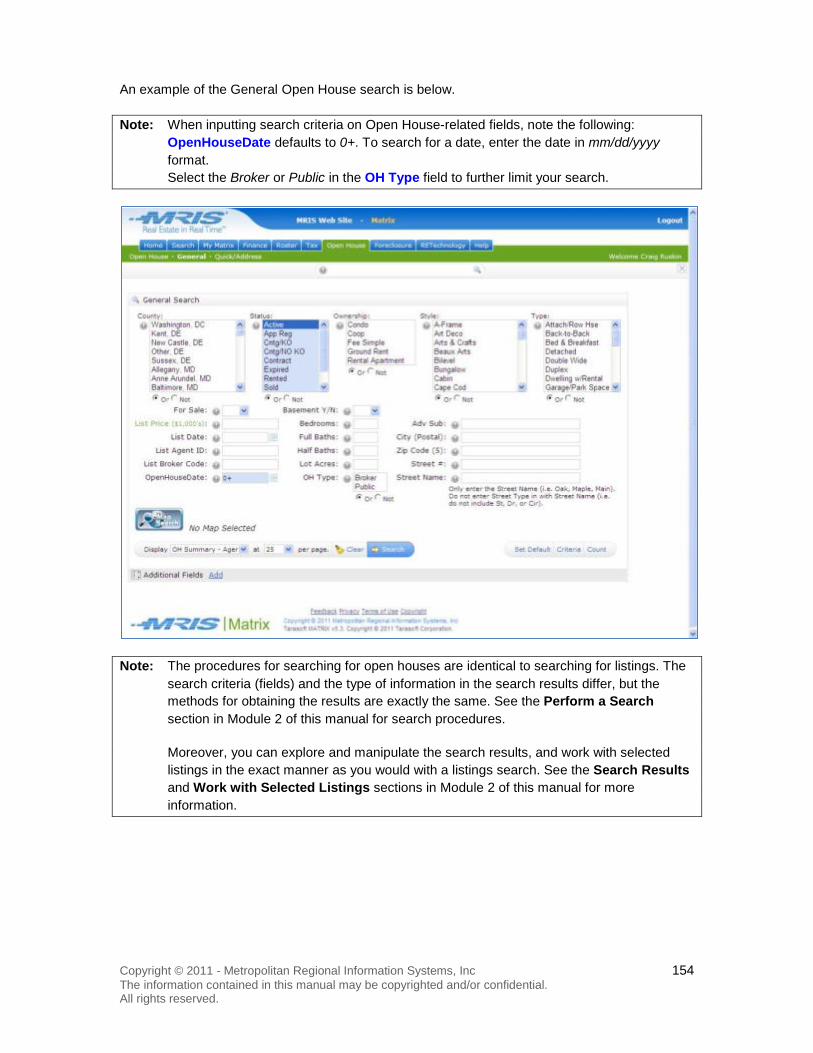
Copyright © 2011 - Metropolitan Regional Information Systems, Inc 154 The information contained in this manual may be copyrighted and/or confidential. All rights reserved.
An example of the General Open House search is below.
Note: When inputting search criteria on Open House-related fields, note the following: OpenHouseDate defaults to 0+. To search for a date, enter the date in mm/dd/yyyy
format. Select the Broker or Public in the OH Type field to further limit your search.
Note: The procedures for searching for open houses are identical to searching for listings. The search criteria (fields) and the type of information in the search results differ, but the methods for obtaining the results are exactly the same. See the Perform a Search section in Module 2 of this manual for search procedures.
Moreover, you can explore and manipulate the search results, and work with selected listings in the exact manner as you would with a listings search. See the Search Results and Work with Selected Listings sections in Module 2 of this manual for more information.
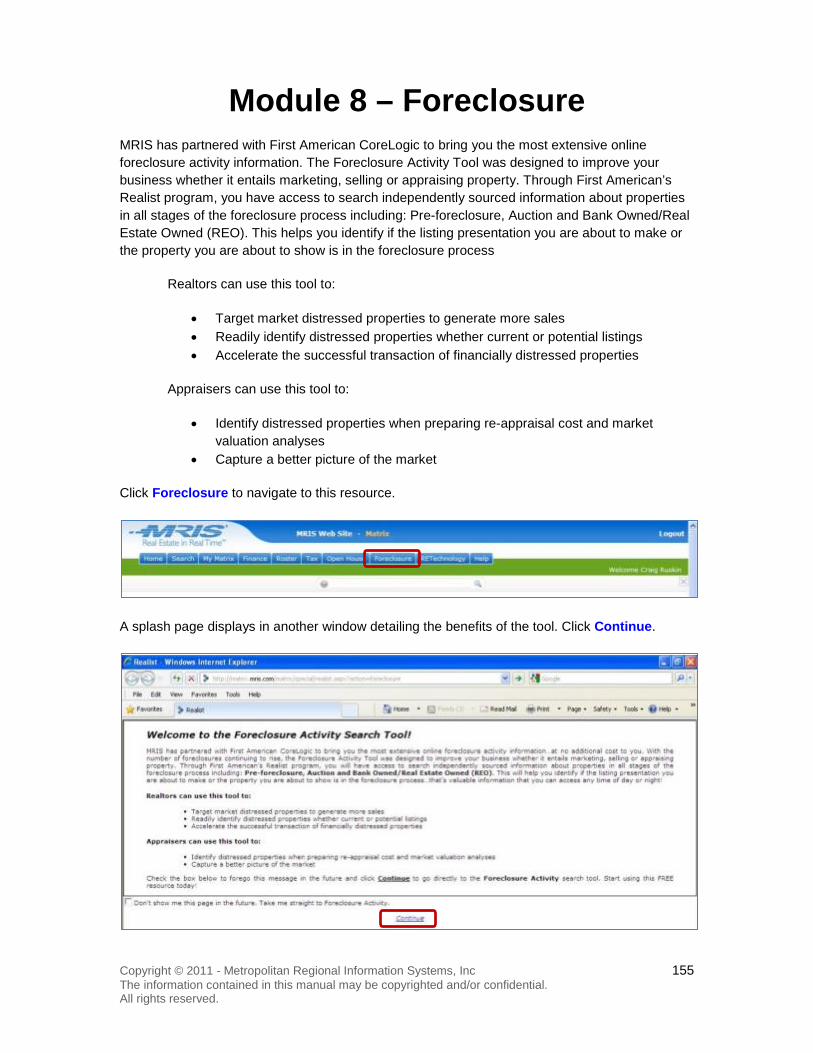
Copyright © 2011 - Metropolitan Regional Information Systems, Inc 155 The information contained in this manual may be copyrighted and/or confidential. All rights reserved.
Module 8 – Foreclosure MRIS has partnered with First American CoreLogic to bring you the most extensive online foreclosure activity information. The Foreclosure Activity Tool was designed to improve your business whether it entails marketing, selling or appraising property. Through First American’s Realist program, you have access to search independently sourced information about properties in all stages of the foreclosure process including: Pre-foreclosure, Auction and Bank Owned/Real Estate Owned (REO). This helps you identify if the listing presentation you are about to make or the property you are about to show is in the foreclosure process
Realtors can use this tool to:
• Target market distressed properties to generate more sales • Readily identify distressed properties whether current or potential listings • Accelerate the successful transaction of financially distressed properties
Appraisers can use this tool to:
• Identify distressed properties when preparing re-appraisal cost and market valuation analyses
• Capture a better picture of the market
Click Foreclosure to navigate to this resource.
A splash page displays in another window detailing the benefits of the tool. Click Continue.

Copyright © 2011 - Metropolitan Regional Information Systems, Inc 156 The information contained in this manual may be copyrighted and/or confidential. All rights reserved.
The Foreclosure Activity Search page defaults. Enter search criteria and click Search to search for a property.
To change the type of search, place your cursor over Searches in the main menu. A menu displays. Click Address or Owner Name to search by either of those criteria.

Copyright © 2011 - Metropolitan Regional Information Systems, Inc 157 The information contained in this manual may be copyrighted and/or confidential. All rights reserved.
To search by address, click Address from the Searches dropdown menu, enter search criteria and click Search.
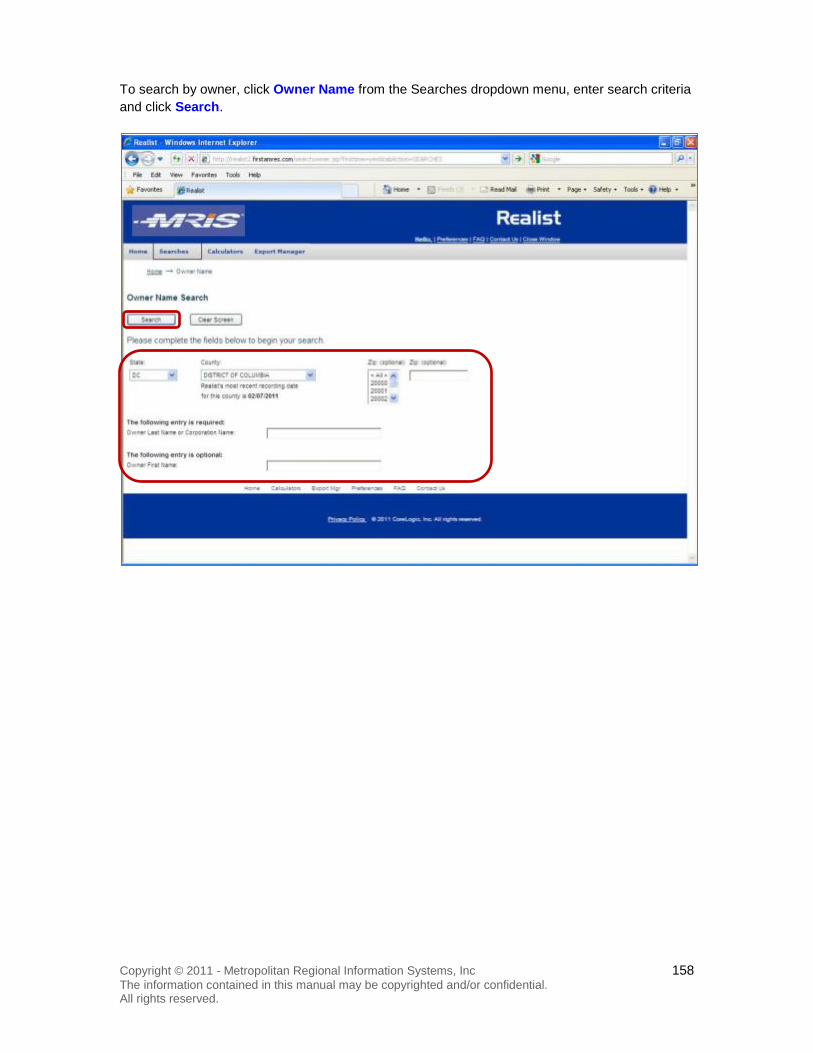
Copyright © 2011 - Metropolitan Regional Information Systems, Inc 158 The information contained in this manual may be copyrighted and/or confidential. All rights reserved.
To search by owner, click Owner Name from the Searches dropdown menu, enter search criteria and click Search.
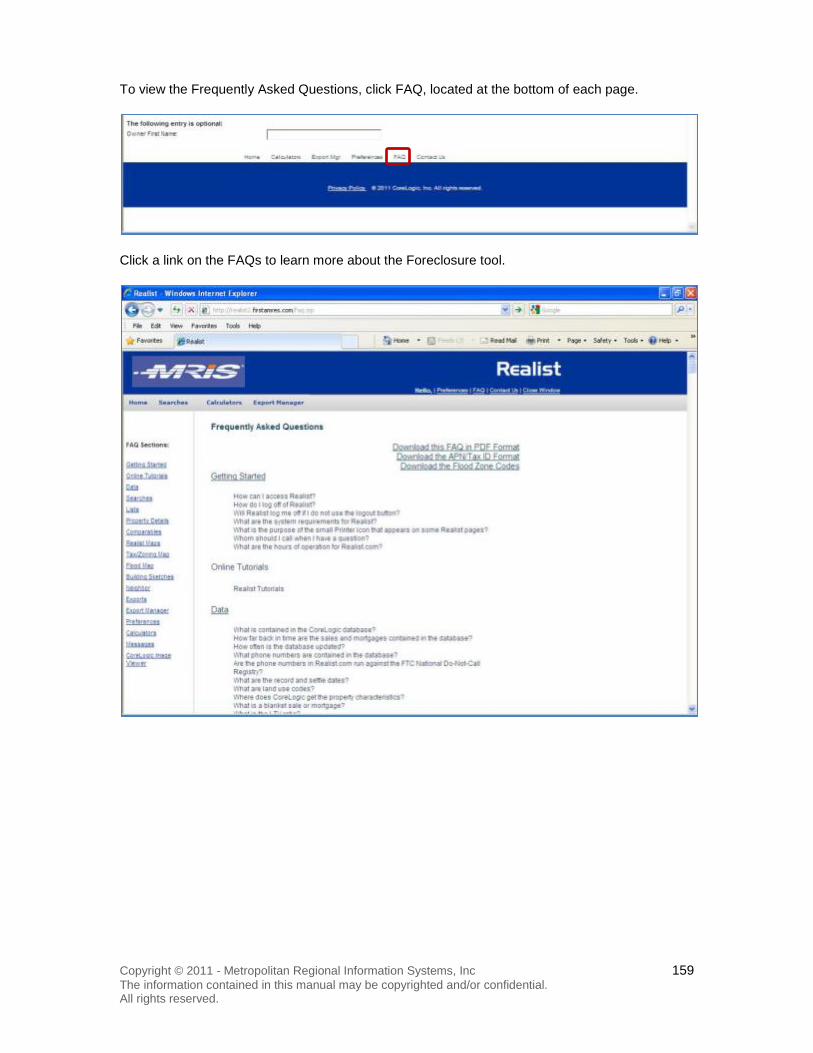
Copyright © 2011 - Metropolitan Regional Information Systems, Inc 159 The information contained in this manual may be copyrighted and/or confidential. All rights reserved.
To view the Frequently Asked Questions, click FAQ, located at the bottom of each page.
Click a link on the FAQs to learn more about the Foreclosure tool.
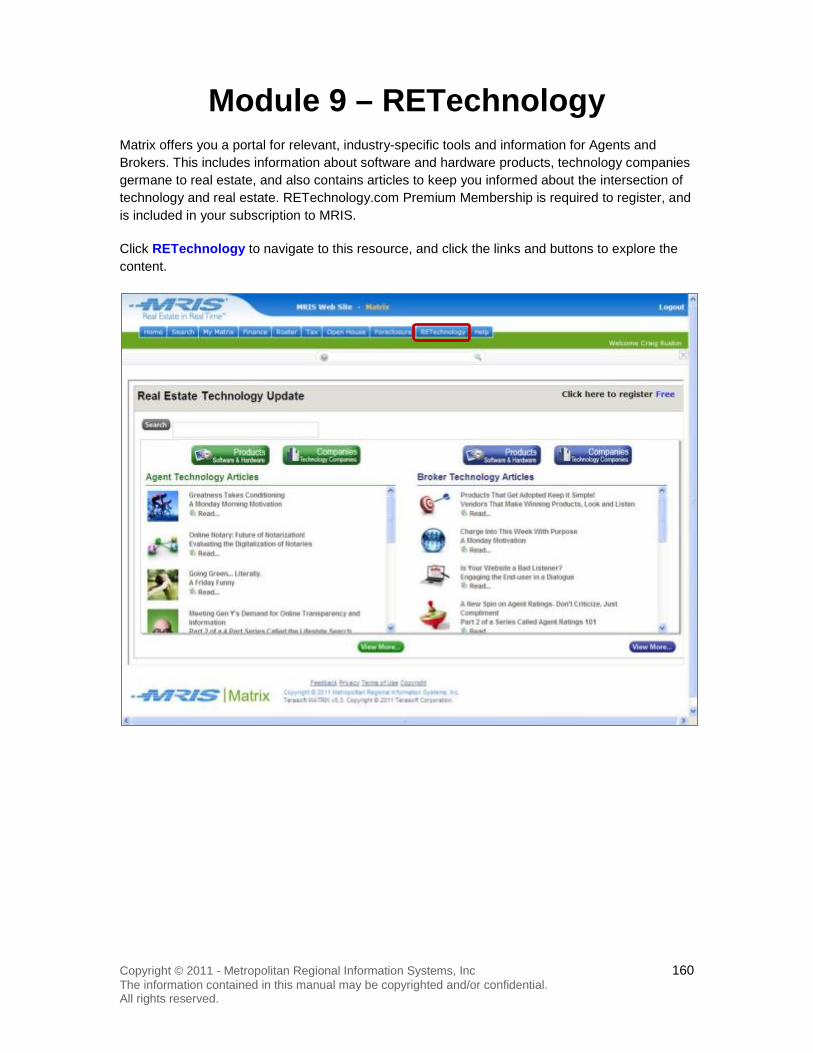
Copyright © 2011 - Metropolitan Regional Information Systems, Inc 160 The information contained in this manual may be copyrighted and/or confidential. All rights reserved.
Module 9 – RETechnology Matrix offers you a portal for relevant, industry-specific tools and information for Agents and Brokers. This includes information about software and hardware products, technology companies germane to real estate, and also contains articles to keep you informed about the intersection of technology and real estate. RETechnology.com Premium Membership is required to register, and is included in your subscription to MRIS.
Click RETechnology to navigate to this resource, and click the links and buttons to explore the content.
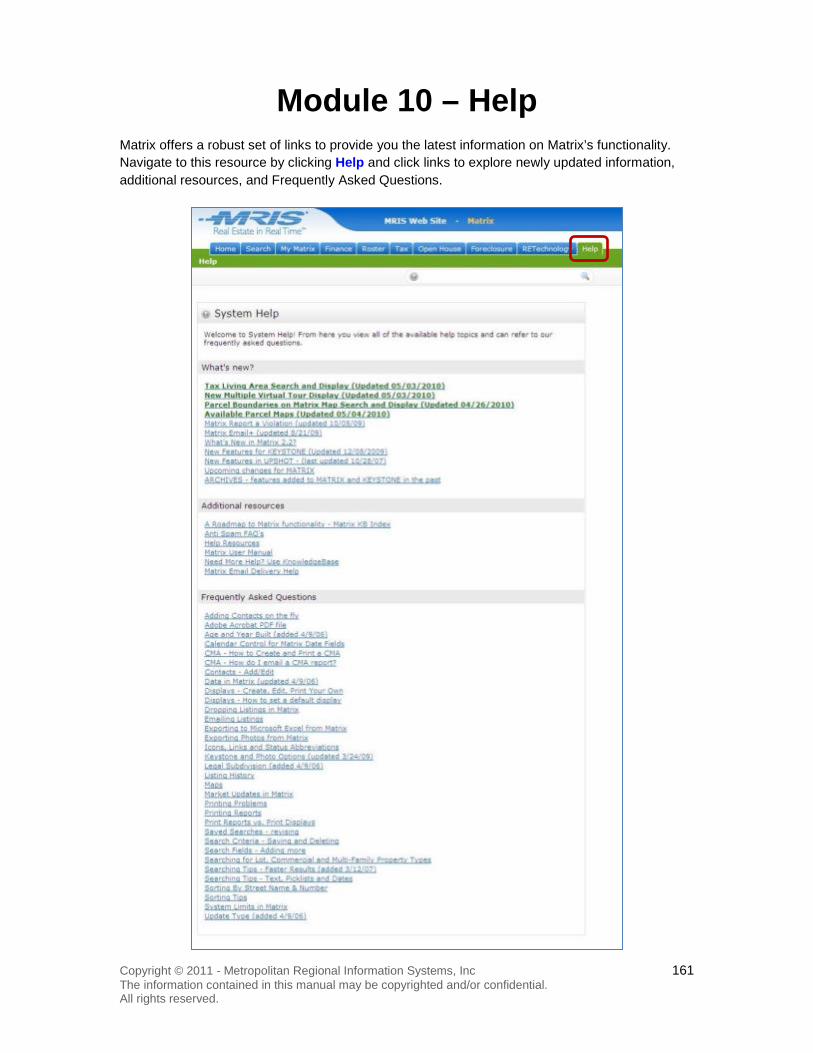
Copyright © 2011 - Metropolitan Regional Information Systems, Inc 161 The information contained in this manual may be copyrighted and/or confidential. All rights reserved.
Module 10 – Help Matrix offers a robust set of links to provide you the latest information on Matrix’s functionality. Navigate to this resource by clicking Help and click links to explore newly updated information, additional resources, and Frequently Asked Questions.