Informatica - 10.2 - How to Split the Domain for Version 10.2 - … Library/1/1113... ·...
27
How to Split the Domain for Version 10.2 © Copyright Informatica LLC 2017. Informatica, the Informatica logo, and Informatica Cloud are trademarks or registered trademarks of Informatica LLC in the United States and many jurisdictions throughout the world. A current list of Informatica trademarks is available on the web at https://www.informatica.com/trademarks.html
Transcript of Informatica - 10.2 - How to Split the Domain for Version 10.2 - … Library/1/1113... ·...

How to Split the Domain for Version
10.2
© Copyright Informatica LLC 2017. Informatica, the Informatica logo, and Informatica Cloud are trademarks or registered trademarks of Informatica LLC in the United States and many jurisdictions throughout the world. A current list of Informatica trademarks is available on the web at https://www.informatica.com/trademarks.html

AbstractIn version 10.2, you can split the domain to run big data products and traditional products in different domains. In a future release, Informatica will require that you run the big data products and traditional products in different domains. This article describes how to split a domain before or after you upgrade to version 10.2.
Supported Versions• Informatica 10.2
Table of ContentsOverview. . . . . . . . . . . . . . . . . . . . . . . . . . . . . . . . . . . . . . . . . . . . . . . . . . . . . . . . . . . . . . . . . . 3
Domain Architecture with Traditional and Big Data Domains. . . . . . . . . . . . . . . . . . . . . . . . . . . . . . . 4
Service Types. . . . . . . . . . . . . . . . . . . . . . . . . . . . . . . . . . . . . . . . . . . . . . . . . . . . . . . . . . . . . 5
Domain Differences. . . . . . . . . . . . . . . . . . . . . . . . . . . . . . . . . . . . . . . . . . . . . . . . . . . . . . . . . 6
Process to Split a Domain. . . . . . . . . . . . . . . . . . . . . . . . . . . . . . . . . . . . . . . . . . . . . . . . . . . . . 6
Before You Split the Domain. . . . . . . . . . . . . . . . . . . . . . . . . . . . . . . . . . . . . . . . . . . . . . . . . . . . . 7
Verify System Requirements. . . . . . . . . . . . . . . . . . . . . . . . . . . . . . . . . . . . . . . . . . . . . . . . . . . 7
Plan Port Numbers. . . . . . . . . . . . . . . . . . . . . . . . . . . . . . . . . . . . . . . . . . . . . . . . . . . . . . . . . 7
Prepare Databases. . . . . . . . . . . . . . . . . . . . . . . . . . . . . . . . . . . . . . . . . . . . . . . . . . . . . . . . . 9
Configure Connectivity. . . . . . . . . . . . . . . . . . . . . . . . . . . . . . . . . . . . . . . . . . . . . . . . . . . . . . 10
Back Up Content. . . . . . . . . . . . . . . . . . . . . . . . . . . . . . . . . . . . . . . . . . . . . . . . . . . . . . . . . . 11
Split the Domain. . . . . . . . . . . . . . . . . . . . . . . . . . . . . . . . . . . . . . . . . . . . . . . . . . . . . . . . . . . . 11
Copy the Informatica Installation Directory. . . . . . . . . . . . . . . . . . . . . . . . . . . . . . . . . . . . . . . . . 11
Configure Environment Variables. . . . . . . . . . . . . . . . . . . . . . . . . . . . . . . . . . . . . . . . . . . . . . . . 11
Verify Directories for Run-time Processing. . . . . . . . . . . . . . . . . . . . . . . . . . . . . . . . . . . . . . . . . . 12
Starting and Stopping Informatica Services. . . . . . . . . . . . . . . . . . . . . . . . . . . . . . . . . . . . . . . . . 14
Define the Target Domain. . . . . . . . . . . . . . . . . . . . . . . . . . . . . . . . . . . . . . . . . . . . . . . . . . . . 14
Update Connection Objects. . . . . . . . . . . . . . . . . . . . . . . . . . . . . . . . . . . . . . . . . . . . . . . . . . . 17
Configure Application Service and Domain Properties. . . . . . . . . . . . . . . . . . . . . . . . . . . . . . . . . . 17
Create and Restore Contents. . . . . . . . . . . . . . . . . . . . . . . . . . . . . . . . . . . . . . . . . . . . . . . . . . 21
Remove Services. . . . . . . . . . . . . . . . . . . . . . . . . . . . . . . . . . . . . . . . . . . . . . . . . . . . . . . . . . 21
After You Split the Domain. . . . . . . . . . . . . . . . . . . . . . . . . . . . . . . . . . . . . . . . . . . . . . . . . . . . . . 22
Upgrade the Domain. . . . . . . . . . . . . . . . . . . . . . . . . . . . . . . . . . . . . . . . . . . . . . . . . . . . . . . . 22
Rename the Domain. . . . . . . . . . . . . . . . . . . . . . . . . . . . . . . . . . . . . . . . . . . . . . . . . . . . . . . . 22
Configure the Developer Tool for Different Versions. . . . . . . . . . . . . . . . . . . . . . . . . . . . . . . . . . . 24
Configure the Developer Tool for the Same Version. . . . . . . . . . . . . . . . . . . . . . . . . . . . . . . . . . . . 24
Update Repository Objects and Scripts. . . . . . . . . . . . . . . . . . . . . . . . . . . . . . . . . . . . . . . . . . . . 25
Uninstalling the Copied Domain. . . . . . . . . . . . . . . . . . . . . . . . . . . . . . . . . . . . . . . . . . . . . . . . 26
Troubleshooting . . . . . . . . . . . . . . . . . . . . . . . . . . . . . . . . . . . . . . . . . . . . . . . . . . . . . . . . . . 26
Checklist to Split a Domain. . . . . . . . . . . . . . . . . . . . . . . . . . . . . . . . . . . . . . . . . . . . . . . . . . . . . 26
2
Before You Split the Domain. . . . . . . . . . . . . . . . . . . . . . . . . . . . . . . . . . . . . . . . . . . . . . . . . . . 26
Split the Domain. . . . . . . . . . . . . . . . . . . . . . . . . . . . . . . . . . . . . . . . . . . . . . . . . . . . . . . . . . 27
After You Split the Domain. . . . . . . . . . . . . . . . . . . . . . . . . . . . . . . . . . . . . . . . . . . . . . . . . . . . 27
OverviewInformatica platform products reach different audiences with different requirements for releases and upgrades. Customers who use Informatica's big data products, such as Big Data Management and Enterprise Information Catalog, require more frequent updates than the customers who use Informatica's traditional products, such as PowerCenter and Data Quality.
Informatica plans to release updates for big data products more frequently than for traditional products. If you use both big data products and traditional products, Informatica recommends that you split the domain into two domains to accommodate future requirements.
When you split the domain, you create a copy of the domain so that you can run big data products and traditional products in separate domains. The domain that you split is the source domain, and the domain that you create is the target domain. You can choose which domain to use for traditional products and for big data products. The domain that supports traditional products is called the traditional domain, and the domain that supports big data products is called the big data domain. This document instructs you to use the target domain as the big data domain.
You can split a domain on the same host machine or to different host machines. When you split the domain on one host, you duplicate the nodes on each machine in the domain. You also duplicate the services that are common to both traditional and big data products. The common services share names, and each host has two nodes of the same name. The domains have the same name, but you can change the name of one of the domains. This document describes how to split a domain into two domains on one host machine.
After you split the domain into two domains, you might want to upgrade one domain or apply a hotfix. For example, if you split a 10.1.1 domain, you might want to upgrade the target domain to version 10.2 or apply the hotfix for version 10.1.1 HotFix 2, based on your requirements. However, if you upgraded the domain to version 10.2, you might want to split the domain in preparation for a future release that Informatica requires the traditional and big data domains to be separate. If you split a 10.2 domain, you will not need to perform the upgrade tasks in this document.
Note: You cannot split the domain if the Model repository is integrated with a third-party version control system.
3
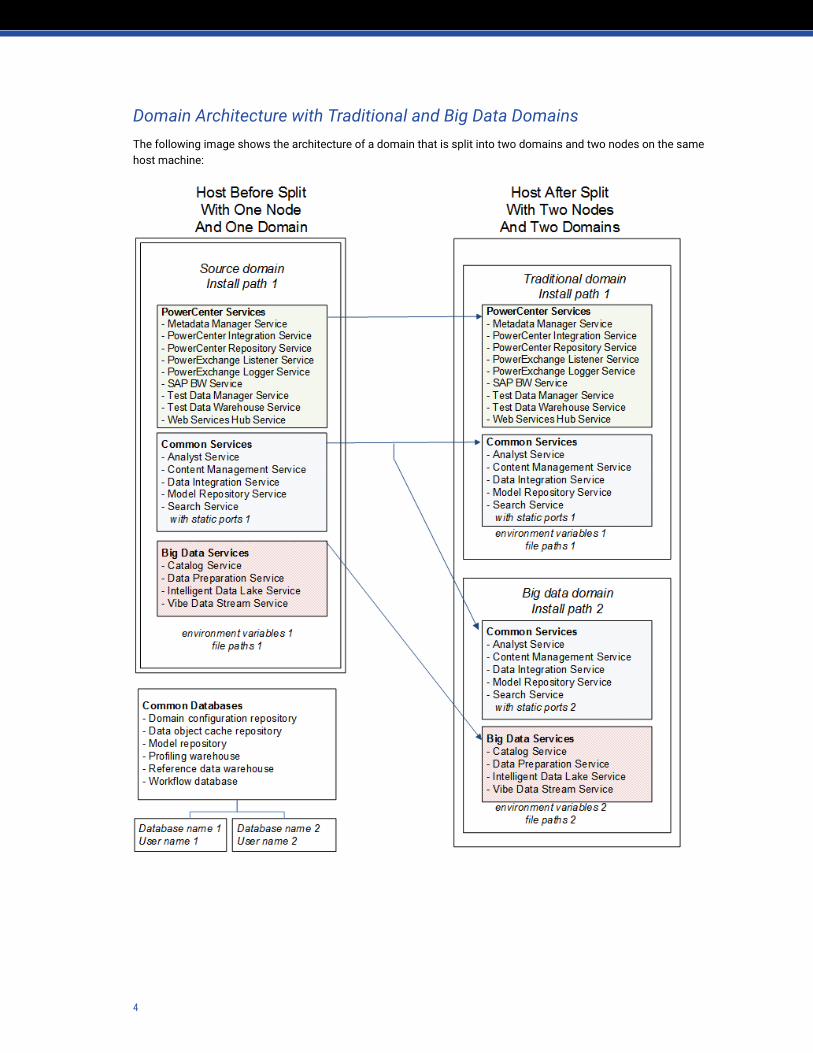
Domain Architecture with Traditional and Big Data DomainsThe following image shows the architecture of a domain that is split into two domains and two nodes on the same host machine:
4
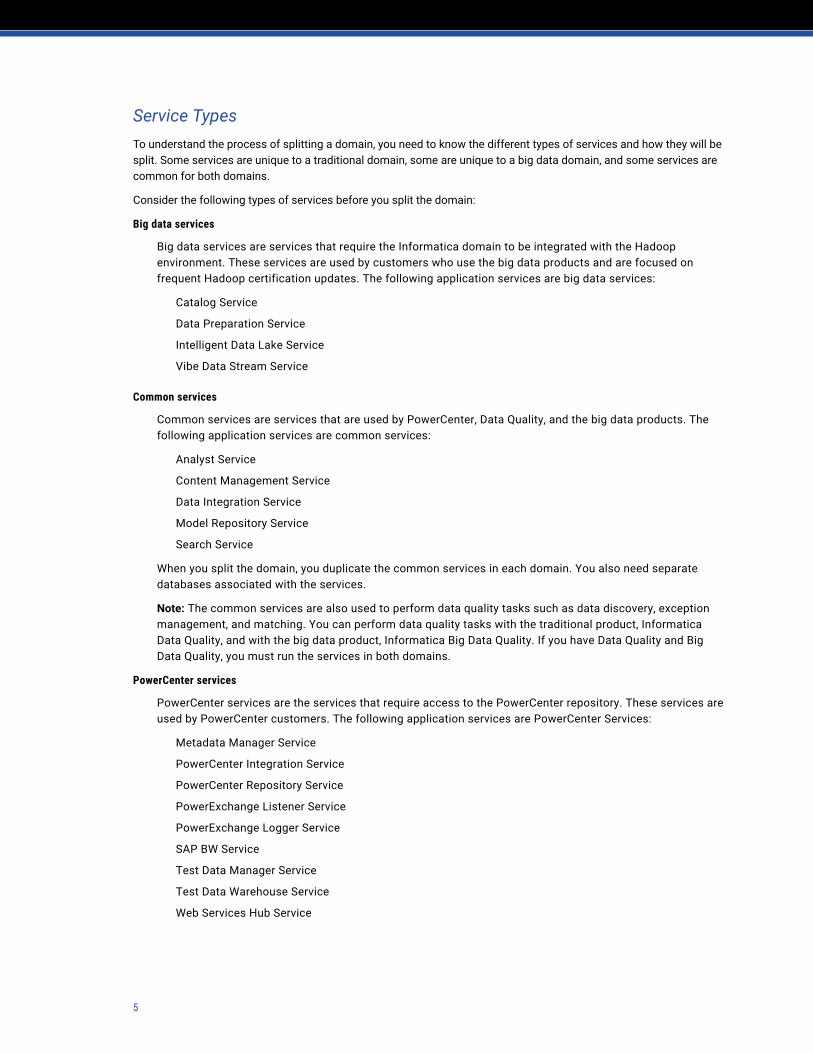
Service TypesTo understand the process of splitting a domain, you need to know the different types of services and how they will be split. Some services are unique to a traditional domain, some are unique to a big data domain, and some services are common for both domains.
Consider the following types of services before you split the domain:
Big data services
Big data services are services that require the Informatica domain to be integrated with the Hadoop environment. These services are used by customers who use the big data products and are focused on frequent Hadoop certification updates. The following application services are big data services:
Catalog Service
Data Preparation Service
Intelligent Data Lake Service
Vibe Data Stream Service
Common services
Common services are services that are used by PowerCenter, Data Quality, and the big data products. The following application services are common services:
Analyst Service
Content Management Service
Data Integration Service
Model Repository Service
Search Service
When you split the domain, you duplicate the common services in each domain. You also need separate databases associated with the services.
Note: The common services are also used to perform data quality tasks such as data discovery, exception management, and matching. You can perform data quality tasks with the traditional product, Informatica Data Quality, and with the big data product, Informatica Big Data Quality. If you have Data Quality and Big Data Quality, you must run the services in both domains.
PowerCenter services
PowerCenter services are the services that require access to the PowerCenter repository. These services are used by PowerCenter customers. The following application services are PowerCenter Services:
Metadata Manager Service
PowerCenter Integration Service
PowerCenter Repository Service
PowerExchange Listener Service
PowerExchange Logger Service
SAP BW Service
Test Data Manager Service
Test Data Warehouse Service
Web Services Hub Service
5

Domain DifferencesWhen you split the domain, you must perform configuration tasks to avoid conflicts and to set up the target domain.
Consider the following configuration differences that result from splitting the domain:
Domain differences
The following table describes differences in the domains that reside on the same host machine:
Domain component Differences
Domain name When you split the domain, you can change the name of one domain.
Domain ports The static ports in the domains are different.
Environment variables Each domain requires a separate set of environment variables.
Install path The installation path is different.
Service property differences
The following table describes differences in the common services:
Service properties Differences
Static ports The static ports must be different to avoid port conflicts.
File paths The common services require separate directories for run-time files.
Database names The database names and owner names that you created for the services in the target domain.
Connectivity differences
The following table describes differences in connectivity:
Connectivity configuration Differences
Connection objects The connection objects reflect the database information of the databases associated with the common services.
Native connectivity Each domain requires a separate odbc.ini file.
Process to Split a DomainWhen you split a domain, create a traditional domain and a big data domain. You create another domain on the same host machine. Remove services that are not required in each domain, and configure services that are common to both domains.
When you split the domain, complete tasks associated with the following high-level process:Preliminary tasks
1. Verify system requirements.
2. Plan for port numbers to avoid port conflicts in static ports after the split.
3. Prepare databases associated with the common services.
6

4. Back up the contents of the domain configuration repository and all Model repositories.
Split the domain
1. Copy the Informatica installation directory to a different location on the same host machine.
2. Configure environment variables for the target domain.
3. Verify run-time directories for the common services to use in the target domain.
4. Define the target domain through a series of infacmd and infasetup commands.
5. Update connection objects in the target domain to access databases that you created for services in the target domain.
6. Configure the application services in the source and target domains.
7. Create database contents.
8. Remove PowerCenter services from the target domain, and remove big data services from the source domain.
Final tasks
1. Upgrade the big data domain if you currently use a version earlier than 10.2.
2. Rename the domain.
3. Configure Kerberos authentication.
4. Configure the Developer tool.
5. Update repository objects.
Before You Split the DomainBefore you split the domain, you need to perform tasks such as verifying system requirements, resolving possible port conflicts, and preparing databases for the target domain.
Verify System RequirementsYou can use one host machine for both the domains. Verify that the host machine meets twice the number of resources required for processor, memory, disk space, and database space.
For example, if you require 2 CPUs with multiple cores, 12 GB RAM, and 20 GB of disk space for a node, you will require at least 4 CPUs with multiple cores, 24 GB RAM, and 40 GB of disk space for both nodes a single host machine.
For more information about system requirements, see the Informatica Installation and Configuration Guide and the Product Availability Matrix on Informatica Network: https://network.informatica.com/community/informatica-network/product-availability-matrices.
Plan Port NumbersWhen you split the domain, you need to ensure that no port conflicts occur. Port conflicts can occur between application services and between nodes.
When you run infasetup to define the gateway and worker nodes, you need to update static port numbers to avoid port conflicts. After you split the domain, you configure application service properties to assign unique port numbers to the static ports.
Before you split the domain, you need to identify values of static ports used in the source domain, and identify available ports to assign in the target domain.
7

Use the following guidelines to determine the port numbers:
• The port number that you specify for the domain and for each component in the domain must be unique.
• The port number for the domain and domain components cannot be within the range of the port numbers that you specify for the application service processes.
• The highest number in the range of port numbers that you specify for the application service processes must be at least three numbers higher than the lowest port number. For example, if the minimum port number in the range is 6400, the maximum port number must be at least 6403.
• The port numbers that you specify cannot be lower than 1025 or higher than 65535.
Use the following table as a template to record existing static port numbers and the port numbers that you will use to update service properties:
Service Name Ports Property Source Domain Port Target Domain Port
Analyst Service Note the port values on the Processes tab:- HTTP Port- HTTPS Port
Content Management Service Note the port values on the Processes tab:- HTTP Port- HTTPS Port
Data Integration Service Note the port values on the Processes tab:- HTTP Port- HTTPS Port
Search Service Note the port value on the Properties tab:- Port Number
Scheduler Service Note the port values on the Processes tab:- HTTP Port- HTTPS Port
Use the following table as a template to record the existing static port numbers and the port numbers that you will use when you define nodes:
Domain Port Source Domain Port Target Domain Port
Node port
Service Manager port
Service Manager shutdown port
Informatica Administrator port
Informatica Administrator shutdown port
Minimum port for service processes
Maximum port for service processes
8
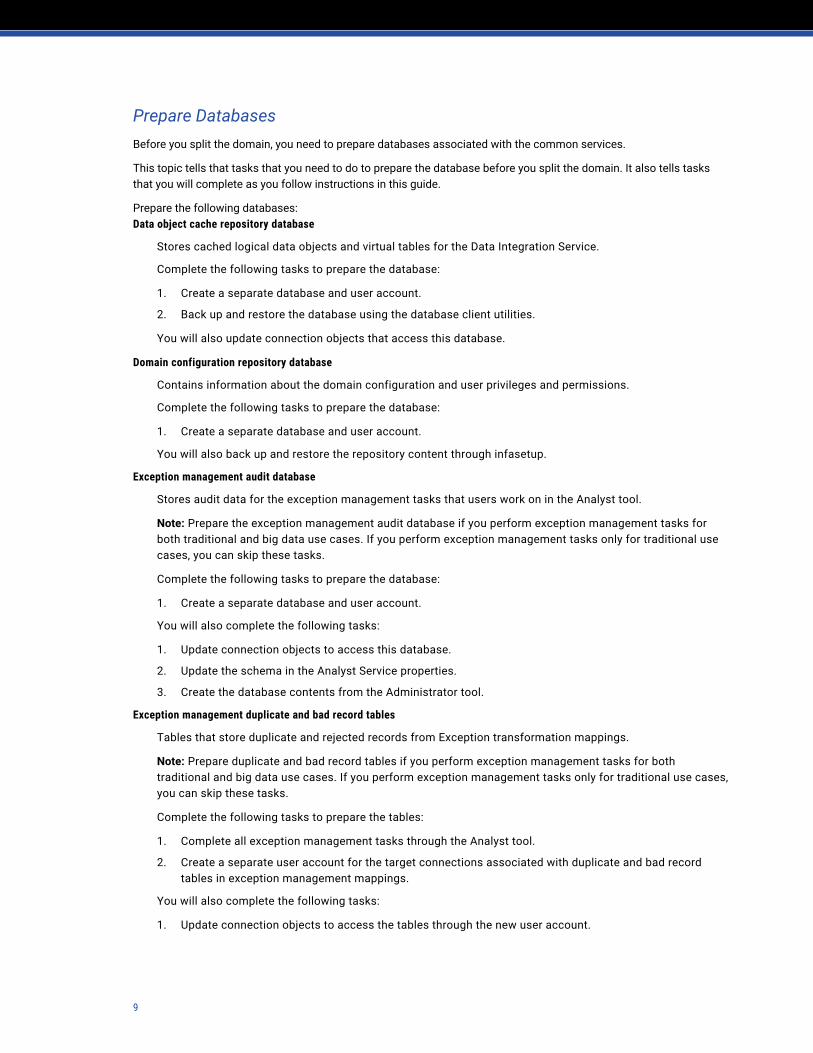
Prepare DatabasesBefore you split the domain, you need to prepare databases associated with the common services.
This topic tells that tasks that you need to do to prepare the database before you split the domain. It also tells tasks that you will complete as you follow instructions in this guide.
Prepare the following databases:Data object cache repository database
Stores cached logical data objects and virtual tables for the Data Integration Service.
Complete the following tasks to prepare the database:
1. Create a separate database and user account.
2. Back up and restore the database using the database client utilities.
You will also update connection objects that access this database.
Domain configuration repository database
Contains information about the domain configuration and user privileges and permissions.
Complete the following tasks to prepare the database:
1. Create a separate database and user account.
You will also back up and restore the repository content through infasetup.
Exception management audit database
Stores audit data for the exception management tasks that users work on in the Analyst tool.
Note: Prepare the exception management audit database if you perform exception management tasks for both traditional and big data use cases. If you perform exception management tasks only for traditional use cases, you can skip these tasks.
Complete the following tasks to prepare the database:
1. Create a separate database and user account.
You will also complete the following tasks:
1. Update connection objects to access this database.
2. Update the schema in the Analyst Service properties.
3. Create the database contents from the Administrator tool.
Exception management duplicate and bad record tables
Tables that store duplicate and rejected records from Exception transformation mappings.
Note: Prepare duplicate and bad record tables if you perform exception management tasks for both traditional and big data use cases. If you perform exception management tasks only for traditional use cases, you can skip these tasks.
Complete the following tasks to prepare the tables:
1. Complete all exception management tasks through the Analyst tool.
2. Create a separate user account for the target connections associated with duplicate and bad record tables in exception management mappings.
You will also complete the following tasks:
1. Update connection objects to access the tables through the new user account.
9

2. Update the mappings that write to the duplicate and bad record tables.
Model repository database
Stores metadata for the Model repository objects.
Complete the following tasks to prepare the database:
1. Create a separate database and user account.
You will also perform the following tasks:
1. Back up and restore the repository content through the Administrator tool or infacmd.
2. Update user name and connection information in the Model Repository Service properties.
Note: Verify that the Model repository is not integrated with a third-party version control system.
Profiling warehouse database
Stores profile and scorecard results.
Complete the following tasks to prepare the database:
1. Create a separate database and user account.
2. Back up and restore the database using the database client utilities.
You will also update connection objects that access this database.
Reference data warehouse database
Stores the data values for reference table objects that you define in a Model repository.
Complete the following tasks to prepare the database:
1. Create a separate database and user account.
2. Back up and restore the database using the database client utilities.
You will also update connection objects that access this database.
Workflow database
Stores run-time metadata for workflows.
Complete the following task to prepare the database:
1. Create a separate database and user account.
You will also complete the following tasks:
1. Update connection objects that access this database.
2. Create the database contents from the Administrator tool.
For information about database requirements, see the Informatica Installation and Configuration Guide.
Configure ConnectivityEach domain requires a separate odbc.ini file.
Copy the existing odbc.ini file and update it as needed.
When you split the domain, you will set up environment variables to access the file.
10

Back Up ContentBefore you split the domain, you need to back up repository metadata for the domain configuration repository and for each Model repository.
1. Back up each Model repository in the domain using the Administrator tool or the infacmd mrs backupContents command.
2. Shut down all application services in the domain through the Administrator tool.
3. Shut down the domain through the Administrator tool, ensuring that all nodes are shut down.
4. Back up the domain with the infasetup BackupDomain command.The following sample command shows syntax for backup:
infasetup.sh BackupDomain -da <host>:<port> -ds ORA11GR2 -du mrs_it -dp mrs_it -dt ORACLE -bf /export/home/toolinst/Backup_IT/10.1.1HF1_backup -dn Domain -kl /export/home/toolinst/Informatica/10.1.1/isp/config/keys
Split the DomainPerform the following tasks to split the domain:
1. Copy the installation directory to another location on the host machine.
2. Configure the environment for the new domain.
3. Verify directories for run-time processing.
4. Define the target domain through a series of infasetup and infacmd commands.
5. Update connection objects to reflect the database that you created for services in the target domain.
6. Configure application services for the target domain, and create database contents.
7. Remove services from the source and target domains.
Copy the Informatica Installation DirectoryTo begin the split process, shut down the services and domain, and copy the Informatica installation directory to a different location.
Before you copy the installation directory, verify that you have read permissions on the following directories:
<Informatica installation directory>/isp/config<Informatica installation directory>/services/shared/security
Copy the Informatica installation directory to a different location on the host machine. Perform this task for all nodes in the domain.
You will restore the domain on one gateway node host, and define the new worker nodes.
Configure Environment VariablesEach domain requires a different set of environment variables. Create a script to set environment variables for the target domain.
Run printenv or setenv to identify environment variables on the host machine. Create a script to set environment variables that the Informatica services require, such as Informatica environment variables, library paths, and Kerberos environment variables.
Important: You must run the script before you start Informatica services or run infacmd and infasetup commands.
11
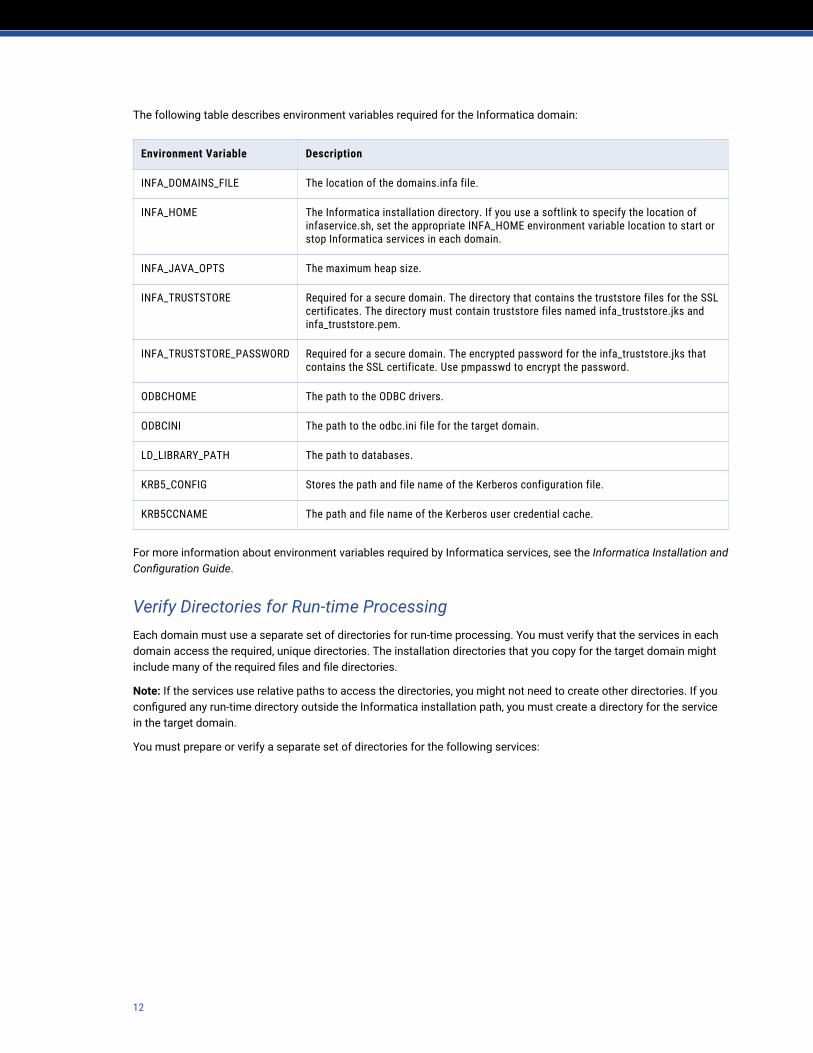
The following table describes environment variables required for the Informatica domain:
Environment Variable Description
INFA_DOMAINS_FILE The location of the domains.infa file.
INFA_HOME The Informatica installation directory. If you use a softlink to specify the location of infaservice.sh, set the appropriate INFA_HOME environment variable location to start or stop Informatica services in each domain.
INFA_JAVA_OPTS The maximum heap size.
INFA_TRUSTSTORE Required for a secure domain. The directory that contains the truststore files for the SSL certificates. The directory must contain truststore files named infa_truststore.jks and infa_truststore.pem.
INFA_TRUSTSTORE_PASSWORD Required for a secure domain. The encrypted password for the infa_truststore.jks that contains the SSL certificate. Use pmpasswd to encrypt the password.
ODBCHOME The path to the ODBC drivers.
ODBCINI The path to the odbc.ini file for the target domain.
LD_LIBRARY_PATH The path to databases.
KRB5_CONFIG Stores the path and file name of the Kerberos configuration file.
KRB5CCNAME The path and file name of the Kerberos user credential cache.
For more information about environment variables required by Informatica services, see the Informatica Installation and Configuration Guide.
Verify Directories for Run-time ProcessingEach domain must use a separate set of directories for run-time processing. You must verify that the services in each domain access the required, unique directories. The installation directories that you copy for the target domain might include many of the required files and file directories.
Note: If the services use relative paths to access the directories, you might not need to create other directories. If you configured any run-time directory outside the Informatica installation path, you must create a directory for the service in the target domain.
You must prepare or verify a separate set of directories for the following services:
12
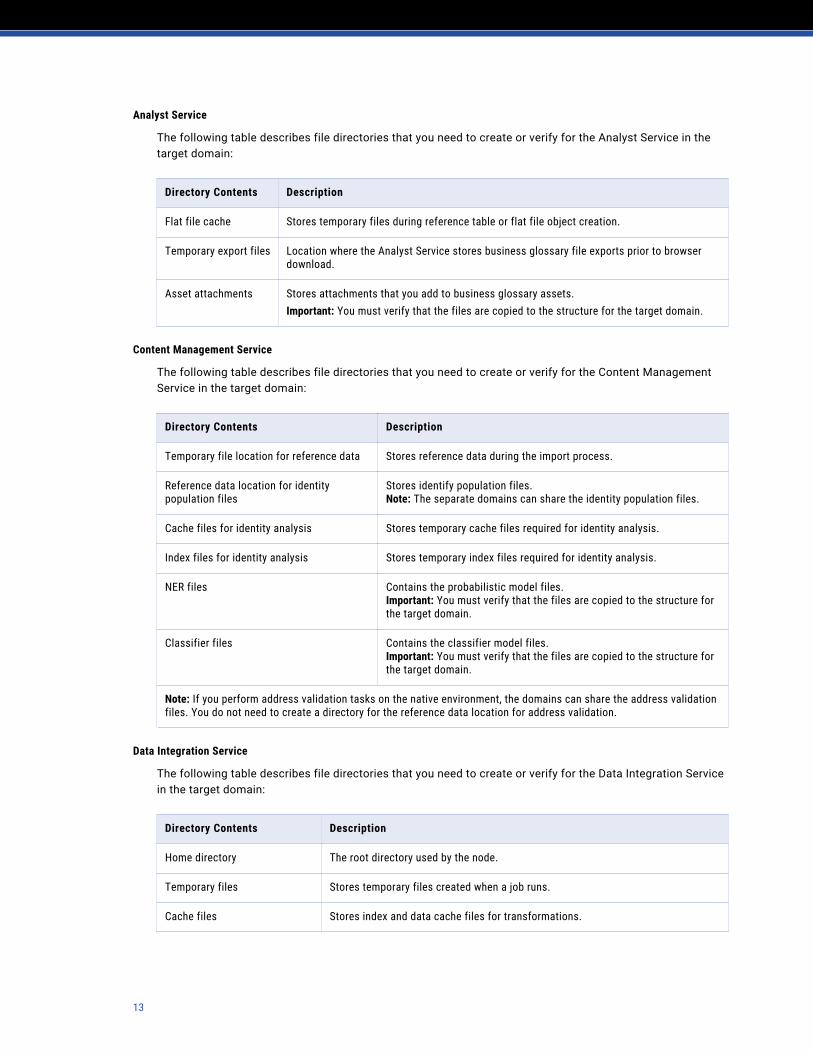
Analyst Service
The following table describes file directories that you need to create or verify for the Analyst Service in the target domain:
Directory Contents Description
Flat file cache Stores temporary files during reference table or flat file object creation.
Temporary export files Location where the Analyst Service stores business glossary file exports prior to browser download.
Asset attachments Stores attachments that you add to business glossary assets.Important: You must verify that the files are copied to the structure for the target domain.
Content Management Service
The following table describes file directories that you need to create or verify for the Content Management Service in the target domain:
Directory Contents Description
Temporary file location for reference data Stores reference data during the import process.
Reference data location for identity population files
Stores identify population files.Note: The separate domains can share the identity population files.
Cache files for identity analysis Stores temporary cache files required for identity analysis.
Index files for identity analysis Stores temporary index files required for identity analysis.
NER files Contains the probabilistic model files.Important: You must verify that the files are copied to the structure for the target domain.
Classifier files Contains the classifier model files.Important: You must verify that the files are copied to the structure for the target domain.
Note: If you perform address validation tasks on the native environment, the domains can share the address validation files. You do not need to create a directory for the reference data location for address validation.
Data Integration Service
The following table describes file directories that you need to create or verify for the Data Integration Service in the target domain:
Directory Contents Description
Home directory The root directory used by the node.
Temporary files Stores temporary files created when a job runs.
Cache files Stores index and data cache files for transformations.
13
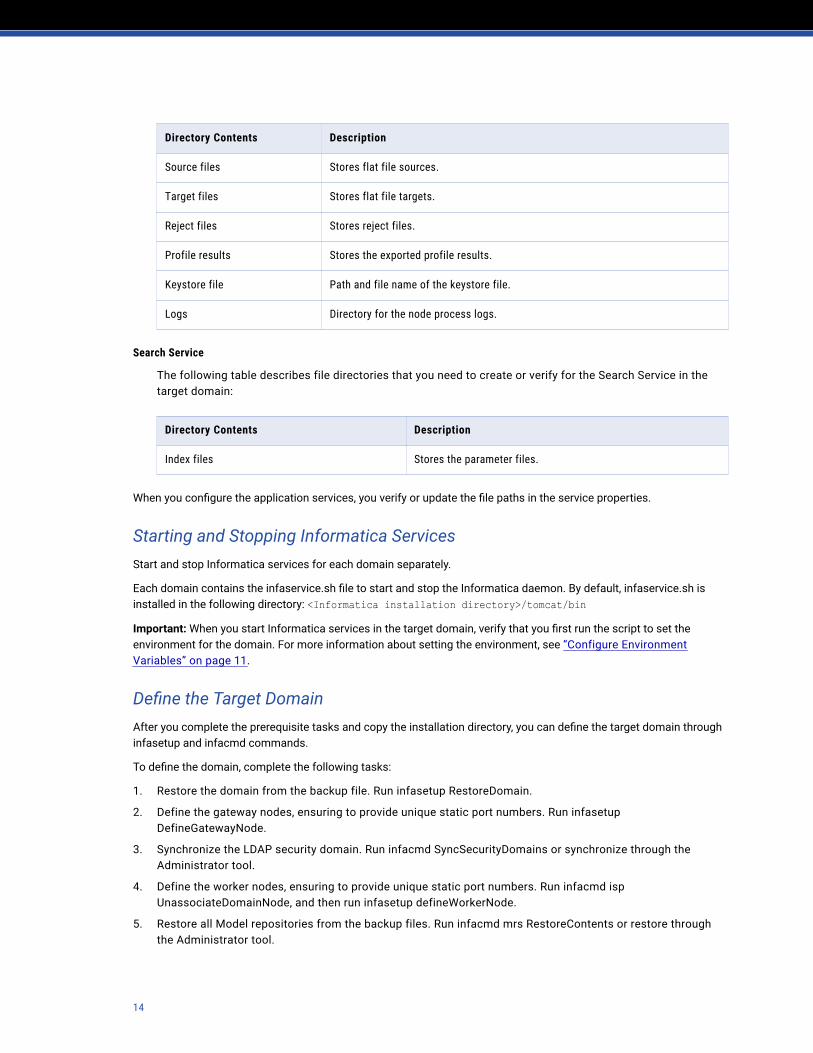
Directory Contents Description
Source files Stores flat file sources.
Target files Stores flat file targets.
Reject files Stores reject files.
Profile results Stores the exported profile results.
Keystore file Path and file name of the keystore file.
Logs Directory for the node process logs.
Search Service
The following table describes file directories that you need to create or verify for the Search Service in the target domain:
Directory Contents Description
Index files Stores the parameter files.
When you configure the application services, you verify or update the file paths in the service properties.
Starting and Stopping Informatica ServicesStart and stop Informatica services for each domain separately.
Each domain contains the infaservice.sh file to start and stop the Informatica daemon. By default, infaservice.sh is installed in the following directory: <Informatica installation directory>/tomcat/bin
Important: When you start Informatica services in the target domain, verify that you first run the script to set the environment for the domain. For more information about setting the environment, see “Configure Environment Variables” on page 11.
Define the Target DomainAfter you complete the prerequisite tasks and copy the installation directory, you can define the target domain through infasetup and infacmd commands.
To define the domain, complete the following tasks:
1. Restore the domain from the backup file. Run infasetup RestoreDomain.
2. Define the gateway nodes, ensuring to provide unique static port numbers. Run infasetup DefineGatewayNode.
3. Synchronize the LDAP security domain. Run infacmd SyncSecurityDomains or synchronize through the Administrator tool.
4. Define the worker nodes, ensuring to provide unique static port numbers. Run infacmd isp UnassociateDomainNode, and then run infasetup defineWorkerNode.
5. Restore all Model repositories from the backup files. Run infacmd mrs RestoreContents or restore through the Administrator tool.
14
Note: You must shut down the domain to run infasetup, and start the domain to run infacmd.
Important
Keep the following rules in mind when you run infacmd and infasetup:
• Run all commands from the installation directory that you created for the target domain.
• Before you run infacmd or infasetup, run the script to set environment variables for the target domain.
For more information about infacmd and infasetup, see the Informatica Command Reference.
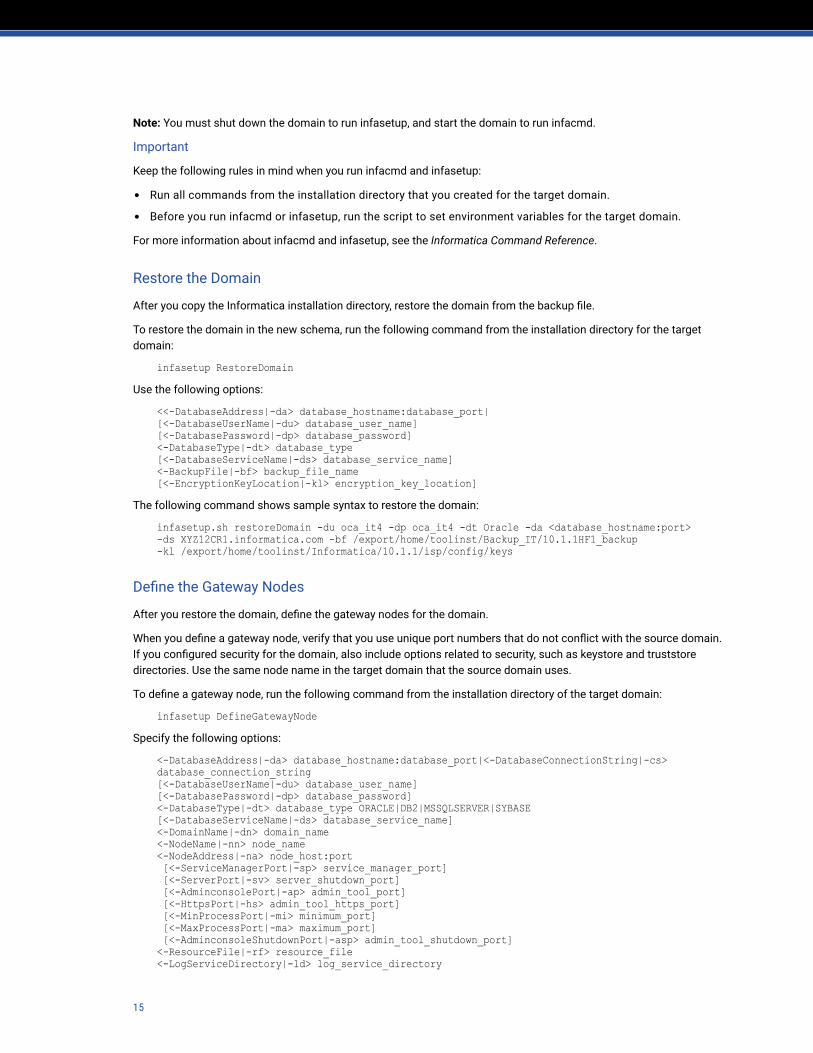
Restore the Domain
After you copy the Informatica installation directory, restore the domain from the backup file.
To restore the domain in the new schema, run the following command from the installation directory for the target domain:
infasetup RestoreDomainUse the following options:
<<-DatabaseAddress|-da> database_hostname:database_port|[<-DatabaseUserName|-du> database_user_name][<-DatabasePassword|-dp> database_password]<-DatabaseType|-dt> database_type[<-DatabaseServiceName|-ds> database_service_name]<-BackupFile|-bf> backup_file_name[<-EncryptionKeyLocation|-kl> encryption_key_location]
The following command shows sample syntax to restore the domain:
infasetup.sh restoreDomain -du oca_it4 -dp oca_it4 -dt Oracle -da <database_hostname:port> -ds XYZ12CR1.informatica.com -bf /export/home/toolinst/Backup_IT/10.1.1HF1_backup -kl /export/home/toolinst/Informatica/10.1.1/isp/config/keys
Define the Gateway Nodes
After you restore the domain, define the gateway nodes for the domain.
When you define a gateway node, verify that you use unique port numbers that do not conflict with the source domain. If you configured security for the domain, also include options related to security, such as keystore and truststore directories. Use the same node name in the target domain that the source domain uses.
To define a gateway node, run the following command from the installation directory of the target domain:
infasetup DefineGatewayNodeSpecify the following options:
<-DatabaseAddress|-da> database_hostname:database_port|<-DatabaseConnectionString|-cs> database_connection_string[<-DatabaseUserName|-du> database_user_name][<-DatabasePassword|-dp> database_password]<-DatabaseType|-dt> database_type ORACLE|DB2|MSSQLSERVER|SYBASE[<-DatabaseServiceName|-ds> database_service_name]<-DomainName|-dn> domain_name<-NodeName|-nn> node_name<-NodeAddress|-na> node_host:port [<-ServiceManagerPort|-sp> service_manager_port] [<-ServerPort|-sv> server_shutdown_port] [<-AdminconsolePort|-ap> admin_tool_port] [<-HttpsPort|-hs> admin_tool_https_port] [<-MinProcessPort|-mi> minimum_port] [<-MaxProcessPort|-ma> maximum_port] [<-AdminconsoleShutdownPort|-asp> admin_tool_shutdown_port]<-ResourceFile|-rf> resource_file<-LogServiceDirectory|-ld> log_service_directory
15
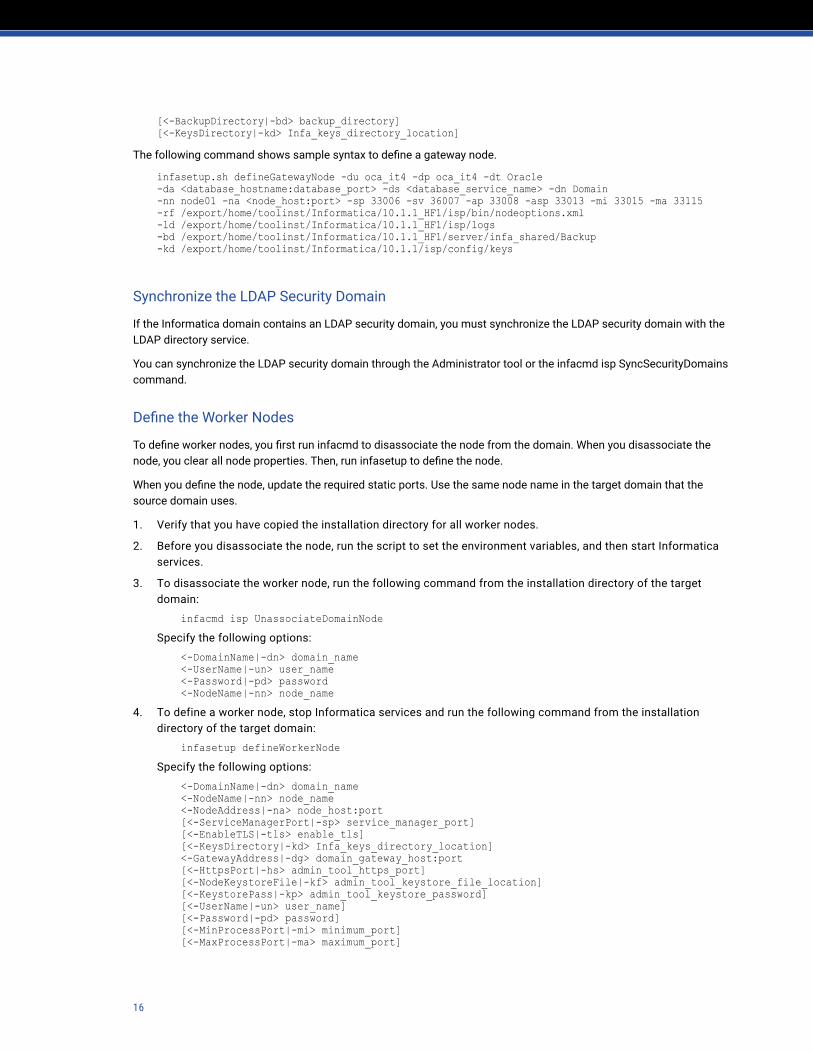
[<-BackupDirectory|-bd> backup_directory][<-KeysDirectory|-kd> Infa_keys_directory_location]
The following command shows sample syntax to define a gateway node.
infasetup.sh defineGatewayNode -du oca_it4 -dp oca_it4 -dt Oracle -da <database_hostname:database_port> -ds <database_service_name> -dn Domain -nn node01 -na <node_host:port> -sp 33006 -sv 36007 -ap 33008 -asp 33013 -mi 33015 -ma 33115 -rf /export/home/toolinst/Informatica/10.1.1_HF1/isp/bin/nodeoptions.xml -ld /export/home/toolinst/Informatica/10.1.1_HF1/isp/logs -bd /export/home/toolinst/Informatica/10.1.1_HF1/server/infa_shared/Backup -kd /export/home/toolinst/Informatica/10.1.1/isp/config/keys
Synchronize the LDAP Security Domain
If the Informatica domain contains an LDAP security domain, you must synchronize the LDAP security domain with the LDAP directory service.
You can synchronize the LDAP security domain through the Administrator tool or the infacmd isp SyncSecurityDomains command.
Define the Worker Nodes
To define worker nodes, you first run infacmd to disassociate the node from the domain. When you disassociate the node, you clear all node properties. Then, run infasetup to define the node.
When you define the node, update the required static ports. Use the same node name in the target domain that the source domain uses.
1. Verify that you have copied the installation directory for all worker nodes.
2. Before you disassociate the node, run the script to set the environment variables, and then start Informatica services.
3. To disassociate the worker node, run the following command from the installation directory of the target domain:
infacmd isp UnassociateDomainNodeSpecify the following options:
<-DomainName|-dn> domain_name<-UserName|-un> user_name<-Password|-pd> password<-NodeName|-nn> node_name
4. To define a worker node, stop Informatica services and run the following command from the installation directory of the target domain:
infasetup defineWorkerNodeSpecify the following options:
<-DomainName|-dn> domain_name<-NodeName|-nn> node_name<-NodeAddress|-na> node_host:port[<-ServiceManagerPort|-sp> service_manager_port][<-EnableTLS|-tls> enable_tls][<-KeysDirectory|-kd> Infa_keys_directory_location]<-GatewayAddress|-dg> domain_gateway_host:port[<-HttpsPort|-hs> admin_tool_https_port][<-NodeKeystoreFile|-kf> admin_tool_keystore_file_location][<-KeystorePass|-kp> admin_tool_keystore_password][<-UserName|-un> user_name][<-Password|-pd> password][<-MinProcessPort|-mi> minimum_port][<-MaxProcessPort|-ma> maximum_port]
16

[<-BackupDirectory|-bd> backup_directory]<-ResourceFile|-rf> resource_file
The following command shows sample syntax to define a gateway node:
-dn Domain -nn node03_XYZ71spldmn25 -na rh71spldmn01:11000 -sp 11001 -tls true -kd /data/Workernode101HF1_parallel_upgraded/isp/config/keys -dg invlx71qa01:11000 -un Administrator -pd Administrator -rf /data/Workernode101HF1_parallel_upgraded/isp/bin/nodeoptions.xml -hs 11111 -kf /data/keystore/Default.keystore -kp changeit -mi 11009 -ma 11109 -bd /data/keystore
Update Connection ObjectsUpdate connection objects in the target domain to access the restored databases.
Important: To avoid run-time failures, do not change the name of the connection object. If you update the name, you need to also update application service properties that refer to the connection object.
Update user information and connect strings in the connection objects that access the following databases:
Data object cache database
Exception management audit database
Duplicate and bad record tables associated with Exception transformation mappings. Update user information only.
Workflow database
Profiling warehouse database
Reference data warehouse
Note: Update the exception management connections if you prepared the databases for the split.
Configure Application Service and Domain PropertiesWhen you split the domain, you must update some service properties in the source and target domains. For example, you need to update static port numbers, database connect strings, and some file directories.
Note: If the directory paths for run-time processing were in the installation directory, you need to change the path to the copied installation directory.
Source domain
Update properties for the following services in the source domain:Analyst Service
The following table describes the properties that you need to update for the Analyst Service:
Property Description
Catalog Service Remove the Catalog Service if it is configured.Configure on the Properties tab.
Target domain
Update properties for the following services in the target domain:
17

Analyst Service
The following table describes the properties that you need to update for the Analyst Service:
Property Description
Flat File Cache Directory Directory of the flat file cache where the Analyst tool stores uploaded flat files.Configure on the Properties tab.
Exception Audit Database Schema
The schema that stores audit data for exception and cluster tasks. Update if you perform exception management tasks for both traditional and big data use cases.Configure on the Properties tab.
Metadata Manager Service
Remove the Metadata Manager Service if it is configured.Configure on the Properties tab.
Temporary Export File Directory
Location where the Analyst Service stores business glossary file exports prior to browser download.Configure on the Properties tab.
Asset Attachments Directory
Stores attachments that you add to business glossary assets.Configure on the Properties tab.
HTTP Port The HTTP port on which the Analyst Service runs.Configure on the Processes tab.
HTTPS Port The HTTPS port on which the Analyst Service runs when you enable secure communication.Configure on the Processes tab.
Keystore File Path and file name that contains keys and certificates. Required if you enable TLS and use HTTPS connections.Configure on the Processes tab.
Content Management Service
The following table describes the properties that you need to update for the Content Management Service:
Property Description
Temporary File Location Path to the directory that stores reference data during the import process.Configure on the Properties tab.
HTTP Port The HTTP port on which the Content Management Service runs.Configure in the Security Options section on the Processes tab.
HTTPS Port The HTTPS port on which the Content Management Service runs when you enable secure communication.Configure in the Security Options section on the Processes tab.
Keystore File Path and file name of the keystore file. Required if you enable TLS and use HTTPS connections for the service.Configure on the Processes tab.
18

Property Description
Reference Data Location
Path to the directory that contains the identity population files.Configure in the Identity Properties section on the Processes tab.Note: You can share the identity population files between the domains.
Cache Directory Path to the directory that contains the temporary data files that the Data Integration Service generates during identity analysis.Configure in the Identity Properties section on the Processes tab.
Index Directory Path to the directory that contains the temporary index files that the Data Integration Service generates during identity analysis.Configure in the Identity Properties section on the Processes tab.
NER File Location Path to the probabilistic model files.Configure in the NLP Options section on the Processes tab.
Classifier File Location Path to the classifier model files.Configure in the NLP Options section on the Processes tab.
Note: If you perform address validation tasks on the native environment, the domains can share the address validation files.
Data Integration Service
The following table describes the properties that you need to update for the Data Integration Service:
Property Description
Home directory The root directory used by the node.Configure in the Execution Options section on the Properties tab.
Temporary Directories
Directory for temporary files created when a job runs.Configure in the Execution Options section on the Properties tab.
Cache Directory Directory for transformation index and data cache files.Configure in the Execution Options section on the Properties tab.
Source Directory Directory for flat file sources.Configure in the Execution Options section on the Properties tab.
Target Directory Directory for flat file targets.Configure in the Execution Options section on the Properties tab.
Reject Files Directory
Stores mapping reject files.Configure in the Execution Options section on the Properties tab.
Data Integration Service Hadoop Distribution Directory
The Hadoop distribution directory on the Data Integration Service node.Configure in the Execution Options section on the Properties tab.Note: Required only if you are splitting a version 10.2 domain.
19

Property Description
Profile results Stores the exported profile results.Configure in the Profiling Warehouse Database Properties section on the Properties tab.
HTTP Port The HTTP port on which the Data Integration Service runs.Configure in the Data Integration Service Security Properties section on the Processes tab.
HTTPS Port The HTTPS port on which the Data Integration Service runs when you enable secure communication.Configure in the Data Integration Service Security Properties section on the Processes tab.
Keystore File Path and file name of the keystore file. Required if you enable TLS and use HTTPS connections for the service.Configure in the HTTP Configuration Properties section on the Processes tab.
Truststore File Path and file name of the truststore file that contains authentication certificates.Configure in the HTTP Configuration Properties section on the Processes tab.
Log Directory Directory for the node process logs.Configure in the Logging Options section on the Processes tab.
Custom properties Update all custom properties that point to the Informatica installation directory of the source domain. For example, ExecutionContextOptions.JVMOption.
Model Repository Service
The following table describes the properties that you need to update for the Model Repository Service:
Property Description
Username The user account for the Model repository database.Configure on the Properties tab.
Password The password for the Model repository user.Configure on the Properties tab.
JDBC Connect String The connection string to the Model repository database.Configure on the Properties tab.
Secure JDBC Parameters
The secure database parameters for a Model repository database that is secured with the SSL protocol.Configure on the Properties tab.
Database Schema The schema name for a Microsoft SQL Server database.Configure on the Properties tab.
Database Tablespace The tablespace name for an IBM DB2 database.Configure on the Properties tab.
20
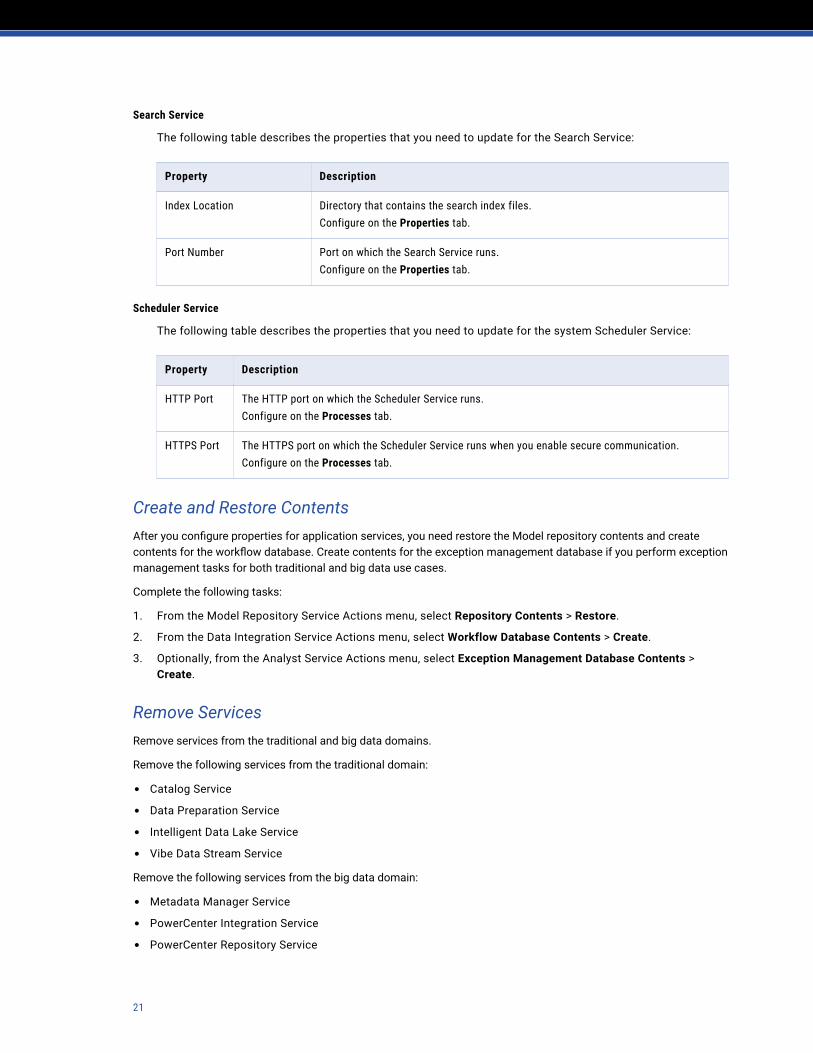
Search Service
The following table describes the properties that you need to update for the Search Service:
Property Description
Index Location Directory that contains the search index files.Configure on the Properties tab.
Port Number Port on which the Search Service runs.Configure on the Properties tab.
Scheduler Service
The following table describes the properties that you need to update for the system Scheduler Service:
Property Description
HTTP Port The HTTP port on which the Scheduler Service runs.Configure on the Processes tab.
HTTPS Port The HTTPS port on which the Scheduler Service runs when you enable secure communication.Configure on the Processes tab.
Create and Restore ContentsAfter you configure properties for application services, you need restore the Model repository contents and create contents for the workflow database. Create contents for the exception management database if you perform exception management tasks for both traditional and big data use cases.
Complete the following tasks:
1. From the Model Repository Service Actions menu, select Repository Contents > Restore.
2. From the Data Integration Service Actions menu, select Workflow Database Contents > Create.
3. Optionally, from the Analyst Service Actions menu, select Exception Management Database Contents > Create.
Remove ServicesRemove services from the traditional and big data domains.
Remove the following services from the traditional domain:
• Catalog Service
• Data Preparation Service
• Intelligent Data Lake Service
• Vibe Data Stream Service
Remove the following services from the big data domain:
• Metadata Manager Service
• PowerCenter Integration Service
• PowerCenter Repository Service
21
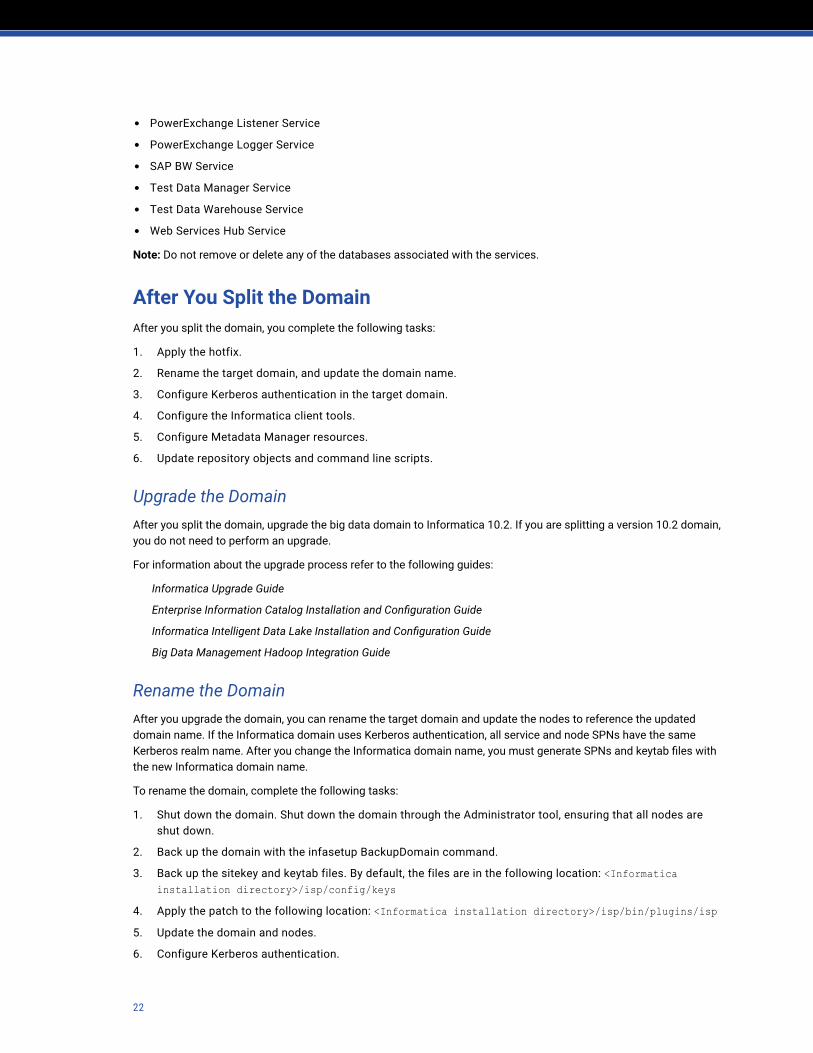
• PowerExchange Listener Service
• PowerExchange Logger Service
• SAP BW Service
• Test Data Manager Service
• Test Data Warehouse Service
• Web Services Hub Service
Note: Do not remove or delete any of the databases associated with the services.
After You Split the DomainAfter you split the domain, you complete the following tasks:
1. Apply the hotfix.
2. Rename the target domain, and update the domain name.
3. Configure Kerberos authentication in the target domain.
4. Configure the Informatica client tools.
5. Configure Metadata Manager resources.
6. Update repository objects and command line scripts.
Upgrade the DomainAfter you split the domain, upgrade the big data domain to Informatica 10.2. If you are splitting a version 10.2 domain, you do not need to perform an upgrade.
For information about the upgrade process refer to the following guides:
Informatica Upgrade Guide
Enterprise Information Catalog Installation and Configuration Guide
Informatica Intelligent Data Lake Installation and Configuration Guide
Big Data Management Hadoop Integration Guide
Rename the DomainAfter you upgrade the domain, you can rename the target domain and update the nodes to reference the updated domain name. If the Informatica domain uses Kerberos authentication, all service and node SPNs have the same Kerberos realm name. After you change the Informatica domain name, you must generate SPNs and keytab files with the new Informatica domain name.
To rename the domain, complete the following tasks:
1. Shut down the domain. Shut down the domain through the Administrator tool, ensuring that all nodes are shut down.
2. Back up the domain with the infasetup BackupDomain command.
3. Back up the sitekey and keytab files. By default, the files are in the following location: <Informatica installation directory>/isp/config/keys
4. Apply the patch to the following location: <Informatica installation directory>/isp/bin/plugins/isp5. Update the domain and nodes.
6. Configure Kerberos authentication.
22
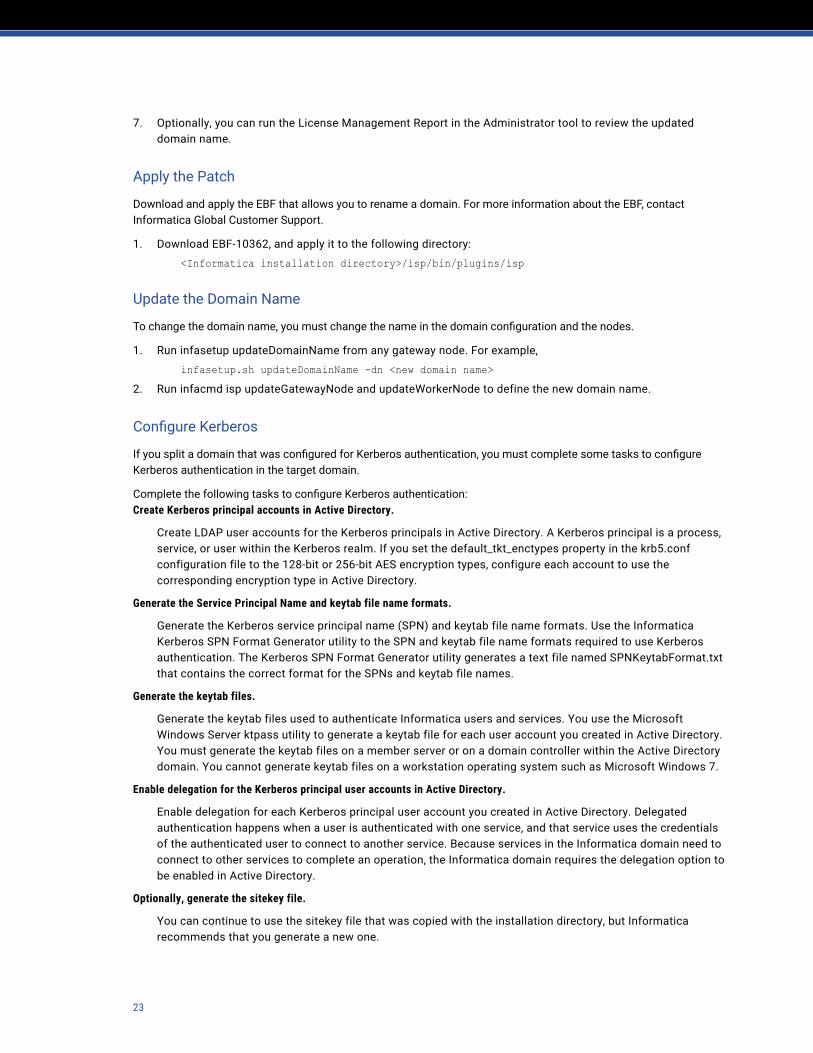
7. Optionally, you can run the License Management Report in the Administrator tool to review the updated domain name.
Apply the Patch
Download and apply the EBF that allows you to rename a domain. For more information about the EBF, contact Informatica Global Customer Support.
1. Download EBF-10362, and apply it to the following directory:
<Informatica installation directory>/isp/bin/plugins/isp
Update the Domain Name
To change the domain name, you must change the name in the domain configuration and the nodes.
1. Run infasetup updateDomainName from any gateway node. For example,
infasetup.sh updateDomainName -dn <new domain name>2. Run infacmd isp updateGatewayNode and updateWorkerNode to define the new domain name.
Configure Kerberos
If you split a domain that was configured for Kerberos authentication, you must complete some tasks to configure Kerberos authentication in the target domain.
Complete the following tasks to configure Kerberos authentication:Create Kerberos principal accounts in Active Directory.
Create LDAP user accounts for the Kerberos principals in Active Directory. A Kerberos principal is a process, service, or user within the Kerberos realm. If you set the default_tkt_enctypes property in the krb5.conf configuration file to the 128-bit or 256-bit AES encryption types, configure each account to use the corresponding encryption type in Active Directory.
Generate the Service Principal Name and keytab file name formats.
Generate the Kerberos service principal name (SPN) and keytab file name formats. Use the Informatica Kerberos SPN Format Generator utility to the SPN and keytab file name formats required to use Kerberos authentication. The Kerberos SPN Format Generator utility generates a text file named SPNKeytabFormat.txt that contains the correct format for the SPNs and keytab file names.
Generate the keytab files.
Generate the keytab files used to authenticate Informatica users and services. You use the Microsoft Windows Server ktpass utility to generate a keytab file for each user account you created in Active Directory. You must generate the keytab files on a member server or on a domain controller within the Active Directory domain. You cannot generate keytab files on a workstation operating system such as Microsoft Windows 7.
Enable delegation for the Kerberos principal user accounts in Active Directory.
Enable delegation for each Kerberos principal user account you created in Active Directory. Delegated authentication happens when a user is authenticated with one service, and that service uses the credentials of the authenticated user to connect to another service. Because services in the Informatica domain need to connect to other services to complete an operation, the Informatica domain requires the delegation option to be enabled in Active Directory.
Optionally, generate the sitekey file.
You can continue to use the sitekey file that was copied with the installation directory, but Informatica recommends that you generate a new one.
23

Run the infasetup GenerateEncryptionKey and MigrateEncryptionKey commands on each node in the domain. The GenerateEncryptionKey command generates the sitekey file and renames the previous sitekey file to sitekey_old. The MigrateEncryptionKey command associates the sitekey file with the renamed domain and secures sensitive data.
By default, the sitekey file is in the following location: <Informatica installation directory>/isp/config/keys
Note: You must keep the name of the domain, the keyword for the encryption key, and the encryption key file in a secure location. The domain name, keyword, and encryption key are required when you change the encryption key for the domain or move a repository to another domain. If you lose the encryption key file, you need the keyword to generate the encryption key again. If you lose the keyword and encryption key, you cannot change the encryption key for the domain or move a repository to another domain.
For information about GenerateEncryptionKey and MigrateEncryptionKey see the Informatica Command Reference.
For more information about tasks related to configuring Kerberos, see the Informatica Security Guide.
Configure the Developer Tool for Different VersionsIf you upgraded a domain after the split, you must install the Developer tool and configure it.
Configure run.bat
If the domain is configured for secure communication, set the truststore environment variables when one of the following conditions is true:
• You do not use the default SSL certificate.
• You store the default certificate in a location other than the default location.
Edit the run.bat file associated with the version of the upgraded domain to set INFA_TRUSTSTORE and INFA_TRUSTSTORE_PASSWORD environment variables.
Configure preferences
Open the Developer tool to set preferences. Edit Informatica domain preferences to configure the updated domain name and gateway port number.
Configure the Developer tool for Hadoop integration
Complete the following tasks to configure the Developer tool for Hadoop integration:
• Extract the cluster configuration files. To browse metadata on the Hadoop cluster, the Developer tool requires access to the *-site.xml files.
• Configure developerCore.ini. Enable communication between the Developer tool and the Hadoop cluster.
• Configure the Developer tool for Kerberos. Generate Kerberos credential files to import metadata from Hive, HBase, and complex file sources.
For information about configuring the Developer tool for Hadoop integration, see the Big Data Management Hadoop Integration Guide.
Configure the Developer Tool for the Same VersionIf you did not upgrade the domain after the split and the domains run on the same Informatica version, you access both domains from the same Developer tool client.
Configure a separate run.bat file for the target domain to use a separate workspace directory and access truststore files. Optionally, you can create a shortcut on the Windows Start menu or taskbar.
24
Configure run.bat
To access more than one domain from the same Developer tool, you need to launch the client from a separate run.bat file that is configured for each domain.
1. Copy run.bat to create a separate file for the target domain. You can find run.bat in the following location:
<Informatica installation directory>\<version number>\clients\DeveloperClient2. Optionally, name the file based on the type of domain, such as run_bigdata.bat.
3. Edit the run.bat file for the target domain:
a. Configure the -data option in the developerCore.exe entry to write to a unique workspace directory. For example,
developerCore.exe -data C:\Informatica\<version number>\clients\DeveloperClient\<big data workspace directory>
b. If the domain is configured for secure communication, and you do not use the default SSL certificate, or if you store the default certificate in a location other than the default location, edit the run.bat file to set INFA_TRUSTSTORE and INFA_TRUSTSTORE_PASSWORD environment variables.
Changes take effect when you start the Developer tool. If the workspace directory does not exist, the Developer tool creates the directory.
Configure preferences
Open the Developer tool to set preferences. Edit Informatica preferences to configure the updated domain name, gateway port number, default Data Integration Service, and the operating system profiles.
Create a shortcut
Optionally, you can pin the run.bat file for the target domain to the Windows desktop or the taskbar.
Update Repository Objects and ScriptsAfter you split the domain, you need to update repository objects to avoid conflicts or unexpected results.
Consider the following types of updates after you split the domain:
• Verify cache directories for transformations, such as the Aggregator, Sorter, Joiner, and Lookup transformations.
• If any mapping runs on both domains, resolve source and target conflicts between the domains.
• Update parameters in objects, such as transformations, mappings, and workflows. Verify the parameter values that use in relational targets and parameters that pass directories and file names.
• Update all scripts, such as infacmd scripts, that you want to run against the renamed domain.
• If any deployed applications contain jobs that run in the native and Hadoop environments, you must separate them into separate applications.
• If you perform exception management tasks for both traditional and big data use cases, update Exception transformation mappings with the following process:
1. Delete duplicate and bad record target objects from the mapping.
2. Remove the objects from the Model repository.
3. Generate the bad record tables and exception records tables from the mapping Configuration tab.
4. Deploy the workflow application.
Note: You do not need to modify the data source of the Human task in the workflow associated with the mapping.
25
Uninstalling the Copied DomainIf you upgrade the target domain after you split the domain, you might want to uninstall the set of binaries that you copied from the source location.
Consider the following scenario:
1. You copy the installation directory for the source_10.1.1 domain.
2. You restore the copied binaries to create the copy_10.1.1 domain.
3. You upgrade copy _10.1.1 to target_10.2.
4. You do not need the copy_10.1.1 domain, and you want to uninstall it.
Warning: If you run the uninstaller from the copy_10.1.1 domain, the installer will uninstall the source_10.1.1 domain.
To uninstall copy_10.1.1, complete the following tasks:
1. Delete the following directory from copy_10.1.1: <Informatica installation directory for copy_10.1.1>/Uninstaller_Server
2. Run the following command on Linux:
rm -rf <Informatica installation directory for copy_10.1.1>Note: You can run the installer to uninstall the upgraded domain.
Troubleshooting
The Analyst Service does not display content.Perform the following actions:
1. In the Administrator tool, disable the Analyst Service.
2. Delete the analyst folder from the following directory: <INFA_HOME>/services/AnalystService3. Delete the Analyst Service folder from the following directory: <INFA_HOME>/tomcat/temp4. Enable the Analyst Service.
The Analyst Service does not start.This issue occurs when the Metadata Manager Service is unavailable on the big data domain but it is linked to the Analyst Service. Check if you have configured some of the Metadata Manager Service Properties for the Analyst Service in the Administrator tool. Edit the Analyst Service properties to remove the Metadata Manager configuration properties, such as the Metadata Manager File Location and Metadata Manager Lineage Graph Location.
Checklist to Split a DomainThe splitting a domain checklist summarizes the tasks that you must perform to split the domain.
Before You Split the DomainBefore you split the domain, perform the following tasks:
Verify that your machine meets system requirements.
Plan for port numbers to avoid conflicts in static ports.
Prepare databases associated with common services.
26

Back up the contents of the domain configuration repository and all Model repositories.
Split the DomainSplit the Informatica domain into traditional and big data domains.
Perform the following tasks:
Copy the Informatica installation directory to a different location on the same host machine.
Configure environment variables for the target domain.
Verify or create run-time directories for the target domain.
Define the target domain.
•Restore the domain.
•Define the gateway nodes.
•Synchronize the LDAP security domain.
•Define worker nodes.
Update connection objects in the target domain to access restored databases.
Restore the Model repository and create database contents from the Administrator tool.
Configure the common application services in the source and target domains.
Remove PowerCenter services from the big data domain.
Remove big data services from the traditional domain.
After You Split the DomainAfter you split the domain, perform the following tasks:
Upgrade the big data domain.
Rename the domain.
•Shut down and back up the domain.
•Back up the sitekey and keytab files.
•Download the patch to rename the domain.
•Update the domain and nodes.
Configure Kerberos authentication.
Configure the Developer tool.
Update mappings.
AuthorInformatica Documentation Team
27