Infoblox Deployment Guide - Infoblox vDiscovery for GCP - …€¦ · Infoblox REST API guide for...
16
DEPLOYMENT GUIDE Infoblox vDiscovery for GCP - Google Cloud Platform
Transcript of Infoblox Deployment Guide - Infoblox vDiscovery for GCP - …€¦ · Infoblox REST API guide for...
DEPLOYMENT GUIDE Infoblox vDiscovery for GCP -
Google Cloud Platform

Deployment Guide – Infoblox vDiscovery for Google Cloud Platform
2
TABLE OF CONTENTS Overview .............................................................................................................................................. 3
Introduction ........................................................................................................................................ 3
Prerequisites ...................................................................................................................................... 3
Basic Workflow ................................................................................................................................... 3
Enabling GCP for vDiscovery ............................................................................................................ 4
Service Account ................................................................................................................................. 4
Infoblox vDiscovery Task ................................................................................................................... 8
Create a vDiscovery Task .................................................................................................................. 8
Run the vDiscovery Task ................................................................................................................. 12
vDiscovery Data ................................................................................................................................ 13
Cloud Network Automation .............................................................................................................. 13
IPAM................................................................................................................................................. 14

Deployment Guide – Infoblox vDiscovery for Google Cloud Platform
3
Overview
Introduction
Infoblox vDiscovery provides enhanced visibility of your networks and virtual machines, and
automatic creation of DNS records for discovered IP addresses.
With Infoblox vDiscovery, you will find an easy to deploy and cost-effective solution that enables
visibility, reporting and automation of your network and VM resources across multiple cloud
platforms, including Google Cloud Platform, or GCP, and for multiple accounts/subscriptions,
bringing all this data under a single pane of glass. In this guide, you will be introduced to Infoblox
vDiscovery for GCP.
Prerequisites
The following are prerequisites for Infoblox vDiscovery with GCP:
• Valid subscription and login to GCP.
• Ability to create (or obtain) the key for a service account.
• The appropriate roles assigned to the service account used by vDiscovery.
• An existing VM instance, or appropriate permissions to create a new GCE instance (optional).
• TCP port 443 access from the Infoblox appliance that will run vDiscovery.
• Be able to resolve and access common resources from the Infoblox appliance that will run
vDiscovery, such as:
o accounts.google.com
o oauth2.googleapis.com
o www.googleapis.com
o gserviceaccount.com
Note: The Cloud Network Automation (CNA) license in NIOS is optional.
Basic Workflow
The following bullet points outline the basic steps involved with creating a vDiscovery task for
GCP:
• Sign in to the GCP Console (https://console.cloud.google.com/).
• Create/review your service account that will be used by vDiscovery and verify that the
appropriate role(s) is assigned.
• Generate/obtain the key for the service account that will be used by vDiscovery.
• In NIOS, navigate to either the Data Management or Cloud tab.
• Create the vDiscovery task.
• Run the vDiscovery task.
Deployment Guide – Infoblox vDiscovery for Google Cloud Platform
4
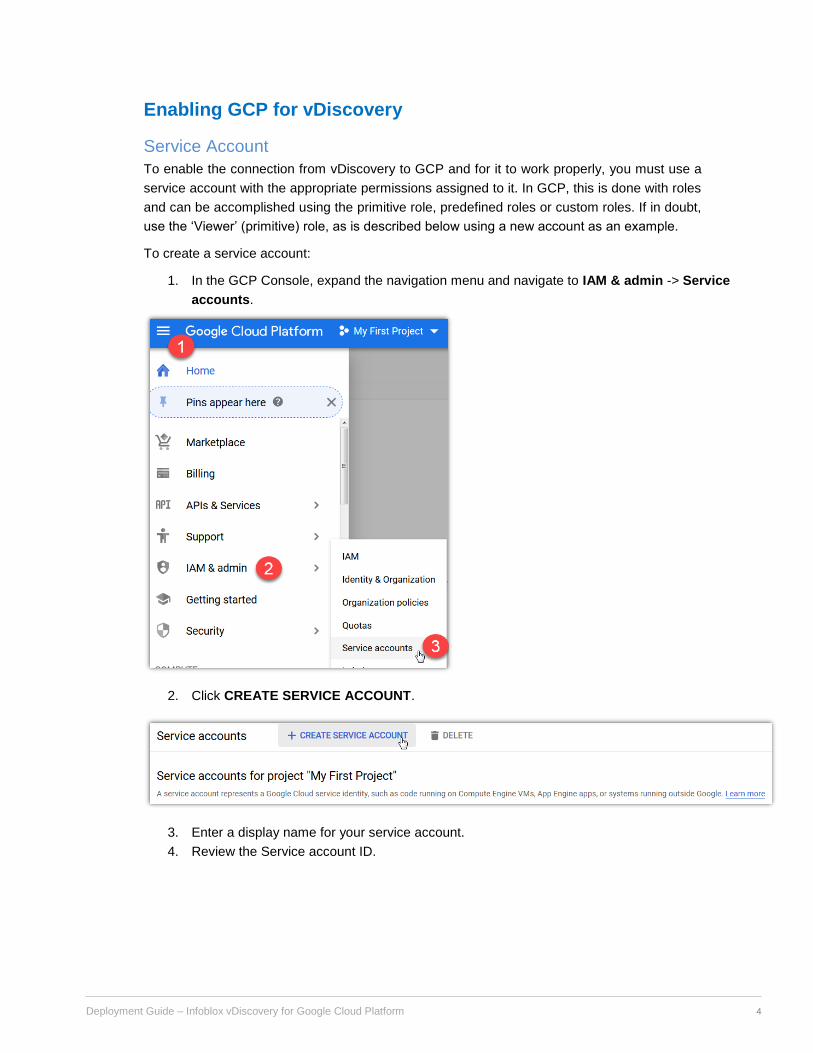
Enabling GCP for vDiscovery
Service Account
To enable the connection from vDiscovery to GCP and for it to work properly, you must use a
service account with the appropriate permissions assigned to it. In GCP, this is done with roles
and can be accomplished using the primitive role, predefined roles or custom roles. If in doubt,
use the ‘Viewer’ (primitive) role, as is described below using a new account as an example.
To create a service account:
1. In the GCP Console, expand the navigation menu and navigate to IAM & admin -> Service
accounts.
2. Click CREATE SERVICE ACCOUNT.
3. Enter a display name for your service account.
4. Review the Service account ID.

Deployment Guide – Infoblox vDiscovery for Google Cloud Platform
5
5. Optional: Enter a Service account description. Click CREATE.
6. Expand the Select a role menu.

Deployment Guide – Infoblox vDiscovery for Google Cloud Platform
6
7. Select Project -> Viewer and click Continue.
8. Click CREATE KEY.

Deployment Guide – Infoblox vDiscovery for Google Cloud Platform
7
9. Select JSON and click CREATE.
10. If prompted, complete any steps to save the resulting file.
Note: This key will contain all connection details, including endpoint addresses (URLs) and
the keys required to authenticate with GCP. This will be downloaded as a file, so you may
need to check your popup blocker settings if the download fails or you never see this happen.
11. Click Close.

Deployment Guide – Infoblox vDiscovery for Google Cloud Platform
8
Infoblox vDiscovery Task Infoblox vDiscovery can work with or without the Cloud Network Automation (CNA) license. CNA
provides enhanced visibility for your cloud resources, greatly extending your searching, reporting
and monitoring capabilities. When deployed without CNA, vDiscovery will help you keep your
IPAM data up to date.
Create a vDiscovery Task
1. Login to the Infoblox Grid Manager GUI.
2. Switch to the Cloud or Data Management -> IPAM tab.
3. Expand the vDiscovery menu and select Discovery Manager.
4. Click on the + (Add) button.
5. Enter a descriptive name.
6. Click Select to assign a Grid member to the vDiscovery task.
7. Click Next.
8. In the Server Type* menu, select GCP.
Note: This guide is intended as an introduction to Infoblox vDiscovery for GCP; however, vDiscovery also supports other services.

Deployment Guide – Infoblox vDiscovery for Google Cloud Platform
9
9. Click on the Upload button.
Note: The file name for the service account file must be unique.
10. Follow the prompts to select and upload your service account key file.
11. Click Close.
12. Click Next.
13. Review the configuration available for Network Views.
Note: The most common cause for vDiscovery to fail to import any data is a “Sync Error”
due to overlapping/conflicting address space. To account for any address space conflicts
that are encountered during the vDiscovery process or with your existing IPAM data, you
may need to select the option to use “The tenant's network view (if it does not exist,
create a new one)”.

Deployment Guide – Infoblox vDiscovery for Google Cloud Platform
10
14. Click Next.
15. For automatic creation of DNS records, enable the option “For every newly discovered IP
address, create:”.
A. Select the desired DNS record object type. If in doubt, stick with the default (Host)
option. For zones integrated with the Microsoft Management feature, use the A &
PTR Record option.
B. The name for DNS records that are created is controlled with a macro, with the most
commonly used macro being ${vm_name). In the text box, type the desired macro,
followed by the zone that you want to use. Example: ${vm_name}.mycompany.com
• The zone must be created separately from the vDiscovery task, though this can be done
after the vDiscovery has already been created. If vDiscovery runs before the zone is
created, any discovered objects will be marked as ‘unmanaged’ until the zone is created,
and it runs again.
• If a different format is desired for the DNS record name, a full list of available macros can
be found in the Help panel. To view this, click on the question mark at the top-right hand
corner of the window and scroll down to the section titled “The DNS name will be
computed from the formula”.
Deployment Guide – Infoblox vDiscovery for Google Cloud Platform
11
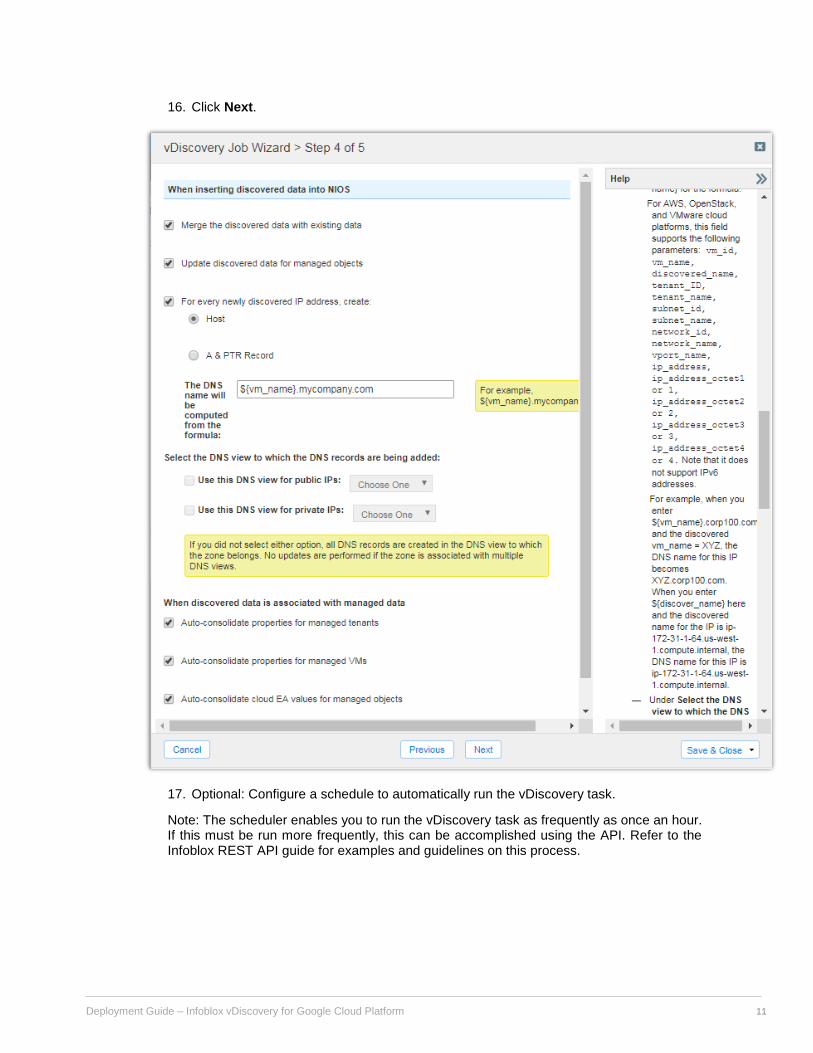
16. Click Next.
17. Optional: Configure a schedule to automatically run the vDiscovery task.
Note: The scheduler enables you to run the vDiscovery task as frequently as once an hour. If this must be run more frequently, this can be accomplished using the API. Refer to the Infoblox REST API guide for examples and guidelines on this process.

Deployment Guide – Infoblox vDiscovery for Google Cloud Platform
12
18. Click Save & Close.
Run the vDiscovery Task
To manually start the vDiscovery task:
1. In the vDiscovery Job Manager, click on the gear wheel and select Start.
2. Click Yes to start the vDiscovery job.
3. Click the Refresh button at the bottom of the window until the Status shows Job completed.
Note: The status may show the vDiscovery task completed but with warnings. This can
happen if objects are skipped, including if the name for a VM is in an invalid format
(vDiscovery does not support dotted VM names), for any instances that have been
terminated, or if the zone configured in the vDiscovery task cannot be found.
4. Click Close.
Deployment Guide – Infoblox vDiscovery for Google Cloud Platform
13
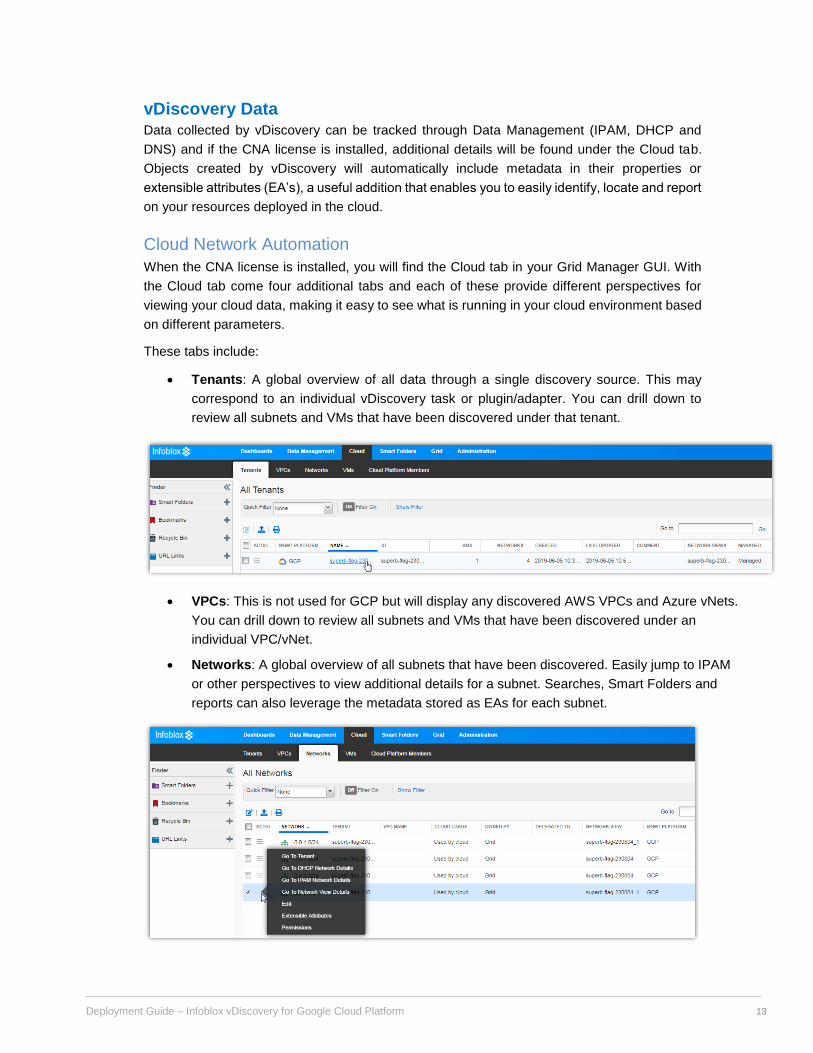
vDiscovery Data Data collected by vDiscovery can be tracked through Data Management (IPAM, DHCP and
DNS) and if the CNA license is installed, additional details will be found under the Cloud tab.
Objects created by vDiscovery will automatically include metadata in their properties or
extensible attributes (EA’s), a useful addition that enables you to easily identify, locate and report
on your resources deployed in the cloud.
Cloud Network Automation
When the CNA license is installed, you will find the Cloud tab in your Grid Manager GUI. With
the Cloud tab come four additional tabs and each of these provide different perspectives for
viewing your cloud data, making it easy to see what is running in your cloud environment based
on different parameters.
These tabs include:
• Tenants: A global overview of all data through a single discovery source. This may
correspond to an individual vDiscovery task or plugin/adapter. You can drill down to
review all subnets and VMs that have been discovered under that tenant.
• VPCs: This is not used for GCP but will display any discovered AWS VPCs and Azure vNets.
You can drill down to review all subnets and VMs that have been discovered under an
individual VPC/vNet.
• Networks: A global overview of all subnets that have been discovered. Easily jump to IPAM
or other perspectives to view additional details for a subnet. Searches, Smart Folders and
reports can also leverage the metadata stored as EAs for each subnet.
Deployment Guide – Infoblox vDiscovery for Google Cloud Platform
14
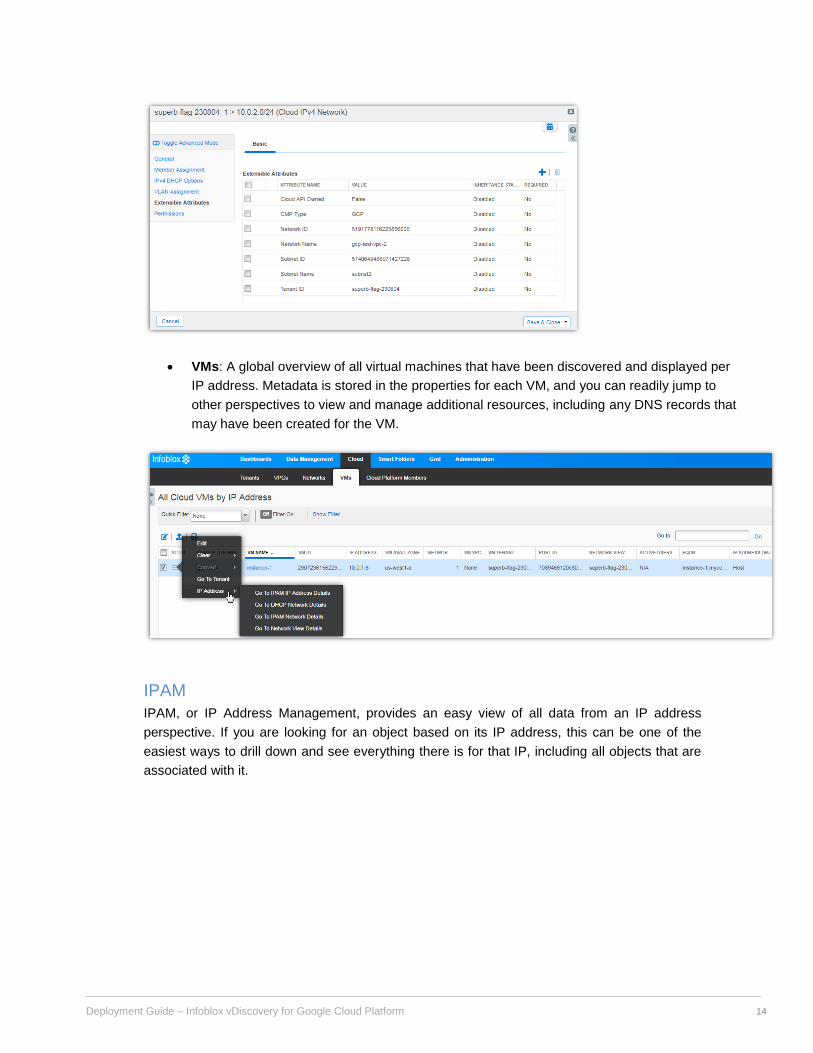
• VMs: A global overview of all virtual machines that have been discovered and displayed per
IP address. Metadata is stored in the properties for each VM, and you can readily jump to
other perspectives to view and manage additional resources, including any DNS records that
may have been created for the VM.
IPAM
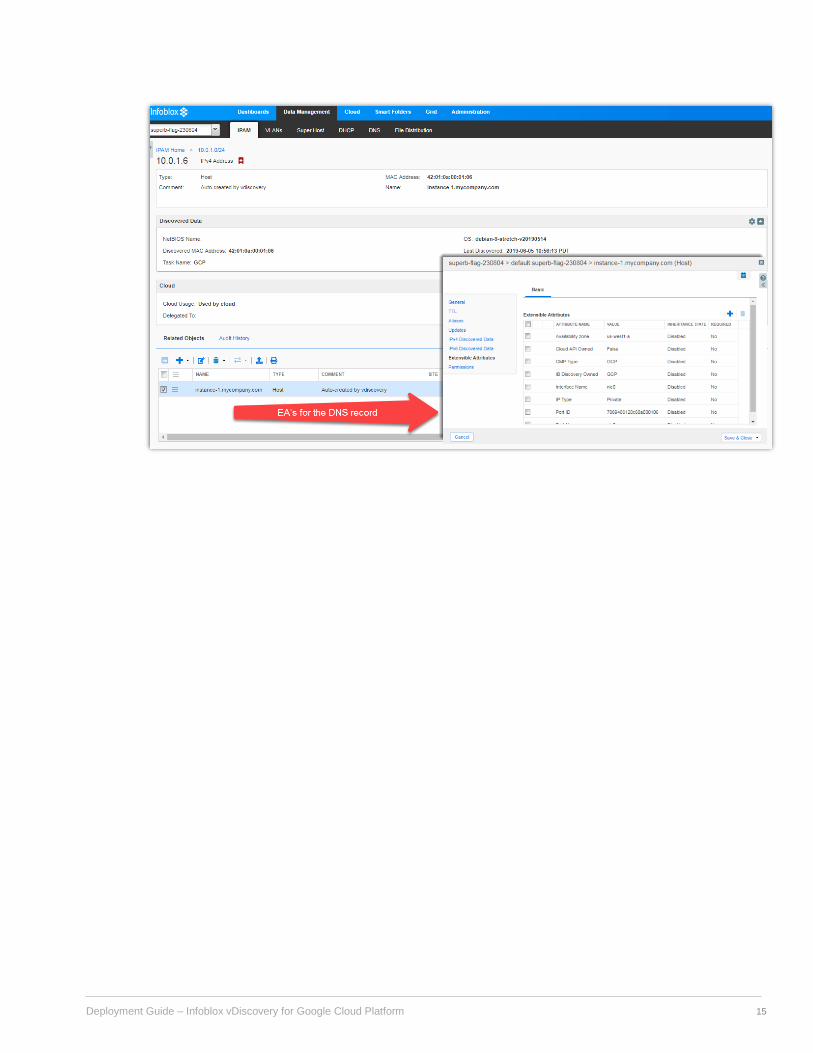
IPAM, or IP Address Management, provides an easy view of all data from an IP address
perspective. If you are looking for an object based on its IP address, this can be one of the
easiest ways to drill down and see everything there is for that IP, including all objects that are
associated with it.
Deployment Guide – Infoblox vDiscovery for Google Cloud Platform
15

Infoblox is leading the way to next-level DDI with its Secure Cloud-Managed Network Services. Infoblox brings next-level security,
reliability and automation to on-premises, cloud and hybrid networks, setting customers on a path to a single pane of glass for network
management. Infoblox is a recognized leader with 50 percent market share comprised of 8,000 customers, including 350 of the
Fortune 500.
Corporate Headquarters | 3111 Coronado Dr. | Santa Clara, CA | 95054
+1.408.986.4000 | 1.866.463.6256 (toll-free, U.S. and Canada) | [email protected] | www.infoblox.com
© 2018 Infoblox, Inc. All rights reserved. Infoblox logo, and other marks appearing herein are property of Infoblox, Inc. All other marks are the
property of their respective owner(s).