Individual Internet Banking
93
Online Banking Department-November v1.1 Page 1 of 93 Individual Internet Banking CUSTOMER USER GUIDE | November.15
Transcript of Individual Internet Banking

Online Banking Department-November v1.1 Page 1 of 93
Individual Internet Banking CUSTOMER USER GUIDE | November.15

Online Banking Department – September 2015 v1.1 Page 2 of 93
Contents 3 Introduction 4 Getting Started 5 Logon to Canadia Corporate Internet Banking 8 View Account List
9 View Account Information and Transaction History 10 Print and Download the Transaction History 12 View Foreign Exchange Rate
13 View Interest Rate 14 User Information 15 Login History 16 Transaction History on Internet Banking
18 Transfer Funds between Your Accounts (Same Currency) 22 Transfer Funds between Your Accounts (Different Currency) 26 Transfer Funds to Third Party (Same Currency)
31 Transfer Funds to Third Party (Different Currency) 36 Domestic Transfer 41 Overseas Transfer
46 Bank Cheque or Draft Request 51 Cheque Book Re-Order 55 Set up an Automatic Payment 59 View and Delete Automatic Payments
60 View Automatic Payments by Date 61 Bill Payment (Different Currency) 68 Bill Payment (Same Currency)
69 Add a New Beneficiary 72 Create a Transaction Template 75 Transfer Funds using a Saved Transaction Template 80 Open an Online Fixed Deposit
85 Close an Online Fixed Deposit 89 Change Password 90 Reset Password
93 Contact Us
Online Banking Department-November v1.1 Page 3 of 93
Introduction Canadia Individual Internet Banking Looking for a fast, convenient way to bank? Say goodbye to queues with Canadia Individual Internet Banking. Enjoy fast and secure access to your accounts - 24 hours a day, 7 days a week. Take care of your everyday banking from the comfort of your desk. With your accounts at your fingertips, it is easy to pay bills, check balances, view transactions, transfer funds, multi-payments and more. This User Guide tells you everything to get you started on Canadia Individual Internet Banking. Get ready to enjoy the best online banking experience possible.
Back to contents

Online Banking Department-November v1.1 Page 4 of 93
Getting Started Once you have an individual account with Canadia Bank, getting started with Individual Internet Banking is
quick and easy.
Register for Individual Internet Banking
To register for Individual Internet Banking, simply follow the steps below.
• Work out which accounts you would like to link or access to the Individual Internet Banking
• Complete the Individual Internet and Mobile Banking Registration Form provided or at http://www.canadiabank.com.kh/ebanking/document/Individual_Form.pdf
• Talk to one of our branch staff, so that we can identify you and activate your registration
• You then will immediately receive your User ID and Temporary Password via your registered email address
Please make sure you read and accept the Canadia Internet and Mobile Banking Terms and Conditions of Use.
Back to contents

Online Banking Department – September 2015 v1.1 Page 5 of 93
Logon to Canadia Individual Internet Banking For the first log-in to the Canadia Individual Internet Banking, user is required to immediately change temporary password and select a new password comprising of both upper and lower case, numeric characters and special character with minimum of 6 and maximum of 16 characters long.
• Click “Internet Banking” icon on www.canadiabank.com.kh
Back to contents

Online Banking Department-November v1.1 Page 6 of 93
Logon to Canadia Individual Internet Banking User Login Screen
Step Field Name Action
User Name Enter 6 digit numbers provided thru your registered email
Password Enter your password
Security Code Enter 5 digit numbers randomly display on the right of the field
Login Click “Login” icon to access to the Corporate Internet Banking

Online Banking Department – September 2015 v1.1 Page 7 of 93
Logon to Canadia Individual Internet Banking Note
: To minimise associated risks when using non-private computer, then the Users are strongly recommended to use the Virtual Keyboard to enter the password which displays on the User Login Screen.
Change Password Screen (for 1st time access only)
Step Field Name Action
Current Password Enter your current password
New Password Enter your new password and must be:
• between 6 to 16 character long with no spaces
• include at least one letter and one number (special characters are allowed)
• must be with both upper and lower case letter
Confirm-New Password Re-enter your new password
Change Click “Change” icon to proceed the password change
Once the new password is successfully changed then the User is required to login again with the new password.
Click Here
Back to contents

Online Banking Department – September 2015 v1.1 Page 8 of 93
View Account List Accessing: Information Inquiry > Account > Account List Select an account by clicking the account number. This will take you to more detailed information and options related to the chosen account.
Screen 1
;
Click on account number to see
more detailed information of the account
Back to contents

Online Banking Department-November v1.1 Page 9 of 93
View Account Information and Transaction History
Screen 2
Select from drop-down list and click View to see other account numbers
• To view the transaction history, select period from drop-
down list; OR
• Enter the date details (From and To) and click View
(Maximum 3 months per view of transaction history) • Then the transaction history will display below
Back to contents

Online Banking Department-November v1.1 Page 10 of 93
Print and Download the Transaction History
Screen 3
• Click Print Information to print or
download the transaction history
• New page will be popped up and you can download or print the file Click Next or Page No. to view next
transactions

Online Banking Department-November v1.1 Page 11 of 93
Print and Download the Transaction History
You can now print or download the transaction history as the pop up above.
Screen 4
Back to contents

Online Banking Department-November v1.1 Page 12 of 93
View Foreign Exchange Rate Accessing: Information Inquiry > Foreign Exchange Rate Use this screen to view foreign exchange rate.
Screen 1
Back to contents

Online Banking Department-November v1.1 Page 13 of 93
View Interest Rate Accessing: Information Inquiry > Interest Rate Use this screen to view interest rate of Canadia Bank.
Screen 1
Back to contents
Online Banking Department-November v1.1 Page 14 of 93
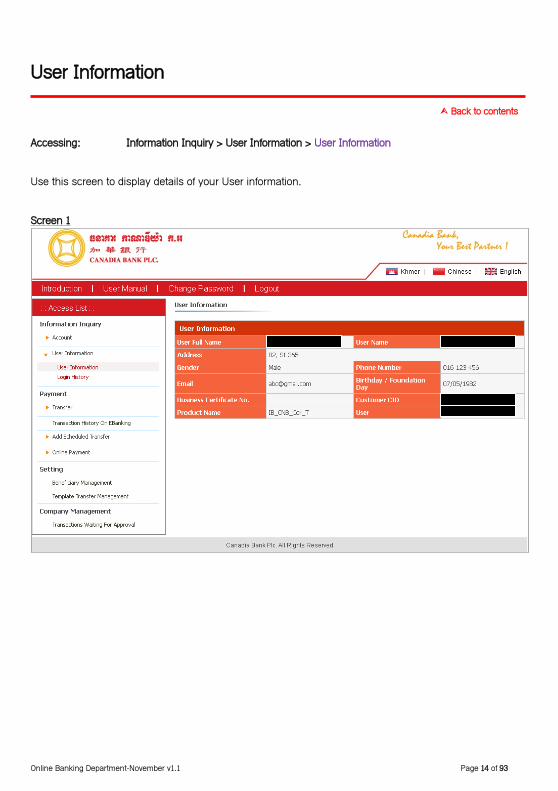
User Information Accessing: Information Inquiry > User Information > User Information Use this screen to display details of your User information.
Screen 1
Back to contents

Online Banking Department-November v1.1 Page 15 of 93
Login History Accessing: Information Inquiry > User Information > Login History Use this screen to display your login history on the Internet Banking.
Screen 1
Select period (From and To) and click View to display
Back to contents

Online Banking Department-November v1.1 Page 16 of 93
Transaction History on Internet Banking Accessing: Payment > Transaction History On EBanking Use this screen to display all transactions that you have initiated thru Internet Banking.
Screen 1
Search for transactions based on criteria above to view transaction details

Online Banking Department-November v1.1 Page 17 of 93
Transaction History on Internet Banking
Screen 2
Scroll to the right to other details
Back to contents

Online Banking Department-November v1.1 Page 18 of 93
Transfer Funds between your Accounts (Same Currency) Accessing: Payment > Transfer > Transfer to same holder account - Same currency Use this screen to move funds between your linked accounts within Canadia Bank. The function is applicable for same currency accounts only. Debit and credit accounts are in same currency.
Screen 1

Online Banking Department-November v1.1 Page 19 of 93
Transfer Funds between your Accounts (Same Currency)
Step Field Name Action
Debit Account Select from drop-down list of source/funding account
Credit Account Select from drop-down list of credit account
Amount Enter transfer amount
Note: transfer amount cannot be exceed the Total Limit of
Contact (Product) In Day that displays in the Product / Contact Remaining Limit
Payment Details Enter short notes that will display on account statement
Continue Click “Continue” to proceed further
Screen 2
Check and verify all information and click Confirm to proceed further

Online Banking Department-November v1.1 Page 20 of 93
Transfer Funds between your Accounts (Same Currency) Screen 3
Step Field Name Action
Authentication Type Select SMS OTP/RSA Token from drop down list
Get OTP Code Click on “Get OTP Code” button to get the OTP code via your registered phone number
Note: For authentication type as SMS OTP only
Authentication OTP Code Enter the OTP Code in “Authentication OTP Code” field which
received via your registered phone or the code shown on RSA Token screen
Apply Click “Apply” to finish the transaction

Online Banking Department-November v1.1 Page 21 of 93
Transfer Funds between your Accounts (Same Currency) Screen 4
Back to contents

Online Banking Department-November v1.1 Page 22 of 93
Transfer Funds between your Accounts (Different Currency) Accessing: Payment > Transfer > Transfer to same holder account - Different currency Use this screen to move funds between your linked accounts within Canadia Bank. The function is applicable for different currency accounts only. Debit and credit accounts are in different currency (USD vs
KHR or KHR vs USD). Screen 1

Online Banking Department-November v1.1 Page 23 of 93
Transfer Funds between your Accounts (Different Currency)
Step Field Name Action
Debit Account Select from drop-down list of source/funding account
Credit Account Select from drop-down list of credit account
Amount Enter transfer amount
Note: transfer amount cannot be exceed the Total Limit of
Contact (Product) In Day that displays in the Product / Contact Remaining Limit
Payment Details Enter short notes that will display on account statement
Continue Click “Continue” to proceed further
Screen 2
Check and verify all information as well
as Exchange Rate and click Confirm to proceed further

Online Banking Department-November v1.1 Page 24 of 93
Transfer Funds between your Accounts (Different Currency) Screen 3
Step Field Name Action
Authentication Type Select SMS OTP/RSA Token from drop down list
Get OTP Code Click on “Get OTP Code” button to get the OTP code via your registered phone number
Note: For authentication type as SMS OTP only
Authentication OTP Code Enter the OTP Code in “Authentication OTP Code” field which
received via your registered phone or the code shown on RSA Token screen
Apply Click “Apply” to finish the transaction

Online Banking Department-November v1.1 Page 25 of 93
Transfer Funds between your Accounts (Different Currency) Screen 3
Back to contents

Online Banking Department-November v1.1 Page 26 of 93
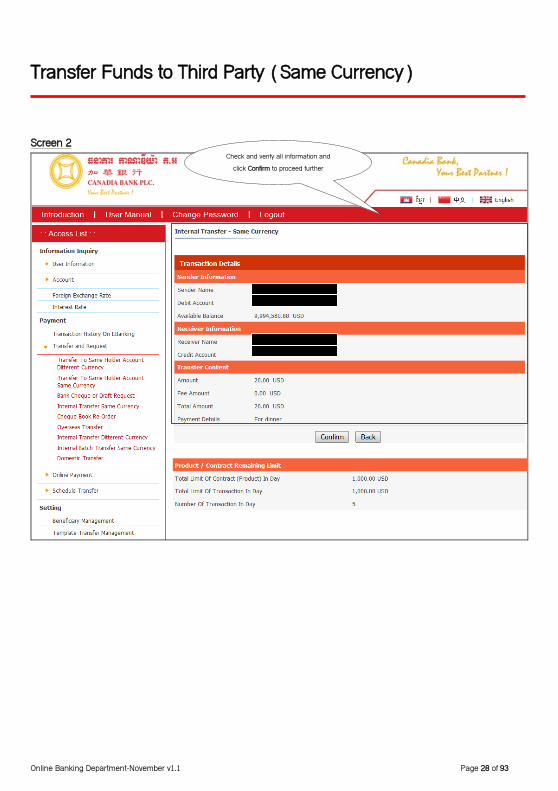
Transfer Funds to Third Party (Same Currency) Accessing: Payment > Transfer > Internal Transfer - Same currency Use this screen to transfer funds to another third party account within Canadia Bank. The function is applicable for same currency accounts only. Debit and credit accounts are in same currency.
Screen 1

Online Banking Department-November v1.1 Page 27 of 93
Transfer Funds to Third Party (Same Currency)
Step Field Name Action
Debit Account Select from drop-down list of source/funding account
Beneficiary; or
Credit Account
• Select from drop-down list of beneficiary name you have saved in the Beneficiary Management; or
• Enter account number that the funds will be credited to
Amount Enter transfer amount
Note: transfer amount cannot be exceed the Total Limit of Contact (Product) In Day that displays in the Product / Contact Remaining Limit
Payment Details Enter short notes that will display on account statement
Continue Click “Continue” to proceed further
Online Banking Department-November v1.1 Page 28 of 93
Transfer Funds to Third Party (Same Currency) Screen 2
Check and verify all information and click Confirm to proceed further

Online Banking Department-November v1.1 Page 29 of 93
Transfer Funds to Third Party (Same Currency) Screen 3
Step Field Name Action
Authentication Type Select SMS OTP/RSA Token from drop down list
Get OTP Code Click on “Get OTP Code” button to get the OTP code via your registered phone number
Note: For authentication type as SMS OTP only
Authentication OTP Code Enter the OTP Code in “Authentication OTP Code” field which
received via your registered phone or the code shown on RSA Token screen
Apply Click “Apply” to finish the transaction
Back to contents

Online Banking Department-November v1.1 Page 30 of 93
Transfer Funds to Third Party (Same Currency)
Back to contents

Online Banking Department-November v1.1 Page 31 of 93
Transfer Funds to Third Party (Different Currency) Accessing: Payment > Transfer > Internal Transfer - Different currency Use this screen to transfer funds to another third party account within Canadia Bank. The function is applicable for different currency accounts only. Debit and credit accounts are in different currency (USD vs
KHR or KHR vs USD). Screen 1

Online Banking Department-November v1.1 Page 32 of 93
Transfer Funds to Third Party (Different Currency)
Step Field Name Action
Debit Account Select from drop-down list of source/funding account
Beneficiary; or
Credit Account
• Select from drop-down list of beneficiary name you have saved in the Beneficiary Management; or
• Enter account number that the funds will be credited to
Amount Enter transfer amount
Note: transfer amount cannot be exceed the Total Limit of Contact (Product) In Day that displays in the Product / Contact Remaining Limit
Payment Details Enter short notes that will display on account statement
Continue Click “Continue” to proceed further

Online Banking Department-November v1.1 Page 33 of 93
Transfer Funds to Third Party (Different Currency) Screen 2
Check and verify all information as well
as Exchange Rate and click Confirm to proceed further

Online Banking Department – September 2015 v1.1 Page 34 of 93
Transfer Funds to Third Party (Different Currency) Screen 3
Step Field Name Action
Authentication Type Select SMS OTP/RSA Token from drop down list
Get OTP Code Click on “Get OTP Code” button to get the OTP code via your registered phone number
Note: For authentication type as SMS OTP only
Authentication OTP Code Enter the OTP Code in “Authentication OTP Code” field which
received via your registered phone or the code shown on RSA Token screen
Apply Click “Apply” to finish the transaction

Online Banking Department-November v1.1 Page 35 of 93
Transfer Funds to Third Party (Different Currency) Screen 4
Back to contents

Online Banking Department-November v1.1 Page 36 of 93
Domestic Transfer Accessing: Payment > Transfer > Domestic Transfer Use this screen to transfer funds to other beneficiary banks in Cambodia. The function is applicable for
USD and KHR currency accounts. Screen 1
11

Online Banking Department-November v1.1 Page 37 of 93
Step Field Name Action
Account Number Select the source/funding account from drop-down list
Telephone Number Enter your telephone number
Full Name Enter beneficiary’s full name
Account Number Enter beneficiary’s account number
Bank Name Select beneficiary’s bank from drop down list or other for manual input (beside existing listed bank)
Amount Enter transfer amount
Note: transfer amount cannot be exceed the Total Limit of
Contract (Product) In Day that displays in the Product / Contract Remaining Limit
Currency Select the currency to be transferred from drop down list
Purpose of Payment Select the existing purpose of your transfer or other for your own description
Relationship to Beneficiary Select from drop down list or other for your own remark
Application Occupation Select from drop down list or other for your own remark
Source of Fund Select from drop down list or other for your own remark
Continue Click “Continue” to proceed further
12
11
12

Online Banking Department-November v1.1 Page 38 of 93
Domestic Transfer Screen 2
Check and verify all information and
click Confirm to continue to proceed further

Online Banking Department - September 2015 v1.2 Page 39 of 93
Domestic Transfer Screen 3
Step Field Name Action
Authentication Type Select SMS OTP/RSA Token from drop down list
Get OTP Code Click on “Get OTP Code” button to get the OTP code via your registered phone number
Note: For authentication type as SMS OTP only
Authentication OTP Code Enter the OTP Code in “Authentication OTP Code” field which
received via your registered phone or the code shown on RSA Token screen
Apply Click “Apply” to finish the transaction
Back to contents

Online Banking Department-November v1.1 Page 40 of 93
Domestic Transfer Screen 4
Back to contents The transaction is waiting for bank staff
to process further. You can review your
transaction in Transaction History on Ebanking.
Online Banking Department-November v1.1 Page 41 of 93
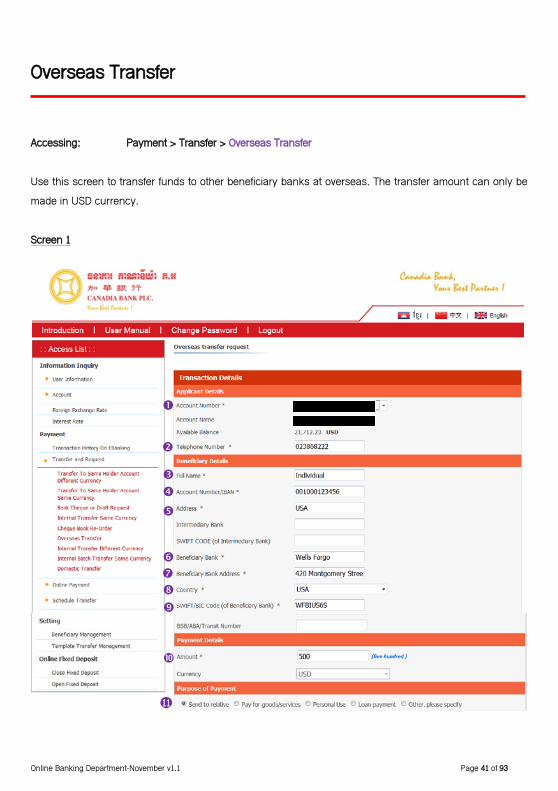
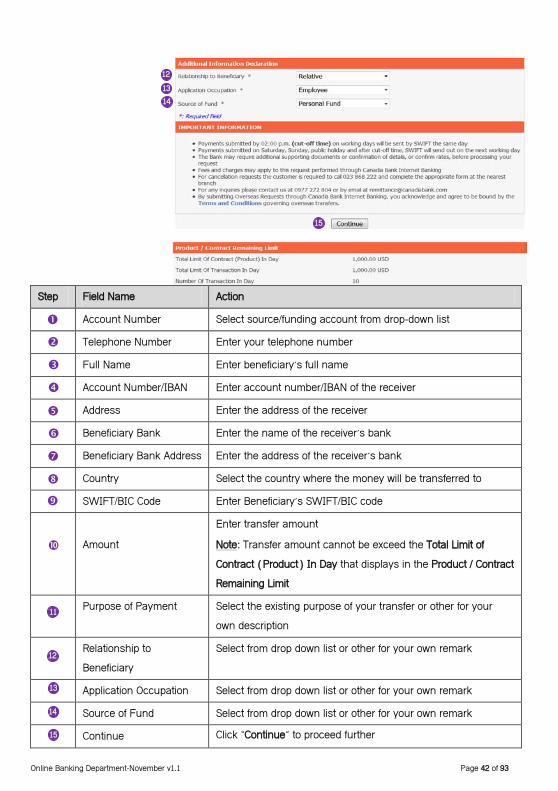
Overseas Transfer Accessing: Payment > Transfer > Overseas Transfer Use this screen to transfer funds to other beneficiary banks at overseas. The transfer amount can only be made in USD currency.
Screen 1
11
Online Banking Department-November v1.1 Page 42 of 93
Step Field Name Action
Account Number Select source/funding account from drop-down list
Telephone Number Enter your telephone number
Full Name Enter beneficiary’s full name
Account Number/IBAN Enter account number/IBAN of the receiver
Address Enter the address of the receiver
Beneficiary Bank Enter the name of the receiver’s bank
Beneficiary Bank Address Enter the address of the receiver’s bank
Country Select the country where the money will be transferred to
SWIFT/BIC Code Enter Beneficiary’s SWIFT/BIC code
Amount
Enter transfer amount
Note: Transfer amount cannot be exceed the Total Limit of
Contract (Product) In Day that displays in the Product / Contract Remaining Limit
Purpose of Payment Select the existing purpose of your transfer or other for your own description
Relationship to Beneficiary
Select from drop down list or other for your own remark
Application Occupation Select from drop down list or other for your own remark
Source of Fund Select from drop down list or other for your own remark
Continue Click “Continue” to proceed further
11
12
13
14
15
13
15
12
14

Online Banking Department-November v1.1 Page 43 of 93
Overseas Transfer Screen 2
Check and verify all information
and click Confirm to proceed further

Online Banking Department-November v1.1 Page 44 of 93
Overseas Transfer Screen 3
Step Field Name Action
Authentication Type Select SMS OTP/RSA Token from drop down list
Get OTP Code Click on “Get OTP Code” button to get the OTP code via your registered phone number
Note: For authentication type as SMS OTP only
Authentication OTP Code Enter the OTP Code in “Authentication OTP Code” field which
received via your registered phone or the code shown on RSA Token screen
Apply Click “Apply” to finish the transaction
Back to contents

Online Banking Department-November v1.1 Page 45 of 93
Overseas Transfer Screen 4
Back to contents
The transaction is waiting for
bank staff to process further. You can review your transaction in
Transaction History on Ebanking.

Online Banking Department-November v1.1 Page 46 of 93
Bank Cheque or Draft Request Accessing: Payment > Transfer > Bank Cheque or Draft Request Use this screen to request to issue bank cheque/bank draft. Bank Cheque is applicable for the request in USD and KHR currency, and Bank Draft can only be requested in USD currency.
Screen 1

Online Banking Department-November v1.1 Page 47 of 93
Bank Cheque or Draft Request
Step Field Name Action
Account Number Select source/funding account from drop-down list
Telephone Number Enter your telephone number
Payee Name Enter full name of the receiver
Amount Enter the amount request on Bank Cheque or Bank Draft
Currency Choose the currency you would like to request
Type of Request Select the type of your request from drop down list
Pick Up Branch Select the branch where you can pick up your Bank Cheque/Draft from drop down list
Purpose Describe the purpose of your payment
Continue Click “Continue” to proceed further

Online Banking Department-November v1.1 Page 48 of 93
Bank Cheque or Draft Request Screen 2
Check and verify all information and click Confirm to proceed
further

Online Banking Department-November v1.1 Page 49 of 93
Bank Cheque or Draft Request Screen 3
Step Field Name Action
Authentication Type Select SMS OTP/RSA Token from drop down list
Get OTP Code Click on “Get OTP Code” button to get the OTP code via your registered phone number
Note: For authentication type as SMS OTP only
Authentication OTP Code Enter the OTP Code in “Authentication OTP Code” field which
received via your registered phone or the code shown on RSA Token screen
Apply Click “Apply” to finish the transaction

Online Banking Department-November v1.1 Page 50 of 93
Bank Cheque or Draft Request Screen 4
Back to contents
The transaction is waiting for bank staff to process further. You
can review your transaction in Transaction History on Ebanking.

Online Banking Department-November v1.1 Page 51 of 93
Cheque Book Re-Order Accessing: Payment > Transfer > Cheque Book Re-Order Use this screen to request to re/issue a new cheque book. This function is applicable for current account,
current elite account and overdraft account. Screen 1
Step Field Name Action
Account Number Select the account to be issued on cheque book from drop down list
No. of Book Select the number of cheque books you want to request from drop down list
Pick Up Branch Select the branch where you would like to pick up the requested cheque book from drop down list
Continue Click “Continue” to proceed further

Online Banking Department-November v1.1 Page 52 of 93
Cheque Book Re-Order Screen 2
Check and verify all information as well and click Confirm to proceed further

Online Banking Department-November v1.1 Page 53 of 93
Cheque Book Re-Order Screen 3
Step Field Name Action
Authentication Type Select SMS OTP/RSA Token from drop down list
Get OTP Code Click on “Get OTP Code” button to get the OTP code via your registered phone number
Note: For authentication type as SMS OTP only
Authentication OTP Code Enter the OTP Code in “Authentication OTP Code” field which
received via your registered phone or the code shown on RSA Token screen
Apply Click “Apply” to finish the transaction
Back to contents

Online Banking Department-November v1.1 Page 54 of 93
Cheque Book Re-Order Screen 4
Back to contents
The transaction is waiting for bank staff
to process further. You can review your
transaction in Transaction History on Ebanking.

Online Banking Department-November v1.1 Page 55 of 93
Set Up an Automatic Payment Accessing: Payment > Add Schedule Transfer > Add Scheduled Transfer Use this screen to set up recurring automatic payment to third party within Canadia Bank, set up once and this is a great way to manage your ongoing payments, e.g. your Rent or Hire Purchase payment.
The function is available for both same and different currencies.
Screen 1

Online Banking Department-November v1.1 Page 56 of 93
Set Up an Automatic Payment
Step Field Name Action
Calendar Name Enter short note for the payment
Transfer Type Select from drop-down list for “Same” or “Different” currency
Calendar Type Select frequency of the payment:
• Onetime
• Daily
• Weekly
• Monthly
Continue Click “Continue” to proceed further
Screen 2
S
Select when the payment will start and finish and click Continue

Online Banking Department-November v1.1 Page 57 of 93
Set Up an Automatic Payment
Screen 3
Step Field Name Action
Debit Account Select from drop-down list of which account the funds is going to come out of
Beneficiary; or
Credit Account
• Select from drop-down list of beneficiary name you have saved in the Beneficiary Management; or
• Enter account number that the funds will be credited to
Amount Enter the payment amount
Payment Details Enter short notes to appear on the account statement
Continue Click “Continue” to proceed further

Online Banking Department-November v1.1 Page 58 of 93
Set Up an Automatic Payment
Screen 4
Check and verify the payment
details again and click Confirm to
complete the set up
Back to contents

Online Banking Department-November v1.1 Page 59 of 93
View and Delete Automatic Payments Accessing: Payment > Add Schedule Transfer > View Scheduled Transfer; Or
Delete Scheduled Transfer Use this screen to view and delete payments you have previously set up.
Screen 1
To view details of automatic
payment, click on each of Calendar Name
To delete specific payment, click Delete or
tick all payments on the left and click Delete on the to delete all
Back to contents

Online Banking Department-November v1.1 Page 60 of 93
View Automatic Payments by Date Accessing: Payment > Add Schedule Transfer > View Scheduled Transfer Date Use this screen to view automatic payments by date. One week is a maximum view per time.
Screen 1
Select From Date and To Date to
and/or select from drop-down list
of Transfer Type and click Search to view
Click on each payment to view it in details
Back to contents

Online Banking Department-November v1.1 Page 61 of 93
Bill Payment (Different Currency) Accessing: Payment > Online Payment > Bill payment different currency Use this screen to make payment to Billers. The payment can be functioned for different currency only (USD vs KHR or KHR vs USD).
Screen 1
Step Field Name Action
Please select service provider
Select from drop-down list of Biller you want to make payment to
Next Click “Next” to proceed further

Online Banking Department-November v1.1 Page 62 of 93
Bill Payment (Different Currency) Screen 2
Step Field Name Action
Providers Select from drop-down list of Biller’s location
Next Click “Next” to proceed further

Online Banking Department-November v1.1 Page 63 of 93
Bill Payment (Different Currency) Screen 3
Step Field Name Action
List of Consumer; or
Consumer Number
• Select from drop-down list of consumer name you have previously paid to; or
• Enter a new consumer number
Next Click “Next” to proceed further

Online Banking Department-November v1.1 Page 64 of 93
Bill Payment (Different Currency) Screen 4
Step Field Name Action
Debit Account Select from drop-down list of which account the funds is going to come out of
Billing Amount Enter the bill amount
Payment Details Enter short notes that appear on account statement
Confirm Click “Confirm” to proceed further
Check and verify the bill payment
details to make sure all are matched to the invoice

Online Banking Department-November v1.1 Page 65 of 93
Bill Payment (Different Currency) Screen 5
Review all information again especially
Consumer Number and Consumer Name; click Confirm to proceed further

Online Banking Department-November v1.1 Page 66 of 93
Bill Payment (Different Currency) Screen 6
Step Field Name Action
Authentication Type Select SMS OTP/RSA Token from drop down list
Get OTP Code Click on “Get OTP Code” button to get the OTP code via your registered phone number
Note: For authentication type as SMS OTP only
Authentication OTP Code Enter the OTP Code in “Authentication OTP Code” field which
received via your registered phone or the code shown on RSA Token screen
Apply Click “Apply” to finish the transaction

Online Banking Department-November v1.1 Page 67 of 93
Bill Payment (Different Currency) Screen 7
Back to contents

Online Banking Department-November v1.1 Page 68 of 93
Bill Payment (Same Currency) Accessing: Payment > Online Payment > Bill payment same currency Use this screen to make payment to Billers. The payment can be functioned for same currency only.
Follow the same instructions from Screen 1 to 7 on section of the Bill Payment (Different Currency).
Back to contents

Online Banking Department-November v1.1 Page 69 of 93
Add a New Beneficiary Accessing: Setting > Beneficiary Management Use this screen to add new beneficiary and it is a way to save account number of a person, organization or company to your Corporate Internet Banking so you can use them anytime in the future.
Screen 1
Click Add New to add beneficiary

Online Banking Department-November v1.1 Page 70 of 93
Add a New Beneficiary
Screen 2
Step Field Name Action
Account Enter account number of beneficiary
Beneficiary Name Enter account name of beneficiary
Continue Click “Continue” to proceed further

Online Banking Department-November v1.1 Page 71 of 93
Add a New Beneficiary
Screen 3
Enter short notes (if applicable)
and click Finish to complete the adding
Back to contents

Online Banking Department-November v1.1 Page 72 of 93
Create a Transaction Template Accessing: Setting > Template Transfer Management Use this screen to save frequently made transactions from re-entering details of common transactions by creating templates. The templates allow you to save details of your regular payment so they can be edited
and/or used again in the future.
Screen 1
Click Add New to add template

Online Banking Department-November v1.1 Page 73 of 93
Create a Transaction Template Screen 2
Step Field Name Action
Template Name Enter name of the template
Transfer Type Select from drop-down list of transaction type
Continue Click “Continue” to proceed further

Online Banking Department-November v1.1 Page 74 of 93
Create a Transaction Template
Screen 3
Step Field Name Action
Debit Account Select from drop-down list of which account the funds is going to come out of
Beneficiary; or
Credit Account
• Select from drop-down list of beneficiary name you have saved in the Beneficiary Management; or
• Enter account number that the funds will be credited to
Amount Enter transfer amount
Payment Details Enter short notes to appear on account statement
Save Click “Save” to complete the creating template
Back to contents

Online Banking Department-November v1.1 Page 75 of 93
Transfer Funds using a Saved Transaction Template Accessing: Setting > Template Transfer Management Use this screen to transfer funds to third party or between your accounts within Canadia Bank by using saved transaction template.
Screen 1
Click on template name to
view transaction details Click Delete to delete save transaction template

Online Banking Department-November v1.1 Page 76 of 93
Transfer Funds using a Saved Transaction Template Screen 2
Review transaction details and click Continue to proceed further

Online Banking Department-November v1.1 Page 77 of 93
Transfer Funds using a Saved Transaction Template Screen 3
Click Confirm to process further

Online Banking Department-November v1.1 Page 78 of 93
Transfer Funds using a Saved Transaction Template Screen 4
Step Field Name Action
Authentication Type Select SMS OTP/RSA Token from drop down list
Get OTP Code Click on “Get OTP Code” button to get the OTP code via your registered phone number
Note: For authentication type as SMS OTP only
Authentication OTP Code Enter the OTP Code in “Authentication OTP Code” field which
received via your registered phone or the code shown on RSA Token screen
Apply Click “Apply” to finish the transaction

Online Banking Department-November v1.1 Page 79 of 93
Transfer Funds using a Saved Transaction Template Screen 5
Back to contents

Online Banking Department-November v1.1 Page 80 of 93
Open an Online Fixed Deposit Accessing: Online Fixed Deposit > Open Fixed Deposit Use this screen to invest your money for a set term at fixed interest rate to get a better return on your money. A minimum balance for opening a Fixed Deposit is US$1,000.
The Fixed Deposit will automatically roll over to new term (same period) at maturity if there is no close or early breakout of the Fixed Deposit by you. However, the roll over to the new term only principal amount
while interest earn will credit to source/funding account (account that you used to open Fixed Deposit).
Screen 1
Select from drop-down list for
term and rate for your new Fixed Deposit and click Continue

Online Banking Department-November v1.1 Page 81 of 93
Open an Online Fixed Deposit Screen 2

Online Banking Department-November v1.1 Page 82 of 93
Open an Online Fixed Deposit
Step Field Name Action
Debit Account Select from drop-down list of source/funding account
I agree with the above Terms and Conditions
Tick the box to confirm you agree to the terms and conditions
Fixed Deposit Amount Enter amount you wish to invest
Description Enter short notes to appear on account statement
Continue Click “Continue” to proceed further
Screen 3
Review the details of Fixed
Deposit and click Confirm to continue

Online Banking Department-November v1.1 Page 83 of 93
Open an Online Fixed Deposit Screen 4
Step Field Name Action
Authentication Type Select SMS OTP/RSA Token from drop down list
Get OTP Code Click on “Get OTP Code” button to get the OTP code via your registered phone number
Note: For authentication type as SMS OTP only
Authentication OTP Code Enter the OTP Code in “Authentication OTP Code” field which
received via your registered phone or the code shown on RSA Token screen
Apply Click “Apply” to finish the transaction

Online Banking Department-November v1.1 Page 84 of 93
Open an Online Fixed Deposit Screen 5
Back to contents

Online Banking Department-November v1.1 Page 85 of 93
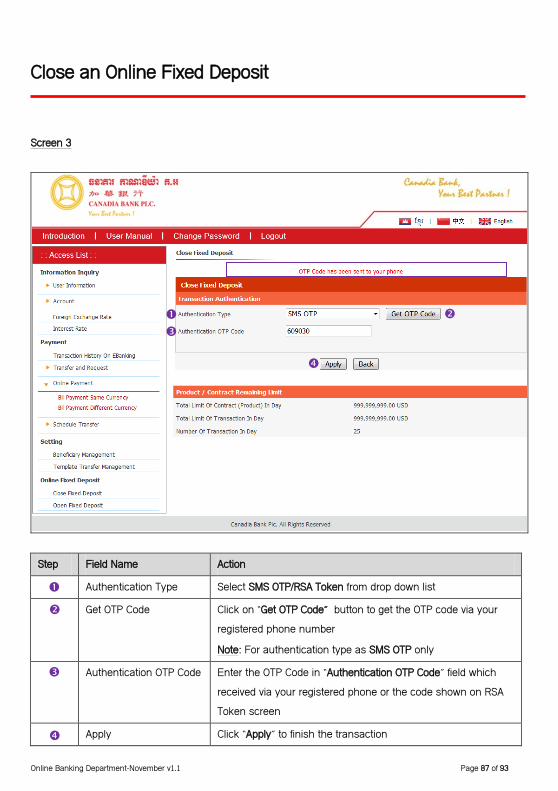
Close an Online Fixed Deposit Accessing: Online Fixed Deposit > Close Fixed Deposit Use this screen to close an online Fixed Deposit that you previously opened thru Internet Banking. No Fixed Deposit opened at branch can be closed thru this function.
Using this function means you are going to close or early breakout of your Fixed Deposit before its maturity. The Terms and Conditions apply.
Screen 1
Step Field Name Action
Fixed Deposit Account Select from drop-down list of which account you want to close
Next Click “Next” to continue

Online Banking Department-November v1.1 Page 86 of 93
Close an Online Fixed Deposit Screen 2
Review the Fixed Deposit details and click Confirm to continue
Online Banking Department-November v1.1 Page 87 of 93
Close an Online Fixed Deposit Screen 3
Step Field Name Action
Authentication Type Select SMS OTP/RSA Token from drop down list
Get OTP Code Click on “Get OTP Code” button to get the OTP code via your registered phone number
Note: For authentication type as SMS OTP only
Authentication OTP Code Enter the OTP Code in “Authentication OTP Code” field which
received via your registered phone or the code shown on RSA Token screen
Apply Click “Apply” to finish the transaction

Online Banking Department-November v1.1 Page 88 of 93
Close an Online Fixed Deposit Screen 4
Back to contents

Online Banking Department-November v1.1 Page 89 of 93
Change Password Accessing: Internet Banking > Change Password Use this screen to change your new password. Please remember that passwords are case sensitive. We recommend that you input your password with ‘CAPS LOCK’ off.
Your password must (e.g. UPlow179$): • between 6 to 16 character long with no spaces
• include at least one letter and one number and one special character • must be with both upper and lower case letters
Screen 1
• Current Password: enter your current
password
• New Password: enter your new password
follow above instruction
• Confirm-New Password: re-enter your
new password
• Click “Change” to proceed the new password change
Back to contents

Online Banking Department-November v1.1 Page 90 of 93
Reset Password Accessing: Internet Banking > Forgot Your Password? Use this screen to reset your password of the Internet Banking by your own without visiting a branch for request.
Please note, you CANNOT do a password reset through this function once your “User Name” already blocked. The blocked User Name results from 3 consecutive times of incorrect password are entered. You
are required to visit the nearest branch to reset the password.
Screen 1
Click Forgot Your Password? to continue

Online Banking Department-November v1.1 Page 91 of 93
Reset Password
Screen 2
Step Field Name Action
User Name Enter your User Name
Email Enter your email address that used when signing up
Confirm Click “Confirm” to continue
Screen 3

Online Banking Department-November v1.1 Page 92 of 93
Reset Password
Step Field Name Action
Authentication Type • Select “SMS OTP” from drop-down list and click “Get OTP Code” to get the OTP to your registered mobile phone or
• Select “RSA Token” from drop-down list
Authentication OTP Code Enter 6 digit numbers received thru SMS or Security Device
Change Click “Change” to proceed the password reset
Screen 4
Message displays that the password is
successful reset, check your registered email to get the “Temporary Password”
Back to contents

Online Banking Department-November v1.1 Page 93 of 93
Contact Us Contact Details Please visit our nearest branches or Contact Center: Tel: (+855) 23 868 222 Email: [email protected]
www.canadiabank.com.kh
Back to contents