Indirect Composite Resin Restorations - Dentaltown€¦ · the long-term serviceability of direct...
6
38 dentaltown.com November 2005 Theory The increasing popularity of tooth-colored composite resin fill- ings is making it the dominant choice of most patients for their cav- ity fillings and replacement fillings. The overall average lifespan of these composite resin materials leaves room for improvement. Polymerization shrinkage is one of the primary limitations affecting the long-term serviceability of direct placement posterior composite resin restorative materials. 3 Managing resin shrinkage has also been sited as a requirement for prevention of biting sensitivity on poste- rior teeth restored with composite resins. The physical putty nature of un-polymerized resins adds to the challenge of creating good Indirect Composite Resin Restorations: Single Appointment Procedure Robert D. Shorey, DDS
Transcript of Indirect Composite Resin Restorations - Dentaltown€¦ · the long-term serviceability of direct...

38 dentaltown.comNovember 2005
TheoryThe increasing popularity of tooth-colored composite resin fill-
ings is making it the dominant choice of most patients for their cav-ity fillings and replacement fillings. The overall average lifespan ofthese composite resin materials leaves room for improvement.Polymerization shrinkage is one of the primary limitations affectingthe long-term serviceability of direct placement posterior compositeresin restorative materials.3 Managing resin shrinkage has also beensited as a requirement for prevention of biting sensitivity on poste-rior teeth restored with composite resins. The physical putty natureof un-polymerized resins adds to the challenge of creating good
Indirect CompositeResin Restorations:Single Appointment Procedure
Robert D. Shorey, DDS

39dentaltown.comNovember 2005
continued on page 40
anatomic proximal tooth form and contacts during place-ment of resin fillings directly in the mouth. These areproblems that may be addressed by using an alternativeindirect fabrication and placement restorative procedure.
The majority of polymerization shrinkage occurs dur-ing the initial polymerization cure and is affected by multi-ple factors like preparation size, design, type of cure andspeed of cure.9 Studies on the kinetics of resin polymeriza-tion show over 98% of the polymerization shrinkage occurswithin two minutes after initiation of the resin cure.2
Although additional polymerization takes place over 24hours, the largest bulk of shrinkage happens within the firstfew minutes of polymerization.10, 11 The current generationof composite materials has volumetric shrinkage in therange of 2 to 6%.9 The resultant stress from shrinkage maydamage the bonding or cause deflection of the surroundingtooth structure.1, 5, 6, 12, 13 The gingival marginal bond hasbeen shown to be a typical weakly bonded area for reasonsof enamel prism quality, lack of enamel and therefore par-ticularly vulnerable to the stress of resin shrinkage forces.4, 14
Even well-placed composite restorations often show a tell-tale margin of stain and future marginal leakage7 after onlyfive years of intraoral service. While we can easily visualizethe process of unzipping at the occlusal surfaces imagine thecondition of the margins placed in the considerably weakerbonded gingival margin areas, Marginal leakage is specu-lated to result from gradual unzipping (breakdown of themechanical bond tags) of the polymerized restoration dueto shrinkage forces inherently stored within the compositeresins during direct placement and polymerization.8, 15, 16 Inthe meantime many alternative indirect placement restora-tions regardless of material (porcelain or composite) seem tohave less marginal leakage in the early years after placement.This may be ascribed to the much lower volume of curingmaterial as well as the method of cure. When an indirectrestoration is placed into a tooth the relatively narrow inter-face between the cavo-surface area and restoration are con-cerned with polymerization shrinkage not the entire prepa-ration void. Additionally using a dual chemical cure alsolowers the polymerization shrinkage.11 Placement of a pre-

polymerized restoration and use of a chemically cured luting resinsubstantially lowers the inherent polymerization stress forces at theresin-bonded cavo-surface.
The issues just mentioned are some of the inherent physicalproperties of plastic resins. When dealing with our patients, pro-cedurally it is necessary for isolation of treated teeth during thetypical direct resin placement. Clinically rubber dam placementprovides both benefits and shortcomings. Some of the short com-ings revolve around our patients having to keep their mouths wideopen during the entire dental procedure, drying of the teeth makesshade matching more challenging and preparations often leadbelow the area of gingival isolation causing additional steps to cre-ate a dry field during preparation and placement time. The indi-rect method of placing composite resin materials in posterior teethlends itself easily to only utilizing a rubber dam during the finalcementation bonding of the restoration.
DiscussionMost indirect restorative methods require two patient visits
and the need for a third-party laboratory. While laboratory-maderestorations can ultimately provide a superior restoration to directresins, the additional time and costs are substantial and can oftenbe considered a barrier to patient acceptance. Indirect methods,like CEREC, can help to eliminate some of the additional time;however, the usual final product can be considered an esthetic con-cession and the ability to add to the milled restorative materialafter the creation of the restoration is severely compromised.
This article will present a method of creating highly estheticindirect resin restorations that will inherently have superior prop-erties to most directly-placed resin restorations in the posteriormouth. This method does not require additional equipment thanwhat is usually present within most general dentists’ existing arma-mentariums. This technique does usually lengthen the deliverytime and may therefore necessitate a slightly higher fee than directplacement posterior restorations. Like all procedures, mastery ofthis technique requires practice. The ultimate result will berestorations with lower frequency of sensitivity, predictable con-tacts, better physical properties and beautiful esthetics andanatomic form.
This article will outline the procedural process of placing an in-office indirect resin restoration utilizing vinyl polysiloxane and poly-ether impression material. Indications for this technique are moderateto large restorations needed for posterior teeth, teeth with unusual con-tact areas (rotated teeth or teeth with greater than average contact distances), or teeth with difficult access and isolation challenges.
40 dentaltown.comNovember 2005
continued from page 39
continued on page 42
Fig. 1: Upper molar with difficult access.
Fig. 2: Restored molar withindirect resin.
42 dentaltown.comNovember 2005
A contra-indication as a final restorative option may be indi-viduals known to be moderate to heavy bruxers and individualswith considerable occlusion issues requiring a comprehensivechange in occlusion.
Benefits of this procedure are better control of contours and thatsculpting is done primarily outside the mouth. The skill-set for creating indirect restorations in this technique is very comparable tothe skills necessary to make a temporary crown. Anyone able to cre-ate an excellent provisional restoration can create beautiful life-likepermanent restorations with this technique. The greatest advantageis delivery of lab-quality restorations chair-side in one visit.
In the procedure about to be described the use of a high-inten-sity, Triad-style light oven was not used or recommended. TheTriad oven is often referred to as a composite tempering processdesigned to create complete polymerization of composite resins ina shortened period of time. While studies show improved wear ofthese tempered restorations the physical bond to the restoration isthought to be mechanical because most active bonding sites havebeen chemically exhausted. It is the author’s belief that tying up allexternal resin bond chemistry may not be desirable when theobjective is to chemically bond the restoration to the bondingresins which tie the restoration to the cavo-surface.
The author feels obliged to point out that because it is necessaryto prepare teeth for path of draw (try-in and removal of the restora-tion) when preparing for indirect restorations more tooth structureis removed compared to the equivalent direct resin cavity prepara-tion. This is not necessarily a disadvantage, as it more adequatelyassures no loose enamel rods are present at the bonding surfaces.
The creation of an indirect restoration using this technique ispredicted to extend your chair-side time, depending on your mas-tery level, anywhere from no additional chair time to 30 minuteslonger than the average direct placement posterior composite.Because no lab bill is incurred and no second visit is necessary, theultimate cost to your patient may be reduced by the amount of a labbill and second appointment setup time. Procedurally the processbegins similarly to a direct placement composite. *It is suggested,however, that a rubber dam is not placed at the initial preparationto allow for the convenience of impressing the preparation.Ultimately a polyether die will be created and the final restorationlayered for color and created on the rubber impression die. A rub-ber dam is placed and the teeth well isolated. Try-in of the restora-tions is accomplished and teeth conditioned for resin bonding. Thefinal restorations are seated using a dual cure luting-resin and therubber dam removed for occlusion review and adjustments.
*Preparation of the teeth without isolation facilitates color match-ing, as well as the ability to take impressions. Placement of a rubberdam for isolation is only needed at the end of the procedure for a shorttime during seating. Difficult isolation can be augmented usingAstringedent and products like OpalDam.
Note: Choice of your composite materials provided they aredesigned for posterior placement is unlikely to be a determinant factor for this procedure. The author suggests using the materials you currentlyare using for your direct placement composite on posterior teeth.
One visit appointment – Indirect Composite Resin Restorative Procedure
Review your patient’s teeth for restorative choices. Smallrestorations may appropriately be restored directly as polymeriza-tion shrinkage is not an over-riding problem due to the small vol-ume of resin material. Teeth with moderate to severe tooth lossmay be considered for this procedure. Maintenance of a stablelong-term occlusion should be weighed when considering this pro-cedure versus a laboratory-made crown. Studies are still beingreviewed to assess the long-term success of composite resin tomaintain a stable occlusion. A discussion with your patient regard-ing the properties of the proposed materials is suggested while
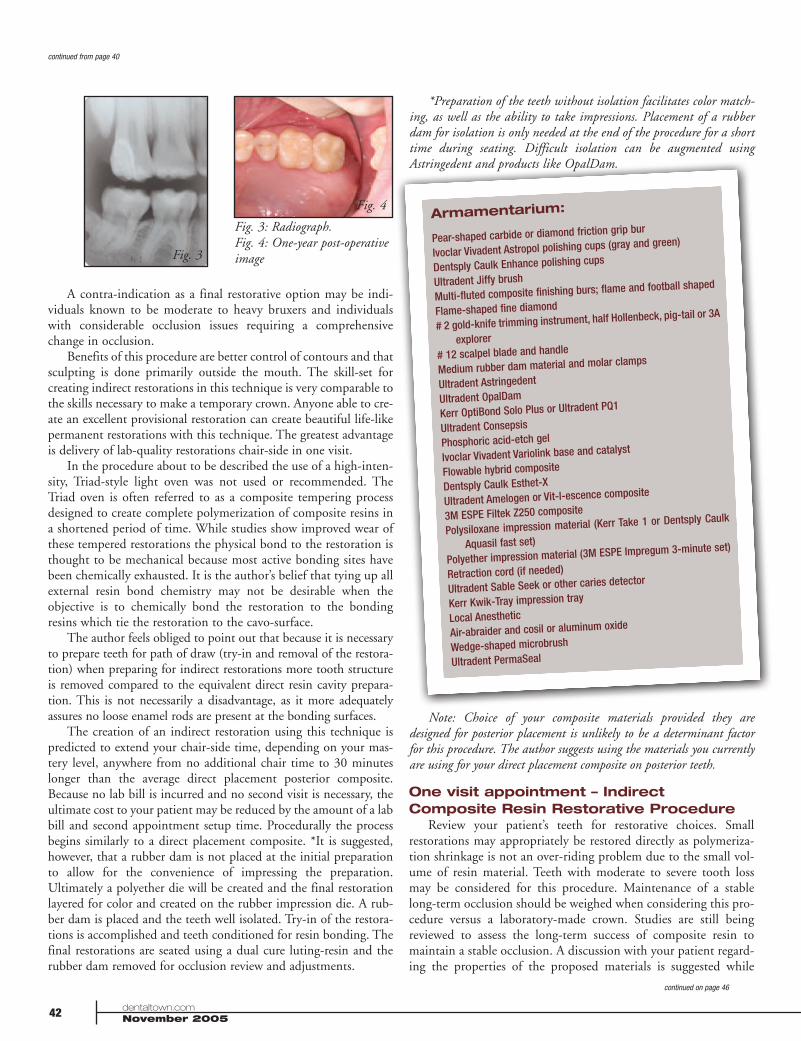
Fig. 3: Radiograph.Fig. 4: One-year post-operativeimage
continued from page 40
continued on page 46
Armamentarium:
Pear-shaped carbide or diamond friction grip bur
Ivoclar Vivadent Astropol polishing cups (gray and green)
Dentsply Caulk Enhance polishing cups
Ultradent Jiffy brush
Multi-fluted composite finishing burs; flame and football shaped
Flame-shaped fine diamond
# 2 gold-knife trimming instrument, half Hollenbeck, pig-tail or 3A
explorer
# 12 scalpel blade and handle
Medium rubber dam material and molar clamps
Ultradent Astringedent
Ultradent OpalDam
Kerr OptiBond Solo Plus or Ultradent PQ1
Ultradent Consepsis
Phosphoric acid-etch gel
Ivoclar Vivadent Variolink base and catalyst
Flowable hybrid composite
Dentsply Caulk Esthet-X
Ultradent Amelogen or Vit-l-escence composite
3M ESPE Filtek Z250 composite
Polysiloxane impression material (Kerr Take 1 or Dentsply Caulk
Aquasil fast set)
Polyether impression material (3M ESPE Impregum 3-minute set)
Retraction cord (if needed)
Ultradent Sable Seek or other caries detector
Kerr Kwik-Tray impression tray
Local Anesthetic
Air-abraider and cosil or aluminum oxide
Wedge-shaped microbrush
Ultradent PermaSeal
Fig. 3
Fig. 4

46 dentaltown.comNovember 2005
making a final choice. The benefits of an indirect restoration areimproved proximal contours, preservation of tooth compared tocrowns, excellent shade matching and ability to provide futurerepair in some instances without complete replacement.
Appropriate anesthetic for the location of restoration is admin-istered. Prepare the teeth similarly to most resin restorations prin-ciples, keeping in mind the concept of draw. All surfaces mustdiverge from the cavo-floor. Rounded line angles are preferredwhile maintaining enamel at the gingival floor when possible. Anyundercuts should be removed in the preparation by preparing atthe proper angles or filling any remaining undercuts with theplacement of flowable composite resins. Should undercuts need tobe removed, placement of resins using a rubber dam will be neces-sary to control the cavo-environment and avoid moisture andhumidity. Review your preparation and make sure all surfaces aredivergent and all outside radius-cut surfaces have a 90-degree fin-ish to the outside enamel or dentin surfaces. Compromise excep-tions to a 90-degree cut may be the preparation of visible buccalsurfaces where transitional blending of resins may be desired foresthetics. Remember that feathered surfaces are more susceptible tobonding failure with time. Hand instruments or disks may be usedto assure that proximal cavo-surfaces are free of loose enamel rodsand draw appropriately.
Examine the preparation. Use caries detector to assure all decayhas been removed. Scrub the cavo-surface with Concepsis(chlorhexidine scrub). Control any areas with crevicular fluids uti-lizing Astringedent scrub, rub and rinse technique. If your prepa-ration extends into deeper areas adjacent to gingival tissues placeretraction cord to control fluids and allow space for impressionmaterial. Using a Kwik-Tray and Aquasil addition reaction siliconeimpression material inject medium or heavy body into tray, injectlight body material into the preparation and move materialthrough the prep with light air. Inject medium/heavy body ontoprep and place tray into mouth. Cotton rolls placed ahead of thetray terminus and against teeth are used to allow your patient torelax their bite and close their mouth while the impression material sets. Set time can vary for silicones from 3 min. to 5 min.depending of regular or fast set. With experience, fast set materialswill reduce overall procedure time. After the material is removedfrom the mouth allow your patient to relax while you work outsidethe mouth. You will be working outside of their mouth for 15 to30 min. Impregum impression material (3 min. set preferred) isinjected into the silicone impression. Work quickly and make sureto avoid trapping bubbles as the impression material is injectedinto the vinyl polysilicone impression. Placing your syringe whileinjecting at the bottom of the impression in the tight intricate areas
will facilitate avoidance of bubbles. Getting this part of the tech-nique down is critical as a poor impression die can either delay theprocedure during re-pours or provide an inaccurate model and fur-ther delays as you try to fit your final restoration into the actualprepared tooth. Procedurally, the author advises that immediatelyafter removal of the polyether die from the polysiloxane impressionyou should make another polyether pour for backup and finalrestoration review. Make sure to pour an appropriate 3-4 mm flatbase while creating the polyether die models. You will find that thepolyether is appropriately ridged and at the same time flexible toview tooth contacts. Do not ply and bend the model too much asthese manipulations are not completely elastic and even small vari-ations in contacts can lengthen try-in times. Bulk filling using adarker base shade is advised leaving room in the proximal andocclusal areas for lighter composite. Keep the resin short of themargins at the occlusal and proximal surfaces but to the margin atthe gingival surface. Cure this underlying layer. If you choose touse a flowable resin you will need to test its compatibility with theImpregum die material; some flowable materials will inappropri-ately stick and fuse with the polyether. Do not use any bondingagents between layers as the alcohol and ketones will facilitatebonding to the polyether die. The author prefers syringe puttycomposites like Esthet-X, Amelogen or Vit-l-escence as the middlelayer of your restoration. Carefully shape it into your preparationusing a half Hollenbeck carver. Cure the middle layer to create asimulation of the dentin layer of natural teeth. Lastly place FiltekZ250 or Ultradent Amelogen transparent shades to complete theproximal contact as well as the occlusal surface. Cure and refineyour anatomy clearly outlining developmental groves and supple-mental anatomy. Remove the restoration from the die and inspectby peeling and lifting out with a metal instrument like the halfHollenbeck. By this time, your second pour Impregum die shouldbe ready to remove from the polysilicone impression. Remove itand set it aside as a secondary model to confirm fit and contacts.Inspect your restoration and refine the gingival margins and prox-imal contours. At this stage, lightly plane the internal cavo-surfaceremoving any potential undercuts. Continue to inspect and planeslightly the inner cavo-surface of the restoration to allow for a pas-sive yet accurate fit. Depending on the size and ability to handleyour restorations a choice may be made to add a handle to therestorations by cutting into the occlusal surface in an appropriateanatomical area (developmental grooves or pits) and bonding asmall stainless-steel wire with ball terminus or Butler floss-threader monofilament loop. These handles can be easily removedwith a bur after final bonding. During placement assess your con-tacts. Contacts and proximal flares having excess resin are the topissues that resist complete seating of your restoration during try-in.Once you successfully fit your restorations and judge the ability toget them completely seated, you are ready to move on.
Tell your patient to wake up, it’s time to finish the work.Review the prepared teeth. If any crevicular fluids, like blood, arepresent use Astringedent to rub, scrub, rinse and control. Placeyour rubber dam in an individual tooth-by-tooth (punch) fashionor utilize a slip dam technique if oral fluids are well controlled andallow for it. Next begin your intraoral try-in of the restoration(s).If contacts are too tight for complete seating simply remove a smallamount. Start your contact assessments beginning with the restora-
Fig. 5: Beginning prep, distalcaries.
Fig. 6: Prep after impression,ready for restoration try-in.
continued from page 42
continued on page 48

tion neighboring natural teeth, existing filled or crowned areasfirst. Your contacts against existing teeth, fillings and crowns caneasily be re-added during the final seating. Once the seat is definiteand proximal contacts confirmed or assessed remove the restora-tion. Air-abrade the internals and add OptiBond bonding agentand cure. (Do not allow final restoration to be placed back on theImpregum die before the bonding agent has been completely curedor you will bond the restoration to the model die.)
Now once you have tried in and fitted your restoration, airabraded, and added bonding resin, start preparing the cavo-sur-faces for composite bonding. Scrub the surface with chlorhexidine,total etch and OptiBond or PQ-1. Move heavy direct operatorylight away from the restorative site. Mix your dual cure and beginto seat your restoration with Variolink buttered into the cavo-sur-face areas. When seating your restorations excess Variolink shouldbe expressed out of the preparation.** If you did not have to mod-ify your contacts utilize the “rapid cementation technique” of tack-ing and cleaning excess resin from the proximal areas. If contactsneed to be added to facilitate try-ins for
restorations resting against natural teeth, crowns or fillings makesure those areas were maintained etch free and bonding agent free.Add a thin (glaze) layer of Filtek Z250 on bonding agent-condi-tioned surface of the proximal of the restoration. When seating donot floss this area at the curing stage of seating but clean out theproximal gingival area using a wedge-shaped microbrush. Makesure to spend the appropriate time getting contacts correct on thenew restoration against new restoration proximal areas before finalseating. The technique for creating contacts just previously out-lined will not work efficiently in these areas because the restora-tions will fuse together and extend your cleanup time significantly.
After your initial tack curing and cleanup, begin to curerestorations in all dimensions. Upon final cure, check all areas tomake sure no irregularities or voids are present. It is much easier tomake any necessary repairs and bonding adjustments while theteeth are dry and isolated. After inspection remove the rubber damand begin occlusal analysis. Refine the occlusion and anatomyusing multi-fluted composite finishing burs. Trim proximal areaswith # 2 gold trimmer or # 12 blade and scalpel. Review contactsand floss and reseal the cavo-surface with etch and PermaSeal orcomposite glaze. A post-operative bite-wing radiograph is appro-priate at this time to review your finished work and assure that allresins have been appropriately trimmed away for tissue health. Ifany flaws are noted at this stage, it is easier to approach yourpatient and correct the problem immediately chair-side or re-appoint your patient for repair or replacement if needed. Becausethe frequency of composite resin restoration replacement is higherthan many other restorative options, it is important to make cer-tain the final restorative product excels in all criteria so that thelongest potential life span is achieved.
Further Discussion:Volumetric polymerization shrinkage of composite resins is
likely responsible for breakdown of resin bonds and secondarycaries in posterior teeth restored with composite resin. Althoughunproven, a review of the author’s clinical photographs over thelast six years has shown indirect resin restorations have negligiblemarginal staining and occlusal wear compared to similarly ageddirect resin posterior fillings. Based on previous findings it is likely that research will support the assumption that indirect resinfillings optimize the properties of composite resin fillings by par-tially eliminating the stresses of polymerization shrinkage. Theability to produce superior esthetics and contacts along withreduced cost compared to other indirect restorative options maysupport this alternative option while we wait to determine ifresearch can ultimately provide evidence of improved clinical wearto further justify this alternative restorative choice.
Referencesto this article can be found on www.dentaltown.com.
48 dentaltown.comNovember 2005
Fig. 12: Stainless-steel wirehandling attachment.
Fig. 13: Example of otherwisedifficult to reach contact.
Fig. 7: First layer of flowableresin.
Fig. 8: Nearly completed layering.
Fig. 9: Restoration before try-in.
Fig. 10: Try-in of restoration.
Fig. 11: Final restoration.
Fig. 7 Fig. 8
Fig. 9 Fig. 10
Fig. 11
Dr. Shorey maintains a private practice inRoseville, Calif. He graduated from theUniversity of Southern California School ofDentistry. He is a member of the AmericanAcademy of Cosmetic Dentistry.
continued from page 46


![King s Research Portal...2. Provision of posterior resin composite restorations The majority of the respondents [n=325 (92%)] reported placing posterior resin composite restorations](https://static.fdocuments.us/doc/165x107/5f865f2865aa236d602dba96/king-s-research-portal-2-provision-of-posterior-resin-composite-restorations.jpg)