INDEX - VICS (VEHICLE INSTRUCTION CARD) HYUNDAI VEHICLES · 2016-10-03 · INDEX - VICS (VEHICLE...
9
INDEX - VICS (VEHICLE INSTRUCTION CARD) HYUNDAI VEHICLES Page Vehicle Details 1 Index n/a 2 Supplement (Electronic Parking Brake, etc) n/a 3 i30 5 seats / 3-5 door hatchback / estate 4 i10 5 seats / 5 door hatchback 5 i20 5 seats / 3 door hatchback 6 i40 5 seats / 4 door saloon / 5 door estate 7 Santa FE 5 or 7 seats / 5 door SUV 2X4 OR 4X4 8 ix20 5 seats / 5 door hatchback 9 Tucson 5 Seats / 5 door SUV 2x4 or 4x4 10 11 12 13 14 15 16 17 18 19 20 INDEX PAGE 1
Transcript of INDEX - VICS (VEHICLE INSTRUCTION CARD) HYUNDAI VEHICLES · 2016-10-03 · INDEX - VICS (VEHICLE...

INDEX - VICS (VEHICLE INSTRUCTION CARD)HYUNDAI VEHICLES
Page Vehicle Details
1 Index n/a
2 Supplement (Electronic Parking Brake, etc) n/a
3 i30 5 seats / 3-5 door hatchback / estate
4 i10 5 seats / 5 door hatchback
5 i20 5 seats / 3 door hatchback
6 i40 5 seats / 4 door saloon / 5 door estate
7 Santa FE 5 or 7 seats / 5 door SUV 2X4 OR 4X4
8 ix20 5 seats / 5 door hatchback
9 Tucson 5 Seats / 5 door SUV 2x4 or 4x4
10
11
12
13
14
15
16
17
18
19
20
INDEX PAGE 1

LOCATIONThe diagrams above indicate example locations of the electronic parking brake (A) which is labelled with the universal icon symbol:
ACTIVATIONThe EPB will normally auto activate. If will also activate if seat belts are not being worn, or when luggage placed on top of seats activates the system. To enable the system to function correctly, fasten seatbelts, and remove luggage from the seats and store it securely in the boot. Pull the switch labelled A to manually apply the parking brake. The warning lamps on both the switch and instrument panel will light up to confirm its activation.
DEACTIVATIONThe EPB will normally auto release. Depress the brake or accelerator pedal to auto release it, or press the switch (A) to manually release it. The associated warning lamps on both the switch and dashboard instrument panel will go out to confirm its deactivation. Note: seatbelts should be fastened, and luggage should not be placed on seats.
WHEN DRIVING AWAYThe parking brake will deactivate automatically when driving away, and it also prevents the vehicle from rolling back unintentionally for a few seconds when starting on a gradient. This works by driving off in a normal way, the parking brake will automatically release and the vehicle will start moving in the desired direction.
On vehicles fitted with an automatic gear box, you can apply the parking brake when stopping briefly at traffic lights etc., to avoid the vehicle creeping forward. When you drive off the parking brake will be automatically released.
INFORMATION
Vehicle specifications are subject to change. This vehicle does not include any manufacturer handbooks or manuals.
VEHICLE INSTRUCTION CARD SUPPLEMENTNo responsibility is accepted for inaccuracies or misunderstanding caused by the wording of this guide. If in any doubt ask a member of staff for
assistance.
HYUNDAI VEHICLES
Where fitted, the electronic parking brake replaces the mechanical handbrake and is designed to prevent the vehicle from accidently rolling away. This system offers convenience and safety features in addition to those normally associated with a mechanical handbrake. Please refer to the primary Vehicle Instruction Guide for information about other operational instructions.
24-10-2015
ELECTRONIC PARKING BRAKE (EPB)
Don’t panic! Despite seeing a new light pop-up on your instrument panel, unless it is red it is likely the car is still running fine, and while there may be a problem to attend to, proceed with confidence and patience.
RED Red indicates a potentially serious problem or safety issue. Attend to it! Red may also indicate an important reminder.
YELLOW Yellow/orange means something needs to be serviced or repaired soon. If it is flashing, it is important that you contact your rental agent for advice.
GREEN Green or blue is only telling you that a system is on or operating normally.
WARNING LIGHTS AND WHAT THEY MEAN
Deadlock / safelock messages shown on the instrument display when the engine is turned off simply indicate that once you exit the vehicle and lock the doors, they’re effectively deadlocked and anyone left in the car wouldn’t be able to get out in the event of an emergency. The warning is nothing to worry about and is just a standard advisory message.
DEADLOCKS
A seatbelt warning light may illuminate when the engine is turned on. This may mean that the electronic parking brake (EPB) becomes auto activated to prevent vehicle movement. To deactivate these warning lights, and turn off the auto activation of the EPB in this instance, ensure all passengers fasten their seatbelts, and remove any luggage from on top of the seats. For safety secure all luggage inside the boot.
SEATBELT WARNING LIGHTS

desi
gn a
nd p
rodu
ctio
n by
: D
rake
Ent
erpr
ises
Lim
ited
- Ph
one
: 01
18 9
86 8
526
USEFUL INFORMATION ABOUT YOUR VEHICLE
CHILD SEATSFUEL IN CASE OF BREAKDOWN DRIVER’S SEAT
Vehicle specifications are subject to change. When the engine is turned off, ensure that the starter switch is in position II when operating electrical items such as door mirrors and windows, etc. This vehicle does not include any manufacturer handbooks or manuals.
No responsibility is accepted for inaccuracies or misunderstanding caused by the wording of this guide. If in any doubt ask a member of staff for assistance.
Use hazard lights. Attempt to park in a safe position.
Use an emergency phone rather than a mobile as emergency services will then know the location of the vehicle.
Never use a child seat in a front passenger seat which is fitted with an active airbag (SRS). Follow all fitting instructions carefully.
Check seat positioning and security before use.
VEHICLE INSTRUCTION CARD
TYRE PRESSURES (COLD)CONTROLS
When parked, the handbrake should be fully applied with the vehicle left in first or reverse gear for vehicles equipped with manual transmission or P (Park) for vehicles with automatic transmission.
CAUTION! NOTE: SHOULD THIS VEHICLE NOT BE SUPPLIED WITH A SPARE WHEEL, PLEASE REFER TO THE TELEPHONE NUMBERS SHOWN ON THE TAX DISC HOLDER.
For assistance after an accident/incident, please call 0800 0280 999For assistance after a breakdown or help with tyres or windscreens please refer to the numbers on the tax disc holder.
HYUNDAI i30 5 SEATS3-5 DOOR HATCHBACK / ESTATE
Key / remote control operated central high security dead locking. Depress the central locking switch on the driver’s door to lock the doors from the inside. Auto door locking on vehicle motion.
Remote anti-theft alarm. Passive arming of electronic engine immobiliser after removal of the key from the starter switch.
Centrally locked. Use the key or remote control to unlock / open. Pull the release handle to open.
Electric adjustment operated by the control pad on the driver’s door.
Electric front operated via control buttons on the driver’s door, with electric or manually operated rear windows.
If fitted: Electric tilt / slide panoramic sunroof operated by roof mounted switchgear.
Located on the edge of the rear doors, slide the door locking lever on the edge of the door to activate it. Check from inside that the doors are securely locked. Ensure gear selector is in neutral (or N or P if automatic) and handbrake is on. Place ignition key in starter switch. Use a normal starting routine (or some vehicles feature an engine start/stop button, simply keep the key in your pocket or handbag, and press the engine start/stop button to start or stop the engine). Select desired gear. Release handbrake and brake pedal and gently press the accelerator to move the vehicle. Some vehicles feature automatic engine start/stop technology - engine auto shuts off at idle and instantly restarts on depression of the clutch.Located under flap on rear nearside. Centrally locked. Release it using the internal remote release adjacent to the driver’s seat. Lift the edge of the flap to open it, and twist off the cap anticlockwise.
Pull bonnet release lever located under the steering wheel column. Unhook catch under bonnet.
The rear seat is divided into sections which can be folded separately. To release the seat press the seat unlocking catch and fold the seat down. To return the seat to normal use, raise the seat and push it firmly to engage the seat lock. Check it is locked before using the seat.Lift the carpet cover to access the storage tray housing the tools and jack, lift out this tray to reveal the temporary spacesaver spare wheel. Release the wheel by turning the retaining bolt anticlockwise. To change the wheel: move the vehicle to firm / level ground. Turn the engine off, select first gear. Apply the handbrake. Loosen the wheel nuts by turning them anticlockwise (do not remove them) before jacking up. Only use the specific reinforced jack points on the underside of the vehicle. Fit the jack. Crank the jack to lift the vehicle. Completely loosen / remove nuts and wheel and replace with the spare. Refit / tighten the wheel nuts. Lower the vehicle. Tighten the wheel nuts.
Select N for neutral, P when leaving the vehicle, R for reversing (the vehicle must be at a complete standstill before this gear can be selected). For normal driving select D where the transmission will use all available forward gears automatically (a ‘kickdown ‘ facility is provided when the accelerator is pressed all the way to the floor past the normal acceleration point forcing the transmission to select a lower gear to obtain maximum acceleration. Release pressure on the accelerator to return to normal accelerator use). Use the 3 or 2 selector positions to select lower gears (use low gears for best engine braking for driving in hilly terrain or hazardous conditions). Whenever the vehicle is at a standstill apply the handbrake.
VIC-HYU-01 / 21-02-2013
Locking the doors?
Anti-theft system?
Opening boot/tailgate?
Adjusting door mirrors?
Opening the windows?
Operating the sunroof?
Using child door locks?
Starting the engine?
Opening fuel filler cap?
Releasing the bonnet?
Folding the rear seats?
How to change a tyre?
How to drive an automatic?
Ensure you use the correct fuel type. Only use unleaded petrol in petrol vehicles (see inside of filler flap).
Fuel Tank Capacity: 53.0 litres
Check tyre pressure regularly Legal minimum tread depth is 1.6 mm
Check the tyre pressure table found on the inside of driver’s door B-pillar (or fuel filler cap).
195/65 R15205/55 R16225/45 R17
Note: driving speeds and travel distances are restricted when using spacesaver spare tyres.
1 Heating & Ventilation2 Hazard Lights3 Starter Switch4 Headlights5 Sidelights6 Indicators7 Wipers8 Rear Screen Wipers9 Horn10 Bonnet Release11 Heated Rear Screen12 Rear Fog Lamp13 Front Fog Lamp
Tilt
LumbarLegroom
Height
10
3
1
11
7 / 8
2
PRND32
or
4 / 5 / 6 / 12 / 13
9
R 1 3 5
2 4 6

desi
gn a
nd p
rodu
ctio
n by
: D
rake
Ent
erpr
ises
Lim
ited
- Ph
one
: 01
18 9
86 8
526
USEFUL INFORMATION ABOUT YOUR VEHICLE
CHILD SEATSFUEL IN CASE OF BREAKDOWN DRIVER’S SEAT
Vehicle specifications are subject to change. When the engine is turned off, ensure that the starter switch is in position II when operating electrical items such as door mirrors and windows, etc. This vehicle does not include any manufacturer handbooks or manuals.
No responsibility is accepted for inaccuracies or misunderstanding caused by the wording of this guide. If in any doubt ask a member of staff for assistance.
Use hazard lights. Attempt to park in a safe position.
Use an emergency phone rather than a mobile as emergency services will then know the location of the vehicle.
Never use a child seat in a front passenger seat which is fitted with an active airbag (SRS). Follow all fitting instructions carefully.
Check seat positioning and security before use.
VEHICLE INSTRUCTION CARD
TYRE PRESSURES (COLD)CONTROLS
When parked, the handbrake should be fully applied with the vehicle left in first or reverse gear for vehicles equipped with manual transmission or P (Park) for vehicles with automatic transmission.
CAUTION! NOTE: SHOULD THIS VEHICLE NOT BE SUPPLIED WITH A SPARE WHEEL, PLEASE REFER TO THE TELEPHONE NUMBERS SHOWN ON THE TAX DISC HOLDER.
For assistance after an accident/incident, please call 0800 0280 999For assistance after a breakdown or help with tyres or windscreens please refer to the numbers on the tax disc holder.
HYUNDAI i10 5 SEATS5 DOOR HATCHBACK
Key / remote control operated central high security dead locking. Depress the central locking switch on the centre console to lock the doors from the inside. Auto door locking on vehicle motion.
Remote anti-theft alarm. Passive arming of electronic engine immobiliser after removal of the key from the starter switch.
Centrally locked. Use the key or remote control to unlock / open. Pull the release handle to open.
Electric adjustment operated by the control pad on the driver’s door.
Electric front operated via control buttons on the driver’s door, with electric or manually operated rear windows.
If fitted: Electric tilt / slide sunroof operated by roof mounted switchgear.
Located on the edge of the rear doors, slide the door locking lever on the edge of the door to activate it. Or press the central locking switch on the centre console. Check from inside that the doors are securely locked.
Ensure gear selector is in neutral (or N or P if automatic) and handbrake is on. Place ignition key in starter switch. Use a normal starting routine. Select desired gear. Release handbrake and brake pedal and gently press the accelerator to move the vehicle.
Located under flap on rear nearside. Centrally locked. Lift the edge of the flap to open it, and twist off the cap anticlockwise.
Pull bonnet release lever located under the steering wheel column. Unhook catch under bonnet.
The rear seat is divided into sections which can be folded separately. To release the seat press the seat unlocking catch and fold the seat down. To return the seat to normal use, raise the seat and push it firmly to engage the seat lock. Check it is locked before using the seat.
Lift the carpet cover in the boot to access the storage housing the tools and jack, lift out this tray to reveal the spare wheel (some vehicles may have a tyre mobility kit in lieu of a spare wheel - follow the instructions). Release the wheel by turning the retaining bolt anticlockwise. To change the wheel: move the vehicle to firm / level ground. Turn the engine off, select first gear. Apply the handbrake. Loosen the wheel nuts by turning them anticlockwise (do not remove them) before jacking up. Only use the specific reinforced jack points on the underside of the vehicle. Fit the jack. Crank the jack to lift the vehicle. Completely loosen / remove nuts and wheel and replace with the spare. Refit / tighten the wheel nuts. Lower the vehicle. Tighten the wheel nuts. Contact the help line on the rear of the car tax disc for assistance.
Select N for neutral, P when leaving the vehicle, R for reversing (the vehicle must be at a complete standstill before this gear can be selected). For normal driving select D where the transmission will use all available forward gears automatically (a ‘kickdown ‘ facility is provided when the accelerator is pressed all the way to the floor past the normal acceleration point forcing the transmission to select a lower gear to obtain maximum acceleration. Release pressure on the accelerator to return to normal accelerator use). Whenever the vehicle is at a standstill apply the handbrake.
VIC-HYU-02 / 26-01-2014
Locking the doors?
Anti-theft system?
Opening boot/tailgate?
Adjusting door mirrors?
Opening the windows?
Operating the sunroof?
Using child door locks?
Starting the engine?
Opening fuel filler cap?
Releasing the bonnet?
Folding the rear seats?
How to change a tyre?
How to drive an automatic?
Ensure you use the correct fuel type. Only use unleaded petrol in petrol vehicles (see inside of filler flap).
Fuel Tank Capacity: 40.0 litres
Check tyre pressure regularly Legal minimum tread depth is 1.6 mm
Check the tyre pressure table found on the inside of driver’s door B-pillar (or fuel filler cap).
175/65 R14155/70 R13
Note: driving speeds and travel distances are restricted when using spacesaver spare tyres. Vehicles may be supplied with a tyre mobility pack in lieu of a spare wheel.
1 Heating & Ventilation2 Hazard Lights3 Starter Switch4 Headlights5 Sidelights6 Indicators7 Wipers8 Rear Screen Wipers9 Horn10 Bonnet Release11 Heated Rear Screen12 Rear Fog Lamp13 Front Fog Lamp
Tilt
LumbarLegroom
Height
10
3
1
11
7 / 8
2
PRND
or
4 / 5 / 6 / 12 / 13
9
R 1 3 5
2 4

desi
gn a
nd p
rodu
ctio
n by
: D
rake
Ent
erpr
ises
Lim
ited
- Ph
one
: 01
18 9
86 8
526
USEFUL INFORMATION ABOUT YOUR VEHICLE
CHILD SEATSFUEL IN CASE OF BREAKDOWN DRIVER’S SEAT
Vehicle specifications are subject to change. When the engine is turned off, ensure that the starter switch is in position II when operating electrical items such as door mirrors and windows, etc. This vehicle does not include any manufacturer handbooks or manuals.
No responsibility is accepted for inaccuracies or misunderstanding caused by the wording of this guide. If in any doubt ask a member of staff for assistance.
Use hazard lights. Attempt to park in a safe position.
Use an emergency phone rather than a mobile as emergency services will then know the location of the vehicle.
Never use a child seat in a front passenger seat which is fitted with an active airbag (SRS). Follow all fitting instructions carefully.
Check seat positioning and security before use.
VEHICLE INSTRUCTION CARD
TYRE PRESSURES (COLD)CONTROLS
When parked, the handbrake should be fully applied with the vehicle left in first or reverse gear for vehicles equipped with manual transmission or P (Park) for vehicles with automatic transmission.
CAUTION! NOTE: SHOULD THIS VEHICLE NOT BE SUPPLIED WITH A SPARE WHEEL, PLEASE REFER TO THE TELEPHONE NUMBERS SHOWN ON THE TAX DISC HOLDER.
For assistance after an accident/incident, please call 0800 0280 999For assistance after a breakdown or help with tyres or windscreens please refer to the numbers on the tax disc holder.
HYUNDAI i20 5 SEATS3 DOOR HATCHBACK
Key / remote control operated central high security dead locking. Depress the central locking switch on the driver’s door to lock the doors from the inside. Auto door locking on vehicle motion.
Remote anti-theft alarm. Passive arming of electronic engine immobiliser after removal of the key from the starter switch.
Centrally locked. Use the key or remote control to unlock / open. Pull the release handle to open.
Electric adjustment operated by the control pad on the driver’s door.
Electric front operated via control buttons on the driver’s door.
If fitted: Electric tilt / slide sunroof operated by roof mounted switchgear.
Ensure gear selector is in neutral and handbrake is on. Place ignition key in starter switch. Use a normal starting routine. Select desired gear. Release handbrake and brake pedal and gently press the accelerator to move the vehicle.
Located under flap on rear nearside. Centrally locked. Release it using the internal remote release. Lift the edge of the flap to open it, and twist off the cap anticlockwise.
Pull bonnet release lever located under the steering wheel column. Unhook catch under bonnet.
The rear seat is divided into sections which can be folded separately. To release the seat press the seat unlocking catch and fold the seat down. To return the seat to normal use, raise the seat and push it firmly to engage the seat lock. Check it is locked before using the seat.
Lift the carpet cover in the boot to access the storage tray housing the tools and jack, lift out this tray to reveal the spare wheel. Release the wheel by turning the retaining bolt anticlockwise. To change the wheel: move the vehicle to firm / level ground. Turn the engine off, select first gear. Apply the handbrake. Loosen the wheel nuts by turning them anticlockwise (do not remove them) before jacking up. Only use the specific reinforced jack points on the underside of the vehicle. Fit the jack. Crank the jack to lift the vehicle. Completely loosen / remove nuts and wheel and replace with the spare. Refit / tighten the wheel nuts. Lower the vehicle. Tighten the wheel nuts.
VIC-HYU-03 / 24-10-2015
Locking the doors?
Anti-theft system?
Opening boot/tailgate?
Adjusting door mirrors?
Opening the windows?
Operating the sunroof?
Starting the engine?
Opening fuel filler cap?
Releasing the bonnet?
Folding the rear seats?
How to change a tyre?
Ensure you use the correct fuel type. Only use unleaded petrol in petrol vehicles (see inside of filler flap).
Fuel Tank Capacity: 50.0 litres
Check tyre pressure regularly Legal minimum tread depth is 1.6 mm
195/55 R16205/45 R17
Check the tyre pressure table found on the inside of driver’s door B-pillar (or fuel filler cap).
Note: this vehicle may be supplied with a tyre repair kit in lieu of a spare wheel or a spacesaver spare wheel.
1 Heating & Ventilation2 Hazard Lights3 Starter Switch4 Headlights5 Sidelights6 Indicators7 Wipers8 Rear Screen Wipers9 Horn10 Bonnet Release11 Heated Rear Screen12 Rear Fog Lamp13 Front Fog Lamp
Tilt
LumbarLegroom
Height
10
31
11
7 / 8
2
4 / 5 / 6 / 12 / 13
9
R 1 3 5
2 4 6
Tilt front seats to access rear seats

desi
gn a
nd p
rodu
ctio
n by
: D
rake
Ent
erpr
ises
Lim
ited
- Ph
one
: 01
18 9
86 8
526
USEFUL INFORMATION ABOUT YOUR VEHICLE
CHILD SEATSFUEL IN CASE OF BREAKDOWN DRIVER’S SEAT
Vehicle specifications are subject to change. When the engine is turned off, ensure that the starter switch is in position II when operating electrical items such as door mirrors and windows, etc. This vehicle does not include any manufacturer handbooks or manuals.
No responsibility is accepted for inaccuracies or misunderstanding caused by the wording of this guide. If in any doubt ask a member of staff for assistance.
Use hazard lights. Attempt to park in a safe position.
Use an emergency phone rather than a mobile as emergency services will then know the location of the vehicle.
Never use a child seat in a front passenger seat which is fitted with an active airbag (SRS). Follow all fitting instructions carefully.
Check seat positioning and security before use.
VEHICLE INSTRUCTION CARD
TYRE PRESSURES (COLD)CONTROLS
When parked, the handbrake should be fully applied with the vehicle left in first or reverse gear for vehicles equipped with manual transmission or P (Park) for vehicles with automatic transmission.
CAUTION! NOTE: SHOULD THIS VEHICLE NOT BE SUPPLIED WITH A SPARE WHEEL, PLEASE REFER TO THE TELEPHONE NUMBERS SHOWN ON THE TAX DISC HOLDER.
For assistance after an accident/incident, please call 0800 0280 999For assistance after a breakdown or help with tyres or windscreens please refer to the numbers on the tax disc holder.
When parked, the electronic parking brake should be fully applied with the vehicle left in first or reverse gear for vehicles equipped with manual transmission or P (Park) for vehicles with automatic transmission.
CAUTION!
HYUNDAI i40 5 SEATS4 DOOR SALOON / 5 DOOR ESTATE
Key / remote control operated central high security dead locking. Depress the central locking switch on the centre console to lock the doors from the inside. Auto door locking on vehicle motion.
Remote anti-theft alarm. Passive arming of electronic engine immobiliser after removal of the key from the starter switch.
Centrally locked. Use the key or remote control to unlock / open. Pull the release handle to open. Saloon has a remote release.
Electric adjustment operated by the control pad on the driver’s door.
Electric front operated via control buttons on the driver’s door, with electric or manually operated rear windows.
If fitted: Electric tilt / slide panoramic sunroof operated by roof mounted switchgear.
Located on the edge of the rear doors, slide the door locking lever on the edge of the door to activate it. Or use the central locking switch on the centre console. Check from inside that the doors are securely locked. Ensure gear selector is in neutral (or N or P if automatic) and electronic parking brake is on. Place ignition key in starter switch. Use a normal starting routine (or some vehicles feature an engine start/stop button, simply keep the key in your pocket or handbag, and press the engine start/stop button to start or stop the engine). Select desired gear. Release electronic parking brake and brake pedal and gently press the accelerator to move the vehicle. Some vehicles feature automatic engine start/stop technology where the engine shuts off when the vehicle is stationary, gears in neutral and pedals are not depressed - engine instantly restarts on depression of the clutch (or brake on auto).Located under flap on rear nearside. Centrally locked. Release it using the internal remote release adjacent to the driver’s seat. Lift the edge of the flap to open it, and twist off the cap anticlockwise.
Pull bonnet release lever located under the steering wheel column. Unhook catch under bonnet.The rear seat is divided into sections which can be folded separately. To release the seat press the seat unlocking catch and fold the seat down. To return the seat to normal use, raise the seat and push it firmly to engage the seat lock. Check it is locked before using the seat.Lift the carpet cover to access the storage tray housing the tools and jack, lift out this tray to reveal the temporary spacesaver spare wheel. Release the wheel by turning the retaining bolt anticlockwise. To change the wheel: move the vehicle to firm / level ground. Turn the engine off, select first gear. Apply the electronic parking brake. Loosen the wheel nuts by turning them anticlockwise (do not remove them) before jacking up. Only use the specific reinforced jack points on the underside of the vehicle. Fit the jack. Crank the jack to lift the vehicle. Completely loosen / remove nuts and wheel and replace with the spare. Refit / tighten the wheel nuts. Lower the vehicle. Tighten the wheel nuts.Select N for neutral, P when leaving the vehicle, R for reversing (the vehicle must be at a complete standstill before this gear can be selected). For normal driving select D where the transmission will use all available forward gears automatically (a ‘kickdown ‘ facility is provided when the accelerator is pressed all the way to the floor past the normal acceleration point forcing the transmission to select a lower gear to obtain maximum acceleration. Release pressure on the accelerator to return to normal accelerator use). Use the 3 or 2 selector positions to select lower gears (use low gears for best engine braking for driving in hilly terrain or hazardous conditions). Whenever the vehicle is at a standstill apply the electronic parking brake.
VIC-HYU-06 / 26-01-2014
Locking the doors?
Anti-theft system?
Opening boot/tailgate?
Adjusting door mirrors?
Opening the windows?
Operating the sunroof?
Using child door locks?
Starting the engine?
Opening fuel filler cap?
Releasing the bonnet?Folding the rear seats?
How to change a tyre?
How to drive an automatic?
Ensure you use the correct fuel type. Only use unleaded petrol in petrol vehicles (see inside of filler flap).
Fuel Tank Capacity: 70 litres
Check tyre pressure regularly Legal minimum tread depth is 1.6 mm
Check the tyre pressure table found on the inside of driver’s door B-pillar (or fuel filler cap).
205/60 R16215/50 R17225/45 R18
Note: driving speeds and travel distances are restricted when using spacesaver spare tyres.
1 Heating & Ventilation2 Hazard Lights3 Starter Switch4 Headlights5 Sidelights6 Indicators7 Wipers8 Rear Screen Wipers9 Horn10 Bonnet Release11 Heated Rear Screen12 Rear Fog Lamp13 Front Fog Lamp14 Electronic parking brake
Tilt
LumbarLegroom
Height
10
3
1
11
7 / 8
2
PRND32
or
4 / 5 / 6
9
R 1 3 5
2 4 6
12 / 13
14

desi
gn a
nd p
rodu
ctio
n by
: D
rake
Ent
erpr
ises
Lim
ited
- Ph
one
: 01
18 9
86 8
526
USEFUL INFORMATION ABOUT YOUR VEHICLE
CHILD SEATSFUEL IN CASE OF BREAKDOWN DRIVER’S SEAT
Vehicle specifications are subject to change. When the engine is turned off, ensure that the starter switch is in position II when operating electrical items such as door mirrors and windows, etc. This vehicle does not include any manufacturer handbooks or manuals.
No responsibility is accepted for inaccuracies or misunderstanding caused by the wording of this guide. If in any doubt ask a member of staff for assistance.
Use hazard lights. Attempt to park in a safe position.
Use an emergency phone rather than a mobile as emergency services will then know the location of the vehicle.
Never use a child seat in a front passenger seat which is fitted with an active airbag (SRS). Follow all fitting instructions carefully.
Check seat positioning and security before use.
VEHICLE INSTRUCTION CARD
TYRE PRESSURES (COLD)CONTROLS
When parked, the handbrake should be fully applied with the vehicle left in first or reverse gear for vehicles equipped with manual transmission or P (Park) for vehicles with automatic transmission.
CAUTION! NOTE: SHOULD THIS VEHICLE NOT BE SUPPLIED WITH A SPARE WHEEL, PLEASE REFER TO THE TELEPHONE NUMBERS SHOWN ON THE TAX DISC HOLDER.
For assistance after an accident/incident, please call 0800 0280 999For assistance after a breakdown or help with tyres or windscreens please refer to the numbers on the tax disc holder.
HYUNDAI SANTA FE 5 OR 7 SEATS5 DOOR SUV 2X4 OR 4X4
Key / remote control operated central high security dead locking. Depress the central locking switch on the driver’s door to lock the doors from the inside. Auto door locking on vehicle motion. Some models feature keyless entry.
Remote anti-theft alarm. Passive arming of electronic engine immobiliser after removal of the key from the starter switch.
Centrally locked. Use the key or remote control to unlock / open. Pull the release handle to open.
Electric adjustment operated by the control pad on the driver’s door.
Electric front and rear operated via control buttons on the driver’s door.
If fitted: Electric panoramic electric / tilt slide sunroof operated by roof mounted switchgear.
Located on the edge of the rear doors. Depress central locking button on the dashboard to activate. Check from inside that the doors are securely locked. Ensure gear selector is in neutral (or N or P if automatic) and electric parking brake is on. Place ignition key in starter switch and use a normal starting routine. (Note: some models are also fitted with an engine start/stop button to turn the engine on or off). Release electric parking brake and brake pedal and gently press the accelerator to move the vehicle. Some vehicles also feature automatic engine start/stop technology - engine auto shuts off when vehicle is not moving, gears are in neutral and foot pedals are not depressed - engine instantly restarts on depression of the clutch (or accelerator pedal for autos).Located under flap on rear nearside. Centrally locked. Release it using the internal remote release adjacent to the driver’s seat. Lift the edge of the flap to open it, and twist off the cap anticlockwise.
Pull bonnet release lever located under the steering wheel column. Unhook catch under bonnet.
The second row (and third row - if fitted) of rear seats are divided into sections which can be flat-folded. To release the seats press the seat unlocking catch and fold the seat down. To return the seat to normal use, raise the seat and push it firmly to engage the seat lock. Check it is locked before using the seat.
Lift the carpet cover to access the storage tray housing the tools and jack, lift out this tray to reveal the full size spare wheel. Release the wheel by turning the retaining bolt anticlockwise. To change the wheel: move the vehicle to firm / level ground. Turn the engine off, select first gear. Apply the electric parking brake. Loosen the wheel nuts by turning them anticlockwise (do not remove them) before jacking up. Only use the specific reinforced jack points on the underside of the vehicle. Fit the jack. Crank the jack to lift the vehicle. Completely loosen / remove nuts and wheel and replace with the spare. Refit / tighten the wheel nuts. Lower the vehicle. Tighten the wheel nuts.
Select N for neutral, P when leaving the vehicle, R for reversing (the vehicle must be at a complete standstill before this gear can be selected). For normal driving select D where the transmission will use all available forward gears automatically (a ‘kickdown ‘ facility is provided when the accelerator is pressed all the way to the floor past the normal acceleration point forcing the transmission to select a lower gear to obtain maximum acceleration. Release pressure on the accelerator to return to normal accelerator use). Use the D+ or D- selector positions to manually select gears. Whenever the vehicle is at a standstill apply the electric parking brake. Some models may also feature 4WD with various automatic modes.
VIC-HYU-07 / 28-01-2015
Locking the doors?
Anti-theft system?
Opening boot/tailgate?
Adjusting door mirrors?
Opening the windows?
Operating the sunroof?
Using child door locks?
Starting the engine?
Opening fuel filler cap?
Releasing the bonnet?
Folding the rear seats?
How to change a tyre?
How to drive an automatic?
Ensure you use the correct fuel type. Only use unleaded petrol in petrol vehicles (see inside of filler flap).
Fuel Tank Capacity: 64.0 litres
Check tyre pressure regularly Legal minimum tread depth is 1.6 mm
Check the tyre pressure table found on the inside of driver’s door B-pillar (or fuel filler cap).
235/60 R18235/55 R19
1 Heating & Ventilation2 Hazard Lights3 Starter Switch / Start-Stop4 Headlights5 Sidelights6 Indicators7 Wipers8 Rear Screen Wipers9 Horn10 Bonnet Release11 Heated Rear Screen12 Rear Fog Lamp13 Front Fog Lamp
Tilt
LumbarLegroom
Height
10
3
1
2
7 / 8
11
PRND+D-
or
4 / 5 / 6 / 12 / 13
9
R 1 3 5
2 4 6
3

desi
gn a
nd p
rodu
ctio
n by
: D
rake
Ent
erpr
ises
Lim
ited
- Ph
one
: 01
18 9
86 8
526
USEFUL INFORMATION ABOUT YOUR VEHICLE
CHILD SEATSFUEL IN CASE OF BREAKDOWN DRIVER’S SEAT
Vehicle specifications are subject to change. When the engine is turned off, ensure that the starter switch is in position II when operating electrical items such as door mirrors and windows, etc. This vehicle does not include any manufacturer handbooks or manuals.
No responsibility is accepted for inaccuracies or misunderstanding caused by the wording of this guide. If in any doubt ask a member of staff for assistance.
Use hazard lights. Attempt to park in a safe position.
Use an emergency phone rather than a mobile as emergency services will then know the location of the vehicle.
Never use a child seat in a front passenger seat which is fitted with an active airbag (SRS). Follow all fitting instructions carefully.
Check seat positioning and security before use.
VEHICLE INSTRUCTION CARD
TYRE PRESSURES (COLD)CONTROLS
When parked, the handbrake should be fully applied with the vehicle left in first or reverse gear for vehicles equipped with manual transmission or P (Park) for vehicles with automatic transmission.
CAUTION! NOTE: SHOULD THIS VEHICLE NOT BE SUPPLIED WITH A SPARE WHEEL, PLEASE REFER TO THE TELEPHONE NUMBERS SHOWN ON THE TAX DISC HOLDER.
For assistance after an accident/incident, please call 0800 0280 999For assistance after a breakdown or help with tyres or windscreens please refer to the numbers on the tax disc holder.
HYUNDAI ix20 5 SEATS5 DOOR HATCHBACK
Key / remote control operated central high security dead locking. Depress the central locking switch on the driver’s door to lock the doors from the inside. Auto door locking on vehicle motion.
Remote anti-theft alarm. Passive arming of electronic engine immobiliser after removal of the key from the starter switch.
Centrally locked. Use the key or remote control to unlock / open. Pull the release handle to open.
Electric adjustment operated by the control pad on the driver’s door.
Electric front operated via control buttons on the driver’s door, with electric or manually operated rear windows.
If fitted: Electric tilt / slide sunroof operated by roof mounted switchgear.
Located on the edge of the rear doors, press the central locking switch on the dashboard to activate child proof locks. Check from inside that the doors are securely locked.
Ensure gear selector is in neutral (or N or P if automatic) and handbrake is on. Place ignition key in starter switch. Use a normal starting routine. Some vehicles also feature automatic engine start/stop technology - whereby the engine automatically shuts off when vehicle is not moving, gears are in neutral and foot pedals are not depressed - engine instantly restarts on depression of the clutch (or accelerator pedal for autos). Select desired gear. Release handbrake and brake pedal and gently press the accelerator to move the vehicle.Located under flap on rear nearside. Centrally locked. Lift the edge of the flap to open it, and twist off the cap anticlockwise.
Pull bonnet release lever located under the steering wheel column. Unhook catch under bonnet.
The rear seat is divided into sections which can be folded separately. To release the seat press the seat unlocking catch and fold the seat down. To return the seat to normal use, raise the seat and push it firmly to engage the seat lock. Check it is locked before using the seat.
Lift the carpet cover in the boot to access the tools and jack, and the spacesaver spare wheel. Release the wheel by turning the retaining bolt anticlockwise. To change the wheel: move the vehicle to firm / level ground. Turn the engine off, select first gear. Apply the handbrake. Loosen the wheel nuts by turning them anticlockwise (do not remove them) before jacking up. Only use the specific reinforced jack points on the underside of the vehicle. Fit the jack. Crank the jack to lift the vehicle. Completely loosen / remove nuts and wheel and replace with the spare. Refit / tighten the wheel nuts. Lower the vehicle. Tighten the wheel nuts.
Select N for neutral, P when leaving the vehicle, R for reversing (the vehicle must be at a complete standstill before this gear can be selected). For normal driving select D where the transmission will use all available forward gears automatically (a ‘kickdown ‘ facility is provided when the accelerator is pressed all the way to the floor past the normal acceleration point forcing the transmission to select a lower gear to obtain maximum acceleration. Release pressure on the accelerator to return to normal accelerator use). Whenever the vehicle is at a standstill apply the handbrake.
VIC-HYU-08 / 28-01-2015
Locking the doors?
Anti-theft system?
Opening boot/tailgate?
Adjusting door mirrors?
Opening the windows?
Operating the sunroof?
Using child door locks?
Starting the engine?
Opening fuel filler cap?
Releasing the bonnet?
Folding the rear seats?
How to change a tyre?
How to drive an automatic?
Ensure you use the correct fuel type. Only use unleaded petrol in petrol vehicles (see inside of filler flap).
Fuel Tank Capacity: 50.0 litres
Check tyre pressure regularly Legal minimum tread depth is 1.6 mm
Check the tyre pressure table found on the inside of driver’s door B-pillar (or fuel filler cap).
195/65 R15205/55 R16
Note: driving speeds and travel distances are restricted when using spacesaver spare tyres.
1 Heating & Ventilation2 Hazard Lights3 Starter Switch4 Headlights5 Sidelights6 Indicators7 Wipers8 Rear Screen Wipers9 Horn10 Bonnet Release11 Heated Rear Screen12 Rear Fog Lamp13 Front Fog Lamp
Tilt
LumbarLegroom
Height
10
31
11
7 / 8
2
PRND
or
4 / 5 / 6 / 12 / 13
9
R 1 3 5
2 4 (6)
desi
gn a
nd p
rodu
ctio
n by
: D
rake
Ent
erpr
ises
Lim
ited
- Ph
one
: 01
18 9
86 8
526
USEFUL INFORMATION ABOUT YOUR VEHICLE
CHILD SEATSFUEL IN CASE OF BREAKDOWN DRIVER’S SEAT
Vehicle specifications are subject to change. When the engine is turned off, ensure that the starter switch is in position II when operating electrical items such as door mirrors and windows, etc. This vehicle does not include any manufacturer handbooks or manuals.
No responsibility is accepted for inaccuracies or misunderstanding caused by the wording of this guide. If in any doubt ask a member of staff for assistance.
Use hazard lights. Attempt to park in a safe position.
Use an emergency phone rather than a mobile as emergency services will then know the location of the vehicle.
Never use a child seat in a front passenger seat which is fitted with an active airbag (SRS). Follow all fitting instructions carefully.
Check seat positioning and security before use.
VEHICLE INSTRUCTION CARD
TYRE PRESSURES (COLD)CONTROLS
When parked, the handbrake should be fully applied with the vehicle left in first or reverse gear for vehicles equipped with manual transmission or P (Park) for vehicles with automatic transmission.
CAUTION! NOTE: SHOULD THIS VEHICLE NOT BE SUPPLIED WITH A SPARE WHEEL, PLEASE REFER TO THE TELEPHONE NUMBERS SHOWN ON THE TAX DISC HOLDER.
For assistance after an accident/incident, please call 0800 0280 999For assistance after a breakdown or help with tyres or windscreens please refer to the numbers on the tax disc holder.
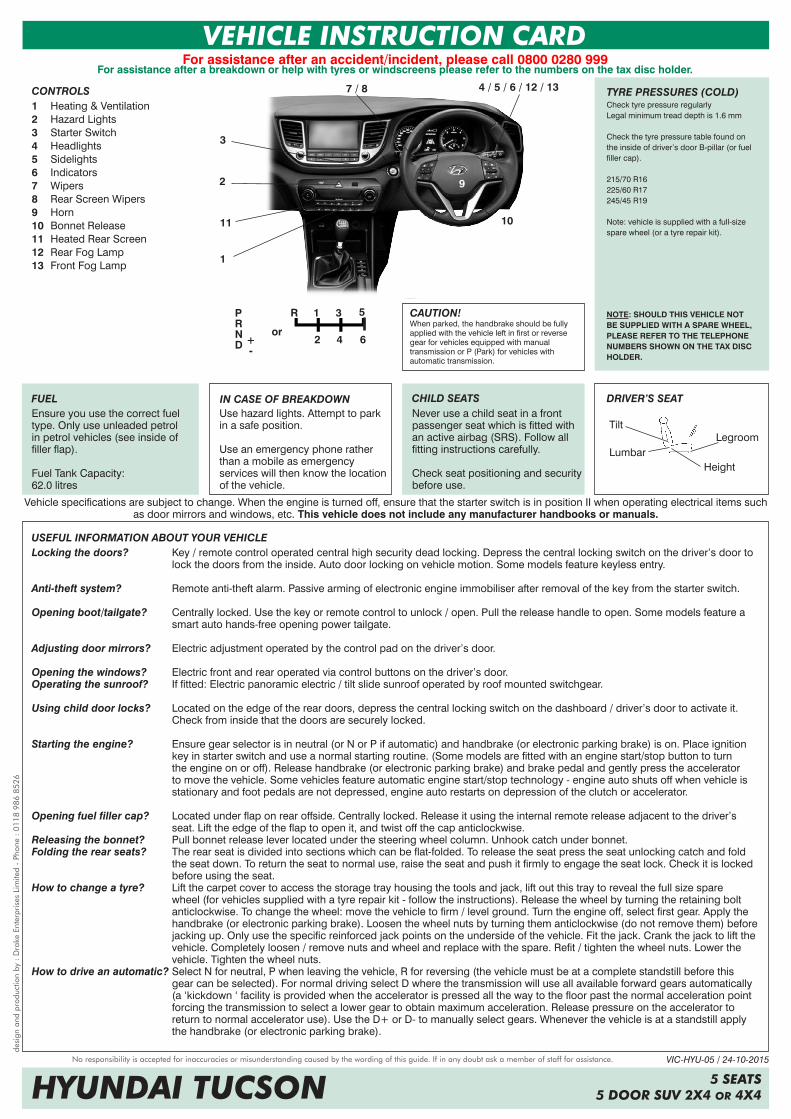
HYUNDAI TUCSON 5 SEATS5 DOOR SUV 2X4 OR 4X4
Key / remote control operated central high security dead locking. Depress the central locking switch on the driver’s door to lock the doors from the inside. Auto door locking on vehicle motion. Some models feature keyless entry.
Remote anti-theft alarm. Passive arming of electronic engine immobiliser after removal of the key from the starter switch.
Centrally locked. Use the key or remote control to unlock / open. Pull the release handle to open. Some models feature a smart auto hands-free opening power tailgate.
Electric adjustment operated by the control pad on the driver’s door.
Electric front and rear operated via control buttons on the driver’s door.If fitted: Electric panoramic electric / tilt slide sunroof operated by roof mounted switchgear.
Located on the edge of the rear doors, depress the central locking switch on the dashboard / driver’s door to activate it. Check from inside that the doors are securely locked.
Ensure gear selector is in neutral (or N or P if automatic) and handbrake (or electronic parking brake) is on. Place ignition key in starter switch and use a normal starting routine. (Some models are fitted with an engine start/stop button to turn the engine on or off). Release handbrake (or electronic parking brake) and brake pedal and gently press the accelerator to move the vehicle. Some vehicles feature automatic engine start/stop technology - engine auto shuts off when vehicle is stationary and foot pedals are not depressed, engine auto restarts on depression of the clutch or accelerator.
Located under flap on rear offside. Centrally locked. Release it using the internal remote release adjacent to the driver’s seat. Lift the edge of the flap to open it, and twist off the cap anticlockwise.Pull bonnet release lever located under the steering wheel column. Unhook catch under bonnet.The rear seat is divided into sections which can be flat-folded. To release the seat press the seat unlocking catch and fold the seat down. To return the seat to normal use, raise the seat and push it firmly to engage the seat lock. Check it is locked before using the seat.Lift the carpet cover to access the storage tray housing the tools and jack, lift out this tray to reveal the full size spare wheel (for vehicles supplied with a tyre repair kit - follow the instructions). Release the wheel by turning the retaining bolt anticlockwise. To change the wheel: move the vehicle to firm / level ground. Turn the engine off, select first gear. Apply the handbrake (or electronic parking brake). Loosen the wheel nuts by turning them anticlockwise (do not remove them) before jacking up. Only use the specific reinforced jack points on the underside of the vehicle. Fit the jack. Crank the jack to lift the vehicle. Completely loosen / remove nuts and wheel and replace with the spare. Refit / tighten the wheel nuts. Lower the vehicle. Tighten the wheel nuts.Select N for neutral, P when leaving the vehicle, R for reversing (the vehicle must be at a complete standstill before this gear can be selected). For normal driving select D where the transmission will use all available forward gears automatically (a ‘kickdown ‘ facility is provided when the accelerator is pressed all the way to the floor past the normal acceleration point forcing the transmission to select a lower gear to obtain maximum acceleration. Release pressure on the accelerator to return to normal accelerator use). Use the D+ or D- to manually select gears. Whenever the vehicle is at a standstill apply the handbrake (or electronic parking brake).
VIC-HYU-05 / 24-10-2015
Locking the doors?
Anti-theft system?
Opening boot/tailgate?
Adjusting door mirrors?
Opening the windows?Operating the sunroof?
Using child door locks?
Starting the engine?
Opening fuel filler cap?
Releasing the bonnet?Folding the rear seats?
How to change a tyre?
How to drive an automatic?
Ensure you use the correct fuel type. Only use unleaded petrol in petrol vehicles (see inside of filler flap).
Fuel Tank Capacity: 62.0 litres
Check tyre pressure regularly Legal minimum tread depth is 1.6 mm
Check the tyre pressure table found on the inside of driver’s door B-pillar (or fuel filler cap).
215/70 R16225/60 R17245/45 R19
Note: vehicle is supplied with a full-size spare wheel (or a tyre repair kit).
1 Heating & Ventilation2 Hazard Lights3 Starter Switch4 Headlights5 Sidelights6 Indicators7 Wipers8 Rear Screen Wipers9 Horn10 Bonnet Release11 Heated Rear Screen12 Rear Fog Lamp13 Front Fog Lamp
Tilt
LumbarLegroom
Height
10
1
11
7 / 8
2
PRND
or
4 / 5 / 6 / 12 / 13
9
R 1 3 5
2 4 6
3
+-


![Zrii+Vics+Ultimate+O.M.[1] Final[1]](https://static.fdocuments.us/doc/165x107/554eb6f6b4c905fb7c8b54c0/zriivicsultimateom1-final1.jpg)