Importing Data in ADT - Schwab Corporate Services ... Product Resource Center...Schwab RT Automated...
20
Schwab RT ® SQL Recordkeeping Operations Library Importing Data in ADT Schwab Retirement Technologies® Recordkeeping Operations Library
Transcript of Importing Data in ADT - Schwab Corporate Services ... Product Resource Center...Schwab RT Automated...

Schwab RT® SQL Recordkeeping Operations Library Importing Data in ADT
Schwab Retirement Technologies® Recordkeeping Operations Library

Schwab RT Recordkeeping Operations Library
Importing Data in ADT
February, 2015
The material contained herein is proprietary to Schwab and for informational purposes only. The information is not intended to provide tax, legal or investment advice. Schwab does not guarantee the suitability or potential value of any particular information source. Certain information presented herein may be subject to change. The information or material contained in this document may not be copied, assigned, transferred, disclosed or utilized without the express written approval of Schwab.
The Charles Schwab Corporation provides services to retirement plans and participants through its subsidiaries: Charles Schwab & Co., Inc. (Member SIPC), Charles Schwab Bank, Schwab Retirement Plan Services, Inc., Schwab Retirement Plan Services Company and Schwab Retirement Technologies, Inc.® (Schwab RT). Schwab RT is engaged in developing and licensing proprietary retirement plan recordkeeping systems to independent Third Party Administrators.
For further information, contact Schwab Retirement Technologies, Inc. at 4529 Sharon Road, Charlotte, NC 28211, USA. Web site: schwabRT.com.
2015. Schwab Retirement Technologies, Inc. All rights reserved.
Schwab RT Automated Processing
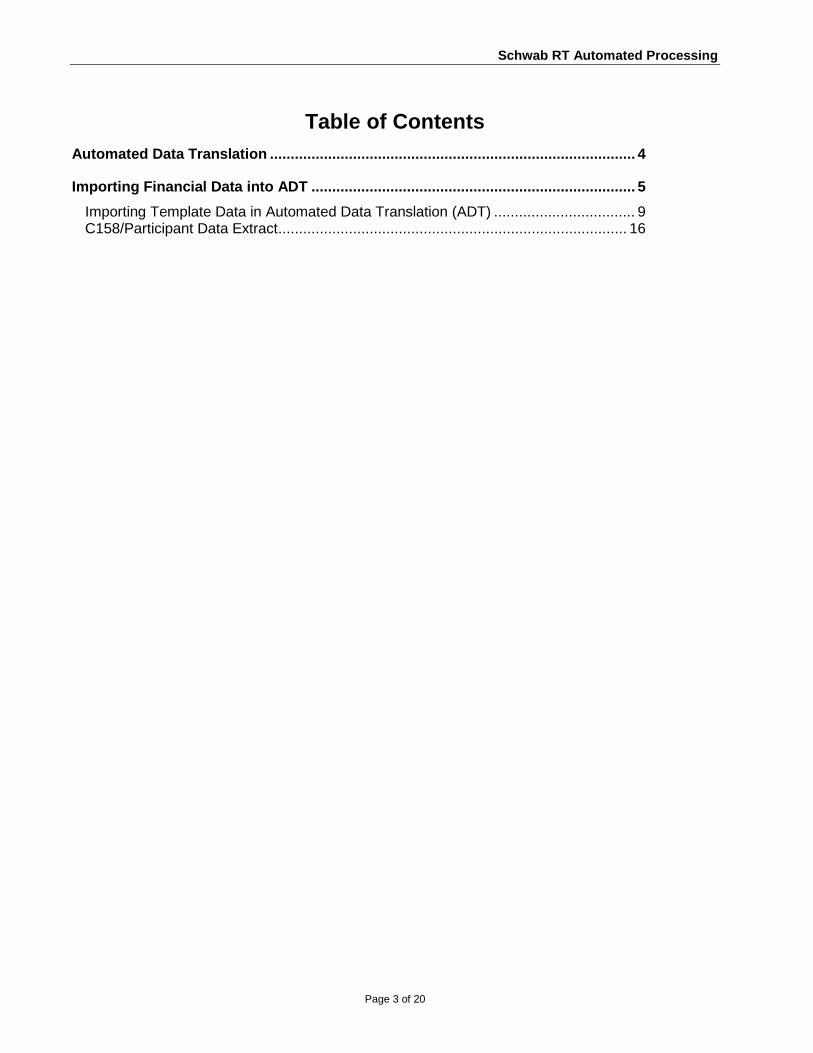
Table of Contents Automated Data Translation ........................................................................................ 4
Importing Financial Data into ADT .............................................................................. 5
Importing Template Data in Automated Data Translation (ADT) .................................. 9 C158/Participant Data Extract .................................................................................... 16
Page 3 of 20

Schwab RT Automated Processing
Automated Data Translation Automated Data Translation (ADT) provides the ability to import both financial and non-financial data electronically. Data can be brought in from payroll tapes, spreadsheets, or any other system that can produce ASCII files.
Schwab RT Recordkeeping can import data from both fixed and variable length files. This is accomplished through the use of templates that represent the format of the files from which data is imported. You can create templates and can save them for repeated use.
There are three types of data that can be imported through ADT: synoptic, financial, and conversion balances. Choose the type of data you want to import by selecting the process type from the Process Setup window. Depending on process type, tree folders to the left of the Process Setup window expand or collapse. For example, if you choose Financial, the Financial folder expands and the Synoptic and Conversion folders collapse.
You can run Automated Data Translation in either Edit mode or Update mode. In Edit mode, you only edit the add/update file and can produce reports, but files are not updated. Update mode is then run to update the files.
When updating files, select Produce Error Log under Reports Library, if you plan to run the error report back in through ADT (using an extension of .esf or .esv). You can manually cancel the request to Produce Error Log or rename the .esf or .esv extension. Recommendation: Import your data in Edit mode first so that any errors can be detected and resolved prior to importing the actual data in Update mode.
Page 4 of 20
Schwab RT Automated Processing
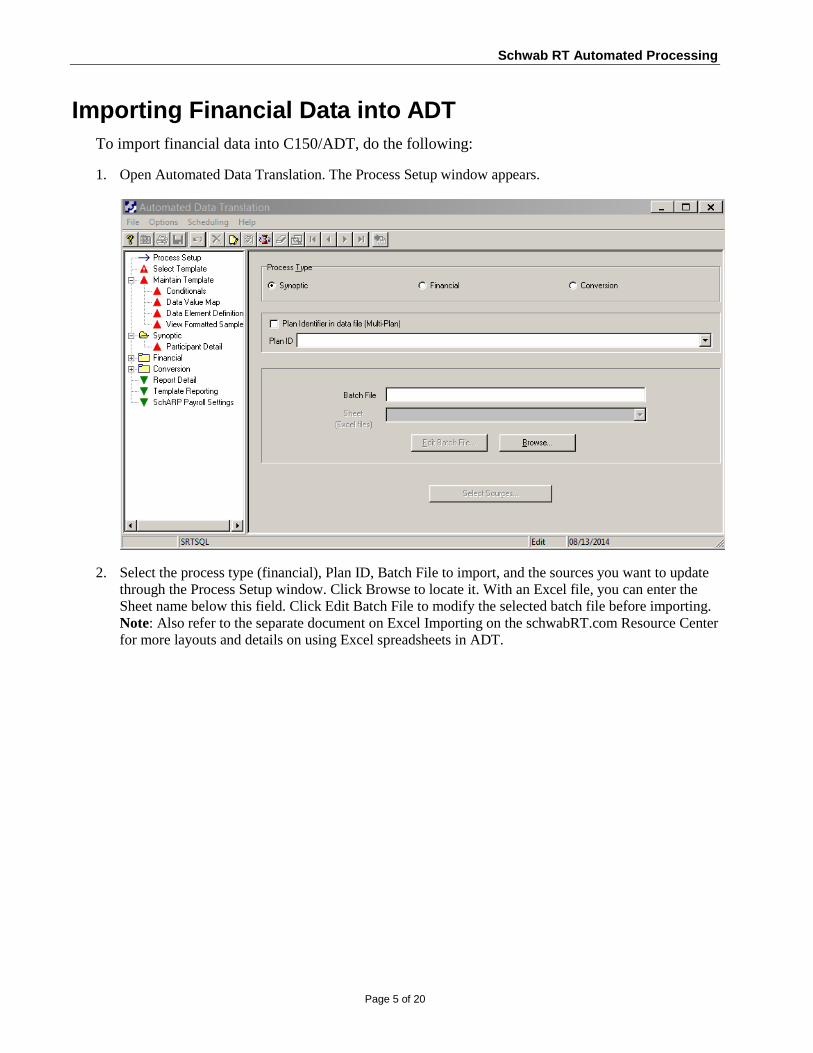
Importing Financial Data into ADT To import financial data into C150/ADT, do the following:
1. Open Automated Data Translation. The Process Setup window appears.
2. Select the process type (financial), Plan ID, Batch File to import, and the sources you want to update through the Process Setup window. Click Browse to locate it. With an Excel file, you can enter the Sheet name below this field. Click Edit Batch File to modify the selected batch file before importing. Note: Also refer to the separate document on Excel Importing on the schwabRT.com Resource Center for more layouts and details on using Excel spreadsheets in ADT.
Page 5 of 20

Schwab RT Automated Processing
3. From the Automated Data Translation tree, select the Select Template window.
4. Select the appropriate template type (Fixed or Variable) and template category (General Use or Insurance).
5. If you know the exact Template ID name you want to use, type the name in the Template ID field. Then click Choose Template. This moves the template to the Template Order field. Note: This is a case sensitive field. Alternatively, click Populate All Templates Available, to display a list of available templates based on the template type and category. Drag and drop selection(s) from the Templates Available field to the Template Order field to put templates in order. Or highlight selected templates and click the left or right arrows to move them between the Templates Available and Template Order fields. Use the up and down arrows to change the order of templates in the Template Order list.
6. To add a template, click Maintain Templates from the Automated Data Translation tree. Select the appropriate template type and category. Click Insert Template ID, add the new template ID, enter a template description, and delimiter (if variable). Define the template data from the Conditionals, Data Value Map, and Data Element Definition windows.
7. To modify a template, click Maintain Templates on the Automated Data Translation tree. The Maintain Templates window appears. Choose the template(s) to modify by selecting the template type, template category, and template ID. If you have selected a template in Step 5, these templates appear in the drop down field. Make the necessary modifications on the Conditionals, Data Value Map, and Data Element Definition windows.
Page 6 of 20

Schwab RT Automated Processing
8. From the Automated Data Translation tree, click Financial to view or modify import options for financial data. The Payroll Transactions window appears.
9. Modify the options from the financial windows as required. • Payroll Transactions • Originate a Loan • Lump Sum Payments • Other Transactions
10. Select or modify the tax codes from the Financial Tax Codes windows. Tax codes are required for contributions (others default to Loan Repayments, Lump Sum Distributions, and Distributions). You need to have tax codes selected only for sources selected in the Process Setup window.
Page 7 of 20
Schwab RT Automated Processing
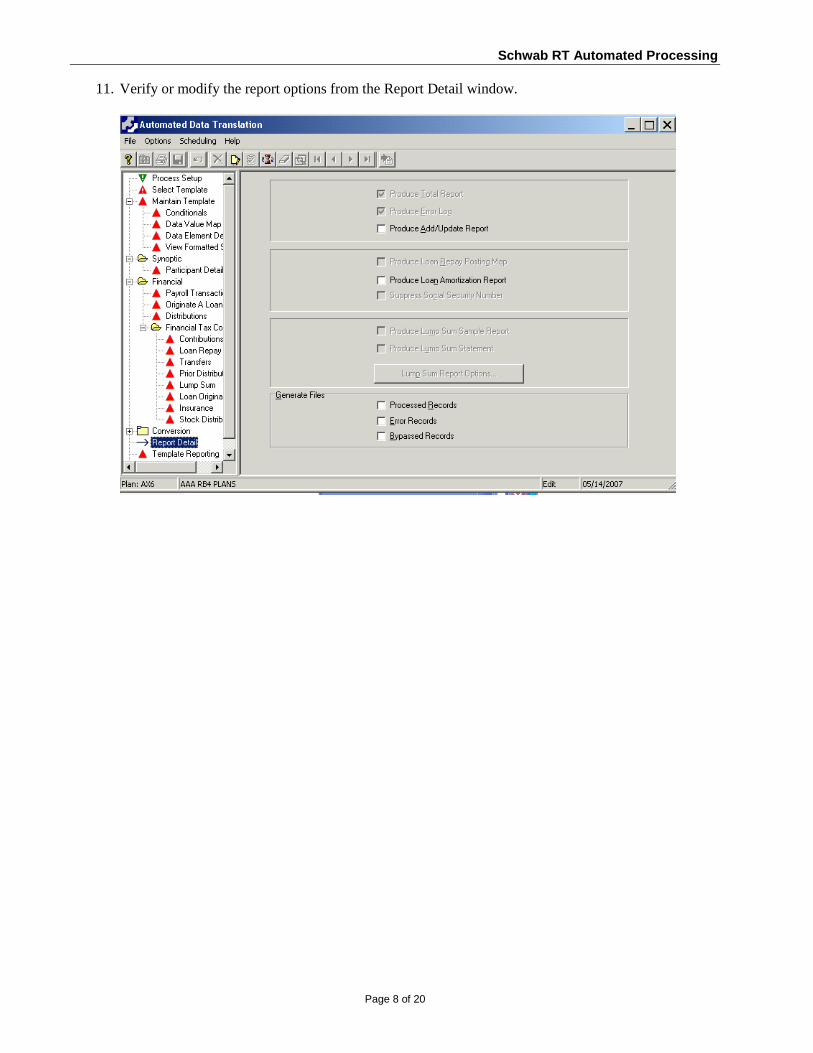
11. Verify or modify the report options from the Report Detail window.
Page 8 of 20

Schwab RT Automated Processing
Importing Template Data in Automated Data Translation (ADT) The C150/ADT application imports data from files, reading Synoptic, Financial, and Conversion DDL’s: ADTSYN.dll, ADTFIN.dll, and ADTCON.dll. Selected column data is added to a specified ADT template. Data is imported through a delimited text file and to populate templates correctly it is important to format data correctly for Social Security numbers, dates, dollars, and zip codes. In the SQL Recordkeeping 2.2 release (2006) data import in ADT will be enhanced to support data import through an Excel spreadsheet, automating some of the formatting requirements. How to Import File Data into an ADT Template To import data from a text file into the ADT application, do the following: 1. Open the ADT application’s Process Setup window and select a Process Type (Synoptic, Financial or Conversion) and a Plan ID:
2. In the Batch File field, enter the location of the file you want to import or click Browse to locate it. You can import data through an Excel spreadsheet. The application reads Synoptic, Financial, and Conversion DDL’s: ADTSYN.dll, ADTFIN.dll, and ADTCON.dll. Selected Excel column data is added to a specified ADT template. Specify the Sheet if you are importing from Excel. Note: Also refer to the separate document on Excel Importing on the schwabRT.com Resource Center for more layouts and details on using Excel spreadsheets in ADT. 3. Click Edit Batch File to modify file data if required.
Page 9 of 20
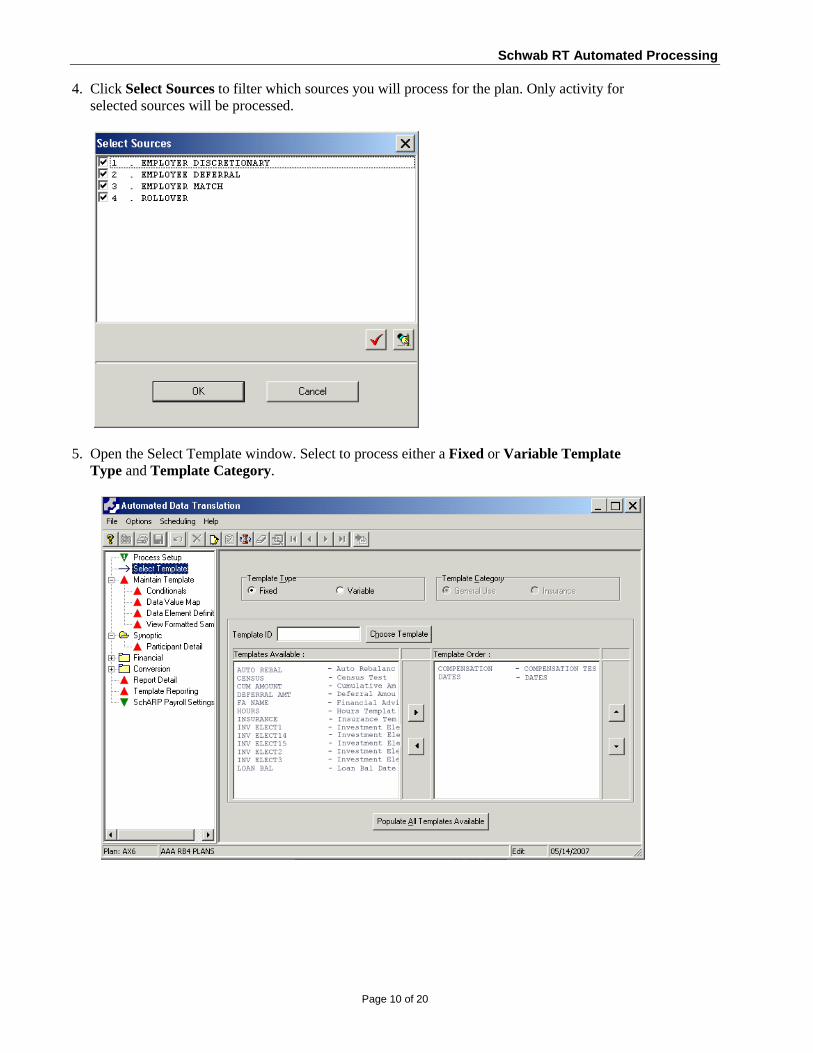
Schwab RT Automated Processing 4. Click Select Sources to filter which sources you will process for the plan. Only activity for selected sources will be processed.
5. Open the Select Template window. Select to process either a Fixed or Variable Template Type and Template Category.
Page 10 of 20

Schwab RT Automated Processing 6. Enter a Template ID or click Choose Template to browse for one. Alternatively, click Populate All Templates Available and then using the arrow buttons move the selected Template(s) from the Templates Available field to the Template Order field. Tip: You can drag-and-drop templates in the grid, or select/clear templates by double- clicking the template names. 7. Open the Maintain Template window to select a Template ID. Under Template Information, enter the appropriate Description, Delimiter and Data Format.. Note: ADT exports only one date format per template.
Page 11 of 20

Schwab RT Automated Processing 8. From the application tree, open the Conditionals window to view data imported from the spreadsheet and in the Conditionals grid, modify as required.
Page 12 of 20

Schwab RT Automated Processing 9. From the Data Value Map window, you can correlate codes in the batch file with specific codes in
Schwab RT Recordkeeping.
10. The Data Value Map allows you to translate codes in the batch file to codes on the system. Numeric entries must be entered for text values. For example, instead of using Y for Yes and N or No, enter 21 for Yes and 22 for No.
In the Data Value Map grid, highlight the code you are defining and enter the corresponding value from the batch file into the Text File Value column.
Page 13 of 20
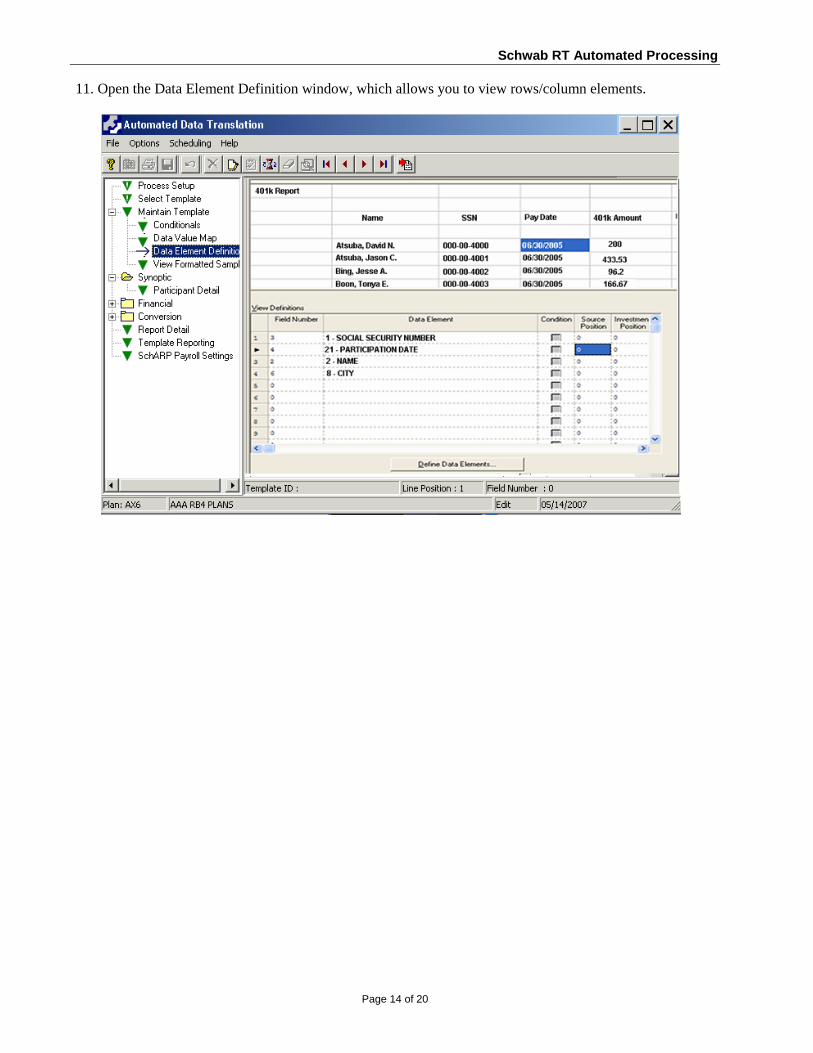
Schwab RT Automated Processing 11. Open the Data Element Definition window, which allows you to view rows/column elements.
Page 14 of 20

Schwab RT Automated Processing 12. Click Define Data Elements to access the Set Field Conditional dialog and specify elements contained in the record being defined by the selected templates. The Social Security number must be defined first and up to 100 data elements can be specified.
13. Open the View Formatted Sample window to view a sample of the results.
14. You may want to run in Edit Mode to check results before running in Update Mode. Click Process to complete.
Page 15 of 20

Schwab RT Automated Processing
C158/Participant Data Extract The Participant Data Extract application allows you to extract participant-related information from Schwab RT Recordkeeping to a file. This application can be accessed from the Schwab RT Recordkeeping tree under Custom Reporting.
How to Generate Participant Data Extract Files To generate the Participant Data Extract files, do the following: 1. Open the Participant Data Extract application. The Select Plans window appears:
2. From the Select Plans window, choose the plan(s) to include. The plans displayed are not directory-specific. You can select a single plan, multiple plans, or all plans. You can then select or clear individual plans. The Access Method defined for the plan is used to access participant records.
Page 16 of 20

Schwab RT Automated Processing
3. Under Processing Options, enter the As Of Date, which allows you to download participant account
information from a date in a prior reporting period. Also select the appropriate Transaction Date and Price option.
4. In the Compensation/Hours Cycle field, choose the appropriate cycle (Calendar or Plan Year), which
determines YTD begin and end dates to use when calculating Compensation and/or Hours. 5. The Output File field specifies where the export information is to be saved. Click Browse to select a file
location or type a file name and complete path location. To ensure that the data always opens correctly, save the file with a .txt extension. The default Output File location is defined by the DOC PATH setting in C282/RK SQL System Maintenance.
6. The Field Delimiter identifies a single delimiting character used to separate fields in the Output File. The
system defaults to comma delimited. Select the Fixed Format check box to separate field with tabs. 7. Select the Fixed Format check box to separate fields with a tab in the extract. Fixed length files contain
records in which each type of data (field) takes up the same number of spaces in every record. The check box is clear by default.
8. Type or select the appropriate date format in the Date Format field. This identifies the format for dates
processed by this template to be stored in the Output File. You can only select one date format per template. The system defaults to the MM/DD/YYYY format.
9. From the Elements window, you can load an existing template, build a new template or modify an
existing template to your specifications.
Page 17 of 20

Schwab RT Automated Processing Select the Elements window displayed below from the Select Plans node to load, modify or build a template:
Load/Save Template:
Under the Load/Save Template box, enter a template file name and location in the File Name field. You can click Browse to select an existing template to process. If you select a template that you do not need to modify, click Process to execute the extract program. After processing is complete, you are returned to the main menu of the Participant Data Extract application. The information can then be viewed in any text editor.
Page 18 of 20
Schwab RT Automated Processing Building a Template or Adding Data Elements to an Existing Template: To customize an existing template, select and open an existing template that closely meets your needs. Note: If you anticipate needing the customized template again in the future, you should save the template by
clicking the Save icon prior to processing. 1. Under Build Template, select a data element category from the Data Element Type field. When you
select a data element type, only those types of data display in the Data Element field. Note: When you select this field, it might take a few moments to load the element list. 2. Press the Plus icon to add all data elements within the selected Data Element Type. Press the Minus icon
to remove all Data Elements within the selected Data Element Type. The selected data elements appear at the bottom of the Elements window.
3. From the Data Element field, select the desired field to be exported. Notes: The data elements that display in the field reflect the type of data selected in the Data Element Type field.
New data elements are always added to the end of the template. You can use the arrows on the right side of the screen to move data elements up or down in the Elements Order field.
4. Select the approprite Source Positon, Investment Position, and Compensation Type.
5. In the Decimal field, enter the number of decimal places for the Data Element selected. The system defaults to 2 decimal places for dollars and 3 decimal places for units. Valid values are from 1 to 9.
6. Select Export Description to use the full Data Element description rather than the code number from the Code file.
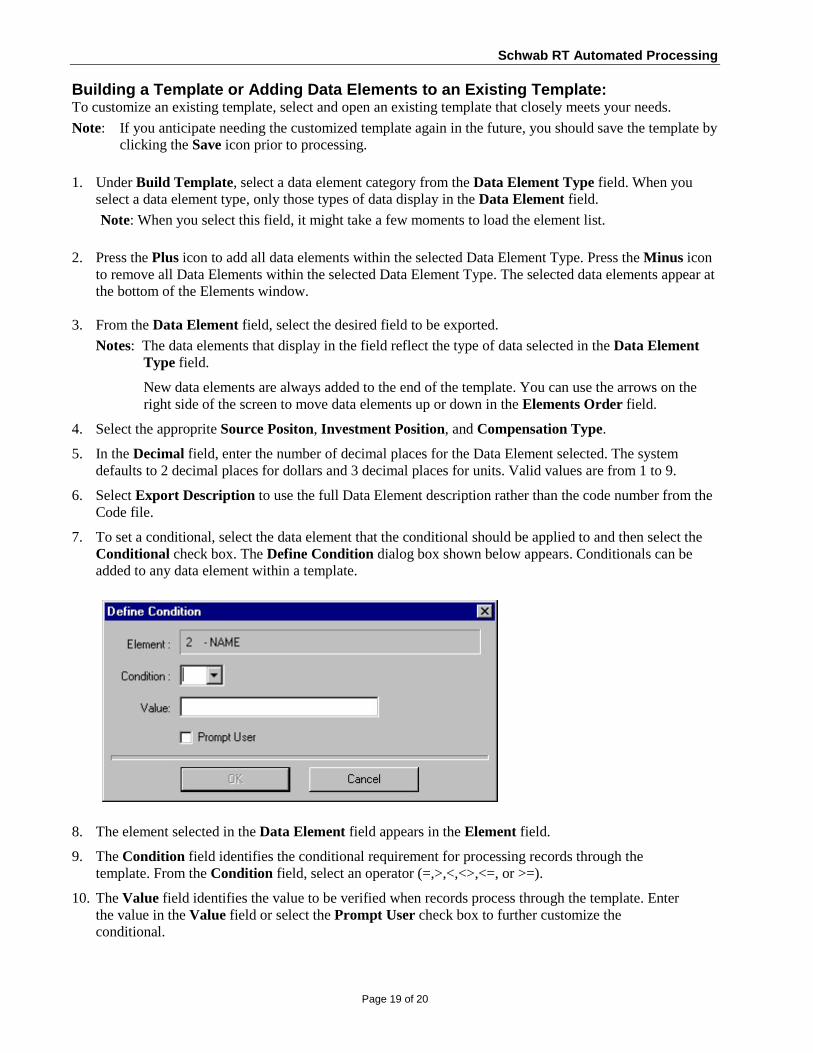
7. To set a conditional, select the data element that the conditional should be applied to and then select the Conditional check box. The Define Condition dialog box shown below appears. Conditionals can be added to any data element within a template.
8. The element selected in the Data Element field appears in the Element field.
9. The Condition field identifies the conditional requirement for processing records through the template. From the Condition field, select an operator (=,>,<,<>,<=, or >=).
10. The Value field identifies the value to be verified when records process through the template. Enter the value in the Value field or select the Prompt User check box to further customize the conditional.
Page 19 of 20

Schwab RT Automated Processing 11. Templates with Prompt User conditionals cause a dialog box to appear when you process the export,
to allow you to enter a conditional value in the Value field.
12. To confirm the conditional settings, click OK to return to the Elements window and then click Add. To make this conditional a permanent part of the template, save the template before processing the Export.
13. Click Process to produce the text file export.
Page 20 of 20