Immunization Interface Management - Indian Health Service
55
RESOURCE AND PATIENT MANAGEMENT SYSTEM Immunization Interface Management (BYIM) User Manual Version 2.0 April 2010 Office of Information Technology (OIT) Division of Information Resource Management Albuquerque, New Mexico
Transcript of Immunization Interface Management - Indian Health Service
RESOURCE AND PATIENT MANAGEMENT SYSTEM
Immunization Interface Management
(BYIM)
User Manual
Version 2.0 April 2010
Office of Information Technology (OIT) Division of Information Resource Management
Albuquerque, New Mexico
Immunization Interface Management (BYIM) Version 2.0
User Manual Preface April 2010
ii
Preface
This user manual contains complete information about the Resource and Patient Management System (RPMS) Immunization Interface Management (BYIM) application, also known as Immunization Data Exchange. This manual:
Introduces Immunization Interface Management (IIMM) and describes the functions and capabilities, for exchanging immunization data between a site’s RPMS system and its state immunization registry.
Provides specific instructions for using IIMM options.
Provides guidance and instructions for automating the immunization data exchange process between a local site and state immunization registry.

Immunization Interface Management (BYIM) Version 2.0
User Manual Table of Contents April 2010
iii
Table of Contents
Document Version History .................................................................................v
1.0 ...............................................................................................1 Introduction1.1 ............................................1 About the Immunization Data Format1.2 ..............................2 Immunization Interchange Management Menu1.3 ...............................4 Immunization Interface Management Process1.4 .................5 Automating the Immunization Data Exchange Process
2.0 .....................................................................................6 Before You Begin2.1 .................................................................6 Setting Site Parameters2.2 .......8 Setting Up the BYIM EXPORT/IMPORT GROUP in MailMan
3.0 ..........................................................................................9 Getting Started3.1 ................................................9 If this is a new installation of BYIM3.2
........................................................................................10 If Your Site Is Automating The Immunization Data Exchange Process
4.0 .................................................11 Immunization Data Exchange Process4.1 .............................11 Immunization Data Exchange Task Summary4.2 ..........................11 Creating an HL7 Immunization Data Export File
4.2.1 ....................................................11 Data Export Filename Format4.2.2 .......12 Extracting/Creating the Immunization Data Export (IZDE))4.2.3 ...............14 Checking the Immunization Data Export Status (IZS)
4.3 ...........................................15 Transmitting HL7 Immunization Data4.3.1 .........................15 Transmitting HL7 Immunization Data Manually4.3.2 ..................16 Transmitting HL7 Immunization Data Automatically
4.4 ........................................16 Importing Immunization Data to RPMS4.4.1 ................................17 Extracting State Immunization Data (IZIM)4.4.2 .................18 Checking for Patients with No Match in RPMS (NO)4.4.3 .....................19 Adding State Immunization data to RPMS (IZAD)4.4.4 .........21 Troubleshooting Immunization Data Not Added to RPMS
5.0 .......23 Immunization Interface Management Administration Functions5.1 ...............23 Reporting Immunizations Exported for a Patient (EXP)5.2 ....................................24 Generating a File Statistics Report (IZIF)5.3 ............24 Setting Immunization Data Exchange Parameters (SET)
6.0 ...........................................27 Automating Immunization Data Exchange6.1 .........................................................................27 Automating IZDE6.2 ..........................................................................27 Automating IZIM
6.2.1 ..................................................................28 Setting Up TaskMan6.2.2 ................28 Activating the Auto Import Immunizations Parameter
6.3 .........................................................................29 Automating IZAD

Immunization Interface Management (BYIM) Version 2.0
User Manual Table of Contents April 2010
iv
7.0 ..................................................................................................31 Glossary
Appendix A: Vaccine Equivalents Table .........................................................33
Appendix B: RPMS Rules of Behavior ............................................................39
All RPMS Users........................................................................................39 Access 39 Information Accessibility .........................................................................40 Accountability .........................................................................................40 Confidentiality.........................................................................................41 Integrity 41 System Logon ........................................................................................42 Passwords..............................................................................................42 Backups..................................................................................................43 Reporting................................................................................................43 Session Timeouts...................................................................................44 Hardware................................................................................................44 Awareness..............................................................................................44 Remote Access ......................................................................................44
RPMS Developers ....................................................................................45 Privileged Users .......................................................................................46
Index .................................................................................................................48
Contact Information ..........................................................................................50
Immunization Interface Management (BYIM) Version 2.0
User Manual Document Version History April 2010
v
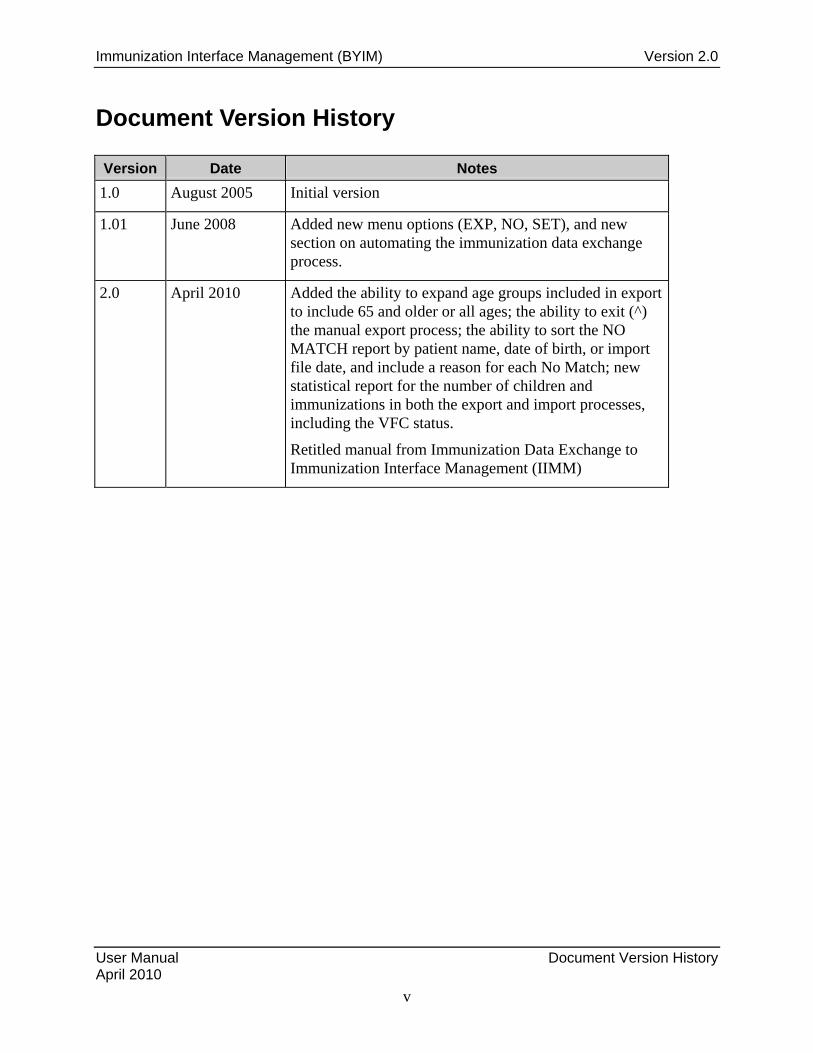
Document Version History
Version Date Notes
1.0 August 2005 Initial version
1.01 June 2008 Added new menu options (EXP, NO, SET), and new section on automating the immunization data exchange process.
2.0 April 2010 Added the ability to expand age groups included in export to include 65 and older or all ages; the ability to exit (^) the manual export process; the ability to sort the NO MATCH report by patient name, date of birth, or import file date, and include a reason for each No Match; new statistical report for the number of children and immunizations in both the export and import processes, including the VFC status.
Retitled manual from Immunization Data Exchange to Immunization Interface Management (IIMM)
Immunization Interface Management (BYIM) Version 2.0
User Manual Introduction April 2010
1
1.0 Introduction Immunization, an established prevention practice, contributes to individual and community health by preventing infectious diseases in children and adults. Over the past decade, both the number of vaccines and the complexity of vaccine regimens have increased dramatically. Patients seek and obtain care and vaccinations from a number of health care resources, including county health departments, private providers and hospitals, and multiple Indian Health Service (IHS) Direct/Tribal/Urban (I/T/U) facilities.
The value and accuracy of vaccine forecasting and reporting features of the Resource and Patient Management System (RPMS) Immunization System application are dependent on complete and accurate vaccination histories in the local RPMS database. Although vaccination history is available to a local site (usually via a paper record), outside immunization information is not always entered into the local RPMS database.
Lack of access to or knowledge of full immunization information directly affects patient care, leading to inappropriate vaccination (incorrect dose timing or over-immunization) and misuse of vaccines, which are a valuable and costly resource.
The Centers for Disease Control and Prevention (CDC) has assisted in the development and use of vaccination registries at the state level. The RPMS Immunization Interface Management (namespace: BYIM) application improves patient care by enabling the exchange of vaccination data with state immunization registries.
1.1 About the Immunization Data Format The data format used to exchange immunization information between a local site’s RPMS and its State registry is the healthcare industry standard, Health Level Seven (HL7) Version 2.4. The HL7 standard dictates both content and format of the data to be exchanged. For more information, go to the HL7 Web site: www.hl7.org.
Sending HL7 messages to the state for inclusion in the state’s immunization database meets the new requirements to share vaccination information with the state registry. More importantly at the local level, vaccines administered and reported to the state–but unknown to the local sites–are now sent back to the local site for inclusion in the local RPMS database.

Immunization Interface Management (BYIM) Version 2.0
User Manual Introduction April 2010
2
1.2 Immunization Interchange Management Menu The Immunization Interface Management Menu (IIMM) provides a set of options that enable the user to prepare RPMS immunization data for export to the state registry and to import state immunization data in to RPMS.
To Access the Immunization Interface Management Menu:
At the RPMS core menu prompt, type BYIM and press the Enter key.
The IIMM is displayed; for example,
IZDE Start Immunization Data Export IZS Check Immunization Data Export Status IZIM Import Immunizations from State Registry IZAD Add Immunizations from State Registry EXP Show Immunizations Exported for a Patient NO Children for whom there is no match in RPMS SET Immunization Data Exchange Parameters IZFS File Statistics Report TEST Create TEST Export File Select Immunization Interchange Management Menu Option:
Figure 1-1: IIMM options
The following table describes each of the IIMM options.
Option Description
IZDE The Start Immunization Data Export menu option enables you to extract patient immunization data from RPMS, create an HL7 data export file, and place the file in a secure directory.
IZS The Check Immunization Data Export Status menu option enables you to check the progress of the IZDE process.
IZIM The Import Immunizations from State Registry menu option enables you to extract the immunization data from the state HL7 data import file and place the data in an RPMS holding area.
IZAD The Add Immunizations from State Registry menu option enables you to add the patient immunization data from the state to the RPMS database.
EXP The Show Immunizations Exported for a Patient menu option enables you to print a report that lists all immunizations sent to the state registry for an individual patient to comply with HIPAA regulations.
IZFS The File Statistics Report menu option enables you to generate a report that lists statistics related to patients and immunizations exported or imported for each file.

Immunization Interface Management (BYIM) Version 2.0
User Manual Introduction April 2010
3
Option Description
NO The Children for whom there is no match in RPMS menu option enables you to view a list the names and dates of birth (DOBs) of those patients for which the IZIM process found no match in the RPMS database.
SET The Immunization Data Exchange Parameters menu option enables you to specify the pathname locations of the HL7 immunization export file and the state HL7 import file, and to activate the automation of the IZIM process and the IZAD process.
TEST The Create TEST Export File menu option enables you to create a small file of real patients that will be used for initial data exchange testing between a site and its state immunization registry.

Immunization Interface Management (BYIM) Version 2.0
1.3 Immunization Interface Management Process
Figure 1-2: Immunization data exchange process
As shown above:
1. IZDE extracts immunization data from RPMS for a given date range, creates an HL7 immunization data export file, puts it in the site’s secure export directory, and sends an email notification that the HL7 data export is ready.
2. Using an HTTPS connection, Information Technology (IT) staff sends the data export file to the State Registry, gets the state HL7 immunization file, and puts it in the site’s secure import directory. If the HL7 Communications Bridge is installed and operating, the transfer of HL7 immunization data files between the local site and the state registry is automatic.
3. IZIM extracts the data from the state HL7 immunization file, finds matching patients in RPMS, places the data in a holding area, and sends an email notification that the immunization data has been imported to RPMS. Any nonmatching patients are written to a list.
4. IZAD adds the state immunization data in the holding area to the RPMS database.
User Manual Introduction April 2010
4

Immunization Interface Management (BYIM) Version 2.0
User Manual Introduction April 2010
5
1.4 Automating the Immunization Data Exchange Process The HL7 Communications Bridge, a non-RPMS application, enables an automated two-way exchange of immunization data between IHS and the state. All IHS sites can download this bridge; however, it can only be utilized in states whose registries support secure data exchange via an HTTPS connection. It is strongly recommended that the HL7 Communications Bridge be installed at the same time as the Immunization Data Exchange software.
When your site is ready to automate the transmission of immunization data files between the site and the state registry, see Section 6.0 for instructions to set up the IZDE, IZAD, and IZIM processes to run automatically.

Immunization Interface Management (BYIM) Version 2.0
User Manual Before You Begin April 2010
6
2.0 Before You Begin Before using any IIMM option, the site manager or other authorized person must do the following:
Set up the site parameters that specify:
Directory pathnames of the export and import directories that hold the HL7 immunization data files at the local site
Ages to include in the immunization data export file
Set up the BYIM Export/Import Group in MailMan for notifications.
2.1 Setting Site Parameters Before you begin using the IIMM options, set the following site parameters:
Path for Outbound Messages to specify the pathname location of the site’s HL7 immunization data export files
Path for Inbound Messages to specify the pathname location of the HL7 immunization data files from the state registry
Ages to Export to specify the immunization data age groups to include in the data export files. Age range group choices are
18 years and under
Under 19 years and over 64 years
All ages
Considerations:
To be Health Insurance Portability and Accountability Act (HIPAA) compliant, the HL7 immunization data file directories must be located in a Secure Area.
If your site is using the HL7 Communications Bridge to transmit HL7 immunization data files between the local site and the state registry, the HL7 immunization data file directories must be the same directories that the HL7 Bridge uses.
To set site parameters:
1. At the “Immunization Interchange Management Menu Option” prompt, type SET and press the Enter key.
2. At the “Select SITE for Data Exchange Parameters” prompt, type the site name and press the Enter key.

Immunization Interface Management (BYIM) Version 2.0
User Manual Before You Begin April 2010
7
3. At the “Path for Outbound Messages” prompt, type the full pathname location for the HL7 immunization data export files and press the Enter key.
4. At the “Path for Inbound Messages” prompt, type the full pathname location for the HL7 immunization data files from the state registry, and press the Enter key.
5. Press the Enter key at the prompts until you reach the “Ages to Export” prompt.
4. At the “Ages to Export” prompt, press the Enter key to accept the default, 18 (years) and under, or type two question marks (??)and press the Enter key to display all of the options.
0 to include ages 18 years and under (default)
1 to include ages under 19 years and over 64 years
2 to include all ages
Type the number corresponding to the age groups you want to include and press the Enter key.
Select Immunization Interchange Management Menu Option: SET <Enter> Immunization Data Exchange Parameters Entering the site parameters ADD Data Exchange Parameter Site Select SITE for Data Exchange Parameters: CHINLE HOSP// <ENTER> NAVAJO CHINLE 01 AZ 010101 ...OK? Yes// <Enter> (Yes) Choosing the facility UPDATE Data Exchange Parameters for CHINLE HOSP PATH FOR OUTBOUND MESSAGES: /local/hl7immunizationDataExport/ <Enter> Replace Set the location of files to be sent to SIIS PATH FOR INBOUND MESSAGES: /local/hl7immunizationDataImxport/ <Enter> Replace Set the location for files from SIIS AUTO IMPORT IMMUNIZATIONS: NO// <ENTER> AUTO ADD IMMUNIZATIONS: NO// <ENTER> AGES TO EXPORT............: 18 AND UNDER// ?? Choose from: 0 18 AND UNDER 1 UNDER 19 AND OVER 64 2 ALL AGES AGES TO EXPORT............: 18 AND UNDER//
Figure 2-1: Example of setting parameters initially for outbound/inbound HL7 immunization files and the ages to export
Immunization Interface Management (BYIM) Version 2.0
User Manual Before You Begin April 2010
8
2.2 Setting Up the BYIM EXPORT/IMPORT GROUP in MailMan The site manager or other authorized person needs to set up the BYIM EXPORT/IMPORT GROUP in MailMan by adding the email addresses of those individuals who should be notified whenever the following occurs:
An HL7 immunization data export file is ready to be sent to the state registry.
Immunization data from the state registry is ready to be added to the RPMS database.
Members of this mail group should include the following:
IT person tasked with monitoring/transmitting the immunization data files between the site and the state registry
Clinical IZ staff member, who performs the activities related to the IZDE, IZIM, and IZAD IIMM options.

Immunization Interface Management (BYIM) Version 2.0
User Manual Getting Started April 2010
9
3.0 Getting Started
3.1 If this is a new installation of BYIM If you decide that you want to “test the system” before creating the initial immunization data export file, use the TEST option and follow these instructions.
Step 1: Create a test immunization data export file.(TEST)
1. At the “RPMS Main Menu” prompt, select Immunization Interchange Management Menu and press the Enter key.
2. At the “Select Immunization Interchange Management Menu Option” prompt, type TEST and press the Enter key.
3. At the “Proceed with TEST export?” prompt, type YES and press the Enter key.
4. At the “Requested Start Time” prompt, press Enter to create the file now.
The system creates an export file of immunizations for 10 patients, 18 years of age or under. When the process is complete, the system displays the following:
The number of immunizations that were evaluated
The name and location of the export file
For example:
Select Immunization Interchange Management Menu Option: TEST <Enter> Create TEST Export File TEST export option An export file will be created for 10 patients 18 years of age or under. Proceed with TEST export? NO// YES <Enter> ////////// Requested Start Time: NOW// <Enter> (JAN 14, 2009@09:44:47) 123 immunizations for 10 Children 0-19 were evaluated in 0 minutes, 0 seconds. The file 'izdata20090114test.dat' will now be created in the 'c:\' directory. This may take several minutes. It can be retrieved from this directory for transfer to the State registry.

Immunization Interface Management (BYIM) Version 2.0
User Manual Getting Started April 2010
10
Press <ENTER> to continue... <Enter>
Figure 3-1: Example of a test immunization data export file
Step 2: Transmit the data file to the state registry and then transmit the registry data file to your site.
MailMan sends an email notification to those names listed in the BYIM Export/Import Group that an immunization data file is in the Outbound Messages directory, ready to be sent to the state registry.
The data file of HL7 immunization data is transmitted from the Outbound Messages directory at your site to the state registry.
When ready, the response file from the state registry is transmitted to the Inbound Messages directory at your site.
Step 3: Extract the HL7 immunization data from the state registry file.
Go to Section 4.4.1, “Extracting State Immunization Data (IZIM)” and follow the instructions.
Step 4: Check for patients with no match in RPMS.
This step is optional for testing the system. To check for no matches, go to Section 4.4.2, “Checking for Patients with No Match in RPMS (NO),” and follow the instructions.
Step 5: Add state immunization data to RPMS
Go to Section 4.4.3, “Adding State Immunization data to RPMS (IZAD),” and follow the instructions.
3.2 If Your Site Is Automating the Immunization Data Exchange Process When the decision is made to automate the exchange of immunization data between your site and your state registry, go to Section 6.0, “Automating Immunization Data Exchange,” which provides information and instructions.
Immunization Interface Management (BYIM) Version 2.0
User Manual Immunization Data Exchange Process April 2010
11
4.0 Immunization Data Exchange Process
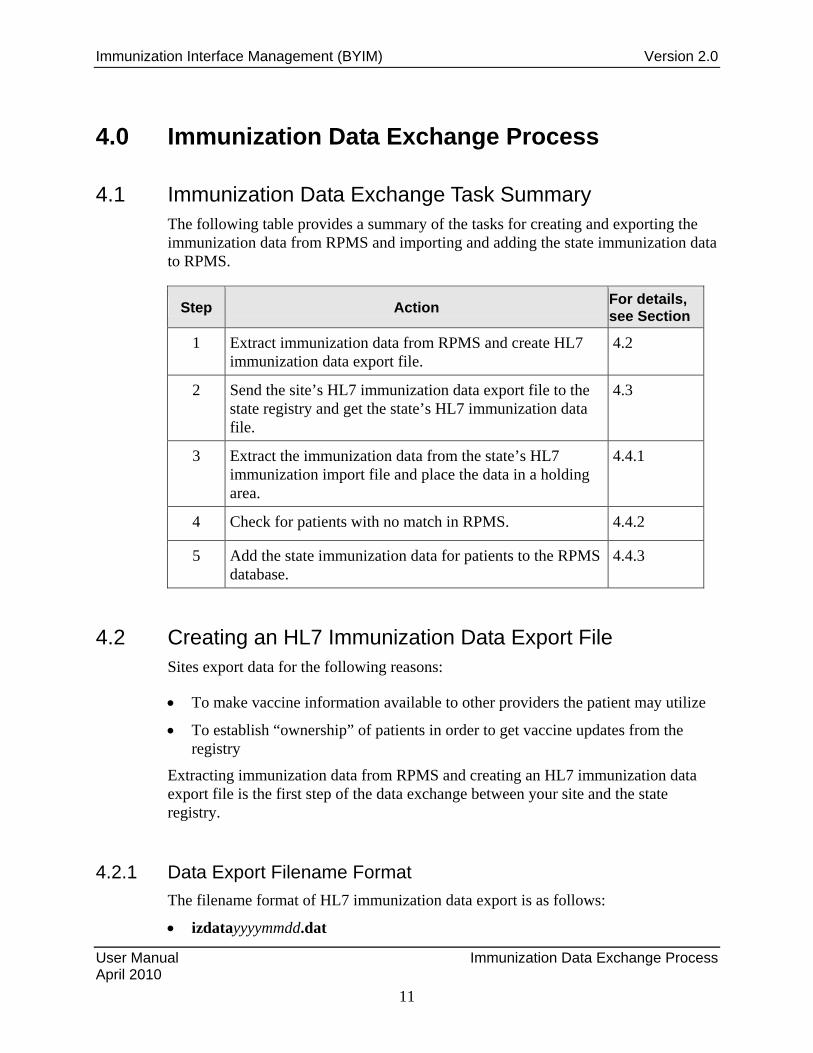
4.1 Immunization Data Exchange Task Summary The following table provides a summary of the tasks for creating and exporting the immunization data from RPMS and importing and adding the state immunization data to RPMS.
Step Action For details, see Section
1 Extract immunization data from RPMS and create HL7 immunization data export file.
4.2
2 Send the site’s HL7 immunization data export file to the state registry and get the state’s HL7 immunization data file.
4.3
3 Extract the immunization data from the state’s HL7 immunization import file and place the data in a holding area.
4.4.1
4 Check for patients with no match in RPMS. 4.4.2
5 Add the state immunization data for patients to the RPMS database.
4.4.3
4.2 Creating an HL7 Immunization Data Export File Sites export data for the following reasons:
To make vaccine information available to other providers the patient may utilize
To establish “ownership” of patients in order to get vaccine updates from the registry
Extracting immunization data from RPMS and creating an HL7 immunization data export file is the first step of the data exchange between your site and the state registry.
4.2.1 Data Export Filename Format
The filename format of HL7 immunization data export is as follows:
izdatayyyymmdd.dat

Immunization Interface Management (BYIM) Version 2.0
User Manual Immunization Data Exchange Process April 2010
12
where
izdata identifies the type of data as immunization data
yyyy = four-character year of file creation
mm = two-character month of file creation
dd = two-character day of file creation
For example: izdata20061023.dat
4.2.2 Extracting/Creating the Immunization Data Export (IZDE))
The IIMM option IZDE, Start Immunization Data Export, extracts immunization data from your site’s RPMS database and creates an HL7 data export file (izdata) of the extracted data. The data export file is placed in the secure directory specified by the Path for Outbound Messages site parameter.
Considerations:
The export date range start date defaults to the day of the last export (if using point-of-care data entry, which will catch any patient and vaccines since the last export). However, if vaccines are entered by data entry staff and there is a delay, you will want to change this date to account for the three-day to three-week delay.
The first time you perform this task, it may take it may take a long time to complete (1–2 hours or even longer at large sites).
When in doubt, go back and be overly inclusive. Sending the same data does not cause problems.
If necessary, you can exit IZDE at the last prompt, “Requested Start Time,” by typing a caret (^).
To extract the immunization data and create the HL7 data export file:
1. At the “RPMS Main Menu” prompt, select Immunization Interchange Management Menu and press the Enter key.
2. At the “Select Immunization Interchange Management Menu Option” prompt, type IZDE and press the Enter key.
A message appears, indicating that this process may take several minutes.
3. At the “Do you want to proceed?” prompt, type Y (yes) and press the Enter key.

Immunization Interface Management (BYIM) Version 2.0
User Manual Immunization Data Exchange Process April 2010
13
The following information is displayed:
Date of the last export
Date-of-birth date for the children 19 and under for the last export.
4. At the “Export Immunizations starting on [today’s date]” prompt, do one of the following:
Press the Enter key to accept the default export date, which is the current date
Enter a start date in mm/dd/yyyy format and press the Enter key
Specifying a start date allows you to go back to an earlier date, if there is doubt whether all past export files were properly transmitted, as well as to capture all children/vaccines from the specified date forward. Sending duplicate information does not create problems locally or at the state level, because both sides have de-duplication processes.
The process of extracting the immunization data from RPMS begins. The dots and slashes appearing on screen represent finding patient immunizations in the RPMS database and extracting the data.
5. At the “Requested Start Time” prompt, press the Enter key to accept the default start time, Now.
The export file, izdatayyyymmdd.dat, is created and placed in the directory specified by the Path for Outbound Messages site parameter.
A message indicates that this process may take several minutes.
Select Immunization Interchange Management Menu Option: IZDE <Enter> Start Immunization Data Export Evaluation of immunizations of children 0-19 for export to the State Immunization registry may take several minutes. Do you want to proceed? NO// Y <Enter> YES The last Immunization export ran on JAN 24,2005 Children 19 and under were born after JAN 24,1986 This export will include all children who have had a visit since the last export ran or after the date you specify below. You can enter another date if you want to run the export for another date range. Last Immunization export ran on JAN 24,2005 Children 19 and under were born after JAN 24,1986 Export Immunizations starting on JAN 24,2005: JAN 24,2005// 01/01/2004 <Enter>.

Immunization Interface Management (BYIM) Version 2.0
User Manual Immunization Data Exchange Process April 2010
14
............................................................................
............................................................................
............................................................................
............................................................................
................................................/////////////////////////////////////////////////////////////////////////////////////////////////////////////////////////////////////////////////////////////////////////////////////////////////////////////////////////////////////////////////////////////////////////////////////////////////////////////////////////////////////////////////////////////// Requested Start Time: NOW// <Enter> (JAN 24, 2005@13:20:30) The immunizations for 375 children 0-19 were evaluated in 2 seconds. The file 'izdata20070124.dat' will now be created in the HIPAA-compliant directory. This may take several minutes. It can be retrieved from this directory for transfer to the State registry. Select Immunization Interchange Management Menu Option:
Figure 4-1: Example of extracting and creating the HL7 immunization data export file (IZDE)
4.2.3 Checking the Immunization Data Export Status (IZS)
The initial data export is quite large and can take many hours depending on the size of the patient population. Subsequent data extracts are completed quickly, in minutes rather than hours.
The IZS, Check Immunization Data Export Status, menu option provides a quick look at the status of the data conversion and file creation process.
To display the status of the creation of the HL7 data export:
At the Select Immunization Interchange Management menu option, type IZS and press Enter.
If the conversion is still in process the following message is displayed:
Immunization data export still in process. (349)
Figure 4-2: Data export message
The number in parentheses after the status message will change each time you check the status.
If the number increases, IZ is still searching and extracting immunization data from the RPMS database.

Immunization Interface Management (BYIM) Version 2.0
User Manual Immunization Data Exchange Process April 2010
15
If the number decreases, IZ has found all the patients/vaccinations and is now converting the data into HL7 format.
When the conversion is complete, the following message is displayed:
The Immunization data export file is ready for transmission to the state immunization registry.
Figure 4-3: Conversion complete message
The export file (izdatayyyymmdd.dat) is now available in a secure directory of the local site’s computer system.
4.3 Transmitting HL7 Immunization Data Transmitting HL7 immunization data files between the site and the state registry can be done manually or automatically.
Note: Please check with both your site’s IT person and your state immunization registry contact to verify the means of data exchange.
4.3.1 Transmitting HL7 Immunization Data Manually
Because the HL7 immunization data files are located in secure directories, manual transmission of HL7 immunization data can only be done by someone with the appropriate security clearance (usually an IT person) at your site.
The authorized person connects to the state registry via the internet using a state registry supplied username and password, and either uploads the data file located in the site’s export directory to the state registry or downloads the data file from the state registry to the local site’s import directory.
Note: The login information used by IT personnel to access the state registry system is usually person-specific. If personnel changes occur, the new IT person must contact the state registry to receive new access codes to avoid potential data security issues.

Immunization Interface Management (BYIM) Version 2.0
User Manual Immunization Data Exchange Process April 2010
16
4.3.2 Transmitting HL7 Immunization Data Automatically
Transmitting the HL7 Immunization data files between the site and the state registry automatically requires the HL7 Communications Bridge. This third-party software must be installed and configured at your site by an authorized IT person.
When installed, the HL7 Communications Bridge enables an automated two-way exchange of immunization data between your site and the state immunization registry.
Considerations:
Both your site and your state immunization registry must be set up to handle electronic file transfers.
Your site has an account with your state immunization registry.
The local site’s export/import directories must be located in a secure area.
If your site is using the HL7 Communication Bridge, the directories specified by the Path for Outbound Messages and Inbound Messages parameters must be the same as the export/import directories used by the HL7 Communications Bridge.
4.4 Importing Immunization Data to RPMS Importing data from the state registry is the second part of this bidirectional data exchange. Sites import immunization data to “discover” vaccines that their patients have received from other providers and facilities.
This information impacts the individual patient’s care and the local site’s approach to care for that patient. For example, if the imported vaccination information changes the patient’s immunization status to “up-to-date,” then
A No Due Letter would be sent to the patient
The patient would not be listed on the PHN work list, saving time and possibly a home visit
The patient would now be in the numerator of the reports, raising the immunization rate
If the imported vaccination information verifies that the patient is clearly living far from the local service unit or is getting primary care from a different provider, the information may help the facility change the patient’s status to Inactive (due to Moved Or Going Elsewhere [MOGE]), affecting both the numerator and denominator of the reports.

Immunization Interface Management (BYIM) Version 2.0
User Manual Immunization Data Exchange Process April 2010
17
This section provides detailed instructions for importing data from the state registry to the local site.
4.4.1 Extracting State Immunization Data (IZIM)
The Immunization Data Exchange Import Immunizations from State Registry (IZIM) menu option has the following capabilities:
Locates the state immunization data file in the directory specified by the Path for Inbound Messages parameter.
Extracts the HL7 data from the state immunization file and translates the messages to RPMS format.
Checks for patient matches in RPMS and writes nonmatching patients to a list.
Includes the following statistics related to the data imported from the state:
Number of state patients that matched patients in RPMS
Number of state shots new to RPMS
Number of patients that had new shots added from the state
Places the extracted state immunization data in a holding area.
Considerations:
You must know the correct name of the state immunization file.
The first time you perform this task, or if the state file is very large, the process may take some time to complete.
To extract the immunization data from the State HL7 data file:
1. At the “RPMS Main Menu” prompt, select Immunization Interchange Management and press the Enter key.
2. At the “Select Immunization Interchange Management Menu Option” prompt, type IZIM and press the Enter key.
3. At the “Enter the name of the file from the State Registry” prompt, type the name of the state output file and press the Enter key.
4. At the “Do you want to proceed?” prompt, type Y and press the Enter key.
The process of extracting the HL7 immunization data from the state registry file begins. The dots and slashes appearing on screen represent patient vaccination data being extracted, then matched and placed in a holding area.

Immunization Interface Management (BYIM) Version 2.0
User Manual Immunization Data Exchange Process April 2010
18
Select Immunization Interchange Management Menu Option: IZIM <Enter> Import Immunizations from State Registry The file from the State Registry must be in the drive/directory: HIPAA-compliant directory Enter the name of the file from the State Registry: state_output.dat <Enter> Import of immunizations of children 0-19 from the State Immunization registry may take several minutes. Do you want to proceed? NO// Y <Enter> YES Please do not interrupt........................................................................................................................................................................................................................////////////////////////////////////////////////////////////////////////////////////////////////////////////////////////////////////////////////////////////////////////////////////////////////////////////////////
Figure 4-4: Example of extracting immunization data from the state registry file (IZIM)
4.4.2 Checking for Patients with No Match in RPMS (NO)
If the imported state immunization data includes any patients with no matches in RPMS, IZIM writes the patient name and date of birth to a list.
If a list of no matches in RPMS is generated, review the information. If necessary, contact your state registry person and local patient registration staff to discuss and resolve the issues of the listed patients.
When the IZIM process completes, you can check for unmatched patients, using the Children for whom there is no match in RPMS (NO) menu option. You can sort the No Match report by patient name, date of birth, or import file date. The listing includes the reason for not matching.
To check for patients with no match in RPMS:
1. At the “Immunization Interchange Management Menu Option” prompt, type NO and press the Enter key.
2. At the “Report sequence” prompt, type one of the following:
1 to sort the report by Patient Name
2 to sort the report by patient’s Date of Birth
3 to sort the report by Import File Date
3. At the “Device” prompt, press the Enter key to view the report on the screen or type the name of the printer to print a hard copy.
Immunization Interface Management (BYIM) Version 2.0
User Manual Immunization Data Exchange Process April 2010
19
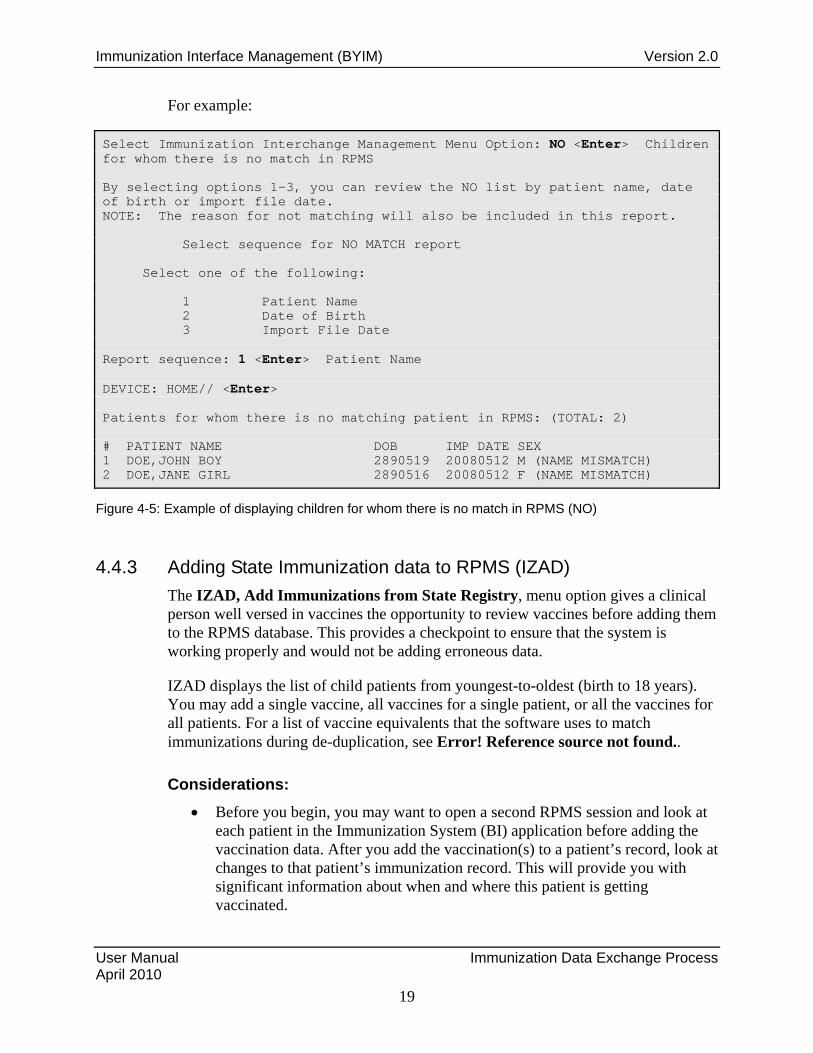
For example:
Select Immunization Interchange Management Menu Option: NO <Enter> Children for whom there is no match in RPMS By selecting options 1-3, you can review the NO list by patient name, date of birth or import file date. NOTE: The reason for not matching will also be included in this report. Select sequence for NO MATCH report Select one of the following: 1 Patient Name 2 Date of Birth 3 Import File Date Report sequence: 1 <Enter> Patient Name DEVICE: HOME// <Enter> Patients for whom there is no matching patient in RPMS: (TOTAL: 2) # PATIENT NAME DOB IMP DATE SEX 1 DOE,JOHN BOY 2890519 20080512 M (NAME MISMATCH) 2 DOE,JANE GIRL 2890516 20080512 F (NAME MISMATCH)
Figure 4-5: Example of displaying children for whom there is no match in RPMS (NO)
4.4.3 Adding State Immunization data to RPMS (IZAD)
The IZAD, Add Immunizations from State Registry, menu option gives a clinical person well versed in vaccines the opportunity to review vaccines before adding them to the RPMS database. This provides a checkpoint to ensure that the system is working properly and would not be adding erroneous data.
IZAD displays the list of child patients from youngest-to-oldest (birth to 18 years). You may add a single vaccine, all vaccines for a single patient, or all the vaccines for all patients. For a list of vaccine equivalents that the software uses to match immunizations during de-duplication, see Error! Reference source not found..
Considerations:
Before you begin, you may want to open a second RPMS session and look at each patient in the Immunization System (BI) application before adding the vaccination data. After you add the vaccination(s) to a patient’s record, look at changes to that patient’s immunization record. This will provide you with significant information about when and where this patient is getting vaccinated.

Immunization Interface Management (BYIM) Version 2.0
User Manual Immunization Data Exchange Process April 2010
20
By watching this process carefully, you may discover data entry errors, such as an incorrect date or location, which may require some data correction actions. In such cases, you would want to work with the state registry staff to correct these errors on the state registry side, so that errors will not be propagated to multiple providers and facilities.
The IZAD screen lists the patients by date of birth (DOB = yyyymmdd), from youngest to oldest.
To add immunizations to the RPMS database:
1. At the “Select Immunization Interchange Management Menu Option” prompt, type IZAD and press the Enter key.
The next screen is your working screen. The total number of immunizations is displayed in parentheses above the display of immunization records.
State Registry Immunizations Jan 24, 2005 19:18:55 Page: 1 of 29 (488) Immunizations from the State Registry NUM DOB NAME IMMUNIZATION DATE RECEIVED ----- -------- ----------------------------- ------------------ ------------ 1 20040726 PEACHES,CODY WEST HEP B PED (8) 08/19/2004 2 20040121 YAZZIE,DERRICK MASON PNEUM-CONJ (100) 03/22/2004 3 20040121 YAZZIE,DERRICK MASON PNEUM-CONJ (100) 06/01/2004 4 20031122 ABRIL,JULIAN MATTHEW PNEUM-CONJ (100) 03/29/2004 5 20031121 LUPE,SHANIA MMR (3) 11/22/2004 6 20031121 LUPE,SHANIA PEDVAXHIB (49) 11/22/2004 7 20031010 FINLEY,FENELLA JADE MMR (3) 10/25/2004 8 20031010 FINLEY,FENELLA JADE DTaP (20) 10/25/2004 9 20031010 FINLEY,FENELLA JADE HIBTITER (47) 10/25/2004 10 20031010 FINLEY,FENELLA JADE PNEUM-CONJ (100) 10/25/2004 11 20031003 JAMES,URIAH ASHLEY MMR (3) 12/03/2004 12 20031003 JAMES,URIAH ASHLEY VARICELLA (21) 12/03/2004 13 20031003 JAMES,URIAH ASHLEY PEDVAXHIB (49) 07/28/2004 14 20031003 JAMES,URIAH ASHLEY PEDVAXHIB (49) 12/03/2004 Enter ?? for more actions ADD Add immunizations from State Reg. Select Action: Next Screen// A <Enter> Add immunizations from State Reg. Select Immunization(s) to add to RPMS: (1-488):
Figure 4-6: Example of Immunization data from the state registry display (IZAD)
Each immunization entry includes the following information:
Immunization Interface Management (BYIM) Version 2.0
User Manual Immunization Data Exchange Process April 2010
21
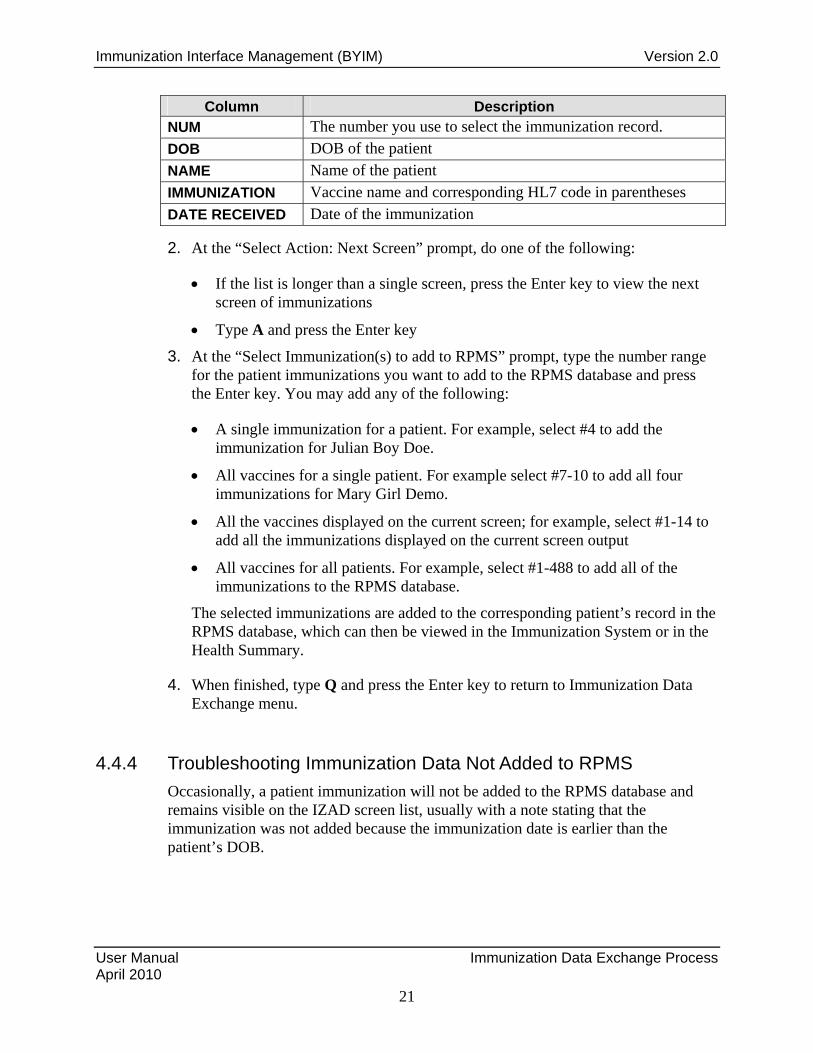
Column Description
NUM The number you use to select the immunization record.
DOB DOB of the patient
NAME Name of the patient
IMMUNIZATION Vaccine name and corresponding HL7 code in parentheses
DATE RECEIVED Date of the immunization
2. At the “Select Action: Next Screen” prompt, do one of the following:
If the list is longer than a single screen, press the Enter key to view the next screen of immunizations
Type A and press the Enter key
3. At the “Select Immunization(s) to add to RPMS” prompt, type the number range for the patient immunizations you want to add to the RPMS database and press the Enter key. You may add any of the following:
A single immunization for a patient. For example, select #4 to add the immunization for Julian Boy Doe.
All vaccines for a single patient. For example select #7-10 to add all four immunizations for Mary Girl Demo.
All the vaccines displayed on the current screen; for example, select #1-14 to add all the immunizations displayed on the current screen output
All vaccines for all patients. For example, select #1-488 to add all of the immunizations to the RPMS database.
The selected immunizations are added to the corresponding patient’s record in the RPMS database, which can then be viewed in the Immunization System or in the Health Summary.
4. When finished, type Q and press the Enter key to return to Immunization Data Exchange menu.
4.4.4 Troubleshooting Immunization Data Not Added to RPMS
Occasionally, a patient immunization will not be added to the RPMS database and remains visible on the IZAD screen list, usually with a note stating that the immunization was not added because the immunization date is earlier than the patient’s DOB.

Immunization Interface Management (BYIM) Version 2.0
User Manual Immunization Data Exchange Process April 2010
22
Most often this is a patient registration error, where a local site has an incorrect DOB. In this case, contact your patient registration staff and have them verify with the parent/patient the correct DOB, and correct it in RPMS. Once this is done, these immunizations can be added to the RPMS database by rerunning IZAD.
Immunization Interface Management (BYIM) Version 2.0
User Manual Immunization Interface Management Administration Functions April 2010
23
5.0 Immunization Interface Management Administration Functions
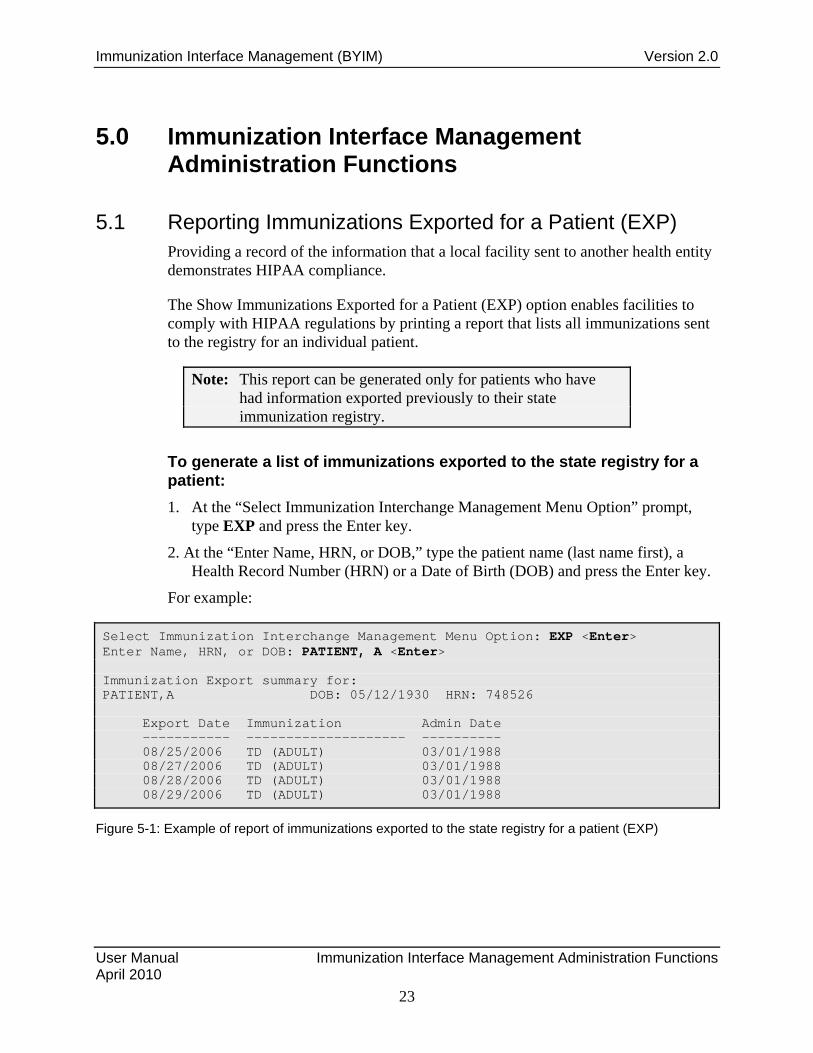
5.1 Reporting Immunizations Exported for a Patient (EXP) Providing a record of the information that a local facility sent to another health entity demonstrates HIPAA compliance.
The Show Immunizations Exported for a Patient (EXP) option enables facilities to comply with HIPAA regulations by printing a report that lists all immunizations sent to the registry for an individual patient.
Note: This report can be generated only for patients who have had information exported previously to their state immunization registry.
To generate a list of immunizations exported to the state registry for a patient:
1. At the “Select Immunization Interchange Management Menu Option” prompt, type EXP and press the Enter key.
2. At the “Enter Name, HRN, or DOB,” type the patient name (last name first), a Health Record Number (HRN) or a Date of Birth (DOB) and press the Enter key.
For example:
Select Immunization Interchange Management Menu Option: EXP <Enter> Enter Name, HRN, or DOB: PATIENT, A <Enter> Immunization Export summary for: PATIENT,A DOB: 05/12/1930 HRN: 748526 Export Date Immunization Admin Date ----------- -------------------- ---------- 08/25/2006 TD (ADULT) 03/01/1988 08/27/2006 TD (ADULT) 03/01/1988 08/28/2006 TD (ADULT) 03/01/1988 08/29/2006 TD (ADULT) 03/01/1988
Figure 5-1: Example of report of immunizations exported to the state registry for a patient (EXP)
Immunization Interface Management (BYIM) Version 2.0
User Manual Immunization Interface Management Administration Functions April 2010
24
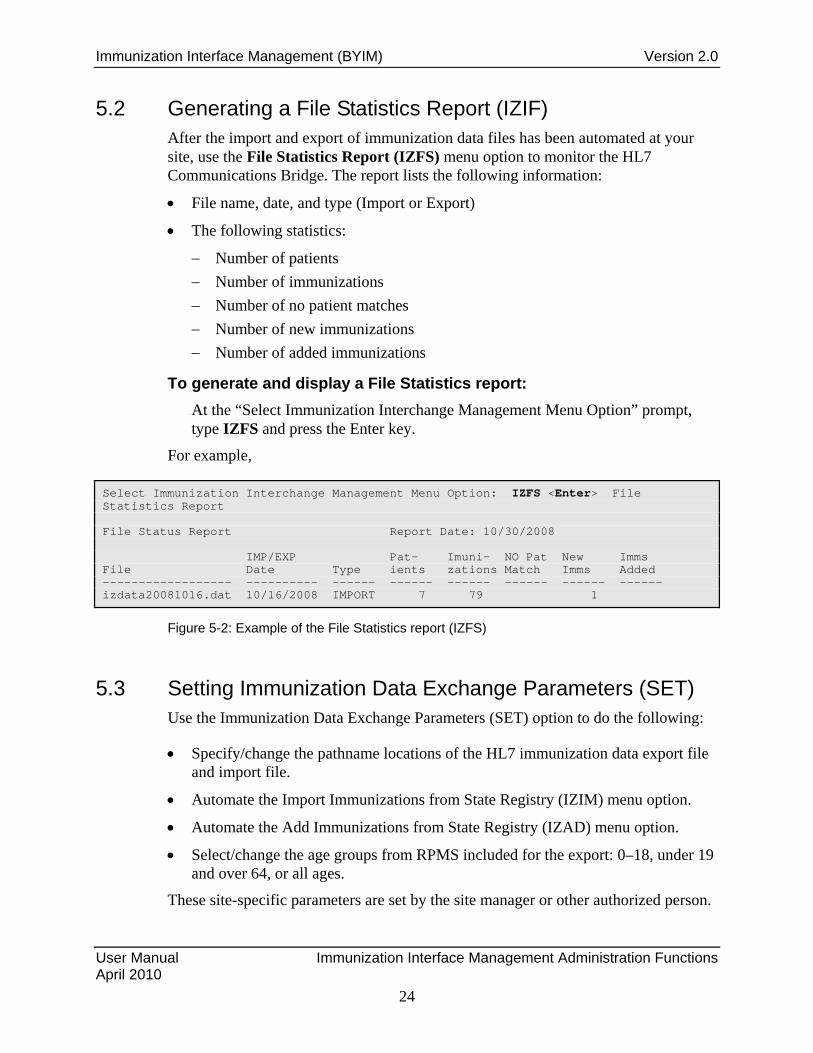
5.2 Generating a File Statistics Report (IZIF) After the import and export of immunization data files has been automated at your site, use the File Statistics Report (IZFS) menu option to monitor the HL7 Communications Bridge. The report lists the following information:
File name, date, and type (Import or Export)
The following statistics:
Number of patients
Number of immunizations
Number of no patient matches
Number of new immunizations
Number of added immunizations
To generate and display a File Statistics report:
At the “Select Immunization Interchange Management Menu Option” prompt, type IZFS and press the Enter key.
For example,
Select Immunization Interchange Management Menu Option: IZFS <Enter> File Statistics Report File Status Report Report Date: 10/30/2008 IMP/EXP Pat- Imuni- NO Pat New Imms File Date Type ients zations Match Imms Added ------------------ ---------- ------ ------ ------ ------ ------ ------ izdata20081016.dat 10/16/2008 IMPORT 7 79 1
Figure 5-2: Example of the File Statistics report (IZFS)
5.3 Setting Immunization Data Exchange Parameters (SET) Use the Immunization Data Exchange Parameters (SET) option to do the following:
Specify/change the pathname locations of the HL7 immunization data export file and import file.
Automate the Import Immunizations from State Registry (IZIM) menu option.
Automate the Add Immunizations from State Registry (IZAD) menu option.
Select/change the age groups from RPMS included for the export: 0–18, under 19 and over 64, or all ages.
These site-specific parameters are set by the site manager or other authorized person.

Immunization Interface Management (BYIM) Version 2.0
User Manual Immunization Interface Management Administration Functions April 2010
25
The following table provides descriptions and valid values for the Immunization Data Exchange site parameters.
Parameter Description/Values
Path For Outbound Messages The local directory in which the site’s HL7 immunization data files are located. If the HL7 Communications Bridge is being used to transfer these files to the state registry, the location specified here must be the same as the location monitored by the bridge. Important: This directory must be in a secure area of the site’s local computer.
Valid Value: Windows-based: drive:\pathname Unix-based: /pathname
Path For Inbound Messages The local directory in which the state’s HL7 immunization data files are located. If the HL7 Communications Bridge is being used to transfer the state immunization files to the site, the location specified here must be the same as the location used by the bridge. Important: This directory must be in a secure area of the site’s local computer.
Valid Value: Windows-based: drive:\pathname Unix-based: /pathname
Auto Import Immunizations When set to YES, the Import Immunizations to RPMS (IZIM) function runs automatically, extracting the patient immunization data received from the state registry to a hold area in RPMS. Note: To work correctly, the TaskMan option, BYIM IZ AUTO IMPORT, must be scheduled.
Valid Values: NO (the default) or YES
Auto Add Immunizations When set to YES, the Add Immunizations to RPMS (IZAD) function runs automatically after IZIM completes processing, adding all patient immunization data received from the state registry to the RPMS database.
Valid Values: NO (the default) or YES

Immunization Interface Management (BYIM) Version 2.0
User Manual Immunization Interface Management Administration Functions April 2010
26
Parameter Description/Values
Ages to Export Enter the code to specify the age groups to include in the immunization export.
Valid Values: 0 = 18 and under (the default) 1 = under 19 and over 64 2 = all ages
To set data exchange site parameters, follow these steps:
5. At the “Immunization Interchange Management Menu Option” prompt, type SET and press the Enter key.
6. At the “Select SITE for Data Exchange Parameters” prompt, type the site name and press the Enter key.
7. Set the desired Data Exchange parameters.
To bypass a parameter, press the Enter key at its prompt.
To display the age groups for Ages to Export parameter, type two question marks (??) at the prompt. Then type the number corresponding to the age groups at the prompt and press the Enter key.
Select Immunization Interchange Management Menu Option: SET <Enter> Immunization Data E exchange Parameters Entering the site parameters ADD Data Exchange Parameter Site Select SITE for Data Exchange Parameters: CHINLE HOSP// <ENTER> NAVAJO CHINLE 01 AZ 010101 ...OK? Yes// <ENTER> (Yes) Choosing the facility UPDATE Data Exchange Parameters for CHINLE HOSP PATH FOR OUTBOUND MESSAGES: PATH FOR INBOUND MESSAGES: AUTO IMPORT IMMUNIZATIONS: NO// AUTO ADD IMMUNIZATIONS: NO// AGES TO EXPORT............: 18 AND UNDER// ?? <ENTER> displays all options Choose from: 0 18 AND UNDER 1 UNDER 19 AND OVER 64 2 ALL AGES AGES TO EXPORT............: 18 AND UNDER//
Figure 5-3: Example of the immunization data exchange parameters (SET)

Immunization Interface Management (BYIM) Version 2.0
User Manual Automating Immunization Data Exchange April 2010
27
6.0 Automating Immunization Data Exchange When you are assured of the accuracy and integrity of the immunization data exchanged between your site and the state registry, the following RPMS Immunization Data Exchange options can be automated:
1. IZDE extracts the immunization data from RPMS, creates an HL7 data export file, and places the file in the export directory.
2. IZIM extracts the immunization data from the state HL7 data import file and places the data in an RPMS holding area.
3. IZAD adds all of the immunization data from the state file to the RPMS database.
Assuming that the HL7 Communications Bridge is operating, once the IZDE, IZIM, and IZAD functions are automated, the entire process will be fully automated.
The following sections provide guidance and instructions to automate the IZDE, IZIM, and IZAD Immunization Data Exchange functions.
6.1 Automating IZDE The Start Immunization Data Export (IZDE) option, which extracts immunization data from RPMS, creates the HL7 immunization data export file and places it in the secure local directory, can be scheduled to run automatically.
Using TaskMan, your site manager or other authorized person will need to schedule the BYIM IZ AUTO EXPORT option and specify the time and frequency to run.
6.2 Automating IZIM The Import Immunizations from State Registry (IZIM) option, which extracts the HL7 immunization data from the state registry file and puts the data in a local hold area, can be automated. The following table summarizes the steps required to automate the IZIM option.
Step Action
1 In TaskMan, configure BYIM IZ AUTO IMPORT.
2 In RPMS, activate the Auto Import Immunizations site parameter.

Immunization Interface Management (BYIM) Version 2.0
User Manual Automating Immunization Data Exchange April 2010
28
6.2.1 Setting Up TaskMan
Using TaskMan, your site manager or other authorized person will need to schedule the BYIM IZ AUTO IMPORT option and specify the time and frequency to run.
After TaskMan has been configured to run the IZIM option, activate the Auto Import Immunizations site parameter in RPMS.
6.2.2 Activating the Auto Import Immunizations Parameter
Note: When the IZIM process is automated, periodically run the Children for whom there is no match in RPMS (NO) option to confirm that there are no unmatched patients.
To set the Auto Import Immunization parameter to run IZIM automatically:
1. At the “Immunization Interchange Management Menu Option” prompt, type SET and press the Enter key.
2. At the “Select SITE for Data Exchange Parameters” prompt, type the site name and press the Enter key.
3. Press the Enter key at the parameter prompts until you reach the “Auto Import Immunizations” prompt.
4. At the “Auto Import Immunizations” prompt, and type YES and press the Enter key.
5. Press Enter at the parameter prompts or type a caret (^) at the next prompt to return to the IIMM options.
Select Immunization Interchange Management Menu Option: SET <Enter> Immunization Data E exchange Parameters Entering the site parameters ADD Data Exchange Parameter Site Select SITE for Data Exchange Parameters: CHINLE HOSP// <Enter> NAVAJO CHINLE 01 AZ 010101 ...OK? Yes// <Enter> (Yes) Choosing the facility UPDATE Data Exchange Parameters for CHINLE HOSP PATH FOR OUTBOUND MESSAGES: /local/hl7immunizationDataExport// <Enter> PATH FOR INBOUND MESSAGES: /local/hl7immunizationDataImxport// <Enter> AUTO IMPORT IMMUNIZATIONS: NO// YES <Enter> Yes to automatically import from SIIS AUTO ADD IMMUNIZATIONS: NO// <Enter> AGES TO EXPORT............: 18 AND UNDER// <Enter>
Figure 6-1: Example of setting the auto import parameter to run IZIM automatically

Immunization Interface Management (BYIM) Version 2.0
User Manual Automating Immunization Data Exchange April 2010
29
6.3 Automating IZAD Initially, the IZAD option should be run manually so that the local clinical immunization person can review the state patient immunizations before adding the data to the RPMS database, thus ensuring that the exchange process is functioning properly. When it is determined that the immunization data exchange process is functioning without errors, this final step of adding the immunization data from the state into the RPMS database can be automated.
The Add Immunizations from the State Registry (IZAD) option can be automated by activating the Auto Add Immunizations parameter. When automated, IZAD runs after IZIM completes processing and adds all immunization data sent from the state registry to the RPMS database.
Note: After the IZAD process has been automated, it is recommended that you periodically run IZAD manually to check for any patient immunizations that were not added to the RPMS database.
To set the Auto Add Immunization parameter to run IZAD automatically:
1. At the “Immunization Interchange Management Menu Option” prompt, type SET and press the Enter key.
2. At the “Select SITE for Data Exchange Parameters” prompt, type the site name and press the Enter key.
3. Press the Enter key at the prompts until you reach the “Auto Add Immunizations” prompt.
4. At the “Auto Add Immunizations” prompt, and type YES and press the Enter key.
5. Press Enter or type a caret (^) at the next prompt to return to the IIMM options.

Immunization Interface Management (BYIM) Version 2.0
User Manual Automating Immunization Data Exchange April 2010
30
Select Immunization Interchange Management Menu Option: SET <Enter> Immunization Data E exchange Parameters Entering the site parameters ADD Data Exchange Parameter Site Select SITE for Data Exchange Parameters: CHINLE HOSP// <Enter> NAVAJO CHINLE 01 AZ 010101 ...OK? Yes// <Enter> (Yes) Choosing the facility UPDATE Data Exchange Parameters for CHINLE HOSP PATH FOR OUTBOUND MESSAGES: /local/hl7immunizationDataExport// <Enter> PATH FOR INBOUND MESSAGES:/local/hl7immunizationDataImxport// <Enter> AUTO IMPORT IMMUNIZATIONS: YES// <Enter> AUTO ADD IMMUNIZATIONS: NO// YES <Enter> Yes to automatically add immunizations to patients records AGES TO EXPORT............: 18 AND UNDER// <Enter>
Figure 6-2: Example of setting the Auto Add parameter to run IZAD automatically
Immunization Interface Management (BYIM) Version 2.0
User Manual Glossary April 2010
31
7.0 Glossary
Archiving
The storing of historical or little-used data off-line (often on tape).
Banner
A line of text with a user’s name and domain.
Caret (^)
A circumflex, also known as a “hat,” used in RPMS to exit from a particular activity or data entry sequence. This special control character is typed by pressing Shift+6 on the keyboard.
Event Type
A message that signifies a particular event on the system (e.g., admit, discharge, etc.).
File
A set of related records or entries treated as a single unit.
HL7
The generally accepted standard for the exchange of certain specified types of medical information between applications. Health Level Seven (HL7) is both the name of the standards developing organization and the collection of protocols that the organization has developed and published. For more information, refer to the HL7 Web site: www.hl7.org.
HL7 Bridge
A software program (external to RPMS) that enables a two-way exchange of immunization data for children from birth to 19 years of age between facilities running RPMS and State immunization registries. It uses secured data exchange via HTTPS, to meet HIPAA data security requirements for exchange of information between IHS and Tribal facilities and State registries.
Immunization Interface Management (BYIM) Version 2.0
User Manual Glossary April 2010
32
HL7 Message
An HL7 message consists of a set of message segments that contain the pertinent data for one patient, where each message segment is a group of elements, also known as data fields, which have been defined as logically belonging to the same category, for example, patient immunization.
Menu
A list of choices for computing activity. A menu is a type of option designed to identify a series of items (other options) for presentation to the user for selection. When displayed, menu-type options are preceded by the word “Select” and followed by the word “option” as in Select Menu Management option: (the menu’s select prompt).
Option
An entry in the Option file. As an item on a menu, an option provides an opportunity for users to select it, thereby invoking the associated computing activity. Options may also be scheduled to run in the background, noninteractively, by TaskMan.

Immunization Interface Management (BYIM) Version 2.0
User Manual Appendix A: Vaccine Equivalents Table April 2010
33
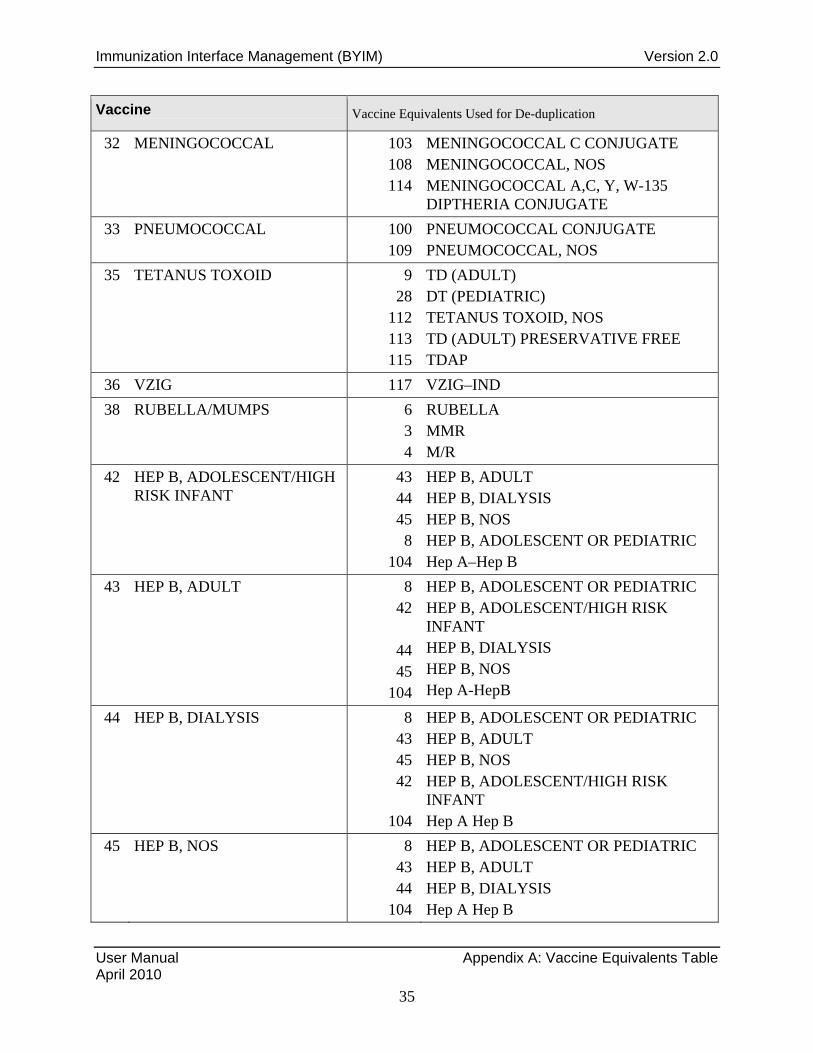
Appendix A: Vaccine Equivalents Table
The following table lists groups of vaccines and their equivalent vaccines, which the data exchange software will match during the unduplication process.
Please note that vaccines are often part of a group of related vaccines. Some of these vaccines are historical, for example OPV or DTP, and are no longer administered. However, they are part of the vaccine history and sometimes affect forecasting of future doses. Data exchange often exposes incorrect vaccine names or CVX codes (e.g., Hep B Adult instead of Hep B Pediatric, or one of the NOS codes).
The RPMS Immunization Package and State Immunization Information Systems (IIS) understand these vaccine groupings (listed in the table) and are able to account for them in their matching algorithm.
Vaccine Vaccine Equivalents Used for De-duplication
3 MMR 4 5 6 7 8
94
M/R MEASLES RUBELLA MUMPS RUBELLA/MUMPS MMRV
4 M/R 3 5 6
38 94
MMR MEASLES RUBELLA RUBELLA/MUMPS MMRV
5 MEASLES 3 4
94
MMR M/R MMRV
6 RUBELLA 3 4
38 94
MMR M/R RUBELLA/MUMPS MMRV
7 MUMPS 7 38 3
94
MUMPS RUBELLA/MUMPS MMR MMRV

Immunization Interface Management (BYIM) Version 2.0
User Manual Appendix A: Vaccine Equivalents Table April 2010
34
Vaccine Vaccine Equivalents Used for De-duplication
8 Hep B, Adolescent or Pediatric 42
43 44 45
HEP B, ADOLESCENT, HIGH RISK INFANT HEP B, ADULT HEP B, DIALYSIS HEP B, NOS
9 TD (ADULT) 28 35
112 113 115
DT (PEDIATRIC) TETANUS TOXOID TETANUS TOXOID, NOS TD (ADULT) PRESERVATIVE FREE TDAP
10 IPV 89 Polio NOS
15 INFLUENZA, SPLIT (INCL. PURIFIED)
16 88
INFLUENZA, WHOLE INFLUENZA, NOS
16 INFLUENZA, WHOLE 15 88
INFLUENZA, SPLIT (INCL. PURIFIED) INFLUENZA, NOS
17 HIB, NOS 46 47 48 49 51
HIB (PRP-D) HIB (HBOC) HIB (PRP-T) HIB (PRP-OMP) HIB-HEP B
20 DTAP 106 107
DTAP, 5 PERTUSSIS ANTIGEN DTAP, NOS
21 VARICELLA 121 ZOSTER
28 DT (PEDIATRIC) 9 35 20
107 106 112 113 115
TD (ADULT) TETANUS TOXOID DTAP DTAP, NOS DTAP, 5 PERTUSSIS ANTIGENS TETANUS TOXOID, NOS TD (ADULT) PRESERVATIVE FREE TDAP
31 HEP A, PEDATRIC, NOS 83 84 85 52
104
HEP A, PED/ADOL, 2 DOSE HEP A, PED/ADOL, 3 DOSE HEP A, NOS HEP A, ADULT HEP A–HEP B
Immunization Interface Management (BYIM) Version 2.0
User Manual Appendix A: Vaccine Equivalents Table April 2010
35
Vaccine Vaccine Equivalents Used for De-duplication
32 MENINGOCOCCAL 103 108 114
MENINGOCOCCAL C CONJUGATE MENINGOCOCCAL, NOS MENINGOCOCCAL A,C, Y, W-135 DIPTHERIA CONJUGATE
33 PNEUMOCOCCAL 100 109
PNEUMOCOCCAL CONJUGATE PNEUMOCOCCAL, NOS
35 TETANUS TOXOID 9 28
112 113 115
TD (ADULT) DT (PEDIATRIC) TETANUS TOXOID, NOS TD (ADULT) PRESERVATIVE FREE TDAP
36 VZIG 117 VZIG–IND
38 RUBELLA/MUMPS 6 3 4
RUBELLA MMR M/R
42 HEP B, ADOLESCENT/HIGH RISK INFANT
43 44 45 8
104
HEP B, ADULT HEP B, DIALYSIS HEP B, NOS HEP B, ADOLESCENT OR PEDIATRIC Hep A–Hep B
43 HEP B, ADULT 8 42
44 45
104
HEP B, ADOLESCENT OR PEDIATRIC HEP B, ADOLESCENT/HIGH RISK INFANT HEP B, DIALYSIS HEP B, NOS Hep A-HepB
44 HEP B, DIALYSIS 8 43 45 42
104
HEP B, ADOLESCENT OR PEDIATRIC HEP B, ADULT HEP B, NOS HEP B, ADOLESCENT/HIGH RISK INFANT Hep A Hep B
45 HEP B, NOS 8 43 44
104
HEP B, ADOLESCENT OR PEDIATRIC HEP B, ADULT HEP B, DIALYSIS Hep A Hep B

Immunization Interface Management (BYIM) Version 2.0
User Manual Appendix A: Vaccine Equivalents Table April 2010
36
Vaccine Vaccine Equivalents Used for De-duplication
46 HIB (PRP-D) 17 47 48 49
HIB, NOS HIB (HBOC) HIB (PRP-T) HIB (PRP-OMP)
49 HIB (PRP-OMP) 17 46 47 48 51
HIB, NOS HIB (PRP-D) HIB (HBOC) HIB (PRP-T) HIB-HEP B
52 HEP A, ADULT 83 84 31 85
104
HEP A, PED/ADOL, 2 DOSE HEP A, PED/ADOL, 3 DOSE HEP A, PEDIATRIC, NOS HEP A, NOS Hep A Hep B
62 HPV QUADRIVALENT 118 HPV, BIVALENT
74 ROTAVIRUS TETRAVALENT
116 119 122
ROTAVIRUS, PENTAVALENT ROTAVIRUS, MONOVALENT ROTAVIRUS, NOS
83 HEP A, PED/ADOL, 2 DOSE 52 83 31 85
104
HEP A, ADULT HEP A, PED/ADOL, 2 DOSE HEP A, PEDIATRIC, NOS HEP A, NOS Hep A Hep B
85 HEP A, NOS 52 83 84 31
104
HEP A, ADULT HEP A, PED/ADOL, 2 DOSE HEP A, PED/ADOL, 3 DOSE HEP A, PEDIATRIC, NOS Hep A Hep B
88 INFLUENZA, NOS 15 16
INFLUENZA, SPLIT (INCL. PURIFIED INFLUENZA, WHOLE
100 PNEUMOCOCCAL CONJUGATE
33 109
PNEUMOCOCCAL PNEUMOCOCCAL, NOS
103 MENINGOCOCCAL C CONJUGATE
32 108 114
MENINGOCOCCAL MENINGOCOCCAL, NOS MENINGOCOCCAL A,C,Y,W-135 DIPHTHERIA CONJ

Immunization Interface Management (BYIM) Version 2.0
User Manual Appendix A: Vaccine Equivalents Table April 2010
37
Vaccine Vaccine Equivalents Used for De-duplication
106 DTAP, 5 PERTUSSIS ANTIGENS
20 107
DTAP DTAP, NOS
107 DTAP, NOS 20 106
DTAP DTAP, 5 PERTUSSIS ANTIGEN
108 MENINGOCOCCAL, NOS 32 103 114
MENINGOCOCCAL MENINGOCOCCAL C CONJUGATE MENINGOCOCCAL A,C,Y,W-135 DIPHTHERIA CONJ
109 PNEUMOCOCCAL, NOS 33 100
PNEUMOCOCCAL PNEUMOCOCCAL CONJUGATE
112 TETANUS TOXOID, NOS 9 28 35
113 115
TD (ADULT) DT (PEDIATRIC) TETANUS TOXOID TD (ADULT) PRESERVATIVE FREE TDAP
113 TD (ADULT) PRESERVATIVE FREE
9 28 35
112 115
TD (ADULT) DT (PEDIATRIC) TETANUS TOXOID TETANUS TOXOID, NOS TDAP
114 MENINGOCOCCAL A,C,Y,W-135 DIPHTHERIA CONJ
32 103 108
MENINGOCOCCAL MENINGOCOCCAL C CONJUGATE MENINGOCOCCAL, NOS
115 TDAP 9 28 35
112 113
TD (ADULT) DT (PEDIATRIC) TETANUS TOXOID TETANUS TOXOID, NOS TD (ADULT) PRESERVATIVE FREE
116 ROTAVIRUS, PENTAVALENT
74 119 122
ROTAVIRUS TETRAVALENT ROTAVIRUS, MONOVALENT ROTAVIRUS, NOS
117 VZIG-IND 36 VZIG
118 HPV, Bivalent 62 HPV QUADRIVALENT
119 ROTAVIRUS, MONOVALENT
74 116 122
ROTAVIRUS TETRAVALENT ROTAVIRUS, PENTAVALENT ROTAVIRUS, NOS

Immunization Interface Management (BYIM) Version 2.0
User Manual Appendix A: Vaccine Equivalents Table April 2010
38
Vaccine Vaccine Equivalents Used for De-duplication
121 ZOSTER 21 VARICELLA
122 ROTAVIRUS, NOS 74 116 119
ROTAVIRUS TETRAVALENT ROTAVIRUS, PENTAVALENT ROTAVIRUS, MONOVALENT
123 INFLUENZA, H5N1 15 16 88
INFLUENZA, SPLIT (INCL. PURIFIED INFLUENZA, WHOLE INFLUENZA, NOS
130 DTaP-IPV 10 110 20 50
106 107
IPV DTaP-Hep B-IPV DTAP DTAP-HIB DTAP, 5 PERTUSSIS ANTIGENS DTAP, NOS
110 DTaP-HepB-IPV 130 120
DTaP-IPV DTaP-Hib-IPV
120 DTaP-Hib-IPV 130 110
DTaP-IPV DTaP-HepB-IPV

Immunization Interface Management (BYIM) Version 2.0
User Manual Appendix B: RPMS Rules of Behavior April 2010
39
Appendix B: RPMS Rules of Behavior
The Resource and Patient Management (RPMS) system is a United States Department of Health and Human Services (HHS), Indian Health Service (IHS) information system that is for official use only. The RPMS system is subject to monitoring; therefore, no expectation of privacy shall be assumed. Individuals found performing unauthorized activities are subject to disciplinary action including criminal prosecution.
All users (Contractors and IHS Employees) of RPMS will be provided a copy of the Rules of Behavior (RoBs) and must acknowledge that they have received and read them prior to being granted access to a RPMS system, in accordance IHS policy.
For a listing of general RoBs for all users, see the most recent edition of IHS General User Security Handbook (SOP 06-11a).
For a listing of system administrators/managers rules, see the most recent edition of the IHS Technical and Managerial Handbook (SOP 06-11b).
Both documents are available at this IHS Web site: http://security.ihs.gov/
The RoBs listed in the following sections are specific to RPMS.
All RPMS Users In addition to these rules, each application may include additional RoBs that may be defined within the documentation of that application (e.g., PCC, Dental, Pharmacy).
Access
RPMS Users Shall:
Only use data for which you have been granted authorization.
Only give information to personnel who have access authority and have a need to know.
Always verify a caller’s identification and job purpose with your supervisor or the entity provided as employer before providing any type of information system access, sensitive information, or non-public agency information.
Be aware that personal use of information resources is authorized on a limited basis within the provisions Indian Health Manual Part 8, “Information Resources Management,” Chapter 6, “Limited Personal Use of Information Technology Resources.”
Immunization Interface Management (BYIM) Version 2.0
User Manual Appendix B: RPMS Rules of Behavior April 2010
40
RPMS Users Shall Not:
Retrieve information for someone who does not have authority to access the information.
Access, research, or change any user account, file, directory, table, or record not required to perform your OFFICIAL duties.
Store sensitive files on a PC hard drive, or portable devices or media, if access to the PC or files cannot be physically or technically limited.
Exceed their authorized access limits in RPMS by changing information or searching databases beyond the responsibilities of their job or by divulging information to anyone not authorized to know that information.
Information Accessibility
RPMS shall restrict access to information based on the type and identity of the user. However, regardless of the type of user, access shall be restricted to the minimum level necessary to perform the job.
RPMS Users Shall:
Access only those documents they created and those other documents to which they have a valid need-to-know and to which they have specifically granted access through an RPMS application based on their menus (job roles), keys, and FileMan access codes. Some users may be afforded additional privileges based on the function they perform such as system administrator or application administrator.
Acquire a written preauthorization in accordance with IHS polices and procedures prior to interconnection to or transferring data from RPMS.
Accountability
RPMS Users Shall:
Behave in an ethical, technically proficient, informed, and trustworthy manner.
Logout of the system whenever they leave the vicinity of their PC.
Be alert to threats and vulnerabilities in the security of the system.
Report all security incidents to their local Information System Security Officer (ISSO)
Differentiate tasks and functions to ensure that no one person has sole access to or control over important resources.

Immunization Interface Management (BYIM) Version 2.0
User Manual Appendix B: RPMS Rules of Behavior April 2010
41
Protect all sensitive data entrusted to them as part of their government employment.
Abide by all Department and Agency policies and procedures and guidelines related to ethics, conduct, behavior, and IT information processes.
Confidentiality
RPMS Users Shall:
Be aware of the sensitivity of electronic and hardcopy information, and protect it accordingly.
Store hardcopy reports/storage media containing confidential information in a locked room or cabinet.
Erase sensitive data on storage media, prior to reusing or disposing of the media.
Protect all RPMS terminals from public viewing at all times.
Abide by all HIPAA regulations to ensure patient confidentiality.
RPMS Users Shall Not:
Allow confidential information to remain on the PC screen when someone who is not authorized to that data is in the vicinity.
Store sensitive files on a portable device or media without encrypting.
Integrity
RPMS Users Shall:
Protect your system against viruses and similar malicious programs.
Observe all software license agreements.
Follow industry standard procedures for maintaining and managing RPMS hardware, operating system software, application software, and/or database software and database tables.
Comply with all copyright regulations and license agreements associated with RPMS software.
Immunization Interface Management (BYIM) Version 2.0
User Manual Appendix B: RPMS Rules of Behavior April 2010
42
RPMS Users Shall Not:
Violate Federal copyright laws.
Install or use unauthorized software within the system libraries or folders
Use freeware, shareware, or public domain software on/with the system without your manager’s written permission and without scanning it for viruses first.
System Logon
RPMS Users Shall:
Have a unique User Identification/Account name and password.
Be granted access based on authenticating the account name and password entered.
Be locked out of an account after 5 successive failed login attempts within a specified time period (e.g., one hour).
Passwords
RPMS Users Shall:
Change passwords a minimum of every 90 days.
Create passwords with a minimum of eight characters.
If the system allows, use a combination of alpha, numeric characters for passwords, with at least one uppercase letter, one lower case letter, and one number. It is recommended, if possible, that a special character also be used in the password.
Change vendor-supplied passwords immediately.
Protect passwords by committing them to memory or store them in a safe place (do not store passwords in login scripts, or batch files.
Change password immediately if password has been seen, guessed, or otherwise compromised; and report the compromise or suspected compromise to your ISSO.
Keep user identifications (ID) and passwords confidential.
RPMS Users Shall Not:
Use common words found in any dictionary as a password.

Immunization Interface Management (BYIM) Version 2.0
User Manual Appendix B: RPMS Rules of Behavior April 2010
43
Use obvious readable passwords or passwords that incorporate personal data elements (e.g., user’s name, date of birth, address, telephone number, or social security number; names of children or spouses; favorite band, sports team, or automobile; or other personal attributes).
Share passwords/IDs with anyone or accept the use of another’s password/ID, even if offered.
Reuse passwords. A new password must contain no more than five characters per 8 characters from the previous password.
Post passwords.
Keep a password list in an obvious place, such as under keyboards, in desk drawers, or in any other location where it might be disclosed.
Give a password out over the phone.
Backups
RPMS Users Shall:
Plan for contingencies such as physical disasters, loss of processing, and disclosure of information by preparing alternate work strategies and system recovery mechanisms.
Make backups of systems and files on a regular, defined basis.
If possible, store backups away from the system in a secure environment.
Reporting
RPMS Users Shall:
Contact and inform their ISSO that they have identified an IT security incident and begin the reporting process by providing an IT Incident Reporting Form regarding this incident.
Report security incidents as detailed in the IHS Incident Handling Guide (SOP 05-03).
RPMS Users Shall Not:
Assume that someone else has already reported an incident. The risk of an incident going unreported far outweighs the possibility that an incident gets reported more than once

Immunization Interface Management (BYIM) Version 2.0
User Manual Appendix B: RPMS Rules of Behavior April 2010
44
Session Timeouts
RPMS system implements system-based timeouts that back users out of a prompt after no more than 5 minutes of inactivity.
RPMS Users Shall:
Utilize a screen saver with password protection set to suspend operations at no greater than 10-minutes of inactivity. This will prevent inappropriate access and viewing of any material displayed on your screen after some period of inactivity.
Hardware
RPMS Users Shall:
Avoid placing system equipment near obvious environmental hazards (e.g., water pipes).
Keep an inventory of all system equipment.
Keep records of maintenance/repairs performed on system equipment.
RPMS Users Shall Not:
Eat or drink near system equipment
Awareness
RPMS Users Shall:
Participate in organization-wide security training as required.
Read and adhere to security information pertaining to system hardware and software.
Take the annual information security awareness.
Read all applicable RPMS manuals for the applications used in their jobs.
Remote Access
Each subscriber organization establishes its own policies for determining which employees may work at home or in other remote workplace locations. Any remote work arrangement should include policies that
Are in writing.
Provide authentication of the remote user through the use of ID and password or other acceptable technical means.
Immunization Interface Management (BYIM) Version 2.0
User Manual Appendix B: RPMS Rules of Behavior April 2010
45
Outline the work requirements and the security safeguards and procedures the employee is expected to follow.
Ensure adequate storage of files, removal, and nonrecovery of temporary files created in processing sensitive data, virus protection, intrusion detection, and provides physical security for government equipment and sensitive data.
Establish mechanisms to back up data created and/or stored at alternate work locations.
Remote RPMS Users Shall:
Remotely access RPMS through a virtual private network (VPN) when ever possible. Use of direct dial in access must be justified and approved in writing and its use secured in accordance with industry best practices or government procedures.
Remote RPMS Users Shall Not:
Disable any encryption established for network, internet, and Web browser communications.
RPMS Developers
RPMS Developers Users Shall:
Always be mindful of protecting the confidentiality, availability, and integrity of RPMS when writing or revising code.
Always follow the IHS RPMS Programming Standards and Conventions (SAC) when developing for RPMS.
Only access information or code within the namespaces for which they have been assigned as part of their duties.
Remember that all RPMS code is the property of the U.S. Government, not the developer.
Not access live production systems without obtaining appropriate written access, shall only retain that access for the shortest period possible to accomplish the task that requires the access.
Observe separation of duties policies and procedures to the fullest extent possible.
Document or comment all changes to any RPMS software at the time the change or update is made. Documentation shall include the programmer’s initials, date of change and reason for the change.
Use checksums or other integrity mechanism when releasing their certified applications to assure the integrity of the routines within their RPMS applications.

Immunization Interface Management (BYIM) Version 2.0
User Manual Appendix B: RPMS Rules of Behavior April 2010
46
Follow industry best standards for systems they are assigned to develop or maintain; abide by all Department and Agency policies and procedures.
Document and implement security processes whenever available.
RPMS Developers Shall Not:
Write any code that adversely impacts RPMS, such as backdoor access, “Easter eggs,” time bombs, or any other malicious code or make inappropriate comments within the code, manuals, or help frames.
Grant any user or system administrator access to RPMS unless proper documentation is provided.
Release any sensitive agency or patient information.
Privileged Users Personnel who have significant access to processes and data in RPMS, such as, system security administrators, systems administrators, and database administrators have added responsibilities to ensure the secure operation of RPMS.
Privileged RPMS Users Shall:
Verify that any user requesting access to any RPMS system has completed the appropriate access request forms.
Ensure that government personnel and contractor personnel understand and comply with license requirements. End users, supervisors, and functional managers are ultimately responsible for this compliance.
Advise the system owner on matters concerning information technology security.
Assist the system owner in developing security plans, risk assessments, and supporting documentation for the certification and accreditation process.
Ensure that any changes to RPMS that affect contingency and disaster recovery plans are conveyed to the person responsible for maintaining continuity of operations plans.
Ensure that adequate physical and administrative safeguards are operational within their areas of responsibility and that access to information and data is restricted to authorized personnel on a need to know basis.
Verify that users have received appropriate security training before allowing access to RPMS.
Implement applicable security access procedures and mechanisms, incorporate appropriate levels of system auditing, and review audit logs.
Immunization Interface Management (BYIM) Version 2.0
User Manual Appendix B: RPMS Rules of Behavior April 2010
47
Document and investigate known or suspected security incidents or violations and report them to the ISSO, CISO, and systems owner.
Protect the supervisor, superuser, or system administrator passwords.
Avoid instances where the same individual has responsibility for several functions (i.e., transaction entry and transaction approval).
Watch for unscheduled, unusual, and unauthorized programs.
Help train system users on the appropriate use and security of the system.
Establish protective controls to ensure the accountability, integrity, confidentiality, and availability of the system.
Replace passwords when a compromise is suspected. Delete user accounts as quickly as possible from the time that the user is no longer authorized system. Passwords forgotten by their owner should be replaced, not reissued.
Terminate user accounts when a user transfers or has been terminated. If the user has authority to grant authorizations to others, review these other authorizations. Retrieve any devices used to gain access to the system or equipment. Cancel logon IDs and passwords, and delete or reassign related active and back up files.
Use a suspend program to prevent an unauthorized user from logging on with the current user's ID if the system is left on and unattended.
Verify the identity of the user when resetting passwords. This can be done either in person or having the user answer a question that can be compared to one in the administrator’s database.
Shall follow industry best standards for systems they are assigned to; abide by all Department and Agency policies and procedures.
Privileged RPMS Users Shall Not:
Access any files, records, systems, etc., that are not explicitly needed to perform their duties
Grant any user or system administrator access to RPMS unless proper documentation is provided
Release any sensitive agency or patient information

Immunization Interface Management (BYIM) Version 2.0
User Manual Index April 2010
48
Index
Add Immunizations from State Registry (IZAD), 21 automating, 31
Ages to Export parameter, 28 Auto Add Immunizations parameter, 27
setting, 31 Auto Import Immunizations parameter, 27
setting, 30 BYIM EXPORT/IMPORT GROUP
setting up in MailMan, 8 BYIM IZ AUTO EXPORT
scheduling in TaskMan, 29 BYIM IZ AUTO IMPORT
scheduling in TaskMan, 30 Check Immunization Data Export Status
(IZS), 15 Children for whom there is no match in
RPMS (NO), 19 Create Test Export File (TEST), 9 EXP
Show Immunizations Exported for a Patient, 25
File Statistics Report (IZIF), 26 files
immunization data export, 11 immunization data
automatic transmission, 16 exported for a patient report, 25 exporting from RPMS, 11 file statistics report, 26 filename format, 11 format, 1 importing to RPMS, 17 manual transmission, 16
Immunization Data Exchange Parameters (SET), 26
immunization data export file checking status of, 15 creating, 12 filename format, 11
immunization data import file extracting data from, 17
Immunization Interface Management MailMan setup, 8 menu options, 2 process, 4 site parameters, 26 task summary, 11
Import Immunizations from State Registry (IZIM), 10, 17 automating, 29
IZAD Add Immunizations from State Registry,
21 IZDE
Start Immunization Data Export, 12 IZIF
File Statistics Report, 26 IZIM
Import Immunizations from State Registry, 17
IZS Check Immunization Data Export Status,
15 Mailman
BYIM EXPORT/IMPORT GROUP, 8 NO
Children for whom there is no match in RPMS report, 19
Path For Inbound Messages parameter, 27 Path For Outbound Messages parameter, 27 patients with no match in RPMS
checking for, 19 reports
Children for whom there is no match in RPMS (NO), 19
file statistics (IZIF), 26 immunizations exported for a patient
(EXP), 25 RPMS
adding state immunization data to, 21 exporting immunization data from, 11 importing state immunization data to, 17
SET

Immunization Interface Management (BYIM) Version 2.0
User Manual Index April 2010
49
Immunization Data Exchange Parameters, 26
Show Immunizations Exported for a Patient (EXP), 25
site parameters, 26 Ages to Export, 28 Ages to Export, setting, 6 Auto Add Immunizations, 27 Auto Add Immunizations, setting, 31 Auto Import Immunizations, 27 Auto Import Immunizations, setting, 30 Path for Inbound Messages, 27 Path for Inbound Messages, setting, 6 Path for Outbound Messages, 27 Path for Outbound Messages, setting, 6
Start Immunization Data Export (IZDE), 12 automating, 29
state immunization data not added to RPMS troubleshooting, 23
TaskMan auto import setup, 30 data export setup, 29
TEST Create TEST Export File, 9
test data export file creating, 9
troubleshooting state immunization data not added to
RPMS, 23
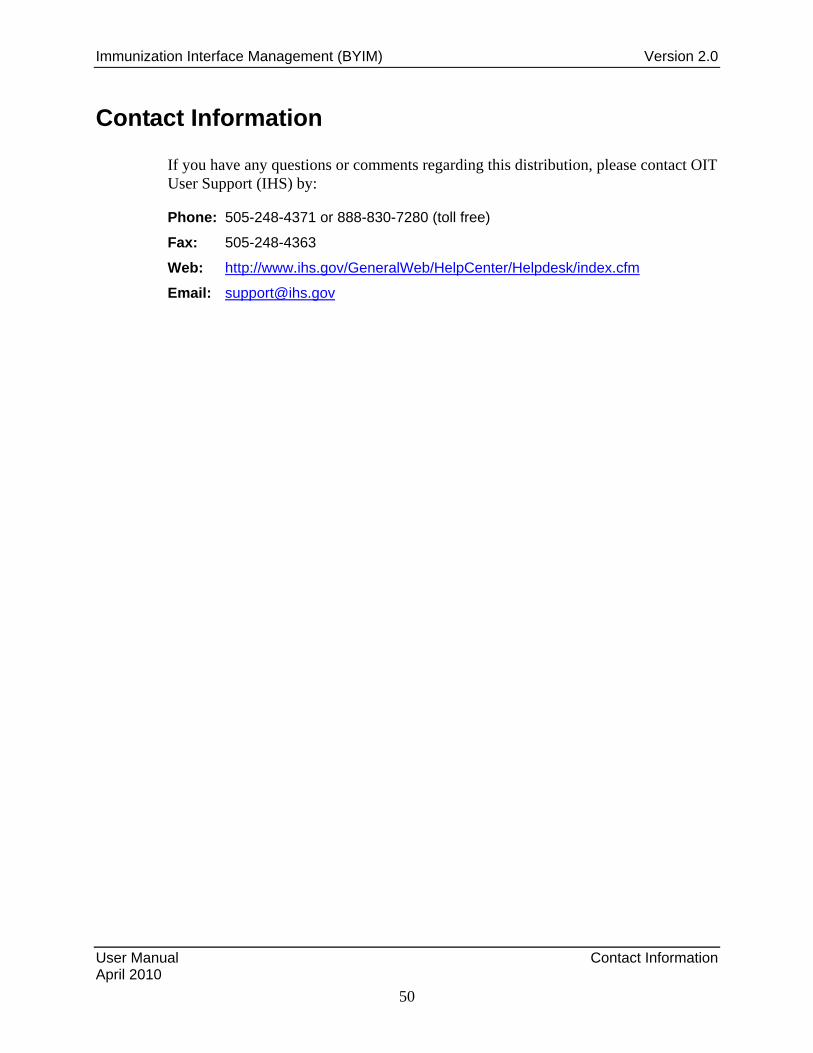
Immunization Interface Management (BYIM) Version 2.0
User Manual Contact Information April 2010
50
Contact Information
If you have any questions or comments regarding this distribution, please contact OIT User Support (IHS) by:
Phone: 505-248-4371 or 888-830-7280 (toll free)
Fax: 505-248-4363
Web: http://www.ihs.gov/GeneralWeb/HelpCenter/Helpdesk/index.cfm
Email: [email protected]


![Immunization Program Strategic Plan 2013 – 2017 · 1 2013-2017 Immunization Program [Immunization Program Strategic Plan 2013 – 2017] Maintaining and Improving Immunization Rates](https://static.fdocuments.us/doc/165x107/5e18e16c0228f448f3787c8f/immunization-program-strategic-plan-2013-a-2017-1-2013-2017-immunization-program.jpg)


