(IIS) Requirements & Permissions for AIMS - Avatier
18
Page 1 2603 Camino Ramon - Suite 110, San Ramon, CA 94583 (Ph) 925-217-5170 (Fax) 925-275-0853 [email protected] Avatier Identity Management Suite Microsoft Internet Information Server (IIS) Requirements and Permissions for AIMS Version 9 2603 Camino Ramon Suite 110 San Ramon, CA 94583 Phone: 800-609-8610 925-217-5170 FAX: 925-217-0853 Email: [email protected]
Transcript of (IIS) Requirements & Permissions for AIMS - Avatier
Page 1
2603 Camino Ramon - Suite 110, San Ramon, CA 94583 (Ph) 925-217-5170 (Fax) 925-275-0853 [email protected]
Avatier Identity Management Suite Microsoft Internet Information Server (IIS) Requirements and Permissions for AIMS
Version 9
2603 Camino Ramon Suite 110 San Ramon, CA 94583 Phone: 800-609-8610 925-217-5170 FAX: 925-217-0853 Email: [email protected]

Page 2
2603 Camino Ramon - Suite 110, San Ramon, CA 94583 (Ph) 925-217-5170 (Fax) 925-275-0853 [email protected]
Table of Contents
1 AIMS INTERNET INFORMATION SERVER REQUIREMENTS OVERVIEW ............................... 3
2 INSTALLING THE .NET 4.0 AND ASPNET 4.0 RUNTIME ENVIRONMENTS .............................. 4
3 INSTALLING MICROSOFT INTERNET INFORMATION SERVER ............................................... 5
3.1 INSTALLING IIS 6.0 ..................................................................................................................... 5 3.2 INSTALLING IIS 7.X ..................................................................................................................... 6
4 PERMISSIONS ON AIMS IIS DIRECTORIES .............................................................................. 10
4.1 CHANGING THE ACCESS CONTROL LIST ON AN AIMS SECURED DIRECTORIES ............................ 10
5 ENABLING INTEGRATED WINDOWS AUTHENTICATION ........................................................ 13
5.1 ENABLING INTEGRATED WINDOWS AUTHENTICATION IN IIS 6.0 .................................................. 13 5.2 ENABLING WINDOWS INTEGRATED AUTHENTICATION IN IIS 7.X .................................................. 15
6 SETTING THE DEFAULT DOMAIN FOR IIS ............................................................................... 17
6.1 SPECIFYING THE DEFAULT DOMAIN FOR IIS 6.0 ......................................................................... 17 6.2 SPECIFYING THE DEFAULT DOMAIN IN IIS 7.X ............................................................................ 18

Page 3
2603 Camino Ramon - Suite 110, San Ramon, CA 94583 (Ph) 925-217-5170 (Fax) 925-275-0853 [email protected]
1 AIMS Internet Information Server Requirements Overview
The Avatier Identity Management Server (AIMS) requires Microsoft's Internet Information Server (IIS) as a the platform to serve the application's pages and to provide the web services functions needed to run the software. AIMS will run on both a Windows 2003 server with IIS 6.0, as well as Windows Server 2008 with IIS 7.0 or 7.5. Regardless of the platform selected, the IIS environment must be prepared properly prior to the installation of AIMS on the server. This preparation includes the following items:
Installation of the .NET 4.0 Runtime environment.
Installation of ASPNET 4.0.
Installation of Microsoft Internet Information Server and associated components.
Installation of the proper access methods to support the AIMS software.

Page 4
2603 Camino Ramon - Suite 110, San Ramon, CA 94583 (Ph) 925-217-5170 (Fax) 925-275-0853 [email protected]
2 Installing the .NET 4.0 and ASPNET 4.0 Runtime Environments
The .NET 4.0 and ASPNET 4.0 framework is Microsoft's comprehensive and consistent programming model for building applications that have visually stunning user experiences, seamless and secure communication, and the ability to model a range of business processes. AIMS 9.0 Requires these components be installed on the server prior to installation of AIMS. Microsoft supplies a standalone installer for the required software that includes both the .NET and ASPNET components in one package.
Download and install the program from Microsoft's download center at:
http://www.microsoft.com/download/en/details.aspx?id=17718
Page 5
2603 Camino Ramon - Suite 110, San Ramon, CA 94583 (Ph) 925-217-5170 (Fax) 925-275-0853 [email protected]
3 Installing Microsoft Internet Information Server
AIMS will run on IIS 6.0 under Windows Server 2003, and IIS 7.x under Windows Server 2008 platforms. The method of installing IIS differs depending on the version selected.
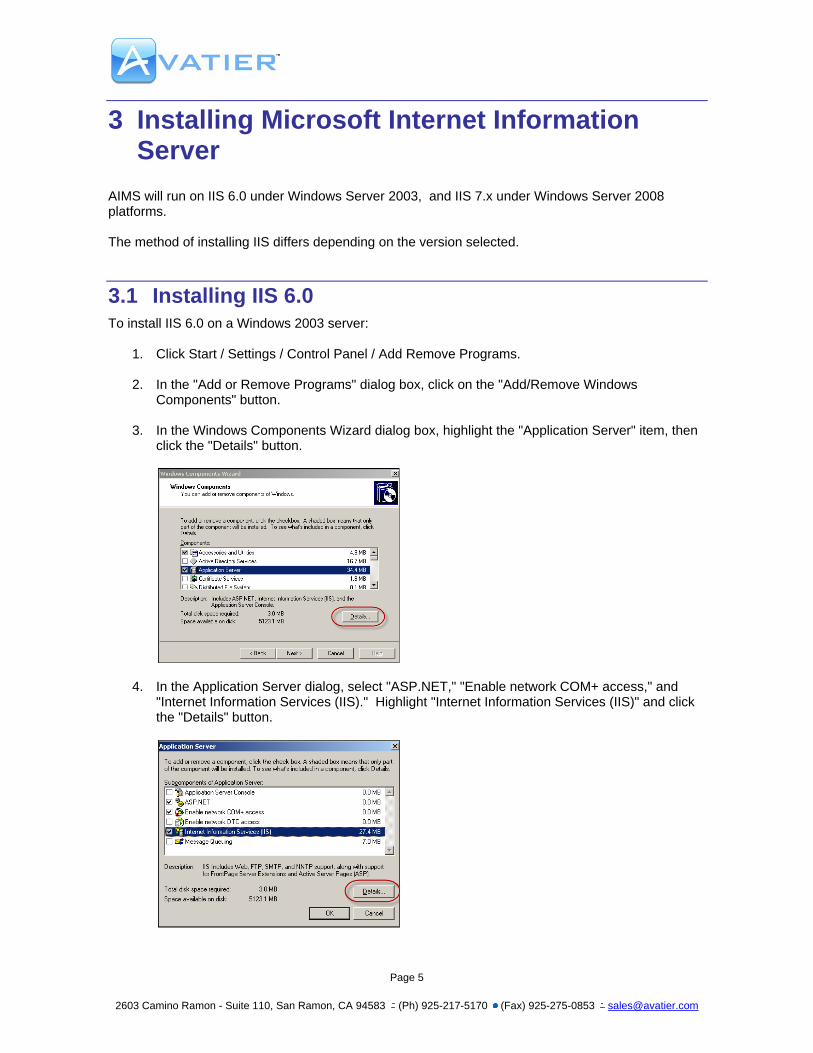
3.1 Installing IIS 6.0 To install IIS 6.0 on a Windows 2003 server:
1. Click Start / Settings / Control Panel / Add Remove Programs.
2. In the "Add or Remove Programs" dialog box, click on the "Add/Remove Windows Components" button.
3. In the Windows Components Wizard dialog box, highlight the "Application Server" item, then click the "Details" button.
4. In the Application Server dialog, select "ASP.NET," "Enable network COM+ access," and "Internet Information Services (IIS)." Highlight "Internet Information Services (IIS)" and click the "Details" button.
Page 6
2603 Camino Ramon - Suite 110, San Ramon, CA 94583 (Ph) 925-217-5170 (Fax) 925-275-0853 [email protected]
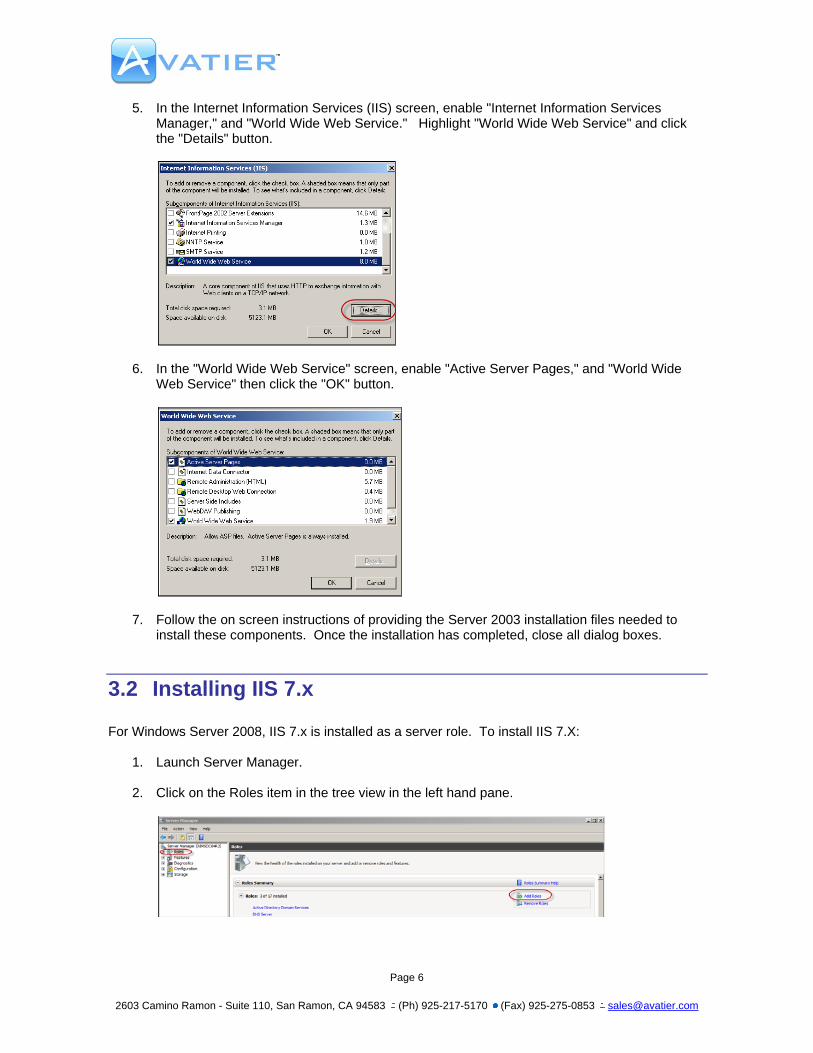
5. In the Internet Information Services (IIS) screen, enable "Internet Information Services Manager," and "World Wide Web Service." Highlight "World Wide Web Service" and click the "Details" button.
6. In the "World Wide Web Service" screen, enable "Active Server Pages," and "World Wide Web Service" then click the "OK" button.
7. Follow the on screen instructions of providing the Server 2003 installation files needed to install these components. Once the installation has completed, close all dialog boxes.
3.2 Installing IIS 7.x For Windows Server 2008, IIS 7.x is installed as a server role. To install IIS 7.X:
1. Launch Server Manager.
2. Click on the Roles item in the tree view in the left hand pane.

Page 7
2603 Camino Ramon - Suite 110, San Ramon, CA 94583 (Ph) 925-217-5170 (Fax) 925-275-0853 [email protected]
3. The Rules Wizard dialog is displayed. Click the "Next" Button
4. In the Select Server Roles screen of the Add Roles Wizard, select "Web Server (IIS)
5. An informational screen will appear that is an introduction to IIS. Click the "Next" button.
Page 8
2603 Camino Ramon - Suite 110, San Ramon, CA 94583 (Ph) 925-217-5170 (Fax) 925-275-0853 [email protected]
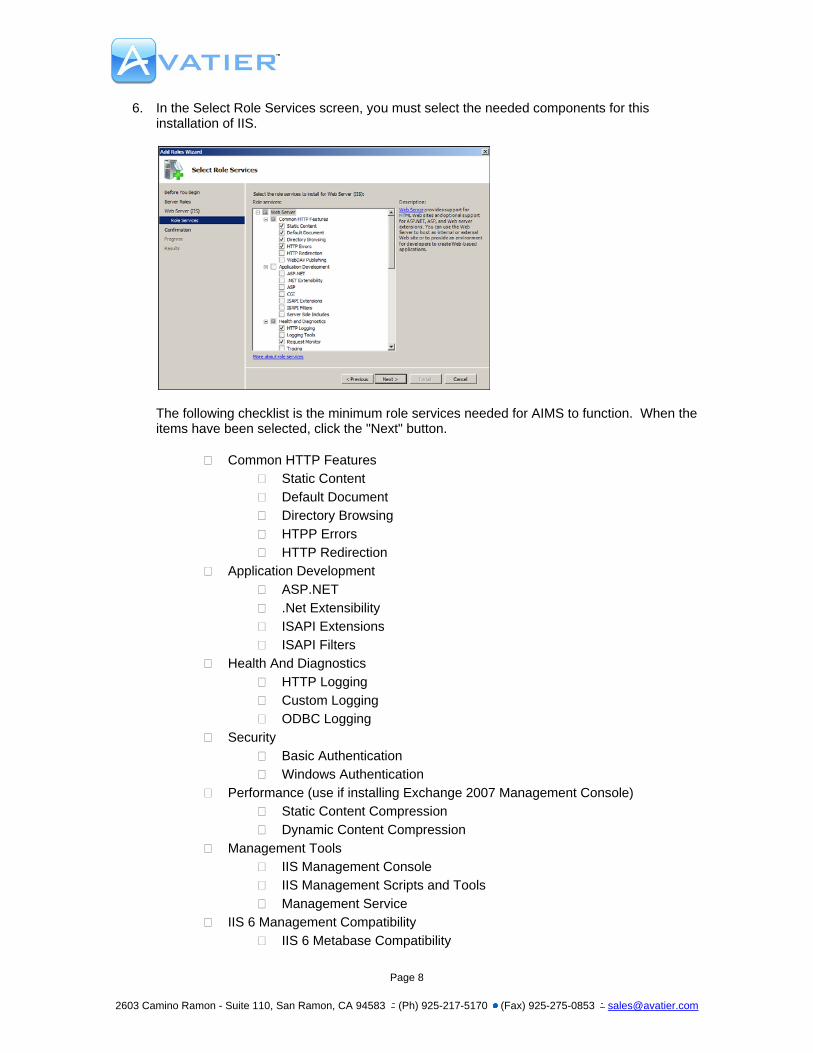
6. In the Select Role Services screen, you must select the needed components for this installation of IIS.
The following checklist is the minimum role services needed for AIMS to function. When the items have been selected, click the "Next" button.
Common HTTP Features Static Content Default Document Directory Browsing HTPP Errors HTTP Redirection
Application Development ASP.NET .Net Extensibility ISAPI Extensions ISAPI Filters
Health And Diagnostics HTTP Logging Custom Logging ODBC Logging
Security Basic Authentication Windows Authentication
Performance (use if installing Exchange 2007 Management Console) Static Content Compression Dynamic Content Compression
Management Tools IIS Management Console IIS Management Scripts and Tools Management Service
IIS 6 Management Compatibility IIS 6 Metabase Compatibility
Page 9
2603 Camino Ramon - Suite 110, San Ramon, CA 94583 (Ph) 925-217-5170 (Fax) 925-275-0853 [email protected]
IIS 6 WMI Compatibility IIS 6 Scripting Tools IIS 6 Management Console
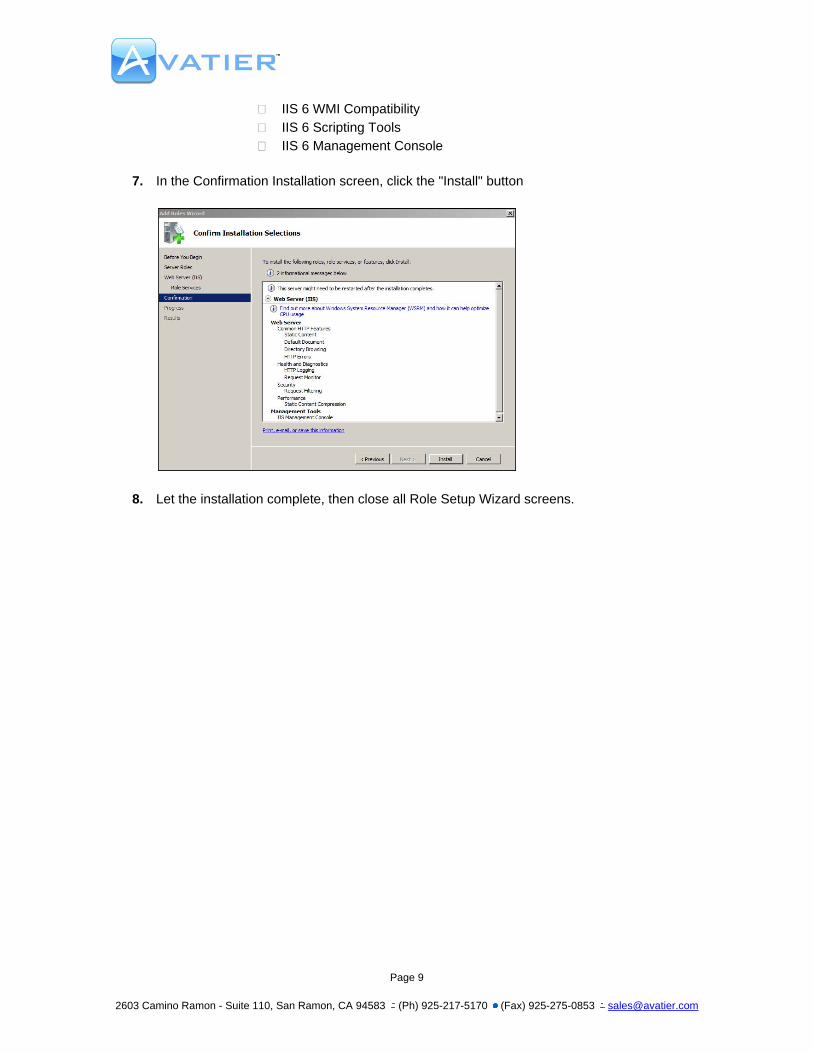
7. In the Confirmation Installation screen, click the "Install" button
8. Let the installation complete, then close all Role Setup Wizard screens.

Page 10
2603 Camino Ramon - Suite 110, San Ramon, CA 94583 (Ph) 925-217-5170 (Fax) 925-275-0853 [email protected]
4 Permissions on AIMS IIS Directories When AIMS is deployed to an IIS Server, the installer creates a default set of permissions on the AIMS web structure directories. Some AIMS directories require nothing more than access from the anonymous user, such as the Password Station directory and the directory that contains the products images and controls. However, many of the AIMS directories are secured with an Access Control List and set for basic authentication. When the default page is accessed for any of these secured directories, the user will be challenged to enter their domain credentials to gain access, if, and only if, they are a member of a group associated with the access control list on that directory. By default, all secured AIMS directories are available to the Active Directory built in group "Domain Admins." Access is denied to all other users in the domain.
4.1 Changing the Access Control List on an AIMS Secured Directories To allow users not in the built in "Domain Admins" group to access a secured directory in AIMS, you must alter the Access Control List (ACL) for that directory. The example below provides the steps needed to allow users in the group called "Help Desk Employees" to access the Password Station Help Desk module. It assumes that the group "Help Desk Employees" already exists in Active Directory, and the desired users are already a member of that group.
1. Logon to the AIMS server as a domain administrator.
2. Using Windows Explorer, navigate to the c:\inetpub\wwwroot\aims\ directory on the AIMS server.
3. Right-click on the directory "Helpdesk" and select the "Security Tab," then click the "Edit" button.

Page 11
2603 Camino Ramon - Suite 110, San Ramon, CA 94583 (Ph) 925-217-5170 (Fax) 925-275-0853 [email protected]
4. In the "Permissions For Helpdesk" screen, click the "Add" button.
5. In the "Select Users, Computers, Service Account, or Groups" dialog box, enter the name of the group you wish to add to the Access Control List. You can click the "Check Names" button to make sure the group is spelled correctly, or if you are confident that the group name you types is correct, click the "OK" button.
6. With the "Help Desk Employees" selected in the Object Name section of the screen, enable the "Read and Execute," "List Folder Contents," and "Read" permissions, the click the "OK" button.
7. Close the Helpdesk Properties dialog.

Page 12
2603 Camino Ramon - Suite 110, San Ramon, CA 94583 (Ph) 925-217-5170 (Fax) 925-275-0853 [email protected]
8. When a user who is a member of Help Desk Employees now accesses the Password Station Help Desk screen, they will be challenged for their Active Directory User ID and password. When successfully entered, they will have access to the AIMS Help Desk screens.

Page 13
2603 Camino Ramon - Suite 110, San Ramon, CA 94583 (Ph) 925-217-5170 (Fax) 925-275-0853 [email protected]
5 Enabling Integrated Windows Authentication In a default installation of AIMS on either IIS 6.0 or IIS 7.x, the directories of the AIMS web structure are either set to anonymous access or Basic Authentication. For the secured directories that are set to Basic Authentication, the user will always be prompted for their domain User ID and password each time they access a secured directory they are allowed to access via the Access Control List associated with that directory. In some organizations, it may be desirable to let the browser pass the credentials of the currently logged on user. This is possible under the following conditions:
1. All AIMS secured directories currently set for Basic Authentication are changed to Windows Integrated Authentication.
2. There is no proxy server between the client workstation and the AIMS server, or the AIMS website is excluded from proxy evaluation.
3. The client's browser is Microsoft's Internet Explorer.
5.1 Enabling Integrated Windows Authentication in IIS 6.0 In a default IIS 6.0 installation, Window Integrated Authentication is automatically installed as part of the access methods to the web site. To enable Windows Integrated Authentication on IIS 6.0 for an AIMS directory follow the instructions below. In the example, we are enabling Windows Integrated Authentication for the Helpdesk directory.
1. Launch the IIS 6.0 Administrator program.
2. Expand the Default Web Site, then expand the AIMS application.
3. Right click on the Helpdesk directory and select "Properties." Click on the "Directory Security" tab, the click the "Edit" button in the "Authentication and access control" section.
4. In the Authentication Methods screen, uncheck Basic Authentication, and select "Integrated Windows Authentication."

Page 14
2603 Camino Ramon - Suite 110, San Ramon, CA 94583 (Ph) 925-217-5170 (Fax) 925-275-0853 [email protected]
5. Click the "OK" button.
6. Close the Helpdesk Properties dialog box.
7. When a user who is part of the Helpdesk directory's ACL access the Helpdesk page, they will no longer be prompted for their User ID and password. Instead, Internet Explorer will pass the credentials of the currently logged on user to the web site.
Page 15
2603 Camino Ramon - Suite 110, San Ramon, CA 94583 (Ph) 925-217-5170 (Fax) 925-275-0853 [email protected]
5.2 Enabling Windows Integrated Authentication in IIS 7.x In a default installation of IIS 7.x, no access methods, even for the default web site are installed as part of the server role. In Section 3.2 of this document, only Anonymous and Basic Authentication was specified. If Windows Integrated Authentication is desired for any of the secured AIMS directories, you must first add that role feature to IIS. The following example assumes that you have already added the Windows Integrated Authentication role service as part of your IIS role, and uses the Helpdesk directory of the AIMS structure.
1. Launch the Internet Information Services Manger.
2. Expand the Sites, then the Default Web Site, then AIMS.
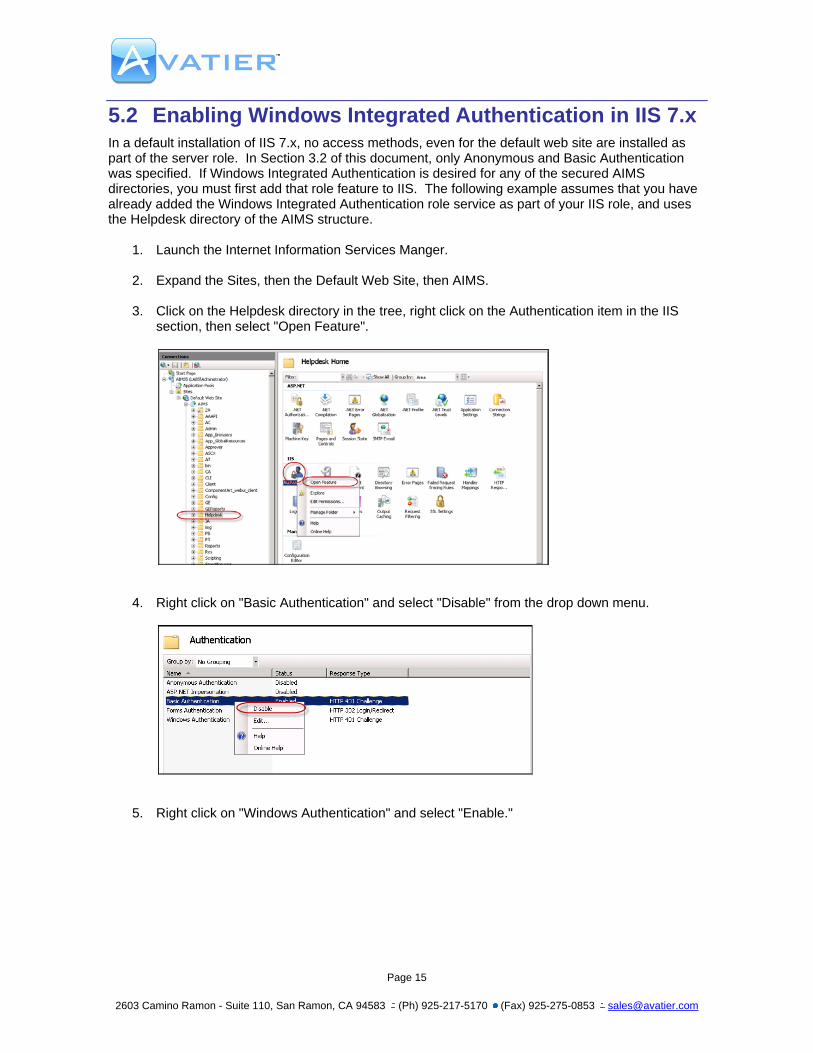
3. Click on the Helpdesk directory in the tree, right click on the Authentication item in the IIS section, then select "Open Feature".
4. Right click on "Basic Authentication" and select "Disable" from the drop down menu.
5. Right click on "Windows Authentication" and select "Enable."

Page 16
2603 Camino Ramon - Suite 110, San Ramon, CA 94583 (Ph) 925-217-5170 (Fax) 925-275-0853 [email protected]
6. Exit the Internet Information Services Manager.
7. The next time a user who is part of the Access Control List on the Helpdesk directory access the helpdesk page through Internet Explorer, their domain User ID and password will be passed from the browser and they will be granted access.

Page 17
2603 Camino Ramon - Suite 110, San Ramon, CA 94583 (Ph) 925-217-5170 (Fax) 925-275-0853 [email protected]
6 Setting the Default Domain for IIS When logging in to a secured AIMS directory with Basic Authentication, the user is challenged for the domain User ID and password. AIMS accepts both the User Principal Name format ([email protected]) and the pre-Win2k format (domain\userid) for providing the logon credentitals. IIS 6.0 and IIS 7.x both have the ability to specify a default domain for an AIMS directory that allows the user to just enter their User ID without any reference to the domain.
6.1 Specifying the Default Domain for IIS 6.0 The following example assumes the domain name is "AIMS" and we are specifying AIMS as the default domain for the Helpdesk directory:
1. Launch the IIS 6.0 Administrator program.
2. Expand the Default Web Site, then expand the AIMS application.
3. Right click on the Helpdesk directory and select "Properties."
4. Click on the "Directory Security" tab, the click the "Edit" button in the "Authentication and access control" section.
5. Add the domain name to the "Default domain" area, and click the "OK" button.
6. The next time a user who is part of the ACL for the Helpdesk directory accesses this page, they will not have to type the domain name when supplying their User ID.

Page 18
2603 Camino Ramon - Suite 110, San Ramon, CA 94583 (Ph) 925-217-5170 (Fax) 925-275-0853 [email protected]
6.2 Specifying the Default Domain in IIS 7.x The following example assumes the domain name is "AIMS" and we are specifying AIMS as the default domain for the Helpdesk directory:
1. Launch the Internet Information Services Manger.
2. Expand the Sites, then the Default Web Site, then AIMS.
3. Click on the Helpdesk folder, then right click on "Authentication" in the IIS section, and select "Open Feature."
4. Right click on Basic Authentication, and select "Edit."
5. In the Edit Basic Authentication Setting screen, enter the name of the domain in the "Default Domain" box, then click the "OK" button.
6. Close the Internet Information Services Manager.
7. The next time a user who is part of the ACL for the Helpdesk directory accesses this page, they will not have to type the domain name when supplying their User ID.