IFU-04 Rev. B | Date: May2019 Page 1 of 19...IFU-04 Rev. B | Date: May2019 Page 5 of 19 Figure 2 —...
19
IFU-04 Rev. B | Date: May2019 Page 1 of 19
Transcript of IFU-04 Rev. B | Date: May2019 Page 1 of 19...IFU-04 Rev. B | Date: May2019 Page 5 of 19 Figure 2 —...

IFU-04 Rev. B | Date: May2019 Page 1 of 19

IFU-04 Rev. B | Date: May2019 Page 2 of 19
Revision History Revision Description
Rev. A Initial release of this document.
Rev. B Add statement for VitalPatch Biosensor compatibility.
Description The optional VistaCenter™ application can be utilized in conjunction with the Vista SolutionTM and allows clinicians to monitor multiple VitalPatch® biosensors from a convenient, customizable user interface that runs in a web browser. When a nurse or other authorized user logs in, the VistaCenter application presents a dashboard view of all the active VitalPatch biosensor wearers they are responsible for. For additional information, see IFU-02, VitalPatch Instructions For Use, and MAN-010, Vista Solution Getting Started.
Hardware and Software Recommendation VistaCenter has been designed for and tested with the following hardware and software:
• Microsoft Windows PC with:
• Google Chrome web browser
• Network connectivity with access on port 443 (HTTPS)
• 22” Display with minimum 1920x1080 resolution
VitalPatch Biosensor Compatibility VistaCenter has been designed for and tested with the VitalPatch Biosensor 1.0 (firmware release 1.0.4.x and earlier). It is not compatible with the VitalPatch Biosensor 2.0 (firmware release 3.0.0.0 and later). Refer to the firmware release (FW#) printed on the VitalPatch biosensor pouch.
Indications for Use VistaCenter is a software Graphical User Interface intended for use by healthcare professionals to display physiological data collected by the Vista Solution wireless remote monitoring system in healthcare settings. VistaCenter is a secondary, adjunct patient monitor and is not intended to replace existing standard-of-care patient monitoring practices.
Contraindications
• The biosensor is not intended for use on users who have implanted defibrillators or pacemakers.
• The biosensor is not intended as a stand-alone diagnostic monitor, but the data may be applicable for use in diagnosis.
Warnings
See IFU-02 for VitalPatch device warnings and precautions.

IFU-04 Rev. B | Date: May2019 Page 3 of 19
Precautions
• Invalid posture data (shown as “?”) indicates a non-calibrated state. In such a state, respiration rate, posture, and fall data are considered invalid.
• Body movements and contact with the connected biosensor may produce motion artifacts that affect the displayed, measured values for both ECG and Heart Rate.
• ECG data stream may take several minutes after the biosensor has been applied to the patient to establish signal stabilization for accurate readings for ECG, Heart Rate, and Respiration Rate.
• Skin temperature may take several minutes after the biosensor has been applied to the patient to register accurate skin temperature values.
• There is a delay between logging on and the first display of live data from connected biosensors. This is typically 1-2 minutes, but can be up to 5 minutes.
VistaCenter Security and Privacy Best Practices Security is a shared responsibility. The VistaCenter application provides remote access to patient data and to configurations that can affect patient care. VitalConnect recommends the following security practices to prevent unauthorized access to VistaCenter and to protect patient privacy.
• Do not run unauthorized applications on the same computer with VistaCenter, and do not use the browser to access personal and/or unauthorized websites.
• Use only the VistaCenter username assigned to you. If a password was assigned to you, change it as soon as possible. Protect your logon credentials (username and password) and do not share them with anyone else.
• If the browser offers to save the logon credentials (username and password) for VistaCenter, decline this feature when prompted.
• Avoid using the browser controls (such as back and forward) to navigate in VistaCenter. Use only the navigational tools provided by VistaCenter.
• If you use the “Download CSV” feature in the Historical View to save a local copy of patient data, follow your facility’s patient record guidelines for securing and maintaining that data.
• Do not leave VistaCenter running unattended. When finished using VistaCenter, log out of the application by selecting Logout from the Settings Menu and close the browser.
• Lock the computer at the end of the session.

IFU-04 Rev. B | Date: May2019 Page 4 of 19
VistaCenter Operating Instructions Before operating the VistaCenter application, you will need a customer-specific URL (provided by VitalConnect) to access VistaCenter, and user credentials (username and password).
Logging on to VistaCenter Use the following procedure to log on to VistaCenter:
Step 1. Contact your IT Administrator or VitalConnect to obtain a URL, username and password for logging on to the VistaCenter application. The username and password are user-specific and must not be shared with others. The URL is specific to your facility.
Step 2. Launch a supported browser (Google Chrome) and enter the VistaCenter URL. If connection is successful, the VistaCenter login window is displayed. See the following figure.
Figure 1 — Login Window
Step 3. Enter your credentials (username and password). VistaCenter opens the Dashboard View.
Note: If you received an administrator-assigned password for first-time access, you should change it as soon as possible.
To change the password, see Changing Your Password on page 18.
Using the Dashboard View After you log on, VistaCenter opens and displays a scrollable Dashboard View with Patient Tiles and a Menu Bar with sorting and filtering options. Each tile in the Dashboard View represents a patient and their vital signs. Clicking a Patient Tile displays a Detail and Notification View for the selected patient. See the following figure.

IFU-04 Rev. B | Date: May2019 Page 5 of 19
Figure 2 — Using the Dashboard View
Note: There is a delay between logging on and the first display of live data from connected patches. This is typically 1-2 minutes.
If there are more tiles than the screen can display, the Dashboard View displays a scroll bar on the right that allows you to see tiles that are off the screen.

IFU-04 Rev. B | Date: May2019 Page 6 of 19
Observing Sensor Data in Dashboard Tiles Each tile displays information about the connected relay (relay name, Patch ID, and patch activation date/time), and an overview of the current patch data (heart rate, respiration rate, activity, posture and patch life). The basic patient tile displays the following information (see the following figure):
Figure 3 — Patient Tile in Dashboard View
• Hub Name — Name assigned to the VistaHub relay in the patient’s room (or the name of the outpatient device).
• Show Details — These three dots (displayed when hovering) indicate additional information. Clicking anywhere on the tile opens the Detail and Notification View where you can configure and acknowledge notifications, or view historical data.
• Patch ID — Bluetooth ID of the VitalPatch biosensor.
• Posture — Can be one of the following postures:
• Heart Rate, Respiratory Rate and Activity — Measured in beats/breaths per minute. Activity
measured in steps.
• Battery Life — Hover over icon to see the percentage of battery life remaining.
Hovering the mouse pointer over any feature in the patient tile will display additional information. Clicking the detail button or the tile itself will open the Detail and Notification View for the patient.

IFU-04 Rev. B | Date: May2019 Page 7 of 19
The patient tile changes appearance to notify clinicians of conditions that may require attention. See the following figure. For a description of notification states and terminology, see Notification States on page 10.
Figure 4 — Patient Tile in Dashboard View with Notifications
Notification Count — Number of unacknowledged notifications.
Black Tile with Yellow Border — Indicates that a notification is happening now.
Vital Sign with Yellow Background — Indicates that this vital sign has crossed a clinician-defined threshold for notification.
Fall Notification — If the patient has fallen, the activity indicator changes to say "FALL Detected".
Battery Life Low Alert — Yellow patch life icon indicates that VitalPatch biosensor should be replaced soon. Hover to see percentage battery remaining.
Patch Status Alert — This text indicates that the VitalPatch biosensor or the VistaHub relay may need attention. Messages include:
• Out of Range — Patient is out of range of the relay.
• Patch Off — Patch is not properly adhered to patient.
• Needs Calibration — Perform patch calibration using VistaPoint.

IFU-04 Rev. B | Date: May2019 Page 8 of 19
• No Patient Connected — Relay is not paired with a patch. If a Patch ID is shown, patch was manually disconnected using VistaPoint.
• Data Not Uploading — Current relay status is unknown. If message persists, check the relay for problems.
Using the Menu Bar to Sort, Filter and Select a Theater The menu bar includes functions for sorting and filtering the current dashboard view, and for selecting a theater. See the following figure.
Figure 5 — Dashboard Menu Bar
Step 1. Select a Theater (View Theater). The first step to displaying the desired view in VistaCenter is to select the theater to view. A theater is a collection of patients. Theaters are predefined by agreement with VitalConnect for your facility, and can be organized on the basis of physical location (floor, wing, building, and so on) and/or patient type (inpatient, outpatient, or other grouping). As an authorized user of VistaCenter, you may have access to all theaters in your facility, or only some theaters.
See the figure above. To select a theater to view, pull down the theater menu. Select All to view all the theaters you are authorized to view. If individual theaters are listed in the menu, you can select a theater to view.
Step 2. (Optional) Select a filter (Show Patients). When you select a filter, some patients will be hidden from view (filtered out) so that you can focus on a limited number of patients. The menu provides buttons that apply filtering by the following criteria:
• Show All — No filtering is applied. This is the default filter. • Patch Applied — Shows only patients with a patch and hides rooms/hubs without a patch. • Current Notifications — Shows only those patients with notifications and hides all others. • Unchecked Notifications — Shows only patients with unchecked notifications and hides all
others. For a description of notification states and terminology, see Notification States on page 10.
• Low Battery — Shows only patients with patches that are near the end of the patch lifespan. These patches need to be replaced.
• Data Not Uploading — Shows only rooms/hubs where data is not uploading from the hub to the cloud and rooms/hubs where the patient is out of range.

IFU-04 Rev. B | Date: May2019 Page 9 of 19
Note: If you select a filter other than “Show All,” you will not see new notifications for patients that do not meet the current filtering criteria.
Step 3. (Optional) Select a sorting method (Sort By). Use the menu to change how the Dashboard View sorts patient tiles.
• Hub Name — Sorts patients alphabetically by hub (relay) name. This is the default sorting. • Patch — Sorts patients by Patch ID. The lowest Patch ID is listed first. • Battery Life — Sorts patients by patch (battery) life. The lowest battery life is listed first. • Unchecked Notifications — Sorts patients by the number of unchecked notifications. The
highest number is listed first.
Displaying Patient Details To display additional detail on a patient, click on a tile. When clicked, the tile expands to a Detail and Notification View that allows you to view, configure and/or acknowledge notifications. See the following figure.
Figure 6 — Click on a Tile to Display the Detail and Notification View
The Notification View includes a collapsed, two-column version of the Dashboard View. The collapsed Dashboard View is scrollable, allowing you to view additional patients that are currently off the screen. The view is updated dynamically based on the currently defined sort and filter options. The Notification View is separately scrollable, allowing you to view the entire list of notifications if the list exceeds the current screen dimensions.

IFU-04 Rev. B | Date: May2019 Page 10 of 19
Configuring and Managing Sensor Notifications The VistaCenter application can generate notifications when vital signs cross clinician-defined thresholds, or when the VitalPatch biosensor detects a fall or a “patch off” event. There is no default notification configuration. The following notifications can be configured:
• Heart Rate High or Low. Trigger a notification when the average heart rate is above or below a threshold. Threshold values between 30 and 200 BPM are supported. You must select an “averaging duration” of 30 seconds, 1 minute or 2 minutes. A shorter averaging duration (such as 30 seconds) will be more sensitive than a longer averaging duration (such as 2 minutes). The use of an average value prevents the triggering of false positives due to transient spikes.
• Respiration Rate High or Low. Trigger a notification when the average respiration rate is above or below a threshold. Threshold values between 4 and 42 BrPM are supported. You must select an “averaging duration” of 30 seconds, 1 minute or 2 minutes. A shorter averaging duration (such as 30 seconds) will be more sensitive than a longer averaging duration (such as 2 minutes). The use of an average value prevents the triggering of false positives due to transient spikes.
• Fall Detection. Trigger a notification when the VitalPatch biosensor detects a likely fall event.
• Patch Off Detection. Trigger a notification when the VitalPatch biosensor detects that it is no longer in proper contact with the patient’s skin.
Note: VistaCenter applies a yellow background highlight to a vital sign when it is in a current notification condition. Because notifications are triggered based on an average value over time (averaging duration), there may be instances where a vital sign exceeds the threshold, but the yellow highlight is not applied. This is expected behavior.
Notification States
The VistaCenter interface uses the following terminology to distinguish between notification states:
• A Set notification means that a vital sign (heart rate, respiration rate, fall detection or patch off) has been configured for monitoring, thresholds have been defined, and the notification is currently enabled.
• A Current (or Active) notification occurs when a vital sign configured for monitoring reaches the threshold value to trigger an alert, and is currently beyond that threshold. For heart rate and respiration rate, the start time of the event is recorded as the time when the average value (over the averaging duration period) is beyond the lower or upper threshold. No end time is recorded because the value is still beyond the threshold. For fall detection or patch off, start time and end time are recorded as the time when the fall or patch off occurred. The VistaCenter dashboard applies a yellow background highlight to vital signs that are in the current notification state.
• A notification becomes Acknowledged after a clinician uses VistaCenter to acknowledge it. A notification can be acknowledged and current at the same time.
• An Unacknowledged notification occurs when a vital sign configured for monitoring reaches the threshold value to trigger an alert, and a clinician has not used VistaCenter to acknowledge the notification. If a notification is both unacknowledged and current, there is no defined end time.

IFU-04 Rev. B | Date: May2019 Page 11 of 19
For heart rate and respiration rate, the end time is defin ed as the time when the average value (over the averaging duration period) is no longer beyond the lower or upper threshold.
• A Not Set (inactive) notification means that a vital sign has been configured for monitoring but is disabled. Note that if a Set notification is switched to Not Set, and unacknowledged notifications still exist, they will remain in the unacknowledged state until acknowledged.+
Configuring SMS Functionality
The VistaCenter notification feature supports sending of SMS (text messages) when a notification is triggered. The content of the text message specifies that there is an unchecked notification — it does not include patient-identifying information. The recipient of the text message must log on to VistaCenter to see the details of the unchecked notification. See the following figure.
Figure 7 — Typical Text Message Alerts from VistaCenter
You can configure VistaCenter to send notification alerts to a default list of destinations on a per-theater basis, or you can specify a unique (individual) destination on a per-notification basis. When both default and individual destinations are configured, the individual destination overrides the default destination (the default destination will not receive an SMS).
Note: Configuring a default SMS destination does not configure a notification. VistaCenter does not currently provide default notifications. Notifications must be configured on a per-patch basis.
If a notification is not acknowledged after the default resend interval of 5 minutes (and remains “enabled” and “current”), VistaCenter will resend the notification. Recipients will receive only one SMS message per 5-minute interval, regardless of the number of active notifications. This prevents the recipient’s inbox from being flooded with incoming messages.
Configuring a Default SMS Destination for Notifications To configure default (per-theater) SMS destination for notifications, use the following procedure:
IFU-04 Rev. B | Date: May2019 Page 12 of 19
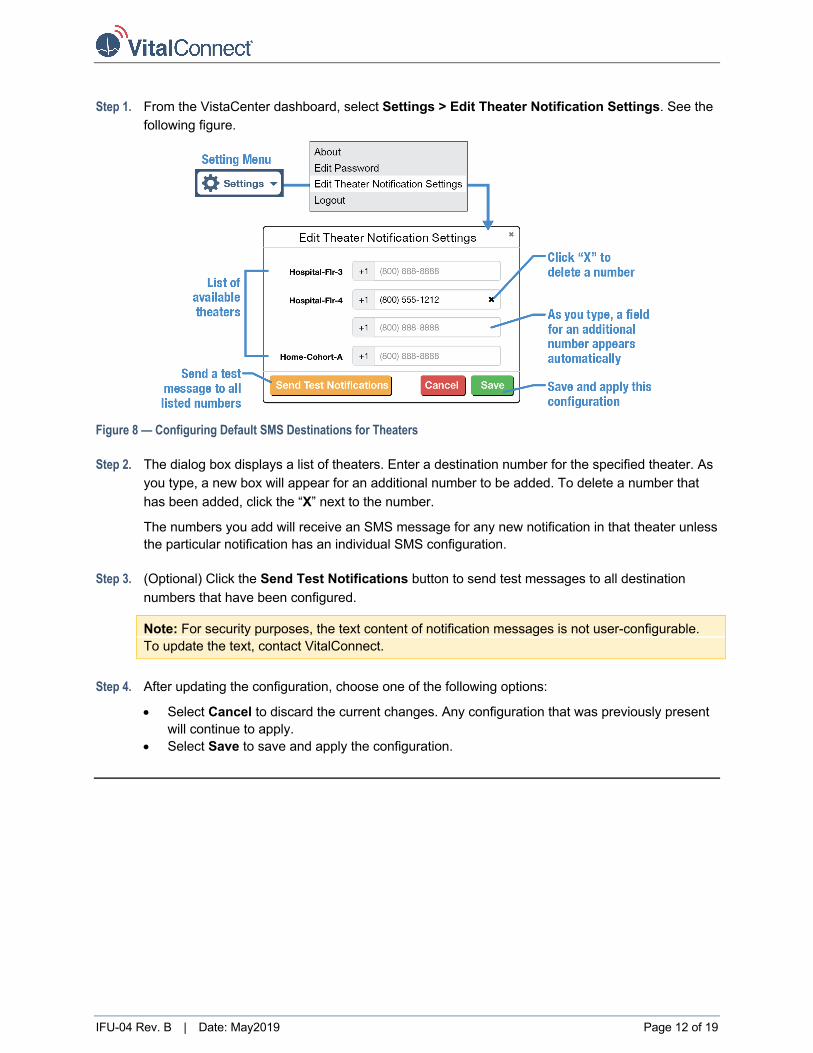
Step 1. From the VistaCenter dashboard, select Settings > Edit Theater Notification Settings. See the following figure.
Figure 8 — Configuring Default SMS Destinations for Theaters
Step 2. The dialog box displays a list of theaters. Enter a destination number for the specified theater. As you type, a new box will appear for an additional number to be added. To delete a number that has been added, click the “X” next to the number.
The numbers you add will receive an SMS message for any new notification in that theater unless the particular notification has an individual SMS configuration.
Step 3. (Optional) Click the Send Test Notifications button to send test messages to all destination numbers that have been configured.
Note: For security purposes, the text content of notification messages is not user-configurable. To update the text, contact VitalConnect.
Step 4. After updating the configuration, choose one of the following options:
• Select Cancel to discard the current changes. Any configuration that was previously present will continue to apply.
• Select Save to save and apply the configuration.

IFU-04 Rev. B | Date: May2019 Page 13 of 19
Individual Notification Configuration and Display in VistaCenter
The VistaCenter application provides an interface for configuring notification criteria individually for each biosensor (patient). See the following figure.
Figure 9 — Notification Configuration
To configure an individual sensor notification, use the following procedure.
Step 1. From the Dashboard View, select the tile corresponding to the patch that will have a notification configuration. The Notification View for that patch is displayed.
Step 2. From the Notification View, examine the notifications for the patch. These will be displayed as either Set (indicating a notification is already configured) or as Not Set.
Step 3. To configure a Heart Rate (HR) or Respiration Rate (RR) threshold notification:
a. Select the HR or RR Notification Status panel.
b. Drag the sliders to set the lower and upper thresholds for the notification, or enter a value directly using the input fields to the right of the sliders.
c. Select an Averaging Duration. The average sensor value must be out of range for the selected interval before a notification alert will occur. For example, if the Respiration Rate is set for a lower threshold of 8 and a higher threshold of 30, and you select “1 Minute” as the

IFU-04 Rev. B | Date: May2019 Page 14 of 19
interval, the average respiration rate must be greater than 30 breaths-per-minute (BrPM) for 1 minute before the notification will be triggered.
d. (Optional) If your facility supports SMS (text messages) to alert clinicians when a notification alert occurs, you can configure SMS using one of the following methods:
• Default SMS Destination: To send alert SMS messages to the default phone number(s) for the theater, leave the Enable SMS checkbox unchecked and do not enter a phone number. Make sure that there are phone numbers configured under Settings > Edit Theater Notification Settings.
• SMS Override: To send alert SMS messages to a phone number different than the theater default number, select the Enable SMS checkbox and enter a phone number. If you select Enable SMS, the phone number entered here will override the default phone number for the theater (if configured).
Note: If you configure an SMS override number for an individual notification, it overrides the default SMS per-theater notification.
e. After updating the configuration, choose one of the following options:
• Select Cancel to discard the current changes. Any configuration that was previously present will continue to apply.
• Select Apply Changes to save the configuration and activate the notification.
Step 4. To configure a Fall Detection or Patch Off notification:
a. Select the Fall or Patch Off Notification Status panel.
b. Select the Set Fall Notification or Set Patch Off Notification checkbox to enable the notification.
c. (Optional) If your facility supports SMS (text messages) to alert clinicians when a notification alert occurs, you can configure SMS using one of the following methods:
• Default SMS Destination: To send alert SMS messages to the default phone number(s) for the theater, leave the Enable SMS checkbox unchecked and do not enter a phone number. Make sure that there are phone numbers configured under Settings > Edit Theater Notification Settings.
• SMS Override: To send alert SMS messages to a phone number different than the theater default number, select the Enable SMS checkbox and enter a phone number. If you select Enable SMS, the phone number entered here will override the default phone number for the theater (if configured).
Note: If you configure an SMS override number for an individual notification, it overrides the default SMS per-theater notification.
d. After updating the configuration, choose one of the following options:
• Select Cancel to discard the current changes. Any configuration that was previously present will continue to apply.
• Select Apply Changes to save the configuration and activate the notification.

IFU-04 Rev. B | Date: May2019 Page 15 of 19
Displaying and Acknowledging Notifications
To display and acknowledge notifications for a patient, click on a patient tile to open the Detail and Notification View. See the following figure.
Figure 10 — Current Notification and Acknowledging a Notification
The notification interface displays details on the notifications, including time stamps and recent history, and a method to acknowledge notifications by clicking the check button next to the notification. Notifications can be acknowledged separately, with each acknowledgement decreasing the displayed notification count by one. When multiple unacknowledged notifications are present, they can all be acknowledged by clicking the Acknowledge All button at the top of the list, or by clicking the check button in the configuration grouping.
When multiple notification configurations are present, each configuration is grouped under a dark blue row. For example, heart rate and fall notifications will appear in separate groups. Additional groups will appear when a new notification configuration replaces a previous notification configuration, or when a notification configuration is disabled. Any notifications that were generated under the previous configuration are retained, and are marked as either “Deleted” (when deleted) or “Not Set” (when replaced or disabled). An entire group of notifications can be collectively acknowledged by clicking the check button in the row group.
To acknowledge notifications, use the following procedure:

IFU-04 Rev. B | Date: May2019 Page 16 of 19
Step 1. When a notification occurs, check the patient as necessary. After responding, the clinician should acknowledge the notification in VistaCenter.
Step 2. Click the patient’s tile to open the Notification View.
Step 3. Use one of the following three methods to acknowledge the notification:
• To acknowledge all notifications: Click the button at the top of the list of notifications.
• To acknowledge a group of notifications: Click the button next to the notification group header.
• To acknowledge a single notification: Click the button next to the notification item.
Step 4. Close the notification view when finished managing notifications.
To review previously acknowledged notifications, click the button in a notification group header (if present) to show the notifications. Acknowledged notifications will display a checked symbol next to the notification, and the user name of the clinician who acknowledged it.
Viewing Historical Data VistaCenter allows you to view sensor data stored in the cloud for historical analysis. Access historical data by selecting a tile in Dashboard View, and then selecting the Historical Data tab. See the following figure.
Figure 11 — Viewing Historical Data

IFU-04 Rev. B | Date: May2019 Page 17 of 19
Use the following procedure to access and view historical data for a patch:
Step 1. From the Dashboard View, select a tile corresponding to the patient to view. VistaCenter displays the Notification View.
Step 2. Select the Historical Data tab. By default, the historical data view shows a heart rate plot for the currently connected patch (if available).
Step 3. Use the Patch selector to select the patch to view. The menu displays all of the patches that have previously connected to the hub. The currently connected patch is selected by default.
Step 4. Use the Vital Sign/Data Channel selector to select a channel to view. The default channel is Heart Rate. In the current release, the following data channels are available:
• Heart Rate • Respiration Rate • Steps • RR Interval (heart rate variability) • Battery Level (represents patch life) • Skin Temperature • Impedance (an electrical measurement representing patch adhesion) • ECG
Step 5. Use the Date, Start Time and End Time selectors to choose a time period to view. Note that if you are viewing historical ECG data, the end time is not selectable. Alternatively, you can use the slider controls below the plot to change the size, start and end points of the time period.
After selecting a view of the historical data, you have the following options:
• Use the expansion button to expand historical data to a full-screen view. This view offers the same functionality as the current view.
• Hover the mouse pointer over the data plot to see details of the recorded sensor value at an exact time. If the vital sign crossed a notification threshold (for example, the heart rate was high enough to trigger an alert), the portion of the plot that is outside the threshold will be shown with a yellow background.
• Change the view by selecting a different time range or sensor channel.
• Use the Download CSV button to export the current plot to a file in comma-separated value (CSV) format.
Note: If you use the “Download as CSV” feature in the Historical View to save a local copy of patient data, follow your facility’s patient record guidelines for securing and maintaining that data.

IFU-04 Rev. B | Date: May2019 Page 18 of 19
Changing Your Password VitalConnect recommends that you change your password on a regular basis. If a password has been assigned to you, change it as soon as possible. Protect your logon credentials (username and password) and do not share them with anyone else. See VistaCenter Security and Privacy Best Practices on page 3 for more security-related recommendations.
Use the following procedure to change your VistaCenter password:
Step 1. Select Settings > Edit Password.
Step 2. Enter your old password and your new password (twice to confirm). Follow your facility’s guidelines for password length and complexity.
Step 3. Select Save.
Logging Out of VistaCenter VitalConnect recommends that you log out of VistaCenter when you are finished using it, or if you will be leaving the computer unattended.
To log out of VistaCenter, select Settings > Logout. You should also close the browser. If appropriate, lock the computer at the end of the session.
General symbols Symbol Title
Federal (U.S.A.) law restricts this device to sale by or on the order of a physician.
Legal Information © 2019 VitalConnect, Inc. A list of our trademarks can be found at www.vitalconnect.com. All other marks mentioned herein may be trademarks of their respective companies.

IFU-04 Rev. B | Date: May2019 Page 19 of 19
Contact Information VitalConnect, Inc. 224 Airport Parkway, Suite 300 San Jose, CA 95110 USA Phone: (408) 963-4600 www.vitalconnect.com [email protected]