iComfort E30 Installation Manual and Setup Guide
44
Disponible en español en www.lennoxPros.com. 507686-06 6/2021 Supersedes 6/2020 Copyright 2021 © Lennox Industries Inc. Dallas, Texas, USA iComfort ® E30 Smart Thermostat Installation and Setup Guide
Transcript of iComfort E30 Installation Manual and Setup Guide
Disponible en español en www.lennoxPros.com.
507686-06 6/2021 Supersedes 6/2020
Copyright 2021© Lennox Industries Inc. Dallas, Texas, USA
iComfort® E30 Smart Thermostat Installation and Setup Guide

2
Table of ContentsShipping and Packing List ............................................................................3Operating and Storage Environment, Electrical and Dimensions ............3Smart Hub External Components, Button, LEDs, Jumpers, Terminals and Wiring Specifications .............................................................................3
External Component Locations ............................................................................... 3Push Button Function .............................................................................................. 3LED Indicators......................................................................................................... 3Unit Type Jumpers .................................................................................................. 5Heat Stage Jumper Positions.................................................................................. 5Terminals and Wiring Specifications ....................................................................... 6Sensor Wiring .......................................................................................................... 7
HD Display External Components ...............................................................7Reducing Electrical Noise ............................................................................7Application Wiring .........................................................................................8Installation Recommendations ..................................................................11Smart Hub Installation ................................................................................11HD Display Installation................................................................................12
Installation ............................................................................................................. 12Mounting Display to Subbase ............................................................................... 13
Commissioning or Service (Using the Mobile Setup Application) .........13Mobile Device Operating System Requirements .................................................. 13Establishing a Direct Wireless Connection to the Smart Hub ............................... 13Service .................................................................................................................. 14Alternative Method ................................................................................................ 14Multiple Smart Hub(s) - Group ID.......................................................................... 15Restarting Smart Hub............................................................................................ 15
Commissioning (Using the HD Display) ....................................................15Boot-up Screen ..................................................................................................... 15Apple HomeKit Wi-Fi Accessory Configuration ..................................................... 15Dealer Info............................................................................................................. 16General Information .............................................................................................. 16Equipment Found Screen ..................................................................................... 16Non-Communicating Equipment ........................................................................... 16Reminders ............................................................................................................. 16Commissioning Completion .................................................................................. 17Equipment Parameters ......................................................................................... 18Tests ...................................................................................................................... 27
Diagnostics............................................................................................................ 28Installation Report ................................................................................................. 28Information ............................................................................................................ 28
Dehumidification Settings ..........................................................................28Dehumidification Setting Options .......................................................................... 28Overcooling ........................................................................................................... 29Dehumidification Set Point .................................................................................... 29Advanced Dehumidification Descriptions .............................................................. 29
Ventilation (ERV, HRV and Fresh Air Damper) ..........................................29Ventilation Rates ................................................................................................... 29Energy Recovery Ventilator (ERV) ........................................................................ 29Heat Recovery Ventilator (HRV) ........................................................................... 29Fresh Air Damper .................................................................................................. 29Zoning Application ................................................................................................. 30Operation of Fresh Air Dampers with Environmental Overrides ........................... 30Wiring .................................................................................................................... 30Ventilation Control Modes ..................................................................................... 30
Wi-Fi Connection .........................................................................................31Performance Reports ..................................................................................32Replacement Parts ......................................................................................32Mobile Applications .....................................................................................32
iComfort Thermostat App (Homeowner) ............................................................... 32iComfort Mobile Setup App (Installer) ................................................................... 32
Notifications .................................................................................................33Alert Code Types ................................................................................................... 33Soft Disable ........................................................................................................... 33Service Notification Codes .................................................................................... 33Alert Codes ........................................................................................................... 34
LennoxPros Dealer Dashboard ..................................................................43Service Dashboard Search Screen ....................................................................... 43Customer Results Screen ..................................................................................... 43Customer Details Screen ...................................................................................... 43
Index .............................................................................................................44
3
Shipping and Packing List
Quantity Description1 iComfort® E30 smart thermostat which includes a Smart Hub and HD Display
6 Mounting screws (#6 X 1.25” pan head) - Display requires 4 and smart hub 2.
6 Wall anchors (alligator flanged solid wall anchors)
1 Installation and setup guide
1 User guide
1 Checklist
1 Warranty certificate
IMPORTANTThe iComfort E30 smart thermostat CAN NOT be connected as a communicating device to indoor or outdoor units. Only conventional 24VAC wiring to indoor and outdoor units is supported.
NOTE: Due to Lennox’ ongoing commitment to quality, features and options are subject to change without notice and without incurring liability.
Operating and Storage Environment, Electrical and Dimensions
• Operating Temperature is 32°F to 104°F (0 to 40°C)• Shipping and storage temperature range is -4°F to 140°F (-20°C to 60°C)• Operating humidity range is 10% to 90% non-condensing at 104°F (40°C)• Storage humidity range is 5% to 95% non-condensing at 104°F (40°C)• Smart Hub Power Input: 24VAC, 1AMP at 60Hz.• Smart Hub Power Output to HD Display: 12VDC• Dimensions (H x W x D):
» HD Display with subbase attached: 7-1/4” x 5” x 1” (184 x 122.5 x 23 mm)
» Smart Hub: 11-1/2” x 7-1/8” x 1-7/8” (292 mm x 181 mm x 48 mm) - antenna length is 7-1/4” (184 mm)
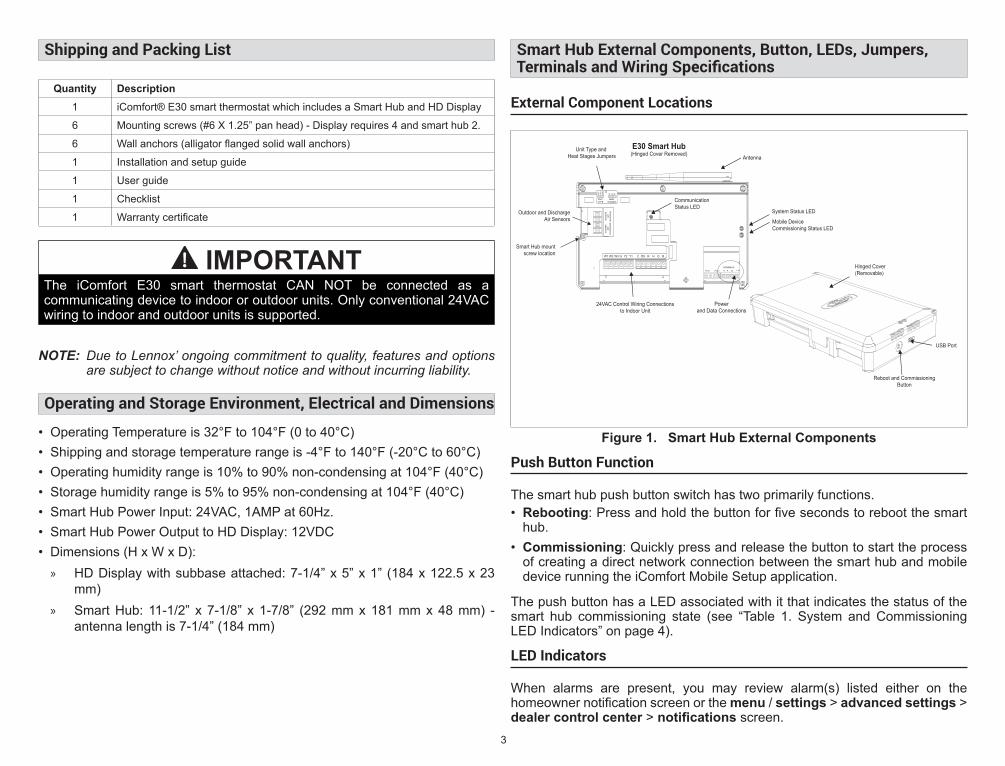
Smart Hub External Components, Button, LEDs, Jumpers, Terminals and Wiring Specifications
External Component Locations
E30 Smart Hub(Hinged Cover Removed)
Powerand Data Connections
24VAC Control Wiring Connectionsto Indoor Unit
System Status LED
Mobile Device Commissioning Status LED
CommunicationStatus LED
Unit Type and Heat Stages Jumpers Antenna
Outdoor and DischargeAir Sensors
Smart Hub mount screw location
Reboot and CommissioningButton
USB Port
Hinged Cover(Removable)
W1 W2 W3 G Y2 Y1 C DS R H O B
UNIT TYPE
HEATSTAGES
OU
TDO
OR
AIR
S
EN
SO
R
DIS
CH
AR
GE
AIR
S
EN
SO
R
HP
IF
CA
HC
0 1 2 3
+ -COMMBUS
A BACC1 ACC2
NOTE THE TERMINAL ARRANGMENT ON THE NOTE THE TERMINAL ARRANGMENT ON THE SMART HUB 3.0SMART HUB 3.0
Figure 1. Smart Hub External Components
Push Button Function
The smart hub push button switch has two primarily functions. • Rebooting: Press and hold the button for five seconds to reboot the smart
hub.• Commissioning: Quickly press and release the button to start the process
of creating a direct network connection between the smart hub and mobile device running the iComfort Mobile Setup application.
The push button has a LED associated with it that indicates the status of the smart hub commissioning state (see “Table 1. System and Commissioning LED Indicators” on page 4).
LED Indicators
When alarms are present, you may review alarm(s) listed either on the homeowner notification screen or the menu / settings > advanced settings > dealer control center > notifications screen.

4
Alert codes which require manual clearing can only be done under the dealer control center > notification screen.
Table 1. System and Commissioning LED IndicatorsLED Color Status Description
W1
W2
W3
GY2
Y1C
DSR
HO
B
UNIT
TYP
EHE
ATST
AGES
OUTDOORAIR
SENSOR
DISCHARGEAIR
SENSOR
HP IFCAHC
0 1
2 3
LEFT LED -SYSTEM STATUS
RIGHT LED -COMMISSIONING
STATUS
+-
COMM
BUS
A
BAC
C1
A
CC2
System Status LED
Green System is normal
A solid green LED indi-cates no system errors are detected. System operating as designed.
Red HVAC FaultSystem has critical alert which needs installer attention.
Amber Wi-Fi Error
Blinking amber LED indicates either Wi-Fi is not connected, no Wi-Fi is within range, or and Wi-Fi hardware error. Could also indicate intermittent Wi-Fi connection.
Magenta T-Stat ErrorBlinking magenta LED indicates HD display not connected.
Cyan Hardware Error
Blinking cyan LED indi-cates E30 internal com-munication error.
Commissioning Status LED
Blue System is normal
No mobile device is directly connected using Wi-Fi to the smart hub.
Green
Blinking green LED indicates the com-missioning button has been activated and the smart hub is waiting for a connection with a mobile device.
Green A solid green LED indicates a mobile device is connected to the smart hub.
Table 1. System and Commissioning LED IndicatorsLED Color Status Description
If multiple errors are present, the system status LED will display each active condition for one second on and one second off. The system will continue to cycle through all active conditions.System status errors are displayed in the following priority: HVAC alerts, thermostats and then Wi-Fi.
Table 2. Communication Error Troubleshooting (HD Display to Smart Hub)
Possible Connection Issues E30 Smart Hub - System Status LED
One communication wire at either the HD Display or smart hub A or B termi-nals is disconnected.
Flashing Magenta LED
Both communication wires – at either the HD Display or smart hub A or B terminals are disconnected.
Flashing Magenta LED
Power wires at either the smart hub or HD Display 12V+ and 12V- terminals are disconnected.
Flashing Magenta LED.
If terminals are connected correctly, then check HD Display. HD Display not be secured correctly to subbase.
Flashing Magenta LED.HD Display screen may be either blank or a message indicating iComfort cannot communicate with the equipment.

5
W1 W2 W3 G Y2 Y1 C DS R H O B
UNIT TYPE
HEATSTAGES
OUTDO
OR
AIR SENSO
R
DISCHARGE
AIR SENSO
R
HP
IFC
AHC
0 1 2 3
+ -COMMBUS
A BACC1 ACC2
System Status LED
Mobile DeviceCommissioning Status LED
E30 Smart Hub with Cover Removed
Figure 2. Smart Hub LED Indicators
Unit Type Jumpers
Set the unit type jumper for the type of indoor unit being used (see “Figure 1. Smart Hub External Components” on page 3 and “Table 3. Unit Type Jumpers Positions”). The factory default setting is IFC. If jumper is missing from header, alarm 130 is activated.
Table 3. Unit Type Jumpers PositionsJumper Position Indoor Unit Outdoor Unit
HP DO NOT USE
IFCConventional furnace, hydronic baseboard heating and hot water coils
Conventional heat pump or air conditioner
AHC Conventional Air HandlerHP IFC AHC
DO NOTUSE
Heat Stage Jumper Positions
The heat staging Jumper must be set for the number of stages of electric heat (air handler) or the number of stage of gas heat (furnace) and stages of heat pump. Using the heat stages jumper (see figure 3 and table 8).
The factory default setting is position 2. If jumper is missing from header, alarm 130 is activated.
0 1 2 3
Figure 3. Heat Stage Jumper Positions
Table 4. Heat Stage Jumpers
Label (Position)
Air Handler Heat Stages
Furnace Heat Stages Heat Pump Stages
Num
ber o
f El
ectr
ic H
eat
Stag
es
Stag
e Pe
r-ce
ntag
e
Num
ber o
f G
as S
tage
s
Stag
e Pe
r-ce
ntag
e
Num
ber o
f C
ompr
esso
rs
Stag
es
Stag
e Pe
r-ce
ntag
e
0 No Elec-tric Heat 0 1 100% 1 100%
1 1 100% 1 100% 1 100%2
(default) 2 50%, 100% 2 70%,
100% 2 70%, 100%
3 333.5%, 66.5%, 100%
2 70%, 100% 2 70%, 100%
If jumper is missing, setting defaults to single-stage. Changing jumper posi-tion after power-up requires recommission for the change to be recognized.
IMPORTANTIf any jumpers were set incorrectly AFTER commissioning was completed, then reposition jumpers to correct configuration. Re-running the commissioning procedure will be required at the thermostat or with the mobile app.
6
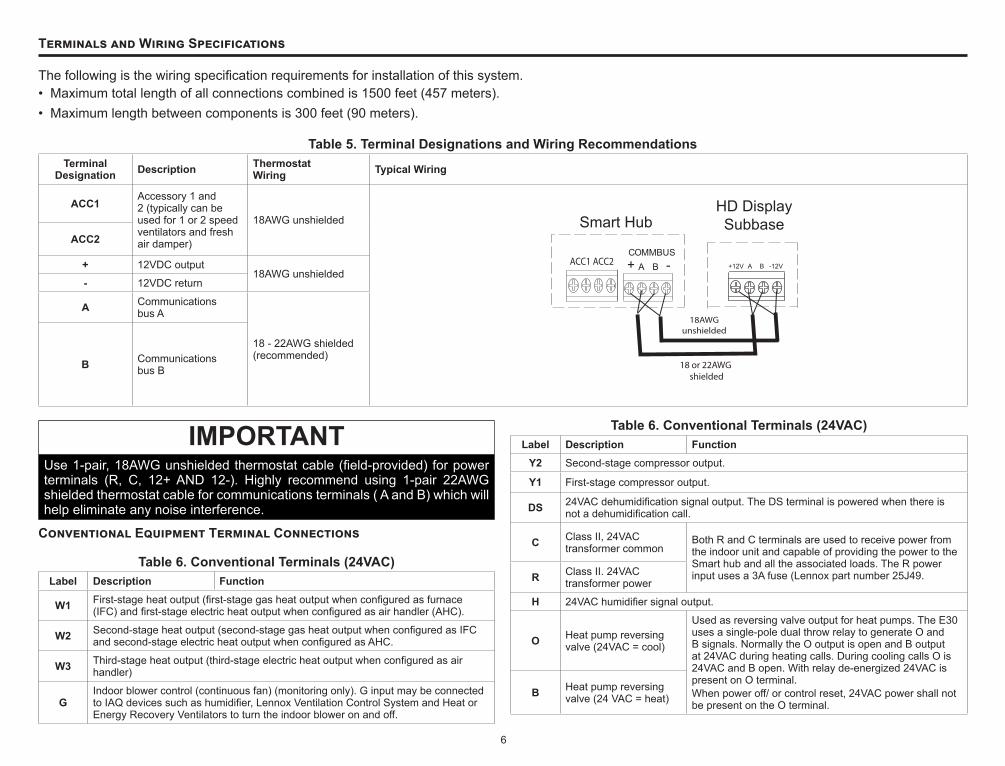
Terminals and Wiring Specifications
The following is the wiring specification requirements for installation of this system.• Maximum total length of all connections combined is 1500 feet (457 meters). • Maximum length between components is 300 feet (90 meters).
Table 5. Terminal Designations and Wiring RecommendationsTerminal
Designation Description Thermostat Wiring Typical Wiring
ACC1Accessory 1 and 2 (typically can be used for 1 or 2 speed ventilators and fresh air damper)
18AWG unshielded Smart Hub
ACC1 ACC2
18AWGunshielded
18 or 22AWG shielded
-12V+12V A B
HD DisplaySubbase
+ -COMMBUS
A B
ACC2
+ 12VDC output18AWG unshielded
- 12VDC return
A Communications bus A
18 - 22AWG shielded (recommended)
B Communications bus B
IMPORTANTUse 1-pair, 18AWG unshielded thermostat cable (field-provided) for power terminals (R, C, 12+ AND 12-). Highly recommend using 1-pair 22AWG shielded thermostat cable for communications terminals ( A and B) which will help eliminate any noise interference.
Conventional Equipment Terminal Connections
Table 6. Conventional Terminals (24VAC)Label Description Function
W1 First-stage heat output (first-stage gas heat output when configured as furnace (IFC) and first-stage electric heat output when configured as air handler (AHC).
W2 Second-stage heat output (second-stage gas heat output when configured as IFC and second-stage electric heat output when configured as AHC.
W3 Third-stage heat output (third-stage electric heat output when configured as air handler)
GIndoor blower control (continuous fan) (monitoring only). G input may be connected to IAQ devices such as humidifier, Lennox Ventilation Control System and Heat or Energy Recovery Ventilators to turn the indoor blower on and off.
Table 6. Conventional Terminals (24VAC)Label Description Function
Y2 Second-stage compressor output.
Y1 First-stage compressor output.
DS 24VAC dehumidification signal output. The DS terminal is powered when there is not a dehumidification call.
C Class II, 24VAC transformer common
Both R and C terminals are used to receive power from the indoor unit and capable of provid ing the power to the Smart hub and all the associated loads. The R power input uses a 3A fuse (Lennox part number 25J49.R Class II. 24VAC
transformer power
H 24VAC humidifier signal output.
O Heat pump reversing valve (24VAC = cool)
Used as reversing valve output for heat pumps. The E30 uses a single-pole dual throw relay to generate O and B signals. Normally the O output is open and B output at 24VAC during heating calls. During cooling calls O is 24VAC and B open. With relay de- energized 24VAC is present on O terminal.When power off/ or control reset, 24VAC power shall not be present on the O terminal.
B Heat pump reversing valve (24 VAC = heat)

7
Sensor Wiring
The following diagrams in this section illustrates the basic Lennox control wiring for all compatible components.Discharge Air Temperature Sensor (DATS)
Installation of discharge air temperature sensor (DATS) (88K38) must comply with the following requirements:• Installed downstream of the heat exchanger or electric heat elements.• It must be placed in free airflow, where other accessories (such as humidifiers,
UV lights, etc.) will not interfere with its accuracy.• Wiring distance between the integrated furnace and air handler controls or
damper control module and the discharge air sensor must not exceed 10 feet (3 meters) when wired with 18# AWG thermostat wire.
• DATS is highly recommended for all systems that include a variable capacity outdoor unit in order to provided more precise dehumidification operation.
Outdoor Air Temperature Sensor (OATS)
The optional outdoor air (temperature) sensor (OATS) (X2658) wiring distance to the iComfort E30 should not exceed 150 feet (45 meters) when wired with minimum 22 #AWG (recommend 18 #AWG) dedicated 2-conductor thermostat cable. Installation of OATS must comply with the following requirements:• Sensor wiring must be run to avoid touching or being close to high voltage
wiring and light ballast.• Choose a protected outdoor location away from direct sunlight or other heat
sources (usually on the north side of the building).• Ensure that water will neither collect on, nor wash over the sensor.• Do not locate the sensor near driveways or similar heat-absorbing masses
which may reflect stored heat energy onto the sensor and send inaccurate information to the thermostat.
• Locate the sensor away from attic and soffit vents, or furnace venting pipes.• Do not locate the sensor directly above an air conditioner or heat pump.
HD Display External Components
• Proximity sensor - Detects a person approaching the HD Display. If the HD Display is in screen saver mode and the proximity sensor setting is enabled (factory default is ON), the proximity sensor takes the HD Display out of screen saver mode automatically and returns to the home screen when someone approaches. This feature can be disabled by going to menu > setting > display.
• Humidity sensor - This is the intake location for the built-in humidity sensor. Do not block the intake location. The indoor humidity percentage is displayed (enabled by default) on the home screen. The humidity percentage display on the home screen can be disabled by going to menu > setting > display.
• Reboot button - Press and hold this button for approximately six (6) seconds to reboot the HD display. No settings are lost using this procedure.
• MicroSD card slot - For future use.• Micro USB connector - For future use.
Proximity and Ambient Light Sensors
microSD slot
micro USB port
power button
humidity sensorair intake
humidity sensorair discharge
temperatur sensor
Subbase attached
Figure 4. HD Display Components
Reducing Electrical Noise
• Use wire nuts to bundle the unused wires at each end of the cable. A single wire should then be connected to the indoor unit end of the wire bundle and attached to the “C” terminals as shown in “Figure 5. Thermostat Wiring - E30 Smart Hub to HD Display Subbase (Electrical Noise Termination Consideration)” on page 8.
• Keep all wiring as far away from the house electrical wiring and large electrical appliances as possible. Recommended minimal distance is 15 feet (5 meters).
NOTE: If the HD Display is removed from the subbase, the HD Display will shut down and will not be able to communicate with the system.

8
W1 W2 W3 G Y2 Y1 C DS R H O B
UNIT TYPE
HEATSTAGES
OU
TDO
OR
AIR
S
EN
SO
R
DIS
CH
AR
GE
AIR
S
EN
SO
R
HP
IFC
AH
C
0 1 2 3
ACC2ACC1
Unused wires
Single wire from bundleto Smart Hub 24VAC
Terminal C
E30 Smart Hub
HD Display Subbase(Front View)
+12V A B -12V+ A B -COMMBUS
Figure 5. Thermostat Wiring - E30 Smart Hub to HD Display Subbase (Electrical Noise Termination Consideration)
OUTDOOR UNIT
SMART HUB
SUB-BASE
+12V A B -12V
Figure 6. Thermostat Wiring - E30 Smart Hub to HCWB3
Application Wiring
Diagrams are typical low voltage conventional wiring connections.
E30 Smart Hub
Set “Unit Type” to IFC for furnaceand AHC for air handler.
Set “Heat Stages” to number of either gas or electric heat stages.
Not all furnaces have Y1, Y2 and W2 connections.Wire E30 Smart Hub direct to air conditioner unitin those cases.
Remove jumper between R and W2 if present.Not removing may cause erroneous alert code 125to appear.
Figure 7. Conventional Furnace or Air Hander with Conventional Air Conditioner
E30 Smart Hub
Set “Unit Type” to IFC for furnaceand AHC for air handler.
Set “Heat Stages” to number of either gas or electric heat stages.
Not all furnaces have Y1, Y2 and O connections. Wire E30 Smart Hub direct to heat pump unit in those cases.
Remove jumper between R and W2 if present.Not removing may cause erroneous alert code 125 to appear.
Figure 8. Conventional Furnace or Air Hander with Conventional Heat Pump

9
3
3
E30 SMART HUB Set “Unit Type” to IFC for furnace.
Set “Heat Stages” to number of gas heat stages.
Remove jumper between R and W2 if present. Not removing may cause erroneous alert code 125 to appear.
NOTE: Defrost temperating is providedby kit 67M41. Tempering thermostat-cycles furnace on at 80ºF (26.7ºC) and off at 90ºF (32.2ºC).
Not all furnaces have Y1, Y2 and O connections. Wire E30 Smart Hub direct to heat pump unit in those cases.
Figure 9. Dual-Fuel - Conventional Furnace with Conventional Heat Pump (Defrost Tempering Kit Installed)
E30 Smart Hub
Terminals O, DS, Y1 and Y2 used only on some air handlers.
Cut on-board links R-DS and R-0.
Set “Unit Type” to IFC (furnace). This will allow baseboard heating (water coil heat) to come up to the Aquastat thermostat’s temperature set point.Once the temperature set point is reached, the indoor fan will start.
Figure 10. Hydronic Baseboard Heating with Conventional Air Handler
Remove jumper between R and W2 if present. Not removing may cause erroneous alert code 125to appear.
Aquastat provided by installer. Set air handler continuous fan speed to desired heating CFM
E30 Smart Hub
Set E30 unit type to IFC to prevent fan operation duringbaseboard heating or untilAquastat closes on hot watercoil heat.
NOTE: Terminals O, DS, Y1 and Y2 used only on some air handlers.
NOTE: Cut on-board links R-DS and R-O on Lennox communicating air handler control.
Figure 11. Hot Water Coil Heat with Aquastat Blower Control with Con-ventional Air Handler
E30 Smart Hub
Set “Unit Type” to IFC for furnaceand AHC for air handler.
Remove jumper between R and W2 if present.Not removing may cause erroneous alert code 125to appear.
EDA Humiditrol can only be installed on matchedsystems with variable speed or CBX27 indoor units.
Figure 12. Enhanced Dehumidification Accessory (EDA) - Humiditrol with Conventional Indoor (Variable Speed) and Outdoor Units

10
E30 Smart Hub
Set “Unit Type” to IFC for furnace and AHC for air handler.
Remove jumper between R and W2 if present. Not removing may cause erroneous alert code 125to appear.
Figure 13. HCWHD3 Series Dehumidifiers with Conventional Indoor Unit
E30 Smart Hub
Set “Unit Type” to IFC for furnaceand AHC for air handler.
Remove jumper between R and W2 if present.Not removing may cause erroneous alert code 125to appear.
Figure 14. LVCS with Conventional Indoor and Outdoor Units
ACC
1AC
C2
Non-Communicating Indoor Unit
iComfort E30
LOW
ON
RED
YEL
GRN
HI
COM
NO
NC
BLK
HRV/ERV Terminal Block
Wire Jumper required between ON and RED terminals.ACC1 is always low-stage for single- and two-stage Zventilators. Wiring connections between E30 and non-communicating indoor unit will be application specific.
-C
OM
BUS
A B+ +1
2VB
A-1
2V
Figure 15. iComfort E30 to either ERV or HRV
-C
OM
BUS
A BAC
C1
ACC
2
Non-Communicating Indoor Unit
iComfort E30
+12V
B A
HD DisplaySubbase
Wire required between ACC 1 and R terminals.
Wiring connections between E30 and non-communicating indoor unit will be application specific.
COM
CLOSE
Fresh Air Damper2-Wire Control (Normally Open)
Wire required between COM and C terminals.
+
-12V
Figure 16. iComfort E30 to Fresh Air Damper

11
Installation Recommendations
WARNINGImproper installation, adjustment, alteration, ser vice or maintenance can cause property damage, personal injury or loss of life.Installation and service must be performed by a li censed professional HVAC installer (or equivalent) or a service agency.
Before beginning installation, note the type of equipment, number of stages, and any accessories being installed.Do• Read this entire document, noting which procedures pertain to your specific
equipment and system requirements.• Make sure that all wiring conforms to local and national building and electrical
codes and ordinances.Do Not• Install on voltages higher than 30VAC.• Exceed 300 feet (91 meters) run when using 18AWG or 22AWG
thermostat wire or larger (see “Table 5. Terminal Designations and Wiring Recommendations” on page 6 for further details.
• Allow power load from any thermostat connection to be more than 1 AMP.
Smart Hub Installation
IMPORTANTDo not install smart hub in location where direct exposure to condensation or dripping water is possible.DO NOT install smart hub on indoor unit.
1. Things to consider when installing the smart hub:• Install near the indoor unit such that there is a direct path to the
approximate location of the home Wi-Fi access point (the signal is not blocked by the indoor unit or duct work, for example).
• Can be attached to a vertical surface such as a wall stud or roof truss web, or to a horizontal surface such as a floor or ceiling joist, or a roof rafter.
• Smart hub antenna should be positioned such that it is roughly vertical, no matter the orientation of the smart hub, itself.
• DO NOT install the smart hub on the indoor unit, duct work, or other equipment that could induce vibration in the smart hub.
• DO NOT install the smart hub on or near large metal objects. This could adversely affect the range and directional coverage of the smart hub Wi-Fi signal.
• If the smart hub MUST be installed on a metal object, orientate the antenna perpendicular to the metal surface.
• In all cases, the smart hub antenna orientation may need to be adjusted to obtain best Wi-Fi results.
2. Use the following procedure outlined in “Figure 17. Smart Hub Installation” on page 11.
3. For low voltage wiring connections use diagrams in section titled “Application Wiring” on page 8.
IMPORTANTDo not install smart hub in location were direct exposure to condensation or dripping water is possible.
1/4”
A
B
D
W1 W2 W3 G Y2 Y1 C DS R H O B
UNIT TYPE
HEATSTAGES
OU
TDO
OR
AIR
SENSO
R
DISC
HAR
GE
AIR
SENSO
R
HP IFC
AHC
0 1 2 3
Front(Hinged Cover Removed)
Rear
Keyhole
Use the Smart Hub as a template to mark the desired mounting locations on the wall or stud.
CAUTION: Do not overtighten lower mounting screw. Doing so may damage the Smart Hub.
Secure Smart Hub towall using field-providedfasteners.
Strip 1/4” insulation fromend of each control wire.
Make connections to the Smart Hub using included wiring diagrams in this instruction.
Smart Hub to Display Wall MountConnectors
W1 W2 W3 G Y2 Y1 C DS R H O B
UNIT TYPE
HEATSTAGES
OU
TDO
OR
AIR
SENSO
R
DISC
HAR
GE
AIR
SENSO
R
HP IFC
AHC
0 1 2 3
W1 W2 W3 G Y2 Y1 C DS R H O B
UNIT TYPE
HEATSTAGES
OU
TDO
OR
AIR
SENSO
R
DISC
HAR
GE
AIR
SENSO
R
HP IFC
AHC
0 1 2 3
W1
W2
W3
GY
2Y
1C
DS
RH
OB
UN
IT T
YP
EH
EAT
STA
GE
S
OUTDOORAIR
SENSOR
DISCHARGEAIR
SENSOR
HP IFCAHC
0 1
2 3
Smart Hub may be installed either horizontally or vertically as illustrated.
Smart Hub illustrated with hinged cover removed.
24VAC Equipment Connections
C+ -COMMBUS
A BACC1 ACC2
+ -COMMBUS
A BACC1 ACC2
+ -COMMBUS
A BACC1 ACC2
+-
COM
MBU
SA
B
ACC1
ACC
2
Figure 17. Smart Hub Installation

12
HD Display Installation
Installation
Use the following procedure for installation of the HD Display where existing thermostat wiring does not exist: 1. Unpack the HD Display and subbase.2. Detached subbase from HD Display body.
IMPORTANTBe careful not to bend the four connection pins protruding from the back side of the HD Display. DO NOT lay display down on side with pins. Damage pins could cause power and communication issues between the HD display and smart hub.
3. Determine the best location to install HD Display. Ideal location should be located away from outside wall, direct sunlight or discharge air vents.
4. Cut or drill a small hole for thermostat wiring.
3/8” (10 mm)Diameter Hole
5. Pull about three inches of thermostat wire through the opening and remove the outer thermostat wire jacket.
Seal wire hole in wall to prevent cold or hot air from affecting temperature sensor in display
IMPORTANTSeal wire hole in wall to prevent cold or hot air from affecting temperature sensor in HD Display.
6. Strip 1/4” (7 mm) insulation from end of each wire.
1/4”
7. Use a level to align the subbase on wall horizontally.
8. Use subbase as a template to mark the desired mounting hole locations on the wall.
NOTE: Make sure the UP arrow on the subbase is pointing up.
Use the subbase as a template to mark the desired mounting hole locations on the wall.
HD Display Subbase(Rear View)
Install subbase with arrow pointing up.
9. Drill 3/16” (5 mm) holes at marked locations on the wall for anchors. Then insert wall anchors into holes until flush with the wall.
Drill Holes Insert in hole until �ush with wall

13
WARNINGDO NOT over-tighten mounting screws. Doing so my distort the subbase plastic housing and cause connection issues when installed the HD display.
10. Secure subbase to wall with provided #6 x 1.25” pan head screws (4).11. Connect thermostat wiring to subbase screw terminals.
Mounting Display to Subbase
Install HD Display with UP arrow pointing up when attaching to subbase.
Rear View of HD Display
1. Hold the HD Display by the edges, line it up with the subbase (horizontal position), and move the HD Display toward the subbase.
2. Center the cavity on the back of the display over the subbase. 3. Gently press on the edges of the HD Display until you hear the mounting
snaps engage. Be careful not to apply force directly on the glass.
NOTE: Once the HD Display is connected, it may take up to 45 seconds for it to power up.
4. To remove the HD Display from the subbase, grasp the left and right edges of the HD Display and gently pull towards yourself.
NOTE: If the HD Display is removed from the subbase base, the HD Display will shut down and will not be able to communicate with the system. System can be controlled from mobile devices or consumer/dealer web portals once registration has been completed.
5. Do not remove the label covering the HD Display screen until after power is applied to the system.
Commissioning or Service (Using the Mobile Setup Application)
This application tool is used by dealers to commission a iComfort E30 smart thermostat using a Wi-Fi enabled mobile device.
A temporary smart hub local network provides a means for a mobile device using the iComfort Mobile Setup application to directly communicate with the smart hub.
NOTE: The iComfort Mobile Setup application running on a mobile device cannot connect to the smart hub through the Internet or home Wi-Fi network.
To use the iComfort Mobile Setup app, the mobile device must be:• Wi-Fi capable• Located in the home near the smart hub
NOTE: A router with Bonjour capabilities is required for this function. Check the router features if the smart hub does not connect. Apple Bonjour® is an implementation of Zero-configuration networking (Zeroconf), a group of technologies that includes service discovery, address assignment, and host name resolution.
Mobile Device Operating System Requirements
The iComfort Mobile Setup application is available for both IOS 6.0 and higher (App Store) and Android 4.1 and higher (Google Play).
Establishing a Direct Wireless Connection to the Smart Hub
IMPORTANTIf the connection between the iComfort Mobile Setup application and smart hub is idle for three (3) minutes, the smart hub will auto-disconnect from the mobile device. Repeat procedures to reconnect.
1. Download and install the iComfort Mobile Setup application.2. Apply power to the system. The first screen to appear after boot-up is the
Apple HomeKit commissioning screen. Cancel that screen for now.
NOTE: At this point, it is recommended that when using the iComfort Mobile Setup application to commission the system, remove the HD Display from the subbase before starting.

14
NOTE: Once commissioning is completed you may reattach the HD Display to the subbase.
3. Go to the smart hub and press the commissioning button located on the side of the unit.
4. The commissioning status LED will start blinking green for two minutes. During this time the smart hub will broadcast its Wi-Fi identifier (SSID).
5. Go to your mobile device’s Wi-Fi connection tool and locate the smart hub Wi-Fi broadcast identifier. A typical example of a identifier (SSID) is DIRECT-XY12-3456.
NOTE: Refer to your mobile device’s owners manual on how to use your Wi-Fi Connection tool.
6. Connect to the smart hub by using the last eight digits of the smart hub SSID as the password. In this example, it would be XY123456).
7. Once the mobile device is connected to the smart hub, the commissioning Status LED will turn solid green.
8. Start the iComfort Mobile Setup application and make sure you are connected to the correct smart hub by checking the serial number.
9. Touch the remote-in tab on the iComfort Mobile Setup application home screen. This will take you to the commissioning screen.
10. You can use the information provided in “Commissioning or Service (Using the Mobile Setup Application)” on page 13 to complete the commissioning process using the iComfort Mobile Setup application.
11. If the system has not been commissioned it will go to commissioning screen. If the system has already been commissioned it will go to dealer control center.
12. Once the commissioning is completed, exit the iComfort Mobile Setup application.
13. Go to the mobile device’s Wi-Fi tool and manually disconnect from the smart hub.
14. Once disconnected, the smart hub commissioning LED turns to a solid blue.
15. Reinstall the HD Display on the subbase.
Service
To use iComfort Mobile Setup application as a service tool, the commissioning of the system must have already been completed.1. Download and install the iComfort Mobile Setup application if not already
installed.2. Go to the smart hub and press the commissioning button once.
3. The LED will start blinking green for two minutes. During this time the smart hub will broadcast its Wi-Fi identifier (SSID).
4. If this is the first time connecting to the target smart hub then go to your mobile device’s Wi-Fi connection tool and locate the smart hub Wi-Fi broadcast identifier. A typical example of a identifier (SSID) is DIRECT-XY12-3456.
5. If your mobile device had already connected previously to the target smart hub, then touch the applicable smart hub SSID on the list and skip to step 7.
NOTE: Refer to your mobile device’s owners manual on how to use your Wi-Fi Connection tool.
6. Connect to the smart hub by using the last eight digits of the smart hub SSID as the password (XY123456) for example.
7. Once connected to the mobile device the smart hub commissioning LED will turn solid green.
8. Start the iComfort Mobile Setup application and make sure you are connected to the correct smart hub by checking the serial number.
9. Touch the remote-in tab on the iComfort Mobile Setup application home screen.
10. If the system has not been commissioned it will launch the commissioning screen. If the system has already been commissioned it will go to dealer control center.
11. Once servicing is completed, exit the iComfort Mobile Setup application.12. Go to the mobile device’s Wi-Fi tool and manually disconnect from the
smart hub.13. Once disconnected the smart hub LED will change to a solid blue.
Alternative Method
From the home screen, go to menu > settings > advanced settings > pair smart hub to iComfort dealer mobile application selection. It will auto connect to dealer application and start you at the dealer control center screen. The following screen will appear and show the status of the connection. Once connected the screen will automatically disappear.

15
view dealer dashboard
restart
pair Smart Hub to icomfort dealer mobile app
advanced settings
wi-� local
smart away on
o�
auto
Feels Like
fan
heat & cool
humidity
iHarmony zoning
noti�cations
general
display
account
settings
home info
advanced settings
wi-� local
smart a
Feels L
fan
heat &
humid
iHarmo
noti�ca
genera
display
account
settings
home info
iview ddealler dda hshbboardd
awwayy
Likee
cooool
ityy
onyy zoon
atiions
al
y
Connect to the Smart Hub from the dealer iComfort mobile app
now broadcasting...
stop
Figure 18. Pairing
Multiple Smart Hub(s) - Group ID
Multiple smart hubs in a home can be assigned to a group (up to nine groups with up to five (5) smart hubs in each group). All smart hubs in a group can communicate with other smart hubs in the same group over the home Wi-Fi network.
Default Group ID 1. Range is 1 to 9.
NOTE: If a smart hub is set to Group 0, then there is no connectivity with another smart hub.
Group IDs can be changed by going to menu > settings > advanced settings > view > dealer control center > equipment > smart hub.
Restarting Smart Hub
Pressing the smart hub button for more than five seconds will reboot the smart hub.
Commissioning (Using the HD Display)
The following procedures are written for commissioning the system using the HD display interface.
When power is applied the system will use the smart hub configured equipment settings and factory defaults. All non-communicating equipment must be added in the “add non-communication equipment” screen.
Boot-up Screen
When power is applied to the system, the HD Display will display a welcome screen.
If there is an issue with communication between any component attached to the thermostat, a critical alert message will appear on the screen. The alert message will provide detail information concerning the possible cause. Once
the issue is corrected and power is restored to the system the first screen in the initial setup sequence will appear.
IMPORTANTSometimes there is a communication delay between the HD Display and smart hub during initial boot-up which will result in the reference message being display. Please wait up to one minute to see if the communication delay is resolved.
Below is an example of a communication error message.
IComfort cannot communicate with the equipment
If problem persists, please contact your iComfort dealer at1-800-555-8888
alert
IComfort is unable to connect to the Smart Hub device
For additional support, contact Lennox at1-800-9-LENNOX or visit www.lennox.com/support
Figure 19. Communication Error Message
Apple HomeKit Wi-Fi Accessory Configuration
A pop-up screen will appears providing instructions on how to connect the thermostat to the home Wi-Fi network using an Apple IOS device. If you wish to use this method to configure the unit for Wi-Fi and Apple HomeKit, then refer to the provided user guide for additional instructions.
Otherwise, select cancel to proceed with the thermostat commissioning procedures. There is an option to perform this task later on at the homeowners convenience.
NOTE: This procedure can only be accomplished using the homeowner’s Apple mobile IOS device.

16
Dealer Info
IMPORTANTThe thermostat is only accessible via the Dealer Dashboard after the dealership’s main phone number or company name is added during thermostat commissioning. See “LennoxPros Dealer Dashboard” on page 43 for further details.
This screen in the commissioning sequence is the dealer information screen where the dealer ID and/or phone number can be added. Once the system is connected to the Internet, the remaining information will be populated automatically by the Lennox server based on the dealer name or phone number entered. All information can be entered manually if desired however.
Information that can be manually entered is name, email website, dealer address which includes address 1, address 2, city, state and zip/postal code. Once completed touch continue.Dealer Info Notification Pop-Up Screen
If either the Dealer ID or phone number is NOT provided, a notification screen will appear. The notification screen will provide information on the limitation imposed on the system if this information is not provided. Touch no to return to the previous screen to complete the information requested or touch yes to continue.
General Information
On this screen general information needs to be verified or changed. Touch any item to change its contents. A pop-up screen will appear that will allow the information to be added or changed.
Information required:1. Select desired language (ENGLISH, FRANÇAIS or ESPAÑOL).2. Select country / region.3. Select time and date which includes time, date, time zone and daylight
savings time (ON/OFF).4. Temperature unit (Fahrenheit or Celsius).5. Once completed touch continue.
Equipment Found Screen
This screen will display the smart hub equipment settings. Here is where 24VAC equipment will need to be added (air conditioner, heat pump,
humidifiers, dehumidifiers and ventilation equipment), by selecting the add non-communicating equipment.
Depending on whether the smart hub is configured for air handler or furnace operations, the name of each option will appear as either EIM-Furnace or EIM-Air Handler.
Non-Communicating Equipment
When selecting the non-communicating (24VAC) equipment icon a screen will appear listing equipment that can be added. When selecting an applicable component, a green check will appear next to the item.
NOTE: A temporary dialog box will appear indicating: Updating - Wait while we check for dependencies.
NOTE: This is where an outdoor unit type only is selected. Selections are one or two-stage heat pumps or air conditioners. Outdoor unit capacity will also have to be set. Other equipment that can be added are humidifiers and dehumidifiers. Other non-communicating equipment that can be added are: » Humidifiers » Dehumidifiers » Humiditrol » Auxiliary Dehumidifier » Fresh Air Damper » 1 or 2 Speed ERV (energy recovery ventilation) » 2 or 2 Speed HRV (heat recovery ventilation)
NOTE: Once completed touch done which will display the equipment found screen. There the additional non-communicating equipment will now be displayed along with the iComfort equipment.
Once completed touch continue.
Reminders
This screen allows you to set reminders as either disabled or 3, 6, 12 or 24 months and also custom by specific date. The other options on this screen is to trigger the reminder event either by calendar or actual system run-time.
Reminders may be set for Replace filter 1, Replace filter 2, Replace UV bulb, Replace humidifier pad, Ventilation maintenance and Ventilation filter.Once a reminder is set for a specific item, touch done to return to the previous screen. An “expires on date” will appear next to the item just set.

17
Commissioning Completion
Once commissioning is completed, the system will leave you at the Dealer Control Center. You can either touch exit to go to the main screen or perform any function listed in the various categories displayed.
Dealer Control Center
This menu provides access to the dealer for performing various functions as listed below:
dealercontrol center
equipment
tests
notifications
information
diagnostics
exit
Use to make changes to equipment settings and add or remove24VAC equipment or accessories. In addition the reset all equipment
option is available. This will allow the installer to reset allequipment and reconfigure.
Use to displaysystem notifications
Use to run test onsystem components
Use to rundiagnostics onsystem components
Use to displaysystem information
Exit to Homescreen.
To navigate back to the dealer control center,touch on the Dave Lennox icon when availableon the top left-hand side of the screen.
<
< To navigate back to the previous screen, touchon the left arrow when available.
“Previous ScreenName”
installationreport
Use to displayinstallation results.Note - Report is notavailable until afterexiting the dealercontrol center followingcommissioning.Return to the dealercontrol center from thehome screen to viewthe installation report.
Figure 20. Dealer Control Center

18
Equipment Parameters
Selections listed in this section are dependent on system hardware configuration. Not all options will be available.
NOTE: When changing the default settings for any parameter, there is a possibility that it will affect the settings for another parameter. If this happens, a pop-up message will be displayed listing the other affected parameters and their new automatically set values.
The following is a complete list of all possible parameters under System. Parameters actually available are dependent on the smart hub settings.
Table 7. Smart Hub ParametersParameter(In alphabetical order)
Description
AboutThis screen provides information concerning language supported, equipment type name, control software revision, model, control mode number, control serial number, control hardware revision, protocol revision number, device product level, 24VAC average power consumption, 24VAC peak power consumption, compatible devices list, application code memory size and micro-controller part number.
Auto Changeover - Humidif. Deadband
Prevents the Humidification and Dehumidification settings from being closer together than 5% or greater than 10% (Dead-band).Range is 5 to 10%. Default is 5%. Adjustments are in increments of 1%.
Auto Changeover - Temp Deadband
Prevents the Heating and Cooling from being set closer together than 3ºF (1.67°C) or greater than 9ºF (5.0°C) (Dead- band). Range is 3 to 9°F (1.67 to 5.0°C). Default is 3°F (1.67°C). Adjustments are in increments of 1°F (0.56°C).
Auto Dehumidification Overcooling Threshold
Range is 0 - 10%. Default is 4%. Adjustments are in increments of 1%. This value can automatically be affected by adjusting other parameters. One example would be when enabling Max Dehumidification Overcooling.
Balance Point ControlIf system is set up as dual fuel or heat pump with electric heat and a outdoor temperature sensor connected to smart hub, the low and high balance point settings will appear. The balance points feature requires that a sensed outdoor temperature is provided to the thermostat. The outdoor ambient temperature can be read from a field-installed outdoor temperature sensor (X2658).When balance point control is ENABLED, the low and high balance point fields will be turned “ON” and show RED. A message will be displayed asking you to review the low and high balance point settings and save all RED settings. Highlighted fields in RED must be saved to allow exit from that screen.Options are enabled or disabled. Default is disabled. When enabled, both low and high balance points can be set.High Balance PointThis setting is used to prevent the furnace or electric heat from heating the structure. (Alert 19 - Minor - Notification only - The outdoor temperature is higher than the level where the furnace or electric heat is programmed to heat the home.)Range is -17 to 75°F (-27.22 to 23.89°C). Default is 50°F (10.0°C). Adjustments are in increments of 1°F (0.56°C).Low Balance PointSetting used to prevent the heat pump from heating the structure. (Alert 18 - Minor - Notification only - The outdoor temperature is below the level where the heat pump is programmed to heat the home).Range is -20 to 72°F (-28.89 to 22.22°C). Default is 25°F (-3.89°C). Adjustments are in increments of 1°F (0.56°C).
Cooling Mode
Options are Normal and Comfort. Default is Normal. When changing to Comfort Mode, several parameters are automatically modified for optimal system operations. The changed parameters are listed on the screen when set to Comfort.Normal - This setting cools the home to the desired temperature setting. Once second-stage is activated by timer or differential, it will not stage down to first-stage until the next cooling cycle demand.Comfort - This is when the system could automatically stage up or down based on the current load demand.
Cooling Discomfort Threshold
Default is ON. The purpose of this algorithm when set to ON is to detect systems with faults which are causing measurable loss of comfort and thus, need repair/service intervention. The algorithm monitors the duration in which the indoor temperature is above the cool set point or below the heat set point and does not approach the set-point. When an issue is detected alarm 901 is activated.
19
Table 7. Smart Hub ParametersParameter(In alphabetical order)
Description
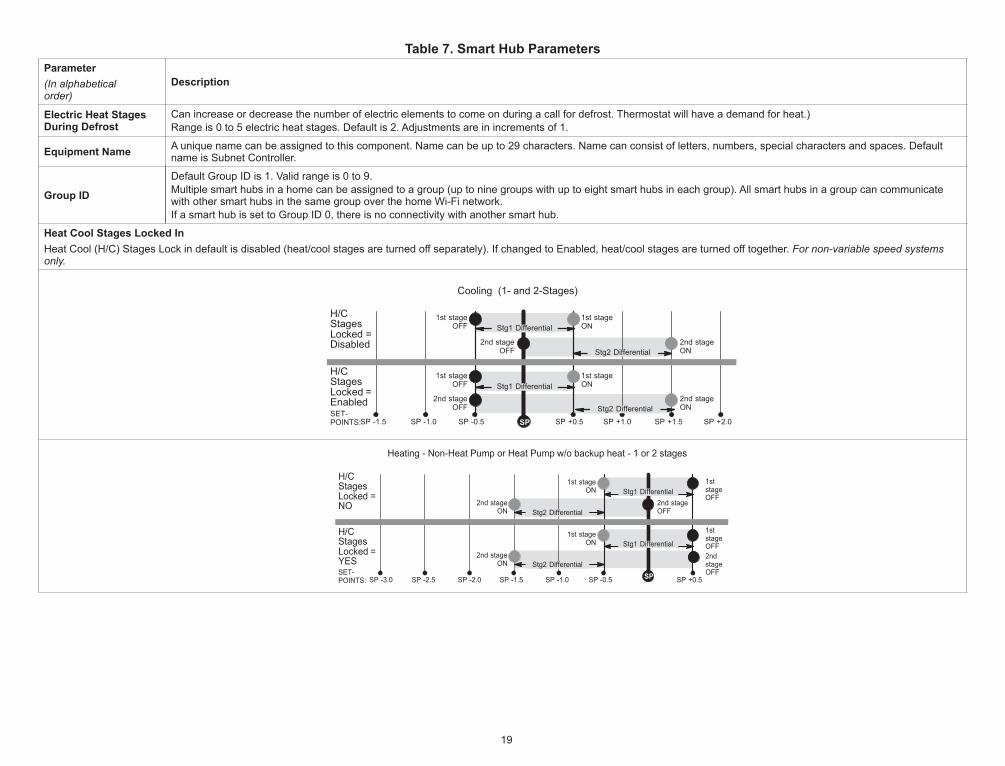
Electric Heat Stages During Defrost
Can increase or decrease the number of electric elements to come on during a call for defrost. Thermostat will have a demand for heat.)Range is 0 to 5 electric heat stages. Default is 2. Adjustments are in increments of 1.
Equipment Name A unique name can be assigned to this component. Name can be up to 29 characters. Name can consist of letters, numbers, special characters and spaces. Default name is Subnet Controller.
Group ID
Default Group ID is 1. Valid range is 0 to 9. Multiple smart hubs in a home can be assigned to a group (up to nine groups with up to eight smart hubs in each group). All smart hubs in a group can communicate with other smart hubs in the same group over the home Wi-Fi network. If a smart hub is set to Group ID 0, there is no connectivity with another smart hub.
Heat Cool Stages Locked InHeat Cool (H/C) Stages Lock in default is disabled (heat/cool stages are turned off separately). If changed to Enabled, heat/cool stages are turned off together. For non-variable speed systems only.
H/CStagesLocked =Enabled
H/CStagesLocked =Disabled
POINTS:
2nd stageON
2nd stageOFF
1st stageON
1st stageOFF
2nd stageON
2nd stageOFF
1st stageON
1st stageOFF
SP -1.5 SP -1.0 SP -0.5 SP SP +1.5SP +1.0 0.2+ PS5.0+ PS
Stg1 Differential
Stg2 Differential
Stg2 Differential
Stg1 Differential
Cooling (1- and 2-Stages)
H/CStagesLocked =YES
H/CStagesLocked =NO
1st stageON
2nd stageON
1st stageON
2nd stageON
2ndstageOFF
1ststageOFF
1ststageOFF
2nd stageOFF
SP -1.5 SP -1.0 SP -0.5 SP SP +0.5SP -2.0
Stg1 Differential
Stg2 Differential
SP -2.5SP -3.0
Stg1 Differential
Stg2 Differential
POINTS:
Heating - Non-Heat Pump or Heat Pump w/o backup heat - 1 or 2 stages
20
Table 7. Smart Hub ParametersParameter(In alphabetical order)
Description
H/CStagesLocked =NO
H/CStagesLocked =YES
POINTS:
3rd stageON
1st stageON
2nd stageON
3rd stageON
1st stageON
2nd stageON
2ndstageOFF
3rd stageOFF
SP -1.5 SP -1.0 SP -0.5 SP SPSP -2.0
Stg1 Differential
Stg3 Differential
Stg2 Differential
SP -2.5SP -3.0SP -3.5
Stg1 Differential
Stg3 Differential
Stg2 Differential
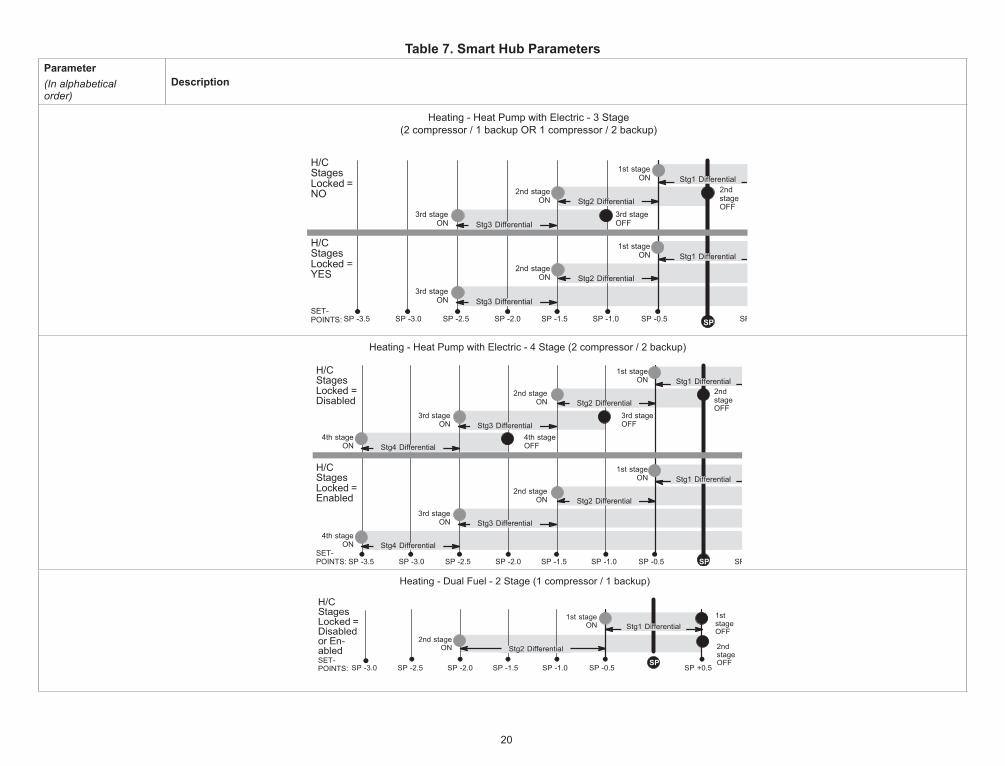
Heating - Heat Pump with Electric - 3 Stage(2 compressor / 1 backup OR 1 compressor / 2 backup)
H/CStagesLocked =Enabled
H/CStagesLocked =Disabled
3rd stageON
1st stageON
2nd stageON
4th stageON
3rd stageON
1st stageON
2nd stageON
4th stageON Stg4 Differential
2ndstageOFF
3rd stageOFF
4th stageOFF
5.0- PS0.1- PS5.1- PS:STNIOP SP SPSP -2.0
Stg1 Differential
Stg3 Differential
Stg2 Differential
SP -2.5SP -3.0SP -3.5
Stg1 Differential
Stg3 Differential
Stg2 Differential
Stg4 Differential
Heating - Heat Pump with Electric - 4 Stage (2 compressor / 2 backup)
H/CStagesLocked =Disabled
abled2nd stage
ON
1st stageON
2ndstageOFF
1ststageOFF
SP -1.5 SP -1.0 SP -0.5SP
SP +0.5SP -2.0
Stg1 Differential
SP -2.5SP -3.0
Stg2 Differential
POINTS:
Heating - Dual Fuel - 2 Stage (1 compressor / 1 backup)
21
Table 7. Smart Hub ParametersParameter(In alphabetical order)
Description
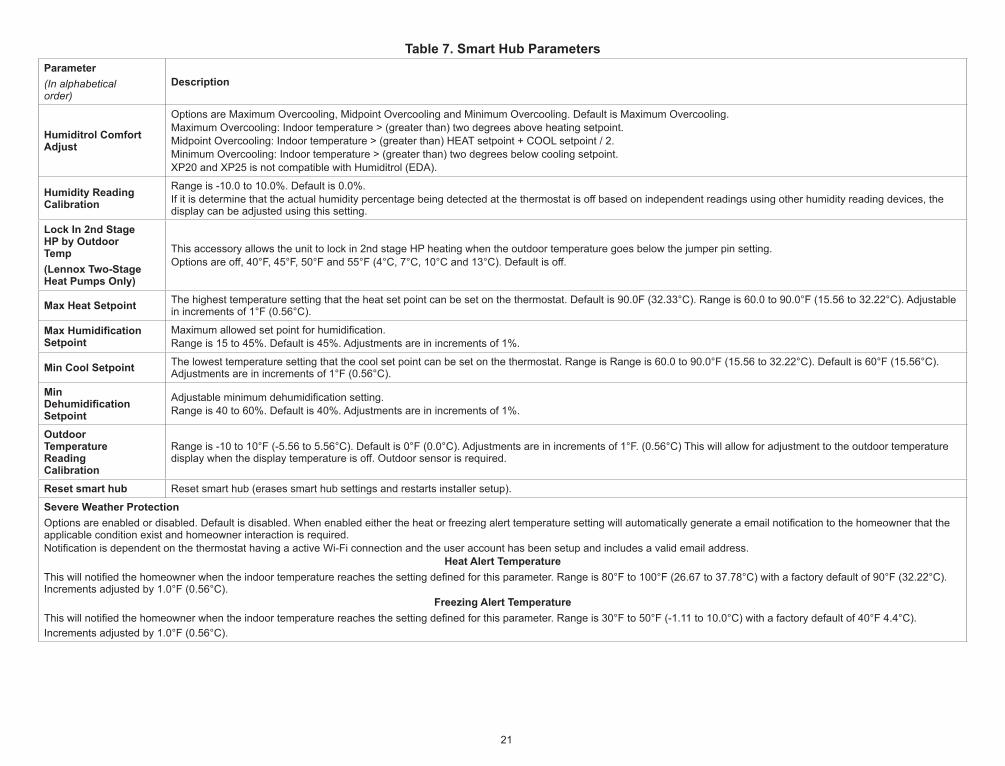
Humiditrol Comfort Adjust
Options are Maximum Overcooling, Midpoint Overcooling and Minimum Overcooling. Default is Maximum Overcooling. Maximum Overcooling: Indoor temperature > (greater than) two degrees above heating setpoint.Midpoint Overcooling: Indoor temperature > (greater than) HEAT setpoint + COOL setpoint / 2.Minimum Overcooling: Indoor temperature > (greater than) two degrees below cooling setpoint.XP20 and XP25 is not compatible with Humiditrol (EDA).
Humidity Reading Calibration
Range is -10.0 to 10.0%. Default is 0.0%.If it is determine that the actual humidity percentage being detected at the thermostat is off based on independent readings using other humidity reading devices, the display can be adjusted using this setting.
Lock In 2nd Stage HP by Outdoor Temp(Lennox Two-Stage Heat Pumps Only)
This accessory allows the unit to lock in 2nd stage HP heating when the outdoor temperature goes below the jumper pin setting.Options are off, 40°F, 45°F, 50°F and 55°F (4°C, 7°C, 10°C and 13°C). Default is off.
Max Heat Setpoint The highest temperature setting that the heat set point can be set on the thermostat. Default is 90.0F (32.33°C). Range is 60.0 to 90.0°F (15.56 to 32.22°C). Adjustable in increments of 1°F (0.56°C).
Max Humidification Setpoint
Maximum allowed set point for humidification.Range is 15 to 45%. Default is 45%. Adjustments are in increments of 1%.
Min Cool Setpoint The lowest temperature setting that the cool set point can be set on the thermostat. Range is Range is 60.0 to 90.0°F (15.56 to 32.22°C). Default is 60°F (15.56°C). Adjustments are in increments of 1°F (0.56°C).
Min Dehumidification Setpoint
Adjustable minimum dehumidification setting.Range is 40 to 60%. Default is 40%. Adjustments are in increments of 1%.
Outdoor Temperature Reading Calibration
Range is -10 to 10°F (-5.56 to 5.56°C). Default is 0°F (0.0°C). Adjustments are in increments of 1°F. (0.56°C) This will allow for adjustment to the outdoor temperature display when the display temperature is off. Outdoor sensor is required.
Reset smart hub Reset smart hub (erases smart hub settings and restarts installer setup).
Severe Weather Protection Options are enabled or disabled. Default is disabled. When enabled either the heat or freezing alert temperature setting will automatically generate a email notification to the homeowner that the applicable condition exist and homeowner interaction is required.Notification is dependent on the thermostat having a active Wi-Fi connection and the user account has been setup and includes a valid email address.
Heat Alert TemperatureThis will notified the homeowner when the indoor temperature reaches the setting defined for this parameter. Range is 80°F to 100°F (26.67 to 37.78°C) with a factory default of 90°F (32.22°C). Increments adjusted by 1.0°F (0.56°C).
Freezing Alert Temperature This will notified the homeowner when the indoor temperature reaches the setting defined for this parameter. Range is 30°F to 50°F (-1.11 to 10.0°C) with a factory default of 40°F 4.4°C). Increments adjusted by 1.0°F (0.56°C).

22
Table 7. Smart Hub ParametersParameter(In alphabetical order)
Description
Single Setpoint Mode (SSP)On the user screens this is referred to as Perfect Temp (Temperature). Options are enabled or disabled. Default is disabled. The Single Set Point (SSP) algorithm allows the user the set only one temperature set point value rather than one value for heating and a different value for cooling. When zoning is present, the following SSP settings are not available. When enabled the following parameters are automatically configured for optimal settings.
SSP Heating Cancel Coast Counter Increment SlopeRange is 0 to 0.75°F (0.0 to 0.42°C). Default is 0.25°F (-0.14°C). Adjustments are in increments of 0.125°F (0.07°C).
SSP Heating Cancel Coast Counter Decrement SlopeRange is 0.25 to 2°F (0.14 to 1.11°C). Default is 0.5°F (0.28°C). Adjustments are in increments of 0.125°F (0.07°C).
SSP Cooling Cancel Coast Counter Increment SlopeRange is -0.75 to 0.0°F (-0.42 to 0.0°C). Default is -0.25°F (-0.14°C). Adjustments are in increments of 0.125°F (0.07°C).
SSP Cooling Cancel Coast Counter Decrement SlopeRange is -2.0 to -0.25°F (-1.11 to -0.14°C). Default is -0.5°F (-0.28°C). Adjustments are in increments of 0.125°F (0.07°C).
SSP Heating Lockout Outdoor TempWhen the outdoor temperature is above this setting, heating is not allowed if single set point is running. Range is 50 to 80°F (10.0 to 26.67°C). Default is 70°F (21.11°C). Adjustments are in
increments of 1.0°F (0.56°C).SSP Cooling Lockout Outdoor Temp
When the outdoor temperature is below this setting, cooling is not allowed if single set point is running. Range is 30 to 60°F (-1.11 to 15.56°C). Default is 40°F (4.44°C). Adjustments are in increments of 1.0°F.
Smart Alert Enable
Options are disabled, conservative, medium and aggressive. Default is disabled.Disable - There is no monitoring of Smart Alert Enable.Conservative - The system will wait longer to display any Smart Alert Enable alarms. This options allow for a minimum chance for false alarms being shown.Medium (default) - Extensive testing by the Lennox development team to minimize the number of false alarms.Aggressive - Will shorten time to display any Smart Alert Enable alarms.Smart Alert Enable function monitors:• Thermostat set point setting• Temperature reading• Determine whether the system moving towards the desired temperature setting or is unable to achieve the desire temperature setting.• Uses local climate design temperatures• System run times.• Depending on type of system (conventional heating/cooling or heat pump system) and optional equipment not all system settings will be displayed.

23
Table 7. Smart Hub ParametersParameter(In alphabetical order)
Description
Smooth Setback Recovery (SSR)
When enabled, smooth set back begins recovery up to two hours before the programmed time so that the programmed temperature is reached at the corresponding programmed event time. Assume 12°F (6.6°C) per hour for first-stage gas/electric heating and 6°F (3.3°C) per hour for first-stage compressor based heating or cooling. With Smooth Set Back disabled, the system will start a recovery at the programmed time. Options are enabled or disabled. Default is enabled.The SSR set point calculation is as follows:
CurrentSSR CSP −
Current Program CSP Target Program CSP−
CurrentSSR HSP
Current Program HSPTarget Program HSP −N−
N
ForNewSSRHSP
ForNewSSRCSP
Where: CSP = Cool Set PointHSP = Heat Set Point N = number of 30 second intervals to the target program setpoint Note: N = 240 when target program set point is 2 hours away(maximum recovery time)
Rules for SSR:• SSR is enabled when both “Smooth Setback Recovery” is set to enabled (default) and the program schedule is turned on.• SSR does NOT turn off stage delay timers.• SSR will NOT change the dead band between heating and cooling modes.• SSR will not overshoot the target set point.• SSR will reset if the user updates the program schedule during the active SSR period
Stage Delay Timers(First)
Enabled (default) setting: When enabled all stage delay timers (stages 2 through 6) are enabled and will serve to bring on additional stage(s) of cooling or heating on a timed basis (default 20 minutes)Disabled setting: All stages delay timers are disabled. Heat/cool stages are changed based on temperatureThe second-stage delay timer (when stage timers is Enabled) is used for both HEATING and COOLING.
Stage Delay Timers(2 through 6)
Second through Sixth Stage Delay timer (where applicable) - If staged delay timers are “Enabled”, the default is 20 minutes but can be programmed from 5 to 120 minutes in 5-minute increments. If the first stage fails to advance the ambient temperature toward the set point by 1.0°F (0.56°C) in the programmed delay time, then the second stage is activated.
Stage Differentials(1 through 6)
Number of stages in thermostat is dependent on equipment that is installed.
Temp Reading Calibration
Range is -5.0 to 5.0°F (-2.78 to -2.78°C). Default is 0.0°F (-0.0°C).If it is determine that the actual temperature being detected at the thermostat is off based on independent readings using other ambient temperature reading devices, the display can be adjusted using this setting.
Temperature Control Mode
Options are Normal and Comfort. Default is Normal. The Feels-Like feature factors in the outdoor temperature and indoor humidity for a more accurate control of the temperature in the home. Either an outdoor temperature sensor is used or Internet Weather is enabled for this feature to operate. Modifying this setting here will also change the feature status on the user settings screen.Normal - This setting cools or heats the home to the desired temperature setting (feels-like) is OFF.Comfort - This setting cools or heats the home to the desired temperature setting (Feels Like) is ON. When set to ON, other parameters are modified to optimal settings for this feature. Those setting changes will be listed on-screen when Comfort is enabled.
24
Table 7. Smart Hub ParametersParameter(In alphabetical order)
Description
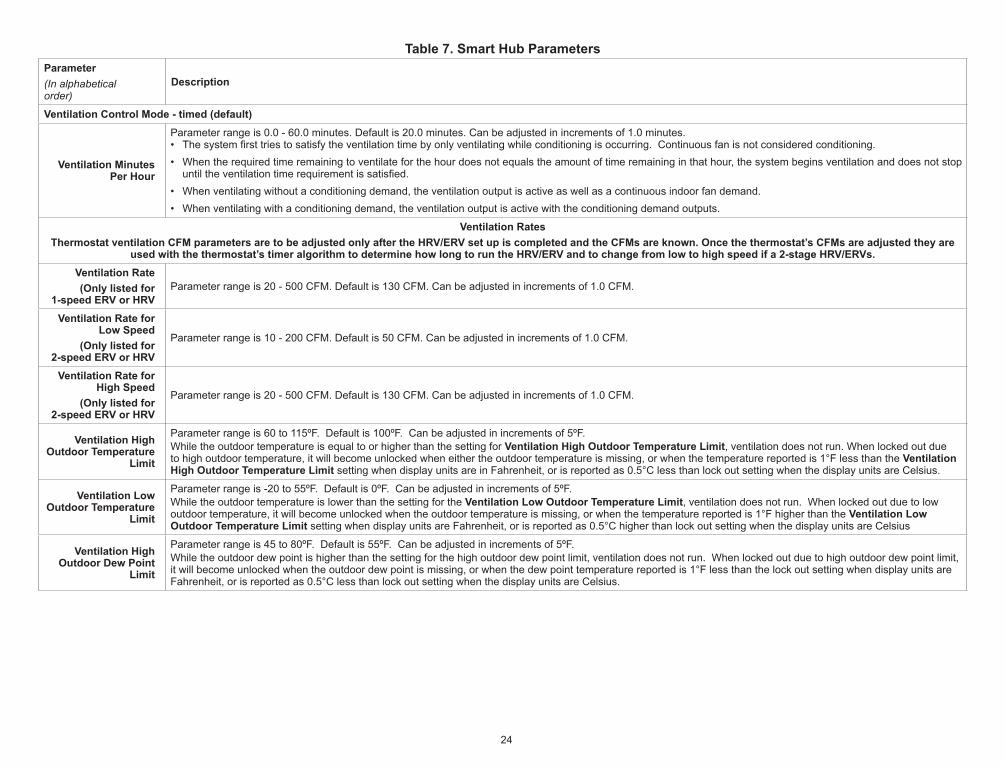
Ventilation Control Mode - timed (default)
Ventilation Minutes Per Hour
Parameter range is 0.0 - 60.0 minutes. Default is 20.0 minutes. Can be adjusted in increments of 1.0 minutes.• The system first tries to satisfy the ventilation time by only ventilating while conditioning is occurring. Continuous fan is not considered conditioning.• When the required time remaining to ventilate for the hour does not equals the amount of time remaining in that hour, the system begins ventilation and does not stop
until the ventilation time requirement is satisfied.• When ventilating without a conditioning demand, the ventilation output is active as well as a continuous indoor fan demand.• When ventilating with a conditioning demand, the ventilation output is active with the conditioning demand outputs.
Ventilation RatesThermostat ventilation CFM parameters are to be adjusted only after the HRV/ERV set up is completed and the CFMs are known. Once the thermostat’s CFMs are adjusted they are
used with the thermostat’s timer algorithm to determine how long to run the HRV/ERV and to change from low to high speed if a 2-stage HRV/ERVs.Ventilation Rate(Only listed for
1-speed ERV or HRVParameter range is 20 - 500 CFM. Default is 130 CFM. Can be adjusted in increments of 1.0 CFM.
Ventilation Rate for Low Speed
(Only listed for 2-speed ERV or HRV
Parameter range is 10 - 200 CFM. Default is 50 CFM. Can be adjusted in increments of 1.0 CFM.
Ventilation Rate for High Speed
(Only listed for 2-speed ERV or HRV
Parameter range is 20 - 500 CFM. Default is 130 CFM. Can be adjusted in increments of 1.0 CFM.
Ventilation High Outdoor Temperature
Limit
Parameter range is 60 to 115ºF. Default is 100ºF. Can be adjusted in increments of 5ºF. While the outdoor temperature is equal to or higher than the setting for Ventilation High Outdoor Temperature Limit, ventilation does not run. When locked out due to high outdoor temperature, it will become unlocked when either the outdoor temperature is missing, or when the temperature reported is 1°F less than the Ventilation High Outdoor Temperature Limit setting when display units are in Fahrenheit, or is reported as 0.5°C less than lock out setting when the display units are Celsius.
Ventilation Low Outdoor Temperature
Limit
Parameter range is -20 to 55ºF. Default is 0ºF. Can be adjusted in increments of 5ºF. While the outdoor temperature is lower than the setting for the Ventilation Low Outdoor Temperature Limit, ventilation does not run. When locked out due to low outdoor temperature, it will become unlocked when the outdoor temperature is missing, or when the temperature reported is 1°F higher than the Ventilation Low Outdoor Temperature Limit setting when display units are Fahrenheit, or is reported as 0.5°C higher than lock out setting when the display units are Celsius
Ventilation High Outdoor Dew Point
Limit
Parameter range is 45 to 80ºF. Default is 55ºF. Can be adjusted in increments of 5ºF.While the outdoor dew point is higher than the setting for the high outdoor dew point limit, ventilation does not run. When locked out due to high outdoor dew point limit, it will become unlocked when the outdoor dew point is missing, or when the dew point temperature reported is 1°F less than the lock out setting when display units are Fahrenheit, or is reported as 0.5°C less than lock out setting when the display units are Celsius.

25
Table 7. Smart Hub ParametersParameter(In alphabetical order)
Description
Ventilation Control Mode - ASHRAE• In this mode the thermostat can assist the installer by validating the ventilation CFMs are capable of meeting the ASHRAE required ventilation volumes, but the thermostat has no ability to control
CFM from the HRV/ERV.• The system first tries to satisfy the ventilation volume by only ventilating while conditioning is occurring. Continuous fan is not considered conditioning.• The total volume of ventilation air is accumulated and stored to compare against the target hourly ventilation volume Vhr. The accumulated value resets each hour.• When the remaining required volume of ventilation air for the hour divided by the fan only ventilation rate is equal to or greater than the time remaining to ventilate for the hour and no conditioning
is occurring, the system begins ventilation using continuous fan and does not stop until the target hourly ventilation volume requirement is satisfied.• When ventilating without a conditioning demand, the ventilation output is active as well a continuous indoor fan demand.• When ventilating with a conditioning demand, the ventilation output is active with the conditioning demand outputs. • When the system is ventilating, the user interface can indicate as such by showing “ventilating” to the user on the home screen.
Ventilation RatesThermostat ventilation CFM parameters are to be adjusted only after the HRV/ERV set up is completed and the CFMs are known. Once the thermostat’s CFMs are adjusted they are
used with the thermostat’s timer algorithm to determine how long to run the HRV/ERV and to change from low to high speed if a 2-stage HRV/ERVs.Ventilation Rate(Only listed for
1-speed ERV or HRVParameter range is 20 - 500 CFM. Default is 130 CFM. Can be adjusted in increments of 1.0 CFM.
Ventilation Rate for Low Speed
(Only listed for 2-speed ERV or HRV
Parameter range is 10 - 200 CFM. Default is 50 CFM. Can be adjusted in increments of 1.0 CFM.
Ventilation Rate for High Speed
(Only listed for 2-speed ERV or HRV
Parameter range is 20 - 500 CFM. Default is 130 CFM. Can be adjusted in increments of 1.0 CFM.
Ventilation Outdoor Condition Override Options are Disabled (default) or Enabled.
ASHRAE Compliance Check = NO (Ventilation CFM too low to comply with ASHRAE 62.2) or YES (Current settings comply with ASHRAE 62.2)
ASHRAE Infiltration Credit Parameter range is 0.0 - 200.0 CFM. Default is 2500 square feet. Can be adjusted in increments of 1.0 CFM.
ASHRAE House Floor Area Serviced by This
Ventilator
Parameter range is 500.0 - 5000.0 square feet. Default is 2500.0 CFM. Can be adjusted in increments of 100.0 square feet. The formula for calculating how much ventilation is required is:
(total square footage of the home/100) + ((number of bedrooms+1) x 7.5 cfm)ASHRAE Number of
Bedrooms Parameter range is 1.0 - 10.0. Default is 3.0. Can be adjusted in increments of 1.0.
Ventilation High Outdoor Temperature
Limit
Parameter range is 60 to 115ºF. Default is 100ºF. Can be adjusted in increments of 5ºF. While the outdoor temperature is equal to or higher than the setting for Ventilation High Outdoor Temperature Limit, ventilation does not run. When locked out due to high outdoor temperature, it will become unlocked when either the outdoor temperature is missing, or when the temperature reported is 1°F less than the Ventilation High Outdoor Temperature Limit setting when display units are in Fahrenheit, or is reported as 0.5°C less than lock out setting when the display units are Celsius.

26
Table 7. Smart Hub ParametersParameter(In alphabetical order)
Description
Ventilation Low Outdoor Temperature
Limit
Parameter range is -20 to 55ºF. Default is 0ºF. Can be adjusted in increments of 5ºF. While the outdoor temperature is lower than the setting for the Ventilation Low Outdoor Temperature Limit, ventilation does not run. When locked out due to low outdoor temperature, it will become unlocked when the outdoor temperature is missing, or when the temperature reported is 1°F higher than the Ventilation Low Outdoor Temperature Limit setting when display units are Fahrenheit, or is reported as 0.5°C higher than lock out setting when the display units are Celsius
Ventilation High Outdoor Dew Point
Limit
Parameter range is 45 to 80ºF. Default is 55ºF. Can be adjusted in increments of 5ºF.While the outdoor dew point is higher than the setting for the high outdoor dew point limit, ventilation does not run. When locked out due to high outdoor dew point limit, it will become unlocked when the outdoor dew point is missing, or when the dew point temperature reported is 1°F less than the lock out setting when display units are Fahrenheit, or is reported as 0.5°C less than lock out setting when the display units are Celsius.
Wall Insulation Options are poor, average and good. Default is average.
Table 8. Air Handler ParametersParameter Description
About
Provides information concerning unit code, language support, equipment type name, unit model number, unit serial number, unit nominal capacity, number of heating states, heating capacity by stage, indoor blower CFM range, control software revision, control model number, control serial number, control hardware revision, discharge air temp sensor, outdoor air temp sensor, protocol revision number, device product level, factory installed transformer, 24VAC average power consumption, 24VAC peak power consumption, line voltage average power consumption, line voltage peak power consumption, compatible devices list, applicable code memory size, and micro-controller part number..
Reset Air Handler Any installer modifications under the air handler tab will be reset back to the factory defaults if the reset air handler option is used.
Table 9. Furnace ParametersParameter Description
About
This screen provides information on unit code, language supported, equipment type name, unit model number, unit serial number, unit nominal capacity, number of heating stages, heating capacity by stage, indoor blower CFM range, control software revision, control model number, control serial number, control hardware revision, discharge air temp sensor, outdoor air temp sensor, protocol revision number, device product level, factory installed transformer, 24VAC average power consumption, 24VAC peak power consumption, line voltage average power consumption, line voltage peak power consumption, compatible devices list, application code memory size and micro-controller part number.
Reset Furnace Any installer modifications under the furnace tab will be reset back to the factory defaults if the reset furnace option is used.
Table 10. Thermostat (HD Display) ParametersParameter DescriptionAbout This screen provides information concerning model number, serial number, hardware revision, software revision, language support and equipment type name.
Auto Brightness Options are on and off. Default is off.
Brightness Value The brightness range is 0 - 100. Default 80. Touch either the + or - button to increase or decrease the setting.
Display Air Quality Options are on and off. Default is off. Air Quality is displayed under the weather display. Touch the Weather icon on the home page to see the current air quality.
Display Indoor Humidity Options are on and off. Default is off.
Display Outdoor Weather Options are on and off. Default is off.

27
Table 10. Thermostat (HD Display) ParametersParameter DescriptionOutdoor Temperature Source
Options are off, Internet (AccuWeather) or sensor. Default is Internet (AccuWeather).
Proximity Control Options are ON and OFF. Default is OFF. Is used to wake-up the display from screen saver mode when motion near the HD Display is detected.
Reset thermostat Resets the thermostat settings to factory default.
Screen Locked Options are unlocked, partially locked and locked. Default is unlocked.
Screen Saver Options are off, weather, power save and logo. Default is off.
Wide SetpointOptions are ON and OFF. Default is OFF. This allows a wider low and high temperature. Normal range is 60 to 90°F (15.5 to 32.0°C). When this parameter is set to ON, the range is 40 to 100°F (0.0 to 40°C). This feature can also be set through the user interface setting screen. From the home screen go to menu > settings > heat & cool > wider set-point range.
Table 11. UtilitiesParameter DescriptionRestart smart hub Restarts the smart hub.
Re-configure System Re-configure HVAC system.
Reset HVAC Equipment Resets all HVAC equipment.
Factory Reset Thermostat Resets thermostat to factory default settings.
Factory Reset Smart Hub Resets smart hub parameters back to factory default.
Tests
Verify Airflow Per Zone is the first screen to appear under this selection. If no zoning is installed, zone airflow settings will be for zone 1 only. If zoning equipment is detected by the system then zones 1 through 4 will be listed. These screens allow for verification and modification of CFMs for blower, heating and cooling circulation. Touch continue to proceed to the next screen.
Select Test Mode is the next screen to appear. Your options are automated tests or manual tests. Select the desired option and select apply.• Automated Tests: Select this options and the next screen will allow you to
select the specific tests available for your hardware configuration. The test are automatic and no installer / service technician’s attendance is required. When the automatic testing is complete the system returns to the consumer home screen. A updated installation report is generated and available in Lennox Pros under the Homeowners account.
Figure 21. Automatic Tests
• Manual Test: Depending on hardware present, various tests are available. By default all items to be tested are enabled. Selecting a specific test will un-check the item. When a specific set of tests are completed the results will be displayed on the screen next to the tested item. Touch continue to proceed to the next set of test items. Once all tests are completed press done to return to the touch tests to run screen. Touch the left arrow at the top left side of screen to return to the Dealer Control Center

28
Diagnostics
This screen allows the installer to verify the current operational state of the air handler or furnace. Diagnostics results are for active various inputs, voltage, delays and relays.
Touch the left arrow at the top left side of screen to return to the Dealer Control Center.
Installation Report
• Overview: The overview screen provides information on dealer and customer information. Also included under day of install section is information on conditions at the time of installation. Information includes date, time indoor and outdoor temperatures and indoor humidity.
• System: Information to complete is System name, model number and other system information.
• Indoor Unit (air handler / furnace): name, model number, serial and other information.
NOTE: Installation Report is not available until after exiting the dealer control center following commissioning. Return to the Dealer Control Center from the home screen to view the installation report.
Results of both manual and automatic tests will be displayed under this section.
Information
The dealer information screen will appear. The next screen will be for dealer information. Here either the dealer ID or phone number can be added. Once the system is connected to the Internet, the remaining information is automatically populated. Not all information for this screen will be viewable. Touch and hold and then swipe up to access the remaining information on the screen.
Information Required: Dealer ID and / or dealer phone number. Information that can be manually entered is name, email website, dealer address which includes address 1, address 2, city state and zip/postal code. Once completed, touch the left arrow at the top left side of screen to return to the Dealer Control Center.
IMPORTANTAdding dealer information will ensure the thermostat is associated with your LennoxPros.com account when connecting to the Lennox server.
Information Pop-Up Screen: If the dealer ID or phone number is not provided, a warning screen will appear. The warning screen will provided information on the limitation imposed on the system if this information is missing. Touch no to
return to the above screen to complete the information requested or press yes to continue.
General Information
On this screen general information needs to be verified or changed. Touch any item to change its contents. A pop-up screen will appear that will allow the information to be added or changed.
Information Required:1. Select desired language (ENGLISH, FRANÇAIS, ESPAÑOL).2. Select country / region.3. Select time and date which includes time, date, time zone, daylight savings
time (ON/OFF)
NOTE: When connected to INTERNET, then time and date can not be changed. If the time and date is incorrect then turn off Wi-Fi and correct then turn Wi-Fi back on.
4. Temperature unit (Fahrenheit or Celsius).5. Once completed press continue.
Home Address
On this screen general information needs to be verified or changed. Touch any line item to change its contents. Information to be added is address 1, address 2, state, city and zip/postal code.
Complete the requested information and press the continue button.
Dehumidification Settings
For firmware version 3.15 and later, all controls for dehumidification are listed at menu > settings > humidity. Under Humidity Control, select dehumidify to enable dehumidification. By default it is disabled.
When dehumidify is enabled, the options are as follows and are dependent on equipment type and accessory installed.
Dehumidification Setting Options
• Normal — Recommend when the air outside is not too humid.• Max —
» Single and Two-Stage Outdoor Units or Variable Capacity outdoor units without a Discharge Air Temperature Sensor (DATS) Installed. Recommend when outdoor air is excessively humid. May cool your home below the set temperature.

29
NOTE: Recommend use of DATS catalog number 88K38 when variable capacity outdoor units are used. » Variable Capacity Outdoor Units with DATS installed.
Recommended when outdoor air is excessively humid. Adjusts cooling based on duct sensor data. May cool your home below the set temperature.
Overcooling
Slide bar adjust with a range of 0°F to 4°F (-17.8 to -15.5°C). Only available when Max is selected.
Dehumidification Set Point
Slide bar adjust with a range of 40% to 60%.
Advanced Dehumidification Descriptions
See table 1 for detail information concerning system operations when using Normal or Max settings.
Table 12. Dehumidification Control Modes of OperationsMode of Operation Option Description
Dehumidification Only
NormalStaged Outdoor Units: Dehumidifies while servicing a cooling demand and will not over-cool. The over-cool slider is hidden from the user.
Max
Staged Outdoor Unit: If at the start or during a cooling call, the humidity is above the relative humidity set point then the unit dehumidifies during the cooling demand. If at the time the cooling call terminates, the humidity demand is not satisfied, over-cooling will occur up to the over-cooling slider setting in an attempt to satisfy the dehumidification demand. Once the room temperature reaches the over-cooling set point. If the system still has a dehumidification demand, the system keeps using the over-cooling set point as its operating cooling set point (will not wait for the temperature to rise to the normal cooling set point to run again) until the dehumidification demand is satisfied
48%
dehumification set−point
60%40%
Ventilation (ERV, HRV and Fresh Air Damper)
This equipment is designed to provide fresh air while exhausting an equal amount of stale air.
Ventilation Rates
The E30 ventilation function is only a turn on - turn off feature. All CFMs must be adjusted from the HRV/ERV unit. The ventilation function can be controlled by outdoor temperatures and by timers in the thermostat. The ventilation feature can also control 1 and 2 stages of ventilation operation.
Thermostat ventilation CFM parameters are to be adjusted only after the HRV/ERV set up is completed and the CFMs are known. Once the thermostat’s CFMs are adjusted they are used with the thermostat’s timer algorithm to determine how long to run the HRV/ERV and to change from low to high speed if a 2-stage HRV/ERVs.
Energy Recovery Ventilator (ERV)
The ERV unit is equipped with an enthalpic core. This device is designed for use in warm, humid climates with heavy air conditioning loads. The ERV unit transfers both sensible (temperature) and latent (moisture) heat from incoming fresh air to the stale air as it is being exhausted; thus, reducing the air conditioning load.
Heat Recovery Ventilator (HRV)
The HRV unit is equipped with an aluminum core. The device uses the stale air that is being exhausted to condition the fresh air as it is being brought in.Lennox models are all non-communicating equipment and can be added during the commissioning procedure (see “Commissioning (Using the HD Display)” on page 15).
Fresh Air Damper
This option is used to control a damper connecting outside air to the return plenum of the system. When a fresh air damper style of ventilation is added to the system, and ventilation is required, the ventilation demand is serviced by energizing 1 relay to close or open the relay contacts connected to the fresh air damper and commanding the blower to run at a rate of at least the continuous fan speed.
The parameter Fresh Air Damper Ventilation CFM represents the CFM of the air drawn through the fresh air damper while the system runs the indoor blower at the continuous fan speed for non-zoned systems, and the lowest zone CFM (continuous fan, heating, or cooling) for zoned applications. All calculations

30
used to determine the ventilation volume requirement and the amount of ventilation air delivered use this number regardless of the actual fan speed.
Zoning Application
• When ventilation is demanded in zoned applications without conditioning calls, the fresh air damper will open and the blower will run at the lowest set zone CFM referred to above.
• Ventilation while a zone is being conditioned is serviced simply by opening the fresh air damper while the zone system conditions the zone.
• The system keeps track of the amount of ventilation delivered in the same manner as any single speed HRV or ERV.
• When the time required to satisfy the ventilation time requirement using the fresh air damper ventilation rate is greater than or equal to the time remaining in the ventilation time block, then ventilation is initiated and continues until the ventilation time requirement is satisfied.
Operation of Fresh Air Dampers with Environmental Overrides
• When the Non-ASHRAE Compliant mode is selected (Timed), the system first checks for the outdoor temperature and dew point to be within the set parameter range before allowing ventilation to occur.
• When the ventilation changes states (on/off) due to an environmental override, it will remain in that state for a minimum of 10 minutes before again changing states due to an environmental override.
• Operation is otherwise the same as the ASHRAE compliant method
Wiring
Parameter settings and descriptions are listed in “Table 7. Smart Hub Parameters” on page 18. The table below list which parameters are available for the Fresh Air Damper, ERV and HRV equipment.
Wiring connections are listed in “Figure 15. iComfort E30 to either ERV or HRV” on page 10 and “Figure 16. iComfort E30 to Fresh Air Damper” on page 10.
Ventilation Control Modes
Thermostat ventilation CFM parameters are to be adjusted only after the HRV/ERV set up is completed and the CFMs are known. Once the thermostat’s CFMs are adjusted they are used with the thermostat’s timer algorithm to determine how long to run the HRV/ERV and to change from low to high speed if a 2-stage HRV/ERVs.
Table 13. Ventilation Control Modes
Ventilation Control Mode Fresh Air Damper
1 Speed HRV
2 Speed HRV
1 Speed ERV
2 Speed ERV
TimedVentilation Minutes Per Hour (0 to 60 min., default is 20 min.) X X X X X
Ventilation Rate (20 to 500 cfm, default is 130 cfm)(Shown only for single speed ERV or HRV)
X X X
Ventilation Rate for Low Speed (10 to 200 cfm, default is 50 cfm)(Shown only for two speed ERV or HRV)
X X
Ventilation Rate for High Speed (20 to 500 cfm, default is 130 cfm)(Shown only for two speed ERV or HRV)
X X
Ventilation High Outdoor Temperature Limit (60 to 115°F, default is 100°F) X X X X X
Ventilation Low Outdoor Temperature Limit (–20 to 55°F, default is 0°F) X X X X X
Ventilation High Outdoor Dew Point Limit (45 to 80°F, default is 55°F) X X X X X
ASHRAE (62.2)NOTE: In this mode the thermostat can assist the installer by validating the ventilation CFMs
are capable of meeting the ASHRAE required ventilation volumes, but the thermostat has no ability to control CFM from the HRV/ERV.
Ventilation Rate (20 to 500 cfm, default is 130 cfm) X X X
Ventilation Rate for Low Speed (10 to 200 cfm, default is 50 cfm) X X
Ventilation Rate for High Speed (20 to 500 cfm, default is 130 cfm) X X
ASHRAE Compliance Check NO YES YES YES YES
ASHRAE Infiltration Credit (0 to 200 cfm, default is 0 cfm) X X X X X
ASHRAE House Floor Area Serviced by this Ventilator X X X X X
ASHRAE Number of Bedrooms X X X X X
Ventilation Outdoor Condition Override - EnabledVentilation High Outdoor Temperature Limit (60 to 115°F, default is 100°F) X X X X X
Ventilation Low Outdoor Temperature Limit (–20 to 55°F, default is 0°F) X X X X X

31
Table 13. Ventilation Control Modes
Ventilation Control Mode Fresh Air Damper
1 Speed HRV
2 Speed HRV
1 Speed ERV
2 Speed ERV
Ventilation High Outdoor Dew Point Limit (45 to 80°F, default is 55°F) X X X X X
Wi-Fi Connection
This is for connecting the thermostat to a secure home wireless network.
NOTE: A router with Apple Bonjour® capabilities is required for this function. Check the router functions if the smart hub does not connect. Apple Bonjour is an implementation of zero-configuration networking (Zeroconf), a group of technologies that includes service discovery, address assignment, and host name resolution.
NOTE: Never use a home guest account. Never use an open router connection (non-secure). Always use a secure connection physically located in the home where the thermostat is located.
Home Wi-Fi Access Point is Visible1. Go to Menu > Settings > wi-fi.2. Slide the option to ON to enable Wi-Fi.3. Wi-Fi network will show not connected. Press on not connected to
display a list of available access points.4. Select a network will be displayed listing all detected networks within
range. Select your home network by pressing on the network name.
NOTE: The thermostat can connect to a home wireless router that uses up to 32 characters in the access point name (visible or hidden).
5. When connecting to a secure home Wi-Fi network, a password will be requested. Enter your home Wi-Fi network password and press join to continue.
NOTE: If you wish to see the characters you are typing, check show password. The thermostat will support up to a 63 character password. The password cannot contain the % or # symbols.
Home Wi-Fi Access Point is Hidden1. Slide the option to ON to enable Wi-Fi.2. Wi-Fi network will show not connected. Press on not connected.3. Select other.
4. The “enter new network information” screen will appear. Enter the name of the hidden network.
NOTE: The thermostat can connect to a home wireless outer that uses up to 32 characters in the access point name (visible or hidden).
5. Select Security. Options are: none, WEP, WPA and WPA2. If your home Wi-Fi connection is unsecured, then Wi-Fi security must be enabled using WEP, WPA or WPA2 via the router before proceeding. Consult your router documentation on how to enable Wi-Fi security.
6. Once security type is selected, a password field will appear. Enter the password to access your home Wi-Fi network.
NOTE: If you wish to see the characters you are typing, check show password. The thermostat will support up to a 63 character password.
7. Press join.
Whether connecting to a visible or hidden network, if successful, a check mark will appear above both the router and Internet icons.
Figure 22. Connection StatusTroubleshooting Wi-Fi Connection
The following terminology is used in this troubleshooting section:• Received Signal Strength Indication (RSSI). This is an indication of the
signal strength of the Wi-Fi router being received by the scanning device (i.e., smart phone). Therefore, the higher the RSSI number (or less negative in some devices), the stronger the signal.
• Wireless networks supported by this system are: » 802.11b is 2.4Ghz band (max 11 Mbit/s) » 802.11g is 2.4Ghz band (max 54 Mbit/s) » 802.11n is 2.4Ghz band (max 130 Mbit/s)
• Internet Protocol Address (IP address). This is an address assigned by your home router for each network device (e.g., computer, printer, thermostat).
Electromagnetic Interference Causing Poor Connectivity: Locate the smart hub and router away from other devices that could possibility interfere with wireless communications. Some examples of other devices that could interfere are:

32
• Microwave ovens• Wireless cameras• Portable phones and bases• Baby monitors• Wireless speakers• Bluetooth devices• Garage door openers• Neighbor’s wireless devices
To eliminate a possible source of interference, temporally disable any devices and see if Wi-Fi performance has improved.
Received Signal Strength Indication (RSSI)
The ideal signal strength range for the thermostat is -1 to -69 RSSI. The signal strength can be viewed from the thermostat interface.1. Press NETWORK SETTINGS; this screen shows a graphical view of
buttons representing OPEN and SECURE wireless networks, along with button for adding a network.
2. Select the access point that has already been established and connected. When selecting the info icon, a screen will appear which will display an option to forget the network and IP address assigned to the thermostat by your router, sub-net mask, router, DNS and RSSI. If the RSSI signal strength is anywhere between -9 to -69, then the signal strength is sufficient. If outside this range, then either relocate the router closer to the thermostat, add a repeater, or move the smart hub. Adjusting antenna on router and/or smart hub may resolve the issue.
Home Network . . . . . . . . . . . . . . . . . . . . . . . .
IP address 192.168.1.4. . . . . . . . . . . . . . .subnet mask 255.255.255.0. . . . . . . . . . . .routerDNS
04-ISSR . . . . . . . . . . . . . . . . . . . . . . . . . . . .
i
forget this network
Figure 23. Verifying Signal Strength
Performance Reports
Performance reports are only available through either the consumer or dealer web portals.• Homeowner access is available at www.myiComfort.com.• Dealer access is available through the Dealer Dashboard at www.
LennoxPros.com.
More information concerning Performance Reports is available in the user guide.
Replacement Parts
The following thermostat component parts can be ordered:
Table 14. Replacement PartsCatalog # Component Remarks17H17 HD display Thermostat interface
15S64 Smart hub Control base
Mobile Applications
iComfort Thermostat App (Homeowner)
The free iComfort® Thermostat app is available for use on iPhone®, iPad® and Android™ devices.
Control cooling/heating temperatures, fan operation, set programs and set Away mode for multiple locations.
iComfort Mobile Setup App (Installer)
Allows the installer to commission the system and remotely turn the system on and off during setup on any iPhone®, iPad® and Android™ device.
Apple, the Apple logo, iPhone and iPad are trademarks of Apple Inc. registered in the US and other countries.
Android is a trademark of Google Inc. Use of this trademark is subject to Google permission.
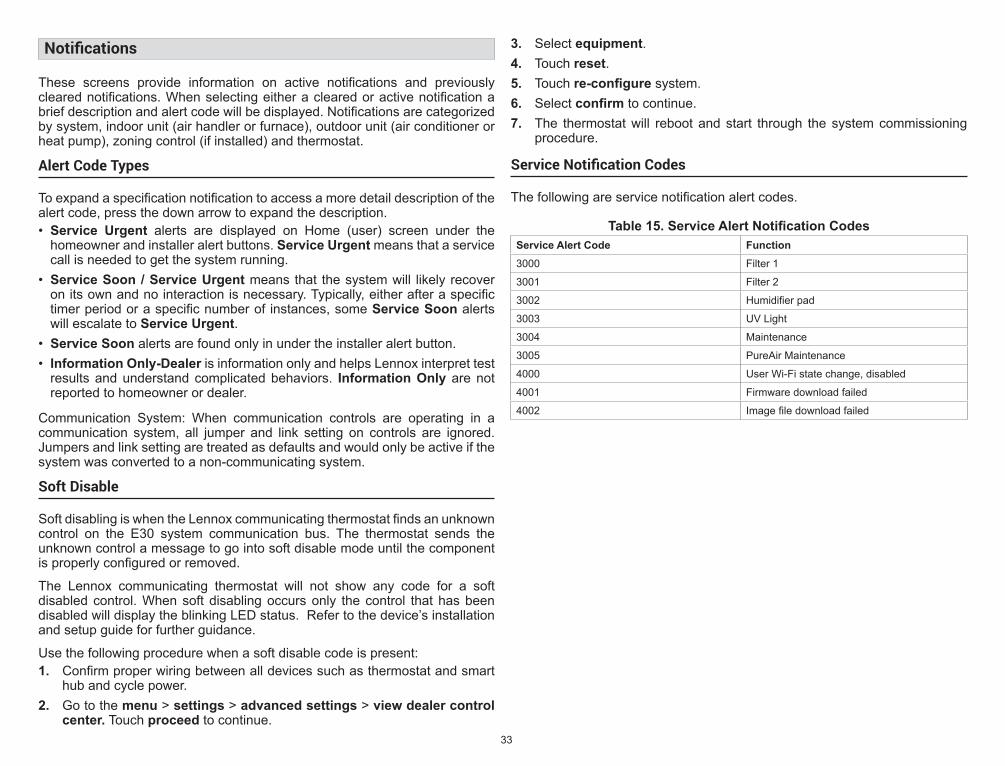
33
Notifications
These screens provide information on active notifications and previously cleared notifications. When selecting either a cleared or active notification a brief description and alert code will be displayed. Notifications are categorized by system, indoor unit (air handler or furnace), outdoor unit (air conditioner or heat pump), zoning control (if installed) and thermostat.
Alert Code Types
To expand a specification notification to access a more detail description of the alert code, press the down arrow to expand the description.• Service Urgent alerts are displayed on Home (user) screen under the
homeowner and installer alert buttons. Service Urgent means that a service call is needed to get the system running.
• Service Soon / Service Urgent means that the system will likely recover on its own and no interaction is necessary. Typically, either after a specific timer period or a specific number of instances, some Service Soon alerts will escalate to Service Urgent.
• Service Soon alerts are found only in under the installer alert button. • Information Only-Dealer is information only and helps Lennox interpret test
results and understand complicated behaviors. Information Only are not reported to homeowner or dealer.
Communication System: When communication controls are operating in a communication system, all jumper and link setting on controls are ignored. Jumpers and link setting are treated as defaults and would only be active if the system was converted to a non-communicating system.
Soft Disable
Soft disabling is when the Lennox communicating thermostat finds an unknown control on the E30 system communication bus. The thermostat sends the unknown control a message to go into soft disable mode until the component is properly configured or removed.
The Lennox communicating thermostat will not show any code for a soft disabled control. When soft disabling occurs only the control that has been disabled will display the blinking LED status. Refer to the device’s installation and setup guide for further guidance.
Use the following procedure when a soft disable code is present:1. Confirm proper wiring between all devices such as thermostat and smart
hub and cycle power.2. Go to the menu > settings > advanced settings > view dealer control
center. Touch proceed to continue.
3. Select equipment.4. Touch reset.5. Touch re-configure system.6. Select confirm to continue.7. The thermostat will reboot and start through the system commissioning
procedure.
Service Notification Codes
The following are service notification alert codes.
Table 15. Service Alert Notification CodesService Alert Code Function3000 Filter 1
3001 Filter 2
3002 Humidifier pad
3003 UV Light
3004 Maintenance
3005 PureAir Maintenance
4000 User Wi-Fi state change, disabled
4001 Firmware download failed
4002 Image file download failed

34
Alert Codes
Table 16. Alert Codes and Troubleshooting
GF= Gas Furnace, AH=Air Handler, ID=Indoor unit (GF or AH), HP=Heat Pump, AC=Air Conditioner, OD=Outdoor Unit (AC or HP), PA=Pure Air S, ZA=Zone system and TS=Thermostat
Alert Code
Inverter Flash Code
Priority Condition
Actual Displayed Alert Text
Under dealer control center > Notifications
Component or System Operational State and Troubleshooting Tip How to clear alert code
10 Service Urgent
Unknown Device Detected
The thermostat when NOT in configuration mode has detected an unknown device. Typically the thermostat will send a command to the unknown device and place the device into a soft disable state. The soft disable control will indicate so as follows:• On air handler, furnace and outdoor controls, the soft-disabled state is displayed by double
horizontal lines on seven-segment display.• On the damper control module, the green LED will flash 3 seconds on and 1 second off.• On the equipment interface module, the green LED will flash 3 seconds on and 1 second
off.• A new communicating device has been added to the system since the original configuration
setup was completed.• Go to menu > settings > advanced settings > view dealer control center > equipment
and press reset all equipment. This will allow the system to auto-detect any Lennox communicating devices attached.
Clear alert code by reconfiguring the system.
12 Service Urgent
Indoor Unit Not Detected
Thermostat did not find an indoor unit. Make sure there is an Lennox communicating indoor unit on the system. • Check for voltage and missing component.• Check R, i+, i- and C connections at mag-mount or subbase, smart hub and all attached
communicating components.• Ohm wires for electrical continuity.• Cycle power to both indoor unit first and then thermostat. • Verify that equipment interface module (if applicable) is configured as either an air handler
or furnace when used with a non-communicating indoor unit.• Go to menu > settings > advanced settings > view dealer control center > equipment
and press reset all equipment. This will allow the system to auto-detect any Lennox communicating components attached.
• Replace indoor unit control if there is no response.
Automatically clears when the system detects that the issue no longer exists.
14 Service Urgent
Too Many Devices of the
Same Type
The thermostat found more than one thermostat, indoor or outdoor unit on the system.• Check wiring and remove duplicate equipment. • Go to menu > settings > advanced settings > view dealer control center > equipment
and press reset all equipment. This will allow the system to auto-detect any Lennox communicating components attached.
Automatically clears when the system detects that the issue no longer exists.
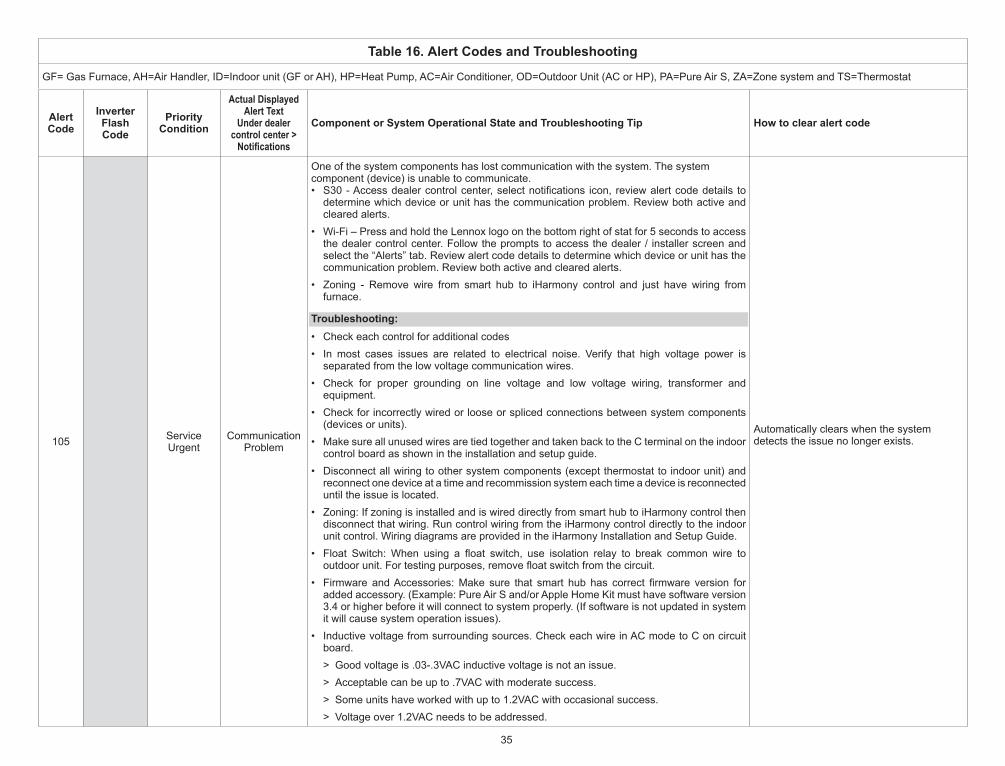
35
Table 16. Alert Codes and Troubleshooting
GF= Gas Furnace, AH=Air Handler, ID=Indoor unit (GF or AH), HP=Heat Pump, AC=Air Conditioner, OD=Outdoor Unit (AC or HP), PA=Pure Air S, ZA=Zone system and TS=Thermostat
Alert Code
Inverter Flash Code
Priority Condition
Actual Displayed Alert Text
Under dealer control center > Notifications
Component or System Operational State and Troubleshooting Tip How to clear alert code
105 Service Urgent
Communication Problem
One of the system components has lost communication with the system. The system component (device) is unable to communicate. • S30 - Access dealer control center, select notifications icon, review alert code details to
determine which device or unit has the communication problem. Review both active and cleared alerts.
• Wi-Fi – Press and hold the Lennox logo on the bottom right of stat for 5 seconds to access the dealer control center. Follow the prompts to access the dealer / installer screen and select the “Alerts” tab. Review alert code details to determine which device or unit has the communication problem. Review both active and cleared alerts.
• Zoning - Remove wire from smart hub to iHarmony control and just have wiring from furnace.
Troubleshooting: • Check each control for additional codes• In most cases issues are related to electrical noise. Verify that high voltage power is
separated from the low voltage communication wires. • Check for proper grounding on line voltage and low voltage wiring, transformer and
equipment.• Check for incorrectly wired or loose or spliced connections between system components
(devices or units). • Make sure all unused wires are tied together and taken back to the C terminal on the indoor
control board as shown in the installation and setup guide. • Disconnect all wiring to other system components (except thermostat to indoor unit) and
reconnect one device at a time and recommission system each time a device is reconnected until the issue is located.
• Zoning: If zoning is installed and is wired directly from smart hub to iHarmony control then disconnect that wiring. Run control wiring from the iHarmony control directly to the indoor unit control. Wiring diagrams are provided in the iHarmony Installation and Setup Guide.
• Float Switch: When using a float switch, use isolation relay to break common wire to outdoor unit. For testing purposes, remove float switch from the circuit.
• Firmware and Accessories: Make sure that smart hub has correct firmware version for added accessory. (Example: Pure Air S and/or Apple Home Kit must have software version 3.4 or higher before it will connect to system properly. (If software is not updated in system it will cause system operation issues).
• Inductive voltage from surrounding sources. Check each wire in AC mode to C on circuit board.
> Good voltage is .03-.3VAC inductive voltage is not an issue. > Acceptable can be up to .7VAC with moderate success. > Some units have worked with up to 1.2VAC with occasional success. > Voltage over 1.2VAC needs to be addressed.
Automatically clears when the system detects the issue no longer exists.

36
Table 16. Alert Codes and Troubleshooting
GF= Gas Furnace, AH=Air Handler, ID=Indoor unit (GF or AH), HP=Heat Pump, AC=Air Conditioner, OD=Outdoor Unit (AC or HP), PA=Pure Air S, ZA=Zone system and TS=Thermostat
Alert Code
Inverter Flash Code
Priority Condition
Actual Displayed Alert Text
Under dealer control center > Notifications
Component or System Operational State and Troubleshooting Tip How to clear alert code
110 Service Urgent
GF Low AC Line Voltage
The component AC line voltage is too low. This alert code may appear during a brownout. • It may also occur when line voltage is below its designed operating value. • Check and correct the power line voltage.
Automatically clears when the system detects the issue no longer exists.
115Service
Soon/Service Urgent
Low Secondary (24VAC) Voltage
24VAC power to a system component control is lower than the required range of 18 to 30VAC.• Check and correct voltage. • Check for additional power-robbing system components (devices) connected to system. • This alert code may require the installation of an additional or larger VA transformer.• Damper control module will operate in non-zone mode until proper voltage is restored.
Automatically clears when the system detects the issue no longer exists.
120Service
Soon/Service Urgent
Unresponsive Device
There is a delay in the system component responding to the system. Typically this alert code does not cause any operational issues and will clear on its own. • This alert code is usually caused by a delay in the outdoor unit responding to the thermostat.• Leaking voltage from strands within the bundle.
> Land only the R wire on the R terminal to load the bundle with 24VAC. ►Typically only the R wire needs to be landed to identify if voltage is leaking. ► If voltage is present checking the other wires is informational only but not needed. ► If voltage is not present checking the other wires one at a time would be needed.
> Check each loose wire in AC mode to C on circuit board. ►Good voltage is .03 -.3VAC leaking voltage is not the issue. ►Acceptable can be up to .7VAC with moderate success. ►Some units have worked with up to 1.2VAC with occasional success. ►Voltage over 1.2VAC needs to be addressed.
Automatically clears after an unresponsive system component (device) responds to any inquiry.

37
Table 16. Alert Codes and Troubleshooting
GF= Gas Furnace, AH=Air Handler, ID=Indoor unit (GF or AH), HP=Heat Pump, AC=Air Conditioner, OD=Outdoor Unit (AC or HP), PA=Pure Air S, ZA=Zone system and TS=Thermostat
Alert Code
Inverter Flash Code
Priority Condition
Actual Displayed Alert Text
Under dealer control center > Notifications
Component or System Operational State and Troubleshooting Tip How to clear alert code
124 Service Urgent
Tstat Lost Communication
To Smarthub
The thermostat has lost communication with a system component for more than three minutes. System component has lost communication with the thermostat. • Check the wiring connections between components.• Ohm wires.• Cycle power. • Any component that is miss-wired may cause a false component code to be shown on
system component. • Disconnect all wiring to other system components and check communication one at a time.
NOTE: When using a float switch, use isolation relay to break common wire to outdoor unit. For testing purposes, remove float switch from the circuit
This alert code stops all associated system operations and waits for a heartbeat message from the system component that is not communicating.
Automatically clears after communication is re-established with applicable system component (device).
125 Service Urgent
Control Hardware Problem
There is a hardware problem on a system component control. There is a control hardware problem. • In system using iHarmony zoning, the system will remain in non-zone mode (all dampers
open) for five minutes after priority condition no longer exist.• In systems using a Equipment Interface Module, remove jumper if present on indoor unit
between R and W2.
• In systems using a PureAir S, the pure air control board jumper selector is missing.
If none of the above tips are applicable, then replace the control if the problem prevents operation and is persistent.
Automatically clears five minutes after the issue no longer exists.
126 Service Urgent
Control Internal Communication
Prob
There is an internal hardware problem on the system component control. In addition, if you have zoning the alert code is triggered when your zone temperature is deviating away from set point persistently.• Typically the system component control will reset itself. • Replace the system component (device) control if the problem prevents operation and is
persistent.
Automatically clears 300 seconds after the issue no longer exists.
130 Service Urgent
Configuration Jumper Missing
• Configuration jumper missing on equipment interface module. • Install the missing jumper.• Set as heat pump, furnace control or air handler control.
NOTE: This is applicable in non-communicating applications only.
Automatically clears after the missing or incorrectly installed jumper is installed or corrected.

38
Table 16. Alert Codes and Troubleshooting
GF= Gas Furnace, AH=Air Handler, ID=Indoor unit (GF or AH), HP=Heat Pump, AC=Air Conditioner, OD=Outdoor Unit (AC or HP), PA=Pure Air S, ZA=Zone system and TS=Thermostat
Alert Code
Inverter Flash Code
Priority Condition
Actual Displayed Alert Text
Under dealer control center > Notifications
Component or System Operational State and Troubleshooting Tip How to clear alert code
132 Service Urgent
Device Control Software Fault
System component control software is corrupted.• Recycle power. • If failure re-occurs, replace the system component control.
Manual system power reset is required to recover from this alert code.
180 Service SoonOutdoor
Temperature Sensor Problem
The thermostat has found a problem with the outdoor temperature sensor. In normal operation after system component control recognizes sensors, the alert code will be sent if valid temperature reading is lost. • Compare outdoor sensor resistance to temperature / resistance charts in unit installation
instructions. Replace sensors pack if necessary. • At the beginning of (any) configuration, furnace, air-handler control or equipment interface
module will detect the presence of the sensor(s).• If detected (reading in range), appropriate feature will be set as ‘installed’ and shown in the
‘About’ screen.
Automatically clears upon configuration, or sensing normal values.
310 Service SoonDischarge Air Temp Sensor
Problem
There is a discharge air temperature sensor issue.• Confirm there is no short or open circuits in the Lennox communicating thermostat
connections to any of the other components in the communication system.• Compare discharge air temperature sensor (DATS) resistance to temperature / resistance
charts in system component installation instruction. • Replace discharge air sensor if necessary.
NOTE: Issues with a DATS connected to a damper control module or equipment interface model will not generate an alert code.
Automatically clears 30 seconds after condition is detected as recovered or after system restart.
344 Service Urgent
GF IFC Relay Y1 Stuck
Link Relay Problem. Issue could be with possible Y1 relay failure.NOTE: Relay is located on the IFC (Integrated Furnace Control). If issue continues replace
IFC.
Automatically clears five minutes after Y1 input sensed OFF.
345 Service Urgent Relay O Failure
The O relay on the system component has failed. Either the pilot relay contacts did not close or the relay coil did not energize.• Possible O relay / stage 1 failure.• Pilot relay contacts did not close or the relay coil did not energize. • Replace system component (device) control.
If error is applicable to the XC20, XC25, XP20 or XP25, the outdoor control will need to be replaced.
Automatically clears after the fault recovered following reset.
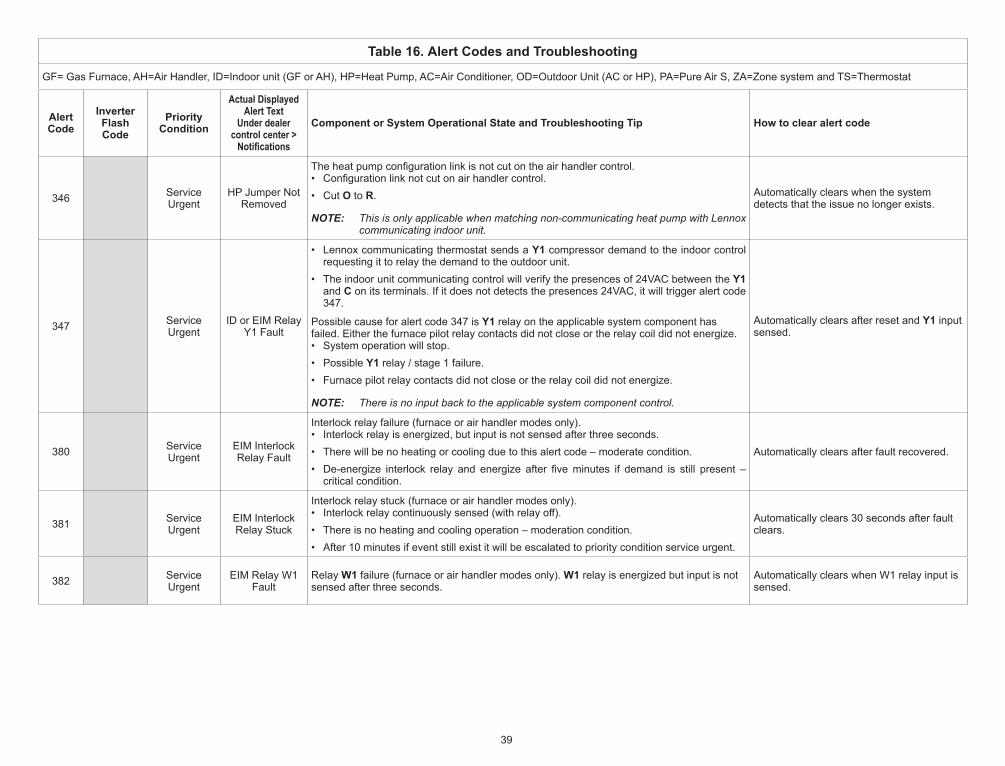
39
Table 16. Alert Codes and Troubleshooting
GF= Gas Furnace, AH=Air Handler, ID=Indoor unit (GF or AH), HP=Heat Pump, AC=Air Conditioner, OD=Outdoor Unit (AC or HP), PA=Pure Air S, ZA=Zone system and TS=Thermostat
Alert Code
Inverter Flash Code
Priority Condition
Actual Displayed Alert Text
Under dealer control center > Notifications
Component or System Operational State and Troubleshooting Tip How to clear alert code
346 Service Urgent
HP Jumper Not Removed
The heat pump configuration link is not cut on the air handler control.• Configuration link not cut on air handler control. • Cut O to R.
NOTE: This is only applicable when matching non-communicating heat pump with Lennox communicating indoor unit.
Automatically clears when the system detects that the issue no longer exists.
347 Service Urgent
ID or EIM Relay Y1 Fault
• Lennox communicating thermostat sends a Y1 compressor demand to the indoor control requesting it to relay the demand to the outdoor unit.
• The indoor unit communicating control will verify the presences of 24VAC between the Y1 and C on its terminals. If it does not detects the presences 24VAC, it will trigger alert code 347.
Possible cause for alert code 347 is Y1 relay on the applicable system component has failed. Either the furnace pilot relay contacts did not close or the relay coil did not energize.• System operation will stop. • Possible Y1 relay / stage 1 failure. • Furnace pilot relay contacts did not close or the relay coil did not energize.
NOTE: There is no input back to the applicable system component control.
Automatically clears after reset and Y1 input sensed.
380 Service Urgent
EIM Interlock Relay Fault
Interlock relay failure (furnace or air handler modes only).• Interlock relay is energized, but input is not sensed after three seconds. • There will be no heating or cooling due to this alert code – moderate condition.• De-energize interlock relay and energize after five minutes if demand is still present –
critical condition.
Automatically clears after fault recovered.
381 Service Urgent
EIM Interlock Relay Stuck
Interlock relay stuck (furnace or air handler modes only).• Interlock relay continuously sensed (with relay off). • There is no heating and cooling operation – moderation condition.• After 10 minutes if event still exist it will be escalated to priority condition service urgent.
Automatically clears 30 seconds after fault clears.
382 Service Urgent
EIM Relay W1 Fault
Relay W1 failure (furnace or air handler modes only). W1 relay is energized but input is not sensed after three seconds.
Automatically clears when W1 relay input is sensed.
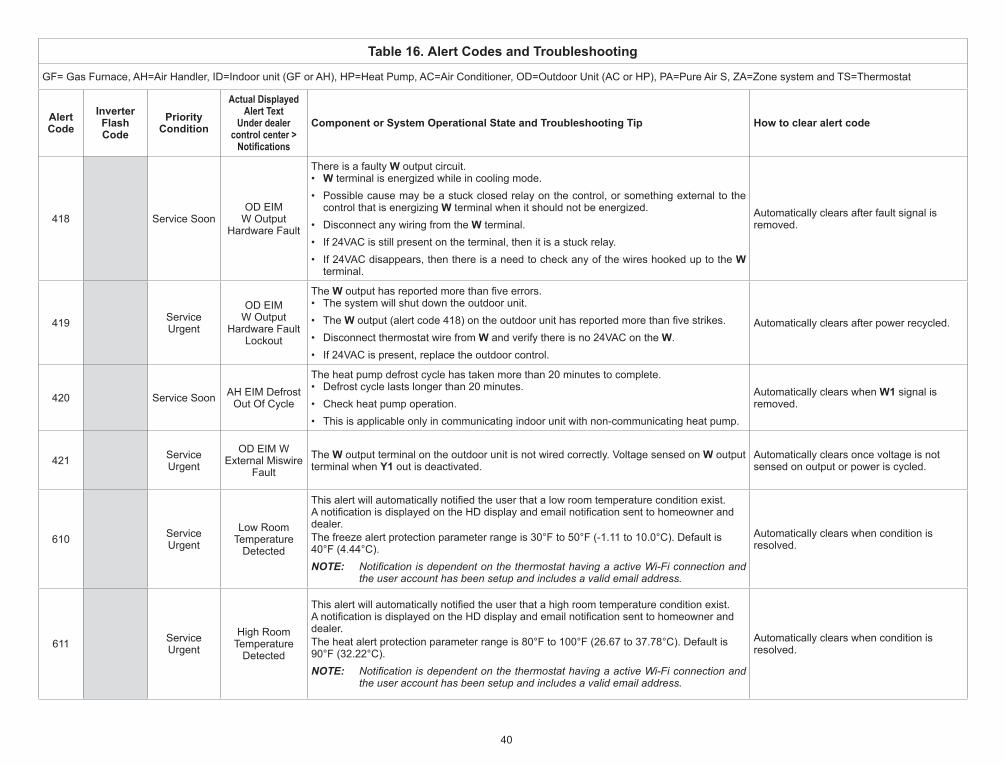
40
Table 16. Alert Codes and Troubleshooting
GF= Gas Furnace, AH=Air Handler, ID=Indoor unit (GF or AH), HP=Heat Pump, AC=Air Conditioner, OD=Outdoor Unit (AC or HP), PA=Pure Air S, ZA=Zone system and TS=Thermostat
Alert Code
Inverter Flash Code
Priority Condition
Actual Displayed Alert Text
Under dealer control center > Notifications
Component or System Operational State and Troubleshooting Tip How to clear alert code
418 Service SoonOD EIM
W Output Hardware Fault
There is a faulty W output circuit.• W terminal is energized while in cooling mode. • Possible cause may be a stuck closed relay on the control, or something external to the
control that is energizing W terminal when it should not be energized. • Disconnect any wiring from the W terminal. • If 24VAC is still present on the terminal, then it is a stuck relay. • If 24VAC disappears, then there is a need to check any of the wires hooked up to the W
terminal.
Automatically clears after fault signal is removed.
419 Service Urgent
OD EIM W Output
Hardware Fault Lockout
The W output has reported more than five errors. • The system will shut down the outdoor unit. • The W output (alert code 418) on the outdoor unit has reported more than five strikes. • Disconnect thermostat wire from W and verify there is no 24VAC on the W. • If 24VAC is present, replace the outdoor control.
Automatically clears after power recycled.
420 Service Soon AH EIM Defrost Out Of Cycle
The heat pump defrost cycle has taken more than 20 minutes to complete.• Defrost cycle lasts longer than 20 minutes. • Check heat pump operation. • This is applicable only in communicating indoor unit with non-communicating heat pump.
Automatically clears when W1 signal is removed.
421 Service Urgent
OD EIM W External Miswire
FaultThe W output terminal on the outdoor unit is not wired correctly. Voltage sensed on W output terminal when Y1 out is deactivated.
Automatically clears once voltage is not sensed on output or power is cycled.
610 Service Urgent
Low Room Temperature
Detected
This alert will automatically notified the user that a low room temperature condition exist. A notification is displayed on the HD display and email notification sent to homeowner and dealer.The freeze alert protection parameter range is 30°F to 50°F (-1.11 to 10.0°C). Default is 40°F (4.44°C). NOTE: Notification is dependent on the thermostat having a active Wi-Fi connection and
the user account has been setup and includes a valid email address.
Automatically clears when condition is resolved.
611 Service Urgent
High Room Temperature
Detected
This alert will automatically notified the user that a high room temperature condition exist. A notification is displayed on the HD display and email notification sent to homeowner and dealer. The heat alert protection parameter range is 80°F to 100°F (26.67 to 37.78°C). Default is 90°F (32.22°C).NOTE: Notification is dependent on the thermostat having a active Wi-Fi connection and
the user account has been setup and includes a valid email address.
Automatically clears when condition is resolved.

41
Table 16. Alert Codes and Troubleshooting
GF= Gas Furnace, AH=Air Handler, ID=Indoor unit (GF or AH), HP=Heat Pump, AC=Air Conditioner, OD=Outdoor Unit (AC or HP), PA=Pure Air S, ZA=Zone system and TS=Thermostat
Alert Code
Inverter Flash Code
Priority Condition
Actual Displayed Alert Text
Under dealer control center > Notifications
Component or System Operational State and Troubleshooting Tip How to clear alert code
700 Service Urgent
Thermostat Temp Sensor
Problem
The HD display’s internal temperature sensor is not operating correctly. To resolve this issue, try the following: • Remove HD display from mag-mount and reattaching.• Seal hole in wall behind mag-mount to minimize exposure to unconditioned air from inside
the wall.• Run “reset all” under dealer control center. • If issue persist, then replace the HD display.
Automatically clears when the system detects that the issue no longer exists.
701 Service Urgent
Thermostat Temp Above
Limit
The thermostat is reading indoor temperatures above the pre-programmed limit. The thermostat has a built-in non-adjustable high limit of 99°F.• Cool thermostat.• Adjust set point.
• Run reset all under dealer control center. • Replace HD display or mag-mount, if needed.
Automatically clears when the system detects that the issue no longer exists.
703 Service SoonThermostat
Humid Sensor Problem
Thermostat Humid Sensor Problem. Sensor is damaged or data is corrupted possibly.. First try a system reset, then if persists the thermostat would need replacement.
-- Service Soon --
Possible loose or mis-wired connections or two zone sensors are assigned the same zone number. Two dashes will be displayed on the S30 thermostat for indoor temperature and/or zone sensor. The system will go into central mode. Individual zone functions is disabled. Anytime the zone sensor loses communication with the damper control module, the entire system will go into central mode. If two sensors are assigned the same zone number, this could result in the double dashes to appear as well.
If two zone sensors are assigned the same zone number, this could cause the double dashes to appear. If loose or mis-wired connection was confirmed, correct the issue and run the re-configuration procedure.

42
Installation Checklist
Smart Hub Checks: YES NO
1Is the smart hub properly mounted to either a wall stud or wall? NOTE: Do not mount on equipment or ductwork.
2Is communication status LED (green) visible when hinged cover is closed? NOTE: When LED is active it indicates that 24VAC is present at the smart hub. It also indicates communication is active between smart
hub and HD Display.3 Is blinking communicating green LED seen (located in center of smart hub) when cover is open?4 Are all terminal wiring properly connected and tight?5 Are jumpers set to proper equipment type and number of stages?
6 When required, is either or both the discharge (DATS) and outdoor air temperature (OATS) sensors properly connected and isolated when used?
HD Display Subbase Checks: YES NO1 Are all terminal wiring properly connected and tight?
HD Display Checks: YES NO1 Is the HD Display properly placed and connected to subbase? 2 Are all terminal wiring properly connected and tight on subbase?
3Is the screen blank after initial power-up? NOTE: The HD Display may take up to three minutes before anything appears on the screen due to a HD Display low battery condition.
HD Display battery charging only occurs when connected to the subbase. System Checks YES NO
1 Is the Wi-Fi connected?2 Can the homeowner access the consumer portal (www.myicomfort.com) from either a PC or tablet?3 Has the homeowner downloaded the Lennox Thermostat application from either Google Play or IOS App Store to their mobile devices?4 Is the Lennox Dealer account number or your main shop phone number been added to the dealer information screen?
5 Has a complete system test been run? If not, from the HD Display home screen go to settings > advanced settings > view dealer control center > and select tests.

43
LennoxPros Dealer Dashboard
The dealer dashboard displays Dealer’s iComfort® thermostat installations in one convenient location. It is accessible through the Service Dashboard at www.LennoxPros.com.
The thermostat can be accessible via the Dealer Dashboard only after the dealership’s main phone number or company name is added during thermostat commissioning. See “Dealer Info” on page 16 for further details for adding your dealer information.
Service Dashboard Search Screen
• Customers can be searched using the following criteria: first name, last name, first and last name, zip code, city, email address, equipment type, error code, serial number or model number.
• Customer searches can be filtered by various options: thermostat type, alert type, access level or maintenance reminders.
Customer Results Screen
Displays a list of customers with installed iComfort® thermostats, and their locations:• Name• Address• Phone• Email• Thermostat Type and Monitor Status
Map displays the following:• Shows all customer’s locations and any current alerts• Color-coded pins on the map denote the following:
» Red - Critical Alert » Yellow - Moderate Alert » Green - No Alerts, normal operation » Black - No system information sharing
NOTE: Click on a customer’s pin to view information about their system.
NOTE: Selecting a customer from the list or map pin displays the detailed System Overview Screen including owner information, system components, system history, status and any alerts.
Customer Details Screen
Home Systems• Shows thermostat connection status• Multiple home systems are displayed for each customer if there are more
than one system.System History
This section provides a list of alerts over the past 12 months Remote In Button• Allows dealer remote control of customer’s thermostat (if enabled)• Remote In thermostat controls have the same appearance and functions
as the touchscreen display, making it easy to make any settings and adjustments.
• Button is red if access is granted by homeowner and gray if Remote In is disabled at the thermostat.
Alerts & Reminders: System
Tabs for Alerts - Critical, Moderate, Cleared and Reminders
NOTE: Clicking on a card with an alert expands to display the Remote In control (if enabled by the homeowner) and Troubleshoot (access to the Lennox Troubleshooting Center which includes error code lookups and any available documentation).
Equipment & Reports• Equipment Tab
» A detailed list of all installed equipment for a particular system » Menus are available for each Equipment Type for Technical Documents,
Warranty Lookup and Repair Parts.• Reports Tab
» View Performance Reports, Installation Reports and Installation Update Reports
» Generate Monthly Performance Reports » Generate Installation Update reports » View Performance Reports Button displays a graphical view of the
system performance » Generating any report will save it as a PDF file to send to the customer
or for record keeping.
NOTE: For additional information please visit the Service Tools Help Center and click on Service Dashboard.

44
Index
AAdvanced Dehumidification Descriptions
29Alert Codes and Troubleshooting 34Apple HomeKit 15Auto Brightness 26Auto Changeover - Humidif. Deadband 18Auto Changeover - Temp Deadband 18Auto Dehumidification Overcooling
Threshold 18
BBalance Point Control 18Boot-up Screen 15Brightness Value 26
CCommissioning
Using the HD Display 15Using the Mobile Setup Application 13
Cooling Mode 18
DDealer
Control Center 17Information 28
DehumidificationSet Point 29Setting Options 28
Dehumidification Settings 28Diagnostics 28Dimensions 3Discharge Air Sensor (DATS) 7Display
Air Quality 26Indoor Humidity 26Outdoor Weather 26
EElectrical Specifications 3
Electric Heat Stages During Defrost 19Energy Recovery Ventilator (ERV) 29Equipment Found Screen 16
FFactory Reset
Smart Hub 27Thermostat 27
Fresh Air Damper 16Fresh Air Dampers 29
GGroup ID 19
HHeat / Cool Stages Locked In 19Heat Recovery Ventilator (HRV) 29High Balance Point 18, 19Home Address 28Humiditrol Comfort Adjust 21Humidity Reading Calibration 21
IInstallation Report 28
LLanguage Selection 16Lock In 2nd Stage HP by Outdoor Temp 21Low Balance Point 18
MMax Heat Setpoint 21Max Humidification Setpoint 21Min Cool Setpoint 21Min Dehumidification Setpoint 21Mobile Applications 32Multiple Smart Hubs 15
NNon-Communicating Equipment 16
OOperating Environment 3Outdoor Air Sensor 7Outdoor Temperature Reading Calibration
18, 21Outdoor Temperature Source 27Overcooling 29
PPerfect Temp 22Proximity Control 27
RReceived Signal Strength Indication (RSSI)
32Re-configure System 27Reminders 16Reset
Air Handler 26Furnace 26HVAC Equipment 27Smart Hub 21Thermostat 27
SScreen Locked 27Screen Saver 27Single Setpoint Mode (SSP) 22
Cooling Cancel Coast Counter Decrement Slope 22
Cooling Cancel Coast Counter Increment Slope 22
Cooling Lockout Outdoor Temp 22Heating Cancel Coast Counter Decrement
Slope 22Heating Cancel Coast Counter Increment
Slope 22Heating Lockout Outdoor Temp 22
Smart Alert Enable 22Smart Hub
Equipment Name 19Group ID 19Installation 3Multiple Devices 15
Rebooting 15Restart 27
Smooth Setback Recovery (SSR) 23Soft Disable 34Stage Delay Timers 23Stage Differentials 23
TTemperature Control Mode 23, 26Temperature Unit of Measurement
Selection 16Temp Reading Calibration 23Terminal Designations 6Tests 27Troubleshooting Wi-Fi Connection 31
VVentilation
Control Mode 30Control Mode Parameters 24Control Wiring 10Filter 16Maintenance 16Reminders 16
WWall Insulation 26Wide Setpoint 27Wi-Fi
Accessory Configuration (WAC) 15Connection Status 31Hidden Home Access Point 31Setting Up Connection 31Signal Strength Indicator 32Troubleshooting 31Visible Home Access Point 31
WiringDiagrams 8