
ICC Insertion Version 1 - EMERGPA · ICC Insertion Version No: 1; ... Use a gown, gloves, ......
13
Princess Alexandra Hospital Emergency Department Clinical Guideline Version No: 1; Approval date: 12/11/2012 Page 1 of 13 Printed copies are uncontrolled EDCG007/V1 ICC insertion Respiratory, Trauma, Resuscitation 1 Introduction Fluid or air that accumulates in the pleural cavity reduces lung expansion which can impair respiratory function. Drainage allows negative intra-thoracic pressures to be re- established promoting lung re-expansion. 2 Indications Intercostal catheter (ICC) insertion is indicated in conditions which require drainage of the pleural cavity of air, blood, exudate or transudate. If the lung is under tension, ICC insertion is a time critical intervention. 3 Contraindications Relative • coagulopathy 4 Patient Consent Informed consent needs to be obtained in all patients prior to ICC insertion. The QHealth informed consent proforma is attached in the Appendix. Important complications to consider are: Common > 5% • Pain • Tube requiring repositioning/replacement Uncommon 1-5% • Infection • Bleeding Rare < 1% • Damage to surrounding structures (eg. heart, lung), requiring urgent surgery or potentially causing death Review Officer: James Collier Version no: 1 Approval Date: 12/11/2012 Review Date: November 2014 Authority: Emergency Department Approving Officer James Collier Co-Director Name ……………………………………… Signature Key Words: ICC Insertion
Transcript of ICC Insertion Version 1 - EMERGPA · ICC Insertion Version No: 1; ... Use a gown, gloves, ......

Princess Alexandra Hospital Emergency Department
Clinical Guideline
Version No: 1; Approval date: 12/11/2012 Page 1 of 13
Printed copies are uncontrolled
EDCG007/V1
ICC insertion Respiratory, Trauma, Resuscitation
1 Introduction
Fluid or air that accumulates in the pleural cavity reduces lung expansion which can impair respiratory function.
Drainage allows negative intra-thoracic pressures to be re-established promoting lung re-expansion.
2 Indications
Intercostal catheter (ICC) insertion is indicated in conditions which require drainage of the pleural cavity of air, blood, exudate or transudate. If the lung is under tension, ICC insertion is a time critical intervention.
3 Contraindications Relative
• coagulopathy
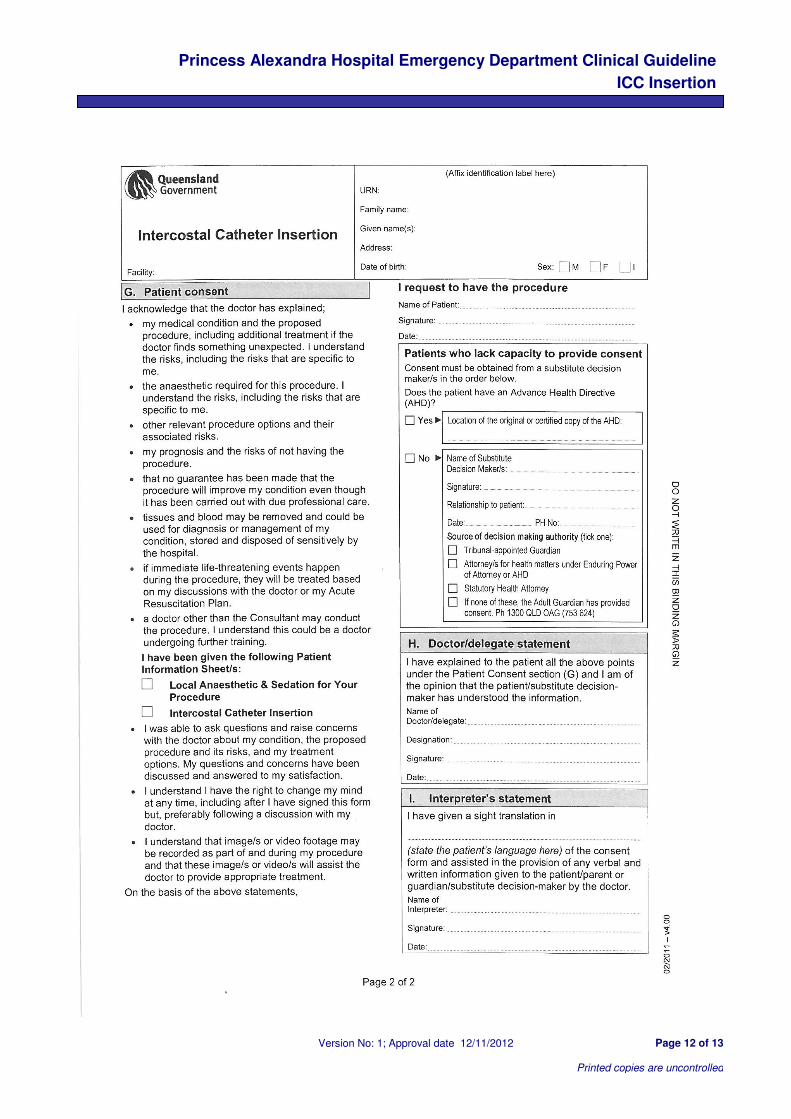
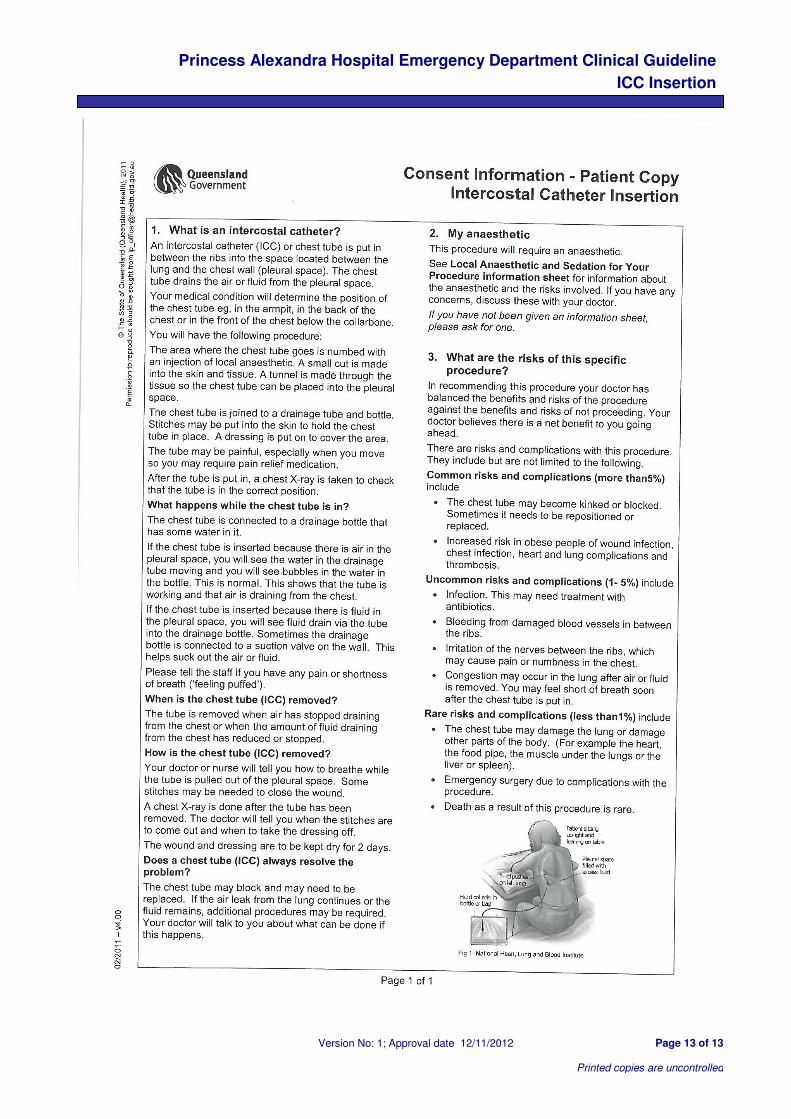
4 Patient Consent Informed consent needs to be obtained in all patients prior to ICC insertion. The QHealth informed consent proforma is attached in the Appendix.
Important complications to consider are:
Common > 5%
• Pain
• Tube requiring repositioning/replacement
Uncommon 1-5%
• Infection
• Bleeding
Rare < 1%
• Damage to surrounding structures (eg. heart, lung), requiring urgent surgery or potentially causing death
Review Officer: James Collier Version no: 1 Approval Date: 12/11/2012 Review Date: November 2014 Authority: Emergency Department Approving Officer James Collier Co-Director Name ……………………………………… Signature Key Words: ICC Insertion

Princess Alexandra Hospital Emergency Department Clinical Guideline
ICC Insertion
Version No: 1; Approval date 12/11/2012 Page 2 of 13
Printed copies are uncontrolled
5 Procedure The following procedure is adapted from ‘A Safe Guide to ICC insertion’ written by Dr Julie Mundy
(Cardiac Surgeon, PAH) Selecting and marking the insertion site Always be mindful of where the important intrathoracic structures are and relate them to surface anatomy landmarks.
Before starting the procedure
• Check the identity of the patient.
• Confirm the site and side for insertion of the chest tube by reviewing clinical signs and the chest X-ray.
• A chest radiograph must be available at the time of drainage insertion, except in the case of tension pneumothorax. A tension pneumothorax is an emergency situation and requires immediate action, irrespective of whether an X-ray is available.
Position the patient for the chest tube insertion
• Recline the patient on the bed at 30°, slightly rotated, with the arm on the affected side abducted and the hand behind the head to expose the axillary area. It may be difficult for elderly patients to maintain this position for long enough to complete the procedure without support.
• A gallows sling may assist with abducting the patient's arm.
• An alternative position is sitting upright leaning over an adjacent table on a pillow.
• It is important that the patient is comfortable during the procedure, to minimise movement.
Note : Abdominal structures lie under the ribs. On full expiration the diaphragm rises to the level of the nipple so NO chest drain should be inserted lower than the level of the nipple (or in women, where it would be if they were a man!)
Princess Alexandra Hospital Emergency Department Clinical Guideline
ICC Insertion
Version No: 1; Approval date 12/11/2012 Page 3 of 13
Printed copies are uncontrolled
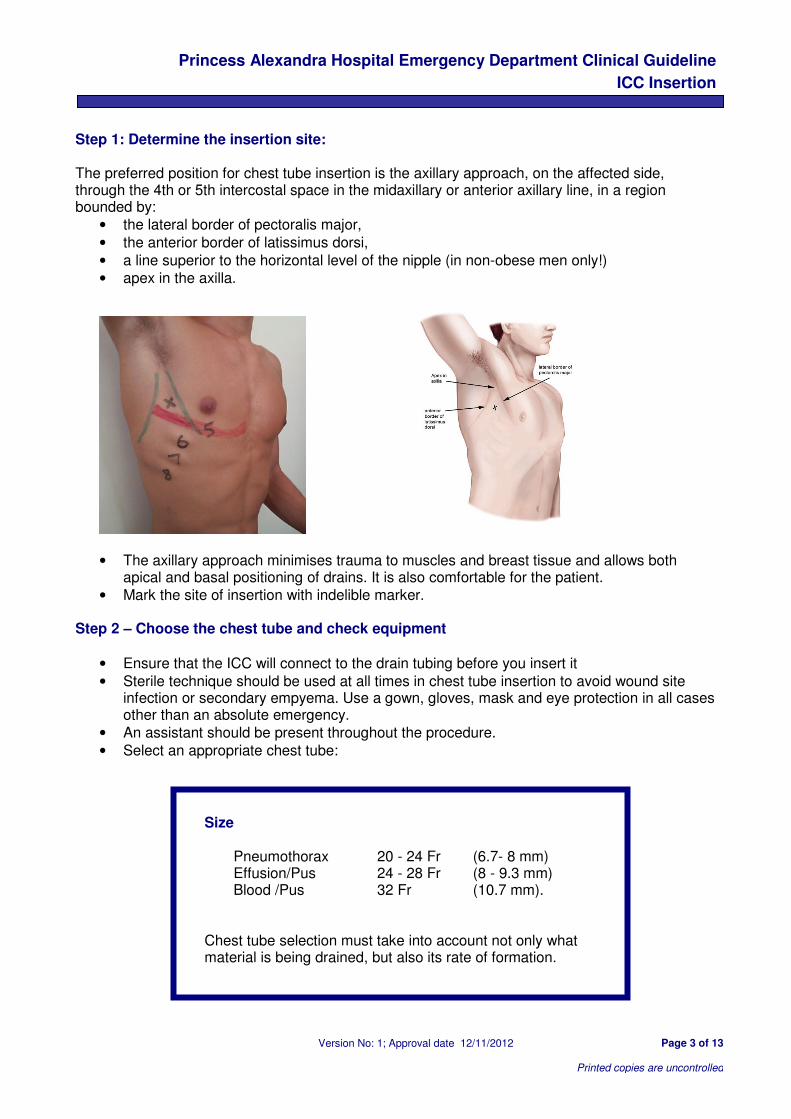
Step 1: Determine the insertion site: The preferred position for chest tube insertion is the axillary approach, on the affected side, through the 4th or 5th intercostal space in the midaxillary or anterior axillary line, in a region bounded by:
• the lateral border of pectoralis major,
• the anterior border of latissimus dorsi,
• a line superior to the horizontal level of the nipple (in non-obese men only!)
• apex in the axilla.
• The axillary approach minimises trauma to muscles and breast tissue and allows both apical and basal positioning of drains. It is also comfortable for the patient.
• Mark the site of insertion with indelible marker. Step 2 – Choose the chest tube and check equipment
• Ensure that the ICC will connect to the drain tubing before you insert it
• Sterile technique should be used at all times in chest tube insertion to avoid wound site infection or secondary empyema. Use a gown, gloves, mask and eye protection in all cases other than an absolute emergency.
• An assistant should be present throughout the procedure.
• Select an appropriate chest tube:
Size
Pneumothorax 20 - 24 Fr (6.7- 8 mm) Effusion/Pus 24 - 28 Fr (8 - 9.3 mm) Blood /Pus 32 Fr (10.7 mm).
Chest tube selection must take into account not only what material is being drained, but also its rate of formation.

Princess Alexandra Hospital Emergency Department Clinical Guideline
ICC Insertion
Version No: 1; Approval date 12/11/2012 Page 4 of 13
Printed copies are uncontrolled
• Check that appropriate equipment is available, sterile, and on-hand:
Step in insertion Standard equipment needed
Operator's preparation sterile gown and gloves mask protective eyewear assistant present
Patient skin preparation antiseptic solution (alcoholic chlorhexidine or iodine) sterile drapes
Monitoring of oxygen saturation oximeter
Local anaesthetic syringe needle (25 G for skin and 21 G for deeper layers) local anaesthetic agent (e.g. 0.5% or 1% lignocaine)
Incision Scalpel and blade
Blunt dissection of tract Instrument for blunt dissection, e.g. curved artery forceps
Insertion and securing of chest tube stout, non-absorbable suture material (e.g. Mersilene 0 or Silk 1) on cutting needle needle holder tape, e.g. leukosilk scissors forceps tube clamps (non-serrated)
Dressing dressings
Connection to UWSD sterile tubing adaptors under water drain seal drainage system which is primed according to manufacturer's instructions
Note: Customise the equipment according to your facility and the individual patient requirements. Step 3 – Prepare the patient
• Consider light sedation to facilitate the procedure
• Use strict aseptic technique
• Prepare the patient's skin; thoroughly clean with alcoholic chlorhexidine or povidine iodine 10% w/v solution.
• Drape the site with sterile drapes. Step 4 – Infiltrate local anaesthetic
• At the site of the insertion, infiltrate with local anaesthetic:
• Infiltrate the skin, subcutaneous tissue, muscle, periosteum (along the upper border of the lower rib) and pleura along the superior border of the rib.
• Remember that the pleura is very pain sensitive and is just deep to the upper border of the rib.
• When you enter the pleural space make sure you can aspirate air or fluid (as appropriate). If you can't, do not continue.
Don't forget to infiltrate the skin where the anchoring suture will be inserted

Princess Alexandra Hospital Emergency Department Clinical Guideline
ICC Insertion
Version No: 1; Approval date 12/11/2012 Page 5 of 13
Printed copies are uncontrolled
• Make sure that an adequate volume of local anaesthetic is used. See table below:
Local anaesthetic Maximum dose Maximum dose for 70kg man
Maximum dose for 100kg man
Lignocaine 1% 3 mg/kg 20 ml 30 ml
Lignocaine 0.5% 3 mg/kg 40 ml 60 ml
• If clinically appropriate, wait 5- 7 minutes for the effect of the local anaesthetic to take effect Practice Tip!
The better the anaesthesia of the site, the less chance of the patient moving and the greater the chance of a successful chest tube insertion. Remember:
• Don't scrimp on the local anaesthetic.
• After infiltrating local anaesthetic, allow sufficient time for it to take effect.
• When the pleural space has been entered, withdraw on the syringe to obtain either air or fluid, depending on whether the pathology is a pneumothorax or a pleural effusion. If you cannot get back either on needle aspiration, you are most likely in the wrong spot or have made the wrong diagnosis and need further image guidance. 'A chest tube should not be inserted without further image guidance, if free air or fluid cannot be aspirated with a needle at the time of anaesthesia.'
• Use the needle aspiration to confirm the thickness of the chest wall by noting the direction and length of the needle when the tip reaches air/fluid. Use this as a guide for dissection and insertion of the chest tube.
Step 5 – Incise the skin and dissect to the pleura
• Once the anaesthetic has taken effect, use a scalpel blade to make a transverse (horizontal) incision 1 - 2 cm long, along the superior surface of the rib margin, and parallel to it
• Insert a wound closure suture (usually a mattress suture or single interrupted suture(s)) loosely across the middle of the wound. This is best done before blunt dissection. This suture will be used to close the wound when the drain is removed. 'Purse string' sutures must not be used as they convert a linear wound into a circular one that is painful to the patient and may leave an unsightly scar
• Use blunt dissection utilising the artery forceps (or similar), to spread the subcutaneous fat, and muscle. Remember the external and internal intercostal muscles are in a criss-cross pattern and must be physically spread apart in two planes

Princess Alexandra Hospital Emergency Department Clinical Guideline
ICC Insertion
Version No: 1; Approval date 12/11/2012 Page 6 of 13
Printed copies are uncontrolled
• Puncture the parietal pleura with the tip of the forceps. You will know when you enter the pleural cavity as the tissue resistance will abruptly disappear
• Ensure the track through the intercostal muscles, and the hole in the pleura, are wide enough to allow easy passage of the chest tube. This can be done with the artery forceps or a gloved finger. Creating an adequate track for the chest tube will ensure excessive force is not needed during chest tube insertion
• Digital examination into the thoracic cavity ensures there are no underlying organs that might be damaged when the chest tube is inserted
Caution!
• Digital examination creates a large track. If a tube with a significantly smaller bore is then inserted, the disparity in size between the track and the tube may increase the risk of subcutaneous emphysema and/or leakage of pleural fluid around the tube.
• If fractured ribs are present, beware of the risk of lacerating the finger on a spicule of bone.
Step 6 – Insert the chest tube If possible the tip of the tube should be aimed
• apically to drain air, and
• basally to drain fluid'.
• Insert the chest tube using artery forceps or guided by a finger.
• Insert cautiously until resistance is met, then withdraw slightly.
• Ensure that all side holes of the chest tube are inside the pleural cavity. Practice Tip!
The cm markings on the side of the chest tube indicate the distance from the most distal side hole (eyelet) NOT the tip of the chest tube. These markings can be used as a guide to the distance between the skin and the nearest side hole.
Princess Alexandra Hospital Emergency Department Clinical Guideline
ICC Insertion
Version No: 1; Approval date 12/11/2012 Page 7 of 13
Printed copies are uncontrolled
Safety Tip!
Correct placement of the chest tube can be confirmed by:
• fogging of the chest tube with expiration
• movement of air/fluid through the tube
• swinging, tidalling or oscillating of the fluid level in the water seal chamber Warning signs that something has gone wrong with the insertion procedure:
• the patient experiences sudden pain or distress
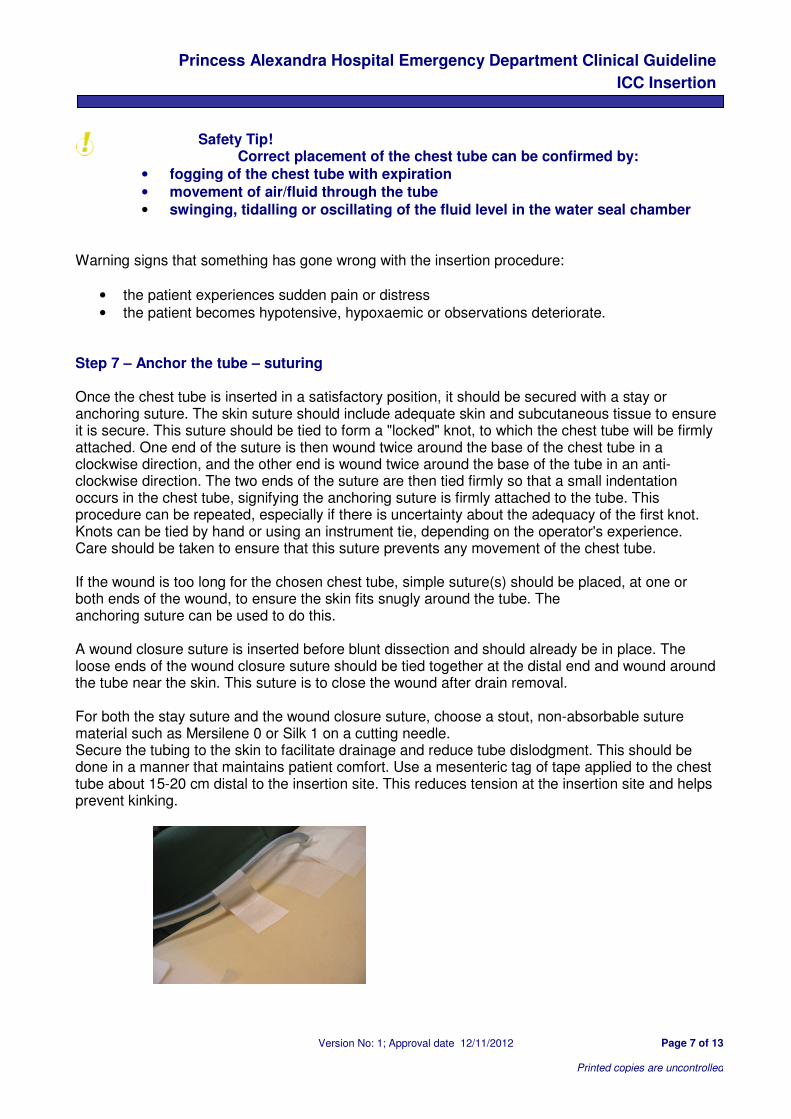
• the patient becomes hypotensive, hypoxaemic or observations deteriorate. Step 7 – Anchor the tube – suturing Once the chest tube is inserted in a satisfactory position, it should be secured with a stay or anchoring suture. The skin suture should include adequate skin and subcutaneous tissue to ensure it is secure. This suture should be tied to form a "locked" knot, to which the chest tube will be firmly attached. One end of the suture is then wound twice around the base of the chest tube in a clockwise direction, and the other end is wound twice around the base of the tube in an anti-clockwise direction. The two ends of the suture are then tied firmly so that a small indentation occurs in the chest tube, signifying the anchoring suture is firmly attached to the tube. This procedure can be repeated, especially if there is uncertainty about the adequacy of the first knot. Knots can be tied by hand or using an instrument tie, depending on the operator's experience. Care should be taken to ensure that this suture prevents any movement of the chest tube. If the wound is too long for the chosen chest tube, simple suture(s) should be placed, at one or both ends of the wound, to ensure the skin fits snugly around the tube. The anchoring suture can be used to do this. A wound closure suture is inserted before blunt dissection and should already be in place. The loose ends of the wound closure suture should be tied together at the distal end and wound around the tube near the skin. This suture is to close the wound after drain removal. For both the stay suture and the wound closure suture, choose a stout, non-absorbable suture material such as Mersilene 0 or Silk 1 on a cutting needle. Secure the tubing to the skin to facilitate drainage and reduce tube dislodgment. This should be done in a manner that maintains patient comfort. Use a mesenteric tag of tape applied to the chest tube about 15-20 cm distal to the insertion site. This reduces tension at the insertion site and helps prevent kinking.
Princess Alexandra Hospital Emergency Department Clinical Guideline
ICC Insertion
Version No: 1; Approval date 12/11/2012 Page 8 of 13
Printed copies are uncontrolled
Practice Tip!
It is difficult to tie suture material finer than Silk 1 tightly enough to hold the chest tube in. When tying off the suture ensure you 'lock' the knot to prevent it loosening. There is a lot of morbidity and increased length of stay associated with chest tubes that need to be reinserted because they are not properly secured and fall out.
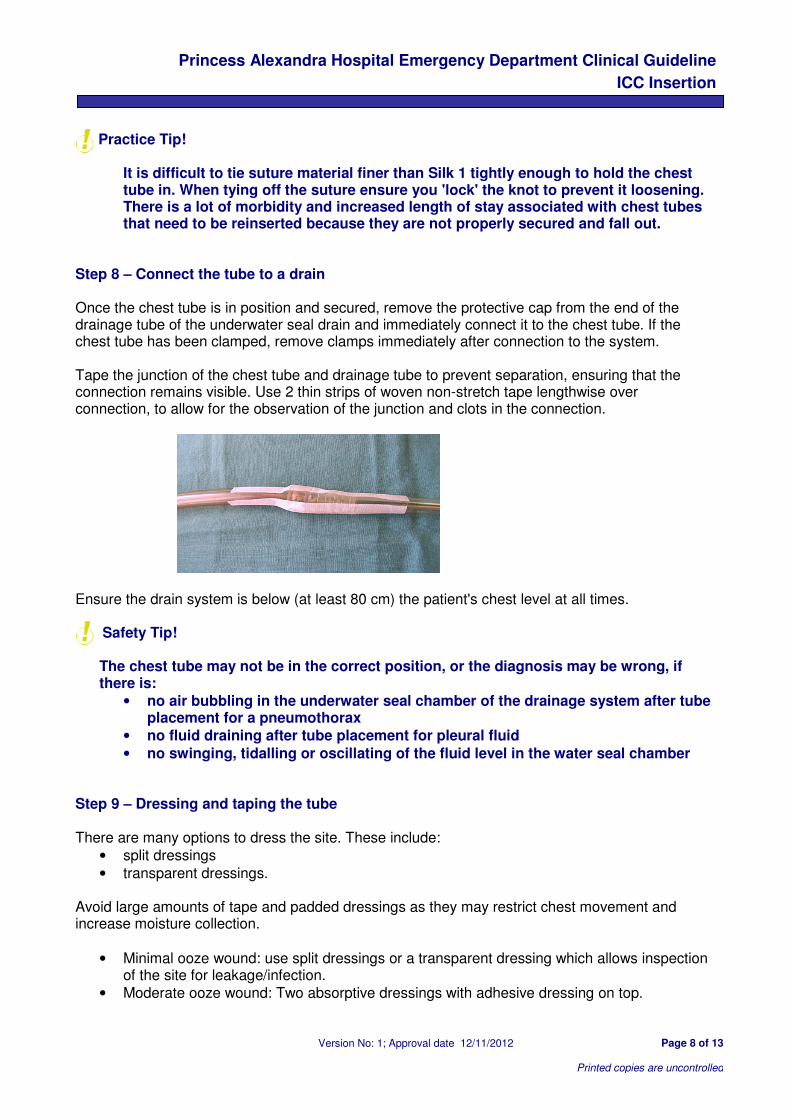
Step 8 – Connect the tube to a drain Once the chest tube is in position and secured, remove the protective cap from the end of the drainage tube of the underwater seal drain and immediately connect it to the chest tube. If the chest tube has been clamped, remove clamps immediately after connection to the system. Tape the junction of the chest tube and drainage tube to prevent separation, ensuring that the connection remains visible. Use 2 thin strips of woven non-stretch tape lengthwise over connection, to allow for the observation of the junction and clots in the connection.
Ensure the drain system is below (at least 80 cm) the patient's chest level at all times.
Safety Tip! The chest tube may not be in the correct position, or the diagnosis may be wrong, if there is:
• no air bubbling in the underwater seal chamber of the drainage system after tube placement for a pneumothorax
• no fluid draining after tube placement for pleural fluid
• no swinging, tidalling or oscillating of the fluid level in the water seal chamber Step 9 – Dressing and taping the tube There are many options to dress the site. These include:
• split dressings
• transparent dressings. Avoid large amounts of tape and padded dressings as they may restrict chest movement and increase moisture collection.
• Minimal ooze wound: use split dressings or a transparent dressing which allows inspection of the site for leakage/infection.
• Moderate ooze wound: Two absorptive dressings with adhesive dressing on top.

Princess Alexandra Hospital Emergency Department Clinical Guideline
ICC Insertion
Version No: 1; Approval date 12/11/2012 Page 9 of 13
Printed copies are uncontrolled
• Heavy exudating wound: use a highly absorbent dressing to prevent wound leakage and cover with adhesive dressing
Step 10 – Confirm tube placement A chest X-ray should be performed to:
• check tube position
• exclude complications such as pneumothorax and surgical emphysema
• assess the volume of fluid drainage or pneumothorax resolution. Practice Tip!
Successful drainage can still be achieved, even when the drain is not placed in an ideal position because expansion of the lung will push the air or fluid into the chest tube. Therefore, do not reposition effectively functioning tubes simply because of a sub-optimal radiographic appearance.
Step 11 – Document the procedure Ensure the procedure is documented in the patient's chart. Include, (at least), the following information:
• date and time
• location where procedure was performed, e.g. ward/ICU/ED
• indication for chest tube insertion
• name of operator and assistant
• pre-medication and local anaesthetic dose used (write on stat/ pre- med section of Medication Chart)
• details of procedure (e.g. site of insertion, air/fluid aspirated prior to insertion of tube, suture material and type, tube size, type of drain etc)
• confirmation that drain functioning following connection to tube
• findings of x-ray taken following chest tube insertion. Step 12 – Monitor patient and chest drain Patients with chest drains should be ideally managed on specialist wards by staff who are trained in chest drain management. Assess the patient regularly. Observe and record:
• basic vital signs
• oxygen saturation
• level of consciousness
• pain & discomfort with deep breaths & cough
• presence of dyspnoea or cyanosis.
Remember you are dressing the wound not the tube!
Princess Alexandra Hospital Emergency Department Clinical Guideline
ICC Insertion
Version No: 1; Approval date 12/11/2012 Page 10 of 13
Printed copies are uncontrolled
Check drainage system to ensure:
• the drain system is below (at least 80 cm) the patient's chest level at all times
• the water seal chamber/bottle is upright
• it is maintained according to the manufacturer's instructions. Observe the chest drain for:
• fluid fluctuating (swinging/tidalling) in chest tube
• bubbling of air in the water seal chamber of the chest drain
• amount, colour and consistency of drainage; drainage of fluid will be demonstrated by a rise in the fluid level in the collection bottle
• tube position and security of connections and system. Tubes do not usually need to be clamped when patients are moved or transported, however, the drainage chambers should always remain at least 80 cm below the patient's chest, otherwise it could result in siphoning of the bottle contents back into the thoracic cavity. Any tube which is bubbling air must NEVER be clamped without a doctor remaining in attendance. If a patient with a clamped tube becomes breathless the clamp must be removed immediately.

Princess Alexandra Hospital Emergency Department Clinical Guideline
ICC Insertion
Version No: 1; Approval date 12/11/2012 Page 11 of 13
Printed copies are uncontrolled
6 Appendix
Princess Alexandra Hospital Emergency Department Clinical Guideline
ICC Insertion
Version No: 1; Approval date 12/11/2012 Page 12 of 13
Printed copies are uncontrolled
Princess Alexandra Hospital Emergency Department Clinical Guideline
ICC Insertion
Version No: 1; Approval date 12/11/2012 Page 13 of 13
Printed copies are uncontrolled