IC Quick Start Guide - Amazon S3 · Quick Start Guide for a Cisco Unified Communications ... Manage...
33
Corporate Headquarters: Singlewire Software 2601 West Beltline Highway #510 Madison, WI 53713 © 2011 Singlewire. Confidential. All rights reserved. InformaCast ® 8.1 Quick Start Guide for a Cisco Unified Communications Manager Express Telephony Environment
Transcript of IC Quick Start Guide - Amazon S3 · Quick Start Guide for a Cisco Unified Communications ... Manage...

InformaCast® 8.1
Quick Start Guide for a Cisco Unified Communications Manager Express Telephony Environment
Corporate Headquarters:
Singlewire Software 2601 West Beltline Highway #510 Madison, WI 53713© 2011 Singlewire. Confidential. All rights reserved.

© 2011 Singlewire. Confidential. All rights reserved.
InformaCast is a trademark of Singlewire Software.
All other referenced trademarks are trademarks of their respective owners and our referenceto them does not imply or indicate any approval, endorsement, sponsorship or affiliation withsuch owners unless such approval, endorsement, sponsorship or affiliation is expresslyindicated.
Last updated: December 8, 2011

Table of ContentsIntroduction . . . . . . . . . . . . . . . . . . . . . . . . . . . . . . . . . . . . . . . 1
Environments . . . . . . . . . . . . . . . . . . . . . . . . . . . . . . . . . . . . . . . . 1
Prerequisites . . . . . . . . . . . . . . . . . . . . . . . . . . . . . . . . . . . . . . . . . 1
Troubleshooting . . . . . . . . . . . . . . . . . . . . . . . . . . . . . . . . . . . . . . 1
Install InformaCast . . . . . . . . . . . . . . . . . . . . . . . . . . . . . . . . . . 2
Prepare your Multicast Environment . . . . . . . . . . . . . . . . . . . . . . . . 2
Install InformaCast . . . . . . . . . . . . . . . . . . . . . . . . . . . . . . . . . . . . 3
Configure Communications Manager Express . . . . . . . . . . . . . . . . . . 4
Configure InformaCast . . . . . . . . . . . . . . . . . . . . . . . . . . . . . . . . 5
Use InformaCast . . . . . . . . . . . . . . . . . . . . . . . . . . . . . . . . . . . . 6
Add a Recipient Group . . . . . . . . . . . . . . . . . . . . . . . . . . . . . . . . . . 6
Add a New Message . . . . . . . . . . . . . . . . . . . . . . . . . . . . . . . . . . . . 9
Configure the Text Tab . . . . . . . . . . . . . . . . . . . . . . . . . . . . . . 11Configure the Audio Tab . . . . . . . . . . . . . . . . . . . . . . . . . . . . . 12Configure the Re-broadcasting Tab . . . . . . . . . . . . . . . . . . . . . 14Configure the Scripting Tab . . . . . . . . . . . . . . . . . . . . . . . . . . . 15Configure the Confirmation Tab . . . . . . . . . . . . . . . . . . . . . . . . 16
Send a Broadcast . . . . . . . . . . . . . . . . . . . . . . . . . . . . . . . . . . . . . 19
Send a Pre-recorded Broadcast . . . . . . . . . . . . . . . . . . . . . . . . 19Send a Live Audio Broadcast . . . . . . . . . . . . . . . . . . . . . . . . . . 20Send an Ad-hoc Broadcast . . . . . . . . . . . . . . . . . . . . . . . . . . . . 21
Manage SIP Functionality . . . . . . . . . . . . . . . . . . . . . . . . . . . . . . . 22
Configure SIP with the IOS Router . . . . . . . . . . . . . . . . . . . . . . 22Allow/Disable SIP Access to InformaCast . . . . . . . . . . . . . . . . . 23Enable SIP Authentication for InformaCast . . . . . . . . . . . . . . . . 24Enable Digest Authentication with SIP User Credentials . . . . . . . 24Manage the SIP Stack . . . . . . . . . . . . . . . . . . . . . . . . . . . . . . . 24Restart SIP 26

Configure DialCast Functionality . . . . . . . . . . . . . . . . . . . . . . . . . . 26
Troubleshooting . . . . . . . . . . . . . . . . . . . . . . . . . . . . . . . . . . . . . 27
Index . . . . . . . . . . . . . . . . . . . . . . . . . . . . . . . . . . . . . . . . . . . 28
1Cisco Unified Communications Manager Express Telephony Environment
Version 8.1
InformaCast Quick Start Guide - ConfidentialIntroduction
IntroductionInformaCast is Singlewire Software’s IP telephony broadcast system that allows you to simultaneously send an audio stream and text message to variety of endpoints including IP speakers, Cisco IP phones, overhead paging systems, computer desktops, digital signage, SMS text, social media sites, and more. This guide is designed to get you started quickly, by explaining how to complete some of the most common tasks you’ll need to get the most out of InformaCast.
EnvironmentsThere are three versions of this guide: one for environments using Cisco Unified Communications Manager, one for environments using Communications Manager Express, and one for hybrid runtime (HRE) environments, e.g. non-telephony, SIP, etc. Please make sure you have the right version by looking at the cover page, or by looking at the environment type printed at the bottom of every page.
PrerequisitesInformaCast has the following system prerequisites:
• A valid license key, which should have been provided to you by your Singlewire salesperson (contact [email protected] if you didn’t receive one)
• Meet the hardware requirements as defined in the “InformaCast Installation and User Guide”
• Enable and configure multicast routing for all network segments between InformaCast and the phones/speakers
• Configure a static IP address on the InformaCast server before installing InformaCast
• Disable all NICs on the InformaCast server other than the primary NIC with a static IP address
• Install and maintain Cisco Communications Manager Express server(s); the following versions are supported: 7.1, 8.0, and 8.1
• Enable web access on any Cisco IP phones working with InformaCast
TroubleshootingIf you’ve followed the instructions in this guide and are still having trouble getting InformaCast to work, you can:
• Consult the “InformaCast Installation and User Guide”
• Check out the troubleshooting tips in the online Knowledge Base, which provides Level 1 and 2 support for those with a current maintenance contract
• Submit a support request, which will be assigned to Singlewire Support personnel.

InformaCast Quick Start Guide - ConfidentialInstall InformaCast
Install InformaCastIt is expected that this application will be installed and configured by a Communications Manager Express administrator, as many of the concepts involved require familiarity with Communications Manager Express, and it will be necessary to configure Communications Manager Express as part of the installation process.
Prepare your Multicast Environment
Note Please follow these next recommendations before installing InformaCast. Your InformaCast environment will be more stable and installation will proceed more smoothly.
You must enable multicast across your network in order for your recipients to receive the audio portion of InformaCast broadcasts.
Caution Just because music on hold works on your phones does not mean that it is using multicast. Music on hold can be used with either unicast or multicast. If you need a tool to verify and test your multicast routing, Singlewire has a tool posted here: http://info.singlewire.com/singlewire-networking-support-tools/.
Multicast is communication between a single sender and multiple receivers on a network. InformaCast has no special requirements for how multicast is enabled, and you should use your network vendor’s best practices and design considerations. Multicast is typically routed with Protocol Independent Multicast (PIM) that is deployed in either sparse or dense mode. InformaCast will work with either mode.
However, many Multiprotocol Label Switching (MPLS) network providers will not route multicast traffic on their networks. For WAN links where your circuit provider will not route your multicast, you have two options:
• GRE tunnels. Carry your multicast traffic from the location where the InformaCast server is located to its recipients. The only traffic that needs to traverse these GRE tunnels is the multicast traffic you might want to route. The tunnels do not need to create a full mesh between sites; they only need to be configured from the hub location to the spoke location(s). Please see the following link for details: http://www.cisco.com/en/US/tech/tk828/technologies_configuration_example09186a00801a5aa2.shtml
• Singlewire Paging Gateway. Allows a lower bit rate unicast audio stream to be sent from an InformaCast server at one location to a Paging Gateway across a WAN that will not route multicast. The Paging Gateway can then turn the unicast audio stream it received from the InformaCast server at the other location into multicast on the local LAN segment. For more information, please contact your Singlewire Territory Manager: [email protected].
For recipients to receive the audio portion of InformaCast broadcasts, they make requests using Internet Group Management Protocol (IGMP). While most networks default to IGMPv2, newer recipients may use IGMPv3. If newer recipients are being deployed, be sure to enable the newer protocol version on network devices.
2Cisco Unified Communications Manager Express Telephony Environment
Version 8.1

InformaCast Quick Start Guide - ConfidentialInstall InformaCast
Network design and multicast configuration is outside the scope for which Singlewire can provide support. It is recommended that you work with your network vendor or partner. If you have a Cisco network, you can work with the Cisco TAC or locate a local Cisco Partner.
Also, set these server recommendations:
• Pre-configure the primary Network Interface Card (NIC) with a static IP address and disable all secondary NICs on the machine to avoid an IP address conflict.
• Do not install InformaCast on a Cisco Communications Manager or Cisco Unity machine.
• Install InformaCast on a server running Windows 2003 Server or 2008 Server.
• Verify that ports 8005, 8081, and 8444 are not currently in use by another application.
Install InformaCastUse the following steps to install InformaCast’s software.
Step 1 Obtain the InformaCast installer and save its zip file to the server on which you will install InformaCast.
Tip It is best to use a dedicated server for InformaCast to avoid IP traffic conflicts. Giving the server a static IP address will avoid reconfiguration problems.
Step 2 Extract all files from the InformaCast installation zip file and double click on the InformaCast executable file.
Step 3 Follow the installer’s prompts, accepting the default location, pointing the installer to the server’s IP address where you’ll install InformaCast, and selecting your Communications Manager Express version.
Warning InformaCast can be installed on a drive other than the default C: drive; however, if InformaCast’s server needs to be rebuilt and the InformaCast database restored, InformaCast will need to be re-installed to the same drive letter. Otherwise, there will be broadcast and recipient group errors related to a data location mismatch.
Step 4 Open InformaCast by going to Start | Programs | Singlewire | InformaCast.
Step 5 Log into InformaCast, entering admin in the Login field and your password in the Password field. Your password is provided to you in the email from your Singlewire salesperson that contained the download link for InformaCast.
Step 6 Go to Admin | Manage License Key and upload your license key. If you have questions about your license key or haven’t received one, contact [email protected].
Note Leave your InformaCast window open. You will come back to it.
3Cisco Unified Communications Manager Express Telephony Environment
Version 8.1

InformaCast Quick Start Guide - ConfidentialInstall InformaCast
Configure Communications Manager ExpressConfiguring Communications Manager Express involves configuring the Cisco IOS router running Communications Manager Express to allow access to phone data. Configuring the interface involves defining values for the HTTP transport parameters and creating an authorized user.
Step 1 Open a Telnet session to the appropriate IOS router.
Step 2 Configure IXI for HTTP transport:
Router(config)# ixi transport httpRouter(conf-xml-trans)# response size 64Router(conf-xml-trans)# request outstanding 10Router(conf-xml-trans)# request timeout 20Router(conf-xml-trans)# no shutdownRouter(conf-xml-trans)# exit
Step 3 Enable XML communication with Communications Manager Express:
Router(config)# ixi application cmeRouter(config-xml-app)# no shutdownRouter(config-xml-app)# exit
Step 4 Create an authorized telephony user, set the authentication and services URLs, and enable web access for phones:
Router(config)# telephony-serviceRouter(config-telephony)# xml user ic password InformaCast 15Router(config-telephony)# url services http://<InformaCast Server IPAddress>:8081/InformaCast/phone/servicesRouter(config-telephony)# url authentication http://<InformaCast Server IPAddress>:8081/InformaCast/phone/authRouter(config-telephony)#service phone webAccess 0Router(config-telephony)# create cnf-file
Step 5 Reset your phones and commit your changes:
Router(config-telephony)#reset all 0Router(config-telephony)#endRouter# copy running-config startup-config
4Cisco Unified Communications Manager Express Telephony Environment
Version 8.1
5Cisco Unified Communications Manager Express Telephony Environment
Version 8.1
InformaCast Quick Start Guide - ConfidentialConfigure InformaCast
Configure InformaCastOnce you’ve installed InformaCast, you must configure the integration of Communications Manager Express and InformaCast.
Step 1 Go back to your InformaCast window and go to Admin | Telephony | CME and click the Edit button next to Default Configuration.
Step 2 Enter your authorized user’s username in the Communications Manager Express AXL User field. You created this user in Step 4 on page 4.
Step 3 Enter the authorized user’s password in the Communications Manager Express AXL Password and Confirm AXL Password fields.
Step 4 Enter the IP address of the Communications Manager Express server in the Communications Manager Express IP Address field. Use the numeric IP address rather than a DNS name. When InformaCast needs to interact with Communications Manager Express, it will use this address.
Note If you are using another third-party application with Communications Manager Express that requires authentication, you will want to put the other application’s URL into the Next Authentication URL field. This will allow both applications to function properly.
Step 5 Click the Update button.
Step 6 Refresh your recipient group list.
Step 7 Click the Update button.
InformaCast Quick Start Guide - ConfidentialUse InformaCast
Use InformaCastIn order to effectively use InformaCast, it is useful to understand the following terms:
• A broadcast is an audio and/or textual message that is sent to a combination of endpoints, called recipients.
• A message contains the text and/or audio that will be broadcast and the recipients that will receive the broadcast.
• A recipient is an endpoint such as a digital phone, a computer, an email address, or an IP-enabled speaker. More than one recipient of any type can be organized into recipient groups.
• A user is a person who will use InformaCast to send a broadcast to one or more recipients.
• A user group is a set of users. Typically, groups are used to give a set of users the same capabilities, such as recording a message or sending messages to a specific set of recipients.
• A role is a set of predefined capabilities, such as the ability to send messages or the ability to administer security. One or more roles may be assigned to users, which in turn allows those users to use those sets of capabilities. Roles may also be assigned to groups.
Users are given privileges to use the system. Once you create a user, you will assign roles to it. By default, users have no access to the system until they are associated with one or more roles.
Add a Recipient GroupIf you’d like to be able to send messages to smaller groups of recipients (rather than all the endpoints in your system), you must set up appropriate recipient groups within InformaCast.
Note By default, InformaCast initially creates an “(All Recipients)” group, which contains all the recipients that can be discovered.
Step 1 Go to Recipients | Edit Recipient Groups. This page shows the number of phones, plugin recipients, and currently registered IP speakers for each group.
Note Only licensed options will appear on this page. For example, if your system is not licensed for IP speakers, the Speakers column will not appear.
Step 2 Click the Add button, name your recipient group, and decide whether you will add members to the group by selecting individual recipients or by making rules (a third option of selecting multiple, existing recipient groups is only available once you’ve created recipient groups and is discussed further in the “InformaCast Installation and User Guide, v8.1”):
• If you have chosen to select recipients, select the Individually checkbox, click its Edit button, and move your recipients from the Available Recipients area to the Selected Recipients area in the Select Individual Recipients pop-up window that appears. Filter your list by entering text in the Filter field. This text will be matched to values of the constraints described in the table on page 7. Click the Submit button to save your selection(s)
6Cisco Unified Communications Manager Express Telephony Environment
Version 8.1

InformaCast Quick Start Guide - ConfidentialUse InformaCast
• If you have chosen to make rules, select the Filter with Rules checkbox, click its Edit button, and use the dropdown menus/fields to create rules to which recipients will/will not match and thus be included or excluded from the recipient group. The rule parameters are described in the following table.
Matching Parameter Description
Communications Manager Device Type Phones that match (or don’t match) the specified model, as reported by the Communications Manager Express server.
If you choose Equal as your constraint, you get a dropdown menu with human-oriented model names. Otherwise, you will see the underlying numeric code number assigned by Cisco.
Can Display Text Recipients that match (or don’t match) in their ability to display text. Recipients that can display text are typically Desktop Notification System machines and IP phones.a
Can Listen Speakers or Desktop Notification System machines that match (or don’t match) in their ability to listen. Recipients that can listen (to what’s going on at another speaker) are typically Desktop Notification System machines.a
Can Play High-Quality Audio Speakers or Desktop Notification System machines that match (or don’t match) in their ability to play high-quality audio.a
Can Record Speakers or Desktop Notification System machines that match (or don’t match) in their ability to record.a
Can Record High-Quality Audio Speakers or Desktop Notification System machines that match (or don’t match) in their ability to record high-quality audio.a
Description Recipients that match (or don’t match) the supplied description value. This is often a useful grouping tool because you have control over the description of the recipients in your system, so you can set up your descriptions in ways that facilitate grouping.
The text you enter will be compared against the Device Description entries of phones registered with your Communications Manager Express server and IP speakers defined in InformaCast. Any recipients whose descriptions match with the rule you’ve specified will be considered part of the recipient group.
7Cisco Unified Communications Manager Express Telephony Environment
Version 8.1

InformaCast Quick Start Guide - ConfidentialUse InformaCast
Dial Code Speakers or Desktop Notification System machines that match (or don’t match) the supplied dial code. Dial codes can also be used to trigger broadcasts using URLs in other applications, or identify recipients using the interface on a phone.
Directory Numbers Phones that match (or don’t match) the supplied phone number(s) assigned to them in the Communications Manager Express Server.a
IP Address Recipients that match (or don’t match) the supplied subnet boundaries. When choosing this parameter, you are given a new Comparison Type choice, Belongs to Subnet, which allows you to enter a subnet mask like 172.17.30.0/8. See “Subnet Matching” on page 523 for more information about this approach.
InformaCast Device Type Recipients that match (or don’t match) in their functionality as an IP phone or an IP speaker.
Is Registered IP speakers or Desktop Notification System machines that match (or don’t match) in their status of being registered on the network.
This parameter doesn’t apply when building recipient groups because only registered IP speakers/Desktop Notification System machines can participate in broadcasts. However, it is useful in filtering the speaker list and tracking down wayward speakers during configuration (see “Adding Individual IP Speakers” on page 387).
Location Recipients that match (or don’t match) the supplied location value.
MAC Address Speakers or Desktop Notification System machines that match (or don’t match) the supplied network hardware address of the recipient, which is guaranteed to be unique across your network.
Name Speakers or Desktop Notification System machines that match (or don’t match) the supplied name. Like the Description parameter, you have control over names, so they may useful for grouping, but should be concise.
Volume Speakers or Desktop Notification System machines that match (or don’t match) the supplied playback volume.
Matching Parameter Description
8Cisco Unified Communications Manager Express Telephony Environment
Version 8.1
InformaCast Quick Start Guide - ConfidentialUse InformaCast
Step 3 Click the Update button when you are done creating your recipient group.
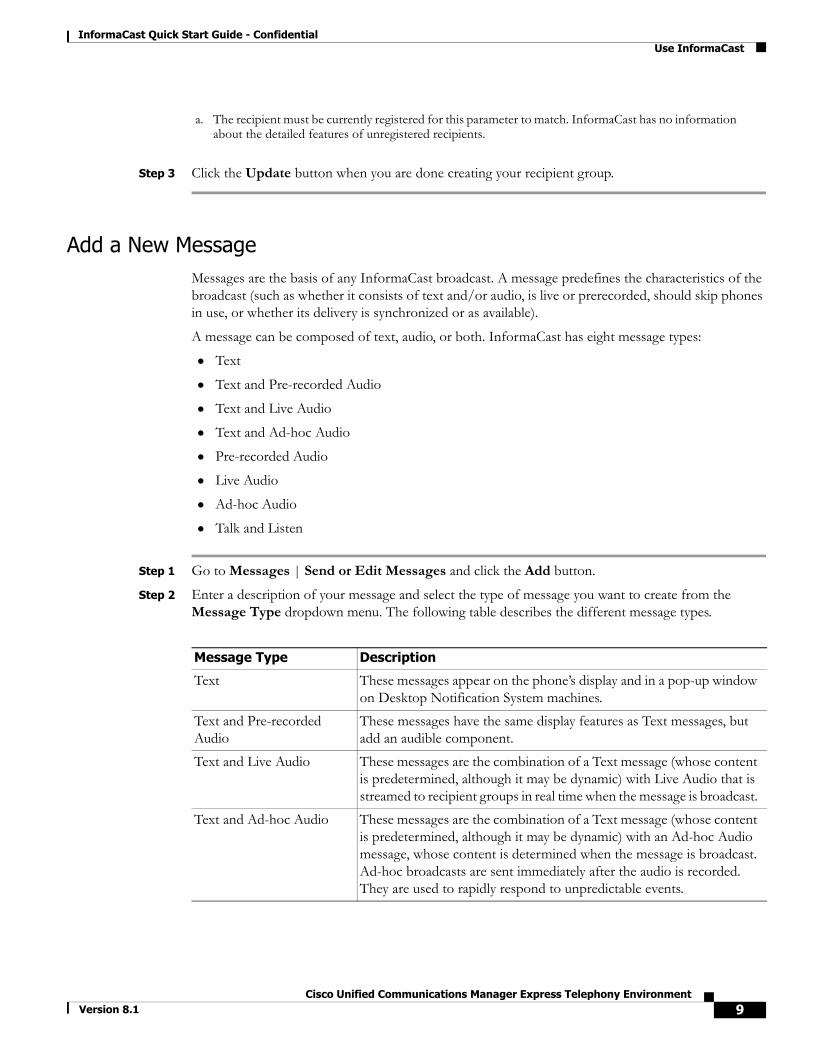
Add a New MessageMessages are the basis of any InformaCast broadcast. A message predefines the characteristics of the broadcast (such as whether it consists of text and/or audio, is live or prerecorded, should skip phones in use, or whether its delivery is synchronized or as available).
A message can be composed of text, audio, or both. InformaCast has eight message types:
• Text
• Text and Pre-recorded Audio
• Text and Live Audio
• Text and Ad-hoc Audio
• Pre-recorded Audio
• Live Audio
• Ad-hoc Audio
• Talk and Listen
Step 1 Go to Messages | Send or Edit Messages and click the Add button.
Step 2 Enter a description of your message and select the type of message you want to create from the Message Type dropdown menu. The following table describes the different message types.
a. The recipient must be currently registered for this parameter to match. InformaCast has no information about the detailed features of unregistered recipients.
Message Type Description
Text These messages appear on the phone’s display and in a pop-up window on Desktop Notification System machines.
Text and Pre-recorded Audio
These messages have the same display features as Text messages, but add an audible component.
Text and Live Audio These messages are the combination of a Text message (whose content is predetermined, although it may be dynamic) with Live Audio that is streamed to recipient groups in real time when the message is broadcast.
Text and Ad-hoc Audio These messages are the combination of a Text message (whose content is predetermined, although it may be dynamic) with an Ad-hoc Audio message, whose content is determined when the message is broadcast. Ad-hoc broadcasts are sent immediately after the audio is recorded. They are used to rapidly respond to unpredictable events.
9Cisco Unified Communications Manager Express Telephony Environment
Version 8.1

InformaCast Quick Start Guide - ConfidentialUse InformaCast
Step 3 Select the Allow Customization checkbox if you want to allow your users to change the contents of a message before it is sent out as a broadcast. When sending a message through the web interface, the Short and Long Text fields of the Text tab will be customizable. Applications initiating broadcasts through the Web Services API will be able to change the Short and Long Text fields of the Text tab and the Audio field of the Audio tab.
Warning If the Allow Customization checkbox is not selected, broadcast requests through the Web Services API (e.g. external applications programmed to initiate InformaCast broadcasts like InformaCast Director, DORA, and CallAware) will be blocked if you chose to override text or audio in the external application. For example, if CallAware tries to send a broadcast with the initiating phone’s DN in the Short Text field, the broadcast will fail if Allow Customization is not selected for that message in InformaCast.
Step 4 Select the Require Confirmation checkbox to display the Confirmation tab, which allows you to specify your message’s confirmation parameters, such as whether confirmation will be required, how confirmation will be configured, whether there will be escalation upon confirmation, etc. The Require Confirmation checkbox and Confirmation tab will only appear for the following message types: Text, Text and Pre-Recorded Audio, Text and Live Audio, and Text and Ad-Hoc Audio.
Note The text of messages that require confirmation will always be persistent, i.e. the text component of your broadcast will remain on an IP phone indefinitely (and the Persistent Text checkbox on the Text tab will be automatically selected and grayed out); subsequent broadcasts will not replace it.
The following sections walk you through the process of filling in the Add Message page tabs. Depending on the message type you selected, these tabs (and the selections available on them) will appear/disappear as appropriate.
Pre-Recorded Audio These messages are audio only and are sent to the specified combination of phones, IP speakers, and Desktop Notification System machines. These messages have no display component; they do not affect the display of the phone (other than a small animation showing incoming stream activity, and the illumination of the Mute and Speaker lights during the audio broadcast).
Live Audio In these messages, the audio is not recorded at all; it is streamed to recipient groups in real time when the message is broadcast.
Ad-hoc Audio These messages are a form of Audio message in which the audio is not recorded in advance; instead, it is recorded each time the message is sent. Ad-hoc broadcasts are sent immediately after the audio is recorded. They are used to rapidly respond to unpredictable events.
Talk and Listen Talk and Listen messages allow any phone in a recipient group to speak, in real time (“live”), to all the other phones receiving the broadcast by pressing a Talk softkey. Other listeners can respond by pressing the Talk softkey on their own phones.
Message Type Description
10Cisco Unified Communications Manager Express Telephony Environment
Version 8.1
InformaCast Quick Start Guide - ConfidentialUse InformaCast
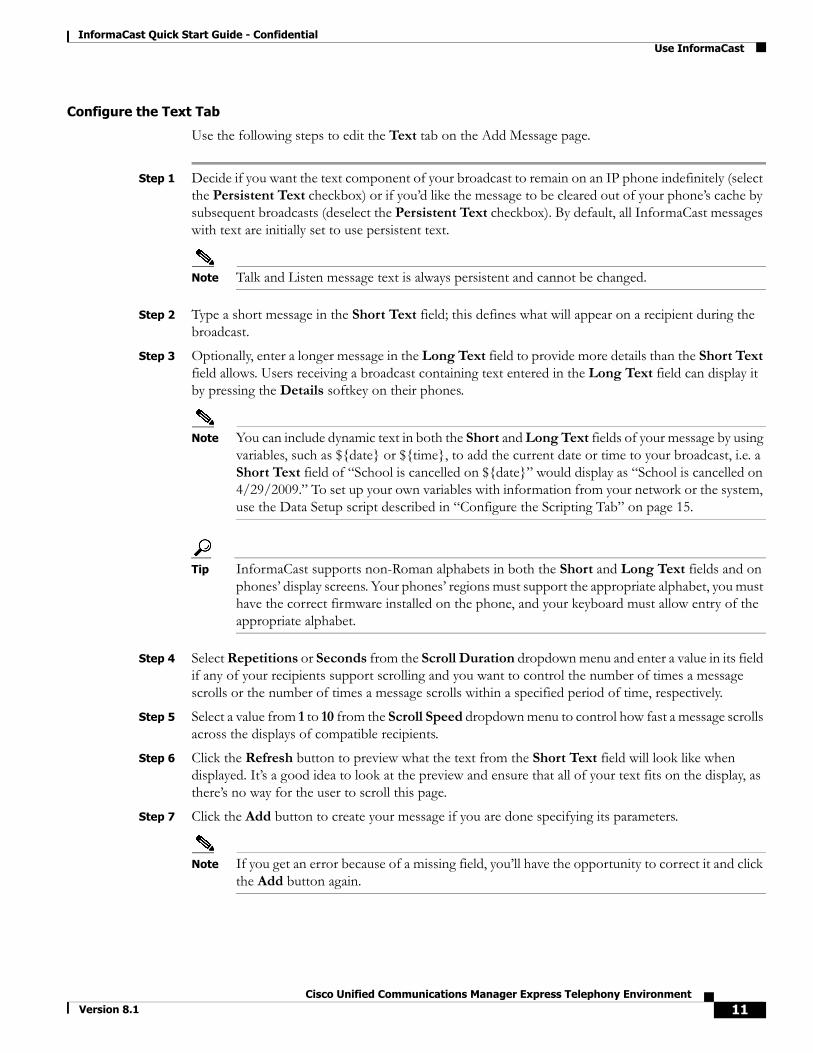
Configure the Text Tab
Use the following steps to edit the Text tab on the Add Message page.
Step 1 Decide if you want the text component of your broadcast to remain on an IP phone indefinitely (select the Persistent Text checkbox) or if you’d like the message to be cleared out of your phone’s cache by subsequent broadcasts (deselect the Persistent Text checkbox). By default, all InformaCast messages with text are initially set to use persistent text.
Note Talk and Listen message text is always persistent and cannot be changed.
Step 2 Type a short message in the Short Text field; this defines what will appear on a recipient during the broadcast.
Step 3 Optionally, enter a longer message in the Long Text field to provide more details than the Short Text field allows. Users receiving a broadcast containing text entered in the Long Text field can display it by pressing the Details softkey on their phones.
Note You can include dynamic text in both the Short and Long Text fields of your message by using variables, such as ${date} or ${time}, to add the current date or time to your broadcast, i.e. a Short Text field of “School is cancelled on ${date}” would display as “School is cancelled on 4/29/2009.” To set up your own variables with information from your network or the system, use the Data Setup script described in “Configure the Scripting Tab” on page 15.
Tip InformaCast supports non-Roman alphabets in both the Short and Long Text fields and on phones’ display screens. Your phones’ regions must support the appropriate alphabet, you must have the correct firmware installed on the phone, and your keyboard must allow entry of the appropriate alphabet.
Step 4 Select Repetitions or Seconds from the Scroll Duration dropdown menu and enter a value in its field if any of your recipients support scrolling and you want to control the number of times a message scrolls or the number of times a message scrolls within a specified period of time, respectively.
Step 5 Select a value from 1 to 10 from the Scroll Speed dropdown menu to control how fast a message scrolls across the displays of compatible recipients.
Step 6 Click the Refresh button to preview what the text from the Short Text field will look like when displayed. It’s a good idea to look at the preview and ensure that all of your text fits on the display, as there’s no way for the user to scroll this page.
Step 7 Click the Add button to create your message if you are done specifying its parameters.
Note If you get an error because of a missing field, you’ll have the opportunity to correct it and click the Add button again.
11Cisco Unified Communications Manager Express Telephony Environment
Version 8.1
InformaCast Quick Start Guide - ConfidentialUse InformaCast
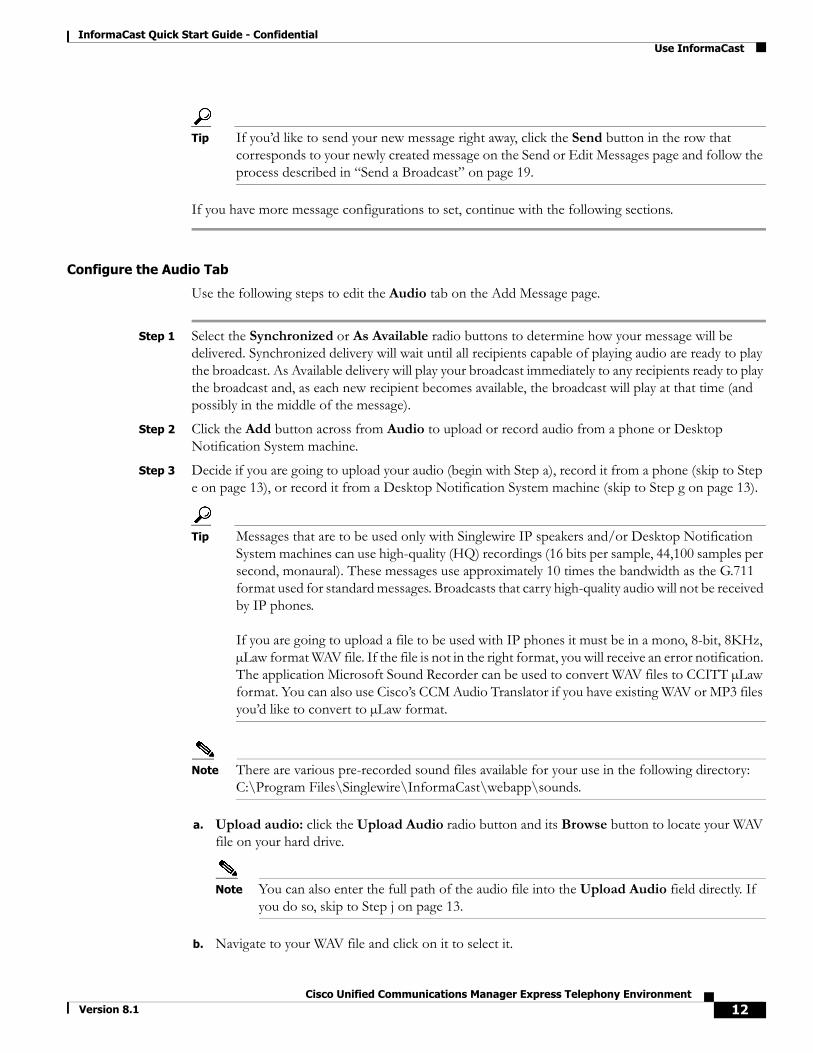
Tip If you’d like to send your new message right away, click the Send button in the row that corresponds to your newly created message on the Send or Edit Messages page and follow the process described in “Send a Broadcast” on page 19.
If you have more message configurations to set, continue with the following sections.
Configure the Audio Tab
Use the following steps to edit the Audio tab on the Add Message page.
Step 1 Select the Synchronized or As Available radio buttons to determine how your message will be delivered. Synchronized delivery will wait until all recipients capable of playing audio are ready to play the broadcast. As Available delivery will play your broadcast immediately to any recipients ready to play the broadcast and, as each new recipient becomes available, the broadcast will play at that time (and possibly in the middle of the message).
Step 2 Click the Add button across from Audio to upload or record audio from a phone or Desktop Notification System machine.
Step 3 Decide if you are going to upload your audio (begin with Step a), record it from a phone (skip to Step e on page 13), or record it from a Desktop Notification System machine (skip to Step g on page 13).
Tip Messages that are to be used only with Singlewire IP speakers and/or Desktop Notification System machines can use high-quality (HQ) recordings (16 bits per sample, 44,100 samples per second, monaural). These messages use approximately 10 times the bandwidth as the G.711 format used for standard messages. Broadcasts that carry high-quality audio will not be received by IP phones. If you are going to upload a file to be used with IP phones it must be in a mono, 8-bit, 8KHz, µLaw format WAV file. If the file is not in the right format, you will receive an error notification. The application Microsoft Sound Recorder can be used to convert WAV files to CCITT µLaw format. You can also use Cisco’s CCM Audio Translator if you have existing WAV or MP3 files you’d like to convert to µLaw format.
Note There are various pre-recorded sound files available for your use in the following directory: C:\Program Files\Singlewire\InformaCast\webapp\sounds.
a. Upload audio: click the Upload Audio radio button and its Browse button to locate your WAV file on your hard drive.
Note You can also enter the full path of the audio file into the Upload Audio field directly. If you do so, skip to Step j on page 13.
b. Navigate to your WAV file and click on it to select it.
12Cisco Unified Communications Manager Express Telephony Environment
Version 8.1
InformaCast Quick Start Guide - ConfidentialUse InformaCast
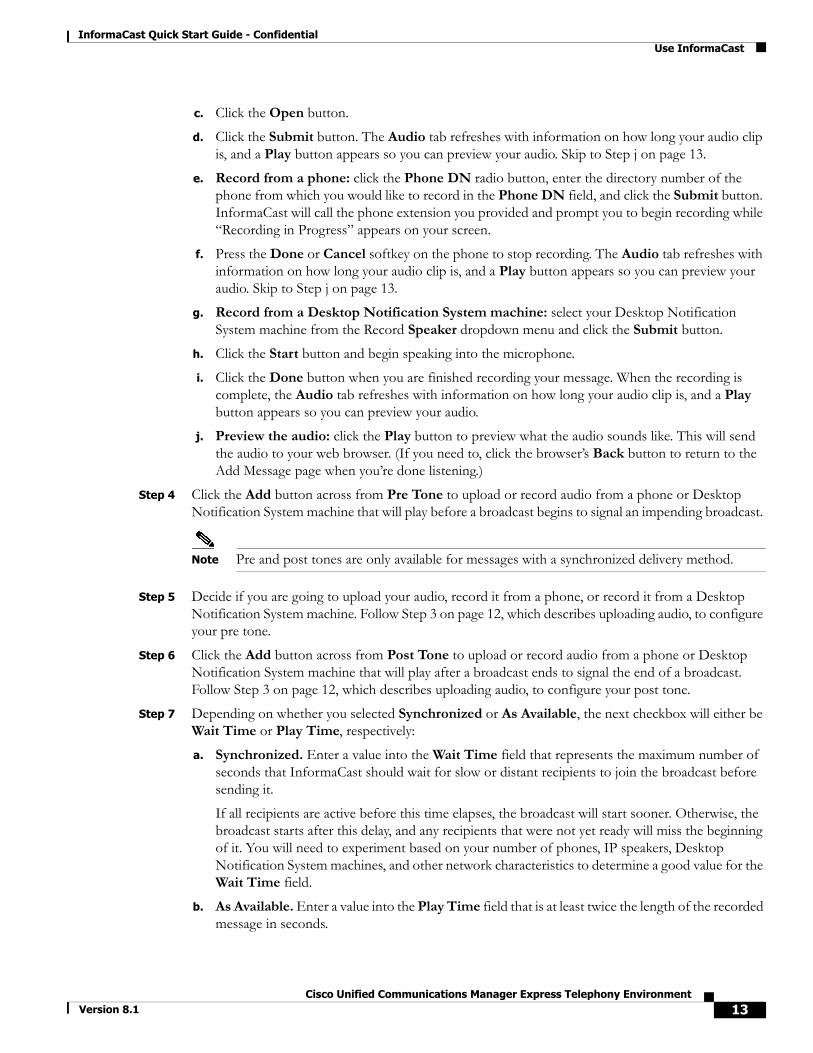
c. Click the Open button.
d. Click the Submit button. The Audio tab refreshes with information on how long your audio clip is, and a Play button appears so you can preview your audio. Skip to Step j on page 13.
e. Record from a phone: click the Phone DN radio button, enter the directory number of the phone from which you would like to record in the Phone DN field, and click the Submit button. InformaCast will call the phone extension you provided and prompt you to begin recording while “Recording in Progress” appears on your screen.
f. Press the Done or Cancel softkey on the phone to stop recording. The Audio tab refreshes with information on how long your audio clip is, and a Play button appears so you can preview your audio. Skip to Step j on page 13.
g. Record from a Desktop Notification System machine: select your Desktop Notification System machine from the Record Speaker dropdown menu and click the Submit button.
h. Click the Start button and begin speaking into the microphone.
i. Click the Done button when you are finished recording your message. When the recording is complete, the Audio tab refreshes with information on how long your audio clip is, and a Play button appears so you can preview your audio.
j. Preview the audio: click the Play button to preview what the audio sounds like. This will send the audio to your web browser. (If you need to, click the browser’s Back button to return to the Add Message page when you’re done listening.)
Step 4 Click the Add button across from Pre Tone to upload or record audio from a phone or Desktop Notification System machine that will play before a broadcast begins to signal an impending broadcast.
Note Pre and post tones are only available for messages with a synchronized delivery method.
Step 5 Decide if you are going to upload your audio, record it from a phone, or record it from a Desktop Notification System machine. Follow Step 3 on page 12, which describes uploading audio, to configure your pre tone.
Step 6 Click the Add button across from Post Tone to upload or record audio from a phone or Desktop Notification System machine that will play after a broadcast ends to signal the end of a broadcast. Follow Step 3 on page 12, which describes uploading audio, to configure your post tone.
Step 7 Depending on whether you selected Synchronized or As Available, the next checkbox will either be Wait Time or Play Time, respectively:
a. Synchronized. Enter a value into the Wait Time field that represents the maximum number of seconds that InformaCast should wait for slow or distant recipients to join the broadcast before sending it.
If all recipients are active before this time elapses, the broadcast will start sooner. Otherwise, the broadcast starts after this delay, and any recipients that were not yet ready will miss the beginning of it. You will need to experiment based on your number of phones, IP speakers, Desktop Notification System machines, and other network characteristics to determine a good value for the Wait Time field.
b. As Available. Enter a value into the Play Time field that is at least twice the length of the recorded message in seconds.
13Cisco Unified Communications Manager Express Telephony Environment
Version 8.1
InformaCast Quick Start Guide - ConfidentialUse InformaCast
Note Pre and post tones are not available when you have selected As Available as your delivery method.
Step 8 Select the Skip Phones in Use checkbox if phones that are being used when this message goes out should be skipped. When Skip Phones in Use is checked, InformaCast will refrain from sending the audio portion of the broadcast to any phones that are involved in calls at the time.
Step 9 Select the volume at which you want the broadcast played from the Play Volume dropdown menu. The Play Volume dropdown menu can be used to override the stream volume setting on the phones and speakers when playing the message. The default setting of As-Is leaves the volume unchanged, and is the safest choice because it is compatible with all multicast-capable phone loads. You can also choose Maximum, Medium, or Low to request that the message be played at the specified volume. However, before relying on a message with such a setting, test it to make sure that your phone and firmware are compatible with this feature. At the time of this writing, only the latest firmware for the Cisco 7920, 7940, 7941, 7960, 7961, 7970, and 7971 phones are compatible with volume control. Trying to use it with other phones or firmware may cause the broadcast to fail on those phones.
Step 10 Click the Ring Tone checkbox if you want the audio message to be available as a ring tone within the Bell Scheduler.
Step 11 Select the priority level for your message from the Message Priority dropdown menu. The lower the number, the higher the priority, i.e. a priority level 1 message is a higher priority (more important) than a priority level 3 message.
Note Priorities can only be assigned to messages with an audio component.
Step 12 Click the Add button to create your message if you are done specifying its parameters.
Note If you get an error because of a missing field, you’ll have the opportunity to correct it and click the Add button again.
Tip If you’d like to send your new message right away, click the Send button in the row that corresponds to your newly created message on the Send or Edit Messages page and follow the process described in “Send a Broadcast” on page 19.
If you have more message configurations to set, continue with the following sections.
Configure the Re-broadcasting Tab
Use the following steps to edit the Re-broadcasting tab on the Add Message page.
Step 1 Click the Re-broadcast checkbox if you’d like your message to be broadcast more than once.
14Cisco Unified Communications Manager Express Telephony Environment
Version 8.1
InformaCast Quick Start Guide - ConfidentialUse InformaCast
Note Dynamic content for re-broadcasted messages is only rendered once, i.e. if you have dynamic text in the Short Text field, such as “School is delayed until ${time}” (which displays as “School is delayed until 9:15 a.m.”), the time will continue to say 9:15 a.m. even though the message may re-broadcast past 9:15 a.m. In addition, any scripts attached to this message will not be re-run for re-broadcasts.
Step 2 Click the Re-broadcast Until Stopped checkbox if you’d like your message to be repeatedly broadcast until it is manually stopped.
Tip Re-broadcast Until Stopped should only be used for emergency purposes, e.g. a disaster has occurred and you need alert the occupants of your building before evacuating yourself.
Note When there are broadcasts occurring, InformaCast will display a short note at the top of the Send or Edit Messages page with a View button. Clicking this button opens a list of active broadcasts. A message with Re-broadcast Until Stopped selected can be stopped by finding it in this list of active broadcasts and clicking the End button next to it.
Step 3 Enter a numerical value (2 or greater) in the Broadcast Count field to designate how many times your message will be broadcast.
Step 4 Enter a numerical value in the Pause field to designate how many seconds InformaCast should wait between broadcasting your message.
Step 5 Click the Add button to create your message if you are done specifying its parameters.
Tip If you’d like to send your new message right away, click the Send button in the row that corresponds to your newly created message on the Send or Edit Messages page and follow the process described in “Send a Broadcast” on page 19.
If you have more message configurations to set, continue with the following sections.
Configure the Scripting Tab
There are three available scripts:
• Data Setup. Pulls dynamic information (e.g. RSS feeds, weather warning details, security threat levels, etc.—anything you can access programmatically over a network) from other sources.
• Audio Replacement. Pulls dynamic audio (e.g. weather reports, stock tickers, synthesized text using text-to-speech software, etc.) from other sources and attaches it to a message.
• Send in Progress. Runs as soon as enough information has been gathered to begin activating recipients, i.e. as a broadcast starts going out, and triggers other events, such as sending an email (which could lead to an SMS message to some cell phones), activating other electrical devices using DORA and a contact closure if you have that configured, snapping a picture if you have a network camera, etc.
15Cisco Unified Communications Manager Express Telephony Environment
Version 8.1

InformaCast Quick Start Guide - ConfidentialUse InformaCast
Note These scripts will apply only to this message.
Step 1 Click the Update button next to Data Setup, Audio Replacement, and/or Send in Progress.
Tip Click the Help button next to any script’s name for a more detailed definition of the script’s purpose and the variables available for your use.
Step 2 Click the Browse button and navigate to where you have saved your JavaScript file containing your script.
Step 3 Select it and click the Open button.
Step 4 Click the Submit button. The Scripting tab refreshes with a status of “Attached” and new buttons:
• View. Opens a script pop-up window that allows you to view the text of your script. Click the OK button to exit.
Note You cannot edit your script from this pop-up window. To edit your script, open the original JavaScript file in your preferred text editor, modify it, and upload the script again to your InformaCast message or click the Download button, modify your script, and upload it again to your message.
• Delete. Deletes the script from your message.
• Download. Allows you to open your script in a text editor for modifications.
Note If you make modifications to your script through the Download button, you will need to upload your script to InformaCast again in order to see your changes.
Step 5 Click the Add button to create your message.
Tip If you’d like to send your new message right away, click the Send button in the row that corresponds to your newly created message on the Send or Edit Messages page and follow the process described in “Send a Broadcast” on page 19.
If you have more message configurations to set, continue with the following section.
Configure the Confirmation Tab
Use the following steps to configure the Confirmation tab of the Add Message page.
Note To configure this tab, you should have already selected in the Require Confirmation checkbox in Step 4 on page 10. By default, this checkbox is not selected, and the Confirmation tab is not visible.
16Cisco Unified Communications Manager Express Telephony Environment
Version 8.1
InformaCast Quick Start Guide - ConfidentialUse InformaCast
Tip Sending a large number of broadcasts (e.g. >40,000) that require confirmation during the time period specified by the Broadcast History Retention Period field (Admin | Broadcast Parameters) will cause page performance issues. Ensure that your Broadcast History Retention Period field is set to a low value (e.g. 7 - 10). This prevents the Confirmation Statistics page from being overloaded with outdated information.
Step 1 Select the Skip No-response Recipients checkbox to skip sending this message to recipients that are unable to provide confirmation.
Note InformaCast doesn’t discriminate between recipients than can/cannot confirm a message; if they are included as recipients to a broadcast that requires confirmation, they will receive it.
Step 2 Select the Set a Time Limit checkbox and enter a value (in minutes) in its corresponding field to set how long InformaCast will collect recipients’ confirmations. Confirmations received after this time will not be registered.
Step 3 Select either the Acknowledge or Respond radio buttons next to Confirmation Mode to determine how confirmation will be applied:
• Acknowledge. By default, the Acknowledge radio button is selected, which requires that the message’s recipients simply acknowledge the fact that they received the message. When a recipient receives a broadcast configured with the Acknowledge confirmation mode, it will display the text of the message to you and provide a user interface element (e.g. a push button, link, etc.), allowing you to indicate that you have received and read the message (and perhaps hear its audio if the message has an audio component). When you activate that user interface element, the acknowledgement will be delivered to InformaCast.
• Respond. The Respond radio button allows recipients to respond to the message with one of several pre-defined responses. When a recipient receives a broadcast configured with the Respond confirmation mode, it will display the text of the message and let the recipient respond to it with one of several responses. The response will then be delivered to InformaCast.
Step 4 Continue with “Configure the Acknowledge Confirmation Mode” on page 17 or “Configure the Respond Confirmation Mode” on page 18.
Configure the Acknowledge Confirmation Mode
Use the following steps for the Acknowledge confirmation mode. For the Respond confirmation mode, skip to “Configure the Respond Confirmation Mode” on page 18.
Step 1 Select the Acknowledge radio button next to Confirmation Mode.
Step 2 Select the Set Confirmations Needed checkbox and enter a positive value in its checkbox if you want to limit the total number of acknowledgements that InformaCast will register. By default, this checkbox is unchecked and InformaCast will register all recipient acknowledgements it receives. If this checkbox is checked, you are required to specify the maximum number of acknowledgements InformaCast should register before it stops accepting further acknowledgements.
17Cisco Unified Communications Manager Express Telephony Environment
Version 8.1

InformaCast Quick Start Guide - ConfidentialUse InformaCast
Step 3 If the Set Confirmations Needed checkbox is selected, you can optionally select the Escalate on Failure checkbox to enable InformaCast to send an escalation Text broadcast to a particular recipient group when the desired number of acknowledgements cannot be registered. When the Escalate on Failure checkbox is selected, you are required to choose a recipient group from the Escalation Recipient Group dropdown menu and enter the text of the message into the Escalation Message Text input field.
Note Dynamic text (e.g. {date}) cannot be used in the Escalation Message Text input field.
Step 4 Click the Submit button to add your confirmation response.
Step 5 Click the Add button to create your message if you are done specifying its parameters.
Tip If you’d like to send your new message right away, click the Send button in the row that corresponds to your newly created message on the Send or Edit Messages page and follow the process described in “Send a Broadcast” on page 19.
Configure the Respond Confirmation Mode
Use the following steps for the Respond confirmation mode. For the Acknowledge confirmation mode, go to “Configure the Acknowledge Confirmation Mode” on page 17.
Step 1 Select the Respond radio button next to Confirmation Mode.
Step 2 Click the Add button next to Confirmation Responses and enter the text to display as a response in the Response Text field (e.g. Yes, I’m coming or No, I can’t make it).
Step 3 Optionally, select the Set Responders Needed checkbox and enter a value in its field to specify the maximum number of responders for this response.
Note A maximum of 16 confirmation responses can be created for each InformaCast message.
Step 4 If the Set Confirmations Needed checkbox is selected, you can optionally select the Escalate on Failure checkbox to enable InformaCast to send an escalation Text broadcast to a particular recipient group when the desired number of acknowledgements cannot be registered. When the Escalate on Failure checkbox is selected, you are required to choose a recipient group from the Escalation Recipient Group dropdown menu and enter the text of the message into the Escalation Message Text input field.
Note Dynamic text (e.g. {date}) cannot be used in the Escalation Message Text input field.
Step 5 Click the Submit button to add your confirmation response.
18Cisco Unified Communications Manager Express Telephony Environment
Version 8.1

InformaCast Quick Start Guide - ConfidentialUse InformaCast
Step 6 Click the Add button to create your message if you are done specifying its parameters.
Tip If you’d like to send your new message right away, click the Send button in the row that corresponds to your newly created message on the Send or Edit Messages page and follow the process described in “Send a Broadcast” on page 19.
Send a BroadcastA message, when sent to identified recipient groups, is called a broadcast. Depending on the message you are sending, you will need to follow a different set of steps:
• For Text, Text and Pre-recorded Audio, and Pre-recorded Audio messages, follow the steps in “Send a Pre-recorded Broadcast” on page 19
• For Text and Live Audio and Live Audio messages, follow the steps in “Send a Live Audio Broadcast” on page 20
• For Text and Ad-hoc Audio and Ad-hoc Audio messages, follow the steps in “Send an Ad-hoc Broadcast” on page 21
Note You must be logged in as a user with the role of messageAdmin, messageSender, or messageSenderDNsRestricted in order to send a message.
Send a Pre-recorded Broadcast
Use the following steps for sending Text, Text and Pre-recorded Audio, and Pre-recorded Audio messages.
Step 1 Go to Messages | Send or Edit Messages.
Step 2 Click the Send button in the row of the message you want to send.
Step 3 Select the recipient group or groups to which you’d like to send the message by clicking the boxes to the left of the recipient groups’ names. Alternatively, you can enter the extension(s) of the phones to which you’d like to send the message in the IP Phone Extension (DN) field. Separate each extension number with a comma.
Note Depending on your assigned role, you may or may not be able to send messages to DNs to which you have not been assigned direct access.
Step 4 Click the Send button and the message will be sent out as a broadcast.
19Cisco Unified Communications Manager Express Telephony Environment
Version 8.1
InformaCast Quick Start Guide - ConfidentialUse InformaCast
Send a Live Audio Broadcast
Use the following steps to send Text and Live Audio and Live Audio messages. To send a Live Audio broadcast, you can use either a Desktop Notification System machine or a phone as the source of the audio.
Step 1 Go to Messages | Send or Edit Messages.
Step 2 Click the Send button of the live message you want to send.
Step 3 Select the recipient group or groups to which you’d like to send the message by clicking the boxes to the left of the recipient groups’ names.
Note If the audio source of a live message (i.e. a phone, speaker, or Desktop Notification System machine) is initially contained in the list of recipients, it will be removed. For example, if a live broadcast is made from a phone to the All Recipients recipient group, that initiating phone will not receive the message, even though it is a member of the All Recipients recipient group.
Step 4 Click the Send button.
Decide if you will dictate your audio message from a phone or Desktop Notification System (machine or IP speaker):
• If you will be using a Desktop Notification System machine, continue with Step 5
• If you will be using a phone, skip to Step 9 on page 20
Step 5 From a Desktop Notification System machine: Select a Desktop Notification System machine from the Speaker dropdown menu.
Note Only Desktop Notification System machines that have registered with the InformaCast server and which are currently active on the network will be available as choices for dictating audio. If there are no such recipients available, you will get an error message.
Step 6 Click the Send button. The Desktop Notification System opens a status window on the machine where the Desktop Notification System is installed.
Step 7 Click the Start button. The broadcast will begin immediately to the recipient group(s) you specified, and the status updates to show that you are broadcasting.
Step 8 Click the Done button when you are finished dictating your message. Your broadcast ends immediately. You have completed this procedure.
Note If you’re using a Desktop Notification System as the live audio source, a pre tone that has been recorded and associated with the message will not sound. Pre tones only function with live audio broadcasts when you’re using a phone as the audio source. Post tones will still work accordingly, regardless of the audio source.
Step 9 From a phone: Enter the extension of a phone to which you have access in the Dial Number field.
20Cisco Unified Communications Manager Express Telephony Environment
Version 8.1

InformaCast Quick Start Guide - ConfidentialUse InformaCast
Note This phone must be configured to be reachable from the calling search space of the CTI ports created for InformaCast, and the device pool used by the phone must be configured with a region using the G.711 codec from the InformaCast server to the phone.
Step 10 Click the Send button. Once you submit the phone number, InformaCast will immediately place a call to that number and pop up a control screen on your phone. Press the Talk softkey and begin your message. The broadcast will begin immediately to the recipient group(s) that you specified. When you are finished, press the Done softkey to end your broadcast.
Send an Ad-hoc Broadcast
Ad-hoc broadcasts are sent immediately after the audio is recorded; they are used if you want to be able to cancel and start again in case you misspeak, without anyone hearing the mistakes.
Step 1 Go to Messages | Send or Edit Messages. The Send or Edit Messages page appears.
Step 2 Click the Send button of the ad-hoc message you want to send. If InformaCast still has the set of messages with which it shipped, you can use the one labeled “(Example Ad-Hoc Broadcast).” The Send Message page appears.
Step 3 Select the recipient group or groups to which you’d like to send the message by clicking the boxes to the left of the recipient groups’ names.
Step 4 Click the Send button. The Send Message page refreshes.
Step 5 Decide if you will record your audio message from a phone or a Desktop Notification System machine (or IP speaker):
• If you will be using a Desktop Notification System machine, continue with Step 6
• If you will be using a phone, skip to Step 10
Step 6 From a Desktop Notification System machine: Select a Desktop Notification System machine from the Speaker dropdown menu. Only Desktop Notification System machines that have registered with the InformaCast server and which are currently active on the network will be available as choices for dictating audio. If there are no such recipients available, you will get an error message.
Step 7 Click the Send button. The Desktop Notification System opens a status window on the machine where the Desktop Notification System is installed.
Step 8 Click the Start button and begin speaking into the microphone. The status updates to show that you are recording.
Step 9 Click the Done button when you are finished recording your message. Your message is sent immediately.
Step 10 From a phone: Enter the extension of a phone to which you have access in the Dial Number field.
Note This phone must be configured to be reachable from the calling search space of the CTI ports created for InformaCast, and the device pool used by the phone must be configured with a region using the G.711 codec from the InformaCast server to the phone.
21Cisco Unified Communications Manager Express Telephony Environment
Version 8.1
InformaCast Quick Start Guide - ConfidentialUse InformaCast
Step 11 Click the Record button.
Step 12 Record your message. Once you’re done recording, press the Done softkey. If you are in the recording process and decide that you would not like to send the broadcast after all, you can cancel it at any time by pressing the Cancel softkey.
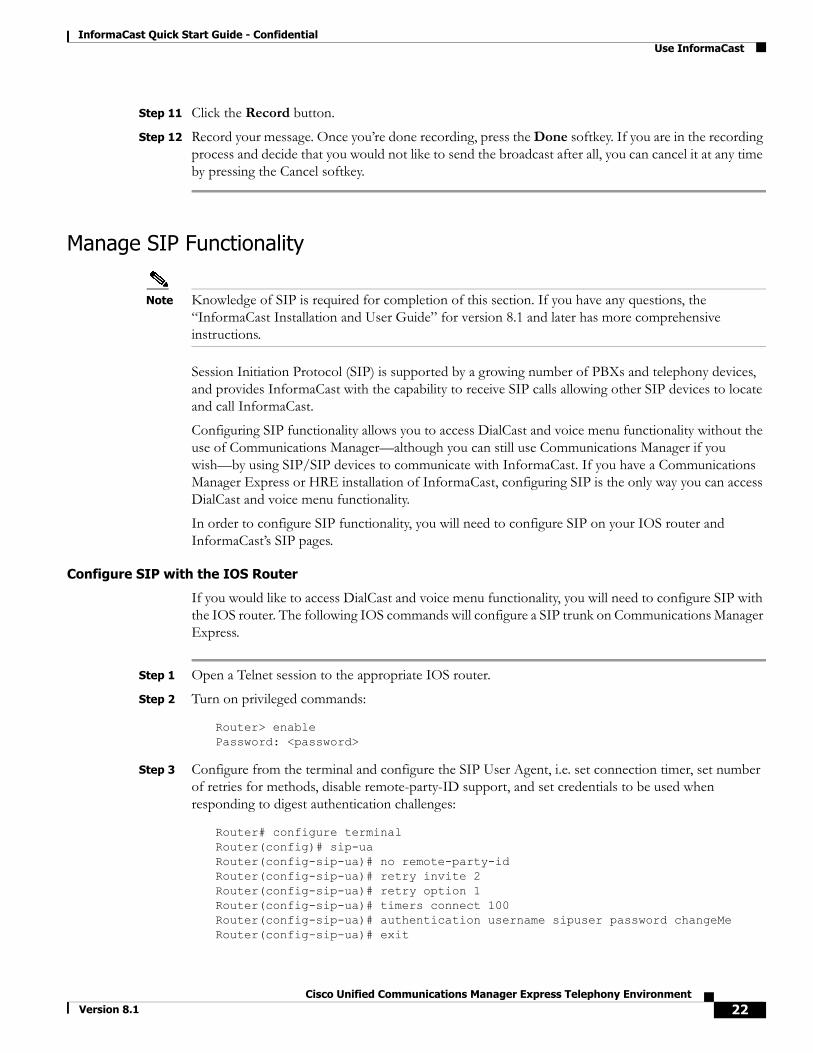
Manage SIP Functionality
Note Knowledge of SIP is required for completion of this section. If you have any questions, the “InformaCast Installation and User Guide” for version 8.1 and later has more comprehensive instructions.
Session Initiation Protocol (SIP) is supported by a growing number of PBXs and telephony devices, and provides InformaCast with the capability to receive SIP calls allowing other SIP devices to locate and call InformaCast.
Configuring SIP functionality allows you to access DialCast and voice menu functionality without the use of Communications Manager—although you can still use Communications Manager if you wish—by using SIP/SIP devices to communicate with InformaCast. If you have a Communications Manager Express or HRE installation of InformaCast, configuring SIP is the only way you can access DialCast and voice menu functionality.
In order to configure SIP functionality, you will need to configure SIP on your IOS router and InformaCast’s SIP pages.
Configure SIP with the IOS Router
If you would like to access DialCast and voice menu functionality, you will need to configure SIP with the IOS router. The following IOS commands will configure a SIP trunk on Communications Manager Express.
Step 1 Open a Telnet session to the appropriate IOS router.
Step 2 Turn on privileged commands:
Router> enable Password: <password>
Step 3 Configure from the terminal and configure the SIP User Agent, i.e. set connection timer, set number of retries for methods, disable remote-party-ID support, and set credentials to be used when responding to digest authentication challenges:
Router# configure terminalRouter(config)# sip-uaRouter(config-sip-ua)# no remote-party-idRouter(config-sip-ua)# retry invite 2Router(config-sip-ua)# retry option 1Router(config-sip-ua)# timers connect 100Router(config-sip-ua)# authentication username sipuser password changeMeRouter(config-sip-ua)# exit
22Cisco Unified Communications Manager Express Telephony Environment
Version 8.1

InformaCast Quick Start Guide - ConfidentialUse InformaCast
Step 4 Set to only support ULAW calls to InformaCast:
Router(config)# voice class codec 1Router(config-class)# codec preference 1 g711ulawRouter(config-class)# exit
Step 5 Prevent the SIP user agent from sending REFER during transfer, which InformaCast does not support:
Router(config)# voice service voipRouter(conf-voi-serv)# no supplementary-service sip referRouter(conf-voi-serv)# exit
Step 6 Configure a voice dial peer, i.e. use voice over IP and set the dial pattern, SIP protocol version, send DTMF as NTE (RFC 2833), and session target and transport:
Router(config)# dial-peer voice 100 voipRouter(config-dial-peer)# voice-class codec 1Router(config-dial-peer)# destination-pattern <12345>Router(config-dial-peer)# session protocol sipv2Router(config-dial-peer)# dtmf-relay rtp-nteRouter(config-dial-peer)# session target ipv4:<x.x.x.x>Router(config-dial-peer)# session transport tcp Router(config-dial-peer)# end
Step 7 Save and commit your changes:
Router# copy running-config startup-config
Allow/Disable SIP Access to InformaCast
SIP access permits you to either allow or deny incoming SIP calls.
Note Changes made to SIP access take effect immediately and do not require a restart of InformaCast.
Step 1 Go to Admin | SIP | SIP Access and select the Allow radio button to allow SIP calls to be answered.
Step 2 Click the Add button to add exceptions to the SIP calls that are allowed.
Step 3 Enter the IP address or fully qualified domain name of the host you want to exclude from SIP access in the Host field.
Tip When defining exceptions, make sure to specify the host that directly sends the INVITE request to InformaCast. This may be a SIP proxy server if proxies stand between InformaCast and the calling host.
Step 4 Click the Add button and click the Update button to save your changes.
23Cisco Unified Communications Manager Express Telephony Environment
Version 8.1
InformaCast Quick Start Guide - ConfidentialUse InformaCast
Enable SIP Authentication for InformaCast
Note This section is optional depending on the security of your environment.
SIP authentication allows you to enable or disable digest authentication of incoming SIP requests.
Step 1 Go to Admin | SIP | SIP Authentication and select the Authenticate Incoming Requests checkbox to enable SIP authentication.
Note The fields on this page come pre-filled. You only need to edit them if you want to change them. By default, the realm is named InformaCast, the authentication username is sipuser, and the authentication password is changeMe.
Note If you changed your authentication credentials in “Configure SIP with the IOS Router” on page 22, you will need to enter those credentials instead of the pre-filled values in the Authentication Username, Authentication Password, and Confirm Authentication Password fields.
Step 2 Select the length of time InformaCast should allow for a single authentication request from the Nonce Duration dropdown menu.
Step 3 Click the Update button to save your changes.
Enable Digest Authentication with SIP User Credentials
Note This section is optional depending on the security of your environment.
SIP peers may challenge InformaCast to provide valid credentials for its SIP realm when registering or terminating a SIP call. You should enter valid credentials for each SIP realm where you expect InformaCast to be challenged.
Step 1 Go to Admin | SIP | SIP User Credentials and click the Add button.
Step 2 Enter the name of your SIP peer’s SIP realm, the username and password associated with the SIP peer’s SIP realm, and click the Add button.
Manage the SIP Stack
InformaCast uses the National Institute of Standards and Technology (NIST) SIP stack to provide it with basic SIP functionality. The SIP stack (Admin | SIP | SIP Stack) provides InformaCast with fundamental low-level SIP functionality such as transaction handling, dialogs, utilities for SIP headers, maintenance of SIP timers, etc.
24Cisco Unified Communications Manager Express Telephony Environment
Version 8.1

InformaCast Quick Start Guide - ConfidentialUse InformaCast
Caution Caution should be exercised when enabling detailed logging in the SIP stack because of the large size of the log files it produces and the degradation of stack performance due to extensive logging. Detailed logging is intended to be used only when troubleshooting SIP problems and should not be enabled for any longer than necessary. Two log files are generated in the InformaCast logs directory: sipStackDebug.log and sipStackServer.log.
Note Most values on this page should not ever need to be changed. The values most likely to be changed are the SIP port numbers and the detailed logging check box.
The following fields/dropdown menus can be found on the SIP Stack page:
• UDP/TCP Port. The port number on which the SIP stack will listen for incoming requests that use the UDP or TCP transport protocol.
• TLS Port. The port number on which the SIP stack will listen for incoming requests that use the TLS protocol.
Note The standard SIP port for UDP and TCP is 5060; the standard port for TLS is 5061. The stack can be configured to use non-standard ports if necessary.
• Enable Detailed Logging. Controls the SIP stack logging level. When checked, extensive and detailed logging of the SIP stack’s activities are enabled, likely resulting in decreased performance. When unchecked, logging is confined to reporting problems encountered by the SIP stack, and its ordinary activities. Unless told otherwise by Support personnel, it is recommended that this checkbox remain unchecked.
• Max Forwards. The maximum number of forwards allowed while a SIP message is being routed to its destination.
• Read Timeout. The read timeout for TCP connections, in milliseconds.
• Cache Client Connections. Controls whether the SIP stack frees the resources associated with a client transaction when it reaches its terminated state. When checked, the SIP stack will cache a transaction’s resources when it terminates, thereby improving the SIP stack’s performance.
• Cache Server Connections. Controls whether the SIP stack frees the resources associated with a server transaction when it reaches its terminated state. When checked, the SIP stack will cache a transaction’s resources when it terminates, thereby improving the SIP stack’s performance.
If you make any changes, click the Update button or click the Restore button to return to your default settings.
Caution You’ll need to restart SIP. Restarting SIP causes all SIP calls to be dropped, i.e. any callers interacting with the DialCast IVR will have their calls dropped. Broadcasts using SIP calls will also be impacted by a restart. Live broadcasts using SIP calls will be stopped.
25Cisco Unified Communications Manager Express Telephony Environment
Version 8.1
InformaCast Quick Start Guide - ConfidentialUse InformaCast
Restart SIP
Changes to the SIP stack or certificates require a restart before they take effect. Other SIP changes, such as changes to access and authentication, take effect as soon as they are made.
Caution Restarting SIP causes all SIP calls to be dropped, i.e. any callers interacting with the DialCast IVR will have their calls dropped. Broadcasts using SIP calls will also be impacted by a restart. Live broadcasts using SIP calls will be stopped.
Step 1 Go to Admin | SIP | Restart SIP.
Step 2 Click the Restart button. It may take a few moments for SIP to restart.
Configure DialCast Functionality
Note In order for this functionality to be accessible in a Communications Manager Express environment, you must first configure SIP. See “Manage SIP Functionality” on page 22 for more information.
InformaCast’s DialCast functionality allows you to dial a route point number to trigger an InformaCast broadcast. The configured route point dialing pattern that matches the dialed DN determines which InformaCast message should be sent and which recipient groups should receive it.
Note Make sure you have a user with a numeric login/password who has message-sending rights for the specific messages you want broadcast.
Dialing patterns determine which message and recipient group will be used based on the number that is dialed.
Step 1 Go to Admin | DialCast | Dialing Configurations, click the Add button, and enter a dialing pattern (e.g. 8811) for a route point monitored by InformaCast in the Dialing Pattern field. You can also enter a regular expression to specify the dialing pattern for the route point (e.g. 88(\d)(\d)$). You will need to add at least one dialing pattern configuration for each route point line monitored by InformaCast.
Tip It is possible to use * or #, when setting up a dial pattern, but you must add \ before the character so that InformaCast doesn’t treat it as a wildcard. For example, **1 would have a dial pattern of \*\*1.
Step 2 Select an authentication method from the Authentication dropdown menu. None will not require your users to prove their identity when making a DialCast broadcast. User Login will require your users to enter their numeric username. User Login and Password will require your users to enter their numeric usernames and passwords.
26Cisco Unified Communications Manager Express Telephony Environment
Version 8.1

InformaCast Quick Start Guide - ConfidentialUse InformaCast
Step 3 Select a message from the Select Message dropdown menu or enter a regular expression in the Message Description field that specifies the message to be broadcast.
Step 4 Use any of the following methods to designate who will receive the broadcast (you can use more than one and the Dialcodes and DNs fields support more than one entry, separated by commas):
• Select a recipient group from the Select Recipient Groups dropdown menu
• Enter a regular expression in the Recipient Group Name field
• Enter a regular expression in the Dialcodes field
• Enter a regular expression in the DNs field
Step 5 Click the Add button to save your current dialing pattern configuration.
Step 6 Dial the dialing pattern and depending on what you set up, a broadcast will be immediately initiated and sent to appropriate recipient groups or whoever dialed the dialing pattern will have options available to them in sending out the broadcast.
TroubleshootingYour first line of support is the Help icon. Clicking it takes you to the online help system. Accessing its dropdown menu allows you to access:
• The online help system
• Its FAQ section
• Its Troubleshooting section
• InformaCast’s Support page
27Cisco Unified Communications Manager Express Telephony Environment
Version 8.1
InformaCast Quick Start Guide - ConfidentialIndex
IndexAAcknowledge Confirmation Mode 17Add
Message 9Pre Tone 13Recipient Group 6SIP Access Exception 23
Ad-hoc MessageSend 21
Allow CustomizationDefinition of 10
As Available Delivery, Description of 12Audio Files, Formatting for Phones 12Audio Only Message
Send 19Audio Tab
Configure 12
BBroadcast
Send 19Broadcast, Description of 6
CCommunications Manager Express
Configure 4Configure InformaCast 5Configure SIP 22Configure the IOS Router 4
ConfigureAudio Tab 12Communications Manager Express 4Communications Manager Express Server 5InformaCast 5IOS Router 4Message Confirmation Tab 16Message Confirmation Tab, Acknowledge 17Message Confirmation Tab, Respond 18Re-broadcasting Tab 14Scripting Tab 15SIP with the IOS Router 22Text Tab 11
DDialing Configuration
Regular Expression 26Dynamic Text 11, 15
EEnvironments, Description of InformaCast Environments 1
HHelp 27High-quality (HQ) Recordings 12
IInformaCast
Documentation 27Help 27Prepare your Multicast Environment 2
Support 27InformaCast, Description of 1Install, InformaCast 2, 3
LLive Audio and Text Message
Send 20Live Audio Message
Send 20
MManage
Digest Authentication with SIP User Credentials 24SIP Access to InformaCast 23SIP Authentication for InformaCast 24SIP Functionality 22SIP Stack 24
MessageAdd 9Configure the Audio Tab 12Configure the Re-broadcasting Tab 14Configuring the Scripting Tab 15Delivery Type 12Dynamic Text 11, 15Send a Broadcast 19
MessagesAcknowledge Confirmation Mode 17Ad-hoc Audio, Description of 10Configure Confirmation Tab 16Configure Confirmation Tab, Acknowledge 17Configure Confirmation Tab, Respond 18Configure the Text Tab 11Description of 6Live Audio, Description of 10Persistent Text 10, 11Pre-recorded Audio, Description of 10Respond Confirmation Mode 18Talk and Listen, Description of 10Text and Ad-hoc Audio, Description of 9Text and Live Audio, Description of 9Text and Pre-recorded Audio, Description of 9Text, Description of 9
Multicast Environment PreparationInformaCast 2
PPersistent Text 10, 11Pre Tone 13Pre-recorded Sound Files 12Prerequisites, Description of 1
RRe-broadcasting Tab
Broadcast Count 15Configure 14Dynamic Text 15Pause 15Re-broadcast Until Stopped 15
Recipient GroupAdd 6
28Cisco Unified Communications Manager Express Telephony Environment
Version 8.1
InformaCast Quick Start Guide - ConfidentialIndex
Recipient, Description of 6Recordings, High-quality 12Regular Expressions
Dialing Configuration 26Respond Confirmation Mode 18Restart
SIP 26Ring Tone
Add 14Role, Description of 6
SScripting Tab
Audio Replacement, Description of 15Configure 15Data Setup, Description of 15Delete 16Download 16Send in Progress, Description of 15View 16
SendAd-hoc Broadcast 21Broadcast 19Live Audio Broadcast 20Pre-recorded Broadcast 19
SIP 22Add Access Exception 23Allow/Disable Access to InformaCast 23Configure with the IOS Router 22Enable Authentication for InformaCast 24Enable Digest Authentication with SIP User Credentials 24Manage SIP Stack 24Restart 26
SIP FunctionalityManage 22
Support 27Synchronized Delivery, Description of 12
TText and Audio Message
Send 19Text Only Message
Send 19Text Tab
Configure 11Dynamic Text 11
Troubleshooting, Description of 1
UUpload Audio 12User Group, Description of 6User, Description of 6
ZµLaw Audio Format 12
29Cisco Unified Communications Manager Express Telephony Environment
Version 8.1