IBM Watson Conversation - Node.js
33
IBM Watson Conversation – Node.js Cognitive Solutions Application Development Paul Godby IBM CSP & ISV Ecosystems Duration: 60 minutes Updated: February 28, 2017
-
Upload
paul-godby -
Category
Software
-
view
602 -
download
2
Transcript of IBM Watson Conversation - Node.js

IBM Watson Conversation – Node.js
Cognitive Solutions Application Development
Paul Godby IBM CSP & ISV Ecosystems Duration: 60 minutes Updated: February 28, 2017
Page 2 of 33
The IBM Watson Developer Cloud (WDC) offers a variety of services for developing cognitive applications. Each Watson service provides a Representational State Transfer (REST) Application Programming Interface (API) for interacting with the service. Some services, such as the Speech to Text service, provide additional interfaces. The Watson Conversation service combines a number of cognitive techniques to help you build and train a bot - defining intents and entities and crafting dialog to simulate conversation. The system can then be further refined with supplementary technologies to make the system more human-like or to give it a higher chance of returning the right answer. Watson Conversation allows you to deploy a range of bots via many channels, from simple, narrowly focused bots to much more sophisticated, full-blown virtual agents across mobile devices, messaging platforms like Slack, or even through a physical robot. Examples of where Watson Conversation could be used include:
Add a chat bot to your website that automatically responds to customers’ questions
Build messaging platform chat bots that interact instantly with channel users
Allow customers to control your mobile app using natural language virtual agents
And more!
Learn how to provision a Conversation service and utilize the web tool interface
Learn how to train your chat bot to answer common questions
Learn how to utilize the Watson Conversation service APIs in Node.js
Before you start the exercises in this guide, you will need to complete the following prerequisite tasks:
Guide – Getting Started with the IBM Watson Node.js SDK
Overview
Objectives
Prerequisites

Page 3 of 33
IBM Bluemix offers services, or cloud extensions, that provide additional functionality that is ready to
use by your application’s running code.
You have two options for working with applications and services in IBM Bluemix. You can use the
Bluemix web user interface or the Cloud Foundry command-line interface.
1. In a web browser, navigate to the following URL:
http://www.bluemix.net
2. Log in with your IBM Bluemix credentials. This should be your IBMid.
3. You should start on your dashboard which shows a list of your applications and services.
Scroll down to the All Services section and click Create Service.
4. On the left, under Services, click on Watson to filter the list and only show cognitive services.
5. Click on the Conversation service.
Create a Conversation service in Bluemix

Page 4 of 33
6. Review the details for this service. At the top, there will be a description of the service. At the
bottom, you can review the pricing plans. The Free plan for this service provides no cost
monthly allowances for workspaces, intents, and API calls. Enjoy your demo!
7. At the top, you can enter information for your new service. In the middle, you can click on a
pricing plan to select it. Fill out the fields as follows, then click Create at the bottom.
Field Value
Service name csad_conv
Credential name Credentials-1
Selected Plan Free
8. IBM Bluemix has created a new service instance. To use this instance in your application, you
will first need to obtain the credentials. At the top, click Service Credentials.
9. On the right, locate the row with a Key Name of “Credentials-1”. In the Actions column, click
View Credentials.
10. You should see the username and password for your service. Later in this exercise, you will
enter these values into a JSON configuration file for your Node.js application. Feel free to
copy them to your clipboard, to a text file, or just return to this section of the Bluemix web
interface when the credentials are needed.
11. Leave the browser open and proceed to the next section.

Page 5 of 33
Before using the conversation instance, you will need to train it with the intents, entities, and/or dialog
nodes relevant to your application’s use case. You will create these items in a workspace. A
workspace is a container for the artifacts that define the behavior of your service instance.
12. In this guide, you will build a Conversation simple app to demonstrate the Natural Language
Processing capabilities of IBM Watson in a simple chat interface. You will also learn how to
identify a user’s intent and then perform an action from a third-party application.
13. Return to the Bluemix web user interface. You should still be in the pages for your new
service. At the top, click Manage.
14. On the right side of the page, click the Launch tool button.
15. If necessary, click the Log in with IBM ID button.
16. First, you will need to create a new workspace. Workspaces enable you to maintain separate
intents, user examples, entities, and dialogs for each application. Click Create.
Create a Conversation workspace

Page 6 of 33
17. In the Create a workspace wizard, enter the following values and click Create.
Field Value
Name CSAD demo
Description For demos only
Language << choose the application’s target language >>
18. Once the workspace has been created, it will appear as a new tile on your dashboard. If you
are not already there, locate the Menu in the upper left and choose Back to workspaces.
19. When you make API calls to the Conversation service, you will need to provide the workspace
ID for the workspace that contains your target dialog tree. On the tile for your new workspace,
click Options View details.
20. Locate the Workspace ID. You will need this value in future steps when creating a JSON
configuration file for your demo application. Feel free to copy the value or just return to this
section of the Conversation tooling web interface when the ID is needed.

Page 7 of 33
21. In the upper right corner of this tile, click the back button.
22. Click on the workspace tile to be taken back to the new workspace.
Before using the new conversation, you will need to train it with the intents, entities, and/or dialog
nodes relevant to your application’s use case. An intent is the purpose or goal of a user’s input.
23. First, you will need to define some intents to help control the flow of your dialog. An intent is
the purpose or goal of a user’s input. In other words, Watson will use natural language
processing to recognize the intent of the user’s question/statement to help it select the
corresponding dialog branch for your automated conversation. If not already there, click the
Intents tab at the top of your workspace.
24. On the Intents tab, click Create new. In the dialog window, enter the following information. In
this example, the overall intent will indicate that the user wants to say a greeting to the
cognitive application. The user examples are phrases that will help Watson recognize the new
intent. (Enter multiple examples by pressing “Enter” or by clicking the plus sign at the end of
the line.) When finished, click Create.
Field Value
Intent name hello
User example Good morning
Greetings
Hello
Hi
Howdy
Create intents
Page 8 of 33
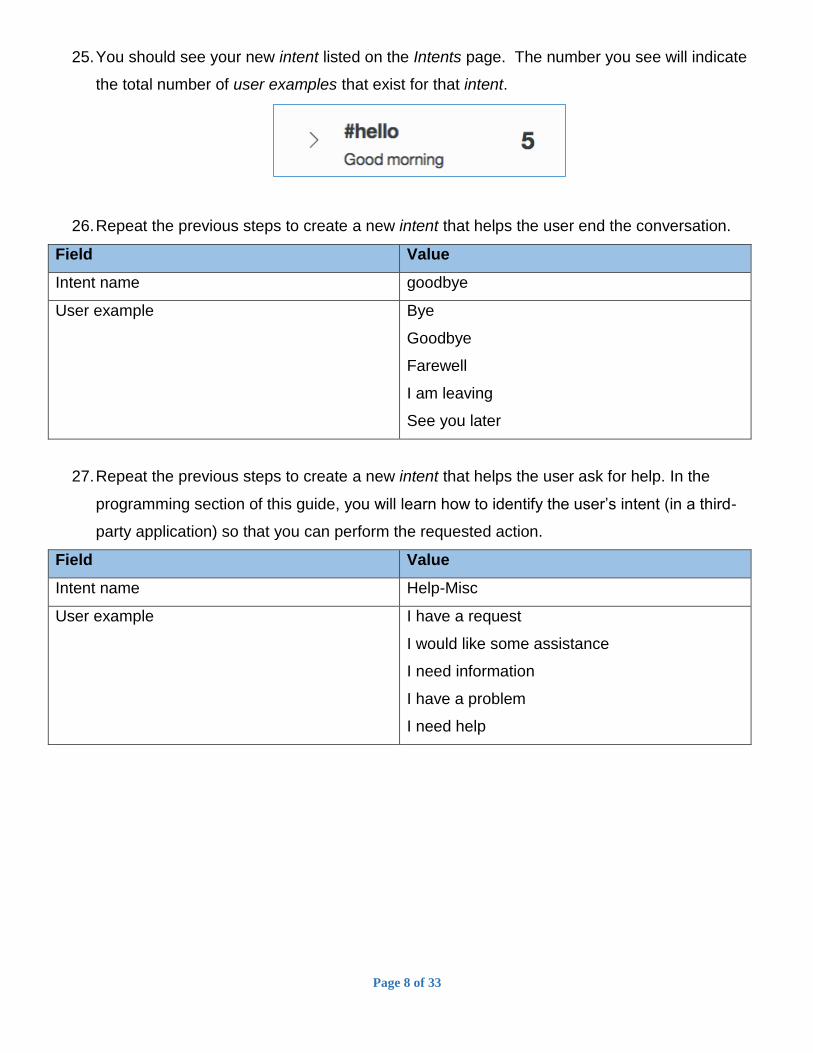
25. You should see your new intent listed on the Intents page. The number you see will indicate
the total number of user examples that exist for that intent.
26. Repeat the previous steps to create a new intent that helps the user end the conversation.
Field Value
Intent name goodbye
User example Bye
Goodbye
Farewell
I am leaving
See you later
27. Repeat the previous steps to create a new intent that helps the user ask for help. In the
programming section of this guide, you will learn how to identify the user’s intent (in a third-
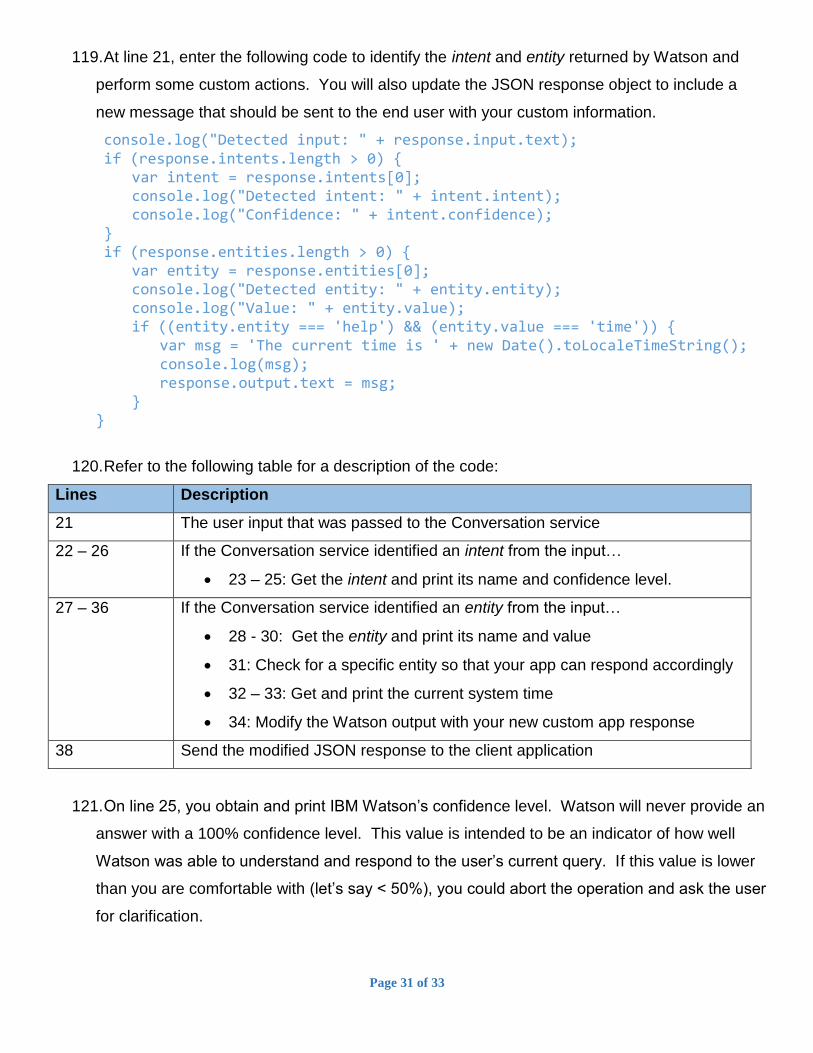
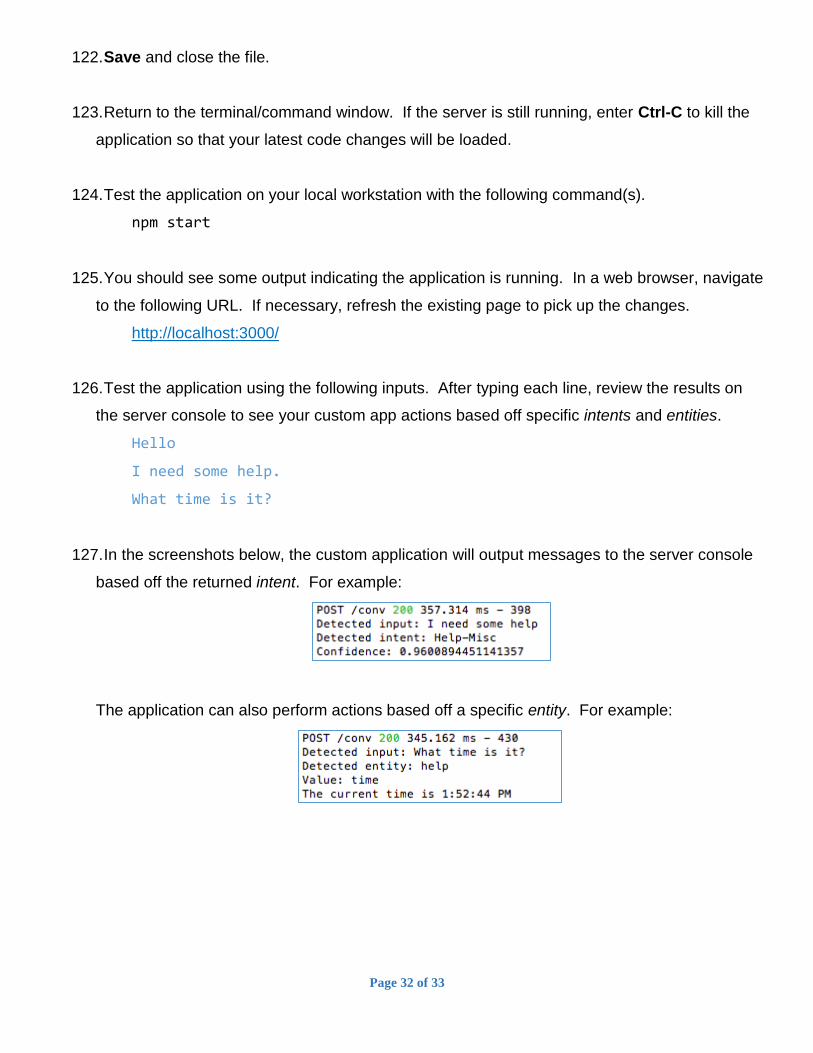
party application) so that you can perform the requested action.
Field Value
Intent name Help-Misc
User example I have a request
I would like some assistance
I need information
I have a problem
I need help

Page 9 of 33
28. Repeat the previous steps to create a new intent that helps the user issue commands to turn
on a device. In this example, you will assume the user is interacting with a home/business
automation system. The purpose of this intent is to show you (in the next section) how to
associate entities with an intent when building your dialog tree.
(Tip: In your application, you could use the Watson Speech-to-Text service to translate voice commands to the plain text input required by the conversation service!)
Field Value
Intent name turn_on
User example Arm the security system
Lock the doors
I need lights
Turn on the lights
Start recording
29. At this point, you have defined some intents for the application along with the example
utterances that will help train Watson to recognize and control the conversation flow.
Before using the new conversation, you will need to train it with the intents, entities, and/or dialog
nodes relevant to your application’s use case. An entity is the portion of the user’s input that you can
use to provide a different response or action to an intent.
30. Next, you will need to create some entities. An entity is the portion of the user’s input that you
can use to provide a different response or action to an intent. These entities can be used to
help clarify a user’s questions/phrases. You should only create entities for things that matter
and might alter the way a bot responds to an intent. If not already there, click the Entities tab
at the top of your workspace.
Create entities

Page 10 of 33
31. On the Entities tab, click Create new. In the dialog window, enter the following information. In
this example, the #turn_on intent will indicate that the user wants to turn on a home/business
automation device. So, you will need to create a new entity representing a device. You will
then provide values (and possibly synonyms) for the various types of devices that can be
turned on. (Enter multiple examples by pressing “Enter” or by clicking the plus sign at the end
of the line.) When finished, click Create.
Field Value Synonym
Entity name device
Value security system alarm
lights bulb, lamp
doors locks, gates, entry, exit
camera video
32. You should see your new entity listed on the Entities page.
33. Repeat the previous steps to create the following new entity for lights controlled by the system.
Field Value Synonym
Entity name lights
Value hallway hall, corridor
overhead main
landscape outside
34. Repeat the previous steps to create the following new entity to request the current time.
Field Value Synonym
Entity name help
Value time clock, hour, minute, second

Page 11 of 33
35. At this point, you have defined intents and the associated entities to help Watson determine
the appropriate response to a user’s natural language input. Your application will be able to:
Respond to a request to turn on specific devices
If a user turns on lights, provide additional choices for light locations
Request information from a system help system, such as the current time
Before using the new conversation, you will need to train it with the intents, entities, and/or dialog
nodes relevant to your application’s use case. A dialog uses the intent and entity that have been
identified, plus context from the application, to interact with the user and provide a response.
36. Next, you will need to create some dialogs. A dialog is a conversational set of nodes that are
contained in a workspace. Together, each set of nodes creates the overall dialog tree. Every
branch on this tree is a different part of the conversation that can be had with a user. If not
already there, click the Dialog tab at the top of your workspace.
37. Review the documentation for creating dialog nodes. You should review the formats for
building nodes as well as the instructions for defining conditions. There are several predefined
conditions that you can use, such as conversation_start and anything_else.
38. On the Dialog tab, click Create. The first thing you will need to do is create a root node, or a
starting point for this application’s conversation. You will need to specify the condition and
response for this starting node. Enter the following values:
Field Value
Name Start
Trigger conversation_start (create new condition)
Responses Welcome to the CSAD demo!
Create dialogs
Page 12 of 33
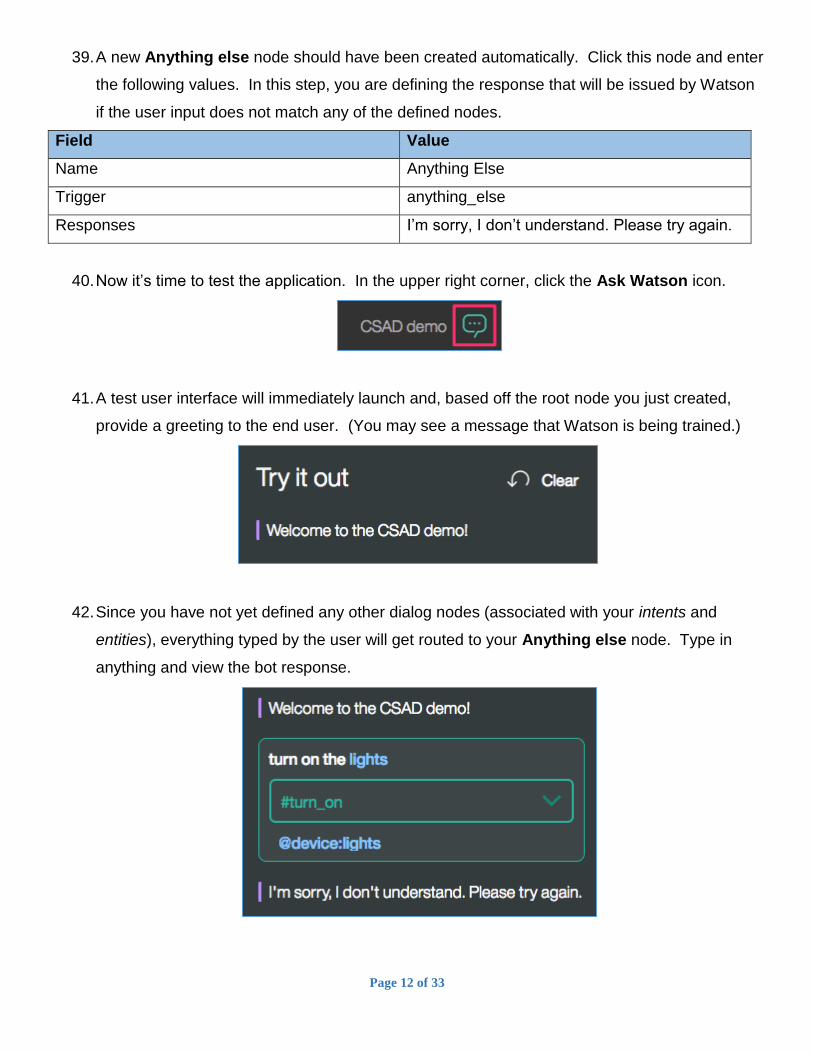
39. A new Anything else node should have been created automatically. Click this node and enter
the following values. In this step, you are defining the response that will be issued by Watson
if the user input does not match any of the defined nodes.
Field Value
Name Anything Else
Trigger anything_else
Responses I’m sorry, I don’t understand. Please try again.
40. Now it’s time to test the application. In the upper right corner, click the Ask Watson icon.
41. A test user interface will immediately launch and, based off the root node you just created,
provide a greeting to the end user. (You may see a message that Watson is being trained.)
42. Since you have not yet defined any other dialog nodes (associated with your intents and
entities), everything typed by the user will get routed to your Anything else node. Type in
anything and view the bot response.

Page 13 of 33
43. Did you notice the drop-down menu that appeared for your invalid input? You can optionally
assign this phrase to an existing intent (or verify the correct intent was used). You can use this
functionality in the future to keep Watson trained on new user inputs and to ensure the correct
response is returned. Cool! For now, just proceed to the next step.
44. Click the X in the top right corner to close the chat pane. Proceed to the next section.
In this section, you will continue building your demo bot utilizing the intents, entities, and dialog nodes
that you created in previous steps. You will do this entirely with the web interface (no programming or
text/XML file hacking required!)
45. You should create a dialog branch for each of the intents you identified as well as the start and
end of the conversation. You should also greet the end user. For the greeting, you can create
a new dialog node to respond to the #hello intent that you created in earlier steps.
Determining the most efficient order in which to check conditions is an important skill in
building dialog trees. If you find a branch is becoming very complex, check the conditions to
see whether you can simplify your dialog by reordering them. It's often best to process the
most specific conditions first.
46. Click the Start node to select it. At the bottom of this node, click the plus sign (+) to create a
new root level node. In this step, by creating a peer root node, you are creating a new branch
in your dialog tree that represents an alternative conversation.
Build your conversation

Page 14 of 33
47. In this new node, enter the following values. By setting the condition to an intent, you are
indicating that this node will be triggered by any input that matches the specified intent.
Field Value
Name Hello
Trigger #hello
Responses Hi! What can I do for you?
48. Using the same steps as before, test the conversation by typing the following chat line(s):
Hello
49. Next, you should create a new root level node for the #goodbye intent. In this new node,
enter the following values.
Field Value
Name Goodbye
Trigger #goodbye
Responses Until our next meeting.
50. Using the same steps as before, test the conversation by typing the following chat line(s):
Farewell
51. Next, you should create a new root level node for the #turn_on intent. As you’ll recall, you
have multiple devices that you might want to turn on. In earlier steps, you documented these
devices using a new @device entity. This dialog branch will require multiple nodes to
represent each of those devices.
52. In this new node, enter the following values. By setting the condition to an intent, you are
indicating that this node will be triggered by any input that matches the specified intent. In this
example, the dialog branch will need additional information to determine which device needs to
be turned on. So, leave the “Responses” field blank.
Field Value
Name Turn On
Trigger #turn_on
Responses

Page 15 of 33
53. Click the Turn On node to select it. On the right side of this node, click the plus sign (+) to
create a new subnode.
54. In this new node, enter the following values. In this example, the only way this node will be
reached is if the user specifies the @device entity “lights” (or one of its synonyms).
Field Value
Name Lights
Trigger @device:lights
Responses OK! Which light would you like to turn on?
55. In this scenario, you will want to automatically move from the Turn On node to the Lights
node without waiting for additional user input. In the bottom row of your Turn On node tile,
click the Jump to… icon. You will be prompted to select where you want the conversation to
continue. So, in this case, click the Lights node and choose the Go to condition option.

Page 16 of 33
56. You should now see a label attached to the Turn On node indicating the conversation flow will
be immediately passed to the Lights node.
57. At this point, Watson will ask you which lights to turn on. As you will recall, in earlier steps you
created a @lights entity to define the available lights in the system. Click the Lights node to
select it. On the right side of this node, click the plus sign (+) to create a new subnode.
58. In this new node, enter the following values. By setting the condition to an entity, you are
indicating that this node will be triggered by any input that matches the specified entity.
Field Value
Name Light On
Trigger @lights
Responses OK! Turning on @lights lights.
59. Next, you will want Watson to respond if it does not recognize a light, or entity, provided by the
user. Click the Light On node to select it. On the bottom of this node, click the plus sign (+) to
create a new peer node.
60. In this new node, enter the following values. By setting the condition to an entity, you are
indicating that this node will be triggered by any input that matches the specified entity.
Field Value
Name Invalid Light
Trigger True (create new condition)
Responses I’m sorry, I can only turn on hallway, landscape,
or overhead lights.

Page 17 of 33
61. Using the same steps as before, test the conversation by typing the following chat line(s):
Hello
Turn on the lights
The overhead lights
Farewell
62. Now that you have a branch in your conversation dialog to turn on lights, you will need to add
additional nodes to deal with the other devices that can be turned on. As you’ll recall, you
defined those devices with the @devices entity. The Turn On node automatically jumps to
the Lights node. So, click on the Lights node to select it. On the bottom of this node, click
the plus sign (+) to create a new peer node.
63. In this new node, enter the following values. By setting the condition to an entity, you are
indicating that this node will be triggered by any input that matches the specified entity.
Field Value
Name Devices
Trigger @device
Responses OK! Turning on @device.
64. Next, you will want Watson to respond if it does not recognize a device, or entity, provided by
the user. Click the Devices node to select it. On the bottom of this node, click the plus sign
(+) to create a new peer node.
65. In this new node, enter the following values. By setting the condition to an entity, you are
indicating that this node will be triggered by any input that matches the specified entity.
Field Value
Name Invalid Device
Trigger True (create new condition)
Responses I’m sorry, I don’t know how to do that. I can
turn on lights, cameras, or security systems.

Page 18 of 33
66. Using the same steps as before, test the conversation by typing the following chat line(s):
Hello
Arm the security system
Turn on lights
The lamp light
Turn on lights
Overhead
67. Finally, you will want to enable the Conversation service to identify your #Help-Misc intent.
You will make this a part of the overall “Help” system for the bot. This intent will be used in the
upcoming programming exercises to show you how to perform specific application actions
based off a detected intent and entity. Click the Turn On node to select it. On the bottom of
this node, click the plus sign (+) to create a new peer node.
68. In this new node, enter the following values.
Field Value
Name Help
Trigger #Help-Misc
Responses How can I help you?
69. Click the Help node to select it. On the right side of this node, click the plus sign (+) to create
a new subnode.
70. In this new node, enter the following values. In this example, the only way this node will be
reached is if the user specifies the @help:time entity (or one of its synonyms). You will
provide your own custom response to the query in the programming exercises.
Field Value
Name Time
Trigger @help:time
Responses

Page 19 of 33
71. Next, you will want Watson to respond if it receives a help question that it cannot answer. Click
the Time node to select it. On the bottom of this node, click the plus sign (+) to create a new
peer node.
72. In this new node, enter the following values. By setting the condition to an entity, you are
indicating that this node will be triggered by any input that matches the specified entity.
Field Value
Name Additional Help
Trigger True (create new condition)
Responses I’m sorry, I can’t help with that. For additional
help, please call 555-2368.
73. This is already an epic conversation, but feel free to experiment with more functionality:
Define entities for additional devices and lights
Add more synonyms for entities
Add new intents, such as #turn_off to turn off devices
Node.js is an open-source, cross-platform runtime environment for developing server-side web
applications using JavaScript. Node.js has an event-driven architecture capable of asynchronous I/O
utilizing callbacks.
Express is a minimal and flexible Node.js web application framework that provides a robust set of
features to develop web and mobile applications. It’s ability to facilitate rapid development of Node
based web applications makes it the de facto framework for Node.js.
74. In a terminal/command window, issue a change directory command to navigate to a top-level
directory that will contain your Node.js projects. Subsequent commands will generate a folder
for each individual Node.js project in this top-level directory.
Create a Node Express application

Page 20 of 33
75. Express supports a variety of view template engines. By default, Express applications will use
the Jade template engine. This engine was developed by the author of Express but it
abstracts away the HTML that most front-end developers are used to. In this demo
application, you will use the EJS view engine since it’s syntax more closely resembles
standard HTML code.
76. Enter the following commands to generate a new Express application that uses the EJS
template engine (as noted by the -e flag).
express -e csadConversation
cd ./csadConversation
77. Test the application on your local workstation with the following command(s). The install
command will install all required dependencies for the application.
npm install
npm start
78. You should see some output indicating the application is running. In a web browser, navigate
to the following URL. You should see the skeleton of your new Express application running
locally on your machine.
http://localhost:3000/
79. Return to the terminal/command window. Enter Ctrl-C to kill the application.
80. In subsequent steps, you will be asked to read or create text files using the text editor of your
choice. However, please note that code instructions will be given using line numbers. The
author of this guide suggests using Sublime or the Eclipse IDE (or similar tools).
81. Next, you will need to install the additional node modules required by this demo application.
Enter the following command(s) to install the node modules. By using the --save flag, the
dependencies list in package.json will be updated automatically!
npm install --save watson-developer-cloud

Page 21 of 33
82. Refer to the following list for a description of the node modules that were installed.
The watson-developer-cloud module will provide access to the high-level wrappers for each of
the Watson cognitive services running in IBM Bluemix.
JavaScript Object Notation (JSON) is a lightweight data-interchange format utilizing key-value pairs.
83. This application will load various bits of required information, such as the user credentials for
the Watson services, from a configuration file. Create the following file and open it with a
text/code editor.
…/csadConversation/config.js
84. Before you continue, you should review the Conversation documentation. Scroll down to the
Authentication section. You will notice a code snippet that shows you how to instantiate the
service. As you can see, it requires that you pass in a JSON object with the specified
credentials and metadata. You will replicate this JSON object in your application’s
configuration file.
85. Return to the text/code editor. At line 1, enter the following JSON object / code.
var config = { watson: { conversation: { username: "", password: "", version: "v1", version_date: "2017-02-03", workspace_id: "" } } }; module.exports = config;
Create a configuration file for the application

Page 22 of 33
86. In earlier steps, you created the required Watson service(s) using the Bluemix web user
interface. Update the following JSON properties with the user credentials you created and
retrieved. The workspace ID can be obtained from the Conversation tool web application.
watson.conversation.username
watson.conversation.password
watson.conversation.workspace_id
87. Save and close the file.
Routing refers to determining how an application responds to a client request to a particular endpoint,
which is a URI (or path) and a specific HTTP request method (GET, POST, etc.). Each route can
have one or more handler functions executed when the route is matched.
88. In this section, you will configure your own routes file. This will allow you to control the actions
that occur when various URIs are accessed in your application. Open the following file with a
text/code editor.
…/csadConversation/app.js
89. At line 10, add 1 blank line so that lines 10-11 are blank.
90. You will be creating a new routes file. You will need to tell your application about its existence
and where to find it. At line 10, insert the following code:
var conv = require('./routes/conv');
91. At line 28, add 1 blank line so that lines 28-29 are blank.
92. Now that your new routes file has been defined, you need to tell the application when it should
be loaded (which URI will execute it). At line 28, insert the following code.
app.use('/conv', conv);
Configure additional routes for the application

Page 23 of 33
93. By adding these lines, the Express application will now load your new routes file any time a
user accesses your application at the specified URI. For example:
http://server:port/conv
94. Save and close the file.
In this section, you will integrate the specified cognitive service into a new route.
95. In subsequent steps, you will create a demo user interface that will allow the end user to
submit data to the cognitive service. In the following steps, you will create the server-side code
for working with the specified cognitive service.
96. You have already configured a new route for the specified cognitive service. Next, you will
need to implement the code that will execute when that route is accessed. You will need to
implement a new routes file. Create the following file and open it with a text/code editor.
…/csadConversation/routes/conv.js
97. At line 1, enter the following code to load required node modules and your configuration file.
var config = require('../config'); var express = require('express'); var bodyParser = require('body-parser'); var watson = require('watson-developer-cloud');
98. Next, you will want to get a handle to the Express router that will allow you to catch specific
URIs for your application. At line 6, add the following code:
var router = express.Router();
99. The “body-parser” middleware will be used to manage the data in an incoming request. At line
7, set up a parser instance for handling JSON data:
var jsonParser = bodyParser.json();
Integrate the application with the cognitive service

Page 24 of 33
100. Next, you will need to create an instance of each Watson service you created in IBM Bluemix.
When you create the instance, you must include a JSON object with the authentication
credentials and some additional metadata. As you’ll recall, you already entered this
information into your JSON configuration file. So, you can just reference those JSON objects
when instantiating your cognitive services. At line 9, add the following code:
var conversation = watson.conversation(config.watson.conversation);
101. At line 11, enter the following code to evaluate the conversation and return a response based
off some input text entered by the user. This data will be submitted by your client in JSON
format by an AJAX request. The “context” value will be passed back and forth between your
application and this code fragment. You will create the user interface for this demo application
in subsequent sections.
router.post('/', jsonParser, function(req, res, next) { conversation.message({ 'input': req.body.input, 'context': req.body.context, 'workspace_id': config.watson.conversation.workspace_id }, function(err, response) { if (err) { console.log('error:', err); } else { console.log(JSON.stringify(response, null, 2)); res.json(response); } }); });
102. At line 27, add the following code to make your routes available to the rest of the application.
module.exports = router;

Page 25 of 33
103. Refer to the following table for a description of the code:
Lines Description
1 – 4 Load required modules and your JSON configuration file
6 Set up the Express router
7 Create a body-parser instance for working with JSON data
9 Instantiate the Conversation service with data from the JSON config file
11 – 25 A function to handle an HTTP POST request to URL “/conv” using the specified
middleware.
12 – 16: send the current message and context to the specified instance
17: the function to execute once a response is received
21: print the returned data to the server console
22: send the returned JSON data to the client application
104. Save and close the file.
You have a Node.js route that will execute the specified cognitive services on data submitted via an
HTML form. In this section, you will create a basic demo user interface to submit the required data.
105. Open the following file with a text/code editor.
…/csadConversation/views/index.ejs
106. Delete the existing code. At line 1, add the following HTML code. This code spans multiple
pages of this document, so make sure to copy all of it!
<!DOCTYPE html> <html> <head> <title>IBM Watson Conversation</title> <link rel='stylesheet' href='/stylesheets/style.css' /> <script type="text/javascript"> var context = {}; function updateChatLog(user, message) {
Create a demo user interface for the application

Page 26 of 33
if (message) { var div = document.createElement("div"); div.innerHTML = "<b>" + user + "</b>: " + message; document.getElementById("history").appendChild(div); document.getElementById("text").value = ""; } } function sendMessage() { var text = document.getElementById("text").value; updateChatLog("You", text); var payload = {}; if (text) { payload.input = {"text": text}; }; if (context) { payload.context = context; }; var xhr = new XMLHttpRequest(); xhr.onreadystatechange = function() { if (xhr.readyState == 4) { if (xhr.status == 200) { var json = JSON.parse(xhr.responseText); context = json.context; updateChatLog("Watson", json.output.text); } } } xhr.open("POST", "./conv", true); xhr.setRequestHeader("Content-type", "application/json"); xhr.send(JSON.stringify(payload)); } function init() { document.getElementById("text").addEventListener("keydown", function(e) { if (!e) { var e = window.event; } if (e.keyCode == 13) { sendMessage(); } }, false); sendMessage(); } </script> </head> <body onLoad="init()"> <p/> <div><b>IBM Watson Conversation</b></div> <p/><div>Enter text to be sent to Watson.</div> <div><input type="text" id="text" name="text" size="50" /> <button onclick="sendMessage()">Send</button></div> <p/><div><b>Conversation History</b></div> <p/><div id="history"></div>

Page 27 of 33
</body> </html>
107. Refer to the following table for a description of the code:
Lines Description
7 A global variable to hold the conversation’s current context (state). If left blank,
the conversation will return to the conversation_start node.
9 – 16 A helper function for writing the current bot message into the page
18 – 39 A function for sending data to the server via an AJAX request
19: Get the current text entered by the user
22 – 24: Gather the data to send to the Watson service. If a context has
already been returned, send it with subsequent requests.
26: Set up the XMLHttpRequest
27: Function to execute when a response is returned
28: The request has finished and a response is ready
29: If the server returned a 200 “OK” status code
30: Create a JSON object from the server response
31: Store the latest Conversation service context in the global variable
32: Retrieve the Conversation response and write it into the page
36: Perform an HTTP POST to the “/conv” URI
37: Set the content type as appropriate
38: Finally, make the AJAX request with the required data
41 – 47 A function that will execute when the page loads
42 – 45: A listener that will submit data when <Enter> is pressed
46: Send a blank message/context to Watson to start the conversation
54 A simple textbox to accept input from the end user
56 A DIV for displaying the current conversation
108. Save and close the file.

Page 28 of 33
Your demo application showcasing IBM Watson cognitive services is now ready! Take a deep breath
and cross your fingers because it’s time to test the application.
109. Return to the terminal/command window. If the server is still running, enter Ctrl-C to kill the
application so that your latest code changes will be loaded.
110. Test the application on your local workstation with the following command(s).
npm start
111. You should see some output indicating the application is running. In a web browser, navigate
to the following URL. If necessary, refresh the existing page to pick up the changes.
http://localhost:3000/
112. You should see your IBM Watson Conversation application running! Notice that your client
application has already contacted Watson and initiated a new conversation. As you’ll recall,
you can review the server console to see the JSON returned by the Conversation service.
Test the application

Page 29 of 33
113. Enter the following messages and observe Watson’s responses in the Conversation History.
The responses will be the same as those you saw earlier when performing tests in the
Conversation tool web application. The difference this time is that you are using the API to
embed this conversation into an external application!
Hello
Arm the security system
Turn on the lights
The overhead lights
Farewell
114. Feel free to experiment with other phrases to further explore the dialog branches that you
created in earlier steps.
115. At this point, you should review the Node.js server console to see the full JSON object that
was returned. There’s more data there than we displayed in this demo
Page 30 of 33
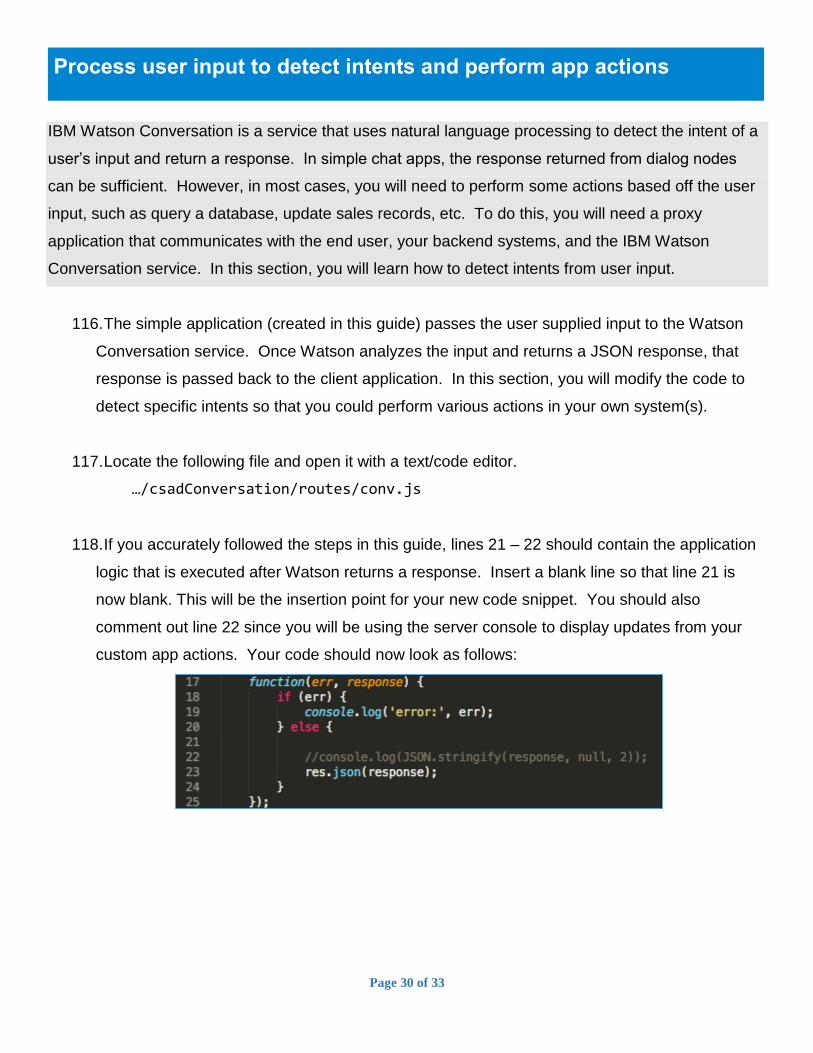
IBM Watson Conversation is a service that uses natural language processing to detect the intent of a
user’s input and return a response. In simple chat apps, the response returned from dialog nodes
can be sufficient. However, in most cases, you will need to perform some actions based off the user
input, such as query a database, update sales records, etc. To do this, you will need a proxy
application that communicates with the end user, your backend systems, and the IBM Watson
Conversation service. In this section, you will learn how to detect intents from user input.
116. The simple application (created in this guide) passes the user supplied input to the Watson
Conversation service. Once Watson analyzes the input and returns a JSON response, that
response is passed back to the client application. In this section, you will modify the code to
detect specific intents so that you could perform various actions in your own system(s).
117. Locate the following file and open it with a text/code editor.
…/csadConversation/routes/conv.js
118. If you accurately followed the steps in this guide, lines 21 – 22 should contain the application
logic that is executed after Watson returns a response. Insert a blank line so that line 21 is
now blank. This will be the insertion point for your new code snippet. You should also
comment out line 22 since you will be using the server console to display updates from your
custom app actions. Your code should now look as follows:
Process user input to detect intents and perform app actions
Page 31 of 33
119. At line 21, enter the following code to identify the intent and entity returned by Watson and
perform some custom actions. You will also update the JSON response object to include a
new message that should be sent to the end user with your custom information.
console.log("Detected input: " + response.input.text); if (response.intents.length > 0) { var intent = response.intents[0]; console.log("Detected intent: " + intent.intent); console.log("Confidence: " + intent.confidence); } if (response.entities.length > 0) { var entity = response.entities[0]; console.log("Detected entity: " + entity.entity); console.log("Value: " + entity.value); if ((entity.entity === 'help') && (entity.value === 'time')) { var msg = 'The current time is ' + new Date().toLocaleTimeString(); console.log(msg); response.output.text = msg; }
}
120. Refer to the following table for a description of the code:
Lines Description
21 The user input that was passed to the Conversation service
22 – 26 If the Conversation service identified an intent from the input…
23 – 25: Get the intent and print its name and confidence level.
27 – 36 If the Conversation service identified an entity from the input…
28 - 30: Get the entity and print its name and value
31: Check for a specific entity so that your app can respond accordingly
32 – 33: Get and print the current system time
34: Modify the Watson output with your new custom app response
38 Send the modified JSON response to the client application
121. On line 25, you obtain and print IBM Watson’s confidence level. Watson will never provide an
answer with a 100% confidence level. This value is intended to be an indicator of how well
Watson was able to understand and respond to the user’s current query. If this value is lower
than you are comfortable with (let’s say < 50%), you could abort the operation and ask the user
for clarification.
Page 32 of 33
122. Save and close the file.
123. Return to the terminal/command window. If the server is still running, enter Ctrl-C to kill the
application so that your latest code changes will be loaded.
124. Test the application on your local workstation with the following command(s).
npm start
125. You should see some output indicating the application is running. In a web browser, navigate
to the following URL. If necessary, refresh the existing page to pick up the changes.
http://localhost:3000/
126. Test the application using the following inputs. After typing each line, review the results on
the server console to see your custom app actions based off specific intents and entities.
Hello
I need some help.
What time is it?
127. In the screenshots below, the custom application will output messages to the server console
based off the returned intent. For example:
The application can also perform actions based off a specific entity. For example:

Page 33 of 33
128. Finally, the end user will see the custom response that was written back into the JSON object
returned by IBM Watson. This demonstrates how you can perform actions (based off Watson
responses) in your own applications and return custom messages to the end user.
129. You’re done! You are officially an IBM Watson Conversation application developer!
In this demo exercise, you have been working locally and running your Node.js server on your own
workstation. You can very easily push your application to the IBM Bluemix environment and make it
publicly accessible to customers, partners, friends, and/or family!
130. Instructions for this section can be found in the following prerequisite guide:
Getting Started with the IBM Watson Node.js SDK
131. When you are asked for the application’s host name, use the following value, but make sure
to substitute your initials for “xyz”.
host: csadConversation-xyz
(Optional) Deploy the application to IBM Bluemix