IBM Optim: Move Introduction - Internodebdavis/Optim/Docs/MoveIntro.pdf · · 2011-07-03Chapter...
74
IBM Optim Move Introduction Version 7 Release 3
Transcript of IBM Optim: Move Introduction - Internodebdavis/Optim/Docs/MoveIntro.pdf · · 2011-07-03Chapter...

IBM Optim
Move IntroductionVersion 7 Release 3
���


IBM Optim
Move IntroductionVersion 7 Release 3
���

NoteBefore using this information and the product it supports, read the information in “Notices” on page 61.
Version 7 Release 3 (September 2010)
This edition applies to version 7, release 3 of IBM Optim and to all subsequent releases and modifications untilotherwise indicated in new editions.
© Copyright IBM Corporation 1994, 2010.US Government Users Restricted Rights – Use, duplication or disclosure restricted by GSA ADP Schedule Contractwith IBM Corp.

Contents
Chapter 1. Overview . . . . . . . . . 1Sample Database Tables . . . . . . . . . . 1Overview of the Extract Step . . . . . . . . . 2Overview of the Insert Step . . . . . . . . . 4Other Actions . . . . . . . . . . . . . . 5Utilities . . . . . . . . . . . . . . . . 5
Chapter 2. Scenario 1 – A Set ofCustomers . . . . . . . . . . . . . 7Open the Extract Request . . . . . . . . . . 8Specify Parameters for the Extract Process . . . . 8Define the Data to Extract . . . . . . . . . 10
Open the Access Definition Editor . . . . . . 10Review the Access Definition . . . . . . . 17
Save the Extract Request . . . . . . . . . . 20Run the Extract Process . . . . . . . . . . 21Create an Insert Request . . . . . . . . . . 23
Edit the Table Map . . . . . . . . . . . 25Save the Insert Request . . . . . . . . . . 27Process the Insert Request . . . . . . . . . 27
Chapter 3. Scenario 2 – A Set of Items 35Open the Extract Request. . . . . . . . . . 35
Modify the Local Access Definition . . . . . . 37Select ITEMS Rows using Point and Shoot . . . 38Define Relationships . . . . . . . . . . 40Review the Access Definition . . . . . . . 41Save the Extract Request . . . . . . . . . 44
Process the Extract Request . . . . . . . . . 44Create the Insert Request . . . . . . . . . . 45Open the Insert Request . . . . . . . . . . 46
Edit the Table Map . . . . . . . . . . . 47Edit the Column Map . . . . . . . . . . 49Save the Insert Request . . . . . . . . . 52
Process the Insert Request . . . . . . . . . 53
Chapter 4. Browse Extracted Data . . . 55Open an Extract File . . . . . . . . . . . 55Select a Table to Browse . . . . . . . . . . 57View Related Data . . . . . . . . . . . . 57
Notices . . . . . . . . . . . . . . 61Trademarks . . . . . . . . . . . . . . 63
Index . . . . . . . . . . . . . . . 65
© Copyright IBM Corp. 1994, 2010 iii

iv IBM Optim: Move Introduction

Chapter 1. Overview
The IBM® Optim™ solution includes the components Archive, Compare, Edit, and Move. Thisintroduction provides information on how to use Move.
This release runs in the Microsoft Windows environment and supports the IBM DB2®, Oracle, SybaseAdaptive Server Enterprise (ASE), Microsoft SQL Server, and IBM Informix® database managementsystems. Additional database management systems may be supported in future releases.
Move extracts and inserts referentially intact subsets of complex relational data with ease—no matter howcomplex the data model. You define the precise set of data to extract using simple or complex selectioncriteria and save the data to a reusable Extract File.
Move allows you to insert the data into one or more tables, providing total flexibility with respect to theproduction and test database environments. Move can even create the destination tables automatically.
Because protecting data privacy is critical, companies must mask sensitive test data to avoid severeconsequences. Move's masking techniques include using arithmetic expressions, substrings, random orsequential number generation, date aging, and more. Most importantly, you can propagate masked valuesfrom a parent table to related tables at all levels—essential for maintaining the referential integrity of thedata.
Move uses a two-step process to migrate data: an Extract step and an Insert step.v The Extract step copies data from one or more related tables in one or more database instances to an
external file called an Extract File.v The Insert step copies data from the Extract File to one or more destination databases. You can copy
extracted data back to the source tables, to different tables in the source database, or to tables in adifferent database. If the destination tables do not exist, Move generates the SQL to create the tables.
Contents
This introduction briefly describes the sample database distributed with Optim and provides an overviewof Move's functions, features, and basic processing flow. Extract and Insert steps presented in samplescenarios provide an overview of Move capabilities, including how to:v Create a test database.v Populate and update a test database.v Transform data using literals and aging parameters.
You can use the comprehensive Help facility in Move at any time to obtain more information about aspecific topic or function. You can select Help from the menu on most dialogs or right-click and selectWhat's This from the shortcut menu to obtain context-specific help. Help is also available by pressing F1.
Sample Database TablesOptim is distributed with sample database tables. These tables correlate with the tables used in theexamples within this manual.
The sample database tables distributed with Optim are as follows. (Table names are prefixed with aCreator ID, which is specified at installation.)
v OPTIM_SALES v OPTIM_MALE_RATES
© Copyright IBM Corp. 1994, 2010 1

v OPTIM_CUSTOMERS v OPTIM_FEMALE_RATES
v OPTIM_ORDERS v OPTIM_SHIP_TO
v OPTIM_DETAILS v OPTIM_SHIP_INSTR
v OPTIM_ITEMS v OPTIM_STATE_LOOKUP
Note: The tables used in examples do not contain the prefix “OPTIM_” in their names.
The major relationships between pairs of tables in the sample database are shown in the followingdiagram. The arrows indicate the flow from parent to child.
In this diagram, the relationships between tables are represented by three-character codes consisting ofthe letter "R", the first letter of the parent table, and the first letter of the child table.
The relationships between tables are as follows:v OPTIM_SALES is a parent of OPTIM_CUSTOMERS (relationship RSC)v OPTIM_CUSTOMERS is a parent of OPTIM_ORDERS (relationship RCO)v OPTIM_ORDERS is a parent of OPTIM_DETAILS (relationship ROD)v OPTIM_ITEMS is a parent of OPTIM_DETAILS (relationship RID)
The sample database includes four additional tables:
v OPTIM_CUSTOMERS2 v OPTIM_DETAILS2
v OPTIM_ORDERS2 v OPTIM_ITEMS2
These four tables are distributed empty and are related in the same way as the similarly named tablesdescribed previously. The empty tables are provided for demonstrating the Insert Process.
For a complete description of the sample database tables, see the Installation and Configuration Guide.
Overview of the Extract StepThe Extract Process selects data from a source (one or more tables in a database) and copies that data to adestination (an Extract File). To extract data, you must create an Extract Request that includes thespecifications for the data to be extracted, called the Access Definition, and the parameters for the ExtractProcess.
You can process the Extract Request immediately, or schedule the process to run automatically. You canalso run the Extract Process from the command line, using overrides for specifications in the request.
2 IBM Optim: Move Introduction

Extract Request
The Extract Request Editor allows you to select parameters for processing the Extract Request. Theseparameters include:v The Extract File, Access Definition, row limit, and items to extract: data, objects (metadata), or both.v Types of objects to extract: primary keys, relationships, indexes, aliases/synonyms, functions, defaults,
UDTs, packages, procedures, sequences, triggers, views, and/or rules. (Move always extracts table andcolumn definitions.)
You can choose to run the Extract Request immediately or schedule the request for later processing.
Extract File
The Extract File contains the selected relationally intact data, the object definitions, or both. The ExtractFile is stored locally on the client system or on a shared file server. After you create an Extract File, youcan use the file as often as needed to create new or refresh existing databases.
After you have extracted data and created an Extract File, you can browse the contents of the file. This isuseful to ensure that the contents are as expected.
Access Definition
The Access Definition governs the overall Extract Process. An Access Definition specifies the tables,relationship traversal, and selection criteria for the data you want to extract. You can select a namedAccess Definition or create a new Access Definition for a single Extract Request. The Access Definitionenables you to:v Specify the set of tables to be included in the Extract Process. You can specify the name of a single
table and request that Move provide the names of all related tables. One table is identified as the StartTable, or table from which data is first extracted.
v Select relationships to be traversed to extract the data. Move has default rules for how relationships aretraversed between the specified tables. You can select from a list of all of the relationships defined tothe database and to the Optim Directory. (The relationships contained in the Optim Directorysupplement the relationships contained in the database.)
v Define criteria for the rows to be extracted by specifying:– Selection criteria for any selected table using SQL syntax.– A selection of rows chosen while browsing the data (Point and Shoot).– A sampling of rows, accomplished by extracting every nth row.– A maximum number of rows for a single table.– A maximum number of children per parent.– Grouping (for example, extract 20 customers from each of the 50 states).
v Ensure that the desired data is extracted using the Show Steps function to review how Move willtraverse the database.
Extract Process Report
An Extract Process Report is generated as part of the Extract Process. The report contains generalinformation and statistics about the process. The content of the report reflects what has beenextracted─data, object definitions, or both.
Chapter 1. Overview 3
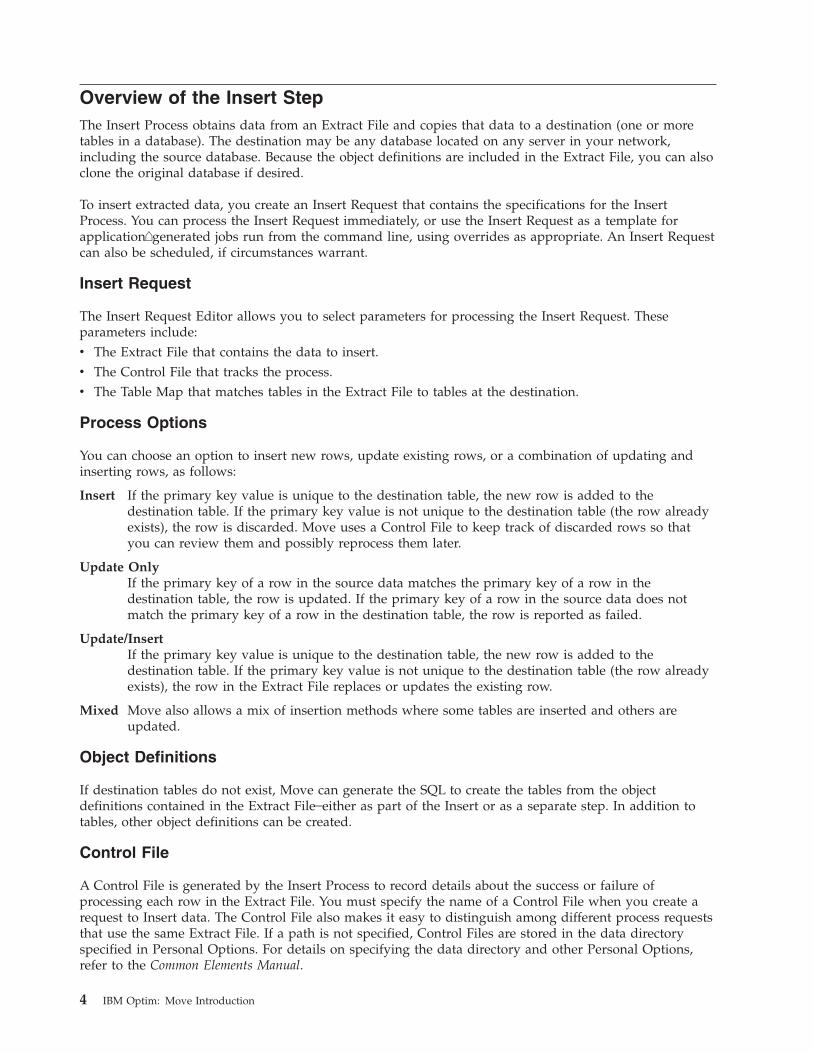
Overview of the Insert StepThe Insert Process obtains data from an Extract File and copies that data to a destination (one or moretables in a database). The destination may be any database located on any server in your network,including the source database. Because the object definitions are included in the Extract File, you can alsoclone the original database if desired.
To insert extracted data, you create an Insert Request that contains the specifications for the InsertProcess. You can process the Insert Request immediately, or use the Insert Request as a template forapplication�generated jobs run from the command line, using overrides as appropriate. An Insert Requestcan also be scheduled, if circumstances warrant.
Insert Request
The Insert Request Editor allows you to select parameters for processing the Insert Request. Theseparameters include:v The Extract File that contains the data to insert.v The Control File that tracks the process.v The Table Map that matches tables in the Extract File to tables at the destination.
Process Options
You can choose an option to insert new rows, update existing rows, or a combination of updating andinserting rows, as follows:
Insert If the primary key value is unique to the destination table, the new row is added to thedestination table. If the primary key value is not unique to the destination table (the row alreadyexists), the row is discarded. Move uses a Control File to keep track of discarded rows so thatyou can review them and possibly reprocess them later.
Update OnlyIf the primary key of a row in the source data matches the primary key of a row in thedestination table, the row is updated. If the primary key of a row in the source data does notmatch the primary key of a row in the destination table, the row is reported as failed.
Update/InsertIf the primary key value is unique to the destination table, the new row is added to thedestination table. If the primary key value is not unique to the destination table (the row alreadyexists), the row in the Extract File replaces or updates the existing row.
Mixed Move also allows a mix of insertion methods where some tables are inserted and others areupdated.
Object Definitions
If destination tables do not exist, Move can generate the SQL to create the tables from the objectdefinitions contained in the Extract File─either as part of the Insert or as a separate step. In addition totables, other object definitions can be created.
Control File
A Control File is generated by the Insert Process to record details about the success or failure ofprocessing each row in the Extract File. You must specify the name of a Control File when you create arequest to Insert data. The Control File also makes it easy to distinguish among different process requeststhat use the same Extract File. If a path is not specified, Control Files are stored in the data directoryspecified in Personal Options. For details on specifying the data directory and other Personal Options,refer to the Common Elements Manual.
4 IBM Optim: Move Introduction

Use the Browse Utility to view the Control File and identify problems with a process, such as rows in theExtract File that failed to process or the cause of an unexpected termination. Diagnostics accompany thediscarded rows to identify why they were not processed. For details on the Browse Utility, refer to theCommon Elements Manual.
Table Maps
Table Maps match source tables to destination tables. Individual tables can be excluded and tables withdifferent names can be mapped. You can use an existing Table Map or define the Table Map along withthe other specifications for the Insert Process. When the columns in the destination table match thecolumns in the source table, Move automatically inserts the data. When the columns do not match, theunmapped data is not inserted unless Column Maps are specified.
Column Maps
Column Maps are used to match source columns to destination columns that have different columnnames, eliminate columns from the process, and most importantly, allow the specification of values thatwill populate the destination columns. Values that can be used to populate a destination column includespecial registers, the NULL value, literals, constants, expressions, and exit routines. The Age functionenables you to age individual columns. The Currency function enables you to convert from one currencyto another.
Insert Process Report
An Insert Process Report is generated as part of the Insert Process. The report contains generalinformation and statistics about the process, details of what has been inserted─data, object definitions, orboth─and what has been discarded.
Other ActionsIn addition to the Extract and Insert Processes, Move provides other processing capabilities, such as aLoad Process and a Convert Process.
Load ProcessThe Extract File can be transformed to Load format to take advantage of the Load Utilitydistributed with the DBMS. Typically, a Load is used to insert large volumes of data.
Convert ProcessThe data in the Extract File can be transformed based on Table Map and Column Mapspecifications. This transformed data can be saved in the same or a different Extract File. This isuseful to mask source data and create consistent, refreshable test data.
UtilitiesIn addition to the actions available, Move includes other processing utilities, such as Restart, Retry,Export and Import.
Move includes the following processing utilities:
RestartUse Restart when an Insert Process does not complete successfully. A process can terminateunexpectedly due to resource restrictions, such as space allocation or network failure. When youuse Restart, the process restarts from the last commit point. Move keeps track of the lastsuccessfully committed row in the Extract File, and restarts the process with the next row in thefile.
Retry Use the Retry Utility when an Insert Process ends normally but could not be performed for one
Chapter 1. Overview 5

or more rows in the Extract File. When the process cannot be performed for a specific row, thatrow is marked as discarded. After making necessary corrections, use Retry to run the process fordiscarded rows.
CalendarUse the Calendar Utility to create calendars for date aging. A sample set of internationalcalendars is provided, including dates and rules, that you can use immediately. Use the CalendarEditor to define dates and rules for your site.
ScheduleUse the Schedule Utility to schedule processes to run at a later time. This reduces the impact onproduction processing and enables you to automatically re-execute a process at specific timeintervals.
Browse Extract and Control FilesUse the Browse Utility to review Extract Files to ensure that the extracted data is what youexpected and to determine which Extract File is appropriate for a Convert, Insert, or LoadProcess. You can also use the Browse Utility to review Control Files for the status of each row orto view only those rows that had errors.
Export / ImportUse the Export and Import Utilities to migrate definitions from one Optim Directory to another.
Create Use the Create Utility to create objects (for example, tables, primary keys and relationships,indexes, and views) using the object definitions in the Extract File, without actually inserting thedata.
Reset Object CacheUse the Reset Object Cache Utility to refresh current database objects or configuration parameters,especially when definitions are subject to frequent change.
SecurityUse one or both types of Optim Security, Functional Security and Object Security, to control useraccess to features and objects.
6 IBM Optim: Move Introduction

Chapter 2. Scenario 1 – A Set of Customers
Scenario 1 guides you through the steps required to create a test database of data from four sample tablesdistributed with Move.
The data in the test database will include a sampling of customers. To create the test database, you mustextract a subset of related data from the source database and insert the data into a target database.Scenario 1 demonstrates how to migrate a relational set of data in two steps.
Note: The sample database tables distributed with Optim correlate to the tables used in examples in thisscenario, although the table names in this scenario do not contain the prefix “OPTIM_”.
The first step describes how to specify, extract, and store a relational set of data.v An Extract Request lists the specifications for the Extract Process.v An Access Definition specifies the data to extract.v An Extract File stores the extracted set of data.v An Extract Process Report records the results of the Extract Process.
The second step describes how to insert the relational set of data into newly created destination tables.v An Insert Request lists the specifications for the Insert Process.v A Table Map specifies the destination of the data.v The Create Utility creates new destination tables as exact copies of the original source tables.v The relational set of data stored in the Extract File populates the destination tables.v An Insert Process Report records the results of the Insert Process.
In this scenario, you will create a subset of data by extracting every tenth CUSTOMERS row in thesample database. The subset of data will also include all orders from the selected customers (from theORDERS table) and the details for those orders (from the DETAILS table). The data also includes all rowsfrom the ITEMS table, which is designated as a Reference Table. The extracted data will be inserted intonew database tables created during the Insert Process.
Note: If you are not authorized to create new tables, you may be unable to complete the Insert Process inthis scenario. Check with the site management for the destination tables to use.
© Copyright IBM Corp. 1994, 2010 7
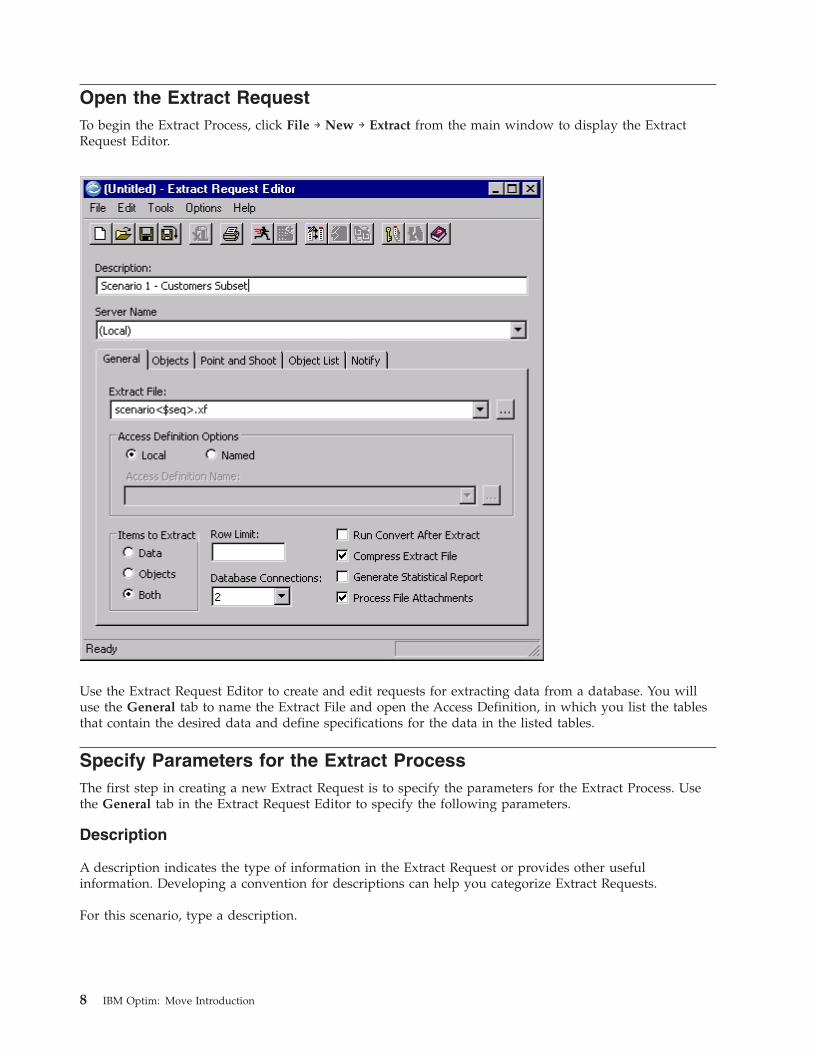
Open the Extract RequestTo begin the Extract Process, click File → New → Extract from the main window to display the ExtractRequest Editor.
Use the Extract Request Editor to create and edit requests for extracting data from a database. You willuse the General tab to name the Extract File and open the Access Definition, in which you list the tablesthat contain the desired data and define specifications for the data in the listed tables.
Specify Parameters for the Extract ProcessThe first step in creating a new Extract Request is to specify the parameters for the Extract Process. Usethe General tab in the Extract Request Editor to specify the following parameters.
Description
A description indicates the type of information in the Extract Request or provides other usefulinformation. Developing a convention for descriptions can help you categorize Extract Requests.
For this scenario, type a description.
8 IBM Optim: Move Introduction

Server Name
Directing resource-intensive processing to a server potentially minimizes network traffic and maximizesefficiency. Server Name indicates the server or workstation used to run the Extract Process. If the OptimServer option is not installed (as for this scenario), you must use your local workstation to process theExtract Request. If the Server option is installed, you can select a server on which to process the ExtractRequest.
Extract File
The Extract File contains a copy of the specified source data. When specifying an Extract File, you caninclude one or more Optim macros to dynamically create a unique file name. When you run the ExtractProcess, Move resolves any macros and generates the file name.
Move adds the default .xf extension for Extract Files. If you do not include a path with the file name, thedefault Data Directory specified in Personal Options is used.
Note: You can use Optim macros for any file that is generated by Move, including Control Files. Inaddition, any specified Optim macro will remain in a saved request, so that a new name is generatedeach time the request is executed.
For this scenario, use a macro with the file name and type “scenario<$SEQ>”. The sequence number isincreased by a single digit each time Move generates a file name that contains the macro.
Access Definition Options
Access Definition Options let you specify the type of Access Definition used in the Extract Request. AnAccess Definition describes the set of data to be extracted, governing the overall Extract Process. You cancreate a Local Access Definition, which is exclusive to the current Extract Request, or you can specify thename of a new or existing Access Definition, which can be used with other process requests.
For this scenario, select Local.
Items to Extract
You can choose to extract Data rows only, Object definitions only, or Both. The Extract Process alwaysextracts column and table definitions, which can be used to create the destination tables, if necessary. Youcan also choose to extract other object definitions, including primary keys, relationships, and indexes.
If you choose to extract additional object definitions, you can select the objects in the Objects tab. Bydefault, all objects are selected on the Objects tab.
For this scenario, select Both.
Row Limit
A row limit is the maximum number of rows to extract. For example, if you expect to extract fewer than10 million rows, you can use a row limit to cause the Extract Process to fail if the number of extractedrows exceeds 10 million. A row limit can be any value between 1 and the maximum limit specified inProduct Options.
For this scenario, do not specify a row limit.
Chapter 2. Scenario 1 – A Set of Customers 9

Run Convert After Extract
Move can automatically perform the Convert Process on the Extract File after the Extract Process. TheConvert Process can transform or mask data in the Extract File.
When you select this check box, the Convert tab in the Extract Request Editor is enabled. Use theConvert tab to specify whether to use a named or local Convert Request.
For this scenario, do not select the convert option.
Compress Extract File
If you select this check box, Move automatically compresses the Extract File created by the ExtractProcess.
For this scenario, select the Compress Extract File check box.
Generate Statistical Report
You can select this check box to include statistical information in the Extract Process Report.
For this scenario, do not select the statistical report option.
Process File Attachments
You can use this check box to extract file attachments specified in the Access Definition.
For this scenario, leave this check box selected, which is the default.
Define the Data to ExtractAfter specifying the Extract Process parameters, you must provide an Access Definition. An AccessDefinition defines the data you want to extract and provides table-specific parameters for processing.
The Access Definition references the tables that contain the data, provides selection criteria for the data,and prescribes the way that relationships between tables are traversed.
In this scenario, you will create an Access Definition that is local or exclusive to the current ExtractRequest. You will:v Select the tables that contain the data you want to extract.v Define selection criteria for the data—in this example, every tenth CUSTOMERS table row is selected.v Define the traversal path—the relationships between tables that Move traverses and the direction in
which they are traversed during the Extract Process.v Review the traversal path to ensure the appropriate data is selected.
Open the Access Definition EditorThe Access Definition Editor is used to create and edit Access Definitions.
In the Extract Request Editor, click Tools → Edit Access Definition to display the Access Definition Editorwith Tables selected as the active tab. You can enter the purpose or function of the Access Definition inthe Description box.
10 IBM Optim: Move Introduction

Create the Table ListUse the Tables tab to list the names of tables that contain the desired data and to define specifications forthe data in the listed tables.
Default Qualifier
The Default Qualifier saves time when you enter table names in the grid or Table List. A fully qualifiedtable name has three parts: dbalias.creatorid.tablename. The dbalias is a user-defined name that providesparameters needed to connect to the database. A creatorid qualifies a table and often reflects the user whocreated it. Tablename is the base table name.
The Default Qualifier can be either dbalias or dbalias.creatorid. Generally, use a Default Qualifier thatapplies to most or all tables in the Table List.
For this scenario, enter the dbalias and creatorid that correspond to the Optim sample database tables.
Start Table
Each Extract Process begins with a Start Table, the table from which data is first extracted, and proceedsto obtain related data from the remaining tables in the Table List. Move automatically places the StartTable in the first line of the Table List.
Chapter 2. Scenario 1 – A Set of Customers 11

If you do not specify a Start Table, the first name entered in the Table List is the assumed Start Table.You can change the Start Table by typing a new name, selecting from the Start Table drop-down list, orright-clicking a name on the Table List and selecting Set as Start from the shortcut menu.
For this scenario, enter CUSTOMERS in the Start Table box. Using this Start Table, you can create a subset ofdata based on a sampling of customers.
Table List
The Table List references tables from which data is extracted. When you add a table name to the TableList, Move automatically displays the type of object referenced by the table name and the name of theDBMS for the table.
You can use two methods to add table names to the list. One method is to type names under theTable/View heading. An easier method, however, may be to let Move find the tables that contain relateddata, using the Select Table(s) dialog.
For this scenario, use the Select Table(s) dialog to display a listing of tables related to the Start Table. Youcan review the list and select tables you want to include in the Extract Process.
Select Tables Dialog
To display the Select Table(s) dialog, right-click the CUSTOMERS table name in the Table List and selectAdd Tables from the shortcut menu. The dialog provides a list of tables, based on the Default Qualifier.
For this scenario, limit the list to tables related to the CUSTOMERS table, and select specific tables fromthe list.v Select the Find Tables Related to Table check box, ensure the default settings Both and All Levels are
selected, and click Display.
12 IBM Optim: Move Introduction

v Locate the following tables in the list: ORDERS, DETAILS, and ITEMS. Select each table while pressingthe Ctrl key, and click Select to add the tables to the Table List in the Access Definition.
Narrow the FocusTo narrow the focus of the Access Definition, you can use the Table List to define limits and selectioncriteria. Move provides several methods to limit the scope of the extracted data.
Table Specifications
Table specifications provide the display and criteria parameters for data. You can set specifications forany table in the Table List by right�clicking the table name and selecting a Table Specifications optionfrom the shortcut menu. A brief description of each option follows:
ColumnsSelect columns to include and exclude from a Point and Shoot display. You can use the Point andShoot facility to manually select specific rows from the Start Table.
Selection CriteriaSpecify selection criteria for one or more columns in a table.
SQL Create an SQL Where clause for complex selection criteria (for example, criteria that require acombination of OR and AND logical operators).
Sort Arrange Start Table rows in a Point and Shoot display according to values in one or morecolumns.
For this scenario, Table Specifications are not used. For complete information about Table Specifications,refer to the Common Elements Manual.
Reference Table
Under the heading Ref Tbl, you can select a check box to designate a table as a Reference Table. Unlessselection criteria are specified for the Reference Table, all rows are selected from the table. The Start Tablecannot be a Reference Table.
For this scenario, designate ITEMS as a Reference Table.
Extract Parms
Under the heading Extract Parms, you can limit the number of rows to extract by entering values underthe following subheadings:
Every NthEnter a numerical value “N” to extract every “N”th row from the corresponding table.
Row LimitEnter the maximum number of rows to extract from a table.
For this scenario, extract a sampling of the CUSTOMERS rows. Enter the number 10 in Every Nth for theCUSTOMERS table to select every tenth row. Leave the Row Limit blank.
Chapter 2. Scenario 1 – A Set of Customers 13
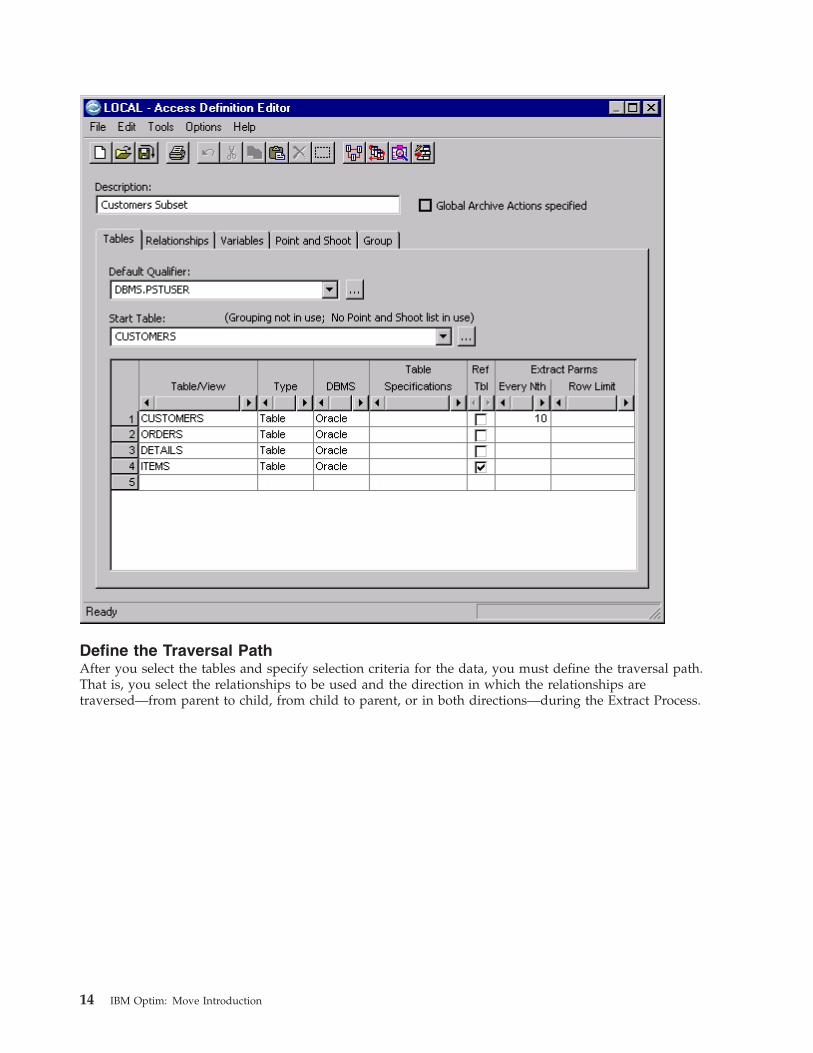
Define the Traversal PathAfter you select the tables and specify selection criteria for the data, you must define the traversal path.That is, you select the relationships to be used and the direction in which the relationships aretraversed—from parent to child, from child to parent, or in both directions—during the Extract Process.
14 IBM Optim: Move Introduction

The traversal path determines the sequence in which Move selects data from tables referenced in theAccess Definition. Consider the database structure of the tables you selected for extracting:
In this diagram, the relationships between tables are represented by three-character codes consisting ofthe letter "R", the first letter of the parent table, and the first letter of the child table.
CUSTOMERS is the Start Table because you want to extract a subset of CUSTOMERS data. Based on therelationships between each pair of tables:v CUSTOMERS is the parent of ORDERS (relationship RCO).v ORDERS is the parent of DETAILS (relationship ROD).v ITEMS is not part of a traversal path, because it is a Reference Table.
To obtain the desired set of data for this scenario, you will include relationships RCO and ROD in theExtract Process and specify the direction in which Move traverses them.
Use the options on the Relationships tab to define the traversal path for selecting data from the tablesreferenced in the Access Definition. All relationships between pairs of tables in the Table List aredisplayed. The parent table and the corresponding child table in each relationship is provided.
Chapter 2. Scenario 1 – A Set of Customers 15

Review Status
Each listed relationship has a status, which indicates:
New Relationship is listed for the first time. The status of a relationship is New the first time the list isdisplayed after:v A new relationship between tables on the list is defined.v A table is added to the list.
(After you view the relationship, the status is no longer New and is shown as blank the next timeyou display the Relationships tab.)
When you run the Extract Process, a warning message advises you of any new relationships.Although you may proceed despite the warning, it may be prudent to review the relationshipusage list.
Blank Relationship is defined and is not new to the list.
Ref Relationship is ignored because the parent or child table is a reference or lookup table, asspecified on the Tables tab.
UnknownRelationship does not exist. This condition can occur when a change in the Default Qualifier
16 IBM Optim: Move Introduction

causes a new set of tables and relationships to be referenced in the Access Definition.Relationships with Unknown status are ignored during a process. To remove a relationship inUnknown status, right-click the relationship and select Remove or Remove All Unknown fromthe shortcut menu.
The Use new relationships check box is selected by default to include all relationships with a New statusin the Extract Process. If you clear this check box, you must manually select new relationships to includethem in an Extract Process. Clearing the check box ensures that a completed Access Definition is notaffected by the addition of a new relationship.
Select Relationships
The Select column determines whether a relationship is used in the Extract Process.
For this scenario, verify that check boxes for relationships RCO and ROD are selected.
Specify Options 1 and 2
You can use the Options check boxes to extend the traversal path:v Option (1) determines whether Move traverses a relationship from child to parent and extracts a parent
row for each selected child row. By default, Option (1) is selected. As a result, this setting maintains therelational integrity of the data.
v Option (2) determines whether additional child rows are extracted when a parent row is extractedbecause of Option (1). In other words, if Move has traversed a relationship from child to parent andextracted a parent row, all children of that parent are extracted when Option (2) is selected. By default,Option (2) is cleared.
For this scenario, only Option (1) is selected because no tables will be traversed from child to parent.
Review the Access DefinitionConsider the steps performed to extract the data based on the specified parameters, selected relationships,and specifications for Options (1) and (2). The following simplified data is displayed for each table to aidin the explanation.
Chapter 2. Scenario 1 – A Set of Customers 17

CUSTOMERS to ORDERS
The steps for CUSTOMERS to ORDERS are illustrated below.
The two steps are:1. Every tenth CUSTOMERS row is extracted based on the sampling factor.2. The ORDERS rows for these CUSTOMERS rows are extracted because of the parent to child
traversal of relationship RCO.
ORDERS to DETAILS
The steps for ORDERS to DETAILS are illustrated below.
The two steps are:1. The DETAILS that are related to the extracted ORDERS, ORD4 and ORD5 are extracted by
traversing the relationship ROD from parent to child.2. All rows in the ITEMS table are extracted because the table is designated as a Reference Table.
18 IBM Optim: Move Introduction

Move provides tools in the Access Definition Editor to evaluate the set of data to be extracted, prior toperforming the Extract Process. After specifying the list of tables, selection criteria, Extract parametersand relationships, evaluate the data to extract using the Tools menu in the Access Definition Editor.
Show Steps Tool
After defining the traversal path but prior to running the Extract Process, you can verify that theappropriate data will be extracted via the Show Steps option, which lists the steps to be performed in theExtract Process.
To display a extract steps narrative that describes the traversal path, click Tools → Show Steps.
Indent Tool
Click Tools → Indent to display the list of tables formatted to show relationships. The related tables aredisplayed with a prefix of C for child table or P for parent table.
Chapter 2. Scenario 1 – A Set of Customers 19

Click File → Update and Return from the Access Definition Editor to update the Access Definition andreturn to the Extract Request Editor.
Save the Extract RequestAlthough you need not save an Extract Request to process it, you should save the Extract Request youjust created because Scenario 2 builds upon the Extract in Scenario 1.
For this scenario, do the following to save the Extract Request:v From the Extract Request Editor, click File → Save to display the Save an Extract Request dialog.v Type PSTDEMO.SCENARIO1 in the Enter pattern for Extract Request box and click Save. (Developing a
naming convention for Extract Requests can be a useful way to organize requests for easy access.)
20 IBM Optim: Move Introduction
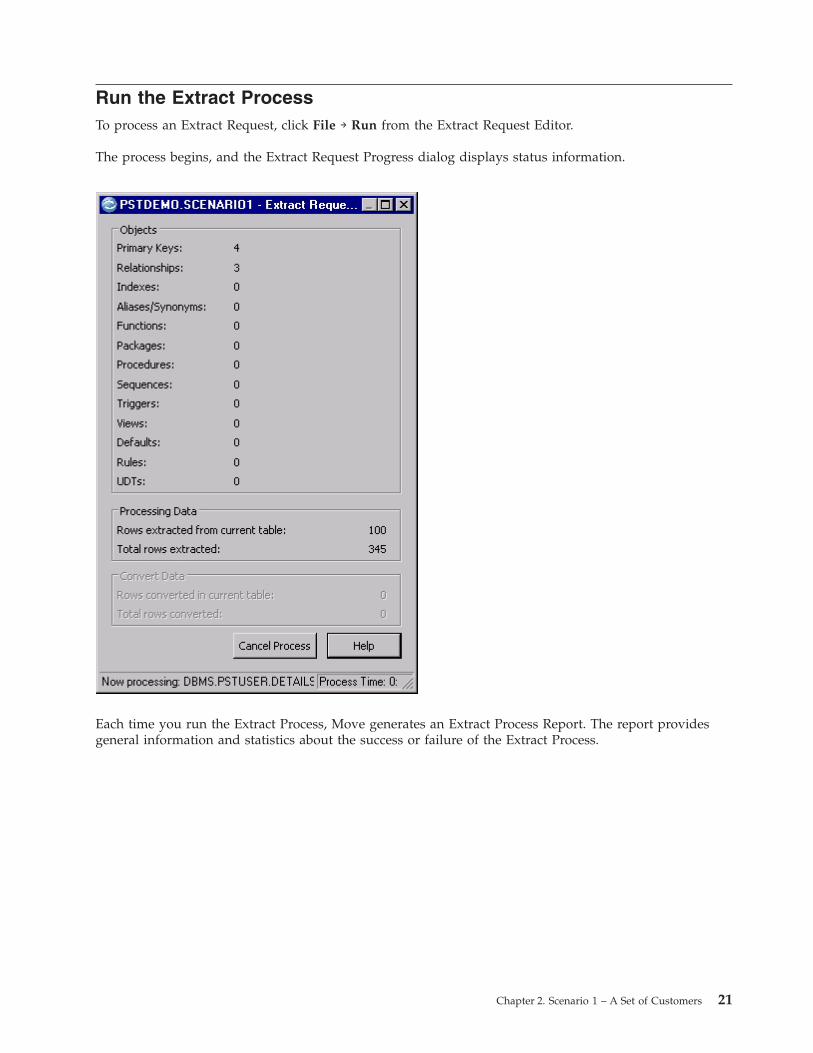
Run the Extract ProcessTo process an Extract Request, click File → Run from the Extract Request Editor.
The process begins, and the Extract Request Progress dialog displays status information.
Each time you run the Extract Process, Move generates an Extract Process Report. The report providesgeneral information and statistics about the success or failure of the Extract Process.
Chapter 2. Scenario 1 – A Set of Customers 21

Note: The report information displayed in the sample illustration may vary from the results displayed onyour workstation.
You can optionally save or print the Extract Process Report. Click File → Save As to save the report, orclick File → Print to print it.
To return to the Extract Request Editor, click File → Close.
If you close the report and want to refer to it again, click File → Redisplay Results → Current. (To displaya list of all retained Extract Process Reports, click File → Redisplay Results → All.)
Browse the Data
To review the data in the Extract File, use the Browse Utility, which is described in Chapter 4, “BrowseExtracted Data,” on page 55.
22 IBM Optim: Move Introduction

Create an Insert RequestAfter the referentially intact set of data is extracted and stored in the Extract File, use the Extract File asthe source to insert data using the Insert Process. The parameters for the Insert Process are specified in anInsert Request.
In this scenario, you will create a test database using an Insert Request and populate the database withthe data in the Extract File.
Note: If you are not authorized to create new tables, you may be unable to continue this scenario. Checkwith the site management for the destination tables to use.
To begin the Insert Process, click File → New → Insert from the menu in the main window to display theInsert Request Editor.
Use the Insert Request Editor to create and edit requests for inserting data into a database. You can entera Description to indicate the purpose or function of the Insert Request. Use the General tab to specifyparameters for the Insert Process. The other tabs are not used.
Chapter 2. Scenario 1 – A Set of Customers 23

Note: Other tabs include Age Function and Global Aging, used to age data; Report Options, used tocustomize the process report; and Currency, used to specify default currency conversion factors. For thisscenario, the data is not aged, the report is not customized, and currency is not converted, so the tabs forthese options are not used. For complete information about an Insert Request, refer to the Move UserManual.
Source File
Enter the name of the Extract File that contains the data for Scenario 1.
For this scenario, click the Last Extract button to specify the last Extract File created. If the Scenario
1 Extract File was not the last Extract File created, use the Browse button to locate the file.
For this scenario, use scenario28.xf.
Control File
Enter the name of a Control File. A Control File is generated during the Insert Process to track the successor failure of each row in the Extract File. Control Files have a .cf extension by default.
For this scenario, enter scenario1.cf.
Table Map Options
A Table Map directs the placement of data in the Insert Process by identifying and matching tables in thesource, or Extract File, with those in the database. In addition, you can use a Table Map to exclude tablesfrom processing.
Table Map Options allow you to use a named Table Map that is saved and can be used with otherprocess requests, or a Local Table Map that is saved as part of the Insert Request.
For this scenario, select Local to create a Local Table Map.
Always View Table Map
Use this option to open the Table Map Editor each time you run the Insert Request. This option providesan opportunity to review the Table Map specifications before you insert data.
For this scenario, do not select the option.
Delete Options
Delete Options let you delete rows from all or specified destination tables or retain all rows in destinationtables (no delete).
For this scenario, use the default setting No Tables to retain rows already in the database.
Process Options
Process Options allow you to select the type of Insert Processing to be performed and specify parametersto be used. You can insert new rows only; insert new rows and update existing rows; or update existingrows only. You can apply these options globally or on a table-by-table basis.
24 IBM Optim: Move Introduction

For this scenario, select Insert to insert new rows of data into the specified tables.
Lock Tables
Select this check box to lock database tables (if authorized) to ensure that other database activity does notinterfere during processing.
For this scenario, do not select the option. Since the tables you create for the test database are new, LockTables is not applicable to this scenario.
Process File Attachments
Select this check box to process file attachments stored in the Extract File.
For this scenario, leave this box selected, which is the default.
Commit Frequency
Specify the number of rows to process before committing the changes to the database.
For this scenario, use the default Commit Frequency established by the system administrator.
Discard Row Limit
Specify the maximum number of rows that can be discarded. When the specified limit is reached and allrows in the array have been processed, the Insert Process is cancelled.
For this scenario, use the default setting of 0 to allow an unlimited number of discarded rows.
Disable Triggers
Specify options to disable database triggers during the Insert Process.
For this scenario, use the default setting.
Disable Constraints
Specify options for disabling referential integrity constraints.
For this scenario, use the default setting.
Always Call Create
Select this option to always start the Create Utility to create or drop objects in the destination databasebefore inserting the data. If you do not select the option, the Create Utility starts only when necessary tocreate desired objects in the destination database.
For this scenario, do not select the option.
Edit the Table MapIn an Insert Process, you use a Table Map to direct the placement of data. A Table Map matches thesource tables in the Extract File to the destination tables in the database.
To display the Table Map Editor, click Tools → Edit Table Map from the Insert Request Editor.
Chapter 2. Scenario 1 – A Set of Customers 25

Note: If the Always View Table Map option is selected in the Insert Request Editor, the Table MapEditor will automatically display when you run the process. This option allows you to verify the TableMap.
Source
Displays the Extract File and Qualifier associated with the source data.
Destination
Enter the Qualifier for the destination data. For this scenario, enter the same Destination Qualifier as theSource Qualifier.
Description
You can enter an optional Description of the Table Map.
Column Map ID
Specify a default Qualifier for Column Maps used in the Table Map. Use a Column Map to correlatesource and destination columns and to transform source data before inserting it.
For this scenario, leave the box blank because Column Maps are not used.
26 IBM Optim: Move Introduction

Server Name
The location of the Extract File.
Source Table
Lists the source table names in the Extract File.
Destination Table
Lists the destination table names. When you create a new Table Map, the destination table names are thesame as the source table names by default. You can modify the destination table names.
For this scenario, prefix the destination table names with TESTX_ to create new tables for the test database.
Type
Identifies the type of object in Destination Table.
For this scenario, Type will display Table for each destination table until you change the table names.After you change the names, Type will display Unknown for each new table name.
To return to the Insert Request Editor, click File → Update and Return from the Table Map Editor .
See the Common Elements Manual for further information about Table Maps.
Save the Insert RequestAlthough you need not save an Insert Request to process it, you should save the Insert Request becauseScenario 2 builds on the Insert in Scenario 1.
For this scenario, save the Insert Request by doing the following:v From the Insert Request Editor, click File → Save to display the Save an Insert Request dialog.v Type PSTDEMO.SCENARIO1 in the Enter pattern for Insert Request box and click Save.
Process the Insert RequestTo process the Insert Request, click File → Run from the Insert Request Editor.
Chapter 2. Scenario 1 – A Set of Customers 27

Note: If you are not authorized to create new tables, you may be unable to continue this scenario. Checkwith the site management for the destination tables to use.
Insert Progress
The Insert Request Progress dialog is displayed as the Insert Request is processed. The Insert Processpopulates the tables with the data from the Extract File.
Create Utility
If the status of any table in the Table Map is Unknown, meaning it does not exist, the Create Utility isopened. The Create Utility uses the object definitions in the Extract File to create those objects in thedatabase.
When the Create Utility is opened, the Create dialog lists all objects in the Extract File that do not exist atthe destination. Objects that do not exist at the destination are selected for the Create Process by default,unless a conflict exists.
In this scenario, the object types PK (for primary key) and FK (for foreign key) are in conflict. The ObjectNames of the primary keys and foreign keys in the Extract File conflict with names that already exist inthe database.
Note: The Create dialog may differ slightly from the example shown, depending on the database youuse. For this scenario, the Oracle version is displayed.
28 IBM Optim: Move Introduction
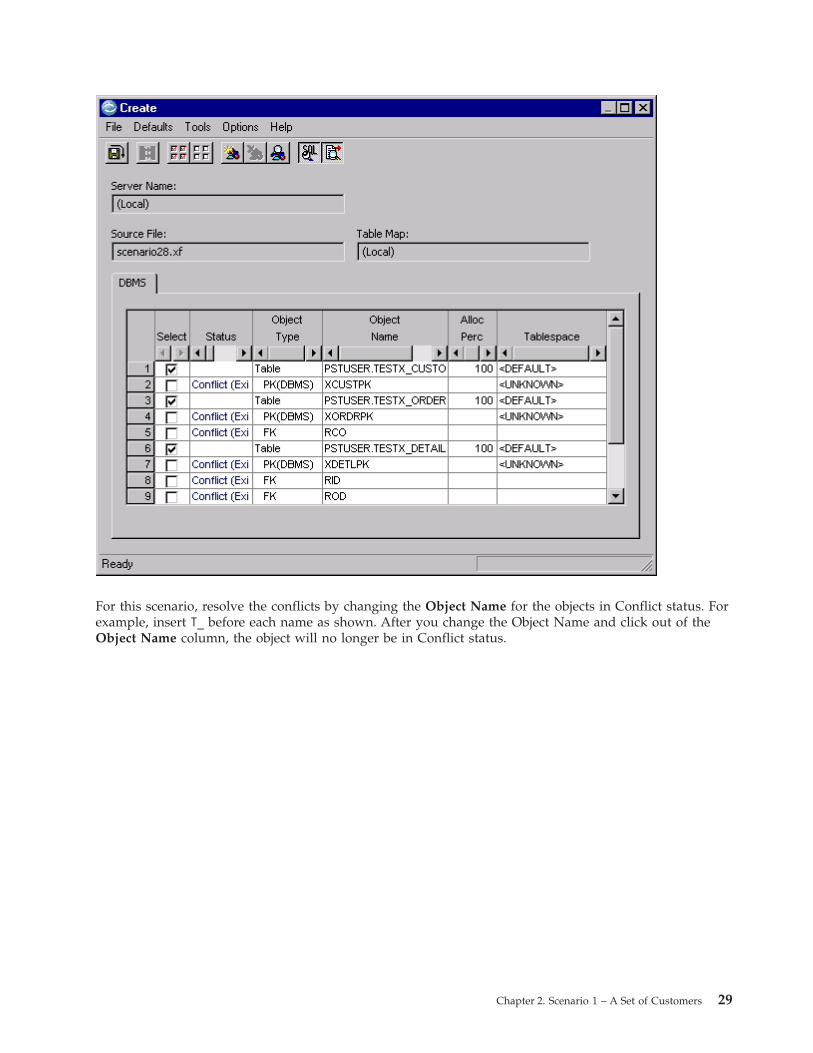
For this scenario, resolve the conflicts by changing the Object Name for the objects in Conflict status. Forexample, insert T_ before each name as shown. After you change the Object Name and click out of theObject Name column, the object will no longer be in Conflict status.
Chapter 2. Scenario 1 – A Set of Customers 29

To create the objects, click Tools → Create All Selected Objects from the Create dialog, or right-click andselect the command from the shortcut menu.
Note: You can also create each object individually using Create Object from the shortcut menu.
Review SQL
The Review SQL dialog is displayed by default, enabling you to examine the SQL produced to create theobjects. The SQL can be edited, if needed.
For this scenario, click Proceed to create the objects.
Note: If there are errors, the Review SQL dialog displays again. You may then edit the SQL to try tocorrect the problem or abandon the Create Request.
30 IBM Optim: Move Introduction

Browse SQL Output
After the objects are created, the Browse Output dialog is displayed, enabling you to browse the SQLstatements and the results of the Create Utility.
Chapter 2. Scenario 1 – A Set of Customers 31

Click Continue on the Browse Output dialog to return to the Create dialog. The objects successfullycreated are displayed with the status of Created.
32 IBM Optim: Move Introduction

After the new objects are created at the destination, click File → Close from the Create dialog.
Insert Process Report
When the Insert Process is completed, the Insert Process Report is displayed. The report providesstatistics and general information about the Insert Process.
Chapter 2. Scenario 1 – A Set of Customers 33

Note: The information displayed in the sample illustration may vary from the results displayed on yourworkstation.
You can optionally save or print the Insert Process Report. Click File → Save As to save the report, orclick File → Print to print it.
To return to the Insert Request Editor, click File → Close.
34 IBM Optim: Move Introduction

Chapter 3. Scenario 2 – A Set of Items
In this scenario, you will use the same set of tables from the sample database that were used for Scenario1, but the Extract Process in Scenario 2 is more complex. Scenario 2 also demonstrates the ability of Moveto transform, age, and update when migrating the set of data. Scenario 2 demonstrates how to migrate arelational set of data in two steps.
Note: The sample database tables distributed with Optim correlate to the tables used in examples in thisscenario, although the table names in this scenario do not contain the prefix “OPTIM_”.
The first step describes how to specify, extract, and store a relational set of data.v An Extract Request lists the specifications for the Extract Process.v An Access Definition specifies the data to extract.v A Point and Shoot list specifies the exact rows from the Start Table to extract.v An Extract File stores the extracted set of data.v An Extract Process Report records the results of the Extract Process.
The second step describes how to transform data, insert the new data, and update existing data in thedestination tables.v An Insert Request contains the specifications for the Insert Process.v A Table Map specifies the destination of the data.v A Column Map specifies the transformation of the data.v The relational set of data stored in the Extract File populates the destination tables.v An Insert Process Report records the results of the Insert Process.
Scenario 2 directs you through the steps required to extract a set of data for specific items, including thedetails and the orders for the items. To obtain the desired set of data, you will specify the ITEMS table asthe Start Table and select specific ITEMS rows using the Point and Shoot Editor. Since the extracted set ofdata must be referentially intact, this scenario will include the orders for these items (from the ORDERStable), the customers who placed the orders (from the CUSTOMERS table), and the DETAILS table rowsfor any order that contains the selected items.
Scenario 2 uses the same destination tables created in Scenario 1. The Insert Process in Scenario 2 alsoupdates the destination data and uses a Column Map to modify data.
Open the Extract RequestThis scenario builds on the Extract Request created in Scenario 1. To begin, open that Extract Request.v Click File → Open from the main window.v Double-click Extract Request in the Identifier list to display the list of saved Extract Requests.v Double-click the name of the Extract Request saved from Scenario 1.
Move populates the Extract Request Editor with the specifications saved in Scenario 1.
© Copyright IBM Corp. 1994, 2010 35

Rename the Extract Request
Before you modify the Extract Request for Scenario 2, click File → Save As to display the Save an ExtractRequest dialog and create a copy of the original Extract Request.
Enter a new name for the request to create a copy of the Extract Request for Scenario 2. The originalExtract Request will remain unchanged and modifications for Scenario 2 will apply only to the new copy.
36 IBM Optim: Move Introduction

For this scenario, modify the Extract Request as follows:v Type a new Description.v On the General tab, use the same Extract File name and Optim macro from Scenario 1. The macro will
increase the file's sequence number.
Note: In this scenario, all the other Extract Process parameters are used at the default settings. Foradditional information about other parameters available in an Extract Request, see the Move User Manual.
Modify the Local Access DefinitionTo display the Access Definition Editor, click Tools → Edit Access Definition from the Extract RequestEditor.
For this scenario, modify the Access Definition as follows:v Change the Description of the Access Definition.v Clear the Every Nth column for the CUSTOMERS table on the Tables tab.v Clear the check box in the Ref Tbl column for the ITEMS table. (To begin the Extract Process with
rows from the ITEMS table, the ITEMS table must be designated as the Start Table. The Start Tablecannot be a Reference Table.)
v Right-click the ITEMS table and click Set as Start on the shortcut menu to designate ITEMS as the StartTable.
Chapter 3. Scenario 2 – A Set of Items 37
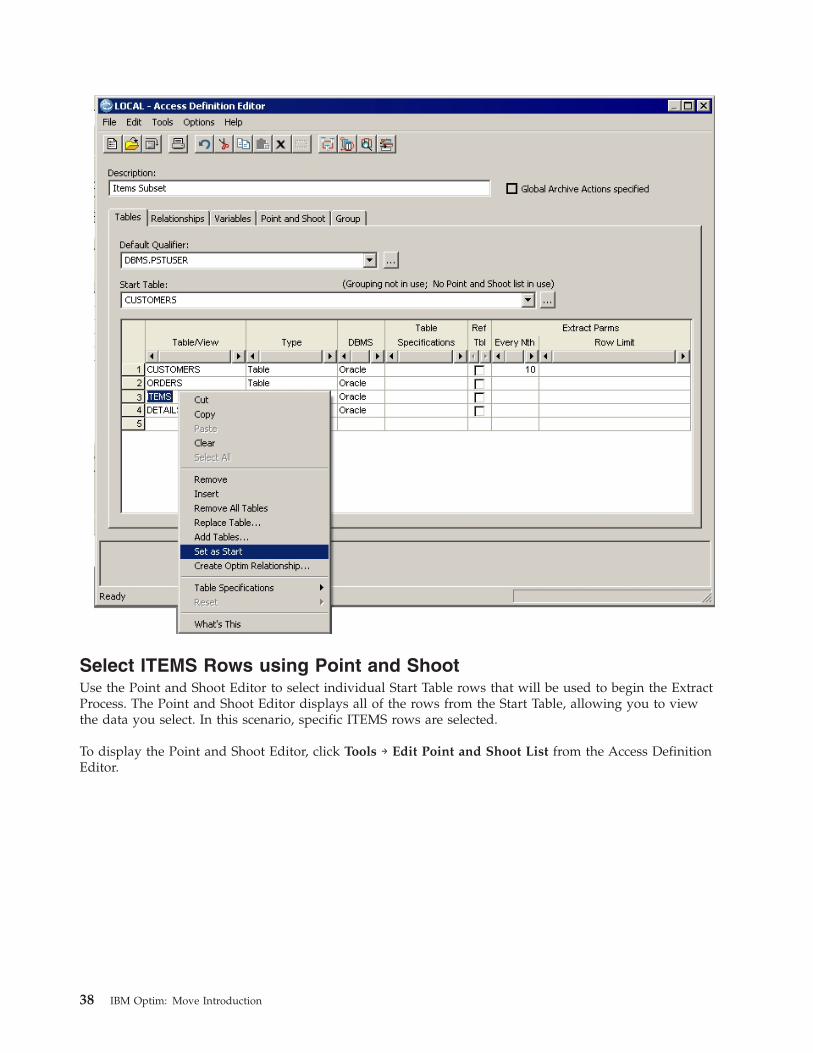
Select ITEMS Rows using Point and ShootUse the Point and Shoot Editor to select individual Start Table rows that will be used to begin the ExtractProcess. The Point and Shoot Editor displays all of the rows from the Start Table, allowing you to viewthe data you select. In this scenario, specific ITEMS rows are selected.
To display the Point and Shoot Editor, click Tools → Edit Point and Shoot List from the Access DefinitionEditor.
38 IBM Optim: Move Introduction

For this scenario, do the following in the Point and Shoot Editor:v Select the check box in the Sel column for the first four rows.v Click Tools → Convert to Local, and click Yes in the confirmation pop-up. This option creates a local
Point and Shoot list, which is stored with the Access Definition only; otherwise, the Point and Shootlist is stored in the Optim Directory.
v Click File → Update and Return from the Access Definition Editor.
See the Common Elements Manual for details on using the Point and Shoot Editor.
The Point and Shoot tab in the Access Definition Editor indicates the Point and Shoot list File Optionselected (which is Local in this scenario):
None Specifies that a Point and Shoot list is not used with the Access Definition. Use this choice todrop an existing Point and Shoot list.
Local Specifies that a local Point and Shoot list is saved as part of the Access Definition but not savedas a file, and therefore not available for use with other Access Definitions.
File Indicates that a named Point and Shoot File is specified for the Access Definition. You can changeto a different Point and Shoot list, as required.
Chapter 3. Scenario 2 – A Set of Items 39
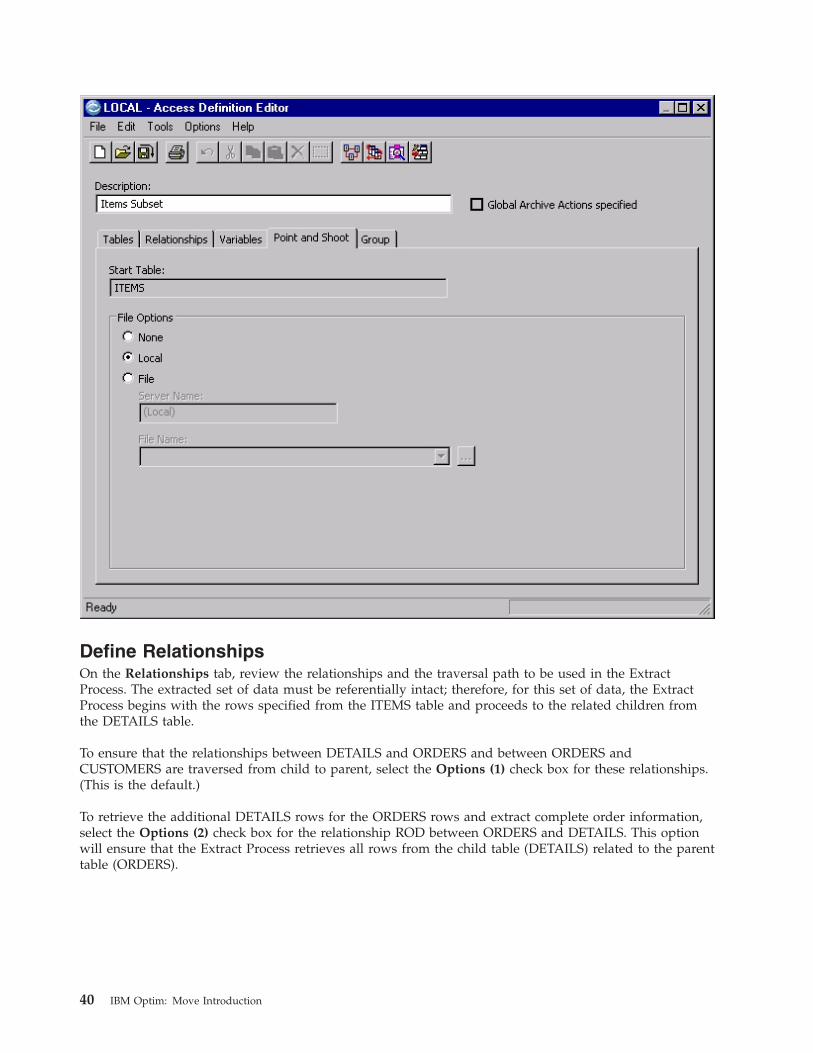
Define RelationshipsOn the Relationships tab, review the relationships and the traversal path to be used in the ExtractProcess. The extracted set of data must be referentially intact; therefore, for this set of data, the ExtractProcess begins with the rows specified from the ITEMS table and proceeds to the related children fromthe DETAILS table.
To ensure that the relationships between DETAILS and ORDERS and between ORDERS andCUSTOMERS are traversed from child to parent, select the Options (1) check box for these relationships.(This is the default.)
To retrieve the additional DETAILS rows for the ORDERS rows and extract complete order information,select the Options (2) check box for the relationship ROD between ORDERS and DETAILS. This optionwill ensure that the Extract Process retrieves all rows from the child table (DETAILS) related to the parenttable (ORDERS).
40 IBM Optim: Move Introduction

For this scenario, do the following in the Relationships tab:v Verify that the Select check box is selected for each relationship.v Verify that the Options (1) check box is selected for each relationship.v Select the Options (2) check box for the relationship between ORDERS and DETAILS.
Review the Access DefinitionConsider the steps performed to extract the data based on the selection criteria, selected relationships,and specifications for Options (1) and (2). The following simplified data is displayed for each table to aidin the explanation.
Steps:1. The rows from the Start Table, ITEMS, are selected by Point and Shoot to extract specific
items. The specific ITEMS in this example are CH1 and CH4.2. The DETAILS rows for these ITEMS rows are extracted by traversing the relationship RID
from parent to child. The extracted DETAILS rows are DTL1, DTL5, and DTL8.
Chapter 3. Scenario 2 – A Set of Items 41

3. The ORDERS related to the extracted DETAILS rows (ORD1, ORD4 and ORD5) are extractedby traversing the relationship ROD from child to parent, as specified by Option (1). DETAILSto ORDERS
4. The CUSTOMERS related to the ORDERS are extracted by traversing the relationship RCOfrom child to parent.
42 IBM Optim: Move Introduction
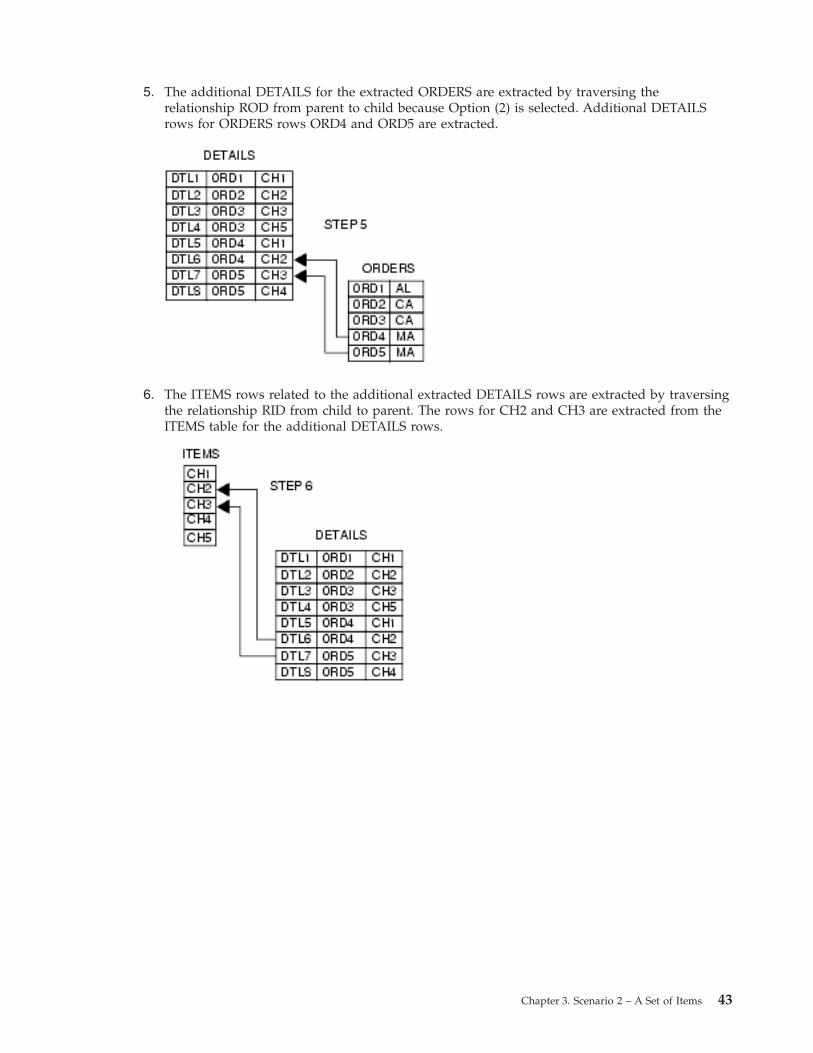
5. The additional DETAILS for the extracted ORDERS are extracted by traversing therelationship ROD from parent to child because Option (2) is selected. Additional DETAILSrows for ORDERS rows ORD4 and ORD5 are extracted.
6. The ITEMS rows related to the additional extracted DETAILS rows are extracted by traversingthe relationship RID from child to parent. The rows for CH2 and CH3 are extracted from theITEMS table for the additional DETAILS rows.
Chapter 3. Scenario 2 – A Set of Items 43

Show Steps
Click Tools → Show Steps to display a narrative that describes the traversal path of the Extract Request.
Click File → Close to return to the Access Definition Editor. Then click File → Update and Return toupdate the Access Definition and return to the Extract Request Editor.
Save the Extract RequestAlthough you need not save an Extract Request to process it, saving it is recommended. For this scenario,do the following to save the Extract Request:v Click File → Save from the Extract Request Editor to display the Save an Extract Request dialog.v Type PSTDEMO.SCENARIO2 in the Enter pattern for Extract Request box and click Save to save the
request.
Process the Extract RequestFor this scenario, process the Extract Request by clicking File → Run from the Extract Request Editor.
44 IBM Optim: Move Introduction
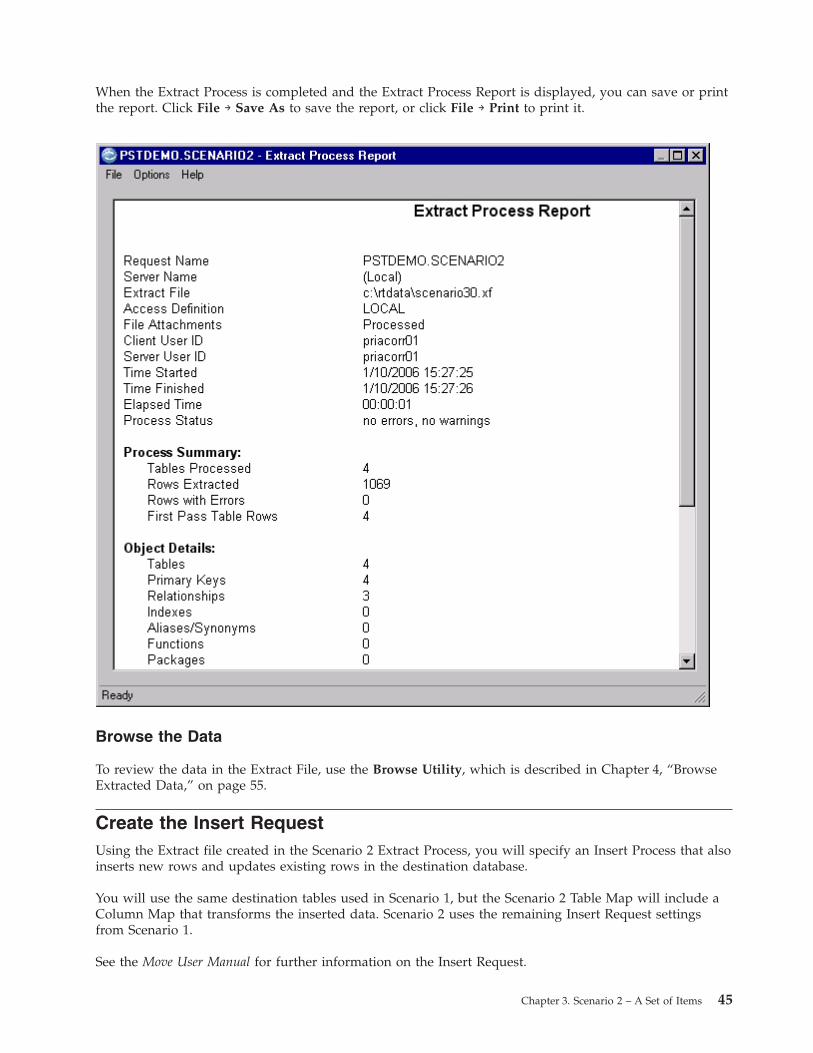
When the Extract Process is completed and the Extract Process Report is displayed, you can save or printthe report. Click File → Save As to save the report, or click File → Print to print it.
Browse the Data
To review the data in the Extract File, use the Browse Utility, which is described in Chapter 4, “BrowseExtracted Data,” on page 55.
Create the Insert RequestUsing the Extract file created in the Scenario 2 Extract Process, you will specify an Insert Process that alsoinserts new rows and updates existing rows in the destination database.
You will use the same destination tables used in Scenario 1, but the Scenario 2 Table Map will include aColumn Map that transforms the inserted data. Scenario 2 uses the remaining Insert Request settingsfrom Scenario 1.
See the Move User Manual for further information on the Insert Request.
Chapter 3. Scenario 2 – A Set of Items 45
Open the Insert RequestThis scenario builds on the Insert Request created in Scenario 1. To begin, open that Insert Request.v Click File → Open from the menu in the main window.v Double-click Insert Request in the Identifier list to display the list of saved Insert Requests.v Double-click the name of the Insert Request saved from Scenario 1.
Move populates the Insert Request Editor with the specifications saved in Scenario 1.
Rename the Insert Request
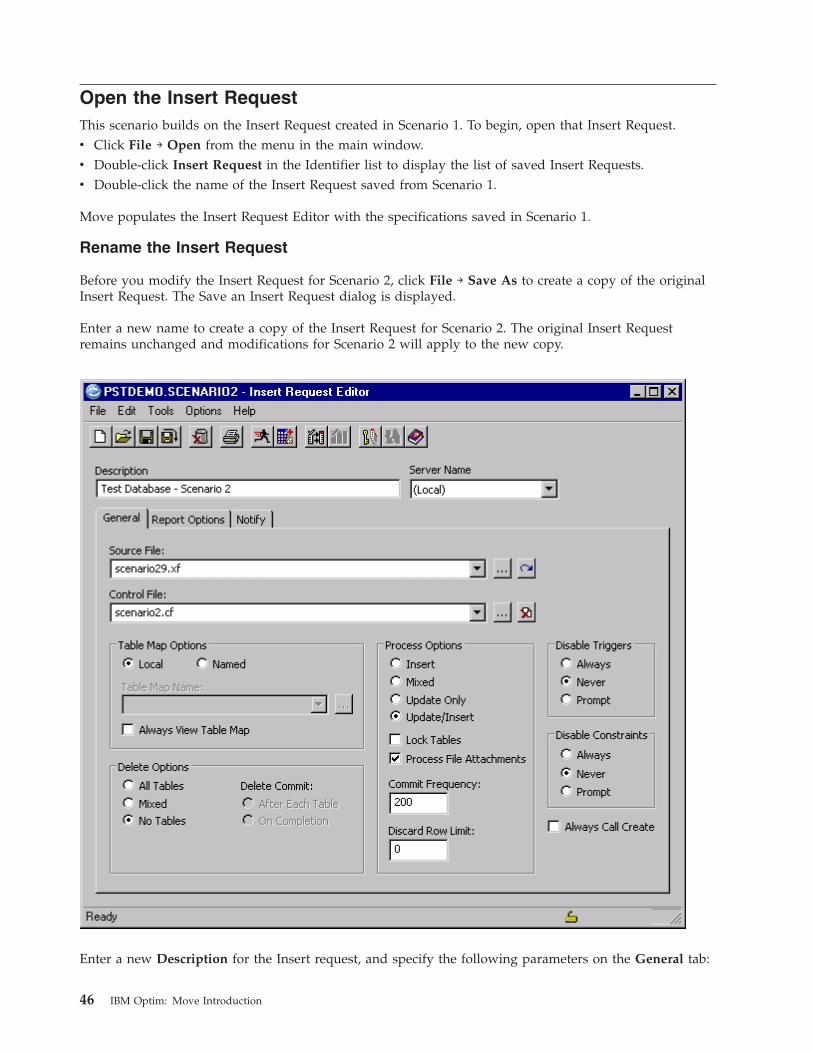
Before you modify the Insert Request for Scenario 2, click File → Save As to create a copy of the originalInsert Request. The Save an Insert Request dialog is displayed.
Enter a new name to create a copy of the Insert Request for Scenario 2. The original Insert Requestremains unchanged and modifications for Scenario 2 will apply to the new copy.
Enter a new Description for the Insert request, and specify the following parameters on the General tab:
46 IBM Optim: Move Introduction

Source File
Enter the name of the Extract File that contains the data for Scenario 2.
For this scenario, click the Last Extract button to specify the last Extract File. If the Scenario 2
Extract File was not the last Extract File created, use the Browse button to locate the file.
For this scenario, use scenario29.xf.
Control File
Enter the name of a Control File. You can use the same Control File repeatedly. If a process executessuccessfully, there is no particular reason to save the Control File.
For this scenario, use scenario2.cf.
Table Map Options
For this scenario, you will create a Local Table Map.
Process Options
For this scenario, select Update/Insert to insert new rows and update existing rows in the specifieddestination tables, as follows:v If the primary key of a row in the source data does not match the primary key of a row in the
destination table, the row is inserted.v If the primary key of a row in the source data matches the primary key of a row in the destination
table, the row is updated.
Edit the Table MapIn this scenario, you will use the same Table Map specifications used in Scenario 1, but the Scenario 2Table Map will include a Column Map for the ORDERS table.
Click Tools → Edit Table Map to display the Table Map Editor.
Chapter 3. Scenario 2 – A Set of Items 47

Destination
For this scenario, verify that the Qualifier matches the DB Alias and Creator ID of the test databasetables created in Scenario 1.
Description
Enter a description of the Table Map.
Column Map ID
For this scenario, leave the Column Map ID box blank. A Column Map ID is only required when thename of one or more specified Column Maps is not fully qualified.
Destination Table Names
For this scenario, verify that the destination table names match those created in Scenario 1.
Column Map or “LOCAL”
For this scenario, specify a local Column Map. Type the word LOCAL in the Column Map or LOCALcolumn for the ORDERS table. When you click outside the grid cell, the Column Map Status columnchanges from Unused to Unknown and a warning message will appear at the bottom of the Table MapEditor. The status remain Unknown until you define the Column Map in the next step.
48 IBM Optim: Move Introduction

Edit the Column MapIn an Insert Process, you use a Column Map to map columns of compatible data between source anddestination tables as well as to manipulate data inserted in the destination table. In this scenario, you willspecify a Column Map that inserts a special value into a column and defines an aging parameter foranother column.
To display the Column Map Editor, right-click in the grid cell of the Table Map Editor where you typedLOCAL and click Open Column Map in the shortcut menu.
Chapter 3. Scenario 2 – A Set of Items 49

Source
There are two entries under Source:v Extract File, which is automatically populated with the name of the Extract File specified in the Insert
Request.v Table Name, which is automatically populated with the three-part source table name:
dbalias.creatorid.tablename
Destination
Automatically populated with the three-part destination table name: dbalias.creatorid.tablename.
Description
Enter a description for the Column Map.
Source Column
The names of the columns in the source table are listed and can be altered as required.
For this scenario, do the following:v Replace ORDER_SALESMAN in the Source column list by typing the literal ‘PROMO' in single quotes.
This literal value will replace the original value for the column.
50 IBM Optim: Move Introduction
v Replace ORDER_SHIP_DATE in the Source column list with the following Age Function that will agethe shipping date by six weeks and change the date from a two-digit year to a four-digit year format:AGE(SF='YY/MM/DD',DF='YYYYMMDD',+6W).
where:
AGE Invokes the Age Function.
SF='YY/MM/DD' The format of the source data.
DF='YYYYMMDD' The format of the destination data (limited by the data type to eightcharacters).
+6W The amount by which to age the date.
Status
The status of each destination column is displayed.
In this scenario, the following statuses apply:v The following columns are defined as Equal because the data types of the source and destination
columns are identical: ORDER_ID, CUST_ID, ORDER_DATE, FREIGHT_CHARGES, andORDER_POSTED_DATE
v The ORDER_SALESMAN column is defined as String Literal.v The ORDER_SHIP_DATE column is defined as Age Function.
Note: The data types in the source and destination columns must be compatible. If not, Status indicatesthe discrepancy. See the Common Elements Manual for further information.
Click File → Update and Return from the Column Map Editor to return to the Table Map Editor. Notethat the Status column for the ORDERS table has changed to Defined on the Table Map Editor.
Chapter 3. Scenario 2 – A Set of Items 51

Click File → Update and Return from the Table Map Editor to return to the Insert Request Editor.
Save the Insert RequestAlthough you need not save an Insert Request to process it, saving it is recommended. For this scenario,do the following to save the Insert Request:v Click File → Save from the Insert Request Editor to display the Save an Insert Request dialog.v Type PSTDEMO.SCENARIO2 in the Enter pattern for Insert Request box and click Save to save the request.
52 IBM Optim: Move Introduction

Process the Insert RequestClick File → Run from the Insert Request Editor to begin processing the Insert Request.
The Insert Request Progress dialog is displayed while the Insert Request is processed.
When the Insert Process is completed, the Insert Process Report is displayed. The report providesstatistics and general information about the Insert Process.
Chapter 3. Scenario 2 – A Set of Items 53

Note: The report information displayed in the sample illustration may vary from the results displayed onyour workstation.
You can save or print the Insert Process Report. Click File → Save As to save the report, or click File →Print to print it.
Click File → Close to return to the Insert Request Editor.
54 IBM Optim: Move Introduction

Chapter 4. Browse Extracted Data
Use the Browse Utility to quickly and easily review data stored in an Extract File without having toinsert the data into a database. You can use the Browse Utility to ensure that an Extract File contains thedata you expected to extract and to determine if an Extract File is appropriate for an Insert Process. Whenviewing data in an Extract File, you can begin with data in any table and join to related data in othertables.
Chapter Overview
This chapter demonstrates how to use the Browse Utility by reviewing the data in an Extract File.
To browse the data, you will:v Open the Extract File created in Scenario 1.v Select a table to browse (the ORDERS table) to verify the data.v Join a table (the DETAILS table) to view related data using the Join facility.
Open an Extract FileIn the main window, click Utilities → Browse to display the Browse dialog. To open the Extract Filecreated in Scenario 1, do one of the following:v If the Extract File was the last file created, click File → Last Created Extract File to open the Extract
File.v Otherwise, click File → Open and select the Extract File using the Open dialog.
The table names from the Extract File are listed in the Browse Extract and Control File dialog.
© Copyright IBM Corp. 1994, 2010 55
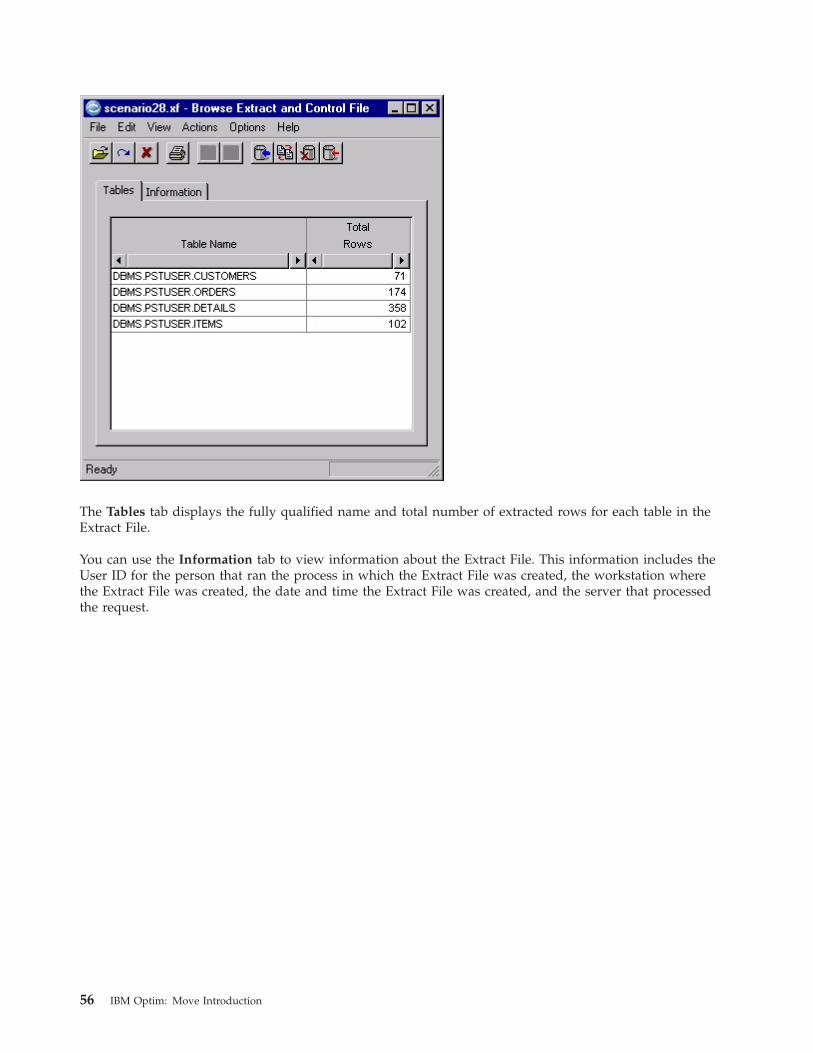
The Tables tab displays the fully qualified name and total number of extracted rows for each table in theExtract File.
You can use the Information tab to view information about the Extract File. This information includes theUser ID for the person that ran the process in which the Extract File was created, the workstation wherethe Extract File was created, the date and time the Extract File was created, and the server that processedthe request.
56 IBM Optim: Move Introduction

Select a Table to BrowseYou can browse data in any table in an Extract File. To display rows in the ORDERS table, double-clickthe table name in the Browse Extract File dialog. In the Browse Extract File Table Data dialog, a browsewindow displays the data.
The browse window contains a toolbar that lets you select display options and menu choices that pertainto the display. For example, you can display or hide column attribute information, join and unjoin tablesto view related data, and switch the display format. Shortcut menu commands, available when youright-click a column heading, allow you to find, include, or exclude rows that contain specific data.
Columnar or Side Label Format
Data is displayed in columnar format or side label format. In columnar format, column names aredisplayed across the top and data is displayed in columns beneath headings. In side label format, columnnames are on the left and a row of data is displayed to the right of headings.
The side label format is useful if you want to view all columns or data in a wide column for a row,without having to scroll the display horizontally. The default format is set in Personal Options, but youcan switch the display format using the Columnar or Side Label toolbar buttons.
View Related DataThe Join facility allows you to join to tables related to the currently displayed table. This feature is usefulfor inspecting related data. You can join a single table or multiple tables, depending on the data you wantto browse.
Chapter 4. Browse Extracted Data 57

Join Arrow
In the browse window toolbar, click the Join arrow to display the Select Join Table dialog.
The names of tables related to ORDERS are displayed: CUSTOMERS is the parent of ORDERS, andDETAILS is the child of ORDERS. Join to DETAILS by double-clicking the table name. Related data isdisplayed in an additional browse window, the Browse Extract File Table Data dialog.
58 IBM Optim: Move Introduction

You can drag the bar between the browse windows to resize each window, if desired.
Current Row Indicator
The Current Row Indicator column is the first column on the left in Browse Extract File Table Datadialog. A left-pointing arrow appears in this column to identify the currently selected row. Click in theCurrent Row Indicator column next to an ORDERS row to display the related DETAILS rows. To move toa different row, click in the Current Row Indicator column for that row.
Unjoin arrow
Remove the joined table from the display by clicking the Unjoin arrow in the browse window toolbar forthe joined table. The Unjoin arrow is the upward-pointing arrow to the right of the joined table name inthe window for the joined table.
To return to the Browse Extract File dialog, click File → Close File on the Browse Extract File Table Datadialog. Then click File → Close to exit the Browse Utility.
Note: See the Common Elements Manual for additional information about the Browse Utility.
Chapter 4. Browse Extracted Data 59

60 IBM Optim: Move Introduction

Notices
This information was developed for products and services offered in the U.S.A.
IBM may not offer the products, services, or features discussed in this document in other countries.Consult your local IBM representative for information on the products and services currently available inyour area. Any reference to an IBM product, program, or service is not intended to state or imply thatonly that IBM product, program, or service may be used. Any functionally equivalent product, program,or service that does not infringe any IBM intellectual property right may be used instead. However, it isthe user's responsibility to evaluate and verify the operation of any non-IBM product, program, orservice.
IBM may have patents or pending patent applications covering subject matter described in thisdocument. The furnishing of this document does not grant you any license to these patents. You can sendlicense inquiries, in writing, to:
IBM Director of LicensingIBM CorporationNorth Castle DriveArmonk, NY 10504-1785U.S.A.
For license inquiries regarding double-byte (DBCS) information, contact the IBM Intellectual PropertyDepartment in your country or send inquiries, in writing, to:
IBM World Trade Asia CorporationLicensing 2-31 Roppongi 3-chome, Minato-kuTokyo 106-0032, Japan
The following paragraph does not apply to the United Kingdom or any other country where suchprovisions are inconsistent with local law: INTERNATIONAL BUSINESS MACHINES CORPORATIONPROVIDES THIS PUBLICATION “AS IS” WITHOUT WARRANTY OF ANY KIND, EITHER EXPRESSOR IMPLIED, INCLUDING, BUT NOT LIMITED TO, THE IMPLIED WARRANTIES OFNON-INFRINGEMENT, MERCHANTABILITY OR FITNESS FOR A PARTICULAR PURPOSE. Somestates do not allow disclaimer of express or implied warranties in certain transactions, therefore, thisstatement may not apply to you.
This information could include technical inaccuracies or typographical errors. Changes are periodicallymade to the information herein; these changes will be incorporated in new editions of the publication.IBM may make improvements and/or changes in the product(s) and/or the program(s) described in thispublication at any time without notice.
Any references in this information to non-IBM Web sites are provided for convenience only and do not inany manner serve as an endorsement of those Web sites. The materials at those Web sites are not part ofthe materials for this IBM product and use of those Web sites is at your own risk.
IBM may use or distribute any of the information you supply in any way it believes appropriate withoutincurring any obligation to you.
Licensees of this program who wish to have information about it for the purpose of enabling: (i) theexchange of information between independently created programs and other programs (including thisone) and (ii) the mutual use of the information which has been exchanged, should contact:
© Copyright IBM Corp. 1994, 2010 61

IBM CorporationSoftware Interoperability Coordinator, Department 49XA3605 Highway 52 NRochester, MN 55901U.S.A.
Such information may be available, subject to appropriate terms and conditions, including in some cases,payment of a fee.
The licensed program described in this information and all licensed material available for it are providedby IBM under terms of the IBM Customer Agreement, IBM International Program License Agreement, orany equivalent agreement between us.
Any performance data contained herein was determined in a controlled environment. Therefore, theresults obtained in other operating environments may vary significantly. Some measurements may havebeen made on development-level systems and there is no guarantee that these measurements will be thesame on generally available systems. Furthermore, some measurements may have been estimated throughextrapolation. Actual results may vary. Users of this document should verify the applicable data for theirspecific environment.
Information concerning non-IBM products was obtained from the suppliers of those products, theirpublished announcements or other publicly available sources. IBM has not tested those products andcannot confirm the accuracy of performance, compatibility or any other claims related to non-IBMproducts. Questions on the capabilities of non-IBM products should be addressed to the suppliers ofthose products.
All statements regarding IBM's future direction or intent are subject to change or withdrawal withoutnotice, and represent goals and objectives only.
All IBM prices shown are IBM's suggested retail prices, are current and are subject to change withoutnotice. Dealer prices may vary.
This information is for planning purposes only. The information herein is subject to change before theproducts described become available.
This information contains examples of data and reports used in daily business operations. To illustratethem as completely as possible, the examples include the names of individuals, companies, brands, andproducts. All of these names are fictitious and any similarity to the names and addresses used by anactual business enterprise is entirely coincidental.
COPYRIGHT LICENSE:
This information contains sample application programs in source language, which illustrate programmingtechniques on various operating platforms. You may copy, modify, and distribute these sample programsin any form without payment to IBM, for the purposes of developing, using, marketing or distributingapplication programs conforming to the application programming interface for the operating platform forwhich the sample programs are written. These examples have not been thoroughly tested under allconditions. IBM, therefore, cannot guarantee or imply reliability, serviceability, or function of theseprograms.
Each copy or any portion of these sample programs or any derivative work, must include a copyrightnotice as follows:
© (your company name) (year). Portions of this code are derived from IBM Corp. Sample Programs. ©Copyright IBM Corp. _enter the year or years_. All rights reserved.
62 IBM Optim: Move Introduction

If you are viewing this information softcopy, the photographs and color illustrations may not appear.
TrademarksIBM, the IBM logo, DB2, Informix, Optim, and ibm.com® are trademarks or registered trademarks ofInternational Business Machines Corporation in the United States, other countries, or both. If these andother IBM trademarked terms are marked on their first occurrence in this information with a trademarksymbol (® or ™), these symbols indicate U.S. registered or common law trademarks owned by IBM at thetime this information was published. Such trademarks may also be registered or common law trademarksin other countries. A current list of IBM trademarks is available on the Web at “Copyright and trademarkinformation” at www.ibm.com/legal/copytrade.shtml.
Microsoft, Windows, and Windows NT are trademarks of Microsoft Corporation in the United States,other countries, or both.
Other company, product, or service names may be trademarks or service marks of others.
Notices 63

64 IBM Optim: Move Introduction

Index
AAccess Definition 3
default qualifier 11table list 12
Access Definition Editor 10Age Function 24Always Call Create 25Always View Table Map 26
BBrowse
columnar format 57Extract File 55Extract File table data 57related data 58side label format 57unjoin tables 59
Browse Utility 6
CCalendar Utility 6Column Map ID 26, 48Column Maps 5, 48
Editor 49Columnar Format 57Columns 13Commit Frequency 25Control File 4Convert Process 5Convert to Local 39Create Utility 6, 28
browse SQL output 31review SQL 30select objects 28
Currency 24
DDefault Qualifier 11Define Relationships 15, 40Destination Table Names 27, 48Disable Constraints 25Disable Triggers 25Discard Row Limit 25
EEdit Point and Shoot List 38Environment 1Every Nth 13Export/Import Utility 6Extract File 3Extract Parms 13Extract Process Report 45Extract Request 3
Editor 8Progress dialog 21
Extract Request (continued)report 3save 20specify parameters 8
GGlobal Aging 24
IIndent 19Insert Process Report 33, 53Insert Request 23
Progress dialog 28report 5save 27
Insert Request Editor 23
JJoin Arrow 58Join Tables 58
LLoad Process 5Lock Tables 25
OObject Definitions 4Optim Security 6
PPoint and Shoot
Editor 38
RReference Table 13Relationships 15Report Options 24Reset Object Cache Utility 6Restart Utility 5Retry Utility 5Row Limit 13
SSample Database 1Sample Scenario
A Set of Customers 7A Set of Items 35
Save an Extract Request 20Save an Insert Request 27
Schedule Utility 6Select Tables dialog 12Selection Criteria 13Show Steps 19, 44Side Label Format 57Sort 13Source Column 50SQL 13Start Table 3Status 51
TTable Map Options 24Table Maps 5, 25Table Specifications 13Traversal Path 15
UUnjoin 59Update/Insert 4
© Copyright IBM Corp. 1994, 2010 65

66 IBM Optim: Move Introduction


����
Printed in USA