IBM Aptiva/NetVista Tech Notes - ps-2.
26
IBM Aptiva/NetVista Tech Notes Pre-Release Version 0.02 07/02/01
Transcript of IBM Aptiva/NetVista Tech Notes - ps-2.

IBM Aptiva/NetVista Tech Notes
Pre-Release Version 0.02 07/02/01

Audience This document contains technical notes for IBM Aptiva (2270) and IBM NetVista (2276) Personal computers. These notes are for the use of field and depot service personnel who might be called upon to service these products.

Page i
Table of Contents Overview ............................................................................................................................ 1
IBM Aptiva and NetVista systems .......................................................................................................... 1 Optional Features.................................................................................................................................... 1 Operating Systems.................................................................................................................................. 1 Bundled Software ................................................................................................................................... 1 Special Packaging for Resellers.............................................................................................................. 1 System Features...................................................................................................................................... 2 Example Configuration (People PC system) .......................................................................................... 2 Example Parts List (People PC System)................................................................................................. 3
System Board Technical Information ............................................................................. 4 System Board Overview........................................................................................................................... 4
System Board Identification ............................................................................................................... 5 BIOS....................................................................................................................................................... 5
Accessing BIOS.................................................................................................................................. 5 Selecting Optimal Settings ................................................................................................................. 5 Auto Detecting IDE Devices (Hard Disks, Optical Drives) ............................................................... 6 Displaying BIOS Information When Booting .................................................................................... 6 Saving BIOS changes ......................................................................................................................... 6 Viewing the BIOS Version................................................................................................................. 6 Viewing DMI Information.................................................................................................................. 7 Clearing CMOS .................................................................................................................................. 7 System Board Options ........................................................................................................................ 8 Button board Connectors .................................................................................................................... 9
Recovery Partition and Recovery CDs ......................................................................... 10 Overview.................................................................................................................................................. 10
Software Installation............................................................................................................................. 10 Performing a Recovery..................................................................................................................... 10 Creating a Boot Manager Repair Diskette ........................................................................................ 11 Accessing the Hidden Recovery Partition ........................................................................................ 12
Recovery CD ........................................................................................................................................... 12 Using Windows Me System Restore.............................................................................. 14
Rolls back your computer to a more stable state .................................................................................. 14 Restores without losing your personal files.......................................................................................... 14 Stores about one to three weeks of changes ......................................................................................... 14 Locates dates with restore points.......................................................................................................... 14 Provides several types of restore points................................................................................................ 14
Initial System checkpoints................................................................................................................ 14

Page i
System checkpoints .......................................................................................................................... 14 Program name installation restore points.......................................................................................... 15 Windows automatic update restore points ........................................................................................ 15 Manual restore points you have created ........................................................................................... 15 Ensures that all restorations are reversible ....................................................................................... 15 Notes................................................................................................................................................. 15
Running System Restore in Safe mode ................................................................................................ 16 Notes................................................................................................................................................. 16
Known Problems and Solutions..................................................................................... 17 BIOS Not Compatible Message........................................................................................................ 17 Unable to Access the Recovery Program ......................................................................................... 17 Missing Network Protocols under Windows ME ............................................................................. 17 CDRW Locks System....................................................................................................................... 17
Troubleshooting Hints .................................................................................................... 19 Static Discharge................................................................................................................................ 19 Power-Up Problems.......................................................................................................................... 19 System Won't Boot ........................................................................................................................... 19 System is slow .................................................................................................................................. 19 Modem Stops Working..................................................................................................................... 20
The Manufacturer's Warranty...................................................................................... 21 The Help Desk......................................................................................................................................... 21
Up and Running Support ...................................................................................................................... 21 Problem Determination ........................................................................................................................ 21
Onsite Service.......................................................................................................................................... 21 Customer Replaceable Units ................................................................................................................ 21 What's Not Covered.............................................................................................................................. 21
Misuse .............................................................................................................................................. 21 Modifications.................................................................................................................................... 22
Optional Depot Maintenance................................................................................................................. 22 Why Depot Maintenance? .................................................................................................................... 22
No Waiting ....................................................................................................................................... 22 No Second Visits .............................................................................................................................. 22 Better Service ................................................................................................................................... 22

Page 1
Overview
IBM Aptiva and NetVista systems Aptivas and Netvistas are IBM personal computer systems designed for the home or home office. Aptivas were produced from April 2000 to October 2000 and NetVistas were produced from November 2000 to April 2001. Aptivas are machine type 2270 and Netvistas are machine type 2276. Both systems are micro ATX form factor with 140 or 230 watt ATX power supplies.
Optional Features The main differences between the Aptiva (2270) and NetVista (2276) systems are the front bezels, the processors, and the operating systems. Both systems were shipped with Intel Celeron or Intel Pentium III processors of various speeds. Both systems could be ordered with optional devices:
• 64 MB or 128 MB 133MHZ SDRAM memory (Max capacity = 512MB)
• CD-ROM drive
• CDRW drive
• DVD drive
• 56KB modem
• Ethernet adapter
• Standard or RAK II multimedia keyboard
• Two-button or scroll point mouse.
Operating Systems Aptiva systems shipped with Windows 98 Second Edition and NetVista systems shipped with Windows Millennium. Windows 2000 was available as an option. No operating systems CDs shipped with the system. The operating system can be restored from an image in a hidden partition on the hard drive. Recovery CDs are provided with a new hard drive or can be purchased.
Bundled Software Some of the available software packages were:
• Norton Antivirus
• Quicken
• Microsoft Money
• Microsoft Works
• Lotus Smartsuite
• Microsoft Office Small Business Edition.
Other software packages were included as part of special offers.
Special Packaging for Resellers Although the 2270 and 2276 systems could be purchased directly from IBM, most were sold by resellers. The major resellers were:
• People PC
• QVC

Page 2
• Working Families
These systems had customized desktops and came bundled with Internet access, printers and additional software. Many systems were also purchased by VARS and modified for specific business applications.
System Features The system board contains integrated sound, video and game controllers. Cable connections include:
• Keyboard
• Mouse
• Two USB ports
• One Serial port
• One Parallel port
• One Video port
• One Midi/Joystick port
• Audio Line Out
• Audio Line In
• Microphone Input.
Example Configuration (People PC system) • NetVista 2276, i810 w aud/vid
• Intel Celeron 566 with 128k Cache
• 64MB PC133 SDRAM
• 10GB Hard Drive
• MS Windows Millennium & Norton AntiVirus
• 3 year onsite limited warranty
• 48x Max CD-ROM Drive
• 56k v.90 Controllerless Modem
• IBM Multimedia Keyboard
• IBM ScrollPoint Mouse
• Intuit Quicken, CD
• Lotus SmartSuite, CD, NFI
• Microsoft Works 2000 & Money 2000, CD
• PeoplePC, consumer
• Standard Speakers
• mATX Microtower

Page 3
Example Parts List (People PC System) Part Number Description 358114-001 PCA assy, system board, BCM/GV 270011-503 Intel Celeron 566 with 128k Ca 270236-001 64MB PC133 SDRAM 300019-001 10GB Hard Drive 320007-001 CD-ROM, 48X 356203-001 PCA, Modem, PCI 56K, CTL-LESS 200124-001 Chassis, micro-ATX, NetVista P 280007-001 Keyboard, RAK II, IBM, Pearl W 290004-001 Mouse, Scroll Button, IBM, Pea 290101-001 Standard Speakers 310003-001 FDD, 3.5" NetVista 332000-001 Modem cable 333124-001 Cable, data, FDD 333126-001 Cable, cd audio 333130-001 Cable, LED, uATX, S370 SIS620 333132-001 Cable, data, IDE, 80-Conductor 353115-001 Power supply, 230 watt, micro- 200121-001 Heatsink, socket 370, active w

Page 4
System Board Technical Information
System Board Overview During the Aptiva/Netvista production run two variations of the BCM Advanced Research system board were used: the IN810P and the IN810EP. The IN810P uses a 100 MHZ front-side bus and the IN810EP uses a 133 MHZ front-side bus. The switch from the IN810P to the IN810EP was made to accommodate the Intel PIII processors that required the 133 MHZ front-side bus clocking and supported the 133 MHZ front-side bus speed. There are also some small differences in the graphics chipset. Late in the production cycle there were some cost reduction changes made to the 810EP system board. Since the Aptiva/NetVista platform did not support COM2 or TV/DFP, the physical headers and associated components were not installed. You can obtain general information for this system board at www.bcmcom.com.

Page 5
System Board Identification The system board version is laser printed on a chip on the system board. The chip is located under the processor and is the only chip mounted at a 45-degree angle.
The second printed line on the Intel chip will be FW82810 (IN810P board) or FW82810E (IN810EP board).
BIOS The BIOS contents have been modified and have progressed through a number of revisions during the production cycle. The latest BIOS level used in production is available on the www.mynetvista.com website and is called BIOS/DMI Update. We recommend that you use the BIOS available here because information is stored in BIOS and BIOS/DMI to identify the machine as an IBM product. Without this information, the system restore from the recovery partition or from a recovery CD will not work.
We do not support BIOS versions obtained from any other website, including the BCM website, and we cannot provide an operating system recovery solution if BIOS is modified.
Warning: An unsuccessful BIOS flash could leave your system board unusable.
Accessing BIOS • Power off the system.
• Press and hold the F1 key and power up the system.
• Release the F1 key when the BIOS Setup Utility starts. (Blue screen with white text and the following heading: AMIBIOS HIFLEX SETUP UTILITY - VERSION 1.23) Note: this is not the BIOS version.
Selecting Optimal Settings To return BIOS settings to a known good state:
• Use the arrow keys to move down to Auto Configuration with optimal settings and press Enter. The following dialog displays: Load high performance settings (Y/N) ? N
• Press Y, then press Enter.

Page 6
Auto Detecting IDE Devices (Hard Disks, Optical Drives) After replacing a hard disk drive or adding/removing an optical drive, access BIOS and:
• Use the arrow keys to move down to Auto-Detect Hard Disks and press Enter.
• Verify that the new drive information is correct.
Displaying BIOS Information When Booting BIOS defaults to a "silent" boot. To display BIOS information during boot,
• Use the arrow keys to move down to Advanced CMOS Setup and press Enter
• Use the arrow keys to move down to Initial Display Mode
• In the Available Options column use the Page Up key to select BIOS
• Press the Esc key to return to the main menu.
Saving BIOS changes • Return to the main menu if necessary (press Esc)
• Press F10 to save settings and exit. The following dialog displays: Save current settings and exit (Y/N) ? Y
• Press Enter to save and exit. The system will reboot and use the new settings.
Viewing the BIOS Version If the Windows operating system is working got to:
• START > RUN
• Enter C:\IBMTOOLS\SERVICE\BIOSCHKI
A command line window will open and display the current BIOS version as shown below:
bioschk ver 6.1, copyright Monorail Computer Corp. Bios version is: 460024e 1.03
Note: bioschki.exe can also be found on the BIOS/DMI Update Diskette.
If the Windows operating system is not working, you can see the BIOS version on the BIOS information screen at boot time.
First, perform the following steps to turn off BIOS silent Mode:
• Use F1 to access BIOS.
• Use the arrow keys to move down to Advanced CMOS Setup and press Enter
• Use the arrow keys to move down to Initial Display Mode
• In the Available Options column use the Page Up key to select BIOS
• Press the Esc key to return to the main menu.
• Press F10 to save settings and exit. The following dialog displays: Save current settings and exit (Y/N) ? Y
• Press Enter to save and exit. The system will reboot.
Next, be ready to press the Break key when the first BIOS screen appears:
• Press the Break key as soon as the first BIOS screen appears. The first screen will show the BIOS version.

Page 7
Viewing DMI Information BIOS/DMI contains information about the system and motherboard. If the Windows operating system is working go to:
• START > RUN
• Enter C:\IBMTOOLS\SERVICE\BCMDMI
Note: bcmdmi.exe can also be found on the BIOS/DMI Update Diskette.
A command line window will open and display the current DMI contents:
BCM DMI Utility v1.04, Copyright(c) 1998, BCM Advanced Research, Inc.
DMI BIOS Revision = 2.3, Number of Structures = 35
System Board Information (Type 1, Length 25 bytes) Manufacturer(1) = IBM Product Name(2) = 227020U Version(3) = 0000000 Serial Number(4) = 02497011220160 UUID = 00000000-00000000-00000000-00000000
Motherboard Information (Type 2, Length 8 bytes) Manufacturer(1) = INTEL Product Name(2) = WHITNEY Version(3) = 1.0 Serial Number(4) = 00000000
Chassis Information (Type 3, Length 17 bytes) Manufacturer(1) = INTEL String Type = 03h, Desktop Version(2) = 1.0 Serial Number(3) = 0000000 Asset Tag#(4) = 0123ABC
Clearing CMOS BIOS settings are stored in CMOS. To clear CMOS to default values and reset passwords,
• Power off the system
• Move the system board jumper from JP4 2-3 to JP5 1-2
(DEFAULT) 1 - 2 2 - 3 1 2 3 J31 OFF CHASSIS INTRUSION • • J31 JP5 OFF CLR PWD/CMOS UNUSED • • • JP5 JP4 OFF SAFE MODE UNUSED • • • JP4 JP3 2 - 3 PROTECT BIOS FLASH BIOS • • • JP3
• Power on the system. The following information displays: Please remove jumper block to normal position, and ........... Press F1 to clear CMOS. It will reboot directly. Press F4 to clear PASSWORD
• Move the jumper from JP5 1-2 to JP4 2-3
• Press F1 to clear CMOS and reboot, or Press f4 to clear password.
Page 8
• If you press F4, the following message displays: Clear Password OK! Press F2 to enter setup.
• Press F2 to start the BIOS setup utility.
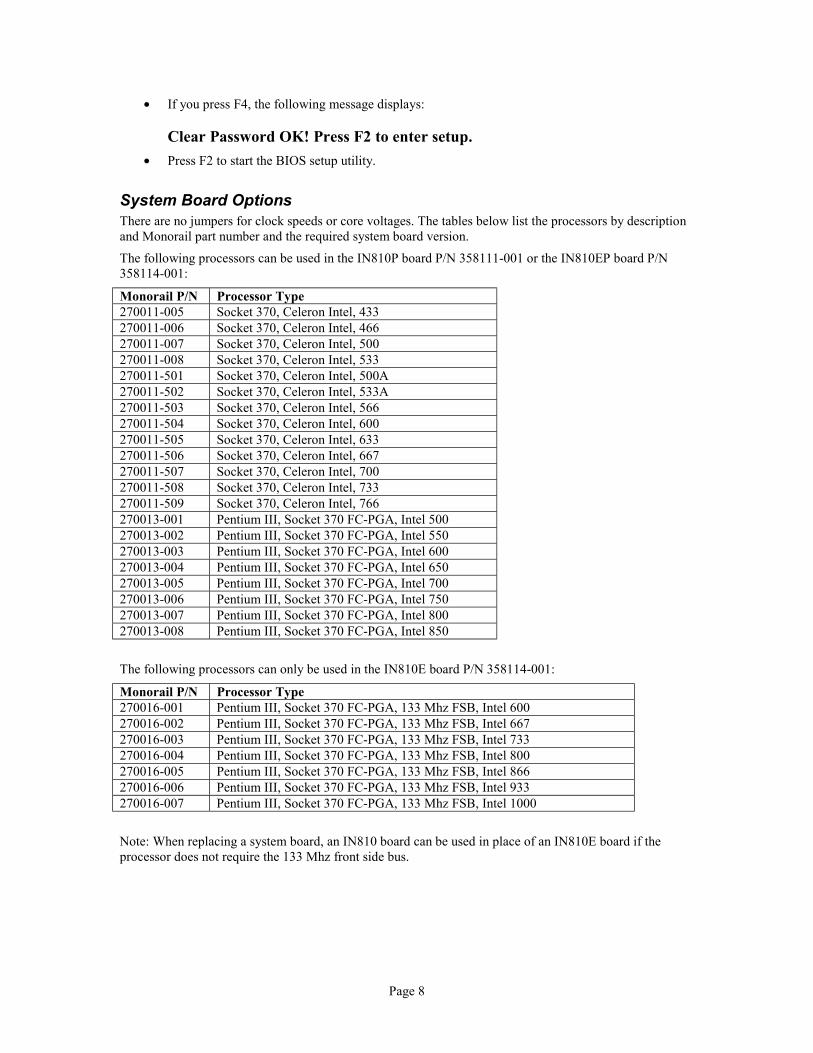
System Board Options There are no jumpers for clock speeds or core voltages. The tables below list the processors by description and Monorail part number and the required system board version.
The following processors can be used in the IN810P board P/N 358111-001 or the IN810EP board P/N 358114-001:
Monorail P/N Processor Type 270011-005 Socket 370, Celeron Intel, 433 270011-006 Socket 370, Celeron Intel, 466 270011-007 Socket 370, Celeron Intel, 500 270011-008 Socket 370, Celeron Intel, 533 270011-501 Socket 370, Celeron Intel, 500A 270011-502 Socket 370, Celeron Intel, 533A 270011-503 Socket 370, Celeron Intel, 566 270011-504 Socket 370, Celeron Intel, 600 270011-505 Socket 370, Celeron Intel, 633 270011-506 Socket 370, Celeron Intel, 667 270011-507 Socket 370, Celeron Intel, 700 270011-508 Socket 370, Celeron Intel, 733 270011-509 Socket 370, Celeron Intel, 766 270013-001 Pentium III, Socket 370 FC-PGA, Intel 500 270013-002 Pentium III, Socket 370 FC-PGA, Intel 550 270013-003 Pentium III, Socket 370 FC-PGA, Intel 600 270013-004 Pentium III, Socket 370 FC-PGA, Intel 650 270013-005 Pentium III, Socket 370 FC-PGA, Intel 700 270013-006 Pentium III, Socket 370 FC-PGA, Intel 750 270013-007 Pentium III, Socket 370 FC-PGA, Intel 800 270013-008 Pentium III, Socket 370 FC-PGA, Intel 850
The following processors can only be used in the IN810E board P/N 358114-001:
Monorail P/N Processor Type 270016-001 Pentium III, Socket 370 FC-PGA, 133 Mhz FSB, Intel 600 270016-002 Pentium III, Socket 370 FC-PGA, 133 Mhz FSB, Intel 667 270016-003 Pentium III, Socket 370 FC-PGA, 133 Mhz FSB, Intel 733 270016-004 Pentium III, Socket 370 FC-PGA, 133 Mhz FSB, Intel 800 270016-005 Pentium III, Socket 370 FC-PGA, 133 Mhz FSB, Intel 866 270016-006 Pentium III, Socket 370 FC-PGA, 133 Mhz FSB, Intel 933 270016-007 Pentium III, Socket 370 FC-PGA, 133 Mhz FSB, Intel 1000
Note: When replacing a system board, an IN810 board can be used in place of an IN810E board if the processor does not require the 133 Mhz front side bus.

Page 9
Button board Connectors The front panel button board has four cables that connect to the system board.
• • • • • • • • • • • • • • • • •
The black rectangles show the cable positions on the header that is located in the lower right corner of the system board. Note: the button boards are different on the Aptiva and NetVista systems and are not interchangeable.
POWER SWITCH
BLUE WHITE
POWER LED-1
RED GREEN
POWER LED-2
WHITE
H.D.D. LED
WHITE ORANGE

Page 10
Recovery Partition and Recovery CDs
Overview The 2270 and 2276 models of Aptiva and NetVista systems were CTO (Configured To Order.) The customer specified the desired hardware and software when ordering, and these specifications generated a list of software modules to be loaded into the hidden system recovery partition on the manufacturing line.
Software Installation During the manufacturing process the actual software installation was performed from the modules in the hidden recovery partition. Here is an example of hard drive mapping using the Fdisk utility:
Display Partition Information
Current fixed disk drive: 1
Partition Status Type Volume Label Mbytes System Usage
C: 1 A PRI DOS IBM_PRELOAD 8691 FAT32 90%
2 Non-DOS 949 10%
Total disk space is 9641 Mbytes (1 Mbyte = 1048576 bytes)
Performing a Recovery Microsoft Windows Boot Manager is used to access either the hidden partition or the system partition. At boot time the Boot Manager program pauses the boot process and displays three dots (. . .) or a message instructing the user to press F11 to start the recovery process. If the user does not press F11 the pause will time out after three seconds and the system will boot to Microsoft Windows on the system partition. If the user presses F11 the system will boot to the recovery program in the recovery partition. Warning: A windows 98 splash screen displays for a short time even if the system is using Windows ME because this is the same utility used for both Windows 98 and Windows ME. The recovery program will then display the following information:
IBM Product Recovery Program - version 5.0
Main Menu
Full recovery: Reformat your hard disk and restore all files.
Partial recovery: Reformat your hard disk and restore Windows ME and all device drivers.
System utilities: View the system utilities menu. <F1> Help <Esc><F3> Exit <↓><↑> Move <Enter> View Menu

Page 11
Pressing <Enter> displays the following information:
Terms and conditions
The IBM Recovery Program will restore the software provided with your system onto your hard disk. You shall only use this utility and the recovery CD provided with your system for the sole purpose of restoring this software onto your hard disk. Any other use is expressly prohibited. Once restored, use of this software, including your use of Microsoft Windows, is subject to the terms and conditions of the applicable licenses which were provided with your system, including the Microsoft end user license agreement.
Do you accept these conditions? (Y/N) [ ]
Entering Y displays the following information:
ATTENTION - READ THIS BEFORE YOU CONTINUE
Recovery is recommended only for irrecoverable system problems. If you have a problem with an individual program, simply reinstalling that program might solve the problem.
All files on your hard disk will be deleted and restored to the original preinstalled version. Back up any data files you want to save.
Do you want to continue? (Y/N) [ ]
Entering Y displays the following information:
Your hard disk will be formatted, and all files will be deleted.
Do you want to continue? (Y/N) [ ]
Entering Y will start the recovery process. Do not stop the machine, wait for the recovery to finish. The recovery process installs the operating system and applications from the hidden recovery partition to the C drive, exactly the way it was done on the manufacturing line.
Creating a Boot Manager Repair Diskette Select the third item in the Main menu to display the following information:
System utilities
Create a Recovery Repair diskette:
Create a startable diskette to recover access to the IBM Product Recovery program on the hard disk.
Press Enter to display the following information:

Page 12
Use this utility to create a Recovery Repair diskette. If the message "To start the IBM Product Recovery Program, press F11" is not displayed when you start your computer, you might be able to restore access to the IBM Recovery Program on the hard disk by using this diskette.
To create a Recovery Repair diskette, insert a blank diskette into diskette drive A, and press any key. Press any key to continue . . .
The Boot Manager Repair diskette created by this utility will restore the Boot Manager program. This diskette is also available from the download section of the www.mynetvista.com website.
Accessing the Hidden Recovery Partition You can access the hidden partition by using F11 to start the recovery procedure. When the first recovery menu appears, press F3 to exit the recovery procedure and display a command line. The hidden partition is now C: and the system partition is now D: The recovery files are in C:\RECOVERY. The largest recovery file, 440050C.IMD, is the base system file and is expanded by the PowerQuest Easy Restore recovery utility. ZIP files starting with 44 (e.g. 448005D.ZIP) are software feature modules. PKUNZIP is available in the RECOVERY directory and can be used to unzip the modules. For example:
PKUNZIP /? will display the available pkunzip options.
MD D:\TESTDIR will create a directory named TESTDIR in the root of the system partition.
PKUNZIP -d C:\448005D.ZIP D:\TESTDIR will unzip the contents of 448005D.ZIP into directory TESTDIR and retain the original directory tree structure.
If you understand these commands you can learn a lot about the recovery structure and process without doing any damage. If you don't understand them, don't use them.
Recovery CD If the recovery partition is deleted or a new hard drive is installed in the system it is not possible to recreate the hidden partition and its contents. At the present time (06/19/01) we create custom recovery CDs to ship with a new hard drive for warranty repair or we sell a recovery solution to the customer. A form is available on the web site for ordering a recovery solution which may be one or two CDs depending on the purchased features. For example, Adaptec CDRW software will not fit on the recovery CD and is shipped on a separate CD. In the near future we will replace the custom recovery CDs with a generic CD set. The generic CD will provide user-selectable options.
The Recovery CD takes the place of the damaged or missing hidden partition. The system is booted from the recovery CD that contains the installation modules. The installation proceeds as it would from the hidden partition.
Note: The default BIOS boot device sequence is:
• Floppy
• IDE-0
• CDROM
To run the recovery from the CD the sequence must be changed to:
• CDROM
• Floppy
• IDE-0
You can change the sequence at the Advanced CMOS Setup screen or you can select Auto Configuration with Optimal Settings.

Page 13
Note: If there is more than one optical device on the channel, the primary optical device is the bootable device. For example, on a system with a DVD drive and a CDRW drive the DVD is jumpered for primary and is the bootable optical device.

Page 14
Using Windows Me System Restore If changes to hardware, software, or settings on your computer (including new program installations, new hardware, or many other types of changes to your system or system settings) have left your computer in an undesirable state, you can use System Restore to undo the changes made to your computer. System Restore does all of the following:
Rolls back your computer to a more stable state System Restore keeps track of changes at specific intervals, as well as when events such as program installations occur. You can also create your own restore points, to record settings as they were just before you make changes. This allows you to roll back to a more stable state or time, by choosing a restore point on a date prior to when a change occurred. For example, if you accidentally delete program files (such as files that have the file extension .exe, .dll, etc.), or program files become corrupted, you can restore your computer to a state before those changes occurred. System Restore monitors and restores all partitions on all drives on your computer.
Restores without losing your personal files System Restore will not cause you to lose your personal files. Items like documents, e-mail messages, and browsing history are saved when you roll back with System Restore.
Stores about one to three weeks of changes The actual number of saved past restore points depends on how much activity there has been on your computer, the size of your hard disk (or the partition that contains your Windows folder), and how much space has been allocated on your computer to store System Restore information.
Locates dates with restore points A calendar appears when you run System Restore to help you find dates with restore points. If you don't use your computer every day, some days may not have any restore points. If you use your computer frequently, you may have restore points almost every day, and some days may have several points.
Provides several types of restore points The list below describes each type of point, as well as how System Restore works with each type.
Initial System checkpoints This checkpoint is created the first time your computer is started after upgrading to Windows Millennium Edition or when first starting a new machine. Selecting this point will revert Windows and programs to the state they were in at that time. Any files with well known file extensions (such as .docs, .htm, .123, etc.) and all files in the My Documents folder will not be restored.
If System Restore has to remove all old checkpoints to make room for new changes, then a new system checkpoint will be created, and normal checkpoint creation will resume from that point. For information on adjusting the space used by System Restore, click Related Topics below.
System checkpoints System Restore creates regular scheduled checkpoints even if you have not made any changes to the system. System Restore automatically creates these checkpoints:
• Every 10 hours that your computer is on
• Every 24 hours in real time
Page 15
If your computer is off for more than 24 hours, System Restore will create a checkpoint the next time you turn it on. The computer must be idle for a few minutes before System Restore will create a scheduled checkpoint.
Selecting a scheduled checkpoint will roll back Windows and programs to the state they were in at that time. Any files with well-known file extensions (such as .doc, .htm, .123, etc.) and all files in the My Documents folder will not be restored.
Program name installation restore points When you install a program using the latest installers from Installshield (6.1 Pro or higher) and Windows Installer, System Restore will create a restore point. Use these restore points to track changes made to your system, or to restore your computer to the state it was in before installation.
Selecting this point will remove installed files and registry settings, as well as restore programs and Windows system files altered by the installation. Any files with well known file extensions (such as .docs, .htm, .123, etc.) and all files in the My Documents folder will not be restored.
To roll back the changes caused by a program that does not use one of the specified installers, select the most recent system checkpoint prior to installation.
Windows automatic update restore points If you use Windows automatic updates, System Restore will create a restore point prior to installation. If items are downloaded, but not installed, a restore point will not be created. A restore point is created only when the components start to install. Use these points to track changes you made to your system, or in the rare event these updates might conflict with other products on your computer.
Manual restore points you have created You can create your own restore points if you want. When a created restore point is listed, it will include the name you gave it at the time you created it. Creating your own restore point can be useful any time you anticipate making changes to your computer that are risky or might make your computer unstable.
Ensures that all restorations are reversible If you do not like the state of your computer after restoring it, you can undo the restore, or select another restore point. All successful restorations are reversible. System Restore automatically reverses all failed restorations.
Notes • If you roll back to a point before a program was installed, the program will not work after
restoration. If you want to use the program again, you must reinstall it.
• System Restore does not replace the process of uninstalling a program. To completely remove the files installed by a program, you must remove the program using Add/Remove Programs in Control Panel or the program's own uninstall program.
• To start System Restore, click Start > Programs > Accessories > System Tools > System Restore. Or To start System Restore, click Start > Help >Fix a problem - Use System Restore.
• To get more information about the system restore process, click Start > Help, then enter 'system restore' in the Search box.

Page 16
Running System Restore in Safe mode System Restore enables you to restore to any point while in Safe mode. If you are in Safe mode and unable to start Windows Millennium Edition in normal mode, you can use System Restore to roll back to a time when Windows started in normal mode.
1. Click Start > Programs > Accessories > System Tools > System Restore.
2. Follow the instructions on your screen.
If you need more information on the screen you are viewing, click Help.
Notes • To retain your most recent settings, select a restore point as close to the current date as possible.
• While in Safe mode, System Restore does not create any restore point. If you do a restore while in Safe mode, and the restore leaves your computer unable to start Windows Millennium Edition, you will be able to start from a startup disk and undo the last restore.
• If you are not sure that your previous settings are safe, you may want to create a startup disk. That way you can start Windows Millennium Edition from the disk, and then run System Restore from a special menu that appears. For more information, click Related Topics below.
• If System Restore is not enabled because of lack of disk space, you cannot enable it while in Safe mode by freeing up space. You must restart in normal mode.

Page 17
Known Problems and Solutions
BIOS Not Compatible Message Problem: When the user attempts to perform a recovery using F11, a "BIOS not compatible" error message displays.
Cause: Information in DMI memory identifying the machine as an IBM system has been lost.
Solution: The BIOS/DMI Repair diskette will rewrite DMI memory. The diskette will also check the BIOS version and will flash BIOS with the latest version if necessary. The diskette is available by mail for systems under warranty (call the help desk) or can be downloaded from www.mynetvista.com.
Unable to Access the Recovery Program Problem: The boot-time prompt for recovery (three dots or Press F11 message) does not appear.
Cause: The Boot Manager program has been damaged.
Solution: The Boot Manager Repair diskette will rewrite the boot manager program. The diskette is available by mail for systems under warranty (call the help desk) or can be downloaded from www.mynetvista.com.
Missing Network Protocols under Windows ME Problem: TCP/IP and NetBEUI protocols are not available in the Select Network Protocol window.
Cause: An unknown problem occurred in the image building process.
Solution: PROTOCOL.BAT will make the protocols appear. The file is available for download from www.mynetvista.com. Go to "Hot News" and click on "Repair for Network Protocols in Windows Me Only".
CDRW Locks System Problem: The system locks when attempting to create an audio CD using the Adaptec "Disk-At-Once" option.
Affected Systems: IBM Aptiva (2270) and IBM Netvista (2276) systems with LG CD-RW CED 8080B CD Read/Write drive and Windows 98se or Windows ME operating systems.
Details: After selecting the Adaptec option to create an audio CD and assembling a list of audio tracks, WAV files or MP3 files to record, the user selects the Create CD operation with the Disk-At-Once option. The CD creation process starts and the 'Prepare audio data' and 'Writing table of contents' tasks complete normally. The 'Writing track' task starts and never completes, usually stopping with 3 to 6 percent complete.

Page 18
Canceling the Create CD operation usually locks the system and may require holding in the power button to stop the system.
Cause: The DMA option is checked in the device properties for the CD-RW drive but DMA data transfer is not working correctly.
Solution: Perform the following steps to turn off the DMA option for the CD-RW drive:
1. Right-click on the 'My Computer' desktop icon.
2. At the bottom of the pop-up menu click on 'Properties'. The 'System Properties' window opens. Click on the 'Device Manager' tab.
3. In the device list click on the plus sign (+) next to the CDROM icon.
4. Right-click on the entry for LG CD-RW CED 8080B.
5. At the bottom of the pop-up menu click on 'Properties'. The 'LG CD-RW CED 8080B Properties' window opens. Click on the 'Settings' tab.
6. In the 'Options' area find the 'DMA' checkbox. If DMA is not checked, finish the rest of the steps and call your warranty service provider for assistance. If DMA is checked, click on the box to uncheck it.
7. Click on the 'OK' button to close the window.
8. Click on the 'Close' button to close the 'System Properties' window.
9. If you made changes, the 'System Settings Change' window opens. Click on the 'Yes' button to restart the system.

Page 19
Troubleshooting Hints
Static Discharge Removing and replacing feature cards (modem, memory, etc.) and devices (hard drive, etc.) without following proper static discharge procedures will destroy these devices. Static discharge problems occur most frequently in the wintertime when humidity is low and a high voltage potential can be created by walking across a carpet. If you get a static shock when you touch a doorknob or the handle of your car door, you know that the humidity is low.
Technicians in a repair environment work at benches with grounded conducting bench surfaces and static lines attached to their wrists or ankles. A good technician working in your home will use a portable static mat as a work surface and a wrist strap attached to it. Without this specialized equipment you need to take extra precautions if you decide to do your own troubleshooting or add features to you system.
• Keep all new devices in their static bags until you are ready to install them. Have everything on the table with your system so that you don't have to get up and move around.
• Ground yourself by touching a grounded object to remove any charge you might carry before opening the static bag and handling the device.
• Install the device. If you are removing a device, put it into an anti-static bag.
Power-Up Problems • The power-on switch does not directly control AC power to the power supply. Always remove the
AC line cord before replacing feature cards (modem, memory, etc.) or the system board.
• Verify that the button board cables are connected to the system board. You can bypass the button board power switch by removing the power switch connector from the system board and momentarily connecting the system board contacts with a jumper to verify that the button board switch is not defective.
• Defective feature cards or devices can prevent the system from powering up and lead you to believe that the power supply or the system board is defective. If the system will not power up (no fans, no image on display), reduce your machine to the minimum configuration. Start by removing the modem card, which is the most likely device to be damaged by external sources (lightning strike on the phone line). If the system still will not power up, disconnect the primary and secondary IDE cables. The machine cannot boot without the hard drive but a BIOS screen should display if the computer powers up. If the system still will not power up, the power supply is probably defective.
System Won't Boot • If you suspect a hard disk failure, use F1 to access BIOS and select Auto-Detect Hard Disks. If
Primary Master shows Not Installed, a drive cable is loose or the drive is not functioning.
System is slow • Right-click on My Computer, click on Properties, then click on the Performance tab. Free
System resources should be 80 percent or more. If lower, there are too many programs running, probably caused by auto-started applications. You can remove automatically started applications from the Startup Folder but many programs are started from the Registry. Go to Start > Programs > Accessories > System Tools > System Information, then select Tools > System Configuration Utility and click on the Startup tab to display running programs. You prevent programs from starting by deselecting the checkmarks. A good alternative is to get PC Magazine's Startup Cop from www.zdnet.com and use its friendly user interface to control automatic program startup.

Page 20
• Use the System Monitor to check processor usage. Go to Start > Programs > Accessories > System Tools > System Monitor and view Kernel Processor Usage. If processor usage is constantly high with no known applications running, use Ctrl+Alt+Delete to display the Close Program window. Close suspect programs (write down their names as you close them) to find the offending program. Note: system background tasks can account for 30 to 40 percent of processor usage when applications are not running. Excessive usage would be a constant high value such as 80 or 90 percent.
Modem Stops Working The modem is the most likely device to be damaged by lightning. Integrated circuits on the card may actually have burn holes in them as a result of a lightning strike. You should protect your system by purchasing a good quality surge protector that includes telephone line surge protection and insurance coverage for damage caused by surges. No protector can prevent damage from a direct hit.

Page 21
The Manufacturer's Warranty 2270 and 2276 systems come with a manufacturer's limited warranty of one to three years. This warranty is for the contents of the box containing the system unit, keyboard, speakers and mouse. Other devices such as monitors, printers, scanners, etc. are covered by the manufacturers of those devices.
The Help Desk The system collateral material includes a warranty statement and a telephone number for warranty service. Calling this number will connect you to the Help Desk. The Help Desk will provide "Up and Running" support for the first thirty days and problem determination for the entire warranty period.
Up and Running Support For the first thirty days of ownership the Help Desk will help the user verify that all applications can be started from their icons on the desktop. The Help Desk will not give "tutorials" on how to use applications.
Problem Determination The Help Desk will help the user troubleshoot system problems and will determine if there is a hardware failure. The Help Desk will identify possible defective components and pass the problem and component information to the field service organization.
• If the problem appears to be an application software problem, it is the user's responsibility to reload the application.
• If the problem appears to a system software problem (Windows 98 or Window ME), the Help Desk will help the user start a system recovery from the recovery partition on the hard drive.
Onsite Service Onsite service is available during normal business hours Monday through Friday and is for parts replacement only. Technicians will not be sent for problem determination. The Help Desk performs that task. When onsite service is required,
• The service organization sends the parts to the customer.
• When the parts arrive and the customer acknowledges receipt, a technician will call to set up an appointment for installation.
• The technician replaces the parts. If a hard drive is replaced, it will arrive with a recovery CD and the technician will start the recovery before leaving. The customer must reload all application programs. If a recovery does not complete successfully the customer must call the Help Desk for assistance.
Customer Replaceable Units A technician will not be dispatched to replace keyboards, mice and speakers. The customer can discard the defective part.
What's Not Covered
Misuse Here are some of the more common types of damage that could be considered to be misuse:

Page 22
• Damage caused by using the product in an unsuitable environment will not be repaired under warranty. Computers need the same environment that people do to survive, such as reasonable temperature and humidity and low air contamination.
• Damage caused by insects and rodents will not be repaired under any conditions because of the health risk to technicians.
• Damage caused by dropping or ripped-out cables will not be repaired under warranty.
• Damage caused by lightning, fire, water or other liquids. Ask your insurance man about a rider for your homeowner's policy if you have a lot of expensive electronic devices, CD collections, etc.
Modifications • Devices and features purchased and installed by the customer are not covered by the warranty. The
customer may be asked to remove some or all added devices before troubleshooting can take place.
• The Help Desk may not be able to perform troubleshooting if the operating system has been changed. (e.g. Windows NT or Linux)
• The Help Desk may not be able to perform troubleshooting if the BIOS has been flashed with a version not obtained from the mynetvista.com web site.
• Recovery from the recovery partition or from a recovery CD may not work and is not supported if the BIOS has been flashed with a version not obtained from the mynetvista.com web site. This could also effect recovery after hard drive replacement.
Optional Depot Maintenance Depot maintenance is now available as an alternative to onsite service at no extra cost. If the customer opts for depot maintenance in place of onsite service, the service organization will send the customer a Fedex shipping label. If the customer has discarded the original shipping box, the service organization will also send a suitable shipping box.
Why Depot Maintenance? There are inherent problems with sending an onsite technician to the customer's home. It is logistically impossible for the technician to have access to all possible parts for all machine models and configurations, so it is often not possible to repair a machine on the first call. It is also not possible to guarantee the quality and knowledge level of all the technicians providing onsite service. Using depot maintenance as an alternative has many advantages:
No Waiting The customer does not have to schedule a technician's visit and then be home when the technician arrives. Fedex picks up and delivers. Depot service may actually result in faster turnaround than an onsite visit.
No Second Visits If the parts don't fix the problem, more problem determination must be performed with the Help Desk and more parts sent for another onsite visit. Onsite technicians only replace parts, they don't do problem determination. Depot maintenance is definitely faster.
Better Service Technicians working in a depot environment have the parts and tools on hand to fix a problem the first time every time, with very few exceptions. If a new hard drive must be installed, the operating system will also be installed and working when the machine is returned.