I Viking Knit Tutorial - Handmade Artists' Shop · Viking Knit Tutorial Created by Linda Aspenson...
20
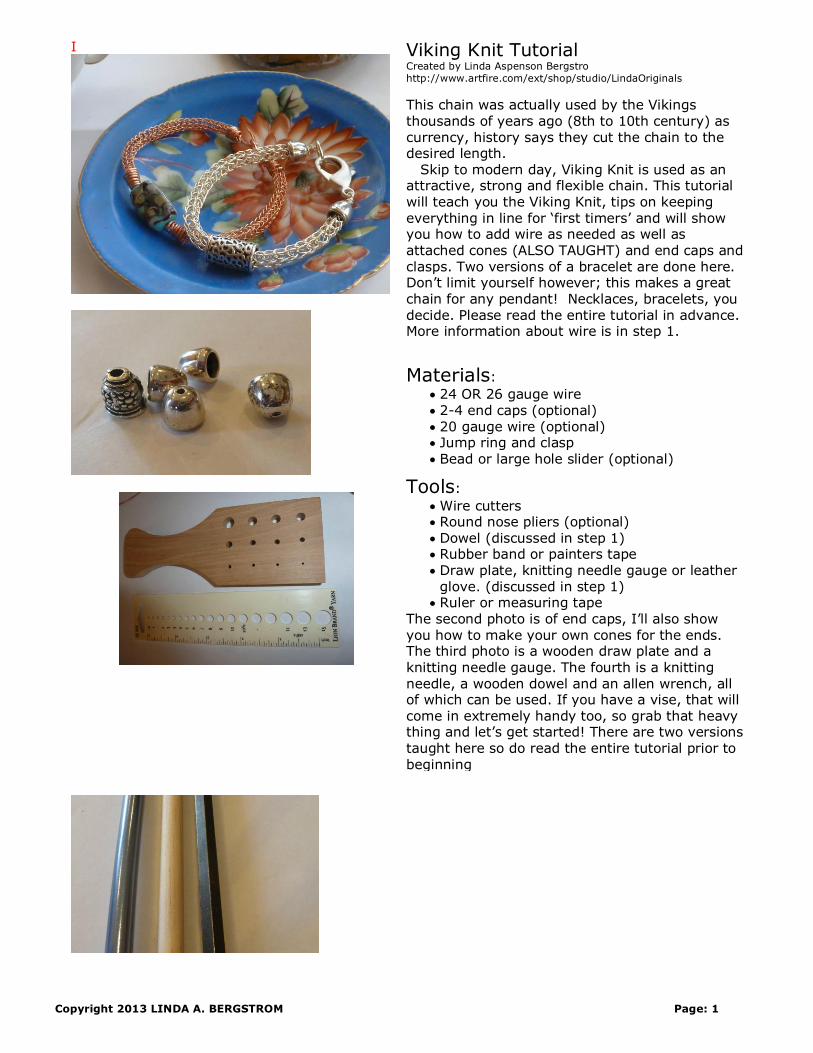
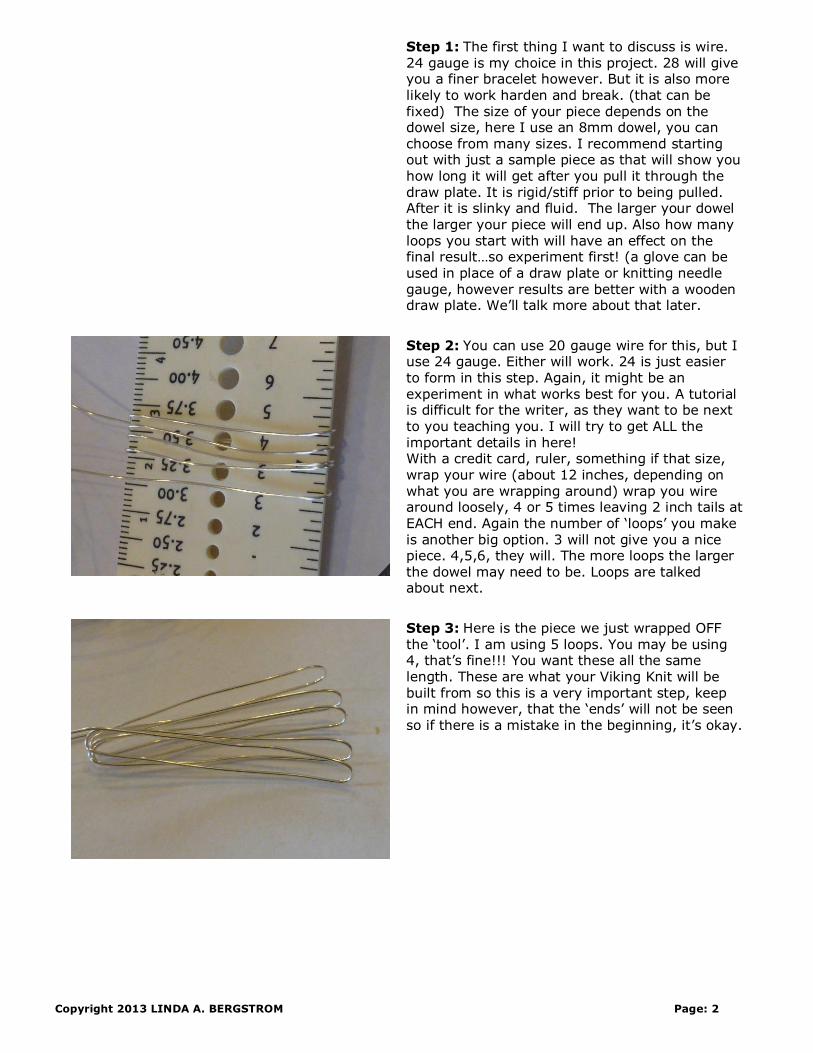
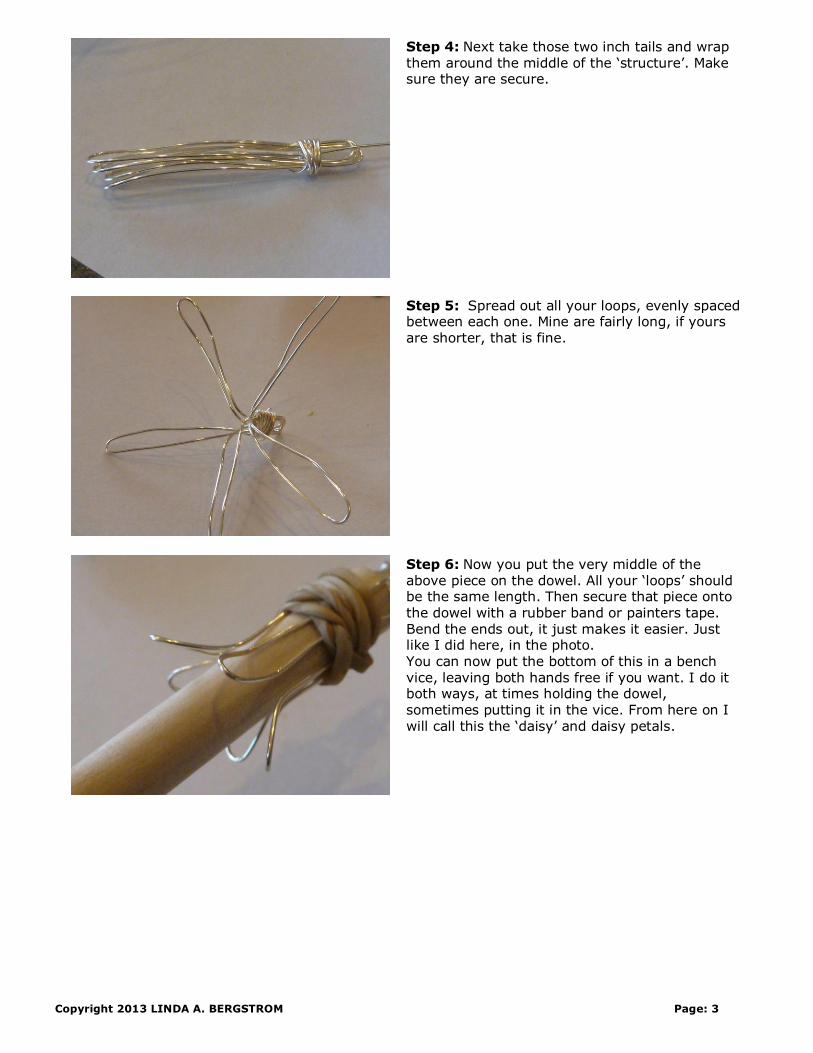
Copyright 2013 LINDA A. BERGSTROM Page: 1 I Viking Knit Tutorial Created by Linda Aspenson Bergstro http://www.artfire.com/ext/shop/studio/LindaOriginals This chain was actually used by the Vikings thousands of years ago (8th to 10th century) as currency, history says they cut the chain to the desired length. Skip to modern day, Viking Knit is used as an attractive, strong and flexible chain. This tutorial will teach you the Viking Knit, tips on keeping everything in line for ‘first timers’ and will show you how to add wire as needed as well as attached cones (ALSO TAUGHT) and end caps and clasps. Two versions of a bracelet are done here. Don’t limit yourself however; this makes a great chain for any pendant! Necklaces, bracelets, you decide. Please read the entire tutorial in advance. More information about wire is in step 1. Materials: 24 OR 26 gauge wire 2-4 end caps (optional) 20 gauge wire (optional) Jump ring and clasp Bead or large hole slider (optional) Tools: Wire cutters Round nose pliers (optional) Dowel (discussed in step 1) Rubber band or painters tape Draw plate, knitting needle gauge or leather glove. (discussed in step 1) Ruler or measuring tape The second photo is of end caps, I’ll also show you how to make your own cones for the ends. The third photo is a wooden draw plate and a knitting needle gauge. The fourth is a knitting needle, a wooden dowel and an allen wrench, all of which can be used. If you have a vise, that will come in extremely handy too, so grab that heavy thing and let’s get started! There are two versions taught here so do read the entire tutorial prior to beginning
Transcript of I Viking Knit Tutorial - Handmade Artists' Shop · Viking Knit Tutorial Created by Linda Aspenson...
Copyright 2013 LINDA A. BERGSTROM Page: 1
I
Viking Knit Tutorial Created by Linda Aspenson Bergstro
http://www.artfire.com/ext/shop/studio/LindaOriginals
This chain was actually used by the Vikings thousands of years ago (8th to 10th century) as currency, history says they cut the chain to the desired length. Skip to modern day, Viking Knit is used as an attractive, strong and flexible chain. This tutorial will teach you the Viking Knit, tips on keeping everything in line for ‘first timers’ and will show you how to add wire as needed as well as
attached cones (ALSO TAUGHT) and end caps and clasps. Two versions of a bracelet are done here. Don’t limit yourself however; this makes a great chain for any pendant! Necklaces, bracelets, you decide. Please read the entire tutorial in advance. More information about wire is in step 1.
Materials:
24 OR 26 gauge wire 2-4 end caps (optional) 20 gauge wire (optional) Jump ring and clasp
Bead or large hole slider (optional)
Tools:
Wire cutters Round nose pliers (optional) Dowel (discussed in step 1) Rubber band or painters tape Draw plate, knitting needle gauge or leather
glove. (discussed in step 1) Ruler or measuring tape
The second photo is of end caps, I’ll also show you how to make your own cones for the ends. The third photo is a wooden draw plate and a
knitting needle gauge. The fourth is a knitting needle, a wooden dowel and an allen wrench, all of which can be used. If you have a vise, that will come in extremely handy too, so grab that heavy thing and let’s get started! There are two versions taught here so do read the entire tutorial prior to
beginning
Copyright 2013 LINDA A. BERGSTROM Page: 2
Step 1: The first thing I want to discuss is wire. 24 gauge is my choice in this project. 28 will give you a finer bracelet however. But it is also more likely to work harden and break. (that can be fixed) The size of your piece depends on the dowel size, here I use an 8mm dowel, you can choose from many sizes. I recommend starting out with just a sample piece as that will show you how long it will get after you pull it through the draw plate. It is rigid/stiff prior to being pulled. After it is slinky and fluid. The larger your dowel the larger your piece will end up. Also how many loops you start with will have an effect on the final result…so experiment first! (a glove can be used in place of a draw plate or knitting needle gauge, however results are better with a wooden draw plate. We’ll talk more about that later.
Step 2: You can use 20 gauge wire for this, but I use 24 gauge. Either will work. 24 is just easier to form in this step. Again, it might be an experiment in what works best for you. A tutorial is difficult for the writer, as they want to be next to you teaching you. I will try to get ALL the important details in here! With a credit card, ruler, something if that size, wrap your wire (about 12 inches, depending on what you are wrapping around) wrap you wire around loosely, 4 or 5 times leaving 2 inch tails at EACH end. Again the number of ‘loops’ you make is another big option. 3 will not give you a nice piece. 4,5,6, they will. The more loops the larger the dowel may need to be. Loops are talked about next.
Step 3: Here is the piece we just wrapped OFF the ‘tool’. I am using 5 loops. You may be using 4, that’s fine!!! You want these all the same length. These are what your Viking Knit will be built from so this is a very important step, keep in mind however, that the ‘ends’ will not be seen so if there is a mistake in the beginning, it’s okay.
Copyright 2013 LINDA A. BERGSTROM Page: 3
Step 4: Next take those two inch tails and wrap them around the middle of the ‘structure’. Make sure they are secure.
Step 5: Spread out all your loops, evenly spaced between each one. Mine are fairly long, if yours are shorter, that is fine.
Step 6: Now you put the very middle of the above piece on the dowel. All your ‘loops’ should be the same length. Then secure that piece onto the dowel with a rubber band or painters tape. Bend the ends out, it just makes it easier. Just like I did here, in the photo.
You can now put the bottom of this in a bench vice, leaving both hands free if you want. I do it both ways, at times holding the dowel, sometimes putting it in the vice. From here on I will call this the ‘daisy’ and daisy petals.

Copyright 2013 LINDA A. BERGSTROM Page: 4
Step 7: Now we’ll start our wire. I cut 3 feet to start with. I don’t work with longer pieces for two reasons: it is difficult to handle the long wire and keep it from kinking up, and this will ‘work harden’. You will notice the further you get on the ‘Knit’ the harder your wire is to work with. I, later, show you how to end and start a new wire. If you choose longer, that’s fine. At the top, the arrow is showing you my wire I will now be working with. Wrap ½” snug just above the top of your dowel.
Step 8: A is the wire we just attached. Bring it down the dowel. B is that same wire going back up, C is the wire passing through your first two (any two) side by side daisy’s. Notice how it goes in one ‘daisy’, passes behind two daisy sides and comes out at the second daisy. ( C )
Step 9: The bottom wire going to the right is C in the above picture. You want to bring it down over the top of itself and make this small loop just as you see. Don’t worry about wire A. We’ll work with that later.
Step 10: Go to the next daisy petal to your right and thread the wire through, behind it and the prior daisy petal sides and out the middle. Just as you see here. We used 2 ‘daisy petals’ in the step above, now we are on the 3rd daisy petal to the right. We’ll work our way around the dowel.
Copyright 2013 LINDA A. BERGSTROM Page: 5
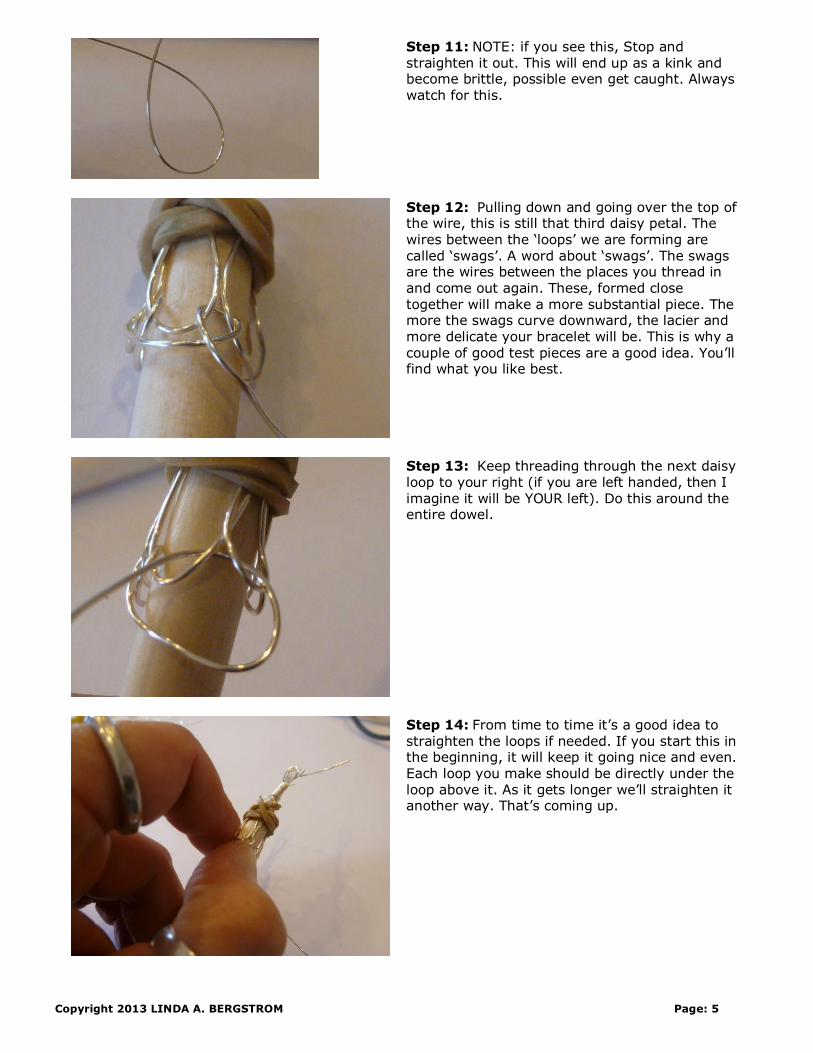
Step 11: NOTE: if you see this, Stop and straighten it out. This will end up as a kink and become brittle, possible even get caught. Always watch for this.
Step 12: Pulling down and going over the top of the wire, this is still that third daisy petal. The wires between the ‘loops’ we are forming are
called ‘swags’. A word about ‘swags’. The swags are the wires between the places you thread in and come out again. These, formed close together will make a more substantial piece. The more the swags curve downward, the lacier and more delicate your bracelet will be. This is why a
couple of good test pieces are a good idea. You’ll find what you like best.
Step 13: Keep threading through the next daisy loop to your right (if you are left handed, then I imagine it will be YOUR left). Do this around the entire dowel.
Step 14: From time to time it’s a good idea to straighten the loops if needed. If you start this in the beginning, it will keep it going nice and even. Each loop you make should be directly under the loop above it. As it gets longer we’ll straighten it another way. That’s coming up.

Copyright 2013 LINDA A. BERGSTROM Page: 6
Step 15: We will now meet the place we brought our wire down from the connection on top. (steps 7-8) Thread youf wire through the daisy petal, behind that petals wire and the one before it, AND that piece from the beginning. It won’t show in the end result. Now you’ve gone once around the dowel.
Step 16: This is the second round on the dowel. We go behind the loops made in the above steps. See my wire? Thread your wire behind that loop made during the first ‘round’ on the dowel. Just as you see. Follow the photo’s closely, they speak better than words. Continue this all the way
around the dowel. It just continuous around and around the dowel.
Step 17: Keep going around the dowel, no changes, same technique. See step 19 for a good
reference photo.

Copyright 2013 LINDA A. BERGSTROM Page: 7
Step 18: TIP, if the loops are too tight and you find you can’t thread your wire behind them (this is only once in a while, I’ve never seen it happen as a ‘total piece problem’) stick a small nail or wire behind as you see here, and pull it out just a tiny bit. Then thread your wire through and keep the motion going!
Step 19: These ‘swags’ are larger swags. IF I pulled tighter and left less space between the swags (wire between our loops) the bracelet
would be more ‘dense’. This will have a lacy look. It’s a preference ‘thing’. Do what you like best!
Step 20: If you are working on a short dowel or wrench, you can pull the top up and off the dowel easily to give you space to work.

Copyright 2013 LINDA A. BERGSTROM Page: 8
Step 21: IF your loops are not one right under the other (that happens often ) you can pull the Viking Knit off the dowel and straighten it out with a light hand. Then just slip it back on.
Step 22: ADDING A NEW WIRE: as I do not work with long lengths I need to add wire often. You see I have made a loop and I know my wire is
getting short. You want at least ½” on this ‘tail’ as we add new wire. Bring that last bit of wire down the dowel just as you see in the picture.
Cut your new wire and slip it behind the last loop you just made. BEHIND, then pull that wire all the way through until you have about ½ inch at the end. The arrow is showing you more clearly, where my new wire is being threaded.

Copyright 2013 LINDA A. BERGSTROM Page: 9
Step 23: I’ve pull it all the way through and have my short end (B). I will now connect that piece to the tail we already have (A)
Step 24: Here, A and B are twisted together. Pliers or your fingers, either way is fine.
Step 25: I snip the twisted wires off, as you see here, and then we proceed in the same fashion as
we have been doing this. The arrow is the new wire I’m now working with.
Copyright 2013 LINDA A. BERGSTROM Page: 10
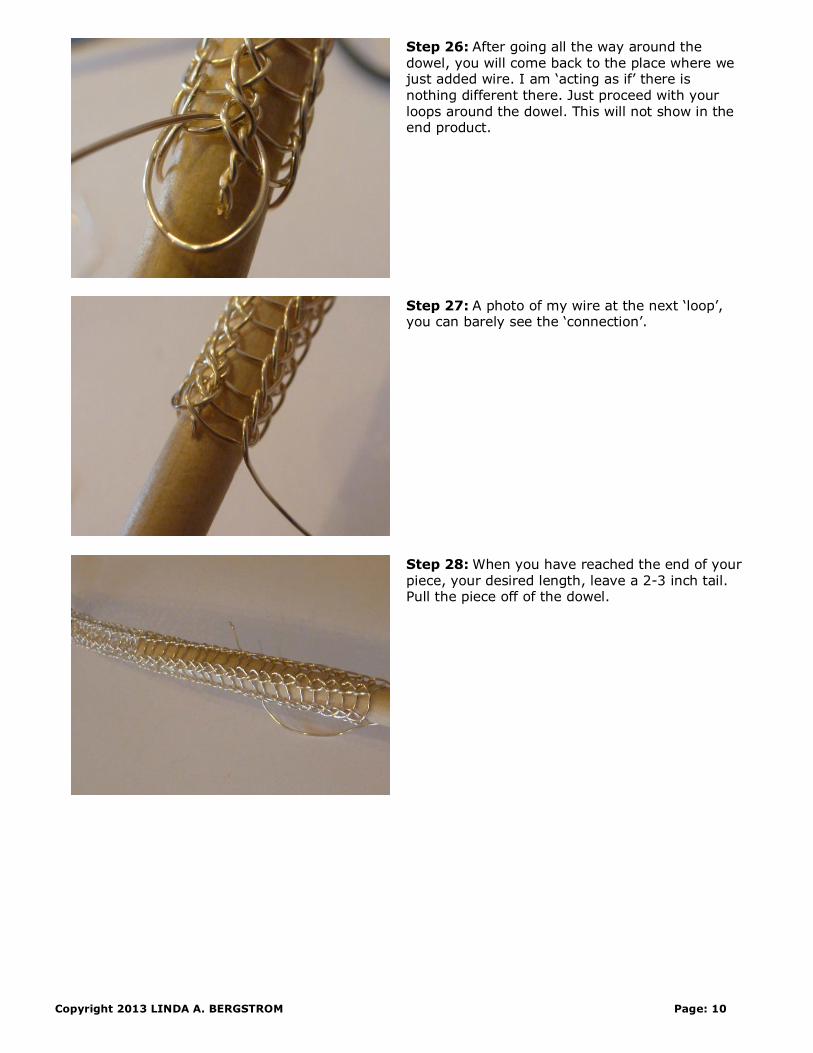
Step 26: After going all the way around the dowel, you will come back to the place where we just added wire. I am ‘acting as if’ there is nothing different there. Just proceed with your loops around the dowel. This will not show in the end product.
Step 27: A photo of my wire at the next ‘loop’, you can barely see the ‘connection’.
Step 28: When you have reached the end of your piece, your desired length, leave a 2-3 inch tail. Pull the piece off of the dowel.

Copyright 2013 LINDA A. BERGSTROM Page: 11
Step 29: Here you see my tail. I am going to thread it through the loops on top in preparation for the end caps.
Step 30: Simply thread it in and out of each loop and pull tight.
Step 31: It should look like this.
Copyright 2013 LINDA A. BERGSTROM Page: 12
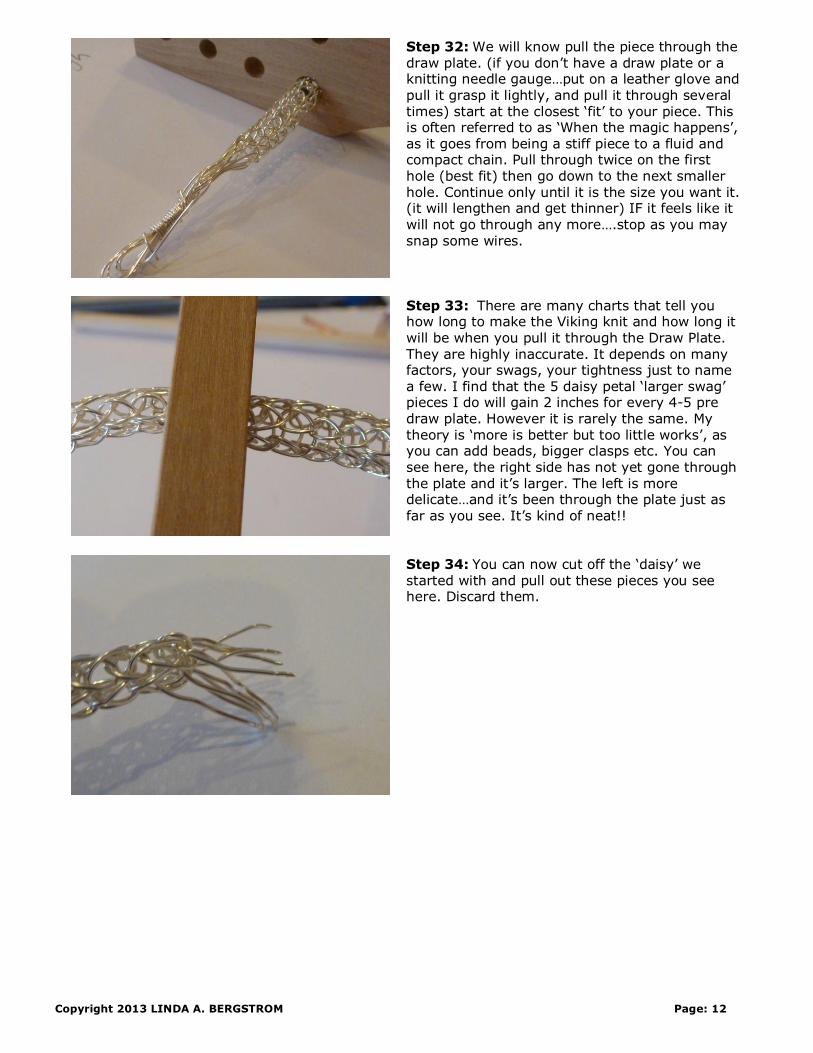
Step 32: We will know pull the piece through the draw plate. (if you don’t have a draw plate or a knitting needle gauge…put on a leather glove and pull it grasp it lightly, and pull it through several times) start at the closest ‘fit’ to your piece. This is often referred to as ‘When the magic happens’, as it goes from being a stiff piece to a fluid and compact chain. Pull through twice on the first hole (best fit) then go down to the next smaller hole. Continue only until it is the size you want it. (it will lengthen and get thinner) IF it feels like it will not go through any more….stop as you may snap some wires.
Step 33: There are many charts that tell you how long to make the Viking knit and how long it will be when you pull it through the Draw Plate.
They are highly inaccurate. It depends on many factors, your swags, your tightness just to name a few. I find that the 5 daisy petal ‘larger swag’ pieces I do will gain 2 inches for every 4-5 pre draw plate. However it is rarely the same. My theory is ‘more is better but too little works’, as you can add beads, bigger clasps etc. You can
see here, the right side has not yet gone through the plate and it’s larger. The left is more delicate…and it’s been through the plate just as far as you see. It’s kind of neat!!
Step 34: You can now cut off the ‘daisy’ we started with and pull out these pieces you see here. Discard them.

Copyright 2013 LINDA A. BERGSTROM Page: 13
Step 35: Add 3-4 Inches of the same gauge wire the way we did in steps 29-31. You can have two ‘tails’ or one, it really doesn’t matter.
Step 36: Thread your bead cap over the tail. Fit it neatly over your Viking knit. (these come in many sizes, also there is a cone you can make
yourself. That is done later in this tutorial.
Step 37: You can add jump rings here, however I go directly to my clasp. Thread it through.

Copyright 2013 LINDA A. BERGSTROM Page: 14
Step 38: I thread it around the clasp connection twice then wrap it around the area the wire comes out of the bead cap. Wrap until it is flush and neat looking. (this is not done, but I did make it nice, I promise! )
Step 39: A sample of the wide variety of large hole beads you can slide onto this piece, if you desire. Some also come with rings on them, those
work great. Ad charms to lobster clasps and hook them on, changing it as often as you want! (You can leave this bracelet with no bead or slide…it’s beautiful either way.
Step 40: I chose this one. It’s a little big for the VK, but I like it.

Copyright 2013 LINDA A. BERGSTROM Page: 15
Step 41: After you put your bead or slide on you can put your end cap on, then a jump ring or large ring to hook you clasp onto. This is the same as in steps 36-38.
Step 42: One more thing you can do with this: string beads smaller that the circumference of your Viking Knit. Pull them through the length
and secure at both ends. IT looks great! This is my finished viking knit piece. Looks great with everything you wear!!! Make it your style by picking beads and end caps you like.
Step 43: SECOND VERSION. ‘Bead In The Middle’. Find the middle of your length of Viking knit, be it a bracelet or a necklace.

Copyright 2013 LINDA A. BERGSTROM Page: 16
Step 44: Go ahead (I know this is hard to do…just seems wrong after so much work right?) Yes, go ahead and snip that in half at the mid point. Discard any scraps you may have fall off.
Step 45: You will need to ‘open’ the VK at both ends of both the newly cut pieces. I use a pen, just like you see here. We are doing this so we
can get a wire through the pieces…so this does not have to be HUGE.
Step 46: Making a CONE: If you want to make your own cones for the ends of your piece, do so by wrapping 20-21 gauge wire around a round nose pliers, or the end of a pen or pencil.

Copyright 2013 LINDA A. BERGSTROM Page: 17
Step 47: Keep wrapping until you get the size you want. (that is your choice)
Step 48: Snip off the ends. With a pliers, tuck them just inside the coil so they won’t be seen or scratch you.
Step 49: Finished small coil. To avoid the tool marks you see here, you can put electrical tape on your tools. (this is a macro shot, the tool marks rarely show to the naked eye)
Step 50: You know cut a length of dead soft or half hard 20- 21 gauge wire 4 inches longer than your finished piece will be. Run it through the first half of the viking knit we cut. Add the coil or end cap.

Copyright 2013 LINDA A. BERGSTROM Page: 18
Step 51: Add your bead, then another cone, then the next piece of Viking knit and another cone at each of the ends.
Step 52: The white line is showing where my wire goes through every piece of this bracelet. (dead soft keeps it a more fluid piece by the way) YOU choose!!!
Step 53: I have 2 inches at each end. Make them into loops like this, leaving enough to coil, see next pic.
Step 54: Coil around the wire itself just after the end cap coil. Do this to both ends.

Copyright 2013 LINDA A. BERGSTROM Page: 19
Step 55: One end will remain round. The other will be bent as shown here. This is your hook.
Step 56: And there you go! Easy clasp!
Step 57: You know have a striking piece of new jewelry!!! Take this and have fun with it, make it your own…and one more thing: (next page please)

Copyright 2013 LINDA A. BERGSTROM Page: 20
Step 58: The variations are really fun with this. This particular piece was done with brass and silver wire. You do this , wires together, threading and weaving your viking knit with both wires at the same time. It can be a little tricky at first, but well worth the effort. No go have fun!!! PLEASE DO NOT LEND, SHARE OR DUPLICATE THIS TUTORIAL WITHOUT WRITTEN PERMISSION OF THE AUTHER. IF YOU WISH TO TEACH THE VIKING KNIT PLEASE PURCHASE ONE COPY PER STUDENT AND ASK THE AUTHER FOR WRITTEN PERMISSION TO TEACH
POLICY OF ALL L.A.B. TUTORIALS.