I-Cord Seaming Tutorial · I-Cord Seam on Pinwheel Blanket I-Cord Seam Close Up Back Side of I-Cord...
2
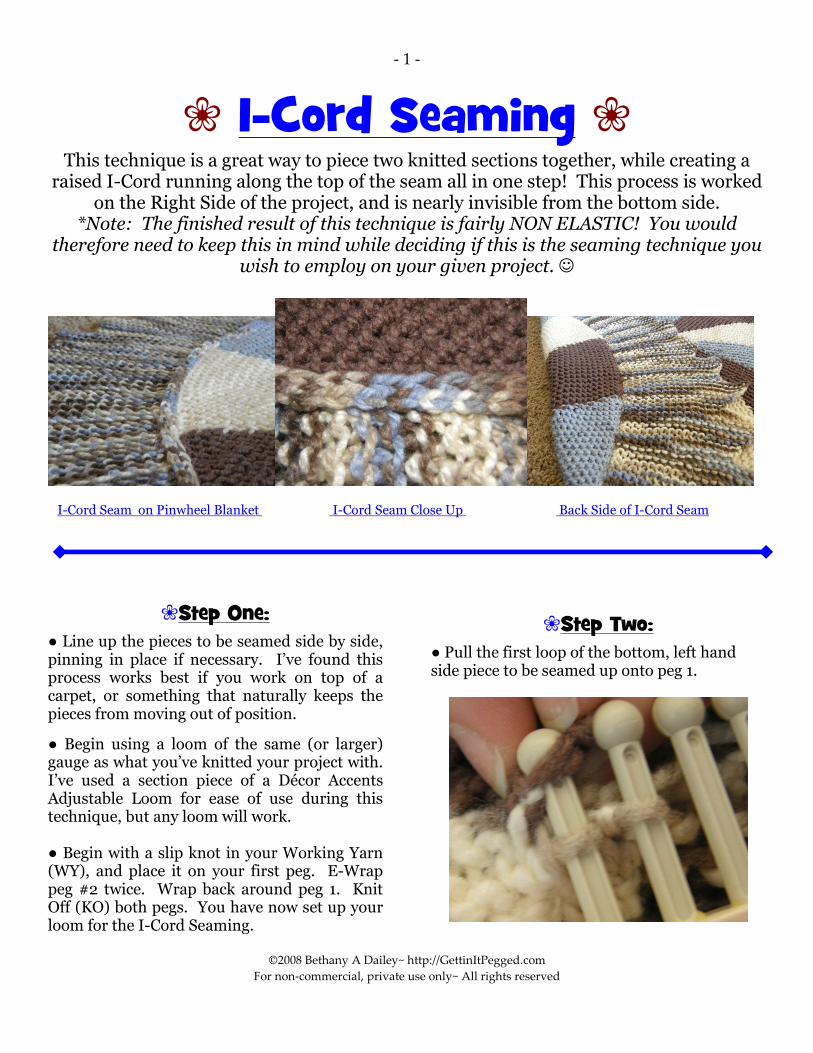
- 1 - 2008 Bethany A Dailey~ http://GettinItPegged.com For non-commercial, private use only~ All rights reserved « I-Cord Seaming « This technique is a great way to piece two knitted sections together, while creating a raised I-Cord running along the top of the seam all in one step! This process is worked on the Right Side of the project, and is nearly invisible from the bottom side. *Note: The finished result of this technique is fairly NON ELASTIC! You would therefore need to keep this in mind while deciding if this is the seaming technique you wish to employ on your given project. ☺ I-Cord Seam on Pinwheel Blanket I-Cord Seam Close Up Back Side of I-Cord Seam «Step One: ● Line up the pieces to be seamed side by side, pinning in place if necessary. I’ve found this process works best if you work on top of a carpet, or something that naturally keeps the pieces from moving out of position. ● Begin using a loom of the same (or larger) gauge as what you’ve knitted your project with. I’ve used a section piece of a Décor Accents Adjustable Loom for ease of use during this technique, but any loom will work. ● Begin with a slip knot in your Working Yarn (WY), and place it on your first peg. E-Wrap peg #2 twice. Wrap back around peg 1. Knit Off (KO) both pegs. You have now set up your loom for the I-Cord Seaming. «Step Two: ● Pull the first loop of the bottom, left hand side piece to be seamed up onto peg 1.
-
Upload
phungkhanh -
Category
Documents
-
view
228 -
download
0
Transcript of I-Cord Seaming Tutorial · I-Cord Seam on Pinwheel Blanket I-Cord Seam Close Up Back Side of I-Cord...
- 1 -
2008 Bethany A Dailey~ http://GettinItPegged.com
For non-commercial, private use only~ All rights reserved
« I-Cord Seaming « This technique is a great way to piece two knitted sections together, while creating a
raised I-Cord running along the top of the seam all in one step! This process is worked on the Right Side of the project, and is nearly invisible from the bottom side.
*Note: The finished result of this technique is fairly NON ELASTIC! You would therefore need to keep this in mind while deciding if this is the seaming technique you
wish to employ on your given project. ☺
I-Cord Seam on Pinwheel Blanket I-Cord Seam Close Up Back Side of I-Cord Seam
«Step One: ● Line up the pieces to be seamed side by side, pinning in place if necessary. I’ve found this process works best if you work on top of a carpet, or something that naturally keeps the pieces from moving out of position.
● Begin using a loom of the same (or larger) gauge as what you’ve knitted your project with. I’ve used a section piece of a Décor Accents Adjustable Loom for ease of use during this technique, but any loom will work. ● Begin with a slip knot in your Working Yarn (WY), and place it on your first peg. E-Wrap peg #2 twice. Wrap back around peg 1. Knit Off (KO) both pegs. You have now set up your loom for the I-Cord Seaming.
«Step Two: ● Pull the first loop of the bottom, left hand side piece to be seamed up onto peg 1.
- 2 -
2008 Bethany A Dailey~ http://GettinItPegged.com
For non-commercial, private use only~ All rights reserved
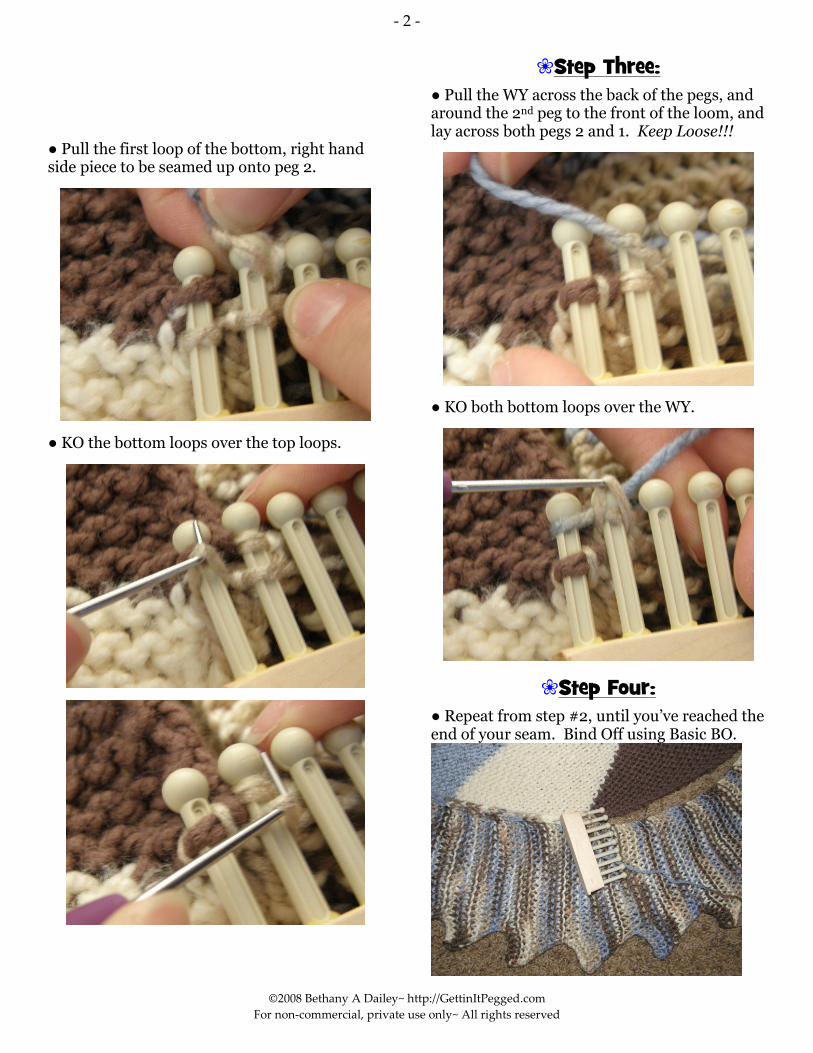
● Pull the first loop of the bottom, right hand side piece to be seamed up onto peg 2.
● KO the bottom loops over the top loops.
«Step Three: ● Pull the WY across the back of the pegs, and around the 2nd peg to the front of the loom, and lay across both pegs 2 and 1. Keep Loose!!!
● KO both bottom loops over the WY.
«Step Four: ● Repeat from step #2, until you’ve reached the end of your seam. Bind Off using Basic BO.