Hybrid Vehicle Operation and Diagnosis Training Hybrid Vehicle Operation and Diagnosis Course Code...
68
Hybrid Vehicle Operation and Diagnosis Hybrid Vehicle Operation and Diagnosis Training Training Hybrid Vehicle Operation and Diagnosis Course Code 30N10T1 Instructor Information PowerPoint
Transcript of Hybrid Vehicle Operation and Diagnosis Training Hybrid Vehicle Operation and Diagnosis Course Code...

Hybrid Vehicle Operation and Diagnosis TrainingHybrid Vehicle Operation and Diagnosis Training
Hybrid Vehicle Operation and Diagnosis Course Code 30N10T1
Instructor Information PowerPoint

Hybrid Vehicle Operation and Diagnosis TrainingHybrid Vehicle Operation and Diagnosis Training
Instructor Information PowerPoint
Purpose: Purpose: – This PowerPoint presentation has been prepared to help This PowerPoint presentation has been prepared to help
Ford Service Training Instructors (STIs) prepare for the Ford Service Training Instructors (STIs) prepare for the presentation of the New Hybrid Vehicle Operation and presentation of the New Hybrid Vehicle Operation and Diagnosis Classroom Course.Diagnosis Classroom Course.
Any additional questions about the presentation of Any additional questions about the presentation of this training course should be directed to Paul this training course should be directed to Paul Garcia, TSO Project Manager at Garcia, TSO Project Manager at [email protected]@ford.com.

Hybrid Vehicle Operation and Diagnosis TrainingHybrid Vehicle Operation and Diagnosis Training
Course Requirements
This is a two-day course.This is a two-day course. Instructors must take the prerequisite web based training course, 30N26W1 Instructors must take the prerequisite web based training course, 30N26W1
Hybrid Vehicle Components and Operation.Hybrid Vehicle Components and Operation. The course content is almost completely new in comparison to the old hybrid The course content is almost completely new in comparison to the old hybrid
classroom course.classroom course.

Hybrid Vehicle Operation and Diagnosis TrainingHybrid Vehicle Operation and Diagnosis Training
PowerPoint Contents
This PowerPoint is divided into 3 Sections.This PowerPoint is divided into 3 Sections.
– Bug SetupBug Setup
– Workstation SetupWorkstation Setup
– Post TestPost Test

Hybrid Vehicle Operation and Diagnosis TrainingHybrid Vehicle Operation and Diagnosis Training
Supplemental Material
This presentation is designed to be used with the Instructor Information This presentation is designed to be used with the Instructor Information Section of the Instructor Guide (IGK) for 30N10T1 Hybrid Vehicle Operation Section of the Instructor Guide (IGK) for 30N10T1 Hybrid Vehicle Operation and Diagnosis.and Diagnosis.
During this presentation you will be referred to setup information within the During this presentation you will be referred to setup information within the IGK.IGK.

Hybrid Vehicle Operation and Diagnosis TrainingHybrid Vehicle Operation and Diagnosis Training
Pre-Class Setup
PG. Inst – 2 of the IGK lists pre-class setup steps for this course.PG. Inst – 2 of the IGK lists pre-class setup steps for this course. Before performing the pre-class setup, view the Bug Setup section of this Before performing the pre-class setup, view the Bug Setup section of this
presentation.presentation.

Hybrid Vehicle Operation and Diagnosis TrainingHybrid Vehicle Operation and Diagnosis Training
WARNINGS
This PowerPoint Presentation is designed specifically for STI’s that have This PowerPoint Presentation is designed specifically for STI’s that have previously taught the Hybrid Classroom New Model Course (2005 version).previously taught the Hybrid Classroom New Model Course (2005 version).
All service publication WARNINGS must be followed when preparing the All service publication WARNINGS must be followed when preparing the classroom vehicle.classroom vehicle.
Failure to do so could result in injury or death.Failure to do so could result in injury or death.

Hybrid Vehicle Operation and Diagnosis TrainingHybrid Vehicle Operation and Diagnosis Training
BUG SETUP

Hybrid Vehicle Operation and Diagnosis TrainingHybrid Vehicle Operation and Diagnosis Training
Bug Setup
There are two on-vehicle bugs for this course.There are two on-vehicle bugs for this course. There is also a component location activity requiring the vehicle be tagged.There is also a component location activity requiring the vehicle be tagged. Tags must be attached to the components listed on the Lesson One – Tags must be attached to the components listed on the Lesson One –
Workstation 2 worksheet and the vehicle must be on a hoist.Workstation 2 worksheet and the vehicle must be on a hoist.

Hybrid Vehicle Operation and Diagnosis TrainingHybrid Vehicle Operation and Diagnosis Training
Begin classroom vehicle preparation by removing the rear seat cushion.Begin classroom vehicle preparation by removing the rear seat cushion. Removal of the seat requires that the two rear seat cushion latches are fully Removal of the seat requires that the two rear seat cushion latches are fully
disengaged or latch damage will result.disengaged or latch damage will result. View the next page for photos of this procedure.View the next page for photos of this procedure.
Remove the Rear Seat Cushion

Hybrid Vehicle Operation and Diagnosis TrainingHybrid Vehicle Operation and Diagnosis Training
Release the rear of the seat cushion in the following sequence. Release the rear of the seat cushion in the following sequence. – Push the cushion assembly back as far as possible.Push the cushion assembly back as far as possible.– Press both seat latches in the direction shown in the photo until the front of the Press both seat latches in the direction shown in the photo until the front of the
seat is released.seat is released.– Lift up at the rear outboard ends of the cushion assembly, disengaging the wires in Lift up at the rear outboard ends of the cushion assembly, disengaging the wires in
the cushion from the wire retainer hooks of the seat cushion.the cushion from the wire retainer hooks of the seat cushion.– Pull the cushion assembly forward and remove.Pull the cushion assembly forward and remove.
Seat LatchSeat Latch
Push Latch in this DirectionPush Latch in this Direction
Remove the Rear Seat Cushion

Hybrid Vehicle Operation and Diagnosis TrainingHybrid Vehicle Operation and Diagnosis Training
Refer to 2010 Fusion/Milan WSM Section 510-10 Removal and Installation Refer to 2010 Fusion/Milan WSM Section 510-10 Removal and Installation for additional information as needed. for additional information as needed.
Remove the Rear Seat Cushion

Hybrid Vehicle Operation and Diagnosis TrainingHybrid Vehicle Operation and Diagnosis Training
Open the trunk and remove the cover over the HVBP cooling fanOpen the trunk and remove the cover over the HVBP cooling fan..
Lower the Rear Seat Backs

Hybrid Vehicle Operation and Diagnosis TrainingHybrid Vehicle Operation and Diagnosis Training
Position of Latches to release rear seat backsPosition of Latches to release rear seat backs(location to insert screwdriver tip)(location to insert screwdriver tip)
There are two releases for the rear seat. These are difficult to see. See the There are two releases for the rear seat. These are difficult to see. See the photos on the following pages.photos on the following pages.
Lower the Rear Seat Backs

Hybrid Vehicle Operation and Diagnosis TrainingHybrid Vehicle Operation and Diagnosis Training
Lower the Rear Seat Backs
Place the tip of the screwdriver against these two releases and pry outward, Place the tip of the screwdriver against these two releases and pry outward, towards the outside of the vehicle. towards the outside of the vehicle.
The seat backs are spring-loaded and will pop down. The seat backs are spring-loaded and will pop down.

Hybrid Vehicle Operation and Diagnosis TrainingHybrid Vehicle Operation and Diagnosis Training
Lower the Rear Seat Backs
Refer to 2010 Fusion/Milan WSM Section 510-10 Removal and Installation Refer to 2010 Fusion/Milan WSM Section 510-10 Removal and Installation for additional information as needed. for additional information as needed.

Hybrid Vehicle Operation and Diagnosis TrainingHybrid Vehicle Operation and Diagnosis Training
Remove the Service Disconnect Switch
Remove the Service Disconnect Switch Before ProceedingRemove the Service Disconnect Switch Before Proceeding

Hybrid Vehicle Operation and Diagnosis TrainingHybrid Vehicle Operation and Diagnosis Training
Remove Passenger Side Rear Seat Bolster
Next, remove the passenger side rear seat bolster.Next, remove the passenger side rear seat bolster. Begin by removing the 10mm retaining bolt from the bottom of the bolster.Begin by removing the 10mm retaining bolt from the bottom of the bolster.

Hybrid Vehicle Operation and Diagnosis TrainingHybrid Vehicle Operation and Diagnosis Training
Remove Passenger Side Rear Seat Bolster
You must now release the bolster retaining latch, which is the same design as those used for the seat cushion.You must now release the bolster retaining latch, which is the same design as those used for the seat cushion. To do this, slide a flat-blade screwdriver behind the bolster to push the latch release toward the RH side of the To do this, slide a flat-blade screwdriver behind the bolster to push the latch release toward the RH side of the
vehicle and release the side bolstervehicle and release the side bolster
Bolster LatchBolster Latch

Hybrid Vehicle Operation and Diagnosis TrainingHybrid Vehicle Operation and Diagnosis Training
Remove Passenger Side Rear Seat Bolster
Refer to 2010 Fusion/Milan WSM Section 510-10 Removal and Installation Refer to 2010 Fusion/Milan WSM Section 510-10 Removal and Installation for additional information as needed. for additional information as needed.

Hybrid Vehicle Operation and Diagnosis TrainingHybrid Vehicle Operation and Diagnosis Training
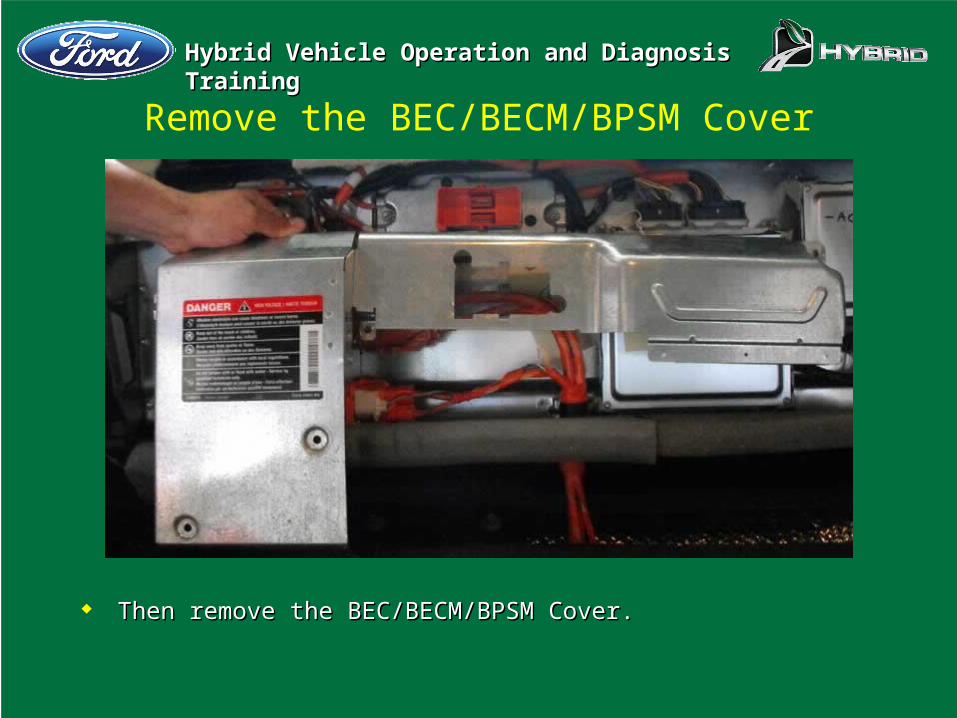
Remove the BEC/BECM/BPSM Cover
Now, remove the BEC/BECM/BPSM Cover.Now, remove the BEC/BECM/BPSM Cover. This is done by removing the four 10 mm retaining nuts, and the two 35 Torx retaining nuts This is done by removing the four 10 mm retaining nuts, and the two 35 Torx retaining nuts
shown here. shown here.
T-35 TorxT-35 Torx
10 mm Nuts10 mm Nuts 10 mm Nut10 mm Nut
Hybrid Vehicle Operation and Diagnosis TrainingHybrid Vehicle Operation and Diagnosis Training
Remove the BEC/BECM/BPSM Cover
Then remove the BEC/BECM/BPSM Cover.Then remove the BEC/BECM/BPSM Cover.

Hybrid Vehicle Operation and Diagnosis TrainingHybrid Vehicle Operation and Diagnosis Training
Re-Install Ground Strap and NutRe-Install Ground Strap and Nut
Remove the BEC/BECM/BPSM Cover
Re-install ground strap and nut.Re-install ground strap and nut.

Hybrid Vehicle Operation and Diagnosis TrainingHybrid Vehicle Operation and Diagnosis Training
Remove the BEC/BECM/BPSM Cover
Refer to 2010 Fusion Milan WSM Section 414-03 Removal and Installation Refer to 2010 Fusion Milan WSM Section 414-03 Removal and Installation for additional information as needed. for additional information as needed.

Hybrid Vehicle Operation and Diagnosis TrainingHybrid Vehicle Operation and Diagnosis Training
Installing the Permanent Bug for Lesson Two Worksheet 2
This bug opens the circuit to the Hybrid Battery Positive Contactor and sets This bug opens the circuit to the Hybrid Battery Positive Contactor and sets DTC P0AD9:00 in the BECM memory.DTC P0AD9:00 in the BECM memory.
This is accomplished by inserting a micro-switch in circuit J1A61 (GY) at This is accomplished by inserting a micro-switch in circuit J1A61 (GY) at pin 4 of C4236Dpin 4 of C4236D
The following pages detail this process.The following pages detail this process. Additional information is available on pages INST-37 – INST 39 in the IGK.Additional information is available on pages INST-37 – INST 39 in the IGK.

Hybrid Vehicle Operation and Diagnosis TrainingHybrid Vehicle Operation and Diagnosis Training
Installing the Permanent Bug for Lesson Two Worksheet 2
WARNING: MAKE SURE THE SERVICE DISCONNECT SWITCH IS REMOVED FROM THE WARNING: MAKE SURE THE SERVICE DISCONNECT SWITCH IS REMOVED FROM THE VEHICLEVEHICLE
To provide room to access the wiring harness, disconnect the three connectors for the black wiring To provide room to access the wiring harness, disconnect the three connectors for the black wiring harness running to the BEC (See next page for additional details).harness running to the BEC (See next page for additional details).
Wiring HarnessWiring Harness

Hybrid Vehicle Operation and Diagnosis TrainingHybrid Vehicle Operation and Diagnosis Training
Installing the Permanent Bug for Lesson Two Worksheet 2
Connectors removed from BEC for black wiring harness.Connectors removed from BEC for black wiring harness.
C4236D Male ConnectorC4236D Male ConnectorC4236D Female C4236D Female ConnectorConnector

Hybrid Vehicle Operation and Diagnosis TrainingHybrid Vehicle Operation and Diagnosis Training
Installing the Permanent Bug for Lesson Two Worksheet 2
Carefully remove the red pin retainer from the center of C4236D by spreading the outside ends of the retainer (Don’t spread them too far or they Carefully remove the red pin retainer from the center of C4236D by spreading the outside ends of the retainer (Don’t spread them too far or they will break. Bet you can’t guess how we know this!)will break. Bet you can’t guess how we know this!)
Good retainer end (spread carefully)Good retainer end (spread carefully)
Not so Good retainer end (spread a bit too far)Not so Good retainer end (spread a bit too far)

Hybrid Vehicle Operation and Diagnosis TrainingHybrid Vehicle Operation and Diagnosis Training
Installing the Permanent Bug for Lesson Two Worksheet 2
Carefully remove pin 4 of C4236D (GY) from the connector using a thin pick.Carefully remove pin 4 of C4236D (GY) from the connector using a thin pick.

Hybrid Vehicle Operation and Diagnosis TrainingHybrid Vehicle Operation and Diagnosis Training
Installing the Permanent Bug for Lesson Two Worksheet 2
Pin 4 in Wiring Diagram Connector view Pin 4 in Wiring Diagram Connector view

Hybrid Vehicle Operation and Diagnosis TrainingHybrid Vehicle Operation and Diagnosis Training
Installing the Permanent Bug for Lesson Two Worksheet 2
Get the micro-switch and pigtails from the course setup packageGet the micro-switch and pigtails from the course setup package

Hybrid Vehicle Operation and Diagnosis TrainingHybrid Vehicle Operation and Diagnosis Training
Installing the Permanent Bug for Lesson Two Worksheet 2
Open the convolute as required and pull pin 4 out.Open the convolute as required and pull pin 4 out. Insert the male pin pigtail into pin 4.Insert the male pin pigtail into pin 4. Insert the female pin pigtail into the connector in the slot for pin 4.Insert the female pin pigtail into the connector in the slot for pin 4.
Male pigtail of bugMale pigtail of bug
Pin 4 of C4236DPin 4 of C4236D
Female pigtail Female pigtail (GY) of bug (GY) of bug inserted into Pin 4 inserted into Pin 4 slot of C4236Dslot of C4236D

Hybrid Vehicle Operation and Diagnosis TrainingHybrid Vehicle Operation and Diagnosis Training
Installing the Permanent Bug for Lesson Two Worksheet 2
Reassemble the connector and use black electrical tape to close the convolute.Reassemble the connector and use black electrical tape to close the convolute. Ensure that the wires are high enough on the harness to allow it to be tucked Ensure that the wires are high enough on the harness to allow it to be tucked
up under the rear window deck so that it can not be seen when the harness is up under the rear window deck so that it can not be seen when the harness is reattached to the BEC.reattached to the BEC.
Micro-switchMicro-switch

Hybrid Vehicle Operation and Diagnosis TrainingHybrid Vehicle Operation and Diagnosis Training
Bug for Lesson Two Workstation 2
IMPORTANT NOTES FOR THIS WORKSTATIONIMPORTANT NOTES FOR THIS WORKSTATION While diagnosing this bug make sure the students use these DVOM adapters:While diagnosing this bug make sure the students use these DVOM adapters:
– Set 300-08040 .060 Female Flex Probes for DVOM leads Set 300-08040 .060 Female Flex Probes for DVOM leads – Set 300-08045 .064 Male Flex Probes for DVOM leads Set 300-08045 .064 Male Flex Probes for DVOM leads
Failure to use these adapters will result in damage to the connector pins, which may require replacement of the wiring harness.Failure to use these adapters will result in damage to the connector pins, which may require replacement of the wiring harness. THIS HARNESS CAN ONLY BE ORDERED WITH A BATTERY PACK! SO BE CAREFUL.THIS HARNESS CAN ONLY BE ORDERED WITH A BATTERY PACK! SO BE CAREFUL.
INSTRUCTOR WARNING:INSTRUCTOR WARNING: AFTER SETTING THE BUG, PLACE THE BEC COVER BACK OVER THE BEC AND BPSM TO PREVENT ACCIDENTAL CONTACT WITH A HV COMPONENT WITH THE SERVICE DISCONNECT INSTALLED. USE ONLY 1 FASTENER TO AFTER SETTING THE BUG, PLACE THE BEC COVER BACK OVER THE BEC AND BPSM TO PREVENT ACCIDENTAL CONTACT WITH A HV COMPONENT WITH THE SERVICE DISCONNECT INSTALLED. USE ONLY 1 FASTENER TO
RETAIN THE COVER AND ALLOW EASY ACCESS TO THE STUDENTS.RETAIN THE COVER AND ALLOW EASY ACCESS TO THE STUDENTS.

Hybrid Vehicle Operation and Diagnosis TrainingHybrid Vehicle Operation and Diagnosis Training
Lesson One Workstation 2 Tag Components
This is a component location and function activity (Easter egg hunt).This is a component location and function activity (Easter egg hunt). Tag components listed on worksheet before beginning class on Day One.Tag components listed on worksheet before beginning class on Day One.

Hybrid Vehicle Operation and Diagnosis TrainingHybrid Vehicle Operation and Diagnosis Training
Tag Components for Lesson One Workstation 2
IMPORTANT NOTES FOR THIS WORKSTATIONIMPORTANT NOTES FOR THIS WORKSTATION This activity will require that the vehicle be placed on a hoist.This activity will require that the vehicle be placed on a hoist. Remove the Beauty cover from the engine.Remove the Beauty cover from the engine. Remove the aeroshield from the bottom of the engine.Remove the aeroshield from the bottom of the engine. The Electric A/C compressor, eCVT, vacuum pump, M/E cooling pump, and The Electric A/C compressor, eCVT, vacuum pump, M/E cooling pump, and
heater helper pump are all tagged from the bottom of the vehicle.heater helper pump are all tagged from the bottom of the vehicle. Students may have difficulty identifying the M/E cooling pump and the heater Students may have difficulty identifying the M/E cooling pump and the heater
helper pump since they both look the same. The one that is higher up in the helper pump since they both look the same. The one that is higher up in the engine compartment is the helper pump.engine compartment is the helper pump.
Students may have difficulty identifying the Electric A/C Compressor and the Students may have difficulty identifying the Electric A/C Compressor and the Vacuum Pump due to limited space in engine compartment.Vacuum Pump due to limited space in engine compartment.
After tagging, raise the vehicle seat backs so the students will have to use the After tagging, raise the vehicle seat backs so the students will have to use the screwdriver to release the seats.screwdriver to release the seats.
See the next page for a list of components to be tagged.See the next page for a list of components to be tagged.

Hybrid Vehicle Operation and Diagnosis TrainingHybrid Vehicle Operation and Diagnosis Training
Tag Components for Lesson One Workstation 2 This activity requires that the students locate the components listed on the worksheet and identify the This activity requires that the students locate the components listed on the worksheet and identify the
component function.component function. The 18 components listed below are tagged with either numbers or letters:The 18 components listed below are tagged with either numbers or letters:
• HVPBHVPB
• Electrical A/C CompressorElectrical A/C Compressor
• Brake BoosterBrake Booster
• Electric Coolant PumpElectric Coolant Pump
• DC/DC ConverterDC/DC Converter
• Vacuum PumpVacuum Pump
• Service Disconnect SwitchService Disconnect Switch
• RCM (Tag on outside of RCM (Tag on outside of
• BECBEC
• DC/AC InverterDC/AC Inverter
• 110 Volt Plug110 Volt Plug
• BPSMBPSM
• EPASEPAS
• BECMBECM
• ME Coolant PumpME Coolant Pump
• HVBP Cooling FanHVBP Cooling Fan
• eCVTeCVT
• Brake Pedal SimulatorBrake Pedal Simulator

Hybrid Vehicle Operation and Diagnosis TrainingHybrid Vehicle Operation and Diagnosis Training
Bug for Lesson One Workstation 5
This activity requires that the students diagnose and replace the High-Voltage This activity requires that the students diagnose and replace the High-Voltage Low-Current fuse on a 2010 Fusion/Milan.Low-Current fuse on a 2010 Fusion/Milan.
Before beginning class on Day One, install the blown High-Voltage Low-Before beginning class on Day One, install the blown High-Voltage Low-Current (HVLC) fuse in the BEC.Current (HVLC) fuse in the BEC.
Refer to INST – 21 in the IGKRefer to INST – 21 in the IGK Refer to Section 414-03 in the WS manual.Refer to Section 414-03 in the WS manual. View photos on following pages for more details.View photos on following pages for more details.

Hybrid Vehicle Operation and Diagnosis TrainingHybrid Vehicle Operation and Diagnosis Training
Bug for Lesson One Workstation 5
WARNING: MAKE SURE THE SERVICE DISCONNECT SWITCH IS REMOVED FROM THE WARNING: MAKE SURE THE SERVICE DISCONNECT SWITCH IS REMOVED FROM THE VEHICLEVEHICLE
After accessing the BEC, remove the two 8mm and one 13mm nut and one 8mm screw shown here.After accessing the BEC, remove the two 8mm and one 13mm nut and one 8mm screw shown here.
13 mm Nut13 mm Nut
8 mm nuts8 mm nuts
8 mm screw8 mm screw

Hybrid Vehicle Operation and Diagnosis TrainingHybrid Vehicle Operation and Diagnosis Training
Bug for Lesson One Workstation 5
Remove the HVLC Bus Bar from the BEC, then remove the fuse.Remove the HVLC Bus Bar from the BEC, then remove the fuse. This is not reassembled the same way for the class. See next page.This is not reassembled the same way for the class. See next page.
13 mm Nut13 mm Nut
8 mm nuts8 mm nuts
HVLC FuseHVLC Fuse
HVLC Bus BarHVLC Bus Bar
8 mm Screw8 mm Screw
HV Bus BarHV Bus Bar

Hybrid Vehicle Operation and Diagnosis TrainingHybrid Vehicle Operation and Diagnosis Training
Bug for Lesson One Workstation 5
During reassembly, install the HV bus bar 1During reassembly, install the HV bus bar 1st,st, and retain it using the 8 mm screw. and retain it using the 8 mm screw. Then install the HVLC bus bar over the HV bus bar end. Then install the HVLC bus bar over the HV bus bar end. This will require that the students only remove the parts shown here to replace the fuse.This will require that the students only remove the parts shown here to replace the fuse.
13 mm Nut13 mm Nut
8 mm nuts8 mm nuts
HVLC FuseHVLC FuseHVLC Bus BarHVLC Bus Bar

Hybrid Vehicle Operation and Diagnosis TrainingHybrid Vehicle Operation and Diagnosis Training
Bug for Lesson One Workstation 5
IMPORTANT NOTES FOR THIS WORKSTATIONIMPORTANT NOTES FOR THIS WORKSTATION Have the students use a lb-in torque wrench and torque nuts and bolts to ½ WSM torque specifications.Have the students use a lb-in torque wrench and torque nuts and bolts to ½ WSM torque specifications. There is a question on the worksheet to make them look up the correct torque specifications. There is a question on the worksheet to make them look up the correct torque specifications. Make sure that the students remove the HV bus bar and HVLC bus bar and do not bend it.Make sure that the students remove the HV bus bar and HVLC bus bar and do not bend it. Have the first two workgroups re-install the blown fuse into the BEC.Have the first two workgroups re-install the blown fuse into the BEC. Give the last workgroup the good fuse to install and verify the vehicle will start.Give the last workgroup the good fuse to install and verify the vehicle will start.
INSTRUCTOR WARNING:INSTRUCTOR WARNING: AFTER SETTING THE BUG, PLACE THE BEC COVER BACK OVER THE BEC AND BPSM TO PREVENT ACCIDENTAL CONTACT WITH A HV COMPONENT WITH THE SERVICE DISCONNECT INSTALLED. USE ONLY 1 FASTENER TO AFTER SETTING THE BUG, PLACE THE BEC COVER BACK OVER THE BEC AND BPSM TO PREVENT ACCIDENTAL CONTACT WITH A HV COMPONENT WITH THE SERVICE DISCONNECT INSTALLED. USE ONLY 1 FASTENER TO
RETAIN THE COVER AND ALLOW EASY ACCESS TO THE STUDENTS.RETAIN THE COVER AND ALLOW EASY ACCESS TO THE STUDENTS.

Hybrid Vehicle Operation and Diagnosis TrainingHybrid Vehicle Operation and Diagnosis Training
Bug for Post Test The post test fault is to simply remove the Service Disconnect switch.The post test fault is to simply remove the Service Disconnect switch.
– Remove the Service Disconnect Switch, lower the handle and reinsert it into it’s socket to help disguise that it is not connected.Remove the Service Disconnect Switch, lower the handle and reinsert it into it’s socket to help disguise that it is not connected.– Raise both seat backs until they latch. This will help disguise the bug and require that the student demonstrate their ability to release the latches Raise both seat backs until they latch. This will help disguise the bug and require that the student demonstrate their ability to release the latches
with the long flat tipped screwdriver.with the long flat tipped screwdriver. This will create a no-start condition and the student must read the DTCs and identify the fault.This will create a no-start condition and the student must read the DTCs and identify the fault.

Hybrid Vehicle Operation and Diagnosis TrainingHybrid Vehicle Operation and Diagnosis Training
Workstation Setup
Supplemental information for preparing these workstations can be found in the Supplemental information for preparing these workstations can be found in the IGK Instructor Information Section.IGK Instructor Information Section.

Hybrid Vehicle Operation and Diagnosis TrainingHybrid Vehicle Operation and Diagnosis Training
Lesson One Workstation 1Escape/Mariner Component Location and Function
Instructor StrategyInstructor Strategy In this activity, students will look up data and procedures in the PC/ED manual In this activity, students will look up data and procedures in the PC/ED manual
and Wiring Diagrams manual, and answer related questions on the worksheet.and Wiring Diagrams manual, and answer related questions on the worksheet. Remind students that some publications change from year to year and model to Remind students that some publications change from year to year and model to
model. Always consult the Service Publications for the correct model year and model. Always consult the Service Publications for the correct model year and vehicle being serviced.vehicle being serviced.
Instruct the students to NOT open any other files loaded on this computer at this Instruct the students to NOT open any other files loaded on this computer at this time.time.
Activity/Bug SetupActivity/Bug Setup Before class starts, install the following on the workstation PC:Before class starts, install the following on the workstation PC:
– -- Training Service Publications DVD Training Service Publications DVD
– -- Zip folder: IDS_SessionArchive1.zipZip folder: IDS_SessionArchive1.zip
– -- Zip folder: L2 WKS 3. zipZip folder: L2 WKS 3. zip
– -- IDS Version 60 or newerIDS Version 60 or newer

Hybrid Vehicle Operation and Diagnosis TrainingHybrid Vehicle Operation and Diagnosis Training
Required EquipmentRequired Equipment ll PC on table PC on table ll Training Service Publications DVD Training Service Publications DVD ll Student Guide - Lesson One - Workstation 1 WorksheetStudent Guide - Lesson One - Workstation 1 Worksheet
Lesson One Workstation 1Escape/Mariner Component Location and Function

Hybrid Vehicle Operation and Diagnosis TrainingHybrid Vehicle Operation and Diagnosis Training
Lesson One Workstation 2FUSION/MILAN COMPONENT LOCATION AND FUNCTION
Instructor StrategyInstructor Strategy In this activity, students will locate specific hybrid vehicle components, In this activity, students will locate specific hybrid vehicle components,
identify the function of those components and list the tag number that is identify the function of those components and list the tag number that is attached to that component on the vehicle.attached to that component on the vehicle.
This activity will require tags that are visible only by raising the vehicle on a This activity will require tags that are visible only by raising the vehicle on a hoist.hoist.
Activity/Bug SetupActivity/Bug Setup
– There are no bugs for this activity.There are no bugs for this activity.
– Tag the components listed on the worksheet and note the tag numbers in Tag the components listed on the worksheet and note the tag numbers in your instructor guide. These numbers may be added to your PowerPoint your instructor guide. These numbers may be added to your PowerPoint presentation for convenience.presentation for convenience.
– Remove the HV safety switchRemove the HV safety switch

Hybrid Vehicle Operation and Diagnosis TrainingHybrid Vehicle Operation and Diagnosis Training
See the Bug Setup section of this PowerPoint for more information.See the Bug Setup section of this PowerPoint for more information. Tag components listed on worksheet before beginning class on Day One.Tag components listed on worksheet before beginning class on Day One. Refer to the Bug Setup section of this PowerPoint for more details about this workstation.Refer to the Bug Setup section of this PowerPoint for more details about this workstation.
Lesson One Workstation 2FUSION/MILAN COMPONENT LOCATION AND FUNCTION

Hybrid Vehicle Operation and Diagnosis TrainingHybrid Vehicle Operation and Diagnosis Training
Required EquipmentRequired Equipment
QTYQTY ITEMITEM 11 Vehicle on hoist Vehicle on hoist 1818 Tags Tags 22 Fender covers Fender covers 11 Long flat tipped screwdriver for releasing the rear seatLong flat tipped screwdriver for releasing the rear seat 11 Personal Computer with Training Service Publications DVDPersonal Computer with Training Service Publications DVD 22 Wheel chocksWheel chocks 11 Student Guide - Lesson One - Workstation 2 Worksheet Student Guide - Lesson One - Workstation 2 Worksheet
Lesson One Workstation 2FUSION/MILAN COMPONENT LOCATION AND FUNCTION

Hybrid Vehicle Operation and Diagnosis TrainingHybrid Vehicle Operation and Diagnosis Training
Lesson One Workstation 3High Voltage Safety Quiz
Instructor StrategyInstructor Strategy In this activity, students will look up safety procedures as described in the In this activity, students will look up safety procedures as described in the
student guide and service publications, and then answer related questions on student guide and service publications, and then answer related questions on the worksheet.the worksheet.
Students must enter their name at the top of the worksheet as this document Students must enter their name at the top of the worksheet as this document demonstrates they received safety training. demonstrates they received safety training.
Activity/Bug SetupActivity/Bug Setup Before class starts, install the following on the workstation PC:Before class starts, install the following on the workstation PC:
-- Training Service Publications DVD Training Service Publications DVD
-- Student Guide – Lesson One – Workstation 3 WorksheetStudent Guide – Lesson One – Workstation 3 Worksheet

Hybrid Vehicle Operation and Diagnosis TrainingHybrid Vehicle Operation and Diagnosis Training
Required EquipmentRequired Equipment PC on table PC on table Training Service Publications DVD Training Service Publications DVD Student Guide - Lesson One - Workstation 3 WorksheetStudent Guide - Lesson One - Workstation 3 Worksheet
Lesson One Workstation 3High Voltage Safety Quiz

Hybrid Vehicle Operation and Diagnosis TrainingHybrid Vehicle Operation and Diagnosis Training
Lesson One Workstation 4Escape/Mariner Hybrid Brake Service
Instructor StrategyInstructor Strategy For this workstations the students will use the PC to play the “Escape Brake For this workstations the students will use the PC to play the “Escape Brake
Service” video found on the instructor CD for this course . Additionally, Service” video found on the instructor CD for this course . Additionally, service publications will also have to be referenced.service publications will also have to be referenced.
The purpose of this activity is to allow students to view Escape Hybrid brake The purpose of this activity is to allow students to view Escape Hybrid brake service procedures on the hotline produced video. This will teach them the service procedures on the hotline produced video. This will teach them the unique aspects of Escape Hybrid brake service. unique aspects of Escape Hybrid brake service.
Instruct the students to NOT open any other files loaded on this computer at Instruct the students to NOT open any other files loaded on this computer at this time.this time.
Activity/Bug SetupActivity/Bug Setup Load the “Escape Brake Service” video on to the PC.Load the “Escape Brake Service” video on to the PC.

Hybrid Vehicle Operation and Diagnosis TrainingHybrid Vehicle Operation and Diagnosis Training
Required EquipmentRequired Equipment PC on table with speakers PC on table with speakers Training Service Publications DVD Training Service Publications DVD Student Guide - Lesson One - Workstation 4 WorksheetStudent Guide - Lesson One - Workstation 4 Worksheet
Lesson One Workstation 4Escape/Mariner Hybrid Brake Service
Hybrid Vehicle Operation and Diagnosis TrainingHybrid Vehicle Operation and Diagnosis Training
Instructor StrategyInstructor Strategy Using the IDS and the service publications, students will diagnose and repair Using the IDS and the service publications, students will diagnose and repair
a No Charging concern on a 2010 Fusion/Milan Hybrid. This is caused by a a No Charging concern on a 2010 Fusion/Milan Hybrid. This is caused by a blown High-Voltage Low-Current (HV-LC) fuse. DTC P0AFA:16 will be blown High-Voltage Low-Current (HV-LC) fuse. DTC P0AFA:16 will be diagnosed.diagnosed.
This activity is designed to provide the students with hands-on practice This activity is designed to provide the students with hands-on practice diagnosing and servicing the HV system.diagnosing and servicing the HV system.
Activity/Bug SetupActivity/Bug Setup For this activity the install the damaged HV-LC fuse.For this activity the install the damaged HV-LC fuse. This will require that the students to remove and replace the fuse to correct the This will require that the students to remove and replace the fuse to correct the
source of the fault.source of the fault. See Bug Setup section of this PowerPoint for additional information.See Bug Setup section of this PowerPoint for additional information.
Lesson One Workstation 5Fusion/Milan High Voltage Service

Hybrid Vehicle Operation and Diagnosis TrainingHybrid Vehicle Operation and Diagnosis Training
Lesson One Workstation 5Fusion/Milan High Voltage Service
Required EquipmentRequired Equipment
QTYQTY ITEMITEM 11 105-00R57 Digital Multi-Meter (A)105-00R57 Digital Multi-Meter (A) 11 Blown High-Voltage Low- Current Fuse (B)Blown High-Voltage Low- Current Fuse (B) 11 1/4” Rachet with extension (C)1/4” Rachet with extension (C) 11 13 mm socket (D)13 mm socket (D) 11 10 mm socket (E)10 mm socket (E) 11 T35 Torx socket (F)T35 Torx socket (F) 11 1/4” Lb.- In. torque wrench (G)1/4” Lb.- In. torque wrench (G) 11 Long flat tip screwdriver (H)Long flat tip screwdriver (H)

Hybrid Vehicle Operation and Diagnosis TrainingHybrid Vehicle Operation and Diagnosis Training
Lesson One Workstation 6Hybrid Diagnostic Procedures
Instructor StrategyInstructor Strategy This is a 2 part activity. In part 1 of this activity the students will view the IDS recording This is a 2 part activity. In part 1 of this activity the students will view the IDS recording
and interpret the Datalogger readings to answer a series of questions. In part 2 of this and interpret the Datalogger readings to answer a series of questions. In part 2 of this activity, students will look up data and procedures in the service publications, and answer activity, students will look up data and procedures in the service publications, and answer related questions on the worksheet. related questions on the worksheet.
Remind students that some publications change from year to year and model to model. Remind students that some publications change from year to year and model to model. Always consult the Service Publications for the correct model year and vehicle being Always consult the Service Publications for the correct model year and vehicle being serviced.serviced.
Instruct the students to NOT open any other files loaded on this computer at this time.Instruct the students to NOT open any other files loaded on this computer at this time.
Activity/Bug SetupActivity/Bug Setup Before class starts, install the following on the workstation PC:Before class starts, install the following on the workstation PC: Training Service Publications DVDTraining Service Publications DVD Zip folder: IDS_SessionArchive1.zipZip folder: IDS_SessionArchive1.zip Zip folder: L2 WKS 3. zipZip folder: L2 WKS 3. zip IDS Version 60 or newerIDS Version 60 or newer

Hybrid Vehicle Operation and Diagnosis TrainingHybrid Vehicle Operation and Diagnosis Training
Required EquipmentRequired Equipment PC on table PC on table Training Service Publications DVD Training Service Publications DVD Student Guide - Lesson One - Workstation 6 WorksheetStudent Guide - Lesson One - Workstation 6 Worksheet
Lesson One Workstation 6Hybrid Diagnostic Procedures

Hybrid Vehicle Operation and Diagnosis TrainingHybrid Vehicle Operation and Diagnosis Training
Lesson Two DemonstrationHybrid Vehicle Diagnostics
Instructor StrategyInstructor Strategy
This demonstration teaches the students:This demonstration teaches the students: Interactive DiagnosticsInteractive Diagnostics Engine Running/Cranking Diagnosis ModeEngine Running/Cranking Diagnosis Mode
To perform the interactive diagnostic portion of the demonstration:To perform the interactive diagnostic portion of the demonstration: Connect a web-enabled Instructor PC to the overhead projector. Go to the PTS Connect a web-enabled Instructor PC to the overhead projector. Go to the PTS
website. Under the training tab select the Steering Systems Theory and website. Under the training tab select the Steering Systems Theory and Operation Web Course 33S12W1.Operation Web Course 33S12W1.

Hybrid Vehicle Operation and Diagnosis TrainingHybrid Vehicle Operation and Diagnosis Training
Lesson Two DemonstrationHybrid Vehicle Diagnostics
Instructor Strategy (continued)Instructor Strategy (continued) Select the Electronic Power Steering (EPAS) lesson. Then select the EPAS Interactive Select the Electronic Power Steering (EPAS) lesson. Then select the EPAS Interactive
Diagnostics subtopic.Diagnostics subtopic. Then, review the web course addressing the questions on the Student Worksheet.Then, review the web course addressing the questions on the Student Worksheet. For more details on the operation of Interactive Diagnostics refer to the Steering For more details on the operation of Interactive Diagnostics refer to the Steering
Systems Theory and Operation Web Course 33S12W1 and the service publications.Systems Theory and Operation Web Course 33S12W1 and the service publications. If web access is not available at your location, an alternative method of presenting the If web access is not available at your location, an alternative method of presenting the
interactive diagnostics demonstration is to show the PowerPoint review of the student interactive diagnostics demonstration is to show the PowerPoint review of the student worksheet while reviewing the answers with the students as a class.worksheet while reviewing the answers with the students as a class.
To perform the Engine Running/Cranking Diagnosis Mode:To perform the Engine Running/Cranking Diagnosis Mode: Gather the students at the classroom vehicle and use the directions on the student Gather the students at the classroom vehicle and use the directions on the student
worksheet to place the vehicle in the Engine Running/Cranking Diagnosis Modes.worksheet to place the vehicle in the Engine Running/Cranking Diagnosis Modes.

Hybrid Vehicle Operation and Diagnosis TrainingHybrid Vehicle Operation and Diagnosis Training
Instructor Strategy (continued)Instructor Strategy (continued)
Activity/Bug SetupActivity/Bug Setup NoneNone
Required EquipmentRequired Equipment Fusion/Milan Hybrid classroom vehicleFusion/Milan Hybrid classroom vehicle Computer with connection to PTS website.Computer with connection to PTS website. Lesson Two - Demonstration WorksheetLesson Two - Demonstration Worksheet
Instructor Action Upon Completion of Demonstration:Instructor Action Upon Completion of Demonstration: Give the students a break, and then set up Lesson Two - Workstation 2 by Give the students a break, and then set up Lesson Two - Workstation 2 by
placing the micro-switch for the bug into the open position.placing the micro-switch for the bug into the open position.
Lesson Two DemonstrationHybrid Vehicle Diagnostics

Hybrid Vehicle Operation and Diagnosis TrainingHybrid Vehicle Operation and Diagnosis Training
Lesson Two Workstation 1IDS Hybrid Diagnosis
Instructor StrategyInstructor Strategy This is a 2 part activity. In part 1 of this activity the students will view the IDS recording This is a 2 part activity. In part 1 of this activity the students will view the IDS recording
and interpret the Datalogger readings to answer a series of questions about voltage leakage. and interpret the Datalogger readings to answer a series of questions about voltage leakage. In part 2 of this activity the students will view the IDS recording and interpret the In part 2 of this activity the students will view the IDS recording and interpret the Datalogger readings to answer a series of questions about HVBP voltage. In both parts Datalogger readings to answer a series of questions about HVBP voltage. In both parts students will look up data and procedures in the service publications, and answer related students will look up data and procedures in the service publications, and answer related questions on the worksheet. questions on the worksheet.
Remind students that some publications change from year to year and model to model. Remind students that some publications change from year to year and model to model. Always consult the Service Publications for the correct model year and vehicle being Always consult the Service Publications for the correct model year and vehicle being serviced.serviced.
Activity/Bug SetupActivity/Bug Setup
Before class starts, install the following on the workstation PC:Before class starts, install the following on the workstation PC: Training Service Publications DVDTraining Service Publications DVD Zip folder: IDS_SessionArchive1.zipZip folder: IDS_SessionArchive1.zip Zip folder: L2 WKS 3. zipZip folder: L2 WKS 3. zip IDS Version 60 or newerIDS Version 60 or newer

Hybrid Vehicle Operation and Diagnosis TrainingHybrid Vehicle Operation and Diagnosis Training
Required EquipmentRequired Equipment PC on table PC on table Training Service Publications DVD Training Service Publications DVD Student Guide – Lesson Two - Workstation 2 WorksheetStudent Guide – Lesson Two - Workstation 2 Worksheet
Lesson Two Workstation 1IDS Hybrid Diagnosis

Hybrid Vehicle Operation and Diagnosis TrainingHybrid Vehicle Operation and Diagnosis Training
Instructor StrategyInstructor Strategy The purpose of this activity is for students to become familiar with performing The purpose of this activity is for students to become familiar with performing
high voltage diagnostic and service procedures on hybrid vehicles.high voltage diagnostic and service procedures on hybrid vehicles.
Activity/Bug SetupActivity/Bug Setup After completion of the Demonstration, have the students take a break out of After completion of the Demonstration, have the students take a break out of
the classroom.the classroom. Flip the previously installed micro-switch to open circuit J1-A61Flip the previously installed micro-switch to open circuit J1-A61
Lesson Two Workstation 2High Voltage System Diagnosis

Hybrid Vehicle Operation and Diagnosis TrainingHybrid Vehicle Operation and Diagnosis Training
Lesson Two Workstation 2High Voltage System Diagnosis
Required EquipmentRequired Equipment
QTYQTY ITEMITEM 11 105-00R57 Digital Multi-Meter (A)105-00R57 Digital Multi-Meter (A) 11 IDS (B)IDS (B) 11 Long flat tip screwdriver (C)Long flat tip screwdriver (C) 11 Set 300-08040 .060 Female Flex Probes for DVOM leads (D)Set 300-08040 .060 Female Flex Probes for DVOM leads (D) 11 Set 300-08045 .064 Male Flex Probes for DVOM leads (E)Set 300-08045 .064 Male Flex Probes for DVOM leads (E)

Hybrid Vehicle Operation and Diagnosis TrainingHybrid Vehicle Operation and Diagnosis Training
Lesson Two Workstation 3Hybrid Diagnostic Procedures
Instructor StrategyInstructor Strategy This is a 2 part activity. In part 1 of this activity the students will view the IDS recording This is a 2 part activity. In part 1 of this activity the students will view the IDS recording
and interpret the Datalogger readings to answer a series of questions. In part 2 of this and interpret the Datalogger readings to answer a series of questions. In part 2 of this activity, students will look up data and procedures in the service publications, and answer activity, students will look up data and procedures in the service publications, and answer related questions on the worksheet. related questions on the worksheet.
Remind students that some publications change from year to year and model to model. Remind students that some publications change from year to year and model to model. Always consult the Service Publications for the correct model year and vehicle being Always consult the Service Publications for the correct model year and vehicle being serviced.serviced.
Instruct the students to NOT open any other files loaded on this computer at this time.Instruct the students to NOT open any other files loaded on this computer at this time.
Activity/Bug SetupActivity/Bug Setup
Before class starts, install the following on the workstation PC:Before class starts, install the following on the workstation PC: Training Service Publications DVDTraining Service Publications DVD Zip folder: IDS_SessionArchive1.zipZip folder: IDS_SessionArchive1.zip Zip folder: L2 WKS 3. zipZip folder: L2 WKS 3. zip IDS Version 60 or newerIDS Version 60 or newer

Hybrid Vehicle Operation and Diagnosis TrainingHybrid Vehicle Operation and Diagnosis Training
Required EquipmentRequired Equipment PC on table PC on table Training Service Publications DVD Training Service Publications DVD Student Guide – Lesson Two - Workstation 2 WorksheetStudent Guide – Lesson Two - Workstation 2 Worksheet
Lesson Two Workstation 3Hybrid Diagnostic Procedures

Hybrid Vehicle Operation and Diagnosis TrainingHybrid Vehicle Operation and Diagnosis Training
Post Test
Hybrid Vehicle Operation and Diagnosis TrainingHybrid Vehicle Operation and Diagnosis Training
Post TestInstructor StrategyInstructor Strategy The purpose of this activity is for students to prove out their understanding of hybrid vehicle operation and demonstrate their ability to diagnose a hybrid vehicle concern. The exam is performed at two workstations: at their seats and on the classroom vehicle.The purpose of this activity is for students to prove out their understanding of hybrid vehicle operation and demonstrate their ability to diagnose a hybrid vehicle concern. The exam is performed at two workstations: at their seats and on the classroom vehicle.
Activity/Bug SetupActivity/Bug Setup
Prior to class:Prior to class: Make one copy of the HANDS-ON POST TEST worksheet for each student from the “Replication” section of this Instructor Guide.Make one copy of the HANDS-ON POST TEST worksheet for each student from the “Replication” section of this Instructor Guide. Make one copy of the WRITTEN POST TEST ANSWER SHEET for each student from the “Replication” section of this Instructor Guide.Make one copy of the WRITTEN POST TEST ANSWER SHEET for each student from the “Replication” section of this Instructor Guide. Make the following copies of the WRITTEN POST TEST from the “Replication” section of this Instructor Guide:Make the following copies of the WRITTEN POST TEST from the “Replication” section of this Instructor Guide:
– Written Post-Test A for approximately one-third of the classWritten Post-Test A for approximately one-third of the class– Written Post-Test B for approximately one-third of the classWritten Post-Test B for approximately one-third of the class– Written Post-Test C for approximately one-third of the classWritten Post-Test C for approximately one-third of the class
AFTER DAY TWO WORKSTATIONS (DURING LUNCH OF DAY 2):AFTER DAY TWO WORKSTATIONS (DURING LUNCH OF DAY 2): Remove HV service connector from vehicleRemove HV service connector from vehicle Close rear seat of classroom vehicle over HVBPClose rear seat of classroom vehicle over HVBP Clear DTCs and perform a KOEO test. Verify P0B37:00 now appears.Clear DTCs and perform a KOEO test. Verify P0B37:00 now appears.