HW550-3G Generic User Manual ver1.4 for FCC -...
50
HW550-3G 3G Mobile Broadband plus 4-Port Wireless-N Router
Transcript of HW550-3G Generic User Manual ver1.4 for FCC -...
HW550-3G
3G Mobile Broadband plus 4-Port Wireless-N Router

User Manual v1.1
Page 2 of 50
Table of Contents
About the Product ..........................................................................................................................4 Features...........................................................................................................................................5 Requirements .................................................................................................................................6 Package Content.............................................................................................................................7 Device Design .................................................................................................................................8 Getting Started .............................................................................................................................11
Plan Your Network...........................................................................................................12
Remove or Disable Conflicts...........................................................................................13
Installing your Router......................................................................................................14
Connecting to the Internet .............................................................................................15
WiFi Protected Setup (WPS) ...........................................................................................19
Connect/Disconnect Button ...........................................................................................20 About the Web User Interface ....................................................................................................21 Basic Mode....................................................................................................................................22
Home.................................................................................................................................22
Storage.........................................................................................................................22
Printer...........................................................................................................................23
Wizard ...............................................................................................................................33
Quick Setup.......................................................................................................................36 Advanced Page.............................................................................................................................38
Network ............................................................................................................................38
Local .............................................................................................................................38
Internet ........................................................................................................................39
Wireless.............................................................................................................................41
Settings ........................................................................................................................41
Security ........................................................................................................................42
Applications ......................................................................................................................43
Port forwarding...........................................................................................................43
DMZ...............................................................................................................................43
Filtering ........................................................................................................................44
DDNS (Dynamic DNS) .................................................................................................45
System ..............................................................................................................................46
System Information....................................................................................................46
Settings ........................................................................................................................46
Firmware Upgrade......................................................................................................47
User Manual v1.1
Page 3 of 50
Reboot..........................................................................................................................47
Password......................................................................................................................48 Regulatory Compliance Notices..................................................................................................49

User Manual v1.1
Page 4 of 50
About the Product
� AZTECH HW550-3G is an IEEE802.11n wireless broadband Router with EVDO\HSDPA\HSUPA support.
Simply plug in the USB 3.5G or USB EVDO Modem to the Router, an Internet connection can be
accessed and shared virtually anytime anywhere within a wireless broadband network.
� 4-Port Wireless-N Broadband Router to Share Wireless Internet Connection with more users.
HW550-3G also integrates router function so that Internet can be accessed through WIFI connection
simultaneously. HW550-3G 4-port wireless-N router function provides an excellent solution for sharing
a wireless Internet connection and files such as High Definition (HD) video, music, photos and
documents with the wireless speed up to 300Mbps.
� Advanced Wireless Security
AZTECH HW550-3G creates a secure WiFi® network by supporting the latest wireless security features
to prevent unauthorized access. It supports for 64/128-bit WEP, WPA, and WPA2 to ensure that you
will be able to secure your WiFi network, regardless of your client devices. In addition, the 3G Mobile
Router utilizes dual active firewalls (SPI and NAT) to prevent potential attacks from across the Internet.
� Wide Wireless Coverage
The product integrates 2x2 (2 transmit and 2 receive) antennas. This MIMO technology overlay the
signals of multiple radios, which successfully reduce “dead spots”, increase throughput and increase
wireless coverage range.
� Easy to install and Use
By connecting an EVDO or 3.5G modem into the USB port of HW550-3G, Internet access can be
accessed and shared virtually anywhere within a wire or wireless broadband network. You can also
directly connect Ethernet-based devices to its built-in 4-port full-duplex 10/100 switch.
User Manual v1.1
Page 5 of 50
Features
� 2-in-1 dual function Router - HSPA support for 3G mobile broadband plus 4-port wireless N router
� Support EVDO/HSDPA/HSUPA USB modem connection - to offer a network connection with full
mobility
� Converts single user EVDO/3G USB modem into a multiple users ready WiFi Router - to share the
mobile Internet connection with your family, friends and colleagues
� Support IEEE802.11b/g and 11n (draft 2.0) wireless standard - data transfer rate reaches up to
300Mbps
� Support WAN Port and 4-Port 10/100M Ethernet - dual way connections to DSL/Cable modem for
Internet access
� Support for 64/128-bit WEP, WPA, and WPA2 - ensure secure WiFi network, and prevent
unauthorized access
� Support WiFi Protected Setup - reduce by half the user steps to configure a network
� Adopt 2x2 MIMO technology - increase throughput and increase wireless coverage range
� Detachable Antennas - allows flexible gain performance antennas.

User Manual v1.1
Page 6 of 50
Requirements
Your computer must meet the following minimum requirements.
� Internet Explorer 7 or Mozilla 3.0.5
� CD-ROM Drive
� Ethernet network adapter

User Manual v1.1
Page 7 of 50
Package Content
The package should contain the following items:
• HW550-3G
• CD Content
• 12.0V, 1A Power Adapter (Model SWM11-12120)
• Easy Start Guide
If any of the items is missing please contact the dealer from whom the equipment was purchased.
User Manual v1.1
Page 8 of 50
Device Design
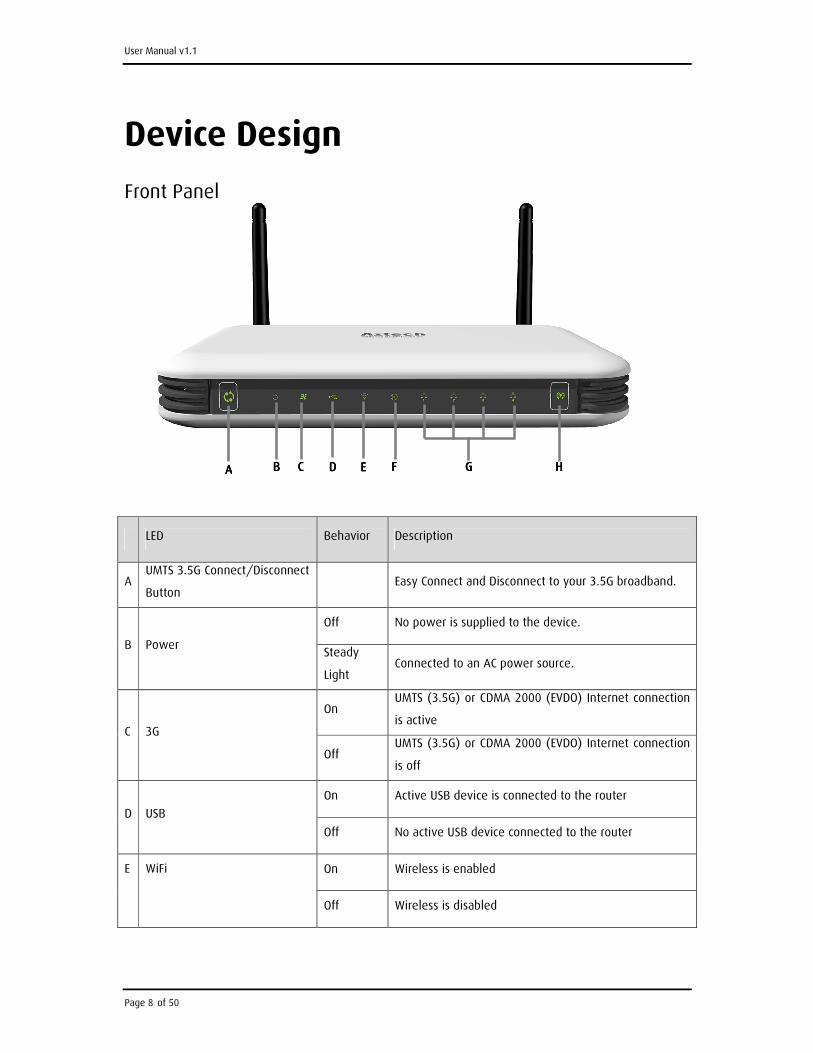
Front Panel
LED Behavior Description
A UMTS 3.5G Connect/Disconnect
Button Easy Connect and Disconnect to your 3.5G broadband.
Off No power is supplied to the device.
B Power Steady
Light Connected to an AC power source.
On UMTS (3.5G) or CDMA 2000 (EVDO) Internet connection
is active C 3G
Off UMTS (3.5G) or CDMA 2000 (EVDO) Internet connection
is off
On Active USB device is connected to the router
D USB
Off No active USB device connected to the router
On Wireless is enabled E WiFi
Off Wireless is disabled
AAAA BBBB CCCC DDDD EEEE FFFF GGGG HHHH

User Manual v1.1
Page 9 of 50
Blinking Transmitting/Receiving data wirelessly
On Connected to a Modem
F WAN
Off No Modem connection
On Connected to an Active Ethernet Device
Off No Ethernet Connection G Ethernet 1-4
Blinking Transmitting/Receiving Data
H WPS
Press for two seconds (or until the LED blinks) to start
WPS pairing.
Wireless client must be WPS-enabled and must be
pressed within 2 minutes.
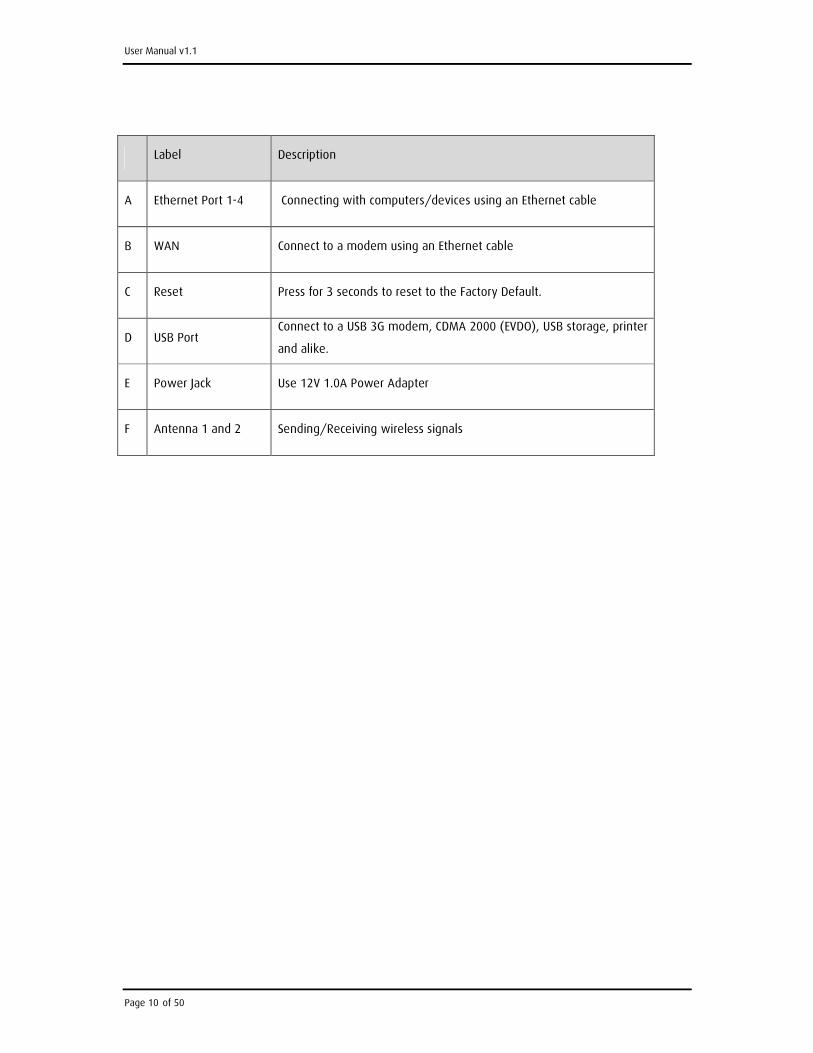
Back Panel
AAAA
BBBB CCCC DDDD EEEE
FFFF
FFFF
User Manual v1.1
Page 10 of 50
Label Description
A Ethernet Port 1-4 Connecting with computers/devices using an Ethernet cable
B WAN Connect to a modem using an Ethernet cable
C Reset Press for 3 seconds to reset to the Factory Default.
D USB Port Connect to a USB 3G modem, CDMA 2000 (EVDO), USB storage, printer
and alike.
E Power Jack Use 12V 1.0A Power Adapter
F Antenna 1 and 2 Sending/Receiving wireless signals
User Manual v1.1
Page 11 of 50
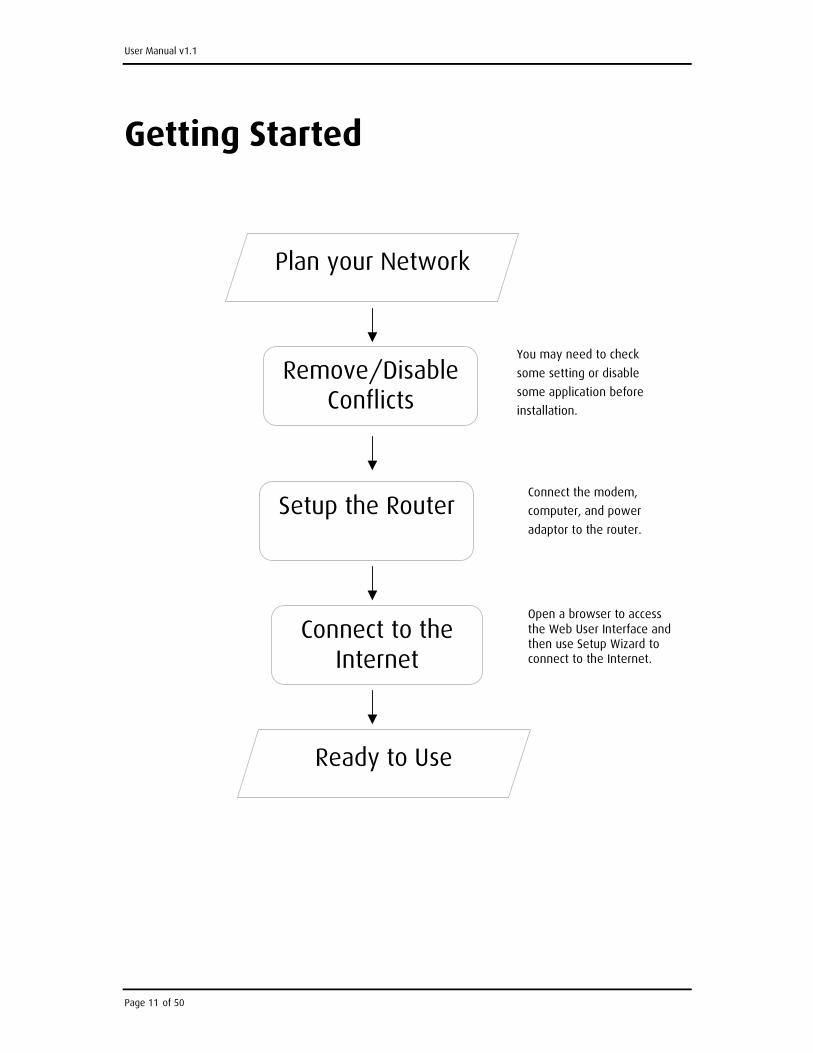
Getting Started
Plan your Network
Remove/Disable Conflicts
Setup the Router
Connect to the Internet
Ready to Use
You may need to check
some setting or disable
some application before
installation.
Connect the modem,
computer, and power
adaptor to the router.
Open a browser to access the Web User Interface and then use Setup Wizard to connect to the Internet.
User Manual v1.1
Page 12 of 50
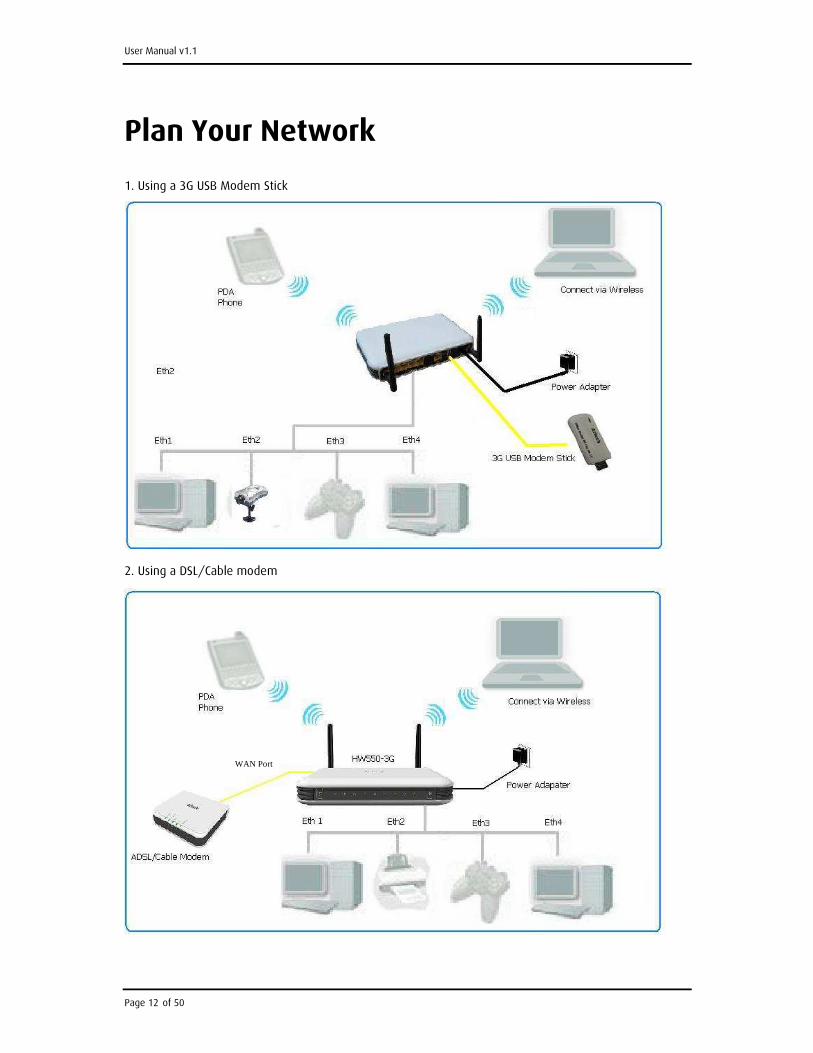
Plan Your Network 1. Using a 3G USB Modem Stick
2. Using a DSL/Cable modem
WAN Port

User Manual v1.1
Page 13 of 50
Remove or Disable Conflicts
To make sure the router installation moves on smoothly, you need to remove or disable conflicts that may
interfere the installation. Probable conflicts may include:
• Internet sharing applications
• Proxy software
• Security software
• TCP/IP settings
• Internet properties
• Temporary Internet files
Internet Sharing, Proxy, and Security Applications
Internet sharing, proxy software, and firewall applications may interfere with the router installation. These
should be removed or disabled before start the installation.
If you have any of the following or similar applications installed on your computer, remove or disable them
according to the manufacturer’s instructions.
Internet Sharing Applications Proxy Software Security Software
Microsoft Internet Sharing WinGate Symantec
WinProxy Zone Alarm
Configuring the TCP/IP Settings
Check if your computer uses default TCP/IP Settings
To check the TCP/IP properties:
1. Click the Start button, and then click Run. This opens the Run dialog box.
2. Type in ncpa.cpl, and then click OK. This opens the Network Connections in your computer.
3. Right-click LAN, and then select Properties. This opens the Local Area Connection Properties dialog box.
4. Select Internet Protocol (TCP/IP), and then click Properties. This opens the Internet Protocol (TCP/IP)
dialog box.
5. Select Obtain an IP address automatically.
6. To close the Internet Protocol (TCP/IP) dialog box, click OK.

User Manual v1.1
Page 14 of 50
7. To close the Local Area Connection Properties dialog box, click OK.
Configuring Internet Properties
To set the Internet Properties:
1. Click the Start button, and then click Run. This opens the Run dialog box.
2. Type in inetcpl.cpl, and then click Ok. This opens the Internet Properties.
3. Click the Connections Tab.
4. In Dial-up and Virtual Private Network settings, select Never dial a connection.
5. Click Ok the button to close the Internet Properties.
Removing Temporary Internet Files
Temporary Internet files are files from Web sites that are stored in your computer. Delete these files to
clean the cache and remove footprints left by the Web pages you visited.
To remove temporary Internet files:
1. Click the Start button, and then click Run. This opens the Run dialog box.
2. Type control, and then click OK. This opens Control Panel.
3. Double-click Internet Options. This opens Internet Options.
4. In the Temporary Internet Files pane, click Delete Cookies.
5. Click Delete Files.
6. To close Internet Properties, click OK.
Installing your Router Mobile Broadband
If you choose to use a Mobile Broadband you are required to have the following:
� USB 3G Modem or USB EVDO Modem
� Broadband data SIM card for USB 3G Modem
1. Plug in your USB 3G Modem (ensure Broadband SIM card is inside) or USB EVDO Modem on your
router’s USB port.
2. Connect the power cable to the router’s power jack and plug it in to the wall socket.
3. Connect your PC to any available Ethernet port using an Ethernet cable or connect via wireless.

User Manual v1.1
Page 15 of 50
Using a DSL or Cable Modem
If you choose to use a DSL or Cable modem you are required to have the following:
� DSL or Cable modem
� Active Internet Account
1. Connect your DSL or Cable modem to the router’s WAN port using an Ethernet cable.
2. Connect the power cable to the router’s power jack and plug it in to the wall socket.
3. Connect your PC to any of available Ethernet port using an Ethernet cable or connect via wireless.
Note:Note:Note:Note: Ensure that the router’s IP address does not conflict with the DSL/Cable modem. Please refer to your
modem’s User Manual on how to change the LAN IP address.
Connecting to the Internet
To Connect to the Internet via the Web User Interface:
1. Open your Internet web browser.
2. Type http://192.168.2.1 in the address bar and press enter. This opens the login authentication page.
3. Type your Username and Password. Your default Username and Password is admin/admin.
4. Click the Wizard Tab then Follow the step-by-step guide on how to setup the router.
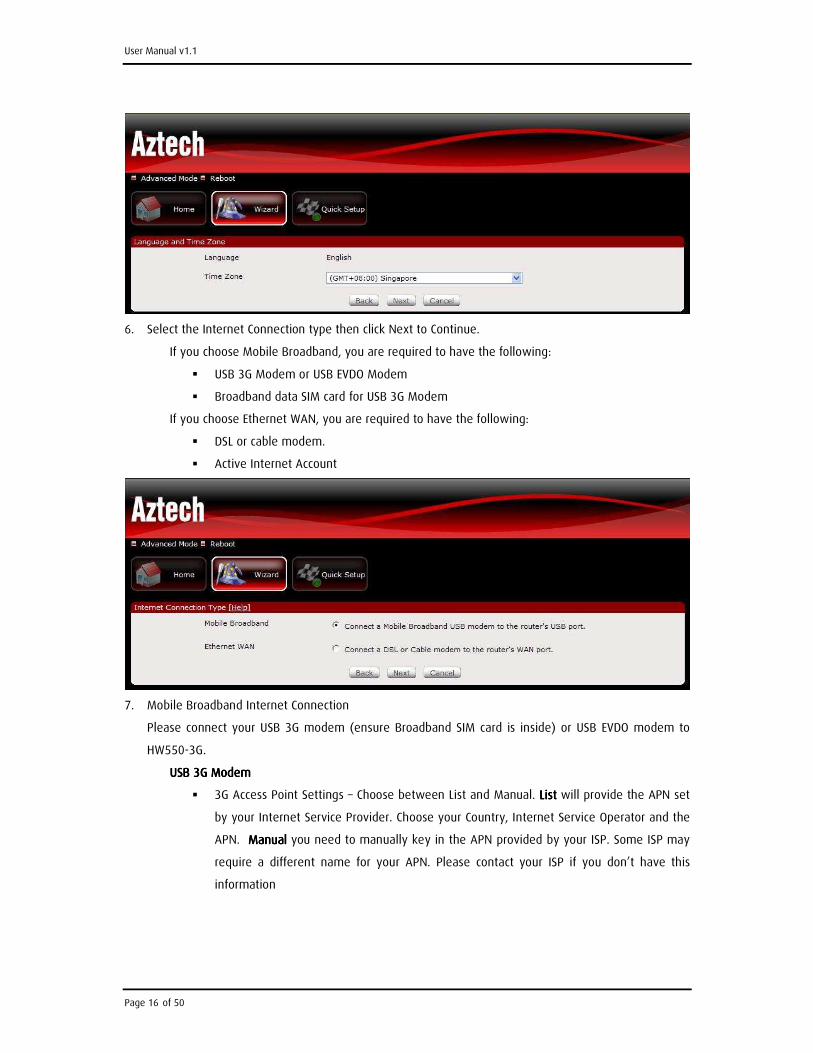
5. Select the Language and Time zone from the drop down box then click Next to continue.
User Manual v1.1
Page 16 of 50
6. Select the Internet Connection type then click Next to Continue.
If you choose Mobile Broadband, you are required to have the following:
� USB 3G Modem or USB EVDO Modem
� Broadband data SIM card for USB 3G Modem
If you choose Ethernet WAN, you are required to have the following:
� DSL or cable modem.
� Active Internet Account
7. Mobile Broadband Internet Connection
Please connect your USB 3G modem (ensure Broadband SIM card is inside) or USB EVDO modem to
HW550-3G.
USB 3G ModemUSB 3G ModemUSB 3G ModemUSB 3G Modem
� 3G Access Point Settings – Choose between List and Manual. ListListListList will provide the APN set
by your Internet Service Provider. Choose your Country, Internet Service Operator and the
APN. ManualManualManualManual you need to manually key in the APN provided by your ISP. Some ISP may
require a different name for your APN. Please contact your ISP if you don’t have this
information

User Manual v1.1
Page 17 of 50
USB EVDO ModemUSB EVDO ModemUSB EVDO ModemUSB EVDO Modem
� Username and Password – Some ISP may require a Username and Password set by the
Operators. Please contact your ISP if you don’t have this information
Choose yourChoose yourChoose yourChoose your preferred Connection Method preferred Connection Method preferred Connection Method preferred Connection Method
� Connect Manually – This connection method requires you to manually press the ‘Connect’
button each time Internet connection is required. Please note that the Internet connection
will not be disconnected unless you manually press the ‘Disconnect’ button.
� Always connected – This connection method allows your Internet connection to be always
ON. You need to manually press the ‘Disconnect’ button when Internet connection is not
required.
� Dial on Demand- This connection allows you to set your router to automatically
disconnect/connect back to the Internet when the router is on idle.
8. Ethernet WAN Connection
Please connect your DSL or Cable modem to HW550-3G WAN port using an Ethernet cable, make sure
that you have an active Internet account.
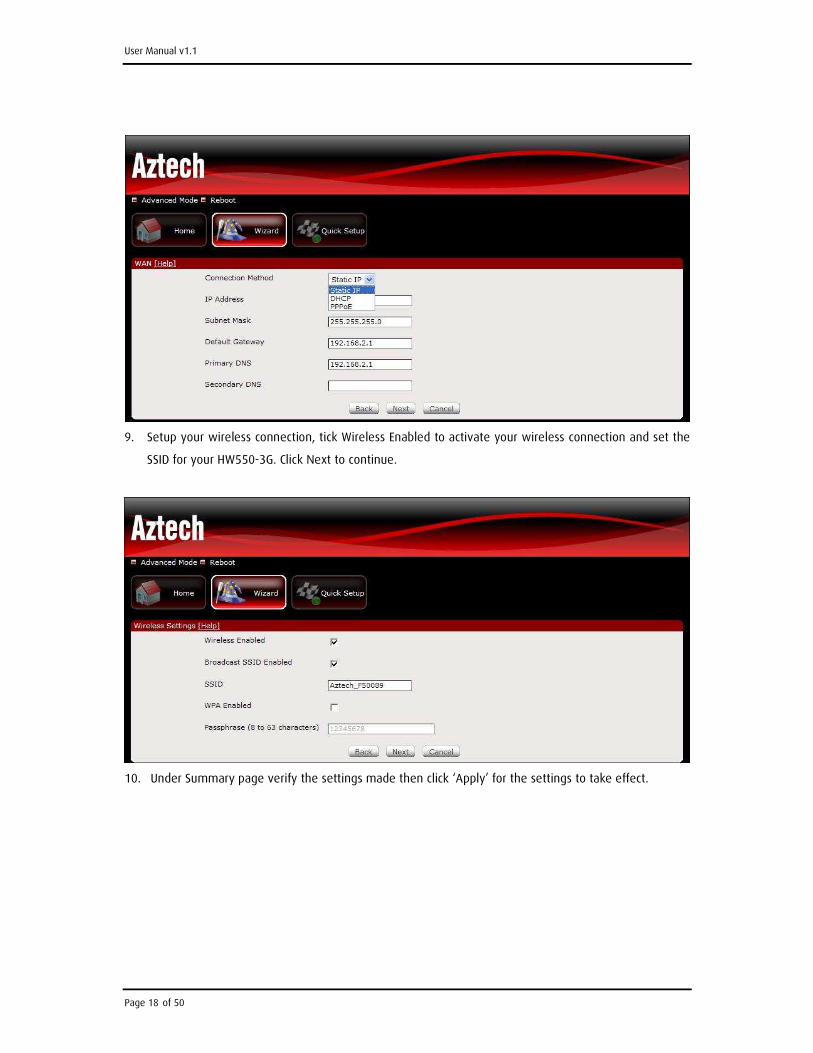
Connection Type
� Static IP – select this if your ISP provides you the IP address, Subnet mask, Gateway and
DNS server addresses.
� DHCP - if you select this your HW550-3G will automatically get an IP address from the
DHCP server or from your ISP.
� PPPoE – select this if your ISP provides you the Username and Password for you to connect
to the Internet.
User Manual v1.1
Page 18 of 50
9. Setup your wireless connection, tick Wireless Enabled to activate your wireless connection and set the
SSID for your HW550-3G. Click Next to continue.
10. Under Summary page verify the settings made then click ‘Apply’ for the settings to take effect.

User Manual v1.1
Page 19 of 50
WiFi Protected Setup (WPS)
WPS button allows you to activate WiFi Protected Setup (WPS). When you press the WPS button it
automatically detects and connects wireless clients into the wireless network by broadcasting the wireless
network settings from your Access Point to you wireless device/s.
To setup WPS:
1. Login to the router’s WEB UI to Enable WPS option.
2. On your WEB browser type 192.168.2.1, use admin/admin on the authentication login page.
3. Go to Advanced Mode> Wireless> Security> choose Enable on the WPS Enable drop down box then
click Apply.
4. Press the WPS button on the router for two seconds, or until the LED blinks
5. Within 2 minutes, press the WPS button on the Wireless Client.
Note:Note:Note:Note: WPS can only be used with wireless client devices that have a compatible WPS component.

User Manual v1.1
Page 20 of 50
Connect/Disconnect Button
Connect/Disconnect button allows you to connect/disconnect to the Internet using your 3.5G mobile
broadband.
To Setup Connect/Disconnect Button:
1. Press the Connect/Disconnect button for 2 seconds to change the current status of your 3.5G
mobile broadband Internet connection.
Note:Note:Note:Note: This button only applies for UMTS 3.5G Internet Connection type.

User Manual v1.1
Page 21 of 50
About the Web User Interface
To Access the Web User Interface
When you router is already setup open your Web Browser and on the Address bar type in
http://192.168.2.1
Username: adminadminadminadmin
Password: adminadminadminadmin
The WEB GUI includes the following settings for your router:
• Basic Mode
o Home Page
o Installation Wizard
o Quick Setup
• Advanced Mode
o Networking
o Wireless
o Application
o System
User Manual v1.1
Page 22 of 50
Basic Mode
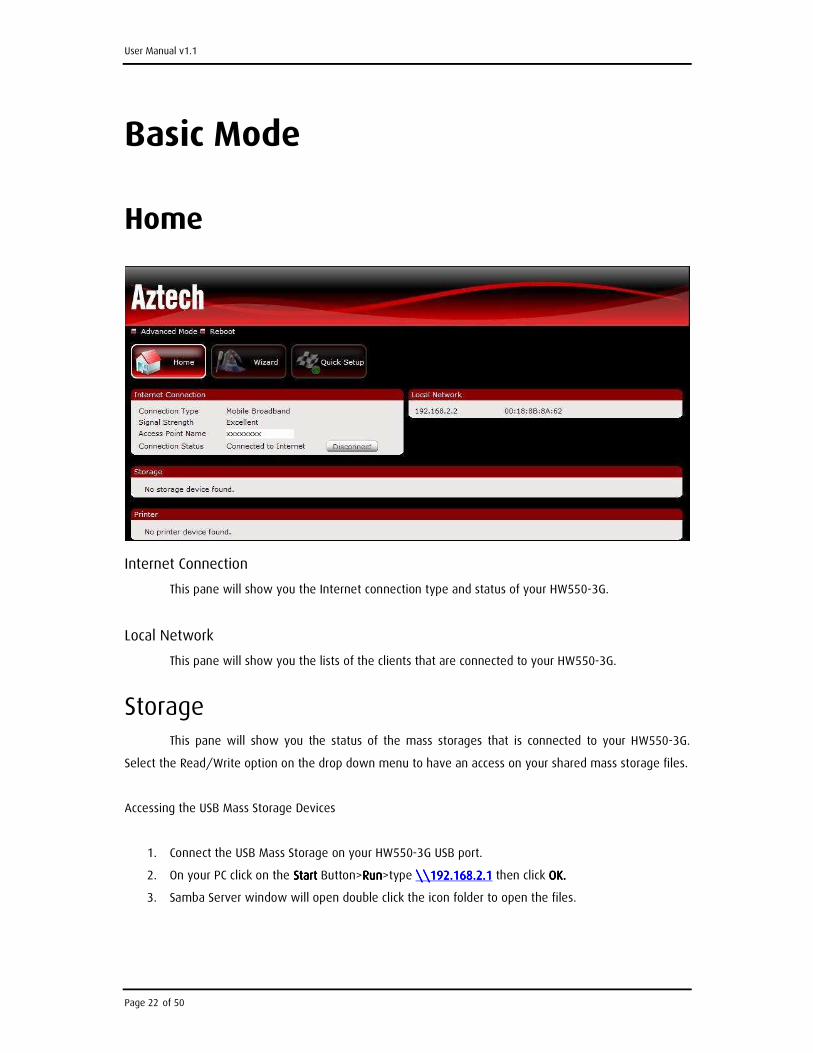
Home
Internet Connection
This pane will show you the Internet connection type and status of your HW550-3G.
Local Network
This pane will show you the lists of the clients that are connected to your HW550-3G.
Storage This pane will show you the status of the mass storages that is connected to your HW550-3G.
Select the Read/Write option on the drop down menu to have an access on your shared mass storage files.
Accessing the USB Mass Storage Devices
1. Connect the USB Mass Storage on your HW550-3G USB port.
2. On your PC click on the Start Start Start Start Button>RunRunRunRun>type \\\\\\\\192.168.2.1192.168.2.1192.168.2.1192.168.2.1 then click OK.OK.OK.OK.
3. Samba Server window will open double click the icon folder to open the files.

User Manual v1.1
Page 23 of 50
Printer This pane will show you the printer that is connected to your HW550-3G.
Print Server
To use the print server on the HW550-3G, you need to accomplish the following tasks:
1. Install the printer drivers on the computer
2. Connect the printer to your HW550-3G.
3. Add a network printer
INSTALL THE PRINTER DRIVERS
Printers using the USB port come with a software installation CD for installing the printer drivers
and applications. The drivers for the printers must be installed on the computer first to prepare it to use the
printer when it’s connected to the HW550-3G. Refer to the printer’s documentation on how to install the
drivers.
ADD A NETWORK PRINTER
FOR WINDOWS XP
Before you continue, ensure that you have installed the printer’s driver on this computer and the
printer is attached to the HW550-3G.
1. Click on the Start ButtonStart ButtonStart ButtonStart Button > Control PanelControl PanelControl PanelControl Panel > Printers and Other Hardware Printers and Other Hardware Printers and Other Hardware Printers and Other Hardware > Printers and Faxes Printers and Faxes Printers and Faxes Printers and Faxes.

User Manual v1.1
Page 24 of 50
2. Click on the File MenuFile MenuFile MenuFile Menu > Add PrinterAdd PrinterAdd PrinterAdd Printer.
3. Click on NextNextNextNext on the Add Printer Wizard page.
4. Choose Local Printer attached to this computer Local Printer attached to this computer Local Printer attached to this computer Local Printer attached to this computer and click NextNextNextNext, on the Local or Network Printer
page.
User Manual v1.1
Page 25 of 50
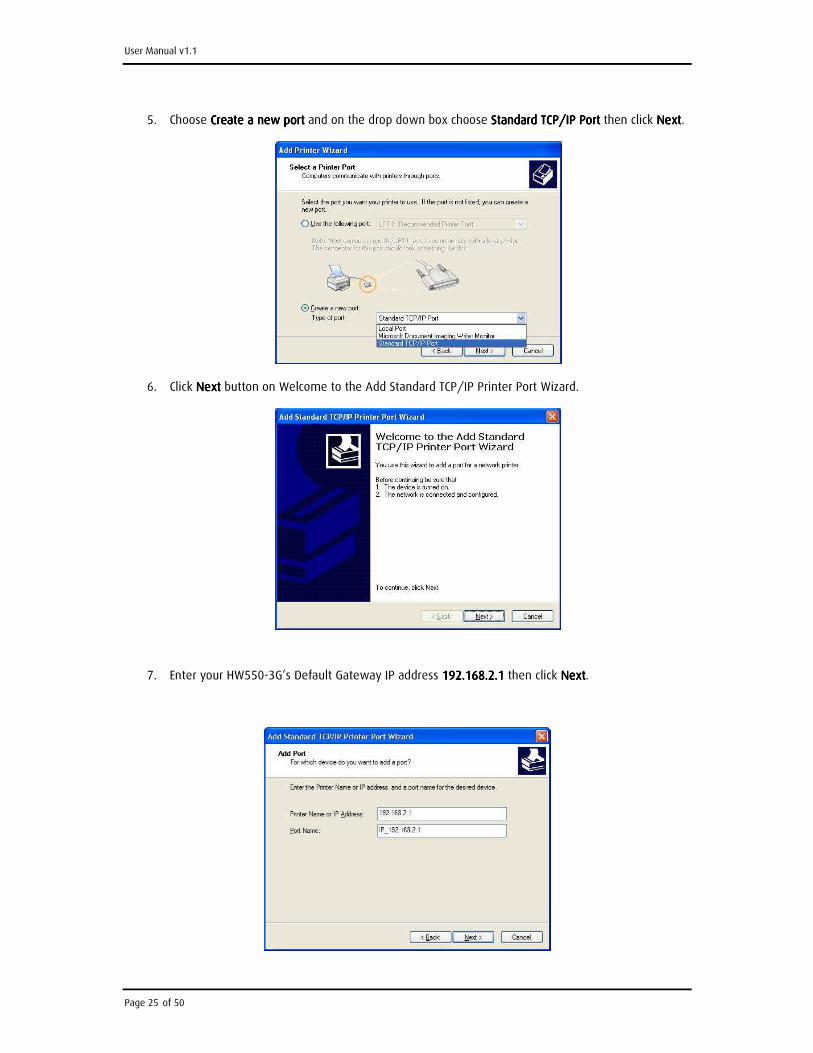
5. Choose Create a new portCreate a new portCreate a new portCreate a new port and on the drop down box choose Standard TCP/Standard TCP/Standard TCP/Standard TCP/IP PortIP PortIP PortIP Port then click NextNextNextNext.
6. Click NextNextNextNext button on Welcome to the Add Standard TCP/IP Printer Port Wizard.
7. Enter your HW550-3G’s Default Gateway IP address 192.168.2.1192.168.2.1192.168.2.1192.168.2.1 then click NextNextNextNext.

User Manual v1.1
Page 26 of 50
8. Under Additional Port Information Required choose CustomCustomCustomCustom then click NextNextNextNext
9. Once the computer detects the printer on the Print Server, it will ask for the printer manufacturer
and model, a list of printers will be shown, select the your printer from the list and click OKOKOKOK.
10. Choose Keep existing driver (recommended)Keep existing driver (recommended)Keep existing driver (recommended)Keep existing driver (recommended) then click NextNextNextNext until you reach Completing the Add Completing the Add Completing the Add Completing the Add
Printer WizardPrinter WizardPrinter WizardPrinter Wizard.

User Manual v1.1
Page 27 of 50
11. Click FinishFinishFinishFinish to complete the installation.
PRINTING A TEST PAGE AFTER INSTALLATION
1. Open the Printers and Faxes page from Control Panel.
2. Right click on the new printer and click on Properties.
3. Click on the Print Test Page button on the Printer properties page, the test page will be printed on
the network printer.
FOR WINDOWS VISTA
1. Click on the Start ButtonStart ButtonStart ButtonStart Button> Control PanelControl PanelControl PanelControl Panel.
2. Click PrinterPrinterPrinterPrinter under the Hardware and SoundHardware and SoundHardware and SoundHardware and Sound category.
User Manual v1.1
Page 28 of 50
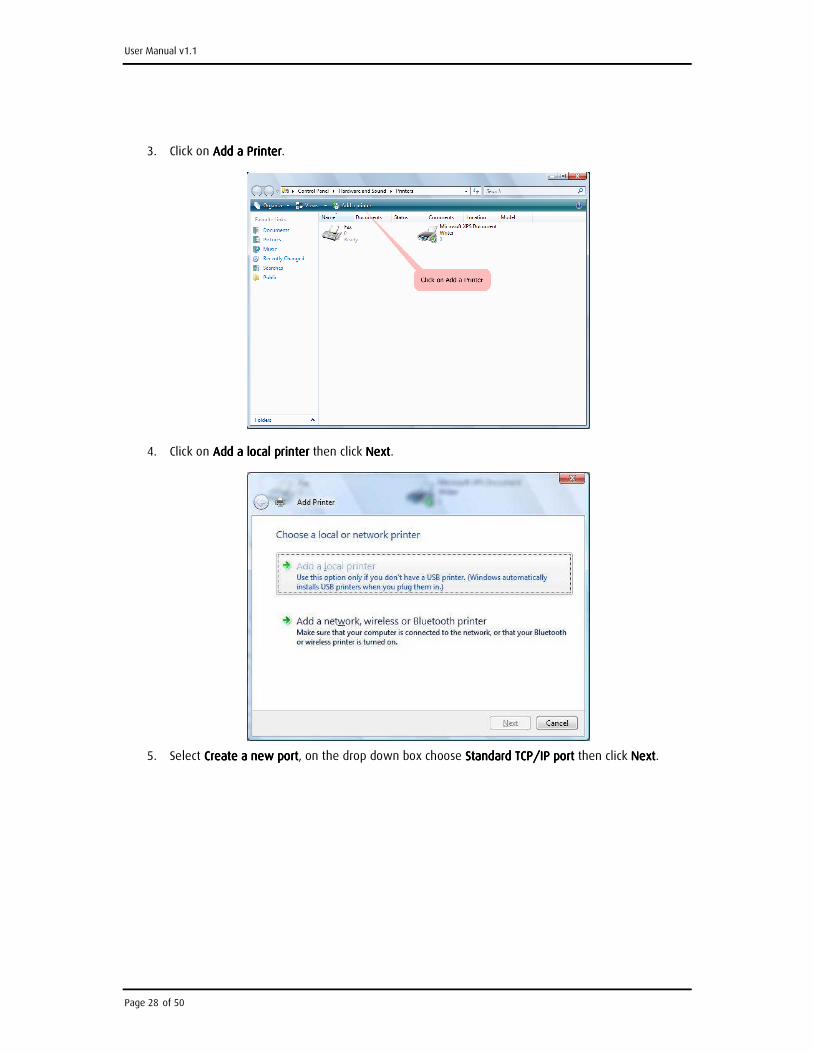
3. Click on Add a PrinterAdd a PrinterAdd a PrinterAdd a Printer.
4. Click on Add a local printerAdd a local printerAdd a local printerAdd a local printer then click NextNextNextNext.
5. Select Create a new portCreate a new portCreate a new portCreate a new port, on the drop down box choose Standard TCP/IP portStandard TCP/IP portStandard TCP/IP portStandard TCP/IP port then click NextNextNextNext.

User Manual v1.1
Page 29 of 50
6. Enter the Default Gateway IP address of your HW550-3G router 192.168.2.1192.168.2.1192.168.2.1192.168.2.1 then click NextNextNextNext.
7. Under Additional Port Information Required window, select Custom then click NextNextNextNext.

User Manual v1.1
Page 30 of 50
8. Once the computer detects the printer on the Print Server, it will ask for the printer manufacturer
and model, a list of printers will be shown, select the your printer from the list and click OKOKOKOK.
9. Select Use the driver that is currently installed then click NextNextNextNext.
10. To print a test page click on Print a test page on the confirmation screen, click FinishFinishFinishFinish to complete
the installation.

User Manual v1.1
Page 31 of 50
11. If Printing was unsuccessful right click on the Printer’s icon then select PropertiesPropertiesPropertiesProperties.
12. Under printer’s Properties click Port Tab and tick the IP address (192.168.2.1) that was set on
previous settings then click ApplyApplyApplyApply.

User Manual v1.1
Page 32 of 50
Note:Note:Note:Note: Scanning, Faxing and Photocopying functions on Multifunction printers are not supported on the
HW550-3G; Print function is the only feature that will work on these printers type when connected to the
HW550-3G.

User Manual v1.1
Page 33 of 50
Wizard
This section will guide you on how to configure your HW550-3G to have an Internet connection.
Language and Time Zone
Select the Language and Time zone from the drop down box then click Next to continue.
Internet Connection Type
Select the Internet Connection type then click Next to Continue.
If you choose Mobile Broadband, you are required to have the following:
1. USB 3G Modem or USB EVDO Modem
2. Broadband data SIM card for USB 3G Modem
If you choose WAN, you are required to have the following:
1. DSL or cable modem.
2. Active Internet Account
Mobile Broadband
1.1.1.1. UMTS (3.5G)UMTS (3.5G)UMTS (3.5G)UMTS (3.5G)
• 3G Access Point Settings –Choose between List and Manual.
• List (recommended) will provide the APN set by your Internet Service Provider. Choose your
Country, Internet Service Operator and the APN.
• Manual you need to manually key in the APN provided by your ISP. Some ISP may require a
different name for your APN. Please contact your ISP if you don’t have this information

User Manual v1.1
Page 34 of 50
• Username and Password – Some ISP may require a Username and Password set by the Operators.
Please contact your ISP if you don’t have this information
2.2.2.2. CDMCDMCDMCDMA 2000 (EVDO)A 2000 (EVDO)A 2000 (EVDO)A 2000 (EVDO)
• Username and Password – Enter the required Username and Password set by the Operators. Please
contact your ISP if you don’t have this information
3.3.3.3. Choose the your preferred Connection MethodChoose the your preferred Connection MethodChoose the your preferred Connection MethodChoose the your preferred Connection Method
• Connect Manually – you need to press the Connect button each time Internet connection is
required.
• Always connected – Internet connection is always ON. You need to manually press the disconnect
button when Internet connection is not required.
4.4.4.4. Dial NumberDial NumberDial NumberDial Number
• Enter the required Dial Number set by the Operators. Please contact your ISP if you don’t have this
information.
5.5.5.5. SIM PIN (UMTS 3.5G)SIM PIN (UMTS 3.5G)SIM PIN (UMTS 3.5G)SIM PIN (UMTS 3.5G)
• Enter your SIM PIN on the required field; if you did not set any SIM PIN on your data broadband
SIM card leave the field blank.
Ethernet WAN connection
On this section you can choose your Internet connection type from Static IP, PPPoE and DHCP.
1.1.1.1. Static IP Static IP Static IP Static IP
Select this Internet connection type if your ISP provides the IP addresses that are required to
establish a connection.
a.) IP Address - Enter the IP address provides by your ISP.
b.) Subnet Mask - Enter the Subnet Mask provides by your ISP.
c.) Default Gateway - Enter the Default Gateway provides by you r ISP.
d.) Primary DNS - Enter the Primary DNS server IP address provides by your ISP.
e.) Secondary DNS - Enter the Secondary DNS server IP address provides by your ISP.
2.2.2.2. DHCPDHCPDHCPDHCP
Select this Internet connection type for your router to get an IP address from your ISP or the DHCP
server.
a.) Host name - Some ISP requires the host name of your router. You can change the current
hostname of your router.
b.) MAC clone - Some ISP requires that you register the MAC address of your computer. Tick the
box to copy your PC’s MAC address.
c.) MAC Address - This is the computer’s MAC address that is running the router.

User Manual v1.1
Page 35 of 50
3.3.3.3. PPPoEPPPoEPPPoEPPPoE
Select this Internet connection type if you’re ISP provides you a username and password to
establish a connection.
a.) Username - Enter the username provides by your ISP
b.) Password - Enter the password provides by your ISP
Note:Note:Note:Note: Please contact your Internet Service Provider if you do not have this information.
Wireless
This section allows you to configure your basic wireless settings.
a.) Wireless Enabled - Uncheck the box to disable your wireless connection.
b.) Broadcast SSID Enabled - Uncheck the box to hide your HW550-3G wireless network name.
c.) SSID - this is your HW550-3G wireless network name.
d.) WPA Enabled - tick the box if your want to enable your wireless security. This will ensure
wireless security on your network.
e.) Passphrase - Enter the password that is required by your HW550-3G to connect via wireless.
Summary
This section will display the entire configuration that was set on your HW550-3G.
1. Language and Time Zone
This pane displays the time that you set on your HW550-3G.
2. UMTS (WWAN)/WAN
This pane displays the Internet connection type that was set on your HW550-3G.
3. Wireless
This pane displays the basic settings of your HW550-3G wireless connection.
Click the Finish button for your settings to take effect.

User Manual v1.1
Page 36 of 50
Quick Setup
This section allows you to change the current settings of your HW550-3G without going to the
step-by-step procedure on how to establish an Internet connection.

User Manual v1.1
Page 37 of 50
Language and Time Zone
This pane displays the time that you set on your HW550-3G. Configure the settings then click the
Apply button for the changes to take effect.
Mobile Broadband/Ethernet WAN
This pane displays the Internet connection type of your HW550-3G. You can choose between
Mobile Broadband and Ethernet WAN connection. Configure the settings then click the Apply button for the
changes to take effect.
Wireless
This pane displays the current Wireless settings of your HW550-3G. Configure the settings then
click the Apply button for the changes to take effect.

User Manual v1.1
Page 38 of 50
Advanced Page
Network
Local
This section allows you to configure your local network connection.
• Router IP Address – this is the router’s default IP address. Use this IP address to access the router’s
Web GUI. Type the Router IP address 192.168.2.1 on your Web browser.
• Router Subnet Mask – this is the router’s subnet mask.
• DHCP Enabled- Your HW550-3G has a built in DHCP server. Your HW550-3G will automatically
assign an IP address to all the computers that will connect to your network. Check the TCP/IP
settings of your computer and make sure to set it on “Obtain an IP automatically”. Note that when
you uncheck the button it will disable the DHCP server. You need to have another DHCP server or
you need manually set the IP address of the computer when your DHCP is disabled.
• Start IP Address- This field specifies the first of the IP addresses in the IP address pool.
• End IP Address- This field specifies the last of the IP addresses in the IP address pool.
• Subnet Mask- Enter the Subnet Mask provides by your ISP.
• Primary DNS Server- Enter the Primary DNS server IP address provides by your ISP.
• Secondary DNS Server- Enter the Secondary DNS server IP address provides by your ISP.
• Default Gateway- Recommend to use the router’s LAN port IP address.

User Manual v1.1
Page 39 of 50
• Lease Time (sec)- this is the amount of time in which the user is allowed to use the current
dynamic IP address.
Internet
This section allows you to choose the Internet connection type that you would like to use.
Mobile Broadband
1. UMTS (3.5G): This connection method requires the APN, Authentication Method, Connection
Method and Dial number to establish an Internet connection.
a. ListListListList will provide the APN set by your Internet Service Provider. Choose your Country,
Internet Service Operator and the APN.
b. ManualManualManualManual you need to manually key in the APN provided by your ISP. Some ISP may require
a different name for your APN. Please contact your ISP if you don’t have this information
2. CDMA 2000 (EVDO): This connection method requires the Authentication Method, Connection
Method, Dial number, Username and Password to establish an Internet connection.
3. Authentication Method Choose between Auto (recommended), PAP and CHAP.
4. Connection Method
a. Connect ManuallyConnect ManuallyConnect ManuallyConnect Manually – you need to press the Connect button each time Internet connection is
required.
b. Always connectedAlways connectedAlways connectedAlways connected – Internet connection is always ON. You need to manually press the
disconnect button when Internet connection is not required.
5. Dial Number: Enter the dial number provides by your ISP to establish a connection. Different ISP
may use different dial number. Please contact your ISP if you don’t have this information.

User Manual v1.1
Page 40 of 50
6. Username – Enter the username provides by your ISP.
7. Password – Enter the password provides by your ISP.
8. SIM PIN (UMTS 3.5G) – Enter the SIM PIN that you set on your SIM card on the required field. Some
broadband SIM card requires a PIN to unlock the SIM broadband account.
Note:Note:Note:Note: Please contact your Internet Service Provider if you do not have this information.
Ethernet WAN
Static IP
Select this Internet connection type if your ISP provides the IP addresses that are required to establish a
connection.
• IP Address: Enter the IP address provides by your ISP.
• Subnet Mask: Enter the Subnet Mask provides by your ISP.
• Default Gateway: Enter the Default Gateway provides by you r ISP.
• Primary DNS: Enter the Primary DNS server IP address provides by your ISP.
• Secondary DNS: Enter the Secondary DNS server IP address provides by your ISP.
DHCP
Select this Internet connection type for your router to get an IP address from your ISP or the DHCP server.
• Host name: Some ISP requires the host name of your router. You can change the current hostname
of your router.
• MAC clone: Some ISP requires that you register the MAC address of your computer. Tick the box to
copy your PC’s MAC address.
• MAC Address: This is the computer’s MAC address that is running the router.
PPPoE
Select this Internet connection type if you’re ISP provides you a username and password to establish a
connection.
• Username: Enter the username provides by your ISP
• Password: Enter the password provides by your ISP

User Manual v1.1
Page 41 of 50
Wireless
Settings
This section allows you to configure your basic wireless settings.
• Wireless Enabled- Uncheck the box to disable your wireless connection.
• SSID- this is your HW550-3G wireless network name.
• Broadcast SSID- Uncheck the box to hide your HW550-3G wireless network name.
• Wireless Mode – select the wireless connection mode on the drop down menu list. By default it is
set to mixed mode.
• Channel- On the drop down box, select the operating frequency that you would like to use. By
default it is set to channel 6. If you notice a lot of interference it is advisable to change the
channel.

User Manual v1.1
Page 42 of 50
Security
This section allows you to set the wireless security setting of your network. Select the wireless security
that you would like to set on your HW550-3G on the drop down menu lists.
• None
Select this if you want your wireless security to be disabled, it is advisable to Enable your wireless
security to avoid unauthorized access to your network via wireless.
• WEP
Set the WEP key on the required field. This is the password that your HW550-3G will require to
connect to it via wireless.
� WEP default key
You may choose from Hex to ASCII key format for your WEP key.
� WEP Key 1-4
Select the WEP that you will use to establish a connection between the router and client.
Make sure that the WEP key will match on your wireless client’s side. Enter the password in
HEX (hexadecimal - using characters 0-9, A-F) or ASCII (alphanumeric characters) format.
• WPA; WPA2; WPA/WPA2
Enter the password in the required field between 8-63 characters long.
� TKIP; AES; TKIP/AES
Choose the encryption that you would like to use. By default it is set to TKIP.
• WiFi Protected Setup (WPS)
This allows you to Enable or Disable the WPS feature. Select from the drop down box to change
the default settings then click the Apply button.
Note:Note:Note:Note: WiFi Protected Setup (WPS) is not supported with WEP

User Manual v1.1
Page 43 of 50
• Router’s PIN
The Router’s PIN is unique for each device. Enter this PIN if your wireless client requires the
Device’s Password.
Applications
Port forwarding
Multiple connections are required by some applications, such as Internet games, video conferencing,
Internet telephony, and others. These applications have difficulties working through NAT (Network Address
Translation). This section is used to open multiple ports or a range of ports in your router and redirect data
through those ports to a single PC on your network. You can enter ports in various formats:
1. Rule Name – enter the rule name in the Rule Name box.
2. IP Address - enter the local network IP address of the device that you would like to port forward.
3. Port Range – enter the port number that you would like open on the required field
4. Protocol – choose the protocol that you would like to open then click Apply for the settings to take
effect.
DMZ
This section allows you to Enable or Disable the DMZ settings. It also allows you to set a single PC on
your network to have an unrestricted Internet access.
User Manual v1.1
Page 44 of 50
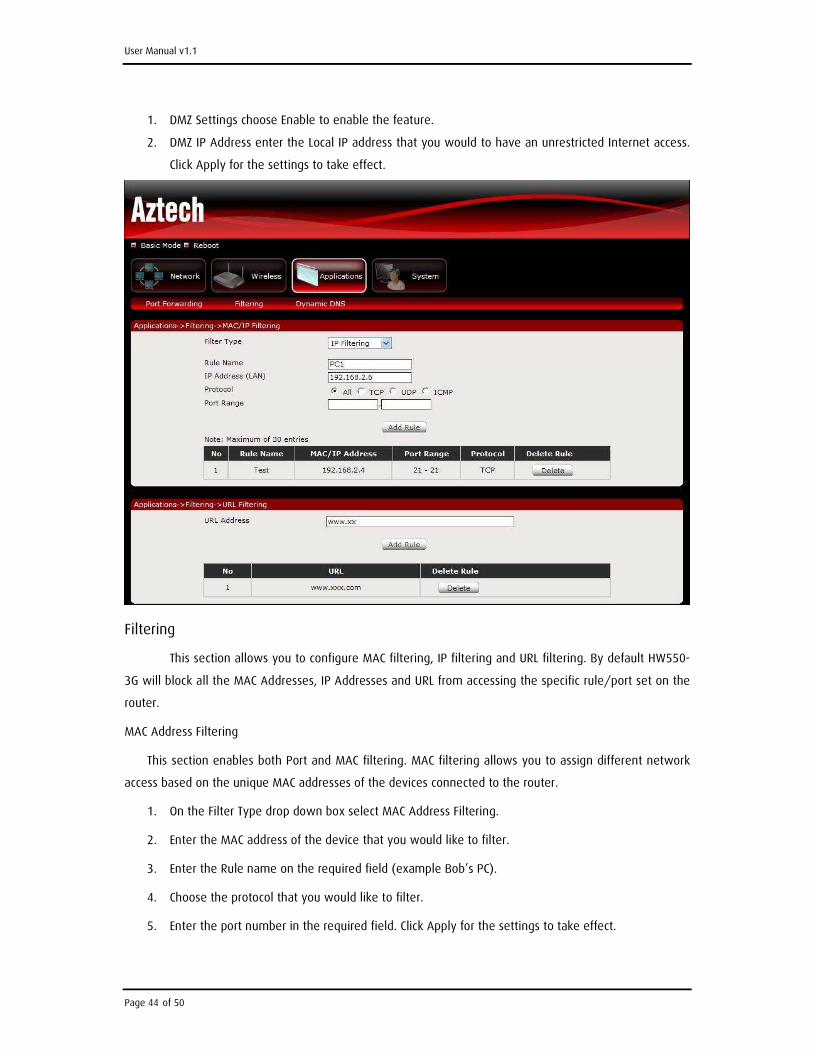
1. DMZ Settings choose Enable to enable the feature.
2. DMZ IP Address enter the Local IP address that you would to have an unrestricted Internet access.
Click Apply for the settings to take effect.
Filtering
This section allows you to configure MAC filtering, IP filtering and URL filtering. By default HW550-
3G will block all the MAC Addresses, IP Addresses and URL from accessing the specific rule/port set on the
router.
MAC Address Filtering
This section enables both Port and MAC filtering. MAC filtering allows you to assign different network
access based on the unique MAC addresses of the devices connected to the router.
1. On the Filter Type drop down box select MAC Address Filtering.
2. Enter the MAC address of the device that you would like to filter.
3. Enter the Rule name on the required field (example Bob’s PC).
4. Choose the protocol that you would like to filter.
5. Enter the port number in the required field. Click Apply for the settings to take effect.

User Manual v1.1
Page 45 of 50
IP Filtering
This section enables both Port and IP filtering. IP filtering allows you to assign different network access
based on the IP addresses of the devices connected to the router.
1. On the Filter Type drop down box select IP Address Filtering.
2. Enter the IP address of the device that you would like to filter.
3. Enter the Rule name on the required field (example Bob PC).
4. Choose the protocol that you would like to filter.
5. Enter the port number in the required field. Click Apply for the settings to take effect.
Note:Note:Note:Note: All incoming access on your network is blocked. If you want to have an access within your network
from WAN please use Port Forwarding.
URL Filtering
This section allows you to control the access to a certain Websites on the Internet by entering URL
name on the required field.
1. Enter the domain name on the URL address field (www.xxx.com or www.xxx.net). Click Apply for
the settings to take effect.
DDNS (Dynamic DNS)
DDNS allows you to assign a fixed domain and host name to a dynamic Internet IP addresses.
1. Choose your DDNS service provider from the drop down box.
2. Enter the username of your DDNS account.
3. Enter the password of your DDNS account.

User Manual v1.1
Page 46 of 50
4. Enter the Domain Name that you received from the Dynamic DNS provider
(xxx.domainmame.com). Click Apply for the settings to take effect.
System
System Information
This section shows the current firmware information and the router’s MAC addresses.
Settings
This section allows you to Back up, Save and Restore to factory default the router’s configuration.

User Manual v1.1
Page 47 of 50
Backup
Click the ‘Backup’ button to save the current settings of your router. If you will change the current
configuration of your HW550-3G it is recommended that you backup the router’s current settings.
Restore
Click the browse button and select the saved configuration setting of the router then click
‘Restore’. This allows you to load the restored configuration file of your router.
Restore to factory default
Click the ‘Reset” button to reset the router’s configuration back to its Factory Default settings.
Firmware Upgrade
This section allows you to upload the latest firmware for your router. Please make sure that you
download the correct firmware from the product support website.
Reboot
Click the ‘Reboot’ button to reboot the device

User Manual v1.1
Page 48 of 50
Password
This section allows you to change the default password setting of the router to access the Web
GUI.
1. Enter the new password on the required field then click Apply.
2. Once the setting is applied, on the authentication login page enter the Username and new
Password to access the router’s WEB UI.

User Manual v1.1
Page 49 of 50
Regulatory Compliance Notices
FCC Notice This equipment has been tested and found to comply with the limits for a Class B digital device, pursuant
to Part 15, 22 and 24 of the FCC Rules. These limits are designed to provide reasonable protection against
harmful interference in a residential installation. This equipment generates, uses, and can radiate radio
frequency energy and, if not installed and used in accordance with the instructions, may cause harmful
interference to radio communications. However, there is no guarantee that interference will not occur in a
particular installation. If this equipment does cause harmful interference to radio or television reception,
which can be determined by turning the equipment off and on, the user is encouraged to try to correct the
interference by one or more of the following measures:
• Reorient or relocate the receiving antenna.
• Increase the separation between the equipment and receiver.
• Connect the equipment into an outlet on a circuit different from that to which the receiver is
connected.
• Consult the dealer or an experienced radio or television technician for help.
ModificationsModificationsModificationsModifications
The FCC requires the user to be notified that any changes or modifications made to this device that are not
expressly approved by Aztech could void the user’s authority to operate the equipment.
This device complies with Part 15 of the FCC ruThis device complies with Part 15 of the FCC ruThis device complies with Part 15 of the FCC ruThis device complies with Part 15 of the FCC rules.les.les.les.
This device complies with Part 15 of the FCC rules. Operation is subject to the following two conditions:
1. This device may not cause harmful interference, and
2. This device must accept any interference received, including interference that may cause
undesired operation.
Exposure Information to Radio Frequency EnergyExposure Information to Radio Frequency EnergyExposure Information to Radio Frequency EnergyExposure Information to Radio Frequency Energy
This equipment complies with FCC radiation exposure limits set forth for an uncontrolled environment. This
equipment should be installed and operated with minimum distance of 20 cm between the radiator and
your body.

User Manual v1.1
Page 50 of 50
European Regulations
The product has been designed, tested and manufactured according to the European R&TTE directive
1999/5/EC.