
HURRICANE - Industrial Vacuum · · 2017-07-20Carefully read the safety precautions below and...
26
HURRICANE 500 OPERATIONS/MAINTENANCE MANUAL INDUSTRIAL VACUUM EQUIPMENT CORP. N7959 BIRCH ROAD, IXONIA WI 53036 800-331-4832
Transcript of HURRICANE - Industrial Vacuum · · 2017-07-20Carefully read the safety precautions below and...

HURRICANE
500 OPERATIONS/MAINTENANCE
MANUAL
INDUSTRIAL VACUUM EQUIPMENT CORP. N7959 BIRCH ROAD, IXONIA WI 53036
800-331-4832

Revised 4/2014 Hurricane 500/600 1
OPERATION / MAINTENANCE MANUAL
HURRICANE 500 & 600
UINTRODUCTION
The Hurricane is designed for rugged, reliable operation featuring powerful vacuuming capability
with a very minimum daily maintenance. The Hurricane will pneumatically convey material from
distances in excess of 1000 feet. Any material that is flowable, whether liquid, slurry or solid, or able
to move through a 4”, 5” or 6” diameter hose, can be handled with this equipment.
This equipment is self-contained and powered by an electronically controlled diesel engine. It will
provide excellent service if properly maintained. There are no unique or complicated parts that require
sophisticated maintenance procedures under normal operation. The diesel engine is equipped with
automatic shutdowns for low oil pressure and high temperature.
The engine enclosure of the Hurricane has locking latches and a locking cap on the fuel tank.
The tandem axle trailer is equipped with electric brakes. The Hurricane can easily be towed and
maneuvered with a one ton, or larger, truck having dual rear wheels.
Because of its ease of set-up and maneuverability, the Hurricane is a very flexible and effective
piece of industrial vacuum cleaning equipment. You will only be limited by your imagination.
DANGER THE HURRICANE SHALL NOT BE USED TO VACUUM/CONVEY
FLAMMABLE OR COMBUSTIBLE HYDROCARBON LIQUIDS.
THE HURRICANE SHOULD NEVER BE USED OR MOVED WITHOUT
REFERENCE TO THE SAFETY PROCEDURES NOTED BELOW.
Revised 9/2013 Hurricane 500/600 2
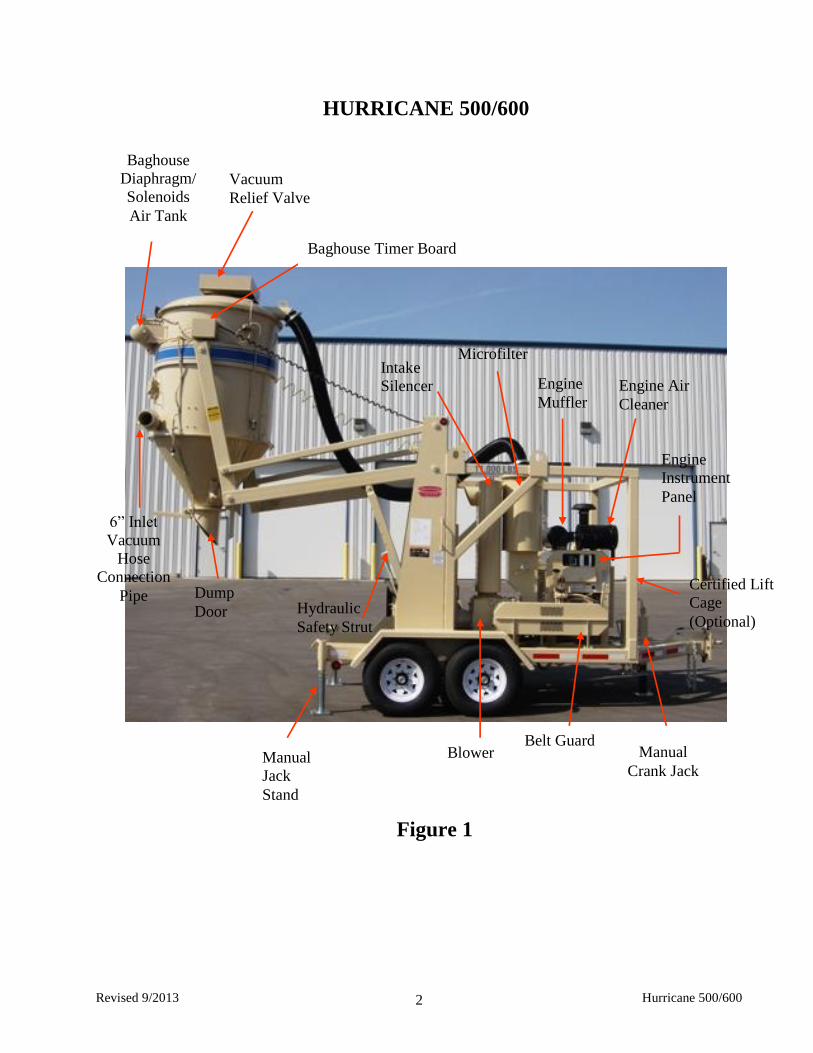
HURRICANE 500/600
Dump
Door
Manual
Jack
Stand
Blower Belt Guard
Manual
Crank Jack
Certified Lift
Cage
(Optional)
Baghouse
Diaphragm/
Solenoids
Air Tank
Baghouse Timer Board
Vacuum
Relief Valve
Intake
Silencer
Microfilter
Engine
Muffler Engine Air
Cleaner
Engine
Instrument
Panel
Hydraulic
Safety Strut
6” Inlet
Vacuum
Hose
Connection
Pipe
Figure 1
Revised 3/2012 3 Hurricane 500/600
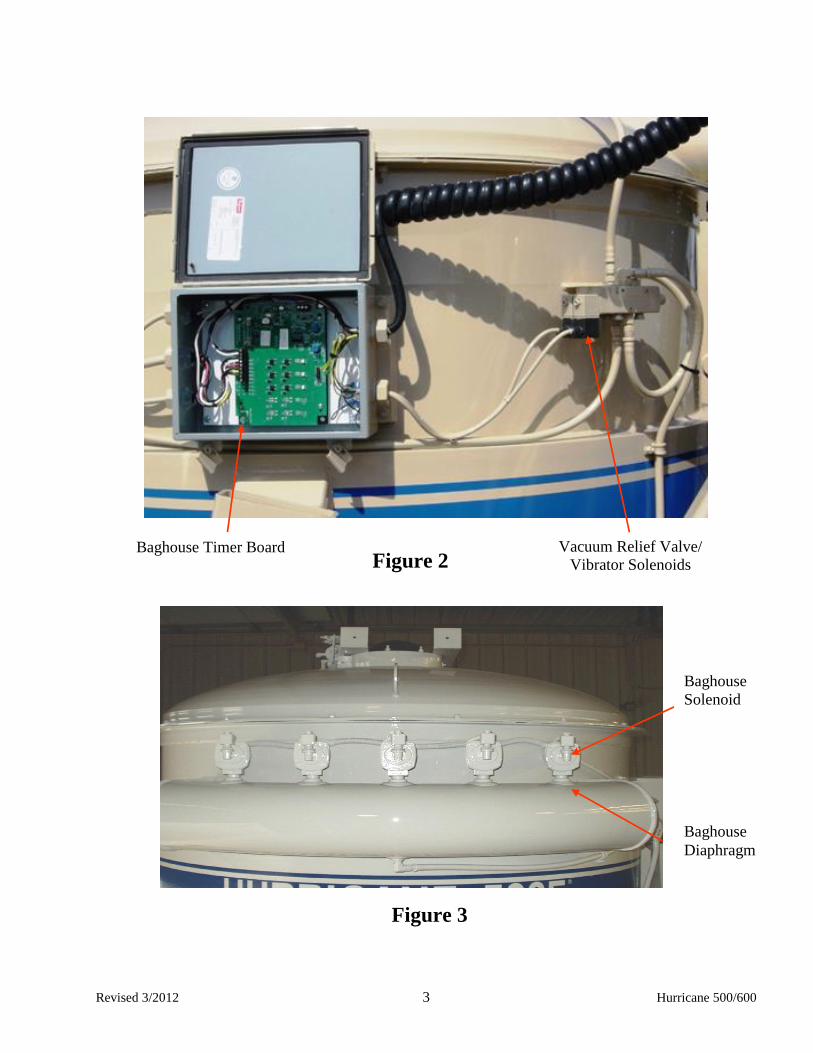
Vacuum Relief Valve/
Vibrator Solenoids
Baghouse Timer Board Figure 2
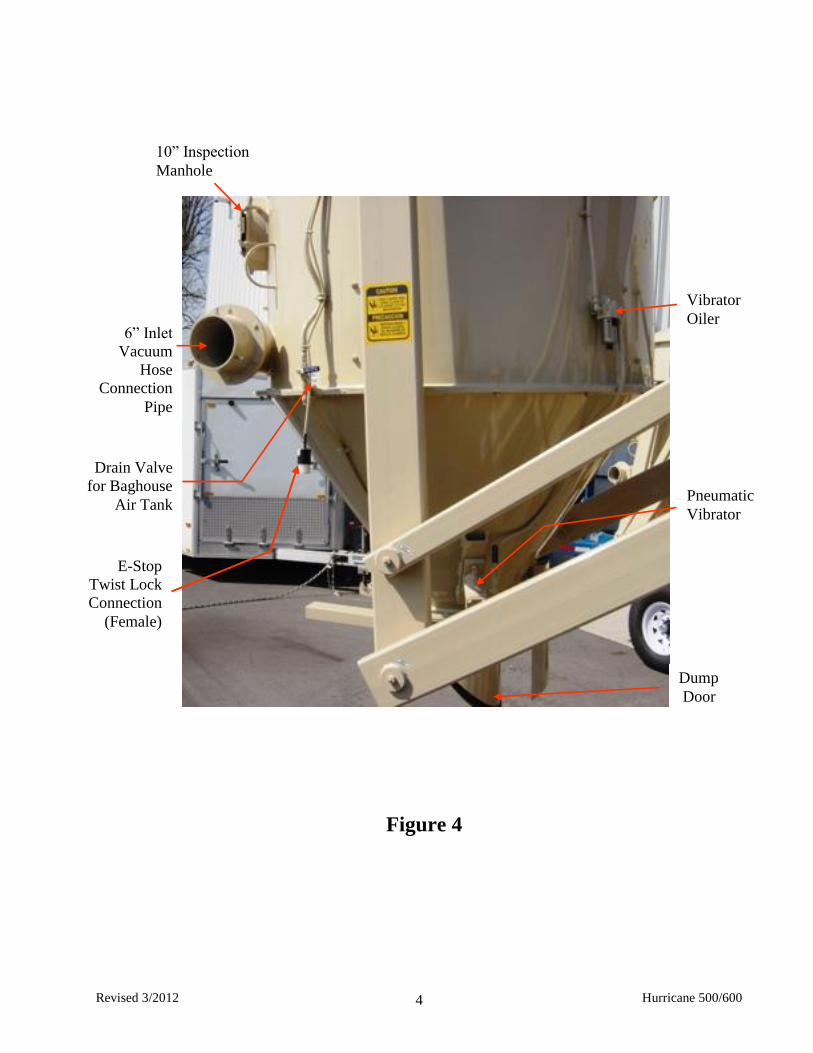
Baghouse
Solenoid
Baghouse
Diaphragm
Figure 3
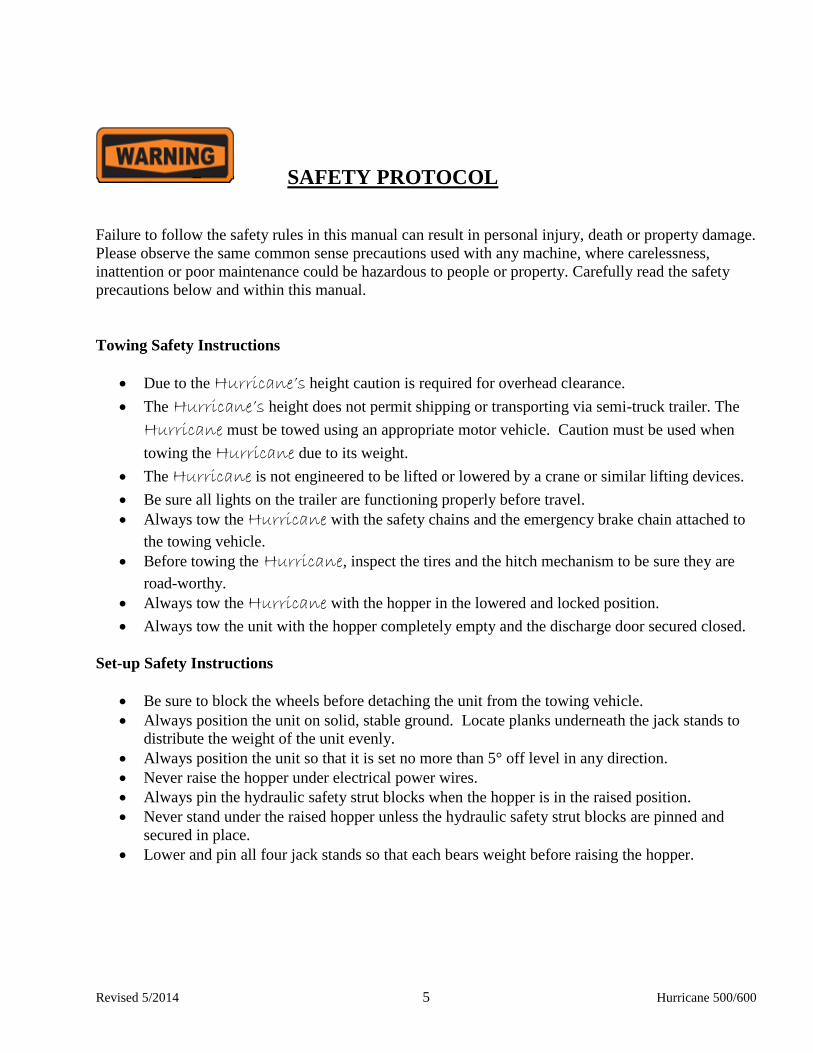
Revised 3/2012 Hurricane 500/600 4
10” Inspection
Manhole
Vibrator
Oiler 6” Inlet
Vacuum
Hose
Connection
Pipe
E-Stop
Twist Lock
Connection
(Female)
Drain Valve
for Baghouse
Air Tank
Dump
Door
Pneumatic
Vibrator
Figure 4
Revised 5/2014 5 Hurricane 500/600
SAFETY PROTOCOL
Failure to follow the safety rules in this manual can result in personal injury, death or property damage.
Please observe the same common sense precautions used with any machine, where carelessness,
inattention or poor maintenance could be hazardous to people or property. Carefully read the safety
precautions below and within this manual.
Towing Safety Instructions
Due to the Hurricane’s height caution is required for overhead clearance.
The Hurricane’s height does not permit shipping or transporting via semi-truck trailer. The
Hurricane must be towed using an appropriate motor vehicle. Caution must be used when
towing the Hurricane due to its weight.
The Hurricane is not engineered to be lifted or lowered by a crane or similar lifting devices.
Be sure all lights on the trailer are functioning properly before travel.
Always tow the Hurricane with the safety chains and the emergency brake chain attached to
the towing vehicle.
Before towing the Hurricane, inspect the tires and the hitch mechanism to be sure they are
road-worthy.
Always tow the Hurricane with the hopper in the lowered and locked position.
Always tow the unit with the hopper completely empty and the discharge door secured closed.
Set-up Safety Instructions
Be sure to block the wheels before detaching the unit from the towing vehicle.
Always position the unit on solid, stable ground. Locate planks underneath the jack stands to
distribute the weight of the unit evenly.
Always position the unit so that it is set no more than 5° off level in any direction.
Never raise the hopper under electrical power wires.
Always pin the hydraulic safety strut blocks when the hopper is in the raised position.
Never stand under the raised hopper unless the hydraulic safety strut blocks are pinned and
secured in place.
Lower and pin Uall four jack stands so that each bears weight before raising the hopper.

Revised 3/2012 6 Hurricane 500/600
SAFETY PROTOCOL
Follow Safety Sticker Instructions
Carefully read all safety stickers on unit. Keep safety stickers in good, readable condition.
Replace missing or damaged safety signs. Be sure new equipment components and repair parts
include the current safety stickers. Replacement safety stickers are available through the
manufacturer.
Handle Fuel Safely
Handle fuel with care: it is highly flammable. Do not refuel the machine while smoking or near
open flame or spark.
Always stop engine before refueling machine. Fill fuel tank outdoors.
Prevent fires by keeping machine clean of accumulated trash, grease and debris.
Prepare For Emergencies
Be prepared if a fire starts.
Keep a first aid kit and fire extinguisher handy.
Keep emergency numbers for doctors, ambulance service, hospital and fire department near
your telephone.
Wear Protective Clothing
Wear close-fitting clothing and safety equipment appropriate to the job.
Operating equipment safely requires the full attention of the operator. Do not wear radio or
music headphones while operating machine.
Protect Against Noise
Prolonged exposure to loud noise can cause impairment or loss of hearing.
Wear OSHA approved personal protective equipment to protect against objectionable or
uncomfortable noise.
Handle Chemical Products Safely
Direct exposure to hazardous chemical can cause serious injury. Potentially hazardous
chemicals used with this unit include such items as lubricants, coolants, paints and adhesives.
Refer to Material Safety Data Sheet (MSDS) for specific details on chemical products: physical
and health hazards, safety procedures and emergency response information.
Review each MSDS before you begin using unit.
Revised 3/2012 Hurricane 500/600 7
SAFETY PROTOCOL
Stay Clear of Rotating Components
Keep rotating shields in place at all times.
Always operate the machine with access doors closed and locked.
Shut unit down and be sure all moving parts have stopped rotating before make adjustments or
performing service on machine.
Keep hands, feet and clothing from power driven parts.
Practice Safe Maintenance
Understand service procedure before performing work. See specific components service
manual, located in Hurricane’s owner manual for instructions and additional safety
requirements.
Vacuum creates VERY HIGH SUCTION—EXTREME CAUTION IS REQUIRED when
handling suction inlet locations.
When vacuuming certain materials static electricity can be generated. PROPER STEPS
SHOULD BE TAKEN TO PROPERLY BOND AND GROUND HOSES, UNIT, ETC.
Never lubricate, service, or adjust machine while it is operating.
Maintain all parts in good operating condition. Replace worn or broken parts immediately.
Disconnect battery ground cable (-) before making adjustment on electrical systems.
Do not look into the discharge door or the hopper inlet pipe when unit is operating.
Always wear safety glasses or goggles when performing maintenance on unit.
Whenever vacuuming sticky materials, such as thick slurry, check the hopper often to verify all
the material is discharging and not building up on the inside. Utilize vibrator often to minimize
material build-up.
Engine Exhaust
Engine exhaust fumes can cause sickness or death. DO NOT operate engine in an enclosed area
without proper ventilation or exhaust pipe extension to the atmosphere.
Avoid High-Pressure Fluids
Escaping fluid under pressure can penetrate the skin causing serious injury.
Avoid the hazard by relieving pressure before disconnecting hydraulic hoses or other lines.
Tighten all connections before applying pressure.
Refer to MSDS for emergency information.

Revised 3/2012 Hurricane 500/600 8
U SAFETY PROTOCOL Blower Discharge Dust
DO NOT operate the unit if dust is visible at the blower discharge.
Shut unit down and contact Industrial Vacuum Equipment Corp. before continuing.
Engine Cooling System
Explosive release of fluids from pressurized cooling systems can cause serious injury and
burns.
Shut down engine. Allow sufficient time for coolant to decrease in temperature. Only remove
filler cap when cool enough to touch with bare hands. Slowly loosen cap to relieve pressure
before removing completely.
Dispose of Waste Properly
Follow OSHA, State and Federal guidelines pertaining to the disposal of waste associated with
vacuum process.
E-Stop Button Instructions
Each day, before beginning vacuum operations, test the E-Stop button to make sure it is
working properly.
Whenever the vacuum is in operation, the E-Stop button MUST be within reach of the vacuum
hose operator, or must be attended by another operator.
Whenever adding/removing hose and/or pipe, the E-Stop button should be used to stop vacuum
suction until all connections are completed.
Button “OUT” - Vacuum ON Button “IN” - Vacuum OFF
Figure 5
Revised 11/2014 9 Hurricane 500/600
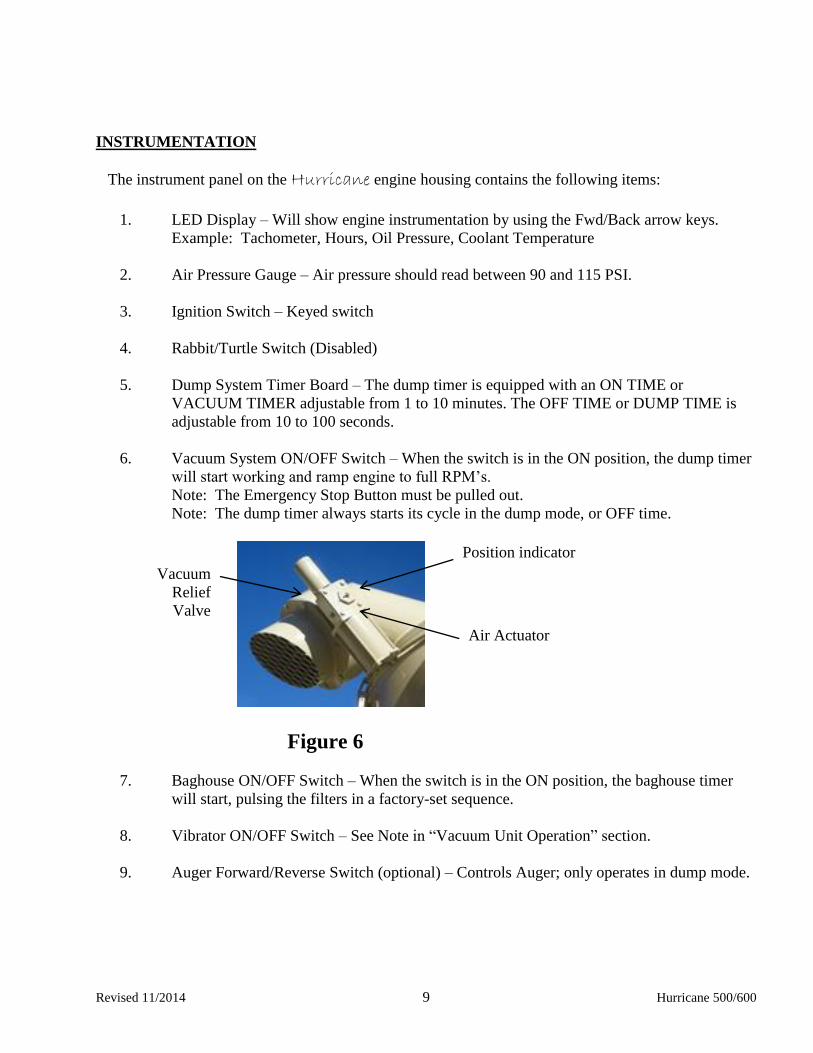
UINSTRUMENTATION
The instrument panel on the Hurricane engine housing contains the following items:
1. LED Display – Will show engine instrumentation by using the Fwd/Back arrow keys.
Example: Tachometer, Hours, Oil Pressure, Coolant Temperature
2. Air Pressure Gauge – Air pressure should read between 90 and 115 PSI.
3. Ignition Switch – Keyed switch
4. Rabbit/Turtle Switch (Disabled)
5. Dump System Timer Board – The dump timer is equipped with an ON TIME or
VACUUM TIMER adjustable from 1 to 10 minutes. The OFF TIME or DUMP TIME is
adjustable from 10 to 100 seconds.
6. Vacuum System ON/OFF Switch – When the switch is in the ON position, the dump timer
will start working and ramp engine to full RPM’s.
Note: The Emergency Stop Button must be pulled out.
Note: The dump timer always starts its cycle in the dump mode, or OFF time.
Figure 6
7. Baghouse ON/OFF Switch – When the switch is in the ON position, the baghouse timer
will start, pulsing the filters in a factory-set sequence.
8. Vibrator ON/OFF Switch – See Note in “Vacuum Unit Operation” section.
9. Auger Forward/Reverse Switch (optional) – Controls Auger; only operates in dump mode.
Position indicator
Air Actuator
Vacuum
Relief
Valve
Revised 11/2014 10 Hurricane 500/600
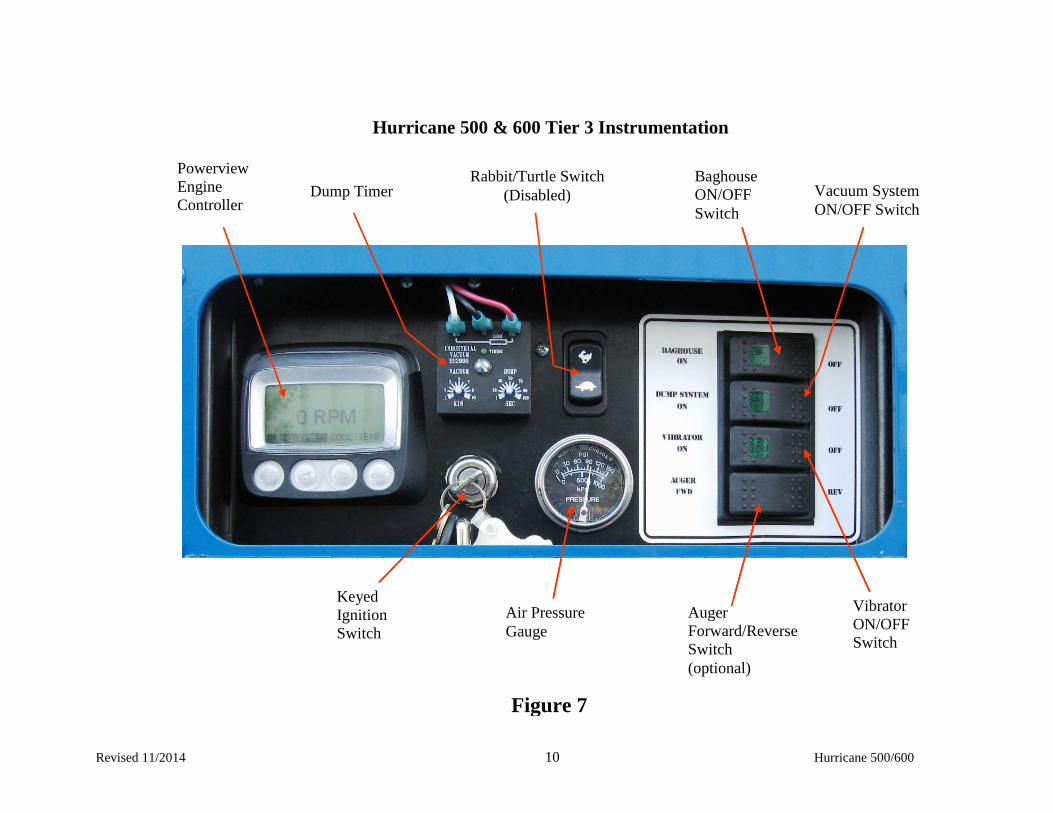
Hurricane 500 & 600 Tier 3 Instrumentation
Dump Timer Rabbit/Turtle Switch
(Disabled)
Baghouse
ON/OFF
Switch
Vacuum System
ON/OFF Switch
Vibrator
ON/OFF
Switch
Auger
Forward/Reverse
Switch
(optional)
Air Pressure
Gauge
Keyed
Ignition
Switch
Powerview
Engine
Controller
Figure 7
Revised 3/2012 11 Hurricane 500/600
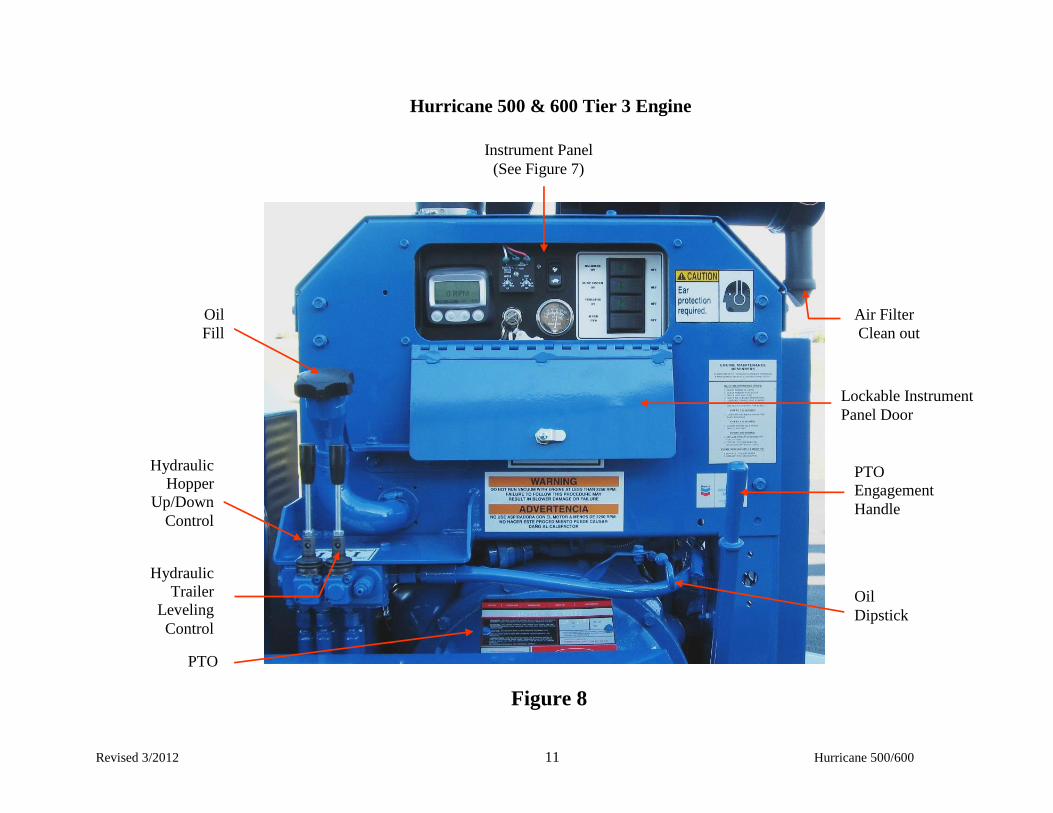
Hurricane 500 & 600 Tier 3 Engine
Instrument Panel
(See Figure 7)
Lockable Instrument
Panel Door
Oil
Fill
Hydraulic
Hopper
Up/Down
Control
Hydraulic
Trailer
Leveling
Control
PTO
Oil
Dipstick
PTO
Engagement
Handle
Air Filter
Clean out
Figure 8
Revised 3/2012 12 Hurricane 500/600
DAILY MAINTENANCE
ALL MAINTENANCE PROCEDURES SHOULD BE ACCOMPLISHED
WITH UENGINE OFF!
ENGINE
1. Check oil level.
2. Check radiator coolant level.
3. Check or change outer air cleaner cartridge.
4. Check battery connections.
5. Check radiator fins for dirt and obstructions on the fan side.
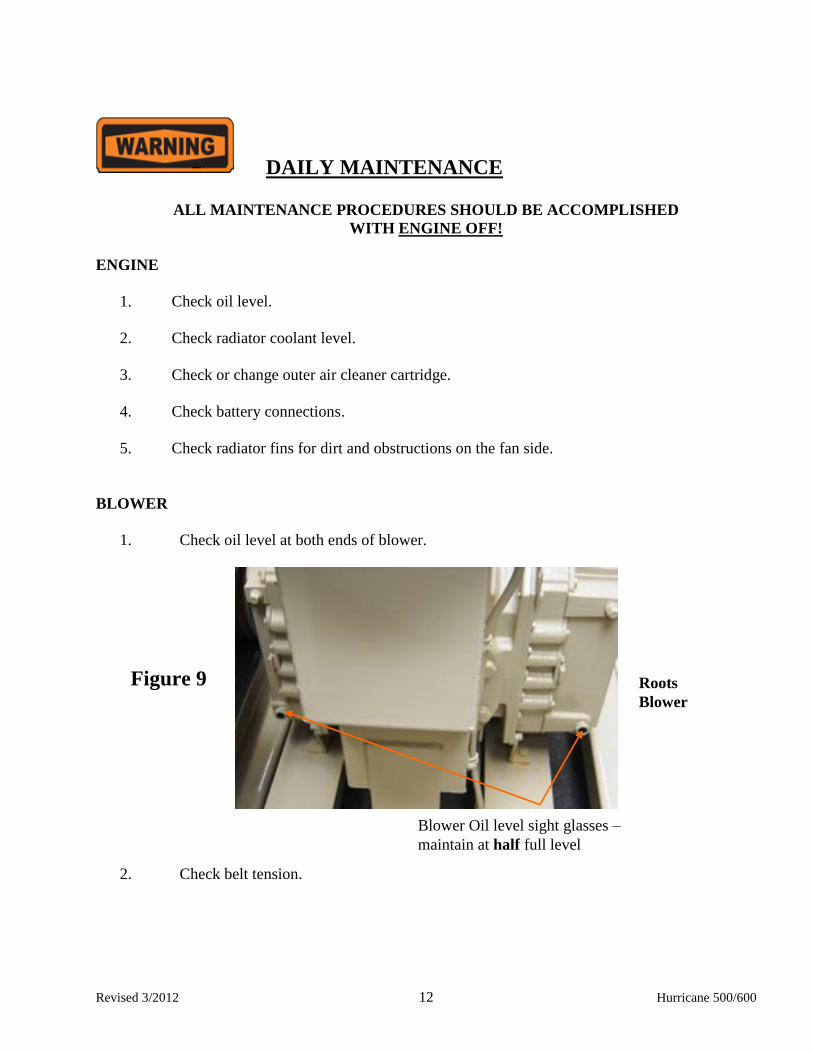
BLOWER
1. Check oil level at both ends of blower.
2. Check belt tension.
Roots
Blower
Blower Oil level sight glasses –
maintain at half full level
Figure 9
Revised 3/2012 Hurricane 500/600 13
DAILY MAINTENANCE
VIBRATOR
1. Check Vibrator Oiler level.
AIR COMPRESSOR
1. Auxiliary drive air compressor – NO daily maintenance needed.
HYDRAULIC SYSTEM
1. Check oil level (at least 1/2 to 2/3 full).
2. Check for hydraulic leaks on the various hoses and connections.
GENERAL
1. Check fuel level.
2. Make general inspection for leaks and loose bolts.
3. Drain water from all air tanks.
4. Check the inside of the collection hopper to be sure no material is collecting on the walls
of the cone.
5. When the unit is running and the air pressure is up to 90 PSI, listen for the bag pulsing
sequence.
Revised 12/2012 14 Hurricane 500/600
EXTENDED MAINTENANCE
FIRST 100 HOURS
1. Change engine oil and engine oil filter. Refer to John Deere Manual.
EVERY 200 HOURS
1. Change engine oil and engine oil filter. Refer to John Deere Manual.
2. Check upper deflector plate inside collection hopper for excessive wear.
EVERY 300 HOURS
1. Change blower safety filter.
2. Change filter bags if needed. See maintenance procedures.
3. Rebuild air dryer. Refer to Air Dryer Bulletin.
EVERY 500 HOURS
1. Change engine fuel filter. Refer to John Deere Manual.
2. Change blower oil in both ends. Refer to Blower Manual. NOTE: Apply pipe joint
compound sealant to blower oil threaded plug before re-installation.
3. Check condition of removable wear plate for excessive wear.
EVERY 1,000 HOURS
1. Remove vent tube on engine and clean it with diesel fuel. Refer to John Deere Manual.
2. Change hydraulic oil. See spec sheet.
3. Check dump door gasket for excessive wear.
4. Replace desiccant in air dryer.
EVERY 5,000 MILES
1. Repack wheel bearings on trailer. Refer to Dexter Manual.
2. Check pressure on trailer tires, 80 PSI.
Revised 7/2015 15 Hurricane 500/600
MAINTENANCE PROCEDURES
Filter Bag Change
1. Disconnect air line that runs from vacuum relief valve to the solenoid.
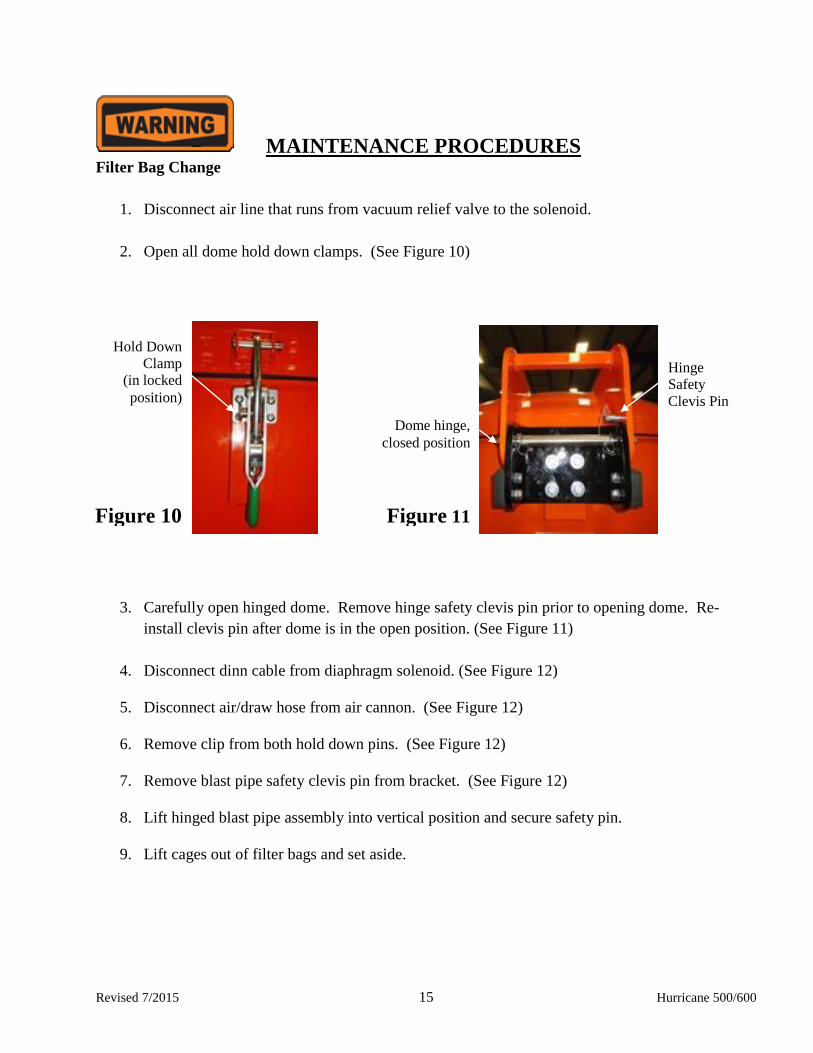
2. Open all dome hold down clamps. (See Figure 10)
3. Carefully open hinged dome. Remove hinge safety clevis pin prior to opening dome. Re-
install clevis pin after dome is in the open position. (See Figure 11)
4. Disconnect dinn cable from diaphragm solenoid. (See Figure 12)
5. Disconnect air/draw hose from air cannon. (See Figure 12)
6. Remove clip from both hold down pins. (See Figure 12)
7. Remove blast pipe safety clevis pin from bracket. (See Figure 12)
8. Lift hinged blast pipe assembly into vertical position and secure safety pin.
9. Lift cages out of filter bags and set aside.
Hold Down
Clamp
(in locked
position)
Figure 10
Figure 11
Dome hinge,
closed position
Hinge
Safety
Clevis Pin

Revised 7/2015 Hurricane 500/600 16
10. Using a large screwdriver, press in on the top part of the filter and pop it out of place. Let the
filter fall down and through the cone.
11. Remove all filters. Clean all of the dust off filter area.
12. Install filters using the same method, only in reverse.
13. Completed
Cage P/N FN8065
Blast Pipe P/N MC2078
Figure 12
Air Cannon
P/N AR5200
Blast Pipe
Hold Down Pin P/N MC2006
Tank Drain
Diaphragm P/N AR5207
Dinn Cable
Connector P/N AR5208
Safety Clevis Pin
(for securing
blast pipe
assembly in the
vertical position) P/N MC2008

Revised 8/2013 17 Hurricane 500/600
MAINTENANCE PROCEDURES
ENGINE U
Maintenance instructions on the engine are included with this manual. The engine should be
maintained per the engine manufacturer’s requirements.
UBLOWERU
Maintenance instructions on the blower are included with this manual. This blower is a precision piece
of equipment, and service should not be attempted by other than qualified personnel. The blower needs
little maintenance other than checking oil levels and changing oil as required. If the blower begins to
“knock”, USHUT DOWN THE UNIT IMMEDIATELY AND CONSULT FACTORY. U
U
PTO U
Operating and maintenance instructions are included with this manual. Follow the manufacturer's
instructions as to grease intervals and adjustment procedures. The clutch needs adjustment when there
is little or no effort required to snap it over center. Sometimes this means Uadjusting the clutch every
few days U for the first 100 hours of operation. If the clutch slips excessively, it will overheat and cause
damage.
UAIR DRYER
A bulletin on this component is included in this manual.
UBAGHOUSE TIMER AND DUMP CYCLE TIMER U
These components cannot be serviced in the field. All that can be checked are voltage to unit, fuse and
output. If the fuse is good and power is present at the input leads and the unit fails to operate, replace
circuit board.
UVACUUM RELIEF VALVE
This valve is factory set and should not be tampered with. Serious damage may result if unqualified
Personnel improperly adjust valve.
UENGINE AIR CLEANER U
The air cleaner on the diesel engine is a dual element filter. There is a smaller secondary element inside
the primary element. The secondary element needs only to be changed if the primary element is
damaged, or is installed improperly. Operating the engine without proper filtration will VOID THE
ENGINE WARRANTY. Operating the engine without proper air filtering for as little as one hour can
seriously shorten engine life.
Revised 5/2013 18 Hurricane 500/600
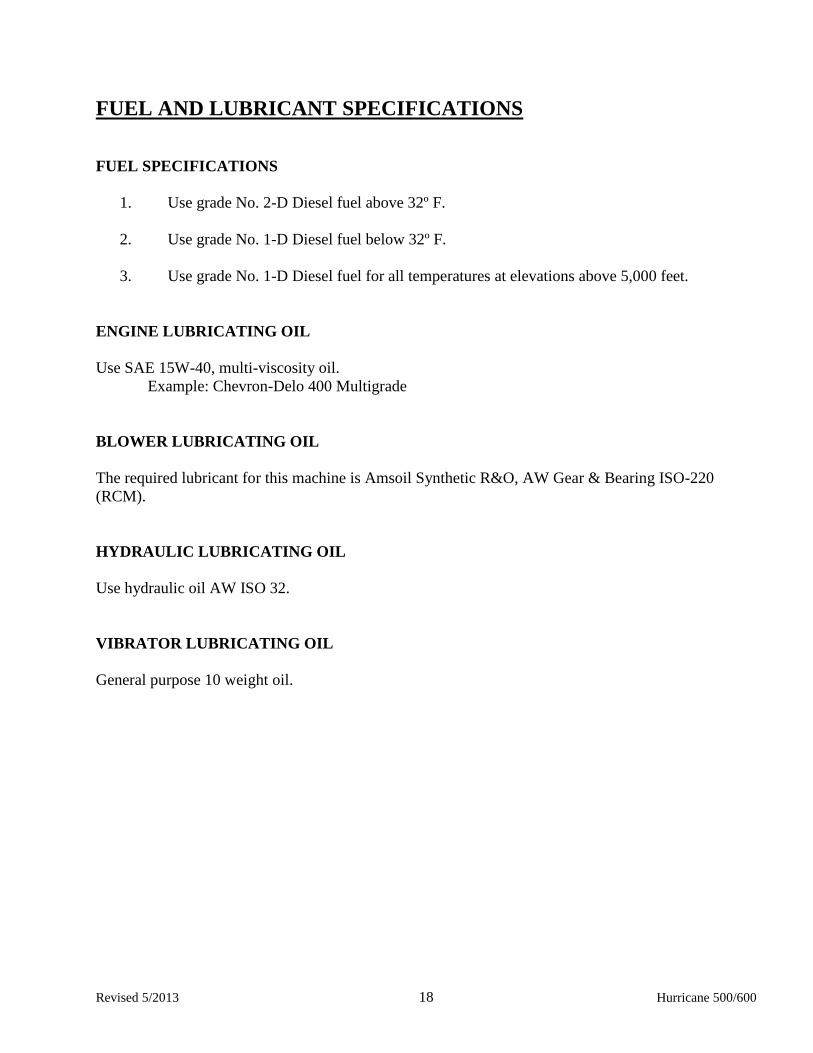
FUEL AND LUBRICANT SPECIFICATIONS
FUEL SPECIFICATIONS
1. Use grade No. 2-D Diesel fuel above 32º F.
2. Use grade No. 1-D Diesel fuel below 32º F.
3. Use grade No. 1-D Diesel fuel for all temperatures at elevations above 5,000 feet.
ENGINE LUBRICATING OIL
Use SAE 15W-40, multi-viscosity oil.
Example: Chevron-Delo 400 Multigrade
BLOWER LUBRICATING OIL
The required lubricant for this machine is Amsoil Synthetic R&O, AW Gear & Bearing ISO-220
(RCM).
HYDRAULIC LUBRICATING OIL
Use hydraulic oil AW ISO 32.
VIBRATOR LUBRICATING OIL
General purpose 10 weight oil.

Revised 9/2013 19 Hurricane 500/600
VACUUM UNIT SET-UP
1. Perform daily maintenance procedures.
2. When the trailer is in position, set the wheel chocks to prevent movement when
disconnected from the truck.
3. Start the diesel engine and idle to build up air pressure and warm up.
4. Attach vacuum suction hose to inlet pipe on collection hopper.
5. Using the adjustable jack on the front of the trailer, raise tongue of Hurricane off pintle
hook to disconnect the truck. Lower front of trailer, then lower and pin rear jack stands in
such a way that trailer will sit level. Make sure the jack stand pads are sitting on a
concrete surface; use heavy planks as required to maintain a stable foundation.
Use the hydraulic leveling cylinder to raise or lower trailer in lieu of manual crank jack
stand.
6. Raise front of trailer so that the rear jack stands are carrying weight, then lower and pin
the front jack stands.
7. When the unit is properly set, it should be level with pressure on all four jack stands.
8. WARNING: Do not proceed or raise collection hopper unless area around and above unit
is inspected and found to be free of electrical power wires or other obstructions.
9. Using “Cylinder Up/Down” control lever, located near engine, raise collection hopper to
necessary height to clear the collection box, dump truck, container, etc.
10. When the proper height is reached, reposition safety blocks to the closest hole on the
hydraulic safety struts just above the hydraulic cylinder top, and pin in place. Gradually
lower the hopper until it is resting on the safety strut safety blocks.
11. WARNING: Do not stand under the collection hopper or get between the collection
hopper and the trailer when the cylinder is in the raised position without the hydraulic
safety strut blocks pinned in place.
12. WARNING: Do not leave the collection hopper in the raised position without the
hydraulic safety strut blocks pinned in place.
Revised 11/2014 20 Hurricane 500/600
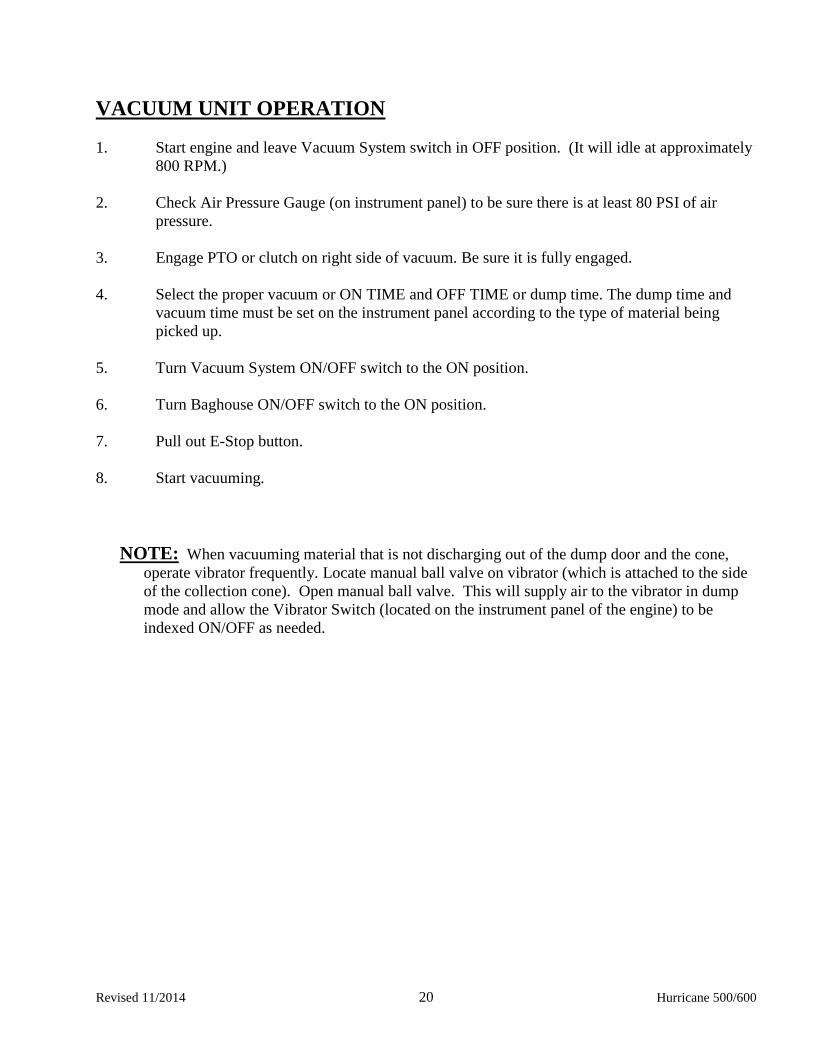
VACUUM UNIT OPERATION
1. Start engine and leave Vacuum System switch in OFF position. (It will idle at approximately
800 RPM.)
2. Check Air Pressure Gauge (on instrument panel) to be sure there is at least 80 PSI of air
pressure.
3. Engage PTO or clutch on right side of vacuum. Be sure it is fully engaged.
4. Select the proper vacuum or ON TIME and OFF TIME or dump time. The dump time and
vacuum time must be set on the instrument panel according to the type of material being
picked up.
5. Turn Vacuum System ON/OFF switch to the ON position.
6. Turn Baghouse ON/OFF switch to the ON position.
7. Pull out E-Stop button.
8. Start vacuuming.
NOTE: When vacuuming material that is not discharging out of the dump door and the cone,
operate vibrator frequently. Locate manual ball valve on vibrator (which is attached to the side
of the collection cone). Open manual ball valve. This will supply air to the vibrator in dump
mode and allow the Vibrator Switch (located on the instrument panel of the engine) to be
indexed ON/OFF as needed.

Revised 9/2013 21 Hurricane 500/600
VACUUM UNIT SHUT DOWN
1. Allow all material to clear suction hose.
2. Index Vacuum System switch to the OFF position.
3. Disengage clutch.
4. Allow all material to clear the collection hopper and cone.
5. Index vibrator switch to the OFF position.
6. Allow diesel engine to idle for 5 minutes after it has been under load before shutting off.
7. Let the baghouse filter pulsing system continue to operate while the engine is cooling
down. This will prolong the life of the filters.
VACUUM UNIT TRANSPORTATION
1. Raise collection hopper and unpin hydraulic safety strut blocks. Re-locate to the “travel”
position.
2. Lower collection hopper and guide the 6” hose down between the engine shroud and the
cross bracing on the towers.
CAUTION: Do not place arms or hands in or near the hopper extension support arms.
3. As the collection hopper approaches the bottom position, be sure the bottom of the hopper
swings in towards the trailer and the retention hook on the dump door engages the bar on
the trailer frame.
4. Secure dump door in the closed position.
5. Ensure the trailer’s adjustable jack is fully raised, and jack stands are pinned in uppermost
position before traveling on the road.
Raise the hydraulic leveling leg so that the cylinder is raised to its uppermost position.
6. Verify that safety chains are attached to towing vehicle before travel.
7. Verify that all marker lights, brake and turn signals are functioning properly before travel.
8. Latch and lock all engine doors and remove the key.
Revised 3/2012 22 Hurricane 500/600
U
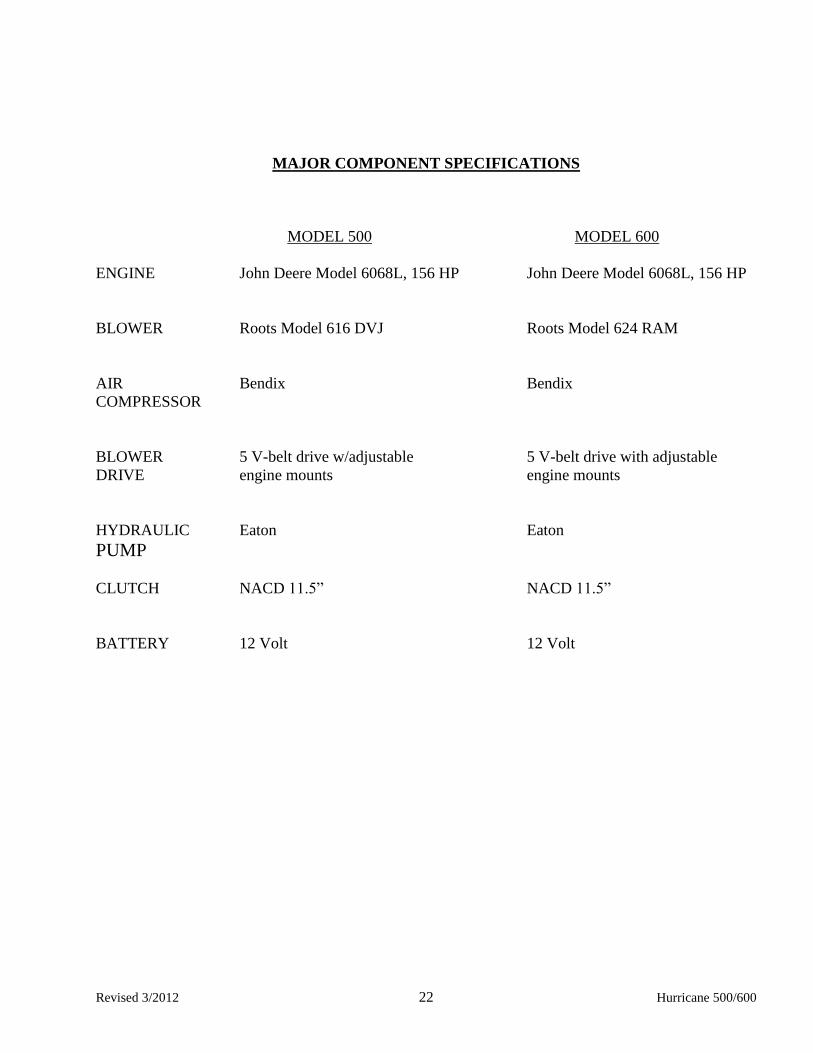
MAJOR COMPONENT SPECIFICATIONS
UMODEL 500 U UMODEL 600 U
ENGINE John Deere Model 6068L, 156 HP John Deere Model 6068L, 156 HP
BLOWER Roots Model 616 DVJ Roots Model 624 RAM
AIR Bendix Bendix
COMPRESSOR
BLOWER 5 V-belt drive w/adjustable 5 V-belt drive with adjustable
DRIVE engine mounts engine mounts
HYDRAULIC Eaton Eaton
PUMP
CLUTCH NACD 11.5” NACD 11.5”
BATTERY 12 Volt 12 Volt
Revised 7/2015 23 Hurricane 500/600
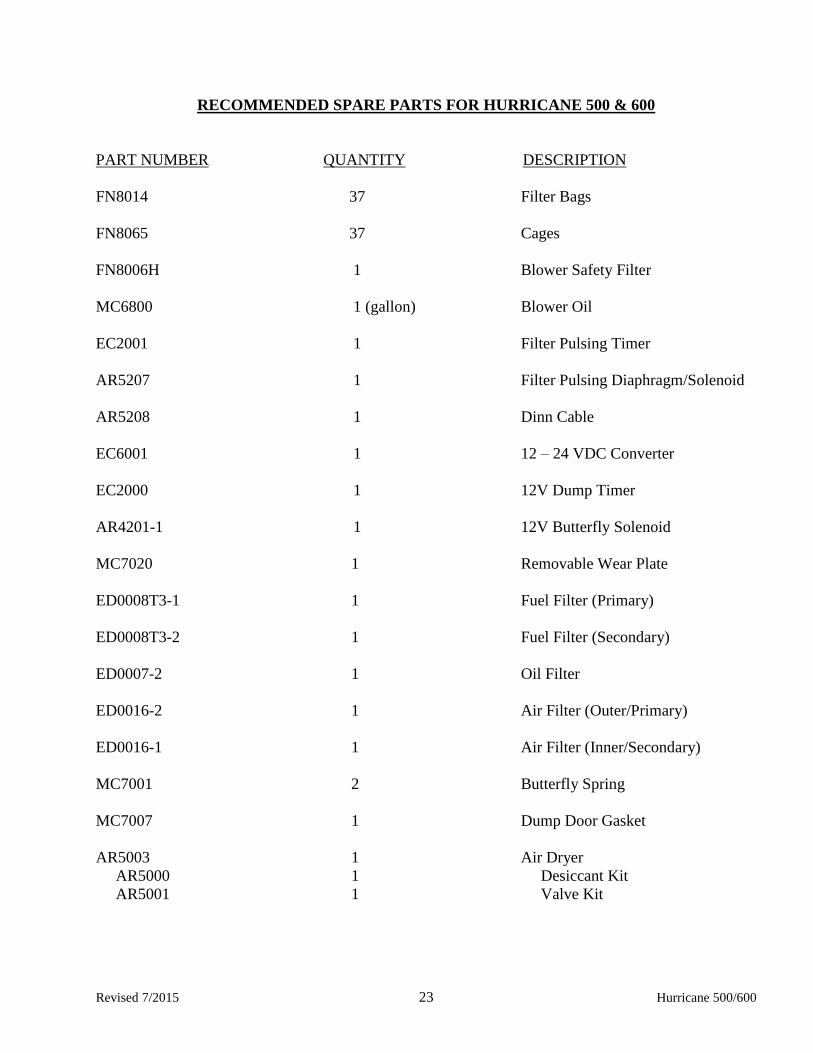
URECOMMENDED SPARE PARTS FOR HURRICANE 500 & 600
UPART NUMBER U UQUANTITY U UDESCRIPTION U
FN8014 37 Filter Bags
FN8065 37 Cages
FN8006H 1 Blower Safety Filter
MC6800 1 (gallon) Blower Oil
EC2001 1 Filter Pulsing Timer
AR5207 1 Filter Pulsing Diaphragm/Solenoid
AR5208 1 Dinn Cable
EC6001 1 12 – 24 VDC Converter
EC2000 1 12V Dump Timer
AR4201-1 1 12V Butterfly Solenoid
MC7020 1 Removable Wear Plate
ED0008T3-1 1 Fuel Filter (Primary)
ED0008T3-2 1 Fuel Filter (Secondary)
ED0007-2 1 Oil Filter
ED0016-2 1 Air Filter (Outer/Primary)
ED0016-1 1 Air Filter (Inner/Secondary)
MC7001 2 Butterfly Spring
MC7007 1 Dump Door Gasket
AR5003 1 Air Dryer
AR5000 1 Desiccant Kit
AR5001 1 Valve Kit

Revised 3/2012 24 Hurricane 500/600
UOPTIONAL EQUIPMENT
Industrial Vacuum Equipment Corp. offers a variety of accessories and optional equipment to
complement your Hurricane, including:
Floor Nozzles Attach to the end of the vacuum hose to pick up material spread across
bare floors or decks.
Removable Bulk Nozzles Lightweight nozzle for attachment to the end of the vacuum hose.
Provides a rigid handle and suction tube to vacuum material from
bare floors and enhances the operator’s ability to vacuum hard to
reach areas.
Replacement Parts Industrial Vacuum Equipment Corp. stocks complete replacement
parts for your Hurricane, including hose and filters. It is recommended
that only Industrial Vacuum Equipment Corp. supplied replacement
parts be used for your Hurricane.
INDUSTRIAL VACUUM EQUIPMENT CORP. ALSO MANUFACTURES A WIDE LINE OF
VACUUM AND COLLECTION DEVICES AND HOPPERS FOR HAZARDOUS AND NON-
HAZARDOUS APPLICATIONS. CONSULT YOUR FACTORY REPRESENTATIVE FOR
INFORMATION ON OUR ENTIRE PRODUCT LINE.

Revised 7/2015 Hurricane 500/600 25
ULIMITED WARRANTY
Seller warrants each new product to be free from defects in material and workmanship under normal
use and maintenance as herein described. This warranty does not apply to commercial items
manufactured by others (Roots Vacuum Pumps, John Deere Engines, etc.), which are covered by
existing warranties of the respective manufacturers thereof. Seller’s sole obligation under this
warranty shall be limited to repairing, replacing or allowing credit for, at Seller’s option, any part
which under normal and proper use and maintenance proves defective in material or workmanship
within twelve (12) months after delivery to Buyer. In the event of defects developing within that
period, the Seller will furnish, F.O.B. its plant, without charge, parts required to replace material found
defective. Beyond this, the Seller assumes no responsibility.
This warranty is in lieu of all other warranties (except of title), expressed or implied, and there is not
an implied warranty of merchantability or fitness for a particular purpose. In no event shall Seller be
liable for consequential or special damages.
Used products are sold on an “as is” basis and there is no implied warranty of merchantability or of
fitness for a particular purpose, unless otherwise expressly stated on the face of this form.
COMPONENT WARRANTY INFORMATION
Warranty information for unit components may be found in the relevant section of this binder.


