Huntvision P2 P4 User Manual - images-na.ssl-images-amazon.com · Reset: Push and hold the...
35
For more detailed instruc�ons, please visit foscam.com/downloads. For more specific assistance, please feel free to drop us an E-mail at: [email protected] User Manual
Transcript of Huntvision P2 P4 User Manual - images-na.ssl-images-amazon.com · Reset: Push and hold the...

For more detailed instruc�ons, please visitfoscam.com/downloads.
For more specific assistance, please feel free to drop us an E-mail at: [email protected]
User Manual
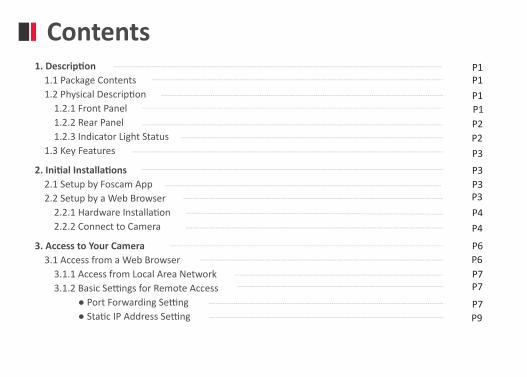
ContentsP1P1
P1P2
P3P3P3
P4
P6
P7
1. Descrip�on 1.1 Package Contents 1.2 Physical Descrip�on 1.2.1 Front Panel 1.2.2 Rear Panel 1.2.3 Indicator Light Status 1.3 Key Features
2. Ini�al Installa�ons 2.1 Setup by Foscam App 2.2 Setup by a Web Browser 2.2.1 Hardware Installa�on 2.2.2 Connect to Camera
3. Access to Your Camera 3.1 Access from a Web Browser 3.1.1 Access from Local Area Network 3.1.2 Basic Se�ngs for Remote Access ● Port Forwarding Se�ng ● Sta�c IP Address Se�ng
P1
P2
P3
P4
P6
P7
P7P9

P9P9
P12P12P12P15
P15P15P17P17P18P18P18P19P20P20P20P22P23P23P26
P28
3.1.3 Remote Access Methods ● WAN IP Access Se�ng ● DDNS Access Se�ng 3.2 Access from Foscam App 3.2.1 Local Area Network Access 3.2.2 Remote Access 3.3 Other Access Method
4. Features and Se�ngs 4.1 WiFi Configura�on 4.2 Storage 4.2.1 SD Card 4.2.2 FTP 4.2.3 Foscam Cloud 4.2.4 Foscam NVR Products 4.2.5 Device Local Storage 4.3 Mail Se�ngs 4.4 Detec�on Setup 4.4.1 Mo�on Detec�on 4.4.2 Sound Detec�on 4.5 Other Se�ngs 4.5.1 Se�ngs in Foscam App 4.5.2 Se�ngs in a Web Browser
5. FAQ
P10
1
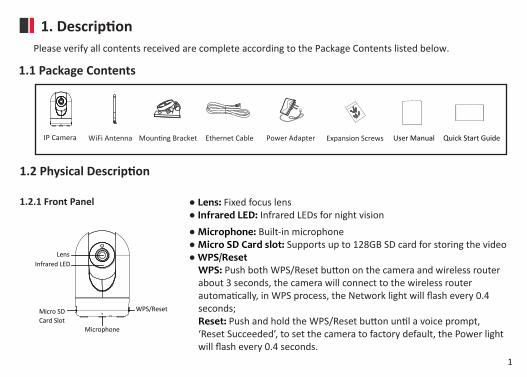
1. Descrip�on
1.1 Package Contents
1.2.1 Front Panel
1.2 Physical Descrip�on
WPS/ResetMicro SD Card Slot
Microphone
Infrared LEDLens
Quick Start GuideUser ManualPower AdapterMoun�ng Bracket IP Camera WiFi Antenna Ethernet Cable Expansion Screws
Please verify all contents received are complete according to the Package Contents listed below.
● Lens: Fixed focus lens● Infrared LED: Infrared LEDs for night vision● Microphone: Built-in microphone● Micro SD Card slot: Supports up to 128GB SD card for storing the video● WPS/Reset
WPS: Push both WPS/Reset bu�on on the camera and wireless router about 3 seconds, the camera will connect to the wireless router automa�cally, in WPS process, the Network light will flash every 0.4 seconds;Reset: Push and hold the WPS/Reset bu�on un�l a voice prompt, ‘Reset Succeeded’, to set the camera to factory default, the Power light will flash every 0.4 seconds.
2
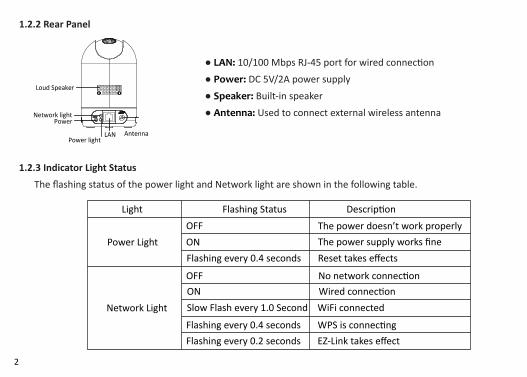
LAN
PowerNetwork light
Power lightAntenna
Loud Speaker
● LAN: 10/100 Mbps RJ-45 port for wired connec�on● Power: DC 5V/2A power supply● Speaker: Built-in speaker● Antenna: Used to connect external wireless antenna
Power Light
Light
Network Light
OFFFlashing Status Descrip�on
ONThe power doesn’t work properlyThe power supply works fine
Flashing every 0.4 seconds Reset takes effects
OFF No network connec�onON Wired connec�onSlow Flash every 1.0 Second WiFi connected
Flashing every 0.4 seconds WPS is connec�ng Flashing every 0.2 seconds EZ-Link takes effect
1.2.2 Rear Panel
The flashing status of the power light and Network light are shown in the following table.1.2.3 Indicator Light Status
3
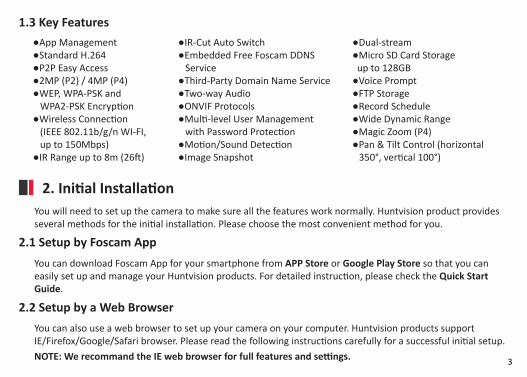
1.3 Key Features●App Management●Standard H.264●P2P Easy Access●2MP (P2) / 4MP (P4)●WEP, WPA-PSK and WPA2-PSK Encryp�on●Wireless Connec�on (IEEE 802.11b/g/n WI-FI, up to 150Mbps)●IR Range up to 8m (26�)
●IR-Cut Auto Switch●Embedded Free Foscam DDNS Service●Third-Party Domain Name Service●Two-way Audio●ONVIF Protocols●Mul�-level User Management with Password Protec�on●Mo�on/Sound Detec�on●Image Snapshot
●Dual-stream●Micro SD Card Storage up to 128GB ●Voice Prompt●FTP Storage●Record Schedule●Wide Dynamic Range●Magic Zoom (P4) ●Pan & Tilt Control (horizontal
350°, ver�cal 100°)
2. Ini�al Installa�onYou will need to set up the camera to make sure all the features work normally. Huntvision product provides several methods for the ini�al installa�on. Please choose the most convenient method for you.
You can download Foscam App for your smartphone from APP Store or Google Play Store so that you can easily set up and manage your Huntvision products. For detailed instruc�on, please check the Quick Start Guide.
You can also use a web browser to set up your camera on your computer. Huntvision products support IE/Firefox/Google/Safari browser. Please read the following instruc�ons carefully for a successful ini�al setup.NOTE: We recommand the IE web browser for full features and se�ngs.
2.1 Setup by Foscam App
2.2 Setup by a Web Browser
4
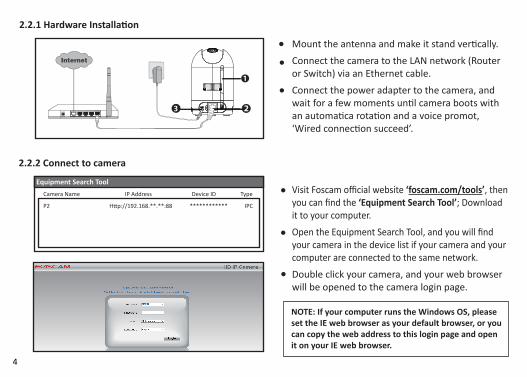
2.2.1 Hardware Installa�on
3
Mount the antenna and make it stand ver�cally.Connect the camera to the LAN network (Router or Switch) via an Ethernet cable.Connect the power adapter to the camera, and wait for a few moments un�l camera boots with an automa�ca rota�on and a voice promot, ‘Wired connec�on succeed’.
2.2.2 Connect to camera
Equipment Search ToolCamera Name
P2 H�p://192.168.**.**:88 ************ IPC
IP Address Device ID Type Visit Foscam official website ‘foscam.com/tools’, then you can find the ‘Equipment Search Tool’; Download it to your computer.Open the Equipment Search Tool, and you will find your camera in the device list if your camera and your computer are connected to the same network.Double click your camera, and your web browser will be opened to the camera login page.
NOTE: If your computer runs the Windows OS, please set the IE web browser as your default browser, or you can copy the web address to this login page and open it on your IE web browser.
5
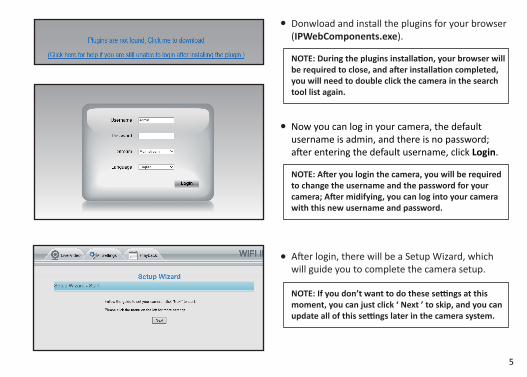
Donwload and install the plugins for your browser (IPWebComponents.exe).
NOTE: During the plugins installa�on, your browser will be required to close, and a�er installa�on completed, you will need to double click the camera in the search tool list again.
Now you can log in your camera, the default username is admin, and there is no password; a�er entering the default username, click Login.
NOTE: A�er you login the camera, you will be required to change the username and the password for your camera; A�er midifying, you can log into your camera with this new username and password.
A�er login, there will be a Setup Wizard, which will guide you to complete the camera setup.
NOTE: If you don’t want to do these se�ngs at this moment, you can just click ‘ Next ’ to skip, and you can update all of this se�ngs later in the camera system.

6
● Now you have logged in the camera system!
P2
3.1 Access to Camera via a Web Browser
3. Access to CameraA�er you finished the ini�al installa�on for your camera, you can login your camera for your daily use and se�ngs.
*If you want to access to your camera via a local area network (LAN), please make sure your App or computer and your camera are connected to the same network;*If you want to access to your camera remotely, please make sure your camera has been connected to the Internet;*If you don’t want to connect your camera with an Ethernet cable, please make sure that you have completed the WiFi configura�on for your camera.
It is easy for you to access to camera by using a web browser; Before accessing to your camera, please check if your camera is connected to a local area network or the Internet.

7
3.1.1 Access to Camera in a Local Area Network
Equipment Search ToolCamera Name
P2 H�p://192.168.**.**:88 ************ IPC
IP Address Device ID TypeDouble click your camera in the device list and your default web browser will be opened automa�caly to the camera login page.
3.1.2 Basic Se�ngs for Remote Access
Log into your router to check the LAN IP your router assign to your camera.
By using the Equipment Search Tool, you can have a quick and easy access to your camera.
Please check Page 4 in this User Manual for the method of downloading the Equipment Search Tool.
You can also just type in the IP Address in your web browser to open the camera login page, our camera supports HTTP and HTTPS protocol.
●h�p://LAN IP:HTTP Port No. ( The default HTTP Port No. is 88 ); For example: h�p://192.168.**.**:88●h�ps://LAN IP:HTTPS Port No. ( The default HTTP Port No. is 443 ); For example: h�ps://192.168.**.**:443
Before having the remote access to our camera, you need to complete the Port Forwarding and Sta�c IP Address Se�ngs for both these two remote access methods.● Port Forwarding Se�ngs* This se�ng is on your router system, not in the camera. Here we will use a regular WiFi Router as an example, and the router se�ngs descrip�on will be slightly different on different routers.

8
a). If your router supports UPnP func�on
You will need to set up the Port Forward-ing manually.Go to the Forwarding func�on page in your router, and add a Custom Service.
For the specific func�on descrip�on and se�ng methods, please check your router’s User Manual or contact with your router’s customer service.
Go to the UPnP func�on page in your router system, and make sure that the UPnP func�on is Enable.
b). If your router doesn’t support UPnP func�on
9
443443
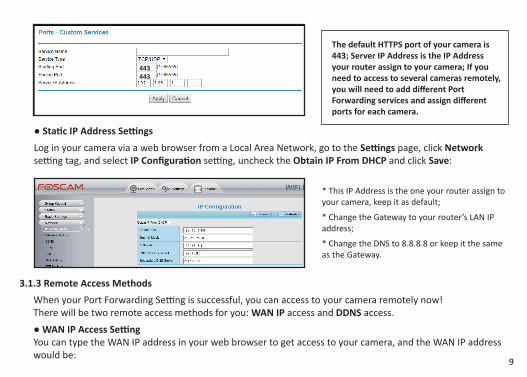
The default HTTPS port of your camera is 443; Server IP Address is the IP Address your router assign to your camera; If you need to access to several cameras remotely, you will need to add different Port Forwarding services and assign different ports for each camera.
● Sta�c IP Address Se�ngsLog in your camera via a web browser from a Local Area Network, go to the Se�ngs page, click Network se�ng tag, and select IP Configura�on se�ng, uncheck the Obtain IP From DHCP and click Save:
* This IP Address is the one your router assign to your camera, keep it as default;
* Change the Gateway to your router’s LAN IP address;
* Change the DNS to 8.8.8.8 or keep it the same as the Gateway.
3.1.3 Remote Access Methods When your Port Forwarding Se�ng is successful, you can access to your camera remotely now!There will be two remote access methods for you: WAN IP access and DDNS access.● WAN IP Access Se�ngYou can type the WAN IP address in your web browser to get access to your camera, and the WAN IP address would be:

10
h�ps:// WAN IP: HTTPS port No.
You can acquire your WAN IP by visi�ng h�p://www.wha�smyip.com from your browser; The default HTTPS port No. is 443. For example, if your WAN IP is 58.541.***.**, your WAN IP access address will be h�ps://58.541.***.**:443; Type this address in your web browser, and you will be able to locate the camera login page.
If you want to use DDNS to get access to your camera, you will need to log in your camera in a Local Area Network to ac�vate the DDNS func�on in your camera first. Please check Page 7 in this User Manual for the method on ge�ng access to your camera in a Local Area Network.
Step 1. Enable UPnP on your camera
Go to the Se�ngs > Network > UPnP se�ng tag, select Yes to enable UPnP.
● DDNS Access Se�ng
11
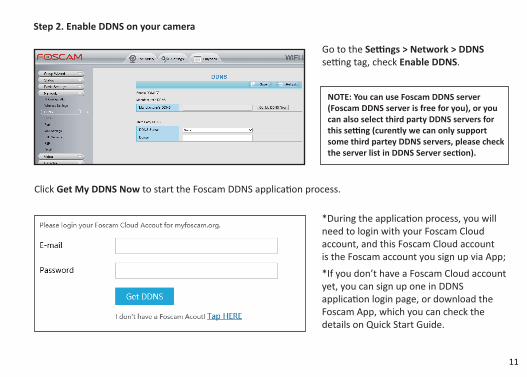
Step 2. Enable DDNS on your camera
Go to the Se�ngs > Network > DDNS se�ng tag, check Enable DDNS.
NOTE: You can use Foscam DDNS server (Foscam DDNS server is free for you), or you can also select third party DDNS servers for this se�ng (curently we can only support some third partey DDNS servers, please check the server list in DDNS Server sec�on).
Click Get My DDNS Now to start the Foscam DDNS applica�on process.
*During the applica�on process, you will need to login with your Foscam Cloud account, and this Foscam Cloud account is the Foscam account you sign up via App; *If you don’t have a Foscam Cloud account yet, you can sign up one in DDNS applica�on login page, or download the Foscam App, which you can check the details on Quick Start Guide.
12
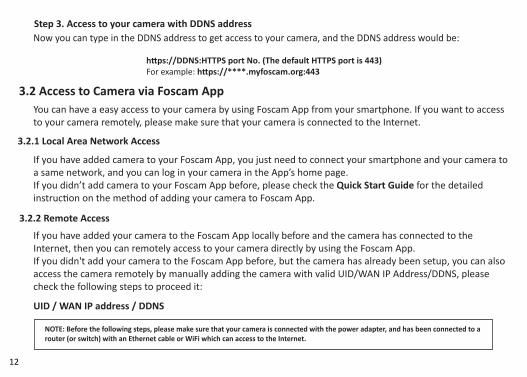
Step 3. Access to your camera with DDNS address
h�ps://DDNS:HTTPS port No. (The default HTTPS port is 443)For example: h�ps://****.myfoscam.org:443
3.2 Access to Camera via Foscam App
Now you can type in the DDNS address to get access to your camera, and the DDNS address would be:
You can have a easy access to your camera by using Foscam App from your smartphone. If you want to access to your camera remotely, please make sure that your camera is connected to the Internet.
If you have added camera to your Foscam App, you just need to connect your smartphone and your camera to a same network, and you can log in your camera in the App’s home page.If you didn’t add camera to your Foscam App before, please check the Quick Start Guide for the detailed instruc�on on the method of adding your camera to Foscam App.
If you have added your camera to the Foscam App locally before and the camera has connected to the Internet, then you can remotely access to your camera directly by using the Foscam App.If you didn't add your camera to the Foscam App before, but the camera has already been setup, you can also access the camera remotely by manually adding the camera with valid UID/WAN IP Address/DDNS, please check the following steps to proceed it:
UID / WAN IP address / DDNS
NOTE: Before the following steps, please make sure that your camera is connected with the power adapter, and has been connected to a router (or switch) with an Ethernet cable or WiFi which can access to the Internet.
3.2.1 Local Area Network Access
3.2.2 Remote Access

13
Step 1. Download Foscam App Search ‘Foscam’ from your smartphone in APP Store or Google Play Store and you can download the latest version of Foscam App.
Step 2. Sign up a Foscam Account and Sign inA�er downloaded Foscam APP, you can sign up a Foscam Account from the APP’s home page, and if you have a Foscam account, you can directly sign in with it.* For more details, please check the Quick Start Guide.
Step 3. Add your camere to Foscam App
Step 4. Add your camera by alterna�ve method
●Tap Camera
+
+Foscam Add Device
Camera
Base Sta�on
Add Device
Next
+●Tap bu�on or + bu�on on the top right corner from App’s home page to start the process of adding a camera.
●Tap Next
*If you have your camera around you, you can also scan the QR code to add camera to your Foscam App, and you can find the QR code from the bo�om of your camera.
14
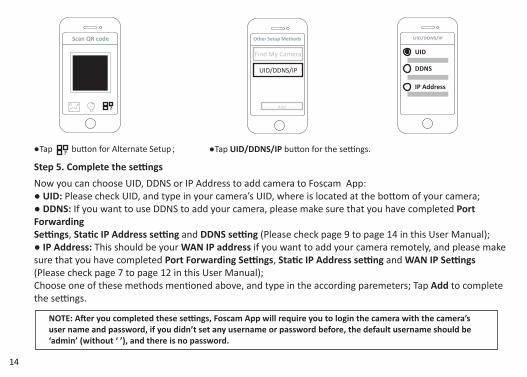
●Tap bu�on for Alternate Setup;?
Step 5. Complete the se�ngs
Scan QR code
?
Other Setup Methods
Find My Camera
UID/DDNS/IP
UID/DDNS/IP
UID
DDNS
IP Address
Add
●Tap UID/DDNS/IP bu�on for the se�ngs.
Now you can choose UID, DDNS or IP Address to add camera to Foscam App:● UID: Please check UID, and type in your camera’s UID, where is located at the bo�om of your camera;● DDNS: If you want to use DDNS to add your camera, please make sure that you have completed Port Forwarding Se�ngs, Sta�c IP Address se�ng and DDNS se�ng (Please check page 9 to page 14 in this User Manual);● IP Address: This should be your WAN IP address if you want to add your camera remotely, and please make sure that you have completed Port Forwarding Se�ngs, Sta�c IP Address se�ng and WAN IP Se�ngs (Please check page 7 to page 12 in this User Manual);Choose one of these methods men�oned above, and type in the according paremeters; Tap Add to complete the se�ngs.
NOTE: A�er you completed these se�ngs, Foscam App will require you to login the camera with the camera’s user name and password, if you didn’t set any username or password before, the default username should be ‘admin’ (without ‘ ’), and there is no password.

15
3.3 Other Access MethodsHuntvision products also support other access methods for you to login your camera.● VMS: This is also a Foscam so�ware designed for computer use, and you can visit foscam.com/downloads to get the latest version so�ware;● VLC: The camera supports RTSP streaming, here you can view the camera by VLC player. RTSP URL would be: rtsp:// [user name][:password]@IP:Port number/videostream Open the VLC, and go to Media > Open Network Stream op�on, then enter the URL in VLC.
4. Features and Se�ngsPlease make sure that you have completed the ini�al installa�on and access se�ngs, so that you can have a successful access to your camera for daily use and se�ngs.
Huntvision camera P2 and P4 are WiFi IP cameras, which can be connected to a WiFi router without using an Ethernet cable; For a successful WiFi configura�on, please maintain a distance between the camera and wireless router of maximum 2-5 meters (6-12 feet) first, and follow the following instruc�ons carefully.
● Configurate the WiFi from Foscam AppPlease check Quick Start Guide for the detailed instruc�ons on how to configurate the WiFi from Foscam App.
4.1 WiFi Configura�on
16
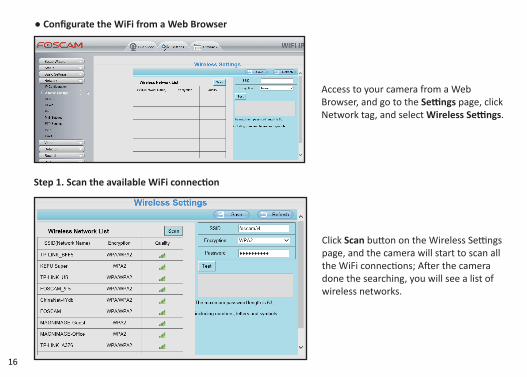
● Configurate the WiFi from a Web Browser
Access to your camera from a Web Browser, and go to the Se�ngs page, click Network tag, and select Wireless Se�ngs.
Step 1. Scan the available WiFi connec�on
Click Scan bu�on on the Wireless Se�ngs page, and the camera will start to scan all the WiFi connec�ons; A�er the camera done the searching, you will see a list of wireless networks.
17
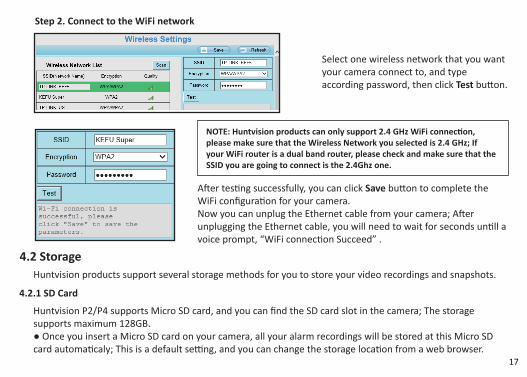
Step 2. Connect to the WiFi network
Select one wireless network that you want your camera connect to, and type according password, then click Test bu�on.
4.2 Storage
NOTE: Huntvision products can only support 2.4 GHz WiFi connec�on, please make sure that the Wireless Network you selected is 2.4 GHz; If your WiFi router is a dual band router, please check and make sure that the SSID you are going to connect is the 2.4Ghz one.
A�er tes�ng successfully, you can click Save bu�on to complete the WiFi configura�on for your camera.Now you can unplug the Ethernet cable from your camera; A�er unplugging the Ethernet cable, you will need to wait for seconds un�ll a voice prompt, “WiFi connec�on Succeed” .
Huntvision products support several storage methods for you to store your video recordings and snapshots.
Huntvision P2/P4 supports Micro SD card, and you can find the SD card slot in the camera; The storage supports maximum 128GB.● Once you insert a Micro SD card on your camera, all your alarm recordings will be stored at this Micro SD card automa�caly; This is a default se�ng, and you can change the storage loca�on from a web browser.
4.2.1 SD Card

18
4.2.2 FTPIf you want to store your alarm recordings at your FTP, you will need to accesee to your camera from a web browser for configura�ng your FTP first.
Access to your camera from a Web browser, and go to the Se�ngs page, click the Network func�on tag and select FTP Se�ngs.Complete these informa�on and click Save bu�on.
If you have ac�vated your Foscam Cloud Service, your alarm recordings will be stored at the Foscam Cloud Server at the same �me, which you can visit myfoscam.com for details.
Huntvision cameras are also compa�ble with Foscam NVR products; You can also access to camera from a Foscam NVR product, and store the alarm recordings at this Foscam NVR product.You will need to do this se�ng on a Foscam NVR product.
4.2.3 Foscam Cloud
4.2.4 Foscam NVR Products
19
Foscam Album Select
Today
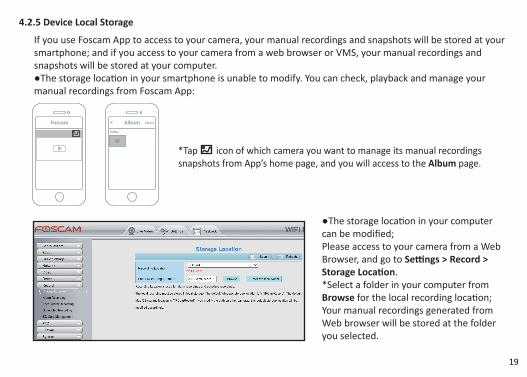
If you use Foscam App to access to your camera, your manual recordings and snapshots will be stored at your smartphone; and if you access to your camera from a web browser or VMS, your manual recordings and snapshots will be stored at your computer.●The storage loca�on in your smartphone is unable to modify. You can check, playback and manage your manual recordings from Foscam App:
*Tap icon of which camera you want to manage its manual recordings snapshots from App’s home page, and you will access to the Album page.
●The storage loca�on in your computer can be modified; Please access to your camera from a Web Browser, and go to Se�ngs > Record > Storage Loca�on.*Select a folder in your computer from Browse for the local recording loca�on; Your manual recordings generated fromWeb browser will be stored at the folder you selected.
4.2.5 Device Local Storage
20
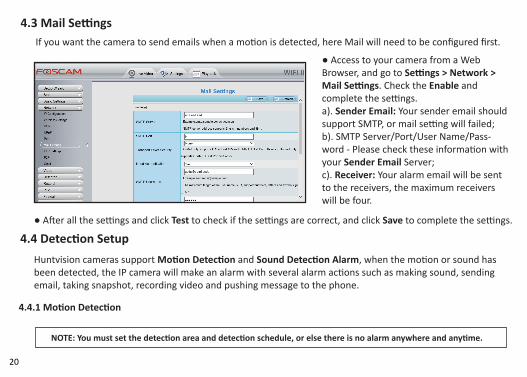
4.3 Mail Se�ngsIf you want the camera to send emails when a mo�on is detected, here Mail will need to be configured first.
● Access to your camera from a Web Browser, and go to Se�ngs > Network > Mail Se�ngs. Check the Enable and complete the se�ngs.a). Sender Email: Your sender email should support SMTP, or mail se�ng will failed;b). SMTP Server/Port/User Name/Pass-word - Please check these informa�on with your Sender Email Server;c). Receiver: Your alarm email will be sent to the receivers, the maximum receivers will be four.
● A�er all the se�ngs and click Test to check if the se�ngs are correct, and click Save to complete the se�ngs.
Huntvision cameras support Mo�on Detec�on and Sound Detec�on Alarm, when the mo�on or sound has been detected, the IP camera will make an alarm with several alarm ac�ons such as making sound, sending email, taking snapshot, recording video and pushing message to the phone.
NOTE: You must set the detec�on area and detec�on schedule, or else there is no alarm anywhere and any�me.
4.4 Detec�on Setup
4.4.1 Mo�on Detec�on

21
● Access to your camera from a Web Browser, and go to Se�ngs > Detector > Mo�on Detec�on. Check the Enable; a�er comple�ng the se�ngs, click Save bu�on to enable Mo�on Detec�on.
a). Trigger interval: The interval �me between two mo�on detec�on.b). Alarm ac�ons: The way that you want to be no�fied when a mo�on is detected:Sound: Please select Camera Sound or PC Sound if you want the camera to alarm when it detects a mo�on;
NOTE: If you selected ‘PC Sound’, please make sure that your computer has connected with a speaker.
Send E-mail: If you want to receive an E-mail when the camera detects a mo�on, please select Send E-mail, and you will need to set up your email informa�on first otherwise camera will fail to send you the alarm E-mail; Check page 20 in this User Manual for how to setup your E-mail;Take Snapshot: If you select this ac�on, camera will take a snapshot automa�cally when it detects a mo�on;Recording: If you want to record a video when your camera detects a mo�on, you will need to select this ac�on; The alarm video will be stored at the storage loca�on you set up for this camera (You can only store the alarm video at your camera’s SD Card or your FTP, but if you ac�vate your cloud service, the alarm video will be stored at Foscam Cloud server at the same �me).
22
NOTE: You will need to setup the storage loca�on for alarm videos first, and your alarm videos can be only stored at camera’s SD card, FTP and Foscam Cloud, please check page 17 to page 19 in this User Manual for how to setup a storage loca�on for your camera.
Push Message to your phone: You will need to download Foscam App to your smartphone, and add your camera to Foscam App first, and then this ac�on can take effects.c). Detect Area: Click Set Detec�on Area to the detec�on area se�ngs page, where you can set up the Sensi�vity and the up-to-3 detec�on areas. ( For P2, you can only set up 1 detecion area, and set up the Sensi�vity on Se�ngs > Detector > Mo�on Detec�on page. ) d). Alarm Schedule: Click All bu�on, and you will see all �me range turn red, which means that when something moving in the detec�on area at any�me, the camera will alarm; Or you can click week day words to set the schedule by days, and also you can click specific �me block to set the schedule by a specific �me.
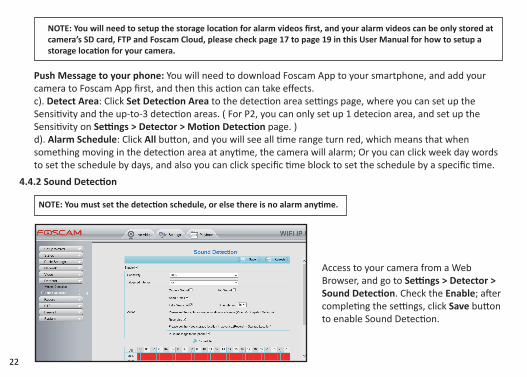
4.4.2 Sound Detec�on
NOTE: You must set the detec�on schedule, or else there is no alarm any�me.
Access to your camera from a Web Browser, and go to Se�ngs > Detector > Sound Detec�on. Check the Enable; a�er comple�ng the se�ngs, click Save bu�onto enable Sound Detec�on.
23
4.5 Other Se�ngs
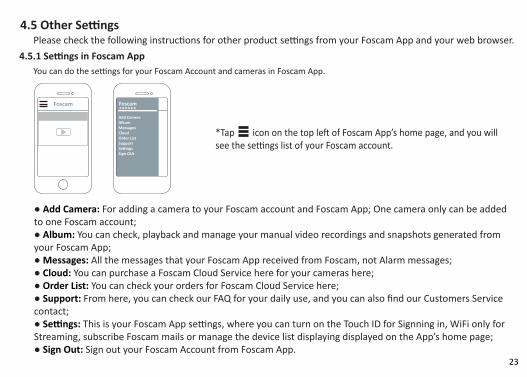
Foscam Foscam******Add CameraAlbumMessagesCloudOrder ListSupportSe�ngsSign OUt
Please check the following instruc�ons for other product se�ngs from your Foscam App and your web browser.
You can do the se�ngs for your Foscam Account and cameras in Foscam App.
*Tap icon on the top le� of Foscam App’s home page, and you will see the se�ngs list of your Foscam account.
● Add Camera: For adding a camera to your Foscam account and Foscam App; One camera only can be added to one Foscam account;● Album: You can check, playback and manage your manual video recordings and snapshots generated from your Foscam App;● Messages: All the messages that your Foscam App received from Foscam, not Alarm messages;● Cloud: You can purchase a Foscam Cloud Service here for your cameras here;● Order List: You can check your orders for Foscam Cloud Service here;● Support: From here, you can check our FAQ for your daily use, and you can also find our Customers Service contact; ● Se�ngs: This is your Foscam App se�ngs, where you can turn on the Touch ID for Signning in, WiFi only for Streaming, subscribe Foscam mails or manage the device list displaying displayed on the App’s home page;● Sign Out: Sign out your Foscam Account from Foscam App.
4.5.1 Se�ngs in Foscam App

24
Foscam P2/P4
HDx←
←
*Tap icon on the camera that you want to manage and you can access to the camera page.
Tap this bu�om to turn on/off the mic on the camera, and if you turn it on, you can hear the sound from your smartphone (Please make sure that your smartphone is not in the Mute mode);Tap this bu�on to adjust the image quality;Tap this bu�on to full screen display;Tap this bu�on to Pan & Tilt control your camera;Press and hold this bu�on, two-way audio is ready for when the bu�on is bright blue;Tap this bu�on to record manually;Tap this bu�on to set Mo�on/Sound Detec�on, enable/disable the IR LED, and rota�on of the image.
HD
x
←←
25
Se�ngs
My PlanShare CameraCamera InfoCamera Sleep ModeFirmware UpgrapeNetworkCamera Speaker VolumeSD Card Video PlaybackAlarm Se�ngsSecurity Se�ngsSync TimeIR LED SchedulePrompt Se�ngsReboot CameraDelete Camera
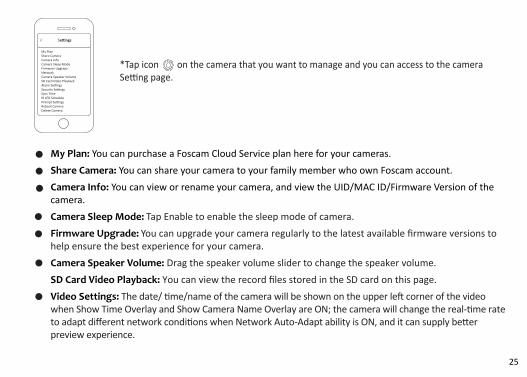
*Tap icon on the camera that you want to manage and you can access to the camera Se�ng page.
My Plan: You can purchase a Foscam Cloud Service plan here for your cameras.Share Camera: You can share your camera to your family member who own Foscam account.Camera Info: You can view or rename your camera, and view the UID/MAC ID/Firmware Version of the camera.Camera Sleep Mode: Tap Enable to enable the sleep mode of camera.Firmware Upgrade: You can upgrade your camera regularly to the latest available firmware versions to help ensure the best experience for your camera.Camera Speaker Volume: Drag the speaker volume slider to change the speaker volume.SD Card Video Playback: You can view the record files stored in the SD card on this page. Video Settings: The date/ �me/name of the camera will be shown on the upper le� corner of the video when Show Time Overlay and Show Camera Name Overlay are ON; the camera will change the real-�me rate to adapt different network condi�ons when Network Auto-Adapt ability is ON, and it can supply be�er preview experience.

26
Security Settings: We recommend that you change the password of your camera regularly, using a combina�on of numbers, le�ers and special characters. Sync Time: Tap this bu�on to sync camera with the smartphone �me.IR LED Schedule: You can manage IR LED based on a schedule if IR LED is in Scheduled mode.Prompt Settings: You can turn on/off the camera LED here, and also you can enable/disable the voice prompt here. Reboot Camera: You can reboot your camera here.Delete Camera: You can delete your camera here.
4.5.2 Se�ngs in a Web Browser
You can do the se�ngs for your camera from a web browser.
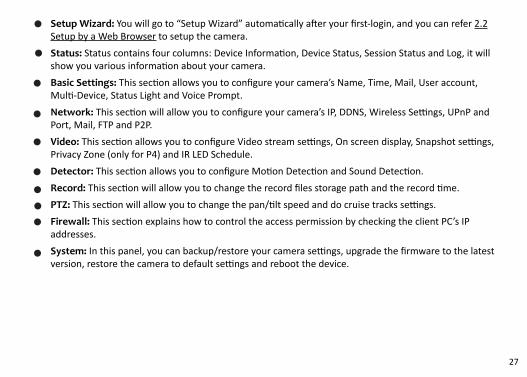
*Tap Se�ngs icon on the top of the Web Browser, and you will see the se�ng list of your camera:
27
Setup Wizard: You will go to “Setup Wizard” automa�cally a�er your first-login, and you can refer 2.2 Setup by a Web Browser to setup the camera.Status: Status contains four columns: Device Informa�on, Device Status, Session Status and Log, it will show you various informa�on about your camera.Basic Settings: This sec�on allows you to configure your camera’s Name, Time, Mail, User account, Mul�-Device, Status Light and Voice Prompt.Network: This sec�on will allow you to configure your camera’s IP, DDNS, Wireless Se�ngs, UPnP and Port, Mail, FTP and P2P.Video: This sec�on allows you to configure Video stream se�ngs, On screen display, Snapshot se�ngs, Privacy Zone (only for P4) and IR LED Schedule.Detector: This sec�on allows you to configure Mo�on Detec�on and Sound Detec�on.Record: This sec�on will allow you to change the record files storage path and the record �me.PTZ: This sec�on will allow you to change the pan/�lt speed and do cruise tracks se�ngs.Firewall: This sec�on explains how to control the access permission by checking the client PC’s IP addresses. System: In this panel, you can backup/restore your camera se�ngs, upgrade the firmware to the latest version, restore the camera to default se�ngs and reboot the device.
28
5. FAQ● Why my camera is unable to connect to router wirelessly?If the camera can’t connect to the the router wirelessly, please proceed the WiFi cofigura�on again (check detailed instruc�ons in this user manual at Page15-17, 4.1 WiFi Configura�on) to make sure the all the se�ngs has been done correctly on WiFi configura�on.● Why can’t I access the camera remotely via the internet using DDNS and Port on my HD camera?If the camera can’t be access remotely by using DDNS and port,please proceed the Remote Access Se�ngs for again (check detailed instruc�ons in this user manual at Page9-14, 3.1.2 Access to Camera Remotely) to make sure the all the se�ngs has been done correctly on WiFi configura�on.● Why can’t I connect to my P2P camera remotely using the Foscam App?Foscam P2P cameras allow users to connect camera remotely using Foscam app without extract setup like port forwarding. When it is unable to connect remotely, below �ps can help to establish the connec�on:Step 1: Update app and camera’s firmware to latest version;Step 2: Power off the camera then power back on;Step 3: Delete camera from app then re-add it back, also lower camera’s resolu�on;Step 4: Check to see if the Foscam camera is connected to the internet;Step 5: Verify the mobile device is connected to the internet; Open a web browser on the mobile device and a�empt to access a web site. If the site is accessible then the mobile device has access to the internet;Step 6: If the P2P port of the camera is modiable,change the P2P port of the camera in the event the port is being blocked by a firewall of the router or the ISP (If the P2P port of the camera can’t be modified, please ignore this step);

29
Step 7: Verify the P2P feature of the camera is enable; Login to the camera via a web browser on a computer connected to the same LAN. Navigate to Se�ngs > Network > P2P and verify the feature is enabled;Step 8: Lower the bit rate and frame rate of the live video feed from the camera;
● How do I fix the error “please re-login a�er plugin installed”? a). Internet Explorer (Windows OS)
Step 1: Launch Internet Explorer, and navigate to Tool > Internet Op�ons > Security > Customer Level > Ac�veX Controls and Plugins;Step 2: Enable ‘Download unsigned Ac�veX controls’, ‘Ini�alize and script Ac�veX controls’, ‘Run Ac�veX controls and plugins’;Step 3: Close and re-launch Internet Explorer and a�empt to login to the camera.
b). Safari (Mac OS)
c). Chrome (Windows OS)
NOTE: If you've turned on Ac�veX Filtering, please find the bu�on in the address bar and click turn it off so the plugin can run.
Step 1: Open Safari and navigate to Security Se�ngs > Internet Plug-Ins op�ons; Step 2: Enable Allow Plug-Ins;Step 3: Close Safari completely and re-launch the browser and a�empt to login to the camera.
Launch the browser and in the address bar type the address ‘chrome://components’, then find pnacl located in the list; If the version number indicated is 0.0.0.0 the component has not been updated. Click on Check for Update to update the pnacl component and restart the browser a�er the update is complete. If the problem con�nues a�er the pnacl plugin is updated temporarily, disable the an�-virus
30
program and try to login to the camera.
d). Firefox Version 52 or below (Windows OS)
Launch Firefox and in the address bar type about: addons and press enter. Click Plugins and find nplIPCRegDLL and choose the op�on Always Ac�ve. Close Firefox and re-launch the browser. A�empt to login to the camera.
NOTE: Firefox version above 52 has blocked Foscam plugin completely, please use Internet Explorer instead.
● Why my camera doesn’t show in the Equipment search tool ?This is usually because camera doesn’t get an IP in same network segment as the computer. Please follow below steps to fix the problem:Step 1: Make sure both camera and computer are connected to same router;Step 2: Make sure camera’s connected to router properly and camera status is normal; For indoor pan/�lt cameras, when powered on you will see a red power light and solid green light and camera will pan/�lt;Step 3: Reset camera to have a check. Just keep pressing rest bu�on on camera with power on for about 30 seconds un�ll it reboots. Reset bu�on is usually on back/bo�om of camera, or on the end cords;Step 4: Try another Ethernet cable or hook into another LAN port on router;Step 5: Make sure the router DHCP server is enabled and there is no Mac address filter; Check router’s DHCP list as well, to see if you can find camera’s IP address there; If yes, please try to log-in the camera directly by manually input the IP address and port (default h�p port for camera is 88) of camera into address bar of web browser; Step 6: Please turn off any virtual machine or mul�ple connec�on (use only wired or wireless connec�on) that is running on computer;

31
Step 7: Make sure there’s no firewall is blocking Equipment Search Tool or other search tool conflicts with it.● What can I do if I forgot camera’s user name and password?
Camera can be hard reset to default se�ngs, when you forgot camera’s login user name and password, please follow the steps to reset your camera and get your camera username and password to defualt:Step 1: Keep power on camera;Step 2: Press and hold reset bu�on of camera for 30 seconds u�ll it reboots and you can hear a voice prompt, ‘Reset succeeded’, On P2/P4 cameras; The Reset bu�on is located on the side of the body;Step 3: Once reset, camera will be restored to default se�ngs; And default username is admin, no password (leave password blank).
● How do I add a Foscam camera back to the Foscam App a�er a change in the network was made?
The type of change could be a replacement router or the network was moved to a different loca�on,as well as changing the network name or password for security purposes.Step 1: Delete the old Foscam camera from the App first;Step 2: If the camera was connected to a wireless network in the past,please connect the camera to the WIFI router with an Ethernet cable first;
Note: The smart device/phone should be connected to the same WiFi network the camera is to be setup.
Step 3: Power on the camera and perform a hard reset of the unit;Step 4: Add the camera once again to the Foscam App; Once the camera has been added to the Foscam App again the video feed can be viewed;
Note: A�er a hard reset the camera will require for new username and password to log in the camera again.
32
Step 5: Proceed the WiFi configura�on for the camera using Foscam App. Please check the Quick Start Guide for detail instruc�on for WiFi configura�on.
● Why am I not receiving alarm push no�fica�ons on the Foscam App?Step 1: Be sure the firmware of the camera is running the latest version and the Foscam App has been updated to the latest version;Step 2: Verify that the mo�on/sound detec�on se�ngs are enabled on the camera being monitored; Login to the camera via a web browser on the LAN and navigate to Se�ngs > Mo�on Detec�on or Sound Detec�on;Step 3: Verify the push message feature is enabled on the Foscam APP; Login to the Foscam App and navigate to App Se�ngs > General > Push Message and enable the feature by switching on the switch;Step 4: Verify that the no�fica�ons for the Foscam App are enabled on the smart device and are not blocked; This should be under the No�fica�on Se�ngs on the Smart Device;Step 5: Verify if an alarm triggered event occurred on the camera; Login to the camera via the LAN with a web browser and navigate to Se�ngs > Status > Log to check the ac�vity of the camera to see if any alarm events have been logged by the unit;Step 6: Remove the camera from the Foscam App temporarily and re-add it.