
Humdinger Wind Belt Kit - Amazon S3 Belt Kit 2 About KidWind The KidWind Project is a team of...
12
i n s t r u c t i o n s Humdinger Wind Belt Kit
Transcript of Humdinger Wind Belt Kit - Amazon S3 Belt Kit 2 About KidWind The KidWind Project is a team of...
i n s t r u c t i o n s
HumdingerWind Belt Kit
2
About KidWindThe KidWind Project is a team of teachers, students, engineers and practitioners exploring the science behind wind energy in classrooms around the US. Our goal is to introduce as many people as possible to the elegance of wind power through hands-on science activities which are challenging, engaging and teach basic science principles.
While improving science education is our main goal, we also aim to help schools become important resources for students, and the general public, to learn about and see wind energy in action. www.KidWind.org
About HumdingerHumdinger, a Hawaii limited liability company with a wholly-owned sub-sidiary (Humdinger Wind Energy (HK) Limited) in Hong Kong, is primarily a research and development house focused on pushing forward the de-velopment of the Windbelt™ technology. Through its growing intellectual property base in the US and abroad, Humdinger manages rights to the Windbelt™ and several additional enabling innovations in power condi-tioning, linear alternator design, and aerodynamic numerical modeling.
The Humdinger Windbelt was developed in partnership between the Kidwind Project and Humdinger. www.humdingerwind.com
A Note on ReproductionThis work may not be reproduced by mechanical or electronic means without written permission from KidWind, except for educational uses by teachers in a classroom situation or a teacher training workshop. For permission to copy portions or all of this material for other purposes, such as for inclusion in other documents, please contact Michael Arquin at the KidWind Project: [email protected]
V3.0

3
Humdinger Windbelt KitParts2 Stator
4 Tap bolt
4 Washers
4 Nylon Insert Lock Nut
4 1/4” Washer
2 Small Spools
1 Double Sided Tape
1 Tyveck Taffeta, 3”x43”
2 Magnet, 1/8” thick
2 Magnet, 1/16” thick
4 Alligator Clip Cord
1 Rectifier
1 LED, red
1 LED, bi-color
You need to supply
1 Measuring tool to measure the one-meter distance (about 39 inches) between bolt holes.Wrenches for above bolts and nuts.
1 Drill or other tool to form holes through the cardboard tube.1 Cutting blade (box cutter or hack saw blade) to form notch for stator in
the cardboard tube.Double sided tape (to attach magnets to belt).Tape: duct tape, masking tape, filament tape, etc.
1 Straightedge to mark belt for cutting.1 Blade or scissors to cut belt.
A small carpenter’s square helps make sure the bolt holes are perpen-dicular to the tube, should you choose to make your frame with one
Congratulations, you are about to embark on a creative journey. Kid-Wind has provided the basic parts needed for a Windbelt. We have not included materials needed to construct the “frame.” You will have to design and try your own. We are including suggested design ideas; you can use them or ignore them. When you get your Windbelt to work, we’d love to see photos of it!
Parts
Rectifier 1×
+ —
Clip cords 4×
+ —
LED 2×Washer 4×
Magnets 4× Lock nut 4×
Stator 2×Belt 1×
Spool 2× 5" bolt 4×

4
The pre-cut belt has a width of about ¾ inch; and a length of about 43 inches . If you want to try different widths, you can cut the additional belt material. The belt can be slit to width with a blade and straight-edge; or marked and cut with a scissors.
MAKE YOUR OWN BELT
top down view
You can use wooden spools to tension your belt.
The materials will work the best if the mounted length of the belt is about one meter (about 39 inches). But feel free to try anything else.
A TIP ON BELT LENGTH
You can use a cardboard shipping tube to make a frame for your Windbelt.
Design ideas
• Film canisters, hand held. (plastic pipe ends, pieces of wood dowels.)
• Step on one end, hold film canister in hand.
• Film canisters, or other spools with belt taped to back of board.
• Bolts on a board.
• Two boards with hinge.
• Turnbuckle on a board.
• Wood-workers clamp as frame.
• Pipe-clamp as frame.
• Suspend a weight from ends of belt, as it goes over vertical supports.
Important operating considerations
• A belt vibrating at a higher frequency produces higher voltage.
• The magnitude of the magnets’ vibration influences electrical output.
• The wind speed is very important. The Windbelt will work much better with a high quality metal fan, than with an inexpensive plastic fan.
• Also, try using two plastic window fans next to each other, so that they both blow onto the Windbelt.
• Belt tension is extremely important and must be fine-tuned.
• The distance from magnets to the stator is extremely important. The mag-nets must be very close to the stator without the belt rubbing the stator.

5
Operation1. Place the Windbelt so it receives maximum air from the fan. The
Windbelt can be horizontal or vertical.
2. Turn on fan. Adjust tension in the Windbelt (by turning either bolt) until the belt vibrates. Make sure that the magnets are always directly in front of the stator.
3. You may use your hand on the belt (on the end opposite the stator) to apply tension to see how it affects the belt vibrations
4. Sometimes the belt will go into a “torsional” mode (rotating back and forth along its length); this torsion will allow the Windbelt to produce a minimal amount of electricity. But the Windbelt produces more power if the belt is in “longitudinal” mode (a long wave throughout the belt that looks like half of a sine wave if viewed from the side).
5. If the belt is in a torsional mode, you can often prod it into longitudi-nal mode by touching it with a finger, by changing the tension with a finger, or by slightly changing the angle to the fan.
ExperimentsChange these variables and observe any changes in production.
Wind Speed
• Vary the fan speed
• Hold the Windbelt at various distances from the fan.
• Hold the Windbelt at various angles to the fan.
• On a windy day, take the Windbelt outside.
Magnets
• Change the standard pair of magnets to another pair (always use two of the same size magnets). Mount the magnets on the belt as previously described. If you want to try the Windbelt with other magnets, www.kjmagnetics.com is one good source.
Belt
• Take off the narrow belt and install the wide belt (mount magnets to the wide belt first).
• Use your fingers (starting at the end opposite of the stator) to pinch the belt. Move your fingers toward the stator, effectively shortening the belt.
• Stator and Magnets: Move them to a different location along the belt.
• Wire two or more Windbelts in parallel to power a bigger load.
• Does adding an electrical load change the vibration of the belt?
Place windbelt accross your fan so that the full length of the belt is inside the air stream, but so that it does not cross the lower-speed center of the fan.
Windbelts can be placed in front of the fan hori-zontally or vertically.
Orient the windbelt so that the belt side is facing the fan. If the magnet sticks to the stator, you can try flipping the orientation so that the wind blows the belt and magnet away from the stator. A better long-term fix is to readjust the belt so that it sits slightly further from the stator.

6
TroubleshootQ: What if the belt will not vibrate?
A: Make sure you are using a high power fan. Adjust the belt to more and less tension (as the Windbelt is in the moving airstream). Make sure the magnets are not “stuck” to the stator. If you mounted the belt so close to the stator that the magnets are clinging to the stator, try rotating the Windbelt so that the wind blows through it from the other side. Otherwise, remount the belt with proper spacing between the belt and stator.
Q: The belt is vibrating but I am not getting any electrical output.
A: Make sure all the wires have good connections, that the stator is in-stalled in the proper orientation and that the pair of magnets is close to—but not touching—the stator.
Q: The belt seems to be in torsion, and is generating very little electrical output.
A: Measure the electrical output (if any) with a meter so you have a com-parison. Then flick the belt with your finger. If that does not work, vary the belt tension with your fingers. Try rotating the Windbelt so the air blows through from the other side.
Torsional flutter often occurs when the belt is incorrectly tensioned, misaligned on the bolts, or too close to the stator. For consistent longi-tudinal oscillations, reinstall the belt.
Q: The bolts loosen and will not hold the belt in tension.
A: Tighten the two lock nuts slightly.
Q: Is it ok to hook up two or more units together to power a bigger load?
A: Yes, as long as you hook them up in parallel (positive-to-positive, and negative-to-negative).
Note: If you hook them up in series, the induced current from one Windbelt may flow through the coil of the other Windbelt, and poten-tially disrupt the induced current generation of that generator.
The Classic Windbelt will only work well with a powerful fan. It works best with wind speeds of 15mph (7m/s) or higher. High quality metal fans tend to be more powerful than cheap plastic ones. A metal cage is one sign of a strong fam.
When shopping for a fan, another good indicator of fan power is the amount of electricity it draws. Look at the specs to find amperage. Many weaker fans draw less than 1 amp. These will not work. Look for a fan that draws around 2 amps.
A NOTE ON FANS
+ —
Windbelts wired in parallel.
Longitudinal flutter is more effective at generating electricity than torsional flutter.
Longitudinal Flutter
Torsional Flutter

7
Q: Does it matter if the Windbelt is horizontal or vertical when it is in front of the fan?
A: No
Q: What is the expected electrical output?
A: 10mW to100mW ( milliWatts), depending on wind speed. At 6m/s wind speed, around 50mW delivered to a load. Voltage, unloaded, will be around 2–3 Volts AC before rectification.
Q: What is the difference between AC and DC?
A: Read the descriptions at the end of this manual.
Q: How does moving a magnet past a coil generate electricity?
A: The process is called induction. See description at the end of this manual.
Q: At what frequency does the Windbelt usually vibrate?
A: The 0.5 meter Windbelts will vibrate at around 70–100 Hz. The 1 meter Windbelt vibrates at a lower frequency: 20–50 Hz range ideally. Frequency varies, depending on belt thickness, belt tension, wind speed, etc.
“One day sir, you may tax it.”
—Faraday’s supposed reply to the British Minister of Finance, when asked about any practical value of electricity.
THE PRACTICAL VALUE OF ELECTRICITY
20200
AC
20200
DC
20200
Using your multimeter
Measuring DC voltage Measuring AC voltage

8
Windbelt TheoryUntil recently, the only viable wind harvesting device was the turbine. Humdinger’s Windbelt is the first non-incremental innovation beyond this century-old approach.
Instead of using conventional geared, rotating airfoils to pull energy from the wind, the Windbelt relies on an aerodynamic phenomenon known as aeroelastic flutter (‘flutter’). While the phenomenon is a well-known destructive force, researchers at Humdinger have discovered that it can also be a useful and powerful mechanism for catching the wind at scales and costs beyond the reach of turbines.
At its heart, The Windbelt uses a tensioned membrane undergoing a flut-ter oscillation to pull energy from the wind.
To picture how this works, think of how you held a blade of grass be-tween your fingers as a kid and made it whistle—or how the strapping on a truck can be seen moving in the wind. That is roughly how the Wind-belt can pull energy from the wind—then, it’s a second step to turn that energy of the moving membrane into electricity, which is done by actuat-ing new types of linear generators.
The Tacoma Narrows Bridge callapse is a famous example of the destructive power of aero elastic flutter. The bridge across Puget Sound opened on July 1, 1940. Four months later a strong continuous wind induced oscillation into the structure, which showed torsional and longi-tudinal flutter, eventually causing its collapse. The photos on the right are stills from video footage of that flutter and collapse. Structural engineers studied the failure; newer suspension bridges were built differently to avoid such oscillation.
A clarinet reed is another, more constructive example of flutter. Air pass-ing through the mouthpiece sets up a vibration in the reed. Certain techniques are required from the musician, which then produce a pleas-ing sound.
How does the Windbelt turn its “flutter” into electricity? A pair of magnets is fastened to the belt, so as the belt moves up and down the magnets fol-low the same motion. This motion of the magnets takes place directly next to the stator (coil). A magnetic field moving next to a coil of wire induces a current to flow. As generated, the electricity is alternating current (AC). This AC may be converted to direct current (DC) with the enclosed recti-fier.
9
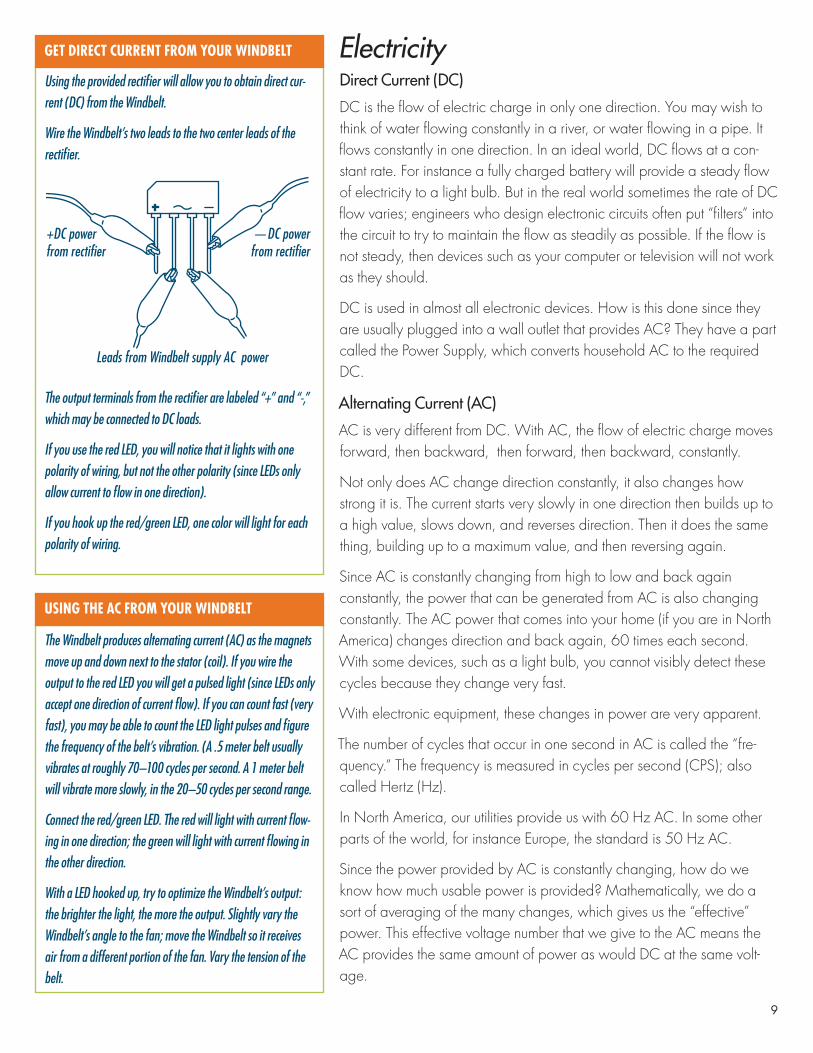
The Windbelt produces alternating current (AC) as the magnets move up and down next to the stator (coil). If you wire the output to the red LED you will get a pulsed light (since LEDs only accept one direction of current flow). If you can count fast (very fast), you may be able to count the LED light pulses and figure the frequency of the belt’s vibration. (A .5 meter belt usually vibrates at roughly 70–100 cycles per second. A 1 meter belt will vibrate more slowly, in the 20–50 cycles per second range.
Connect the red/green LED. The red will light with current flow-ing in one direction; the green will light with current flowing in the other direction.
With a LED hooked up, try to optimize the Windbelt’s output: the brighter the light, the more the output. Slightly vary the Windbelt’s angle to the fan; move the Windbelt so it receives air from a different portion of the fan. Vary the tension of the belt.
USING THE AC FROM YOUR WINDBELT
ElectricityDirect Current (DC)
DC is the flow of electric charge in only one direction. You may wish to think of water flowing constantly in a river, or water flowing in a pipe. It flows constantly in one direction. In an ideal world, DC flows at a con-stant rate. For instance a fully charged battery will provide a steady flow of electricity to a light bulb. But in the real world sometimes the rate of DC flow varies; engineers who design electronic circuits often put “filters” into the circuit to try to maintain the flow as steadily as possible. If the flow is not steady, then devices such as your computer or television will not work as they should.
DC is used in almost all electronic devices. How is this done since they are usually plugged into a wall outlet that provides AC? They have a part called the Power Supply, which converts household AC to the required DC.
Alternating Current (AC)
AC is very different from DC. With AC, the flow of electric charge moves forward, then backward, then forward, then backward, constantly.
Not only does AC change direction constantly, it also changes how strong it is. The current starts very slowly in one direction then builds up to a high value, slows down, and reverses direction. Then it does the same thing, building up to a maximum value, and then reversing again.
Since AC is constantly changing from high to low and back again constantly, the power that can be generated from AC is also changing constantly. The AC power that comes into your home (if you are in North America) changes direction and back again, 60 times each second. With some devices, such as a light bulb, you cannot visibly detect these cycles because they change very fast.
With electronic equipment, these changes in power are very apparent.
The number of cycles that occur in one second in AC is called the “fre-quency.” The frequency is measured in cycles per second (CPS); also called Hertz (Hz).
In North America, our utilities provide us with 60 Hz AC. In some other parts of the world, for instance Europe, the standard is 50 Hz AC.
Since the power provided by AC is constantly changing, how do we know how much usable power is provided? Mathematically, we do a sort of averaging of the many changes, which gives us the “effective” power. This effective voltage number that we give to the AC means the AC provides the same amount of power as would DC at the same volt-age.
Using the provided rectifier will allow you to obtain direct cur-rent (DC) from the Windbelt.
Wire the Windbelt’s two leads to the two center leads of the rectifier.
The output terminals from the rectifier are labeled “+” and “-,” which may be connected to DC loads.
If you use the red LED, you will notice that it lights with one polarity of wiring, but not the other polarity (since LEDs only allow current to flow in one direction).
If you hook up the red/green LED, one color will light for each polarity of wiring.
GET DIRECT CURRENT FROM YOUR WINDBELT
+ —
Leads from Windbelt supply AC power
+DC power from rectifier
—DC power from rectifier

10
The technical term for this effective (usable) power of AC is the RMS (root mean square) value of the voltage. The RMS value of an AC current is the number which represents the same power that a DC current at that voltage would produce.
In North America, most homes have 110 to 120 Volts AC electricity. (120 volts is the most commonly used term; 115 volts is the official National Electrical Code Standard.) This 120 VAC is the RMS value; so the AC electricity is equivalent in power to 120 VDC.
AC with an RMS of 120 volts actually goes from peaks of +170 volts to -170 volts. Students with a strong interest can search and find the formula to calculate RMS.
AC usually comes from large scale power generation by utility compa-nies.
The advantage of AC is that it is easy to transform voltages: So it can be run efficiently at high voltage for long distances, and then a transformer can lower the voltage for residential or business use.
Direct Current may be obtained from Alternating Current by using a recti-fier, a device that allows current to flow in only one direction.
Alternating Current may be obtained from Direct Current by using an inverter.
How a Generator Works
Electromagnetic Induction: It is the production of current across a con-ductor in a changing magnetic field. If a magnet moves near a wire, it produces electricity in the wire. If a wire moves near a magnet it will also produce electricity in the wire.
Electromagnetic induction is used in generators, electric motors, transform-ers, solenoids, etc.
• Direct Current• Alternating Current• RMS (Root Mean Square) • Thomas Edison• Nikola Tesla• Michael Faraday• Induction• Heinrich Hertz
FURTHER READING
Time
Volta
ge
Time
Volta
ge
Time
Volta
ge
DC
Rectified AC=DC
AC
0
0
0
X
X
X
-X

11
Notes

800 Transfer Road, Suite 30B, St. Paul, MN 55114www.kidwind.org ✦ Phone:877.917.0079Fax: 208.485.9419
© Copyright 2012 All rights reserved